Dirty Bomb
67 평점
The Mercs and Their Role Basics
Major Fret 님과 1명의 기여자가 작성
UPDATED! This is a basic guide on the mercs, their role in a team, what they do best and how to counter them on a basic level. It is intended for new players.
   
어워드
즐겨찾기
즐겨찾기됨
즐겨찾기 해제
Introduction
Greetings,

This guide is intended to teach you (the player) the basics of the mercenaries of Dirty Bomb. Mercenaries are the playable characters of the game. Each one is good in their own way and useful in certain situations.

Remember there is no jack of all trades mercenary and you need mutliple mercenaries covering multiple roles. You don't need four people covering the same role (for example, you don't need four snipers or four medics on a team). During my 200+ hours of gametime I have found a balance team is the best way to go.

Please note this is aimed at PUBLIC Play and not competitive. I would also like to place the following disclaimer: This guide is what I have found to work best in MY personal experience. It is likely you may disagree with some of what I have to say. This guide is subject to change due to the nature of an open beta. If a merc has a * by his/her name, that means edits are likely to happen to their section.

For the purpose of this guide, I have divided the mercs into five roles.

1. Medic
These mercs are able to drop health for allies, and can revive people instantly. This includes Sparks, Sawbonez, Phoenix and Aura.

2. Engineer

These mercs repair quickly and can plant C4 faster than anyone. They include Bushwacker, Proxy and Fletcher

3. Ammo Support

Able to provide ammo and use devastating air support, these mercenaries are great at stopping EVs and taking out enemy positions. They include Skyhammer, Kira and Arty.

4. Assaulters


With powerful weapons and explosives, these characters are fantastic for assaulting and holding positions. They include Fragger, Nader, Rhino

5. Assassins

Finally, we have the characters that specialise in keeping other mercs down, and putting pressure on key mercs such as medics and engineers. They are Vassili, Redeye and Phantom.

DISCLAIMER
I will be no longer updating this guide. Information is this guide may be inaccurate and will not include any mercs after the release of Aimee.
General Tips
General Tips:

These are just some general tips during gameplay:

-Try not to have more than 2-3 of the same class

It's counter-productive. You don't need 4-5 snipers or 4-5 medics. If you have too many of one thing you will have none of one thing. A team of three Vassilis, two Proxys and a Fragger will struggle to take an objective, as once they are down they will not be able to be revived by a medic. I could go on and on about this, but just make sure your team has a balanced amount of rolls.

-Lone Wolves die young

It's a team based game, enough said.

-Don't use iron sights

Although this game has iron sights they are borderline useless. They will slow you down, and get you killed, and you don't really gain any more accuracy with them. This game is about movement and quick aiming.

-Try not to revive if you are not playing a medic
It's not your job, and it will get you killed. It's better you delay the enemy until a medic comes. Unless you are reviving a medic, or you are sure the area is secure, do not revive unless you are medic.

-If you are the only person in a roll, and you change, warn your team.

There have been numerous times that the only medic in the team has, without warning changed to something else. DON'T F##KING DO THIS. The fact I even have to say this makes me want to do this:


It seriously sucks to suddenly lose your healer. If you need/want to change press 'U' and type in "Someone go medic so I can do 'x'"

-Likewise, play what the team needs you to play, not what you want to play

Dirty Bomb is a class base game. Yes there are times where I just want to go Nader and make it rain grenades, but if my team needs a medic or engineer, I have to put that aside and play that role. If you feel like you can't do that when needed, don't play Dirty Bomb, as it is not the game for you.

-The objective is more important than kills

I've been on top of score boards with a 2/26 KD. Why? Because I played the objective, and worked with my team (I was playing Sparks). Your K/D Ratio does not matter for good reason, this is an objective based game. Again, if you want a Team Deathmatch game, this is not the game for you.

-Stick to Max Level 5 Servers if you are Level 5 or under:

These servers are best for learning the game. You don't want level 10+ who have played much longer than you destroying you.

Weapons:

Every merc carries a Primary Gun, a back up gun and a melee weapon.

Melee: This includes the Cricket Bat, Katana, Beckhill Knife and Stilnotto Stiletto. Don't worry too much about these, as you aren't really going to do melee unless in an emergency or just being an a$$hole

Pistol: These include the M9, Caulden and Selbstadt .40. These guns are poor performers and again should only be used in an emergency. I've found the Selbstadt to be the best of these 3 but honestly, I wouldn't want to depend on any of them.

Machine Pistol: Includes the Tolen MP, MP 400 and Empire 9. Able to provide rapid firepower, these guns aren't bad in a pinch and are capable in the right hands. Just remember they are not as capable as larger automatics. The Empire 9 is the best of these but I found all 3 of these to be reasonably effective considering they are secondaries.

Magnum: Includes the DE.50, Smjuth & Whetsman .40 and the Simeon .357. These hard hitting pistols have low ammo capacity but high power, which makes them great for finishing off enemies once your primary gun is out of ammo. I prefer the DE .50 as it fires faster and has an extra round per magazine for close quarters, but all 3 of these guns are great.

SMG: Includes the SMG-9, Hochfir SMG, Croztni, KEK-10 and Blishlok. The most common Primary in the game, these guns are basically lesser assault rifles. The KEK-10 and Croztni are the best. SMG-9 is basically a lesser Croztni. Hochfir sacrifices damage for extra ammo and firerate, and is decent. Blishlok is arguably the worse, due to it's low DPS, but is still capable in the right hands. So basically go for the KEK-10 or Croztni if you can.

Shotguns: Includes the Remburg 7, Hollunds 880 and Ahnuhld-12. These weapons are great up close, but require good aim. I generally prefer to use an SMG if I can for range, but these weapons can be used to great effect and still have decent range. The Remburg holds the least amount of ammo but does the most damage, the Hollunds in the middle and the Ahnuhld-12 holds the most shells at the cost of damage. I have found the Remburg to be the most effective.

Assault Rifle: This includes the Timik 47 and M4A1. Both very good choices, these two basically act like better SMGs. The Timik has slightly better DPS than the M4A1 but not by much.

Burst Fire Rifles: Includes Stark AR and BR-16. Although at the time of start of this guide I wasn't a big fan of these two, I have now gotten a little bit more time behind them. Burst fires are easy to control, and with practice can be absolutely deadly.

Semi Auto Rifles: Driess AR and Grandeur SR, The Driess fires semi-auto and deals a lot of damage, whilst holding a lot of ammo in it's magazine, making it a decent choice if you are willing to practice with it, although I am now willing to admit it is a lesser choice compaired to the burst fires. The Grandeur SR is a very powerful rifle but recoils very hard and has low capacity, so it has good potential but is hard to master.

Light Machine Gun: The K121 is basically a high capacity, high recoil assault rifle. It can be deadly with practice, but I'd argue both the M4A1 and BR-16 (the other weapons used by Fragger) are easier to use and more effective at range. The Mk 46 on the other hand is basically a high capacity SMG. You won't need to reload for a while, but damage wise it's not much unless you're aiming for the head.

Sniper Rifles: This includes the Felix, MoA SNPR and PDP-70. These guns are used by Vassili (excluding the PDP-70, which is used by Redeye) and all have scopes for sniping people. The Felix and MoA are bolt action, whilst the PDP-70 is semi-auto. Note that the MoA and Felix will gib on a head shot, which means that merc cannot be revived, so long the target is under 50 health.

Terms

I think most of the terms I will use in this guide are easy to understand, but I'll put this section in to drive the point home and make sure we are on the same page:

Area Denial: Turning an area into a 'no go zone'. For example, firing grenades near an objective so people run away from it or planting mines in a hallway.

Assaulting: Breaking defensive positions.

Anti-Personnel: Killing people. The reason I have put this seperate from Assaulting is that a character like Vassili can kill people just fine, but if he had to get in to take over an Aura and Rhino defending an objective, he would be less than ideal than say Fragger.

Now obviously every character is able to kill. If I have put 'anti-personal' on there role section, that means they specialise in that role. (for example Fragger would have better killing potential than Aura would).

Holding Ground: Making it difficult for enemies to assault your position. For example putting up healing stations and sentry guns.

EV: Escort Vehicle. The car thingy you escort during Chapel and Bridge. If I have noted a merc as being a good 'EV Stopper' that means they can deal good damage with their ability to stop an EV.

(somewhat): If I have put this by a 'role' in the Roles section of a character, that means they aren't ideal for the job, but can do it.

Medic Tips
Medics are the glue that keep the team together. They must be able to respond to multiple casualties and tend to them effectively. Medics tend to have very low health and SHOULD NOT lead an assault. A good medic will remain aware of their team's health as much as possible and can turn the tide of a game.

Tips:

-Pay attention to your teammate's health

On the middle left, there are the health bars of each team member. Pay attention to these as they are important to you as a medic.


-It's more important that you RELIEVE trauma, not induce it.

Two of the three medics (Aura and Sparks) have the lowest health in the game (80HP), and Sawbonez isn't the strongest merc in the game either. You will not be leading the leaderboards because of your K/D, but with the amount of healing and reviving.

-Weigh up the risk/reward of reviving someone

Remember, if you go out of action, the team may lose there only healer for up to 20 seconds, which is no good. If some idiot has gone down because he ran towards the enemy's spawn to attempt some solo spawn camp, leave him. If someone is in the middle of three enemies, leave him. You may have to take some risks when reviving, but don't do anything stupid.

-Whip out your knife to get to casualties quicker

Your move fastest when you have your knife out. Getting to casualties faster means they are less likely to be finished off.

-Charge your defibrillator/Revive gun whenever possible to revive with more health
Hold down the F button (or left mouse button if you have your Defibrillator or Revivr in hand) when revivng will give that ally more health when they are revived.


Medic Mercs
Aura:


Roles: Medic, Holding Ground

Weapons:

Primary: SMG or Shotgun

Secondary: Pistol

Aura is the starting medic. She drops a healing station that produces an Aura (hence the name) and can revive allies with her defibrillator.

Strenghts:
+Healing Station is very potent and provides the best healing effect
+Can heal allies whilst taking damage
+Moves very fast
+Shotgun is great in close quarters
+Despite low health, she can be extremely durable if she sticks with her Station

Weaknesses:

-Extremely low health
-Stations are attractive targets for explosives
-Healing Station is stationary which can make it hard to take care of multiple casualties if they are spread out
-If the station is destroyed, it can leave you without healing for up to 30 seconds
-Very easy to over-extend with due to her movement speed

Tips:
-Keep your healing stations behind cover. They can be shot down quickly if out in the open
-Try to keep your healing station where it will be most useful for your team. Don't be an a$$hole and use that station for just yourself.
-Don't go seeking fights. Aura is very strong with her station but without it she is an easy kill for any merc.
-Aura's better as a defensive medic.

Synergizes with:
Aura is good with anyone but works especially well with more stationary mercs like Rhino and Bushwacker.

Counters:

Despite low health, Aura can be a formidable foe if on top of her healing station. With fast movement, and the Remburg 7 she can be absolutely savage up close. Destroying her station is a top priority for taking her out.

Both Fragger and Nader are the biggest threat to Aura. Their grenades are a huge threat to Aura and her station. If you are able to get close enough as Proxy you can plant a mine on her station which can not only kill her, but take out the station. Fletcher can also take out Aura and her station with sticky bombs.

Phantom can also be deadly to her as he can kill her in one hit with his katana and Rhino will dominate her in close quarters with his minigun. Finally, the Remburg 7 shotgun can kill her in one hit even without a headshot (if all pellets hit at close range).


Sawbonez:


Roles: Frontline Medic, (somewhat) Assaulting, (somewhat) Holding Ground

Weapons:

Primary: SMG

Secondary: Pistol

In my opinion, Sawbonez is the easiest medic to play, as he is the most conventional. He throws out health kits, and revives with a defibrillator like Aura. He also has more health and an SMG as his primary, making him a decent fighter as well.

Strengths:
+Easy to play
+Good health for a medic (110HP versus 80Hp of Aura/Sparks)
+Health kits can be used to address specific allies (unlike Aura's station) and is much more mobile
+Health kits are much more potent than Sparks

Weaknesses:
-Healing will not take effect if ally is taking damage and does not take effect instantly
-Slower than other medics (still a fast runner though)
-Less potent healing compared to Aura

Tips:
-If you have a mic, communicate with your team when you are waiting for kits to recharge.
-Don't try and be Rambo. There are stronger fighters than you and your team needs those revives.
-Be careful when you throw health kits. You don't want to give the enemy any health kits.

Synergizes with:

Again, like Aura he works well with anyone. Sawbonez is better moving with an assaulting team and is also good for covering Engineers as they repair.

Counters:

Basically, any Assault or Assassin merc are good counters for Sawbonez, as they should be able to overwhelm him in a gunfight. He should be the first target if possible as then he cannot revive anyone. Finally, remember if he is able to retreat, it is highly likely he has used his kit to heal himself, so if you can, kill him off before he can get his health back and overwhelm you.

Sparks*:


Roles: Revival Expert

Weapons:

Primary: Machine Pistol

Secondary: Pistol

Sparks has one big advantage, she can revive at range with her REVIVR gun. Otherwise, she is a very vunerable character with poor healing ability. That said, in the right hands she can be a potent, and deadly medic.

Strengths:

+Can revive at range
+Fast
+Healing kits heal at a flat rate unlike Sawbonez which just speed up regeneration. This means no matter what you will heal that amount, even if that ally is under fire.
+Revive Gun can also be used as an improvised sniper rifle or if you are out of ammo for your main (try not to do this unless you are in danger, as reviving people is more useful).

Weaknesses:

-Low health, and poor firepower (machine pistols, her primary are some character's secondary)
-Healing kits only heal 30-36 HP
-Difficult to play effectively without practice

Tips:

-Stay away from the enemy. Sparks is a very weak fighter.
-Try to charge your revive gun as much as possible
-Although it deals damage, leave the sniping to Vassili. Your REVIVR takes long to charge and will only kill a merc with a headshot (unless they have taken some damage). Still, it can be a fantastic weapon and has unlimited weapon, just remember you are a medic first.
-The REVIVR can be used to damage an EV. It's nowhere near as effective as an airstrike or even Nader's grenades, but it will do some damage.
-The hitboxes for the REVIVR can be a bit goofy. If you are not reviving your target, move to make sure you get the revive.
-

Synergizes With:


Sparks does not last long on the front line and should stick back. Again, she is a great asset to any team. So long she is careful she can keep the whole team in the fight.

Counters:

At short range, Sparks movement speed is her biggest advantage. Don't underestimate her up close, but also understand her weapons are pretty weak, so as long as you keep the crosshair on her you should be fine. At range her Revive gun can be dangerous, but if you keep moving she'll struggle to nail hits and you can either pick her off or close the distance.


Medic Mercs Continued
Phoenix *:


Roles: Frontline Medic, (somewhat) Assaulting, (Somewhat) Holding Ground

Weapons:

Primary: SMG

Secondary: Pistol

With healing Nanites that heal in a radius around him, and the ability to revive himself, Phoenix can be a great asset to any offence or defence, although I'd argue that he is inferior to Sawbonez as a general purpose medic. He is also great for execution considering his self revive.

Strengths:
-Can Revive himself
-Healing heals instantly, unlike Sawbonez's kits
-Any healing you perform will heal yourself as well as your allies at the same time
-Higher health than Sparks or Aura
-Reasonably effective in a gunfight


Weaknesses:
-Healing requires that you are close to the injured ally. This becomes a problem if they're in the middle of a gunfight, which increases the risk for you. This also means that people have to be paying attention to where you are. I've had many moments where I've had to chase down someone who was hurt.
-Because you have to be close to an ally to heal them, this will possibly make you vunerable to grenades and other explosives
-You only get one heal at a time, meaning that you can be at least without 5 seconds without healing.
-Can only heal a maximum of 80 health at a time without perks.
-10 less health than Sawbonez

Tips:
-Like Sawbonez, you shouldn't be driving an offense. Leave that to the Fraggers and Naders.
-Be careful with your self revive. If you are finished off during it, you'll have to wait for a minute before you can do it again.
-Try to stick close to team mates if possible.
-Practice charging your Nanites. The more health you need to heal, the more you should charge.
-Moving with team mates is helpful because if you get downed they may be able to take the enemies attention away from you.
-This dude is pefect for Execution. His ability to revive himself is great considering you don't respawn, and he is arguably the most combat capable medic in the game. Check this video for an example of a revive saving the day: https://www.youtube.com/watch?v=o6Qak2fYEhE

Synergizes with:

Phoenix is great on the frontlines, but even better supporting a defensive position. He works well with anyone really. He should try to be at the back of the group, so if he gets downed, he can revive himself before someone can finish him off.

Counters:
He only has 100 HP, so most mercs should be at least equal to him in a gunfight. He can give himself a fair amount of health instantly though, so make sure to keep the pressure on him and try to make sure he can't retreat.

Also, finish him off. You don't want to kill someone, only to have them come back from the dead and return the favour.

Guardian * (Credit to contributor CombatMist who wrote this section):


Roles: Combat/Support Medic, Assaulting, Holding Ground

Weapons:

Primary: Assault Rifles (full auto)

Secondary: Pistol

Amazing base stats. Speed of Phoenix, hp of Sawbonez, weapons of Skyhammer and hit box of Kira. She specalizes in front line combat and preventing damage with the sky shield instead of healing and if that fails she has a versatile ranged aoe revive. She is not your primary in anything but is a great secondary for medic or dps. She is a hybrid with many advantages.

Strengths:
+High base stats
+Assault rifles
+Anti explosives protection/warning
+Ranged AOE revive versatility
+Very effective front line combat

Weaknesses:
-Lack of healing
-Cool down on revive
-Sky shield has a limited duration and goes on cool down
-Lack of sustain

Tips:
-Dont try to haver her fill your team slot of medic or fire support. She will fail. Pick her after core roles of engineer, medic and fire support are chosen.
-Great filler as a secondary medic, dps or engineer
-Great for front line combat with stats and gear. Push forward with your dps
-Play her like you play Phoenix. Manage charge up of bionic pulse (like healing pulse) with cool down it will receive for longer charge.
-Practice jumping and using bionic pulse at the same time
-Run around like phoenix charging bionic pulse as your run/jump as it does not slow you down.
-Shines most on pushing EV. Protect with sky shield and keep your team revived all while providing fire support.
-Focus 1st thing on deploying that drone to protect your team then reviving then last combat.

Synergizes with:

With any medic. Focus on well reviving 1st and let the other medic take care of healing. She does amazingly well with Phoenix. Aoe revive + Aoe heal = we win. Both are mobile and can fight well. This allows for strong mobile support. With Sparks you get 2 amazing revives which make it very hard to keep your team down. With Sawbonez you get 2 combat medics and saw can heal them up as they retreat. With Aura you also get aoe rez + aoe heal some what like Phoenix.

Guardian can suplement many roles and complements many mercs.

Counters:
Lacking a heal makes it possible to whiddle her and the team down. A cool down on the revive can make it possible to not be able to revive as often as needed in quick succession. Wait for her sky shield to go on cool down befor throwing explosives that way.
Engineer Tips
If you need C4 planted or an EV repaired, these are the guys for the job. They also have some pretty strong area denial ablities which can help them win the tide in a fight.

General Tips:

-It's your job to defuse/plant C4 and repair the EV
If you are playing engineer, remember you are the one who has to defuse/plant C4 and repair EVs, even if someone else is doing it. I have seen objectives lost because someone playing an engineer class ignored an objective whilst a Rhino attempted to defuse it. Safe to say I was not impressed.

-Use your abilities to turn the tight of the battle

Although not the best direct fighters, the Engineers have some pretty capable abilities. Proxy's mines can deal a lot of damage if not outright down some characters instantly. With support, Bushwacker's turret can cause confusion and damage during a gunfight, and Fletcher's sticky bombs can be used as traps or improvised grenades.

-Make sure it's safe to plant/defuse

There is no point in attempting a defuse if someone's gonna ventilate you with bullets. Help your team mates secure the area and defuse as soon as you can.

-Plant C4 out in the open

In some maps, the C4 for an objective can be planted behind cover. This is a bad idea, as this gives a defuser cover. You want them to expose themselves, so you and your allies can shoot them.
Engineer Mercs
Proxy:


Roles: Repair/C4 Planting, Area Denial

Weapons:

Primary: SMG or Shotgun

Secondary: Machine Pistol or Magnum

Armed with proximity mines, Proxy is fantastic for denying the enemy certain paths and acting as an alarm.

Strengths:
+Fastest Moving Engineer
+Mines are very deadly
+Shotgun gives good close quarter ability

Weakness:

-Lower health (90HP versus Bushwacker's and Fletcher's 110HP) makes her vunerable when repairing and planting
-Mines aren't great in offensive situations

Tips:
-Don't be repetitive with the use of your mines. Keep the enemy on their toes.
-Mines can also be used as an alarm. A blue symbol will show up on your screen to indicate where mines are, and if they go off, it will disappear, letting you know that the enemy might be moving there.

-Don't rush ahead of the group. You are not the strongest fighter.
-If you are in a firefight up close, you can throw a mine. Even before it activates, you can shoot it to detonate it, and even if you die, under pressure most people won't remember where it is. Obivously this is a very risky move but it is an option.

Synergizes With:

Proxy tends to be pretty mobile, and can easily take over objectives with the support of Sawbonez/Aura, Fragger and Nader. Just remember to watch her back as she plants.

Counters:

Vassili and Phantom as always can be very effective in shutting her down due to her low health. Rhino will also have a devastating effect on her. She can be hard to nail with explosives due to her movement speed.

Her ability to move fast, combined with a shotgun can make her a powerful force in close quarters, so be careful if you have to get close to her.

Bushwacker:


Roles: Repair/Planting C4, Area Denial

Weapons:

Primary: SMG

Secondary: Pistol

Bushwacker packs a sentry gun, making him great at defending a point. Also armed with SMGs, he is not only an effective engineer but a great fighter if used right.

Strenghts:
+Turret can dish out damage and be used as a distraction
+The SMGs allow Bushwacker to be a good all round fighter.
+Tied highest health with Fletcher for an Engineer

Weaknesses:
-His sentry is not as disposable as Proxy's mines or Fletcher's bombs.
-Sentry requires assistance to be an effective killer
-Weakest Secondary weapons of any Engineer

Tips:
-The sentry is not going to wipe out half the enemy team. It has poor range and requires you to back it up. Expect the turret to make 1-2 kills at most (3-4 is really good for the turret).
-Use the sentry in corridors or corners
-Like Proxy, try and change the position of the sentry gun whenever possible

Synergizes with:
The turret can be used well with Aura, as you can stick close to healing and support your sentry. As you may be less mobile, you may find yourself with a Rhino as well.

Counters:
Make sure to take out Bushwacker himself before the sentry. The sentry is replacable, and chances are it's already recharged by the time you've shot his down. The sentry is also weaker, has less range, and is much less mobile than Bushwacker.

Anything explosive/Kira's laser can ruin Bushwacker's day. Fraggers and Naders are great at taking out defensive positions. Whilst cloaked, Phantom cannot be engaged by a sentry gun, which can be extremely helpful fighting him. Finally, staying out of range of the sentry gun can also be very helpful.

Fletcher*:


Roles: Repair/C4, Area Denial, (somewhat) Assaulting

Weapons:

Primary: SMG or Shotgun

Secondary: Machine Pistol or Magnum

Armed with sticky bombs, Fletcher has the most versatile ability of an Engineer. The sticky bombs are like a compromise between Proxy's mines and Fragger's grenade. If used right, Fletcher is fantastic.

Strengths:
+Sticky bombs are versitile and have great damage potential if used right
+Better health than Proxy
+Sticky bombs are harder to see than Proxy's mines and can be thrown further

Weaknesses:
-Easily the hardest to play Engineer
-You need to pay attention to your sticky bombs, they are not fire and forget like Proxy's mines
-One sticky bomb on it's own is very weak (100 damage max) and has a small radius. You need at least 2 to kill all mercs above 100 health.

Tips:
-Fletcher is a great fighter if used right.
-Practice with the sticky bombs, they are extremely useful if used right
-Plant your sticky bombs on the top of doorways instead of the side. They are harder to notice that way
-If you're using them as traps, try to spread out your sticky bombs, for a bigger kill zone
-Remember that one sticky is unlikely to kill most mercs, but it will take off a serious chunk of health, so you'll most likely be able to finish them off
-Sticky bombs can be shot out of the air, so be careful if your using them as grenades
-You can booby trap downed enemies with sticky bombs. It's a risky tactic but it can be done to take out an enemy medic

Synergizes with:
Fletcher can be great for supporting an assault as his Sticky's can be used as hand grenades (although it isn't ideal), so he can be a great addition to an assaulting team. He can also be used defensively, forming traps, whilst sitting back.

Counters:
Unless using the Blishlok, Fletcher is poor at range. Kira, Arty and Vassili can be very effective at combating him. Lower health can make it hard for him to fight Fragger and Rhino unless he ambushes them with sticky bombs. Try to keep moving when fighting Fletcher as he can potentially stick bombs onto you.

Do not attempt to hide in a corner when fighting Fletcher. He'll use his bombs to kill/flush you out.
Ammo Provider Tips
They make it rain from the sky and give you ammo. In open areas they can be devastating and are great at taking out EVs.

Ammo Provider General Tips:

-Skyhammer is great for newbies:

There's a reason he's one of the starting characters. Skyhammer is pretty easy to use, and very versatile. His M4A1 or Timik 47 plus decent health (120 HP) make him a good fighter at most ranges, and his airstrike is potent.

-They are decent pushers

Although maybe not as ideal as Fragger or Nader, these three are still potent fighters, with powerful weapons. Don't hold back unless the situation dictates it.

-That said, range is your friend

All three Ammo Provider characters, especially Kira and Arty with the Driess AR, are very effective at longer ranges. You can easily deal a lot of damage at a distance where other mercs will struggle to get effective hits on you.

-Just throw ammo

I'm guilty of forgetting to hand out ammo, because unlike health, it is nowhere near as well shown what ammo an ally haves. Don't be fussy, because no one went into a gunfight wanting less ammo. Pass the ammo around. JUST DO IT!


Ammo Provider Mercs
Skyhammer:


Roles: Ammo Provider, EV Stopper, (somewhat) Anti-Personnel, (somewhat) Area Denial, (somewhat) Assaulter

Weapons:

Primary: Assault Rifle or Burst Fire Rifle

Secondary: Magnum

Skyhammer is your other starting Merc. He can throw bags of ammo or deploy a devastating airstrike. He's also not bad as an assaulter as his flare can be used as a grenade (granted a very weak one).

Strenghts:
+Powerful Primaries
+Airstrike can be devastating
+Can hand out ammo
+Only merc that can one shot an EV
+Easy to play

Weakness:
-Airstrike has long cool down
-Airstrike can be avoided easily (Granted it has a great surpressive effect)

Tips:
-Airstrikes can be used as grenades. It's not ideal but can wound enemies, giving you the edge. I have seen the markers do at least 74 damage, which, even if they don't do any more, is just under half of Fragger's health.
-Airstrikes can stop an EV in one strike, but may require 2, meaning one Skyhammer can stop an EV every 1-2 minutes.

Synergizes with:

Skyhammer is great for any team at any time. He provides ammo which can keep other allies going and he's a decent fighter to boot.

Counters:
Staying indoors makes his airstrikes less powerful. If you think one is coming RUN! He can be a pretty potent fighter at any range with the Timik 47 or M4A1 so be careful when fighting him.

Arty:


Roles: EV Stopper, Ammo Provider, (somewhat) Anti-Personnel

Weapons:

Primary: Burst Fire or Semi-Auto Rifle

Secondary: Pistol

Since his recent buff, Arty has become much more powerful. His Artilliery drops very quickly and can easily take out enemy positions. He is a fantastic EV stopper and a decent fighter with good range.

Strengths:
+Can use his Artilliery at any range
+Artilliery recharges much quicker than Skyhammer's airstrike or Kira's laser and can be used twice
+Because of the recharge, this makes misses with Arty less costly
+Solid at Stopping EV (but requires 2-3 artilliery shots)

Weaknesses:
-Despite buff, Artilliery still has a very small radius which with the (very slight) delay can still cause misses
-Artilliery is a bit hard to be precise with at range
-Somewhat weak at close range

Tips:

-Use Artilliery as much as possible.
-Artilliery is great for breaking Healing Station camps, so long it doesn't have a roof over it
-Artilliery is only likely to kill one person 90% of the time (most I've gotten is 3)
-It takes 2-3 shots to stop an EV with Arty. Considering Artilliery takes 15 to recharge (without perks) which means 1 Arty can stop an EV in 30-45 seconds.

Synergizes with:

Due to your ability to hand out ammo, you can really help out anyone, but you'll most likely be sitting back dropping Artilliery from range, making you a good ammo provider for the likes of Vassili and Aura.

Counters:
He isn't a bad fighter with his Driess, but it requires good accuracy. Snipers (or anyone) should try and take him out when he's lining up his artilery (granted this process is much quicker than it use to be). His weapons aren't great in close quarters either, with the Driess becoming inaccurate with rapid fire and the burst fires having poor damage per second. I wouldn't worry a lot about getting hit by artilliery, but if you think some is inbound, staying mobile is the best way to avoid getting hit.

Kira:


Roles: EV Stopper, Ammo Provider, Area Denial, Anti-Personnel, (somewhat) Assaulter

Weapons:

Primary: Semi-Auto or Burst Fire Rifle

Secondary: Pistol

With her Orbital Laser, Kira can be a very potent anti-personal mercenary. She can also deploy an ammo station similar to Aura's Healing Station.

Strengths:
+Laser can be devastating if used right
+Even if the laser doesn't kill, it can be used to force enemies away from an area.
+Faster than Skyhammer and Arty
+Because you can move the laser rapidly, misses are not as big of an issue.

Weaknesses:
-Ammo is not as mobile as Skyhammer and Arty
-Low health (90 compared to Skyhammer and Arty's 120HP)
-Need at least two lasers to stop the EV
-Laser can be wasted if you are killed whilst using it, making it very high risk
-Laser is the hardest to use of the 'air support' abilities.

Tips:
-The laser can easily wipe out many enemies. Try and use it from a distance.
-The laser can also surpress enemies, stopping their movement, or covering objectives
-I have heard some people say that you should put the ammo station by spawn. I disagree with this for the following reasons:
a) It's better to top off ammo after a fight than before
b) you already have a good amount of ammo once you have spawned
c) A Skyhammer/Arty could already be handing out ammo
-Enemy laser's are a brighter colour than allied ones. You can run through allied lasers (unless you are the one who fired it) as there is no friendly fire in Dirty Bomb.

-It takes 2 lasers to stop an EV. This, plus a recharge of at least 40 seconds means 1 Kira can stop an EV every 80 seconds (1 minute and twenty seconds).

Synergizes With:

You can put that ammo station with Aura's healing station, making it a place to stock up on ammo and health. Again, Kira is a fantastic ranged fighter so she can end up providing ammo for Vassili's and other defenders.

Counters:
Try to pick Kira off as she uses her laser. It makes the laser go to waste and she will be focusing on the laser, not you. She isn't the strongest in close quarters, and like with Arty, if she panic fires the Driess AR she will most likely miss and the burst fire rifles don't have good DPS. Staying indoors will protect you from the laser.

Finally, you can use her ammo stations for yourself, even if it's an enemy Kira, so don't just shoot the stations if you see them, use them to your advantage.
Ammo Provider Mercs Continued
Stoker


Roles: Ammo Provider, Area Denial, (somewhat) Anti-Personnel, (somewhat) Assaulter

Weapons:

Primary: Assault Rifle or Burst Fire Rifle

Secondary: Magnum

With molotov grenades and an ammo station, Stoker is a great defensive mercenary.

Strenghts:
+Powerful Primaries
+Molotovs can block off objectives for up to ten seconds. It can also deny routes
+Only Ammo Provider who has an ability that is truly effective indoors (granted Skyhammer's marker can be used as a grenade, but it's pretty easily avoided).
+Molotovs are a great counter to fixed positions, such as Aura stations and Bushwacker turrets.

Weakness:
-Ammo Station is not as mobile
-Ability has a long cooldown, bad throws are costly
-If even slightly off target, the molotov might not cover the area you wish to cover.
-Worst EV stopper of any of the ammo supports.

Tips:
-Be careful with the molotovs. Use them to surpress and deny routes, not to kill
-He's more of a defensive mercenary.

Synergizes with:

He's more of a defensive mercenary. His station, like Kira works well with Aura's health station. He can work with engineers to put his grenades over objectives such as planted C4.

Counters:
Fire can be put out by explosives and Redeye's smoke grenade. Nader and Fletcher are best for removing his fire with explosives. Otherwise, he's a solid fighter. He has good all-rounded weapons (Timik and M4A1 especially) and decent health (120 HP).
Assaulter Tips
Perfect for clearing the road ahead or holding said road, these mercs are great in anti-personal roles.

Like Skyhammer, Nader and Fragger are good newbie characters

Both of these characters are relatively easy to play, and are quite capable, even in the hands of someone who hasn't mastered them.

-Get in there and KILL THE BASTARDS!:

These characters, especailly Fragger and Nader, are designed to storm positions and kill people. You need to be on point and destroying the enemy. Although you shouldn't get too far from your team, don't be afraid to clear the road ahead.

-Medics are your friend

Even though these characters are bad mofos who kill anything that move, they can die (unless they're hacking...). Don't overextend yourself and stick close to your medics.

-Keep topped up on Ammo too

Going into a gunfight without ammo is a bad idea. Try and make sure you've got some ammo to keep on trucking. If your team mates are not providing, there are some ammo dispensers in each map. Find them and use them.


-Make sure your ability is ready too

If you can, make sure you have grenades (Fragger and Nader) or your minigun is reasonably cool (Rhino) before getting into action. Of course not every situation is ideal, but these abilities are what make these characters so dangerous.
Assaulter Mercs
Fragger:


Roles: Assaulter, Anti-Personnel, Holding Positions

Weapons:

Primary: Light Machine Gun, Assault Rifle or Burst Fire Rifle

Secondary: Magnum

Considered by many the best merc, Fragger has a lot of health, a big f**king gun and frag grenades. He is a fantastic counter to anything if used right.

Strengths:
+Frag Grenades, if cooked right, can destroy enemy positions
+Powerful primary and secondary weapons
+A lot of health

Weaknesses:
-Slow movement
-Grenades require cooking to be effective

Tips:
-Learn how to cook grenades. These bad boys, if cooked right can not only kill, but gib an enemy instantly, meaning they cannot be revived.
-Grenades will bounce off allies, so be careful
-Do not throw a grenade unless you have a target. Grenades take 30 seconds to come back and there's no point in just throwing them away.
-Fragger is a fantastic pusher, don't sit back with him unless you need to be defensive or no one is pushing with you...

Synergizes With:
With Aura he can be fantastic at holding a position, and with an ammo provider Fragger is a powerhouse.I cannot think of a situation where I would not want a Fragger on my team (unless we have like 4 of them and no medic)

Counters:

His movement speed is slow, so Vassilis can be good at taking him down. Otherwise, spread out so he doesn't kill too many of you with those grenades.

Nader:


Roles: Assaulter, Area Denial, Anti-Personnel, (somewhat) EV Stopper

Weapons:

Primary: SMG

Secondary: Pistol

Armed with a 40mm grenade launcher, Nader is a very deadly merc with incredible fire power.

Strengths:
+Easy to play
+Grenade launcher can suppress enemies and force them to move
+Decent at damaging the EV
+Grenades recharge faster than Fraggers

Weaknesses:
-Weak primary and secondary (for an assualter/ammo provider)
-Lower health than Fragger (120 is 30 less than Fragger's 150HP)
-Grenades can't be cooked

Tips:
-Only Matyrdom if:
a) You are killing a medic/engineer
b) You're about to be killed anyway
c) You are taking out a position like an Aura station
d) you have the potential to kill more than one person
Otherwise it's just a complete waste. You are much more useful alive than dead.
-The grenade launcher isn't great for kills, but can be used to soften up enemies, or force them to move away from an area.
-Try to wait until you have at least 3-4 grenades if possible. One grenade on it's own is not very useful.
-Like Fragger's hand grenades, Nader's grenades bounce off of allies, so be careful.
-If you're trying to stop an EV, stay near it. You might be able to take out a few enemies, and when you get downed, you can use Matyrdom to deal some damage to the EV.
-5 grenades take off roughly 1/3 of an EV's health, assuming all grenades hit.

Synergizes with:

Nader is a great merc and like Fragger, having one on the team is always a good thing. They are great with Engineers as they can surpress the enemy and buy time.

Counters:

If she is downed, shoot her, don't get close to her. Minus her grenade launcher, she is only slightly stronger than Bushwacker, Sawbonez, Phantom and Fletcher in direct combat, so other characters can fight her pretty well once she is out of grenades.

Rhino (fatty):


Roles: Area Denial, Holding Positions, Making newbies salty

Weapons:

Primary: Shotgun

Secondary: Magnum

Rhino is of limited use, but can be deadly if used right. His minigun is absolutely devastating but at the same time, he really lacks range. Some players get really salty over him, but honestly he's one of the worst mercs in the game if you ask me, and I'd rather have a Fragger or a Nader than Rhino.

Strengths:
+The most health of any merc in the game (200 HP)
+Minigun is a monster in close quarters
+Minigun has infinite ammo, meaning you don't have to worry about ammo too much.

Weaknesses:
-At range he sucks
-Very slow, practically a walking target for anyone at long to medium range
-High health leads to overconfidence sometimes

Tips:
-Do not overextend yourself. Think of Rhino more as a mobile turret than someone who should be charging positions.
-Do not try to fight anyone at long or medium range. Close the distance if possible.
-Fire the minigun in bursts unless you are really close to your target (I'm talking point blank). You do not want your minigun to overheat.
-YOU ARE NOT INVINCIBLE
-Despite incredible firepower, Rhino is terrible at pushing.His slow speed makes him vunerable as he heads to the area he needs to take, and he can't deploy any form of explosive to take out enemies that are behind cover.
-That said, flanking with Rhino is devastating.

Synergizes with:

Aura. On top of a station, Rhino is almost unstoppable, until a grenade comes along...

Counters:
Any explosive+Kira's Laser can easily rain on Rhino's parade. He cannot move fast which makes him a juicy target for Vassili as well. Fighting Rhino face on is like trying to stop a speeding train by stepping in front of it, so try and flank him and shoot him in the head.

Thunder:
[/screenshot]

Roles: Assaulter, Anti-Personnel, Holding Positions

Weapons:

Primary: Light Machine Gun, Assault Rifle or Burst Fire Rifle

Secondary: Magnum or Semi-Auto

This Russian big guy throws stun grenades that annoy people instead of killing them.

Strengths:
+Stun Grenades are annoying.
+Powerful primary and secondary weapons
+A lot of health
+Grenades don't need to be cooked
+Pretty capable tank, and has much better range than Rhino ever will.

Weaknesses:
-Slow movement. Second slowest merc in the game. Juicy target for snipers.
-Unlike Fragger, Thunder's grenades don't actually hurt. You need to get in their and finish the job. This consumes ammo and may possibly make you vuneralbe to reinforcements. Hell, I even once manage to get Miracle Worker (Four revives quickly) whilst stunned (granted on top of an Aura station)
-You can't time grenades

Tips:
-He seriously seems less useful than Fragger in most situations. Granted I haven't put the time in with Thunder, but Fragger's grenades actually K I L L people. The health advantage is something in a defensive situation, but I think Fragger would be better when attacking.
-Remember that just because you've stunned one person doesn't mean someone else is covering their a$$.

Synergizes with:

Thunder in my mind seems to be more of a defensive merc. I can seem him being pretty effective on an Aura station.

Counters:

Slow movement makes him vunerable to explosives and snipers. His large health pool and ability to stun may lead to over-confidence. Also remember that just because your stunned, doesn't mean you can't try to at least chip off some health ;) .
Assassin Tips
Taking out important enemies, these two can be useful in limited use. Just remember this is a team based game.

Assassin General Tips
-These are for experienced players

I've seen many terrible Vassilis and Phantoms. Even a bad medic can at least do something a little helpful. Bad Vassilis and Phantoms are nothing more than dead weight. If you are playing either of these two and it's not working, change to another role. I do respect that you need practice to get good with these guys, but you also need a bit of the feeling on how the game works to make both of these guys effective (especially Phantom)

-It's the team game that matters

Yes, killing people is useful, but only if you're taking them out in the right places. A sniper that camps to cover one area, as the rest of the team plants is of no use. You need to be able to adapt to the situation at hand.

-Don't play 3 or 4 Phantoms or Vassilis at the same time

Even at the best of times, these two are of limited use. 2 is generally too much, but can be acceptable. You need characters than can push, heal, defend, defuse etc. This rule could be applied to all roles, but having 3 medics isn't too bad on a larger team, same with the other roles. Too many snipers means your team will lack the ability to push, and unless they are all really good (which is unlikely) at least one of them will be dead weight. Phantoms are the same, they cannot really hold ground. Sure, one person ambushing, is useful, but no team needs 3 of you doing it.
Assassin Mercs
Vassili:


Role: Anti-Personnel, Sniper, Area Denial

Weapons:

Primary: Sniper Rifle

Secondary: Machine Pistol or Magnum

With his heart beat sensor, and sniper rifle, Vassili can either be a fantastic killer that shuts down enitre areas, or that w@nker who should play something else.

Strengths:
+Deadly at long range
+Heart beat sensor can aid the team

Weaknesses:
-Terrible pusher
-Needs headshots to be effective
-Weak in close quarters

Tips:
-Aim for the head
-Remember it's not all about K/D, don't just camp one area, move up as your team does.
-Beyond that I don't really know, I never liked being sniper

Synergizes with:

He'll most likely hang back a fair bit. Just give him ammo if he needs it.

Counters:

Get close and kill him. Airstrikes, artiliery and Kira's laser can be very helpful, if you can't reach him. If you see his heart beat sensor, shoot it so he can't track your movements or the movement of allies.

Phantom

Roles: Anti-Personnel, Harassment, Ambushing

Weapons:

Primary: SMG

Secondary: Magnum

Phantom is the sword swinging ambusher. In my opinion he is rarely useful and only as strong as a team is weak. Despite this, he can in certain situations take out vital enemies and act as a distraction whilst the team does other things.

Strengths:
+Cloak can soak up damage, allowing for a retreat or for you to close the distance
+Great ambusher
+Can have a powerful phsycological effect on people not use to dealing with him
+Now has that EMP ability for enemy devices.

Weaknesses:
-Low health for a non-Medic/Engineer (110HP compaired to Fragger's 140 or Skyhammer's 120HP)
-SMGs only (Granted he gets a KEK-10)
-Horrible at fighting groups of enemies
-EMP device might make you more detectable to enemies paying attention to their gadgets.

Tips:
-It's about time I added this to the guide: Phantom is pretty pathetic since his nerf. Even the engineers are probably more effective than him in direct combat. I would not recommend playing Phantom unless he gets a buff or it's for a challenge/joke.
-Use the SMG. The Katana is not your primary and is only good for taking out weak enemies if you surprise them.The amount of low levels I see running around with the Katana makes me cringe (unless they are on the other team, then I just shoot 'em like I'm Indiana Jones)

-Cloak is a great asset, use it to get in and to get out when you are taking damage
-You are only invisible if you are not moving. Use this to ambush the enemy
-You can use the cloak to close the distance and get into melee range.
-Don't over-extend. If you are close to your team you can retreat behind them. Remember lone wolves die young. Yes you may move somewhat seperate from your team, but you shouldn't be so far that you cannot reach them if you get into trouble.

Synergizes with:

Phantom can be a great addition to an assaulting team, as he can get in and flank the enemy whilst they are distracted.

Counters:
Good team work. Seriously, against a group that is paying attention he's terrible. He has low firepower and low-ish health. If you all split up and run solo he will destroy your team, but together, he'll probably only take out one person. Also, listen out for the sound of his cloak humming.

Redeye:


Roles: Anti-Personnel, Area Denial, (somewhat) Holding Ground, (somewhat) Sniper

Primary: Sniper Rifle or Semi-Auto Rifle

Secondary: Magnum or Pistol

Able to deploy a smoke grenade which he can use IR vision to see through, Redeye may be the last thing you never see.

Strengths:

+More Health than Vassili (120 versus Vassili's 100)
+Only person who can see through smoke grenade
+Able to use IR Vision to spot enemies for allies like Vassili's Heartbeat Sensor does
+Versatile arsenal allowing him to be dangerous at any range

Weaknesses:
-Smoke can be a liabilty as allies cannot see through it
-Somewhat weak in close quarters
-Takes practice to get smoke/IR combo right

Tips:
-Don't stand in smoke, as that's the first place people are going to fire or throw grenades, and if they are in smoke, they can still see you if you are also in the smoke grenade
-If you have a mic, inform your team you're gonna throw smoke.
-If you can, pick a loadout with the DE.50 as it's easily his best side arm
-Smoke grenades are great for delaying the enemy. No one wants to play a guessing game on what's behind that smoke, especially when it could be a barrage of rifle fire.

Synergizes with:
I have heard Bushwacker's turrets are not effected by smoke, but I do need to test that. Smoke could also potentially conceal a mine laid by a Proxy. On top of that, smoke grenades can be used to block the vision of other enemies whilst someone does an objective.

Counters:
Redeye is the only person who can see through smoke making him his own worst enemy. Vassilis can also use their Heartbeat Sensors to 'spot' a Redeye through smoke. A Nader could potentially launch grenades through smoke to force a Redeye away, making him lose time with his IR/Smoke combo. Finally, any explosive will get rid of the smoke cloud.

Another trick you can do, is 'probe' the smoke by firing. You'll still get a hit indication (AKA a red X on your crosshair) and their health bar will pop up. I don't recommend doing this unless you have to.

Aimee:

Role: Anti-Personnel, Sniper, Area Denial

Weapons:

Primary: Sniper Rifle

Secondary: Magnum or Semi-Auto

Basically Vassili with less health and slightly more useful ability.

Strengths:
+Deadly at long range
+SNITCH can not only detect enemies, but can increase damage dealt to enemies. This makes it helpful in combat.

Weaknesses:
-Terrible pusher
-Needs headshots to be effective
-Weak in close quarters
-SNITCH is larger than Vassili's heartbeat sensor.
-Less health than Vassili

Tips:
-Read Vassili's tips.

Synergizes with:

She'll most likely hang back a fair bit. Just give him ammo if he needs it.

Counters:

Same as Vass, close in and kill. Try to avoid being in the radius of the SNITCH as it will put you at a huge disadvantage in gunfights.
Squad
Unlike most class based shooters, you can only select up to 3 mercs for your Squad, to be play in the match. It is important that you set up your squad properly.

Until you are in a game, you should have one medic and one engineer in your squad. The other slot is a 'free' one, ideally for an ammo provider, assaulter or assassin. The only time I would change this is:

A) I'm defending only on Bridge or Chapel. I wouldn't worry so much about having an Engineer (granted an Engineer is useful in Bridge for the barrier generator) and make sure I have at least Nader to stop the EV (Kira, Arty or Skyhammer would be better though)

B) A certain role is covered and I don't need to play it (IE if everyone else has an Engineer, I might not need to play one). Even if this does happen, I generally stick to the my standard 1 Medic, 1 Engineer, and 1 'Free', as, well, you are trusting random people to do their job.

or

C) We're at a point in the game where an Engineer is no longer needed (IE the final parts of Chapel and Bridge).

Again this is all relative to the situation you are in. You are going to have to make the decision yourself.
Videos
COMING SOON!

General:

Medic:

Engineer:

Ammo Provider:
Assault:

Assassin:
댓글 30
boba tea enema 2017년 9월 23일 오후 3시 54분 
Nice, someone revived the guide. Besides that I want Fragger now.
Major Fret  [작성자] 2017년 9월 23일 오후 3시 40분 
@ TheEpicPancake

I'd say getting an engineer first is ideal. Off the top of my head Proxy is the cheapest but that's when I use to play and I know pricing has changed since then.

Otherwise, if you're going to pick between Phoenix or Sawbones I'd say Sawbones is much easier to play as he plays like 99% of video game medics. That being said Phoenix can be very effective and isn't super hard to play either.
TheEpicPancake 2017년 9월 23일 오후 2시 28분 
So what merc would you suggest buying first (I only have 40000 credits so One of the cheaper mercs)? I really li8ke the sound of pheonix but sawbones sounds good too. or I could get an engineer. I dont know really
boba tea enema 2016년 8월 30일 오전 2시 07분 
@The Mother F*cking Major F R E T I didn't want fragger, plus he is in rotation.
Major Fret  [작성자] 2016년 8월 29일 오전 2시 10분 
@bluemars Not my fault you didn't get the Fragman :HappyFragger:
boba tea enema 2016년 8월 28일 오후 8시 13분 
I came here for Thunder tips (As he is my first merc) and... no help. GOD DAMMIT!
CocoaAndTea 2016년 7월 1일 오후 1시 08분 
bushwackers turrets can't see through smoke , well at least the time I played it did shit.
bogginwater 2016년 5월 23일 오후 7시 01분 
I bought vassili first sadly:steamsad:
Major Fret  [작성자] 2016년 2월 27일 오후 7시 10분 
@Geo

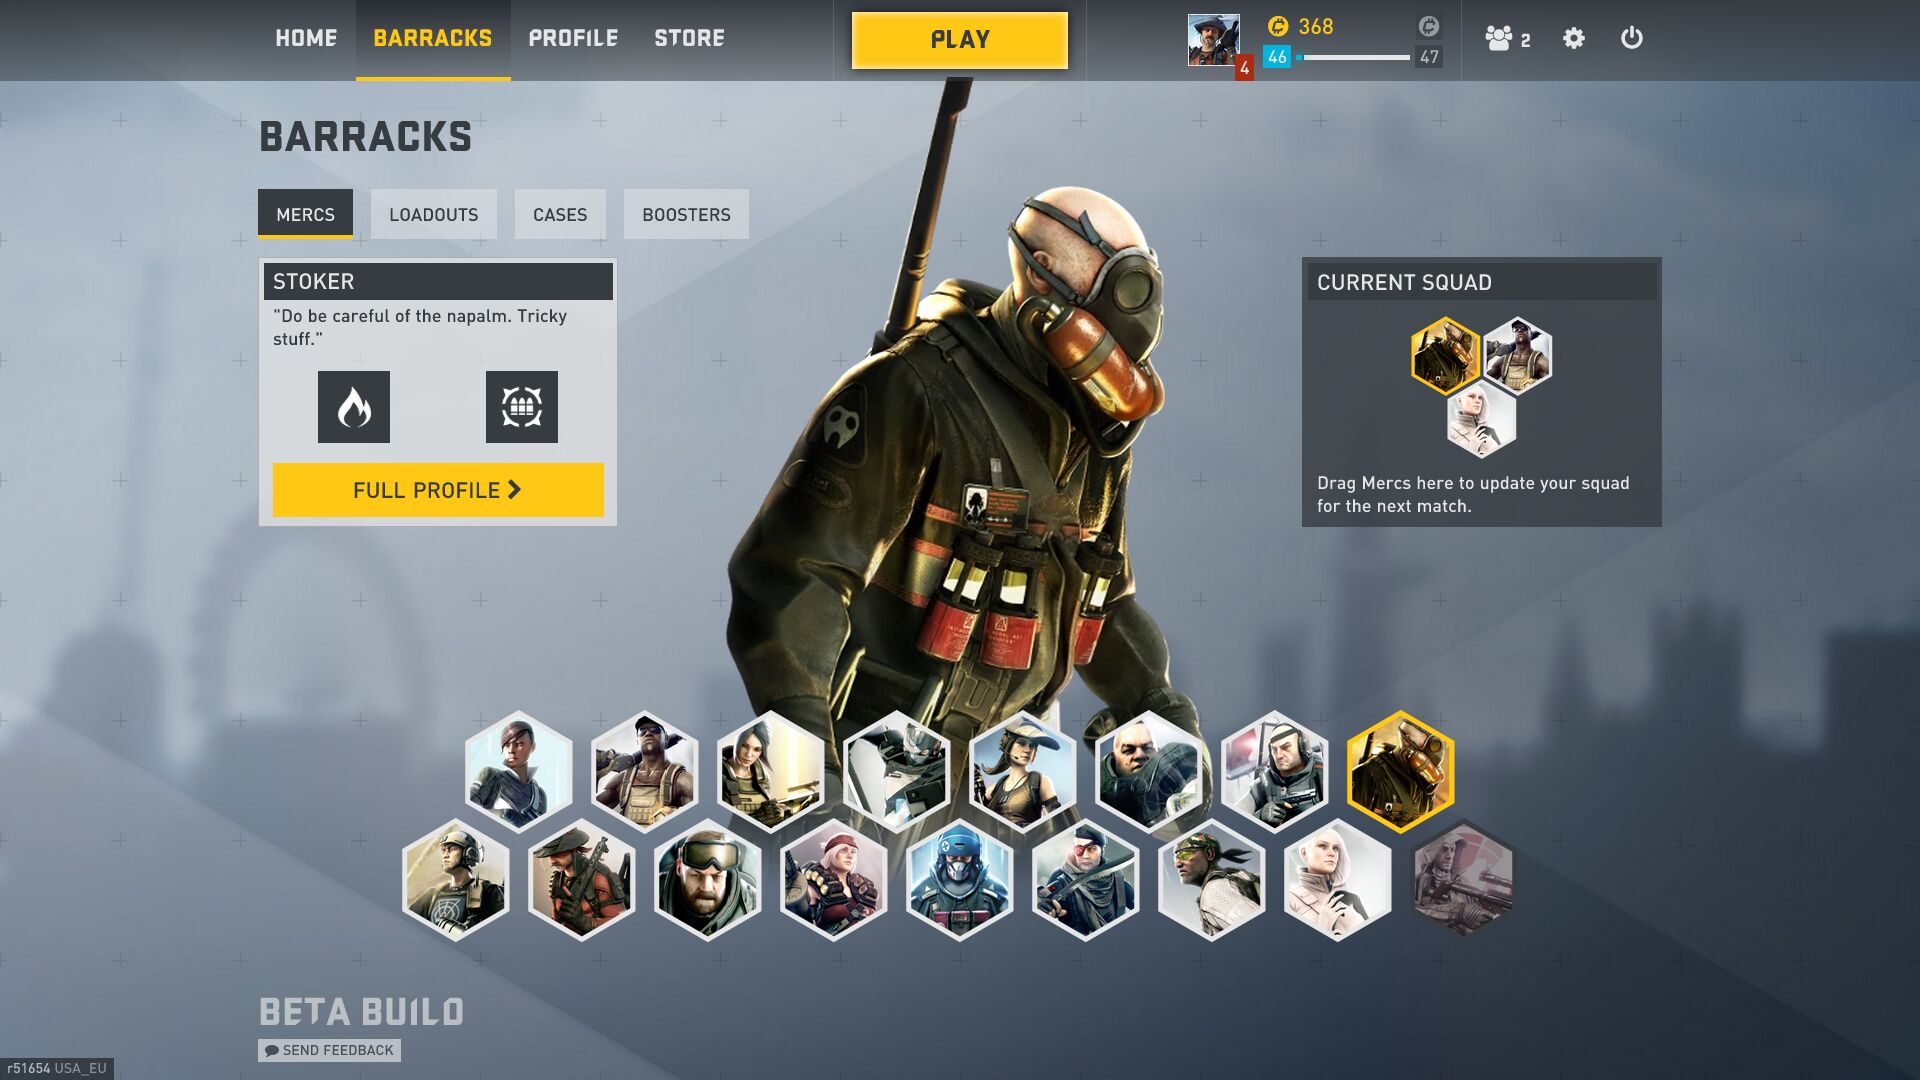
I haven't forgotten Stoker. In fact he's got a section just for himself (Ammo Provider Mercs Continued)

The only merc not on this list is Thunder, who can basically be summed up in two words: Play Fragger
Geo 2016년 2월 27일 오전 11시 43분 
You forgot about Stoker