PAYDAY 2

PAYDAY 2

67 ratings
Making Inventory Icons
By White_3Designer and 3 collaborators
Guide to help people with creating good-quality inventory icons.
   
Award
Favorite
Favorited
Unfavorite
Introduction
Welcome to the LASTBULLET guide which will help you in creating custom inventory icons for any item you want. In this guide I will show you an easy method of creating a well-done inventory icon without using any 3D software or render program.
Requirements
As I mentioned, you don't need any 3D software at all, except for making the models of course, but it's not relevant to this guide.
The things you will need:
  1. Payday 2
  2. An imported custom model (weapon or mask, whatever you want)
  3. The inventory icon setup created by White_3Designer (Link[forums.lastbullet.net])
  4. BLT Hook (Link[paydaymods.com])
  5. Beardlib (Link[lastbullet.net])
  6. Any image editor that can export .dds files with alpha channel
A little bit about the inventory icon setup
The setup contains a .pdmod file and a template of a BLT script created by Great Big Bushy Beard. We will be able to change the type of the mask to remove the straps and open the eyeholes if the mask has those

mod_override part makes several changes:
  • replaces color_payday gradient which now inverts the screen to make it negative and black-white.
  • makes the background solid black and removes the PAYDAY 2 LOGO as well as the smoke.
  • removes lens dirt and camera gradient.

The BLT scripts changes camera position in inventory previews, changes FOV to 2 and changes light setup.
You might be interested in Tweakdata.lua file
There are a few lines and only 1 line is what you should change for your work.

tweak_data.blackmarket.masks.<mask_id>.type = "glasses"

Replace the "<mask_id>" with the mask's you want id.

For example, I did this with Alienware mask.
tweak_data.blackmarket.masks.alienware.type = "glasses"

You can find the id's of all masks in the extracted game files. Note: the "msk_" part is not a part of the mask's id.
To give you an example: The "Cursed One's" mask ID is "cursed_crown", not "msk_cursed_crown".


We're almost ready to finish.

In-Game
When you open the game for the first time after installing everything your game should look like this:


Creepy and dark. Perfect.

I'm gonna assume you already have the mask model imported and ready to go. Open preview of your item. In our example, this is The Redhead mask which replaces Eagle mask.

As you can see, I wrote id of eagle mask in our script that makes game disable the straps (which improves the quality of the picture, since straps can get in our way).

My setup has already toggled everything you need for good screenie (Update 2.00).
If mask or weapon is too close to camera, you can scroll down a mouse wheel a bit.


If you have the Poser mod (Link[forums.lastbullet.net]), you can remove the hud by pressing "F2" (default)
Now we're ready! Take a screenshot with "F12".


After you've done that, load the screenie to the image editor.


Using the image editor
Time for the easiest part of this method, editing the image. I am using Adobe Photoshop CC, but you can use any image editor you want.

Our task is:
  1. Load the screenshot


  2. Crop the image (1x1 for masks, 2x1 for weapons/melee/throwable). Mask/weapon should be in the center of the picture. Frame of the blackness is around 1/8 - 1/6 from top to bottom (for other stuff - from left to right). If you went over the edge of the picture, make the extra part black after cropping.


  3. Change the resolution to 128x128 (for masks) or 256x128 (for other stuff)


  4. Make some adjustments in brightness/contrast (Read more in Tips & Hints section)

  5. Copy the picture to the alpha channel. Make RGB channels solid white.


Our icon is done, congratulations! Now save it as a .DDS file with an alpha channel (I would recommend ARGB8, or A8R8G8B8). DO NOT generate MIP maps! The icon will drop in quality along with all of the other textures when lowering the game texture settings if you do that, and we don't want that.


Now you can replace any icon in the game via mod_override or pdmod file.
Tips and hints
  • Brightness/contrast adjustment: icon should have a strong contrast, visible black parts as well as white parts. For weapon icons: bigger contrast - better icon, but be careful, do not overdo the contrast.

  • Sometimes it's better to decrease the specular of the mask or the weapon by making a darker alpha channel of the color/diffuse map, because strong gloss/reflection might look bad on the icon.

  • BLT script that changes the type of the mask is not limited to glasses, I'll list the mask types that can be also used to remove the straps. They can also be useful when creating your own mods.


    Template:

    if not tweak_data then return end tweak_data.blackmarket.masks.<mask_id>.type = "<type_id>"

    Let's see what we can do with type_id.

    There are several types of masks you can use:
    1. glasses - obviously used for glasses, adds the glasses' "masking up" animation, removes straps and the backside.

      Script:
      tweak_data.blackmarket.masks.babyrhino.type = "glasses"

    2. helmet - used for masks such as "Richard Returns", "Spectre" etc., removes straps and the backside and also has its own "masking up" animation.

      Script:
      tweak_data.blackmarket.masks.babyrhino.type = "helmet"

    3. beard - only used for Almir's Beard, removes straps and the backside and has it's own "masking up" animation.

      Script:
      tweak_data.blackmarket.masks.babyrhino.type = "beard"

    If you want straps and/or backside, you should write "nil" (without quotes) instead of "type_id"

    Example:
    tweak_data.blackmarket.masks.stoneface.type = nil
The End
Thank you for reading this guide, I hope it helped you with creating your own inventory icon.

If you have questions, write it in the comments. I will try to answer any of your questions as soon as I can.


White_3Designer
Last Bullet
11 Comments
WINSTON Aug 13, 2016 @ 9:47pm 
Great! Thanks.
White_3Designer  [author] Jul 31, 2015 @ 12:45am 
No problems c;
[ ] Jul 30, 2015 @ 3:15pm 
Thanks :D
White_3Designer  [author] Jul 30, 2015 @ 12:03am 
@MdZ
Well...I don't know xD
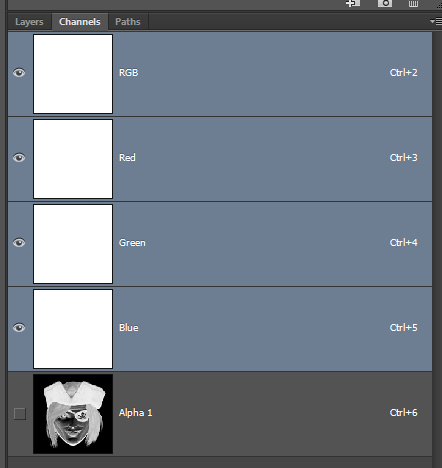
If you use Adobe photoshop:
1. Select whole channel by ctrl+a
2. ctrl+c from RGB -> ctrl+v to Alpha
[ ] Jul 29, 2015 @ 3:41pm 
Why i can't copy/paste channels?
TrinTong Jul 29, 2015 @ 9:50am 
Thank you for reply ! I will try it out.
White_3Designer  [author] Jul 29, 2015 @ 7:16am 
@Sgt. TrinTong
It's custom mask made by me and my brother BMSTU_hEDGEhog
You can download it here: http://forums.lastbullet.net/mydownloads.php?action=view_down&did=13053
It goes with Kitty mask and they can't be seperated to different mods because of small tech. issue

The Redhead replaces Eagle mask
Kitty replaces The Cursed One from The Diamond dlc
TrinTong Jul 29, 2015 @ 6:57am 
Wait, How did you get the mask in this guide ?

I did not remember it was in the game.
LazyPyro Jul 28, 2015 @ 2:04pm 
very boring
LGL_Matthelzor Jul 27, 2015 @ 10:53am 
Very helpful guide! Now i don't have to render images in softwares when this is way easier to do! Thanks!