Invisible, Inc.

Invisible, Inc.

124 ratings
[English/JP] Extensive Guide for Invisible (Contingency DLC) [日本語ガイド]
By MeaslyTripod
Currently editing for Contingency DLC, Detailing mission types, useful items, tips based on my experience, mainly for Campaign.
You can't fully enjoy Endless mode where the true fun lies without enough skills and knowledge to beat Campaign.
This guide will help those from beginners to veterans who aim more challenge on Endless mode!
This guide consists of 2 parts, one written in English, the other is the same except it's written in Japanese.
Both parts contain some spoilers at latter section.

(Japanese translation below)
========================================================================

日本語訳はずーっと下の方にあります、現在ContingencyDLCに対応するため編集中です。
本作の醍醐味はエンドレスモードにありますが、キャンペーンをクリア出来ないようではとても楽しめません。
初心者からエンドレスモードを目指す人まで役立つ情報を載せたガイドです、記事後半にネタバレあり。
3
   
Award
Favorite
Favorited
Unfavorite
Introduction
There's no certain solution for beating this game, you have to adapt and rewrite your plan to the given situation.
So my guide puts more importance on covering useful tips and info to assist your victory, rather than being simple database for each item.
You make the final decision, Operator, plan well and succeed, good luck!

Play tutorial first!
It's not enough to be the best tutorial, but it gives us ABC of the game.

About the game
On Campaign mode, you have 3 days (72 hours) to prepare for the final mission which is revealed on the 4th day.
On Endless mode, you test your limit until you fail.

Campaign mode limits how many missions you can try by imposing limit on avaiable time.
Each mission's flight time varies from 5 to 12 hours depending on the distance to the mission.
Try to run as many infiltrations as possible to maximize profit!
Less flight time allows you to run more infiltrations, which brings more profits!
If there are 2 missions of the same type, then pick the nearby one.

The 1st mission always takes 10 to 12 hours and its type is always Executive Terminal.
After the 1st mission is complete, 4 more randomly generated missions are revealed on the map.
Everything is situational, there's no right plan.
See the world map, calculate the required flight time, and check what your team needs (programs or gadgets or weapons?).
Needful things to beat the campaign
Beating the campaign mode with the default agents and programs is quite possible,
unlockable agents and programs aren't necessarily better than the default ones.
If their potentials can be fully maximized and utilized depends on player's skill and situations.

Here're some fundamental tips for any combinations of agents and programs.
No matter how you're going to play the game, you can't ignore these.

Try to collect the following asap
  • Credit to buy the following below and upgrade you agents
    Money, money, money! Your number one priority!
    Grab some from safes, steal from guards!

  • Proper upgrade for agents
    Make sure either of the initial agents have level 2 of Anarchy skill just after the 1st mission!
    Anarchy 2 allows the agent to steal from guards silently, which doesn't make them alert.
    Most gadgets require users to meet certain skill level.

  • Items to kill or bypass or knock out ARMORED guards
    While this game is about stealth, it sometimes forces you to bring some violence due to circumventing guards being not enough.
    Imagine a map with only one route to the exit or mission objective, which is under surveillance of stationary guards, besides they're all armored... it is quite possible.
    Lack of means to deal with armored guards will likely make your game bogged down.

    KO is usually better than kill, which incurs inevitable Cleaning Fee.
    Prepare to deal with 1 to 3 points armor!

    T.A.G. pistol doesn't deal KO nor lethal damage but helps agents bypass guards and saves their APs for observing enemy movement, it's definitely worthy 1 slot!
    EMP Pack disables nearby devices temporarily, destroys Camera Drone permanently.
    Shock Trap ignores enemy armor but needs closed door to deploy.
    Ping program is excellent for any team to distract guards, buy it when you find one!

  • Hacking programs that break 2 or more firewalls quickly
    From the 2nd day, expect the initial firewall level to be 2, 4 on the 4th day!

    Lockpick 1.0 the default hacking program breaks 1 firewall for 2 powers, useful during the early missions but soon will be obsolete once the initial firewall level of the mission becomes 2.
    Consider finding a replacement, for example, Lockpick 2.0 or Parasite, which takes 1 turn to actually break firewall.
    Wrench 2 works well with Lockpick 1.0 or Parasite 1.0 so keep initial Lockpick 1.0 unless you feel it completely useless.

  • Additional power supply
    Power Drip the default power supply program generates 1 power each turn.
    This is not enough to stand latter missions, you need to find some supplements.

    Portable server, Accelerator Chip, just 1 agent with high hacking skill makes a great difference.
    Distributed Processing augment is...not worthy occupying 1 augment slot unless Sharpe is among your initial members.

  • Additional agents
    You might want to put your priority on enhancing the 2 initial agents rather than finding the 3rd cause rescued agents have nothing but their initial augment, imagine Decker without Cloaking Rig or Shalem without gun.
    You need to think what they can do with initial augment and what items and how much credit to upgrade them is required to properly gear them up.


Search for vendor machines! (Nano Fabricator and Secondary Terminal)
These can be found during any infiltration, try to check its stock.
They have less stock than their counterparts found in Nanofab and Server Farm missions but they're still worthy checking, you might find something useful!
Trim the list of what you trully need, refrain from spending on temporal solutions, pick what keeps its usefulness until the end of the final mission!

About the default agents (Decker and International)
Decker's Cloaking Rig renders him invisible for a turn, quite useful for not only passing guards without being noticed but also getting out of trouble.
By combining it with HoloCircuit Overloaders augment, he can knock out multiple armored guards but try to only knock out necessary ones and make sure your power supply is well enhanced before installing it, this augment consumes 5 power with each use!
Chameleon Movement augment is also good but you'll need to have something up your sleeve to knock out armored guards.
Having no means to deal with them will cast a shadow on your campaign, check how many Cybernetic Labs are available, it's the only way to increase the number of additional augment slot.

Internationale's augment reveals remote hackable objects, which helps quick planning and saves several turns.
Her hacking consoles generates 1 more power thanks to her initial Hacking skill being 2, so try to let her hack as many as possible.
Increasing her Hacking skill yields more power, but unnecessary upgrade is unwelcome and costly, try to add Portable Server or Accelerator Chip to easily enhance power supply.

Both agents are equipped with 1 Neural Disrupter I each, a basic weapon capable of knocking out a non-armored guard for 3 turn with each use.
Corporations and missions
The game offers variety of missions and each one belongs to one of 5 companies based on where in the world the mission takes place.
The world of Invisible Inc is divided by 4 corporations and 5th one appears on the 4th day, each of them deploys their unique security measures so every mission is never the same.

Corporations
Corporation
Security measures
Note
Sankaku
Drones and Sound Bugs
It's an easy prey provided enough power reserve and strong hacking programs are available.
K&O
Automated turret
Turrets can be turned to your ally or simply compromised by hacking it or its power generator.
Plastech
Modded guards and Sirens
Each Modded regains the control of 1 hacked device every turn, quite annoying.
FTM
Scanning Amps and Security Routers
Scanning Amp informs one of your agents' location to a guard, which can be compromised by hacking it.

Missions
Mission
Reward
Note
Executive Terminal
More missions become available
Pick this If there'are no desired missions nearby.
Security Dispatch
1 randomly chosen high-end gadget or weapon for free
The reward is completely random, if you don't like it then sell.
Detention Center
1 additional agent (randomly chosen) or credits
Resuced agent's inventory is empty, you might want to fully equip the 2 initial agents before the 3rd agent.
Chief Financial Suit
1 free Vault Access Card
The reward is used to open a special door at Vault or Cybernetics Lab, one time use only.
Vault
credits and sellable items
There's always a special door for Vault Access Card, try to bring one if you have.
Cybernetics Lab
2 to 4 free augments(randomly chosen) or augment slots, or remove installed ones
Sometimes there's a special door requiring Vault Access Card.
Nanofab
weapons, gadgets, augments to purchase
There's a vendor machines with wider stock, prepare at least 2000 credits before trying this mission.
Server Farm
programs to purchase
There's a vendor machines with wider stock, prepare at least 1000 credits before trying.
Alarm level
Alarm level tracker's gauge increases by 1 point each turn after the 1st turn unless the game settings are changed.
Every 5 points raises alarm level by 1, which activates a security measure to tighten the security, making each mission harder.
There's no way to reduce the tracker's gauge.
The tracker can also be increased each time when an enemy (security camera, guards) detects an agent or an enemy human guard with functional Heart Monitor is killed.
That's why stealth is recommended on this game.

What security measure will be taken effect next can be shown by hovering mouse cursor over the alarm level tracker.

Alarm level
security measure
detail
1
additional security cameras
You'll need to hack more cameras to evade detection.
2
firewall increase
Every unhacked devices gain 1 more firewall each, making your hacking process require more power.
3/4
additional security guard
1 security guard spawns inside a guard teleporter.
5
Enforcer deployment
Enforcer throws scan grenade which detects agents behind cover.
6
2 Enforcers deployment + agents detected
More Enforcers and agents' location is relayed to guards.
Guards behaviour
Each Guard's behaviour can be observed by spending 1 AP of your agents.
Guards are categorized to 2 types, human and drone, this section covers the first.
Human guard can be easily distracted by making a loud sound.

Every guard has their inventory like agents, where some credits or items will be found.
Agents whose Anarchy skill is 2 or higher can steal from guards without KO or kill, which greatly helps your infiltration.

Status
Description
Stationary
The guard keeps standing unless being distracted.
Patrolling
The guard keeps moving between 2 places.
Investigating
The guard enters this state when he is distracted by something such as noise or your agent's entering in his peripheral sight. He'll move toward his point of interest (indicated by ! icon) and perform investigation, which temporarily widens his range of sight from 90 degrees to 180. Once he perfroms investigation, he returns to his original state if his original status is Stationary, he keeps moving if his original state is Patrolling.
Preparing to Hunt
When the guard regains his consciousness from KO, he enters this state being alert. From the next turn his status becomes Hunting permanently during the mission.
Hunting
The guard is alert by your agent's presence, makes a unpredictable move with longer distance each turn by running.

Most guards' sight ranges are 90 degrees so standing on their side and behind doesn't alert them.
Guard's sight is categorized to 2 types, direct sight (red tile) and peripheral one (tile with diagonal red stripes), while your agent's presence in the former makes the guard alert, in the latter simply makes him distracted.

Distraction is a prerequisite skill for this game, let guards leave their station so that your agents can bypass them undetected.
These screenshots below are examples.

vs Drone tactics
Drones are mechanical guards whose behaviour is nearly the same as human counterparts with some exceptions.
Drones are unaffected by sound or KO damage, have a chance to be possessed by DAEMONs like other hackable devices, and they perform investigation by using their internal scanner which can detect nearby agents through walls and covers.
Of course you can hack drones like security cameras but you only gain temporal control for mere 1 to 2 turn, after which they enter rebooting process for 1 turn and start tenacious hunting for your agents.


Drones also have their inventory, you can steal some power for Incognita.

Sankaku Corporation is the only corp that deploys the highest end drones, thus missions against Sankaku is struggle against drones.

sankaku = triangle in Japanese, san(three)kaku(angle)
akuma = devil in Japanese
obake = ghost in Japanese


Sankaku's unique drones are equipped with weapons unlike their low end counter parts often seen in other corps missions.
Do you think drones are unaffected by sound so agents can keep running?
Sankaku missions always deploy at least one human guard and lots of Sound Bugs, both reacts to any sound including gunfire and EMP, making the situation worse.
Flying drones don't make any noise while they move thus pose a great risk, there're even ones with 2 armors!

Let me show some ways to deal with drones.

Hacking
This might be the easiest solution.
Just hack drones and move them away or let them attack other guards.
Abundant power supply and programs capable of breaking 2 or 3 firewalls quickly are required.

A gadget called Buster Chip can manually hack one drone without power consumption but the user needs to be adjacent to the target without being seen, or a bullet will welcome him or her if the drone is armed.

Hacking tactic can be easily compromised by one Null Drone, and hacking can trigger DAEMONs possessing the target drone.
Guard's gun including drones' even can't penetrate 1 point of armor.

EMP
One EMP Pack can disable multiple drones and devices without triggering DAEMONs.
It has a risk to involve useful objects such as local vendor machines.
EMP instantly kills Camera Drones the most common model in the game.
Drone's wreckage makes human guards who see it.

Weapons
This isn't much smart but useful when you don't have any proper gadgets and power supply is scarce, or when there's a Null Drone.
Drones are unaffected by KO damage, so attack them with lethal damage instead and destroy.
Of course there's a drawback, most weapons with lethal damage demand ammo, quite costly.
Some drones are protected with armor thus armor piercing weapon is required.

Watch out for Sound Bugs, they detect the sound of gunfire and raise alarm level.
Also keep in mind that drones' wreckage can't be dragged.
Guards become alert by seeing a wreckage.
vs DAEMONs
Some devices are possessed by DAEMONs, enemy programs.
They stay dormant until player successfully breaks all the firewall of the DAEMON possessed device via hacking, once a DAEMON awakes, it hinders player's infiltration with nasty effect such as increment of Alarm Tracker or deployment of additional guard or making guards armored.
There's a variety type of DAEMONs, each of which deals a terrible blow.
Some effects last for certain number of turns.
As the difficulty rises, more and more devices are possessed by DAEMONs thus avoiding them becomes impossible.
Also, DAEMON's type is hidden from the player unless the player has ways to identify such as gadget or augment.

Fortunately every mission with DAEMON has a device called "DAEMON Terminal" which reveals the type of all the existing DAEMONs around the map once it's under player's control.
Put your priority on compromising security measures along the route to the exit and try to hold hacking DAEMON possessing objects until hack on the DAEMON Terminal is finished, then check which device you can safely hack and extract.
Sometimes DAEMON Terminal itself is possessed by a DAEMON but 1 DAEMON won't be a game ender unless you've already made a mistake.
Cameras on campaign don't possess DAEMONs, nor shoot, Camera Drones are also unarmed.


Programs
None of these programs are requisites for beating the game on campaign, so never give up even if your Incognita doesn't have one!

Hunter
This eliminates 1 DAEMON for 5 powers and 3 turns, it's really helpful but quite costly and you can avoid most of DAEMON possessing objects by simply ignoring them, on campaign.
Hack DAEMON Terminal first, and see which the highest threat to use this program is.

Eliminating a DAEMON spawned by a KO'd MODDED guard with Hunter program instantly kills the guard and raises alarm level, from which Cleaning Fee accrues!
It might be better to simply kill the cyber guards using this program so that new DAEMONs won't trouble you, with EMP you can ignore Heart Tracker.

Daemon Sniffer
Why you bother with this when you can receive the same effect for free by simply hacking a DAEMON Terminal.
What if it's infected with a DAEMON?
One DAEMON won't ruin your mission on campaign unless you already made a mistake, it's not indispensable for beating the game...on campaign.
Check which type of DAEMON is possessing what, and decide whether to hack or not.

Taurus
This program moves 1 DAEMON to a non-hacked object provided it doesn't possess DAEMON, for 2 powers with no cool down.
If you're going to use this, leave unnecessary cameras (like ones watching an empty room with 1 door) unhacked so you can move DAEMONs from safes or terminals.
Which device the target DAEMON possesses next completely depends on luck, there's no assurance DAEMON moves as intended.
You might have to keep using this program until the target moves to your desired device... it's quite a waste of power, check your power reserve and pray.

Bless (Contingency DLC required)
This reduces DAEMON's effect duration by 2 turns, quite useful both on campaign and endless mode as you'll have to activate some DAEMONs for completing the objective, each mission's number of deployable DAEMONs is proportional to their indicated difficulty level.
Complete avoidance from DAEMONs on latter missions is nearly impossible.

Gadget
EMP Pack
Safes can be temporarily opened without hacking by using EMP Pack.
Bring lots of them, so that you don't need to hack safes or drones possessed by DAEMONs.
Version I suffices your purpose.

Buster Chip
While this gadget can't bypass DAEMONs nor eliminate them, it allows the user to manually hack without Incognita, which means agents won't be hindered even under Paradox DAEMON effect, avoiding it is still the best due to the gadget's relatively longer cool down.
DAEMONs react hacking, Incognita or not, using this gadget on DAEMON possessed device could make the situation worse, so check the type of the DAEMON beforehand.
Upgrading agents
Pick only necessary upgrade, and save credits for weapons, gadgets, programs.
Choose wisely when and what to upgrade.

No agent can knock out guards without weapons or gadgets.
Without better hacking programs, the multiple firewalls block your infiltration.
Always keep some credits with you hoping to find a local vendor machine with great stocks!

Anarchy
This is my number one priority for either agent just after the 1st mission, raise it to 2 so the agent can steal from guards without knocking them out, you only need to move the agent adjacent to the target but out of his sight.
KO'd guards become alert after recovering consciousness and keep moving until they find your agents.

Never upgrade Anarchy more than 2 unless you're playing on Endless mode or you acquired either of the following : Buster Chip, Shock Trap, Paralyzer.
Credit bonus from steal is subtle and you have to utilize limited resource on campaign mode due to the limited time of 72 hours. (the 1st mission always costs 11 to 12 hours)

Maxed Anarchy will be your great savior on Endless mode, never hesitate to maximize it!
Level 5 brings you lots of Energy Pack and Med Gel from steal so you can sell them and be rich, but agents will suffer encumbrance due to these extra items.

Strength
Expanding inventory capacity allows your agents to carry more items without being encumbered, which means they can sprint.
Make sure each agent has at least 1 empty slot in their inventory at the start of missions, save some credit for vendor machines.

Hacking
This skill increases power income from hacking consoles, its true purpose is to allow agents to use EMP Pack and Portable Server so plan well when to upgrade.

Speed
This is essential for your quick extraction...1 AP can make a big difference!
Agents can bypass guards without sprint, and it also allows them to use Cloaking Rig and Stim.
Field manual
- Learn from mistakes!

Hone your skill, that's your best weapon.
Rewinding and Restarting are the first obstacles between you and victory you're going to achieve.
Higher difficulty and Iron-man awaits your challenge!

- Safe extraction is your primary goal!

Infiltration can be finished without fulfilling objective.
Of course Central doesn't like it but she'll understand.
Not only bad luck but also your greed can kill your agents.

- Be patient and cautious, especially during the 1st turn!


Leave your agents stick to cover, with ambush or over watch state when they're in front of the door, just in case.

- Try to close doors except ones that are in guards' sight!
One open door can easily ruin your infiltration.
Closing or Opening doors can distract guards so check enemy's sight range.

- One Agent can perform attack only once each turn except Nika!
That's why Volt Disruptor is invented for her.
Melee attack can't be done when the agent is standing on a KO'd guard!

- Power management is crucial!
Plan when to hack consoles, don't waste turn.

- Installing augments can't be undone without a device called Augment Drill!
Is that augment really worthy 1 slot? If not, just sell it to Monst3r.

- KO'd guard's recovery timer doesn't tick while agent is standing on him.

- Successfully finishing a mission doesn't replenish used ammo!
Save ammo well or buy Charge Packs for $400 each, or steal from guard hoping they have one.

- Sight of successfully hacked cameras and drones are shared among agents to observe remote enemy's movement!
Manage and utilize your agents' AP wisely, who spends 1 AP makes a great difference.
Don't let those behind cover waiting for the next turn waste their APs.

- Opening an adjacent door to guards can distract him, no matter it's in his sight or not!


If you simply want to avoid him not distract, don't do that.

- Cameras don't possess DAEMONs on campaign,
...unless a Fractal DAEMON is activated via successful hacking or agents knock out Modded guards, or you moved a DAEMON from other devices by using Taurus program, or you triggered DAEMON spawn event.
Leave unnecessary cameras unhacked to let DAEMONs possess them.

- Cameras and Camera Drones don't shoot you!


Sometimes you have to run under their surveillance, do so if your escape is assured.

- Try not to poak unnecessary guards or drones unless you have to!
Prioritize on revealing maps, check or expect where the exit and the objectives are, you can steal later.
That's why agents need Anarchy 2.


Sometimes you have to do so...these are examples.


Opening door in their sight or making noise can distract them, and lure them.
Never stand in front of a door when you open it!
Avoid unnecessary increase of alarm level..

Distracted guards move to their point of interest and perform investigation by looking around, widening their sight range temporarily to 180 degree![/b]
Find cover and let them return to their original position after investigation or simply make ambush and knock them out.
Patrolling ones resume his work and stationary ones just stands there.

Now it's time to steal from behind.


Drones are unaffected by sound, they won't be distracted by your agents' sprint nor gunfire.
Noise just covers a radius of 5 tiles from the source, 1 cover or closed door is enough to erase agents' trail even if human guards heard the noise, which just distracts them!
On Sankaku missions, check where the Sound Bugs (audio censor) are.

- Shock Traps can be set on the door of guard teleporter!
Each teleporter has 2 doors, expect which one will be opened before planting the trap.
Making noise can easily control a newly spawned guard's move.

- When an agent is standing adjacent to 2 doors, then press P key instead of peeking through either door so the agent can peek through the 2 doors simultaneously with 1 AP!


Save APs well, who spends 1 AP really matters.

- EMP Pack temporarily disables safes without triggering possessing DAEMONs!
They only react to hacking.

- Killing is your final resort!
Each kill costs you cleaning fee and raises alarm by 2
Try to avoid...


but never hesitate when you have to do so!
Weapon analysis
Every weapon deals either type of damage, KO or lethal.
While KO damage only affects human guards not drones for several turns, lethal one does both by literally killing.
Each kill incurs cleaning cost. which hurts your early economy especially on campaign.

Melee

Thermal Disrupter (Contingency DLC required)

Volt Disrupter
Security Dispatch mission could throw it into your inventory for example, it's a possible case.
Volt Disruptor is a Neural Disruptor with no cool down and additional cost of power, which is the reason why some users hate this weapon on campaign but Volt Disruptor or not, your power consumption arguably increases thus enhancing power supply is requisite.
If just one Volt Disruptor made your game impossible then you're completely out of luck or your plan for power supply is poor, or simply you're playing this game in the wrong way.
This game isn't a fighting game, a stealth one, try to remain unseen.

Though this weapon is for Nika the only agent who can perform 2 attacks each turn without Stim III and also synergies well with Predictive Brawl augment, remember to check your power reserve as each attack consumes precious power.
Keeping some power for this weapon makes quite a difference in case you have to utilize it, prioritize what device needs immediate hack, leave unnecessary devices, which is indispensable technique for this game.

You can try these to increase your power supply!
  • Portable servers or Accelerator Chip or both (II or higher is recommended, I is powerless)
  • An agent with high hacking skill
  • Distributed Processing augment (I don't recommend this cause installed augments can't be removed!)

Ranged

Biogenic D.A.R.T.
While it's quite expensive and has long cool down of 7 turns, this weapon's potential is worthy its cost.
It can penetrate up to 2 points of armor without spending ammo, instead it costs 7 turns cool down...imagine a ranged version of Neural Disruptor III with much longer cool down.
Add a Ventricular Lance or Piercing Scanner augment so that 3 points armor is no longer a problem.

7 turns are too long?
Invisible Inc is a stealth game, not fighting one, attack is your last resort.
Besides it's a wrong idea that one weapon solves all the problems, just think it a supplement to your arsenal, combine with other weapons or distracting methods.
Opening or closing doors can simply distract guards, Ping program is better of course.
Place Shock Trap on doors, other agents with weapon can be also helpful.
Starting agents have at least 1 weapon each, it's a good idea to let one agent have multiple weapons in his or her inventory.

T.A.G. pistol
This is arguably one of the best weapons, simply buy one, you'll be thankful for its cheap cost and potential!
While it doesn't deal any KO nor lethal damage, it tags guards (including drones) at the expense of 1 power each (doesn't consume ammo) without making them distracted or alert, and displays their next move route each turn during the mission, which means surplus power can be used as additional APs.
You'll be relieved of the burden of memorilizing each guards' movement and their current locations.


It shines most when there're 1 or more alert guards who make unpredictable move every turn, imagine you can save plenty of APs that should be spent each turn for observing their movement, tagging KO'd guards is also a wise choice, who's sure to become alert later.
It's usually a waste of power to unnecessarily tag guards you don't need to poke with, especially stationary ones but quite useful on Executive Terminal mission where their behavior can be switched to active by snatching the mission objective item, assuming enough power reserve is available.

This isn't actually a weapon but falls into that category, using it is regarded as performing attack thus leaving the user defenseless unless it's Nika who can perform 2 attacks every turn.
It can also be used for Overwatch because it's a weapon!
This weapon needs a clear line of sight as other ranged kins, so be careful not to distract or alert the target by opening doors.
Gadget analysis
Accelerator Chip
This gadget's effect to boost power income from consoles stacks with Hacking skill's, let agent with highest Hacking skill have this gadget.
It requires Anarchy skill so consider allocatating resource on upgrading it.
Keep in mind you can't reserve more than 20 points of power, excess power is discarded...
III alone will be enough to maintain your power reserve during every mission.

This gadget also needs shorter cool down after each use like Econ Chip, and console placement is randomly chosen.
The more you stick to utilizing it, the more turns you'll spend.


Look at this shot, how many turns do you need?

Buster Chip
This allows the user to manually and instantly break multiple firewalls without Incognita, which means no power is needed and can't be hindered by Paradox DAEMON.
The drawbacks are longer cool down and the fact that the user has to be adjacent to the target object...so it's not suitable for hacking cameras or turrets.

While this gadget doesn't rend Incognita's hands, it literally "hacks" the target device, so can trigger DAEMONs.

Camera Canister
I can't find any reason to bother with this scrap, hacking cameras and memororizing the guards' movement are enough to run successful infiltrations.

Cloaking Rig
Avoid I, it's garbage...

Econ Chip
This wonderful gadget exchanges power income from consoles with credit, 50 credits per power.
Latter missions they contain more power, so each hacking consoles yields several hundred credits, and stacks with the user's hacking skill, it's awesome.
With Torque Injectors augment, its cool down is just 1 turn, now every console looks like a non-locked safe!

Considering the hefty price enough to hurt your economy and the limited number of available missions on campaign, I don't think it's worthy buying on campaign mode though.
If you find one on Security Dispatch, you're so lucky!
This gadget forces you to abandon additional power income from consoles for money, power supply won't be your trouble at the early part but will be soon.
Thus alternative power supply which is independent of consoles is required to fully utilize this gadget, Portable Server will be ideal.
Consoles' position is purely luck dependent on each mission, your agent with this gadget has to move around the map, also every use cost you several turns for cool down...eventually your greed for money ruins your mission.

Use well and earn well, buy Portable Server quickly and upgrade the user's hacking skill then just sell it before the final mission!

EMP Pack
Try to acquire at least 1 during each game, this makes a huge difference!
It disables any hackable objects for 2 turns (destroys Camera Drones permanently); agents can now safely pass cameras, turrets, laser grids, and open safes without spending power to hack them, which means DAEMONs possessing the safes stay dormant as they only react hacking.
Barrier protecting several types of guards can also be disabled with EMP, turning those special guards to ordinal ones temporarily.
Besides, it can disable not only barrier but also Heart Tracker (not improved one) which all the human guards are equipped with, one of obstacles making you think twice when you want to perform kill.
Cleaning cost for each kill can't be disabled with EMP, so killing still troubles you financially though, except the final mission.

Keep your eyes open and see what you want to disable is, its wide effect range can involve vendor machines, and disabled drones will become alert once their reactivation process is done!
Destroyed drone's wreckage makes other guards who saw it alert and can't be dragged to behind covers.
EMP Pack makes a loud sound that affects nearby human guards and Sound Bugs so check where they are beforehand.
Its great potential can save or doom your mission.


This shot shows a potential of EMP!

Lock Decoder
I don't think it's worthy bothering with, it keeps occupying 1 inventory slot as dead weight just for unlocking 1 or 2 doors on each mission.
Besides, this gadget requires 2 turns to unlock a door!
Security Card is much more convenient, which can be easily acquired from a guard for free, unlocks needed doors instantly, after that you can simply drop on the floor.

Paralyzer
Costing KO'd guards more turns to recover consciousness is a welcome thing for any teams.
You'll raise Anarchy to 2 for every agent during campaign so they all meet the requirement for Paralyzer I, which can be traded among them.

Portable Server
If you happen to acquire one on Security Dispatch, just keep it!
Imagine a deployable power generator that grants you constant power supply independent of consoles.
The drawback is that it needs to be recovered before extraction, or it's gone forever!
It's wise to place this on the route to the exit so that at least one agent can recover it on the way to the exit.
Remember to place it behind cover, once a guard spots it, he'll take it into his inventory, forcing you to pickpocket him.

II or III is recommended, both will greatly help you on latter missions.

Shock Trap
A deployable weapon that can be placed on closed doors including ones at guards' teleporter, not open or broken one.
It knocks down whoever opens the door, armored or not, including agents!
Agents can disarm it, which doesn't reset the cool down timer to zero, plan well when and where to set.

Alhough III has area of effect to knock out multiple guards which seems useful, try not to take down unnecessary guards unless you have to or your safe escape is at hand, otherwise the situation becomes unruly beyond your agents' capability.

Stim
More APs are a welcome thing for any team.
Subdermal Cloak augment works well with this gadget, but be ware of your power management.
With the augment, each Stim usage costs 5 power!

Ventricular Lance
Grants all attacks (melee or ranged) +1 armor piercing effect for 1 turn...this will turn initial Neural Disruptor I to II, II to III.
While its longer cool down isn't welcome, it could be your savior when you need more armor piercing.
There could be a situation where neither of Piercing Scanner or Penetration Scanner isn't at your disposal, or simply no agents have an empty augment slot.
It's a gadget not augment, can be traded among agents when necessary, making your plan more flexible!
Gadget analysis (DLC required)
Cry Baby (Contingency DLC required)
It's a throwable gadget which distracts human guards by making a loud sound whenever you want.
While it's cheap and its sound range is wider than Ping program, the fact that it's a throwable gadget which needs to be recovered requires you to plan carefully before throwing it, as the agents will be forced to deal with a bunch of human guards who are distracted by it, one of them definitely picks and tucks it into his inventory.
You can simply abandon it for your agents' safety, it's a complete waste though.
This gadge requires careful plan and bold move, without which it's merely a dead weight as the player is afraid of losing it.


Here's my example of Cry Baby's use to steal from stationary guards, you need a Cry Baby and an agent with Anarchy level 2.
First throw the gadget to a point where you want to lure him so that he shows his vulnerable flank.
Let him pick it and send your agent whose Anarchy is level 2 to steal his loot including Cry Baby.

Flash Pack (Contingency DLC required)
Its usage is similar to EMP Pack, place this gadget on the groud and it explodes, differences are that it affects guards not devices by dealing 2 KO damage each and you can activate it whenever you want to.
It's not categorized to deployable gadget so doesn't need to be recovered.
Augment analysis
Installed augments can't be removed without Augment Drill!
Chance to see that device is quite rare, don't count on it.

Anatomy Analysis
Each kill prevents the victim's Heart Tracker from raising alarm level by 2 at the expense of 3 power.
Sounds awesome? Let's take a closer look.
You need to take account of these to utilize this augment.

  • At least 1 ranged weapon with lethal damage is needed to perform kill.

  • Most ranged weapons consume ammo thus Energy Pack is required to reload.
    How many of them and empty inventory slots are available for your team?

  • On latter missions, there'll be more and more ARMORED guards.
    How many armors can your agent penetrate?
    OMNI Harbingers and Soldiers are expected to wear at least 3 armors on the final mission.

  • OMNI Harbingers are equipped with Improved Heart Tracker that ignores this augment, EMP can't disable it.

  • Each kill using this augment costs 3 power, and Cleaning Fee!
    Cleaning Fee doesn't bother you on the final mission, where power consumption does though.

Focusing kill might doom you especially on campaign, on endless mode this augment is indispensable though.

Chameleon Movement
This augment also grants 6 APs just like Predictive Brawlings, except it requires the user to carry Cloaking Rig instead of melee weapon.
Of course its effect is awesome, but the frequency of usage of Cloaking Rig isn't that high as melee weapon due to its longer cool down.
Decker's the only agent who has Cloaking Rig as initial equipment, .

Distributed Processing
50% chance for 1 more power each turn, stackable!
More power income won't make you regret as power consumption increases at daily basis,
...but hey, installed augments can't be removed unless you stumble upon a device called Augment Drill!
You need to think well if just a chance for 1 power or nothing each turn is worth an augment slot.
If your team has Sharp, then give it to him, he has 5 free slots, now you and he are both happy!

HoloCircuit Overloaders
Don't install it unless you acquire Cloaking Rig, without which this augment is no use.
Tuck it in your inventory, if you don't stumble upon the corresponding gadget, simply sell it.

MicroSLAM Apparatus
If you find one at the very early part of campaign mode and when your team has Sharp, just buy.
Each augment occupies a slot and can't be removed without Augment Drill thus installing it on other agents who have only 1 empty augment slot can be quite risky but early income boost is definitely helpful.
Check how many Cybernetics Lab missions are available, then make your choice, there's no right answer.

On Endless mode, it's worthy installing at early part!

Net Downlink
This grants the user 2 APs for every successful hack, up to 6 APs per turn.
Try not to hack more than 3 devices every turn to maximize its AP bonus, prioritize which one needs immediate hack.

Penetration Scanner
Most agents' initial weapons are melee based ones so this augment synergies with any team well.

Piercing Scanner
Agents who start with a ranged weapon are quite rare, Shalem and Archive Decker and Monst3r.
See how many guns and Charge Packs are at your team's disposal before installing.

Predictive Brawlings
Each successful melee attack grants 6 additional APs, self-explanatory.
The user has to carry at least 1 melee weapon.

While this sounds awesome, stealth is still your number one priority cause focusing on attack just for additional APs makes no sense, it merely makes your infiltration harder and harder.
You need to think well if this augment is truly necessary for your team especially on campaign mode where your resource income is limited.
Without armor piercing ability, this augment is no use against armored guards.

Sadochistic Pumps
Killing is the least thing you want in this game, besides just 3 AP is too small difference.
I don't think it's worth one slot on campaign even if Sharp is in the team, on endless mode, it's another story.

Skeletal Suspension
You have so many and more important things to improve than the speed of dragging...pass.

Subdermal Cloak
Each Stim use renders the user with this augment invisible for 1 turn, with the cost of 5 powers.
Power management is crucial during latter missions especially on higher difficulties, thus you have to put limit on the usage of Stim for the agent with this augment.

More than 1 of this will destroy your game...careful plan is needed to utilize this augment, you have to choose who to install, and when to use Stim.
Its power cost isn't cheap but 1 turn stealth with more APs is awesome, of course!

Titanium Rod
Extending KO time is welcome provided your agents have measures to deal with armored guards, without which installing this augment is risky on campaign due to scarce augment slots.
Paralyzer gadget might be a more flexible option as gadgets can be freely traded among agents.

First of all, all agents except Sharp have just 1 empty augment slot, so installing this augment excludes Penetration Scanner thus at least 1 Cybernetics Lab for additional slots to install it or multiple Ventricular Lances is needed to gain more armor piercing abilities.
You can try Executive Terminal mission but there's no certainty that 1 or more Cybernetic Lab spawn.
Second, this augment's effect only applies to melee attacks, which doesn't trouble you much as most agents are initially equipped witth 1 melee weapon.
You'll need Neural Disruptor, II or III is preferable, I has no armor piercing effect, and I don't recommend Volt Disruptor.

Torque Injectors
Each time the agent with the augment uses an inventory item, the used item's cool down is reduced by 1 turn!
With it Accelerator Chip and Econ Chip can be used every 2 turn,.
Try to install it on an agent who has multiple items with longer cool down, Tony Xu, for example.
Augment analysis (DLC required)
Gel Injectors (Contingency DLC required)
This augment grants the user 3 APs every turn, which sounds nice but at the same time the total amount of the agent's available AP per turn is reduced by 1 per alarm level (every 5 turn from the 1st turn), which means up to 6 APs are subtracted every turn.
An agent with no speed upgrade has 11 APs per turn when the alarm level is 0, but every alarm level reduces this number by 1, to 5 APs per turn in the end.
Are 5 APs enough for the agent to make it to the exit when the alarm level is 6?
The user definitely needs speed skill upgrade to mitigate this drawback, level 4 is required to nullify it.
Thus its true potential will be shown on Endless mode, where enough credits to maximize speed skill and augment slots are available.

Kinesiology Brain Chip, Cryptology Brain Chip, Physiology Brain Chip (Contingency DLC required)
These lock either of the agent's skill (Speed, Hacking, Strength, Anarchy) to level 3 permanently for 400 credits each.
While I don't recommend installing it on the 2 initial agents, it saves your credit greatly when you need to upgrade a rescued agent's on campaign before the final mission.
It's definitely a garbage on endless mode!

Pheromone Filter (Contingency DLC required)
This augment grants 2 APs when a guard recovers his consciousness while Predictive Brawlings grants more APs with each successful KO attack...pass.

Reactive Moyomer (Contingency DLC required)
Sample of my win (Expert with Iron Man)


I failed a Financial Suite mission on the 3rd day, an armored guard entered the initial room on the very 1st turn...and spotted my agents.
The target executive heard that, running towards the nearest guard elevator...but I never gave up.
I opened all of the safes instead and earned pretty well.

Programs
Power Drip 1.0 (initial)
Lock Pick 1.0 (initial)
Wrench 2.0

Agents
Sharp (initial)
Speed 2, Hacking 4, Strength 3, Anarchy 4
Additional augments: Distributed Processing, Predictive Brawling, 2 Penetration Scanners
Gadgets: Paralyzer III, Portable Server III,
Weapons: Neural Disrupter III

Prism (initial)
Speed 2, Hacking 1, Strength 3, Anarchy 3
Additional augments: none
Gadgets: Paralyzer I, Shock Trap II, Buster Chip I
Weapons: Neural Disrupter I (her initial weapon), T.A.G. pistol

Banks
Speed 2, Hacking 1, Strength 1, Anarchy 2
Additional augments: none
Gadgets: Shock Trap I
Weapons: Neural Disrupter I (Sharp's initial weapon)

Nika
Speed 1, Hacking 1, Strength 1, Anarchy 1
Additional augments: none
Gadgets: none
Weapons: T.A.G. pistol

Mission analysis (SPOILER ALERT)
Executive Terminal

The first mission is always this type, objective is simple, access a hackable terminal, grab the Site List and get out so that new missions appear on the world map.

Agent's access to the terminal changes guards' behavior and their patrolling route.
Stationary guards might start patrolling.

The terminal allows you to pick one from 4 randomly generated missions, except the 1st mission.
While the 1st mission's reward adds 4 more missions, the others just add 3 including the one you chose.
This mission could be a valid choice when there are no attractive ones such as Vault or Detention Center.

Detention Center
Holding cell's door can be opened only by manually operating Detention Processor, which is protected by firewall.

At least 1 stationary captain is deployed in the holding cell room, mostly facing the door!


...maybe not.


Sometimes he has companion with him, a stationary or patrolling guard.

Rescued agents have nothing but installed augments.
You need to equip him or her with whatever is available at your disposal.
Even an agent with no weapons can explore the map or carry loots to the exit so use wisely.
If the hostage is a nameless prisoner, he'll pay 1000 credits for successful extraction.

Security Dispatch


Security Dispatch offers you a randomly chosen high end gadget for free, and a chance to rescue a hostage for credits!

The next room to the weapon lock down room has a chance to spawn a hostage (Courier).
Courier's weakened by interrrogation, has only 5 APs and 1 empty inventory slot, he can't sprint.
Try to escort him to the exit and his client pays you 500 credits.

The weapon lock down room's door is locked thus a security card is required.
Steal it from guards, or use Bank's ability to unlock the door.
You can also disable the lock by using a Lock Decoder.
The lock down room is also protected by a laser grid, which can be temporarily disabled using a EMP Pack or simply hacking the corresponding power generator deployed somewhere around the map.

At least 1 patrolling or stationary guard is always deployed near the objective, and the access to the case draws his attention.
He's simply distracted not alert.

Chief Financial Suit


You need to find and knock out the Financial Executive, who is stationary and mostly facing a door so needs to be lured by distraction such as opening the door.
After his losing consciousness, one agent has to stay near him and wait for 6 turn before a Vault Access Card spawns in the Executive's inventory, during which an Enforcer spawns to investigate where the Executive is.
Let your agent drag the Executive to somewhere else, preferably behind some cover.


While Enforcer's scan grenade can easily detect your agents, you can easily avoid him by letting one agent drag the executive to behind a cover and the other distract him, provided other guards aren't nearby.
Vault Access Card grants you the access to the most valuable items in Vault and Cybernetics Lab.

Once the Financial Executive becomes alert, he runs toward the nearest guard teleporter and escapes!
Don't let him see your agents.

Vault Access Card can be acquired from Monst3r for 400 credits, but such chance is rare.

Vault


The vault room is behind a laser grid, which won't cause much trouble as its power source is nearby.
The real problem is a stationary guard or drone deployed.in front of the vault.

The vault always consists of 2 areas, the outer and the inner.
There's a hackable terminal that unlocks nearby safes, each contains some credits and also at least 1 hackable case which contains an item called Research Experiment that can be sold after successful extraction.
The inner vault can only be accessed by Vault Access Card, has the most valuable loots.
Hacking a case or terminal calls an additional Enforcer, so be careful!


The vault room has some varieties of layout and its loot, there could be Sound Bugs.

Cybernetics Lab


This mission offers 2 or 4 randomly chosen augments for free.
In the lab you'll see 2 devices called Augment Grafter, each contains a randomly chosen augment and allows the agent to install it or add a free augment slot instead.
The drawback is that these augments can't be brought to inventory slot so you can't sell them nor keep them for later, and there's no assurance which augment will be available.
There might be a chance that Augment Drill is deployed instead, which can be used to remove 1 installed augment or add a free augment slot.


Sometimes there's a specially locked door in the lab that can be opened by Vault Access Card!
Behind the door is 1 or 2 more Augment Grafters.

Access to one of the Augment Grafters reboots some already hacked objects under corporation's control!
Some power reserve will be required to rehack.

Nanofab & Server Farm

Nanofab sells variety of items & weapons & gadgets, Server Farm programs.

Exiting the shopping screen of the objective vendor machine incurs one of the following!
1. Rebooting some already hacked objects, including the vendor machine itself, forcing you to hack them again, so try to keep from hacking unnecessary objects until your shopping finishes, this will save some power.

2. Spawning several DAEMONs on non-hacked devices including cameras, this is really annoying.
Corporation analysis (SPOILER ALERT)
The world is divided and controlled by 5 corporations on the current version.
Each has their different security measure and different guards, making every mission unique.

Sankaku
Welcome to the kingdom of drones, this company deploys a lot of their unique drones.
Most of them are armed ones so be careful not to be shot.
There could be Null Drones that protects nearby objects from hacking, and the Null Drone itself has higher firewall!

This company also deploys Sound Bugs that detect sound and raise alarm...sprint or guns will be risky.
With enough measures to enhance power income and hack multiple devices, this company will be your easy prey!

FTM


They deploy at least 1 Scanning Amp which scans the whole map every 5 turn after the 1st turn and sends a guard to one of agents' location to investigate, or Security Router (Contingency DLC required) which boosts the firewall of a randomly chosen device for 1 turn every turn, both devices contain one item each called Valuable Tech, which can be retrieved from the device by finishing hack and is sold automatically to Mon3ter for some credits after successful extraction.
Scanning Amp simply makes one guard distracted not alert, so the sent guard returns to his position after performing investigation.
Of course the faster you hack the device the better.


Scanning Amp's location can be easily predicted by the buzz sound from the device!
Scroll the map and check if the sound faints.

K&O
They deploy at least 1 automated turret, which will shoot agents!
Each turret needs one power generator and they're deployed adjacent.
There's no need to hack both, hacking the generator shuts down the turret.
Hacking the turret turns it to your side, and it'll shoot guards who enter its range, this sounds awesome but each turret can attack only twice during a mission due to limited ammo, and each kill raises alarm level and costs you cleaning fee.

Turrets are Draco's best friend cause he needs as many dead bodies as possible.
With some power to hack turrets and cleaning fee incured by each kill, he can easily upgrade himself permanently!
Be ware of Elite Enforcers who spawn with higher alarm level, turrets can't attack armored guards!

Plastech
This company doesn't have unique security device, they deploy cyber-guards called MODDED, who regain control of one hacked object each that are within 6 tiles away from them every turn...so nasty.
I don't recommend this corp when your primary hacking program is Parasite.
Now you want to knock down them asap, but here's another trap: each KO'd cyber-guard infects a hackable object with 1 DAEMON, which can be destroyed using Hunter program but doing so also kills the guard and raises alarm level.
Once the infected object was successfully hacked, KO'd cyber-guard infects another unhacked object with another DAEMON.
The infecting DAEMON/KO'd Modded can be killed by Hunter program but this will trigger Heart Tracker and cost you cleaning fee.
Heart Tracker can be disabled by using EMP Pack.


With Contingency DLC, they also deploy another type of guard called Siren who boosts the firewall of all the nearby devices each time when he loses his consciousness or he becomes alert.
Try not to draw his attention, or finish hacking on necessary devices around him before dealing with him if you have to.

OMNI
This is your final target and foe!
They deploy at least 1 Camera Drone, and lots of guards with multiple armor or barrier.


OMNI has 3 types of their unique guard, Protector is the easiest to deal with as his barrier can be easily compromised by hacking, Soldier is protected by multiple armors.

The real problem is Harbinger who has not only multiple armors, but also Improved Heart Tracker which ignores Anatomy Analysis and invulnerable to EMP, and Consciousness Tracker that raises alarm level when the user is knocked out, which means successful KO or lethal damage against Harbinger raises alarm level!
Hopefully Consciousness Tracker can be disabled by EMP.
Final mission (SPOILER ALERT)


This is the final infiltration, every guard is protected by armor or barrier whose strength is equal to firewall, and at least 1 Camera Drone is expected.
If you don't pick either or both of Central and Monst3r as starting member, then the one who isn't chosen appear on the final mission with initial stat and equipment, which means if you start the campaign with none of them, both appear as additional agents on the final mission.

There's no exit on the final mission so just focus on the objective!
Just keep both of Monst3r and Central alive.


There're 2 objective devices you need to find and hack and manually operate called Security Hub and Final Security Console, both of which occupy 1 room each and can be operated only by Monst3r.
First, find the Security Hub and break its firewall and move Monst3r there.
Once he starts operating the console, he has to stay adjacent to the console for 6 turns, during of which at least 1 additional guard spawns to investigate the very console Monst3r is operating and invisible DAEMONs activate, so protect him at all cost.
Keep Monst3r behind the console so that guard can't notice him except Enforcer who has the annoying throwable scanner.


While Monst3r is operating, find the final security console and move Central there.
This 2nd console is also protected by firewalls and can be operated only by Monst3r after his operation at the 1st console finishes, so if these 2 consoles are placed separately then you'll have a great trouble.
There's a large locked gate in the same room, into which Central has to enter to see the ending.
Let Monst3r operate the 2nd console and the locked gate opens.
Now move Central inside the gate and you beat the final mission and the game, congratulations.
ゲーム内容

キャンペーン
72時間の制限時間中に出来るだけ多くのミッションをこなしエージェントを強化、最終戦に挑むゲームです。

ゲーム開始前にエージェント2名と使用プログラム2つを選びます。
潜入任務中はターン制となり、警備に見つからないようにしながら目標を達成し脱出を目指します。
先入先への飛行時間が残り時間から差し引かれます、所要ターン数は制限時間の残量には影響しません。
最初のミッションだけで11~12時間かかります。


最初のミッションを終えると新たに4つがマップ上に表示されます。
それぞれ達成目標と難易度と報酬が異なります。
残り時間は60時間しかないので、飛行時間を計算しながら出来るだけ多くのミッションをこなし、チームの強化をすることになります。


残り時間がゼロになると最終ミッションが出現、他のミッションは全て選べなくなります。
これまでに得たものを駆使して突破しましょう、失敗すればゲームオーバーです。


アンロック内容
達成したミッションの数と難易度に応じてXPが貰えます、規定値に達する度に新たなエージェントやプログラムが解禁されるのです。
クリアに必要なもの
初期エージェントと初期プログラムによるキャンペーン突破は可能です。
解禁されるエージェントのほうが性能が高いというわけではありません。
彼等が実力を発揮できるかどうかは、状況とプレイヤーの腕次第です。

以下のものを可能な限り迅速に揃えましょう
  • クレジット
    何事も金です、武器やガジェットやプログラムの購入、エージェントの強化に使います。

  • エージェントの強化
    初ミッション後必ず最低1人のアナーキーを2に上げましょう、警備員を気絶させずに盗めるようになります。
    また大半のガジェットは、使用者の必要スキルが一定値に達していないと使えません。

  • アーマーつき警備員を迂回・気絶・殺害する武器やガジェット
    殺害するより気絶させるものが好ましいです。
    殺害すると清掃費用がかさんで経済的に厳しくなります。

    ショックトラップならアーマーを無視して相手を気絶させます。
    TAGピストルがあれば、APを消費せず敵の動きを見極められます。
    EMPを使えばカメラドローンを瞬時に破壊し、警備員のバリアを一時的に消滅させます。
    プログラムのPingなら複数の警備員の注意を逸らすことが可能です。
    サイバネティック研究所ミッションが幾つあるか確認し、オーグメントのスロット数を増やせるか計算しましょう。
    幹部端末ミッションもありますすが、必ずサイバネティック研究所が出現する保証がありません。

  • 電力収入の確保
    初期プログラムのパワードリップは毎ターン1点の電力しか得られません。
    インターナショナルのようなハッキングスキルの高いエージェントに端末をハックさせれば序盤は凌げますが、すぐに辛くなります。
    急いでポータブル・サーバーかアクセラレーター・チップを入手しましょう。

  • 2点以上のファイアウォールを破るプログラム
    2日目から初期ファイアウォールが2点に、4日目には4点になります。
    初期プログラムのロックピック1.0は単独ではすぐに役に立たなくなります。
    代替品か補助するプログラムを買いましょう。
    ディストリビューティッド・プロセシングのオーグメントは、シャープがメンバーにいないのならオススメしません。

    初期プログラムのロックピック1.0は、2点の電力で1点のファイアウォールを破るハッキング用プログラムです。
    単独では非力なので、ロックピック2.0 かパラサイト系を用意して中盤に備えましょう。
    パラサイト系は実際にハックするのに1ターンかかります。
    キャンペーンモードなら、レンチ2とロックピック1.0かパラサイト1.0の組み合わせは有効なので、
    本当に不要になったと判断できるまで、初期のロックピック1.0を売るのは控えましょう。

  • 追加要員
    初期メンバーは2人、3人目以降は拘束センターミッションで救出しましょう。
    救出されたメンバーは、初期オーグメントしか持たない丸腰です。
    クローキング・リグの無いデッカーや銃を持たないシェイレムが役に立つかどうか、彼等の装備を整えるのに幾らかかるか考えましょう。
    最初の2人の装備を充実させることに専念し、十分な装備やクレジットを溜めてから3人目を確保するほうがいいかもしれません。

自販機を探しましょう
どのミッションでも自販機が置いてある場合があります。
ナノファブやサーバーファームのミッションに置いてあるものに比べ品揃えは悪いですが、
良い品が無いとは限りません。


初期エージェント解説
デッカーの初期装備クローキング・リグは、警備員をやり過ごしたり見つかった際の切り札として役立ちます。
ホロサーキット・オーバーローダーを入手すれば複数のアーマーつき警備員を一度に気絶させられますが、
手を出す必要のない相手を巻き込むのは控えましょう、後で大惨事になります。
また5点の電力を喰う代物なので、電力供給手段を充実させないと詰みます。
カメレオン・ムーブメントもいいのですが、警備員を倒すことは出来ないのが難点です。

インターナショナルは周囲の装置を画面に表示するため、無駄なく計画を立てるのに役立ちます。
またハッキングスキルが初期値2である点を活かすため、端末は彼女にハックさせましょう。
ハッキングスキルを更に上げれば電力収入を増やせますが、無意味なアップグレードは不要です。
ポータブル・サーバーかアクセラレーター・チップを探して安く電力を確保しましょう.

2人とも最初からニューラル・ディスラプター1を装備しているので、序盤は武器の心配は要りません。
ドローン対策
ドローンにはKOダメージが通じず、ハッキングしても1~2ターン操作できるようになるだけです。
その後は1ターンの再起動を経て警戒状態のままプレイヤーを追跡してきます。
5つの企業の中でもSankakuだけが高性能ドローンを使用しています。


Sankaku製ドローンは武装しており、またSankakuミッションでは最低1人の人間の警備員に加え音を探知する装置が複数設置されているため、安全に走るには大量の電力が要ります。
また音響センサーは銃声やEMPの音にも反応します。

ハッキング
ドローンをハックして向こうに移動させるか、他のドローンや警備員を攻撃させるやり方です。
警備員の武器ではアーマーを貫通させることが出来ないので、エリートエンフォーサー等には無力です。
複数のファイアウォールを一気に突破するプログラムと、膨大な電力が必要になります。
ガジェットのバスターチップを使えば電力消費無しでハッキングできますが、目標に隣接しないといけないので危険です。

周囲の装置へのハッキングを無効化するナル・ドローンが1機いるだけで無力化されるのが難点です。
またデーモンはハッキングに反応して起動します。

EMP
ガジェットのEMPパックを使えば、デーモンを起動させずに複数の装置を一時的に無力化できます。
カメラドローンなら瞬時に破壊できますが、残骸を見た守衛は警戒状態に移行します。

武器による破壊
電力残量や手持ち装備が乏しい時の最後の切り札です。
KOダメージがドローンには通じないので、致死ダメージを与える銃が必要になります。
難点は銃の大半が弾薬を消費すること、また装甲を貫通させる手段が無いと一部のドローンには無力であることです。
銃声で他の守衛やセンサーが反応することにも注意が必要です。
デーモン対策
エージェント強化
プログラムや装備品の購入のため、常に手元には幾らかクレジットを残しておきましょう。
いつどのスキルを強化するかよく考えましょう、丸腰で警備員を倒せるエージェントは存在しません。

アナーキー(Anarchy)
初ミッション後にまず1人のアナーキーを2に上げましょう、警備員の死角から所持品を盗めるようになります。
これで盗むために相手を気絶させる必要はなくなります。


ドローンからは電力を盗めます、とても重要です。

アナーキーを更に上げれば盗みによるクレジット収入が増えますが、得られる利益は僅かなもので、
アップグレード費用には見合いません。
アナーキーを必要とするアイテムを手に入れるか、5まで上げるつもりが無ければ2で止めておきましょう。
5まで上げればエナジーパックとメディジェルが山程手に入るので、売却益で稼げます。
ただし大量のアイテムを入手することで重量過多になるため、走れなくなるでしょう。
挑めるミッション数が限られているキャンペーンモードで、アナーキーを5まで上げる意味は無いでしょう。

ストレングス(Strength)
ストレングスは全員に最低1つは空きスロットがあるように、必要に応じて強化しましょう。

スピード(Speed)
スピードの数値が高ければ走らずに警備員をやり過ごせるようになり、ミッションが大幅に楽になります。
警報レベルを低く抑えるためにも迅速な行動が必要になるのです。

ハッキング(Hacking)
端末からの電力収入を増やし、EMPやバスターチップを使うためにも、最低1人はハッキングに投資することも忘れてはいけません。
豆知識とコツ
失敗から学ぶゲームです
毎度リセットしていてはいつまで経ってもクリアできません。

チームを無事に脱出させることが最優先目標です
主目標を達成しなくてもミッションを終えることは可能です。
欲張りすぎると全滅することもあります。


第1ターンは特に用心深く慎重に
エージェントを遮蔽物の陰に隠し、念の為にドアの側で武器を構えて待機させるといいでしょう。

ドアは可能な限り閉める!
ドア1つを開けっ放しにするだけで、最悪の事態が起こり得ます。
ただし警備員の視界内にあるドアの開閉は、その警備員の注意を惹くことになるのでよく考えましょう。

ニカ以外のエージェントは1ターンに1回しか攻撃できません
警備員の上に立っているエージェントは、近接攻撃ができません。

電力管理を忘れずに!
余計な端末へのハックで貴重なターンを浪費してはいけません。

装備したオーグメントは、オーグメント・ドリルという装置を使わない限り2度と取り外せません!
不要なオーグメントは装備せず売りましょう。


出来るだけ走りましょう!
ドローンは音に反応しません。
音は音源から5マスの範囲に広がるだけです。
ドア1枚があれば、音を聴かれても警備員をまくことは可能です。

Sankakuミッションに挑む際は音響センサーの場所を確かめましょう。

気絶した警備員の上にエージェントが立っている限り、相手の起き上がるまでの時間を示すタイマーは停止します

ミッションを成功させても弾は補充されません
400ドル払ってチャージパックを買うか、警備員がチャージパックを持っていると祈るしかありません。

ハック済みのカメラやドローンの視界を借りることで、直接視界に入っていない敵の動きを観察できます
誰に1APを支払わせるか、よく考えましょう。


警備員は、死角であろうと隣接するドアの開閉に反応します

キャンペーンモードでは、カメラにはデーモンがついていません
Taurusプログラムでデーモンを移動させるか、MODDED警備員を気絶させるか、特定のデーモンを起動させるか、デーモン発生イベントが起きた場合は例外です。
無用のカメラはハックせずに放置して、デーモンの感染先として利用しましょう。


カメラとカメラドローンに武器はありません
仮にエージェントが見つかっても即死するわけではありません。
出口が目の前にあるなら走り抜けることは可能です。

警備員には可能な限り手を出してはいけません
そのためにアナーキーをレベル2にまで上げるのです。


手を出さないといけない場合は多々あります。


警備員の視界内のドアを開閉することで相手を誘き寄せましょう。
ドアを開ける時には、ドアの前に立ってはいけません
警備レベルを無闇に上げないようにしましょう。

ショックトラップは警備員用テレポーターのドアにも設置可能です

注意を逸らされた警備員は、興味のある場所(!マーク)に到達すると周囲を見回し視界範囲を一時的に180度に広げます
遮蔽物に隠れるか待ち伏せして気絶させましょう。

捜索を終えた警備員は元の場所に戻ります、巡回中なら元のルートに戻ります。

戻る途中を狙って後ろから盗みましょう。


エージェントが2枚のドアを覗ける位置にいる場合、Pキーを押せば1APの消費で2枚のドアを覗けます

EMPを使えばデーモンを誘発させずに金庫を開けられます
デーモンはハッキングにのみ反応します。

相手の殺害は最終手段です!
殺す度に掃除費用がかかり、警備レベルが上昇します。
挑めるミッション数が限られているキャンペーンモードでは可能な限り避けましょう。


他に手が無い場合には躊躇わずに撃ちましょう。
武器解説
ガジェット解説
アクセラレーター・チップ (Accelerator Chip)
電力収入増加の効果は、ハッキングスキルの効果と重複するので誰に持たせるかが大事です。
電力は20点までしか貯められないので無駄にしないように気をつけましょう。

役立つガジェットですが端末からの電力収入を増やすだけなので、
全ての端末をハックすると後は荷物になるだけです。
また再使用に数ターンかかり、端末の配置は常にランダムです。


この画像のように、1箇所に複数の端末が集中すると面倒になります。
有効活用しようとする程にターンがかさむガジェットです。

バスターチップ (Buster Chip)
インコグニタを介さずハッキングを行うため電力を消費せず、またパラドックスデーモンの発動中でもハック出来る便利なガジェットです。
再使用にかかるターン数が長い上に、ハック対象に隣接する必要があるのが難点です。
このためカメラや無人砲台を黙らせるのには不向きです。

文字通りハッキングを行うため、ハック対象に感染しているデーモンを発動させる点に注意しましょう。

カメラ・キャニスター (Camera Canister)
カメラをハックしたり警備員の位置を記憶すれば十分なので、これを使う理由が思いつきません。

クローキング・リグ (Cloaking Rig)
Iは避けましょう、性能が低すぎます。

イーコン・チップ (Econ Chip)
端末からの電力収入を1点につき50クレジットに変換するというスグレモノ。
後半のミッションほど端末からの電力収入が多いため、数百クレジットは稼げます。
トルク・インジェクターオーグメントと組み合わせれば、1ターンで再使用可能です。

価格が800クレジットと高いため、
挑めるミッション数が限られているキャンペーンモードで買うと痛手になります。
もし警備派遣ミッションで入手出来たなら、手元に置いておきましょう。
端末からの電力収入をクレジットと交換するため、欲張り過ぎるとクリア不可能になります。
可能な限り稼いだらポータブル・サーバーを買って、最終ミッション前に売りましょう。

EMPパック (EMP Pack)
1つあるだけで難易度が劇的に下がるガジェット、周囲の装置を2ターン機能停止させます。
カメラドローンなら破壊し、金庫ならデーモンを発動させず開けられるようになります。
また警備員のバリアだけでなくHeart Trackerも停止させるため、殺害しても警備レベルが上がりません。
ただし殺害による清掃費用は発生します、またOMNI社の改良型Heart Trackerには通じません。
EMPは発動時に音を発するため、周囲に人間の警備員や音響センサーがいないか確かめましょう。


この画像が示す通り、絶大な効果のあるガジェットです。

ロック・デコーダー (Lock Decoder)
設置から解錠までに2ターンかかるガラクタです。
これに頼るくらいなら、警備員からセキュリティカードを盗みましょう。

パラライザー (Paralyzer)
気絶させた人間の警備員が起き上がるまでの時間を延長します。
ドローンには効果がありません。
1の使用条件はアナーキー2以上なので、最終的には全員が条件を満たすことになるはずです。

ポータブル・サーバー (Portable Server)
警備派遣ミッションで入手したなら手元に残しましょう。
設置可能な発電機だと思って下さい。
ミッション終了前に回収しないと消滅するので、
出口までのルート上に置いておけば忘れる心配はありません。

警備員に見つかると回収されるので、必ず物陰に隠しましょう。
IIかIIIがあれば最終ミッションが大幅に楽になります。

ショック・トラップ (Shock Trap)
閉じたドアなら警備員用テレポーターにも設置可能な罠です。
開いたり蹴破られたドアには設置できません。
ドアを開けた者を敵味方の区別なく、アーマーを無視して気絶させます。
設置後に解除は出来ますが、再使用までのタイマーを元には戻してくれません。
いつ何処に仕掛けるか考えましょう。
バージョン3なら範囲内の敵を丸ごと気絶させてしまうので、注意しましょう。

スティム (Stim)
保有APは多いに越したことはありません。
サブダーマル・クロークオーグメントの装備者が使う場合には、5点の電力を消費します。

ベンティキュラー・ランス (Ventricular Lance)
射撃・近接を問わず1ターンだけ1点のアーマーを破れるようになります。
再使用まで長くかかるのが難点ですが、他にアーマーを破る手段が無い場合には頼りになります。
取り外しの利かないオーグメントと違って、エージェント同士で融通出来るのも見逃せません。
オーグメント解説
クリア例(エキスパートwithアイアンマン)


3日目の幹部襲撃時に、第1ターンで開始地点の部屋に入ってきたアーマーつき警備員に発見され、標的の幹部に逃げられてしまいました。
それでもめげずに全ての金庫を開けてプレイ続行、最終的にクリアできました。

使用プログラム
Power Drip 1.0 (初期)
Lock Pick 1.0 (初期)
Wrench 2.0

Agents
Sharp (初期メンバー)
Speed 2, Hacking 4, Strength 3, Anarchy 4
追加オーグメント: Distributed Processing, Predictive Brawling, 2 Penetration Scanners
所持ガジェット: Paralyzer III, Portable Server III,
武器: Neural Disrupter III

Prism (初期メンバー))
Speed 2, Hacking 1, Strength 3, Anarchy 3
追加オーグメント: none
所持ガジェット: Paralyzer I, Shock Trap II, Buster Chip I
所持武器: Neural Disrupter I (Prismの初期武器), T.A.G. pistol

Banks
Speed 2, Hacking 1, Strength 1, Anarchy 2
追加オーグメント: none
所持ガジェット: Shock Trap I
所持武器: Neural Disrupter I (Sharpの初期武器)

Nika
Speed 1, Hacking 1, Strength 1, Anarchy 1
追加オーグメント: none
所持ガジェット: none
所持武器: T.A.G. pistol

ミッション解説(ネタバレ)
幹部端末 (Executive Terminal)

最初のミッションは常にこれです。
目標の端末にアクセスしてSite Listを入手、無事に脱出することで新たなミッションが地図上に追加されます。

目標の端末にアクセスすると警備員の行動パターンが変化します。

初ミッション後に同種のミッションに挑んだ場合は、端末にアクセスすることでランダムに表示される4ミッションから好きなものを選べるようになります。
ミッション成功後に選んだものを含む幾つかのミッションが地図上に表示されます。
周囲に望みのミッションが無い場合に選ぶとよいでしょう。

拘束センター (Detention Center)


独房のドアは同じ部屋にある端末にアクセスすることで開けられます。

最低1人は動かない隊長が拘束室内にいて、大抵は部屋の入り口を見張っています!


何故か入り口と真反対を向いている場合があります。


また他の警備員と一緒にいることがあります。

救出されたエージェントはオーグメント以外は何も持っていません。
救出対象がただの囚人だった場合には、無事に脱出させることで高額のクレジットが貰えます。

警備派遣 (Security Dispatch)


ランダムに選ばれた高性能ガジェット1つが手に入るミッションです。
望みのものでない場合には売りましょう。

武器保管室の隣の部屋に、捕虜がいる場合があります。
この捕虜は尋問で弱っていて保有APが本来より少なく走ることができません。
無事に脱出させれば少額とはいえクレジットが貰えます。

目標の武器保管室のドアはロックされていて、警備カードが必要になります。
警備員から盗むかバンクスの能力で開けるか、ロック・デコーダーで解錠するしかありません。
またドア前には必ずレーザーグリッドがあるので、電源をハックするかEMPで停止させる必要があります。

武器保管室の周囲には必ず警備員が1人いて、保管庫へアクセスすると武器保管室を調べにやってきます。

財務部長室 (Chief Financial Suite)


まず会社の幹部を探した上で気絶させ、6ターン待つ必要があります。
幹部は動かず部屋のドアを向いているので、ドアを開けて誘い出しましょう。
その間に新たな警備員が1人出現するのでどうにかしましょう。
6ターン経過後に幹部からアクセスカードを盗んで脱出すればクリアです。
ここで手に入るカードは、金庫かサイバネティック研究所で最深部のドアを開けるのに必要となります。
なお幹部は警戒状態に移行すると、最寄りの警備員用テレポーターに逃げ込んで消えてしまいます。
ドアを開けて誘い出す際に、見つかることのないようにしましょう。

モンスターからアクセスカードを400クレジットで買える場合があります。

金庫 (Vault)


金庫室はレーザーグリッドに守られていますが、電源がすぐ側にあるので問題ではありません。
面倒なのは金庫の側にいる動かない警備員、ドローンだと更に手間がかかります。

金庫室は2部屋に分かれ、中には幾つかの容器や金庫と端末があります。
容器には脱出後に換金可能になるアイテム、金庫にはクレジットが入っています。
端末にアクセスすれば周囲のクレジット入り金庫が解錠されます。
2番目の部屋に最も高価な品がありますが、ここにはアクセスカードが無いと入れません。

金庫室内のいずれかの装置へのハックを成功させると、追加の警備員が金庫室を調べにやってきます。

サイバネティクス研究所 (Cybernetics Lab)


このミッションでは2~4個のオーグメントが無料で手に入ります。
研究室内の装置オーグメント・グラフターにはオーグメントが入っていて、インストールするか2ターン気絶するのと引き換えにスロット数を1つ増やすかを選ばされます。
ここで手に入るオーグメントはインベントリに入れられないので、売却することが出来ません。
たまにオーグメント・ドリルという装置が置いてあります、これを使うとオーグメント用スロットを1つ追加するか、装備済みオーグメント1つを破壊してスロットを開けるか選べます。


たまに奥の部屋に通じる特別なドアがありますが、開けるには金庫室の奥に入るのと同様にアクセスカードが必要になります。

研究室内の装置にアクセスすると、ハック済みの装置の幾つかが企業側のコントロール下で再起動されます。
要するに再ハックする羽目になるのです。

ナノファブ&サーバーファーム (Nanofab & Server Farm)


ナノファブでは武器やオーグメントやガジェットを、サーバーファームではプログラムを買えます。

買い物を終えると、自販機を含めハック済み装置の幾つかが企業側のコントロール下で再起動されるか、幾つかの未ハック状態の装置にデーモンが発生します。
買い物は1回で済ませましょう。
企業解説(ネタバレ)
現時点で登場する企業は5つ、それぞれ異なる手段や警備員でエージェントを出迎えてくれます。

Sankaku
武装した高性能ドローンが複数出現します。
ナル・ドローン(Null Drone)は周囲の装置に対するハッキングを妨害する超強敵です。
また音に反応して警報レベルを上げるサウンド・バグが大量に配置されています。

FTM


最低1つはスキャン用アンプが設置されていて、5ターン毎にエージェント1人の所在を警備員の1人に知らせます。
この時の警備員は警戒状態にはなっていないため、捜索を行えば元の位置に戻ります。
このため動きまわっていれば安全ですが、早めに装置をハックして無力化したほうが確実です。

アンプにアクセスすれば脱出後に売却されるアイテムが手に入ります。

アンプの場所は装置が発する独特の音で予測可能です。マップをスクロールして音の大きさを調べましょう。

K&O
最低1つは自動砲台を設置している会社です。
自動砲台には電源がセットで、両者は隣り合って配置されています。
電源をハックすれば砲台は停止し、砲台をハックすれば味方として警備員に発砲してくれますが、数回撃っただけで弾切れを起こします。
死体の山を築くことで、ドラコを一気に強化するのには役立ちます。
殺害による警備レベルの上昇と清掃費用には注意しましょう。

Plastech
ここの会社はMODDEDと呼ばれるサイバー警備員を用意しています。
毎ターン半径6マス以内のハック済み装置の支配権を取り戻す面倒な相手です。
かと言って気絶させるとデーモンとして未ハック状態の装置に取り付きます。
ハックが完了しデーモンが起動すると、今度は別の未ハック状態の装置に新たなデーモンとして取り付くのを延々と繰り返します。

MODDEDによって出現したデーモンに対し、ハンタープログラムを使用するとMODDED本人が死亡します。
これによってHeartTrackerが警備レベルを上げ、清掃費用が発生します。
HeartTrackerはEMPで無効化できますが、清掃費用から逃れる術はありません。


Contingency DLCを導入している場合は、サイレン(Siren)という新型警備員も登場します。
気絶するか警戒状態になる度に、周囲の装置のファイアウォールを上昇させる面倒な相手です。

OMNI
最終ミッションで登場する会社です。
最低1機はカメラドローンを用意し、アーマーかバリア持ちの警備員を大量投入してきます。


警備員には、ハックすることで消滅させられるバリアを持ったプロテクターと、アーマーで守られたハービンジャーとソルジャーがいます。
一番の問題はハービンジャー、HeartTrackerに加えConsciousTrackerすら装備しているので、気絶させても警備レベルを上げてしまいます。
幸いなことにConsciousTrackerはEMPで停止させることが可能ですが、HeartTrackerはEMPに耐える改良型で止めようがありません。
最終ミッション(ネタバレ)

カメラドローンが最低1機、警備員は全員アーマーかバリア持ちです。
もしキャンペーン開始時にセントラルとモンスターのどちらか或いは両方を操作キャラとして選ばなかった場合には、選ばれなかった者がエージェント側に追加メンバーとして参戦します。
つまり最終ミッションのみ最大で6人を操作することになるのです。
なお追加メンバーは初期スキルと初期装備しか持っていません。

出口は無いので目標達成に集中しましょう。
モンスターとセントラルは何があっても死守しましょう。


目標は2つの装置、どちらもモンスターで無いと操作できません。
まずはSecurity Hubを探しモンスターを向かわせましょう。
彼が操作を始めたら、6ターンは装置から移動させることはできません。
装置に隣接している限りは移動させることが出来るので、端末で警備員の視線を塞ぎましょう。
6ターンの間に、複数のデーモンと追加の警備員が出現するので耐えましょう。
Enforcerは投擲可能なスキャナーを持っています。


その間にFinal Security Consoleを探し出しセントラルを移動させます。
この装置もモンスターでないと操作できません。
このため、もし2つの装置が離れたところに配置されていると、非常に面倒なことになります。
Final Security Consoleがある部屋には、巨大な扉がありモンスターが装置を操作することで開きます。
扉を開けたらセントラルを中に入れましょう、これでゲームクリアです。
25 Comments
Yammy Nov 30, 2015 @ 4:25am 
Very cool!:steamhappy:
MeaslyTripod  [author] Nov 24, 2015 @ 10:58pm 
Thanks, I rewrote my guide.
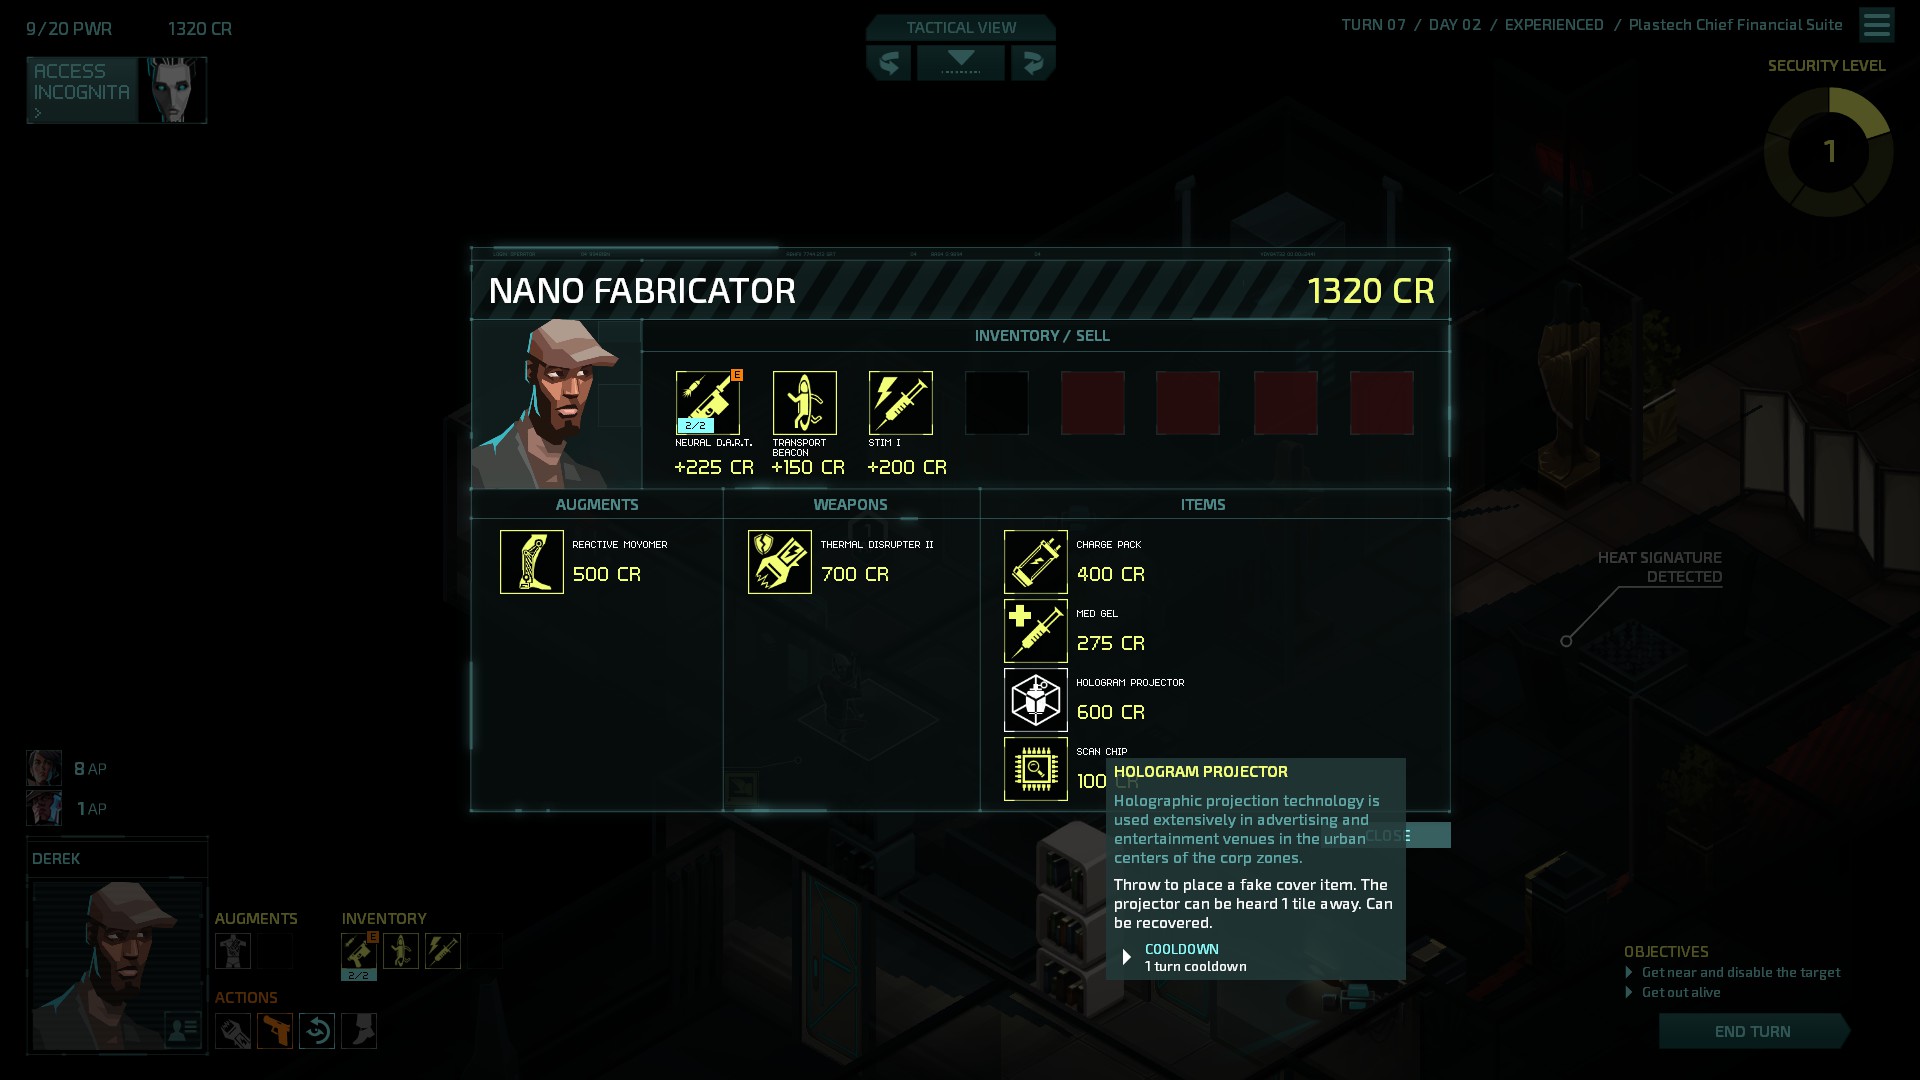
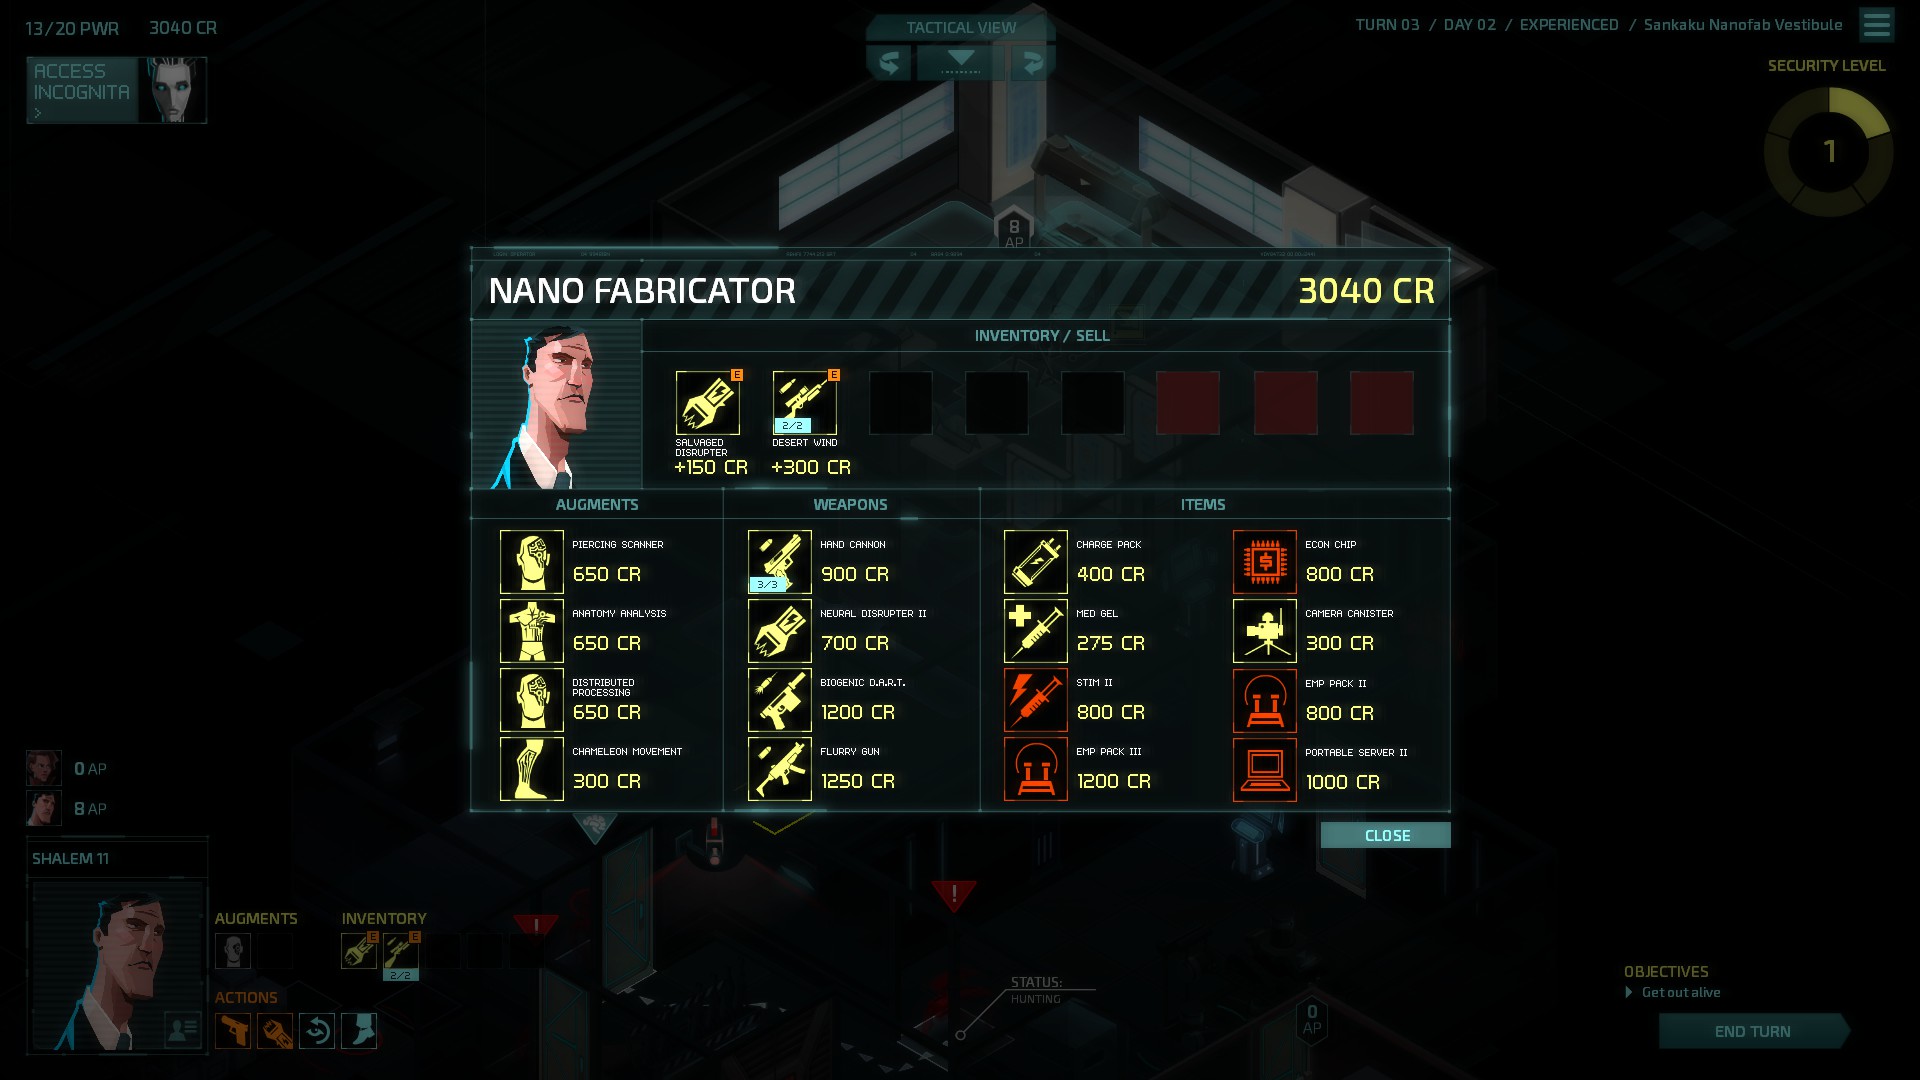
Frankly speaking Augment Drill isn't that useful as Augment Grafter cause it doesn't contain a free augment, it simply removes installed one.
Dew the Do! Nov 24, 2015 @ 8:59pm 
Augments be removed with the augment drill.
Shiro Nov 16, 2015 @ 2:35am 
thanks
MeaslyTripod  [author] Nov 16, 2015 @ 2:35am 
Forget what you saw and simply enjoy the game, that's all I can say... :(
Shiro Nov 16, 2015 @ 2:28am 
sadly i accidently saw ending already ;_; (youtube)
MeaslyTripod  [author] Nov 15, 2015 @ 3:42pm 
They're experimental characters who don't appear in the actual game so far.
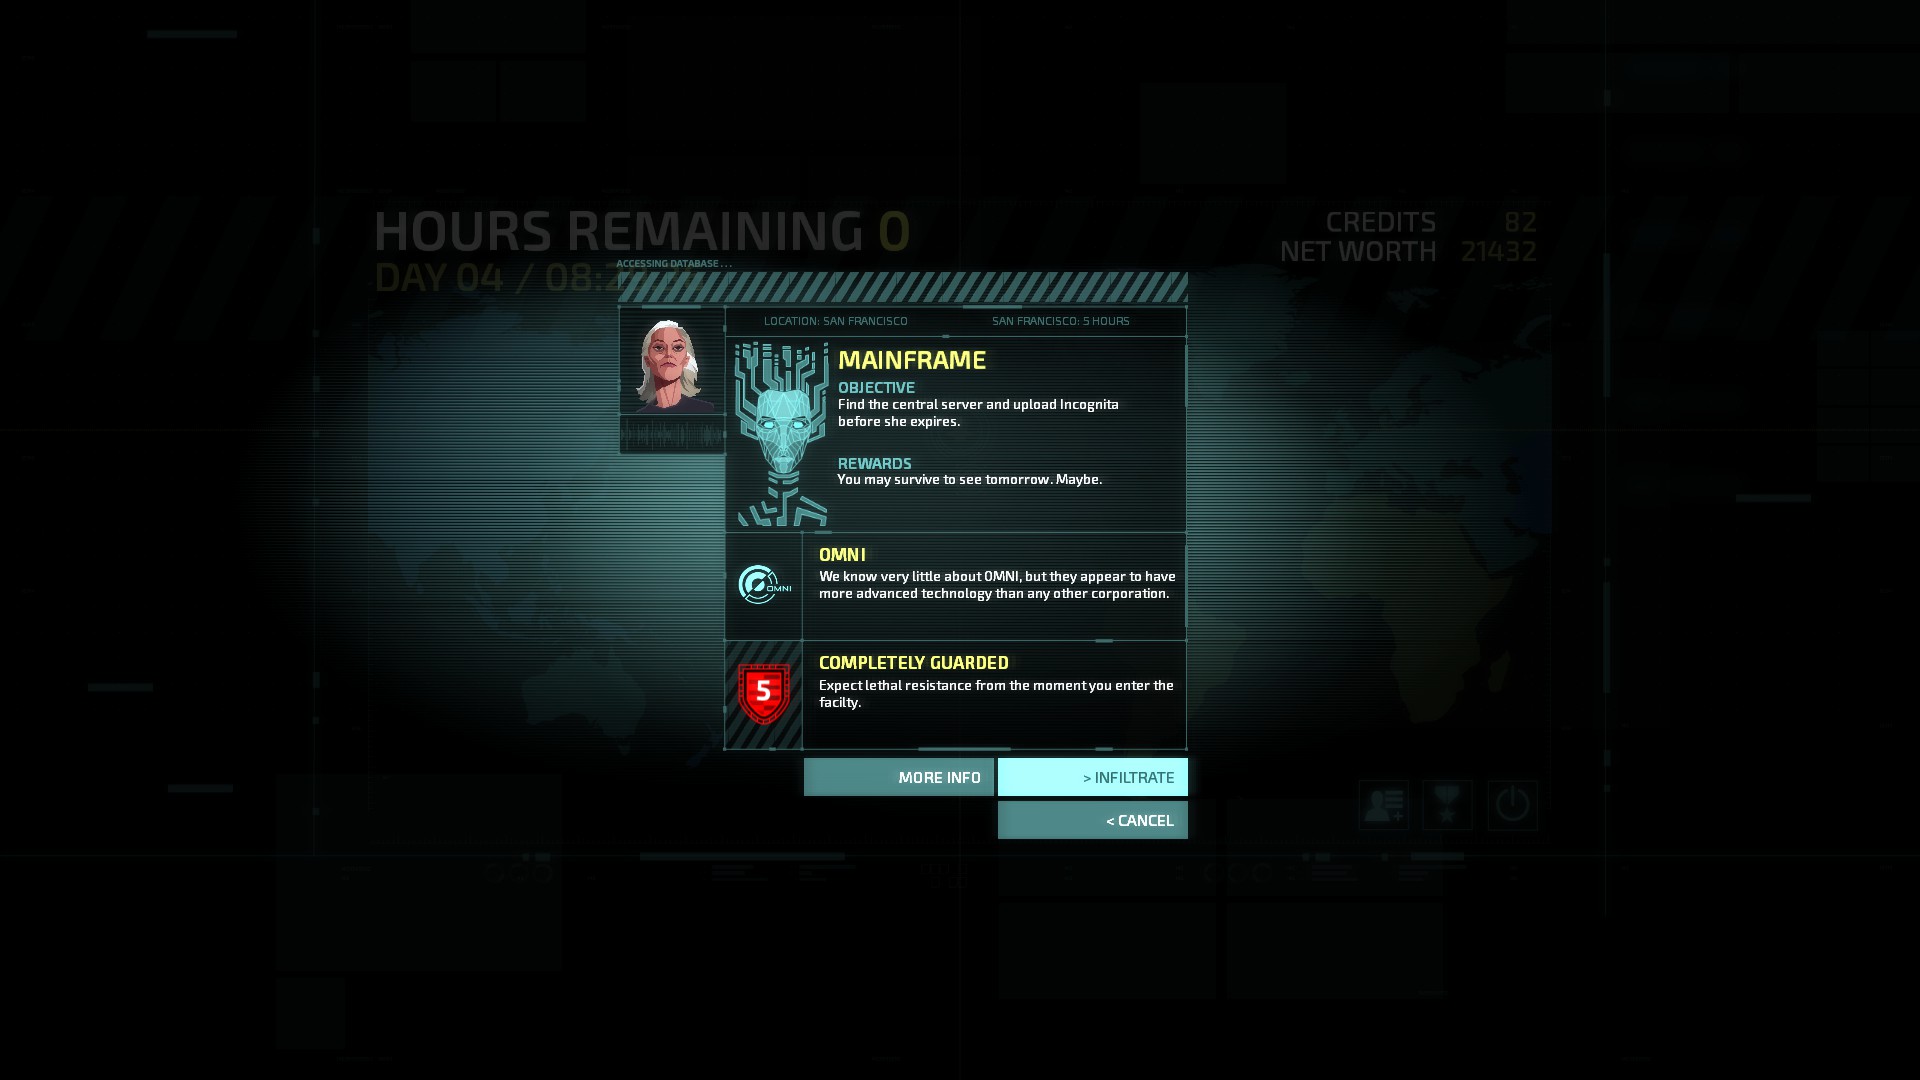
I'd recommend you playing the game to see the ending at least once.:happy_creep:
Shiro Nov 15, 2015 @ 6:32am 
as I remember, game wiki mentioned more OMNI guard types
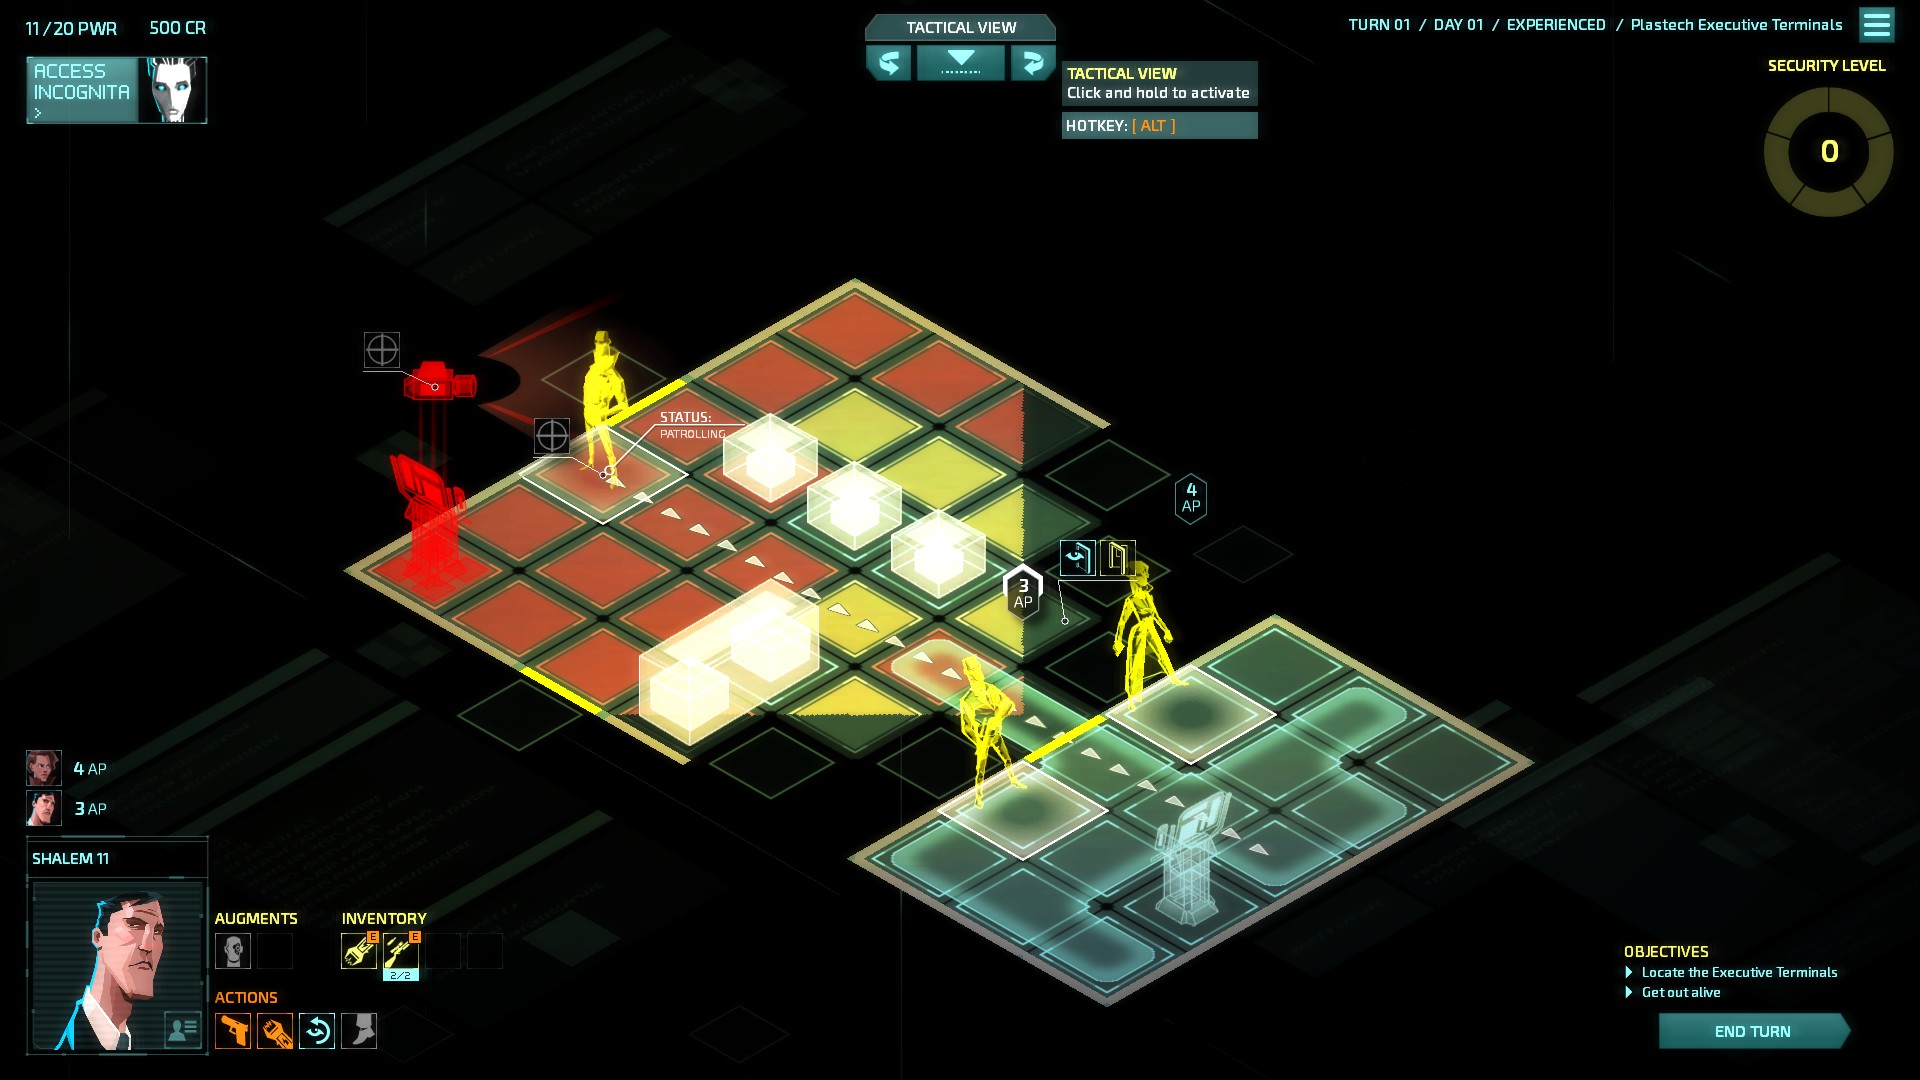
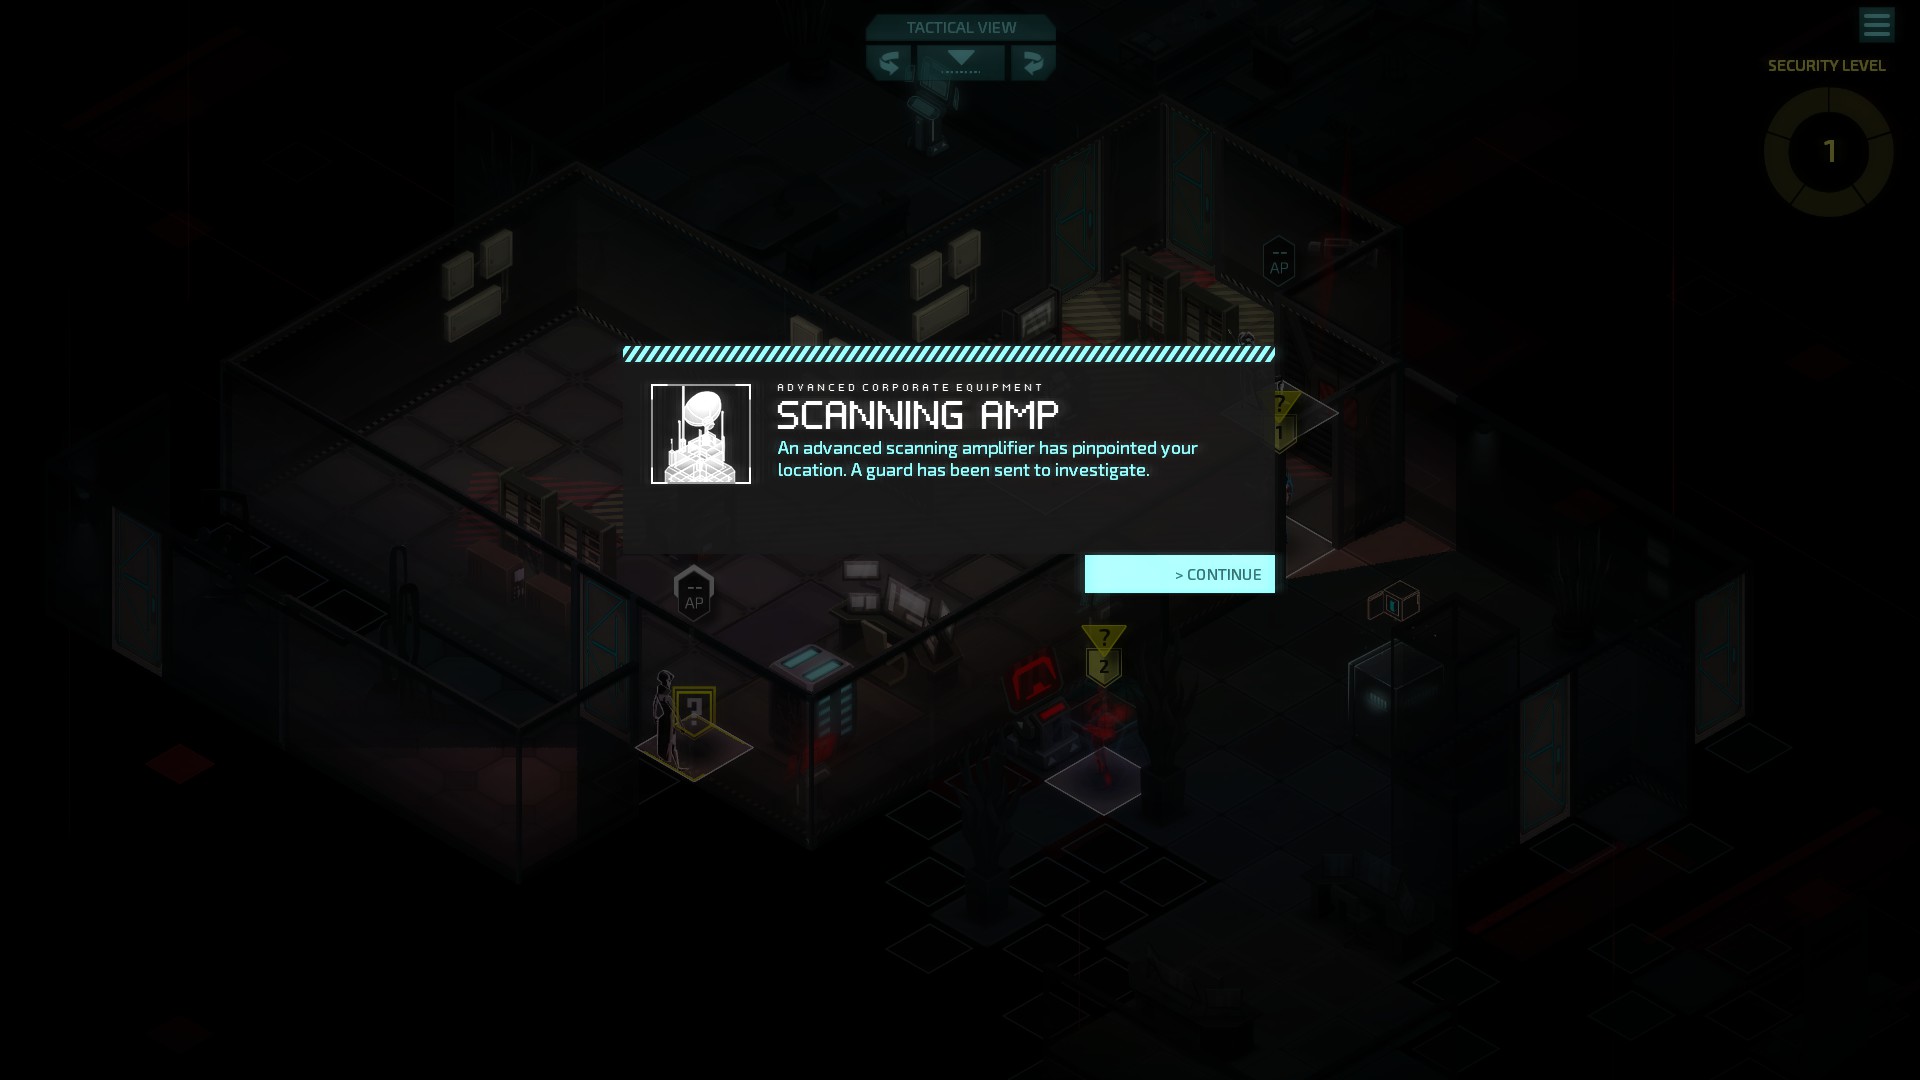
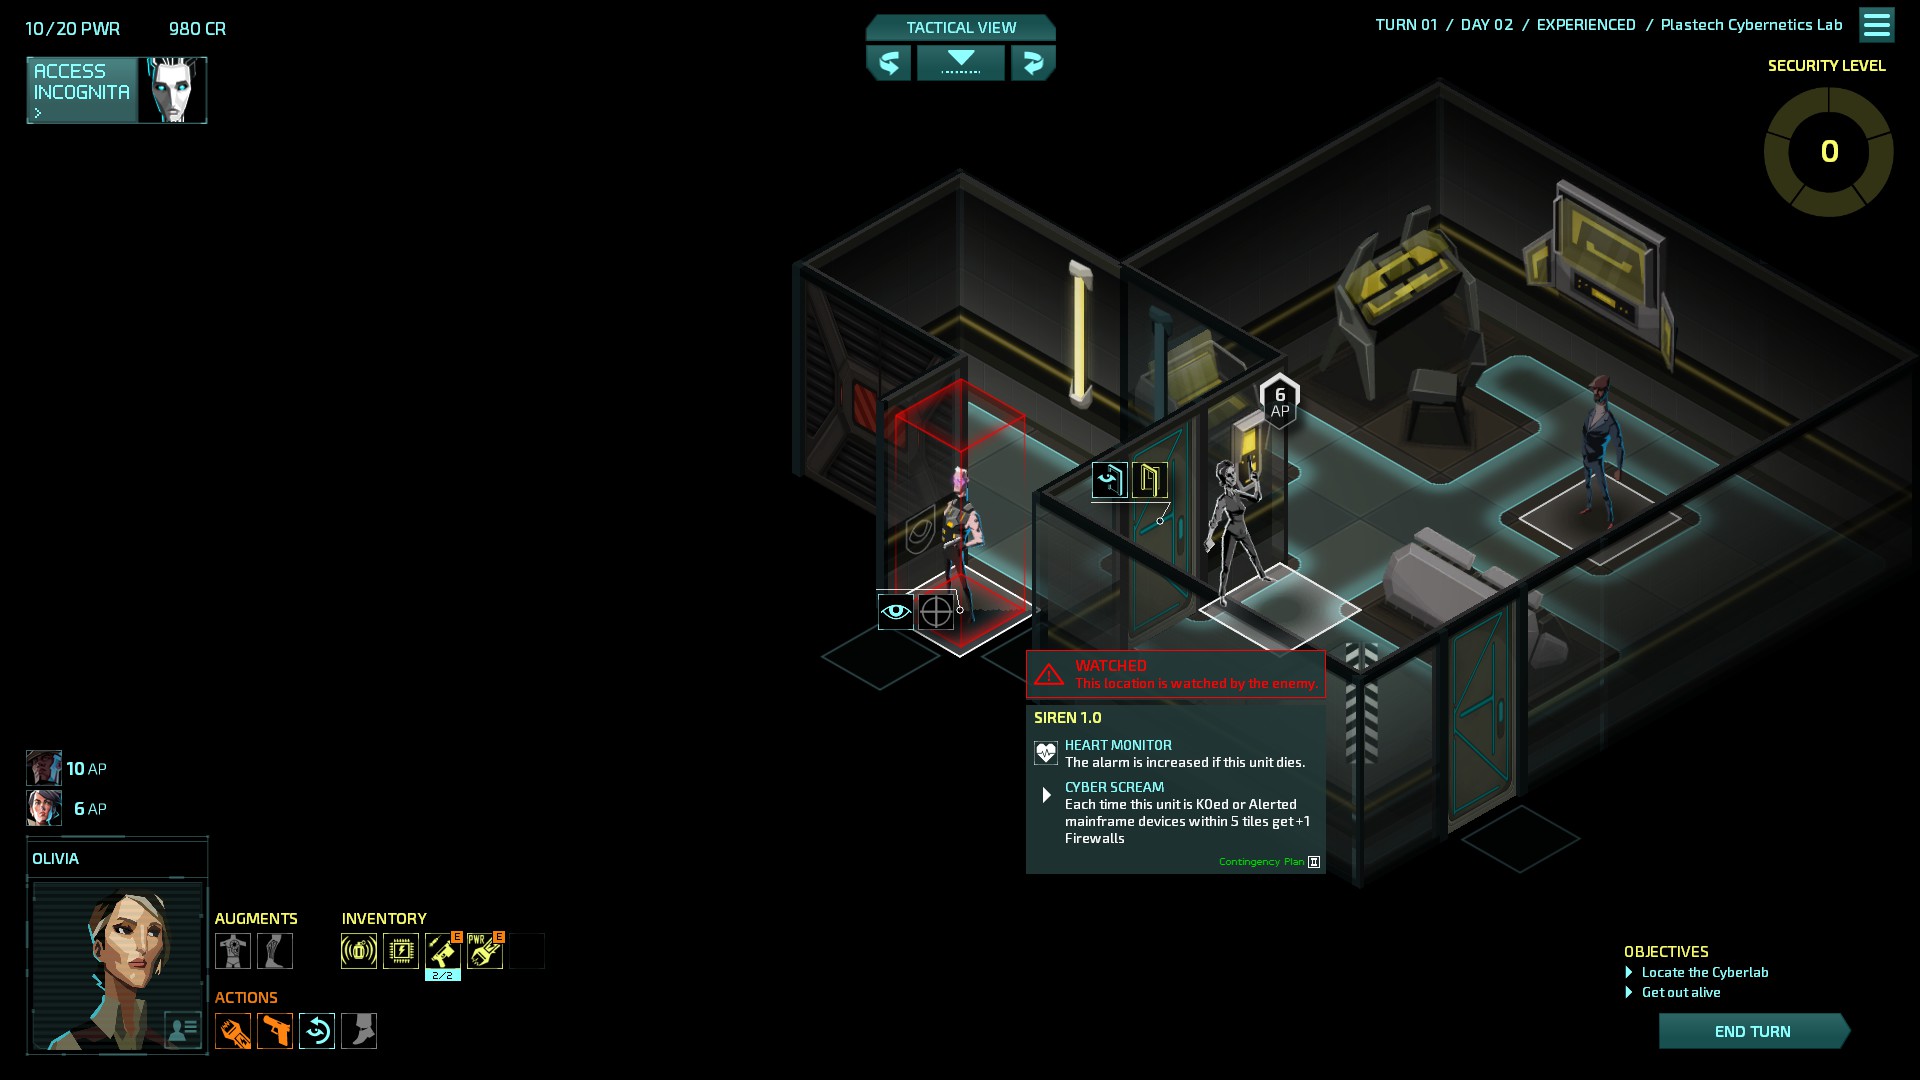
one who shoot on sight, one who able to detect agents stealtherd or behind cover.. dont remember exactly
MeaslyTripod  [author] Nov 14, 2015 @ 6:57pm 
I'm currently updating this guide for covering the Contingency DLC, which will take a while as I purchased just today.
MeaslyTripod  [author] Aug 14, 2015 @ 5:44am 
Thx for info, I fixed my description! :D