Outer Wilds

Outer Wilds

Not enough ratings
Ship Log Completion Guide (All Entry Conditions)
By AmpeRSands
Spoilers ahead (Duh)!
This guide includes every Ship Log entry and the conditions to unlock them - across both the main game and Echoes of the Eye.
The DLC and base game content are split into separate sections to help avoid accidental spoilers, just in case you're still exploring.
2
   
Award
Favorite
Favorited
Unfavorite
Intro
Hello Travelers!

You may be asking, “Hey! How is this guide any different from the other ones?”

And it’s simple!
Every other guide just lists the Ship Log entries - they show you the text, tell you where they come from, and only sometimes how to actually unlock them. This guide, on the other hand, shows you the specific conditions required to reveal every entry - including those weird little rumors and in-between connections that most people skip because they aren’t tied to the Archaeologist achievement.

That said - if you’re going for the Archaeologist achievement, don’t worry!
This guide makes it super clear what you do and don’t need for that, so you won’t waste time chasing optional logs unless you want to.

Basically, if it can show up in your Ship Log, this guide tells you how to make it show up.

Also, don’t worry about Echoes of the Eye spoilers - the DLC section is tucked safely at the very end, so nothin' will sneak up on ya unless you scroll too far!

That said, this guide does assume you’ve finished the base game, or at least explored pretty much everything, so major major warning if you’re just starting out!
Legend & Completion Criteria
You can use this map as a quick reference to jump to each section and see how many entries each node contains.

What Is a "Complete" Ship Log Anyway?
The Ship Log’s a handy tool — but when it comes to knowing if you’ve really seen everything, it can be a little... sneaky.

Each node in the log contains:
1. Entries – the main bits of written information you uncover.

2. Rumors – the connecting lines that link discoveries together.

And now, to talk about the headache inducer -


The message “There's more to explore here.” appears when there’s still an important entry or rumor missing - usually something tied to the main progression.

But here’s the catch:

Not all entries trigger that message.

Some entries are considered non-essential, so even if you haven’t found them, the game won’t flag them. That means a node can look “complete” without actually containing all its entries.

This seems intentional - likely to avoid distracting players with side details that aren’t needed to finish the story.

On the other hand, sometimes you’ll see the “more to explore” message even when you’ve found every entry. That’s usually because a rumor connection is still undiscovered. Once you find both entries that the rumor links, the game ignores the connection entirely - and the message disappears, even if you never actually found the rumor firsthand.

Now, I’m not saying the Ship Log is haunted but...
This is what the game considers a “complete” log (i.e the bare minimum for the Archaeologist Achievement):

Notice the wide gaps and missing connections between entries, especially on the left and right sides of the log. Despite these empty spaces, none of the nodes show “More to explore,” because every entry has been discovered.

One last thing to point out: the DLC area is completely absent from the log. Even with the DLC installed and enabled, the Archaeologist Achievement still unlocks without finding a single entry.

Everything in this guide was personally tested - I even used a fresh account to confirm exactly what’s required for the Archaeologist Achievement. No guesswork here ::)
Probe

Village - 2 or 3 Entries, 1 to 3 Rumors
1. The one and only Hearthian village, as well as the main source of explosions on this planet
[Revealed on start]

2. The Nomai statue in the observatory opened its eyes and looked at me! I saw strange glowing lights and my own memories flashed before my eyes.
[Sync with the Nomai Statue]

[MISSABLE/OPTIONAL]
3. Hal says the statue has never opened its eyes before (despite Hornfels' best efforts).
[Talk to Hal outside the Observatory on the first loop AND tell them that the statue is weird, can be missed but is not required.]

RUMORS [OPTIONAL]
[To Eye Signal Locator] I hear there are Nomai ruins somewhere on the Attlerock. No one knows what they are or why they were built.
[Missable, tell Hornfels "I don't know" or "I Think I'll start with something small" the 1st Loop when they ask where you will go OR tell Hal "Don't worry about it" when talking to them outside the Observatory 1st loop]

[To Eye Signal Locator] The Nomai text in the observatory talks about calibrating some sort of device on the Attlerock.
[Translate the Nomai text in the Observatory]

[To Gabbro's Island] Hal says Gabbro went back to Giant’s Deep to try to learn more about the Nomai statue in the observatory.
[Missable, Talk to Hal outside the Observatory 1st Loop AND tell them the statue is weird OR Talk to Hal about Gabbro inside the Observatory before you obtain the launch codes]

Zero-G Cave - 2 Entries
1. A cave at the very center of Timber Hearth used by Outer Wilds Ventures to train new astronauts.
[Enter the Zero-g area of the Cave]

2. I successfully repaired another "satellite" for Gossan.
[Revealed upon repairing all 3 parts of the "Satellite" in the Cave]

Esker's Camp - 1 Entry, 1 Rumor
1. Esker is growing a crop of trees at their camp. They seemed to be doing ok, but they’ve probably been alone on the moon for too long.
[Talk to Esker]

RUMORS [OPTIONAL]
[To Lunar Lookout] Esker says the Attlerock’s north pole (marked in red on my minimap) is a great spot to listen for the other travelers’ music with a signalscope.
[Ask Esker about their Whistling]

Lunar Lookout - 1 Entry, 1 Rumor
1. A lookout platform with a spectacular view of the solar system. Esker uses their signalscope here to keep tabs on the other travelers.
[Read Esker's Signalscope Log]

RUMORS [OPTIONAL]
[To Dark Bramble Seed] Esker's signalscope log reports harmonica music coming from somewhere on Timber Hearth. They claim it sounds just like Feldspar's harmonica, but Feldspar disappeared in space ages ago.
[Read Esker's Signalscope Log]

Dark Bramble Seed - 3 Entries, 1 Rumor
1. A seed from Dark Bramble crashed here and has already taken root. Tektite wants to use a scout launcher to get a look at what's inside.
[Speak with Tektite]

2. My signalscope picks up harmonica music when I aim it at the seed.
[Aim your Signalscope at the Seed]

3. I launched my Little Scout into the seed. Somehow the seed is much bigger on the inside.
[Shoot your scout inside the Seed]

RUMORS [OPTIONAL]
[To Feldspar's Camp] When I launch my scout into the seed that crashed on Timber Hearth, it ends up in a much bigger space filled with fog and thorny vines.
[Shoot your scout inside the Seed]

Bramble Island - 1 Entry, 1 Rumor
1. An island of thorny vines and what appears to be a frozen jellyfish. It looks like Feldspar camped here before heading off to Dark Bramble.
[Play Feldspar's Recording]

RUMORS [OPTIONAL]
[To Ocean Depths] Feldspar found a way to reach the core of Giant’s Deep.
[Play Feldspar's Recording found at the end of the island]

[To Feldspar's Camp] Feldspar headed off to Dark Bramble after reaching the core of Giant's Deep.
[Play Feldspar's Recording found at the end of the island]

Feldspar's Camp - 3 Entries, 1 Rumor
1. Feldspar is alive! They crashed their ship and is now camping inside a huge anglerfish skeleton.
[Talk to Feldspar]

2. Feldspar doesn't think my scout tracker is wrong when it says my scout is in two places at once. They have a theory that space doesn’t work the same inside Dark Bramble.
[Ask Feldspar where to explore]

3. Feldspar doesn't sound overly eager to return to civilization. They've been enjoying the (relative) peace and quiet.
[Ask Feldspar about ground control retrieving him]

RUMORS [OPTIONAL]
[To Frozen Jellyfish] Feldspar hinted that a secret to reaching the core of Giant's Deep lies at the end of the hollow vine they crashed their ship into. To find Feldspar's ship, I'll want to go to the tail end of the anglerfish skeleton and look for a flickering light in the fog.
[Ask Feldspar how to reached the core of Giant's deep]

Frozen Jellyfish - 3 Entries
1. Feldspar documented their attempts to eat this enormous jellyfish frozen in the ice. The outside was all rubbery and tough, possibly because it insulates the jellyfish’s insides from getting zapped by electricity.
[Play Feldspar's Recording]

2. Feldspar decided to venture into the jellyfish’s interior cavity to see if it tasted any better on the inside.
[Play Feldspar's Recording]

3. After tasting the inside of the jellyfish, Feldspar concluded that these jellyfish are only useful for insulation from electricity.
[Read Feldspar's Note inside the Jellyfish]

Gabbro's Island - 4 Entries, 4 Rumors
1. Gabbro is lounging in a hammock near the island’s shore.
[Talk to Gabbro]

2. Gabbro found a Nomai statue on another island. The statue's eyes started glowing and Gabbro saw their memories flash before their eyes.
[Talk to Gabbro]

3. Gabbro remembers dying. They saw their memories flash before their eyes, just like the time with the statue.
[Talk to Gabbro during the 2nd loop or later]

4. Gabbro and I seem to be the only ones aware that we're in a time loop.
[Talk to Gabbro during the 3rd loop or later]

RUMORS[OPTIONAL]
[To Orbital Probe Cannon] Gabbro sees a bright flash in the sky at the start of every loop. Something must be happening in orbit around Giant’s Deep.
[Ask Gabbro where to explore 3rd Loop or later]

[To Statue Island] One of the islands on Giant’s Deep has a Nomai statue on the beach just like the one Gabbro brought back to Timber Hearth.
[Talk to Gabbro]

[To Statue Island] Statue Island (as Gabbro calls it) is the one with two islands connected by a natural rock arch.
[Ask Gabbro what to explore]

[To Ocean Depths] Gabbro says there’s a strong current beneath the surface of the ocean that prevents anything from sinking below it.
[Ask Gabbro about Giant's Deep]

Eye Signal Locator - 2 Entries, 2 Rumors
1. A Nomai device created to pinpoint the sources of distant signals.
[Read the Scroll plugged into the wall]

2. The Nomai were disappointed by their failure to detect a signal from something called the Eye of the universe.
[Read the Scroll plugged into the wall]

RUMORS[OPTIONAL]
[To Riebeck's Camp] Riebeck headed to Brittle Hollow to investigate something the Nomai were doing at the south pole.
[Play Riebeck's Recording]

[To Southern Observatory] The Nomai decided to build a larger, more sophisticated Eye signal locator on Brittle Hollow's south pole.
[Read the secondary Scroll on the shelf]
Probe (Cont.)
Riebeck's Camp - 2 Entries, 1 Rumor
1. Riebeck has set up camp at the bottom of the Crossroads. Their excitement at being surrounded by so much Nomai history is matched only by their terror of the black hole.
[Talk to Riebeck]

2. Riebeck is Timber Hearth's only archaeologist. They overcame their fear of space to explore Brittle Hollow's treasure trove of Nomai culture.
[Ask Riebeck what they are doing]

RUMORS[OPTIONAL]
[To Southern Observatory] Riebeck says you can't get into the observatory from the surface (they tried), but there's probably a path to it beneath the crust somewhere.
[Ask Riebeck where to explore]

Southern Observatory - 4 Entries, 1 Rumor
1. The new, more sensitive locator the Nomai built in this observatory was unable to detect any trace of the Eye's signal.
[Read the 1st Scroll on the second floor]

2. Based on their knowledge of the Quantum Moon, the Nomai believed the Eye was in a distant orbit around the sun.
[Read the 1st Scroll on the second floor]

3. The Nomai decided to stop searching for the Eye's signal and instead look for it visually by sending out a deep space probe.
[Read the 2nd Scroll on the second floor]

4. There were concerns that the probability of launching a probe in the correct direction would be absurdly small.
[Read the 2nd Scroll on the second floor]

RUMORS[OPTIONAL]
[To Orbital Probe Cannon] The Nomai decided to construct a probe cannon in orbit around Giant’s Deep.
[Read the 2nd Scroll on the second floor]

Tornado Simulation - 2 Entries
Most cyclones on Giant's Deep rotate clockwise. These are the cyclones the Nomai used to send components into orbit.
[Read the Scroll in the back of the first floor]

There also exists a rarer type of cyclone that spins the opposite direction and pushes objects beneath the waters and below the current.
[Read the Scroll in the back of the first floor]

Construction Yard - 3 Entries, 3 or 5 Rumors
1. This island is where the Nomai built the Orbital Probe Cannon.
[Read the Scroll on the ground]

2. For some reason, the Nomai put the Orbital Probe Cannon on indefinite hiatus. The cannon was not asked to fire.
[Read the Control Module Projection Stone]

3. According to a Nomai computer, a long-range probe was recently launched from the Orbital Probe Cannon.
[Read the Nomai computer next to the Projection Pool]

RUMORS[OPTIONAL]
[To Southern Observatory] There are two paths beneath Brittle Hollow's surface that lead to the observatory. One starts at the gravity cannon, and the other starts at the Tower of Quantum Knowledge.
[Read the Brittle Hollow Projection Stone]

[To Tornado Simulation] The Nomai at the Southern Observatory constructed a model of Giant's Deep that revealed how an object might sink below the strong ocean current.
[Read the Brittle Hollow Projection Stone]

[To Ocean Depths] The Nomai on the Construction Yard saw something sink beneath the underwater current, which they'd previously thought was impossible.
[Read the Brittle Hollow Projection Stone]

[To Orbital Probe Cannon [MUTUALLY EXCLUSIVE TO CORRESPONDING RUMOR]] The Nomai built the Orbital Probe Cannon at a Construction Yard on Giant’s Deep.
[Read the Scroll on the ground]

[To Orbital Probe Cannon [MUTUALLY EXCLUSIVE TO CORRESPONDING RUMOR]] I used a Nomai projection pool and saw the interior of a space station in orbit around Giant's Deep.
[Use the Control Module Projection Stone on the Projection Pool]

Orbital Probe Cannon - 3 Entries, 0 or 1 Rumor
1. The broken remains of a Nomai space station in orbit around Giant's Deep. There are three accessways branching off from the central hub area.
[Enter the Orbital Probe Cannon]

2. The Orbital Probe Cannon was created to find the precise location of the Eye of the universe.
[Read the Launch Module Projection Stone]

3. The Nomai pushed the Orbital Probe Cannon above its maximum power setting to create the greatest chance of finding the Eye of the universe.
[Read the Launch Module Projection Stone]

RUMORS[OPTIONAL]
[To Construction Yard [MUTUALLY EXCLUSIVE TO CORRESPONDING RUMOR]] The Nomai built the Orbital Probe Cannon at a Construction Yard on Giant’s Deep.
[Read the Giant's Deep Projection Stone]

Control Module - 2 Entries
1. The Control Module (recently) received a request from the Ash Twin Project to launch the probe. The cannon was aligned with a randomly selected probe trajectory.
[Read the first Nomai Computer after the animation]

2. The probe was successfully launched, but the cannon's structural integrity was compromised in the process. Damage is detected in multiple modules.
[Read the second Nomai Computer after the animation]

Launch Module - 3 Entries
1. The Launch Module is badly damaged, but its projection pool is still intact.
[Enter the Launch Module]

2. A Nomai named Mallow argued that it wouldn't matter if the cannon's structural integrity was compromised, since they only needed to fire the probe once.
[Read the Tracking Module Projection stone]

3. A Nomai named Privet countered that they wouldn't be capable of receiving the probe's data if the Probe Tracking Module was destroyed.
[Read the Tracking Module Projection stone]

Probe Tracking Module - 4 Entries
1. The statue in the Probe Tracking Module automatically records each probe's trajectory and transmits the data to the Ash Twin Project.
[Read the Ash Twin Projection Stone]

2. The Orbital Probe Cannon has launched millions of probes.
[Read the second Nomai Computer]

3. The 9,318,054th probe located a deep space anomaly matching all known criteria for the Eye of the universe.
[Read the second Nomai Computer]

4. I found Nomai coordinates marking the location of the Eye of the universe.
[Read the 3rd Nomai Computer]

Ocean Depths - 2 Entries
The ocean is surprisingly calm beneath the current. Some sort of electrical field surrounds the planet's core.
[Break through the Giant's Deep current]

I passed through the electric barrier and reached the coral forest at the planet's core.
[Reach the Core]
Core

Statue Island - 2 Entries
1. This island must be where the Nomai created statues like the one in our observatory.
[Read the Statue Workshop sign outside the Door OR Read the Nomai Writing in the Ruins]

2. I found a Nomai statue lying on the beach. It looks just like the one in our observatory.
[Look at the Nomai Statue next to the Statue Workshop Door]

Statue Workshop - 3 Entries, 1 Rumor
1. Nomai statues were designed to pair with a single user, record their memories, and send those memories to a storage unit within the Ash Twin Project.
[Read the Nomai Recording under the Statue]

2. Each storage unit inside the Ash Twin Project was equipped with a mask (the statue’s counterpart), which could then send those stored memories back to the corresponding user.
[Read the Nomai Recording under the Statue]

3. The statues were designed to only activate once the Ash Twin Project succeeded, or in the event that it failed.
[Read the Ash Twin Projection Stone]

RUMORS[OPTIONAL]
[To Ash Twin Project] Every memory recorded by a Nomai statue is transmitted to a corresponding storage unit within Ash Twin.
[Read the Nomai Recording under the Statue]

Volcanic Testing Site - 3 Entries, 1 Rumor
1. Ore samples from the Nomai Mines on Timber Hearth were sent to this volcano for durability testing.
[Read the Timber Hearth Projection Stone]

2. The Nomai were trying to craft a (briefly) supernova-proof shell to encase the Ash Twin Project.
[Read the Timber Hearth Projection Stone]

3. Even the smallest crack or opening in the protective shell would destroy everything.
[Read the Timber Hearth Projection Stone]

RUMORS[OPTIONAL]
[To Nomai Mines] The Nomai were mining ore somewhere on Timber Hearth.
[Read the Timber Hearth Projection Stone]

Nomai Mines - 3 Entries, 1 Rumor
1. The Nomai mined ore from this site to craft a protective shell designed to physically seal off the central chamber inside Ash Twin.
[Read the Scroll outside the Gravity Lift]

2. Once the shell was finished, the Nomai checked to ensure there were no longer any physical entrances or cracks.
[Read the Ash Twin Projection Stone]

3. The Nomai discovered a species of four-eyed, semi-aquatic lifeforms in the waterways near the mine.
[Read the Nomai writing outside the mining site in the water under the bridge]

RUMORS[OPTIONAL]
[To Ash Twin Project] The central chamber inside Ash Twin was physically sealed off by an immensely thick protective shell.
[Read the Scroll outside the Gravity Lift]

Black Hole Forge - 5 Entries, 2 Rumors
1. A warp tower's alignment point is not its warp receiver. Rather, a warp tower always aligns with the center of its corresponding astral body.
[Read the 2nd Scroll on the shelf]

2. The warp receiver must be located on (or in close orbit around) the relevant astral body.
[Read the 2nd Scroll on the shelf]

3. The Hourglass Twins are so close together they function as a single astral body, with a shared alignment point in between them.
[Read the 2nd Scroll on the shelf]

4. All of the warp towers were being constructed on Ash Twin, while the six warp receivers were being constructed at different locations.
[Read the 1st Scroll in the wall]

5. A Nomai named Poke successfully forged an advanced warp core for the Ash Twin Project.
[Read the Ash Twin Projection Stone]

RUMORS[OPTIONAL]
[To Ash Twin Tower Designs] There are tower designs in the High Energy Lab that reveal each warp receiver's location.
[Read the 1st Scroll in the wall]
[To Ash Twin Project] An advanced warp core was approved for installation in the central chamber of Ash Twin.
[Read the Ash Twin Projection Stone]

Alignment Angle Diagram - 4 Entries
1. A diagram depicting the alignment angle between a warp tower and its corresponding astral body.
[Look at the Alignment Angle Diagram]

2. Warp tower alignment angles are not exact. They only need to be within five degrees of the astral body's center.
[Read the Nomai Writing next to the Alignment Angle Diagram]

3. This results in slightly longer warp windows that last roughly several seconds.
[Read the Nomai Writing next to the Alignment Angle Diagram]

4. Anyone stepping onto the warp platform during the active window will be immediately warped.
[Read the Nomai Writing next to the Alignment Angle Diagram]

Ash Twin Towers - 2 Entries, 3 Rumors
1. Several large Nomai towers form a ring around Ash Twin's equator.
[Read the Scroll inside the Brittle Hollow Warp Tower]

2. The White Hole Station was used as a model for these towers, which were built for the Ash Twin Project.
[Read the Scroll inside the Brittle Hollow Warp Tower]

RUMORS[OPTIONAL]
[To Black Hole Forge] The Nomai crafted warp cores at the Black Hole Forge before delivering them to Ash Twin.
[Read the Scroll inside the Brittle Hollow Warp Tower]

[To White Hole Station] The towers on Ash Twin were modeled after the White Hole Station.
[Read the Scroll inside the Brittle Hollow Warp Tower]

[To Sun Station] The Nomai built something called the Sun Station, but not everyone supported its construction.
[Read the Scroll inside the Sun Station Warp Tower]

Sun Station - 4 Entries
1. The Sun Station was designed to make the sun go supernova.
[Read the Scroll inside the Sun Station]

2. The Nomai fired the Sun Station but it had no effect on the sun. They concluded that the Sun Station could never cause the sun to go supernova.
[Read the Ash Twin Projection Stone]

3. After the failure of the Sun Station, the Nomai took a break to investigate the newly arrived comet.
[Read the Ash Twin Projection Stone]

4. According to a Nomai computer, our sun has reached the end of its natural life cycle.
[Read the Nomai Computer Inside the Sun Station]

White Hole Station - 4 Entries, 0 or 1 Rumor
1. Every Nomai warp tower is tuned to a specific astral body.
[Read the Nomai Writing in the White Hole Station]

2. To use a tower, you must be standing on the warp platform during the tower's alignment with its corresponding astral body (the alignment happens when the astral body is directly overhead).
[Read the Nomai Writing in the White Hole Station]

3. The Nomai noticed something strange: Warped objects appeared to arrive at the receiver on Brittle Hollow slightly before they departed the White Hole Station.
[Read the Ember Twin Projection Stone]

4. This negative time interval between an object arriving and departing was incredibly miniscule (roughly one hundred-thousandth of a second). The Nomai were skeptical if their equipment could even measure time to such a small degree.
[Read the Ember Twin Projection Stone]

RUMORS[OPTIONAL]
[To High Energy Lab [MUTUALLY EXCLUSIVE TO CORRESPONDING RUMOR]] The negative time interval measured at the White Hole Station was further investigated at the High Energy Lab (in the canyon at Ember Twin’s equator).
[Read the Ember Twin Projection Stone]
Core (Cont.)
High Energy Lab - 3 Entries, 1 or 2 Rumors
1. The Nomai successfully reproduced the temporal anomaly first observed at the White Hole Station (warped objects appear to arrive before they depart).
[Read the 2nd Scroll on the ground on the 2nd floor of the Lab]

2. The Nomai discovered they could increase the negative time interval between arrival and departure by adding energy to the warp cores.
[Read the 2nd Scroll on the ground on the 2nd floor of the Lab]

3. The Nomai wanted to know if a 22-minute negative time interval was possible. They concluded it would require new technology to produce the necessary energy as well an advanced warp core to handle those energies. Ash Twin was proposed as a location for the project.
[Read the 3rd Scroll in the Wall on the 3rd floor of the Lab]

RUMORS[OPTIONAL]
[To Ash Twin Project] The Nomai planned to construct technology capable of producing a 22-minute negative time interval on Ash Twin.
[Read the 3rd Scroll in the Wall on the 3rd floor of the Lab]

[To White Hole Station [MUTUALLY EXCLUSIVE TO CORRESPONDING RUMOR]] The experiments at the High Energy Lab were based on extraordinary findings from the White Hole Station.
[Read the Nomai Writing outside the High Energy Lab Door]

Ash Twin Tower Designs - 4 Entries
1. Designs for each of the towers on Ash Twin's equator.
[Look at one of the Warp Tower Designs on the wall]

2. Each tower warps to a different planet (although many Nomai were quick to note that the sun is not actually a planet).
[Read the 4th Scroll on the ground on the 3rd floor in the Lab]

3. Each tower was designed to visually reflect its warp destination.
[Read the 4th Scroll on the ground on the 3rd floor in the Lab]

4. The towers allowed the Nomai to quickly travel between Ash Twin and all other locations crucial to the Ash Twin Project.
[Read the 4th Scroll on the ground on the 3rd floor in the Lab]

Ash Twin Project - 5 Entries
1. A hollowed-out chamber inside Ash Twin. The energy cables from the surface are plugged into a protective casing at the center of the planet.
[Enter the Ash Twin Project]

2. There are eight monoliths with Nomai masks attached. Three of the masks are actively receiving data from the Probe Tracking Module, Giant's Deep, and Timber Hearth respectively.
[Read the Nomai Computer near the Masks]

3. The Ash Twin Project was designed to use the energy from a supernova (triggered by the Sun Station) to send probe data from the Orbital Probe Cannon 22 minutes into the past.
[Read the 6th Nomai Writing on the wall]

4. The Sun Station did not work. Although the Ash Twin Project was theoretically sound, the Nomai were unable to power it.
[Read the 7th Nomai Writing on the wall]

5. There is an advanced warp core inside the protective casing at the center of the planet. Removing the core will disable the Ash Twin Project.
[Read the Nomai Computer near the casing controls]
Nomai

Chert's Camp - 5 Entries, 2 Rumors
1. Chert has set up their astronomy gear on the north pole of Ember Twin.
[Talk to Chert]

2. Chert has spotted an unusually high number of supernovae recently.
[Talk to Chert before you are 17 minutes into the Loop]

3. All of the stars in the universe are dying, including our sun.
[Talk to Chert between 17 minutes to 20 minutes and 30 seconds into the Loop]

4. The stars are simply dying from old age. Apparently they're much older than we realized.
[Ask Chert why the stars are dying between 17 minutes to 20 minutes and 30 seconds into the Loop]

5. Chert has become catatonic in response to our sun's imminent death.
[Talk to Chert 20 minutes and 30 seconds into the Loop or later]

RUMORS[OPTIONAL]
[To Escape Pod 2] Chert saw a Nomai shipwreck shooting a beam of light into the sky somewhere on Ember Twin's southern hemisphere.
[Ask Chert where to explore]

[To Sunless City] Chert thinks the lack of surface ruins means the Nomai must have lived somewhere underground.
[Ask Chert where to explore]

Escape Pod 2 - 2 Entries, 3 Rumors
1. One of three Nomai escape pods that crashed in our solar system.
[Read the Nomai Recording inside the Escape Pod]

2. All three escape pods were launched from something called the Vessel, which was badly damaged.
[Read the Nomai Computer inside the Escape Pod]

RUMORS[OPTIONAL]
[To Sunless City] The Nomai survivors who crashed on Ember Twin decided to seek shelter in the caves beneath their crashed escape pod.
[Read the Nomai Recording at the Escape Pod Exit]

[To Sunless City] The Nomai discovered a promising long-term shelter site at the end of one of the passages beneath the escape pod.
[Read the Nomai Writing in the cave to the left of the Escape Pod Exit]

[To Anglerfish Fossil] I found a cave with an anglerfish fossil inside, but the opening is only big enough for my scout.
[Launch your Scount into the Anglerfish Cave]

The Sunless City - 3 Entries, 4 Rumors
1. A Nomai city built into the walls of a huge underground cavern. The city is divided vertically into four districts.
[Enter the Sunless City]

2. The Nomai debated building a Sun Station in order to power the Ash Twin Project. Several Nomai opposed its construction, arguing that failure could result in the destruction of the solar system.
[Read the Nomai Writing near the light controls]

3. The Nomai traveled to this solar system in pursuit of a signal from something older than the universe itself. They named the source of this signal the "Eye of the universe."
[Read the 1st Nomai Writing in the Eye Shrine]

RUMORS[OPTIONAL]
[To Sun Station] There is a way to safely travel to the Sun Station from Ash Twin.
[Read the Scroll inside a Ruin outside the Fossil Overlook]

[To Sun Station] The Nomai debated building a Sun Station in order to power the Ash Twin Project.
[Read the Nomai Writing near the light controls]

[To Anglerfish Fossil] Nomai children used to play a game in Fossil Fish Cave. There is a way to enter Fossil Fish Cave from Stepping Stone Cave.
[Read the Nomai Writing in the Ruins outside of the Stepping Stone Cave]

[To Anglerfish Fossil] The entrance from Stepping Stone Cave is hard to see unless the anglerfish is fed a light first.
[Read the Nomai Writing in the Ruins outside of the Stepping Stone Cave]

Anglerfish Fossil - 3 Entries
1. Nomai children used to play a game here. One player was the anglerfish and wore a blindfold. The rest of the children (the littlefish) lined up against one wall. When the anglerfish said go, the littlefish had to sneak across to the other side.
[Read the Nomai Writing on the Floor]

2. The blindfold rule was added because real anglerfish are blind.
[Read the Nomai Writing on the Floor]

3. The adult Nomai were delighted to see the children incorporate their research into the game's rules.
[Read the Scroll in the room above the Anglerfish Fossil]

The Hanging City - 4 Entries, 5 Rumors
1. A Nomai city suspended beneath Brittle Hollow's northern glacier. The city is divided vertically into four districts.
[Enter The Hanging City]

2. I found a switch in the Meltwater District that raises and lowers the Black Hole Forge.
[Use the Black Hole Forge Controls]

3. The Nomai debated how to obtain the powerful, highly advanced warp core required for the Ash Twin Project.
[Read the Center Scroll in the Meltwater District]

4. The Nomai traveled to this solar system in pursuit of a signal from something older than the universe itself. They named the source of this signal the "Eye of the universe."
[Read the Nomai Writing in the Eye Shrine District]

RUMORS[OPTIONAL]
[To Black Hole Forge] The Black Hole Forge is suspended below the Hanging City. I found a switch in the Meltwater District that raises and lowers the forge.
[Use the Black Hole Forge Controls]

[To Black Hole Forge] The Black Hole Forge District is the highest district in the Hanging City.
[Read the Black Hole Forge Sign next to the Gravity Walkway]

[To Black Hole Forge] A Nomai named Poke planned to create a new advanced warp core in the Black Hole Forge.
[Read the 3rd Scroll found in a ruin outside the Scroll Walls in the Meltwater District]

[To Anglerfish Fossil] The Nomai learned how to evade anglerfish (theoretically, at least) by studying an anglerfish fossil they found on Ember Twin.
[Read the 2nd Scroll found in a ruin on the 2nd Floor outside the Scroll Walls in the Meltwater District]

[To The Vessel] The Vessel's warp core broke when the ship crashed in Dark Bramble.
[Read the 2nd Scroll found in the 2nd Floor outside the Scroll Walls in the Meltwater District]

Escape Pod 1 - 2 Entries, 1 Rumor
1. One of three Nomai escape pods that crashed in our solar system.
[Read the Nomai Writing near the Distress Beacon]

2. All three escape pods were launched from something called the Vessel, which was badly damaged.
[Read the Nomai Computer inside the Escape Pod]

RUMORS[OPTIONAL]
[To Old Settlement] The Nomai survivors who crashed on Brittle Hollow climbed down the cliff to a shelter site below the surface.
[Read the Nomai Writing near the Distress Beacon]

Old Settlement - 4 Entries 1 Rumor
1. The Nomai constructed a temporary settlement beneath their crashed escape pod.
[Read the Nomai Writing at the entrance of the Old Settlement]

2. The Nomai worked together to recall an eye-shaped signal they encountered while aboard the Vessel.
[Read the Nomai Writing in the Eye Shrine]

3. The signal was somehow older than the universe itself. The Nomai decided to call it the "Eye of the universe."
[Read the Nomai Writing in the Eye Shrine]

4. The Nomai abandoned this settlement over growing concerns about its stability.
[Read the Nomai Writing at the beginning of the Gravity Crystal trail]

RUMORS[OPTIONAL]
[To The Hanging City] The Nomai decided to migrate from the Old Settlement to the northern glacier. They used gravity crystals to craft a stable path beneath the surface.
[Read the Nomai Writing at the beginning of the Gravity Crystal trail]
Nomai (Cont.)
Mural (Panel 1) - 1 Entry
1. A mural of a Nomai vessel encountering a signal.
[Look at Mural 1 below the Eye Shrine]

Mural (Panel 2) - 1 Entry
1. A mural of Dark Bramble ensnaring the Nomai vessel.
[Look at Mural 2 below the Eye Shrine]

Mural (Panel 3) - 1 Entry, 4 Rumors
1. A mural of three escape pods evacuating the Nomai vessel.
[Look at Mural below 3 the Eye Shrine]

RUMORS[OPTIONAL]
[To Escape Pod 1] One of the three Nomai escape pods landed somewhere on Brittle Hollow.
[Look at Mural below 3 the Eye Shrine]

[To Escape Pod 2] One of the three Nomai escape pods landed somewhere on the Hourglass Twins.
[Look at Mural below 3 the Eye Shrine]

[To Escape Pod 3] One of the three Nomai escape pods never made it out of Dark Bramble.
[Look at Mural below 3 the Eye Shrine]

[To The Vessel] The Vessel crashed somewhere in Dark Bramble.
[Look at Mural below 3 the Eye Shrine]

Escape Pod 3 - 3 Entries, 2 Rumors
1. One of three Nomai escape pods that crashed in our solar system.
[Read the 1st Nomai Recording inside the Escape Pod]

2. All three escape pods were launched from something called the Vessel, which was badly damaged.
[Read the 1st Nomai Recording inside the Escape Pod]

3. The survivors from Escape Pod 3 detected two distinct beacons from the Vessel, as if it was in two locations at once.
[Read the 2nd Nomai Recording inside the Escape Pod]

RUMORS[OPTIONAL]
[To Nomai Grave] The survivors from Escape Pod 3 abandoned the wreckage and attempted to return to the Vessel.
[Read the 2nd Nomai Recording inside the Escape Pod]

[To Nomai Grave] The survivors decided to follow the closer of the two Vessel beacons due to their limited air supply. They planned to leave a trail of lights behind them in case someone heard their distress signal.
[Read the 2nd Nomai Recording inside the Escape Pod]

Nomai Grave - 4 Entries, 1 Rumor
1. The survivors from Escape Pod 3 followed one of the two Vessel beacons to a small Dark Bramble seed, where they could go no further.
[Read the Nomai Recording outside the Seed]

2. The Nomai could faintly hear the Vessel's beacon from within the seed, but the opening was too small for a single Nomai to fit through, much less an escape pod.
[Read the Nomai Recording outside the Seed]

3. The Vessel's beacon was dying, and would soon be gone completely.
[Read the Nomai Recording outside the Seed]

4. If I launch my scout into the seed, I can take photos of an enormous derelict Nomai ship.
[Launch your Scout into the Seed and take a photo of The Vessel]

RUMORS[OPTIONAL]
[To The Vessel] I launched my scout into the seed at the Nomai Grave and took photos of an enormous derelict Nomai ship.
[Launch your Scout into the Seed and take a photo of The Vessel]

The Vessel - 6 Entries
1. I found the derelict Nomai Vessel deep within Dark Bramble.
[Enter The Vessel control room]

2. The Vessel's warp core is long dead.
[Reinsert the dead Warp Core]

3. I activated a three-sided pillar on the Vessel's bridge that appears to be some sort of input device.
[Raise the Coordinate Pillar then look at it]

4. The Nomai tried to call for help, but the Vessel's outgoing message system broke during the crash.
[Read the top right Nomai Writing]

5. The Vessel can still hear incoming messages from other Nomai vessels. The remaining Nomai clans are regrouping in response to the impending death of the universe.
[Read the top left Nomai Writing]

6. I found a recording of the original signal the Nomai encountered from the Eye of the universe. The Nomai were worried the signal might disappear, so they warped before they could tell another clan where they were going.
[Read the Nomai Recording in the bottom floor of The Vessel]
Extirpation

Frozen Nomai Shuttle - 4 Entries, 3 Rumors
1. I found a Nomai shuttle almost completely encased in ice.
[Read the Nomai Recording outside the Frozen Shuttle on the Interloper]

2. There were three Nomai aboard the shuttle. One of them stayed behind to keep the shuttle warm while the other two explored the Interloper.
[Read the Nomai Recording outside the Frozen Shuttle on the Interloper]

3. The Nomai landed on the Interloper not long after its arrival in the solar system. The shuttle's equipment heard strange energy readings coming from somewhere beneath the surface.
[Read the Nomai Recording inside the Shuttle]

4. Clary, the Nomai who stayed behind, lost contact with the other two after they descended below the Interloper's surface.
[Read the Nomai Recording inside the Shuttle]

RUMORS[OPTIONAL]
[To Gravity Cannon] The Nomai shuttle that's frozen on the Interloper can be called home to the gravity cannon on Ember Twin.
[Read the Nomai Recording outside the Frozen Shuttle on the Interloper]

[To Ruptured Core] The shuttle's equipment heard strange energy readings coming from somewhere beneath the surface.
[Read the Nomai Recording inside the Shuttle]

[To Ruptured Core] Two of the Nomai located a fissure in the ice on the Interloper’s sunward side. They descended inside to investigate.
[Read the Nomai Recording inside the Shuttle]

Gravity Cannon - 2 Entries
1. A huge cylindrical structure that generates a strong upward gravity field.
[Activate the Gravity Cannon]

2. I recalled a Nomai shuttle from the Interloper.
[Recall the Frozen Shuttle]

Ruptured Core - 4 Entries
1. I found the two missing members of the Nomai shuttle crew near a large ruptured stone that looks like it exploded from the inside.
[Enter the Ruptured Core area]

2. The Nomai traced the strange energy readings to a spherical stone casing filled with some form of exotic matter.
[Read the Nomai Recording near the Ruptured Core]

3. They determined the exotic matter was both lethal and under extreme pressure. If the stone were to rupture, the exotic matter within would rapidly expand, completely blanketing the solar system almost instantaneously.
[Read the Nomai Recording near the Ruptured Core]

4. One of the Nomai stayed behind to examine the alien matter while the other rushed back to the surface to warn the rest of the Nomai.
[Read the Nomai Recording near the Ruptured Core]
Quantum

Northern Glacier - 2 Entries, 3 Rumors
1. The north pole of Brittle Hollow is covered in snow and ice. There is a uniquely shaped Nomai ruin on the surface.
[Read the Scroll in the Ruins outside the Brittle Hollow Warp Reciever]

2. The Nomai were able to warp here from the White Hole Station. This is where they first recreated warp technology.
[Read the Scroll in the Ruins outside the Brittle Hollow Warp Reciever]

RUMORS[OPTIONAL]
[To White Hole Station] There is a White Hole Station on the other side of Brittle Hollow's black hole.
[Read the Nomai Writing in the Ruins outside the Brittle Hollow Warp Reciever]

[To White Hole Station] Several Nomai returned to the station to investigate an equipment reading that appeared to violate causality.
[Read the Nomai Writing in the Ruins outside the Brittle Hollow Warp Reciever]

[To Quantum Moon] The Nomai on Brittle Hollow observed a phantom moon that would sometimes appear in the sky.
[Read the Nomai Writing in the Ruins on the Hill]

Gravity Cannon - 2 Entries, 1 Rumors
1. A huge cylindrical structure that generates a strong upward gravity field.
[Activate the Gravity Cannon]

2. I recalled a Nomai shuttle from the Quantum Moon.
[Recall Solanum's Shuttle]

RUMORS[OPTIONAL]
[To Tower of Quantum Knowledge] A Nomai named Solanum was told to visit the Tower of Quantum Knowledge (on Brittle Hollow's equator) to learn one final rule before embarking on her pilgrimage to the Quantum Moon.
[Read the Brittle Projection Stone in the Ruins outside the Gravity Cannon]

Tower of Quantum Knowledge - 3 Entries
1. The Nomai built a shrine on the Quantum Moon to aid in the pilgrimage to its sixth location. "Remember this final rule: To explore the sixth location, the shrine must be on the moon’s north pole."
[Read the Scroll in the wall on the top floor]

2. The pilgrimage to the Quantum Moon was a deeply significant journey for the Nomai.
[Read the Scroll on the Shelf]

3. After the two groups of Nomai stranded on Ember Twin and Brittle Hollow were reunited, it became their united goal to find and visit the Quantum Moon.
[Read the Scroll on the Shelf]

RUMORS[OPTIONAL]
[To Quantum Shrine] The Nomai built a shrine on the Quantum Moon to aid in the pilgrimage to its sixth location.
[Read the Scroll in the wall on the top floor]

[To Sixth Location] Many Nomai went on a pilgrimage during which the Quantum Moon carried them to its sixth and most secret location.
[Read the Scroll in the wall on the top floor]

[To Sixth Location] To explore the sixth location, the shrine on the Quantum Moon must be on the moon’s north pole.
[Read the Scroll in the wall on the top floor]

Quantum Shard - 3 Entries, 3 Rumors
1. A strange rock shard that wanders when no one is watching. The Nomai determined this shard is the reason objects in this grove behave in a quantum manner.
[Read the Scroll on the Shard]

2. The Nomai hypothesized that this shard is actually a piece of the Quantum Moon.
[Read the Scroll on the Shard]

3. This shard emits the same signal as the Quantum Moon.
[Read the Scroll on the Shard]

RUMORS[OPTIONAL]
[To Tower of Quantum Trials] The Nomai detected a Quantum signal coming from somewhere on Giant’s Deep.
[Read the Scroll on the Shard]

[To Quantum Grove] The Nomai detected a quantum signal coming from somewhere on Timber Hearth.
[Read the Scroll on the Shard]

[To Quantum Caves] The Nomai detected a quantum signal coming from somewhere on the Hourglass Twins.
[Read the Scroll on the Shard]

Quantum Grove - 2 Entries
1. There is a strange rock shard in this grove that moves when I’m not watching. It emits a signal on the Quantum Fluctuations frequency.
[Aim your Signalscope at the Grove Shard]

2. I found a poem written on one of the trees in the grove.
[Look at the Quantum Poem]

Quantum Caves - 2 Entries, 2 Rumors
1. The Nomai noticed a strange wandering rock that appeared in multiple caves on Ember Twin’s northern hemisphere.
[Read the Scroll[s] in the Quantum Caves]

2. I found a strange rock shard that moves when I’m not watching. It emits a signal on the Quantum Fluctuations frequency.
[Aim your Signalscope at the Cave Shard]

RUMORS[OPTIONAL]
[To Lakebed Cave] The wandering rock was first spotted in a cave at the bottom of the dry lakebed at Ember Twin’s north pole.
[Read the Scroll in the Cave with Nomai Writing on the Ground]

[To Lakebed Cave] A Nomai named Coleus mysteriously vanished from a cave at the bottom of the dry lakebed at Ember Twin’s north pole.
[Read the Nomai Writing in the cave]

Lakebed Cave - 3 Entries
1. A Nomai named Coleus was standing on the wandering rock when another Nomai's lantern died. When they relit the lantern, Coleus and the rock were both gone.
[Read the Nomai Writing in the Lakebed Cave]

2. To travel with a quantum object, I must stand on the object and cease to observe my surroundings (meaning I must be in complete darkness). Coleus used this quantum rule to escape the cave he was trapped in.
[Read the Nomai Writing in the Exitless Cave]

3. Coleus and Merolae returned to examine the rock. They theorized that when a conscious being is in contact with a quantum object and ceases to observe his or her surroundings, the being can become entangled with that quantum object, and they both move together.
[Read the Nomai Writing in the Exitless Cave]

Quantum Moon Locator - 3 Entries, 2 Rumors
1. A Nomai device created to track the Quantum Moon's location. [Read the Scroll found in the Ruins near the Locator]

2. The Nomai hypothesized that the Quantum Moon might be a form of macroscopic quantum mechanics. [Read the Scroll next to the Locator]

3. The Quantum Moon travels to at least five locations, but sometimes the locator can't tell where the moon is. [Read the Scroll found in the Ruins near the Locator]

RUMORS[OPTIONAL]
[To Sixth Location] The Quantum Moon sometimes disappears, possibly to an unknown sixth location.
[Read the Scroll found in the Ruins near the Locator]

[To Quantum Moon] The Nomai on Ember Twin observed a moon that would disappear when no one was watching.
[Read the Scroll next to the Locator]

Tower of Quantum Trials - 4 Entries
1. This tower held knowledge a Nomai needed to make his or her first quantum journey.
[Read the Sign alongside the Tower Stairs]

2. "Observing a quantum object; observing an image of a quantum object. These are the same."
[Read the Sign on the 3rd floor down]

3. The Nomai called this the "Rule of Quantum Imaging."
[Read the Nomai Writing on the bottom floor]

4. "Remember, the other quantum shards have other lessons to teach."
[Read the Nomai Writing on the bottom floor]
Quantum (Cont.)
Quantum Moon - 2 Entries
1. I was able to land on the surface of the Quantum Moon.
[Land on the Quantum Moon]

2. I found a dead Nomai in a space suit near the south pole.
[Look at Solanum's body]

Solanum's Shuttle - 2 Entries
1. A Nomai named Solanum landed her shuttle at the Quantum Moon's south pole and prepared to make the rest of the journey on foot.
[Read the Nomai Recording inside Solanum's Shuttle]

2. Visitors to the Quantum Moon always arrive at the south pole (for reasons unknown to the Nomai).
[Read the Nomai Recording inside Solanum's Shuttle]

Quantum Shrine - 4 Entries
1. A Nomai shrine that wanders about the Quantum Moon.
[Obtain an entry about the Quantum Shrine]

2. "You have recalled the rule of quantum imaging" is inscribed next to a mural of a tower on an island.
[Read the 1st Nomai Writing]

3. "Recall the rule of quantum entanglement" is inscribed next to a mural of a quantum shard in a cave.
[Read the 2nd Nomai Writing]

4. "Recall the rule of the sixth location" is inscribed next to a mural of a tower hanging above a black hole.
[Read the 3rd Nomai Writing]

Sixth Location - 6 Entries
1. I met a living Nomai named Solanum at the south pole!
[Meet Solanum]

2. The Quantum Moon is the Eye of the universe's moon.
[Ask Solanum to Identify the Quantum Moon["Identify" & "Quantum Moon"]]

3. At this location, the Quantum Moon becomes a reflection of the Eye itself.
[Ask Solanum to Identify the Eye of the Universe["Identify" & Eye of the Universe"]]

4. The Eye is likely the source of all macroscopic quantum phenomena in the solar system.
[Ask Solanum to Explain the Quantum Moon["Explain" & "Quantum Moon"]]

5. Solanum wonders what would happen if a conscious observer were to enter the Eye.
[Ask Solanum to Explain the Eye of the Universe ["Explain" & Eye of the Universe"]]

6. Solanum has a hypothesis that she may not be entirely alive.
[Ask Solanum about herself and the Quantum Moon OR Ask Solanum about herself and the Eye of the Universe ["You" & "Quantum Moon" OR "You" & "Eye of the Universe"]]
DLC

Radio Tower - 1 Entry
1. A radio tower designed to receive photos taken by the deep space satellite. There are several photos of the entire solar system hanging on the walls. Hornfels noticed something strange in one of the photos, but concluded equipment malfunction was the only sensible explanation.
[Listen to Hornfels' Recording in the Radio Tower]

The Stranger - 1 Entry
1. A massive artificial ring world hidden within some sort of cloaking field. It does not appear to be Hearthian or Nomaian in origin.
[Enter The Stranger]

River Lowlands - 2 Entries, 1 Rumor
1. A low-lying region near the entrance to the Stranger. There are wooden buildings along the banks of the river.
[Enter the River Lowlands]

2. I found several ornate metal artifacts inside a workshop surrounded by ghost matter.
[Enter the Artifact Workshop Ruins]

RUMORS
[To Sealed Vault] A slide reel from the River Lowlands showed a strange vault being closed and sealed with chains and a glowing symbol.
[Watch the 1st Vault Seal Slide Reel]

Burned Slide Reel [River Lowlands] - 2 Entries
1. A slide reel that shows the origin of the Stranger and its inhabitants.
[Watch the Origin Slide Reel]

2. Several slides have been burned and cannot be viewed.
[Watch the Origin Slide Reel]

Slide Burning Room [River Lowlands] - 2 Entries, 1 Rumor
1. A room full of burned slide reels piled next to a strange device.
[Enter the Slide Burning Room]

2. I found a hidden slide reel that shows a container marked with a glowing symbol being handed to a shadowy figure. The figure follows a procession of green lights through a forest to a candlelit building, where they carry the container into a secret passage behind a roaring fireplace.
[Watch the Hidden 1st Vault Seal Slide Reel]

RUMORS
[To the Forbidden Archive [Shrouded Woodlands]] I found a hidden slide reel that shows a container marked with a glowing symbol being handed to a shadowy figure. The figure follows a procession of lights through a forest to a candlelit building, where they carry the container into a secret passage behind a roaring fireplace.
[Watch the Hidden 1st Vault Seal Slide Reel]

Cinder Isles - 2 Entries, 2 Rumors
1. A pair of small rocky islands connected by a village of stilt houses.
[Enter the Cinder Isles]
2. I found a large metal symbol for the Eye of the universe inside a burned-out building. [OR] I found a large metal symbol inside a burned-out building that closely resembles the Nomai symbol for the Eye of the universe.
[Enter the burned shrine and look at the Eye of the Universe symbol [Entry Text Changes depending on your knowledge on the Eye of the Universe]]

RUMORS
[To Island Tower] I found a projection that reveals a cave entrance at the base of a rocky island with a tall tower.
[Look at the lit up projection in the Ruins to the left of the Island Tower]

[To Sealed Vault] A slide reel from the Cinder Isles showed a glowing symbol and chains appear around a strange vault.
[Watch the 2nd Vault Seal Slide Reel]

Burned Slide Reel [Cinder Isles] - 2 Entries
1. A slide reel that shows the Stranger's inhabitants analyzing an anomaly that closely resembles the Nomai symbol for the Eye of the universe.
[Watch the Eye Slide Reel]

2. Several slides have been burned and cannot be viewed.
[Watch the Eye Slide Reel]

Slide Burning Room [Cinder Isles] - 2 Entries, 1 Rumor
1. A room full of burned slide reels piled next to a strange device.
[Enter the Slide Burning Room]

2. I found a hidden slide reel that shows a container marked with a glowing symbol being handed to a shadowy figure. The lights are extinguished, and the figure carries the container down into a dark well.
[Watch the Hidden 2nd Vault Seal Slide Reel]

RUMORS
[To the Forbidden Archive [Starlit Cove]] The reel I found in the slide burning room shows a container marked with a glowing symbol being handed to a shadowy figure. The lights are extinguished, and the figure carries the container down into a dark well.
[Watch the Hidden 2nd Vault Seal Slide Reel]

Island Tower - 2 Entries
1. A tower that sits atop one of the Cinder Isles. The upper floors can only be reached from a second entrance at the back of the tower.
[Enter the center room in the upper floor]

2. I found a slide reel that shows the Stranger's inhabitants opening a secret passage in a round room filled with lanterns and murals. The inhabitants are shown filing into three of these rooms throughout the Stranger.
[Watch the Tower Slide Reel]

Symbol Room - 3 Entries
1. A secret room filled with wooden containers marked with different symbols.
[Obtain any Symbol Room Entry]

2. Three of the containers are marked with glowing vault seals, but their contents have been burned away.
[Open one of the Vault Seal Containers]

3. I opened the container marked with the symbol of a burning slide reel and found a vertical sequence of symbols inside.
[Open the Burning Slide Reel Container]

Hidden Gorge - 1 Entry, 1 Rumor
1. A narrow gorge along the rightmost branch of the river. There are dwellings built into both cliff faces high above.
[Enter the Hidden Gorge]
RUMORS
[To Sealed Vault] A slide reel from the Hidden Gorge showed a glowing symbol and chains appear around a strange vault.
[Watch the 3rd Vault Seal Slide Reel]

Burned Slide Reel [Hidden Gorge] - 2 Entries
1. A slide reel that shows the Stranger's inhabitants congregating around a strange green fire.
[Watch the Artifact Slide Reel]
2. Several slides have been burned and cannot be viewed.
[Watch the Artifact Slide Reel]

Damaged Laboratory - 3 Entries
1. A laboratory with three test chambers. The second chamber is badly damaged and can be entered through a hull breach in the side of the Stranger.
[Enter the Damaged Laboratory]

2. I saw a vision-like recording of someone picking up an artifact and going to sleep in front of a green fire. The rest of the vision was distorted and difficult to make out, but a flame seemed to appear inside the artifact.
[Look at the Vision Torch in the 1st chamber]

3. I found a slide reel that shows three experiments conducted with three different artifacts. The third experiment appears to have been a success.
[Watch the Artifact Experiments Slide Reel]

Slide Burning Room [Hidden Gorge] - 2 Entries, 1 Rumor
1. A room full of burned slide reels piled next to a strange device.
[Enter the Slide Burning Room]
2. I found a hidden slide reel that shows a container marked with a glowing symbol being handed to a shadowy figure. The lights are extinguished, and the figure carries the container into a secret passage behind a mural of a large tree.
[Watch the Hidden 3rd Vault Seal Slide Reel]

RUMORS
[To the Forbidden Archive [Endless Canyon]] The reel I found in the slide burning room shows a container marked with a glowing symbol being handed to a shadowy figure. The lights are extinguished, and the figure carries the container into a secret passage behind a mural of a large tree.
[Watch the Hidden 3rd Vault Seal Slide Reel]
DLC (Cont.)
Abandoned Temple - 4 Entries
1. An abandoned temple marked with the symbol of a burning slide reel. It can be accessed from a passage in the Hidden Gorge.
[Enter the Abandoned Temple]

2. There is an interface upstairs that can be used to line up symbols in a vertical sequence.
[Use the interface in the Temple]

3. Entering the correct sequence opens the path to a secret room beneath the temple.
[Enter the lower Temple area]

4. I found a slide reel that shows the Stranger's inhabitants removing all of the slide reels from their shelves, scanning each reel with a device, and incinerating specific slides as well as entire reels.
[Watch the Slide Burning Reel]

Map Projection 1 - 1 Entry, 1 Rumor
1. A projection that seems to reveal a secret location somewhere within the Stranger.
[Look at the lit up Map Projection]

RUMORS
[To Slide Burning Room [River Lowlands]] A map I found in the Abandoned Temple reveals a secret location somewhere within the Stranger.
[Look at the lit up Map Projection]

Map Projection 2 - 1 Entry, 1 Rumor
1. A projection that seems to reveal a secret location somewhere within the Stranger.
[Look at the lit up Map Projection]

RUMORS
[To Slide Burning Room [Cinder Isles]] A map I found in the Abandoned Temple reveals a secret location somewhere within the Stranger.
[Look at the lit up Map Projection]

Map Projection 3 - 1 Entry, 1 Rumor
1. A projection that seems to reveal a secret location somewhere within the Stranger.
[Look at the lit up Map Projection]

RUMORS
[To Slide Burning Room [Hidden Gorge]] A map I found in the Abandoned Temple reveals a secret location somewhere within the Stranger.
[Look at the lit up Map Projection]

Reservoir - 3 Entries, 1 Rumor
1. An enormous reservoir with wooden piers and buildings on both shores.
[Enter the Reservoir]

2. I found a room with a burned control interface and a projection that seems to indicate a broken connection between the Stranger and another craft.
[Enter the ruins to the left of the Reservoir, look at the projection on the table]

3. I found a projection showing the Stranger's current trajectory and the sun's predicted supernova radius.
[Enter the room to the right on top of the Dam, look at the projection on the table]

RUMORS
[To Submerged Structure] I found a diagram of a hollow metal structure suspended by chains. There is a round hole underneath that appears to be the only entrance.
[Look at the lit up Diagram in the Ruins to the right of the Reservoir]

Burned Slide Reel - 2 Entries, 1 Rumor
1. A slide reel that shows a strange vault being encased in a large metal structure and lowered underwater.
[Watch the Vault Slide Reel]

2. Nearly all of the slides have been burned and cannot be viewed.
[Watch the Vault Slide Reel]

RUMORS
[To Submerged Structure] According to a slide reel, a strange vault was encased in a large metal structure and lowered underwater.
[Watch the Vault Slide Reel]

Submerged Structure - 2 Entries
1. A large metal structure suspended by chains. It can be entered by swimming from below.
[Enter the Submerged Structure]

2. There is a sealed vault illuminated by a green fire inside the structure.
[Look at the Green Fire inside the Submerged Structure]

Shrouded Woodlands - 3 Entries
1. A dense forest along the banks of a river.
[Enter the Shrouded Woodlands]

2. I heard music coming from a candlelit building across the water.
[Get close to the Music Building]

3. I found a covered bridge leading into the darkest part of the forest.
[Walk along the second bridge leading into the forest]

Forbidden Archive [Shrouded Woodlands] - 5 Entries
1. A library full of intact slide reels hidden deep underground.
[Enter the Forbidden Archive]

2. There is a container marked with one of the vault seals, but its contents have been destroyed.
[Open the 1st Vault Seal Container]

3. I found a slide reel that shows the origin of the Stranger and its inhabitants.
[Watch the intact Origin Slide Reel]

4. Intact slides reveal the sacrifice that was made to build the Stranger.
[Watch the intact Origin Slide Reel]

5. I found a slide reel that appears to be some sort of error report. It shows one of the Stranger's inhabitants jumping off a raft during a transition between areas and falling below the world.
[Watch the Error Report Slide Reel]

Starlit Cove - 4 Entries
1. A secluded village nestled within a cove. A candlelit tower sits atop a nearby island.
[Enter the Starlit Cove]

2. The well at the bottom of the village is guarded by a statue that activates an alarm bell when it sees me.
[Enter the lower area close to the well of the Starlit Cove]

3. I found the remains of a burned-out building on the outskirts of the village.
[Enter the Burned Ruins]

4. I reached the tower's upper floors by projecting a path to a second entrance at the back of the tower.
[Enter the center room in the upper floor of the tower]

Forbidden Archive [Starlit Cove] - 6 Entries
1. A library full of intact slide reels hidden deep underground.
[Enter the Forbidden Archive]

2. There is a container marked with one of the vault seals, but its contents have been destroyed.
[Open the 2nd Vault Seal Container]

3. I found a slide reel that shows the Stranger's inhabitants analyzing the Eye of the universe. [OR] I found a slide reel that shows the Stranger's inhabitants analyzing an anomaly that closely resembles the Nomai symbol for the Eye of the universe.
[Watch the intact Eye of the Universe Slide Reel [Entry Text Changes depending on your knowledge on the Eye of the Universe]]

4. Intact slides reveal the construction and launch of a spacecraft designed to block the Eye's signal.
[Watch the intact Eye of the Universe Slide Reel]

5. I found a slide reel that shows two artifacts being lit near a green fire. The first artifact lights after its bearer falls asleep, and the second artifact lights after its bearer dies.
[Watch the Post-Mortem Slide Reel]

6. I found a slide reel that appears to be some sort of error report. It shows an alarm bell failing to wake up one of the Stranger's inhabitants.
[Watch the Error Report Slide Reel]

Endless Canyon - 2 Entries
1. A massive canyon that stretches into the distance. A candlelit lodge is built into the far cliff face.
[Enter the Endless Canyon]

2. I found a mural of a large tree on the bottom floor of the lodge.
[Look at the Tree Mural in the Lodge]

Forbidden Archive [Endless Canyon] - 5 Entries
1. A library full of intact slide reels hidden deep underground.
[Enter the Forbidden Archive]

2. There is a container marked with one of the vault seals, but its contents have been destroyed.
[Open the 3rd Vault Seal Container]

3. I found a slide reel that shows the Stranger's inhabitants congregating around a strange green fire.
[Watch the intact Artifact Slide Reel]

4. Intact slides reveal the creation of a simulated reality modeled after their home moon.
[Watch the intact Artifact Slide Reel]

5. I found a slide reel that appears to be some sort of error report. It shows one of the Stranger's inhabitants dropping their artifact on the ground and walking beyond its projection radius.
[Watch the Error Report Slide Reel]
DLC (Cont. 2)
Subterranean Lake - 2 Entries, 2 Rumors
1. I discovered a vast subterranean lake beneath the submerged structure. The sealed vault is resting on the shore of the lake. There are three interfaces, each marked with one of the three symbols from the vault.
[Enter the Subterranean Lake]

2. I rotated the mechanism in front of the vault, causing it to strain against the chains holding it shut. Moments later rays of green light spilled out of the vault.
[Rotate the Vault mechanism twice]

RUMORS
[To Symbol Room] The light coming out of the vault gave me a vision of climbing a spiral staircase to a room near the top of a tower. One of the Stranger's inhabitants pointed at a mural of an identical tower beneath a ringed planet, then picked up an artifact and carried it downstairs to a room with a green fire. Some time later, two of the lamps in the mural room turned off, plunging the mural into darkness and revealing a secret passage.
[Watch the Vault Vision]

The passage lead to three wooden containers, each marked with a glowing vault seal.
[Watch the Vault Vision]

Sealed Vault - 4 Entries
1. I met one of the Stranger's inhabitants who was imprisoned within the vault!
[Meet the Prisoner]

2. The Prisoner showed me a vision revealing the actions they took that resulted in their eternal confinement.
[Watch the Prisoners' Vision]

3. I used the vision torch to share my knowledge of the solar system's history with the Prisoner.
[Use the Vision Torch on the Prisoner]

4. The Prisoner left one final vision for me by the water's edge as a farewell.
[Watch the Prisoners' Final Vision]
Conclusion
That's a wrap!

And that should be every last entry and rumor the Ship Log can hold.

Whether you were hunting down one last elusive log or aiming for full-on archaeologist-mode completion, I hope this guide helped make sense of the weirder corners of the solar system (and maybe saved you a loop or two).

As mentioned, I tested everything personally, but !'m still not perfect! If I made a mistake, or if anything should be tweaked, feel free to leave a comment - I'll try and keep the guide updated as best I can!

If this guide helped you out - leave a like and consider leaving a Steam Award!
They're a fun way to show support and help keep the stars aligned on my end - and it won't cost ya nothin' but a few Steam Points!
...PLEASE I WORKED SO HARD ON THIS PLEASE PLEASE SHOW ANY APPRECIATION

As Feldspar might say: the best discoveries are made after the ship stops being flyable.
Stay curious, and Thank you for reading!


10 Comments
AmpeRSands  [author] Jul 24 @ 9:32pm 
Updated! Thanks for the catch! :steamhappy:
Michael Scarn Jul 24 @ 9:21pm 
I was following the photos and didn't get the achievement. After looking at a website from a separate guide notices your "Quantum" photo says "Tower of Quantum Trials" has 3 entries when in reality it has 4 entries. In the paragraph it looks correct though. Otherwise great guide :D
Wølfpr@nX_ Jul 24 @ 9:20am 
Thank you very much for this guide!

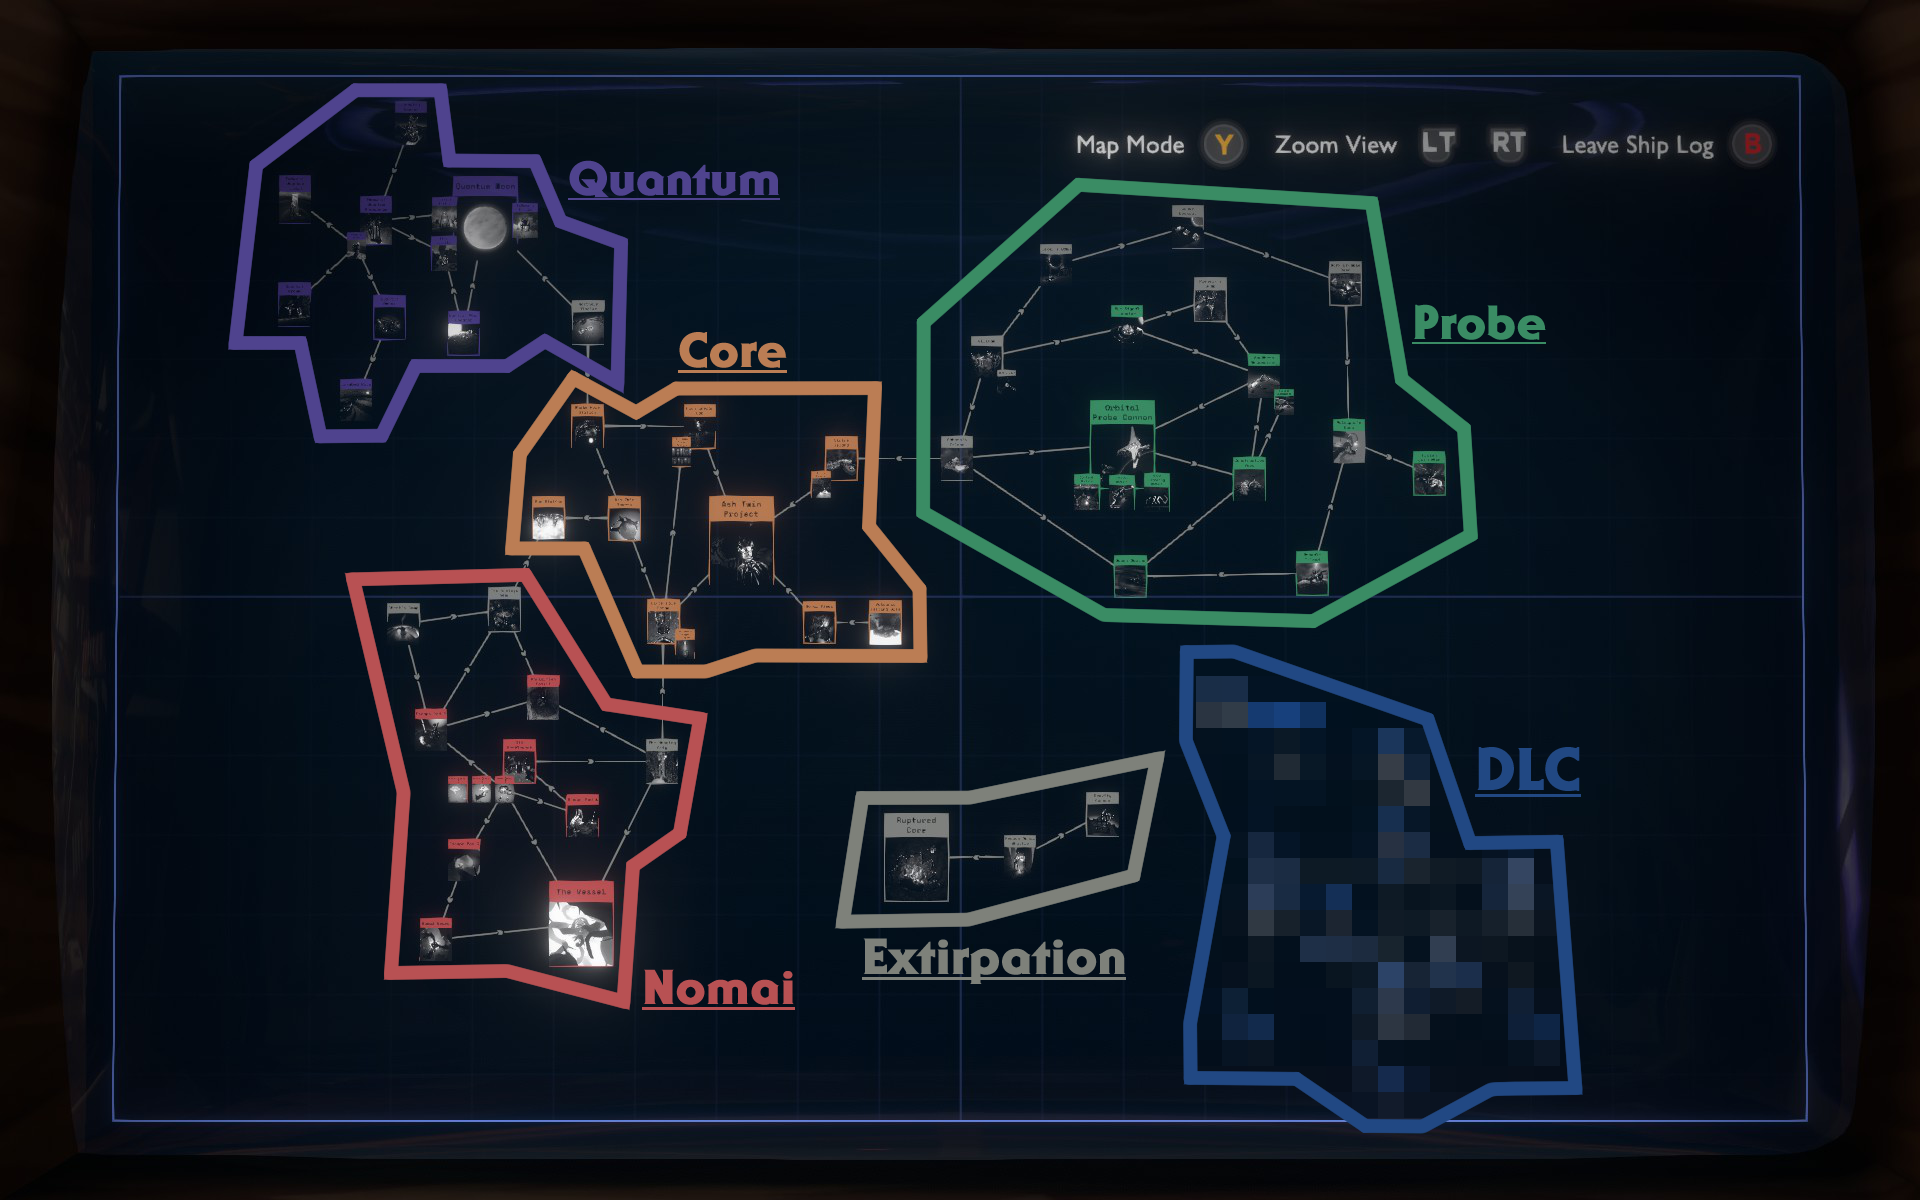
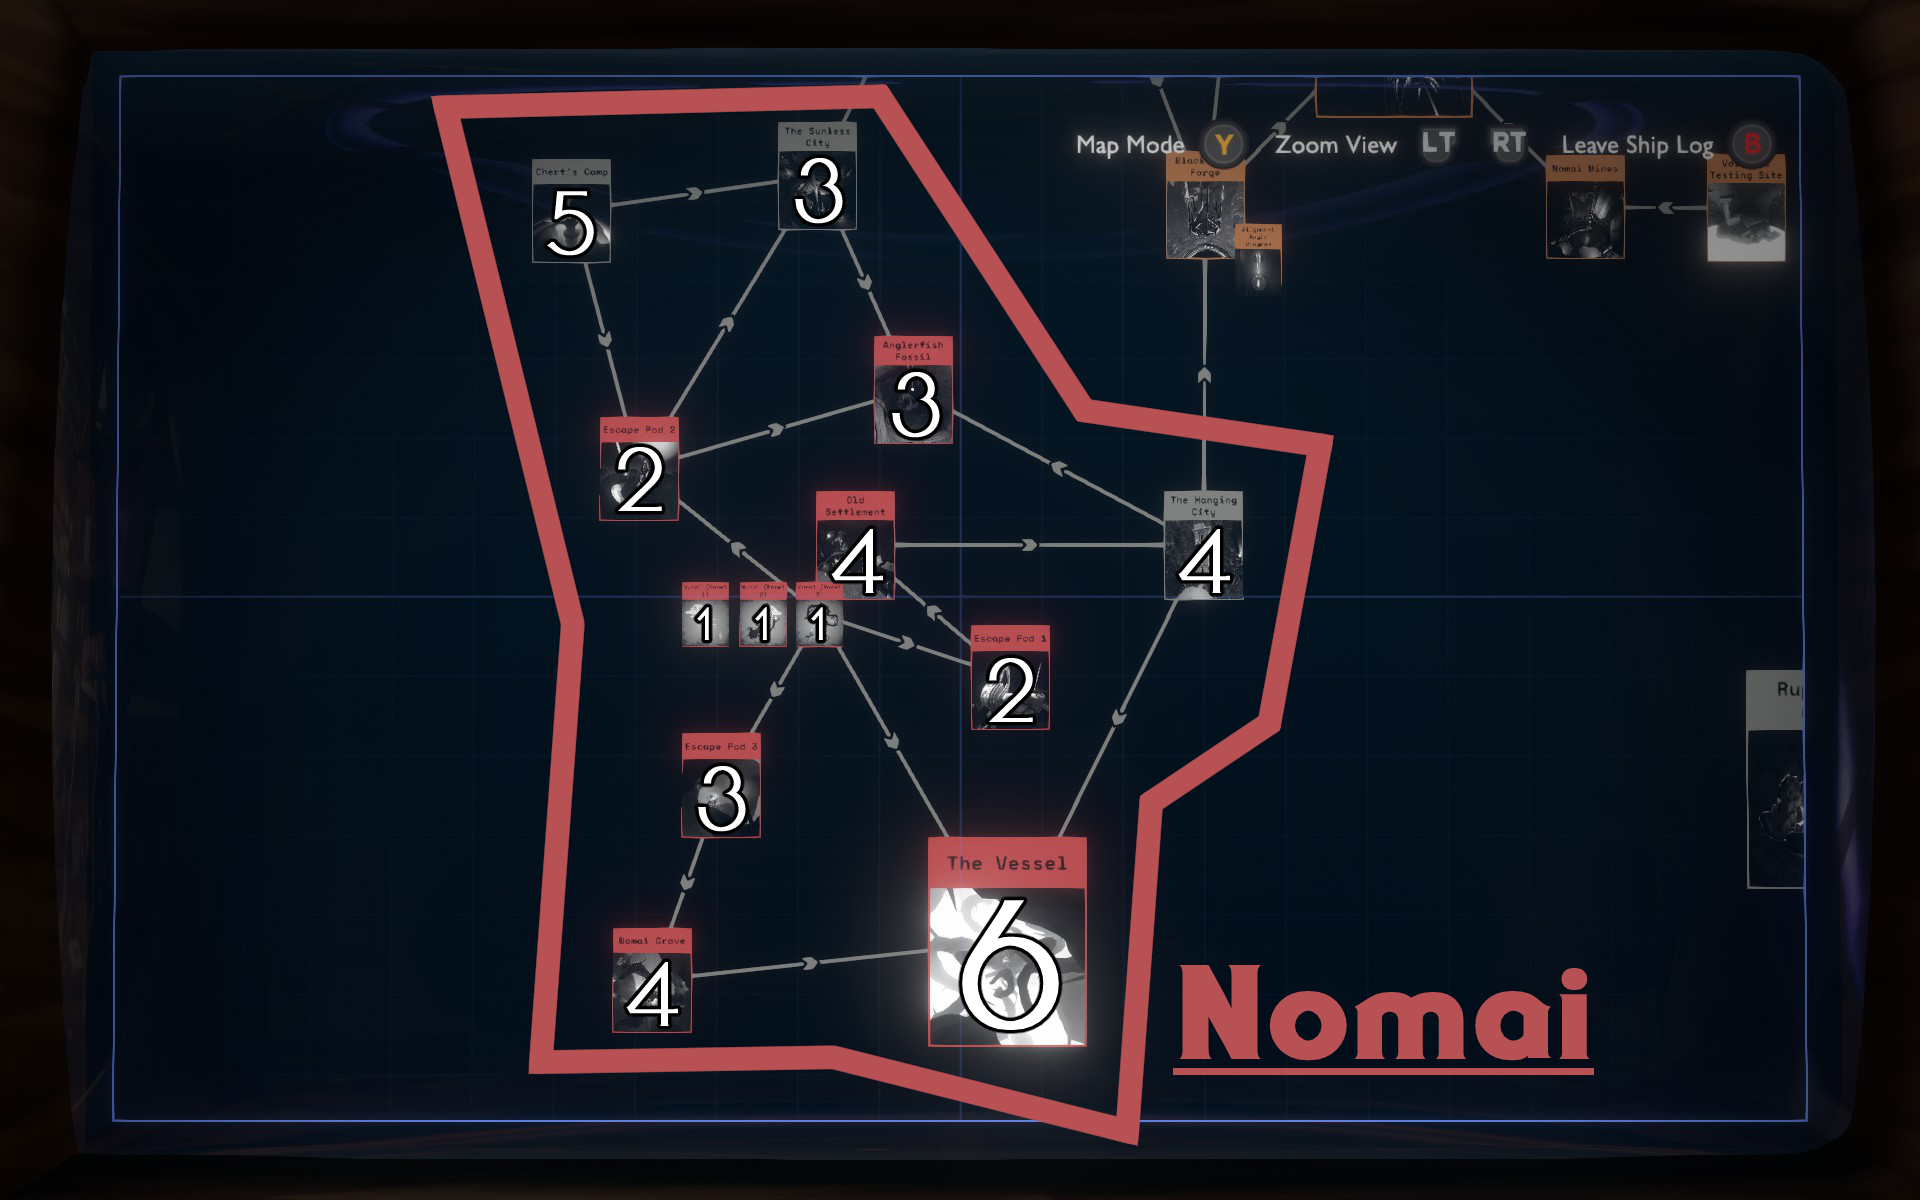
I was missing something on the vessel, searching for hours in it in this terrifying Environment...only to find out i have to read something in hanging city, thanks to you!

Here are some Steam points for your great work. :steamhappy:
AmpeRSands  [author] Jul 20 @ 10:08pm 
Excellent catch! Thank you so much for the correction, the Guide imagery has been updated!
That's what you get when you design graphics for your guide BEFORE you collect data :angry_seagull:
Reimu Fumo Jul 20 @ 2:34am 
I somehow missed whe whole Quantum Moon Locator and was incredibly confused, since it is missing on your images at the beginning and in the Quantum section. Other than that, a great guide!
2sxy Jul 10 @ 6:34am 
I was missing (might be helpful to someone else):
- some interactions with Chert (didn't realize they were time-sensitive)
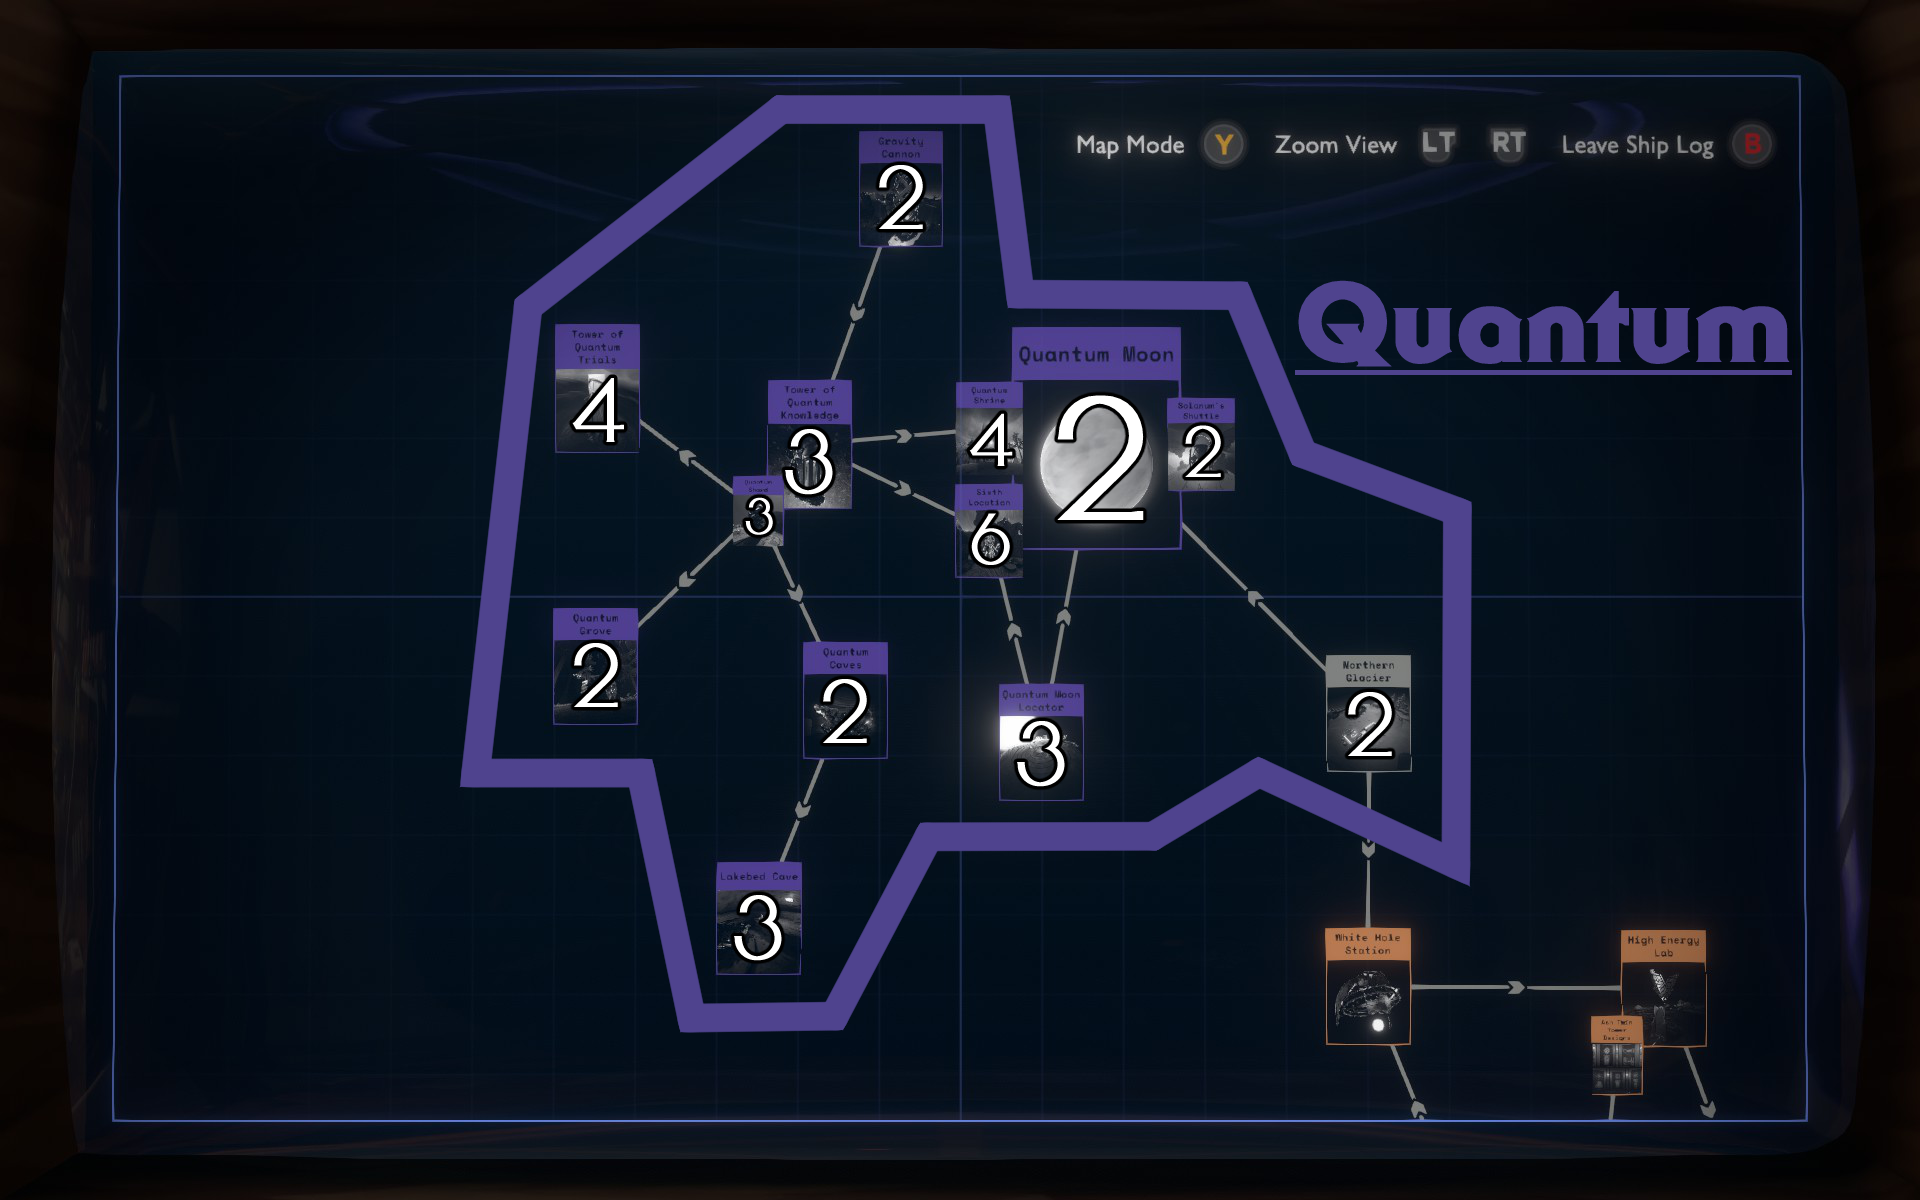
- poem in Quantum Grove
- interaction with Solanum "You + Quantum moon"
2sxy Jul 9 @ 2:07pm 
I did find the writing, but I am clearly missing something else :) Your guide is outstanding, it's me who is not seeing something most likely
AmpeRSands  [author] Jul 9 @ 1:18pm 
Are you sure? The directions I give are unfortunately vague I know, but there is Nomai Writing to the left of the old settlement when taking the path from the escape pod.
2sxy Jul 9 @ 12:51pm 
That wasn't it :(
2sxy Jul 9 @ 12:41pm 
Thank you so much! I thought my log was complete, but thanks to your screenshot I was able to locate one rumor connection between The Hanging City and The Old Settlement that I was missing.