Wargame: AirLand Battle

Wargame: AirLand Battle

Not enough ratings
Integrated Air Defense and You
By alan85224
This guide describes for new players and veterans how to set up an effective anti air defense and the use of tactical air power.
   
Award
Favorite
Favorited
Unfavorite
Why I wrote this, why you should read it
Before you begin reading this guide, go read the 176 page Wargame guide. I have been wanting to write this guide for a while now, I think there are many players new to the game who do not understand the intricacies of airpower and air defense. So if this guide can save even one player from watching their F-117 fall from the sky, or save one noob the frustration of watching their Hawk roll down the road while enemy fighters drop napalm at will on a convoy, then this guide will have been worth it. I would also like to give veteran Wargame players a better understanding of how a fully functional air defense system can deny the airspace over the battlefield to the enemy.

I also want to give you a better answer to the question “How do I protect my units from aircraft?” If your answer up until now has been “Spam more SAMs!” then this guide is for you.

I see a lot of decks that, IMHO, lack the qualities of a good air defense system. To put it another way, if I asked you to bake me a cake, you would probably measure the different ingredients and make sure you had just enough of everything. An air defense system is no different, it’s the mixture of different ingredients that make it good. Too much of one thing and it’s terrible. I recognize that different types of deck, different nationalities and the limited availability of support units makes it impossible to bring everything you want to sometimes. No deck is perfect, but I will describe the ideal that you should strive for.

When it comes to airpower, Wargame players generally fall into one of three categories:

1) The Seasoned Air General- this player focuses primarily on the battle in the air. Will send interceptors and SEAD aircraft relentlessly. Will send large strike packages and artillery barrages to suspected SAM and AAA locations. This player will be aware of the battle on the ground and will be an active participant. This will be your toughest opponent and you won’t win every battle. Your best bet is to try and bring down his SEAD aircraft as soon as you can. He won’t make that easy, however.

2) The Noob Air General- this player is unpredictable, he may send a consistent stream of varied aircraft to multiple locations or large strike packages of similar aircraft. Typically when you see large numbers of aircraft circling over the battlefield (particularly if they include enemy territory in their circling) you can be sure you are up against this type of player. Typically this type of player runs out of aircraft and rage quits.

3) The Average Player- air power is just one part of a larger force. If you’re like me, I want my air power to accomplish tactical objectives like clearing out houses with napalm or stopping enemy advances with attack helicopters. I don’t want to “own” the sky, but I want to be able to use it whenever I want for as long as it takes to get bombers in and out.

This guide is supposed to help you defend against all three types, it is NOT a guide on how to be an Air General- sorry. I will address the use of tactical airpower, and the tactics I use personally, but that’s the part of this guide that’s a suggestion. The rest of this guide will be based on real life military tactics and it’s not a suggestion that you use the systems as they were designed.

If you’re going to make a dedicated effort to deny the airspace to the enemy, then you’re going to be controlling some of the most high value targets on the battlefield. A determined enemy is going to make every effort to target your units. SEAD aircraft with anti-radar missiles, flown by experienced pilots, are going to come looking for you. Nothing enrages a Wargame player more than seeing his fancy interceptor shot down. Every minute you spend studying the art and science of Integrated Air Defense, your enemy has spent a minute studying how to get bombers over your airspace to bring death and destruction. It’s not a job for the weak, or faint of heart. You’re going to suffer casualties. Artillery is going to make an effort to hunt you down. Bombers in waves are going to come rushing at your units. No air defense system is going to bring down 100% of the enemy 100% of the time. Know that if you bring down five aircraft in a ten plane wave that the next wave will be smaller, and it’s your job to whittle those numbers down some more the next time they show up.

An intro to anti air warfare
Since the introduction of aircraft on the Battlefield (and in Wargame too I suppose LOL) there have been those who think that airpower alone will win the battle. I am not here to debate that issue. I know that denying the enemy the ability to fly aircraft over the battle field will be a decisive factor in the outcome of the fight. My goal is to deny the use of airspace to the enemy so that I can fly aircraft and helicopters in support of units on the ground.

Jargon, Acronyms and Techno Babble will be kept to a minimum, I would like this guide to be a good intro to civilians and lay people, however I will be using some terms that I won’t be stopping to explain. Some of my terms may be out dated in the 21st century, but generally they are accurate in today’s military.

There are two ways to shoot down aircraft, one way is to use a Surface to Air Missile (SAM) and the other is to use a bullet. Units that fire bullets from a barrel are referred to as Anti-Aircraft Artillery (AAA). There is no one “best” way to shoot down aircraft, the missile vs gun debate has been raging for a long time- to the point that the latest PACT units now feature BOTH radar guided cannons and IR missiles. So there’s no end in sight to the argument.

Just as there are two ways to shoot aircraft down, there are two ways to detect and target them. Radar uses beams of radio waves that are reflected off an aircraft to guide a missile to the target.

In the 1960’s aircraft engineers tried to design planes that could fly higher and faster than SAMs could intercept but more capable missiles were introduced. Designing an aircraft for ultra-high speed (in excess of Mach 3) and ultra-high altitude (above 80,000 feet) proved to be too expensive and technically challenging to engineers of the day, and to some extent this is still true today.

In the 1970’s low level bombing became the accepted tactic. Anti-radar missiles were introduced to the battlefield and SEAD aircraft began searching for radars to destroy. As more powerful radars were introduced, more powerful jammers were installed on aircraft. In the 1980’s stealth designs were introduced that made it harder (but not impossible) to detect, track, and shoot down aircraft. In the competition between aircraft designers and those that design systems to shoot them down, no clear winner has yet emerged.


The second way to target aircraft is with IR systems that detect aircraft by detecting the heat of the engine and airframe, which is visible in the infra-red spectrum of light.

While early SAMs were not very effective, as the technology matured accuracy has improved. The latest high end units are deadly accurate, but no matter how accurate a missile is, it will always be subject to certain limitations. AA missiles are large and bulky, a vehicle (or person!) can only carry a limited amount of ammo. Launchers will always be subject to long reload times, some of the missiles can weigh hundreds of pounds! Launching a missile at a target is no guarantee that it will be destroyed. A good pilot (fighting for his life!) will maneuver his aircraft in such a way that missile cannot follow. To further complicate matters, newer aircraft (and especially SEAD aircraft) have Electronic Counter Measure (ECM) pods that reduce the effectiveness of radars in addition to chaff and flare decoys.


AAA cannons are the perfect way to complement any good SAM system. While most units cannot match the range of SAM systems, when deployed in groups of four and properly spread out AAA cannons can chew up waves of incoming aircraft. Radar guided cannons have very good range and their accuracy and damage only increases as the enemy gets closer. Cannons are particularly effective against helicopters and low flying aircraft.


Some of the low point units may (at first glance) appear to be short ranged and of limited value, the larger caliber (35 and 40 MM shells) will blast large holes in any unsuspecting aircraft that wanders overhead. The lack of guidance may seem like a liability, but there’s no countermeasure for the human eyeball. SEAD aircraft are most vulnerable to these types of systems IF they get within range. Finally, optical systems are difficult to spot, when they open fire it will appear to the enemy that gunfire has magically appeared under his aircraft.


While it IS satisfying to shoot down enemy aircraft, it’s still good enough to damage them. Every piece of damage has to be repaired, which translates in game to long periods when aircraft are not available. If an aircraft is damaged and leaves before it drops its bombs, that’s what the military calls a “mission kill” and that’s good enough. Don’t be disappointed if an aircraft doesn’t fall from the sky- be happy you poked lots of holes in it before it left.

Everything you need to know about building an IADS
Any good air defense system will subject enemy aircraft to an increasing volume of fire the closer the enemy comes to friendly forces. The first step in establishing a good IADS is to put all the right units in your deck, you must bring units that can engage aircraft at short (2000M or less), medium (3000M and under) and long (Beyond 4000M) range. Keep in mind these ranges are totally arbitrary and represent my needs, but I think they are totally reasonable and achievable with the right units.


You must also bring radar, IR and optical systems as mentioned earlier.

It is also critically important to know which units can fire on the move, a “stabilizer” value in the unit stats indicates the ability to fire on the move. Weapon systems that must be parked, or in a “static position” (fancy military talk for an object that is not in motion) have the term [STAT] in their description. When choosing systems for your deck, be sure to have both static and units that can fire on the move.

A Hawk or a Buk SAM rolling down the road are useless as AA pieces and vulnerable to attack from the air, however a unit like the American Avenger CAN fire on the move and will be a critical in defending convoys in the opening minutes of the game.

It is not necessary for you to memorize that stats for every unit in the game, just the units in YOUR deck!


Long range systems These are large units that are slow moving even on the road. They have large, radar guided missiles and primarily engage fixed wing aircraft- they are of limited use against helicopters. NATO units consist of the Hawk and Patriot, with the Buk system being a good PACT example. You should select one, if not two, units of this type to be in your deck.

Strengths: The closer the enemy gets, the more accurate this unit is. High point systems like the Patriot can be very deadly. Note the example, at 50 points I won't cry if I lose it and it comes with Exceptional optics.

Weaknesses: These units are slow on the roads and have limited ability off road. These units do not fire on the move and must be parked to engage the enemy. While parked with the radar on these units are vulnerable to attacks from SEAD aircraft with anti-radar missiles that follow the radar beam back to its source. These units are moderately effective against helicopters but very good at shooting down fixed wing aircraft.

How to use it:
While the radar can typically see a long way, it can’t see through mountains, so park this unit on high ground.

This unit MUST have a supply truck travelling with it, units like the NATO Hawk system only carry three (very large) missiles. Gunners will often fire two missiles at a single target, or two thirds of their ammo. No matter what the unit, once it’s out of ammo it’s useless on the battlefield. Don’t let your long range SAMS run out of ammo, if it takes a steady stream of trucks then send a steady stream but no matter what it takes don’t let these units run out of ammo. Ever.


I keep these units on the road or very close to it. Keep it parked with the radar on, after it has fired all its missiles or shot down one or two planes, move it a few hundred meters down the road. This is very important- move your units after they make a kill. If the enemy thinks they know where these units are, they WILL send artillery to that spot or, better yet, bombers. Do I feel warm and fuzzy shooting down planes bombing where I was? Yes, I do.

After you make a kill or two, you should think about brining another unit of the same type into the battle. The more successful a particular SAM is, the more the enemy is going to shell where he thinks it is. The life expectancy for a SAM of this type is under ten minutes, so plan accordingly.
These units should be deployed as single units. Parking two units of this type next to each other does little to increase the size of your air defense zone and increases the likelihood that BOTH units will be destroyed by artillery fire or a wave of bombers. If you’re going to bring two Buk’s to the battle, spread them out, WAY OUT, to increase the area they can defend.

Medium and short range units
Medium range systems

Typically IR missiles for NATO, PACT has radar and IR missile systems, and radar guided AAA for both sides. First, I will look at missile systems. Ideally you will have at least one medium range IR SAM and one radar AAA unit in your deck.

IR missiles
Strengths: Because of the passive nature of IR if a pilot doesn’t see the missile launch he has little chance of avoiding getting hit. Some units of this type can fire on the move, although they are more accurate when parked. ECM pods have no effect on IR missile systems. These units will be your primary defense against helicopters!

Weaknesses: early IR missiles are easily fooled by flares, sunlight reflecting off clouds, and even the sun itself. Modern systems can still be decoyed by flares. Only some of these vehicles have good off road performance, so keep them close to roads.

How to use them: IR SAM units should be deployed in pairs, keep them spread out and parked in towns or on the edge of a tree line facing the enemy. These units should be deployed close to friendly ground forces but out of range of the enemy. The closer you are to the enemy the more effective you’ll be, but if a tank starts shooting at you- you’re too close! I try to keep these units a few hundred meters behind friendly forces. IR SAMs have a life expectancy of between 10 and 15 minutes, you should replace these as they are lost in combat. When friendly forces advance, call up reinforcements to cover your current positions and advance with friendly units.

Radar guided AAA systems
Strengths: Cannons aimed by radar can reach out a considerable distance, and at short range can deal a significant amount of damage. Some of these vehicles can fire on the move.

Weaknesses: These vehicles can be targeted by SEAD aircraft with anti-radar missiles. These vehicles should be deployed in pairs at least, preferably in threes and fours. Keep them spread apart so that a single arty barrage or bomber plane can’t kill them all at once. Due to the threat from ground fire and SEAD aircraft the life expectancy for a radar guided AAA piece is under five minutes, keep a fresh supply of these vehicles on the way to the front with your supply trucks!

If you want to make an effective IADS and deny the enemy use of the airspace above the battlefield, you’re going to HAVE TO bring one of these! One is fine, don’t go loading up your deck full of Flakpanzers and Shilkas, bring two if you must but don’t go crazy.
How to use them: These vehicles can roll alongside tanks for maximum protection from aircraft and helicopters. Keep them a few hundred meters behind advancing infantry to provide fire support and engage ground targets if the need arises. While some can fire on the move, it is best to park when they are firing to increase accuracy. For units that must be stationary to use their radar, this is a must.

Short range systems are your last line of defense. I will discuss AAA cannons first, and Man Portable IR systems second.

You MUST have at LEAST ONE AAA piece, preferably a vehicle. The ability to provide fire support and (reasonably) accurate fire to aircraft and helicopters that stray into range, as well as fire support to troops on the ground, make them a necessary and vital ingredient in your IADS cake.

Strengths: These units can be very difficult for the enemy to detect and should be placed as close to friendly units as possible. It is also advisable to leave these units in the rear as well to deal with any enemy aircraft that are deep in friendly airspace. Cannons in particular can come in large sizes that deal significant damage. Many AAA pieces can be found in the vehicle section and will not take up a support slot. Most of these units can fire on the move. AAA units are also very cheap, some costing as little as 10 points. These units may not kill enemy aircraft, but remember that an aircraft poked full of holes will be out of the battle for a long time. These systems will be most effective against enemy helicopters and least effective against high flying fixed wing aircraft like the F-15 and MiG-25.

Weaknesses: some low point vehicles of this type can be very short ranged and will need refueling to cover any kind of long distance, be sure to send a supply truck along with them if you’re going a long way. Because these systems rely on human eyesight, their range is limited.

How to use them: AAA pieces should be mixed with armored and infantry units to provide fire support for advancing friendly units in addition to keeping helicopters and aircraft at bay. Keep these units behind advancing infantry to provide fire support. Some low point systems I drive to their range limit and spread them out into static positions. They stay there for the rest of the game providing air defense over friendly airspace, or dying in their spots covering a retreat.

I personally like the 40MM cannons, though they are easily out ranged by many types of helicopter launched missiles. Mixing long range smaller caliber radar guided AAA with larger caliber optical units enables you to put up a “wall of lead” that any attacking aircraft is going to have to fly through.

These units should be deployed in pairs, preferably in threes and fours. One cannon by itself is not much of a threat, but four.......

MANPADs are optional, but if you have the infantry slots available then take at least one. Put them in trucks and drop them off randomly in friendly territory to provide air defense over friendly airspace. I personally have brought down top of the line fighters when they flew (unsuspectingly) directly over MANPADS deep in my territory.

Man-portable systems (Stinger and Igla) are carried by small infantry teams- while they do have infantry weapons they are not particularly effective in ground combat. Keep them in buildings and trees close to friendly troops but try to avoid direct combat. MANPAD teams will also need a supply truck nearby if they are going to be in the fight for long.

There's a North Korean Armored Personnel Carrier (look in the INF section) that brings an AA capability in the form of IR missiles. Let's hear it for Juche! If you can bring that kind of capability AND a squad of soldiers, then you’re a fool not to. While I don’t often play PACT, when I do I bring one card of these every time I can.

When you build your deck you should carefully consider quality and quantity of units. For example if you’re going to bring a top of the line American Patriot SAM, you should also bring a cheaper version of the Hawk as well. Plan on taking casualties! If you only are going to take one long range radar guided SAM, bring a mid-point unit. That is to say, don’t go with the cheapest OR the most expensive unit. If you HAVE TO have that expensive (and very capable) top of the line SAM, bring along another cheaper radar SAM to bait the SEAD aircraft with. You’ll be glad you did.

Look for a good IR missile to provide medium range coverage. Some of the top of the line units are especially good and carry lots of reloads, so they stay in the fight longer and require less attention from supply trucks. This type of unit is a MUST! If you only bring one SAM to the battle, make it one of these! Ideally your deck will have two cards of these units.

You should also have a SPAAG (optically guided cannon) in your deck. Because some of these systems are so cheap, and they don’t take up a support slot, you really have no excuse NOT to have one of these vehicles.
Deploying your IADS
No deck is perfect, but the example below is what I would consider ideal. You might notice that it is five support slots and that is the maximum some decks allow. Some of the units below are not available in every type of deck. So there will be some exceptions to my rules below, but if you want to build as perfect an IADS system as you can, you'll need these platforms.

1 card radar guided SAM, latest model. In some decks I don’t bring a top of the line SAM system, losing a 90 or 100+ point unit is painful.

OR

1 card radar guided SAM, low point model. Whatever sacrifices I make in range and general capability I make up for with numbers and overlapping fields of fire/zones of coverage.


1 card IR guided SAM, I prefer a top of the line model, something effective out to about 3000M. I like the accuracy of the latest systems, I figure if you’re going to shoot at it, then you might as well hit it.


1 card Radar guided AAA, I prefer a mid-point or top of the line model. I prefer quantity over quality because I tend to suffer high losses among these types of units. A range of above 2500M is good enough.

OR

1 card Radar guided AAA, low point model because I tend to suffer high losses among these types of units. This can be swapped out with a MANPAD unit in some decks.

1 card SPAAG. This is usually in my vehicle section and NOT my support section. Range (of the guns and gas tank) is not usually a concern to me, I prefer to bring a large caliber cannon- something that packs a punch. This type of unit sometimes needs a supply truck to refuel it if you’re going to try and cover significant distances.

At a bare minimum you should have one IR SAM and one radar guided AAA. This will give you the best area of coverage and the best weapons mix to ensure a reasonable chance of bringing down aircraft and helicopters.

I do have unit that fire on the move, I rarely exploit that ability. Units are always more accurate when stationary, and I want that advantage! Keep in mind that you WILL be chasing down targets and sometimes just shooting in their general direction will be enough to scare them off- so there are times when shooting on the move is tactically appropriate.

Establishing an initial Air Defense Zone
Now that you have the proper units in your deck, you will want to establish air defense zones that look similar to this diagram. The circles represent (approximately) the lethal zone of the different units.


Under ideal conditions you will establish a large zone of coverage, and smaller zones within that larger zone. The blue circles represent areas where friendly troops are present. Any enemy aircraft trying to attack friendly troops will be met with a variety of different weapons fire as it gets closer to their positions.


This diagram represent what I would consider the opening stage of a battle. Be sure to spread your units out, a little overlap is good but too much does not mean more effective. Large red circles represent fixed radar SAMs, green represents IR or radar AAA, and blue represents MANPADS or optically guided AAA. Under ideal conditions as an aircraft flies out of range of one pair of guns it flies into the range of another pair! As the battle progresses I would move the units on the map across the river and bring in reinforcements of cover their original positions. The circles represent what I would consider the “lethal” radius of the different weapon systems, outside this radius I consider a hit unlikely. As units take casualties I would call up units from the rear to the front.


The weakest link in any IADS is going to be logistics, make sure you deploy a supply truck with missile vehicles and supply truck for your AAA with small gas tanks. This diagram loosely represents what I think the initial stages of crossing the river would look like. This is made easier with amphibious units.

Radar and SEAD

Once your IADS is set up, standard military doctrine is to "flicker" the radars of individual vehicles on and off at random intervals. In the above example the red circle represents a radar that is on and the orange one is off, this would change every 30 seconds or so. This takes a lot of micromanagement on your part, but if done well this can be most effective. The earlier you can detect the enemy, the sooner your units can engage the enemy and start bringing planes down BEFORE they drop their payload. Killing them AFTER they drop their bombs is ok (I mean it's still a kill) but not the preferred outcome.

Option #2 is to park all your vehicles with the radars on, this increases your chances of spotting incoming airstrikes and decreases your response time as well. Also, your units are broadcasting their positions to SEAD aircraft who can hunt you down with Anti radar missiles. While this tactic comes with significant advantages, it comes with significant disadvantages as well.

Option #3 is to park your vehicles with most of the radars off. This will increase your response time (it takes a while to detect a fast moving aircraft, track it and then fire off the missile) and increase the chances of aircraft making it over their target. This is particularly hard to micromanage getting all your radars back on before all the aircraft come and go.

With all your varied options, and a battle to fight on the ground, you can get very busy sometimes. With that in mind, I prefer to just randomly move my units around. While on the move the radar is off, this is why I prefer to keep them near roads. I park at an intersection, wait a while and then move some where else. I might bring 4 M163's and then spread them out, split them apart and move them around. This seem like a reasonable solution that lets me focus on something other than micro managing radars. If I bring 4 M163's, I will probably turn off at least one radar and let it function like that until the other 3 are dead. That one's the "last man standing."


Finally, lets say you do detect a SEAD aircraft.


In this example (admittedly a very poor one) I have detected a SEAD aircraft as part of an airstrike. I would select my nearest radar SAM (like a Hawk or a Buk) and start driving toward it. I doesn't really matter what direction it's coming from, the first thing I do it start driving towards it. In motion with the radar off I am an impossible target for anything but its guns.


SEAD aircraft are only a danger when they are facing you and you have your radar on. While anti radar missiles have a minimum range, I have not extensively tested to find out what (exactly) that is.


When the aircraft is right overhead, I order my vehicle to stop. Now that it is flying away from me, it's no longer a threat. Unless there's another one behind it...... While SEAD aircraft have extensive electronic counter measures designed to blind enemy radars, they are not particularly effective at short range because your radar can "burn through" the jamming. It's kind of like trying to talk at a concert, you have to be close to the person and yelling to be heard, but if you try hard enough a SEAD aircraft will hear you.

You can turn your radars off as soon as you detect a SEAD aircraft, but if it is escorting an airstrike then you're surrendering control of the sky to the enemy. I prefer to start moving my radar vehicles towards the threat and trying to engage at close range.

A determined enemy that sends large airstrikes is going to try and overwhelm your defenses, for particularly large airstrikes my best advice is to stand and hold your ground. If the airstrike is targeting your particular units (that is to say, units in your IADS) then you're certainly going to take losses. The best you can hope for is to take down as many as you can on the way in and out. But unless the enemy can target all you radars, AAA vehicles and MADPADS all at once, the best the enemy can hope to do is degrade your effectiveness to a certain degree. While it can be a messy, bloody affair, but because of the disparity in points between aircraft and AA pieces it's more likely that it will turn out in your favor. A wise man once said "They will run out of airplanes before I run out of SAMs."


Finally, a word about stealth. It's in the unit stats, not only the F-117 but the EuroFighter and Rafale have some degree of stealthiness. Stealth, as you can see in the above example, only reduces the range that a SAM can detect you, but at close range the F-117 CAN BE detected on radar, so don't go flying over SAMs thinking you're invisible. While the bomb bays are open this aircraft is particularly vulnerable so don't go bombing that target next to the Buk thinking you won't be visible long enough for it to get a shot off- it will, as I learned so terribly painfully.

While an interceptor's radar can't detect the F-117 at long range, one of the requirements for being a pilot is good eyesight so don't go trying to fly in under the SU-27's thinking you're invisible. Until Wargame starts having night missions, that's not gonna happen.

I don't think there's really much else I need to say, I hope this guide helps you understand how the systems work in real life and hope you can have better games because of it! If you feel the need, leave something in the comments for me! HAPPY KILLING!


22 Comments
Onkel Weezy Jul 30, 2017 @ 9:53pm 
It has already.. I never completely understood AA strategies.. but your post hugely helped. :)
alan85224  [author] Jul 30, 2017 @ 8:24am 
Thanks Darth I hope it helps you defend your forces against enemy aircraft!
Onkel Weezy Jul 29, 2017 @ 11:26pm 
Great guide!
[SR] 73096 Jul 29, 2017 @ 12:30am 
totally and gladly
alan85224  [author] Jul 28, 2017 @ 6:47pm 
Happy killing flyingscotsman!
[SR] 73096 Jul 28, 2017 @ 7:56am 
tacoshy MMBs mobile missle batteries do move quite frequently to avoid staying at the same location twitce cus if you miss they know where you are
alan85224  [author] Jan 3, 2015 @ 9:26am 
Please dude, don't make me start deleting your comments. I think the developers of this game put a lot of time and effort into simulating the different units and variables that go into warfare and I think they did a really good job of approximating what a clash between two nations would look like. This is a game of maneuver, tactics, and strategy. I wrote this guide to save people the trouble of reading a Field Manual. I appreciate that you play video games really good, but I don't think you're going to be able to teach me anything about anti air warfare. I read your guide to air warfare and I think you over estimate the ability of helicopters to spot AAA pieces and IR missiles. I saw your video and you use the Raven to good effect, if anything your video highlights the need for AAA pieces and MANPADs.

http://www.marines.mil/Portals/59/Publications/MCWP%203-22%20Antiair%20Warfare.pdf
tacoshy Jan 3, 2015 @ 1:56am 
yeah you wrong about that thos game is a simulation. its far away froma simulation. In reallife a tank has up to 4-5km range. In reallife a Raven is unarmed an ECM just blocking radar frequencies. And in reallife a SAM site does not move after firing because there positions with the SAM and somewhere else Radar installations which are linkted to the SAM's.

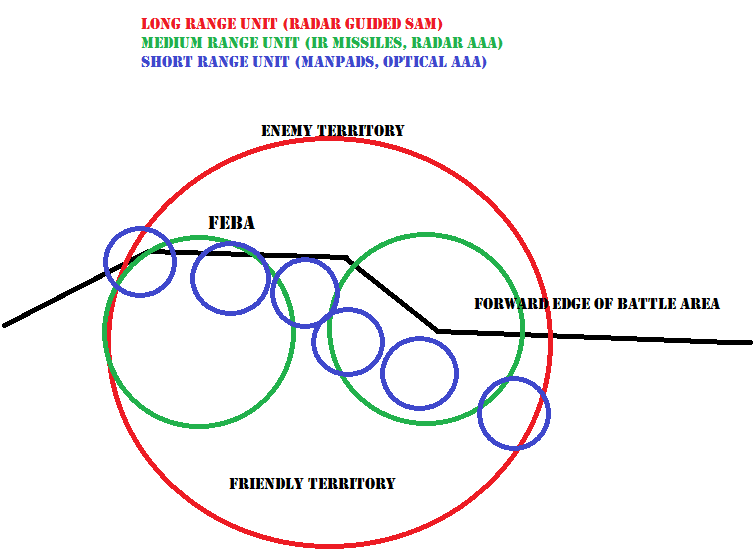
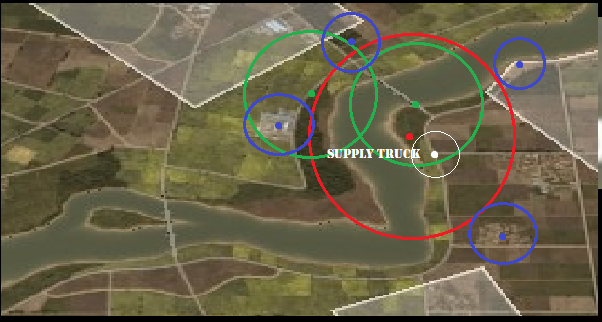
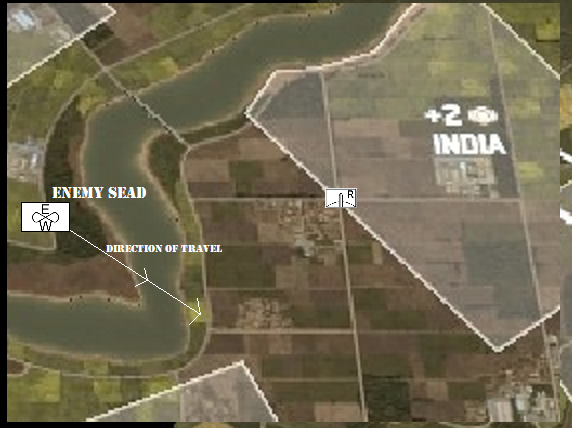
You have to look on the game at a whole differen perspective. Its simply just about ranges. basically you just try to outrange units to get a shot at them while they cant fire back. And this is always possible.

The greatest threat of anti air defenses are not planes, that are chopeprs because they got mostly the higher range. but if you really want to learn it i will be happy to explain and etach you.
alan85224  [author] Jan 2, 2015 @ 4:28pm 
I am still not sure what your point is, but I want to mention (again) this is a game that simulates warfare and some knowledge of how the systems work is going to be helpful to new players or people who don't know all that much about military hardware. If this was a racing game and I wrote a guide on how real race car drivers draft other cars, wouldn't that be helpful? . Part of the reason I wrote this guide was to share my knowledge of real world military systems because I don't think there's a lot of material out there that's easy to read and understand. I though the real life diagrams taken from real world sources would increase my credibility and help my target audience. I am more than convinced that you're not my target audience, I think the best I can tell you is to go and write your own anti air warfare guide
tacoshy Jan 2, 2015 @ 4:33am 
exactly you prove my point. It's still a game and does not work like in reallife. In the game the chapparal is a long range helicopter killer with the gepard the only 2 on Nato side that cant be outranged by helicopters. and you do not need to move fast to avoid getting hit by arty. like i said even if you just move 50-100m (which you can do on an open field) the arty still miss. and it will keep you save from being spotted and hunted by choppers