Grand Theft Auto V Enhanced

Grand Theft Auto V Enhanced

38 ratings
GTA 5 Enhanced | OPTIMIZATION GUIDE
By victao
Ultimate Graphics Optimization Guide for GTA V Enhanced Edition

Want to get the most out of performance and visual quality in Grand Theft Auto V Enhanced Edition?
This guide, based on detailed analysis from the BenchmarKing channel, provides the best graphics settings to achieve the perfect balance between FPS, visual fidelity, and smooth gameplay.

With clear explanations and tested recommendations across various hardware configurations, this guide is ideal for players who want to optimize their experience without sacrificing the stunning visuals of Los Santos.
Whether you're aiming for higher frame rates or max visual quality with minimal performance loss — you’ll find everything you need right here.

Roam the streets of Los Santos with the best performance and visuals possible!
2
   
Award
Favorite
Favorited
Unfavorite
Ray Traced Shadows
When switching between standard shadow maps and the Ray Tracing options, we can see that RT Shadows excel at capturing both close and distant objects, especially on Ultra.

However, in this scene, a major limitation becomes apparent. Due to excessive contact hardening, enabling Ray Tracing actually removes a lot of shadow details. This is evident in the shadows of the Ferris wheel and the rollercoaster track.

In these cases, the softer standard shadows produce more accurate and visually appealing results.

Additionally, due to either a low ray count or a low-quality denoiser, RT Shadows, similar to other RT effects (as we will see later), exhibit noticeable noise, even at native 1440p with DLAA.

Performance impact: Enabling RT Shadows can reduce performance by up to 11%.

Ray Traced Reflections
This RT effect significantly enhances visual fidelity by rendering accurate reflections across the game's glossy surfaces.

As you can see here, increasing this setting extends the distance at which objects are considered for reflections.

However, similar to RT Shadows, there are some limitations. Many reflective surfaces, such as vehicle rear-view mirrors and bodies of water, do not receive RT Reflections. Instead, they rely on cubemaps and planar reflections, which can be distracting.

Additionally, as we saw with RT Shadows, these RT Reflections exhibit noticeable noise, as shown here.

Performance impact: On High, RT Reflections reduce performance by around 6%, while Very High and Ultra increase the impact to 14% and 16%, respectively.

However, in this scene, the performance hit is more significant:
  • High: 10%
  • Very High: 23%
  • Ultra: 25%
Ray Traced Ambient Occlusion
The last Ray Tracing effect is Ray Traced Ambient Occlusion (RTAO), and visually, this is the least noticeable one.

While the difference is visible when switching between comparison shots, during normal gameplay, it is unlikely to be noticeable.

Similar to the previous RT settings, increasing this option extends the distance and the number of objects that receive RTAO.

Performance impact:
  • HBAO → High RTAO: Costs around 9%
  • High → Very High: Costs around 11%
  • Very High → Ultra: Costs around 18%

Ray Traced Scene BVH Quality
Finally, for Ray Tracing, we have the BVH Quality Setting, which has a limited visual impact on most RT effects, as seen here with RT Reflections.

However, for RT Shadows, it has a noticeably greater impact on the number of objects that receive this effect.

Performance impact: In this scene, going from High to Very High has a small cost of around 4%.

Ray Traced Conclusion and Recommendations
So generally for Ray Tracing, I think RTGI is a must,
and if you have a capable GPU I highly recommend enabling it with High or Very High.

RT Reflections also provide a noticeable visual upgrade, but they are the noisiest of all RT effects.
If you want to enable RT Reflections, I recommend High,
as it provides noticeable visual improvement over the standard planar and cubemap reflections
without the significant performance hit of Very High or Ultra.

RT Shadows, on the other hand, are not worth the extra cost.
The implementation has major drawbacks, and in most situations, the standard softest shadows provide better results.

Lastly, RTAO has the least noticeable visual impact,
making it the least important RT effect to enable.

Also keep in mind that the performance impact of Ray Tracing varies depending on your CPU and your GPU's RT capabilities.
If your GPU has weak RT performance or you have a weaker CPU,
you might see an even greater performance hit than what I’ve shown when enabling Ray Tracing.
Frame Scaling (FSR1, TAA, FSR3, DLSS3 and DLSS4)
Let's move on to image quality and the new upscaling and Anti-Aliasing options.

And here at 1440p with the Quality Mode, we can see that both DLSS and FSR3 suffer from noticeable shimmering issues,
but FSR3 appears softer and struggles with ghosting and severe pixelation on fast-moving objects.

On the other hand, TAA with FSR1 are not even on the same level as DLSS or FSR3,
and they look significantly worse — which explains their higher performance.

At native resolution, FSR3 looks much better, with a significant reduction in pixelation, though ghosting remains an issue.
DLAA looks softer and struggles to retain the details on this moving wheel,
while TAA still looks blurry, and unlike when upscaling, it doesn't provide the same level of performance gain.

So overall, if you can't use DLSS, FSR3 — despite all its issues — remains a much better option than TAA.

And if you have an RTX GPU, I highly recommend overriding the DLSS Transformer model with preset K using Nvidia Profile Inspector.
This will provide a sharper image, better anti-aliasing, and improved texture clarity compared to the default DLSS.

Yes, there will be a performance cost,
but you can compensate by using a lower upscaling tier —
like here, where Quality DLSS 4 delivers a much better image than the old DLAA,
while still offering significantly higher performance.
Shader Quality
Moving on to Shader Quality — this one has a major impact on the game's visuals.

It affects Parallax Occlusion Mapping, which is only enabled when using Very High, as you can see here,
and also improves the accuracy of lighting in certain scenarios, like this sunset scene.

Performance-wise, I tested this setting across multiple scenes with parallax mapping, like here,
or lighting accuracy, and couldn’t measure any significant performance impact.

Therefore, I recommend leaving this one at Very High.
Texture Quality/Anisotropic Filtering
Let's move on to Texture Quality.

This is an area I wished Rockstar had improved to better complement the Ray Traced Lighting,
because even with Very High, the texture quality and assets don’t hold up particularly well.

As for VRAM usage, 8GB is more than enough for Very High textures at 1440p, even with Ray Tracing enabled.

And to keep textures clearer and sharper, I recommend setting Anisotropic Filtering to 16x,
as this doesn't cause any noticeable performance impact.
Particles Quality
Moving on to Particles Quality

As I mentioned before, the game features new and enhanced particle effects
that are only enabled when using Ultra, as you can see here.

These effects look significantly better, adding a noticeable improvement to the visuals,
but of course, this comes at a massive performance cost.

In my testing, I measured around a 16% performance drop when going from Very High to Ultra.

That being said, it's hard to justify downgrading to the original particles —
after all, we’re playing the Enhanced version of the game.

So, I generally recommend keeping this setting at Ultra.
However, if performance drops during intense combat scenarios or explosions become an issue,
then consider lowering it to Very High.
Tesselation
Next we have Tessellation.
This setting adds more depth and polygonal details to certain objects,
primarily affecting Trees and Palms Trunks.

In terms of performance, it has a negligible impact,
so I recommend keeping it at Very High.

Next, I want to talk about Water Quality alongside Reflection Quality,
as both contribute to a significant performance issue in this Enhanced Version.
Water Quality/Reflection Quality (Performance issues underwater)
So let's start with Water Quality.
This one is straightforward and affects the quality of water surfaces and water simulation effects,
in addition to Reflections on bodies of water.

There’s little to no visual difference between High, Very High, and Ultra,
and they also perform the same — with around a 6% cost when coming from Normal.

On the other hand, Reflection Quality controls the quality of both Cubemap and Planar Reflections.
Using Very High costs around 4%, while going up to Ultra drops performance by around 8%.

Now, the issue I mentioned earlier occurs when going underwater, as you can see here —
where the performance dips significantly, and both settings are the main culprits.
This happens when using Water Quality above Normal while also setting Reflection Quality above High.

Now, unless you spend a lot of time underwater in this game,
I recommend keeping Water Quality at Ultra and Reflection Quality at Very High.

However, until Rockstar fixes this issue,
whenever you plan to go underwater,
make sure to lower either Water Quality to Normal or Reflection Quality to High to prevent major performance drops.
Grass Quality
Moving on to Grass Quality

This setting simply adjusts the density and draw distance of Grass and Ground vegetation,
with both Very High and Ultra adding shadows to these elements.

While Ultra Grass Quality no longer has the same massive performance hit as before,
it’s still quite demanding.

Here, going from Normal to High costs around 8%,
to Very High around 12%,
and to Ultra around 18%.

So for this one, I recommend High or Very High.
Lighting Quality
Let's move on to Lighting Quality.
This setting is new to the Enhanced version,
and according to its description, it should adjust the lighting quality of the sun, moon, and local lights.

However, after spending a considerable amount of time trying to spot any visual differences between Normal and Ultra,
I couldn’t find any.

It’s possible that I’m looking in the wrong place, or this setting simply isn’t functioning correctly.

Either way, I recommend leaving it at Ultra,
since it doesn’t seem to have any noticeable impact on performance.
Shadows Settings (Shadow Quality, Soft Shadows, High Res Shadows)
Let's move on to the Shadow Settings, starting with Shadow Quality and High Resolution Shadows.

There is one key change in this Enhanced version compared to the Legacy one when it comes to shadows —
Vehicle headlights and local lights shadows now remain enabled even when using Normal or High, as you can see here.

Looking at performance:
• Going from Normal to High Shadow Quality costs around 2%
• Going up to Very High raises the cost to about 8%

However, enabling High Resolution Shadows results in a significant 13% performance hit when coming from Very High.

Because of this, I don’t recommend using High Resolution Shadows.
Instead, I suggest taking advantage of the Soft Shadows setting —
which can help reduce and hide shadow aliasing, as you can see here,
without causing a significant performance drop.
More Shadows Settings (Extended Shadow Distance and Long Shadows)
Another setting that can influence shadow aliasing is Extended Shadow Distance.
This increases the draw distance of shadows, allowing more of them to be visible on distant objects,
and as you can see here, it doesn’t have any major performance impact.

However, it does come with a drawback that I previously overlooked and didn’t mention in my last video:
When set above 0/10 bars, this setting starts showing aliasing in mid-range shadow cascades.

Unfortunately, this issue is still present in the Enhanced version.
Because of this, I highly recommend keeping it at 0.

And lastly, we have Long Shadows, which, as we saw last time,
doesn’t have any significant performance impact.
So, I recommend keeping it enabled.
Post Processing Effects (Post FX and In-game Depth of Field Effects)
Moving on to Post FX
This setting controls the quality of the new Bloom effect.

Going from Normal to High enables bloom,
while going further slightly increases its intensity.
Additionally, using Very High adds a subtle depth of field effect on distant objects, as you can see here.

Surprisingly, this setting has a major performance impact, especially at higher levels:
• A 10% cost when going from Normal to Very High
• Around 16% when going to Ultra

Because of this, I recommend keeping it at High,
but if you don’t like the bloom effect, drop it to Normal.

And I noticed something strange regarding the In-Game Depth of Field Effects Setting
Throughout my testing, I consistently found that High performs better than Normal.

If we take a look at this scene,
we can see that High has more artifacts and lower quality depth of field,
which explains the performance difference.

I don’t have a strong recommendation for this one since it’s mostly a matter of personal preference,
but if you like the effect, keep it on Normal to get the best quality depth of field.
Ambient Occlusion
Next we have Ambient Occlusion
This is another area where the Enhanced Version differs from the Legacy Version.

The old SSAO is gone, replaced by two new techniques: HBAO and SSDO.

Visually, SSDO has a darker and more intense Ambient Occlusion effect,
but because of this, it suffers from noticeable stability issues compared to HBAO, as you can see here.

In terms of performance, both options cost around 4%.

So for this one, I recommend using HBAO,
as it provides a more stable Ambient Occlusion.
Population Settings (Population Density and Population Variety)
Let's move on to the Population Settings, starting with Population Density.

This setting adjusts the number of pedestrians and vehicles, as you can see here,
and it primarily affects CPU performance.

In testing:
• I measured an average performance cost of around 6% when going from 0/10 to 5/10
• And about 11% when going all the way up to 10/10

As for Population Variety, it doesn’t seem to have any noticeable performance impact.

However, despite this, I recommend keeping both settings at 5/10.
And if you’re still having CPU performance issues, consider lowering them further.
LOD Settings (Distance and Extended Distance Scaling/High Detail Streaming While Flying)
And lastly, we have the Level of Detail settings.

Let’s first examine Distance Scaling
This adjusts the level of detail for distant objects, as you can see here,
and it doesn’t seem to have any significant impact on CPU performance,
even when increasing it from 0/10 to 10/10.

There’s also the Extended Distance Scaling setting,
which pushes the Level of Detail even further.
Performance-wise:
• Going from 0/10 to 5/10 costs around 5%
• Going up to 10/10 increases that to about 9%

The last setting here is High Detail Streaming While Flying
which, as the name indicates, allows for higher Level of Detail when flying, as seen here.
It’s quite challenging to measure the performance impact of this one,
but overall, it doesn’t seem to come with a significant cost.

So generally, for these settings, I recommend:
  • Distance Scaling: 10/10
  • Extended Distance Scaling: 5/10
  • High Detail Streaming While Flying: Enabled

And just like with Population Settings,
if you’re having CPU performance issues, be sure to lower the LOD settings further.

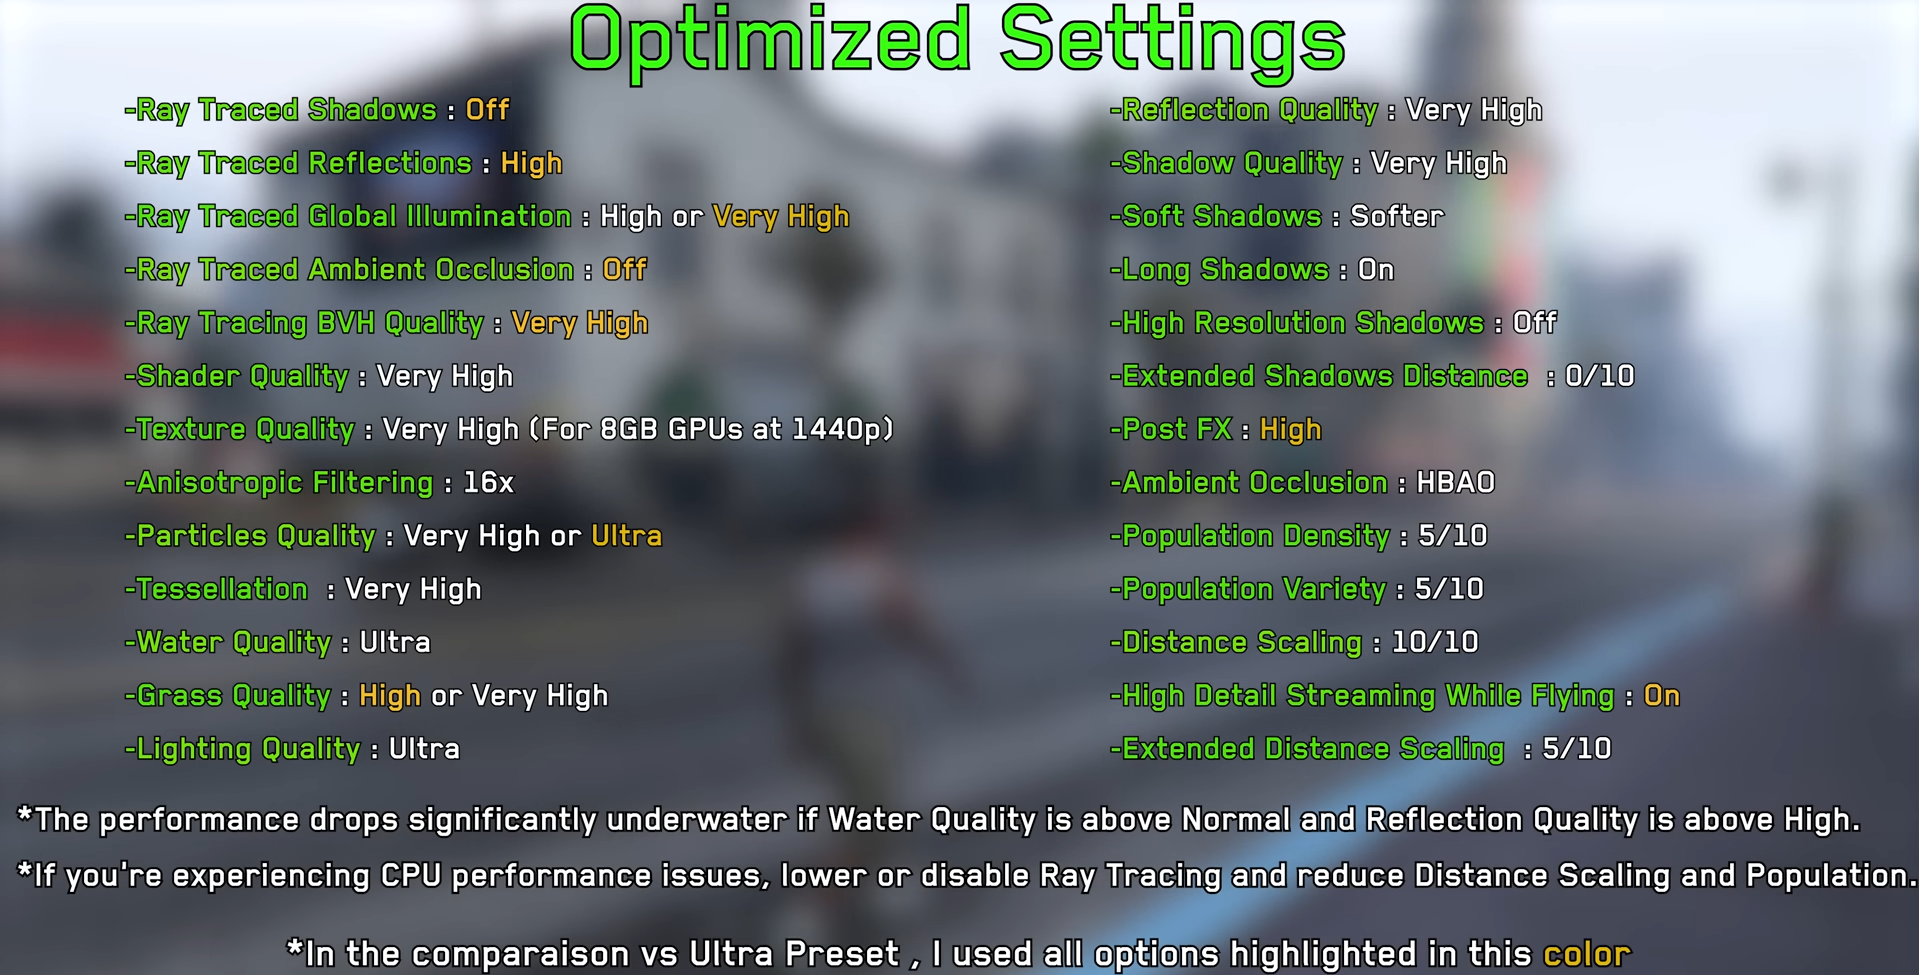
So, given everything we’ve discussed so far, these are my recommended settings for Grand Theft Auto V Enhanced.
Optimized Settings
So, given everything we’ve discussed so far, these are my recommended settings for Grand Theft Auto V Enhanced.
Optimized Settings Vs Max Settings
Now, let’s compare the performance of Optimized and Max Settings at 1440p DLAA.

To keep the comparison fair, I disabled RTAO and RT Shadows on both sides.
And as you can see here:

  • Optimized Ray Tracing offers an average performance improvement of around 87% over the Maximum RT Preset.
  • When removing Ray Tracing from the equation, the performance gain isn’t as drastic,
  • But we still see about a 32% boost when going from Max Settings to Optimized Settings.

A perfect example of how smart tweaks can deliver massive FPS gains with minimal visual sacrifice.
Conclusion
That brings us to the end of this guide.

This video was 100% sourced from the BenchmarKing channel, and if you want to watch the original video, it's below.

Thanks for reading! If you found this helpful, please consider favoriting/leaving a comment so it can reach more people!

https://www.youtube.com/watch?v=89MylWqN-Yo
5 Comments
⛧ɹǝʞoſsɐllǝʇnN⛧ Apr 19 @ 1:30pm 
ENG: Write something from the list below in my profile and I will do the same

+rep nice profile
+rep good player
+rep absolute
+rep 200 iq
+rep
+rep it was funny
+rep chill guy
+rep 𝘺𝘰𝘶'𝘳𝘦 𝘸𝘪𝘭𝘥, 𝘣𝘳𝘰
+rep love <3
+rep god
+rep nice game
+rep too cool...
+rep 𝙨𝙝𝙤𝙤𝙩𝙞𝙣𝙜 𝙜𝙖𝙡𝙡𝙚𝙧𝙮 1 𝙥𝙡𝙖𝙮𝙚𝙧
+rep good profile
Horaxis Traeger Apr 13 @ 6:58pm 
thanks for the guide
Just A Filipe Apr 11 @ 8:19am 
I just wanted to take a moment to say how incredibly helpful this guide has been. As someone who’s been playing GTA V for a while now, I thought I had a pretty good handle on the game—but this guide completely changed the way I play. The level of detail, the step-by-step explanations, and the clear organization made it so easy to find exactly what I needed. Whether it was completing tricky missions, finding hidden collectibles, or understanding the best strategies for heists, everything was laid out perfectly.


Huge thanks to the creators for putting this together. It’s without a doubt the best GTA V guide I’ve come across, and I highly recommend it to anyone, whether you're just starting out or looking to master the game. Amazing job!
CamaradaPedro Apr 10 @ 6:58pm 
great guide bro
Ultra Apr 10 @ 6:53pm 
BenchmarKing is hands down my favorite PC resource for gaming.