Alone in the Dark

Alone in the Dark

No hay suficientes valoraciones
The ULTIMATE Graphics & Performance Optimization Guide
Por 0p3r4t10n CHAOS
Cheap and easy performance enhancements, fixing blurriness, mitigating stuttering and lags.
   
Premiar
Favoritos
Favorito
Quitar
Introduction

This game has a lot of problems and I was about to discard it, because even though my tolerance is very very high when it comes to performance and graphics problems, this game is so insanely blurry and stuttery, that I had to find ways to fix it or else I couldn't play it. It depends a bit on your hardware how well this will work, but for me it now looks super sharp and the stutters are at least 90% less and only happen in some cutscenes or entering new areas for the first time. I'd consider this very playable now.


Please don't forget to LIKE if this guide was helpful for you. If you're happy with the results and feel generous leave a Steam points award. Commenting your experience will also be appreciated. Thank you and I really hope you find success with it.
Optimized Settings
Display Settings


I disabled Depth of Field, Chromatic Abberation and Motion Blur, because the game graphics are already a smeary mess as it is, so I didn't feel like adding onto it with more masking effects. DOF might be more cinematic for you during cutscenes, but other than that, I don't see a reason for it.

Setting FOV to 90 looks much more natural to me and more towards what you're used to from other survival horror games like Resident Evil remake. It can however reduce the scariness a bit, because you're not as up close for jumpscares.

Video Settings


The biggest performance killer is undoubtedly Volumetric Quality. Reducing it from Cinematic to Epic already gave me a 90% FPS increase without any noticable quality loss. Down to High it gave me another 10% FPS and I still couldn't tell the difference. It's quite crazy. I don't know if the options are working right actually. Simply because of the fact that I couldn't see a difference between the Shadows on the lowest and highest setting either.
You can toy around with reducing other ones if needed, but for the ones I've tried they barely did anything and for some settings the game unironically performed way worse with shockingly low FPS of -75% on lower settings. So to start off keep it all at Cinematic, except for Volumetric Quality and go from there.

I don't think the Pre Load Shader Setting does anything by itself, I kept it enabled regardless though. Beware that it comes with a 1GB VRAM penalty though, as far as I know. So if you're tight on VRAM, maybe don't enable it.
Fixing the blurriness
I highly recommend using DLSS instead of native, because the TAA anti aliasiing is so terrible, but what's even better is enabling the sharpening through your graphics driver. You can try it together, but I guess the best results would be achieved in native resolution without DLSS or FSR.

For AMD:
Enable Radeon sharpening in the driver. For 1080p I turned it to 100% and it actually works super well. Even higher native solutions don't look as clear as 1080p with the driver sharpening. Only if you go up to 1800p or 4K it starts to look as clear.


If you're really desperate for fps and need FSR, you can try using it in combination with the sharpening. I would probably recommend just going lower in your native resolution than enabling FSR, because the gained frames are really not worth the quality loss.


For NVIDIA:
If you are an Nvidia user and DLSS doesn't do it for you, you can try the same thing and enable the sharpening in the driver too and see what you get out of it.


Rough Sharpening Recommendations Based on Resolutions:
        
  • For 1080p I recommend 90-100% sharpening
        
  • 1440p probably 70-80%
        
  • 1800p around 50-60%
        
  • 4K you might get away with 20-50%
You'll have to play around with it and decide what looks best to your own eyes. This is highly dependant on your taste.

Something that could also be useful, if you're already maxed out on sharpening for lower than 1080p resolutions, is to try turning the Anti Aliasing setting down to High to make it sharper, but if you go any lower than High everything will start flickering.
VULKAN API Mod to mitigate stuttering and lags
I've tried all the engine.ini edits to modify UE4 shader compilation, like it's discussed in the forums,
[SystemSettings] r.CreateShadersOnLoad=1 r.HZBOcclusion=2 r.SkinCache.CompileShaders=1 r.DBuffer=0
but none of that actually worked to any measurable degree, neither does the ingame pre shader compilation setting. VULKAN is the only thing that actually does and runs like you want it to.

If your GPU is Vulkan capable, then there's no better fix for stuttering than this.


You unfortunately won't be able to use DLSS with this and it will break Steam Screenshots. I've got a workaround for this further down below though.

Installation:
  • download the newest version package.zip here: https://gitlab.com/Ph42oN/dxvk-gplasync/-/releases

  • extract and now copy and replace the d3d11.dll and dxgi.dll files from the x64 folder into whereever your game is installed to, for example: C:\SteamLibrary\steamapps\common\AloneInTheDark\AloneInTheDark\Binaries\Win64

  • Optional: You can read more on the gitlab page how to modify it through creating a config file "dxvk.conf" and applying certain commands. This is usually not necessary though for it to run. It will launch and work without a config.

I can't tell if this is the game or the mod causing this, but when you switch too many graphics options at a time you might be left with 20-30fps all of a sudden and only after you get back to the main menu and reload into the game the FPS will return to normal.

NOTE: People report having the best results after clearing their shader cache even without doing all of the above.

You might still have some stutters in cutscenes and traversal stutters when entering some areas for the first time. Traversal stutters are typical for Unreal Engine games. The problem is with the engine and some lags will be unfixable no matter what you do. This is the game we have, guys. I don't think it gets any better than this, sorry to say.
Better Frametimings for less stutters

https://www.msi.com/Landing/afterburner/graphics-cards

If you cap to your refresh rate and given that your average fps never dips below that, you will have the lowest input latency with no screen tearing and no need for any additional features like V-Sync, Radeon Enhanced Sync / NVIDIA Fast Sync, Radeon Anti Lag / NVIDIA Low Latency (NULL).
A lot of those will in fact make it worse, if combined unfavorably and cause more stutters and have higher input latency, than just capping your Framerate with RTSS. It is hard to believe, since they all sound so good and you'd think everything's cross compatible, but no. There's no one size fits all answer, but I'd say turn everything else off to start off with, cap your FPS with RTSS and then go from there.
Engine Edits for further enhancement
If you've done all that, you can try this out and see it improve even further. You might have to cut back on the driver sharpening again, because the TAA commands might do some of that job for you and you may end up with an oversharpened looking game if you use it all together. I've reduced mine by 10% after applying this, so to 90% sharpening on 1080p. See for yourself.

Navigate to C:\Users\YourUsername\AppData\Local\AloneInTheDark\Saved\Config\WindowsNoEditor and open Engine.ini to edit as a text document

Copy the code below to the end of the ini file and save it:
[SystemSettings] r.SceneColorFringe.Max=0 r.SceneColorFringeQuality=0 r.motionblurquality=0 r.Distortion=0 r.DisableDistortion=1 r.VRS.Enable=0 r.DepthOfFieldQuality=0 r.ShaderPipelineCache.Enabled=1 r.ShaderPipelineCache.Precompile=1 r.Tonemapper.Quality=0 r.TemporalAA.Quality 2 r.TemporalAACurrentFrameWeight .6 (with vsync) r.TemporalAASamples 2 r.TemporalAAFilterSize 0.09 r.TemporalAA.Upsampling 0 r.TemporalAA.R11G11B10History 1 r.TemporalAA.HistoryScreenPercentage 100 r.TemporalAACatmullRom 0

This is aimed at disabling masking effects, reducing any type of ghosting, tweaking the anti aliasing to look better and more attempts at better shader compilation. If you like the film grain, you can remove the Tonemapper command line, but I found it to be pretty horrible looking in a later stage of the game. Especially on lower resolution.
Workaround for Steam Screenshots
The Vulkan mod will make screenshots look like you're on psychedelic drugs.
-ALONE IN THE 60'S, LOL!

It's a bit tragic, because I like to take screenshots and the best workaround I've found for now is to just take them through your GPU driver and later upload them manually to Steam.

For AMD Adrenaline:


Here you can set your save folder for the screenshots.

Then you press the cogwheel in the upper right, go to "Hotkeys" and here you can set your keybind for a screenshot. I put mine to ALT + F1.


For Nvidia:
This was the next best video I've found for it.
https://www.youtube.com/watch?v=v-w7novAS_4
DLSS Swap for better visuals and performance
"DLSS Swapper is a tool that allows you to conveniently download, manage, and swap DLSS, FSR and XeSS dlls allowing you to upgrade or downgrade DLSS, FSR and XeSS version in a game without the game needing an update."

https://github.com/beeradmoore/dlss-swapper?tab=readme-ov-file


This is an insanely great tool, I am so impressed with it. It could not be easier and reverting the changes is also an inbuilt function.
If this was in any way helpful for you, I'd appreciate a thumbs up! :)
If you liked it, disliked it, whatever you may feel, please leave a rating. If it helped you out and you're happy with the results, leave a Steam points award. Comments are also appreciated.
5 comentarios
0p3r4t10n CHAOS  [autor] 8 MAR a las 15:46 
There's the folders in AppData from your driver and then there's more in D:\WINDOWS\Programme\Steam\steamapps\shadercache\1310410, which is the number for Alone in the Dark.

In the end you're the safest if you just clear out everything.
0p3r4t10n CHAOS  [autor] 8 MAR a las 15:25 
I mean if I'm honest, I didn't even go in there cleaning anything up manually. I just pressed the button in my AMD Driver and could notice an immediate improvement in the game where before it had always lagged when I went down a particular stairwell and afterwards it was gone or just sometimes a little microstutter in that place. So I guess that already did the trick. I can't comment on NVIDIA though.
RasterMaster 8 MAR a las 15:19 
Maybe it's easier to clear the DXCache like that:

Win + R
cleanmgr
Select "Direct X-Shadercache"
Press OK-Button

https://i.computer-bild.de/imgs/1/5/5/2/7/1/9/1/DirectX-Shader-Cache-836-2048x1152-dc2d2e56bf2b7008.jpg?impolicy=full_content
0p3r4t10n CHAOS  [autor] 8 MAR a las 15:10 
I might have had them from trying a DLSS crack for AMD on this game, but it didn't work and the uninstall did not remove all files.

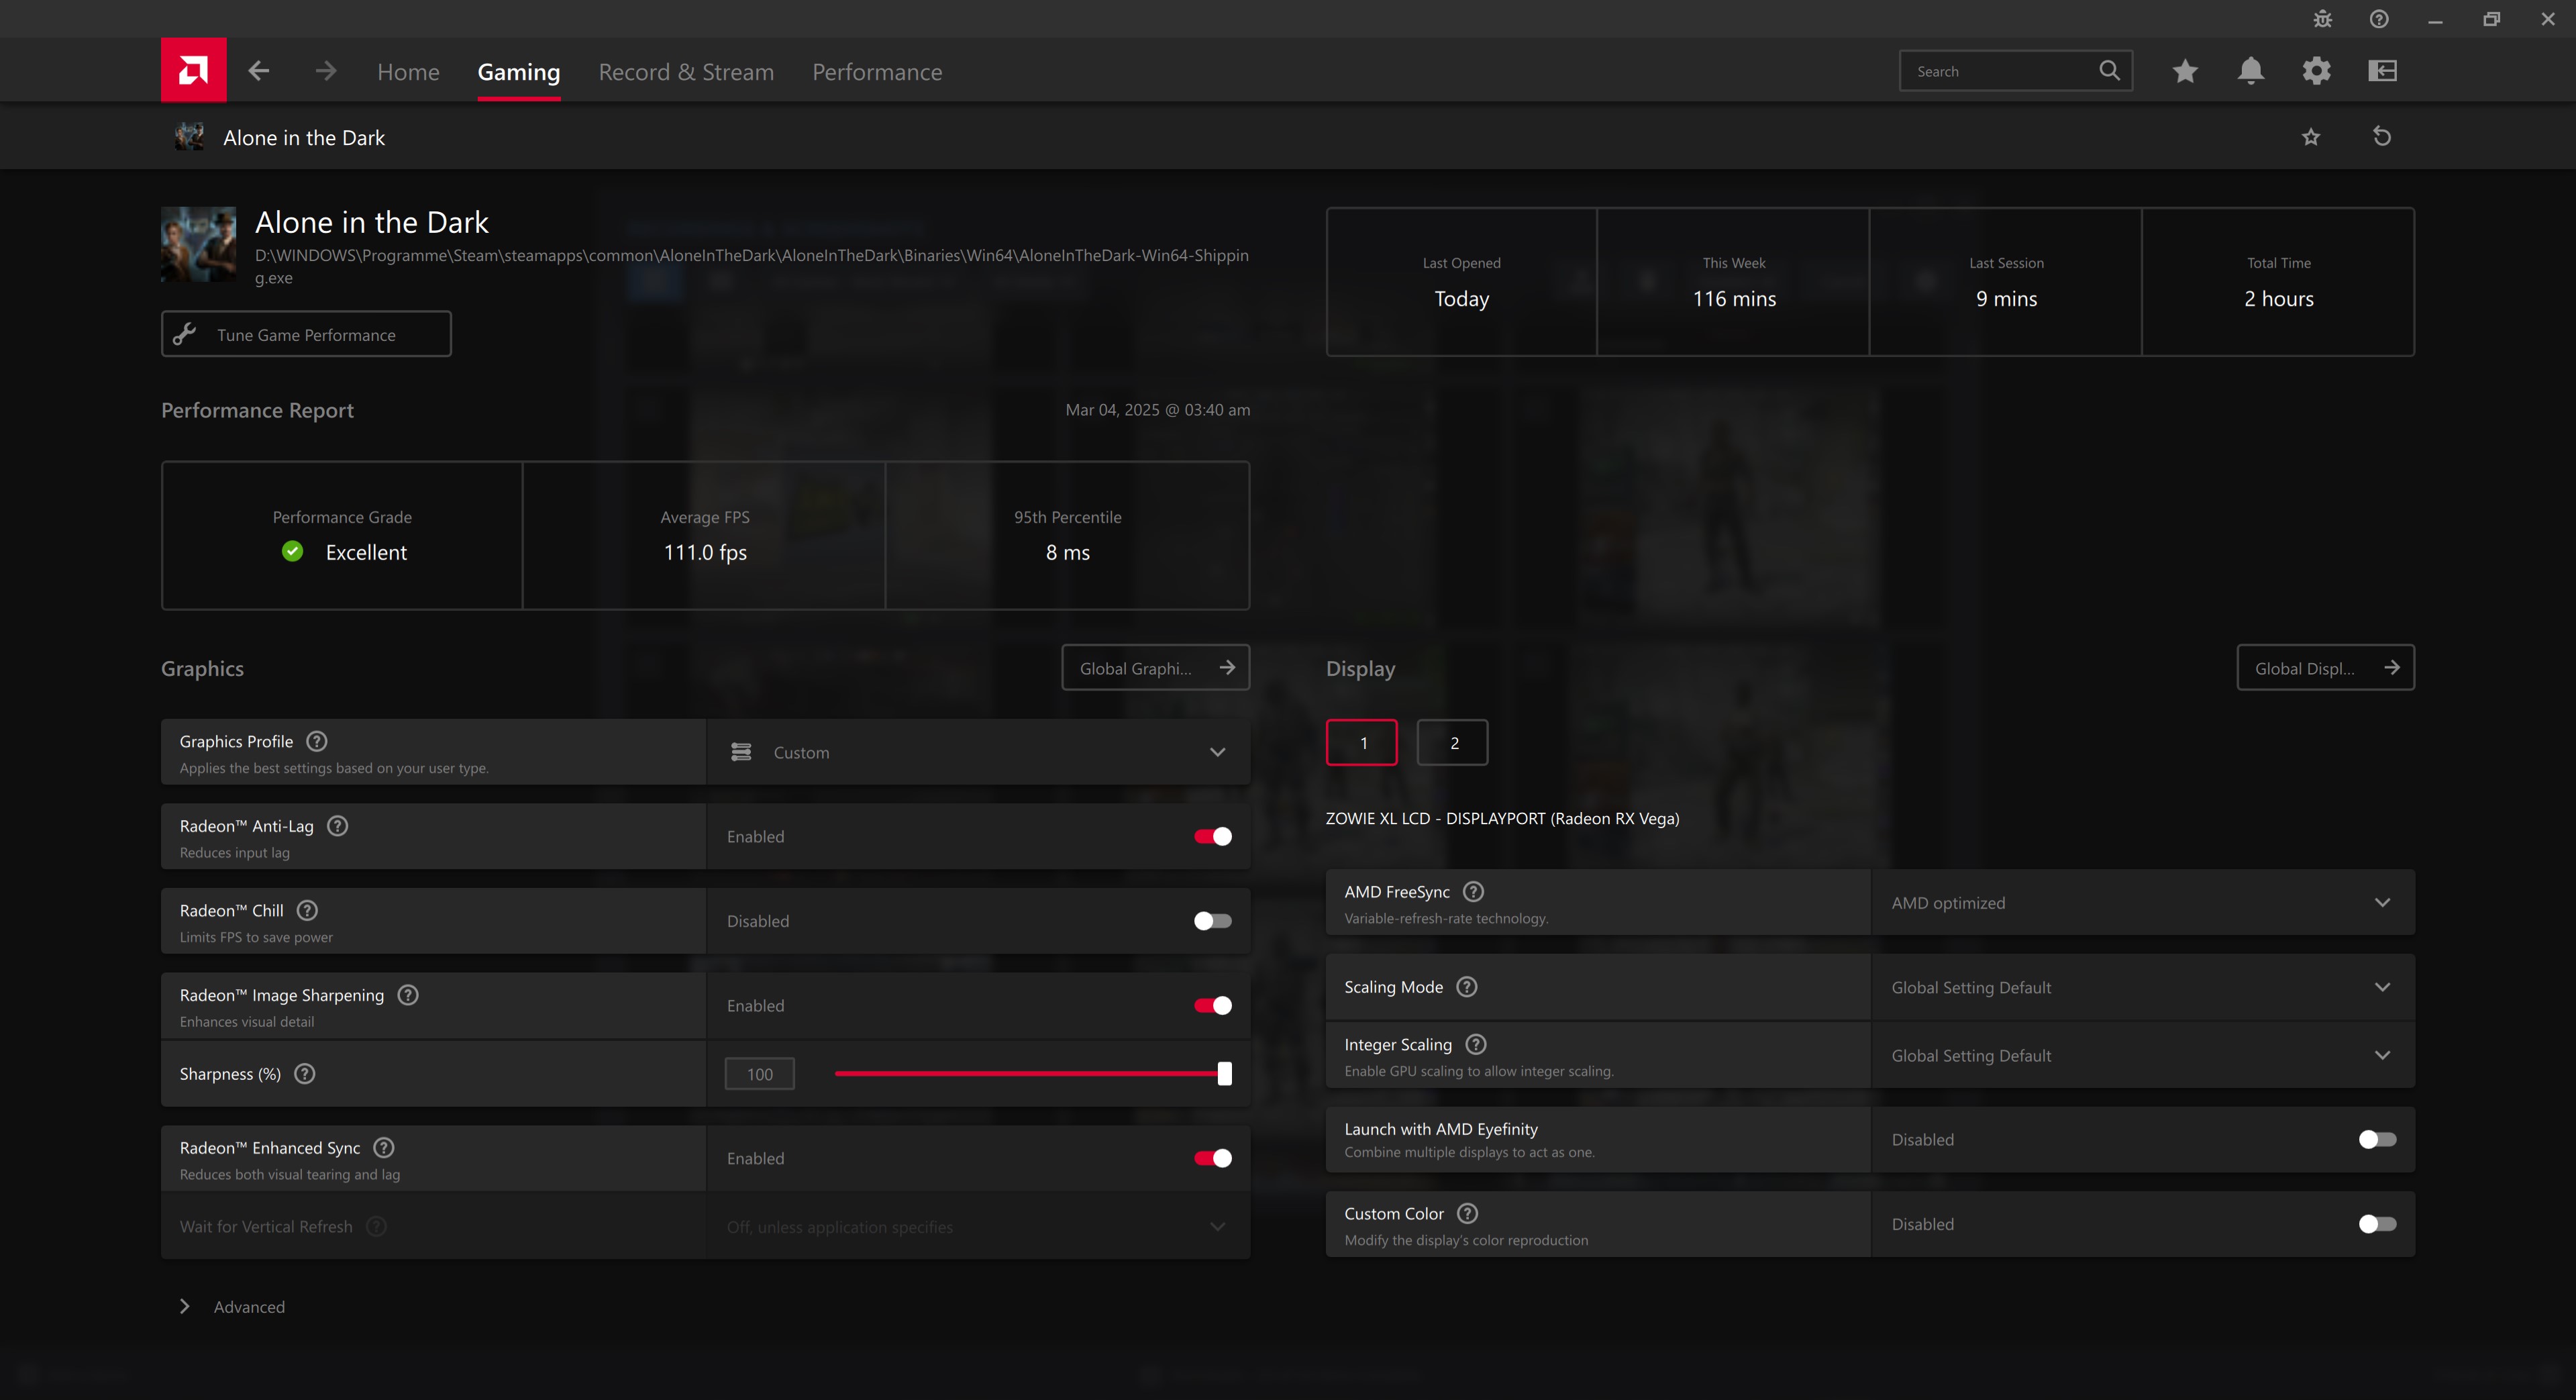
However... C:\SteamLibrary\steamapps\common\AloneInTheDark\AloneInTheDark\Binaries\Win64, is where you should copy them and then it will work.

You can check with the MSI Afterburner OSD monitoring overlay to see if it says VULKAN.
RasterMaster 8 MAR a las 14:45 
"extract and now copy and replace the d3d11.dll and dxgi.dll files from the x64 folder into whereever your game is installed to, for example:"

There is no d3d11.dll or dxgi.dll in my Alone In The Dark folder...