Revolution Idle

Revolution Idle

242 ratings
Revolution Idle Guide
By spidweb01
From Start to Finish guide current game version #0.230 (Unity in progress)
Does Not include the Secret Achievements.
25
8
15
4
2
2
2
   
Award
Favorite
Favorited
Unfavorite
Introduction
***NOTE: This guide is currently complete as of Game Version #0.225. I do not include Secret Achievements and most normal Achievements.


This guide is NOT meant to give you the most optimal way to do absolutely everything. What it is meant to do, is to provide some helpful tips to get from the beginning of the game to the current end while allowing the player to make adjustments for what works for them at each stage of progress. There is a Help option available in game that will give you the basics of gameplay, read that each time you unlock a new section or sub-section for the basics. The game is divided by 6 main sections of progress and this is what I will be focusing on.

*A Note about ACHIEVEMENTS: They give a Multiplier bonus to your main multiplier and Generators, so they are good to get, but don't waste time specifically to achieve them as the individual bonus isn't worth any extra time spent. Most achievements will be obtained just by playing and while you may get them in order, this doesn't always happen and doesn't mean you missed it. The only ones you may not get during normal play and may require a little extra time and/or effort are:

During Infinity, #'s 005, 021, 025, 026, 029.
Laboratory related are #'s 089, 090, 093.

All of these can be done almost instantly the further you progress. Achievement #029 is the only one that can be a little tricky, and you definitely want it as it becomes very important late game. I will cover these specific achievements further in the guide. Don't waste more than a few minutes just to get these. These are easy achievements, there is no reason to turn them into challenges.

Secret Achievements: There are other guides for those, so I won't go into them here.

1.) INFINITY : First Infinity, Upgrades, Generators, Infinity Challenges, Stars
2.) ETERNITY : First Eternity, Milestones, Animals, Eternity Challenges
3.) LABORATORY : Supernova
4.) DILATION
5.) DILATION TREE
6.) Unity
Infinity
BRIEF OVERVIEW:

Revolution Tab: The main playing area.

Time Flux Tab: Accumulates while offline and from Daily Rewards. You can use it to speed up the game, but some things like auto infinity don't seem to work very well with it active and/or when using Time Warp. The most efficient use is the x2 speed. I rarely use it but it can be very useful when you are in a long grind. I have never used Offline Flux, so can't say much more about it.

Statistics Tab: You can see various game data here which becomes extremely useful as you progress.

Achievements, Options, Help, Shop, Credits Tabs: Should be self explanatory.

Colors: Hotkey "B". The foundation of everything. Buy these with your Income.

Ascensions: Hotkey "A". Resets color level to 5, but increases the revolution multiplier initially by x10. Also increases max level.

Prestige: Hotkey "P" Gives a prestige multiplier and exponent bonus at the cost of resetting all colors and ascensions.

Promotions: Hotkeys "1- 4". Resets all colors, ascensions, and prestige but gives multiplier to the specific promotion you bought. #1 Multiplier, #2 Lap speed, #3 Ascensions, #4 Increases power of the other promotions. Promotions do not reset until infinity is reached.


FIRST INFINITY:

Not hard, but slow and tedious especially at the start. Buy colors and ascensions as they become available. I do recommend using at least hotkey "B", otherwise you will be doing a LOT of clicking. The hotkeys listed are the game defaults, you can change them in "Options".

*Note: For this guide, I bought nothing in the shop (not even with daily rewards). I also use Scientific notation (changeable in Options). Also just purely based on how long the first infinity takes compared to the second, I don't think the achievement bonuses obtained get applied until after Infinity.

Grab Achievement #005 "Check the Dev". Simple. Hit the "Credits" tab on the right.

Because Prestige and Promotions cause a reset, you want the bonuses to be worth the penalty of the reset. But you also don't want to wait too long to get the bonus. Some generalized recommendations:

First Prestige: The ingame "Help" recommends when the multiplier is x10. I use this x10 increase up to 1 million. (10 > 100 > 1000 > 10,000 > 100,000 > 1 million). From there you generally want the multiplier bonus to be at least x1000 of your previous amount (1 million > 1 trillion.....1e12 > 1e15 > etc). As your promotions get stronger, it will start to speed up and your prestige after promotions will be much higher and it will increase much faster.

First Promotion: The ingame "Help" recommends #1 Multiplier gain at x6 which would be level 3. This will be when your P. Mult is at about x13k so be patient and wait for it. After that there is some flexibility, you just want the bonus to be worth the reset. I do #1 again at lvl 8 followed by #2 at lvl 10, then back to #1 again at lvl 20 and lvl 30. Starting to speed up now, #3 at 30, #2 at 40, #1 and #4 at 50. Just promote what you want at this point. It should be no less than a 10 level increase and you'll get to the end before long.
My final lvls: #1 at 80, #2 at 40, #3 at 70, and #4 at 50 and just ride it out to the end. Probably not the fastest, but it will get you there.

*Note: While it's not hard to get some of Achievement #'s 021, 025, 026, 029 during your first Infinity, I prefer just to get through this Infinity as they are much easier in the future with less clicking.

Congrats! First Infinity complete.

**Checkpoint: Not important but for reference: My first Infinity time was 12 hrs 7 min.

A new Infinity tab unlocks with Upgrades and Generator subtabs. You received your first Infinity and an Infinity Point (IP). Yes, they are different and some upgrades provide bonuses based on the number of Infinities, others provide bonuses based on the number of current IP. All upgrades and generators are bought with IP. Now you can buy the first upgrade which allows automation for buying colors. Save your fingers, go into the new Automations tab on the right, and turn all colors on at 100%.

I recommend turning Off Infinity animations in Options so when complete it will immediately start the next run. Continue doing the Infinities and buying more upgrades and generators when you can afford them. Your second infinity you should notice that it goes much faster and you can do fewer prestiges and promotions, which saves considerable time.

If you haven't done them already, now is a good time to start getting the achievements that require a little more than normal gameplay. I just do one of these achievements per Infinity, but that's up to you. You can also do them later if you choose.

#021 "You don't need it. Promote without Prestiging". Leave promo #4 at lvl 1 otherwise play the Infinity as normal (including prestige). When Infinity progress is around 50% do any #1-3 promotion followed by promotion #4 without prestiging in between them.

#025 "Only three, Prestige with only 3 colors". Same strategy as #021. Play as normal until progress bar is around 70-90%. Turn OFF autobuyers and don't use Hotkey "B". Promote any #, then only buy first three colors, Prestige as soon as available.

#026 "Easy Prestige. Promote without Prestiging and Ascensions" Same strategy as achievement #021 above. When you're ready, turn OFF Ascension autobuyer (if you have it), do any #1-3 promotion, buy colors but don't prestige or ascend, do promotion #4 when available.

#029 "Backwards, Make White mult > Pink mult >Purple mult, etc." The colored numbers at the top of the screen are the multipliers referred to. White needs to be the biggest, and Red the smallest. When you are getting close to the end of the Infinity, turn OFF all color and ascension autobuyers except White. Prestige (not promote) to reset the colors and keep the high P .multi, then quickly unlock each color. When you get to White work your way back up buying decreasing amounts for each color. Don't buy Red at all. Check the numbers at the top and buy more of whatever is needed. You may even need to Ascend some colors. You can mouse over the colors to see what the multiplier is per revolution as well. This helps determine if you need to buy more of a certain color. It's actually easy to do, but don't feel bad if it takes a couple times to get the hang of it. If you feel you messed it up or it's taking too long, just finish the Infinity and try again on the next run or buy more upgrades to help before the next try.

Some important upgrades to note:

Upgrade 2:2 unlocks Automation for Ascensions so go ahead and turn them all on.

Upgrade 5:3 unlocks Automation for Prestige. I always set Min P. Exponent gain to 0, so can't really say if it might be useful. I set Min P. Mult Gain to 1000. The Time is how long it will run after it reaches the target amount which can be useful, but not really right now. So for now I set it to 0-1000-0. It will get the job done but you still need to do promotions and probably a few prestige before you want the auto x1000. At this stage in the game, it is more efficient doing them yourself, so setting it On or Off is up to you.

Upgrade 7:1 unlocks Infinity Challenges.
Infinity Challenges
Infinity Challenges: These improve your IP gain per Infinity. Each completed challenge adds a +1 Multiplier to your IP gain per Infinity up to x10 when all challenges are completed. Once all challenges have been completed, several upgrades also provide bonuses based on your total challenges time. For this reason, you will want to reduce these times as much as possible as you buy more upgrades and generators. Once all challenges have been completed at least once, you will also be able to break Infinity which will enable much, much better IP gains.

*Note that until all challenges have been completed at least once, the Challenges time sum in statistics is meaningless. You can also exit a challenge by clicking on it x3.

*Using Time Flux during the longer challenges can really be helpful to speed them up. But you should probably turn it off when you are getting close to the end so that it finishes correctly. Not saying that it won't finish correctly, but why risk it?

Challenges #1-2: Not much to say, Due to the penalties, they will be a little slower than normal Infinity but not a whole lot.

Buy the 10 IP Generator

Challenge #3: This will be slower than the first two. Use Time Flux if you want to speed it up.

Buy upgrades 8:1-3 at a minimum before continuing with challenge #4. At this point you should be doing Infinities in 3-5 mins for 8 IP so it doesn't take that long. I prefer to spend extra time to get the next set of generators (100 IP each) but that's up to you.

Challenge #4: Nothing really to say here, except it's even slower. Time Flux if you want.

If you haven't already, buy either upgrade 9:1 or 9:2, and 10:1 which unlocks automation for Promotions. Finally! Set up automation so you can take a break. This setup should get you an infinity approx. every 1 min 10 secs. Feel free to make it faster.

***NOTE: I do not use promotion automation during challenges, so any automations listed are not designed for challenges.

Automate Prestige 0 - 1000 - 0

Automate Promote
#1 +6 Lv 0 s
#2 +22 Lv 0 s
#3 +35 Lv 0 s
#4 (or any) +500 Lv 0 s (This is to stop it from repeating and let the prestige carry it to the finish).


I like to farm here for about an hour and buy Upgrades 9:1-2 (if you skipped either), and 11:1-2. These increase in power based on current IP.

Challenge #5: Promotions are extremely weak and do basically nothing. Turn off your Promotions and let auto prestige take it to the end. Easy and fast compared to earlier challenges.

Challenge #6: If you took the time to farm earlier, this will be a breeze. If not, it can be a very slow start.

Challenge #7: Slow in the beginning. By the end, Promotions should overpower the penalty without much trouble.

Time to farm some more upgrades up to 14:1-2 and generator. Should be getting about 1 IP/s now. None of the column 15 upgrades will help so no need to get them yet.

Challenge #8: No Ascensions. Promotion #3 does nothing so don't use it. About 100 levels of the other promotions should get it done.

Challenge #9: A long slow grind. About 110 levels of all promotions and ride it out.

Challenges Complete!

*Reference: Still not really important yet. My total challenges time: 8 hrs 22 mins
Infinity Breaking
A new "Break Infinity" appears at the bottom of the challenges tab. Broken Infinity allows you to go beyond Infinity which adds a multiplier to your IP gain. With each progress bar beyond infinity gradually increasing up to x10 when full. A 50% full bar would still give x5 multiplier. Above the progress bar you will see a new bar, click on it to Claim that amount of IP and reset the run. Unfortunately it's still not super useful right now but will be very soon. Feel free to check it out.

At this time, I still recommend unbroken Infinity since it will give about the same IP/s and also increases your Infinity count (for the upgrades that use that stat for their bonus). I used this setup to buy upgrades 15:1-4 starting with 15:2

Prestige 0 - 1000 - 0
Promote
#1 +7 0s
#2 +18 0s
#3 + 500 0s
Gives about 2.5 IP/s. (approximately an hour to buy all 4 upgrades)


Now that you have those, it's time to re-run all the challenges to get the total time reduced. The faster your times are the more it can boost 15:3-4 which is a key part of broken infinity runs, along with other upgrades based on Challenge times that you will be getting soon.

Note: From now on, any time you want to reduce challenge times, turn off automation for prestige and promotions, they will almost certainly slow you down (#9 can still be rough so automation is ok for now). Make sure Infinity is not broken (challenges won't finish if it's broken), and get those times down. With that done, It's time to break Infinity for real.

Checkpoint: New Challenges time sum should be around 1 hour.
*Reference, mine was 1 hour 5 min.

Automation setup for broken Infinity:
Prestige 0 - 1000 - (time anywhere from 0 - 0.10) The reason why you might want a delay is to give it a little extra time to buy more all at once. This reduces the total number of Prestiges which might save some time. I use 0.00 but feel free to experiment and use what you like.

Promotions:
#2 +10 1s (I like Lap Speed first, but it probably doesn't make much of a difference)
#1 +10 1s
#3 +10 1s
#4 +10 1s


The 1 second delay here IS important. It keeps them about the same level. Without it, you can have one promotion that's 50+ levels above the others and that's not good. You want balance.

Automate Infinity: (unlocked with 15:1 upgrade only works with Broken Infinity)
This is where you will make most adjustments from now on. "Min IP": This is the amount set where it will automatically claim and restart. "Time": I don't really know how this is supposed to work. I tried various things to try and test it but results were inconsistant so.... I just leave it at the default .05

For your first Broken Infinity run leave Automate Infinity OFF. You want to watch it until Auto prestige and promotions basically stop going full speed. Click on the "Infinite for xx IP" and note the amount or check statistics for the total claimed as well as IP/s. The total IP claimed is the number you should put into automate Infinity and now turn it ON and let it farm.

*Reference: Mine at this point was 700 IP in 1:50 for 6.41 IP/s

***Common Mistake*** Don't let it run for hours thinking it will be a huge IP reward. It's a complete waste of time right now.

Buy the next set of Upgrades starting with 16:1-3.
Each time you buy an upgrade, see if you can improve on the IP gains the same way as above. Very quickly you should see a big difference. Buy the Generators for 10k each.

Run the Challenges again to further reduce the time.

*Reference: My time is now 15 min 33 sec (a nice improvement)

You should again check to see what to set auto Infinity to. Set it and farm IP to buy the generators for 100k each and.... Re-run the challenges. At this point you should try to get Challenge times under 10 mins. If you have trouble with that, build up your reserve IP to boost Upgrades 11:1-2.

*Reference: My Challenge time sum now 6 mins.
Infinity Broken
Instead of checking your IP gains like previously, this time just go ahead and set your auto Infinity amount to 1.1e6, which just so happens to be the cost of the next upgrade, plus a little extra. In about 20-30 mins check on it and see where it's at. If it didn't auto claim yet, use your own judgement if you want to claim it and reset or let it auto finish out. Once you buy one upgrade, you can increase the amount about x2 and repeat. Buy upgrades 17:1-3 followed by the generators.

And WOW! That's a high inflation to the next set of upgrades.
Better try to get your challenge times under 3 mins.

Buy the next sets of generators on the way to the upgrades.

Probably the "correct" way to reach the next set of upgrades is either turn OFF auto Infinity or Set it very high and do a run for 30-40 mins (set a timer or something) then claim IP. Do next run for 50-60 mins and compare the IP/s. If the 50-60 min run had higher IP/s, then do an even longer run and compare that IP/s. Keep doing this until you find the "optimal" spot. Set your auto Infinity to that amount. Or set a timer for a specific time. It would be really nice if the time on auto Infinity worked for this purpose, but it doesn't seem to, or if it does I never could get it to work that way consistently.

If you go with a specific time, you will notice your claimed IP and IP/s increasing each run. If you set a specific target amount, you will notice your Time decreasing and IP/s increasing each run. I find that about 60-90 mins is a decent time for a while both for IP/s and stopping to buy more stuff.

Whatever method you choose, it's a little bit of a grind for upgrades 18:1-3 but shouldn't be too bad if you get your challenge times under 1 minute.

Continue to use the same process to keep buying upgrades and generators. After several upgrades/generator purchases do the challenges again. Rinse and repeat.

When you buy the final upgrade, a new Infinity sub-tab unlocks for...

Stars: Simply produces Stardust.

Stardust: Multiplies Generators and can be used to buy Stardust Upgrades. Stardust resets when you claim IP so try to buy upgrades before the reset.

There's really nothing different from what you've already been doing, keep buying stars and stardust upgrades and generators.

When you reach 1.79e308 IP, you can "eternate". When it's available it will appear above the "Infinite for xx IP" bar (You probably will have have to first claim the IP for the Eternity to appear). If your prestige is still going you may see it blinking, if you have trouble clicking it, turn off the automation.

Congratulations! You have just received your first Eternity and Eternity Point (EP). Just like Infinity and Infinity Points, these are two separate things.

*Reference: Not important but my first Eternity time was 3 days 20 hrs
Eternity Beginner and Zoo
First Eternity: Each Eternity provides passive Eternity Bonuses which are permanent and can be viewed in the Eternity Milestones tab. Eternity Points will be used to buy Laboratory and Animal Points when they become available a little later.

The bad news with your first Eternity is that everything else gets reset and you will need to go through it all again for your next Eternity. However, with the Eternity Bonus and all your achievements it will be faster (although it will still feel slow). You can now see Eternity Milestones and how many Eternities are needed for each perk or additional feature. For now you need....

Eternity Milestones #1-2: Self explanatory

Eternity Milestone #3: Unlocks Eternity Zoo
Animals: Each animal provides a bonus and is bought with Animal Points (AP). Animal Points can be purchased with Eternity Points, current run Score, or current run IP. There is also an Animal Milestones sub-tab.

*NOTE: When Infinity or Eternity resets, so does your current Score and IP, meaning you need to buy AP when they are available before reset. To get higher Score/IP you will need to break Eternity with Milestone #10.

Animal Milestone #1: unlocks slowdown.

Slowdown: Basically reduces lap speed in exchange for an Ascension. Can only be used when all colors are solid. When you first get it, you need to be careful not to slow down too much. If you use the slowdown too much and prestige or a promotion resets colors, the slowdown remains in effect, which can be a real drag. You can "speedup" again, but it's better just to not overuse it. Having said that, it is very much worth using when you get into the longer IP runs.

With a couple animals, Eternities should be going much faster now. You won't be able to do too much more with animals for now, so the next goal is to keep unlocking Eternity Milestones, but keep buying AP when you can.

Eternity Milestone #4: Buying colors (revolutions) now costs nothing. Nice!

Eternity Milestone #5: Unlocks Auto IP Adjuster

Auto IP Adjuster: When IP is claimed (either manually or by using Auto Infinity value), the adjuster multiplies your Auto Infinity value by the Auto IP Adjuster value increasing the Auto Infinity value so you don't have to. You then only really need to buy upgrades and generators.
Example: Automate Infinity value 1e110 x Auto IP Adjuster 1e10 = 1e120 New Auto Infinity Value
(The number after the "e" is how many places are after the first number, so 1000 = 1e3)

Eternity Milestone #6: Unlocks Eternity Challenges

Each challenge provides an immediate bonus when completed. In addition, there are also Challenge Milestones for completing a combined total number of any challenges. Each challenge also has 5 levels of difficulty. Each difficulty provides completion bonus and adds to the Challenge Milestone count. Unlike Infinity Challenges, once completed there is no reason to run a challenge again (you only get the bonus once). Completion time does not matter.

You do not need to complete challenges when they first become available. In many instances it would take far longer than you would want. If a challenge is going to take longer than 30 mins, in most cases there are better things to do with that amount of time.

Animal Milestone #2: Unlocks Auto Slowdown. Nice you don't need to do it manually anymore, but with auto active, it can definitely slow you down too much. I do not understand the math of it, but for now, if you set it to 1000, it should be about right for gains vs. speed loss.

Eternity Milestones #'s 7-9: Unlocks Auto Eternity (set it to 1), Auto buy Infinity upgrades, stars/stardust, generators (turn them all On with Generators to Max buy setting).

Eternity Milestone #10: Breaks Eternity
When you can break Eternity, you can get a few more Animal Points with Score and IP, but not a whole lot yet. Once you buy the AP that you can with broken Eternity, I recommend just auto Eternate at 1 Min EP for now.

When you have 11-13 AP, buy or respec to animals 1:1-2, 2:1-4 (If you have enough AP to buy 2:5 even better) for focus on lap speed and go into the Eternity Challenges and complete Challenge #1, difficulties 1-3 for the first Challenge Milestone. These will be slow in the beginning but after the 1st Infinity will be very doable. Before your next eternate, get you Infinity challenges as low as they will go since Challenge Milestone #1 allows you to keep the best times.
Eternity Laboratory and more Zoo
At this point buy or respec animals so that you have at least 7 total for the next Animal Milestone.

Animal Milestone #3: Unlocks Laboratory
Spend EP to generate Lab points which fill the beaker. Each time the beaker fills you get 1 Research Point (RP) to upgrade 1 of 6 bonuses. Currently there are only 4 that are worth the investment:
#1 IP Gain, #4 EP Gain, #5 Gen power Exponent, #6 Common Exponent.

Right now, you don't have enough power to get very far into Broken Eternity which means your EP gains are probably maxed at maybe 3 or 4 per run (as you noticed, you need a lot more than that). You need to kickstart the Lab to get more EP. I highly recommend your first 6 RP be spent on #4 EP Gain, and then into #1 IP Gain so that #1 is about x2 more (a 2:1 ratio up to 16 pts in EP after that all in IP). This ratio can change with less in EP.

**Noted: The above is what I used. Some people say that all in IP is always better, so find what works for you.

I also highly recommend turning off Auto Eternity since it can fluctuate a lot (I've had anywhere from 30-118 EP with the same settings). When progress comes to a halt, just claim EP.

If you do want to use Auto Eternity, make sure it's a low enough value that you know you can hit and not get stuck grinding and about a 10-15 second timer so that it can go beyond that point as well. Still a good idea to re-evaluate it after buying lab upgrades.

Before long you should be able to buy 10 total animals I went with 1:1-5, and 2:1-5 but that's up to you.

Animal Milestone #4: Promotions reset nothing. Nice!
Go into your automations and set all your promotions to +1 and 0 sec and watch it go nuts.

***Challenge Checkpoint*** Now would be a good time to finish Challenge #1 for the next Challenge Milestone. Respec your lab to a 1:4 ratio into upgrades #5 and #6. The ratio does change so check it. For me the 1:4 ratio worked all the way into Dilation but there can be a lot of variables so find what is best for you.

***NOTE: To quickly find the best ratio for the lab, Set a target amount in Auto Eternity that would take approximately 1-3 mins. When it reaches the goal, switch the ratio to what you want to check and compare EP/s. This works better after you have Animal Milestone #5.

Challenge Milestone #2: Prestige resets nothing. Excellent !
Now you can set your Prestige mutiplier however low you want (I use x2, but that's up to you).

You should also be able to do Challenge #2 x2 and Challenge #3 x1

Challenge Milestone #3: Unlocks Supernova. Go Supernova when possible for more boosts.

***NOTE: This is the last time I call out challenges, do them when you want just remember they are not worth spending long periods of time on. It's more important to keep the other things progressing and the Challenges will finish in seconds or minutes when you're able to.

Now that Prestige and Promotions reset nothing, you can also change Auto Slowdown setting. After some testing, 10 seems to be the best for me. Others disagree so feel free to experiment.

For now keep working on the Lab and Animals. Occasionally switch between the IP/EP lab setup (for gaining EP), and Gen power/Common Exponent setup at a ratio of 1:4 (for score to buy AP and Supernova). Again, verify that that is a good ratio for you.

Turn ON auto Eternity for IP/EP setup to probably between 3-10 secs (you can leave value at 1).
Turn OFF auto Eternity when doing Score/supernova runs.

*Note: You can respec your animals to focus more on IP/EP or Score/SN. I found this to be too tedious and just left them as described and didn't respec at all.

Animals to get: Right now the goal is 20 Animals for the next milestone. I recommend them to be the whole block 1:1-5 through 4:1-5 You can get them in any order but IP and EP boosters should be priority, but 5:1 is a bit too expensive right now.

Animal Milestone #5: Get 100% of IP you would get from Infinity per second.
This is excellent! Now you can grind out EP points and set a more precise target value for Auto Eternity. Keep checking your EP/sec. I find that very short times are best.

***Achievements: If you haven't already done this and have 60 RP, respec the lab and put 10 points into each upgrade. Achievement #'s 089, 090, and 093 complete.

About Lab level 130 or Supernova 4 or 5 you should be able to turn Auto Infinity OFF for even better gains and Auto Eternity time can probably be set to about 0.5 secs in IP/EP setup.

Next Animals goal: 5:2 (Frog) then 6:2-9 (Giraffe down through Pegasus)
You should be able to get a Supernova about every 10-20 Lab Research points. Remember to turn off auto Eternity and switch lab focus to 1:4 ratio between #5 Generator: #6 Common or what works best for you, and also check to see if any Challenges can be quickly finished. Buy Score AP before switching back to IP/EP setup.

After you have Animals 6:2-9, I recommend the cheapest which would be 1-4:6 (Gopher through Bull).

**Checkpoint** You should now have Supernova 20 or 21, Laboratory about lvl 410, and 28 or 29 challenges completed.


At this point your Score/Supernova Lab setup should be getting about the same results for EP gains as the IP/EP setup and you should now be able to do longer runs with better results. If not it will before long so look for it. When It does, either set a target value for EP or claim it when you want. You want a balance between gaining EP and keeping the lab growing. Keep upgrading the lab, buying Animals, getting Supernovas and occasionally checking in on Challenges.

From this point forward, Lab points should always be in #5 and #6. The only thing that changes is the ratio. For now 1:4 seemed to be the best for me. I highly encourage you to find what works best for you since there are many variables.

Animal Milestone #6: +10 free levels to all RP upgrades (a very nice boost).

Challenge Milestone #6: More free Research upgrades.

Finishing Animals will go much faster now.

**NOTE: for Eternity Challenge #9 put all lab points into #6, since generators are useless.

Challenge Milestone #7: More free Research upgrades. Challenge Milestones complete!

Animal Milestone #7: Unlocks Dilation. Animal Milestones Complete!
Dilation
In order to progress in Dilation, you need to first Enter Dilation (with extreme penalties). The higher your score is in dilation, the more Dilation Point (DP) Income you will receive when you Exit Dilation mode. Income will generate at a constant rate based on your Dilation Score. Buy Dilation Upgrades with the DP Income.

***Note: You can continue to buy AP points. Right now they don't do anything, but will later on. So you can buy them, or ignore them for now.

***Tip: Before you "Go Dilation" reset the lab for all points into #6 Common Exponent. Generators won't be much good there for a while yet.

For your first Dilation run, I recommend letting it go until your current max score is about 1e30. This will give you an Income of 2.00 and gives you something to slowly work with. Immediately go back into dilation to improve the score to around 1e60. Income will continue to generate while in Dilation. Buy the #1 dilation upgrades when available to slightly reduce the dilation penalty.

By this time your lab production has probably slowed so do a normal run for EP to keep the lab moving. You could probably change your lab ratio to 1:3, but again verify what works for you. Check this occasionally, as it will gradually become a 1:2 ratio and then 1:1 towards the end of Dilation but can also fluctuate back and forth.

The only tricky part about Dilation is striking a balance. As you noticed, while in Dilation it slows down quickly so I don't recommend staying in dilation for more than 30-60 mins. Cycle between being in Dilation to raise income and being out of Dilation to keep the lab moving, and get Supernova. You want enough upgrades outside of dilation to make substantial push while inside of dilation so you don't waste a lot of time. Until you have a high enough income to buy more of the dilation upgrades, the lab is really the only way to do this so you want to keep it moving.

***TIP: When you first enter dilation you have 0 Infinity, so when you reach Infinity in Dilation, claim the IP. You get an achievement but more importantly this will kick start your generators. You will need to do this each dilation run until you can easily buy Infinity upgrade 18:1 to get the few generators you have moving. (This seems to be fixed with game version #.230)

I don't really know of a good way to speed this up. Just keep the lab growing and try to get better score in Dilation. Since you get 0 EP in dilation, I spend more time increasing lab production.
I also prioritize EP spending on lab production in the order of "Power" > "Mult" > "Base" and usually try to get enough EP in one run to upgrade all of them at least once.

Challenge #10: When you have maybe about 150 - 170 levels of Dilation Upgrade #1, and other upgrades in the same price range, put all lab points into Common Exponent for the challenge. Upon completion this will give a much needed boost to DP Income (x10). If you want to do it earlier and spend more time to complete it, I would say it's worth it, as it will end up saving a lot of time in buying upgrades. Wish I had done it sooner for myself.

For Reference: I did Challenge #10 with 180 levels of Dilation Upgrade #1 and it took about 35 minutes. I would consider it worthwhile even if it took several hours without time flux.

When you can reach Infinity Upgrade 20:2 while in Dilation, you can start using the same lab setup ratio for both in and out of dilation. I was using 1:3 ratio but verify what works for you.
***Caution: Do not change this while in dilation as this will force a reset.

Challenge #10 difficulty 2: I started this with Dilation #1 at level 225 and lab level 1140 (all in Common). Took just under an hour to complete. So now you have a better idea when you want to start it.

After this Challenge, my lab ratio started to fluctuate between 1:1 and 1:2. This continued back and forth into the Dilation Tree so I won't be noting these changes. Use whatever works for you.

That should keep things moving smoothly for a while.

Challenge #10 difficulty 3: I started with Dilation Upgrade #1 at level 325 and lab 1450 (all in common exp). Completed in 53 mins.

Challenge #10 difficulty 4: I was making good gains so didn't start this one until Dilation Upgrade #1 was level 390 and Lab level 1805 (all in Common exp). Completed in 3 mins.

Challenge #10 difficulty 5: I started with Dilation Upgrade #1 at level 440 and Lab level 2050 (all in common exp). I turned on auto infinity to claim the amount I could get quickly in order to buy Infinity upgrades and bought up to 16:1-3 and about 3k extra to boost 11:1-2 although the extra probably didn't do much. The upgrades significantly reduced the time.
Completed in about 15 mins.

All Challenges complete: Dilation Tree unlocked. First Dilation Tree Point (DTP) requires 1e27 DP.

**If you have been ignoring buying AP, now is a good time to start buying them when you can.

Final run to get DTP 1, my income 5.27e22 and Supernova 44. Stop buying Dilation Upgrades when you are ready to wait. About 5 hrs to first DTP without using Time Flux.

Dilation Tree
***IMPORTANT*** Since the Unity update, some things have changed so that the later stages are a lot smoother. I will try to verify and update the info when I get here (again). Things to look for: Lab ratio may have changed with #5 being stronger than previously. Some tree upgrades may be better or worse which could affect build order. Just be aware the builds probably still work, but this whole section was made prior to the Unity update and probably needs overhauled. Thanks
==========================================================================

My goal is to lay out point distribution builds that allow progress, but expect to grind for a day or more in one build as you get closer to the end. This may not be the most optimal, but it will get you to the current last achievement end game.

There are 5 permanent upgrades that will always provide some sort of bonus and never get reset which allows for progress. Adding points to Dilation Tree should ALWAYS be improving at least one of these permanent upgrades, they are: Eternities (boost Eternity milestone bonuses), Supernova, Dilation Tree Points (DTP), Dilation Upgrades (#4-9), and Animal Points (AP). *Note that when you are boosting one of these, most likely there is little or no progress in the others. You need to switch focus to improve each aspect by changing DTP from one setup to another. You can also save up to 3 free setups to make changing builds easier and I recommend using one each for Dilation, Supernova, and AP builds.

There is a penalty cost for changing Dilation Points of 5% of Dilation upgrades #1-3 and DP score and Income is reset. For this reason, you should always do a Dilation Point build between other builds to offset this penalty and not let it become a worse penalty (losing 5% + 5% is worse than just 5%).

***VERY IMPORTANT*** When you have 13 DTP get Achievement #140. Also, if you haven't already, turn Off Eternity Automation (unless trying to get lower Eternity time), it has the potential to severely slow you down especially when trying to buy Animal Points.

While it's not absolutely necessary at this stage, I do recommend your first goal is to increase Eternities (with 3 DTP) which will boost all other aspects through Milestones Eternity bonus. Doing this now, will make the next stages of progress much easier and faster.

BUILDS:

DTP Levels 1-3: (C) 1 - (M) 1-1-0-0

Once you have all three DTP and passively generating Eternities, your only goal is to increase Eternities so you can turn ON Auto Eternity to 1 and 0 secs. You may also be able to reduce eternity time this way, which boosts M2. The fastest Eternity time that I got at this point was 14 ms. Almost all will be 17 ms, but you can get a "lucky" trigger.
Do this anytime you do Eternity build and hope for 10 ms (it's nice but not absolutely necessary).

Get around 2 million Eternities, turn OFF Auto Eternity, then respec to:

(C) 1, (T) 1-1-0-0

General build cycle order (not absolute): Dilation> Supernova> Dilation> Animal> repeat...(Add in Eternity Point Build when things slow down too much or you want to go afk for hours. The goal for Eternities is about 4e10+ by DTP 39 and it will take a long while. But I don't recommend spending a lot of time with Eternity build until you have at least 13 DTP for maximum passive eternities.

When you get your 4th DTP point, continue below to the first Dilation Upgrade Build.

ETERNITY POINT BUILD: Apply points in the order given (example: Max M2, before single M3).
===================

DTP Levels 3-40
(C) 1, (M) 1-5-1-5 (extra points can go basically anywhere as they won't do much of anything).
As far as I know, the fastest possible Eternity is 10 ms for 3,046,350 per/s.
*Becomes obsolete at DTP 41. Get Eternities with Animal Point Build*


DILATION UPGRADE BUILDS: Apply points in the order given (Achievement #140 at DTP 13).
=======================

Before 120 Supernova: DTP Levels 4-16+ :
(C) 1, (B) 1-1-5-0, (C) 5, (T) 1-1-0-0 (M) 2-0-0-0, (add to T2 if needed)

***Note: It's been brought to my attention that for 8 DTP The following is better
(C) 1, (B) 1-1-3-0, (T) 1-1-0-0 Not sure if that remains true after 8, or if it's just an oddity. When I tried to test this on my next run through, (following my own advice to get 2 million Eternities first and general build order getting supernovas), I literally blew past this point in a minute or two, so I still can't say if that's better or not and had no issues with the earlier point order. So if you've followed this guide, it shouldn't matter :)

**Note: If it seems slow getting to Supernova 120, most likely you need AP and/or didn't get Achievement #140 (I made both mistakes and is why I'm making this note).

With 120+ Supernova: DTP Levels 13-17 :
(C) 1, (M) 1-1-5-5, (C) 5
DTP Levels 18-39: Keep the above then continue
(C) 5, (M) 5-1-5-5, (B) 1-1-5-0, (T) 1-1-1-5 (Then max T2)

DTP 39+ and with approximately 4e10+ Eternities (more eternities makes this better):
(C) 5, (M) 5-1-5-5, (T) 1-4-1-5, (B) 1-1-1-5 (Finish B3 then T2 and finally B2)
*(If you have 1.1e11+ Eternities, finish T2 then B3)


SUPERNOVA BUILDS: Apply points in the order given
=================
*Early DTP levels, claim AP before switching back to Dilation Build*

DTP Levels 4-16 : (C) 1, (T) 1-1-5-0, (B) 1-1-1-5
DTP Levels 17-41+: Keep the above then
(C) 1, (T) 1-1-5-5, (M) 1-1-5-5, (B) 5-5-1-5, (Then max M2 for more eternities)
*Becomes obsolete at DTP 45 as it merges into Animal Point Build.*
*Supernova 155 at about mid to late DTP 41
*Supernova 156 at about mid to late DTP 44


ANIMAL POINT BUILD: Apply points in the order given.
===================

DTP Levels 13-41+: (You shouldn't need this build early. Get AP with early Supernova build)
(C) 1, (M) 1-1-5-5, (B) 5-5-0-0, (T) 1-1-1-5 (then max B4 and M2 then T3)
*Extra points don't really do anything since primary things are maxed.

Late game these runs can take several hours or even a day or more before any new points can be bought. Since you need to manually buy the AP, make sure Eternity Automation is OFF so it doesn't reset without buying any AP and wasting time. And since it can take so long just to get these points, make it worthwhile. Rough estimate of a minimum of 5000 AP each run (unless it slows down too much). Another method that seems to work is to farm AP the same amount of time that it takes to get where you left off. If it took 12 hrs just to get to the point where you can start buying them again, spend 12 hrs minimum actually buying them.

LAB POINTS: No special build needed. You will get lab points during Dilation and AP builds. Lab points might vary on how you apply them for optimization, The only place worth using points is #5 (Gen Power Exponent) and #6 (Common Exponent). At the beginning of Dilation Tree 1:1 ratio was better for me but shifted to a 1:2 ratio part way through. In the later stages it moved all the way to everything in #6 Common Exponent. There are too many variables to say when the ratio change happens but all in #6 probably no later than DTP 37 and Supernova 152. Once that happens, it never changes again.

Expect things to slow down drastically at about Supernova 153 and DTP 40. This really starts the end game grind where you will need much longer runs to make any gains, specifically for AP.


End of Content: Game Version #0.226
Final Achievements (as of game version #0.226)

***May contain Spoilers***

Continue grinding away to get DTP 45 (Supernova and Animal Point Builds should be the same at DTP 45). When you reach Supernova 157, you have a choice to make.

Option #1: Do NOT claim the Supernova. This allows you to keep moving in your current run and you can grind it out to the final achievement.

Option #2: Claim Supernova 157 which will cause Eternity reset so might as well go back to Dilation buildup for final run. If you want to get more AP or Eternities before the reset hold off on going Supernova.

My first playthrough I chose to claim SN 157 since that run had already run 2 days+ and slowed down a lot. I also felt that my Eternities and other upgrades were still kind of low. Second playthrough I chose not to claim SN 157.

Whichever option you choose, when you do reach the final EP goal, be sure to let it overrun the EP amount needed, you don't want to spend all that time only to miss it because of some number rounding issue. Probably about 30 minutes to be safe. Claim the EP and claim the Unity.

Congratulations!

First playthrough (Pre-Unity)
Reference: I started final run with DTP 46, Supernova 157, Lab lvl 16,340 (all in Common Exponent) , AP 467k, Eternities 1.48e12 and it took 2 days 2 hours (actual play time).

A few other stats: Total playtime 36 days, Fastest Infinity 33 ms, Challenges time sum 618 ms, Fastest Eternity 16 ms

2nd playthrough (Pre-Unity)
Reference: Started final run with DTP 45, Supernova 156, Lab Level 16,245, AP 452,220, Eternities 1.95e12 and it took 2 days 2 hrs to reach score for SN 157 (did not claim).
Final run total time 3 days 12 hrs.

Other stats: Total playtime 24 days 10 hrs, Fastest Infinity 33 ms, Challenges time sum 604 ms, Fastest Eternity 10 ms
New Content Unity: Version #0.230
In Progress...might be a while for this to get updated with better info.

When you claim the 1.08e2466 EP another claim button will show to claim 1 Unity. Unity resets most of the game but automations and achievements remain. You are given 4 Zodiac signs to pick from and they each have 2 bonuses out of 4 possible, so two players with the same zodiac could have different bonuses. You can also re-roll zodiacs at the cost of Souls.

Aries appears to be the best for your 1st choice, but I chose Scorpio just to see how it would play out. Which one you choose also affects what your potential for "next zodiac" becomes available. After choosing your zodiac, it appears in the Inventory screen of the Unity tab. Drag and drop to equip it to the Sun (which unlocks Mercury) or Mercury spots at the bottom.

***CAUTION: If you move your zodiac sign from one planet to another, it will cause a Unity reset so only switch at the beginning of a Unity.

***NOTE: Refer to the "Appendix" section for more Zodiac and Planet bonus info.


Make adjustments to automations that you want and start the grind all over again...It is possible to use auto Slowdown which can be a huge boost, just be aware that since Slowdown is technically still "locked" it's not possible to "speed up", except by claiming the IP and restarting the run. Use it wisely. If you don't mind some micro managing, once you get into Broken Infinity, start with it set to 500 or 200, then work your way down to 10 for the big gains. Something like 200>100>10. Remember to reset it before going into the next run so it doesn't slow too much at the beginning.

I'm comfortable using the automations the way they are, so haven't really messed with the macros, but this can be useful for lowering your challenge times without going through them individually. Screenshot only shows the end, just use the same for the beginning. Really only useful once you no longer need to Prestige or Promote to finish them.
Appendix: Zodiac and Planets Info
***Please be patient it's a work in progress. Anyone with missing or incorrect info feel free to post in comments***


ZODIAC SIGNS:
=============
Sorted by Element, Name- Season: four potential bonuses. underlined potential bonus appears exclusively on that Zodiac sign. Higher "Rarity" can have all four bonuses.

Rarity

Garbage to Epic: 2 Zodiac Bonuses
Legendary to Godly: 3 Zodiac Bonuses
Divine and Immortal: 4 Zodiac Bonuses


Fire Element: Red

Aries- Spring: Multi Gain, Promotions Power, Ascension Power, Common Exp. Power
Leo- Summer: Lap Speed, Center DTU Effect, Achievement 29 Reward, Game Speed
Sagittarius- Winter: Lap Speed, Slowdown Power, Ascension Power, Common Exp. Power

Earth Element: Green

Taurus- Spring: IP Gain, Infinity Gain, Gen. Exponent, Mult/bought Gen
Virgo- Autumn: Star Base, Infinity Gain, Gen. Exponent, Mult/bought Gen
Capricorn- Winter: Star Base, Stardust Exponent, Gen. Exponent, Mult/bought Gen

Wind Element: Light Blue

Gemini- Summer: Eternity Gain, EP Gain, Supernova Requirement, Lab Mult Power
Libra- Autumn: DP Gain, EP Gain, Supernova Requirement, Lab Mult Power
Aquarius- Winter: DP Gain, Free Lab Levels, Supernova Requirement, Lab Mult Power

Water Element: Dark Blue

Cancer- Summer: DTP Cost, Center DTU Effect, Achievement 29 Reward, Game Speed
Scorpio- Autumn: Luck, Center DTU Effect, Achievement 29 reward, Game Speed
Pisces- Spring: Luck, Zodiac Quality, Achievement 29 Reward, Game Speed

=====================================================================

PLANETS: Bonus received for equipping zodiac sign
=========

Sun:

Spring: Zodiac Quality x1.5 (Aries, Taurus, Pisces)
Summer: Luck Mult x1.15 (Gemini, Cancer, Leo)
Autumn: Unity Rewards ^1.100 (Virgo, Libra, Scorpio)
Winter: Eternity Reward ^1.2 (Sagittarius, Capricorn, Aquarius)

Mercury:

Spring: Eternity Gain x2 (Aries, Taurus, Pisces)
Summer: Infinity Gain x10 (Gemini, Cancer, Leo)
Autumn: DP Mult x2 (Virgo, Libra, Scorpio)
Winter: Stars Cost ^0.9 (Sagittarius, Capricorn, Aquarius)

Venus:

Spring: Game speed x1.2 (Aries, Taurus, Pisces)
Summer: Lap Speed x3 (Gemini, Cancer, Leo)
Autumn: Supernova Rewards ^1.02 (Virgo, Libra, Scorpio)
Winter: Dilation Upgrade x1.05 (Sagittarius, Capricorn, Aquarius)

Moon:

Spring: Luck Mult x1.2 (Aries, Taurus, Pisces)
Summer: Unity Rewards ^1.15 (Gemini, Cancer, Leo)
Autumn: Eternity Rewards ^1.15 (Virgo, Libra, Scorpio)
Winter: Zodiac Quality x1.3 (Sagittarius, Capricorn, Aquarius)

Mars:

Spring: Infinity Gain x5 (Aries, Taurus, Pisces)
Summer: Dilation Points x1.8 (Gemini, Cancer, Leo)
Autumn: Star Cost ^0.85 (Virgo, Libra, Scorpio)
Winter: Eternity Gain x2 (Sagittarius, Capricorn, Aquarius)

Jupiter:

Spring: Lap Speed x2 (Aries, Taurus, Pisces)
Summer: Supernova Rewards ^1.03 (Gemini, Cancer, Leo)
Autumn: Dilation Upgrade Power x1.03 (Virgo, Libra, Scorpio)
Winter: Game Speed x1.1 (Sagittarius, Capricorn, Aquarius)

Saturn

Spring: Unity Rewards ^1.1 (Aries, Taurus, Pisces)
Summer: Eternity Rewards ^1.1 (Gemini, Cancer, Leo)
Autumn: Zodiac Quality x1.2 (Virgo, Libra, Scorpio)
Winter: Luck Mult x1.1 (Sagittarius, Capricorn, Aquarius)

Uranus

Spring: Dilation Point Mult x5 (Aries, Taurus, Pisces)
Summer: Star Cost ^0.93 (Gemini, Cancer, Leo)
Autumn: Eternity Gain x3 (Virgo, Libra, Scorpio)
Winter: Infinity Gain x3 (Sagittarius, Capricorn, Aquarius)

Neptune

Spring: Supernova Rewards ^1.04 (Aries, Taurus, Pisces)
Summer: Dilation Upgrades Power x1.06 (Gemini, Cancer, Leo)
Autumn: Game Speed x1.4 (Virgo, Libra, Scorpio)
Winter: Lap Speed x10 (Sagittarius, Capricorn, Aquarius)

Pluto

Spring: Eternity Rewards ^1.15 (Aries, Taurus, Pisces)
Summer: Zodiac Quality x1.25 (Gemini, Cancer, Leo)
Autumn: Luck Mult x1.25 (Virgo, Libra, Scorpio)
Winter: Unity Rewards ^1.15 (Sagittarius, Capricorn, Aquarius)

Chiron

Spring: Star Cost ^0.9 (Aries, Taurus, Pisces)
Summer: Eternity Gain x2 (Gemini, Cancer, Leo)
Autumn: Infinity Gain x100 (Virgo, Libra, Scorpio)
Winter: Dilation Point Mult x2.5 (Sagittarius, Capricorn, Aquarius)

Fortune Pars

Spring: Luck Mult x1.5
Summer: Luck Mult x1.5
Autumn: Luck Mult x1.5
Winter: Luck Mult x1.5
Appendix: Macros
I don't really like the Macro system, but will try to include some here when I get around to it...
Thanks !
Thanks to the many people that provided their hints, tips, and setups that were a great help. There were many along the way, and I can't remember them all, so thanks to everyone especially: s1borg, arronax06, Thanatos, DiMono, Kyouko Tsukino, fractalgem, Elementus, roboticaust, and zeysoft. I would have given up on this game without your input. And from the Discord Community, Rosa Laminae and Stayven for the majority of the Zodiac/Planets info.

Thanks to the people that rated, awarded, and commented on my first Steam Guide ever. As I write this, there are currently 100 people that favorited this guide and I'm happy that so many people found it helpful enough to do that.

And thanks for the feedback and comments that have helped to improve different points of the guide. It was made for all of you. Thank You!
83 Comments
TolikKrymov 14 hours ago 
I love your guide. My suggession is to add more informative screenshots of the zoo in the related parts of the guide
Ninjahoernchen 15 hours ago 
you need to unlock lab of course for it to work, as soon as you done some easy trials, you will have ECs done from the start, so you get 7 animals which will unlock lab. but guess this is only for #5 and #6 since you wont have enough before that
Streketh 18 hours ago 
free lab levels don't seem to be working until you have the lab unlocked, so at least for me they haven't been helpful for the trials. (maybe the automation unlock at 10 unities lets you start with it open? not there yet)
slowdown power (asc amount) was amazing and made the 5th trial trivial once added to the other bonuses i had already.
might be strong enough to get the 6th one too.
Ninjahoernchen Apr 24 @ 2:21pm 
for the easy challenges, try to get one of each for the early game zodiacs
- lap speed
- mult gain
- promotion power
- ascension power
- common exponent power
- and if you manage to get one then free lab levels

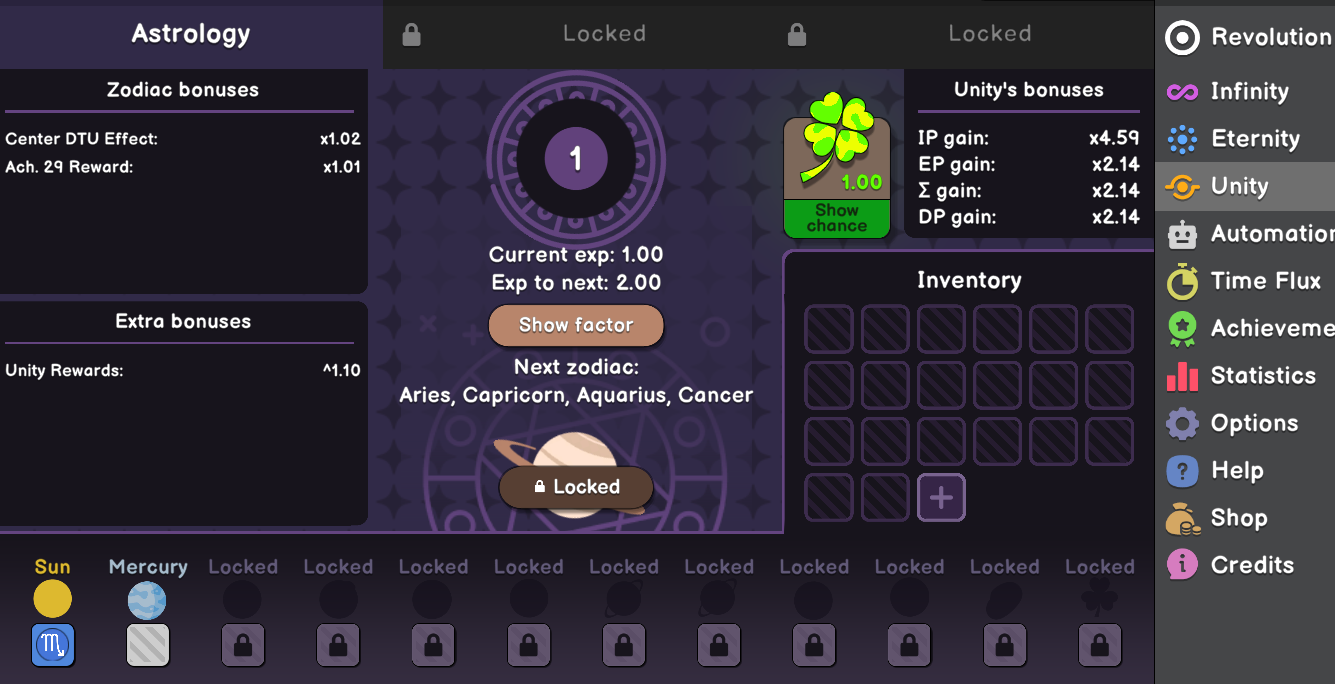
also make sure to place them on the right planets to gain the extra bonus stats that help with early game. managed to beat all easy trials by around the 10th unity.

now i could need some tips for the #5 and #6 medium trials if anyone beat them yet? :D
yandrakgod Apr 24 @ 12:39pm 
thank you for the info ill try to do as you did and see what happens
Streketh Apr 24 @ 12:03pm 
@yandrakgod I have completed 6 unities so far, and have completed the first 4 trials.
I did them in the order 2,3,1,4 (might have been 2,1,3,4 not 100% certain).
2 is by far the easiest. they all take a bit of time, but it mostly comes down to what zodiacs are using.
having zodiacs that boost late game (supernovas/DP etc.) speed up unities a lot, but do nothing for the trial. To beat them, try to equip zodiacs that focus on early game stats
like mult gain/promotion power/common exp power/ascension power etc.

also, once you've completed the first trial (#2), remember that you get access to AP from the start of the unity because of the free EC completions, buying pets make progressing through the others a lot easier.
yandrakgod Apr 24 @ 7:37am 
did anyone reach any of the easy unity challenges ? cause i dont really know how or when to do them
im trying them in my 5 unity but im not reacching close to any of them
spidweb01  [author] Apr 22 @ 3:18pm 
@Maymne Yep, you're right. Thanks for the correction. That's why I use ratio instead :)

@dathompson The power of T2 depends on Eternities. Guide used to say 1e11+ Eternities but from other feedback here, I lowered it. Also B3 depends on Supernova, so it's possible to have really high eternities early and still have lower SN.

Hope to be able to verify something soon and make a hopefully clarifying note about it.

And thanks to everyone for the feedback.
dathompson Apr 22 @ 8:59am 
For dilation upgrades builds DTP 40+, you should do B3 before T2. I was getting around 1e850 DP with T2 and 1e910 DP with B3.

Here is what the guide currently says:
DTP 40+ and with approximately 6e10+ Eternities (more eternities makes this better):
(C) 5, (M) 5-1-5-5, (T) 1-4-1-5, (B) 1-1-1-5 (Finish T2 then B3 and finally M2 for eternities or T1 for better dilation score)
Maymne Apr 22 @ 8:08am 
Actually, 1:4 ratio would be 20% into #5 and 80% into #6, as 25:75 is 1:3 instead