Uncle Chop's Rocket Shop

Uncle Chop's Rocket Shop

61 ratings
UCRS For Dummies 101 [WIP]
By Bot Stummy Hurts
This guide will help you with all base modules in UCRS. + Tips
3
2
2
   
Award
Favorite
Favorited
Unfavorite
Introduction
Didn't really see a full guide to help me out on solving certain things so I decided to make one, hopefully it'll help someone. I obviously would suggest people to try and playing/solving them by yourselves when starting off. This guide is mainly to help those who are stuck or confused!
Most spoiler stuff will be skipped, however I might make a guide for it later on.
Some things here might be wrong/Have other methods of doing it, but these are how I solve my modules. They are also slow and clean fixes, so preferably done in Focused Fixing Mode.

First off, when starting a new run i'd really suggest you to play on the Focused Fixing mode.

The difference?
Frantic Fixing
  • Has a time limit every day.
  • Can Earn way more money.
  • Can ignore some minor mistakes.

Focused Fixing
  • Only 3 Jobs per day. Able to add one more job later in the game by paying 250 Coins

  • Earn less money but still manageable.
  • Mistakes are more costly.
  • You can take as long as you want.


At the start most people will have trouble reading through the guide book and struggle making the time limits for each module, especially later on into the game. Thus focused fixing helps a lot to learn how each module sorta works.
You are able to change which mode you want after every new run so don't worry too much about it.

Some tips to help you out

  • Grab the checklist before the jobs (Especially jobs with a lot of modules.
    You can scratch out jobs which you have completed.
  • If your hands hurt/annoyed/lazy by the wrench and screwing motion you can use electric ones.
    .
  • Later into the game you can buy upgraded electric ones! You can also buy perma electric tools with omens! There is a cheese however. Once you acquire the ability to buy the electric upgrades, it usually takes a day to appear. You can skip this by turning on the Tool assistance option. If it is already on, just off/on.
Fuel Module
Electric Fuel
Usually you'd start off with something like this.
Follow the red arrows


Don't forget to check which fuel it requires. Usually the electric fuel has this setup!

If any of the fuel cans are broken like

Just buy new ones in the store. You can trash the broken one. Or place it in the auto repair storage.


Move onto the fueling station

If you want a perfect fix, it needs to be maxed out! Otherwise above 50% is good enough.


Once filled go back to the fuel module.

Remember to rescrew/bolt you have to change the mode of the tool by pressing A/D (On PC)


You can also open up the fuel module


When starting off there is usually no problems with wiring. However it is always best to check it out since you might find hidden stuff inside.

Once it is all done close everything back up, if you did it right and perfect you'll get this.

Water Fuel

Way easier than electric fuel.


Pull lever down and press all em buttons. Top Left button just checks the wiring and for hidden stuff.
Wiring is usually okay, but check just in case especially the further into the game you go!


Replace broken or missing fuel tanks.
Go back to the fueling station and change the fuel type to water.


Fill like usual.


For a perfect fix, max the fuel as usual.
Oil Module
Usually, to make things fast, id always bring 3 Fluid canisters
1 Empty
1 Filled with Cleaner Fluid
1 Filled with Oil


Start of by unscrewing the latches and opening it.

I would usually follow these steps to check for any broken parts.

Replace parts with new ones.
Turn on pump (1). Cool the Heat Sink by pressing on the red button (2)

If in any case the Heat sink is fuzzing out, then there is a problem with the pancake.

You can use a 4 - 4 Pancake to fix this.

For more info on pancakes go to the pancake section.

Now that everything is working. To change the oil we first use the empty canister and empty the remains of the Oil (or substance)

Then we add Cleaner fluid and then take it out.


This is to make sure there aren't any dirt. (I'd usually just do this step anyway to save me the hassle of finding out the oil is dirty afterwards)

Then we add the Oil

For a Perfect score, we would want the oil to be 50%, or half a canister.
We can reuse that half canister on another Oil job to guarantee a perfect score too since its 50%.
Close everything up and we are done!

I would usually empty out the 1st canister used and fill that with cleaner fluid.
the old cleaner canister would be emptied out, allowing me to have 3 canisters (50% oil, full cleaner, empty) again ready for the next oil job!

If everything goes well you should end up with
Identification Module
Unbolt and take out the bolts. (annoying)


Pull and push the lever to check for the bulb
Check if bulb is missing or broken
Check if there is an ink cartridge


Replace bulb and ink cartridge if needed.
Preferably would want the ink cartridge to have 9 shots.

Press the button to move the bulb into place


There are cases in which the wiring of the Module is missing/broken.
In such cases the LED will stay red after taking a picture!

Just add a wire and it should be calm.
Thanks to @Outninjad for the comment!

move the lens to the bottom and pull the lever


Check photo.
- If the background is clear (then you would want to move the lens to the opposite)


- If WILBURRRRRR is clear then you are good to go!


- if both are blurry then move the lens to the middle!


Usually this works just fine. Using this method can guarantee us to still have 5 shots remaining in the ink cartridge! However there are some cases in which you would have to move the lens a bit to find the clear photo.

There is a perfect focus fixing reward, however I am unsure how to do it repeatedly. (I tried but I can't replicate it well enough!)
Looks something like this


Once the photo is clear and the shots taken to check for the photo is Max 4 (9 - 4 = 5) (Since we need to keep a minimum to 5 shots in the ink cartridge). then rebolt and close up, we done!
Headlight Module
Very simple, much easy.

Unbolt and pull lever up to check the bulbs.


Manually turn the locks for the bulbs and check if the bulb is cracked/or missing.


Replace bulbs but fill 1 bulb with Freeze fluid.


Place freeze fluid bulb at the bottom and the normal one on top.

Relock the bulbs, push the lever up and rebolt.


And you should get your perfect fix for the headlamps!

BTW some people in the comments have mentioned to let people know that Headlight modules can be 2. Like such


Thanks to OutNinjad for the mention!
Safe Module
Uhhhh....

rotate the lock clockwise (TO THE RIGHT)


Do it slowly until you hear a loud *CLICK*.
After the click rotate the other way, anti-clockwise (TO THE LEFT)
rotate until another click and rotate clockwise again!


keep doing this until safe unlocks.


TIPS*

You do not have to do the Anti-Trifle module to unlock the safe! (For some reason)

Ignore Anti-Trifle modules!
Toilet
Super simple, if you want to be fast bring a pump.
Start off by checking the pump (Changing it/Fixing it/ or turning it on)
Press the yellow button to open the Toilet and move the inside to the bottom open area.


If motor is running, Change the cabling from top to down


Use the hose to clean everything up.
For the ones you can't reach, you can adjust the trajectory


Once cleaned, put back the toilet and close it.
Change back the wiring.

and flush (Optional but i'd like to make sure) If the bar under the flush refills then you should be all good.
VR Module
Move the dials to aim the crosshair to wilburr's eyes


Make sure the green crosshair is LEFT and magenta/pink is on the RIGHT

Once fixed on the eyes, press the switch


Move on to the 4 switches and press the switches from left to right when the bar is exactly under the switch.


Once everything is in place. Press the GO button and have fun in the VR realm.


There is one VR realm that needs you to swap "UP" and "DOWN" inputs.
Start by unscrewing the two screws at the bottom left and right.


Open the panel and swap the wirings.


You can leave the wires as such. and finish the job after completing the VR Stage.

Tomfoolery Module
This module makes you play minigames, pretty simple but some of the minigames are quite hard.
ENCODER REQUIRED!

When you open the module, focus on these 3 LEDs on the top.


From left to right they represent the Platformer levels 1-3 respectively.
If the LED is red, it means that you would have to encode the platformer game and beat it.

For e.g in my picture the left and middle LEDs are red.
I need to beat level 1 and 2 to fix this Tomfoolery module.
Encode the game, place the cartridge, and then press the button.


After beating the level the LED will change colour!


Repeat for all the levels that have red LEDs and thats it!

In later days there might be issues with the internal display of the module.
If there is such a case unbolt the screen and check inside.


*I am not sure why, however I can't get the achievement "I AM GAMER" which needs you to beat all 3 levels. For some reason doing it all 3 at once and even doing 3 different levels for 3 different customers still does not give me the achievement. If anyone knows why please do comment!
Alarm Module
Lower yalls volumes because holy....

Usually find this module on Day 3 (R E N T Day)


Yikes.. But worry not, it is not FATAL.


Go to this blaring module.
Press the dice.


Now its like


We first focus on the Pip Dial.
We want to place it where it is the opposite of the Dice.
For e.g
If the Dice is 6, then the pip dial must be 1.

Dice
Dial
6
1
5
2
4
3
3
4
2
5
1
6

Then we move onto the Captcha
The 3 buttons with faces and legs.
We need to click on these buttons in order to solve the captcha.

First we look at the Amount of Eyes.
Click from lowest amount of eyes to highest.
But wait what if there is multiple buttons with same amount of eyes?
Then we look at the direction.
Click from the Left direction towards the Right
Or simpler, look at the NECK if the neck is to the left, then its the left direction. Vice versa.

LEFT NECK (LEFT DIRECTION)


RIGHT NECK (RIGHT DIRECTION)


Okay but what if all the necks are the same?
Then we look at the amount of legs.
Click from least amount of legs to most.

TLDR
CLICK IN ORDER OF
1. LEAST EYES TO MOST EYES
2. LEFT NECK TO RIGHT NECK
3. LEAST LEGS TO MOST LEGS

After clicking in order just use the lever and alarm will stop sounding and you can proceed to do the other jobs!

IF THE TIMER RUNS OUT, ALARM WILL START GOING HAM AGAIN.
To prevent this, go back to the module and press this button to reset the timer.
(Max timer is 2mins 30secs)


Examples.
1.

2.

3.

4.

5.


Pipebomb Module
Usually spawns on R E N T day. (Day 3)
Will be the only job available and is FATAL.


I suggest opening your guide book to do this one. Or have a guide to know which wires to cut.
It is pretty simple, so don't paniccc

There is usually 3 pipebombs around the ship so don't slack too hard as well.

You will need this unless you have memorized it then.... well idk.


The diagram is simple to understand, first is to find out what the wires are.
There are 4 possibilities.
Plain


Stripe


Spiral


Dual


Look at the variations of the wirings (NOT THE AMOUNT!)
and use the guide to find out what wires to cut.
Remember the wires are LEFT to RIGHT so 1 is most left, 4 is most right.
Cut the wires using the Snipping tool.


and then press the button.


For example.
(3 examples cause 3 bombs)
Bomb 1


Explaination
3 Wire types = Spiral, Plain, and Dual.
Look at the venn diagram intersections.

Venn Diagram tells us it is all uncut. Thus Press the Button and we've disarmed the bomb.

Solution


Bomb 2


Explaination
3 Wire types = Spiral, Plain, and Stripe.

Tells us to cut 2nd wire. and then press the button.

Solution


Bomb 3


Explaination
2 Wire types = Spiral and Stripe.

Cut the 4th wire. And press the button.

Solution


Once all bombs are defused, you are calm to just finish the job.
GIVES SO MUCH MONEHHHH for such a simple job :D

*PS. I did this pipebomb module whilst making the guide and I didn't explode, so it is quite a calm-ish module!
Rebreather Module
Simple but lotsa going to the store to buy things.

Open up the latches with the screwdriver.


Check for Missing/Broken Parts
Such as:
1. Pump
2. Gas Filter
3. Canister
4. Heater Filament
5. PANCAKE
Replace them with working ones.


Pancake is 4-4-3-2


Once all the parts are working as intended.
Turn on the pump. and pull down the lever to see the "World".

What to check for
  • 4 Trees that are NOT RED (Needs to be Yellow Trees)
    *Apparently some people in the comments said that only 3 trees are needed!
    Thank you @Zeptor!

  • A bug feeder thats FILLED WITH GNAT FLUID
  • 2 Snails

If snail shell is blue = NO HEAT
If snail shell no dots = NOT ENOUGH TREES OR MISSING 1 SNAIL
if snail is not bluish/black = NO FEEDER OR NOT ENOUGH GNATTT

If the snail looks good and the gas in the canister is now pink then you are good to go!
Close everything up and its done!

BTW QUICK NOTE - if there is no PANCAKE, and the cage to the world is opened. things will start flying and disappear (Happened to me at least) so make sure everything works first then handle the world.
AI Module
Pretty annoying module but simple. (NEEDS ENCODER) (USUALLY PANCAKE TOO)


Hectic I know.
1. Pull lever all the way down
2. Check PANCAKE, (In the picture the pancake is wrong and needs to be replaced)
3. Check Rotators
4. Check Band
5. Unscrew/Bolt everything marked (Except PANCAKE if it is working) (Trust me)

Open up the Rotators thingy after unscrewing.

Check the motors if it is broken.
If it is, unscrew and replace.
Make sure motors are correct

fix the rest of the broken things.

Pancake is a 4-4-4.


Once its all done it will look like


Now press power button, Push lever up to 5 points of power, Press rotators button (Top Right), Check the AI's Emotion and check the Intended AI's Emotion (TOP TOP RIGHT).


Check what AI Emotion is needed and use this to pick which AI Card to use (Card 1/Card2)


Neutral = C2 - Cat
Anxious = C2 - Tree
Bored = EMOTIONAL RESET
Happy = C1 - Bathtub
Love = C2 - Cat, Cat
Shy = C1 - Burger
Angry = C2 - Tree, Rain
Sad = C2 - Rain, Rain
Scared = C2 - Toilet


Okay Now we have the cartridge we need, place it in and we need to reset the AI.

Set power to 5 (If it is then its fine). Click any 3 buttons. and press the play button on the top.


In most cases you will have an emotional shutdown. (If not then repeat until he shutsdown.)


Open up the rotator and the AI. Use the code. (1 means button goes left or its green, 0 means button goes right or red). Once the code is the same with the buttons behind the AI. Pull the lever.


TADA! blank boi is back.

Now follow the guide above and click on the respective buttons to make his mood right.
If you only have to press 1 button make the power 1, if 2 buttons, make the power 3.


If done right.

Change back the power to 5, and TAKE YOUR CARTRIDGE BACK

We donezo with the module, screw and bolt everything back.


Reactor Module
Hard at first but easy later on once you understand.

*Most pictures will not have the reactor inside... well because I don't want to explode so please understand.

Few things to understand.
When job picking and there is a "FATAL", check if there is a reactor module.
if you hear a beeping sound like *beep* *beep*, you should check for a reactor module.
if the beeping is too fast you are most likely dead. Still possible but you should asap run for the module!
IF THERE IS, YOU SHOULD ALWAYS BE READY TO GO TO IT ASAP!
Don't panic.
In every single reactor module fixing or not fixing you should always go to the reactor module first!
Always have enough space for a reactor!

First thing you do to go to the reactor module.


press the "A"


it'll open up the reactor screen. Look at these 2 (a switch and a slider)


MAKE SURE THE SWITCH IS OFF
How to make sure it is "OFF"?

THAT IS ON


THAT IS OFF


MAKE SURE IT IS OFF
Then pull the slider all the way down.

*beeping intensifies*

Once switch is off and slider is all the way down.
unbolt them with the top bolt being the LAST to be unbolted


open up the latches


Pull out the reactor to your inventory


and... done the reactor is now inert and you can calmly do all the other jobs first.

Once all the jobs are done
Make sure of 2 modules being fixed!
1. Fuel Module
2. Cooler Module

You can check the specific sections for help in those modules.

If those modules are functioning
and this is the last module to finish.
Get ready to be a bit speedy.

Place back the Core (If the green triangle is small, you should replace it with a new one bought from the store) and fix the latches back.


Rebolt the TOP bolt and switch ON the switch (fuel switch), and slide the slider up (max is okay).


Once the fuel starts filling up the bar, try to make the cooling bar the exact same as the fuel bar for a PERFECT FIX!

Cooler Module
Very simple module, usually done after handling the reactor module.

check for ice in the tube and also the pump


Replace or fix pump if needed.
Turn on the pump
Place ice cube into press. Use the lever to squish the cube into a sphere.


Press button when done


Move sphere into tube


Repeat until tube is full.


Cooler fixed! easy.
Anti-Tamper Module
Kill me. I hate this one so much, made me lose so many runs....


Look at the serial number, and unscrew the screw marked.


YOU WILL NEED THE GUIDEBOOK FOR THIS!

Use you serial number to find your location

If your number ends in an ODD number, then its either column 1 or 5
If your number ends in an EVEN number, then its either column 2 or 4
If your first number is bigger than 5, then it is on the right column (4 or 5)
If your first number is lower than 5, then it is on the left column (1 or 2)
Your second number is the ROW
If you have the number "8" in your serial number then the FOURTH number is your ROW


For example my serial code is 34363734

My last number is even and my first number is lower than 5 so I am on column 2
I do not have any "8s" in my number, and my 2nd number is 4 so I am on row 4

Now we look at the possible operations


In my example for column 2, row 4, I need to remove a wire.


Wire removed and instructions given, just follow it with the map.
I was at Column 2, Row 4. Now I am at Column 1 Row 5 and I need to add a wire.


Now I am at Column 5, Row 5. Cut a wire.


I used the cutter to cut the green wire.
Now I am at Column 2, Row 5. Cut another wire.


I cut the yellow wire. Now I am at Column 1, Row 3. Add a wire.


I bought a wire and placed it. Now I am at Column 4, Row 2. Remove another wire.


DONE, REWARDS = NONE, RUNS BROKEN = 9999999999
Not worth the failure risk right now, don't bother with this module unless necessary. Like achievements,

*If a sequence contains the skull cell, you should open up skull thing and press the button.
Also ANY FAILURE, will make you fail that job and lose like A LOT of money.
I was once -7000+ on day 4 :/


Lever Module
.....

If the LED is red you pull...
if it is green, well... don't pull it.

if you mess up....


So, there are cases in which the lever Module has all of its wiring missing/broken!
(No picture yet sorry)

In this case follow the wiring picture guide and fill the wires!

Thanks to @OutNinjad for the comment!
Starmap Module
Pretty simple module as well. (NEEDS ENCODER)

The scroll is to move the map up or down.
The button is to change map.


First unbolt these


Check for missing Map Cartridges.
We will need to place Starmap 1,2,3 respectively from top to bottom.
You can check the Encoder guide to understand a bit more!


Once all the cartridges are placed and fixed.
We pull down the lever to check for faults.


We need to check for
  • 2 Bulbs
  • 1 Integrated Circuit
  • 1 Fuse
  • PANCAKE


Pancake is 4-4


If everything is well, the map will show up stars and lines.
check each map for faults, if nothing is wrong, close it up and bolt it again.
You should be done.
Fluid Station
There is 8 Options in the fluid station + 3 on the other side
  • Oil
  • Freeze
  • Pus
  • Cleaner
  • Coffee
  • Gnat
  • Blood
  • Blood
  • R
  • B
  • G


What Jobs Use What
Oil Module - Oil, Cleaner
Rebreather Module - Gnat
Headlights - Freeze
FTL Drive - Freeze (3 Canisters)

The rest are also used for specific jobs later on to the game which I won't spoil.

Encoder
You need to buy this from the station.
You will need at least 1 Cartridge to use it.


This is how it looks like. Place the cartridge in the slot.


There are 5 different areas in the encoder at the start.

Top left - Tomfoolery Games

Top right - Starmap Data

Right - OS Data (For FTL)

Bottom Right - AI

Bottom - Uncle Chop


HOW TO USE
Use the joystick to move towards the desired node.
Once over the desired node use the lever and hold it until the encoding is complete

If you hold it for too long after the encoding is completed, the cartridge will explode... It takes a few seconds before it does (I tried it).
Pancake
Simple to use, tedious to do.


Follow this 1-4.

Step 1. Pick desired Pancake and press the button to stick it to the hand.


Step 2. Move the joystick to the top right most slot and press the button to place the pancake.


Repeat Step 1-2 Until desired pancake is made.

Once it is made, push the lever up.

Voila! PANCAKE DONE.

If it is a good pancake (Usable) it will have a green light.

If not.... Red light and repeat the pancake...


Fret not, here are some combos to use for modules.

OIL - 44
REBREATHER - 4432
STAR MAPS - 44
AI - 444
SPRITE CONTROL - 1332
RGB CONTROL - 1332
PIXEL CONTROL - 1332
FTL OS 1 - 12344321
FTL OS 2 - 14414441
FTL OS 3 - 12344321
Welder
Quite useful machine for Focused Fixing since you can save money by welding broken items

Looks something like this.


There are a few things you can weld together.
  • Pump


  • Heat Sink


  • Heater Filament


  • Rotator


Gumball
[WIP] Sorry
FTL Module
[WIP] Sorry
Random Tips (May Contain Spoilers!)
You can take the bobble head at the Fueling Station!
Use the snipping tool to get it!.

The bobble head is used for the cultist run!

After a work day, standing infront of the store can shine UV Light.
Open your guide book with TAB (On PC) to see good stuff whilst under this UV Light!


You can find hidden cards inside certain modules!

Main ones I usually find cards at
- Toilet Module
- Fuel Module
Final Words and etc
Ill be adding the WIP ones soon. Haven't gotten them as a job so I can't really show the steps!
Will also be adding more tips and tricks!

Please do let me know if there are any errors or mistakes!
Thank you.
25 Comments
chris_mingus Jun 26 @ 5:42pm 
"BTW QUICK NOTE - if there is no PANCAKE, and the cage to the world is opened. things will start flying and disappear (Happened to me at least) so make sure everything works first then handle the world."

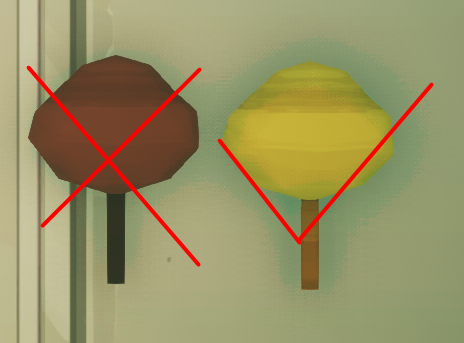
Frankly it should say as much in the grimoire.
Kratochek Apr 2 @ 6:26pm 
I dunno where to put this, but you'll need the welder for FTL cores. I died on the fourth visit from Uncle Chop because the manual just assumed you've fixed an FTL module before :/
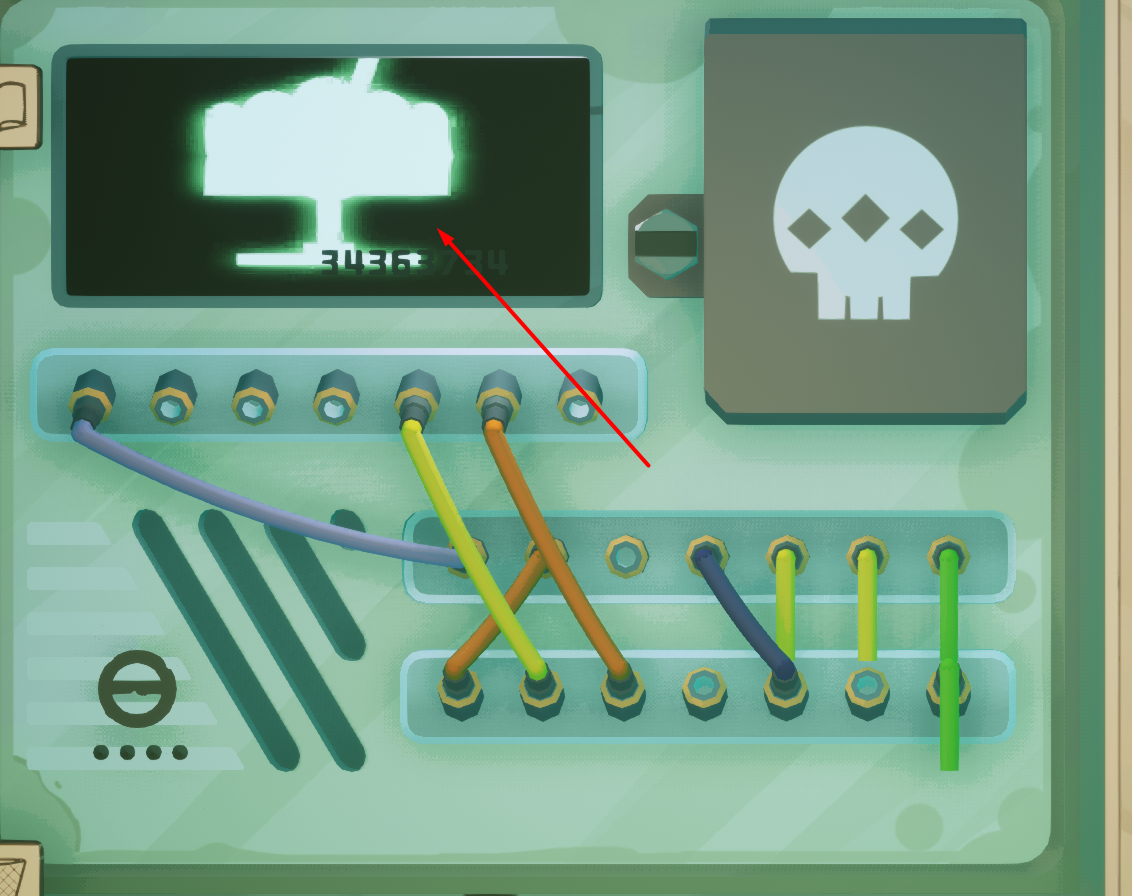
Not that you can survive anyways, but still.

Good guide! Hope there'll be some for the individual endings someday.
Kratochek Apr 2 @ 6:22pm 
@ZeriTos If you're using a mouse, make sure to yank the WHOLE wire away, until both ends aren't connected to anything. Sometimes it's alarmed out on me if I just pull one end out, before I could even get to the other.
MarcMatti Jan 25 @ 8:27am 
You don't. Once you unlock everything else but the last row, you're done with upgrades and Omens
Born In Flame Jan 21 @ 6:33am 
how to unlock the bottom line of Kyle's upgrades?
Bot Stummy Hurts  [author] Jan 13 @ 9:21am 
right above the nob slider is a lightbulb holder. If you are holding a light bulb there should be a silhouette of a bulb placement. @Xzanos
Xzanos Jan 10 @ 10:59am 
Hey in the lighthouse VR level I'm having some real trouble. I go to the top of the tower and slide the nob to the side but I can't seem to put a bulb anywhere? I'm holding it! Where do I put the bulb?
Bot Stummy Hurts  [author] Jan 6 @ 6:14am 
Also might add other ending job tutorials but unsure if people want it
Bot Stummy Hurts  [author] Jan 6 @ 6:09am 
@OutNinjad I have not gotten a single cockpit fix request other than the boss fix . So yea, its pretty rare to me atleast.
OutNinjad Jan 5 @ 7:02pm 
@TheUnnamedStranger I've figured out the order of the lights for the Cockpit module. The first 3 are the same order as the book (1=Fuel Pump, 2=Oil Temp, 3=Throttle Sliders). The 4th Light is actually for the Ignition Switches (6th check in the book). 5th Light is for Gumballs and 6th is for Fuses + Check Engine Light.

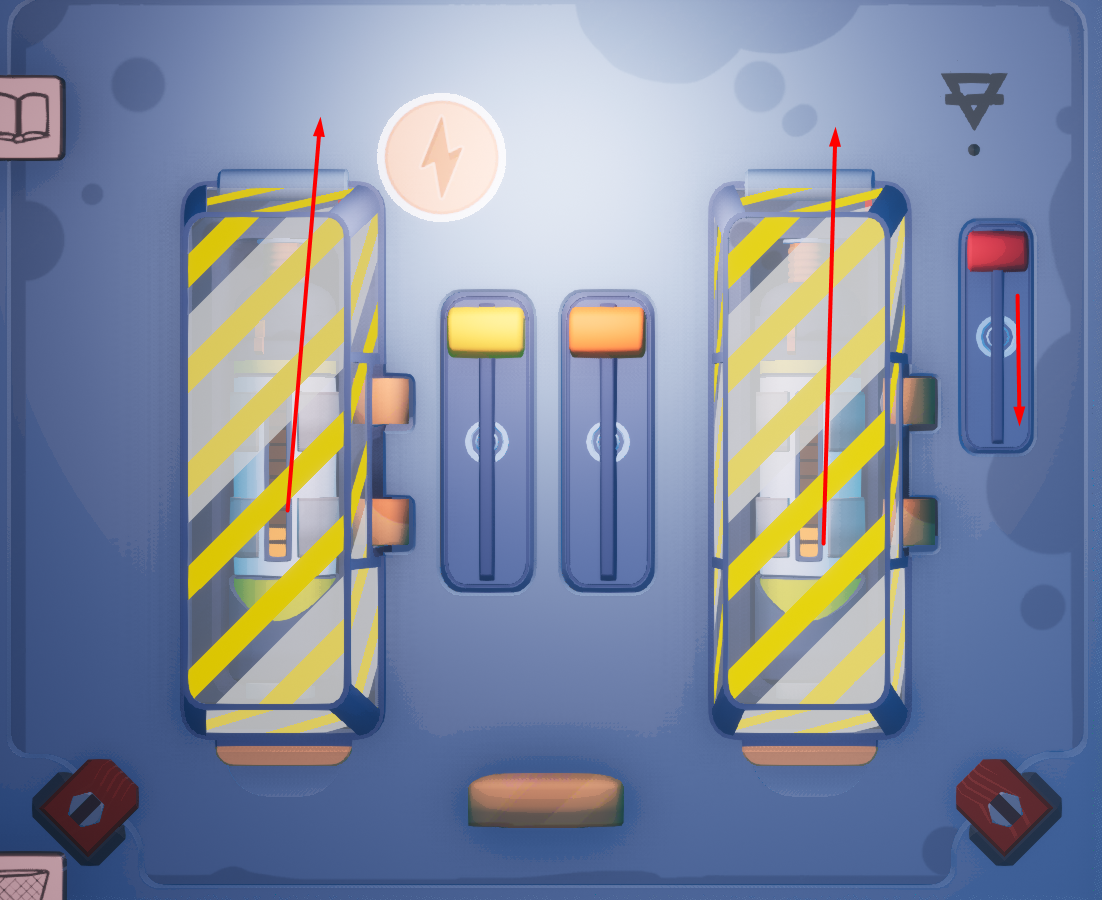
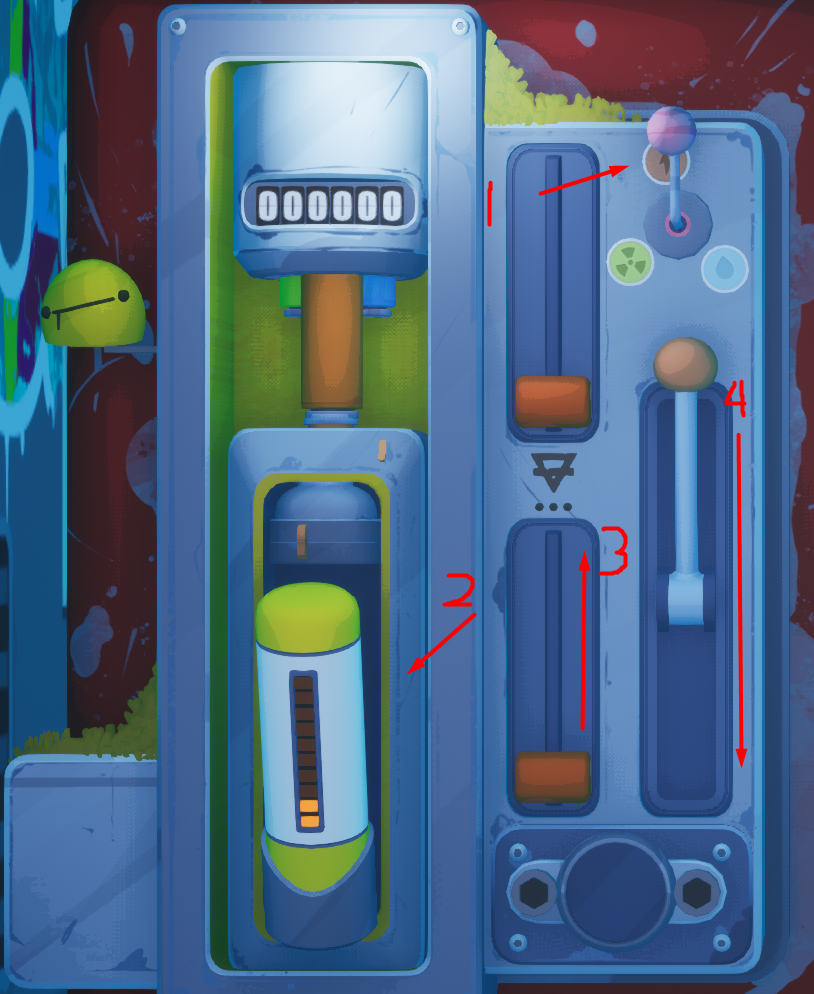
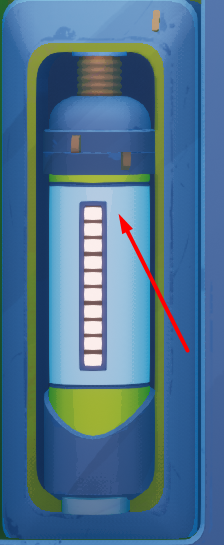
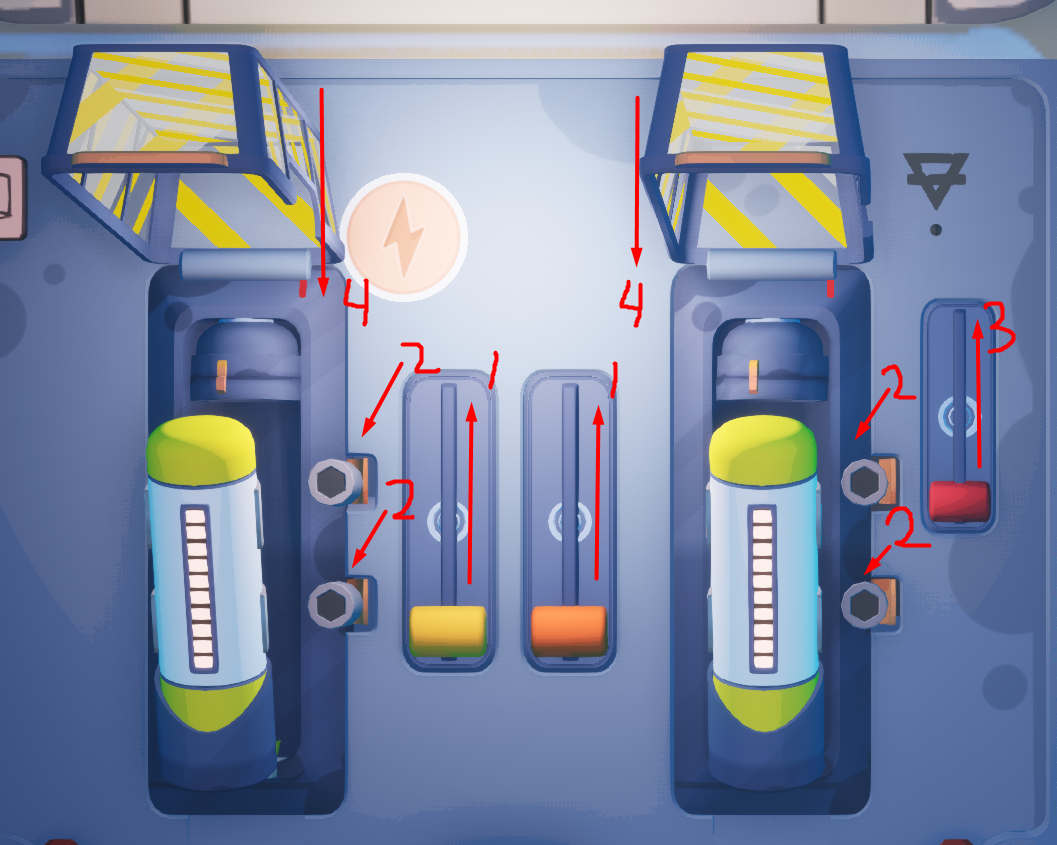
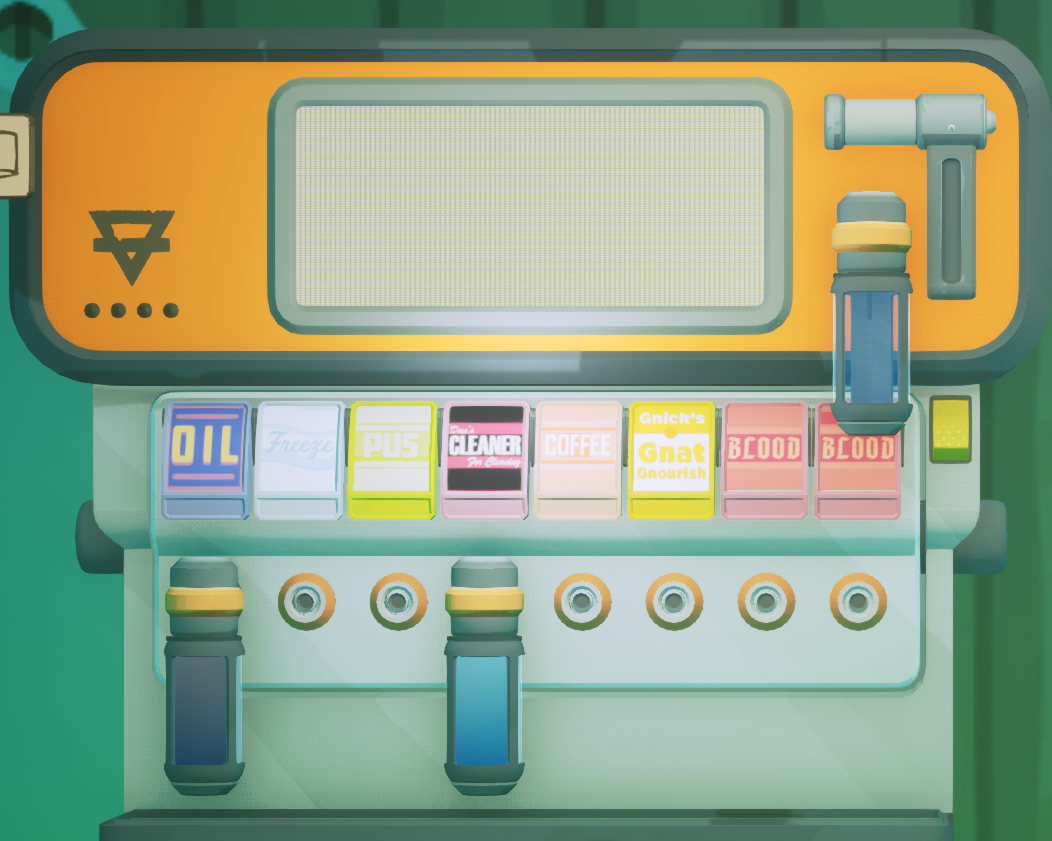
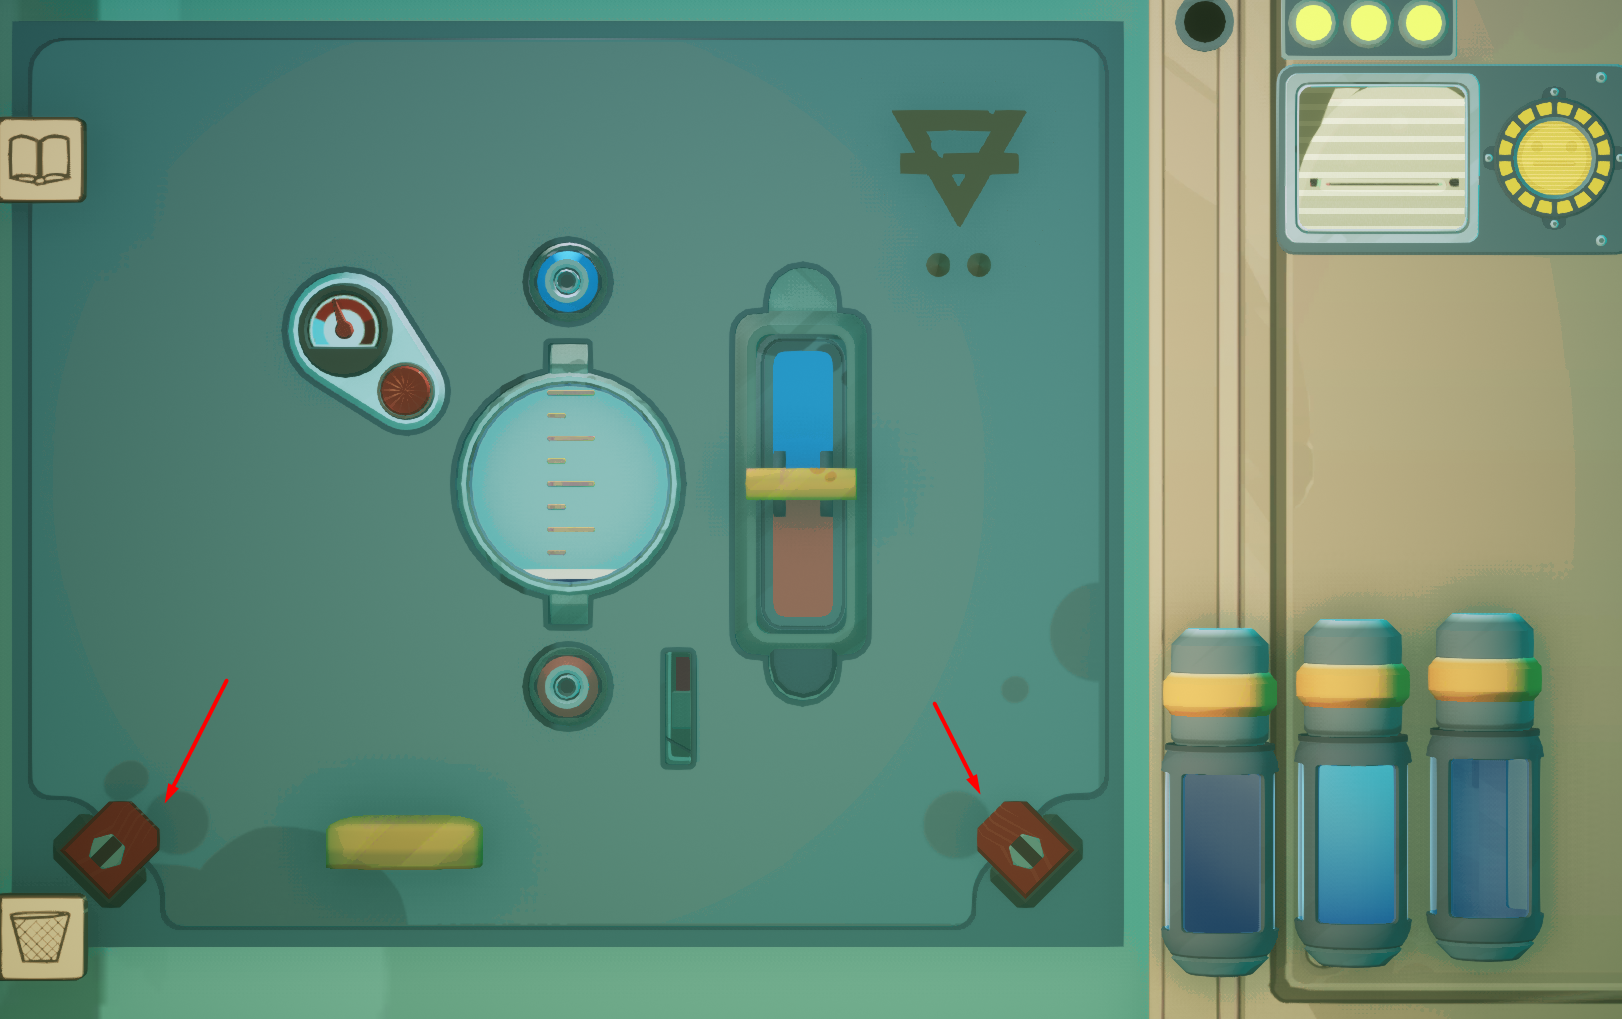
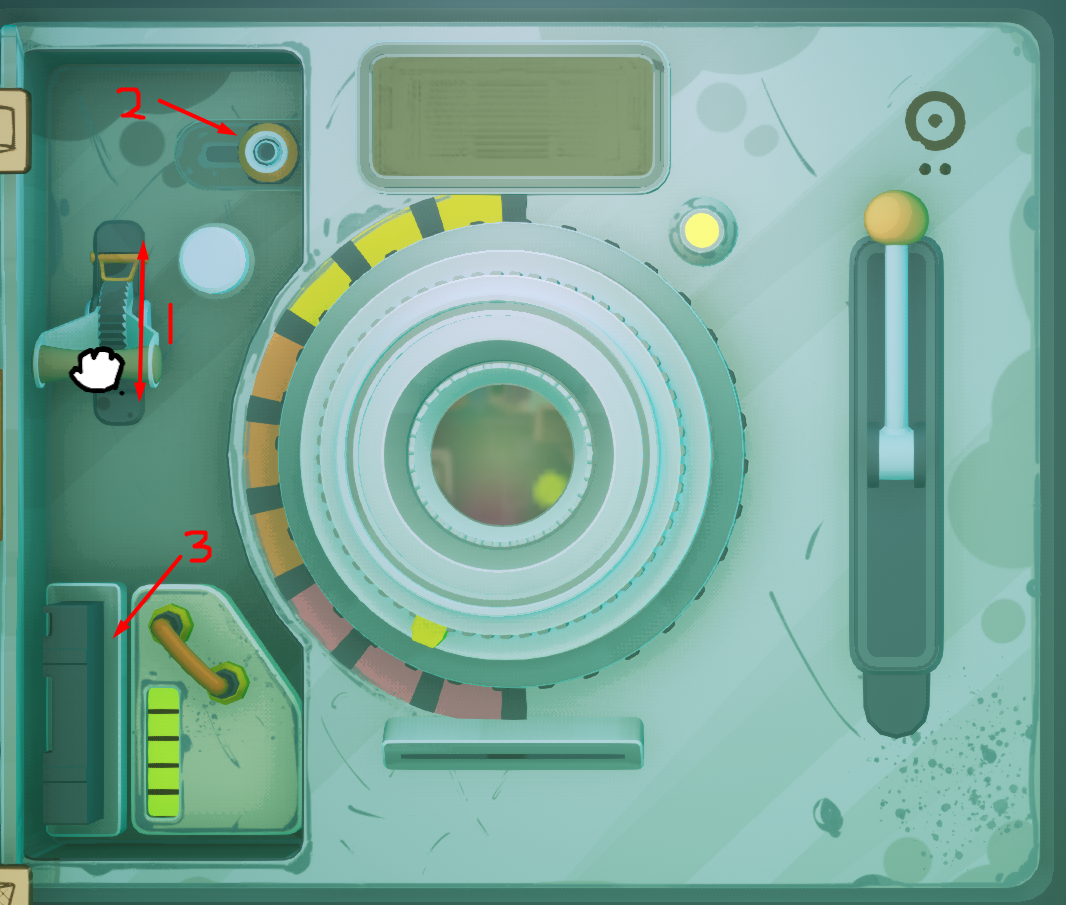
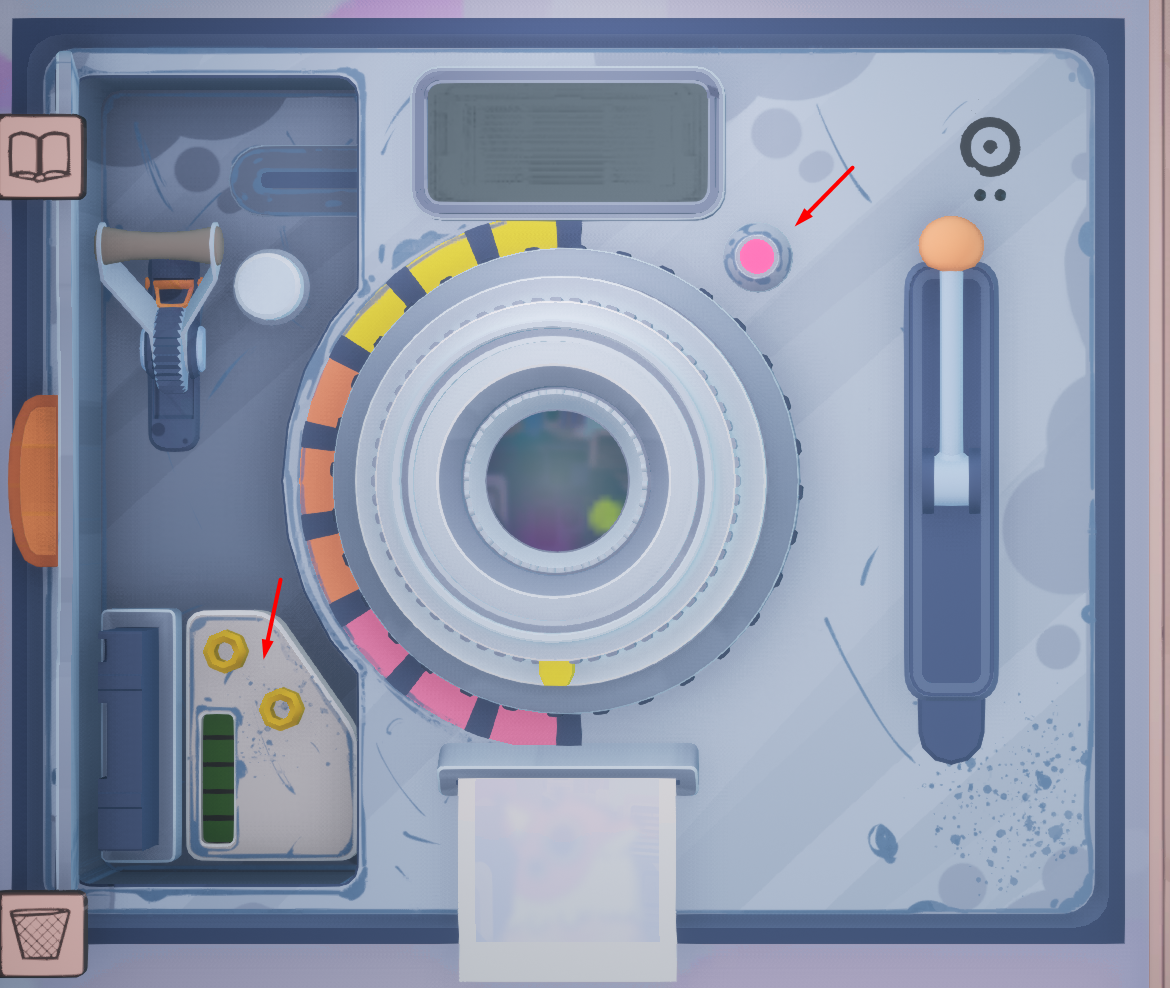
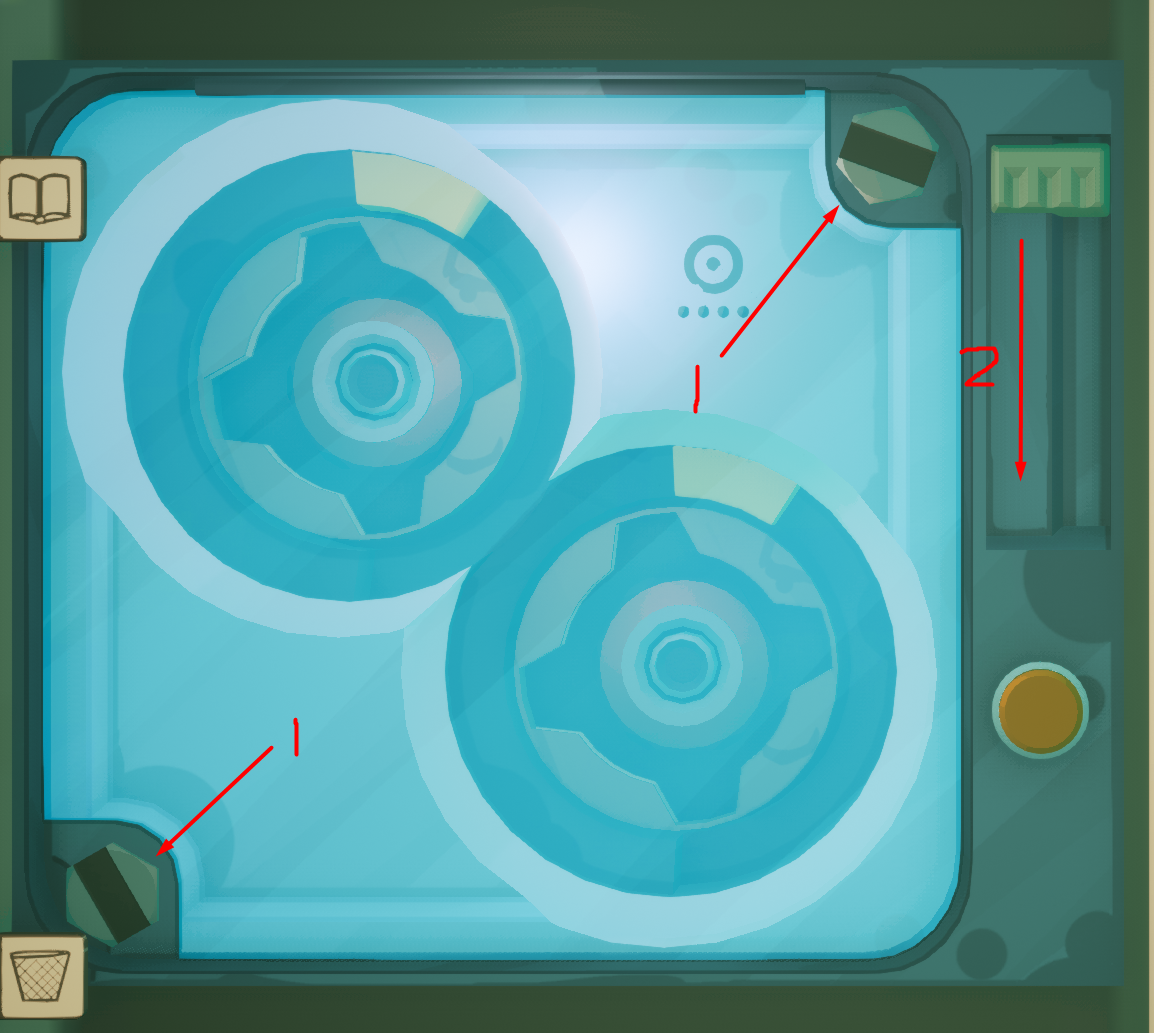
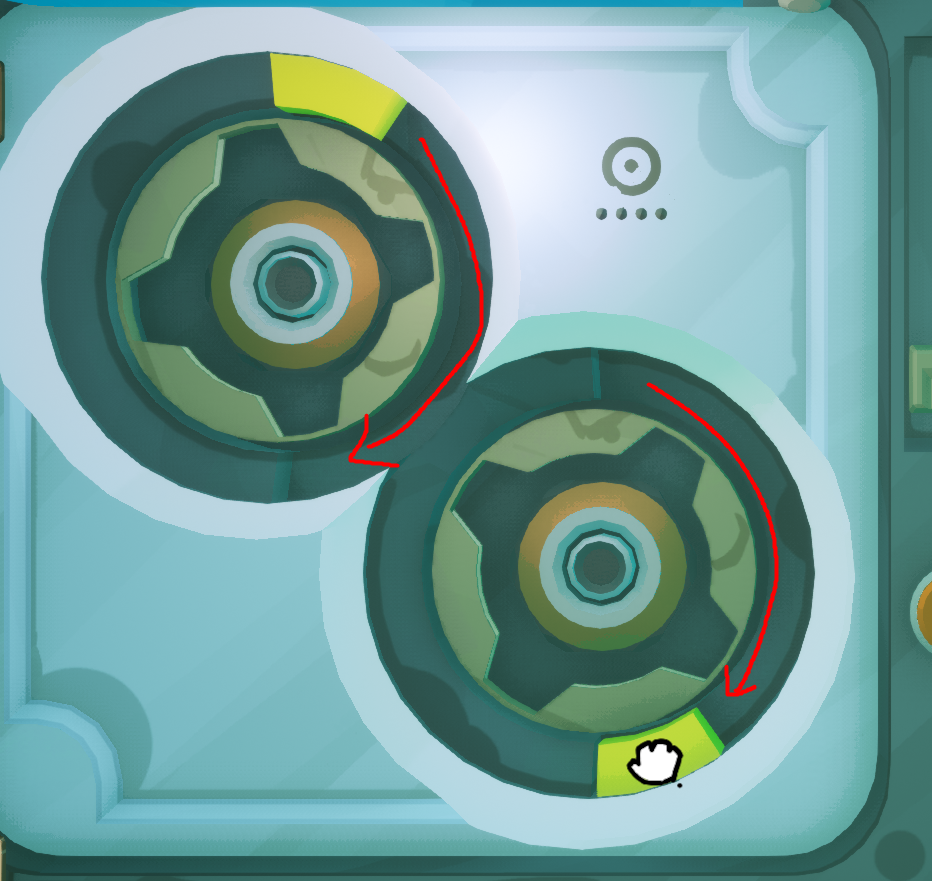
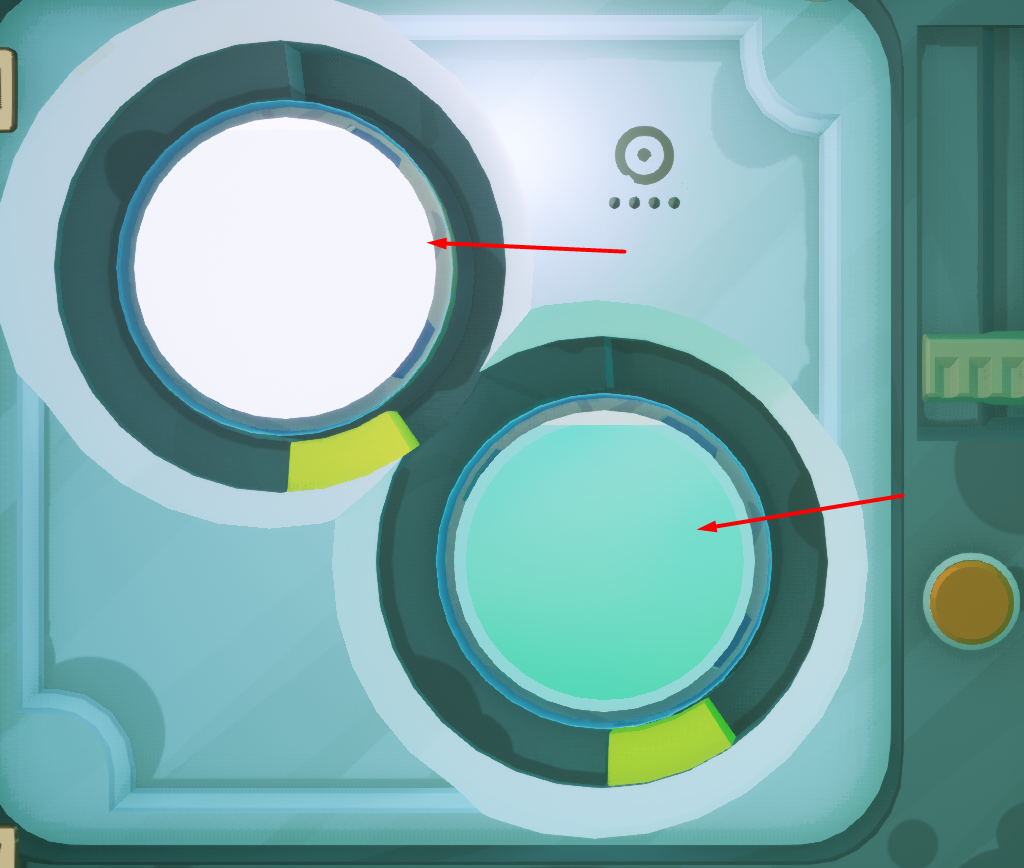
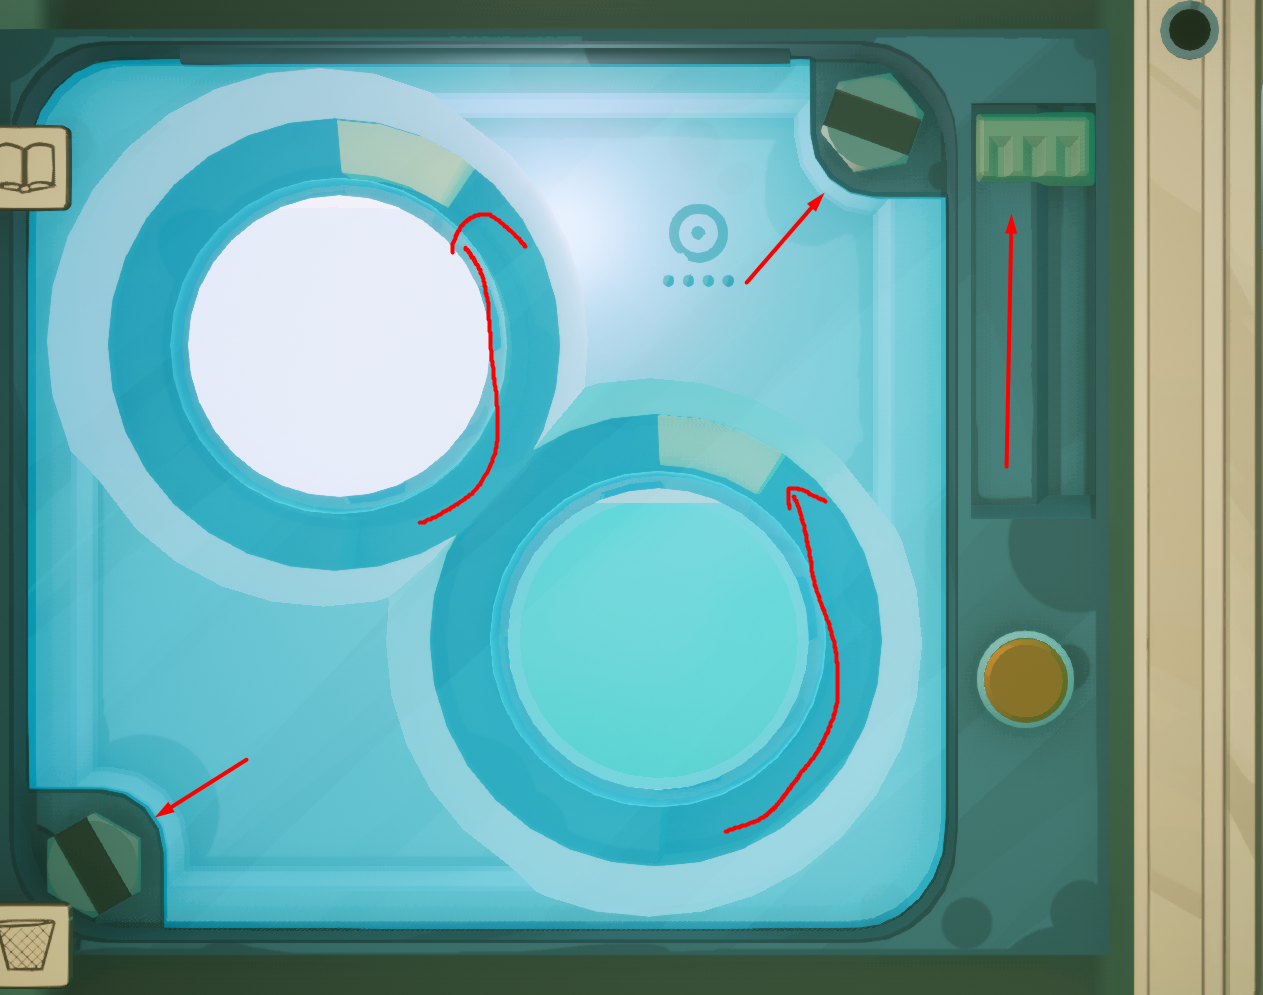
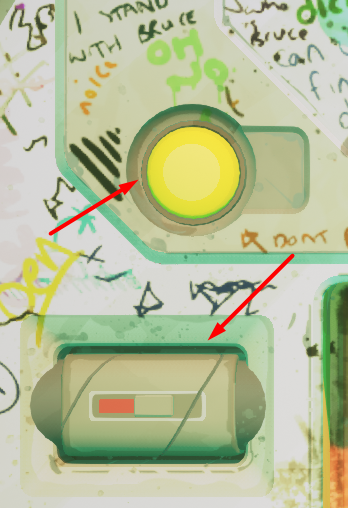
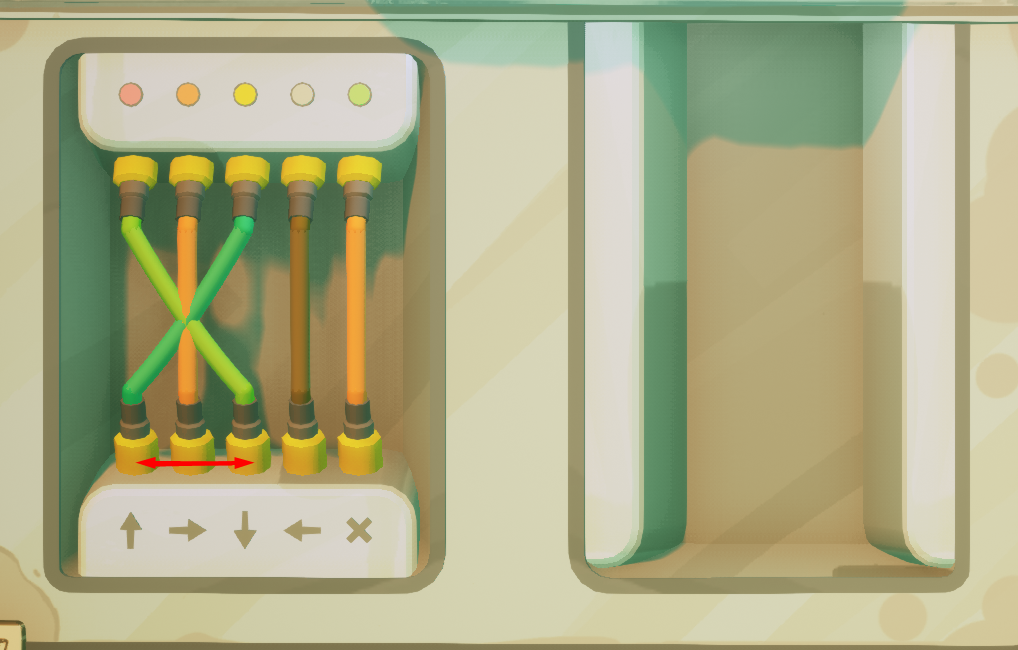
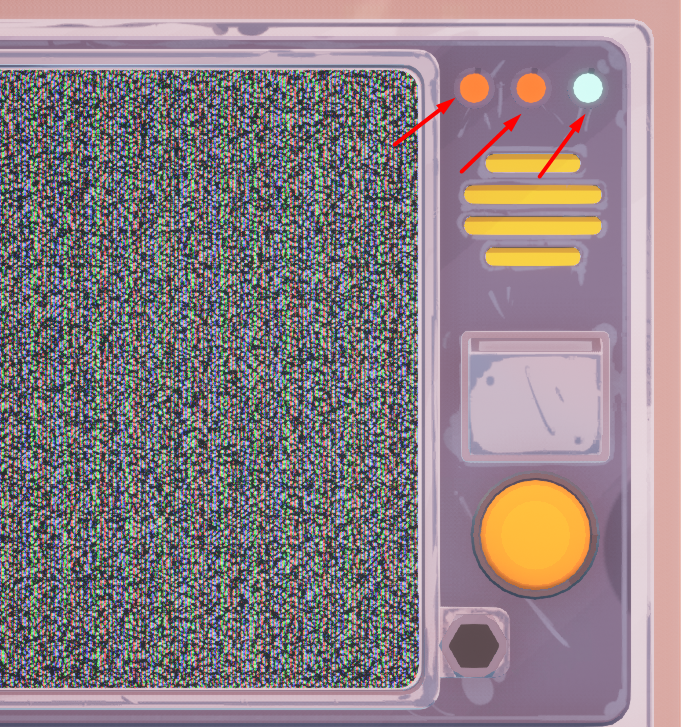
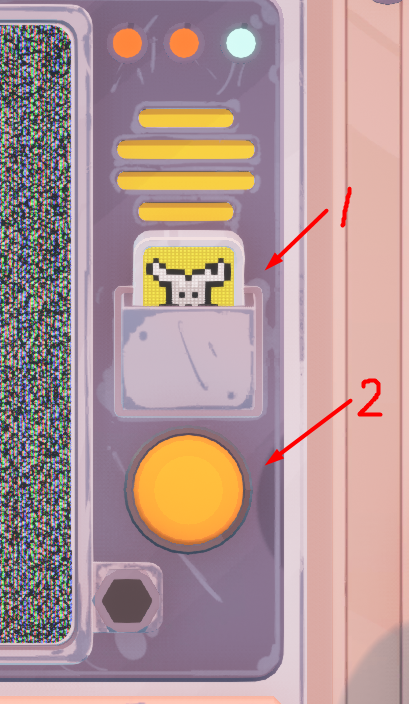
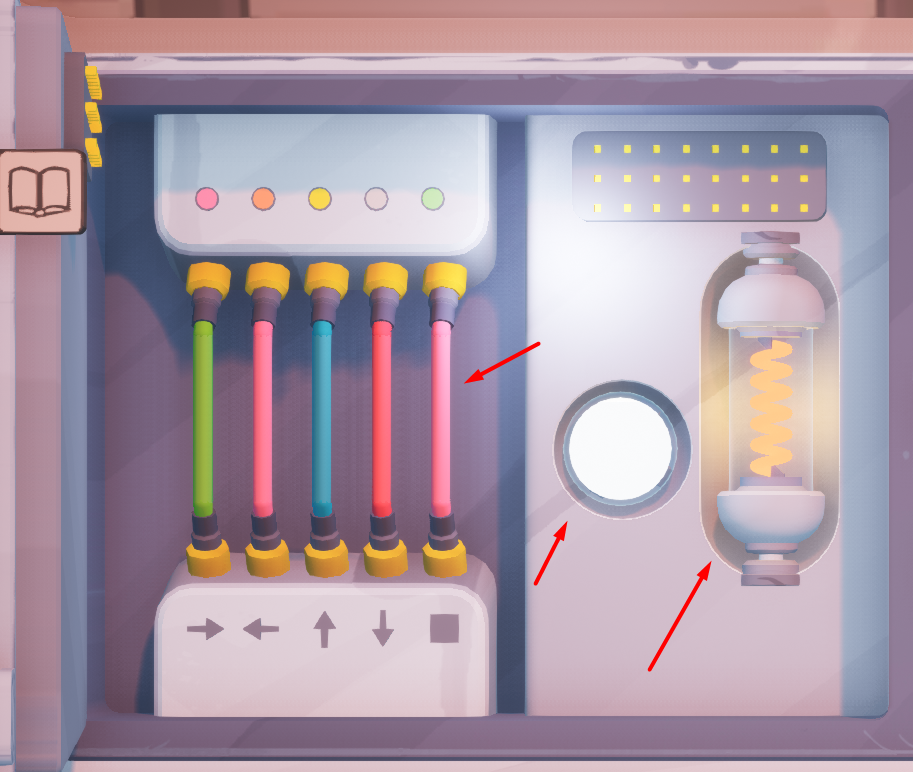
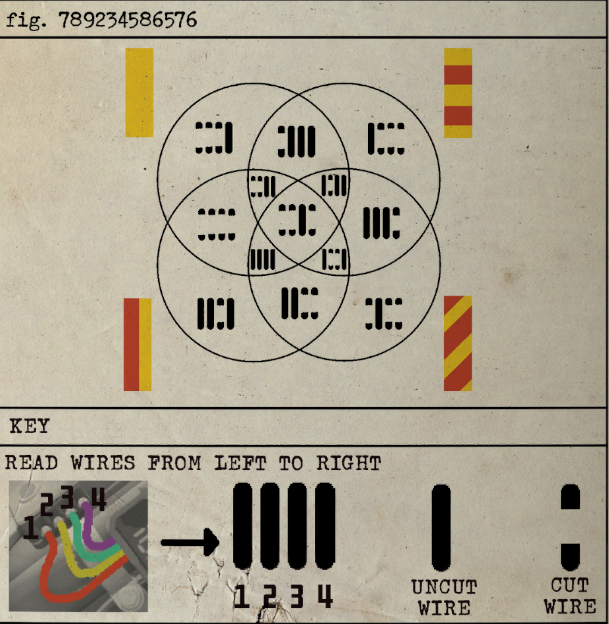
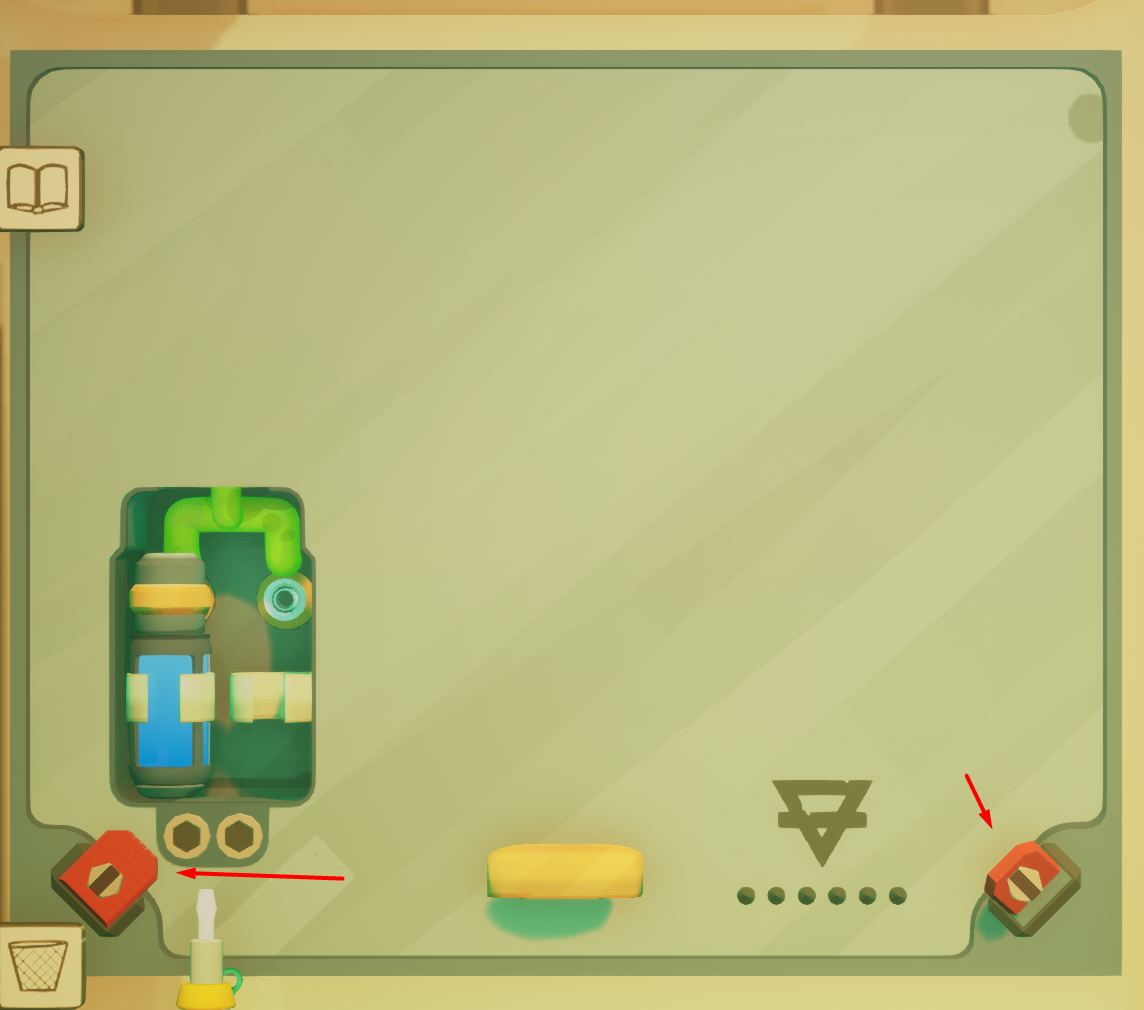
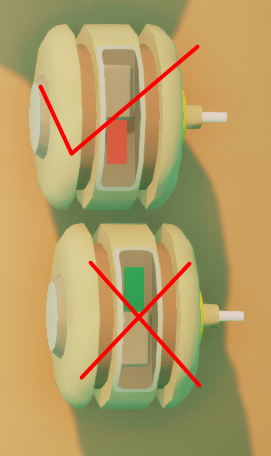
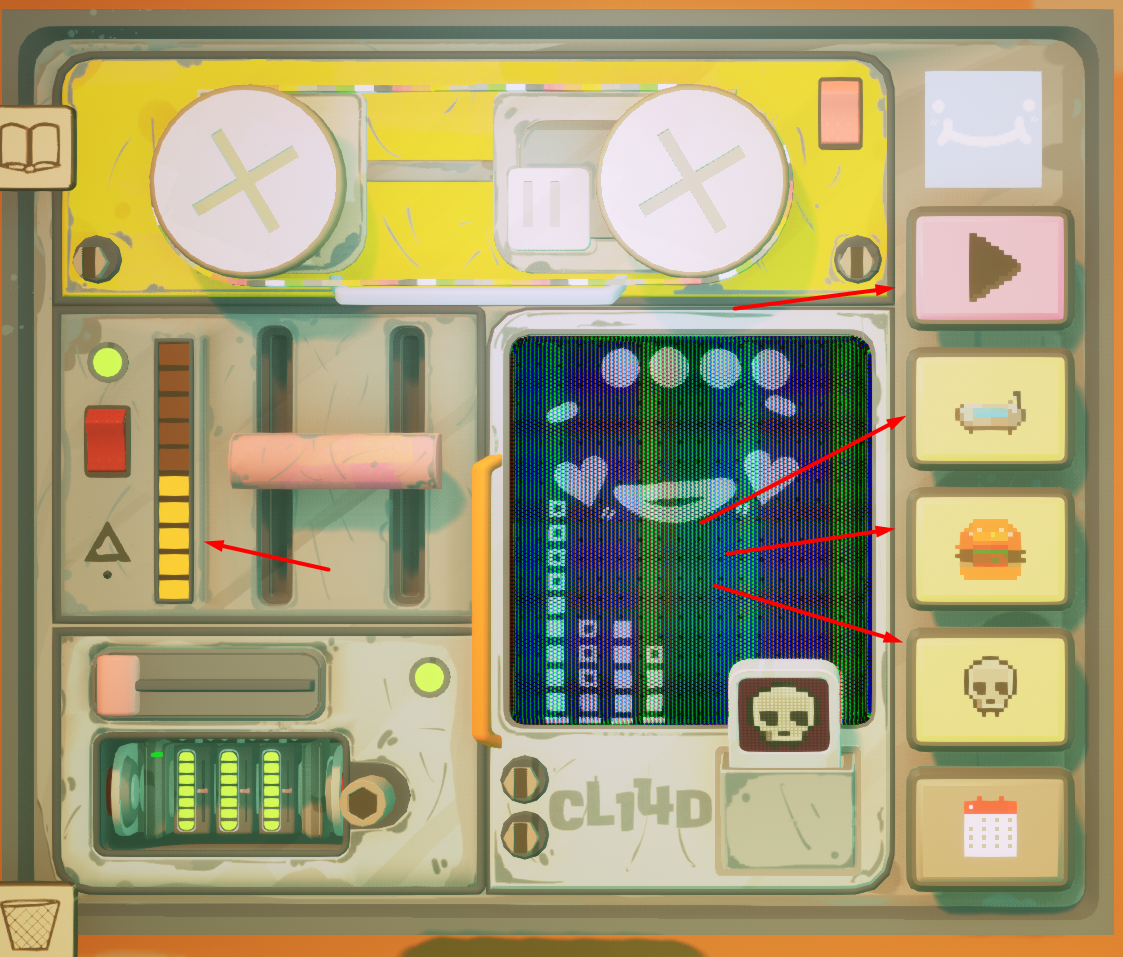
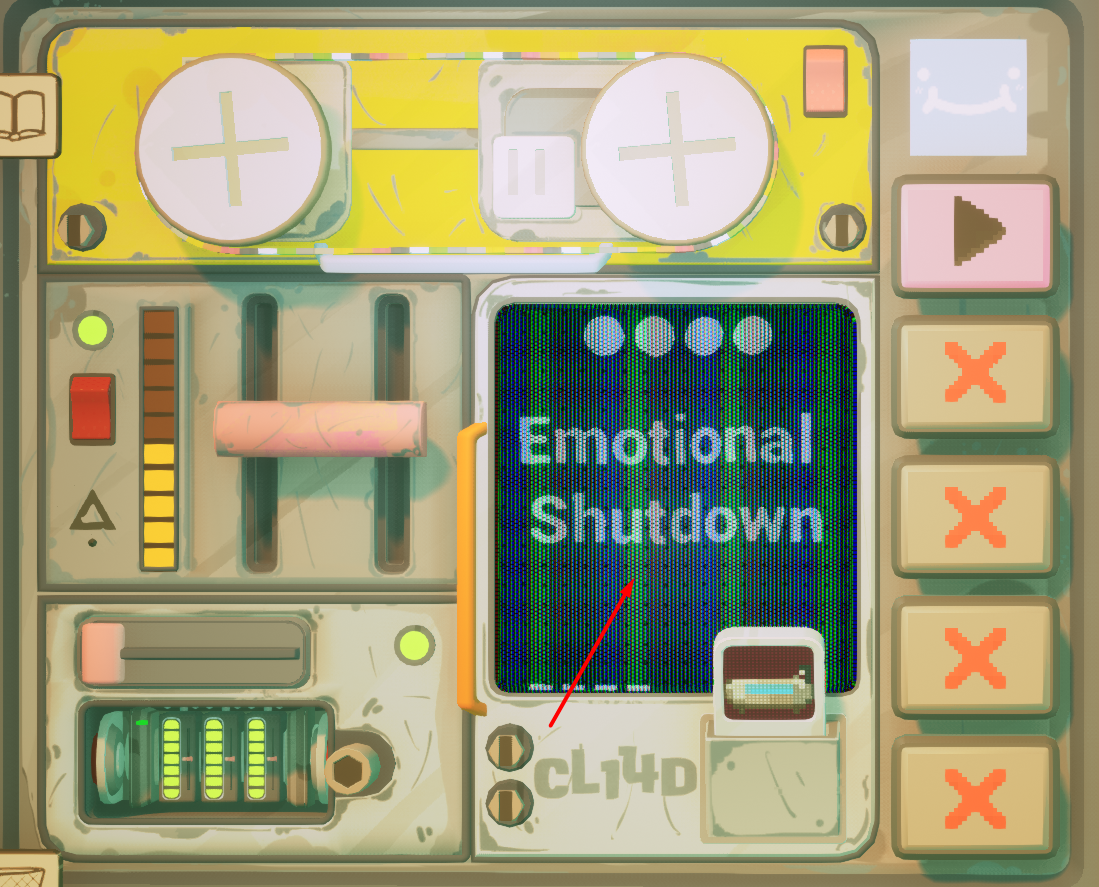
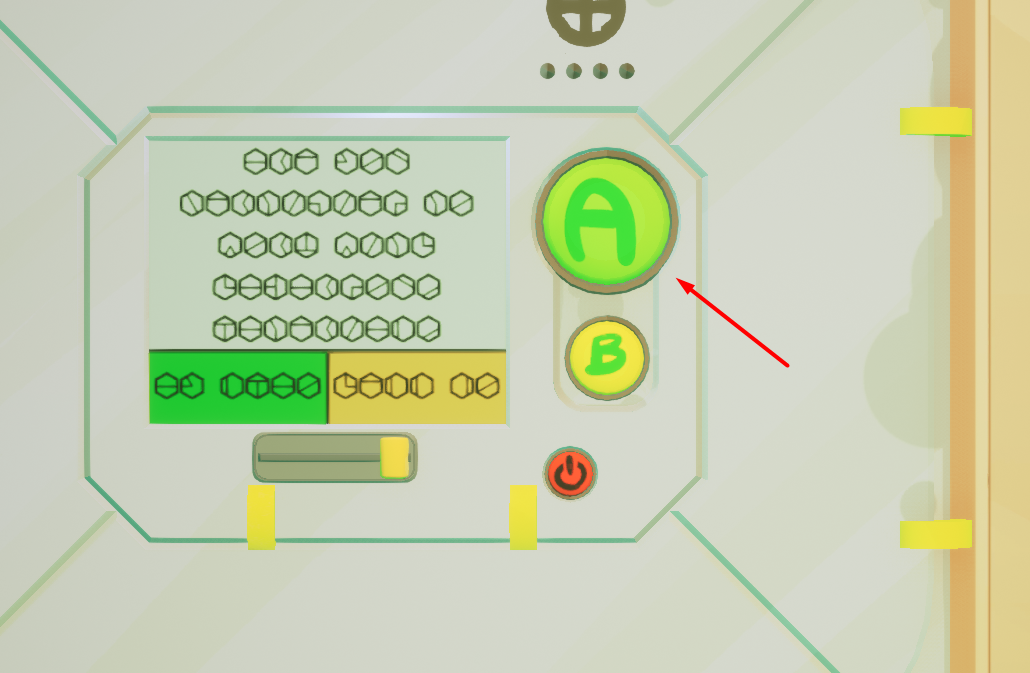
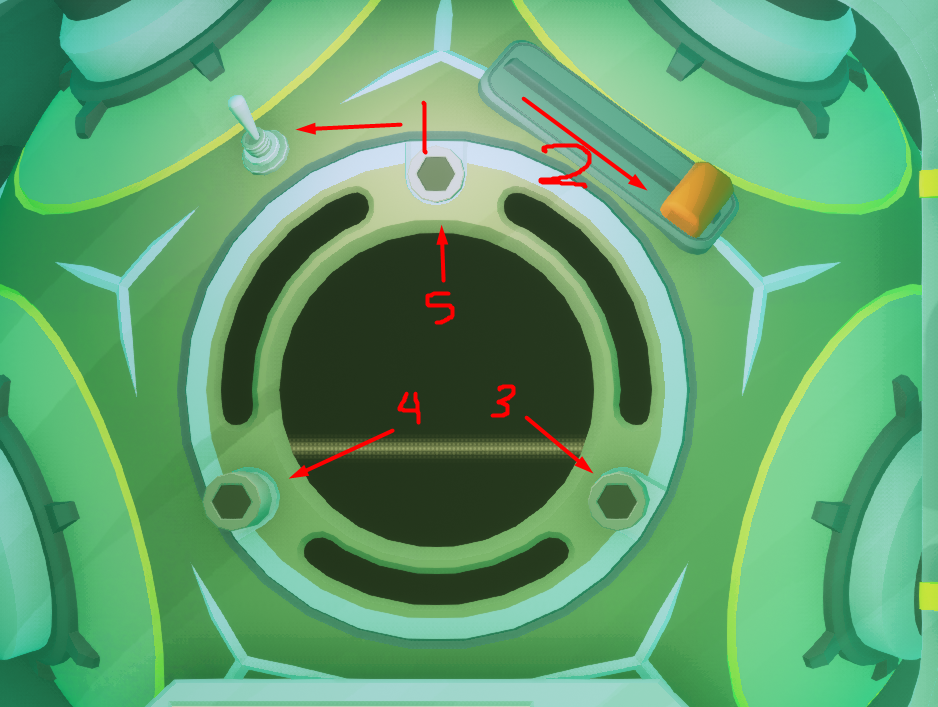
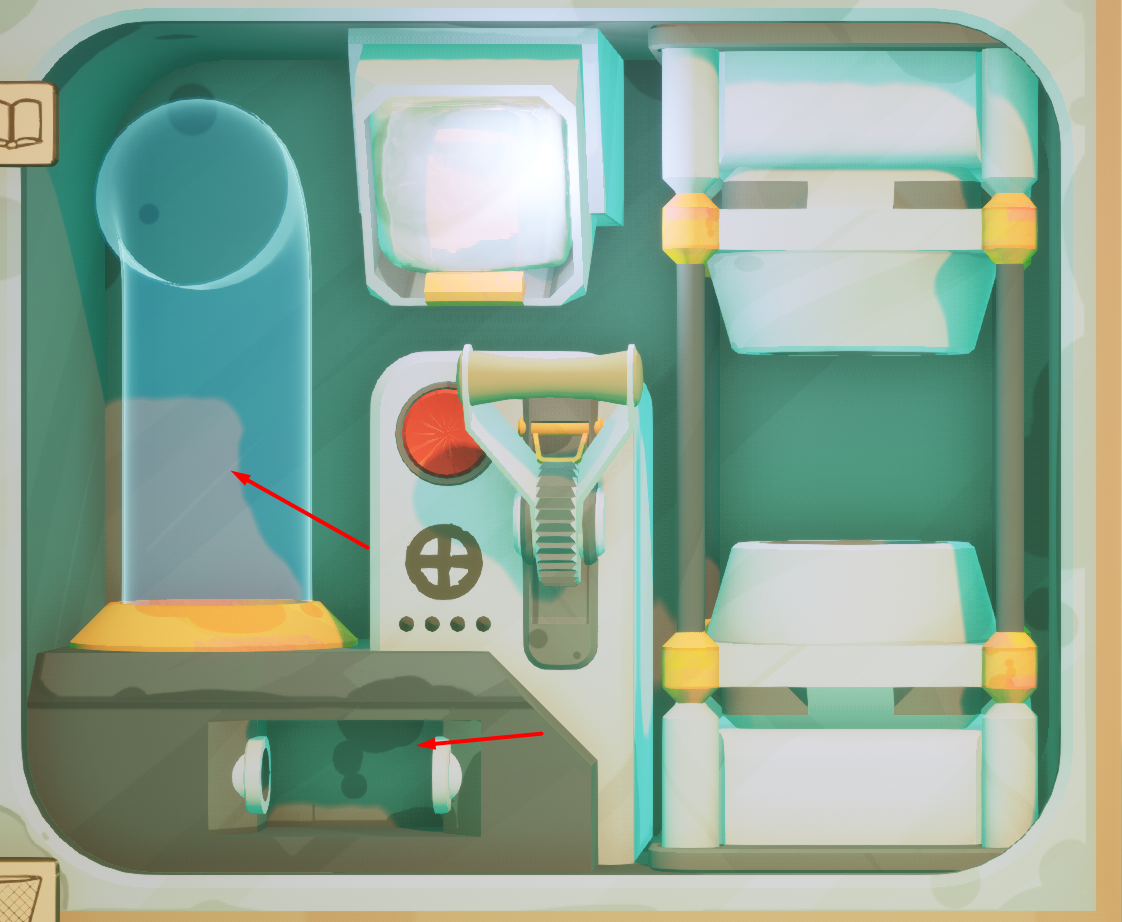
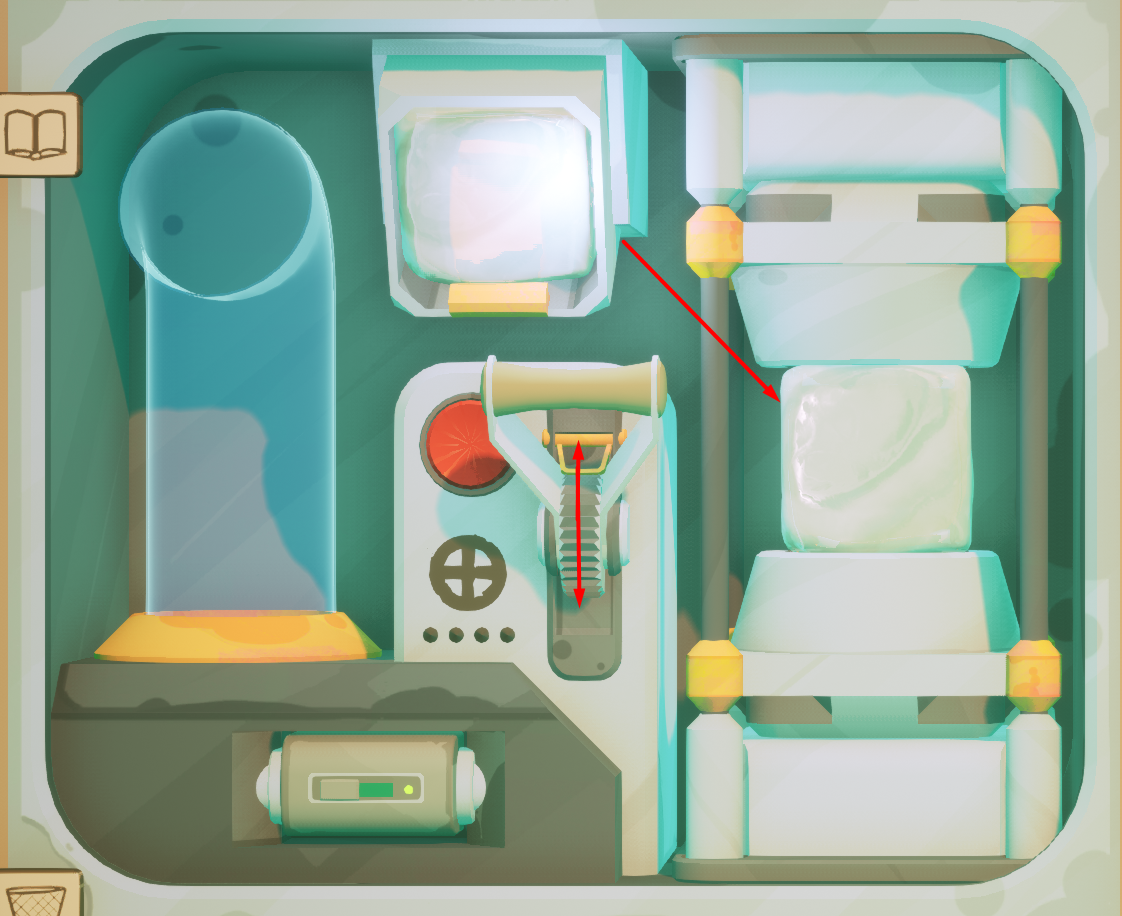
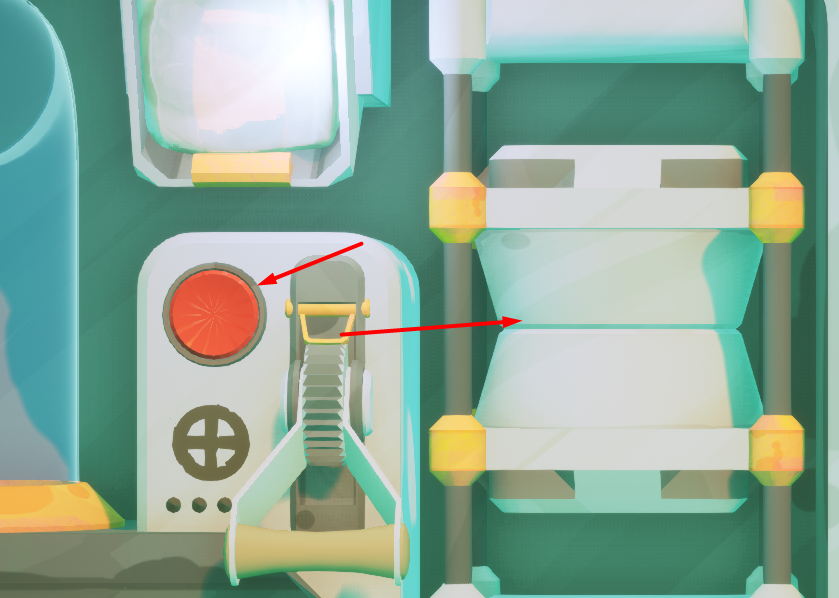
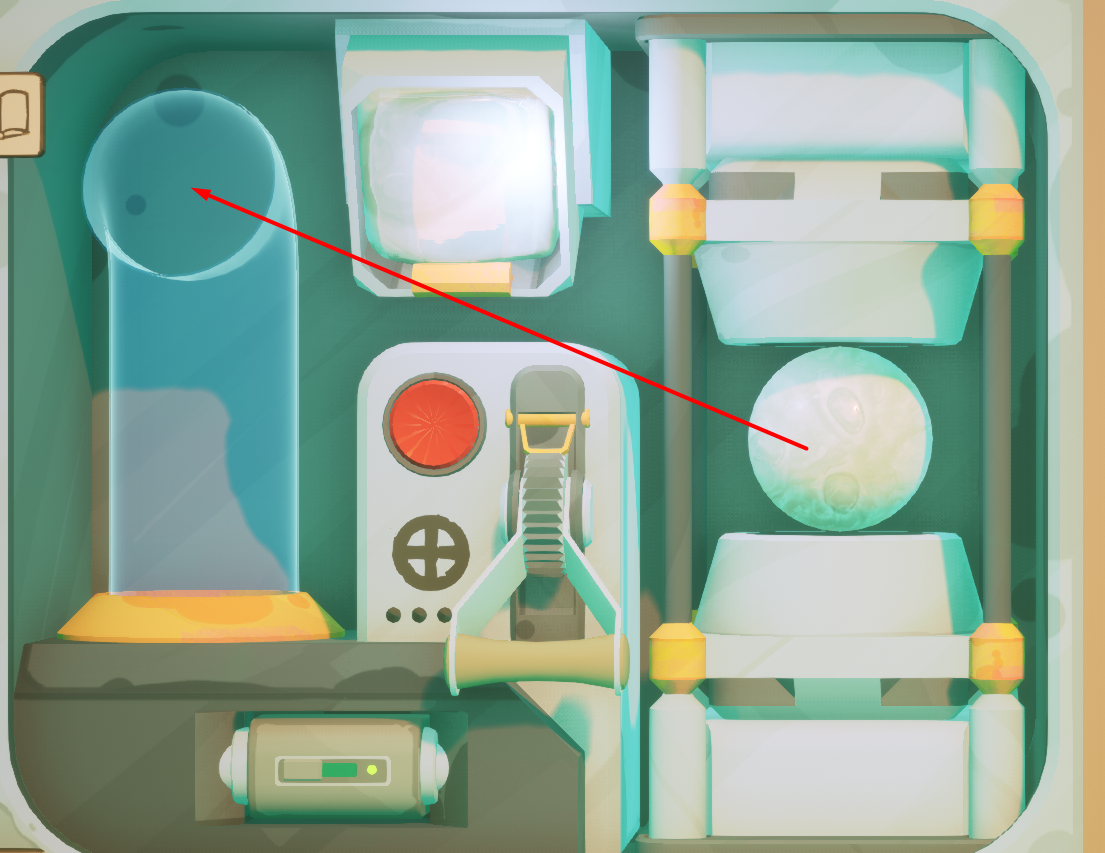
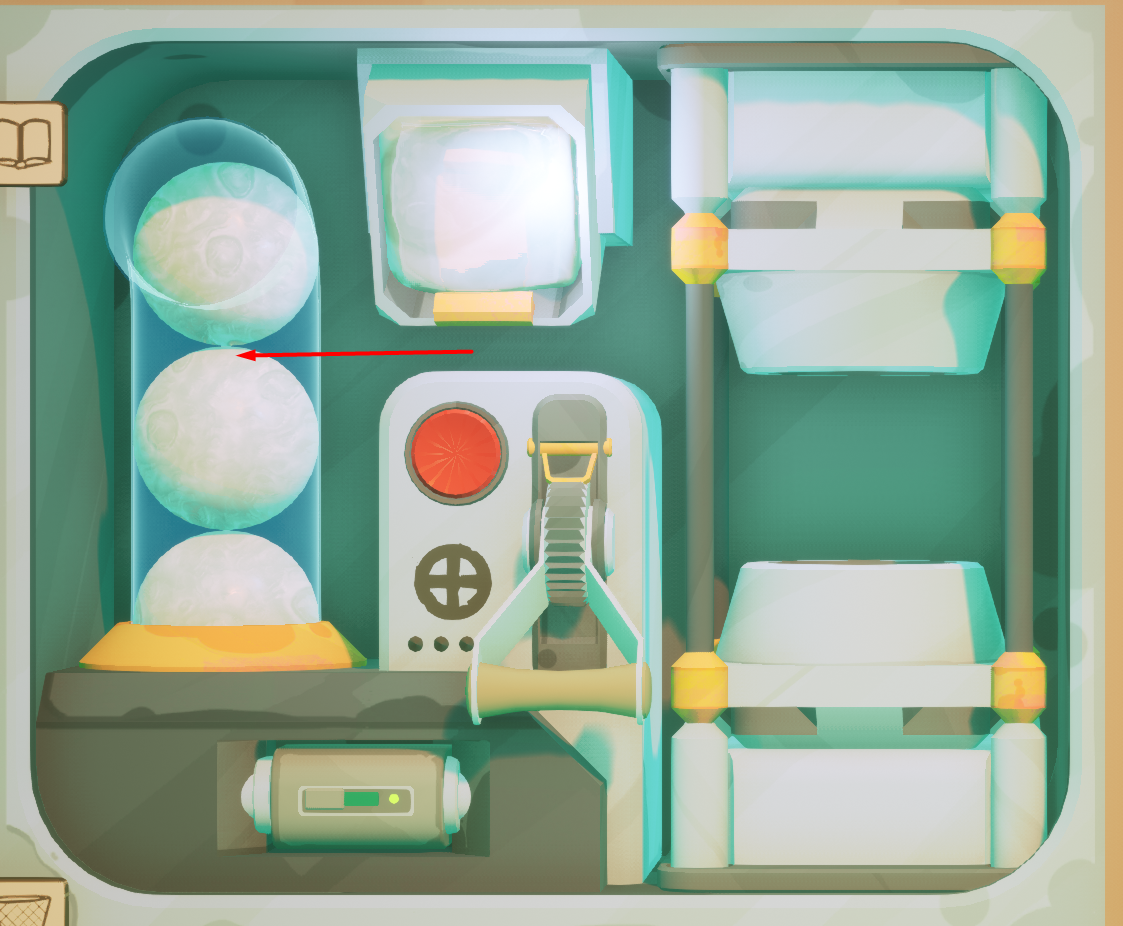
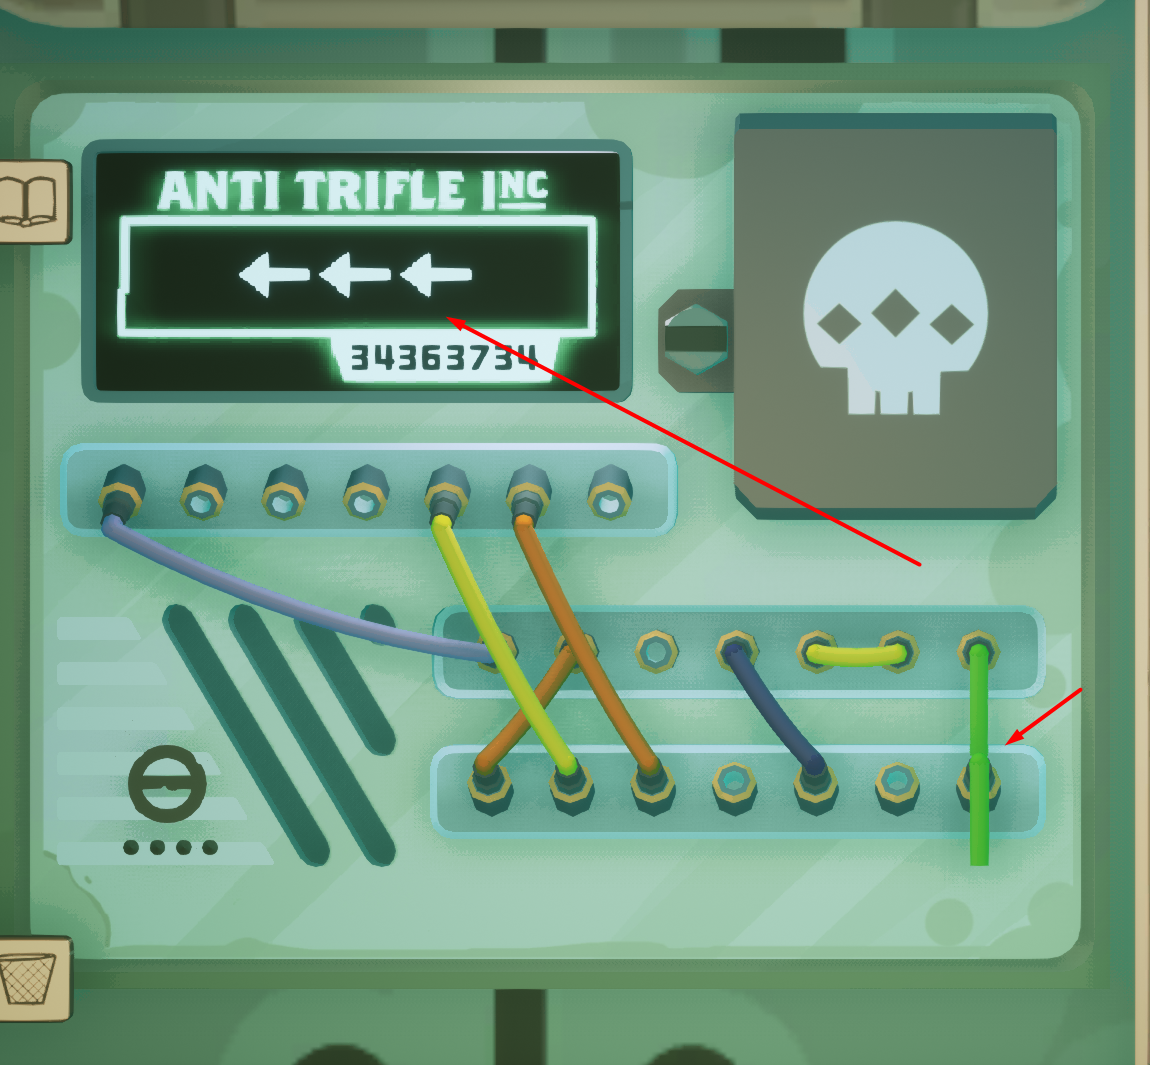
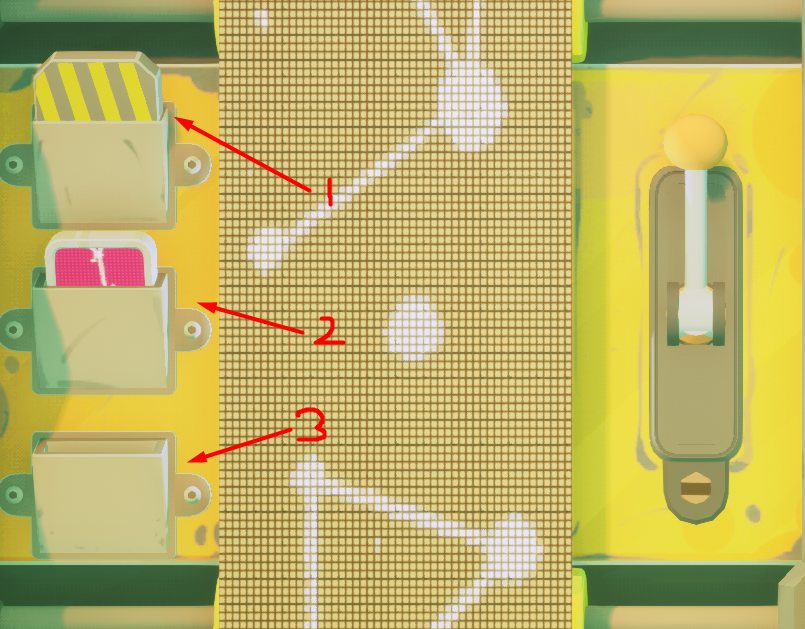
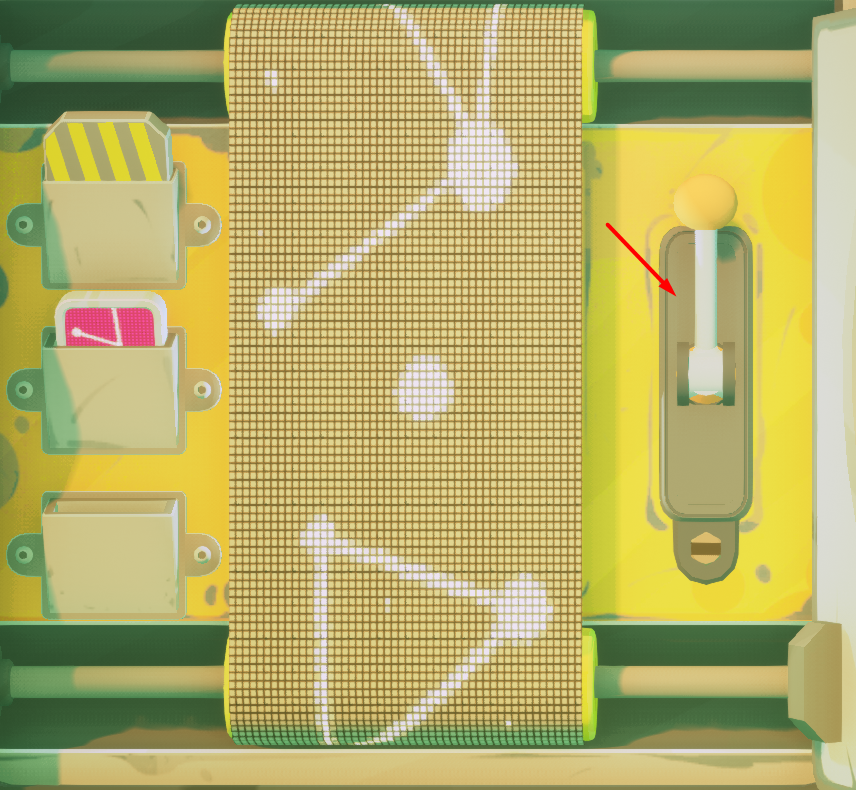
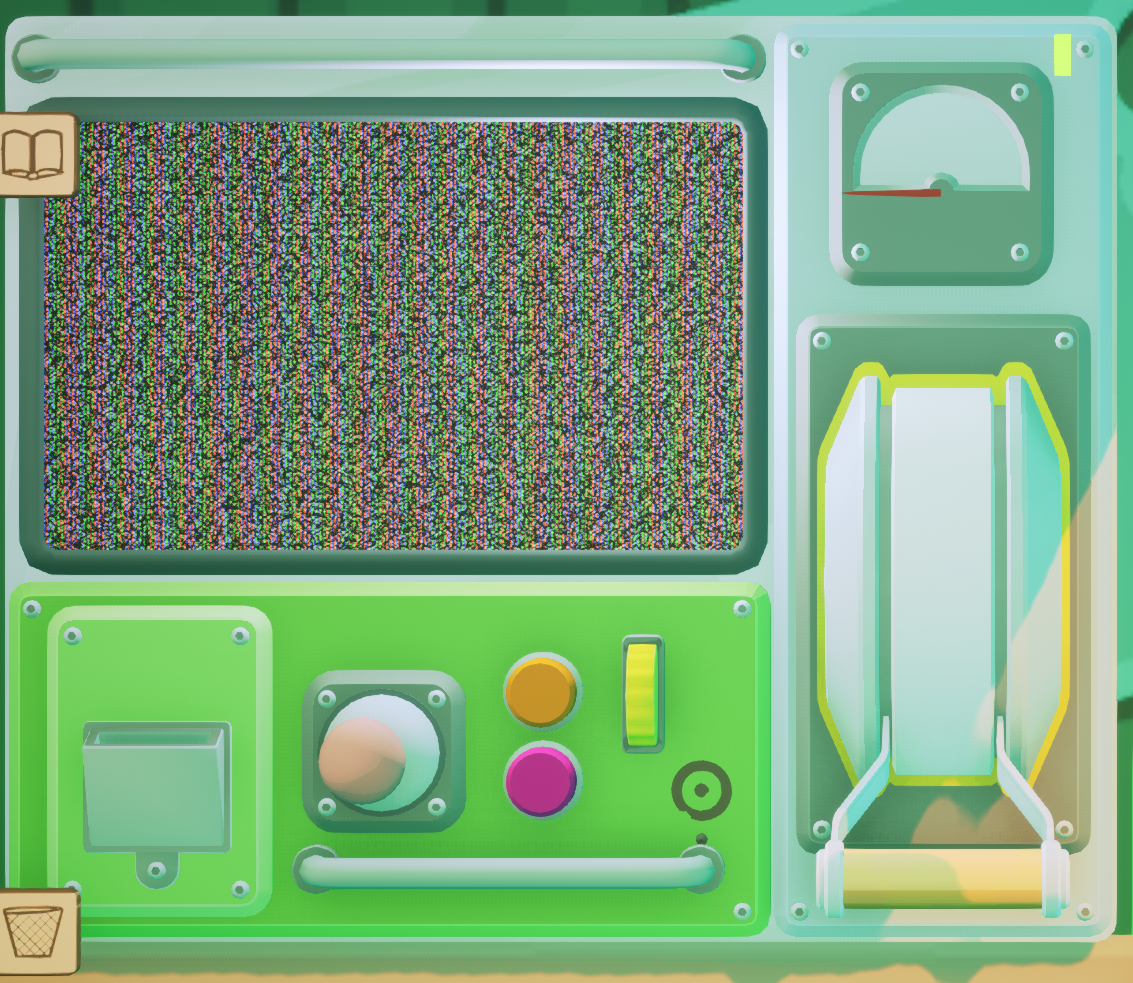
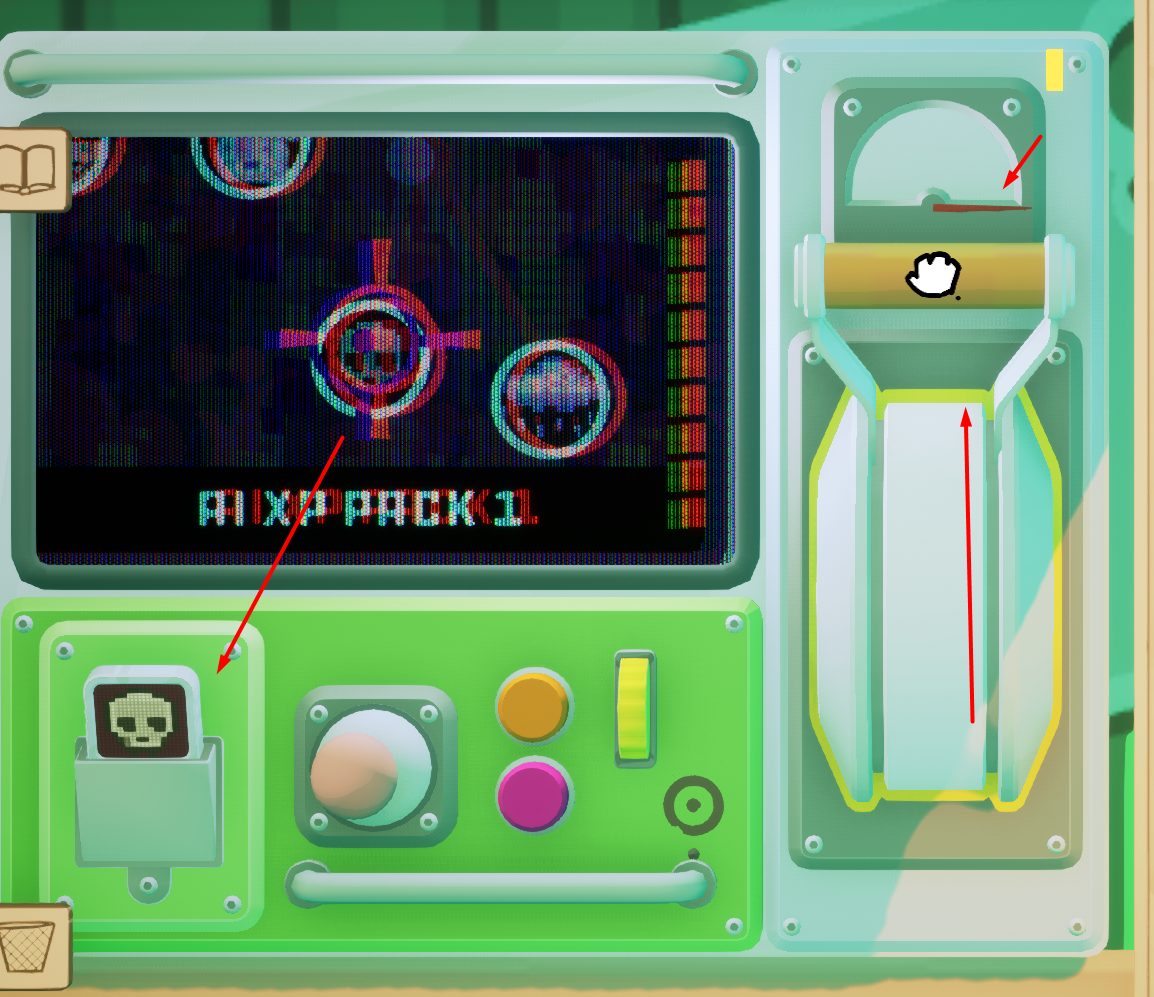
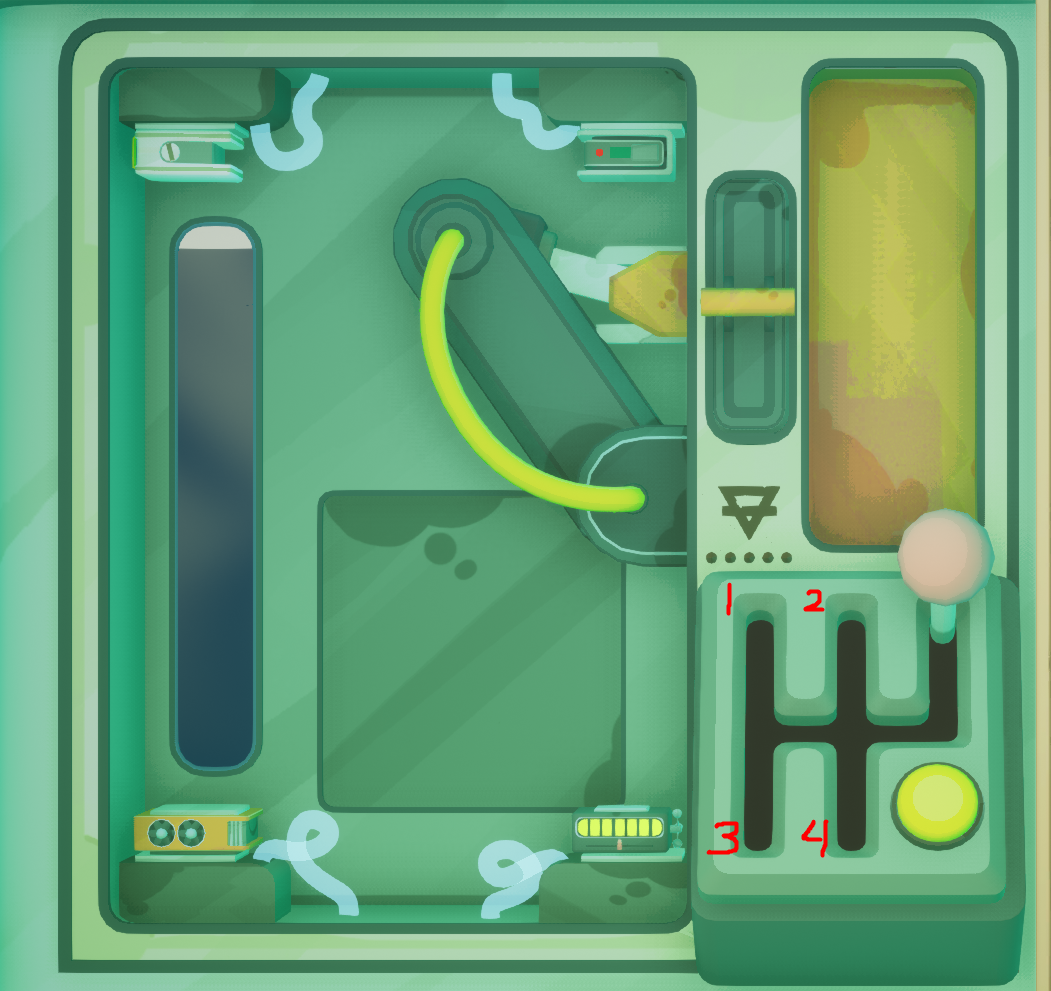
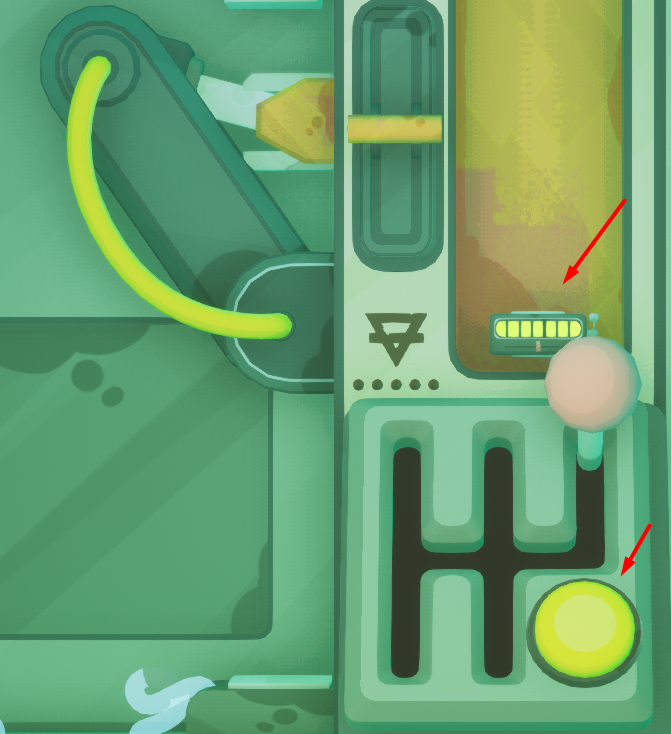
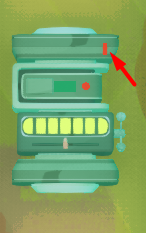
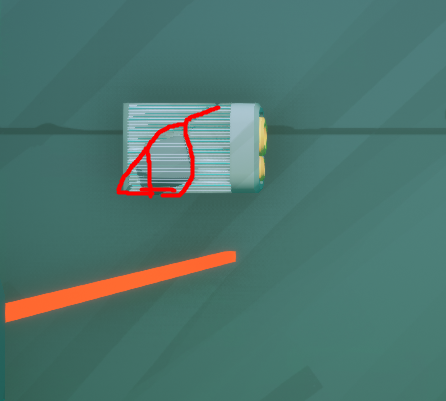
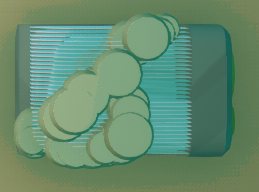
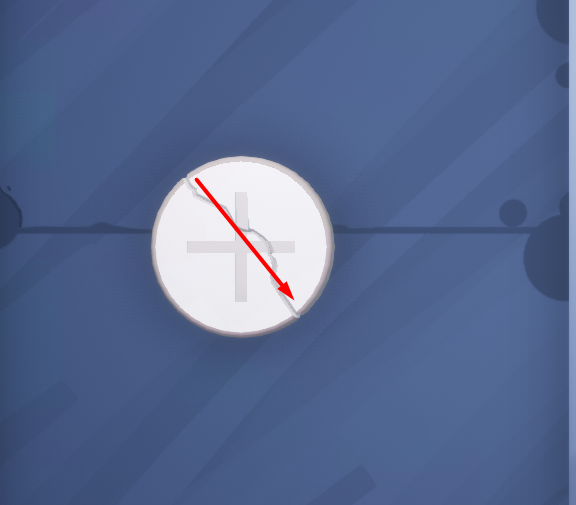
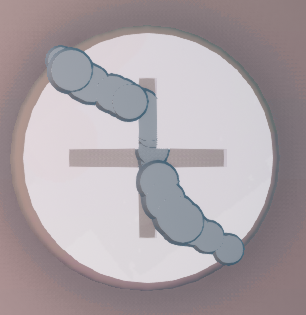
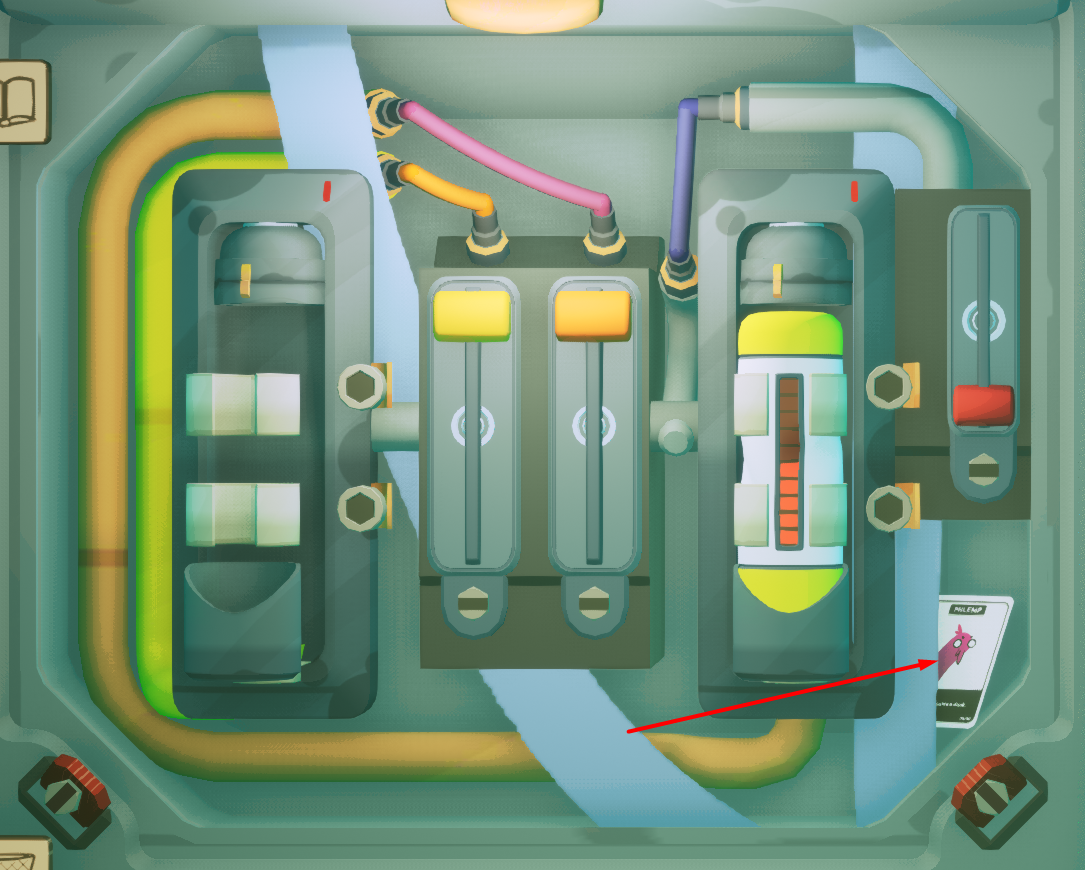
So if your 5th light is still off after you fixed everything then you need to follow the last sentence in the Gumball section and reset the cache (pull both Gumballs out, Try the Ignition, put the gumballs back and try the key again).