Automobilista 2

Automobilista 2

79 évaluations
PERFECT VR CLARITY GUIDE FOR AMS2 (UPDATED FOR V1.6)
De Augustus_V_Ren
HELLO THERE (imagine a picture of Obi-Wan here)

New to VR or tired of the constant fiddling to find a good enough setting for VR in Automobilista 2? This guide is for you!
In this guide, I will provide the setting that give you the perfect visual clarity with the best performance for the QUEST 3 in AUTOMOBILISTA 2.

The entire guide has been revised following the V1.6 update.

GOING THROUGH THE WHOLE GUIDE AND USING ALL MY SETTINGS IS ESSENTIAL!!!
6
2
6
2
2
2
   
Récompenser
Ajouter aux favoris
Favoris
Retirer des favoris
Hardware used
Essential to this guide if for you to know what hardware I am running.
I am using a Lenovo gaming laptop with a RYZEN 7 5800H, NVIDIA 3080 (165W) mobile GPU and 32GB of RAM. I am also using windows 11 home (24H2) with game mode on and hardware accelerated gpu scheduling off.

MY GRAPHICAL POWER IS JUST UNDER A 3070 (same chip but lowered power due to cooling)
This particular run put me about 3% under an average FE 3070 card (I had the factory overclock on my laptop on)

I did all the testing with no overclock. As you can see, the difference in performance is about 5 % but it is more stable and my temps don't exceed 72-73 degrees on my laptop at full load.

I also use a link cable to achieve my " perfect clarity" and cannot guarantee the same results if Virtual desktop, steam link or air link is used.
The cable is this one[www.amazon.co.uk]

The cable works with the quest 3 and is also able to keep it charged up for however long your are driving! Any link cable that reports USB3 speeds should work fine for visuals.
Software needed
* You need the META QUEST LINK APP[www.meta.com]

* NVIDIA control panel (I do not know the equivalent of the AMD Adrenalin software setting i will change but if you do, please comment)

*OCULUS debug toool ("C:\Program Files\Oculus\Support\oculus-diagnostics\OculusDebugTool.exe")

* An edit to the graphicsconfigoculusdx11 file will also be needed ("Documents\Automobilista 2\graphicsconfigoculusdx11.xml")


Software settings
Short and brief here, most of my waffling will be at the end.

*META QUEST LINK
72hz (maximum frame rate) to begin with and see how your computer responds to the settings.
The maximum rendering resolution is NECESSARY.

Ensure Meta quest link is set as the active openxr runtime

*NVIDIA control panel (NVCP)
Use the advanced 3D option

Go to the manage 3D settings tab
These are the global settings for the NVCP

This is the program setting for the AMS2AVX.EXE. Check if your CPU can use the avx instruction set (unless you use something ancient, you should be fine)

* graphicsconfigoculusdx11

Scroll to the bottom and change the texture filter to 0, the sharpening strength to 3, the sharpening clamp to 0.0115

* Oculus Debug tool
The FOV tangent is more personal but will be discussed LATER.

(PC) Asynchronus spacewarp (ASW) - DO NOT USE THIS AND DISABLE IT.

THE ASW AUTOMATICALLY TURNS ON EVERYTIME THE LINK SOFTWARE IS
RUN/RESET AS THE DEBUG TOOL ALSO RESETS. YOU HAVE TO MANUALLY TURN IT
OFF. THIS IS JUST HOW THE META APP WORKS.


Default puts distortion curvature on low, video codec on h.264 and sliced encoding at 5 slices.
The slices encoding, improved chip and the link cable allows me to use a STABLE bitrate of 960 EVERYTIME. Compression while greatly reduced is still not 100% eliminated.
Link sharpening is on normal as I found it produce a better image than the quality setting.

The visible HUD set to performance lets you see the fps the game is running at and any possible dips and stutters. It also shows you the amount of GPU overhead you have (on the performance summary setting). The app render timing gives you the CPU and GPU time to render so you can see which one is a possible bottleneck (timing is relative to the frame rate of the headset and the higher the frame rate, the lower the render time needs to be).

NOTE: FOR A VALUE ABOVE 500, THE ENCODE BITRATE HAS TO BE TYPED ELSEWHERE SO IT CAN BE COPY AND PASTED INTO THE VALUE BOX.
You can now just type the number in.

I have game mode on and hardware accelerated GPU scheduling off.

*AUTOMOBILISTA 2 GAME SETTINGS

NOTE: The performance settings of the game when launched in VR (Oculus VR mode) is separate to the performance setting when launched normally (flat screen). I also put the game in windowed to be able to show you guys the screen shots. It can be whatever you want.

Texture resolution and MSAA are ESSENTIAL at high. The texture filtering changes as a result of editing the graphicsconfigoculusdx11 file. DO NOT CHANGE IT. Vehicles and track detail can be put at ultra with a greatly reduced performance impact if you follow the whole guide (YES YOU READ THAT RIGHT). To best show this, go to test at Daytona on low track detail and on Ultra and look at the impact on performance!

My guide should also allow you to have the pit crew detail at ALL too. Do note, the first time you drive the car in the pits (at practice or qualifying) at a race/weekend on tracks like Le Mans and Daytona where all the cars are, there is a sharp drop just because of the sheer number but once you drive out or the cars spread onto the track, it goes back to normal.
I need more feedback on this so please try it and report how it works for you.

SHADOWS ARE A KNOWN PROBLEM IN AMS2 AS THEY CAN FLICKER AND DON'T LOOK THE BEST IN ALL HONESTY. I HAVE THEM AT LOW AS I COULD NOT FIND A REAL DIFFERENCE IN VISUALS BETWEEN LOW AND ULTRA. I LEFT THEM ON AS DESPITE THE FLICKERING, THEY STILL CONTRIBUTE A LOT TO THE IMMERSION.

I would like to have enhanced mirror on as there is a noticeable difference between on and off but it does its job well enough at on. Plus I would prefer looking forward than back

Motion blur off. Detailed grass off (actually still looks good, like its just been mowed) With my texture settings, you can put the detailed grass to high (looks much better and costs less than before.
Particle detail at low, particle density is on medium as i found low makes things like track dirt and things that you would normally find "normal" missing. Low is also forced on the particle detail when online so I just left it there

My other game settings

I WOULD STILL RECOMMEND THESE SETTINGS

The high speed shakes feels natural and makes you feel in the car so I would turn it on. The g-force effects can be too distracting so i have them off. I have changed the legacy head movement to off. If you drive the GTP cars on the banking at Daytona, it is just better.

These here are the default and don't think they affect VR.

The super-sampling here is not to be used. you can change the recenter options to your liking. The camera near clip plane is the default. I would also put off gaze control.

I would reduce the tyre and track volume to these numbers and increase the LFE volume to 100. Headphone mix if you use headphones too.
VR LAUNCH


Using the oculus VR mode is the fastest and easiest way to play AMS2 using a quest 3.
While using opencomposite might allow you to use more foveated rendering, with the lens and large sweet spot of the quest 3 i don't think that is necessary. It might also add some some confusion if you are not the best at using computers ( it isn't that complicated to be fair).

USERS OF virtual desktop, i am interested to see if these settings might work well for you. Please comment your findings.


Performance BOOST
WITH THIS GUIDE YOU ARE ABLE TO TO GET THE BEST VISUAL CLARITY POSSIBLE WITH THE BEST GRAPHICS ECONOMY. HOWEVER, THERE ARE SOME WAYS TO HELP YOUR GPU EITHER RUN THESE SETTING BETTER (HIGHER IN GAME SETTINGS LIKE DETAILED MIRROR OR REFLECTIONS), AT A HIGHER REFRESH RATE (90hz for example)

*VR LAUNCH EDIT


Adding the command "-vrnomirror" in the selected launch option removes the VR mirror that appears on your monitor screen while you're in VR. Unless you are a streamer and/or some that uses the VR mirror to record, I HEAVILY RECOMMEND THIS.
There are some handicaps that come with using this (nothing major). The command removes mouse functionality and that means you are unable to access replays as you wont be able to leave them due to the way the games replay works (hoping the new UI in 1.6 fixes it and we can navigate it properly with the keyboard or controller) but you can now access the entire game, replays included, thanks to the 1.6 update and improvements to the UI. The command is totally worth it in my opinion. I use a PlayStation controller to navigate the game and the keyboard can still work to type (alternatively you can use the virtual keyboard on the quest to type too).

NOTE: You can alt tab to focus out of the game. If you use the command and the game loads on your headset but does not seem to respond, that means it is not in focus. Just click the game's icon in the task bar to bring it back into focus.

*FOV TANGENT MULTIPLIER


Using the tangent multiplier can increase or decrease the size of what our GPU renders, in this case, we will be decreasing it to find more performance. I aim to replicate the feeling of being in a helmet while using this setting (killing two birds with one stone). This is better than using the games other helmet camera.
If you have a larger IPD like me (67-68) you are able to use a lower value horizontally. This is because the quest cuts more of the image from the inside of the panel compared to the outside. So if your IPD is lower like 60, your eyes are closer together and you will see the boundaries compared to someone with a higher IPD. This is just the way the headset works
After careful pixel pinching, I can use a value of 0.7 but most people would have to use a higher value. I recommend using 0.8 to start and adjust high or lower on what you see.

I would recommend a vertical multiplier of 0.3 (I WOULD HEAVILY RECOMMEND YOU TO START WITH THIS). Some may not agree, but 0.3 is all you need. The legs of the VR driver in the car is very off putting for me in every car (especially formula) and this helps to also remove this. It also works well in both open wheelers and sport-cars. Adjusting the cockpit camera to where you can see about 1/2 to 1/3 of the steering wheel in the car vertically is what i found to be perfect. This way, my brain assumes my body is in a better position while driving as I can see the hands and the wheel but not the lower body. See how it works for you and let me know if you like it/

The setting increases performance by not rendering the entire scene. Adjustments using the cockpit configuration means you can perfectly change your seating position in the car to suit what you want such as how far forward the seat is placed.

Even if you value immersion more, I would still recommend you start with the tangent values and adjust based on your GPU performance.
My Recommendations and Rain/Night performance
Nothing much here now.

With my hardware which is equivalent to a 2080 Ti (if you have anything above this, you can possibly increase the FOV tangents or the headset refresh rate.

NOTE: I HAVE 16 GB OF VRAM, and while I never seem to allocate more than 8GB. The maximum I have seen it allocate is 8.97GB With the ability to now turn things up like like vehicle, track, grass, and pit crew detail to the highest setting, my maximum VRAM allocation has increased to 11.2GB. This is the max allocated amount but i am sure it would not allocate this much if it does not at least use most of it. This will not affect me due to the amount of VRAM (16GB) that I have but if you have 8 or possibly 10GB of VRAM and you try the highest of those setting, there is a chance you could run into a VRAM bottleneck.

I can run in the rain, even storm and thunderstorm without* changing any settings. The first lap is the toughest and can dip below 72 (especially with higher downforce cars and the spray they produce) but after that, It is PERFECT. I have tested this on the heavier tracks like the newly improved Austria, Le Mans and Daytona. The Le Mans and Daytona testing also included night testing. ALTHOUGH, I WOULD RECOMMEND REDUCING THE PIT CREW TO PLAYER ONLY ON SUCH HIGH PIT NUMBER TRACKS

An important factor to this is limiting the maximum visible cars to 19. With the new algorithm Reiza has made to decide which cars get shown, this is now my preferred number. I mainly race F1 cars so no more than 24 cars on track, but in a multi class event, you can still see everyone in you class even from the back and cars popping should not happen especially after the first lap. If 19 is still too low for you, 24 is the highest number I would say you need

ALL RAIN SETTINGS HERE WERE DONE WITH PARTICLE LEVEL ON LOW AND PARTICLE DENSITY ON MEDIUM
Conclusion and Suggestion *IMPORTANT*
If you have a better card than my own, I would recommend you increase first the the FOV multiplier if you find mine too small (but please try it first), followed by the headset frequency (interchangeable depending on if you like the (0.7 vertical ; 0.3 horizontal values that I use).
The game setting would be the third i would look at to increase immersion. ONLY IF YOU STILL HAVE PERFORMANCE LEFT AFTER THIS WOULD I RECOMMEND INCREASING THE PIXEL PER DISPLAY OVERRIDE. I would not recommend increasing the pixel override (1.3) as this also increases the cost of the anti aliasing as we are using MSAA (high).

FOR THOSE THAT ARE READING THROUGH THE GUIDE AND MIGHT HAVE A SLIGHTLY LESS POWERFUL CARD, I WOULD RECOMMEND REDUCING THE PIXEL PER DISPLAY OVERRIDE BACK TO 1 ( OR ZERO AS THEY ARE SEEN AS THE SAME), REDUCING THE MAX NUMBER OF CARS SHOWN TO 16, TRACK DETAIL TO MEDIUM OR LOW AND PARTICLE DENSITY TO LOW. If you have a less powerful card, I would recommend reducing MSAA first from high to low, there is a much bigger gap visually between high and medium than medium and low.

I DO NOT RECOMMEND YOU REDUCE MSAA AS THIS IS VERY ESSENTIAL FOR JUST GENERAL USE AND PREVENTING JAGGIES (ESPECIALLY AT NIGHT TIME AS THEY ARE MORE OBVIOUS) I striked this but it is still kinda true. If you have followed my settings, the game should run better than ever and you should at least be able to use my settings in dry settings

After you've made every change from the guide, including those in-game, I recommend restarting your PC

Last advice is to get a lens insert for VR, especially if you wear glasses and even if you don't. I have glasses that i never wear as i don't really need them due to my prescription being quite weak (-1.25), BUT THEY MAKE A NOTICEABLE IMPACT ON THE IMAGE YOU SEE IN THE HEADSET.
YOU CAN WATCH THIS IF YOU ARE NOT SURE

I would recommend using my exact settings first to determine where the performance of your computer may lie if you are not certain.

Would also recommend pinning the debug tool to your task bar so you can turn off ASW and alter the FOV multipliers easily whenever you first launch the Meta quest link app.

Ensure your graphic drivers are up to date.
Ensure the quest is set to set to your correct IPD (Inter-pupillary distance. There is also an app on your phone that can do this).
Ensure the lenses are clean and that the headset is close but not too close to where your eyelashes touch the lenses or they start to fog up


I HAVE SPENT EVEN MORE TIME ON THE POST 1.6 VERSION OF THIS GUIDE THAN I THOUGHT SO A LIKE OR REVIEW WOULD BE NICE IF YOU FOUND THIS HELPFUL (you would not believe the amount of laps i drove just looking at the track for changes lol).
ALSO LEAVE A RATING AND LIKE IF YOU FOUND THIS HELPED.


If you have any issue, you can leave a comment on here or the Reddit post here

COMMENTS THAT CAN IMPROVE THE GUIDE ARE ALSO WELCOME IF YOU HAVE ANYTHING TO CONTRIBUTE.

HAVE FUN RACING....
67 commentaires
Augustus_V_Ren  [créateur] 25 avr. à 15h30 
@fofocho I replied on reddit too but one thing to note is that there are no more updates to the opencomposite software so any update from steam, the game or even meta could affect things
fofocho 24 avr. à 15h55 
If I use Opencomposite, FPS are capped at 78.8 fps, despite having headroom available, in both Virtual Desktop and Meta Link. If I remove the DLL of Opencomposite and just use normal Oculus mode, I get 90 fps. Any idea of why Opencomposite is limiting the FPS despite having headroom available?
Augustus_V_Ren  [créateur] 17 avr. à 11h53 
@gette I can reach all buttons with a controller. It just gets weird sometimes in a scenario where i had to press left to go up or the down to go to the left
GeoB13 26 mars à 18h51 
@Augustus_V_Ren and @BrassYeti

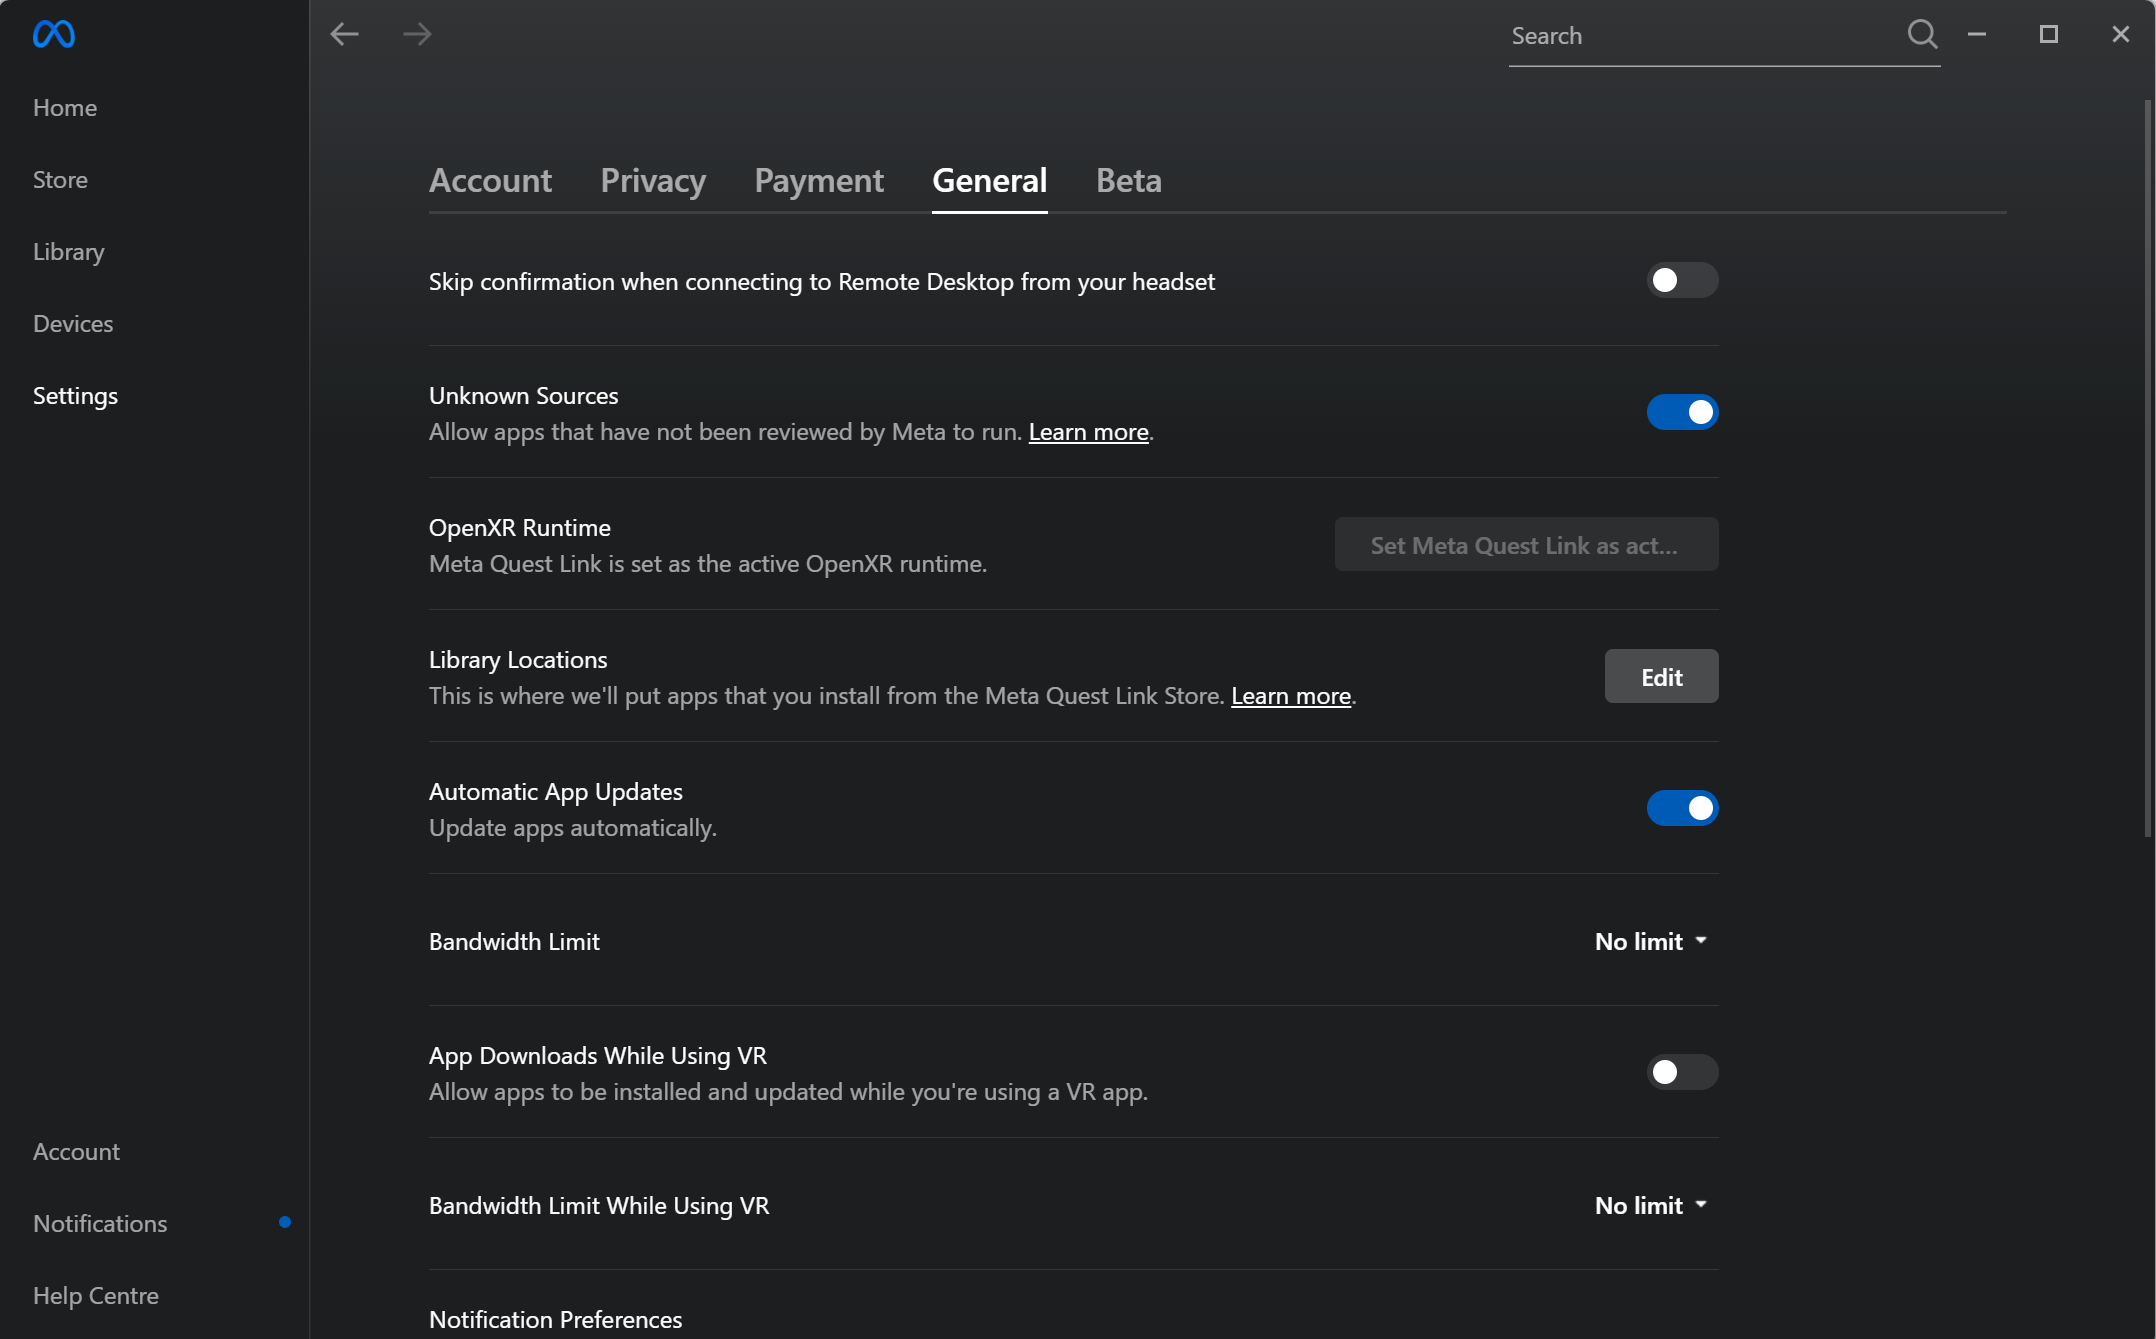
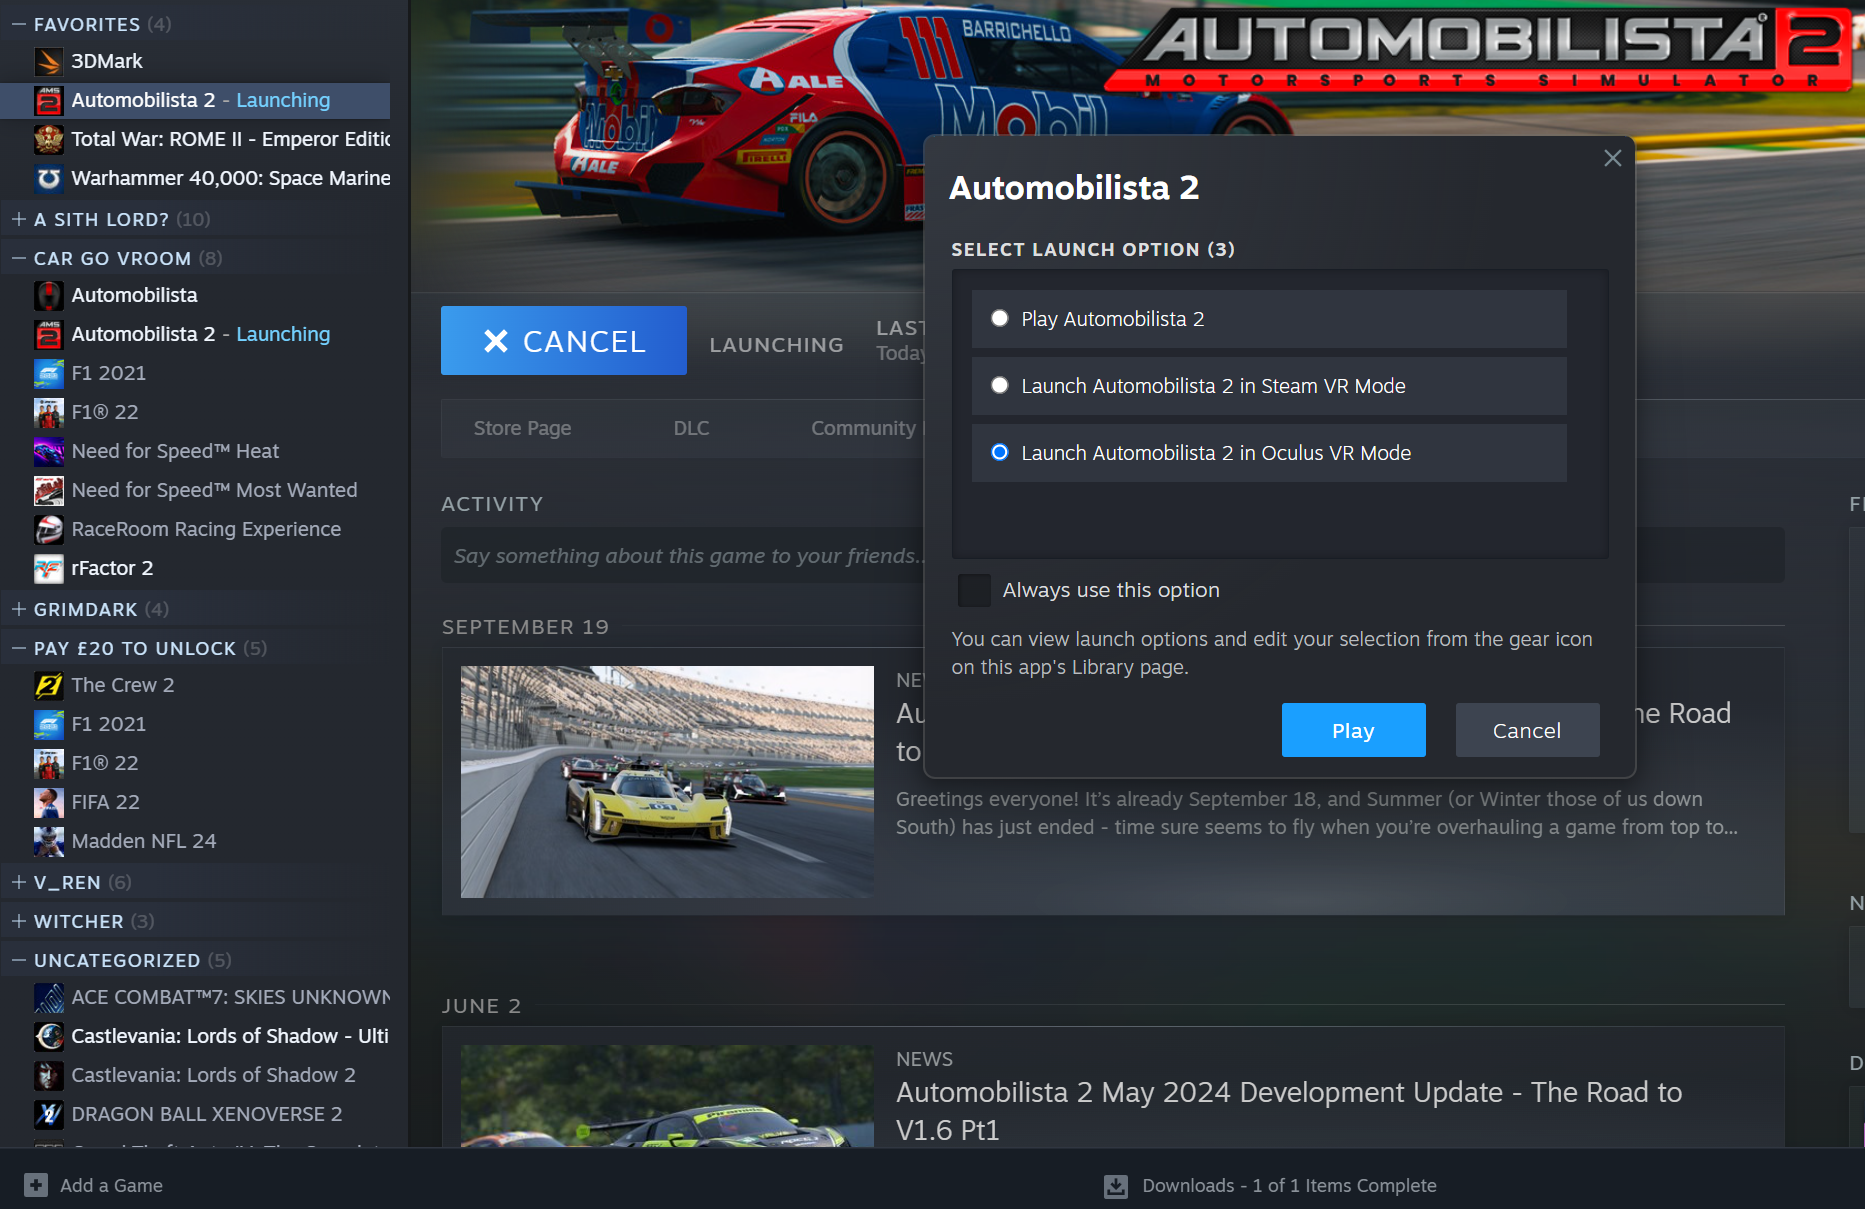
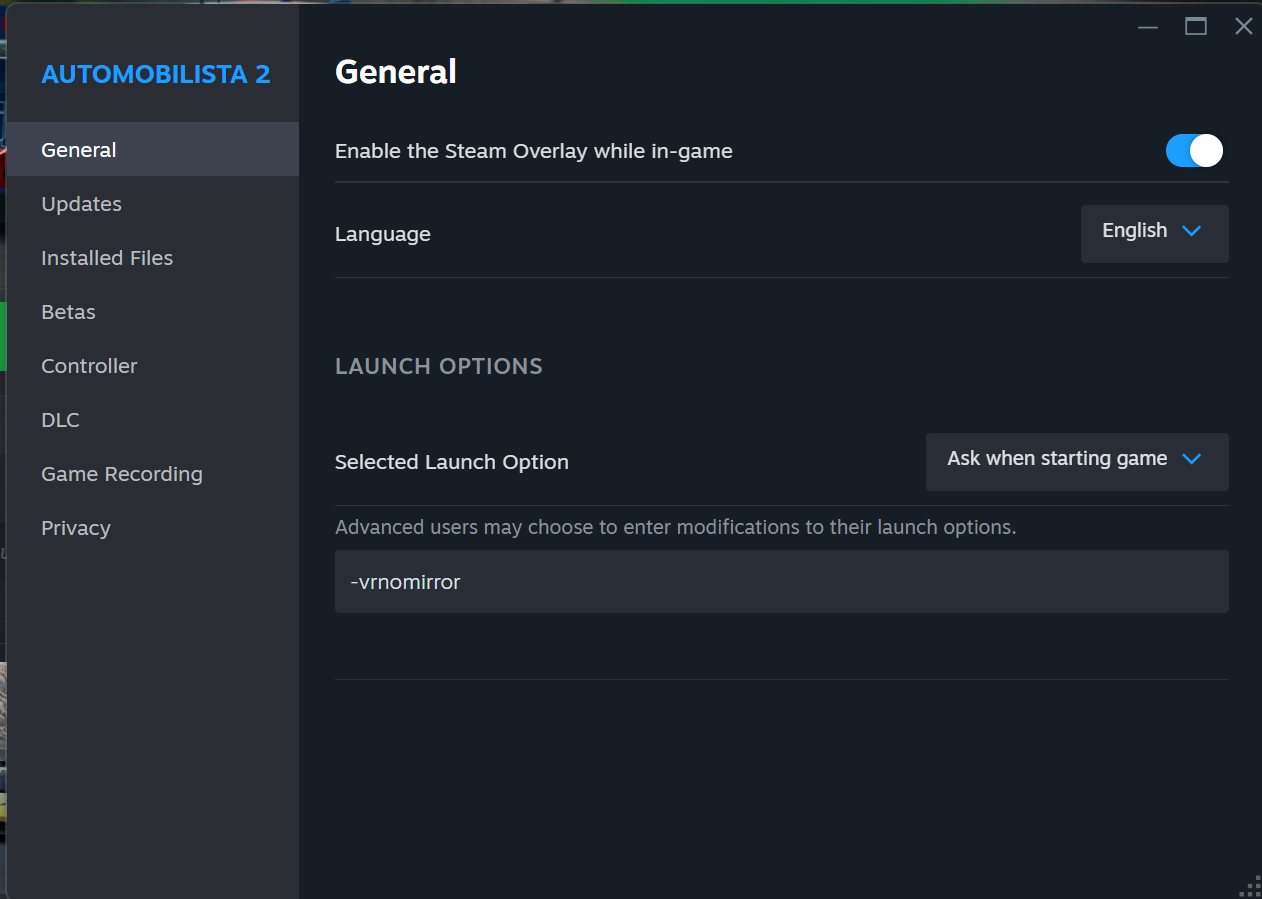
Also I'd love to do the -vrnomirror and that headroom it would give me.
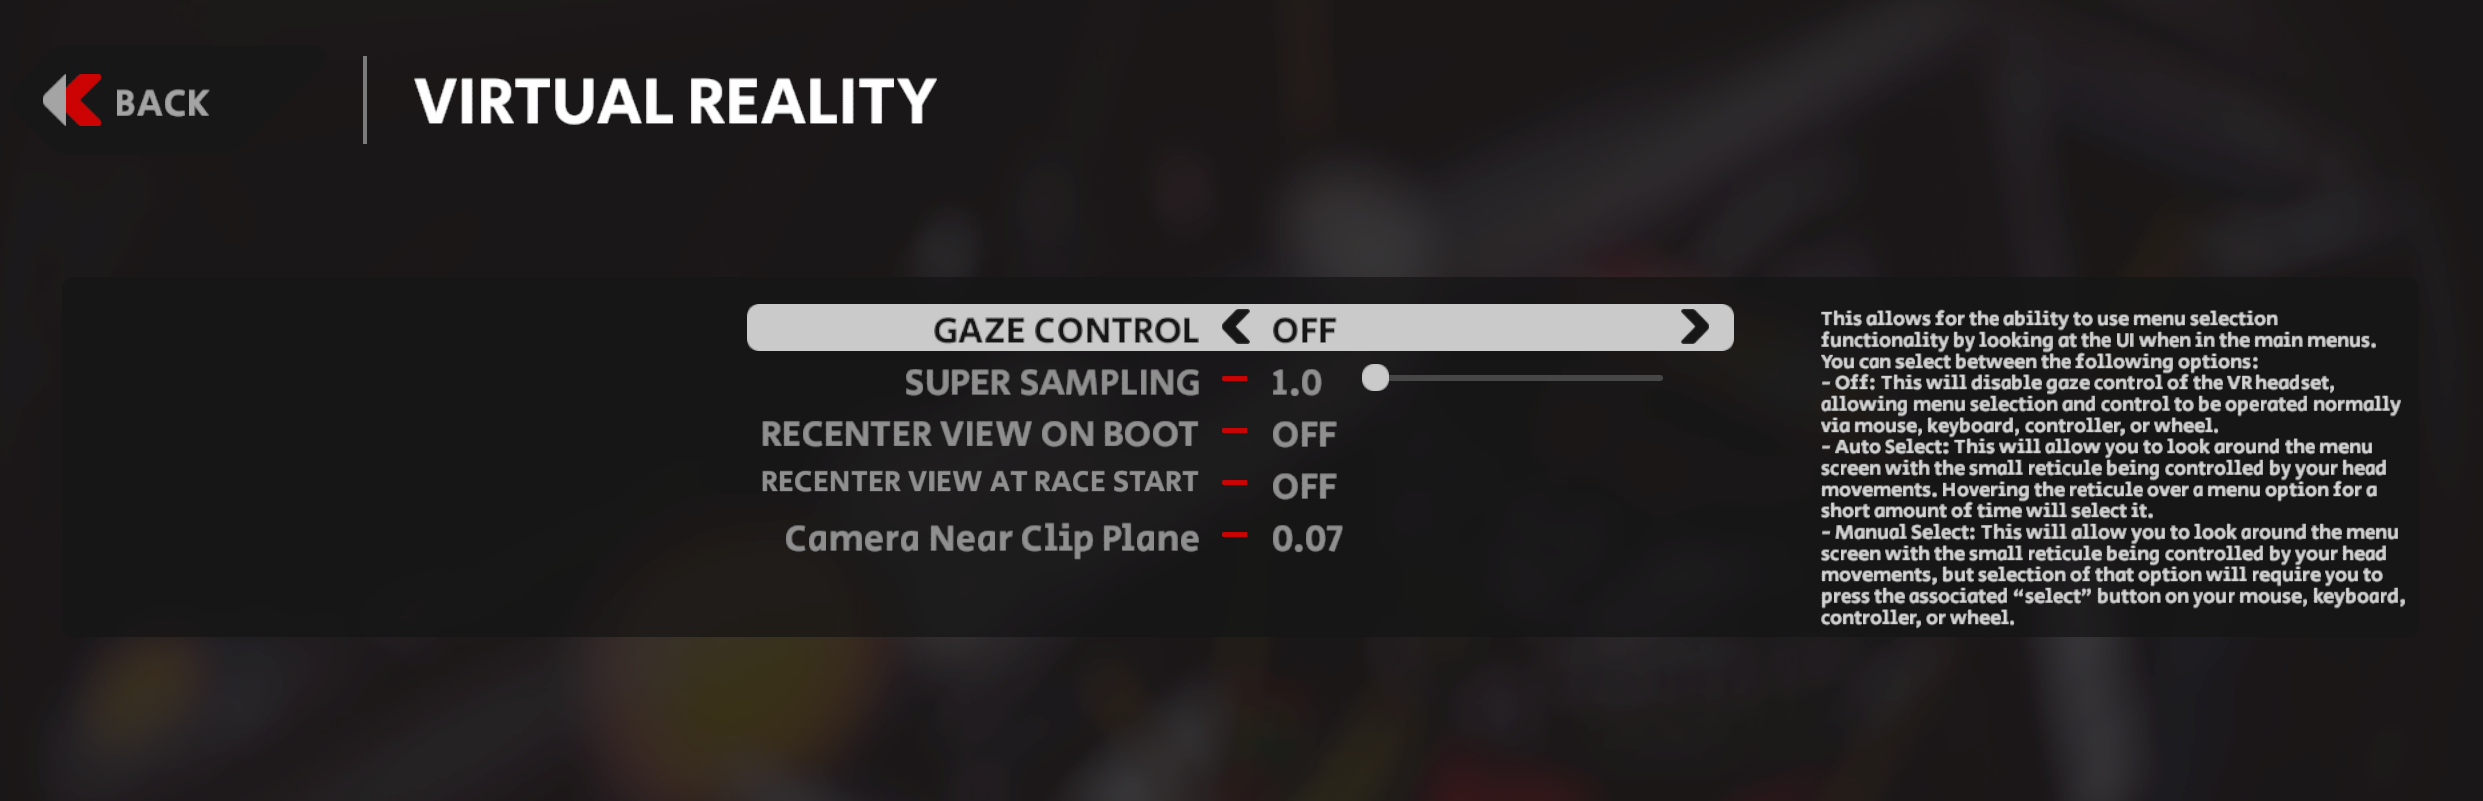
But I can't figure out how to navigate the menus. Its hit or miss on a mouse/keyboard and controller. And Don't even get me started on mapping my Moza wheel mapping Im still in search of. I know I am missing something but can't find it via searches, yet.

Basically I have to Tab out of game and back in to get mouse working in which I can sometime get my Xbox controller working. Always hit or miss, cant put ,y finger on it. But even with Xbox controller I can't figure out how to select the very top buttons "<< BACK", "OPTIONS", "X EXIT" etc. Which is preventing me from using the no mirror.

Can you do those very top menu buttons with an XBox controller and/or keyboard hot keys?

Anyway thx again for everything!
GeoB13 26 mars à 18h51 
@Augustus_V_Ren and @BrassYeti

Thanks for replies!
I'm a noob so haven't even attempted night or rain, so thats concerning to hear. lol

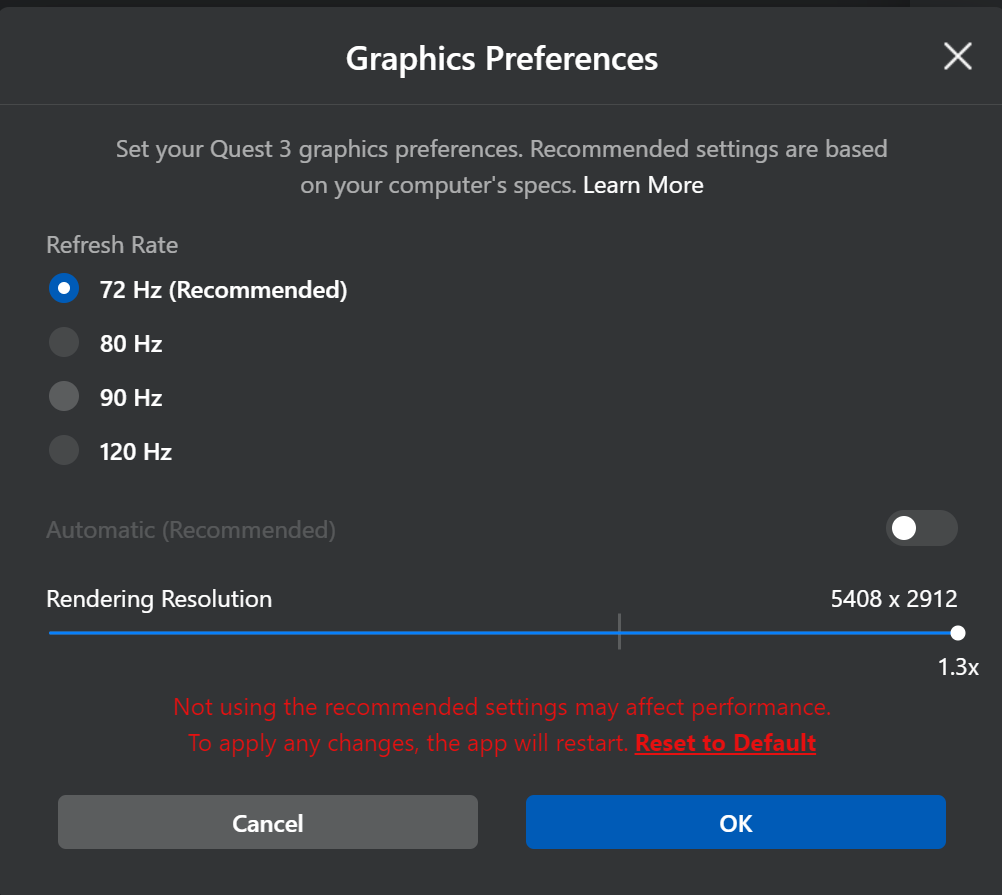
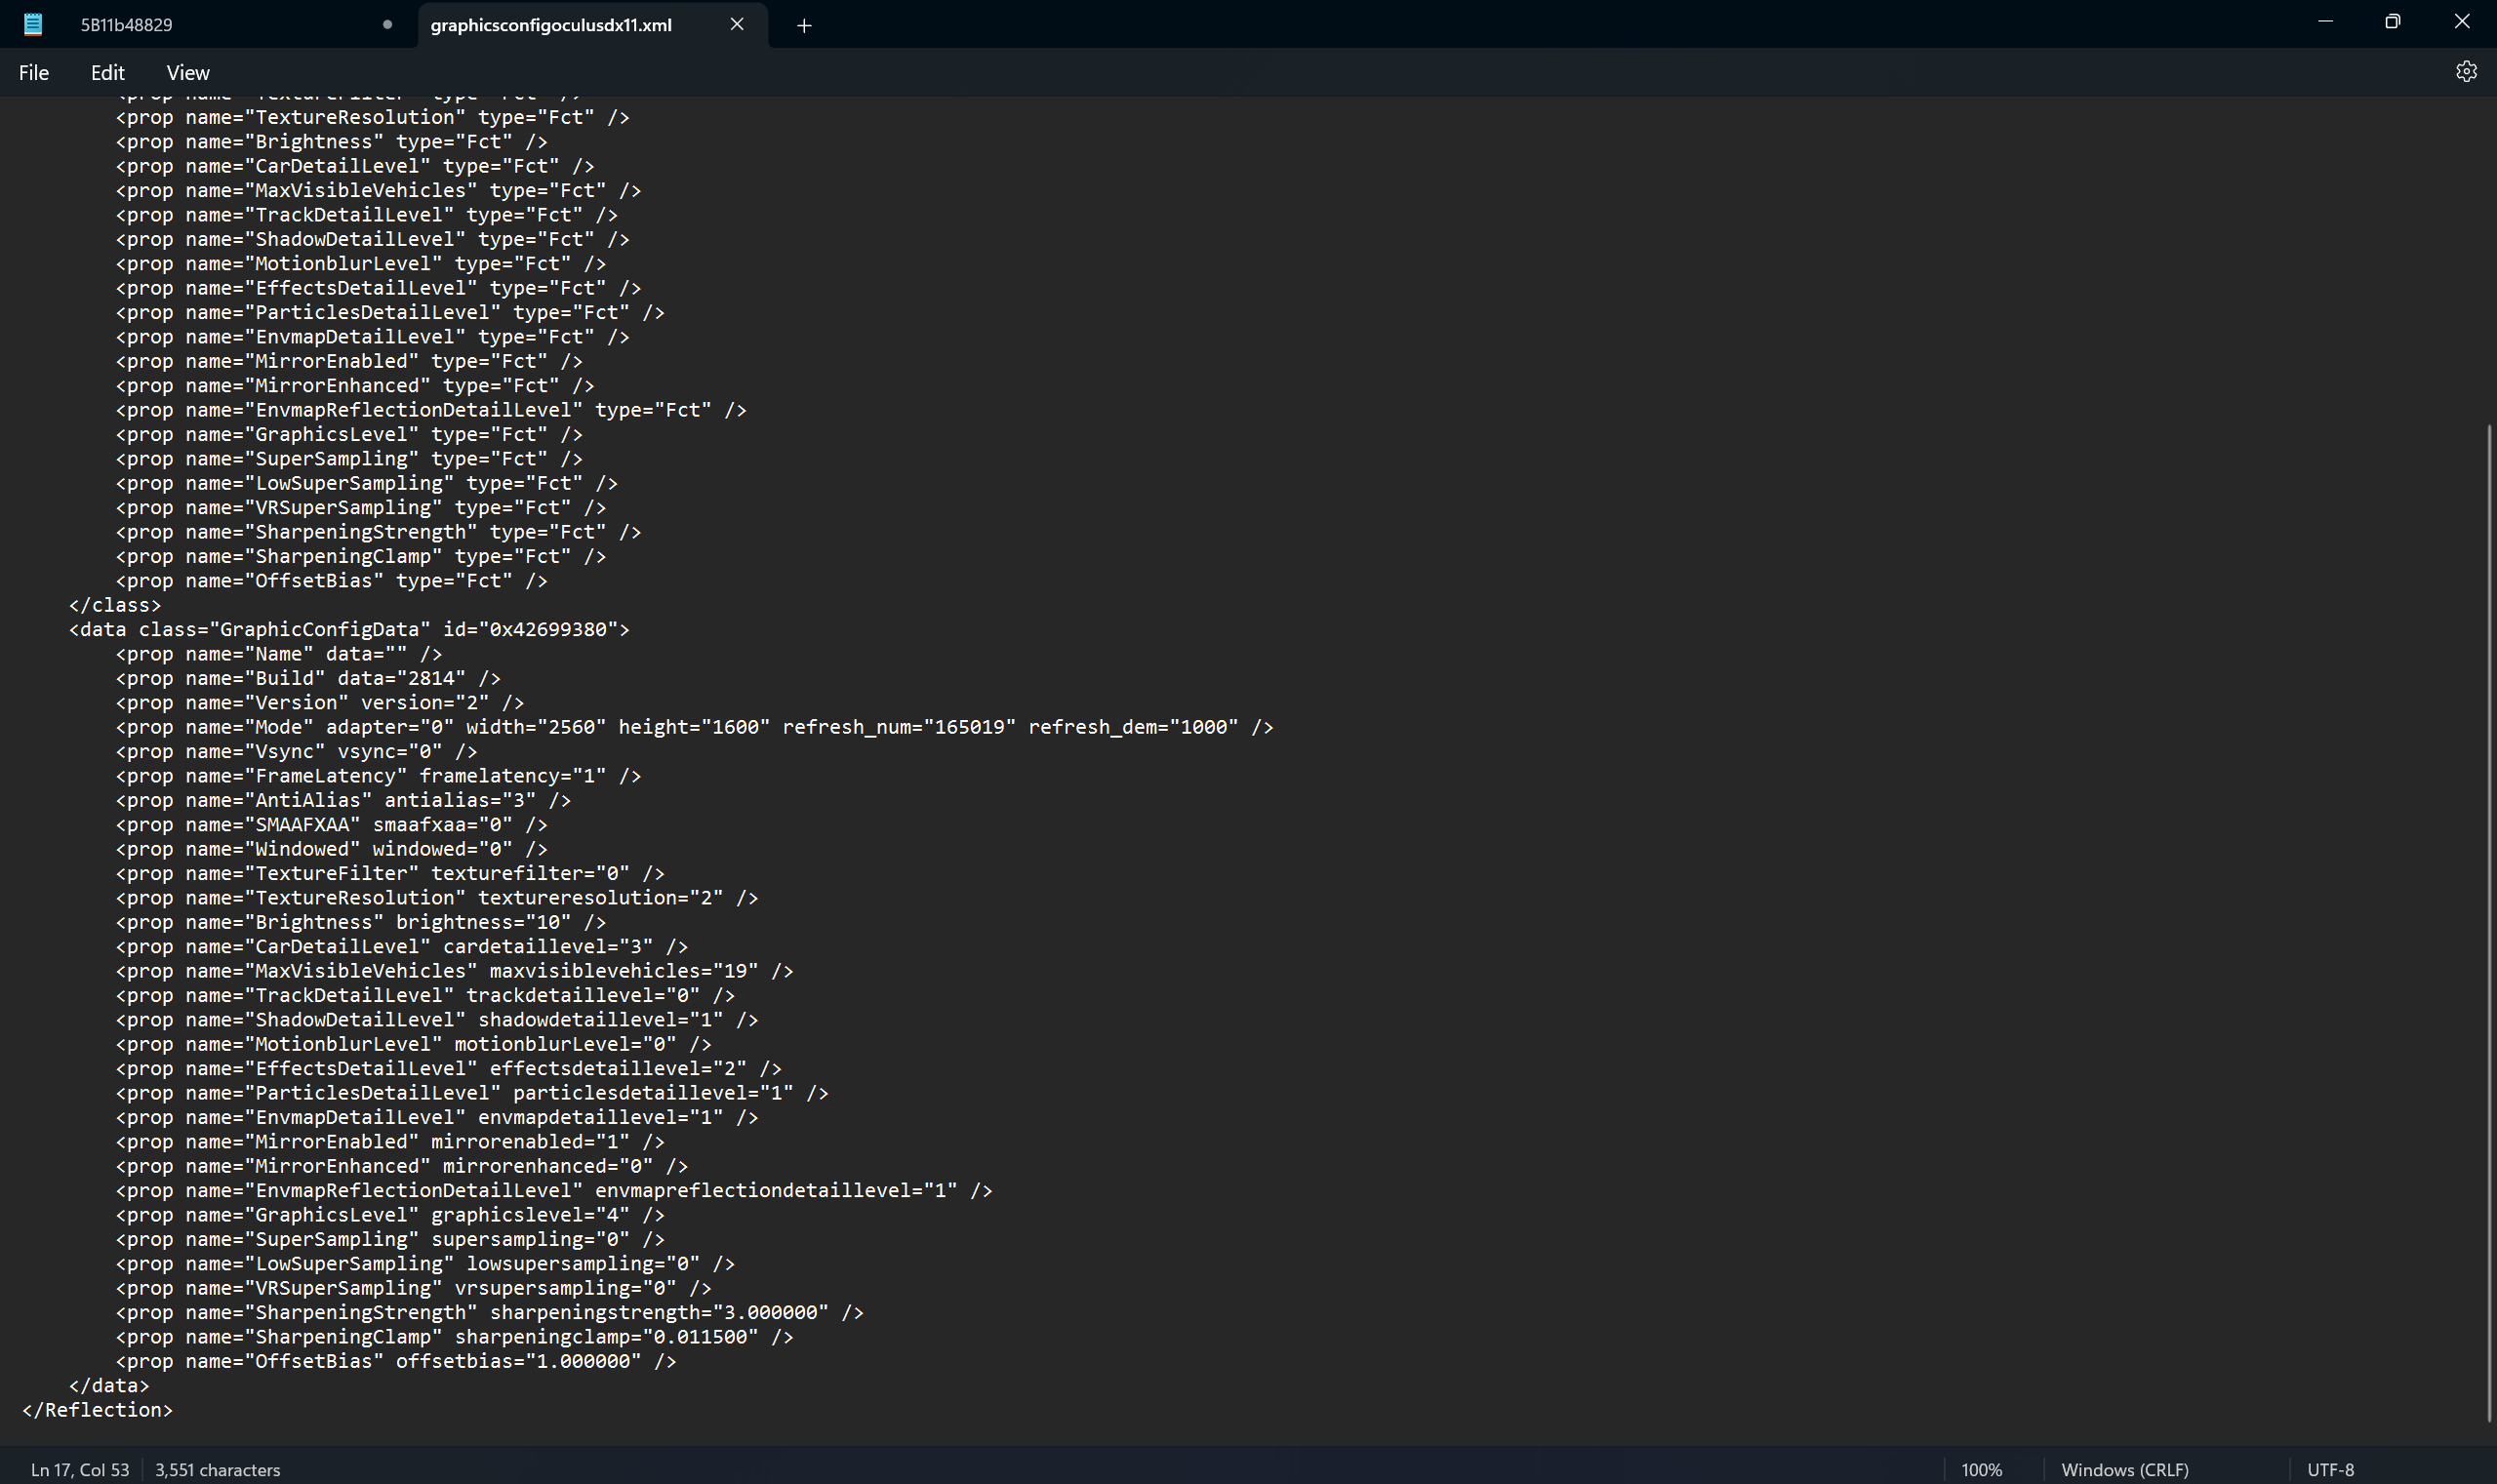
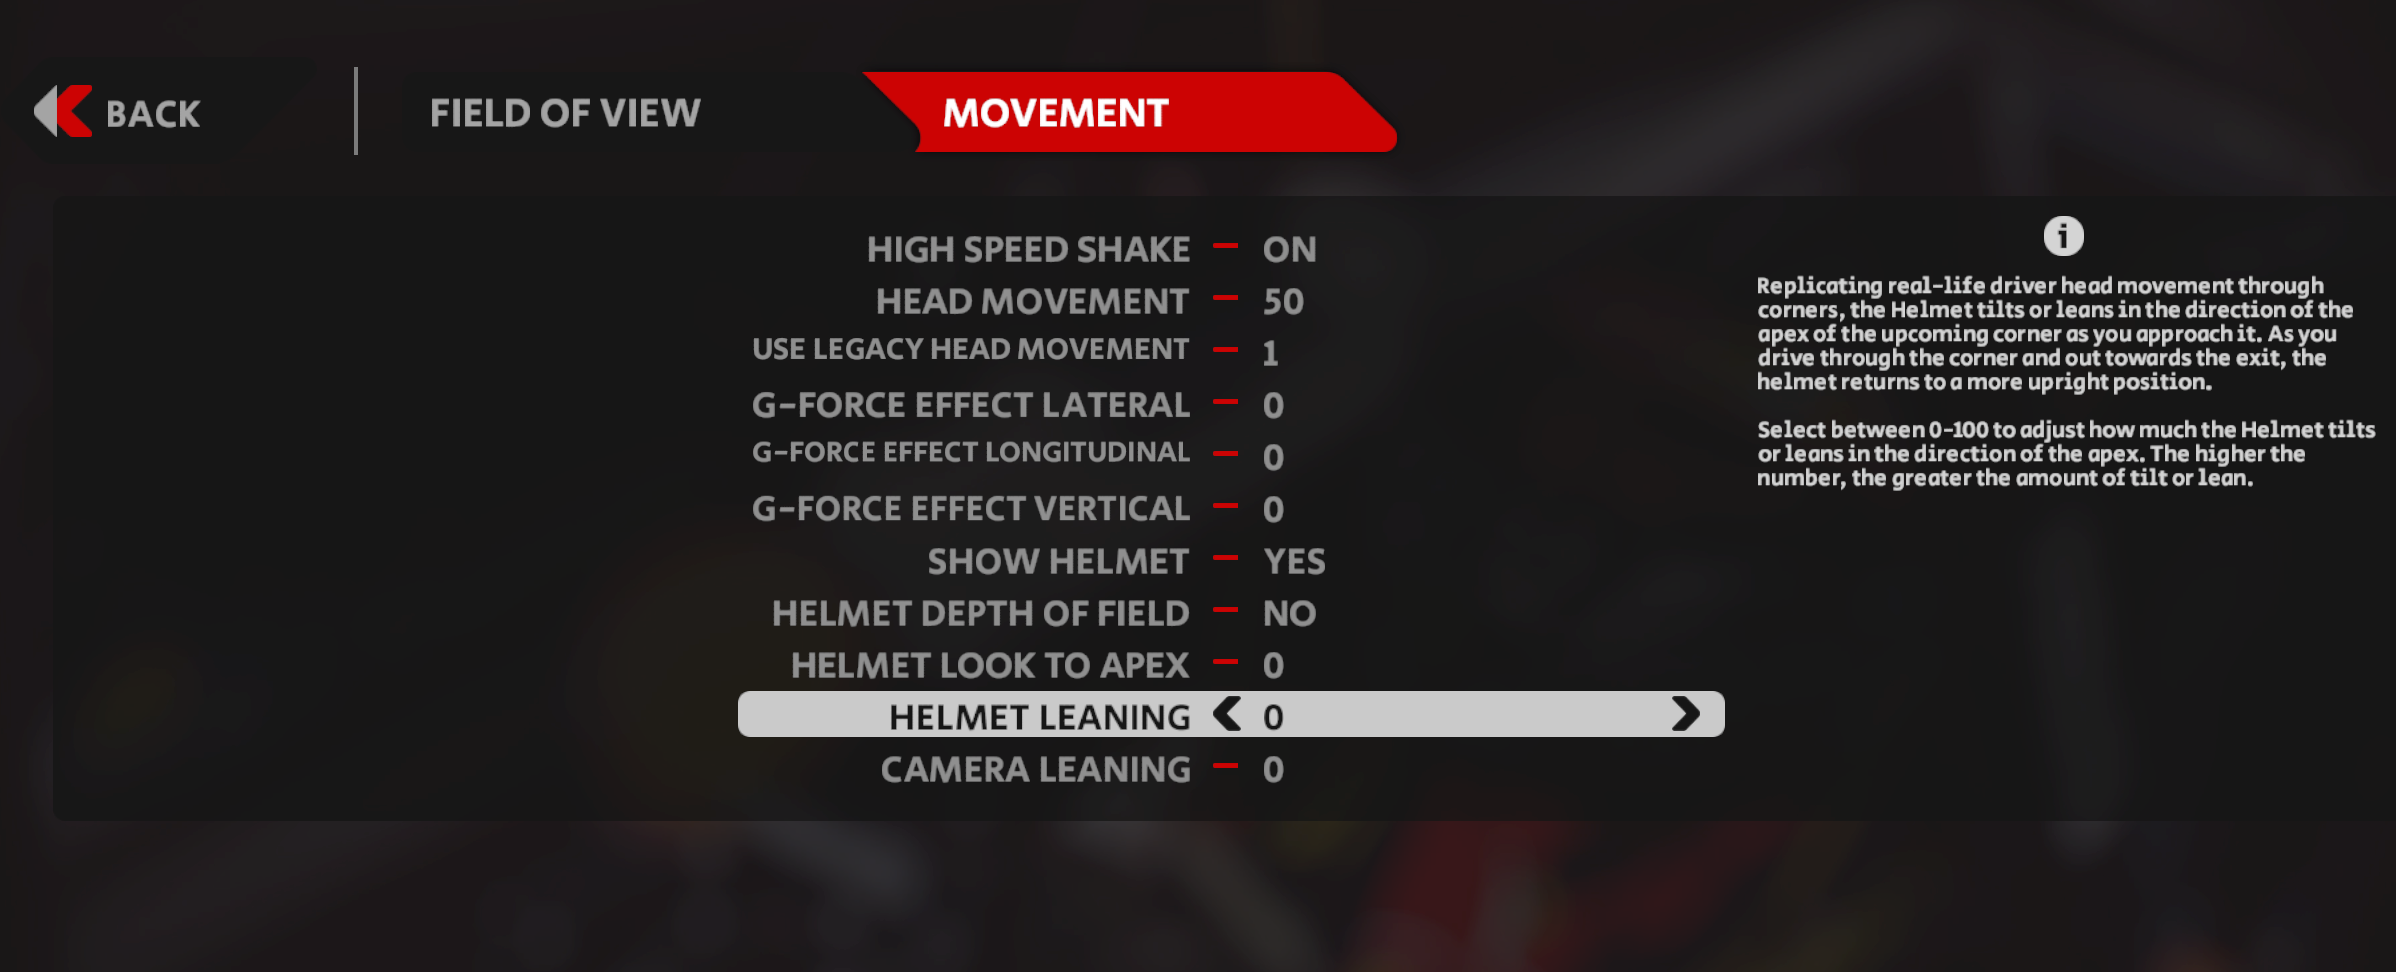
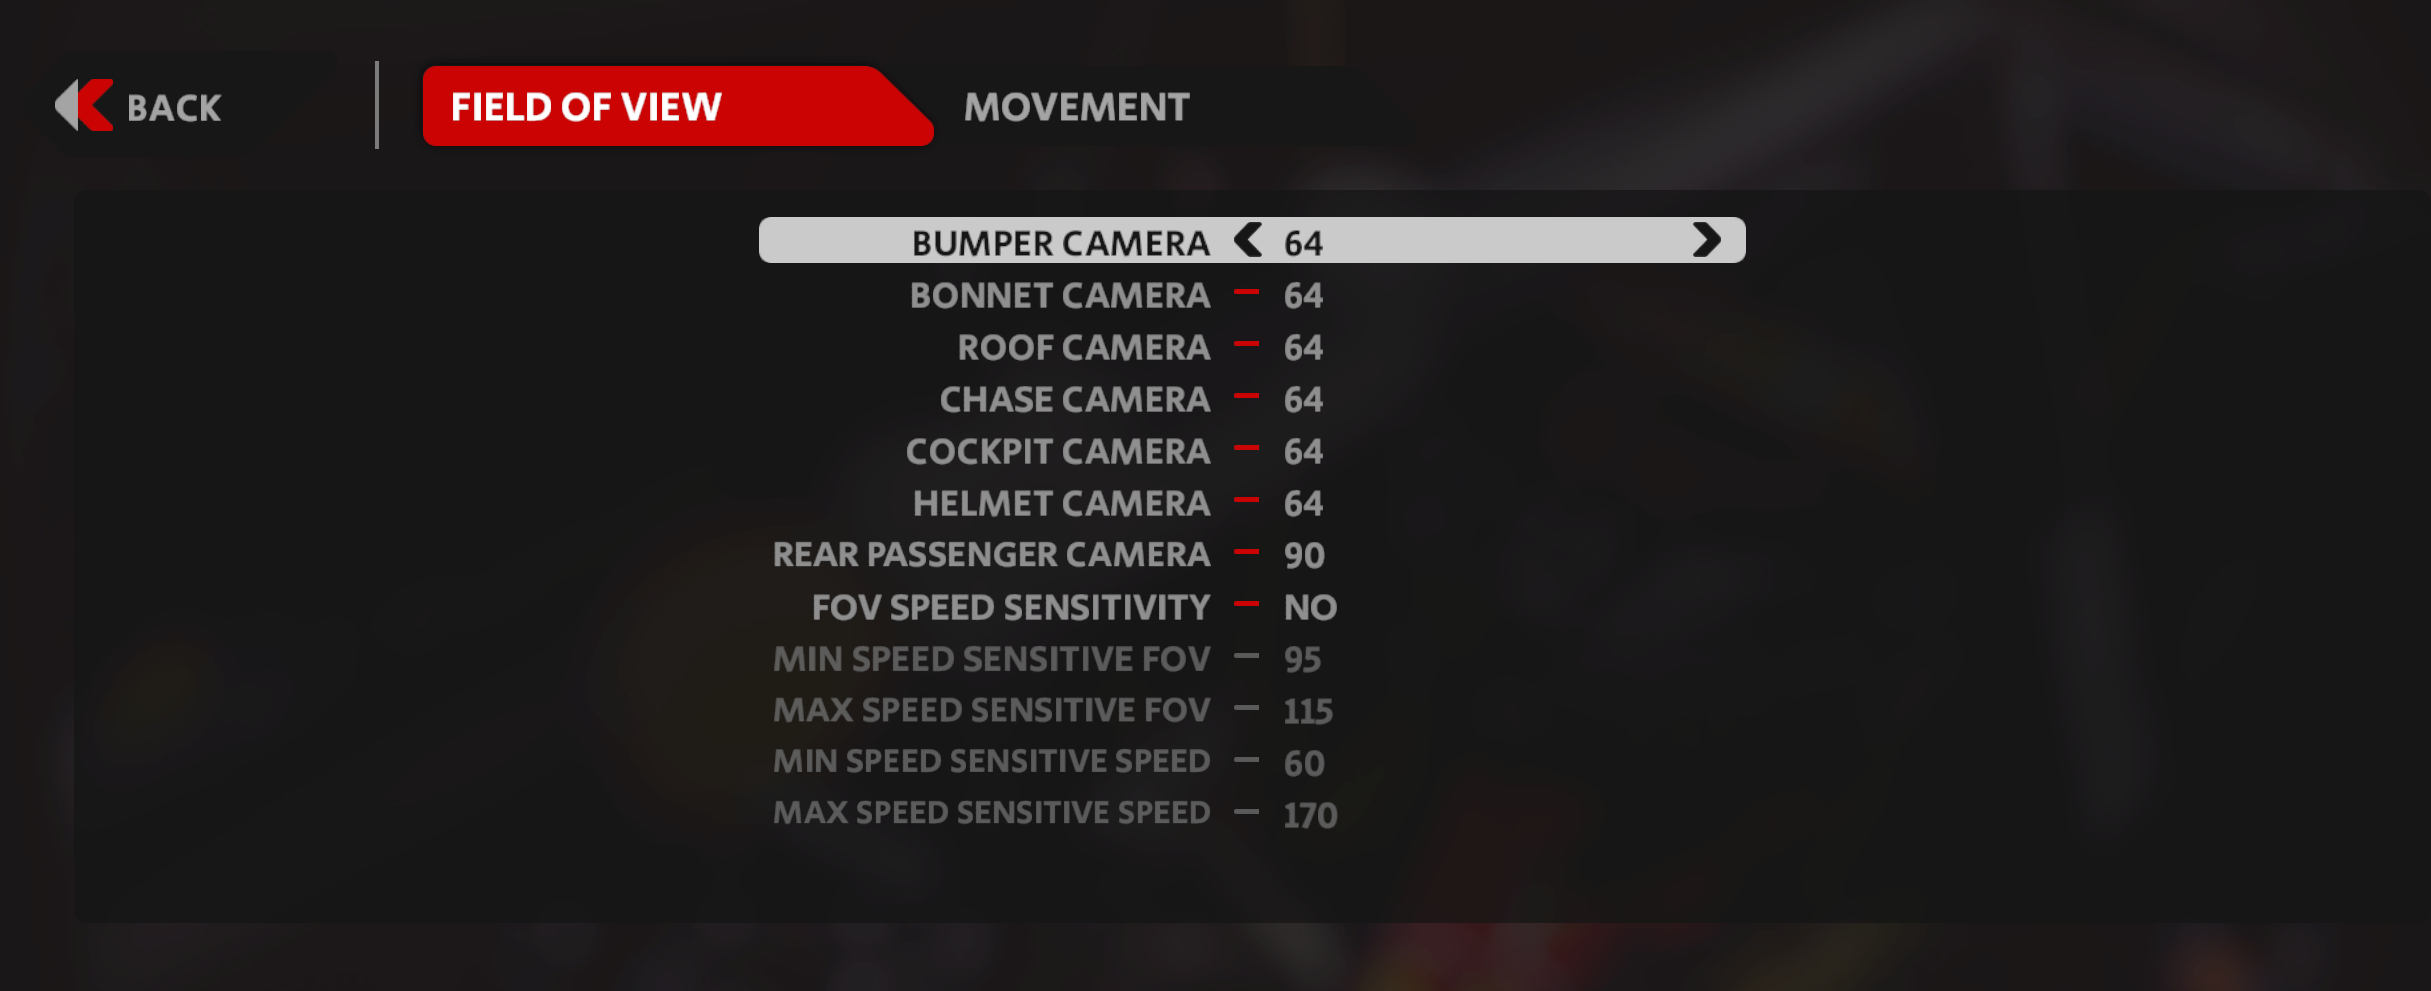
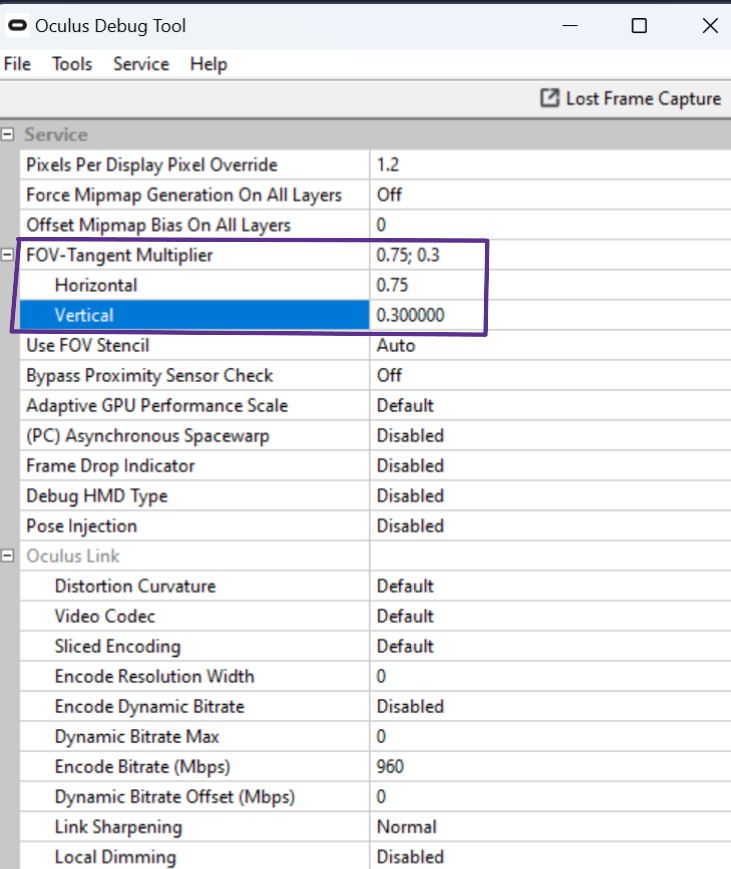
I have my FOV 0.9, 0.8 I can prob do 0.9 x 0.7 maybe even less width too, if I can setup my mirrors forward and HUD (so much to do/learn and I'm not even talking about the driving lol).

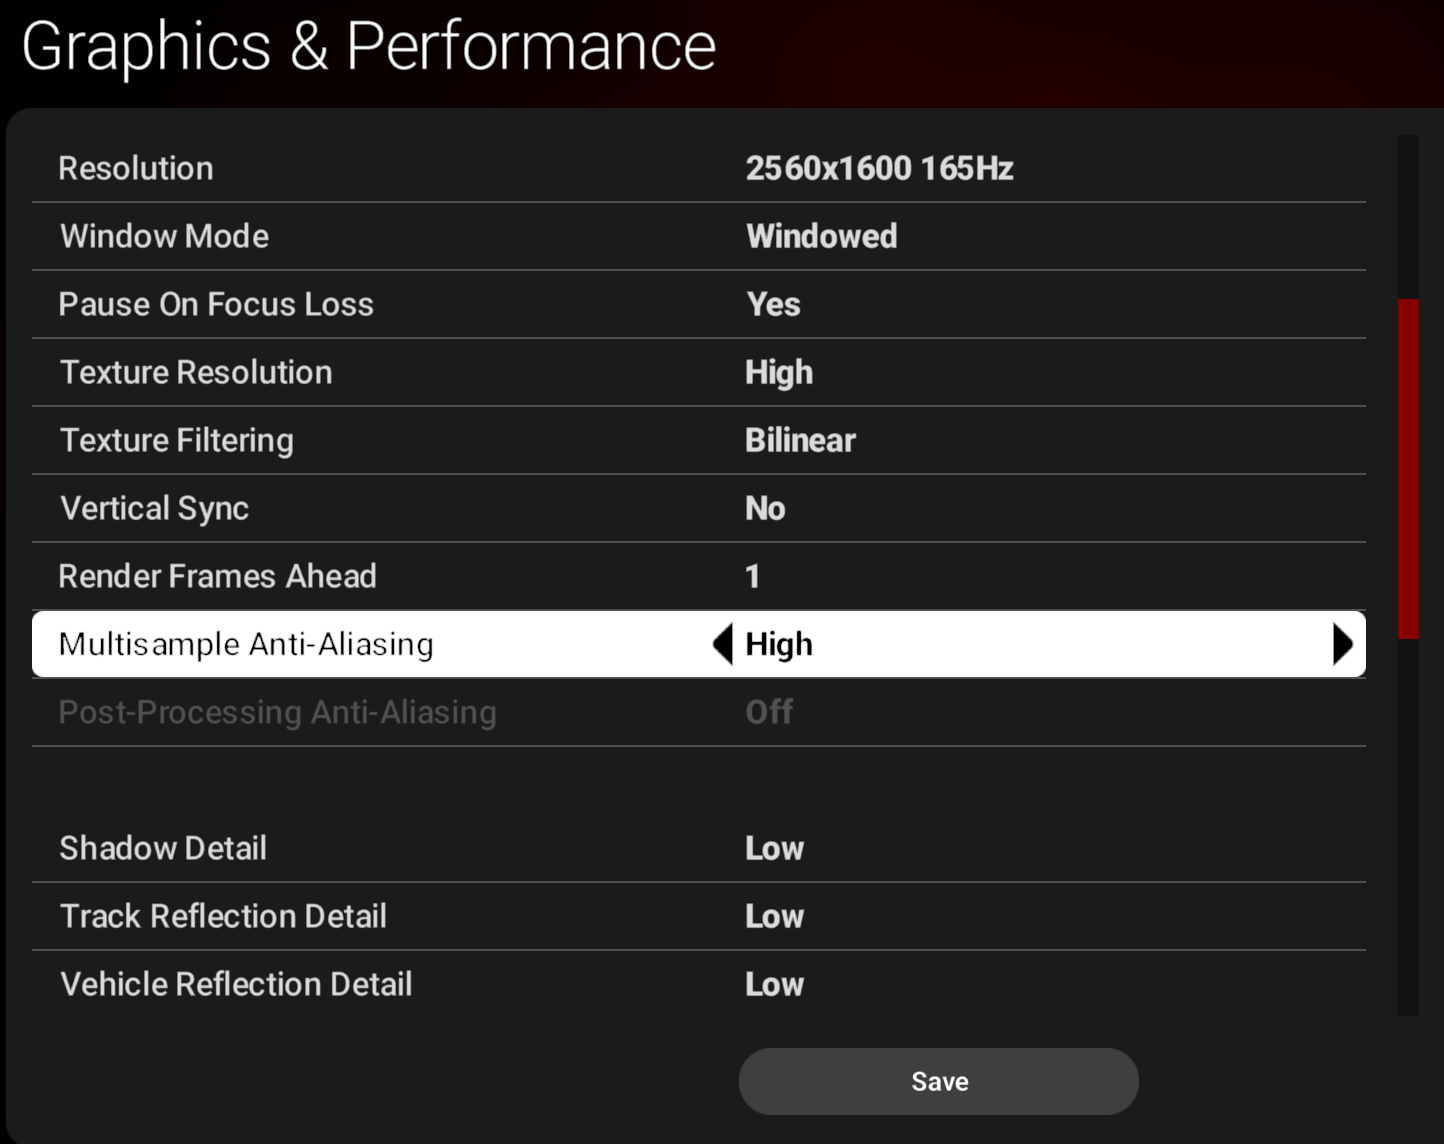
When I did have it running even with poor headroom I did not like the sharpness at the edge of shadows on the road at all. Like on Moza Junior with sun. But I think I could spend more time and unsharp that a little more. Hard edge shadows on the road are the absolute worse. Doesn't matter how great everything else looks when your starting at the road IMO.

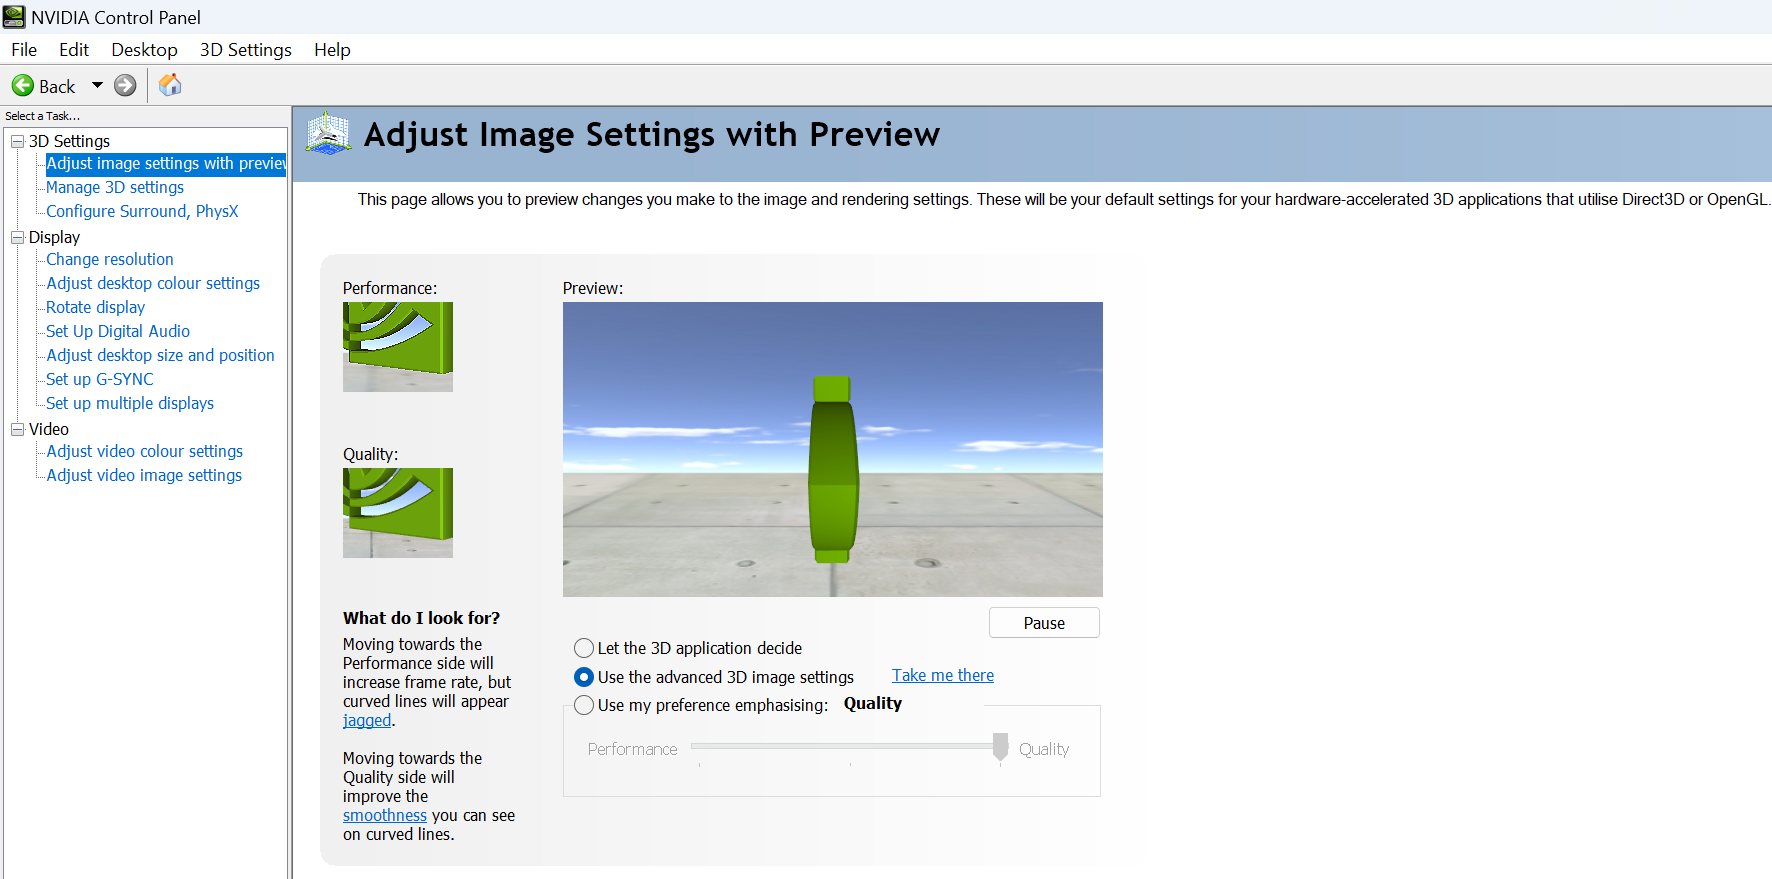
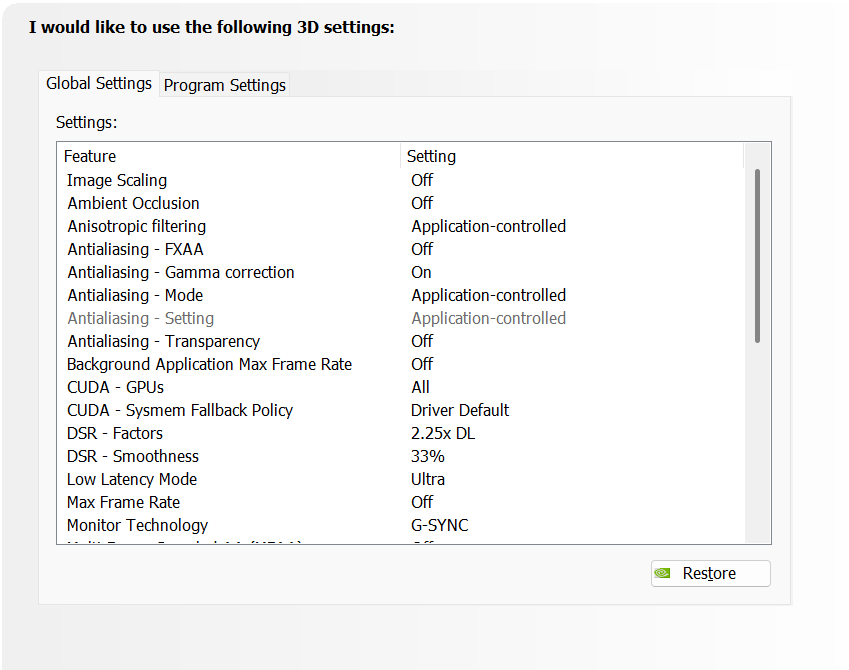
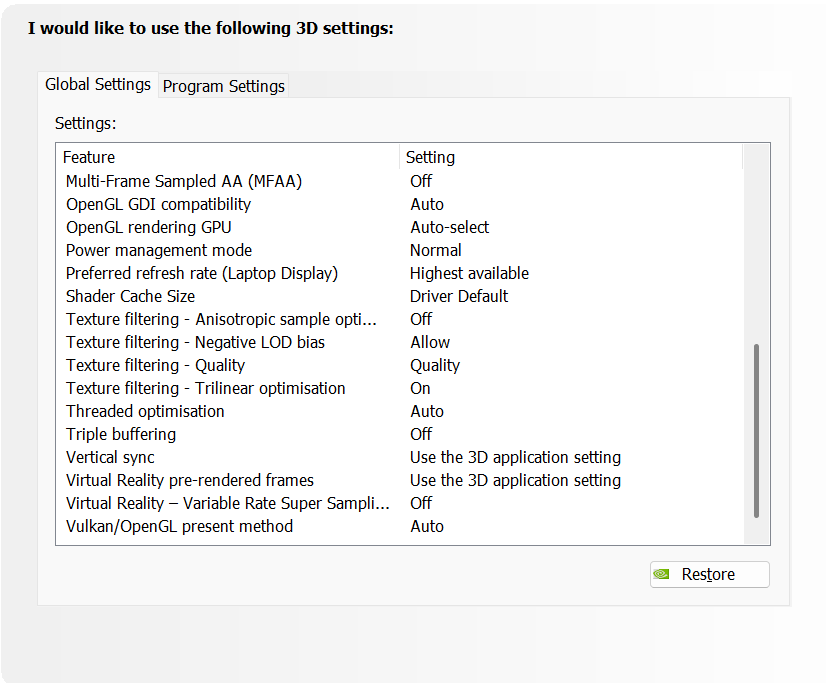
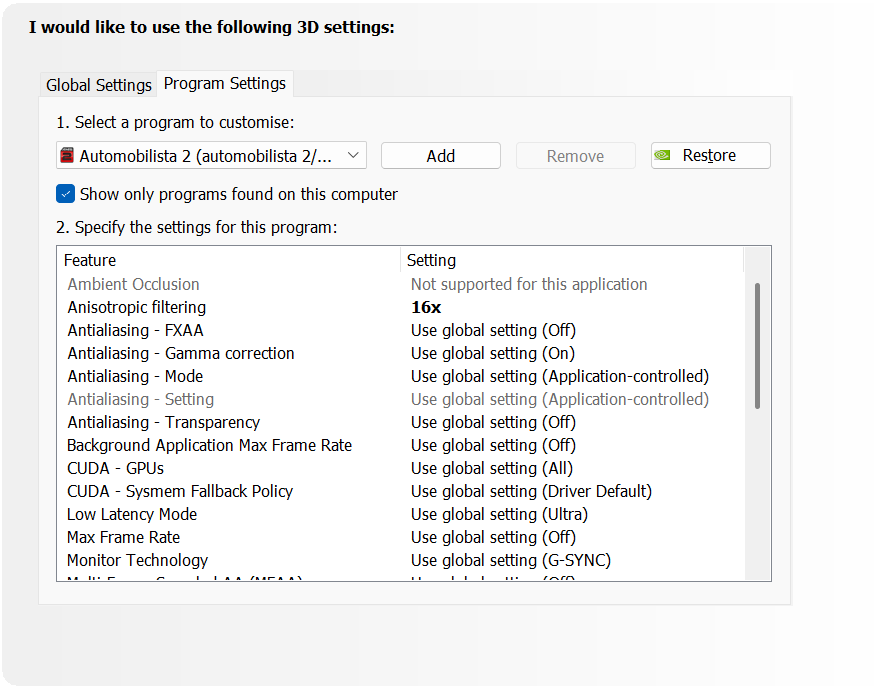
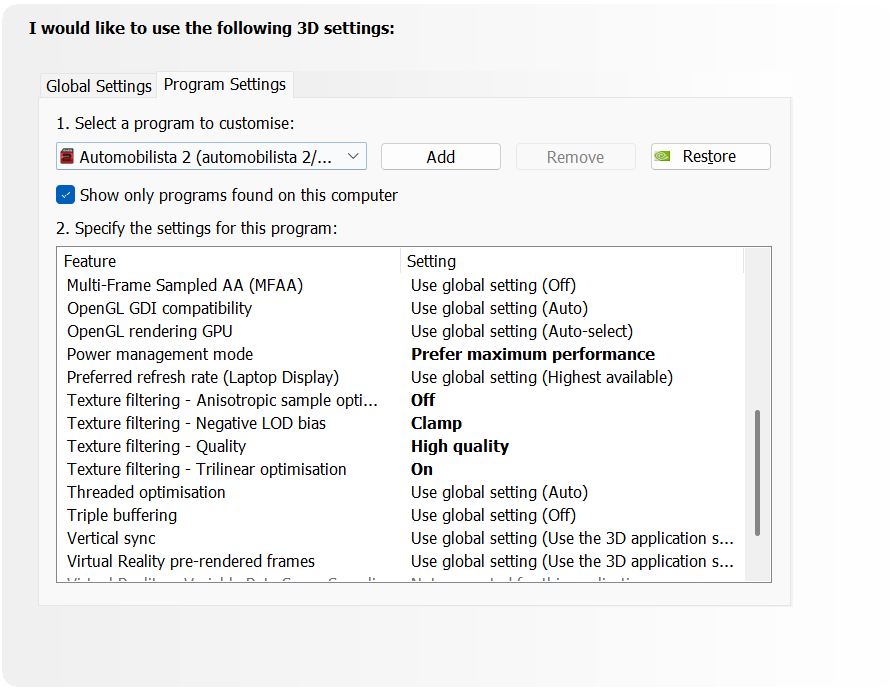
Also how does these settings affect other games/sims. iRacing? AC EVO will be nice eventually. ? As the main Nvidia settings will affect everything obviously.

Anyway thx for everything. ssl!
Augustus_V_Ren  [créateur] 25 mars à 10h49 
Glad you were able to make it work for you,. I just imagine the bars as racing helmet and my brain works with it. Yh a 4090 would be a huge upgrade, especially with the vram too.
BrassYeti [OPE] 25 mars à 8h35 
@Augustus_V_Ren, You were right - the FOV multiplier was not as low as yours. With your settings I was getting about 20-30% headroom and the image looked amazing - best i'ts ever been.

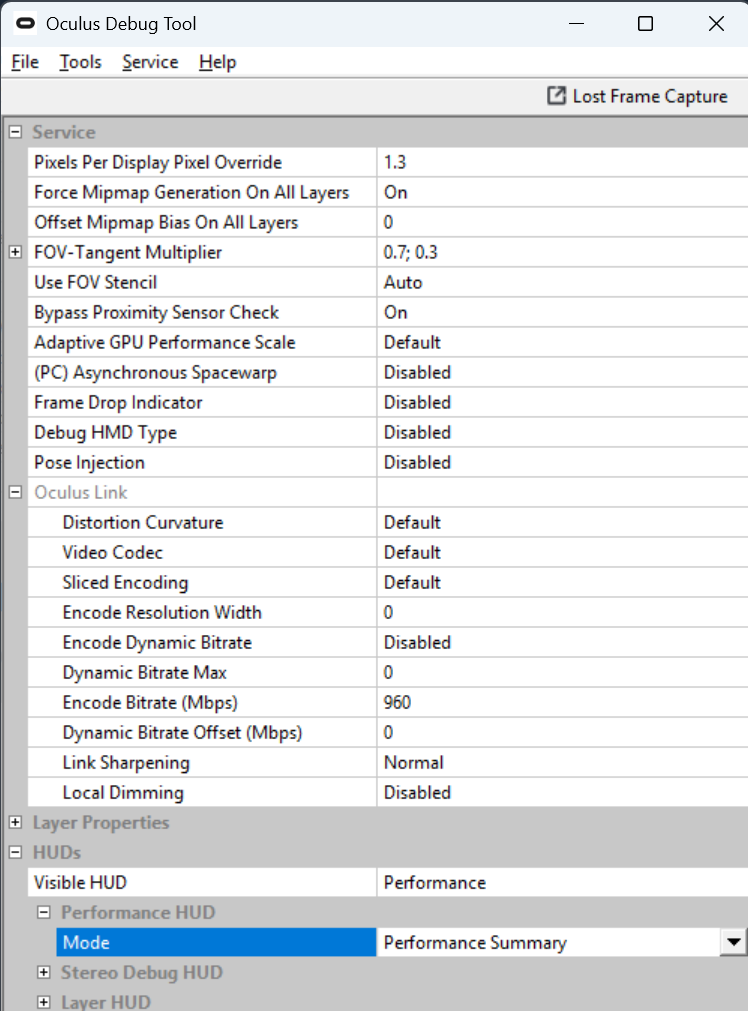
For those following the guide, encode bitrate at 960 did not work for me - It was produce some ghosting stuttering artifacts as well as popping audio. I had to lower it to 850. This is something I think you need to play around with based on your own setup.

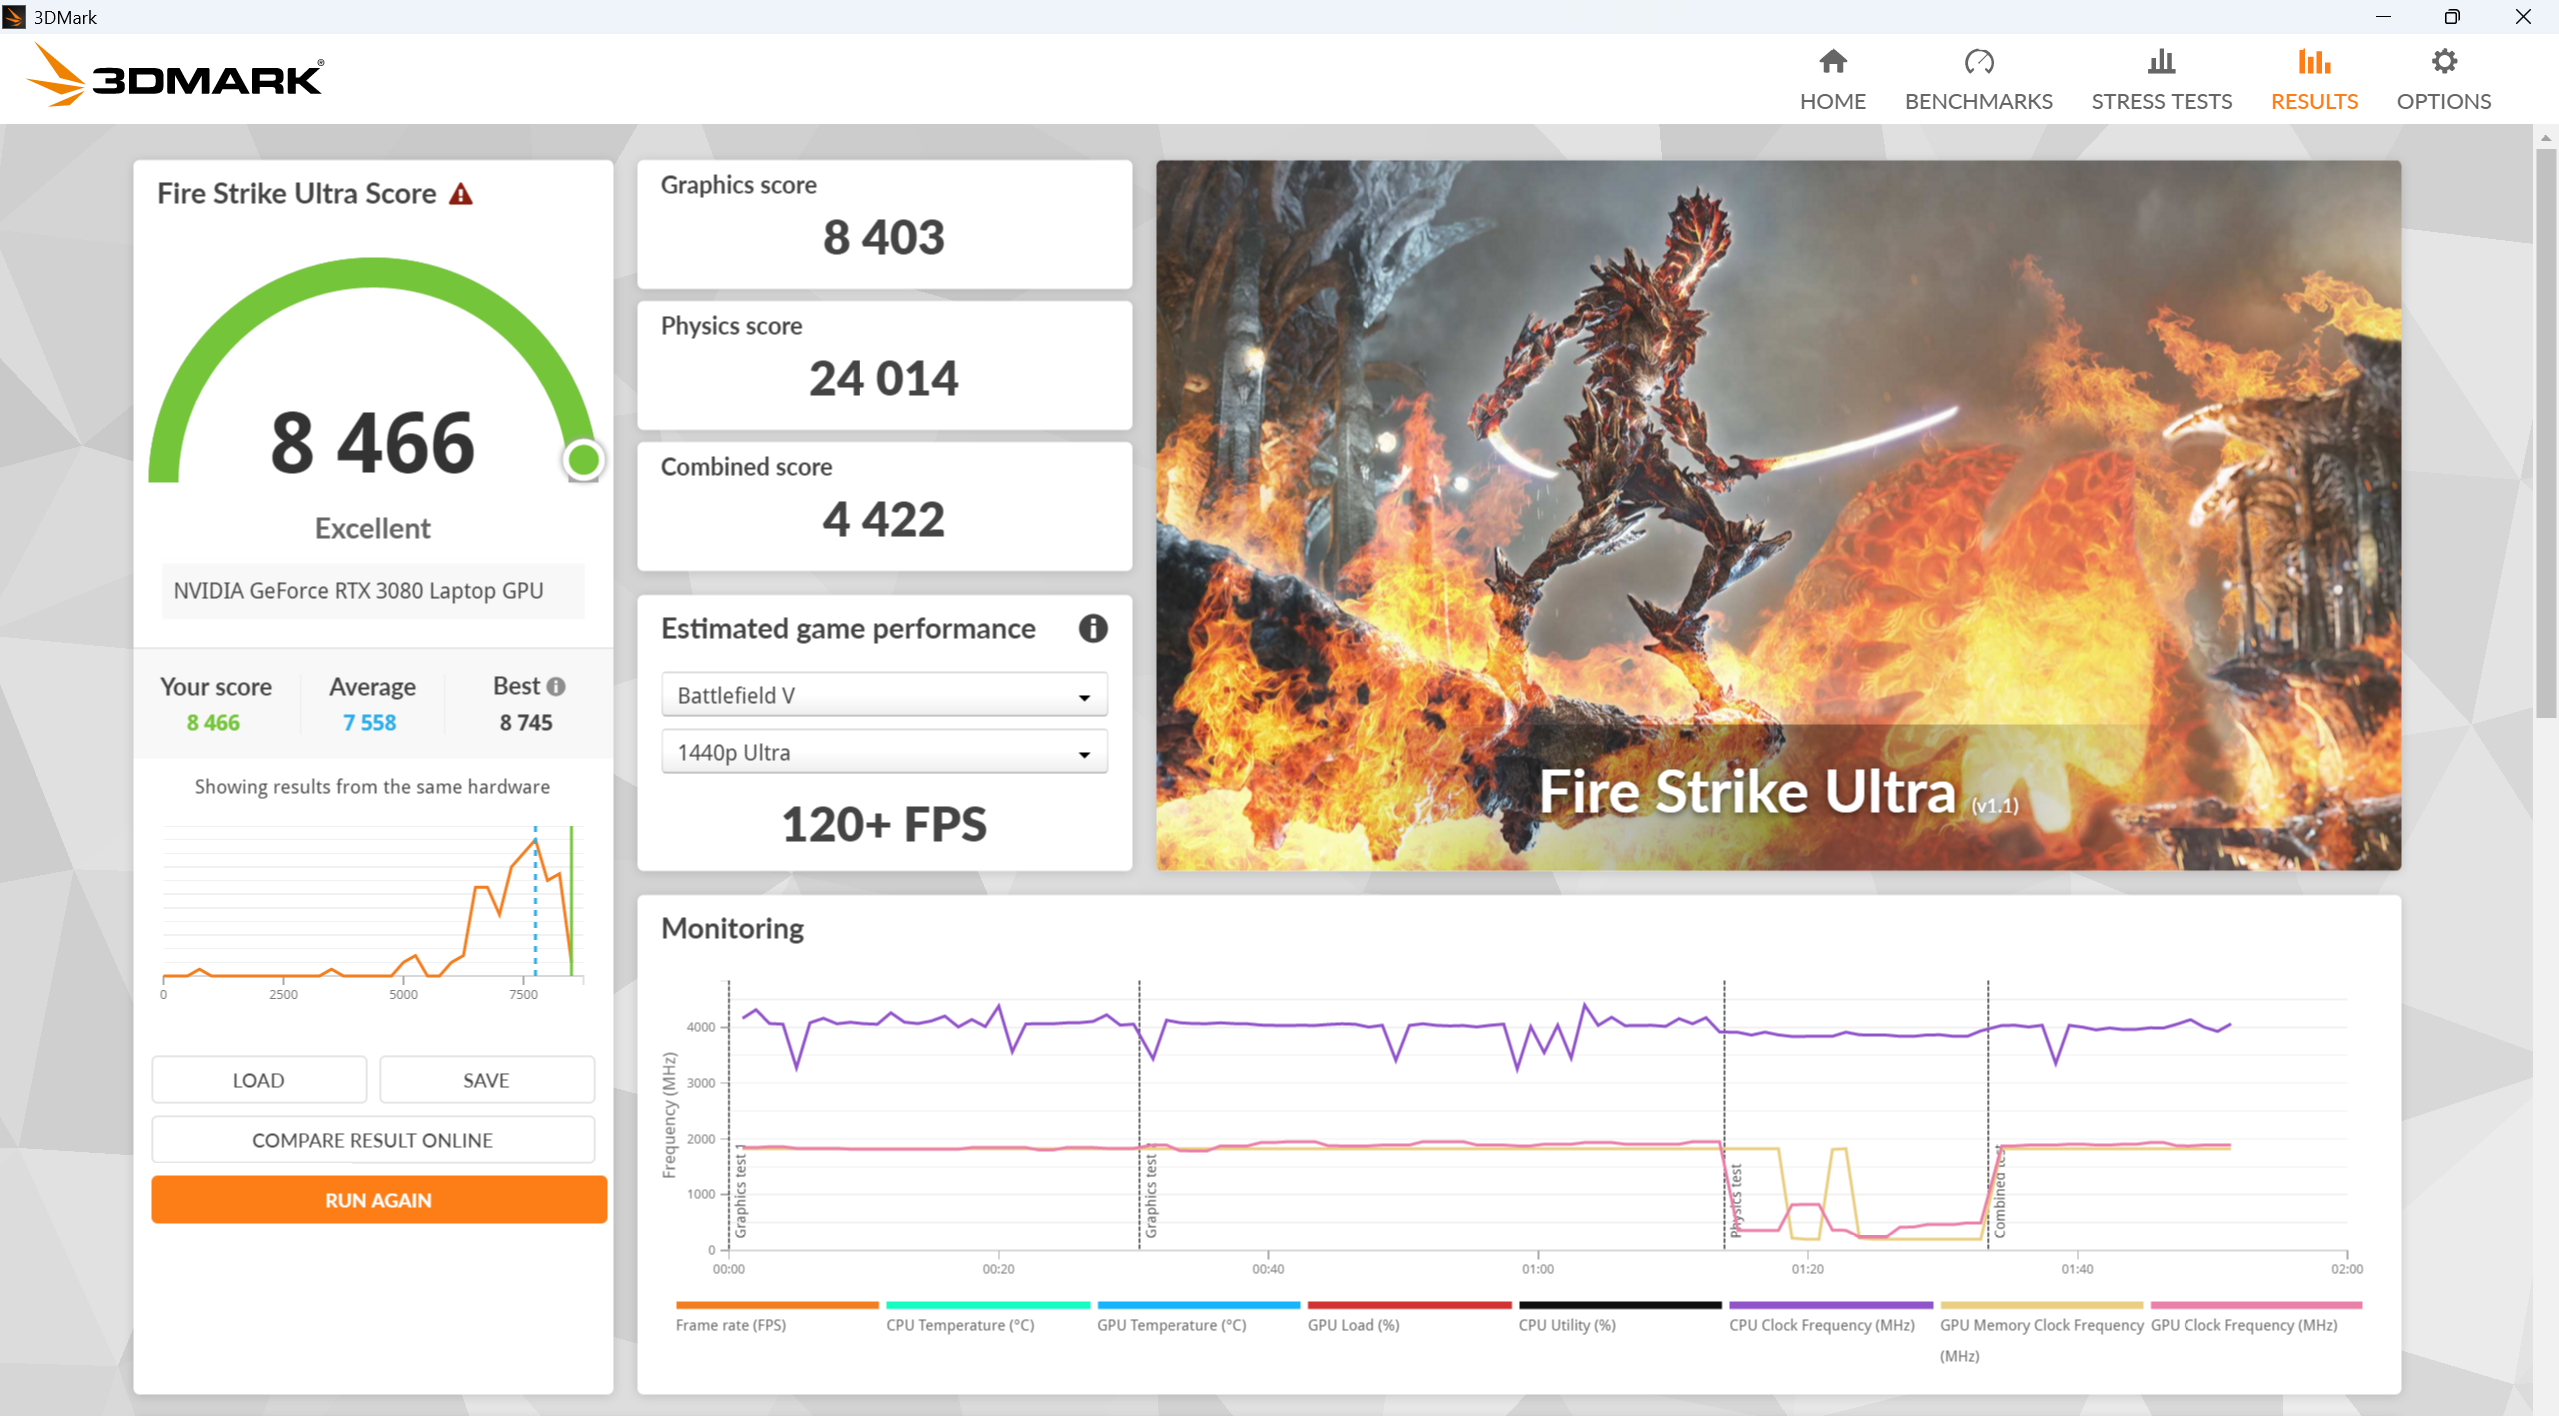
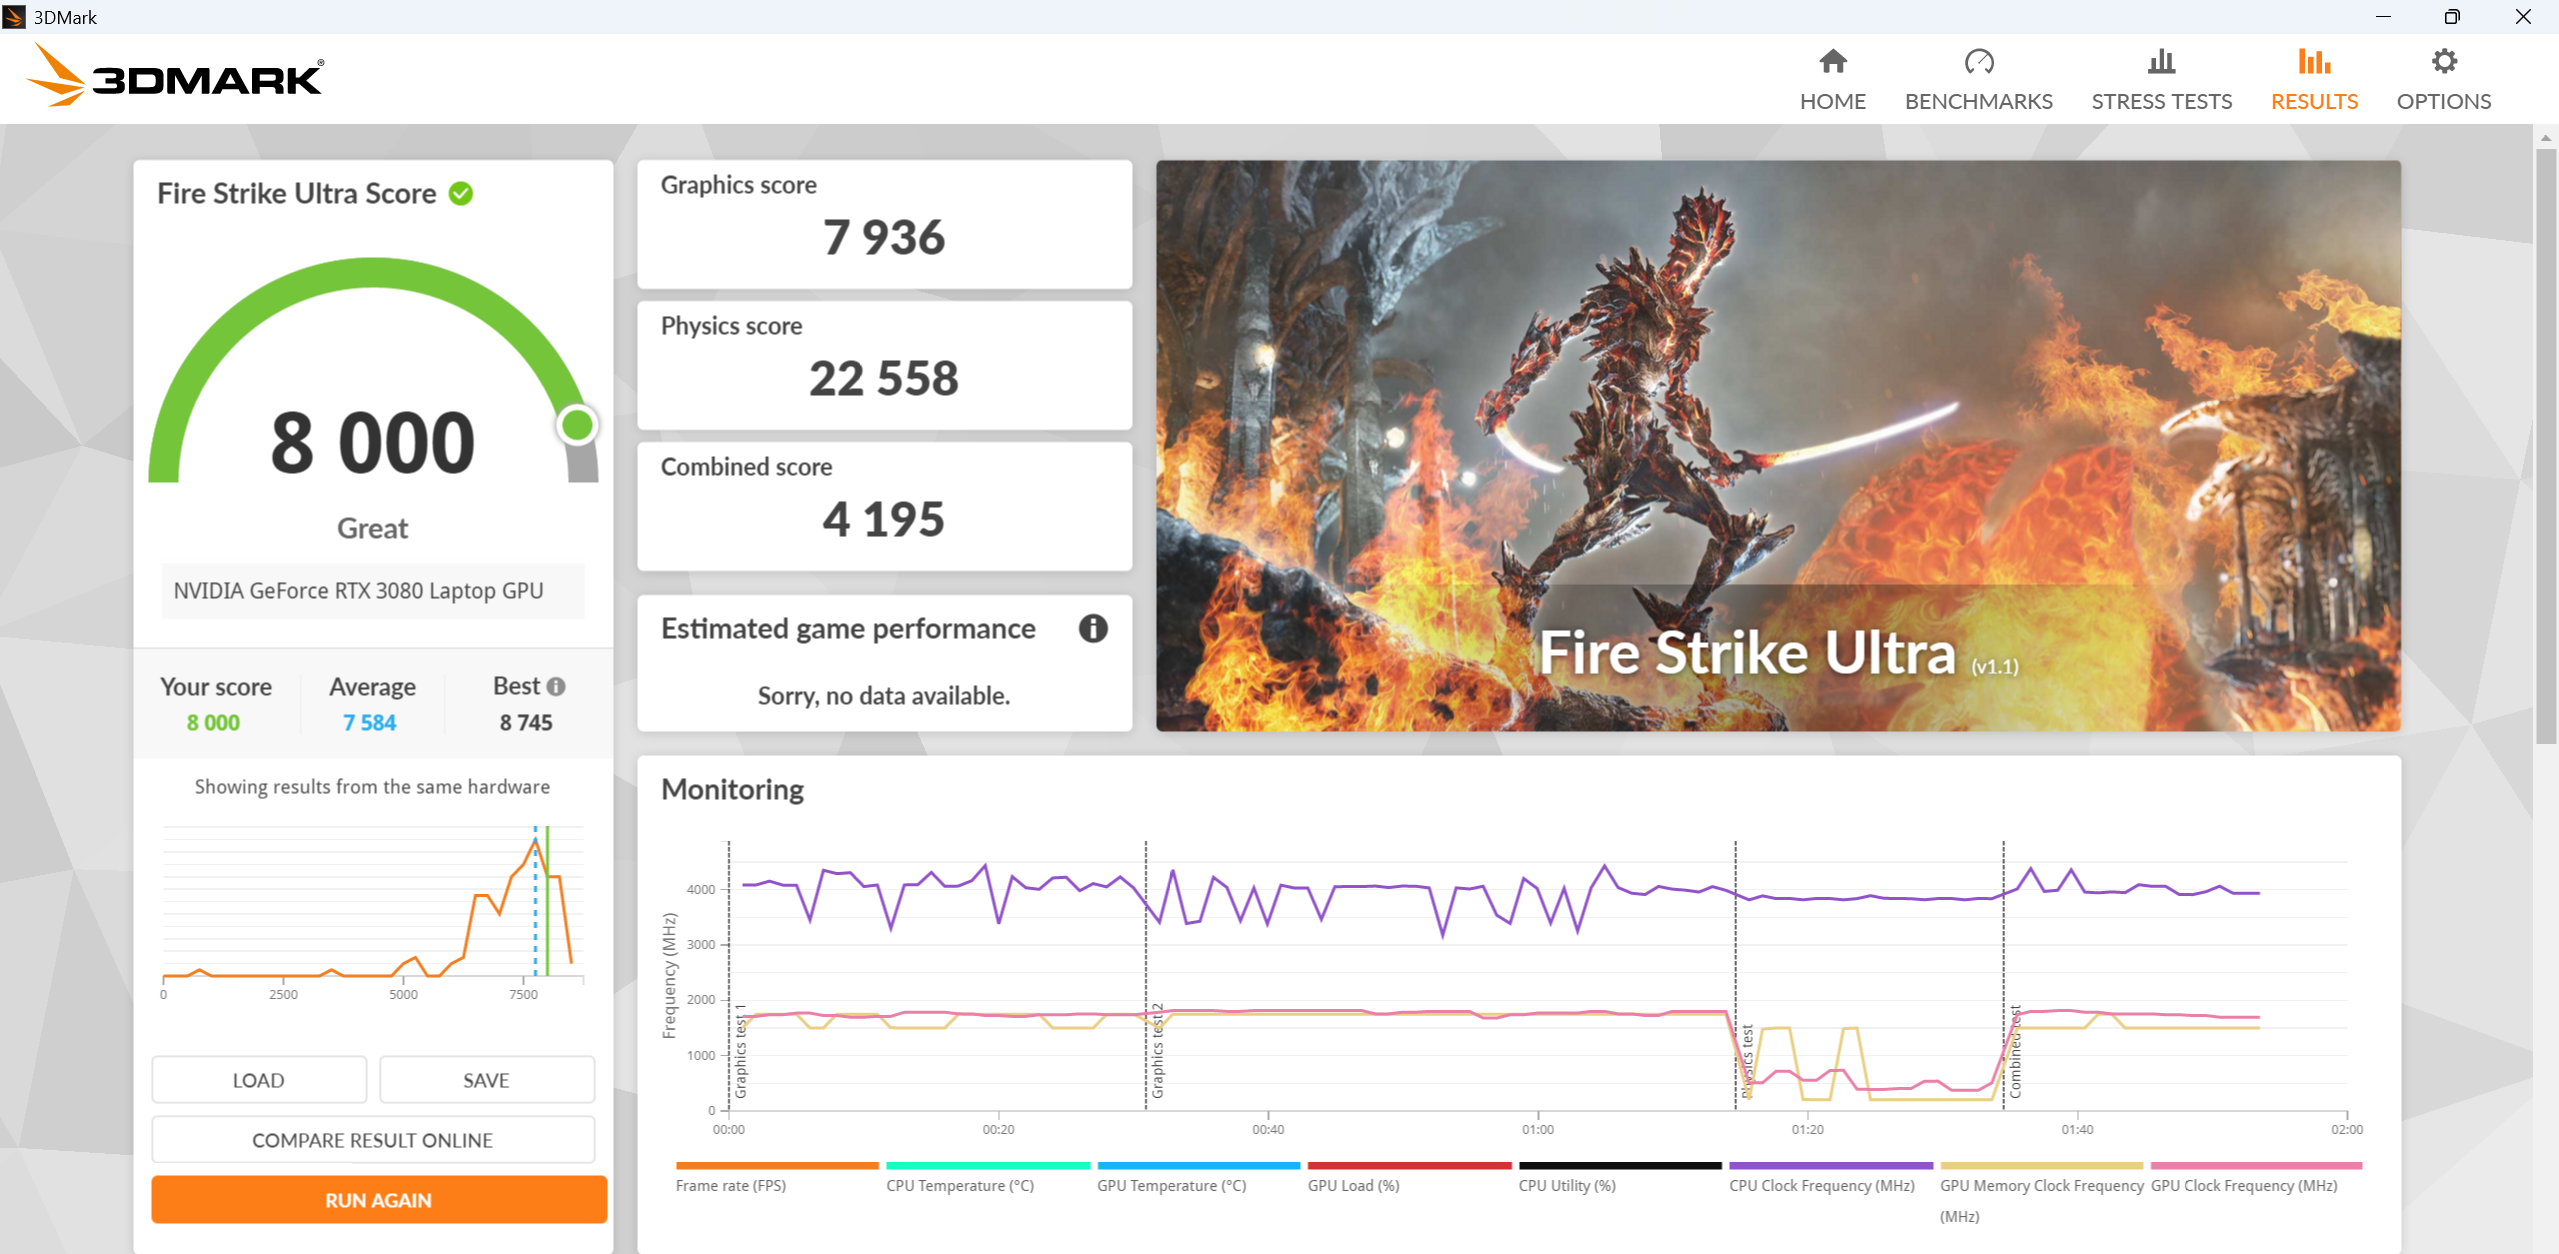
The black bars annoyed me so much though I picked up a 4090. What a beast - Not super scientific, but I'm pretty sure the 4090 is 4x-5x faster than a 3080 n this application based on the increase in FOV multiplier, refresh rates, and other general settings while still being around the same headroom.
Augustus_V_Ren  [créateur] 24 mars à 21h44 
Your Encode bitrate for the quest 3 at 960 is also quite important. Compression does not help at all
Augustus_V_Ren  [créateur] 24 mars à 21h43 
Will be ugrading my Nvidia drivers to 572.83 later so ill see if that affects anything. Are you also sure all the texture and anisotropic filtering settings are followed and that could be a big fps drag if not done as said. If keeping it at zero is good for you then that is perfectly fine. With a 5070 TI you should have at least twice my processing power so everything should be good
Augustus_V_Ren  [créateur] 24 mars à 21h35 
@gette At 1.0, and even on high MSAA, the edges of cars at nighttime can still be noticeably stair-stepped. 1.3 is enough but not too much to where it helps increase the image resolution and power of the anti-aliasing (MSAA basically super-samples the edges at a higher resolution than even the increased "1.3") to make it a noticeably better and not distracting anymore (at least to my eyes). Even on daytime it should be quite noticeable if you go to 2022 spa in an open wheel car. From the start finish straight to the run to eau rouge and radillon, just look around, from close and far. Image should be much clearer, Also when youre just going out from the pits. Look at the grandstand thats directly in from and look how it changes when using 1.0 to 1.3. Do you guys alsonuse the -vrnomirror launch command. That puts my headroom from like the 10% you mentioned back to the 25+%. my fov is 0.8,0.3 now btw. Was able to move my eye closer to the lens so had to expand a bit more horizontally.