Abiotic Factor
Оценок: 213
Abiotic Factor: A General, Spoilertastic Guide
От Blackfaction99
Hey, there! Not sure where to start? Having some trouble getting through the Gate Complex? Are those pesky specimens from a different dimension giving you a headache? I can maybe help you with that!

Equip your pocket protectors, don your lab coats, and dust off your Ph.D.s, because this is going to be one hell of a first day at the office!
19
8
2
7
2
2
2
2
   
Наградить
В избранное
В избранном
Удалить
Building Character (Part 1)
The Character Creator! Here, you'll pick your job and your traits. Both can affect your skills and the XP gain of said skills!

Skills
But first, you need to know what these skills are or how important they are! Some skills even give you cool perks at a certain level.

Fitness Skills
Sprinting: Very important. Determines how much stamina you have. Stamina is used when running, sprinting, swinging heavy weapons, and jumping. It's increased by sprinting, and given how large the facility is, you'll likely reach a high sprint level regardless of what you start with.

Strength: Very important. Every item in the game weighs something. Strength determines the weight of items your character can carry at one time without penalty. Important, but you'll naturally improve it over time by carrying a lot of stuff. You can shake vending machines at level 5, giving you strength XP and occasionally getting you free food or drinks.

Throwing: Determines how far you can throw certain items. I never threw things in my game, so I barely leveled this. Hitting or shooting things is better, in my opinion. At level 12, you can craft an additional throwable whenever you craft throwables (like grenades).

Sneaking: Increases the time it takes for enemies to see you. Crouch and walk near enemies to level it up (as long as they don't notice you). At level 2, you can do extra damage to unaware enemies, like any stealth-focused character in a Bethesda game.

Combat Skills
Blunt Melee: Determines the damage you deal with blunt weapons. Hit enemies to increase it.

Sharp Melee: Determines damage with sharp weapons. Hitting corpses with a sharp weapon will break them down into food or materials you can use, and Level 5 increases the odds you won't reduce corpses into a meaty paste (Bio Scrap).

Accuracy: Determines how well you can aim guns. As it increases, your character will guns at more distant targets without shaking them around like their arms are made of Jello. Shoot enemies to improve this stat. Later levels of Accuracy will allow you to craft arm armor that allows you to use advanced guns.

Reloading: Higher levels mean that you reload faster. Increase it by reloading. Nothing fancy here.

Fortitude: Determines your maximum health. You increase it by taking damage.

Crafting Skills
Crafting: Increases your crafting speed... which isn't very slow to start with anyway. It also unlocks ways to upgrade your crafting bench at levels 2 and 5. The crafting bench upgrades are integral to creating a good base nearly anywhere, but most of the items you need to make those upgrades won't be available until after you leave the Office Sector.

Construction: Increases how quickly you can install furniture. Not important.

First Aid: Improves the efficacy of items that restore health. Increases as you heal yourself or others (in multiplayer). Like Fortitude, your only real opportunity to level this is being injured. Crucial for keeping yourself alive.

Cooking: Unlocks new cooking methods and decreases the time it takes to cook. Level 3 unlocks the ability to make soup, which can turn a small amount of food and a large amount of water into several servings of food that counts as nutrition and hydration. Level 10 unlocks the ability to build ovens for baking and increases your natural health recovery over time.

Agriculture: Cuts down on the time it takes for plants you plant to grow. Increases as the plants you've planted grow or when you harvest plants. This includes plants that you haven’t grown yourself.

Jobs
Jobs will determine what skill levels you start with, and some will give you extra XP whenever you gain XP in specific skills. Each job also determines the number of trait points you can allocate in the next part.

In my experience, your job won't determine your odds of survival or your enjoyment of the game. Unless you've got a group of friends wanting to role-play, I'd pick Summer Intern so you can have the most trait points. The trait points are worth more than the minor head start a different job would give you.

Traits
Traits can also increase your starting skills, as well as alter your game experience in positive ways, negative ways, ways that barely make any impact, or ways that will probably make you want to pull your hair out. Let's avoid those last ones.

Positive Traits

Decathalon Competitor: Increases fitness XP gain. Very good. Ensures your stamina and carry limit increase quickly, both of which will impede your exploration and survival if they're too low.

Wrinkly Brainmeat: Increases overall XP gain by 20%. Excellent perk. The only trait that can increase combat skill XP gains, vital to dealing with enemies.

Night Owl: Decreases fatigue gain by 50%. It's unnecessary, but only as long as you try to get back to base to sleep regularly.

Hobbyist Chef: Doubles Cooking XP gain. Not necessary, though you should take it if you have the spare trait points and nothing else sticks out to you.

Inconspicuous: Enemies see you twice as slowly. Not very useful, and sneak attacks are easy to pull off even without it.

Weathered: Increases your temperature tolerance. Not necessary. Being slightly too hot/cold increases how much hydration/ nutrition you lose. The areas available right now that would put you in extreme temperatures have clear countermeasures.

Fanny Pack: You have 2 more hotbar slots. Without the perk, you can only hotkey items to keys 1-8. I'll admit, I spent an embarrassing amount of time my first playthrough (without the Fanny Pack) juggling what items go into my hotbar and what sit in my bag. Having played with the perk, it's worth getting if you have the Trait points.

Thick Skinned: Bleed 50% less often. DO NOT TAKE THIS TRAIT. The bleeding condition is easily remedied with bandages, which you can make from the start of the game, carry in large quantities in a minimal amount of space, and which you can find everywhere anyway.

First Aid Certification: Start with a slightly higher First Aid Skill and 5 bandages. DO NOT TAKE THIS TRAIT. As said above, bandages are abundant, and a starting First Aid skill of 0 is fine.

Building Character (Part 2)
Positive Traits Continued
Gardener: Doubles Gardening XP gain, and you can make garden plots from the start. Not worthwhile. At the beginning of the game, you won't have the clean water sources neccessary to garden properly without also depriving yourself of water, so the garden plots are useless at that point. And gardening skill only increases the plant growth speed; you won't even notice how long it takes to grow stuff if you're running around the facility.

Light Eater/Naturally Moist: Decreases Nutrition/Hydration loss by 20%, respectively. Don't take either perk. 20% isn't worth the trait points. Food's pretty abundant everywhere, and water becomes less and less of a problem as the game progresses.

Self Defense: Do 3 more points of damage with all melee weapons. DO NOT TAKE. The 3 extra damage points will barely make a difference later on in the game.

Bladder of Steel: Toilet need gain reduced by 20%. NOT WORTHWHILE. There are toilets pretty much everywhere, and the standard toilet need gain will give you plenty of time after the first warning to find a bathroom.

Buff Brainiac: Start with 1 extra Strength and carry 15% more weight. Slightly worthwhile for the 15% extra carry weight.

Lead Belly: Drink tainted water without getting sick. This is definitely worthwhile, but it pretty much destroys the difficulty of survival, given the abundance of tainted water throughout the facility. Take it with the Gardener Trait if you want to garden from the start with the clean water around the facility. Just ask first if you're playing with friends: they won't appreciate you stealing their clean water to grow your tomatoes.

Negative Traits
Obviously, only take these if you need the trait points.

Fear of Violence: All combat skills are capped at level 5. ABSOLUTELY NOT. There's not a lot to say here. There's too much in the facility to fight to make this worth the measly 4 extra trait points. Some enemies end up being damage sponges by the time you get to the Lab Sector, even without this limit.

Feeble: 25% lower maximum health, and your bones break easier. Only take this if you REALLY need a trait you can't afford. You will die a lot easier with only 75% of your maximum health, and breaking a bone is easy even without this perk.

Narcoleptic: Fatigue gain is increased by 75%. NOT WORTH IT. Standard fatigue loss is already a bit annoying. Taking this perk means you'd have to put beds everywhere in the facility to make exploration feasible.

Asthmatic: Use 40% more stamina for everything. It's not worth the 2 extra trait points. You need that stamina for exploration, combat, and running away from danger.

Painfully Obvious: Enemies see you 45% faster. TAKE THIS. There's only one place so far where stealth is the only way to deal with enemies; even there, running is always an option. Plus, sneak attacks are easy to pull off, even with this perk.

Hearty Appetite: Increase Nutrition loss by 60%. Not worth the 3 points.

Dry Skin: Increase Hydration Loss by 20%. TAKE THIS. 20% is not that bad and is easily dealt with.

Slow Healer: Healing over time is slower. Manageable, but just understand that you'll end up waiting around to heal for longer if you get in a fight. Take it if you're willing to be extremely patient.

Slow Learner: 20% slower XP gain overall. DON'T TAKE. Not worth the 2 points.

Hemophilia: Twice as likely to bleed when wounded. WORTH IT. Bandages are everywhere and easy to make. Also, having played with and without it, it didn't seem to cause me to bleed much more than average.

Weak Bladder: Toilet needs increased by 15%, and you have to spend more time on the toilet. Worth it, given how many toilets there are, but only if you need that 1 skill point.

General Tips!
General Control Tips
  • If you equip a weapon that has a flashlight attached to it, press V to turn it on. If you equip a headlamp or other head-based light source, pressing V will turn that on, too. If you hold a weapon that has a flashlight attached and you’re wearing a headlamp, V will turn the weapon light on first, and pressing V again will turn the headlamp on at the same time, which is generally just a waste of battery. You can also use the middle mouse button.
  • Pressing H will holster your weapon. If you have a shield equipped, this will lower your shield first, and pressing H again will lower your weapon. Useful if you want to use the weapon's alt attack (by right-clicking) instead of blocking with the shield.

General Combat Tips
  • Left Clicking will attack with any given weapon. Right-clicking with any blunt non-heavy weapon will charge a slower, more powerful attack, as long you don't have a shield in your left hand (because then right-clicking will just block). Useful for maximizing the damage of a sneak attack if you don't have or can't use a heavy weapon.
  • Holding right-click with spears or certain items will allow you to charge a throwing attack, and left-clicking after the charging animation is done will throw it. Don't do this if you're feeling particularly attached to the thing you're throwing.
  • Blocking with a shield can reliably block melee attacks. Shields can block bullets, but I find it's less consistent, especially when snipers get involved. Exon Monk lightning blasts cannot be blocked (as far as I can tell).
  • The SMG is hot garbage. It's inaccurate, burns through 9mm ammo, and breaks way too quickly. Save your bullets and just use the pistol.

General Survival Tips
  • Right-clicking with the Hammer will disassemble most furniture into materials, but will grant no Construction XP. Packaging furniture will, whether it succeeds or fails, give you Construction XP, and failure still gives you the materials. However, a Construction Perk at level 9 will give you a chance to double the materials dropped when you use a Hammer to disassemble furniture. You should package furniture whenever you can: if all you want is the materials, bring the furniture to a Repair and Salvaging Table and break it down there.
  • Breaking boxes, computers, and other objects that display a particular symbol when you mouse over them will grant you XP with the weapon type you're using to do the breaking.
  • Right-clicking on most weapons in your inventory will allow you to use one roll of Duct Tape to restore part of their durability. You can't do this with guns.
  • Hitting enemies will cover you in a layer of blood or oil (getting hit might also contribute to this, but I don't know for sure). Too much of this and the game will warn you that you might get sick randomly. Getting sick will force you to vomit, lowering your nutrition and hydration.
  • You can't drink Tainted Water without getting sick (unless you have the Lead Belly trait). But you CAN wash yourself off using Tainted Water without negative effects.
  • Security Carts have a storage compartment on the side for carrying loot. It can’t carry as much as the Forklift, though.

Chapter 1: First Day at the Office (Sector) (Part 1)
(DISCLAIMER: You're gonna be here for more than a day)

The Cafeteria Tutorial
The cafeteria you start off in is an extension of the tutorial you played when booting the game up for the first time. I won't go into detail about any of that; I trust your ability to follow basic instructions. I will highlight some things the tutorial won't outright say.
  1. You can sleep on any three-sectioned couch, like the one opposite the tutorial TV in the cafeteria break room. Sleeping recovers your fatigue, and passes time quickly at night.
  2. You can package furniture to be picked up by holding the appropriate key, as long as you have a Screwdriver. There's a chance the furniture will break.
  3. By making a bed, you can create a respawn point. You craft beds using two or three-sectioned couches after packaging them. Don't use the couch in the break room for this. The default respawn point is the cafeteria anyway, so you're not accomplishing anything by potentially destroying your one guaranteed sleeping spot to spawn 5 feet closer to base. Make a bed for when you want to set up a base somewhere else in the facility (and you've found more couches).
  4. One of your main enemies in the Office Sector, the Peccary, will take more damage from blunt weapons. Save your kitchen knives for cutting bodies for food.
  5. Headshots matter. Whether it's a table leg or a laser sword, hitting the enemy in the head still does more damage.
  6. Enemies will respawn daily, in the exact spots they were the day before. Placing a Crafting Bench creates a safety zone in which that won't happen. The "Home Sweet Home" effect (the little green house icon that appears when you're inside the zone) indicates how far this effect spreads.
  7. Every few days, an event will occur where enemies will spawn near your Crafting Bench at night and attempt to destroy it and all your stuff. You'll be warned that this will occur earlier in the day before it happens. There is a countermeasure, but you won't get the necessary items until you reach the Lab sector. Enemies will spawn in wherever these appear:


The Office Plaza
Once you've talked to the guard hiding in the security booth outside, who will tell you to go to the Manufacturing Sector to escape, press T to check your watch. At 9 PM, the lights and power will go out. This is a problem. Why? Look to the right of the office plaza fountain, and you'll see this thing:

This robot, and robots like it throughout the facility, will patrol the facility after 9 PM rolls around, and you do NOT have the means to deal with them right now. Avoid wandering the facility at night. You'll find a toolbox with a hammer near the bottom of one of the stairs. This will be useful for dealing with the robot later.

If you head upstairs towards the objective marker to get to Manufacturing, you will be disappointed. A worker will be there, bleeding out next to the closed door to Manufacturing. He'll tell you that some soldier types started shooting up the place and shut the door. Fortunately, there's a forklift ready to lift the door back open. Unfortunately, it needs a power cell, and some scientists took all the cells in the sector up to Level 3. What a buncha inconsiderate jerks! Anyway, leave the worker to his bleeding, because you need to start looting through your dead coworkers' stuff! It's what they would've wanted. Speaking of which: Looting Tips!

Looting Tips!
  1. Your inventory weight determines how heavy of a load you can carry, determined by your Strength skill. If you carry enough stuff to push your inventory weight meter into the yellow, you'll start to gain Strength XP while you move. Push it past that into the red, and you'll gain even more as you move. However, push it to or past the absolute limit (an even deeper red), and you won't gain any Strength XP. Get some early game Strength gains by packaging a single piece of heavy furniture and carrying it around while you explore and loot. I've found the L-Shaped Desk to be the best weight for this.
  2. Be careful: if your inventory weight meter is in the yellow or more, you'll move slower, and your stamina will recover slower or not at all. If you max out your inventory weight meter, falling from any height can potentially break your leg.
  3. Once you find a bottle of oil, you'll unlock the ability to build the Platform Cart. You can use this to transport heavier furniture for no penalty, and you can use it as an extension of your inventory, allowing you to ferry large quantities of stuff around. There's only one catch: It's technically a vehicle, so you're technically "sitting" in it when you push it around, meaning you're not going to gain any Strength XP while pushing it.
  4. While you loot, you might see monitors that are still lit up and make an occasional sound. These can be vital, as they sometimes contain information and item crafting recipes required to make progress. Keep an eye out.
  5. You might also see blue holograms of a scientist. Those are audio recordings. They primarily give out lore, but they also might give you a data entry of an enemy, giving you a better idea of the threats you're dealing with and how to handle them.
  6. Living facility staff also tend to be vital to progress. They tend to be hard to miss and aren't typically hiding their presence. Still, watch out and talk to everyone you see (as long as they aren’t trying to kill you).

The Offices, Level 2
You can start searching around Level 2 in any order you want, but I'd heavily recommend heading to the gym through the blue-tiled hallway next to the ramp of broken concrete. Wander around the pool, and you'll find the locker room, where you can find a backpack, which will expand your inventory size.
If you jump over the pile of couches in the locker room, you'll end up in a break room, complete with a fridge! These are currently the only way to preserve food, so make a mental note to return for it later. Past the break room is the Data Farm, a maze of cubicle walls. Careful! There are quite a few enemies in there. You can grab a map of Level 2 from a wall nearby. If you look at the map, you'll see a few paths to Level 3. If you go down the corridor at the other end of the Data Farm (the one with the freakin' laser beam), you'll see these paths. Unfortunately, the stairs are broken, and the elevator in the middle is locked down, which leaves the maintenance lift near the Manufacturing Sector door as your only option. You'll need to build an Energy Brick to lift a security door, but that's easily done if you smash a few monitors and computers.

Before you head to Level 3, head back to the plaza. When you got your first bottle of oil, you also unlocked the Chopinator, a base defense item that's going to come in handy for taking out that robot in the plaza. Build a battery, a Chopinator, and bring both a Hammer and a couple pieces of Tech Scrap. Find an outlet and plug it into a battery, then take the plug from the battery and click on the ground or wall to extend the cable with Tech Scrap, and put the Chopinator near the robot while it charges. Hit the robot with a weapon until it wakes up, then quickly hide behind the Chopinator. With any luck, the robot will focus on trying to destroy the Chopinator and get destroyed in the process. Use the Hammer from earlier to fix the Chopinator as needed. Once destroyed, the robot will drop a Security Bot CPU. These robots also restock the drink machines, so they'll also drop a few cans of soda.

Chapter 1: First Day at the Office (Sector) (Part 2)
When you're ready, head up to Level 3. You'll find a few dead scientists, a dead alien, and a door you can't open yet. Oh, and your very first Portal! As the nearby computer and whiteboard say, there's quite a lot of radiation in the area beyond the portal, so pick up those Iodine Tablets. You can also find a Lead Vest on Level 2 that will decrease your radiation exposure, but it's not necessary and you'll find better radiation protection in a little bit.

Far Garden
The area beyond the portal is small, and there's only one direction to go. However, along the way you'll find a couple of bipedal aliens. These are Exor Monks. They shoot lightning and teleport around. Right now, they're pretty dangerous if they hit you with their lightning attacks, but if you strafe side to side while they charge up, use stuff as cover, or use a shield to block their shots, you can get in close to hit them. Hit them in the head, and you can interrupt them while they prepare an attack. I'll also say that, as decently sized bipedal enemies that stand around while charging their attacks, Exor Monks make for good target practice, so use your Makeshift Crossbow on them for easy Shooting and Reloading XP. Carve up an Exor Monk's body, and you might get an Exor Heart. These are the basis for quite a few Crafting Bench upgrades and later on, some equipment. Don't cook the hearts, unless you're desperate or they're about to decay.
Before you leave, you should also look around for some Anteverse Wheat:

This stuff is a major ingredient in Healing Syringes, so stock up.
Head through the portal by the pond to head back to the Offices.
The Offices, Level 3
You'll end up standing on some pipes above some electrified water. Carefully drop down. One direction will lead you back to the portal and the other will go towards the main part of Level 3. You can grab a map for Level 3 at a nearby intersection. Get through the nearby alien-infested cubicles and you'll find the elevator leading to Level 2 that you couldn't use earlier. You'll also hear a person complaining in a room opposite said elevator. Talk to her, and she'll give you the recipe for a Hack Tool. You'll need a few Security Bot CPUs to make one. Luckily, you've been following my guide, and have an easy way to acquire some.
Before running back to base to build your very first Hack Tool, check out the closet next to the room the scientist is in and grab the Anvil. You'll need it to build a Repair and Salvaging Station, which is just as important as a Crafting Bench. It'll allow you to fix any piece of equipment, as long as you have the necessary material (which depends on what you're repairing). It'll also allow you to break stuff like packaged furniture into parts.
Also, if you scrounge around Level 3, you'll find plenty of Magazines and Books, components for the first craftable armor set. You'll also find a few tall Standing Lamps. Pick one up, you can make a spear out of it (you can still cut up bodies with spears, even if that makes no sense).

Once you've built and equipped a Hack Tool (there's a slot for Hack Tools alongside where you equip armor), take a quick detour on the way back to Level 3, and head towards the maintenance lift. If you look to your right as you near the big door to Manufacturing, you'll see a locked door, which can be open with your brand new Hack Tool.

You'll end up in another locker room, where you can find a white Security Backpack! This'll increase your inventory space a little. You can also get into a security room. If you check upstairs, you'll find a firing range where you can acquire your very first handgun and some ammo. The handgun is a bit of a novelty right now, since there's no way to get more ammo or the items necessary to repair the gun in the Office Sector, but that'll change when you reach Manufacturing.
The Security Checkpoint room is a good candidate for a base area. I'd highly recommend moving your base there, due to its proximity to Level 3, Manufacturing, and built-in Charging Station. Just don't forget to build a bed to set your spawn point there.

Now that you have a Hack Tool, it's time to enter Silo 3. Kill the Exon Monk and Pest beyond the door, and you'll see a dying guy in strange armor that will, aside from cursing at the scientists for messing with forces beyond their control, tell you NOT to open the portal back up. Then he'll die. Weird. Ignore him and open that sucker up using the nearby security panel.
The white board behind the dead guy will note that there are 3 Power Cells beyond the portal, and that they're radioactive. Luckily, you'll find a Hazardous Materials Suit just downstairs, by the lockers. This will increase your hydration loss while you wear it, but you'll get protection from radiation and airborne threats. Extremely useful. You should keep this in your inventory throughout the game, in my opinion.
Before entering, make sure your inventory is mostly empty. There's a fair amount of loot in the area ahead. Also... you're gonna want to be able to move as fast as possible.
Flathill: Shapes in the Fog (Part 1)
Welcome to Flathill, a quiet little town in South Dakota! Well, it's definitely quieter than it usually is. Where is everyone?

After climbing down from the treehouse you start in, go through the nearby grocery store (grab some Canned Peas and Tomato Seeds on the way through), head out a side door into the neighboring ice cream parlor, and head upstairs to the manager's office. Before heading through the vent nearby, if you look out a window, you'll see the nearby public libra-

Oh. Oh no.

They Might Be Are Definitely Giants
Say hello to the main inhabitants of Flathill, the Composers. They're big, dangerous, and aggressive. Oh, and you can't kill them. They have highly damaging attacks, but they also have the ability to grab and eat you, killing you instantly. They can also crouch down to get through double doors and reach their arms through single doors. Avoid being seen at all costs (their eyes are in their chest, so if you can't see that, they should not see you). If they do see you, they'll make a noise and start moving much faster than usual (their footfalls are very audible; you'll hear them long before you see them). One thing you have going for you is that the Composers are deaf, so sprinting around won't draw their attention unless they're looking in your direction. Unfortunately, the Composers also emit a lot of fog, as you may have already noticed, so seeing where to go will be difficult. Hopefully, this guide can help you.

Flathill Main
Crawl through the vents, and you'll enter a video store, home to the one human inhabitant of Flathill, Marion. He's crazy, but he'll outline your goal for you: pull the three power cells out of the portal containment units so that you can get back to the GATE Facility. A truck outside has a laptop that will specify that these containment units are on the rooftops. (There's also a return portal near the truck; maybe the creators decided trapping new players here was too cruel) There are ladders that lead to the rooftops, but they've been locked behind doors that can only be opened from the other side. Keep those in mind.

One thing really quickly: there are two bright red Magazine Stands near the video store. When you leave Flathill, you should take at least one Magazine Stand with you. It's necessary for something later.

For now, gather your courage and run up the street when the Composer's not looking. Stick to the left: the Public Library's front door is locked, but you can sneak next to the front door to stay on the fringes of the Composer's vision.

When ready, sprint up the street, but be warned: there's another Composer on patrol up ahead. Whether it sees you or not, run into the public bathroom building, break the vent, and crawl to the other side. You'll be able to see a playground set by the door:

Wait for the Composer patrolling nearby, then crawl into the playground set tunnel. Crawl out the tunnel on the opposite side, and you'll see this gate:

Head out this gate, and you'll see another Composer. If it's headed your way, hide behind the nearby chainlink fence and wait for him to turn around, or retreat to the playground for a bit. When the coast's clear, run to the entrance of the building with the statue in front of it:


Unlike all the others up to this point, this building (which I'll refer to as City Hall) is unlocked! Be warned! If the Composer sees you, it can enter City Hall. Whether it sees you or not, head up the stairs and go to through the yellow door. A ladder in this room will take you to the roof. There, you'll see the first portal containment unit:

Grab the Power Cell and enter the portal that appears. You'll end up on a different roof. Crawl down the nearby vent shaft, and you'll find yourself in the Flathill Arcade!
Run around the bottom floor until you see the exit sign with a yellow door, then head through and open the next door. This is a major shortcut. You'll see the ice cream and grocery stores from before ahead. If you go right, crawl through the truck, and head left, you'll be back at the beginning of Flathill. Weird quirk about the truck, though: the Composer will see you if you're inside it. You're not in danger, because the Composer can't get past the truck or the chain link fence, but it is still inconvenient.
Head up to the top floor of the Arcade, and you'll see another containment unit. Remove the power cell to open another portal. One more to go! Before heading through the new portal, look around for a nearby ladder downwards: this will lead to a chainlink door that you can open to get to the portal that can take you back to City Hall's roof! Now that it's unlocked, you can enter the new portal. BRING SPLINTS FOR THIS NEXT PART.

The Libary
You'll end up in the Flathill Public Library. Unfortunately, there are Composers inside. Watch the nearby Composer until it wanders far enough away, then hug the shelves just to the right of the elevator and go through the gap:
Look to your right again for a fallen bookcase you can climb to the top of the shelves:
You'll fracture a leg if you fall, and the Composers will outrun you quickly if you have a fractured leg, and that’s what the splints are for.
Hug the wall on the right and head towards the light:
There's a stationary Composer that shouldn't see you since the shelves block its chest, but the patrolling Composer may see you if it patrols over here. When you reach the light, jump down to the double doors and head through (use a splint or two to fix your legs).
Now you're back outside! There are two shortcut ladders back to the beginning of the level on each side of the bridge here. Open those up, and you never have to return to the Library again.
Head across the bridge and take the elevator up. Stick to the back left corner of the elevator. Trust me.
Flathill: Shapes in the Fog (Part 2)
Flathill Corn Syrup Factory
You'll end up face-to-knee with a Composer. It can't reach into the elevator, but it'll see you if you're in the middle of the elevator. This next part is... rough, to say the least. You want to run past the Composer to the back of this area full of servers and head up the staircase. There's no way to avoid detection, so you'll be chased the whole way. I've taken a picture from after the chase for a basic layout (the Composer's facing the elevator door, away from me):
I'm struggling to word this properly, but this is the best advice I can give. Keeping in mind that there are no dead ends here, head left out the elevator and sprint, staying to the left and heading towards the back of the room. If the Composer moves in front of you, don't risk getting grabbed. Turn around and run the opposite direction, and at the first opportunity, turn back towards the back of the room and run in that direction. You'll go down a linear path, where you can run up some stairs leading to a yellow door. Go in there to break line of sight with the Composer and wait for it to wander back to the elevator. Then, head out and jump across the servers with the yellow lights towards the short ladder:

Remember, Composers are deaf, so you don't NEED to crouch behind it, but you can if it makes you feel safer. Unlock the shortcut chainlink door nearby so that you don't need to parkour here ever again.
Head up the stairs, and you'll find the final portal containment unit. Pull the last Power Cell to open a portal back to the GATE Facility.

The Offices, Level 3 (Again)
You'll wind up in Physics Lab D. Every door leading in here was locked from the outside, and now you know why. Two scientists are holed up here: Dr. Abe Stern and Dr. Janet Ross. They thought they could escape the facility through a portal in Flathill, with no luck. Dr. Abe, the one cowering on the ground, will lament that, since the portal containment system is down, that the "fog is coming." You'll see these two characters later on. But right now... I need to talk about the fog.

THE FOG
Now that you've disabled the portal containment system in Flathill, you've enabled Abiotic Factor's weather system, which cause certain weather events to occur every now and then. More events will unlock as you move through the facility, but the first of the events you unlock is the fog event, which will fill the facility with a blinding amount of fog. It's really bad right now since you're about to head into a new area, and you want to learn the layout of said area. Luckily, there's a button to turn it off!
If you head to Silo 3 while the event is occurring, you can press this button on the right side of the room as you enter:

A unique enemy also appears during fog events, the Symphonists. They're extremely dangerous. They also appear in Flathill on subsequent visits. Luckily, if you got all three Power Cells, you may never have to go back to Flathill (on my first playthrough, I may have only gone back once).

Flathill Loot Recap
Unlike the GATE facility, major portal worlds like Flathill respawn all their resources every few days. If you can't find a resource in the GATE Facility, it's usually best to head to a portal world to get more.
Flathill, being the first major portal world, has the most basic resources you'll find in abundance elsewhere. However, if you're in a group, you may need to go back to Flathill to outfit everybody with gear, so I felt it would be good to list them anyway.

Grocery Store, Ice Cream Store, and Video Store
Canned Peas, Tomato Seeds, Ice Cream, and a small amount of money can be found here. The Magazine Stands outside the video store contain magazines you can use to make more armor, and the Stands themselves will be useful later as well.

City Hall
The first floor has an abundance of computers, and a few staplers. Staplers aren't high in supply, generally, and you might find yourself coming up short on staplers like I did on my first play through. There are a decent amount of filing cabinets here too, which can have money or Duct Tape.

The Arcade
Salt and Nachos. Salt is used for cooking advanced stuff, and Nachos are used for Pest Traps if you want a pet.

The Libary
Books, if you want to make more armor. You can grab the bright red ones that stick out from the shelves. Stay close to the elevator so you don't get caught between a Composer and a wall.

The Rooftops
The Power Cells. The first two are easy to grab if you open the shortcuts like you should’ve. There are Power Cells in other sectors of the GATE facility later on, so if you keep an eye out for the blue glow, you may not need to go back to Flathill.

Onwards!
For now, offload your loot (but bring two power cells, trust me on this) and head to the Manufacturing door. Plug one Power Cell into the forklift and continue across the bridge.
Chapter 2: Manufacturing Confidence (Part 1)
Welcome to the Manufacturing Sector! Follow the path (there's only one route for now, all the other doors are locked), and you'll eventually meet a Manufacturing Sector Employee named Varsha. She'll tell you the Blacksmith would know how to get out of the Facility from Manufacturing. She'll also tell you that there are crazy terrorists everywhere, shooting up the place.

Order Up!
As you'll find in a little bit, these terrorists belong to a secret organization called The Order. Why are they here? Well... it's not clear yet. What is clear is that they were spying on the GATE Facility, and now they've decided to put an end to the research being conducted... by killing everyone tangentially involved.
All the Order soldiers you'll meet in Manufacturing are armed with guns (save for one weird exception). That means that you won't be able to dodge their attacks. Damage is unavoidable, so ensure you're stocked up on medical supplies. Also, there are a LOT of Order soldiers in Manufacturing. If they're close enough, one Order soldier will alert the rest of his friends, turning a one-on-one fight into a three or four-on-one. If you end up outnumbered, you should run.
If you get up in their face they'll sometimes stop shooting to try to smack you, just like an Exon Monk will do. Unlike an Exon Monk, Order soldiers can't teleport, so all they can do to get away from you is turn and run, which is a prime opportunity to hit them in the back. If you can, rush or sneak up behind them so that you can start the fight up close. If they notice you before you can get close, you don't have to rush at them while they shoot you. If you retreat around a corner, they'll chase you, where you can ambush them.
When killed, Order soldiers drop ammo for the gun they're using, Military Electronics, and very rarely, they will drop the gun itself. Unfortunately, most of said guns are biometrically locked, aside from the 9mm pistol. You'll need Accuracy Level 10 to create the Biometric Armbands necessary to use them. If you want to get started on that, this would be the time to start using your pistol if you picked it up earlier. Also, you can begin gathering the materials needed for the armbands now. You'll need to collect 10 arms from Order Soldiers. They'll sometimes drop if you butcher their bodies. If you end up with Skulls instead, you can take them to a Repair and Salvaging table and break them down into Brains, which can be broken down into Bio Scrap.
You'll also start to encounter Lab Rats. These weirdos from the Order mainly just run away from you (at high speed, if I might add), and they don't have guns. They drop random scrap while running away from you, and they emit radiation. They despawn if they get far enough away from you. They'll hit you if cornered, which will push you away a fair amount, before running away again. There's a tiny chance they'll drop an Ornate Key on death, which you can use to open an Ornate Chest, scattered containers around the Facility that contain ammo, weapons, firearm repair kits, and gear from the Order. Kill them if you can. Order Officers (the ones wearing red berets) can also drop keys.
Instead of the portal storm, sometimes the Order will raid your base. They'll spawn outside your base, though, and sometimes end up fighting Security Bots. Barriers will stop them, but they're not stupid enough to run into Chopinators. The Tesla Coil, which you'll unlock in a bit, works wonders for killing them.


Manufacturing Crossroads
Before you head forward through the door Varsha opens, you'll notice a big ol' green button for something called a "Synchrotron Test" on the opposite side of the room from Varsha.

Varsha will mention her concern that if the Synchrotron were disturbed, it could destroy the whole GATE Facility. Hmm. Pressing the button won't do anything, you maniac.
Heading forward, you can climb out of a manhole and press a button to open a security door. Then, you'll hear what sounds like either a broken washing machine or a machine gun. Turns out, it's the latter.

That yellow spotlight belongs to an Order Machine gun. It's covering the nearby intersection, but it's shooting at the yellow crane right now. The guy inside the crane will speak to you on a radio down the road: he's holed up there to distract them. He'll tell you that you should head through the garage rather than attempt to charge through. I'd do what he says: that machine gun will tear you to pieces, not to mention the four or so Order troops camping around the Crossroads.
Just outside the room with the radio is a convenient ladder marked Garage Access.

The Garage Area
At the bottom of the ladder, you'll find a small hallway where you can hack a security panel to open a big door back to the Office Sector, and a green door nearby will lead you to a path blocked by boxes. Break them, and you'll find two new resources: Rebar and Screws. You've probably also come across a few pallets of Concrete by this point. You'll see another radio at the end of the hall: you can smash radios like this for Military Electronics. Continue into the small kitchen area (and kill the Order Soldier staring at the fridge). There's a couch in here big enough to sleep on if you need it, next to the tutorial TV talking about forklifts.
Continue into the Supply Room, a big room with Pests in it. This room has a few more boxes of Screws and Rebar, and there's also a white fire extinguisher in the room as well. These are somewhat rare; keep an eye out for them. They're useless on their own, but you can break them down at a Repair and Salvaging table to get a Canister, needed to make an Air Compressor, which is vital for progress. You'll also find a Welding Mask and F.O.R.G.E Gloves. They'll provide more protection than the makeshift armor you're already wearing, and they're also items necessary for making the next set of armor, which will give you a chance to deflect bullets.
Continuing out of the room and across the hall, you'll end up in the Garage, inside of which you'll find another Order Soldier, a Lab Rat, and a forklift. If you plug in a Power Cell, you can drive the forklift, and you can put stuff into the box it's carrying around! Very useful for getting around Manufacturing, which is comprised of a set of long tunnels, and for carrying large amounts of stuff quickly.
The corridor between the Supply Room and the Garage also leads to several other rooms: a Security room at one end has a keypad that can open a door back to the Crossroads from earlier. Unfortunately, you'll need a level 2 hack tool. Near the Security room is a room with this contraption:

This is part of a portal system that will become a shortcut between this sector and the next sector.
At the other end of the corridor is a Tram Station: this is the first of a few Tram stations. This one will lead back to the front of the Office Sector Plaza. Trams have a small storage box on them, if you want to ferry stuff around. You can grab a Manufacturing Sector map near the Tram Station. There's also a room between the Supply Room and Garage that has a charging station. Consider making the Garage your new base. Just beware of the Security Bot that will patrol the area just ahead during the night.

Chapter 2: Manufacturing Confidence (Part 2)
The F.O.R.G.E
Just outside the Garage and down the way will be the F.O.R.G.E, manned by the Blacksmith. Talk to him, and he'll give you the blueprint for a Level 2 Keypad Hacker, necessary to open the security doors between you and the exit. You already know how to get the Power Cell and Military Electronics, but you don't know how to make Reinforced Hose yet. You'll need to search Manufacturing for a new resource first.
Also, inspect the cooking pot by the Blacksmith. It'll give you the recipe for Solder, which is technically a Soup Recipe. It'll appear in your journal. You'll need Silver Scrap for it, which you won't find until later on, but you won't need Solder for a little while, anyway.
Before continuing, you should make the new weapons you unlocked by finding Rebar, such as the Thermal Mallet, Scrapshot and Pipe Pistol.
Also, by finding Rebar you've unlocked the Reinforced Wooden Plank and by extension, the Hazard Crate, which you can use to store radioactive stuff (like Power Cells) without irradiating your base. That's what you can use the Magazine Stand from Flathill for.
Speaking of Power Cells, there's one above where you talk the Blacksmith, in a crate on suspended on a rope.

You can get on top of the F.O.R.G.E by going up a nearby ladder to the right of the Blacksmith (beware the Pests), climbing on top of this railing and crouch jumping onto the piece of machinery next to it:

After that, it's just a matter of walking forward from the top of the F.O.R.G.E into the box from the other side. This is easier said than done. Bring splints and healing syringes, because you'll break several pairs of legs doing this. Putting Landing Pads beneath the gap between the F.O.R.G.E and the box might mitigate some of the damage if you fall.

Shipping
Before we head into this next area, I'll just warn you that you'll probably die here, a lot. Order soldiers are not easy to deal with. If your stuff is in a hard to access place (and you're playing alone), quit the game and reenter: your stuff will get placed in the middle of the Office Plaza.
Also, wear your Hazardous Materials suit whenever you enter the room full of radioactive waste.

Head up the hill. You need to get past the giant security door at the top, but it's locked. Enter the doorway on the left, and you'll be in Shipping. It's the giant room opposite the garage, with the giant pool of radioactive waste at the bottom. It's also filled with a lot of Order soldiers (most of which use and can drop handguns. Pick these up and replace your current pistol when needed). You can head left or right from here. Head right for now, and you'll find a coil of Steel Cable on one of the desks in the same room as the forklift tutorial TV. This is what you'll need to make Reinforced Hose. Once you find two coils of Steel Cable, you should immediately head back to base to make Keypad Hacker 2. There are a lot of doors in Manufacturing that will need a Level 2 Keypad Hacker, like the keypad opposite of the tutorial TV. You'll need to come back here to progress further.
Further down this path, there's a place you can put Fiber Optic Cable (this will be important for later) and a zipline you can interact with, but for now, head through the nearby doorway, down the stairs. You can pick up a High Vis Vest here to make better armor later.

Alloy Handling and Shipping Logistics
If you head forward past the Alloy Handling sign, be warned: there's a Sniper perched on the other side of the room. Order Snipers do a LOT of damage. If you see the orange laser, run back the way you came. There's usually a way to sneak up behind them. In this case, you can go through the kitchen in between Shipping and Alloy Handling, drop down by the orange crane, and climb up a ladder to the sniper's position. There's also a Power Cell in the corner office opposite where the sniper is, along with two soldiers and some lore.

If you take out the sniper, you can head through the nearby doorway, and you'll end up right on top of the Shipping Logistics building where the machine gun nest from earlier sits. Unfortunately, this building has somewhere in the realm of 8 Order soldiers within earshot of each other. You can either be stubborn like me, and die two times trying to clear it out, or you can come back later with better armor. While you're in here, go through every floor of both sections of the building and unlock the doors. If you can set up a bunch of Tesla Coils, you can basically farm Order soldiers. Just set them up to levers so you can turn them off: they'll zap you if you're in front of them.
Once you're done with that, head back to where the sniper was and head down the ladder again. Head back to where I'm pointing in the picture above. You'll see a doorway, but you'll also see a path that leads downwards. For now, head through the doorway, past the scientist (don't go upstairs yet), and take the catwalk over the radioactive waste. There'll be a Level 2 Security Keypad you can hack to open a door straight back to the Garage.

Railway
Double back to the path downwards and you'll end up in the Railway. There are alien enemies down here, and quite a lot of Anteverse Wheat growing here, too. A hole in the wall will lead into a cavern, at the bottom of which you'll find a Portal Containment system with a Power Cell. Grab it, and enter the portal to end up in a small cave off to the side of the tunnel system, opposite of the entrance you took to go into Shipping in the first place.

Escape!
Now that you've got a Level 2 Keypad Hacker, head back to the room with the tutorial TV and hack the keypad. You'll immediately see the Surface Tunnel, right there behind the door!

Oh. Hm. Well, just to the right of that there's a smaller tunnel headed in the same direction, so maybe it connects back to the Surface Tunnel?

Turns out it does! And there it is! The road leading to the Surface! Only 500 meters away!

Sunlight! Beautiful sunlight! Freedom is right there! Let's get outta this place!


Well, that's just great.


Chapter 2: Manufacturing Confidence (Part 3)
Back into the Tunnels
A nearby Lab Rat (he's given up on whatever mission he was sent here to do) will tell you that the Order blew the tunnel, so there's no chance of getting out this way. He's convinced that Frake, who has holed herself up in the Processing Plant, knows a way out of Manufacturing. So that's where we're going. Unfortunately, the Processing Plant isn't on the map, so we'll have to explore to find it. There are three directions to go.

From here, you can go left or right. Left leads to a security door that you can't open from this side, and a shortcut you can unlock that just leads back to the Crossroads.
Right leads to a giant cavernous area full of Order troops.
And near the empty Order camp at the bottom of the ramp leading to what was the Surface Tunnel, there's a break in the wall leading to what the Manufacturing map refers to as the Digsite and Old Mines. Decisions, decisions. But, before any of that:

Trading!
Some parts of the caves get kinda dark. And while you may have attached a flashlight to a gun, you still lack a hands-free light source. Luckily, you likely have most of the components for one already! However, you’ll need an Optic Lens, which you cannot make. Luckily, the Blacksmith can! If you build a Reinforced Hose and drop it into the chute near him, you can grab an Optic Lens and make a Makeshift Headlamp! You'll need to make other trades with the Blacksmith later to get out of Manufacturing, but the Reinforced Hose -> Optic Lens trade is going to be a thing you'll need to come back and do for advanced tech later on.

Giant Cavern
Head right at that intersection I mentioned earlier to head into a massive cavern. There's a lot of Order soldiers here, too, so be careful. Head into the building at the end of the path, and read the emails on the computer right by the door. It'll mention that you can get silver from an Anteverse they call IS-0138. Also known as The Train.
For now, go through the exit door on the opposite side of the room, and press the button by the Forklift (which you can plug a Power Cell into, but I don't know why you would, since there's nowhere to drive it from where it's parked) to open the door. Rather than go through, head back into the first building and head out the double doors on the side. Kill the Sniper in the tower, then the soldier on the bridge. Loot the camp if you want, then head over the bridge and kill the Sniper on the right.
Head forwards until you see the Power Cell on the ground next to the dead scientists. Grab it, if you really did kill the snipers from earlier (otherwise you're going to get sniped, a lot). the path forwards will have an Exor Monk in the way, and past that, the forklift from earlier. Also near where the Power Cell was is a drop downwards into a Storage room that connects back to the Garage. Well, this was a dead end.

Digsite and Old Mines
Head back to the empty Order camp and go through the crack in the wall. You'll see something that looks like this:

The left and right paths head downwards, and the center path leads upwards. They all end in the same place, though.
To the right, near a small waterfall and a bunch of Anteverse Wheat, you'll find the next type of box you should keep an eye out for. These thin brown boxes contain Steel Wire, Grinder Disks (for the Grinder weapon, which you can't build quite yet), and most crucially, Chains. Getting Chains will unlock the Air Compressor blueprint, necessary for the Grinder, among other things.
If you head down the left path, you'll hear a weird noise, originating from the tan building (you can see it in the picture above. It kinda sounds like the audio of a video being placed in reverse. Looking in the window, you'll see:
Well, you won't see much unless you squint, since it's mostly transparent until it starts attacking. This new enemy is called a Crystalisk. They're pretty tough enemies that take less damage from bullets, and take no damage from fire. But they take more damage from both blunt and sharp weapon damage. The Powdered Crystal they drop isn't useful yet, but it will be later.

Explore the giant building on the other side of the cavern:

There'll be a locker room with another Crystalisk in it. After killing it, stack furniture until you can climb to the catwalk above. Enter the portal that's at the end, and you'll enter the Staff Processing area, the area the tutorial was set in! The place has taken a real beating: the room looks like it was bombed, and all the doors are shut. One set of double doors is even blocked by what looks to be an infestatioan of giant mushrooms. Approach the Pest Dummy you built in the tutorial for an achievement, loot whatever seems useful, then head back through the portal, and go back into the cavern.

In the middle of the cavern, next to a big waterfall, will be something called the Flow Control Module, which needs to be fixed with an Optic Lens. You'll need to do this to progress onward later (but you can do it now, if you want to).

If you head up a nearby dirt path (the one on the opposite side of the cavern from the building with the portal) you can unlock a shortcut that leads back to the tunnels. You'll also see a locked tram station that needs a Tram Station Key.
Opposite the shortcut door is the Processing Plant. Climb the stairs to the top, and you can talk to Frake. She'll tell you about an accident that occurred years ago: the Synchrotron overloaded and made a singularity big enough to carve a hole into the next sector. Frake wants you to recreate the accident, but there's a catch: the electron pumps are broken. Frake sent her team to fix them... but hasn't returned. Frake will also tell you that the Blacksmith can supply the parts, and that the pumps are connected by red, yellow, and green pipes.
Actually, one broken pump is right outside the room Frake's in:

It needs a Diode.

Before leaving the cavern the Processing Plant is in, you'll see two of the pipes run down a tunnel off to one side of the cavern. If you go down here, you can enter the room with the Synchrotron. If you explore the room, you can open several shortcuts back to the Crossroads and to the Sychrotron Test button, near where you entered Manufacturing to begin with.

And if you remember from before, you found the third pump earlier: it needed Fiber Optic Cable.
So, you need Fiber Optic Cable, an Optic Lens, and a Diode. Go talk to the Blacksmith.
He'll expand his trading list to include the items you need and send you a list of what you need to trade for them. He'll even give you a blueprint to make a Tram Station Key since some of the stuff you need is in the portal inside that station. Build the key, enter the station, and kill the Order soldiers.
Make sure your bag is as empty as possible, then enter the portal when you're ready.

The Train: Next Stop, Hopefully Never
Welcome to The Train! Or IS-0138 if you prefer. It's a 19th-century train engine that has somehow become its own Portal World, running on a seemingly infinite set of tracks in a seemingly endless expanse of grass.

You’ll start on a platform on top of the train’s engine. Open the nearby door and head inside (don't get clever and try jumping onto the train car behind the engine: the train's smoke will kill you).

You'll see (and hear) an Order officer interrogating the scientist frantically shoveling coal into the Train's engine. Kill the officer and talk to the scientist, Dr. Hammond. He won't say anything useful, but he will make it clear that THE TRAIN MUST NOT STOP, NO MATTER WHAT.

Train Stops, Everybody Dies
Despite being its own Portal World, it turns out that The Train is still attached to our reality on some physical level. And it's been going and going for a long time. There's so much energy in that motion that if The Train were to stop moving, the release of energy would be on a potentially catastrophic scale. Not that you can do anything about any of that: you're just trying to get the hell out of the GATE facility.

Hijacked!
Order soldiers have taken the rest of The Train over. I won't go into detail about how to get through the level, because it's pretty much a straight line to the back of the train. Just be aware that there are Order soldiers in every car.

While you're looting the train, be sure to look out for:
  • Axle Grease: The big red cans. You need one to trade for a Diode.
  • Briefcases: Can be broken down into Leather Scrap, and can also be used for a healing item later.
  • Pocket Watches: Can be broken down into Exquisite Chains and Tiny Gears. Exquisite Chains are used to make Trinkets, which grant you certain benefits while equipped. Tiny Gears don't do anything (as of the Crush Depth update). They might be useful later, so you should still stockpile them.
  • Car Battery Chargers: These are used to make your own charging stations, as well as other tech later on.
  • The thin brown boxes you can break to get Chains, Steel Wire, Hoses, and Grinder Disks.
  • Silver Scrap: Needed to make Solder, which you need to trade for the Fiber Optic Cable.

Oh, and there's a Crystalisk on the top of the last train, where the exit Portal is. It won't bother you unless you climb the ladder on the side of the last train car. Why is it there? It's a mystery.

Synchrotron-icity
Head back to your base and make Solder (fill a Pot with clean water, put it on a stove, then add Silver Scrap and Metal Scrap). Then head to the Blacksmith to trade in one Reinforced Hose, Axle Grease, and Solder for one Optic Lens, Diode, and Fiber Optic Cable, respectively.

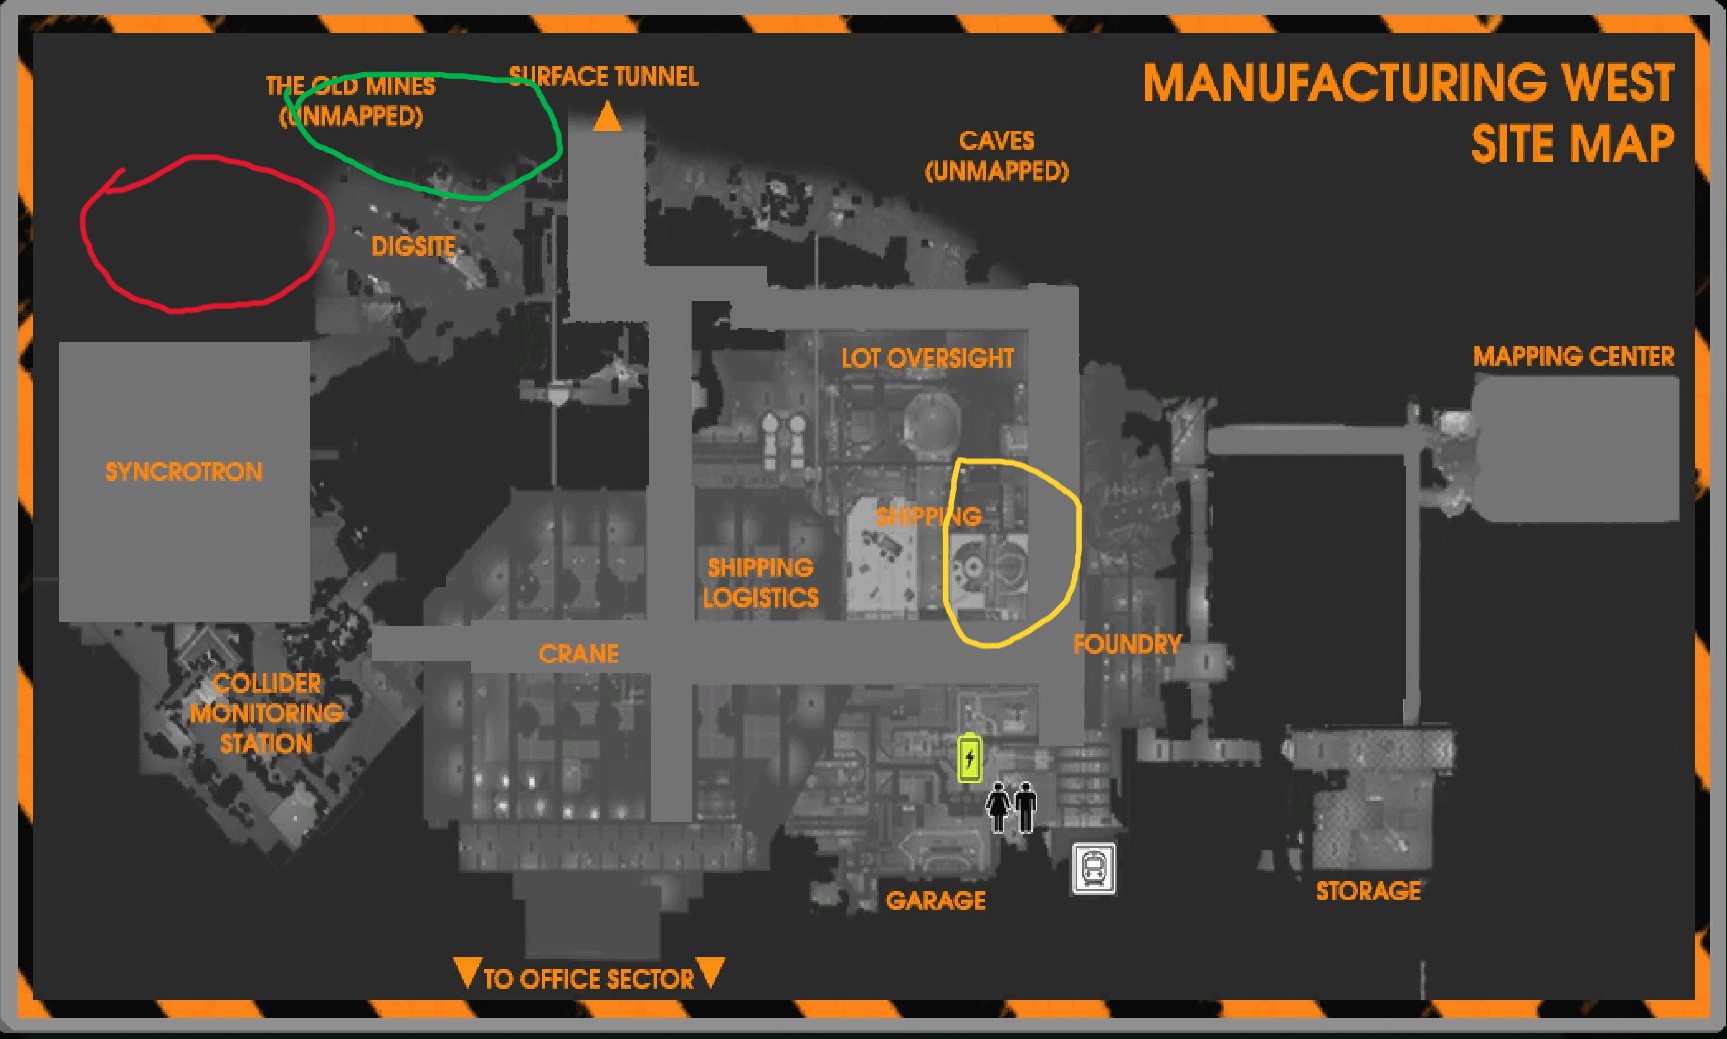
Plug these items into the Electron Pumps in Shipping, by the waterfall in the Dig Site, and at the Processing Plant. I've included a map where I've circled the rough locations of the Electron Pumps.

Once you've done that, head back to where you entered Manufacturing, and join Frake by the Synchrotron Test Button. Press it. A "micro" black hole (Frake's words, not mine) will form, leaving a massive hole where the Synchrotron used to be. Head to the room the Synchrotron was in, climb down the hole where it used to be and follow the tunnel.

Before you reach the Lab Sector, you'll meet Dr. Abe and Dr. Janet again. Abe's in the middle of creating an Electro Pest, a cyborg Pest that produces a blast of electricity every other time it jumps. Oh, and they're immune to electricity damage. There's a lot of them in the sector coming up, and they're really annoying. Thanks, Dr. Abe. You can butcher them to get Capacitors, which are integral for several weapons and pieces of equipment, so it's not all bad. Climb through a hole in the nearby chainlink fence, and you'll have officially entered the GATE Facility Lab Sector.

Chapter 3: The Labs Just Came In (Part 1)
Welcome to the Lab Sector, more officially known as the Cascade Laboratories! The Offices and Manufacturing Sector may have given you Half-Life vibes, but this next area is strictly SCP-inspired.

The first thing you'll see in the Lab Sector is this sign.

Huh. That's a little concerning. Enter the nearby room and examine the broken X-Ray Emitter for the X-Ray Tower blueprint. Then you'll hear a noise. Kinda like someone's sighing. Look back in the direction you entered the room, and you'll see:

Oh dear God, what the hell is that thing?! Why does it look like a tumor grew eyes?! And most importantly, WHERE DID IT JUST GO?!

The Leyak
Say hello to the Leyak, or IS-0109. It's from something that scientists refer to as "The Flesh Dimension." Fun! It'll also be your stalker for the rest of the game! Not fun!
You just stumbled onto its containment cell, which has been irreparably broken. Luckily, the Leyak vanishes for a while when exposed to one of its two weaknesses:
  1. Being stared at by its current target (how long this takes seems to be random)
  2. X-Rays
Unluckily, the blueprint for an X-Ray Tower is full of parts you've never seen before. You'll need to gather them as you go through the Lab Sector.
The Leyak picks one victim at a time, who is also the only person that can see or hear it. In multiplayer, the Leyak picks a random person to stalk, switching targets after vanishing. In single-player, you're the only target.
After vanishing, the Leyak will spawn (after some time passes) a certain distance from you and approach your location slowly. The Leyak will phase through obstacles and open doors to reach you. Even though it floats, it can't fly: it still has to take stairs to reach the next floor. If you look at it, it will freeze until it vanishes, or you stop looking at it. Looking at the Leyak through a transparent surface won't count. Another (extremely annoying) complication is the fact that you have to be able to see the very bottom of the Leyak, so some low barriers can prevent the Leyak from vanishing. The Leyak can follow you through vents, so if you hear it approaching, don't go into vents: the game seems to have trouble detecting the fact you're looking at the Leyak while it's in there.
If it gets almost close enough to touch you, it'll enter attack mode, where it will move much faster and start hitting you rapidly. At this point, the only thing that'll save you is if you expose the Leyak to X-Rays. Otherwise, you're doomed.
One more thing: The Leyak will not follow you into Portal Worlds.

Shortcut!
Before going anywhere, look for the XR Transfer sign in the same room as the broken X-Ray Tower. Use the elevator and hit the button on the next floor to open a portal that will take you back to the Garage area. You'll need the Blacksmith's services, and this is easily the fastest way to get back to him from the Labs.

Cascade Laboratories
Grab the ball of Leyak Essence from the chamber the broken X-Ray tower is facing (these are incredibly radioactive, so put on your Hazardous Materials Suit), press the button by the shattered window, and you'll open a door to the Cascade Laboratories. Head through the path past the flipped truck. You’ll see a Security Cart you can use later, so keep it in mind. Go further along the path and you'll end up in a massive room with a big elevator. These are the containment blocks, where a lot of the anomalies collected by the GATE Facility are held in cells. Most of these cells are locked shut, and you'll be unable to interact with them, but feel free to explore to collect some lore. Unfortunately, a lot of the security doors to the other Lab wings are shut tight, too.
Head to the security booth on the first floor and talk to Dr. Thule: he'll tell you that the Vacuum Door between here and the nearest surface elevator is blocked by some alien crud. You'll see it at the top of the nearby ramp:

He'll also speculate that the Lab Sector contains something that can get rid of it, but it's all on lockdown. Then he'll give you the Level 3 Keypad Hacker blueprint.

First, you should head up a floor and head to the room covered in yellow paint: somehow, this stuff has burrowed its way past the security door into the Inner Wing’s security checkpoint. You'll meet your first Electro Pest and your first Exor (these ones have no titles).
These glowing green Exor shoot quills and can even run around while shooting. In my experience, these quills reliably cause bleeding, so keep bandages handy. They're also not afraid of melee: they have a 3 or 4 attack melee combo that really, really hurts even in full F.O.R.G.E. armor. Butcher them, and you can get Exor Quills. You can't use them yet, but stocking up on them isn't a bad idea, and you can break them down into Bio Scrap if you need to.
You'll find the Level 3 Keypad you can access later to open the way to the Inner Wing, but for now, open the door back to the elevator, and go across the way to the Wildlife Pens.

The Wildlife Pens
You'll hear Abe as you enter, so head right and grab a Wildlife Pens map along the way, then talk to Janet and Abe. They’ll point towards a shortcut you can open to the Office Sector.
The Wildlife Pens wing is constructed in a loop: With Aquariums on one corner, Particle Labs in another, and the actual Pens in the middle.
In the Aquarium area, you can open a door back to the Leyak holding cell.
There's a new kind of robot here: the Containment Robot. Don't cross the lines near their charging stations, because they'll wake up immediately, regardless of the time of day. They'll do more damage than the Security Robot, move a lot faster, and can also kidnap you, breaking your leg and putting you in a holding cell. I've had trouble using the Chopinator on them: their melee attacks are sometimes long enough to avoid getting hit. Putting a Tesla Coil down behind a barrier works much more reliably. Destroy Containment Robots to get Jailbroken CPUs. There's also a tram station here, but you'll need to build another Tram Key to open it up.
Upstairs from the tram station is a small lab area, with a lot of stuff to loot. Keep an eye out for the new type of computer monitors, because smashing them will yield Liquid Crystal. There's also a Terminal that will tell you how to build Antethermite, an incendiary explosive that can burn away the alien gunk on the Vacuum Door. However, you'll need Anteverse Gel to make it. More on that later. Grab a Lab Mask while you're up here; it'll be on one of the desks. You'll need that later to get the Anteverse Gel safely.

The Pens have Peccary Sows and Alphas. They're both more dangerous than a standard Peccary, but Sows can shoot you with a projectile, too. The Carbuncles here are Tainted variants, meaning they do damage to you while holding you in place. There's also a LOT of Anteverse Wheat growing here.

There are Order Troops in the Particle Labs, and a lot of stuff to loot, particularly Liquid Crystal computer monitors. You'll meet a new type of Order soldier here: the Breacher. They're heavily armored and slow moving, but they have shotguns. Unlike other Order soldiers, these guys will walk towards you at all times, and they won't ever retreat. My advice: use your shield to block their shots and hit them while they get ready to shoot again. Bullets are less effective against them.

Chapter 3: The Labs Just Came In (Part 2)
Adjustment Wing

To make the Keypad Hacker Level 3, you're going to need to head to the Adjustment Wing, one floor up from the Wildlife Pens. I'll warn you: It's a maze of corridors, and the large number of aliens and Order soldiers here don't make it any easier to get your bearings. Luckily, they fight each other. Bring Healing Syringes, a Healing Briefcase if you made one, and bandages. Arm yourself with a Grinder or a firearm: having a ranged attack option will make things much easier for you.

After you get past the Exor at the front desk and head inside, there are three paths you can take that all eventually loop back into each other: up the stairs in the center, to the right past some lockers, and to the left through a hole in the wall into a lab. You're looking for two items as you go through the Adjustment Wing: Anteverse Gems and Enriched Carbon. They'll be in special containment cases scattered throughout the wing, and there's only a limited number of them, but there's a way to make more. As you explore the wing you'll find Adjustment machines that can change one material into another. They look like this:

This Adjustment Machine changes Anteverse Gems into Liquid Crystal. If you take the stairs at the entrance, head left at the end of the hall and follow the sign pointing to Cold Storage, the machine will be in an unmarked lab to the left along with an Order soldier. There's also a shortcut you can open further down the hall that'll connect down to the Wildlife Pens.

If you head back towards the entrance and look left, you'll see a door to the Cellular Labs. Go through the room, past the Peccaries, to the other side: you'll find another Adjustment Machine that exchanges Silver Scrap for Refined Carbon.

Also in the Cellular labs is a side door leading to a ladder to the next floor up. The first room has an Adjustment Machine that exchanges Anteverse Wheat for Anteverse Gems. Just outside this room, and just past a Breacher, is a staircase up to the very top of the Adjustment Wing. There's a conference room with a few Refined Carbon and Anteverse gems, a lore hologram, and most importantly, a whiteboard with a blueprint for the next backpack upgrade, the Research Pack. You will need to get some Anteverse Gel for that as well as the Antethermite.

In Cold Storage itself you'll find an Adjustment Machine that can change Leyak Essence into Greyeb Seeds. Greyeb Seeds aren't necessary, but I still wanted to mention it. Also, there's a Power Cell in Cold Storage in one of the fridge units on the second floor.

If you thoroughly search the Adjustment Wing, you should be able to get all the parts for the Tier 3 Keypad Hacker, aside from Optic Lenses. Before heading to the Blacksmith with Reinforced Hoses, build an Air Compressor, too. He'll trade you a Fire Proximity Suit for it, which you should leave at your base for later. Now, head to the Inner Wing.

The Inner Wing
You'll start in a hallway with numbered cells containing various anomalies. Not all of these are locked, and you should take advantage of that.
IS-0099 is a functional double barreled shotgun with no (apparent) anomalous properties at all, and IS-0052 is a gravity-decreasing cube which you can make into a Trinket that allows you to jump higher and fall slower (you can still break a leg by falling, though).

Head further into the Inner Wing and follow the objective marker into Containment Block Baird: you'll be able to talk to a scientist in a containment cell, Dr. Cahn. He locked himself in on accident. He'll claim that he can get you through the gunk blocking the Vacuum door, if you can end the lockdown and let him out. You'll need to get to the Control Center to do that. Dr. Cahn suggests taking advantage of the portal system to get there: and that's the only way you'll get there in one piece. The main entrance to the Control Center on the top floor of the Lab Sector is blocked by security turrets.

Luckily, a nearby whiteboard, just outside of the Containment Block, will outline where to go:


The Helmholtz Containment Block is on the other side of the chasm in the Inner Wing. You can either build two Bridges to cross the gap, or you can use the Gravity Cube trinket to jump the gap. Before going any further, consider building the following:
  • A Personal Teleporter, synced to your base's workbench (highly recommended)
  • A Lightning Spear
  • A Charge Shield
  • Carapace Sabatons and Gauntlets
  • 5 Wall Torches (EXTREMELY IMPORTANT)

Also, make sure you've charged your Headlamp. Bring a secondary light as well.

Containment Block Helmholtz
The doors to the Containment Block are locked. Just to the left of them is a splash of yellow paint next to a vent cover you can break. As you crawl through the vents, you'll hear moaning. Exit the vent, grab the shotgun shells, and head upstairs, and CHECK THE CUBICLES. You'll find a Zombie. Zombies are deceptively dangerous: getting hit by them at all can infect you. There's no cure for this infection, and it is ultimately fatal. Headshots, as always is the case with Zombies, are king.

When ready, hack the keypad and enter the Helmholtz containment block. You'll find a LOT of Zombies. The Lightning Spear can instantly kill one Zombie with a headshot, and the chain lightning it causes can kill another zombie after two strikes, making it an effective crowd-control weapon. Enter the portal in the big room, when you're ready for the apocalypse ahead.
The Furniture Store: Eat Your Heart Out, Jonathan Coulton
(Gold star if you get the reference. If you don't, go listen to some Jonathan Coulton songs)

The Furniture Store is completely dark. Only the lightning flashes outside will give you any illumination. Also outside is a horde of Zombies, pounding on the doors you'll appear in front of. Don't worry about them right now: there aren't any inside the Furniture Store. Yet.

The Furniture Store has an elevator in the middle of the ground floor, but it's powered down. You'll need to find the 5 power buttons to turn the elevator back on. There are a lot of different places the buttons can be, and they randomize location every time the Portal Worlds reset. The buttons make a weird noise, so you might hear it before you see them. This is what they look like:


DO NOT PRESS THE BUTTONS YET! After you press the first button, Zombies will begin spawning at random places inside the Furniture Store, at a rate that will increase the more buttons you press. Once you've found a button, place a light source near it so you can find your way back after you've found where all the buttons are.

While you look around, search through cabinets and other containers. If you can find a Sword or Cane Sword, you can carry it around later to butcher aliens without wasting the durability and charge of weapons like the Lightning Spear. Also, the Sword can be used for a blueprint you'll unlock much later.

Once you've found all the buttons, start pressing them, beginning with the ones on the lowest floor and working your way up. The basement is more complicated to navigate, and you want to get it out of the way first. Also, you can jump off the top floor to reach the elevator faster.

Once you've hit all the buttons, make a beeline for the elevator and head up. There's not much up here besides the laptop, which has some minor lore, and the portal. You can also examine the hell you've narrowly avoided by looking through the glass flooring. Seriously, after all the buttons are pressed, there's no chance of surviving the hordes that begin to spawn. When ready, head through the Portal to the Lab Control Center.

Loot Tips
If you ever come back to the Furniture Store, bring a Personal Teleporter, so you don't have to hunt for the buttons again.
You can get Refrigerators from the kitchen section on the ground floor. The kitchen cabinets here replenish with a random assortment of loot, which can include Hydrochloric Acid, Enethiol, Canned Peas, Plastic Scrap, and Hoses.
The Desks elsewhere in the store can have Duct Tape and Money.
The Furniture Store is also a good source of couches if you can't find any and want to make more beds.
Chapter 3: The Labs Just Came in (Part 3)
Lab Control Center Security Checkpoint
You'll appear just outside of the Control Center. Through a window, you'll see that it's completely overrun with Order soldiers. They've hacked the security system: they're freely wandering in front of the security turrets without being mowed down.
You can't go into the Control Center yet: there's an X-Ray forcefield in the way. You'll need 4 Leyak Essences to repair the mechanism to turn it off. Luckily, there's a diagram of a handheld X-Ray emitter that you can build. All you have to do is build it, wait for the Leyak to appear, then blast it with X-Rays until it drops its essence. You also might already have enough essences if you built X-Ray Towers before now.

Until you have enough Leyak Essences, all you can really do is explore and look at the subjects that are still contained. You could also stock up on Refined Carbon and Anteverse Gems using the Adjustment Wing machines.
By the way, unlocking the Helmholtz Containment Block has set the Zombies loose in the Labs. Oops. You'll see them in the Adjustment Wing, and every few days, a small group will raid your base instead of the Order or aliens. They're easily handled by either the Tesla Coil or Chopinator.

Lab Control Center
Now that you have all the Leyak Essences you need, you can enter the Lab Control Center. Try to focus on resetting the security system before you start looting the area: there's a lot of stuff you can get here, but it'll be much easier when the security turrets are on your side.
Head straight forward and look for the yellow paint on the ground (you'll take some fire from a security turret). Follow it around the corner towards the bathrooms and follow the sign pointing to the Control Lift, and ride the elevator up.
If you follow the path straight ahead, you can unlock a couple of locked doors to the Control Center Security checkpoint from earlier.
Around the corner just before that is a hallway covered in bodies, guarded by an Order soldier manning a machine gun on the far end. Take cover behind the crates, then duck into the offices nearby. Use the cubicle walls to block the machine gun fire and work your way towards it from the side, then take out the gunner. After he's dead, you can climb the crates just in front of the gun and access the Keypad linked to the security controls, instantly turning the security turrets on the Order.

Dr. Cahn will instantly appear behind you.

How'd he here so fast? Something's very... off about him.

In any case, he'll point you toward a Portal you can take to find the Anteverse Gel. You've definitely seen where it is already: it's on the top floor of the Lab Sector, where the giant mushrooms are growing. In fact, if you take the Control Lift back down and follow the objective marker, you'll find that you're on the opposite side of the floor from it. You can unlock the door to enter the room, but the Keypad that would turn the Portal back on isn't working. Head down to the platform surrounded by lava, and you'll see the missing component: you need Tarasque Ichor. A nearby hologram will mention more about the Tarasque in question, but not where it is.

The Tarasque
The Tarasque is further in the Inner Wing you went into earlier, in the area that was guarded by security turrets.
This area has a few offices, a security room, a tram station (this one goes to the Wildlife Pens aquarium area and back to the Office Sector), and an observation room overlooking the containment cell Dr. Cahn was stuck in. Listen to a hologram here for some very interesting lore.

A hallway in this area also leads down a long corridor. A scientist hiding in a security room nearby will tell you that she's the only survivor of the group that managed to trap the Tarasque in there.
Crouch under the security door at the end of the corridor, and you'll find it, staring out a window on the far side of the room:


Now, you need to kill it. The Tarasque will resist any firearms or explosive damage, but it is weak to electrical or fire damage. Head back to your base and make a bunch of barriers, Plug Boards, Chopinators, and Tesla Coils (bring plenty of Tech Scrap for cable extensions). I ended up using around 6 Tesla Coils, 5 Chopinators, and 6 reinforced wooden barriers.
Set up a perimeter around the end of the hall leading to the room the Tarasque is in. If you set it all up far enough away, the Tarasque shouldn't hear you install any of it. Arm yourself with an Electro-Thrower, the Lightning Spear, and the two pieces of Carapace Armor that you can make now. You should be safe as long as you stay out of melee range, but still, bring plenty of healing items. When ready, shoot the Tarasque with something long-ranged to draw it into the traps. When the traps make the Tarasque kneel, try to hit it in the red flaps it exposes: you'll see them if you're behind the Tarasque. Otherwise, hit its face and chest tentacles.
Once it's dead, you can butcher it to get 5 servings of its Ichor, and its head. As of the Crush Depth update, you only need one unit of Ichor. I would leave the traps there instead of dismantling anything: I have a feeling you’ll need to come back for more Ichor in another update.

Head back to your base, grab a Fire Proximity Suit and Lab Mask, make some Splints, and return to fix the Portal with the Ichor. If you haven't already, make the Dangling Gravity Cube trinket, as it will be extremely helpful in the next Portal World. Make sure you're wearing the Fire Proximity Suit and Lab Mask before you jump in the Portal. You'll need both immediately.

The Mycofields: Too Hot to Handle
You'll end up in an extremely hot, spore-filled dimension. If you weren't wearing the Fire Proximity Suit, you'd catch fire.
The whole area is comprised of a forest of giant mushrooms and lava lakes (don't fall in them, you'll die), and is divided into several islands suspended above an abyss. Some of these islands are higher than others, and the exit portal is on the highest island you can reach. Use the jump pads to get around, and use the Rope Plants to get up to islands that are out of reach. Don't worry about breaking your legs while using the Jump Pads: you'll take no fall damage after being launched by one. You'll still get hurt if you fall off a giant mushroom, though, so be careful.

Before you leave, you need to find 12 units of Anteverse Gel: 10 for the Antethermite, and 2 for the Research Pack. Technically, you need another 10 to make a second Antethermite for something else, but it's tough to find that many in a single run, and it's not necessary, so don't worry about it. You get Anteverse Gel from these rocks:


And while you're looking around for gel, keep an eye out for these bugs:

These drop Carapaces when you kill them. You'll have to sneak towards them to get close to them, otherwise they'll hide in their burrows until you back off. You'll need the Carapaces to make Carbon Plating, which is used for advanced tech like the Research Pack, as well as the rest of the Carapace Armor.

You'll also find Rope Plant Seeds scattered around:

If you plant these at your base, they can grow into a deployable plant that will act like a ladder. Very useful if you want to make a shortcut between floors.

Also, you can grab these Gaseous Nests:

They're deployable jump pads. You can use them in the Jump Pad blueprint to make them even better.

In terms of enemies, there are Pests, Peccaries, Mushroom Peccaries, Mushroom Carbuncles, Exor Monks and Exors. The Mushroom enemies will expel spores, and the Fire Proximity Suit doesn't protect against them, which is what the Lab Mask is for. If you get a fungal infection, you'll get a cough. As far as I can tell, all this does is make enemies detect you quicker, but I wouldn't chance it.

When you've got enough Anteverse Gel and Carapaces to build an Antethermite, take it to the gunk blocking the Vacuum Door and burn it away, then open the Vacuum door. Your path forward to the Security sector is open.
(OPTIONAL) The Rise: Tower Above
If you get enough Anteverse Gel to make a second Antethermite, build one and take it to the Adjustment Wing. There's more alien gunk blocking the door to the Laser Labs. You'll know it when you see it: it'll be the room with a laser randomly shooting into the ground just outside of it.

Once you're in the Laser Lab, kill the Order soldiers and find the whiteboard: It'll give you the Laser Reflector blueprint. Build one and come back (you'll need an Optic Lens).
Now, you need to redirect the laser from the misaligned laser emitter into the hole opposite it, where you can see a small purple circle. This can be a bit tricky, but I find that stacking two small Storage Crates in just the right place and putting the Laser Reflector on top will give you the correct height, like so:

Nothing will seem to happen, but if you head to the Vacuum Door, you'll see a Portal has opened in the machine nearby.

Head in when you're ready.

The Rise
You'll appear in one of GATE's other facilities, the Rise Bio-Laboratory. As is typical by now, all the scientists and security staff here are dead, shot by the Order soldiers that have taken the place over. It's unclear where precisely The Rise is, but the achievement you get for getting through this area implies it's on Earth. In any case, the Leyak can still follow you here.
If you look around, you won't find much out of the ordinary in terms of loot. Mostly office supplies and equipment you'd find elsewhere, with a few Liquid Crystal monitors here and there and a couple cases of Anteverse Gems and Refined Carbon. In one lab, you'll find an "Egg". It's an alien plant you can grow at your base to make more "Eggs."
To continue, head up to the second floor, look in the room facing the elevators, and hit a button. This will raise the shutter in front of an elevator on the second floor, which you can take to the roof.

On the roof, there's an Order machine gun emplacement pointing right at the elevator that will begin to take shots at you. Take cover behind the boxes and computers up here and make your way left through a hole in the chain link fence, then work your way around to attack the emplacement from behind. Once you're done, head through the portal under the giant helicopter. You'll get the achievement "The Big Apple" for your trouble.
(OPTIONAL) The Pool Room: Don't Do the Dead Man's Float
The Red Chair
Once you've reset the security system, head back to the Helmholtz Containment Wing. All the containment cells here are still closed and locked, save for one: the room with the Red Chair. If you go into the observation hallway nearby and interact with the lore hologram dedicated to the Red Chair, Dr. Manse will warn you vaguely about how dangerous it is to interact with the chair in any capacity. Intriguing.
Bring a Personal Teleporter (I'm serious), and sit in the Red Chair.

The Pool Room
You'll be teleported to a room of dirty porcelain tiles filled with pool water. Unlike other Portal Worlds, there's no immediate return portal you can take. Also, there are invisible monsters that live in the pool water, and they'll attack you if you get too close. They're not very subtle about their movement: they'll stomp around, making visible splashing in the water. I'm pretty sure they're invisible, maybe slightly smaller, Tarasques.

You have to find a button. The button in question is about at waist height, is made of slightly darker porcelain tiles than the walls, and its location is randomized. While you're looking, you'll find a giant grate blocking a tunnel of light. Once you press the button, this grate will open up, allowing you to leave.

You'll appear in a holding cell near the Inner Wing's Live Fire Line. The temporary Crowley's Curse effect you get for doing all that means you'll move faster while crouched but slower while standing. You'll also get the "No Running" Achievement.
Chapter 4: In Security (Part 1)
Welcome to the Security Sector! Well, almost. The door's shut.

There's a strange lady sitting near the door, called the Sister of the Unlost. She's kinda hard to miss since she's loudly singing an eerie, kinda beautiful song. Oh, and she's surrounded by dead Order soldiers. She's clearly not from around these parts, wearing that strange outfit, which is somewhere between "witch" and "witch hunter".
You can talk to her, but she's not being very helpful with her whole "cryptic warning about the dangers ahead" and "give up here, it's hopeless" shtick. (She does say a lot about the "darkness," though. Better bring a flashlight. Maybe two or three, just in case.)

Ignore her doom and gloom, and look behind the security booth by the bridge. You'll see a ladder leading down to a path that runs along the moat of radioactive waste. Don your Hazardous Materials Suit and follow the path, and you'll find yourself in Security.

Hey, Who Turned Out the Lights?!

I hope you brought a light because somebody shut the power off and removed all the power sockets. Leave your base-building stuff at home because there's nowhere to set up a proper base.

Grab a map from a wall nearby, if you want. It's not exactly what you'd call "helpful".

Seriously, who redacts a map?!

You can also open a shortcut back to the Office sector. There's a dark hallway in the reception area that leads right back there.

Head to the reception desk for some lore, then head up the stairs behind it and talk to Dr. Cahn, who somehow got here before you. He'll be humming a weird tune. He'll tell you to take the Large Surface Elevator. He'll also comment on how peaceful it is in Security. And he's not wrong: you can't hear any Order radios or alien noises here. It's like there's almost no living things here, aside from you and Dr. Cahn. Even the Leyak won't show up here.
If you head forward on the path ahead, you'll pass some red Security lockers. These will have a random assortment of loot: you might get a Gun Repair Kit or some parts of Security armor. Further on, you'll find a Keypad for one of the security doors below. Open it up, then go a bit further, past some bloodstains, to listen to a hologram about IS-0059, an extremely dangerous creature that seems impervious to all forms of damage, aside from a sensitivity to light. Attempts to capture it have only resulted in failure, with some staff fatalities to boot.
Head through the security door you opened and-

Oh. That's a bad sign.

[RESTRICTED]
Head further in, despite how you might feel, and you'll run into another closed security door. Take a side door into the Restricted Area on the map. Head over to the computer near the destroyed robot. An email will give you a blueprint for the Tier 4 Keypad Hacker. There's also a note about IS-0059 in here, mentioning how it will drop a strange material when hit with X-Rays. Keep your X-Ray Lamp ready.
Head up the stairs and approach the next Keypad. It's covered in a black ooze.

Head back towards the stairs and IS-0059 will appear. It's better known as The Reaper.

Run into the gateway it appeared from. Nothing you have will even faze it right now.

The Night Realm

You'll appear in a different Portal World, in a gothic-looking castle. Take a sigh of relief: there are no threats here.
Follow the only path forward, past the well of Ink. You'll see what looks like the Sister of The Unlost from earlier, but covered in shadowy stuff. The game calls it a Shade, and the realm is full of them. Scientists, Order soldiers, even an animal, all covered in this shadowy stuff. You can try to talk to them, but you'll only get moans. Hopefully, there's a way to hear what they say in a future update.
Head up the stairs and grab the Night Essence on the railing. You'll unlock the Laser Pistol blueprint, but you'll need 3 more Night Essences to make it.
On the opposite side of the room, you'll find this weird thing:

Smash it, and another gateway will appear downstairs. Head through it, and you'll appear at Security's front desk.

Don't Fear the Reaper
Now the Reaper is loose, and it's gonna cause you problems. Typically, if it catches up to you, it'll grab you and teleport you to the Night Realm. If you attack it or blast it with the X-Ray Lamp, it'll get mad and attack you instead. You'll need to blast it with the X-Ray Lamp, because that's mainly how you get more Night Essence (it'll only drop one Night Essence at a time, and it can be inconsistent about when it drops). The Reaper won't detect light sources like the headlamp, but it does hear really well, which will be a problem, because you'll have to make a lot of noise soon.
The Reaper patrols wherever you are in Security. If you move from one of its patrol areas to another, it'll reappear in the area you wander into, regardless of whether it saw you. If it does see you, it won't stop chasing you. Your only hope is to run outside of Security. It won't go much further than the front desk before dissipating.
When the Reaper is close by, you'll be able to hear a faint ethereal noise, and your light source will begin to blink. When it sees you, it'll speak in a strange language, and the music will change.

The Surface Elevator
Head back to the keypad and hack it: the ooze is gone now. It'll open a security door you can take to go even further around the Restricted Area, but not much further: another door will be in your way.
The surface elevator will be in this room. Head into a room on the opposite side of the room to call it down!
...And it will fall down the shaft and crash, rendering it irreparably broken. Great.

Storage Units
The Reaper will start patrolling the elevator room. Run down the hallway marked with the sign
pointing to Storage Unit C, past the broken vending machines.

You'll see a new type of crate. This one contains Sensors and Kevlar Scrap.

Just past this is a laser shooting out from a pipe: If the Reaper walks into it, it will vanish, betraying the Reaper's only weakness. The minute you have 4 Night Essences, go build the Laser Pistol, go and build it. You can shoot the Reaper once to make it disappear immediately. Just don't walk where it was standing for a few seconds, or it will still teleport you.
Just next to it is the first of many storage rooms. The Reaper won't go into these small rooms normally unless it hears you smashing stuff. Depending on the storage room, you might be able to jump over a shelf (with the Gravity Cube's help), or you might be able crawl under a shelf to get past the Reaper if it follows you.
Chapter 4: In Security (Part 2)
Storage Units (cont.)
As you progress past the laser, the Reaper will patrol the maze of hallways and storage rooms ahead. Smash boxes until you have at least 8 Sensors for the Tier 4 Keypad Hacker. After that, run up the stairs at the end, down the hallway past some more storage rooms and a new kind of box, this time blue. These blue crates contain Magnetic Alloy. You can smash them now, or do it later, but be warned: The Reaper will patrol upstairs, too.

At the end of the hallway, you'll find another Keypad covered in black ooze. This one's a Tier 4 Keypad. Another gateway will appear. Take it back to the Dark Realm.

Back into the Night Realm
You'll appear in what looks like a castle's dungeons. Have a look around. Most of the cages are locked and contain more of those Shades. One is unlocked and has a Night Essence in it.
If you explore around, you'll find a portcullis you can open back to the Ink Pool from earlier in one direction and a set of stairs heading upwards in another. Head up the stairs. There's a blue box in one of the cages here.
You'll also find another of those weird orbs to smash upstairs. Break it, then head through the gateway that appears, back to the Security Sector's front desk.

Vehicle Depot
At this point, you need to make a Tier 4 Keypad Hacker. If you don't have enough Metallic Alloy, you'll need to return to the second floor of those storage units. At this point, I strongly recommend going out of your way to hit the Reaper with X-Rays until you can get 4 Night Essences for the Laser Pistol. The upstairs storage units are small, and there's little room to maneuver around, so the Laser Pistol is super helpful here. Also, build a Carbon Pickaxe. The less time you're spending smashing boxes, the better.

UPDATE: You'll need a Snag Vine Seed from the Night Realm to finish making the Tier 4 Keypad Hacker.
Search around the Night Realm until you find one, then follow the New Canaan part of my guide to get the Lodestone Fragment you'll need.

Once you've got the Tier 4 Keypad Hacker, you can hack the next keypad and open the next door in the hallway leading around the Restricted Area. Before heading forward, head back to the door leading into the Surface Elevator room. There's another door that leads to the Vehicle Depot. You can unlock it with your new hack tool, but go to the storage closet nearby to talk to Celine. She's too scared to move, and she's in dire need of her glasses, which she lost somewhere in Security. Try as you might, you won't find them there.
The Vehicle Depot itself is pretty barren. There's a constant infestation of Zombies, one Security Jeep, but you need to build a Hotwire Kit to operate it (which you can't yet), and a giant test track for said Jeep. There are a few power outlets in the Vehicle Depot area, so if you wanted to, you could build a base here. You'd just have to deal with the respawning Zombies.

Once More, Unto the [RESTRICTED]
Head out of the Vehicle Depot and further down the path around the Restricted Area, straight into another security door. Take the elevator nearby up, go down the hallway and you'll find a Training Course area. You can open two doors here. One leads to an office with some ammo, and another to a small kitchen area with a vent you can access to get into the firing range, where you'll find ammo, guns, and a shortcut you can open to the Repair Bay near the Security sector's front desk.
When you've looted everything, traverse the Training Course. You'll find another ooze-covered keypad. Enter the gateway that appears.

The Night Realm: Revengeance
From where you start, you'll see a doorway leading back into the dungeon area from your last visit. Instead, go the other way and see a Shade looking at a broken ladder.

You can actually climb the ivy on the wall. At the top, go through the hallways and smash the orb at the base of a giant tree. There's also a Night Essence next to a wall in that room.

Fun fact! You can find a pair of glasses that may be Celine's near this Night Essence! Unfortunately, whether they were Celine's or not, the lenses have been smashed, and you can't interact with them.

Terrifying fact! In a side room next to the giant tree room, you can find a shade mourning over the dead body of a scientist. There's a tree growing out of the body. Now consider that despite all the blood in Security, you've never seen any bodies there. Now, consider the implications of every tree you see in the Night Realm.

Take the gateway back to Security, go back through the training course, and use the keypad to open the next security door in the tunnel. Head through it, and you'll reach the last security door before you reach the next area. It's covered in a ton of black ooze. A final gateway will open.

The Night Realm: The Final Night
From where you appear, head straight down the path toward the visible glowing orange shortcut button on the far wall. You'll see the final sphere you need to smash behind a locked portcullis on your left. Open the shortcut, but don't go in. Keep going down the path (open the portcullis at the far end here, but don't go in) and take a right when you see the half-buried Security Cart. You'll know you're in the right place when you see the unlocked cage holding a blue crate and a Night Essence. Go past the cage (open a shortcut door that leads back to where you appeared), and take the wooden ramp to the second floor.
On the second floor, you'll run into a gap you can jump across.

Before you head over the gap to the left to progress, you should either jump across the gap to the right (with the Gravity Cube Trinket) or use the nearby shortcut doors and come up from the other side. The tree sticking out on the right side of the picture above has a computer stuck in it with some lore on the Night Realm, and the Night Helmet blueprint.
Head further on, and you'll find a Shade examining a beautiful vista of trees in the distance.

Boy, that's a lot of trees.
Talk to the Shade. It's Dr. Cahn, somehow.
Head further on into the throne room with the final sphere. Open the portcullis, smash the sphere, and head through the gateway. Head back to that last security door and open it. The way forward to the Hydroplant is open.
The Cult of Canaan: Oh, Canaan-ada (Part 1)
You need three things for this area:
  • One Snag Vine Seed, which can be found growing around the Night Realm
  • A Tier 3 Keypad Hacker

Once you have these things, head to the Particle Lab near the Wildlife Pens area of the Lab Sector.
There's a set of giant roots growing in this room, and there are two yellow machines nearby. Plug the Night Essence and Snag Vine Seed into these machines, then hack the Tier 3 Keypad to open a portal very similarly colored as the gateways you take to enter the Night Realm.


Before heading in, there's a hologram recording nearby of Dr. Lenora Riggs, leader of a Transrecon team that went into the portal. She mentions that the world beyond the portal is similar to Earth and that there are "inhabitants" they don't plan on meeting. She also mentions searching for a "signal source" of some kind.

Wear your best armor and pack plenty of weapons before heading in. You should bring a spear. And bring a Personal Teleporter, because there's no easy way to leave.

Through the Woods
You'll appear at what seems to be the aftermath of a witch trial, complete with the skeleton of someone who has been burned at the stake. Inspect the skeleton, and you'll get a journal entry that states you found the burned ID of Dr. Felicia Miller: a member of Transrecon. Looks like they made contact with the locals, after all.


Head down the path, and you'll end up at a fork in the road, with one path leading towards a locked wooden gate manned by one of the locals, a guy armed with a crossbow. He'll tell you to go away. Take the other path and cross the creek using a fallen tree. You'll end up on a hill, where some locals are camped out. One local is chopping a creepy, humanoid tree. You can chop trees like this down for a unique resource, Hexwood, but be warned: they fight back. The locals will try to kill you if you get too close.

You'll find another Transrecon member here.

She got too close.

The Canaans
There are four types of cultists, each armed with a different weapon:
  • The ones with pitchforks can do a charge attack that'll impale and carry you a short distance. It’s more jarring than threatening, in my experience.
  • The ones with axes do a lot of damage and can cause heavy bleeding.
  • The ones with torches ignore armor and shields with their attacks and are particularly dangerous.
  • The crossbow ones are the only ranged attackers. They're not very accurate, in my experience, and can even hit other cultists.
All of them can drop their weapons, except for the torchbearers. They can also drop Silver Scrap. You'll find wooden bell towers throughout the village. The cultists can run up to these and ring them, causing another wave of cultists to spawn. The Canaan cultists are also surprisingly durable: each member can really take a beating before going down. The cultists' melee range is short, so using a spear will allow you to deal damage without taking any.

The Village
Head down the hill from the camp use another fallen tree to cross a gap. Follow the path, and you'll end up just outside the village, at the edge of a farm. You can find Apples and Pumpkins here. You can also find Corrupted Corn, but it'll just make you sick if you eat it.
To progress, either fight your way through the doorway in the village wall or use the rope on the second floor of the barn to zipline your way over the wall. You'll end up in a village square, with shop stalls and a well in the middle. There's also a small chapel on one side. You can find a small amount of Silver Scrap in the stalls, and some Axle Grease.
Before going any further, look along the shoreline here, and you'll see a small path. You can find a man fishing here, and he turns out to be a member of the Transrecon team that managed to escape and go undercover. Keep talking to him, and you'll eventually get the Insulated Fishing Rod recipe, which you need to get certain fish in the Canaan ocean. The fisherman will also mention that another Transrecon team member might have escaped: the locals have been talking about a "Witch" that's taken up residence in the swamp.

There's a hidden power socket in the Fisherman's hut. There's also one of the five Diaries of Niketas, the leader of the cultists, here. You'll find them scattered around the village. They've got some lore in them, but they're not important.
Head back to the village square and through the chapel.
You'll see the entrance to a mine shaft on the cliff on the other side of this next area. That's where you want to go next.

To get there, head over the bridge just to the left of where you exited the chapel. You'll see a blacksmith building on the other side, complete with an anvil, which you can use like a Repair and Salvage Station. Keep it in mind for later.
You'll also see a path leading up the big hill nearby towards a building at the top. If you look at the building from a distance, you'll notice a symbol on the side:

It's the symbol of the Order. Interesting.
For now, head into the mine.

The Mines and Water Mill
Head up the ladder in the mines and out the other side, and you'll be back outside, on a cliff overlooking the river. From here, one path would head up the cliff, but the stairs are gone, and another path leads towards a caved-in mine. The last path leads towards a ladder downwards into a camp of cultists. Off to one side of the camp, you can find a path that leads through a cave to the water mill.
The water mill has another power socket hidden beneath some straw. Climb the ladder in the water mill, and you can ride one of the buckets on a rope to the top of the cliff. Head along the path, jump the gap and keep going.

The Swamp

Welcome to the Swamp. You'll hear the witch warning you to go away. But she's nowhere to be seen! How is she talking to you? Could it be magic?
You'll also encounter the Bogmen, creatures made of wood that can launch roots that burrow underground and pin you in place, causing damage. They'll also try to get close and hit you. They can also burrow themselves underground and pop up somewhere else. They're not too challenging. Butcher their bodies for Leather Scrap and Bio Scrap.

Head along the wooden walkways here, and you'll find the witch's hut. Turns out, the "witch" is Dr. Riggs, and she's hooked up a sound system, partly to keep the cultists away, partly to broadcast a frequency that keeps the Bogmen at bay. She'll tell you that the Lodestone, a "holy" artifact belonging to the cult, is the key to reactivating the portal equipment and creating an exit portal.
The Cult of Canaan: Oh, Canaan-ada (Part 2)
Dr. Riggs has the Lodestone in her hut, but it's useless now: it must be broken apart to be plugged into the portal equipment. She suggests using the blacksmith's anvil to do so. She also mentions that the preacher in the church (the big building on the hill near the blacksmith) probably took the portal equipment. Grab the Lodestone before you leave. You can interact with Dr. Riggs' cauldron to get a blueprint for making your own Cauldrons.
Before you leave the swamp, look for the biggest tree, deep in the center of the swamp.

Head over there, and you'll see what looks like another of those humanoid Hexwood trees at the base of the big tree. Except this one has a mask on it, and it's inanimate.

Interact with it to get a blueprint for the Accursed Hood.
Also, interact with the straw doll hanging in front of the Swamp entrance to get a blueprint for the Corn Husk Doll Trinket.

The Church
Leave the swamp and head back to the blacksmith. Use the anvil there to salvage the Lodestone into Lodestone Fragments (you only need one for the portal device, but you can use the other fragments for stuff like the Accursed Hood). Then, climb the hill to the church.
Approach the church, and you'll hear Niketas, the cultists' leader, speaking to his congregation. You'll have to fight him and his cronies to access the portal equipment. He's not tough, but he can throw "holy" fire to light a small area on fire, and his melee attacks ignore shields and armor, just like the cultists holding torches. He also has an energy shield you need to break before you can damage him.
To explain the giant Order symbol on the church and Niketas' weird powers: According to Niketas' diaries, a deserting Order member ended up in Canaan, and Niketas became enamored with the Order's philosophy. However, Niketas didn't like the fact the guy was a deserter, so he killed the guy and took his "trinkets," resolving himself to carry on the Order's creed. Niketas was also sure that one of these trinkets would lead him and his followers to "Paradise," so maybe the Order member also brought the Lodestone to Canaan.
After they're dealt with, you can head through the door behind Niketas' podium and climb to the roof to find the Portal equipment. Plug in the Lodestone Fragment, and you'll open the exit portal.
Chapter 5: Dam It All! (Part 1)
Before heading into the Hydroplant area, I'd suggest opening the shortcut back to the Office sector. I'd also HEAVILY suggest taking a trip to the security guard hiding in the booth in the Office Plaza. He has more trading options now.

Warren will trade Nyxshade Seeds for GATE Security Keys. You've definitely seen a few of the white Security chests, especially in Security itself, but until now, there's been no way to open any of them.
You'll need to spend 10 Night Essence and 5 Leyak Essence to build a Nyxshade Seed. Trade it in to Warren and use your new key to open a Security Chest (the closest one to Warren is next to the shortcut back to Security). Aside from Gun Repair Kits, ammo, and Security Armor, you'll get a Night Pass Trinket. Stash it at your base or equip it. Also, make some Tech Bandages using the Kevlar Scrap you've accumulated. You'll need some of those, too, as well as Healing Syringes and the Healing Briefcase.
Lastly, this next area is a combat-heavy area with a LOT of Order soldiers. If you've got Level 10 Accuracy, the Bio-Metric Armwraps, and you've managed to collect some guns from the Order, now would be the time to start using them. Just be aware that you'll be taking extra damage since the armwraps give you almost no armor. The Romag Shotgun and the Talagi Revolver are extremely useful, in my opinion (though it is hard to collect ammo for the Revolver).

Once you're ready, head towards the Hydroplant area. There'll be a door in the way, holding back a lot of water. Dr. Cahn will tell you to activate the pumps to drain the water. He'll also mention that "something" is in the water in there.
Head into the room near Dr. Cahn and hack the Keypad to drain the water, hit the button to open the door, and head down the path.

The Hydrodam
You'll end up on one end of the Hydrodam. A Security guard hiding behind a box nearby will urge you to "get down." Rush over to him, and he'll tell you that the Order has taken the Dam, and there are snipers everywhere! He'll tell you that there are probably survivors in the Electrical Station, which is the building just down the way, and that they've probably got an escape plan. He'll also mention that he was abandoned by Gatekeepers, who headed towards the Reactor sector.

Keep your Tech Bandages on your hotbar: you'll probably get sniped no matter how careful you are, and the snipers in this area can inflict Heavy Bleeding, which can't be fixed with regular bandages, and cause way more damage over time.
There is a tram station here, but don't use the tram yet: there's a sniper perched on top of the Electrical Station that has a clear line of sight. Instead, head through the yellow door near the tram station and head in. Fight past the aliens, and you'll find the Lower Access area, which you can use to progress toward the Electrical Station without getting sniped. Keep an eye out for yellow Hydro Pipes on the walls: dismantle them for Hydro Pipes and Rotary Pumps.
Head up the ramp at the end of the Lower Access area, and you'll be right next to the Electrical Station.

The Electrical Station
You'll hear Order soldiers shooting at something in the room nearby, but that's not your problem right now. Climb the ladder to take out the Sniper on the roof, then head back down the ladder and down a small ramp to enter the Electrical Station. Kill the Order soldiers hanging out by the door in this room. The door is locked, but you can crawl through a vent nearby to enter the next room.
Here, you'll meet Isaiah, a wounded technician, and Dr. Newman. Dr. Newman is convinced that the only way forward is the Reactor sector since there's functioning portal equipment down there that could lead to a way out.
You'll need to open the Spillway to get there. It’s going to be a bit of a process.

Reset the Power System
Turn around and hit the button on the big yellow machine near Isiah and Dr. Newman.

That was the easy part. As Isaiah will ask: "How desperate are you?"

Grab a map from the wall nearby. If you keep talking to Isaiah, he'll give you the rest of the tasks you need to accomplish, as well as where to go. You need to:
  • Reboot the Spillway Computer (in the Waterfall Apartments)
  • Unlock the Flow Valves (In the Neutrino Detector building, which is in the Reservoir)
  • Bring the Transmitter Online & Reactivate the Flow Control Module (On top of the Hydroplant Building)

All of these places are on the map. Getting to them is another matter entirely. You'll need to get something else from the Electrical Station first.

The rest of the Electrical Station
Before you leave the room where Dr. Newman and Isaiah are, look at this machine on one of the walls:

You'll need to smash these machines to get Coil Winding and Rotary Pumps.
In the next room, there are more Coil Winding machines, and if you check the crawlspace underneath, you'll find a blue pipe you can smash to get a Motor and some Cogs:

Unfortunately, every door in this room is locked, so this is a dead end.
There are two ways that I know of to go any further:
  1. Go behind the Electrical Station sniper nest and climb over the building (this is easier with the Gravity Cube)
  2. Get down to the Electrical Station basement using a Rope Plant
I'll do the 2nd option.

If you go down to the basement, you'll find the Submarine Pen, where Janet and Abe are trying to commandeer the submarine. Unfortunately, it's broken. You can also access the reservoir from here, which is the best water source for any base in the Hydroplant sector.
The Spillway is down here, on the opposite side of the room from the submarine, but it will stay shut until you've completed all the tasks.
Use the lift on one side of the submarine pen and explore around. There are a few doors that you can unlock that lead back to the dead end from earlier, a staircase that will lead to the rest of the dam, and a set of ladders you can take to one of the Electrical Station's upper floors. You might hear the Order still fighting something. As it turns out, it's a Composer.

Terrific.
The Composer and the Order are mainly focused on fighting each other, so it's not that hard to sneak around. However, once the Composer has killed all the Order, it does get a bit trickier.
You want to get into this room:

Just climb across the shelves on the other side of the room. The door is locked, but there's a vent you can crawl through under the windowed room in the picture.
Once you're in the room (beware, there's a Sniper in the tower outside that'll shoot at you), use the computer to get the Tier 5 Keypad Hacker blueprint. It requires Photon Receptors, but the email won't say where they are.
As it turns out, they're in the Neutrino Detector. You can't get over there yet.
Chapter 5: Dam It All! (Part 2)
If you head back outside and up the stairs from earlier to the other side of the dam, you'll find a new type of robot, the Defense Robot.

These robots are ALWAYS on patrol, they can detect you from a distance, and they're really hard to destroy. Worst of all, they're armed with grenade launchers. At a distance, they'll act like artillery, launching shells in a large arc that will explode on impact. Up close, they'll launch frag grenades or incendiary grenades that cover the ground in fire. They still have melee attacks, but they'll actively try to get away so they can keep launching grenades. As far as I can tell, they can't hurt themselves with any of their attacks. They have one glaring weakness: a volatile component on their back. If you hit them there a few times, they'll self-destruct after a short delay. The robot makes a different noise when you damage the component and will start an alarm when it's about to explode. The problem is that the Defense Robots are really good at hiding their back from you.
That's where the Night Pass comes in handy. They'll completely ignore you if you have the Night Pass Trinket equipped, so you can get a few good hits in, hopefully enough to set them to self-destruct before they can attack you.
Upon destruction, Defense Robots will drop a Toroidal Power Transformer, Transformer Bushing, and a Reinforced CPU. You need 1 Transformer Bushing for the Tier 5 Keypad Hacker, and the Reinforced CPUs for advanced tech.

Once you're on the other end of the dam, you'll have two ways to go: across the bridge by the waterfall towards the Waterfall Apartments or towards the closed gate in front of the Hydroplant Building. Head towards the Waterfall Apartments for now.

The Waterfall Apartments
The Waterfall Apartments are overrun with aliens. You'll meet a new Exor variant here, the Armored Exor.

Sorry, trying to get a picture of this thing while it's still alive is a pain.
The Armored Exor fires quills like the Exor, has much more health than an Exor, and can teleport like an Exor Monk. And they can throw organic grenades. Butcher them, and you can get a Vibrant Exor Arm, which you can use to make a Quill Rifle, a weapon that fires Exor Quills (once you make Quill Bolts out of them).

If you head right as you go in the Waterfall Apartments' front door, you can follow the "Exercise" sign down to the gym. Near the tennis court, you'll find the Spillway Computer. Unfortunately, it's locked behind a Class 5 Keypad. You'll also find an equipment room behind a locked door. If you access the vent near the tennis court, you can enter this room. There's a hologram that you can use to get the blueprint for the next backpack upgrade, the Voidpack, but you don't know how to make most of the components for it yet.
If you head back towards the entrance and up the stairs, you'll find another survivor, Dr.Hoff, just outside on the balcony. Dr. Hoff will tell you that there's a portal in the Neutrino Detector and that there's only one way to get there: swimming. Then he'll give you the Diving Suit blueprint. He'll also mention that IS-0142 is growing down at the bottom of the reservoir, and that he's seen something else in the water, too.
Before you do anything else, you'll need to get to the Neutrino Detector. All the other steps to open the Spillway will require materials that you can only get there. I'll also say that Dr. Ross is wrong: there are 2 ways you can get into the Neutrino Detector. But you'll still have to do some diving, either way.

The Reservoir & Neutrino Detector
Build the Diving Suit, bring your X-Ray Lamp, and bring a grown Plant Rope. There are only two threats to you in the reservoir: your limited oxygen supply, and IS-0023. IS-0023, or the Darkwater Beast, is a giant... thing that swims around in the reservoir. It'll try to eat you if it sees you. It can be warded off with the X-Ray Lamp, but don't take risks: the best defense against the Darkwater Beast is just staying away from it. It's very hard to see in the reservoir, but the Darkwater Beast does make a sonar-like noise.
You'll want to swim towards the Neutrino Detector in the distance. There's no ladder or anything to climb, so you'll need to dive to look for an entrance.
While you're down there, look for parts of IS-0142, the glowing stuff near the bottom of the reservoir.

If you search along these glowing blue/purple lines, you'll find small red parts:

These Reservoir Growths can be collected, and are necessary for the Voidpack and other tech.
Also, look for Murkweed, the seaweed growing in the reservoir's dirt. You'll need that to make cold-weather gear for later.
If you look in the trenches at the bottom of the reservoir near the left of the Neutrino Detector, you'll find a bunch of broken architecture. Search these ruins, and you'll eventually be able to find a tunnel system that you can take into the Neutrino Detector.

If you have Thalassophobia like me, and you don't want to spend another SECOND more than you have to in the Reservoir, the other way into the Neutrino Detector have will require the Jetpack, and the Dangling Gravity Cube. If you need more Coil Windings or Transformer Bushings, destroy some Defense Robots, or take a quick trip to the Hydroplant Building and smash some of these things:

They're a great source of Transformer Bushings.
Once it's built, and you have the Dangling Gravity Cube equipped, you can simply fly across the Reservoir (just watch the red bar by the jetpack indicator, if that fills, you'll fall). Honestly, you can use the Jetpack + Gravity Cube combo to get just about anywhere in the Hydroplant sector if you want (just be wary of the Snipers).

Either way, you'll end up at the Neutrino Detector. Put the Plant Rope at the edge of the platform, and anyone can use it to climb up. If you use the Jetpack, you'll immediately get the sense that the portal in here is going to lead somewhere very cold. You can also hit the button on the blue machine in the picture below to open the Flow Valves, one of the tasks you need to do to open the Spillway.

You can also talk to a survivor, Dr. Quercy, in this room. Dr. Quercy only speaks French. Not very useful to you if you don't speak French. Which I don't.
If you go just outside and down a ladder, you can enter the Neutrino Detector.

Every one of the golden balls on the wall in here holds a Photon Receptor. Easily enough for the rest of the game, I'd say.
Photon Receptors unlock a whole bunch of Laser technology, including the Laser Prism, a component for the Voidpack, which I suggest you make as soon as you can.
Oh, and Photon Receptors are the last component for the Tier 5 Keypad Hacker. You can reboot the Spillway Computer in the Waterfall Apartments right after building it.
Chapter 5: Dam it All! (Part 3)
Now for the last step: you have to clear up the interference on the Hydroplant Building's Transmission Tower, or the tower can't send the signal to open the Spillway.

Hydroplant Building
If you don't have the Jetpack, head through the garage to the right of the shut gate in front of the Hydroplant building and head along the left side of the building to get in through an unlocked maintenance door. Head through the door directly to your right and head up the stairs, following the Lift Access sign to the elevator. From the top of that elevator, head left, then take the ladder just outside on the left. The Transmission Tower is here.

But, it turns out that the interference is radiation-based. By now, you'll have obtained the blueprint for something that would help block the radiation: the Neutrino Emitter. However, you'll need a Neutrino Mapper to build it. And those can only be found beyond the portal in the Neutrino Detector building.

Portal Preparations
Before you go into the portal, I suggest you bring:
  1. Snow Pants and Snow Gloves (you don't need more than 3 cold resistance)
  2. Plenty of Thermite Molotovs and/or Mugnades
  3. The Voidpack
  4. Healing items
  5. A Personal Teleporter synced to your base in the Hydrodam sector

Head through the Neutrino Detector portal when you're ready.

Voussoir: A Story of Firearms and Ice
Welcome to Voussoir, a facility located in the French Alps.

You'll start off in the facility's basement. Head forward down the hallway, past the dead scientist, and you'll encounter the Order. They've taken the facility over.
What's different is that these Order soldiers are wearing cold weather gear, and they can drop stuff like Magnetic Alloy and Kevlar when they die. Some of them also carry Assault Rifles.

Head up the elevator at the end of the hallways, and you'll encounter your first melee-focused Order soldier, the Rook, just outside. I hate the Rooks. They carry Riot Shields and use combat knives. The shields block their entire body (except their feet) from projectile and melee attacks. And once they see you, they'll never show their back to you. Dealing with even one at a time is a pain. Dealing with more than one? That's what the Mugnades and Thermite Molotovs are for. Or for dealing with lone Rooks that peeve you off too much.

Stay outside, and head up the stairs there to the second floor. Head forward and around the corner to the right, and you'll find another set of stairs heading to the roof (there are a bunch of transformers up here, a great source for more Transformer Bushings). Cross the roof and drop down to the other side, kill the Rooks that are in your way, and head inside. You'll find two Neutrino Mappers sitting on desks to your left.


If you're anything like me, you've hit your inventory weight limit by this point, so use your Personal Teleporter to drop off all that stuff at your base and come back, because there's still more to see.

Head through the main room of the building (it's the room with the front desk and 10 different Order soldiers) and find the Helipad. Use the Zipline to descend down to the mountainside.

Mountains
The mountains are also swarming with Order soldiers.

Unfortunately, most of the stuff the soldiers can drop will get lost under the layer of snow. Really makes looting a pain.
Keep going down through the valley until you reach an area overlooking part of the Ski Lift (unfortunately, it's entirely broken).

Look left, and you'll see a warning sign in a small hole.

Crawl in there, and you'll find another (French) survivor, Dr. Dupont. He can speak English! Unfortunately, he'll tell you that there's no way off the mountain unless you have a helicopter. He says there is a portal that could be a way out, in IS-0134's containment zone. He does also state that it's extremely dangerous. He also calls IS-0134 "the Yeti."

Head towards the Ski Lift building, and you'll hear Order soldiers shooting at something. Sounds like they're hunting a Yeti.
The Ski Lift building down here is filled with Order soldiers, too, Particularly Rooks. There's also a bunch of tech you can smash for Motors, Pumps, Coil Windings, and Cogs. You'll even find a spare Neutrino Mapper here, too.
Head towards the left side of the Ski Lift: there's a small path down the mountainside towards the gunfire.

Kill the Order soldiers in your way, and the Yeti will be there, patrolling around a cavern.

Slaying the Yeti

The Yeti is weak to fire, so use what remains of your Thermite Molotovs. Also, it will panic once it's set on fire, stunning it temporarily. Beyond that, use whatever ranged weapons you have on hand, and stay away as much as possible: its melee attacks hurt like heck, and you're already wearing less armor due to the Snow gear.
If you aren't in any condition to fight the Yeti, the escape portal is already open, so you can just run past the Yeti.
Killing the Yeti and butchering its body will get you a Yeti Skull and Yeti Fur. Yeti Fur is used to upgrade a Refrigerator into a Freezer.

Clearing up the Interference
Now that you have a Neutrino Mapper, you can build the Neutrino Emitter. But you can't just plug it in: it runs on Lasers. Build a Laser Emitter, too (building one will unlock Laser weapons, too, which also run on Lasers).
Go back to the Hydroplant Building roof (much easier with a Jetpack, just saying) and plug in the Laser Emitter, then Install the Neutrino Emitter so that the laser hits the Neutrino Emitter, like so:

The Neutrino Emitter will clear up the interference. Hit the button to open the Spillway.

To the Reactors! (Well, not yet...)
Head back to the Submarine Pen, and take the Spillway down to the Reactor entrance.
Alas, the entrance is blocked up with... fungus? Coral? Tendrils?

Whatever they are, this is as far as you're going for now.
The Sister of the Unlost will say something about a "boundary of dust", and sing about a "core of darkness". Foreshadowing?
(OPTIONAL) Home on the Royal Range
Before following this part of the guide, you should bring:
  • Tier 5 Keypad Hacker
  • The Dangling Gravity Cube Trinket
  • At least one piece of snow gear (optional)
  • Splints

Once you have a tier 5 Keypad Hacker, head back to the Helmholtz Containment Block in the Lab Sector. You'll find a new tier 5 keypad on one of the containment cell doors. If you head inside, you'll find the Space Queen arcade machine.


Interact with it, and you'll be teleported to IS-0083, known by its inhabitants as the Royal Range, a level inside the Space Queen video game.


The Royal Range

The Royal Range is quite cold, but not as cold as Voussoir. You won't be in danger of taking any damage from the cold. You will have to deal with the minor effects of the debuff though.
Also, Space Queen is a platforming game, so you can double jump, and fall damage is negated. That being said, I did manage to take fall damage one time, but I couldn't recreate the event, so it could've been a bug.

Head up the path to the wooden platform to talk to Commander Fili. Commander Fili is a talking penguin and the only speaking inhabitant of this area (in that iconic Banjo and Kazooie kind of way).


Commander Fili will task you with finding 7 Royal Crowns. They're massive, floating crowns. You can't miss them at a distance. Also, you can find 8 of them, for some reason.

Collect 7 and you'll open the exit portal. They'd normally send you to the next part of the Space Queen game, but the machine was infected by another anomalous entity, IS-0235 , making the Royal Range the only accessible level.

You'll also find coins floating around as well. They don't do anything unless you collect all 25 of them, and they're harder to track down than the crowns. Luckily, like the crowns, they make a lot of noise, so you'll hear them before you see them.

Collect all 25 for a special prize.

The Enemies
The Royal Range is now populated mainly by the Lamogi, Bombogi, and Bigogi, several variants of the same species.

The infection affecting the Space Queen arcade machine has caused them to become much more aggressive and deadly, according to Commander Fili. This is evidenced by the frozen corpses (of both penguins and humans) scattered around the Royal Range.

All variants are completely immune to every weapon you have. At best, all they do is push them around. Luckily, Space Queen is a platforming video game, so jumping is the solution.

The Lamogi will die if you jump on them once.


The Bigogi will die if you jump on them 5 times (also, the one in this picture will drop a Royal Crown on death).


Unfortunately, the Bombogi are immune to being jumped on. Once they've started their fuse, all you can do is jump away as they explode. Alternatively, hitting them with a heavy weapon will shove them, allowing you to shove them off ledges.
.

Exploration/Finding the Crowns
If you have the Dangling Gravity Cube, you should have no trouble finding most of the crowns. Just use a jump pad (the giant bullseye things) and you'll see them as you float around.

There are a couple underground, too. You'll find the entrance to the underground near Commander Fili, behind this rock surrounded by stacked ice cubes and giant ice spikes.


Once you find 7, a giant purple pillar will appear. Use the jump pad here to enter the next level of Space Queen head back to the Space Queen containment cell.

The Coins
I won't go into exactly where every coin is, but I will go into where I found my last coins. (I've placed the Royal Coin item down where I'm sure I found them. The coins are much bigger before you collect them, and are much easier to see at a distance than in these pictures).

Behind the Bigogi pictured above, on a small ledge behind the jump pad.


From the platform where the Bigogi is, look towards the ledge where three Lamogi are wandering around. There's a coin nestled in a corner in the area below them.


Check the three bushes near Commander Fili. There's one hidden in the bush closest to the cliff.


Once you find all 25, head towards this structure:

The ledge just below will have a Bombogi next to a dead Penguin, and a small entrance to a cave where you can find a small Bigogi frozen in place. Loot it and you'll get a pair of cosmetic sunglasses, which you can equip from the character creator.

GATE Staff
You can find a few members of GATE in the Royal Range. Unfortunately, all of them were killed, supposedly by the Lamogi. Recover their Christmas-themed ties/pocket squares from these locations.

Head up to the source of the rolling snowballs that crash near Commander Fili. You'll see a stack of ice cubes in a nearby cliff. Head through the obvious gap. You'll also find an outlet in here.


There's another body frozen to the giant snowman's butt. I'd include a picture of the snowman, but he's kinda hard to miss.

Underground, slumped against the stack of ice cubes on the ledge above the underground lake.


SUPER SPECIAL SECRET
If you look in the distance to the giant snowman's left, you'll see an island floating in the far distance.

Once you've finished the level, come back with a Jetpack. Use the Gravity Cube/Jetpack combo to fly to the island. You'll find something special underneath a snowball.
Chapter 5.5: Power Services (or Lack Thereof)
Welcome to Reactors! Well... not yet.

Before you go much further, you should build a Jetpack. It's downright necessary at this point.

It's a Jungle Out There In Here


Jeez, the Maintenance team really isn't earning their paychecks.

From where you start, climb onto one of the gross-looking pads floating in the water and look the opposite direction of the colorful jungle. You'll see (and hear) one of those growths you burnt at the end of the Lab sector with Antethermite. I'll ruin the surprise for you: there's a series of tunnels full of Zombies and chests past it (one GATE Security Chest, one Cacophonous Chest, one Order Chest, and one Runic Chest, the last of which is new).

Assuming that you aren't using the Jetpack, cross the pads and climb the ladder up to the residential-looking building here. Fight through the aliens up to the second floor, head past the electrical equipment just outside, and pop through a hole in the fence. You'll find a pipe shortcut back to the Dam here.

If you go through the Tram building full of bright red plants, you can cross the river(this Tram Stop connects to the Office Sector, if you want to unlock it with a Tram Station Key).

Head towards the pillar in the center of this jungle, and you'll notice the entrance to the Reactor Sector is blocked by a floor made of what will turn out to be fungus. Unfortunately, Antethermite won't solve this problem. Time to talk to an expert.

Head towards the opposite side of the room. You'll see a robot, called Waterbot. Don't worry, this one's only equipped to water plants, and is quite friendly. He'll indicate that there's an antifungal agent in the portal here. The portal in question is in the top of the pillar in the center of the room. Either use the jump pad by Waterbot to climb the fungus, or just use your Jepack, to fly to the platform at the top of the pillar. Enter the portal.

Village Den da'ko Yeer: It Takes a Village (to get in the way)


You'll fall into a river of antejuice on top of a cliff. Nearby, you'll see a GATE facility building with a hologram. It'll explain that there's a device capable of eliminating biological infestations native to the area. Specifically, it's in the middle of the nearby Exor Village. You can see it in the picture above: it's the thing right above the pink plant in the middle of the picture.

The way there is fairly straightforward: just jump off the cliff into the sea of antejuice below, climb out the other side, and take one of the two paths around to the bridge where you can cross the chasm surrounding the device. I personally recommend taking the left path.

Either way, you'll meet a new Exor type, the Exor Cha. They're troublesome. Sure, they teleport and can shoot lightning, but it's their SPEARS that are the real problem. There's almost no pause between their spear melee attacks, meaning if they get in range (and they can teleport right next to you, so they're always in range), they'll whale on you repeatedly. Best you can do is block their attacks with a shield and try to hit them between their attack animations. Try to keep track of the pink paths they leave when they teleport: the Cha have a nasty habit of teleporting behind you.

If you take the left path, you'll stumble across a bridge leading to an outcrop above the device. Here, you'll find an Exor that you can actually talk to: named Kin Haak Jaal da. He'll say some cryptic stuff that's generally foreboding, but not actually helpful.


Once you've gone all the way around, cross the bridge and interact with the green spots on the side of the device to harvest Anti-Fungal Gelatin. An exit portal will appear. This one is red, which is... new. Well, I'm sure it's nothing to worry about.


YUP, NOTHING TO WORRY ABOUT FOLKS, NOTHING TO SEE HERE, MOVE ALONG.

After appearing back in Power Services, simply slap some of that Anti-Fungal Gelatin onto the growth blocking your way to the Reactors, and continue onwards to the elevator down to the Reactor Sector.

Fun Fact: if you return to the Exor Village and talk to Kin Haak Jaal Da again, he'll give you the blueprints for Exor-themed armor. He'll also say some more foreboding things that basically amount to "Yep, you've REALLY done it now, bud. It's seen you, and that's bad. No going back now."

IMPORTANT NOTE: The Transcendium you find in the Exor Village is going to be extremely important for progress in the Reactor Sector. Go back for more if you run out.
Chapter 6: Going Nuclear in the Reactor Sector
Welcome to the Reactor Sector! This time, for realsies.

Head over to Dr. Cahn, who somehow got ahead of us, AGAIN, and he'll give you the lowdown. Basically, you've got to turn on all four of the reactors down here to power the main fusion reactor. That'll reopen the Gatekeepers' personal waygate: a portal that supposedly allows Gatekeepers to come and go from the GATE Facility as they please.

Oh, and speaking of the Gatekeepers... they're guarding most of the Reactors. They've got a whole kill-on-sight thing going on.


Also, they've started drawing on the walls. So they're probably all insane, too.

The Gatekeepers
Gatekeepers are GATE's elite security/paramilitary force. They get sent to contain anomalies that seemingly can't be contained. They are by far the most dangerous force you'll encounter by this point.

Most of the Gatekeepers have energy shields that will completely block damage until you damage the shield enough to break it. If you stop damaging the Gatekeeper, the shield will eventually recharge, and you'll have to break it again.

All Gatekeepers drop Arcane Scrap, which you need, so keep an eye out.

Gatekeepers can also drop Gate Defense Runes, which open Runic Crates. There are Defunct Shield Generators in every Runic Crate, which you can fix and wear as trinkets, giving you your own Energy Shield. I didn't know any of this until I got through Reactors. I probably would've died half as much if I had a freaking energy shield. >:(

Neophytes are like the average Order soldier, except they've all got assault rifles, they really like throwing grenades, and they really, really like retreating to recharge their shields. If you have to fight more than one at a time, focus on attacking just one until they're dead.

Chieftains wield powerful handguns, and they wear cow/goat skulls on their head. Get too close, and they'll grab and headbutt you.

Mystagogues float around and launch magic(?) fireballs that can coat the ground in flames. Get too close, and they'll either launch you away or grab you, remove a chunk of your health, then throw you away. Mystagogues don't have an energy shield covering their body like the other Gatekeepers. Instead, they'll project a shield in front of themselves, usually immediately after taking damage, that will stop all projectiles (though they can still launch fireballs through it). Mystagogues also usually have at least one drone looking thing that can fire a beam of energy at you, but they're easy to destroy. Killing a Mystagogue usually comes down to dodging fireballs while waiting for them to drop their shield so you can shoot them, though throwing a grenade under their shield works great. Mystagogue drones drop Flickering Eyes, and you can cut up a Mystagogue's body to get their head, which can be dissassembled for another Flickering Eye.

The Gatekeeper Jotun are by far the most problematic of all the Gatekeepers. They have huge energy shields, a lot of health, and they wield machine guns that can tear you apart in seconds. Killing a Jotun is a headache even in the best of circumstances. My advice for dealing with Jotun is this: avoid whenever possible. If you run into one you can't avoid, use hit-and-run tactics: attack from cover, then hide when they start shooting. When they inevitably move closer to attack you, find another piece of cover to hide behind. If you get caught out of cover, use your shield to block their shots, but leave your Dangling Gravity Cube at base: otherwise you'll go flying. If you have to fight a Jotun and any other Gatekeeper at the same time, you're in big trouble. What do you do in these situations? Well:

A HEARTFELT SUGGESTION FROM THE GUY WRITING THIS GUIDE

Do yourself a favor: commit to only using Makeshift Toilets. You need the feces to make Bags of Dirt for Mugnades. This was how I got out of any of situation involving Jotun, massive groups of Gatekeepers, or particularly annoying Mystagogues. If you start now, you might be able to make enough Mugnades to get through the Reactor Sector. It takes around 5 Mugnades to kill a Jotun.

Also, don't feel ashamed if you have to tweak the sandbox settings at this point.

Dusk Reactor
Dr. Cahn will make it clear that the first reactor you need to activate is the Dusk Reactor. The rest of the reactors are locked behind doors that need to be powered by the Dusk Reactor.

How do you get there? Well, ignore all the "Dusk Reactor" signage and instead look for the "Check-In" markings near the beginning of Reactors (It's near that first Class 6 Keypad: you'll see it in the photo I took of the Gatekeeper Markings). You'll find a Tram that can take you straight towards the Dusk Reactor, and the office plaza in front of it. There's another tram you can take at the same station that'll take you in the direction of the other reactors, but that's for later.

You'll get your first taste of Gatekeeper combat in this area, but it's limited to Neophytes and one Mystagogue for now. The plaza in front of the Dusk Reactor is a prime spot for a base. I personally recommend you set up in the cafeteria on the second floor: it has two prebuilt stovetops with sixteen cooking surfaces, a coffee machine (remember what I said about Mugnades), and even a Slushie machine. You'll just have to clear out the alien infestation there first. You'll also meet the new Pest variant in the cafeteria: they explode when they hit you. Try to avoid letting them do that: they're the most reliable source of Plutonic Carapaces, which are ESSENTIAL to progress in this area, and detonating completely destroys their bodies, leaving you with nothing.
Chapter 6: Going Nuclear in the Reactor Sector (Part 2)
Dusk Reactor (continued)
The way to the Dusk Reactor is near the library on the second floor of the plaza: you'll pass by it as you enter the office plaza for the first time. You'll know you're going the right way when you see the functional computer terminal, and the writing on the wall (it's blood).


Head down the path here, and you'll enter an area full of cubicles, and a new Exor variant, the Volatile Exor. These Exor are scary: they have a leaping attack that will quickly close any distance between them and you, and their melee attacks are no joke. Also, they'll stop attacking you to detonate when they're near death, destroying their bodies and any goodies you might get from them. You can kill them while they're doing this, and if you can, you can get Plutonic Blood. You need Plutonic Blood to make Transuranic Superalloy, which is critical to progress. You'll find vials of the stuff around the Reactors, but the most reliable method involves Plutonic Carapaces.

Plutonic Blood Source
About halfway through the cubicle area, you'll see this through the window of an upper office:

A machine that makes Plutonic Blood from Plutonic Carapaces! Unfortunately, the door to the office is locked. Go back the way you came and look for the fallen segment of ceiling nearby:


You can climb this this to access the bridge of cables above: one path will take you to a series of offices with goodies and a hidden scientist, and another will take you to the upper office with the machine.

Dusk Reactor (continued)
Keep heading forward: you'll pass through a room full of screens (if you want access to the corner office with the TV, you'll need to come back at night: a nearby vent will grant you access, but there's a fan in the way that only turns off when the power goes out), some vending machines, and you'll end up in a hallway. Two of the doors here are shortcuts back to the plaza, so head towards the room with a burning hole in the side of it.


You'll meet your first Order Sapper here: he'll fire a rocket at you, so he's kind of hard to miss. Sappers are like Lab Rats, but actually dangerous. They'll mainly throw grenades at you, but if you let them gain some distance, they'll fire a rocket at you instead. Don't try to close the distance when they pull their rocket launcher out: they'll fire at point blank range if they have to, and they don't seem to take any of their own splash damage. They drop PETN on death, which you can use to make explosive goodies like the Cluster Grenade, which can cause heavy damage to a group of enemies.

Before heading any further, you'll need to have one Transuranic Alloy on hand: the Dusk Reactor needs it to function again. You'll also need heavy weapons, because THERE'S A TARASQUE IN THE CORNER OF THE REACTOR ROOM.


Tarasques are weak to fire and electricity, so Thermite Molotovs and the Electro-Thrower will do the most damage, though they're not necessary: I made do with the Deatomizer and Quill Rifle. Abuse the high ground: the Tarasque can't hit you while you're up there. Just climb down when it falls over, hit the glowing weak points, then climb back up when it recovers. Repeat until dead. You don't NEED to kill the Tarasque to plug the Transuranic Alloy into the reactor, but it gets in the way. Also, Tarasque Ichor has a purpose now: you can use it to build Teleporter Pads, which are super useful for getting around.

Once you've plugged the Transuranic Alloy into the Dusk Reactor, head back up the ladder, press the big button in the center console, and the Dusk Reactor will reactivate. One down, three to go!

Now, you can either do the Cloud or Mist Reactor next. The Gale Reactor requires a Tier 6 Gatekey, which you won't have all the parts for yet. The Mist Reactor is easier to reactivate than the Cloud Reactor, so let's do that one next. Also, you'll be able to get the last part you need for the Tier 6 Gatekey here.

The Mist Reactor
You'll need two Transuranic Alloys to reactivate the Mist Reactor. From the Dusk Reactor plaza, take the tram back to the station in front of the Reactor Sector's entrance. There, you can use the other tram car to ride in the opposite direction. The first stop will be a shortcut to the Cloud Reactor, but it's shut right now.

The next stop is at this giant tree(?) branch sitting in the middle of the way. There's a staircase of fungus on the left you can climb on top of.

This tree branch has two paths: a lower one to the left, and an upper one to the right. They both head to the same place, but the lower path is covered in Volatile Pests, and the upper one has Exor Cha. Take your pick.

At the end of either path, you'll find the security door to the Mist Reactor. Crack it open and head inside.

You'll run into the new robot variant, but don't worry: this one ran out of battery.

Just to let you know ahead of time: these Expedition Assistant Robots will ignore your Night Pass. They have energy shields, a lot of health, and flamethrowers (I think that's what they are... it's hard to tell) that can do serious damage if you let it hit you. Beating one is simply a matter of circling around it and whaling on it with whatever you have (don't use electricity: they're immune) and blocking their melee attacks.

You'll notice that the Mist Reactor area has a pretty serious fungal infestation.


That's not the only type of infestation here: the whole Mist Reactor area is swarming with Exor, Pests, and Carbunkles. It's so bad that this is the only Reactor without any Gatekeeper presence.
Chapter 6: Going Nuclear in the Reactor Sector (Part 3)
Mist Reactor (continued)

The Mist Reactor is pretty straightforward: the only path you'll have available to you will be towards Turbine 01. Just take the jump pads up to the Turbine (beware the Volatile Pest sitting in front of it) and plug in the Transuranic Alloy. From there, use the jump pads to follow the sign on the opposite side of the room towards the Control Room.

Take either of the two paths here, and you'll end up in the Control Room. You'll reactivate the Reactor from here later on. Something to make note of: you can end the Spore weather event here.


Take the elevator in the Control Room. You'll meet your first functional Expedition Assistant Robot, just standing there ready to surprise you once you exit the elevator. Once you start fighting it, be aware of the Volatile Exor just down the hall. This area has a shortcut back to Reception, where the Mist Reactor area starts. There's also a forklift here, but I don't really understand why. There's nowhere to really drive it.

Head further on, and follow the sign pointing to Turbine 02. You'll end up in a room without any doors, just vents. Use the jump pad in this room to access a vent on the upper floor, and head through. You'll end up in a room with unfamiliar maggot-looking enemies.

They're aggressive, but they're harmless compared to most of the enemies you've seen so far.

Abe and Janet are sitting partway up the tree-thing in this room. They're not very happy about their lack of progress.

Take the jump pads in the room, and you can access Turbine 02. Beware! There's a Volatile Exor hiding just out of sight in the corner! Once you've plugged the Transuranic Alloy in, take the jump pads to the other side of the room, and you'll see the Reactor itself. Also, there's another Expedition Assistant Robot right by the door, so be careful.

Now, even though the Reactor is fueled up, a nearby display will state that the Reactor's blocked up and won't work. It's covered in fungal growths of some kind that have to be removed before you can reactivate it. Don't worry: you won't need the Anti-Fungal Gelatin for these, you just have to hit or shoot them. The room is full of Volatile Exor, though, so you may have to deal with them first. Once you've dealt with the fungal growths, and the screen gives the all-clear, go back the way you came and go to the Control Room, then turn on the Reactor. Two reactors down, two to go!

Now that you've got a Heart of Corruption, you should go back to your base and make a Tier 6 Gatekey. Once you've made one, you can technically reactivate either of the remaining reactors. Of the two, the Cloud Reactor is a little easier to fix... though not by much. Bring as many weapons as you can. And a Hazardous Materials Suit. And a Night Pass (but just for this next area).

Cloud Reactor
You'll need another 2 Transuranic Alloys for the Cloud Reactor, but I'd recommend waiting until later to bring them along. There's a lot of stuff to grab in the area around the Cloud Reactor, and you need space in your inventory for all the weapons you'll need.

Go back in the direction of where you entered the Reactor Sector. There's an alcove with a Tier 5 Keypad that you wouldn't have been able to use until the Dusk Reactor was working again. This will open the nearby door leading towards the Cloud Reactor. You should access the nearby garage (on the other side of the tunnel) and grab one of the vehicles there (bring a Power Cell/Hotwire Kit).

The next door is closed too, so you'll have to jump through the nearby window into a room full of radioactive sludge in order to open it from the other side. You can talk to Dr. Hill on the way: he's plugging a radioactive leak with his bare hands. He's very chill. I like him.

Follow the sign leading you toward Cloud Reactor, and you'll eventually end up in front of the main Cloud Rector building. There's also a metal tower nearby full of Order soldiers. Clear it out, and you can open a Tram Station on the top floor.


The whole area is full of radioactive waste, so you'd better have protection. You'll see Frake hiding near the entrance. Frake had the same idea as Dr. Cahn, but ran into a bit of a problem: the Gatekeepers.

You'll hear him before you see him, but a Gatekeeper Jotun will be shouting at you from on top of a rocky outcropping up the nearby hill. His dialog boils down to "Go away or die", so that's not very useful. He's got two Defense Bots with him, which is why I suggested the Night Pass. You can fight him without triggering the Defense Bots so long as you don't hit them, but if the Jotun ends up shooting one of the bots too much, it'll get mad at YOU, so be aware of that.

At the top of the hill, you'll run into the sight of a bunch of dead Order soldiers, with an Jotun and a Neophyte standing on a ledge in the distance.


I personally recommend taking the lower path to the left. It's best to avoid fighting Joutuns whenever possible, and this one has backup. Sneak along this lower route. If you end up getting spotted, there's a manhole in the next area you can take to hide, which you leads to a route you can take to bypass the next area full of enemies:


There's also another manhole just past this one, behind the red shipping container in the photo above. Take the ladder down (beware the Zombie at the bottom, use a gun or something to take it out while you're on the ladder) and you can open a shortcut.


Keep heading forward (you'll have to kill another Jotun), and you'll eventually run into a stop sign. There's a mounted machine gun operated by the Order in the area below, and it can shoot you, even up here.


If you crouch and hug the wall away from the ledge, you should be able to avoid most of the gunfire. Keep going forward, and you'll find stairs headed downward marked with "Reactor Entry." There are Order soldiers on these stairs, and the machine gun can still shoot you through the windows, so be careful. The stairs leading to the ground floor are broken, so you'll have to jump into some water to make it all the way down safely.

At the bottom, you'll be in a room with a laptop. Take the doorway left of the laptop, and follow the path marked by shipping containers towards a ladder which you can climb to ambush the Order soldiers manning the machine gun. Once you take them out, the machine gun will be permanently disabled.


Climb down the ladder on the other side of the machine gun nest, next to the Order Crate, then head towards the pipe in the picture below:

Take the ladder up to the pipe: there'll be a Jotun further ahead, but if you're quick, he won't see you. There's another shortcut up there.
Chapter 6: Going Nuclear in the Reactor Sector (Part 4)
Cloud Reactor (continued)
The Jotun (who's facing the ladder leading to the shortcut I mentioned in the last part) is standing near an entrance back into the building. You don't have to fight him: just sneak around. Once you're inside, go through a pipe in the wall (beware the sneaky Exor Cha that isn't making any sound), and keep going.

Carefully fall into the river of radioactive waste below, and enter a pipe housing a Volatile Exor and Pest. After dispatching them, keep going, head up a ladder, and deal with the Gatekeeper Jotun and Chieftain there. Head up the stairs, follow the route through a storage room-looking area. If you end up fighting a Mystagogue and or see this:


You'll know you're going the right way. Head through the shipping container in the picture, follow the Reactor Entry sign and go downstairs, use the Keypad, and you'll end up in a locker room. Unlock the side door in this room to open a shortcut that goes straight outside: if you don't have the 2 Transuranic Alloys, you can use this to bring them in. The tunnel in this room only leads one way: to the Reactor Core. There are a few Order soldiers in this room, but once they're dealt with, all you have to do is plug the Transuranic Alloys into the slots on each side of the room. There aren't any ladders or paths to the slots, so you'll have to use a Jetpack. Once you've plugged them in and pressed the button on the center console, you're good to go! One more reactor left to activate!

And boy oh boy, it is a DOOZY.

Side Note: Skinks
Before heading to the last reactor, I wanted to mention the Skinks. They're the blue squeaky aliens you'll find running around the pools and rivers of radioactive waste in the Cloud Reactor area. If you damage one enough, then hit it with the Net Launcher, you can capture it and make it into portable weapon that eats radioactive waste and shoots sticky globs of blue crud. It does fairly high damage, though having one does mean you'll have to keep barrels of radioactive waste around your base.

Gale Reactor

Unlike the other reactors, you won't need any Transuranic Alloys for the Gale Reactor. This will free up some of your carry weight for weapons and healing items. You WILL need them. Oh,and by the way: BRING A LASER WEAPON, AND MAKE SURE YOU DON'T USE THE WHOLE CHARGE.

To get to the Gale Reactor, you'll need to take the tram that you took to the Dusk Reactor, but one stop further. Unfortunately, you'll run out of rail.


I'd be remiss if I didn't mention the camp of non-hostile Gatekeepers near where the tram stops, which includes the Sister of the Unlost, but they're no help.

There are probably multiple ways across the chasm between here and the Gale Rector, but I just use the Dangling Gravity Cube + Jetpack combo.

Anyway, after you get across the chasm and past the Tier 6 Keypad, you'll be in the Gale Reactor area.


It's turned into a warzone, with the Order on one side of the chasm dividing the area and the Gatekeepers on the other. Obviously, the Order is losing the fight.

The Order-controlled half is full of supplies to loot, but it's a dead end: the Reactor is sitting squarely in the Gatekeeper-controlled territory. There are a few options to get in there, some with less fighting than others.

The chasm in the entry hall, where the Order/Gatekeeper fighting is occurring, isn't bottomless: there's a pool of water at the bottom, and there are a few ways down there to return to the surface, at least one of which goes into Gatekeeper territory. Unfortunately, there's another Darkwater Beast swimming down there, so I didn't try looking.

There's a lower floor on both sides of the chasm, each manned with fewer soldiers: and the Gatekeeper side of this lower floor leads into their main territory. If you use a Jetpack or rope, you can access it from the entry hall, or you could walk through the big front door leadiing into Order territory and use the stairs, then navigate around the chasm until you're on the Gatekeeper's lower floor. Just beware the Exor Cha: those spear attacks are enough to push you into the chasm.

Or you could do what I did: sneak along the heavily plant-covered overhang along the edge of the Gatekeeper's side of the chasm, then carefully drop down next to the big doors leading right into their territory. This is the overhang I'm talking about:


Since the doors are wide open, you can walk right in. You'll see a set of double glass doors pointing to the Gale Reactor, but these are locked.

This next room is full of Gatekeepers, but the big problem is the Jotun watching over the room from a window above: he's in prime position to mow you down if you linger.


Your best bet is to immediately climb the stairs in the image above, turn right, and go into the hole in the side of the yellow pipe:


Run to the end of the pipe (maybe give the Gatekeepers a second to de-aggro if they saw you), then climb the ladder at the end. Run out of this room, and you'll end up directly behind where the Jotun is. Head down the hallway to the left, deal with any Neophytes in your way, and you'll end up in a room with two Mystagogues. Kill them, and you can unlock those locked glass doors from earlier that lead back to the entrance.

Head through the next set of glass doors, marked with a Gale Reactor sign, and then unlock the door to your left with the Tier 6 Keypad. You'll know you're going the right way when you see this sight:


Keep going this way over the catwalk into the next room. You can head up the ladder in here and listen to a hologram message to learn more about IS-012, othewise known as Dr. Cahn. All I'll say is that it might be a good idea to be wary of him.

In any case, you can take a side door out of this building and you'll gain access to the Gale Reactor's main room.
Chapter 6: Going Nuclear in the Reactor Sector (Part 5)
Gale Reactor (continued)
The Gale Reactor's main room is going to have a lot of Gatekeepers in it, but you do have one thing going for you: there are two indestructible security turrets on the ceiling, and they're on your side. The room's cluttered enough that they don't have perfect coverage of the entire room, and they can't draw enemy attention away from you, but they'll help you rip the shields off enemies so you can put them down.

There's a console near the Gale Reactor with several buttons on it (this is an "after" screenshot, please pretend that the reactor is offline and that only the first button is uncovered):


Pressing the first button will spawn a wave of Gatekeepers from the doorways on the opposite side of the room. Once you deal with them, the second button will uncover, and pressing that will spawn another wave of Gatekeepers. Pressing the third button (the one with the weird rune) will spawn the Reaper from Security. Shoot it with your Laser weapon to make it go away. The last button will uncover, and pressing that will reactivate the Gale Reactor. Congrats! Now all that's left is the main Fusion Generator.

The Fusion Generator

Head all the way back to the entrance of the Reactor Sector: you'll likely remember that first Tier 6 Keypad you saw as you came in: well, now you're going to activate it. Doing so will open the giant doors across the chasm, and extend a bridge for you to cross. Head inside.


Despite the Gatekeeper markings at the entrance, there aren't any hostiles in the area ahead. Head down the left path (following the WG-Intrados sign) and you'll meet Dr. Hill, cheerful as ever. He'll mention that there's a bit of an electrical problem you'll have to fix before you can activate the generator, but it's really no big deal.

Simply head into THIS door, located just before where Dr. Hill is standing:


Then, make your way across the electrical equipment to the other side without falling into the water and frying yourself, and press the button.

Head back towards the way you came into the Fusion Generator area, and follow the "Waygate Ctrl" signs down the opposite path and up a ramp. Head through a hole in the wall (previously, this would've been blocked by a wall of electricity), and activate the keypad at the end of this path. This will open a door at the bottom of the Fusion Generator. Head all the way back down the path, towards the Fusion Generator, and enter the Waygate there. Make sure you're well armed. A Rocket Launcher and some Rockets wouldn't be totally out of the question at this point.
Shadowgate Facility: Into the Woods and Through the Gate, Off to [REDACTED] We Go


Quite the view.

Head down the path, and talk to Dr. Cahn. Because of course he's here before us.

He'll mention that there are force fields between you and the Shadowgate facility... so you'll need to find a way to deal with that.

The solution is pretty simple... and it involves killing more Gatekeepers.

Witch Hunt
Head down the path illuminated by the yellow lights, and you'll encounter a new kind of Gatekeeper: Witches. Though, instead of brooms, they have jetpacks, and instead of casting magic spells, they've got shotguns. Their jetpacks make them hard to pin down, and they can kick you back if you get too close. Fortunately, their shields and health are lower than any of the other Gatekeepers, so it doesn't take much to put them down. Pick up the Embellished Censers they drop: you can use them to make Null Grenades. These will immediately destroy a Gatekeeper's shield, but more importantly, they can take down the force fields blocking your way. There are quite a few forcefields you need to disable to get through this place, and you'll want a few extra for combat as well. I would say you need 9 at the very least, but try to bring more.

Keep heading down the path and through the woods: you'll know you're going the right way if you find a paved road heading through a tunnel:


Head down this path, but be wary: there's a camouflaged machine gun nest ahead that'll open fire on you. Instead, jump down the path to the left of the bridge just after the tunnel, and follow the path up to the giant pink forcefield.


Throw a Null Grenade near it to permanently deactivate it. Now that you're past the Shadowgate Facility's outer wall, head towards the front of the building and go through the door: you'll run into another forcefield you need to disable.

You'll now be inside the Shadowgate Facility's main building. Head up the stairs in here, and you'll find Dr. Cahn, staring at a familiar sight:


OH GOD, NOT THAT THING AGAIN.

Dr. Cahn will say that the Gatekeepers are trying to bring that thing into our world through that giant gate, and he'll ask you to destroy the devices that are pulling it into our world, would you kindly.

Sure, the objective calls them "Containment Devices", which kinda sounds like breaking them would just let it loose, but what do we know?

Head through either of the doors on either side of this window, disable the forcefields sitting in front of each of the devices, smash the devices, and kill any Gatekeeper that stands in your way. When you break the last device, the creature will slink back into the gate.

Congratulations! You just saved the world! Maybe! But where did you send that thing off to? We need to head through it to find out.


It's probably some hellish dimension full of gross monsters or something.


Oh, it's just the Anteverse II, where the Exor and Peccaries come from. But there's another portal here: where does that lead?


...Huh. This doesn't seem that alien. Head further on, and you'll find a familiar symbol on the wall:


Wait... this place belongs to the Order? You can explore around, but there's not a lot to see right now. There's exactly one side room open to you, and you'll find a semi-friendly face: Hasta Tria! You met him before in the Manufacturing Sector, by the destroyed Surface Tunnel.


Apparantly, you're standing in the Praetorium, a major Order base. Good thing no one's home.

Hasta Tria will give you the lowdown: the Order soldiers that stole the Dark Lens (which was responsible for opening portals into other realms, and started causing havoc upon its impromptu removal) from the Lab Sector were defeated by the Gatekeepers, who have taken it and retreated into the Residential Sector. According to Hasta, they're trying to harness its power for their own ends. Remember, they're insane, so that would obviously end VERY badly for humanity.

However, Hasta Tria has to "prepare for the journey." So, for now, that's as far as we go. One last thing to note: Hasta Tria will mention that the Residential Sector is a "frozen aether". Be prepared to dress warm.
Комментариев: 17
-=Ðﮐ=- Arctic Howler 7 апр в 15:41 
small note: reaper has a timer, just gotta keep moving and he'll eventually return to his spawn, can't say for absolute time, but also could be patrol route change as well... might as well say crystalline armor is your friend as so long as you go invisible he'll ignore your existence(assuming you didn't aggro him) including night essence farming(he'll recoil, but wont attack)

Never had him take me to night realm though... only attack non-stop/time out
Soon Dead 12 мар в 20:58 
Holy Portals! First off, great job as this got me out of a infinite loop of exploring with nowhere to go. I will be returning (often) as I stumble blindly about (literally). Second, I am only in the middle of Chapter 3 and the amount of game still stretching out before me is daunting. I might be playing this for an entire year! Again, thanks for putting this together. It had to have been a daunting chore all on its own.
rabrot 28 фев в 7:22 
Amazing guide thank you :)
MrMcGreedy 13 фев в 7:54 
For Reactors I’d really recommend:
1. Open all the shortcuts in Dusk Reactor so in subsequent visits enemies fight (namely the mystagogue and volatile Exor which are both scary early on), making killing them a bit easier
2. Getting skink as soon as Cloud Reactor is available. This can be done by going straight down the road and killing the Sapper by the fallen pipes (he would otherwise kill the single skink in the area). It’s hard to find at first but this skink requires fighting or getting past 0 Jotun to get (both of which are easier with the skink’s damage and stun on headshot).
Bonus points for bringing a barrel+bucket to fill with radioactive waste to refill your skink at base (not a big deal for cloud reactor but will help with the others)
3. For Mist Reactor, lure the corrupted robots or the Exors to each other. Saves a lot of ammo when the fight is half done for you. It’s about 3 volatile exors (+ deatomizer) to one robot.
Gonner Maleggies 12 фев в 1:22 
slight thing -recent update has the recipe for a tier 4 hacker changed, the lcd screen swapped out for lodestone fragments, and the canaan portal changed to a tier 3 pad. canaan is now necessary
Kat 11 фев в 23:21 
Thanks so much for the guide, it's a big help!

Protip about making mugnades in reactors: There's a new critter you can befriend in the cloud reactor. Capture it, put it in a pest trap, and it will poop so much for you. Afaik you don't even need to feed it. You'll be swimming in mugnades in no time!
Emporoar Ccin 10 фев в 15:53 
Something noteworthy about radiation management:

Using the toilet REDUCES radiation by a decent amount.

This almost flips the positive/negative traits relating to toilet needs. I've gone from 5-7 rads to 0 in a single siting with a half-empty toilet meter.
Hades_General 4 фев в 14:49 
Thanks for the guide so far, and I can't wait for an updated version!
Mastermechanic 24 янв в 16:26 
you can also use middle click to turn on headlamps
3isha 5 янв в 17:45 
Very well written. Thank you for taking the time to write this. This is helping me a lot!