Yaoling: Mythical Journey

Yaoling: Mythical Journey

79 ratings
Dar's YaoLing Guide
By Dar
Dar's guide to YaoLing

A guide covering endgame breeding loops, a list of Talents, and general tips/advice which I hope other people may find useful.

~(Last updated in game version: ea 0.95e) Added a new section addressing added features so I can file them away later. Fixed Breeding Guide after testing Inheritance Rules.
10
4
5
2
   
Award
Favorite
Favorited
Unfavorite
Latest Updates
Latest Update - 0.95e
As the game is being frequently updated I'm adding this section here in order to record the latest major changes. This update was full of minor QoL changes, such as the ability to view Evolution levels and bugfixes, but a few significant features were added.

-13 Sep 2024: Huge update made massive changes. Won't have time to update the guide until perhaps the weekend, sorry. TLDR: There's a new game mode, some gameplay rebalances, Eternica got massively nerfed and Charity abuse with WuKong has been reined in to no longer break the game with cumulative cost increasing YaoLing.

Update notes are at.
https://store.steampowered.com/news/app/2816950/view/4610085845253512381

-4 Aug 2024: Noticed that the Help section updates have clarified a lot of the mechanics, updated the guide with the exact details. Check out the new DEF vs Damage Reduction graph!
-3 Aug 2024: Breeding talent inheritance rules cleaned up. Some of it was incorrect.
-2 Aug 2024: Mini YaoLing Scroll added.

Important features added:
Difficulty Settings
- Found at the School of Blades, located here on your map.
Consists of granting all enemies a permanent buff in battle, and grants increased rewards as follows:
Name
Enemy HP
Enemy ATK
Enemy MAG
Spirit Gems
Exp Multiplier
Talent Jades
Perception
+0%
+0%
+0%
None
+0%
None
Enlightenment
+100%
+80%
+50%
minute
+50%
Blue
Testament
+160%
+150%
+100%
small
+100%
Blue/Purple
Union
+320%
+280%
+220%
moderate
+200%
Blue/Purple/Yellow

Notably, this adds an infinite source of Legendary Yellow Spirit Jades, although the probability for obtaining them is extremely low. More importantly, Harder modes give enemy Yaoling better talents and stats, making it easier to hunt for Legendary talents, but it does decreases your talisman catch rate.

As you can see, the jump from Testament to Union difficulty is very large and it requires very specialised parties and strategies to defeat Demons, for example: heavy crowd-control or use of Reflect.
Marks

A function to the right of the Rename option in each unit which adds an icon to your unit so that you can find important units more easily in your box.
Blessing animation skipping

Now you can get rid of your Heart Crystals ten times faster.
YaoLing Types and Stats
YaoLing may have up to 3 additional types, which may all co-exist.
  • Elite YaoLings


    These are easy to identify as they have a crown icon on their portrait in the inn. Elite YaoLing have a noticeably larger model. This does not appear to affect their Size, nor Strength, but it does seem to affect their hurtbox and collision.

    The game states they have better growth potentials than normal YaoLing, but this just means they have at least one stat which has 5-6 diamonds ♦♦♦♦♦♦ in growth potential. Elite YaoLings are hostile on the map regardless of level, and will always spawn in the same locations.

    Note that currently, the four story boss YaoLing do not appear to have Elite spawn locations, therefore, they cannot be caught in Elite form. However, there is a 1% chance that breeding may result in a YaoLing randomly becoming Elite.

  • Rare Colour
    These YaoLing have a different palette and are uncommon. Breeding YaoLing has a 1% chance of them becoming a Rare Colour. All Wild YaoLing which are Rare Coloured have at least 3 growth potentials in every stat.


  • Shiny YaoLing
    Shiny YaoLing are the rarest of the three alternate types and can easily be identified from the unit list thanks to their rainbow-coloured border.

    Shiny YaoLing have a sparkling star effect around them, at least two stats which are maxed out in growth potential (♦♦♦♦♦♦) and come with one random SE Talent - a talent which is a direct upgrade of another in terms of power and has a rainbow border which shifts its colour over time.

    In general (as of now), SE Talents are not very good and are rather weak. However, the growth potential guarantee is significant.


    Here is a picture of how all the borders look.

    Attributes


    There are six attributes in the game and they all have growth potentials, shown to the right of them. Mousing over each potential will let you see the numbers for how much they will grow with every level.

    Note that there appears to be rounding for some of these stats, especially ones with low growth rate.

    There is no need to go through each attribute, since the descriptions state exactly what they do and abilities usually tell you exactly how they scale. The current maximum level for YaoLing is 70, but the developers have announced their intent to increase this cap to 99 in the future.

    With this in mind, note that it's not always necessary to be obsessive and go for 6 stars in all stats.

    Generally, HP, ATK and MAG will always be good to maximise, but some YaoLing have such abysmal growth in a specific stat that there is no practical difference between 1 diamond or 6.

    Take note that DEF often has very poor growth. Many back-line YaoLing such as your starter healer, Lume, will find it difficult to get significant amounts of DEF, even at level 70.

    (DEF is not directly subtractive to ATK, it reduces non-fixed damage by a percentage, calculated by (1-1/(1+2%DEF)


    Additionally, WP is of limited use to units which are fragile because they will usually die before it makes any difference. 30 WP would mean the unit will gain 30 mana from taking damage as it goes from 100% to 0% HP. (The normal rate of mana gain is 10 mana per second)

    Finally, there is one hidden statistic, called LUCK. LUCK primarily affects the activation probability of abilities and talents. 50 Luck appears to correspond with a talent triggering approximately 50% more often.
Elements and Ailments
There are nine different elements in YaoLing: Fire, Ice, Lightning, Wind, Poison, Darkness, Pierce, Concussion and Slash.

Whenever a YaoLing does non-true damage with an attack or ability, they will inflict colour-coded damage of that type and cause a small amount of elemental buildup on the target. This bar is not entirely accurate in real time, but when it fills up, an elemental debuff will be inflicted on the target.

Buildup seems to naturally decay in real time and can be prevented entirely by Talents such as Consecrated. Unlike Monster Hunter, the cap does not seem to increase each time a debuff is inflicted.


This is the list of the various damage types and the ailments directly related to them:


Ailment List


  • Pierce, Concussion and Slash are considered PHYSICAL elements.
  • Fire, Ice, Lightning, Wind, Poison, Darkness are considered ELEMENTAL.
This is mostly relevant to some specific talents.

12/9/2024 Updated effects of Ailments (translated directly from the Chinese notes):

  • Bleeding: Take extra Pierce damage equal to a percentage of lost HP (10% from Normal attacks and 25% from abilities) for 7 seconds. (Originally just 5% of lost HP)
  • Burn: Every second, take 26 points of Defence-ignoring Fire damage. Scales by 4 damage per level (Originally 80-1580 damage, now 130-2130 damage)
  • Frozen: ASPD -50%, MOV -70% (Originally ATK/MOV -50%)
  • Poisoned: ATK/MAG - 30% for 8s (Originally -20% for 10s)
  • Paralysis: Chance to become paralysed every second, also receiving 2-12% of current HP in Lightning damage. Lasts 8s. (Originally: Chance to become paralysed when attacking, stopping actions, Duration: 12 seconds)


Every YaoLing does a specific damage type with their auto-attacks, which may not necessarily be the same as their ability. You can view this damage type in the Party List or the YaoLing Scroll as shown:


Debuffs get more difficult to inflict consistently the higher level the target is. A diverse team will have great difficulty keeping up debuffs consistently on Demon bosses, so it is recommended to focus on specific damage types if you wish to prioritise a debuff. Fortunately, talents which convert a portion of your default attack damage type are relatively common.
Map: Rare YaoLing and Where to Find them
This is a small map showing roughly where to find the 3 starter YaoLing and the 4 current story boss starters.

YaoLing Breeding Guide Part 1: Getting components
A large portion of the endgame will focus around Breeding YaoLing. I shall walk you through how I do it.

Because of UI Limitations, it is very difficult to breed efficiently as it is difficult to see at a glance if a YaoLing is an Alternate Colour or not. Fortunately, there are many things you can do to mitigate this.

I recommend only breeding 1 to 2 YaoLing families at once. This streamlines things a lot and declutters your YaoLing inventory, which is very difficult to organise once it gets cluttered. Working on 2 at once gives you the advantage of being able to alternate between the two when gathering ingredients.

Step 1: Locate the YaoLing you want to breed.
Refer to the previous map for the unique YaoLing Locations. Starter YaoLing have 3 spawns, one of which is guaranteed to have an Elite. Boss YaoLing have only 1 spawn and no Elites, as far as I know, it is not possible to get an Elite Boss YaoLing.

Step 2: Capture breeding components
You will need the following. Feel free to omit as many steps as you wish, but my current project is focused on breeding an alternate-coloured-shiny YaoLing. There are valid reasons why you may not want your YaoLing to be any of these, however, so leaving steps out saves a lot of time and Spirit Gems.

  1. 1 Shiny YaoLing
  2. 1 Alternate Colour YaoLing
  3. 1 Elite YaoLing (optional)
  4. As many useful Legendary Traits as you want.

You can use certain food to increase the rate of Shiny and Alternate-Coloured YaoLing, but this is not efficient for the Rare YaoLing, because the best method for those is the Save and Load tactic and Food Buffs are removed when you Load a Game.


The Save and Load tactic


Step 1:
Go to where a Rare YaoLing is and bring a large stack of Tier 1 damage charms and capture charms.
  • Save the game.
  • Now hit the YaoLing with a damage charm (RMB) to start a battle.


Step 2:
When battle starts, press TAB. This shows you a list of all enemy units in battle.Check if there are any YaoLing with good traits you wish to capture and you can left click on any single one to tag it.

If there are no YaoLing you want and they are all trash, hit the Escape key and Space to Escape from the battle. Note this only works if you surprise the enemy, so always try to ambush them.


Step 3:
When you find a YaoLing you want, capture it, then Save the game.

  • Now load the game you just saved (Esc > Load Game > Highlight > F) and repeat from Step 2 until you have all the components you want.

On average, I estimate it takes around perhaps a hundred tries to get a Shiny. Fortunately, you only really need one per breeding type.

Shinies from the Heart Stone gacha
Lastly, one of the most reliable ways of getting non-Boss and Starter Shinies is just to breed lots of eggs and use the Heart Stone gacha. Every time you delete an egg, you get heart crystals, and any eggs you pull from the Jade Tree's blessing is guaranteed to be a Shiny one. This saves you a lot of time rather than fiddling around with food, although it does not address the Elite or Alternate Colour problem.

Username @Dylan pointed out that unlike breeding, talents for these gacha YaoLing seem to be randomly generated when clicking on the Hatch button - hence if you don't like what you get, it is possible to save-scum their talents. If you can't tell them apart from your breeding projects, note that they will be marked as "Source: Wild" under the egg description.
Interlude: Egg Names and what they mean
Before we start the next part, I need to go over the importance of Egg names and how to read them.

Every Egg has a name, which can be divided in to 3 different parts:
  1. Size
  2. Talents
  3. Element

Element just indicates the element type of the YaoLing, as such, it is mostly irrelevant for breeding.

Size:
Size is a determination of how many potentials the YaoLing has. YaoLing may have anywhere from 6 to 36 potential points. I estimate they are as follows (not confirmed):

Points
Size
6
Tiny
7-11
Small
12-17
Medium
18-23
Large
24-29
Huge
30-35
Giant
36
Colossal

The cost of hatching an egg increases dramatically the more potential points the YaoLing has, capping out at about 2200 for a Colossal egg.

Quality:
The second part of the egg name. This determines the types of talents the YaoLing has. Since only Legendary Traits cannot be bought in endgame, we can just break this down into "Number of Legendaries as follows".

# of Legendary Traits
Description
0
Tapered, etc
1
Perfect
2
Pristine
3
Dazzling
*
Shiny

Note:
  • Shiny indicates the presence of a Shiny SE Trait and overrides ALL other desciptions.
  • The cost to hatch the edge will also increase accordingly, but less so than egg size.
  • There is probably a name for having 4 Legendary traits, but I am not crazy enough to find out what that is.
YaoLing Breeding Guide Part 2: Egg and Unit management
In this section, I'll walk you through a worked example of breeding. My goal is to make a Colourful Shiny Tifur with the legendary Traits: Perfection and Elite Heritage.

Wild Tifurs do not come in Elite forms, so this makes things significantly easier.

Talents or Potentials first?
Potentials greatly determine how expensive an egg is to hatch. However, talents are the biggest single contributing factor to how long an egg takes to hatch (potentials contribute only 6 min per perfect stat). There is a tradeoff as even 1 Legendary talent will result in the egg taking 27 minutes longer to hatch (before Breeding Hut reductions). Generally, it can be faster to breed Potentials before you breed in Talents, but since the Shiny inheritance rate from 1 parent is only 10%, it is difficult to breed in Talents to a Shiny YaoLing later.

The importance of Naming
As of the latest patch, breeding has been improved. It is still a good idea to rename breeding units, but now it's better to focus on Legendary talents they have as the parent names will appear on eggs.

Names are NOT unique, so don't worry about renaming a whole batch of YaoLing the same thing.


Here is my personal naming scheme, you can create your own as it is just a guideline:

Component Breeding Names
<Type Letters> - E for Elite, S for Shiny, and C for Alternate Colour. I will call these ESC for short. No longer necessary as the UI was fixed.
<Name of YaoLing> - Keep this short. For use on eggs.
<YaoLing Type/Sex> - I use M for Yang and F for Yin because this is easier to type.
<Legendary Talents> - Useful when you are storing different Legendary talents to try out.

So in the example picture above, I would name the unit "STifurM".
You can now also add marks to your YaoLing, so you can conveniently label all your current breeding pairs with an egg mark .

Step 1: Talent Breeding Rules
Your goal here is to combine the legendary talents you want. These rules govern talent inheritance:

  1. When you breed two YaoLing, ONE talent and ONE of the highest stat potentials are chosen at random from each parent to be passed down to the offspring.
  2. Rarer Talents are prioritised for inheritance. Legendary talents will ALWAYS be chosen over Elite, which will be chosen over Rare talents, for example.
  3. Shiny Talents occupy a talent slot. Hence, the maximum Legendary talents on Shinies is 3 Legendaries (Dazzling).
  4. Unlike other good Talents, Shiny Talents are randomised every time you breed YaoLing.
  5. Once bred, Empty slots may be filled by random talents, including negative ones. Random talents may be Legendary, resulting in 3 Legendary talents. This creates a Dazzling egg.
  6. This means Dazzling eggs are still incredibly rare and breeding one should not be counted on as the talent will be random. It is probably more sensible to use a precious Legendary Talent Jade if you need 3 or more Legendary Talents on a single unit.

We do Talent breeding first because Shiny overrides all other descriptors - there is no way to tell how many Legendary Talents we have once we start breeding Shinies. Doing this first lets us use Pristine/Dazzling to determine if an egg is worth hatching.

Colour does not have an effect on stat potentials for YaoLing breeding, so it is safe and a great idea to start mixing in Colour at this stage. My goal is to get a few CTifur(M/F) with both Legandaries. This shouldn't take that long.

For Elites and Rare Colours, there is a 50% chance of inheriting this from each parent, otherwise an egg will have a 1% chance to become Elite/Rare coloured.

For Shinies, the probability is 50% if both parents are Shiny. Otherwise, it is 10% if only one parent is Shiny. This means combining Elite/Colour and a non-EC-Shiny has a 1 in 20 chance.

  • Until you combine Shiny/Colour/Elite, try to prioritise hatching the LOWEST Potential eggs as you can as this is faster as well as dramatically cheaper. Hatching Huge eggs is around half to 2/3 the cost of Giant eggs.
  • If Soul Crystals are scarce, delete all non-Shiny eggs which are too expensive or only Perfect. Only hatch Pristine or Dazzling eggs as this indicates successful inheritance of Legendary traits.

Step 2: Breeding in Types

This is the time you start breeding in Shinies. Hopefully, you have a bunch of cheap Coloured 2-Trait Legendaries. Breed them with your Shinies and hatch the shiny eggs.

  • Don't hatch every single egg, you'll just delete all your soul crystals. ONLY hatch Shiny eggs.
  • Use the Inn to delete all unwanted units and sell all unwanted eggs. Only keep Shiny Coloured (SC) units.

At this point, I do not need to name every single unit as I only keep SC units - I am going to start the most expensive part, which is breeding in potentials.

Fortunately, a recent patch has made obtaining Colossal eggs a lot easier.

  • Prioritise eggs with 6 stars in the potentials you want as 2 of the highest potentials are inherited, one from each parent.
  • At this point, I just rename them Tifur<sex><number> now, e.g.: "TifurM33". Breeding higher potential units increases the probability of the offspring having higher potentials.

A perfect unit isn't actually necessary. You should isolate the useful stats.
Description
ATK is important on all units, even healers as it affects status buildup.
DEF can be dumped on units with low DEF growth and backliners. However, it is always good.
HP has one of the more observable variances, but at a level cap of 70, this only works out to around 140-ish HP for every diamond at the level cap.
WP is only really good for your frontline and has poor growth variance. It can be dumped.
MAG determines how your abilities scale, and is one of the most important stats.
Crit will usually make a small difference of about 3-4% at level 70, it's worth maxing because the difference in growth is usually between 0.2% to 0.4% per level.

More importantly, if you are breeding a Shiny, the Talent will randomise itself. Getting a good talent is completely RNG, so cross your fingers and pray.

I'll gradually switch up my production line until I have 3 sets of SC x SC breeding pairs and use the remaining 3 slots to start my next breeding project. My final production line will look like this:


At this point, I just follow the guidelines:
  • Only Hatch Shiny and Dazzling Eggs and delete all else.
  • Delete all eggs which take fewer than ~1600 Soul Crystals to hatch. These eggs won't have good potentials and aren't worth the time and crystals to hatch.

This is about the right time to start a new breeding project or level up some new units while farming Soul Crystals on a boss rush. Getting a good SC YaoLing is just a matter of time at this point. Temper your expectations.


At this point, I stop production and save 4-6 of my breeding pairs, deleting all the rest so that my YaoLing list stays organised. This is when it is a good idea to mark all your breeding pairs with an Egg mark so you can resume where you left off if you ever want to revisit the YaoLing again, for example if you want to breed in a new Legendary Talent.
Crafts and recommended YaoLing
YaoLing all have Craft skills, which may be viewed under their Crafting tab.


There is very large variance to these crafts. All these three Level 1 Bunbows have dramatically different Crafting skills, for example.

Each YaoLing species has a predisposition towards certain Crafts, which can be approximately measured by a rating of 1 to 10 on the YaoLing scroll.


I originally had a huge Excel Sheet with all of this information, but I realised it was kind of useless because most people would just be interested in the top YaoLing for each Craft.

Training has no 10/10 YaoLing, the best YaoLing for it is the Tifur family at 9/10, and it doesn't appear to be important since it's just experience, so I am leaving it out.

  • Due to this variance, 9s may actually have higher values than 10s.
  • Demons usually have much worse Crafting stats, so check first before you try the Demon form.

Cooking
9
10
147 - Elixishell
215 - Nocturoam
187 - Domisun
243 - Wardendure

Crafting
9
10
255 - Celesprita
235 - Sealighten

Guarding
9
10
039-Quakehorn
151 - Ripplance
059-Pangocoil
163 - Cannonlob
111-Gallopurge
187 - Domisun
115-Hedgemon
243 - Wardendure
135-Shalo
247 - Dongdong
191 - Adepdoe
263 - Excaladin
255 - Celesprita

Gardening
9
10
203 - Danseama
143 - Aquora
199 - Vergalia

Mining
9
10
012 - Rekkoon
219 - Seekerite
071 - Cointaur
251 - Aegistelle
123 - Ursalanche
255 - Malletmaw
139 - Colostiff
167 - Drillpinch
175 - Blizzball
215 - Nocturoam

Trading
9
10
155 - Reinkoil
107 - Baalody
179 - Jestricity
223 - Emotem

Hunting
9
10
031 - Artepuss
127 - Sirius
075 - Anuyi
211 - Maskeraith
207 - Whipstache
About Talents
YaoLing may learn up to four talents, which is the main way you customise them.

Talents are divided into 5 rarities:
  • Common - Trash talents, which are usually negative. Delete these with Amber Teardrops.
  • Rare (R) - Blue Commonplace talents, can be bought at the Village Shop every game day for 150 Soul Crystals.
  • Epic (E) - Purple talents, can be bought at the Village Shop every game day for 500 Soul Crystals.
  • Legendary (L) - Yellow talents. Soul Jades can only be found in chests at the moment and are limited. Easily breedable, up to a soft limit of 2, after which it gets dramatically more difficult.
  • Shiny (S) - Upgraded versions of other talents, generated randomly on Shiny YaoLing.

Some talents have some hidden restrictions to them:
  • (Ranged) - only learnable by YaoLing with a Ranged default attack.
  • (Melee) - only learnable by YaoLing with a Melee default attack.
  • (Summon) - only learnable by YaoLing with an ability which summons units.

Since some talents do multiple things, some of them will re-appear over multiple categories for your convenience.

Some Game Mechanics notes:
  • Reflect: Prevents a percentage of damage and returns it to attackers. A very strong defensive effect.
  • Weight: Determines how severely a YaoLing is affected by physics, such as knock up and knockback.
  • Strength: Each YaoLing has a Strength category, which is used in knockback calculations.
  • Interrupt: Note that some abilities and status are capable of interrupting any action taken by enemies. The status Paralysis seems to inflict a certain rate of random interruption.
  • Dispel: Only buffs marked with [Buff] in the Status Window appear to be dispellable. It's useful to keep a dispeller (ability or talent) around just for some very annoying enemies.
Talents (Pt 1) - Base Stats / LUCK
ATK TALENTS
(L) Tyrant
ATK increased 35%
(R) Reckless
ATK increased by 30%, MAG decreased by 20%
(R) Heavy Strike
ATK increased by 50%, Attack Speed decreased by 30%
(R) Last Stand
Below 50% HP: ATK increased by 30%
(E) Avenger
On ally death: Gain a permanent buff of 10% ATK and 10 DEF. Stacks up to 5 times. Triggered by death of summons
(R) Alpha
If 2 other units of the same species present: ATK/HP/MAG increased by 10%
(S) Alpha SE
If 2 other units of the same species present: ATK/HP/MAG increased by 25%
(L) Perfection
Gain 1% HP/ATK/MAG/Crit/Healing/Status Res/LUCK per Research Level

DEF TALENTS
(R) Sturdy
DEF increased by 10
(R) Pacifist
ATK decreased by 30%, DEF increased by 30
(R) Instinctive
Below 50% HP: DEF increased by 20%
(R) Extrovert
Attack Range decreased by 5, DEF increased by 20
(E) Avenger
On ally death: Gain a permanent buff of 10% ATK and 10 DEF. Stacks up to 5 times. Triggered by death of summons

HP TALENTS
(L) Royal Bloodline
HP increased by 40%
(E) Soul Binding
Unit loses 50% Max HP.
Allies gain a total of twice that amount of Max HP evenly distributed amongst all units.
(L) Perfection
Gain 1% HP/ATK/MAG/Crit/Healing/Status Res/LUCK per Research Level
(R) Alpha
If 2 other units of the same species present: ATK/HP/MAG increased by 10%
(S) Alpha SE
If 2 other units of the same species present: ATK/HP/MAG increased by 25%

WP TALENTS
(R) Tunnel Vision
Mana regen decreased by 3/s, Gain 100 WP
(S) Tunnel Vision SE
Mana regen decreased by 5/s, Gain 300 WP

MAG TALENTS
(L) Brilliant
MAG increased 35%
(E) Deft Hands
After ability use: Gain 15% MAG (Up to 45%)
(R) Mind Over Matter
ATK decreased by 20%, MAG increased by 30%
(S) Mind Over Matter SE
ATK decreased by 25%, MAG increased by 40%
(R) Alpha
If 2 other units of the same species present: ATK/HP/MAG increased by 10%
(S) Alpha SE
If 2 other units of the same species present: ATK/HP/MAG increased by 25%
(L) Perfection
Gain 1% HP/ATK/MAG/Crit/Healing/Status Res/LUCK per Research Level

CRITICAL TALENTS
(L) Intuition
Crit chance increased 20%, Crit damage increased 100%
(E) Anger Issues
(Melee) When hit by enemy: Gain 2% Crit chance and 4% Crit damage.
Stacks 25 times for a total of 50% Crit chance and 100% Crit damage.
(R) Warmed Up
Battle Start: Gain 100% Crit chance for 6s
(E) Methodical
On attack hit: Gain 20% Crit (stacking), resets when a Critical strike is dealt
(R) Prideful
Crit Rate decreased by 20%, Crit Damage increased by 100%
(R) Sniper
Attack Speed decreased 20%, Crit Rate increased by 20, Crit Damage increased by 50%
(E) Combative
On Kill: Gain 100% Attack Speed and 50 Move Speed for 6s
(E) Accurate
Critical strikes ignore 30 DEF
(L) Perfection
Gain 1% HP/ATK/MAG/Crit/Healing/Status Res/LUCK per Research Level
LUCK TALENTS
(L) Luckystar
Double the trigger chance of other abilities.
(L) Perfection
Gain 1% HP/ATK/MAG/Crit/Healing/Status Res/LUCK per Research Level
Talents (Pt 2) - Mana / Attack Speed / Movement / Ambush / Knockback
MANA
(L) Elite Heritage
Abilities cost 30% less Mana
(E) Inspiration
On ability use: 33% Chance not to consume the Mana cost. 5s CD
(E) Moral(sic) Boost
Aura: All allies recover 3 Mana per second. Does not stack
(R) Investment
Lose 2% Max HP/s: Regenerate 4 Mana/sec
(S) Investment SE
Lose 4% Max HP/s: Regenerate 10 Mana/sec
(R) Piloerection
Below 50% HP: Regenerate 7 Mana/sec
(R) Nimble
DEF decreased by 30, Attack Speed and Move Speed increased by 30%
Mana recharge increased by 3
(E) Siphon
On Kill: Gain 100 Mana
(R) Energetic
Battle Start: Gain 30 Mana
(E) High Spirit
Battle Start: Gain 200 Mana
(R) Charity
On Death: Grant all allied units 30% Mana
(S) Charity SE
On Death: Grant all allied units 70% Mana

MANA DEPRIVATION
(E) Eyecandy
Aura: All enemies recharge 2 less Mana/second and their abilities are weakened by 10%
Does not stack
(E) Drain
On attack hit: 25% chance to steal 20 Mana (5 Mana on Demons)
(E) Irritate
On attack hit: Target loses 5 Mana

ATTACK SPEED
(L) Trance
Consecutive attacks on the same target grant 10% Attack Speed, up to 120%.
Resets when switching targets.
(R) Nimble
DEF decreased by 30, Attack Speed and Move Speed increased by 30%
Mana recharge increased by 3
(R) Leadership
Aura: Allies gain 20% Movement Speed and 10% Attack Speed (Does not stack)
(R) Rapid Strike
Attack Speed increased by 50%, ATK decreased by 25%
(E) Impatient
Battle Start: Gain 100% ASPD for 10s
(R) Hot-Headed
Battle Start: Gain 150% ASPD and Burn status for 6s
(R) Proud
Attack Speed decreased by 100%.
Gain 10% Attack Speed every second, up to a maximum of 150%
(E) Berserk
For every 10% missing HP, gain 10% Attack Speed
(R) Martyr
On Death: Grant all allies 80% ASPD for 6s

MOVEMENT
(R) Hurricane
Move Speed +50%, Weight and Knockback +1
(R) Leadership
Aura: Allies gain 20% Movement Speed and 10% Attack Speed (Does not stack)
(E) Combative
On Kill: Gain 100% Attack Speed and 50 Move Speed for 6s
(R) Flicker
When hit: Blink to a random location (5s cooldown)

AMBUSH
(R) Grand Entrance
Battle Start: Blink behind the farthest enemy, gain 30% DEF for 6s
(S) Grand Entrance SE
Battle Start: Blink behind the farthest enemy, gain 30% DEF and 100% Crit Rate for 6s
(E) Rampage
(Melee) On Kill: Blink behind a nearby opponent and gain 100% Lifesteal for 6s
(R) Backstab
Attacking from behind ignores 30 DEF

KNOCKBACK
(R) Buff
Knockback +1
(R) Hurricane
Move Speed +50%, Weight and Knockback +1
(R) Strength
Further knockback increases stun duration (vague description)
(E) Tantrum
Below 30% HP: Movement Speed decreases by 90%, knockback +3
Talents (Pt 3) - Healing / Shield / Defensive / Status Defence / Behaviour
HEALING
(R) Bloodshot
Gain 15% Lifesteal
(R) Life Sap
On Kill: Heal for 20% MaxHP
(E) Fragrance
On ability use: Heal a random ally for (50 + 2xLv) HP(
(E) Transmutation
On ability use: Heal self for 15% of Max HP(
(E) Rampage
(Melee) On Kill: Blink behind a nearby opponent and gain 100% Lifesteal for 6s
(R) Rapid Recovery
Receive 20% more healing
(E) Organic
Receive 50% more healing
(L) Perfection
Gain 1% HP/ATK/MAG/Crit/Healing/Status Res/LUCK per Research Level
(L) Rewind
The first time HP drops below 30% each battle, blink to the back row and heal 30% HP
(S) Rewind SE
The first time HP drops below 20% each battle, blink to the back row and heal 50% HP

SHIELD
(R) Armoured
Battle Start: Gain (50+5*Lvl) pts of Shield (Scales with level)
(E) Scrap Armour
On Kill: Gain Shield equal to 20% Max HP
(E) Magic Armour
On ability use: Gain (50%Mana REQ*(1+0.1*Lvl)) Shield

DEFENSIVE
(E) Mirror Skin
Battle Start: Gain 100% Reflect for up to 3 hits
(R) Tai-chi
Every 8s: Gain 1 stack of Reflect
(E) Rock Solid
Damage taken: 20% is reflected to nearby enemies
(E) Rough Skin
When hit by enemy: Reduce attacker's Attack Speed by 20% (Stacking up to 100%, lasts 3s)
(E) Eyecandy
Aura: All enemies recharge 2 less Mana/second and their abilities are weakened by 10%. Does not stack
(L) Rewind
The first time HP drops below 30% each battle, blink to the back row and heal 30% HP
(S) Rewind SE
The first time HP drops below 20% each battle, blink to the back row and heal 50% HP
(E) Tantrum
Below 30% HP: Movement Speed decreases by 90%, knockback +3
(R) Elemental Armour
Physical Damage taken increased by 30%, Elemental Damage decreased by 30%
(E) Persistent
When receiving damage greater than 20% of Max HP: Decrease that damage by 50%. A fantastic skill for squishies.
(E) Adaptive Defence
When taking damage from a resistant element: Damage is reduced by an additional 20%

STATUS DEFENCE
(L) Consecrated
Gain status immunity
(L) Perfection
Gain 1% HP/ATK/MAG/Crit/Healing/Status Res/LUCK per Research Level
(R) Optimist
Below 50% HP: Duration of status ailments halved
(E) Cleanup Crew
Every 6.5s: Cleanse an ally of 1 debuff. Radius: 5

BEHAVIOUR
(L) Inconspicuous
Become less likely to be targeted
(L) Ingenious
Always target the opponent with the lowest HP
Talents (Pt 4) - Damage / Conversion / Ailments / Summons / Auras
DAMAGE MULTIPLIERS
(R) Martial Mastery
Physical Damage increased by 10%
(R) Elemental Mastery
Elemental Damage increased by 15%
(E) Adaptive Offence
If the opponent is weak to the element of your attack: Deal an additional 30% damage
(R) Bully
Deal 15% more damage to smaller opponents, 15% less to larger opponents
(E) Demonbane
Unit deals 30% more damage to Demons
(R) Yeet
(Ranged) Projectiles gain 2% damage per unit traveled
(E) Focused
Increase damage by 10% every second, resets after attack
(R) Charge!
On attack hit: Deal 10% more damage for each 1 unit this unit has moved since its last attack
(E) Turret
(Ranged)Unit cannot move, but deals 25% more damage
(E) Quick Draw
Battle Start: Your first attack does 300% damage

ELEMENTAL CONVERSION
(R) Heated
50% of attack damage converted to Fire
(R) Shocking
50% of attack damage converted to Lightning
(R) Winded
50% of attack damage converted to Wind
(R) Chill
50% of attack damage converted to Ice
(R) Emo
50% of attack damage converted to Darkness

STATUS INFLICTION
(L) Master of Elements
Attacks have increased Elemental status buildup
(E) Arsonist
On attack hit: If the target is Burning, extend the duration of the Burn
(E) Chisel
On attack hit: If the target is Frozen, send out Frost shards in 8 directions, dealing (8+50%MAG) Ice damage
(E) Smite
On attack hit: If the target is Paralysed, deal an additional (8+10%MAG) to (8+60%MAG) at 78 MAG) Lightning damage
(E) Waft
On attack hit: If enemy is Weakened, apply Levitate: Weight -4
Please note that "Weakened" is an inconsistent translation of the Wind status ailment.
(E) Defile
On attack hit: If enemy is Poisoned, apply Strong Poison (Deals 5% Max HP/Sec, 2.5% vs Demons)
(E) Demoralise
On attack hit: If enemy is Feared, all enemies are feared (Triggers once every 10s)
(E) Lacerate
On attack hit: If enemy is Bleeding, apply Wounded: Inflicts 2% of Missing HP as damage for every unit moved

SUMMONS
(E) Mentor
(Summon) This unit's summons gain "Heavy Blow", granting a 25% chance to deal 3x damage
(E) Cheerlead
(Summon) This unit's summons gain 20% ATK and 30% Attack Speed
(E) Loud Voice
(Summon) On Abilty use: 30% Chance to summon an additional summoned unit

AURAS
(E) Eyecandy
Aura: All enemies recharge 2 less Mana/second and their abilities are weakened by 10%. Does not stack
(E) Leadership
Aura: Allies gain 20% Movement Speed and 10% Attack Speed. Does not stack
(E) Healing Aura
Aura: All allies recover 2% HP per second. Does not stack
(E) Moral(sic) Boost
Aura: All allies recover 3 MP per second. Does not stack
(E) Intimidating
Aura: All nearby enemies lose 15 DEF. Does not stack
Talents (Pt 5) - Periodic / Attack / Hit Triggers
PERIODIC
(R) Play-Dirty
Every 7 seconds: Next attack will dispel buffs from enemies struck
(R) Tai-chi
Every 8s: Gain 1 stack of Reflect
(E) Rainstorm
(Ranged) Every 7s: Attack all nearby enemies
(E) Double Strike
(Melee) Every 3s: The next attack strikes twice
(E) Dominion
Every 2-6s: Deal (3+10%)MAG damage to surrounding enemies. Radius 3
(E) Cleanup Crew
Every 6.5s: Cleanse an ally of 1 debuff. Radius: 5
(E) Judicator
Every 30s: Summon a blade of Judgement, dealing (200+10*Lvl) true damage to opponent with the highest HP (Deals 10% more damage for every other opponent alive)
(E) Static Electricity
Every 2-6s: Deal (8+30%MAG) lightning damage to 2 nearby opponents

TRIGGERS ON ATTACK
(E) Shotgun
(Ranged) On Attack: Fire 2 additional projectiles in a fan shape, they deal 50% damage. Will slightly track multiple targets, but cannot hit the same target
(E) Firework
(Ranged) On Attack: Fire projectiles in 8 different directions.
Note this includes the direction your original attack was in.
These projectiles do not proc on attack hit effects
(E) Boomerang
(Ranged) On Attack: 25% chance to create an orbital projectile, dealing 50% damage. Lasts for 10s
(E) Chuck
(Ranged) On Attack: 33% chance to fire an additional projectile to a second target in range
(R) Rapid Fire
(Ranged) Movement Speed -30%. On Attack: 60% chance to fire an additional projectile

TRIGGERS ON ATTACK HIT
(E) Sparkle
(Ranged) On attack hit: Fire 5 projectiles in random directions, each dealing 50% damage
(E) Chain
(Ranged) On attack hit: Projectiles can chain up to 3 times, doing 20% less damage per chain
(E) Sweeper
(Melee) On attack hit: Deal 30% Cleave damage to enemies.
(E) Gyrate
(Melee) On attack hit: 35% chance to deal 60% Splash damage to enemies
(R) Crusher
On attack Hit: 20% chance to shred 2 DEF
(E) Drain
On attack hit: 25% chance to steal 20 Mana (5 Mana on Demons)
(E) Irritate
On attack hit: Target loses 5 Mana
(R) Overpower
On attack hit: Lose 10% of current HP, deal that amount in true damage
(S) Overpower SE
On attack hit: Lose 20% of current HP, deal that amount in true damage
(L) Herald of Flame
On attack hit: Deal 50% MAG Fire damage
(L) Herald of Frost
On attack hit: Deal 50% MAG Ice damage
(L) Herald of Wind
On attack hit: Deal 50% MAG Wind damage
(L) Herald of Lightning
On attack hit: Deal 50% MAG Lightning damage
(L) Herald of Blight
On attack hit: Deal 50% MAG Poison damage
(E) Methodical
On attack hit: Gain 20% Crit (stacking), resets when a Critical strike is dealt
(E) Retaliate
On attack hit: Add damage equal to damage taken in the last 1s
(S) Retaliate SE
On attack hit: Add damage equal to damage taken in the last 2s
(E) Curveshot
(Ranged) On attack hit: Attacks will fork to an opponent within 15 degrees behind the initial target
(E) Wind Vortex
On attack hit: 15% chance to create a Wind Vortex, pulling opponents in and dealing X(29 with 10 MAG) Wind damage
(E) Rime Beam
On attack hit: 20% chance to fire an ice beam forwards, dealing X Ice damage
(E) Chain Lightning
On attack hit: 20% chance to deal additional (50%-200%MAG) Lightning damage to up to 3 nearby opponents
(E) Hurricane
On attack hit: 20% chance to deal additional (15+150%MAG) Wind damage and shred DEF by 2 points for 10s
(E) Gale
On attack hit: Deal 100% of ATK in Wind damage (Skill is fixed now)

TRIGGERS ON ANY HIT
(E) Starfall
On any hit: 16% chance to summon a meteor dealing (16+200%MAG) Fire damage on the target's location
(S) Starfall SE
On any hit: 13% chance to summon a meteor dealing (33 + 250%MAG) (estimated) Fire damage on the target's location
Talents (Pt 6) - Ability Use / Reactive Triggers
TRIGGERS ON ABILITY USE
(E) Magic Armour
On ability use: Gain (50%Mana REQ*(1+0.1*Lvl)) Shield
(E) Fragrance
On ability use: Heal a random ally for (50 + 2xLv) HP(
(E) Transmutation
On ability use: Heal self for 15% of Max HP(
(E) Inspiration
On ability use: 33% Chance not to consume the MP cost. (5s CD)
(E) Ignition
After ability use: Gain 100% Fire damage on attacks for 6s
(E) Ice Cold
After ability use: Gain 100% Ice damage on attacks for 6s
(E) High Voltage
After ability use: Gain 100% Lightning damage on attacks for 6s
(E) Venomous
After ability use: Gain 100% Poison damage on attacks for 6s
(E) Deft Hands
After ability use: Gain 15% MAG (Up to 45%)
(E) Electric Charge
After ability use: The next 3 attacks deal X blasts of Lightning damage

TRIGGERS WHEN HIT
(E) Rough Skin
When hit by enemy: Reduce attacker's Attack Speed by 20%
(Stacking up to 100%, lasts 3s)
(E) Infernal Armour
(Melee) When hit by enemy: 15% chance to burn nearby opponents
Deals (6+1xMAG) Fire damage. Radius: 3
(E) Storm Armour
(Melee) When hit by enemy: 15% chance to fire a whirlwind.
Deals(5+1xMAG) wind damage and knockback: 2. Radius: 4
(E) Toxic Armour
(Melee) When hit by enemy: Deal (8+20%MAG) poison damage to the attacker
(E) Anger Issue
(Melee) When hit by enemy: Gain 2% Crit chance and 4% Crit damage.
Stacks 25 times for a total of 50% Crit chance and 100% Crit damage.

TRIGGERS ON DEATH
(R) Insurance
On Death: Grant Shield equal to 30% Max HP to the ally with the lowest HP
(E) Explosive
On Death: Explode, dealing 30% Max HP damage to nearby opponents
(E) Martyr
On Death: Grant all allies 80% ASPD for 6s
(E) Unyielding Presence
On Death: Summon a Phantom of self to keep fighting for 8s
(R) Charity
On Death: Grant all allied units 30% Mana
(S) Charity SE
On Death: Grant all allied units 70% Mana

TRIGGERS ON LETHAL DAMAGE TAKEN
(L) Indomitable
When taking fatal damage: Remain at 1 HP for 6s (Once per battle)
(S) Indomitable SE
When taking fatal damage: Remain at 1 HP for 5s and gain 100% Attack Speed. (Once per battle)
Common Talents
These are all negative talents and you want to delete them most of the time.

Name
Effect
Anxious
Weak to Lightning Damage
Asthmatic
Weak to Wind Damage
Nyctophobic
Weak to Darkness Damage
Flammable
Weak to Fire Damage
Flu-prone
Weak to Ice Damage
Light Bones
Weak to Slash Damage
Thin Skinned
Weak to Pierce Damage
Unhygienic
Weak to Poison Damage
Starved
Weak to Concussion Damage
Slacker
Attack Speed decreased 20%
Lazy
Stunned for 5s at battle start
Slow
Movement speed -50%
Dumb
Mana regen -3
Dejected
WP decreased by 60
Carefree
Crit chance decreased by 30
Wimp
Knockback -2
Anaemic
Def decreased by 10
Rebellious
Reduce healing received by 50%
Malnourished
Weight decreased by 2
Unlucky
Halves the trigger chance of other abilities/Talents
Timid SE
Feared for 1s whenever an ally falls in battle.
Griefer
Debuffs on self last 50% longer
Legendary Talents
These are Legendary talents (Yellow). Legendary Skill Jades are limited in number right now, so you probably want to focus on these when breeding. They are often the strongest types of talents, stronger than the majority of Shiny talents.

Name
Effect
Indomitable
When taking fatal damage: Remain at 1 HP for 6s
Trance
Consecutive attacks on the same target grant 10% Attack Speed, up to 120%. Resets when switching targets.
Luckystar
Double the trigger chance of other abilities.
Intuition
Crit chance increased 20%, Crit damage increased 100%
Ingenious
Always target the opponent with the lowest HP
Herald of Flame
Deal 50% of ATK in Fire damage on normal attacks.
Herald of Frost
Deal 50% of ATK in Ice damage on normal attacks.
Herald of Wind
Deal 50% of ATK in Wind damage on normal attacks.
Herald of Lightning
Deal 50% of ATK in Lightning damage on normal attacks.
Herald of Blight
Deal 50% of ATK in Poison damage on normal attacks.
Perfection
Gain 1% HP/ATK/MAG/Crit/Healing/Status Res/LUCK per Research Level (caps at 10)
Brilliant
MAG increased 35%
Tyrant
ATK increased 35%
Royal Bloodline
HP increased by 40%
Inconspicuous
Become less likely to be targeted
Consecrated
Gain status immunity
Master of Elements
Attacks have increased Elemental status buildup
(L) Rewind
The first time HP drops below 30% each battle, blink to the back row and heal 30% HP
Elite Heritage
Mana cost of ability reduced by 30%
Shiny Talents
Shiny Talents are upgraded versions of lower-level talents. Now I'll be candid with you - many of these are weak and not worth using. Overpower SE is downright suicidal, for example. Generally speaking, the usable ones are Investment SE for ability spammers, Mind over Matter SE, and Starfall SE. Grand Entrance SE is good for tanks/assassins. The rest are a bit situational, although Charity SE has one special mention for being crucial for a degenerate loadout (to be covered later).

Since you're a smart reader, you're probably wondering: If these skills are kind of mediocre, why breed shinies? Well, Shinies still have 2 guaranteed 6 potential stats, which helps increase the probability that your offspring will have great stats. Also, they are pretty.

Name
Effect
Overpower SE
On attack Hit: Lose 20% of current HP, deal that amount in true damage
Starfall SE
On attack hit: 13% chance to summon a meteor on the target's location, dealing fire damage.
Retaliate SE
On attack hit: Deal extra damage equal to damage received in the last 2s.
Mind Over Matter SE
ATK decreases by 25%, MAG increases by 40%
Indomitable SE
When taking fatal damage: Remain at 1 HP for 5s and gain 100% Attack Speed
Rewind SE
When HP drops below 20% for the first time: Blink to the back of the field and heal for 50% HP
Alpha SE
If there are 2 others units of the same species: ATK/HP/MAG increased 25%
Tunnel Vision SE
Mana regen decreases by 5/s, WP increases by 300
Investment SE
Lose 4% Max HP/second, gain 10 Mana/second
Charity SE
On Death: Recharge allies' Mana by 70%
Grand Entrance SE
Battle Start: Blink behind the farthest enemy, gain 30% DEF and 100% Crit chance for 6s
YaoLing List (1-60)
ID
Family
Location
Ability Summary
3rd Form
Demon Form
Notes
1
Moustrike
(10)Ratzor
(32)Rodenja
Shadowtail
Fig Forest
Attacks Backline for Fire damage + Bleed
Guaranteed Crit
Attacks 3 random enemies
-
5
Bunbow
(8)Herbunny
(28)Florbunny
Terrigaze
Fig Forest
Arrow barrage + proc on hit effects + LUCK buff
6 Attacks
8 Attacks, higher cost
Sustains well with Drain. Focus on MAG over ATK.
9
Rockoon
(12)Chuckoon
(33)Rekkoon
Grinhurl
Fig Forest
AoE damage + Knockback
Does Pierce damage to hit target
Higher mana cost, 3 secondary explosions.
-
13
Muzzlewack
(9)Barktooth
(40)Clubfang
Rictushriek
Fig Forest
20% Selfheal + (Attack Speed + Movement) Buff for 8s
Shares buff with 1 ally
Applies status ailments at 200% the rate
-
17
Lurkwulf
(20)Bandiwulf
(38)Wulfgang
Dreadprawl
Fig Forest
Summons a wolf minion with high Crit
Summon 2 wolves at a time
First cast summons 3 wolves instead
-
21
Zpear
(14)Lizpear
(34)Lizgard
Wraithlash
Fluvial Hills
AoE Poison damage + Stacking permanent DEF buff
Reduces enemy Def
Changes Ability to a permanent aura dealing DoT Darkness damage to close units.
Infinite scaling on DEF buff makes normal unit the strongest DEF tank
25
Lume
(12)Lumina
(35)Owlumina
Noculipse
Fluvial Hills
Heals Lowest HP units
Heals 5 allies and cleanses
No longer heals, drains 10%++ of enemy HP
Decent starter healer. Smart targeting.
29
Duskit
(15)Duskat
(38)Artepuss
Umbravix
Fluvial Hills
Piercing Wind attack, knocks back
Dispels buffs
Applies Mana Lock, disabling mana gain for a short duration (bugfixed)
One of the few dispelling units. Mana seal is useful too.
33
Keenine
(15)Howledge
(36)Shroudfang
Ravedge
Fluvial Hills
Stacking permanent HP/ATK/WP buff. Cost increases per use.
Buff also increases Status resistance.
Buff also increases Crit Rate
Fast attacker. Tanking ability needs time to ramp.
37
Bax
(28)Rushorn
(48)Quakehorn
Doomhorn
Titan Woods Peach Grove
Deals AoE Concussion damage and knocks back
Applies additional Stun buildup
Does additional attack to single target
Starter unit, can get somewhat tanky
41
Floop
(16)Fronderer
(37)Vigilantoad
Scarleapt
Riverbloom Valley
Randomly leaps at multiple enemies, dealing Poison damage. Damage increases with distance.
Slightly better scaling
Slightly worse scaling.
-
45
Crowlet
(18)Phancrow
(42)Brimgwing
Crowlamity
Peach Grove
Temporary self buff: Deal additional Darkness damage and attacks pierce.
Guaranteed Crit if opponent is feared
2 additional projectiles
-
49
Swotter
(28)Meditott
(46)Otterzen
Rakshott
Peach Grove
AoE Wind damage, gains immunity to ranged attacks during animation
Knocks enemies back, swings 10 times
Vacuums enemies in. Swings 6 times
-
53
Cinderkit
(20)Kitzember
(42)Flamenix
Vixtress
Peach Grove
Summons up to 5 wisps which attack when the unit attacks
Starts battle with 2 wisps
Gain a wisp whenever defeating an opponent
-
57
Pangoling
(36)Panguardin
(55)Pangocoil
Marrogash
Black Mountain
Shreds DEF and interrupts enemy
50% more damage to enemies above half HP
Creates shockwaves which deal 50% damage
-
YaoLing List (61-120)
ID
Family
Location
Ability Summary
3rd Form
Demon Form
Notes
61
Laventot
(11)Lavenfly
(30)Lavenqueen
Flamender
Fig Forest
Restores Mana to 1 ally. Cost increases per use.
Automatically targets lowest Mana ally and grants MAG buff
AoE weaker mana restoration, removes MP from enemies
-
65
Mosswisp
(18)Pedalmoth
(42)Mossokis
Mesmermoz
Leviathan's Domain
Teleports back, summons 2 temporary clones dealing AoE wind damage
Slows enemy
Summons 1 more clone behind the enemy
-
69
Mintling
(21)Changling
(36)Cointaur
Mormetal
Queen's Vale
Temporarily loses Attack speed and Def, gain ATK, knockback power and knockback resistance
ATK and DEF changes are stronger
Gain 50% Status RES and Knockback immunity
-
73
Scorplune
(22)Analune
(35)Anuyi
Anula
Queen's Vale
Deals ranged Darkness damage. Creates weak friendly clone of opponent. Opponent will take 50% of the damage the clone does.
-
Summon's Attack Speed increased by 100%
-
77
Seeper
(21)Lashsprout
(32)Inscyther
Reaploom
Riverbloom Valley
Teleport behind lowest HP enemy and deals Slash damage. Does AoE damage if the target dies. Deals more damage the lower the HP of target.
Recover 30% HP on kill.
Recover 50% of Mana on kill
-
81
Shockle
(17)Voltzard
(36)Zapsilisk
Malvanic
Riverbloom Valley
Throws a spear dealing pierce damage. Spear does lightning damage periodically to nearby opponents and draws them in.
7 ticks of damage
Throws 3 spears, dealing 5 ticks of damage
-
85
Battusk
(17)Vampwing
(29)Nocula
Fangraze
Fluvial Hills
Gain buff - Leeches HP to self and one ally, gain 10% of damage done as ATK
Buff lasts 10 sec
Buff lasts 7 sec. Gain 10% attack speed per second of the buff
-
89
Rattlesong
(36)Serpentune
(50)Toxithrall
Cursela
Black Mountain Amethyst Mountain
Summons up to 4 snakes behind enemies. Snakes apply poison buildup.
Snakes have slightly more HP
Snakes deal 100% more damage against poisoned targets
-
93
Salachid
(22)Serepent
(43)Vespernox
Malivoo
Riverbloom Valley
Apply Poison DoT to lowest HP opponent, decreasing DEF. DoT will transfer to random opponent if target dies.
Prevents healing
If target dies, 25% of its max HP is dealt as damage to all nearby opponents
-
97
Cuttodile
(19)Cleaverdile
(42)Crocovile
Massacroc
Riverbloom Valley
For 5s, does AoE Slash damage while moving towards opponents. AoE grows with time.
While attacking, gain 50 DEF and immunity to debuffs
Penetrates 80 DEF
-
101
Rhinebeat
(22)Rhinebrate
(34)Rhinegong
Infernus
Titan Woods
Ally attacks in a location become Fire element and damage is increased. Effect persists for 5s after leaving area.
Larger AoE
Applies 20 burn buildup per second to enemies in area
-
105
Lullahorn
(22)Songhorn
(37)Baalody
Sedusa
Titan Woods
Shoots a tornado, pulling in opponents and dealing Wind damage. Tornado slows down each second.
Larger AoE
30% chance to summon 2 additional tornadoes
-
109
Galestride
(21)Rumbstead
(38)Gallopurge
Samurampt
Peach Grove
Charges at enemy, knocking them back and dealing Pierce damage. Deals more damage the further the distance moved
Longer distance
Ends in AoE dealing Concussion damage and applying 50 Stun buildup to nearby opponents
-
113
Drifpine
(17)Quillguard
(33)Hedgemon
Ferropale
Fig Forest
AoE taunt, blocks damage from attacks and shoots out thorns when attacked
Procs thorns once every 0.2s
Longer range thorns spray within a 90 degree arc toward attacker. Can shotgun. Triggers once every 0.5s.
-
117
Grimpaw
(23)Tilash
(35)Noxsho
Cynigash
Black Mountain
Leap towards enemy with the highest HP. Deals more Pierce damage the more HP the target has.
Attacks twice, ignores 50 DEF
Attacks Twice. Increases Attack Speed 200% for 2 sec
-
YaoLing List (121-180)
ID
Family
Location
Ability Summary
3rd Form
Demon Form
Notes
121
Clubcub
(21)Polarmace
(28)Ursalanche
Tedditerror
Amethyst Mountain
Slams ground, dealing AoE Ice damage and knocking up opponents
Reduces opponent Attack Speed by 30% and Movement by 50% for 5s
Higher mana cost, creates 3 AoEs, knocks back
-
125
Arruda
(20)Aruhadi
(41)Sirius
Sinrudis
Riverbloom Valley
Inflicts Ice damage and Ice vulnerability
Ability has a small AoE
Freezes target for 3 seconds, does another 50% damage when effect wears off
Very high ATK growth, but extremely slow attack speed
126
Yaka
(21)Yaken
(39)Yakuro
Fiendstead
Titan Woods
Self cleanse Buff: increase ASPD 300% Block attack damage Decreased mana recharge Stun self when skill ends
Shorter Stun duration (2s)
Heal self for 4%/sec
-
133
Bobo
(12)Moco
(26)Shalo
Vexo
Fig Forest
Throws a fan of 6 Pierce damage blades
Blades split into two midflight.
Throws 12 Blades in a ring, which return.
-
134
Mastiff
(38)Gigantiff
(52)Colostiff
Masterror
Great Rift
Summons a thunder cloud, strikes random opponents 5 times for Lightning damage. Attacks deal 30% Lightning damage for 10s
On attack hit, 44% chance to inflict lightning strike
When attacked, 22% chance to inflict lightning strike
-
135
Droplet
(35)Narcinie
(47)Aquora
Byssbloom
Western Gulf
Create 5 orbiting pearls, doing damage on impact
Pearls rotate faster
Create 3 larger pearls instead
-
145
Poshell
(50)Shellchemy
(66)Elixishell
Venomper
Western Gulf
Throw a projectile which bounces once. Creates AoE field on impact which deals Fire DoT damage and heals all allies within for 5s
AoE restores 20 Mana/sec
AoE cleanses debuffs
Very high DEF for a support Excellent melee healer
149
Spearfin
(36)Tridefin
(50)Ripplance
Mawserrate
Western Gulf
Creates an AoE dealing 10 hits of Ice damage, applying extra Freeze buildup
16 hits
-
-
153
Bubber
(22)Gurglio
(37)Reinkoil
Achermaw
Fluvial Hills
Silences random opponent for 3s Creates a bubble, exploding after 3s, applying 50 points of random status buildup
Bubble also deals random elemental damage equal to 50% of damage received while bubbled
Explosion creates 3 smaller bubbles on nearby opponents with 33% effectiveness
Reinkoil is a very strong damage multiplier
157
Bubliss
(38)Melochat
(50)Achorus
Sirena
Frostpeak Fortress
Grants Redemption to 3 allies with lowest HP, preventing HP from falling below 1 for 8 sec. Mana cost increases 50% per use.
Heal affected allies when effect ends
No longer buffs Debuffs opponent with lowest HP, preventing damage/healing for 8s Opponent takes 2x prevented damage at end of effect. Mana cost increases 50% per cast
Very strong healer, but requires percentage mana regeneration like Clarity. Sirena is similar to Reinkoil with a stronger multiplier, but may work against you due to the immunity.
161
Gunster
(25)Shelgun
(45)Cannonlob
Scorchrack
Black Mountain
Summons 2 shrimplings, firing 4 volleys with a 20% crit rate
Summons 3 Shrimplings
Summons 2 fire shrimps Attacks pierce enemies and deal 5 ticks of fire damage
-
165
Crabrock
(38)Rockrab
(50)Drillpinch
Moltcan
Western Gulf
Gain a shield for 10s Shield explodes for AoE Ice damage when expiring Damage scales with remaining shield amount
-
While shield is up, reflects 50% MAG of damage when attacked
-
169
Lotsy
(27)Lolla
(49)Lotmosa
Nyxsa
Northern Snowfield
Randomly buff 3 allies: Regenerate HP for 10s Resist Ice damage Luck increased by 50%
Buff temporarily increases Max HP
Instead, channel for 8s Each second, heal 5 random allies and grant a buff stack for 2s (Max 12 stacks) Buff increases frost resistance, and healing received/Luck by 10%
Very random healer with a fast attack speed
173
Orby
(27)Icephere
(44)Blizzball
Glacieraith
Northern Snowfield
Rolls a snowball for 4s, dealing area damage and knocking opponents back
Snowball grows bigger with distance
Damage and knockback increase with distance
Like that little boy character from the popular game "League of Legends"
177
Boltee
(23)Shocklass
(40)Jestricity
Harlewatt
Amethyst Mountain
Channels for 8s, randomly releasing lightning balls at 300% of Attack Speed. Balls deal Lightning damage each second when passing through opponents.
25% chance to release a larger lightning ball for double damage
Surrounds self with lightning Lightning arcs between pairs of bolts for 3s, dealing 50% damage
-
YaoLing List (181-240)
ID
Family
Location
Ability Summary
3rd Form
Demon Form
Notes
181
Songcada
(30)Serenada
(46)Eternica
Enchantress
Queen's Vale
Randomly strikes 15 times for Wind damage, inflicting Silence for 2s and reducing all Status resist by 20%
Debuff stacks up to 3 times
Silence lasts for 3 sec
Very strong debuffer and CC unit with amazing DPS potential
185
Wandersun
(48)Brawlersun
(60)Domisun
Wu Kong
Golden Valley
Creates a clone of self behind target for 12s, inheriting all talents and a proportion of own stats
Clone lasts 18s
Create 2 clones, lasting for 7s
Enables many degenerate strategies with on-Death or On Hit effects. Amazing Mana battery. Very versatile.
189
Fawnduo
(43)Retaineer
(52)Adepdoe
Inferdoe
Golden Valley
Summons 4 swords, dealing Pierce damage to different targets. Each subsequent hit deals 20% more damage and applies on hit effects.
Summons 6 swords
Lifesteal: 30% of damage dealt
-
193
Pawnda
(44)Panbrawl
(55)Pandover
Pandevil
Harvest Fields
Deals Wind damage to a cone Knocks targets back, reduces their mana by 50
Damage increases with every target hit
Gain shield for every target hit
-
197
Scaleaf
(56)Vinecoil
(67)Vergalia
Hellthorn
Lotus Pool
Fires a slow poison orb dealing Poison damage every second. Leaves a cloud applying 20 poison buildup.
Ally attacks deal 30% additional poison damage
Reduces 5 DEF per sec
-
201
Weavy
(49)Spinnit
(59)Danseama
Arachloom
Lotus Pool
Summon 8 spiderlings with no collision. Spiderlings deal Darkness damage.
Spiderlings multiply after 6 attacks
Spiderlings explode in an AoE for 20% HP in Darkness damage on death
-
205
Whippy
(49)Whuppa
(59)Whipstache
Fettermaw
Lotus Pool
Releases 5 vine traps for 5s around unit. Traps root enemies which touch them, dealing Poison damage every second
Trapped enemies lose 30% Attack Speed
Releases 7 traps
-
209
Shask
(52)Spectrask
(63)Masqueraith
Wraithstress
Guardian's Ridge
Pulls opponent with lowest HP to self, dealing Slash damage while attacking them once
Refunds mana cost if target dies while being grabbed
Execute target if HP is below 15%
-
213
Duskeen
(50)Scentinel
(59)Nocturoam
Stygifang
Evernight Woods
Marks closest opponent for 8s, shredding DEF and making ranged allies attack them. When marked, ranged allies launch 1 extra attack at marked enemy
If target dies while marked, increase ATK of all allies by 10%
Increases own Attack Speed to marked target by 50%
Synergy with slow attackers like Aruhadi family, bad on bosses
217
Lingeraze
(55)Pupisight
(65)Seekerite
Liegeling
Bronion Ruins
Shoots a piercing laser in a fan sweep, dealing fire damage every second
Causes an explosion at the end
Deals true damage
-
221
Totodd
(52)Totanger
(60)Emotem
Malevotem
Guardian's Ridge
Transforms for 12s, attacks deal Darkness damage, Max HP is increased and Weight increases by 1
Deals 30% increased Darkness damage
Applies 70 points of Feared buildup to nearby opponents
-
225
Lanty
(54)Lampid
(65)Lumicarp
Lampdra
Fort Wharf
Self-destruct, dealing Concussion and Fire damage in an area. Damage scales with current HP
Higher damage scaling
Instead of dying, consumes 50% of current HP
-
229
Roslet
(30)Bloomaid
(57)Florstress
Carntitress
Peach Grove
Randomly buffs 3 allies for 8s: 30 DEF penetration Crit rate increased by 30% Crit damage increased by 50%+30%MAG
Affects 5 allies
Only affects self Crit rate increased 50% instead Crit damage increased by (100%+30%MAG)
Very large damage increase
233
Seallu
(58)Pineseal
(64)Sealighten
Necroseal
Harvest Fields
Links 3 opponents/allies. Whenever 1 takes damage, all linked opponents also receive 40%+10%MAG of that damage
Links 4 units
If a linked target dies, the link transfers to a new target
-
237
Jatu
(50)Pilikal
(61)Jakalace
Tyrakal
Fort Wharf
Fires 30 low accuracy shots in a fan. Each shot that hits restores 5 mana
Accuracy slightly improved, decreasing angle of fire
-
-
YaoLing List (241-297)
ID
Family
Location
Ability Summary
3rd Form
Demon Form
Notes
241
Plateling
(39)Guarmetal
(56)Wardendure
Religeist
Frostpeak Fortress
Grants 3 allies (10+20%MAG) Shield.

Gain 50% Status resistance while shield lasts
Affects 4 allies
Only affects self Reflect 50% of damage taken as true damage
-
245
Bangbang
(50)Boomboom
(62)Dongdong
Doomdoom
Harvest Fields
Attacks deal Concussion damage to nearby opponents instead.

Each attack grants a 5s buff to allies which increases ATK by 5%.

When buff expires, deals (MAG*(1+20*Stacks) damage.

Area increases with Stacks
Attack AoE scales with stacks
Taking damage has a 25% chance to grant a stack of the buff
-
249
Astar
(57)Stellux
(64)Aegistelle
Aegisvex
Bronion Ruins
Become invincible and increases Luck by 100% for 5s.

Mana cost increases by 40% per use (not stated in ability)
Nearby Allies have 33% chance to gain Invincibility
7% chance to do 700% damage
-
253
Wanny
(40)Cresenla
(58)Celesprita
Celenyx
Geyser Forest
Darkness AoE. Deals (5-35%) more damage, increasing with opponent size
Hit debuffs ATK/MAG by 50% for 5s
Rains down 5 waves of AoEs at random spots
-
257
Poundor
(56)Crusheron
(66)Malletmaw
Maelstrum
Bronion Ruins
Smashes 3 times, creating AoEs around all allies, dealing Fire damage to nearby enemies.

Each smash increases the area by 25%
Next 3 attacks also create the AoE
Emits thorns from both allies and enemies
-
261
Senzor
(47)Furend
(65)Excaladin
Durandoom
Golden Valley
Charges 3 times, dealing Pierce damage to all opponents hit
Charges 4 times
Summons 7 blades to fly at random opponents
-
265
Bungo
(12)Vagabun
(30)Harogue
Vorbane
Starter
Deals Slash damage to main target, then a Wind damage AoE.

Each use of this ability increases AoE by 20%, to a limit of 100%
If target is the only enemy hit, damage is doubled
Instead, deals AoE Slash damage twice
-
269
Flenny
(12)Foxire
(30)Furniere
Pyravix
Starter
Deals 2*ATK AoE Concussion damage.

Ignites ground to burn opponents for 50%MAG Fire damage every 0.5s for 6s
Ground AoE lasts 9s (total 300%MAG more damage)
Fires 3 arrows instead
Note that arrow explosions scale with ATK, not MAG
273
Meep
(12)Merlaw
(30)Merking
Abyseer
Starter
Gain Status/Knockback immunity

Pulls in enemies in a large AoE, ending with a 150% MAG Ice AoE to all nearby opponents
Decreases Attack Speed and Move speed of affected opponents by 70%
Deals (90%MAG*(1 to 2)) Darkness damage per tick to nearby enemies, damage increases with proximity
Explosion is quite weak, but the suction effect is gigantic
277
Tifur
(30)Tigrunt
(60)Khangur
Khan of Flames
Boss
Leaps towards an opponent, dealing (350%MAG) AoE fire damage and knocking them back
Grabs opponent and powerbombs it onto another opponent. Deals 200%ATK Concussive damage to grabbed opponent
Slams the ground 3 times for (250%MAG) Fire damage with each slam
Khangur will interrupt enemy actions and is invincible while powerbombing them, but your ally attacks will also probably miss.
281
Wyrmy
(30)Scalyx
(60)Eysdrax
Thousand-Gaze
Boss
Fires an orb which chains 4 times off random allies, Cleansing and healing (20+3*MAG) HP
Each bounce also deals (2*ATK) Poison damage to nearby opponents
Instead, fires an orb which bounces 4 times off opponents, dispelling buffs and dealing (10+1.5MAG) Poison damage per bounce. Final bounce creates poisonous ground, dealing 0.5*MAG/0.5s Poison damage for 6s
Demon version is a rare dispeller
285
Frosly
(30)Galie
(60)Alluair
Ninetails
Boss
Shoots a blizzard towards the enemy, dealing (30+5*MAG) Ice damage and applying 30 Freeze buildup.
Blizzard is larger
Creates 9 blizzards which blow in random directions instead
-
289
Tunie
(30)Lyrotun
(60)Axeman
Rocklorde
Boss
Creates a ring of electricity which expands and contracts 3 times, dealing (50%MAG) Lightning damage on contact and inflicting Petrify (-100% Attack and Move speed) for 0.5s
Expands and contracts 4 times
Next 3 attacks will create an additional ring
Rings hit twice per expansion/contraction cycle
293
Cardiling
(30)Scarpy
(60)Solcrow
Raven
Boss
Leaps back, then flies forward, creating 15 AoEs dealing (300%MAG) Pierce damage.
AoEs track opponents
Leaps into the air on the spot instead
Avoids most attacks while flying AoEs are slightly inaccurate
297
Didi
Unknown (Western Gulf Cage in Fluvial Village)
Taunts furthest opponent, then runs away

Opponent gains debuff Annoyed: Attack Range -5, is unable to cast abilities.

If target dies while debuff is active, fully recharge mana
Does not evolve
Does not evolve
Quick recharging rare taunt, useful on Demon fights, but may lead boss on top of your backline
Extra Random Questions nobody asked.
This is an extra general questions section.

Q: How do you sustain Soul Crystals?
A: Commissions at the Tavern are currently the only real way of getting significant amounts of Soul Crystals. Hunting Demons in the meanwhile can provide you with a small amount and is a good way to level up units at the endgame when you unlock a certain boss rush area.

Which units should I use?
A: I'm compiling (very slowly) a YaoLing scroll which is only 56/297 units in. You shouldn't expect it any time soon. I can give general tips on YaoLing if needed, but I think one of the fun parts about this game is that almost every single YaoLing I've seen has a purpose and can be made to work. You should play around and find what works for you, because that is part of the fun of the game.

Just as an example, Bunbow, which is one of the first YaoLing you ever meet, can be potentially S-tier material with a little bit of breeding.

I hate thinking/have completed the game and just want a way to farm demons effectively.
A: I'll share a degenerate strategy I use to farm all demons by using one of the most broken units in the game.


(Space for spoilers)


Behold the pinnacle of Mechanics abuse. Make two of these or back them up with a decent Wind debuffer and you'll never have to worry about Demons getting a skill off again because they simply won't have any mana.

Wu Kong is an absolutely degenerate unit to use because his summons sharing his Talents means that they also trigger "On Death" skills, meaning you can combine them with Charity to feed your entire team with % mana, letting you spam skills which shouldn't be spammable and have an increasing cumulative Mana cost to stop you from doing that normally. Charity also feeds himself with Mana, so you'll always have summons up.

Incidentally, his summons also trigger "At Battle Start" skills.

He generates an absurd amount of hits, so he is a great candidate for Irritation and Drain, while building a crazy amount of Stun on the boss. There's probably about a hundred different builds with Wu Kong alone.
47 Comments
Passi Biceps Mar 29 @ 7:22am 
Hi there,

thanks for the awesome guide! :)

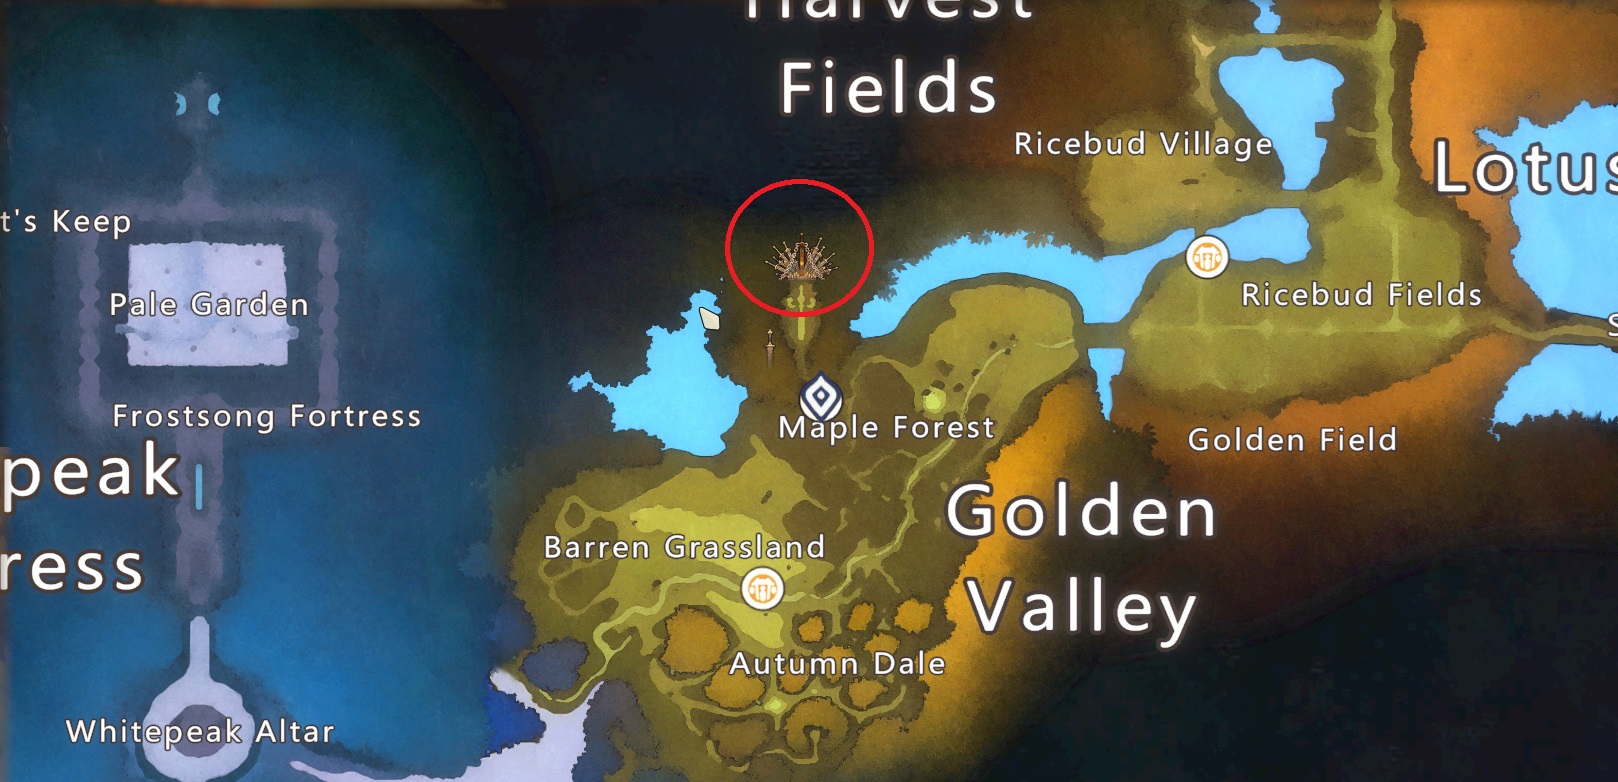
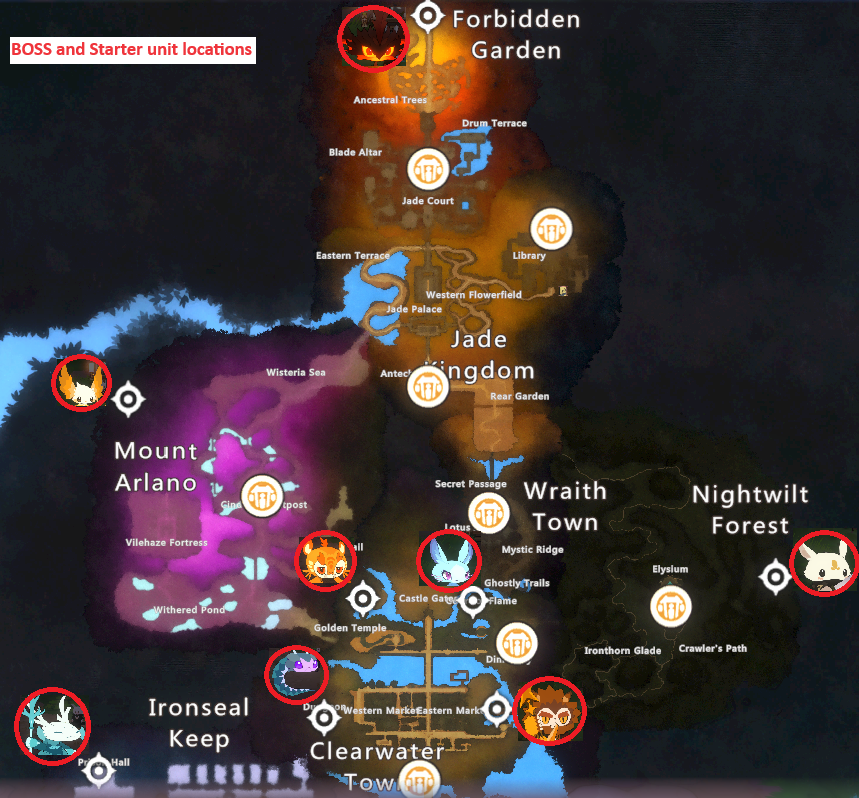
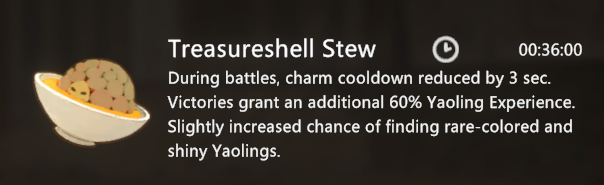
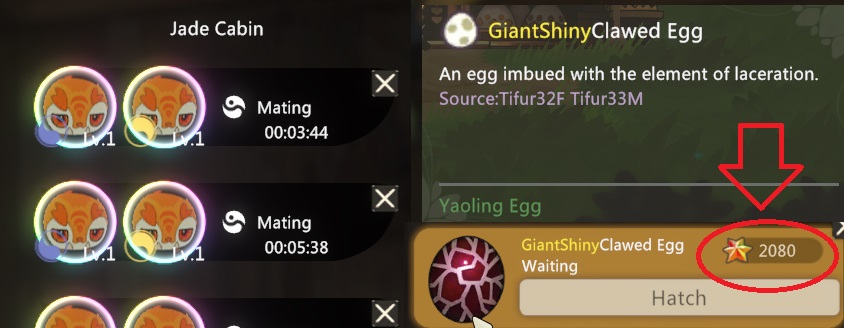
i want to farm sealighten for charm crafting, but i forgot where the ink realm is.
Can you tell me how to access the area to farm sealighten? I think there was a portal, but i cant remember...

Thanks in advance :)
VinceWolf Jan 16 @ 2:59pm 
Thank you for the detailed guide!
Dar  [author] Oct 21, 2024 @ 6:44am 
@fairfrozenn - Not viable anymore, so I deleted it. Sorry, I haven't had the time to play the game much thanks to it being a crunch period at work and a whole lot of games I've been meaning to play come out one after another. I haven't even updated the guide for the last patch's changes to abilities.

@Lemniv - Dazzling is not that difficult at all, and is basically a 100% chance once you have both the traits on both parents. Not sure if they changed something, however.
Lemniv Oct 20, 2024 @ 5:14pm 
Hey there, just recently got this game and discovered breeding, just wondering how difficult it is to get a Dazzling egg? I've been cross breeding 2 units with 2 gold stats but its been almost 2 full days of breeding and I've never gotten a Dazzling egg
fairfrozenn Oct 16, 2024 @ 8:36pm 
Is there a new guide for team comp in union difficulty? I saw you had one before but it's outdated with the changes, is it still viable? Thanks
Palea_alt2 Sep 26, 2024 @ 9:42pm 
@Dar Thank you, much appreciated.
Dar  [author] Sep 26, 2024 @ 5:49pm 
@Palea_alt2 Press RMB to throw a charm at them, the charms will hit them through the bars and start a battle.
Palea_alt2 Sep 26, 2024 @ 5:39pm 
Thanks for the guide. This was super helpful.
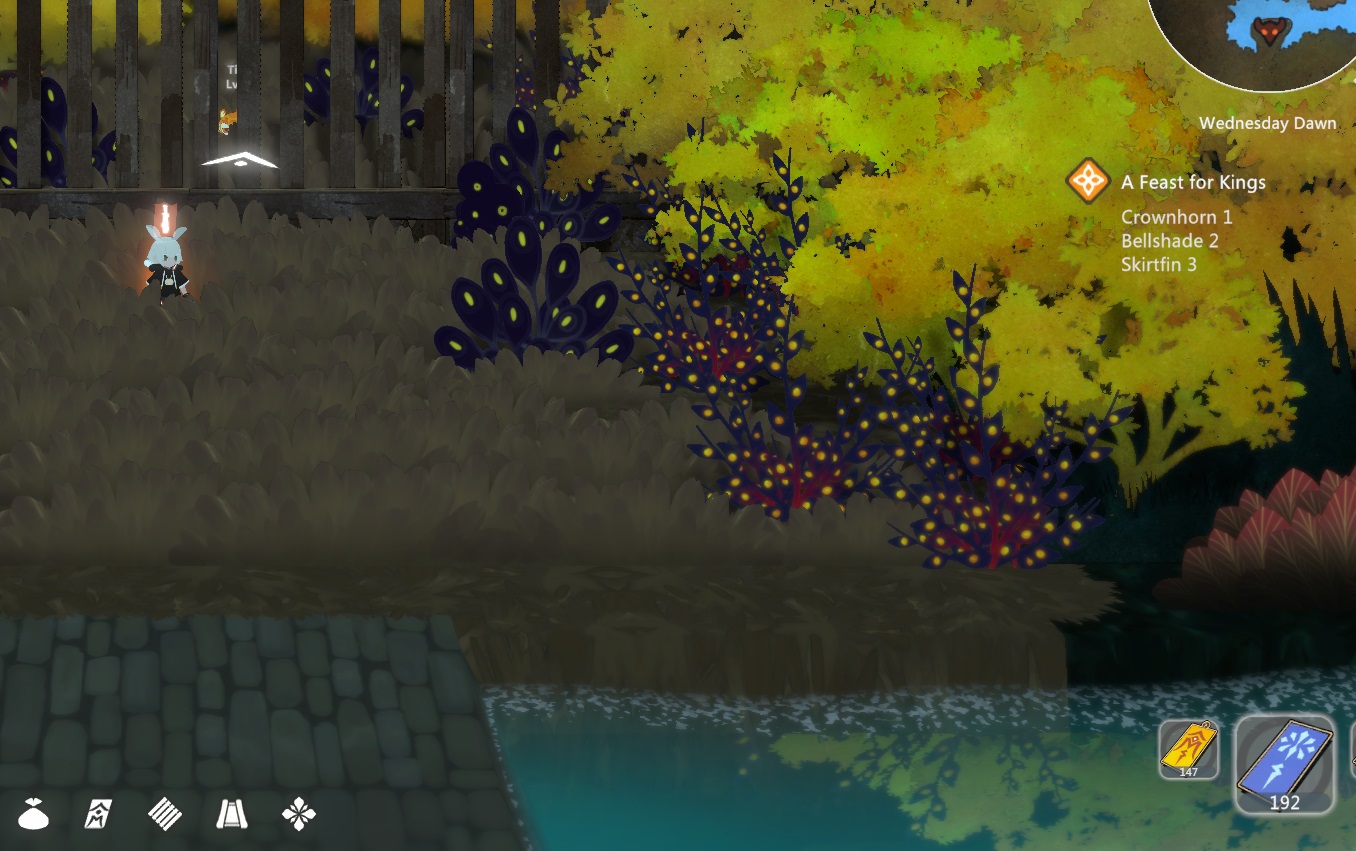
1 question: not sure if I'm stupid or what, but how do you get to the starter Yaolings? They're behind bars/cages.
Are there quests for each of these?
Thank you.
Surkk Sep 9, 2024 @ 7:06pm 
@Dar Ah, ok then, thanks for the info.
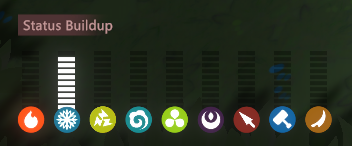
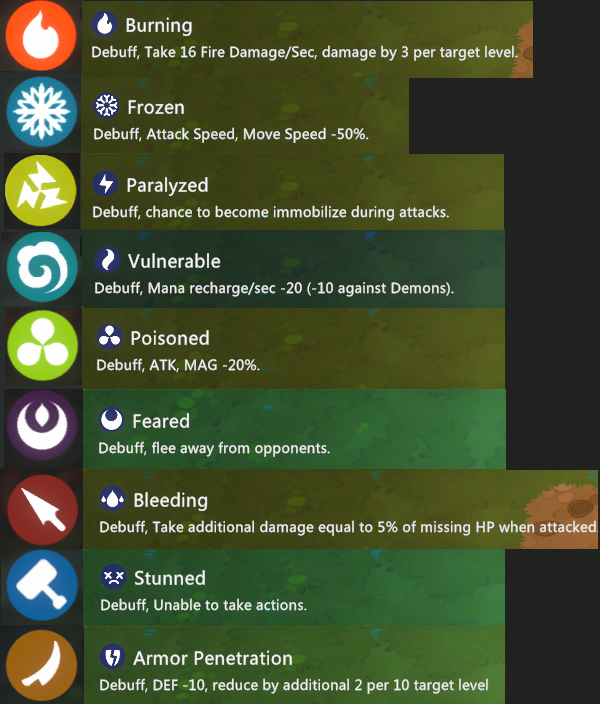
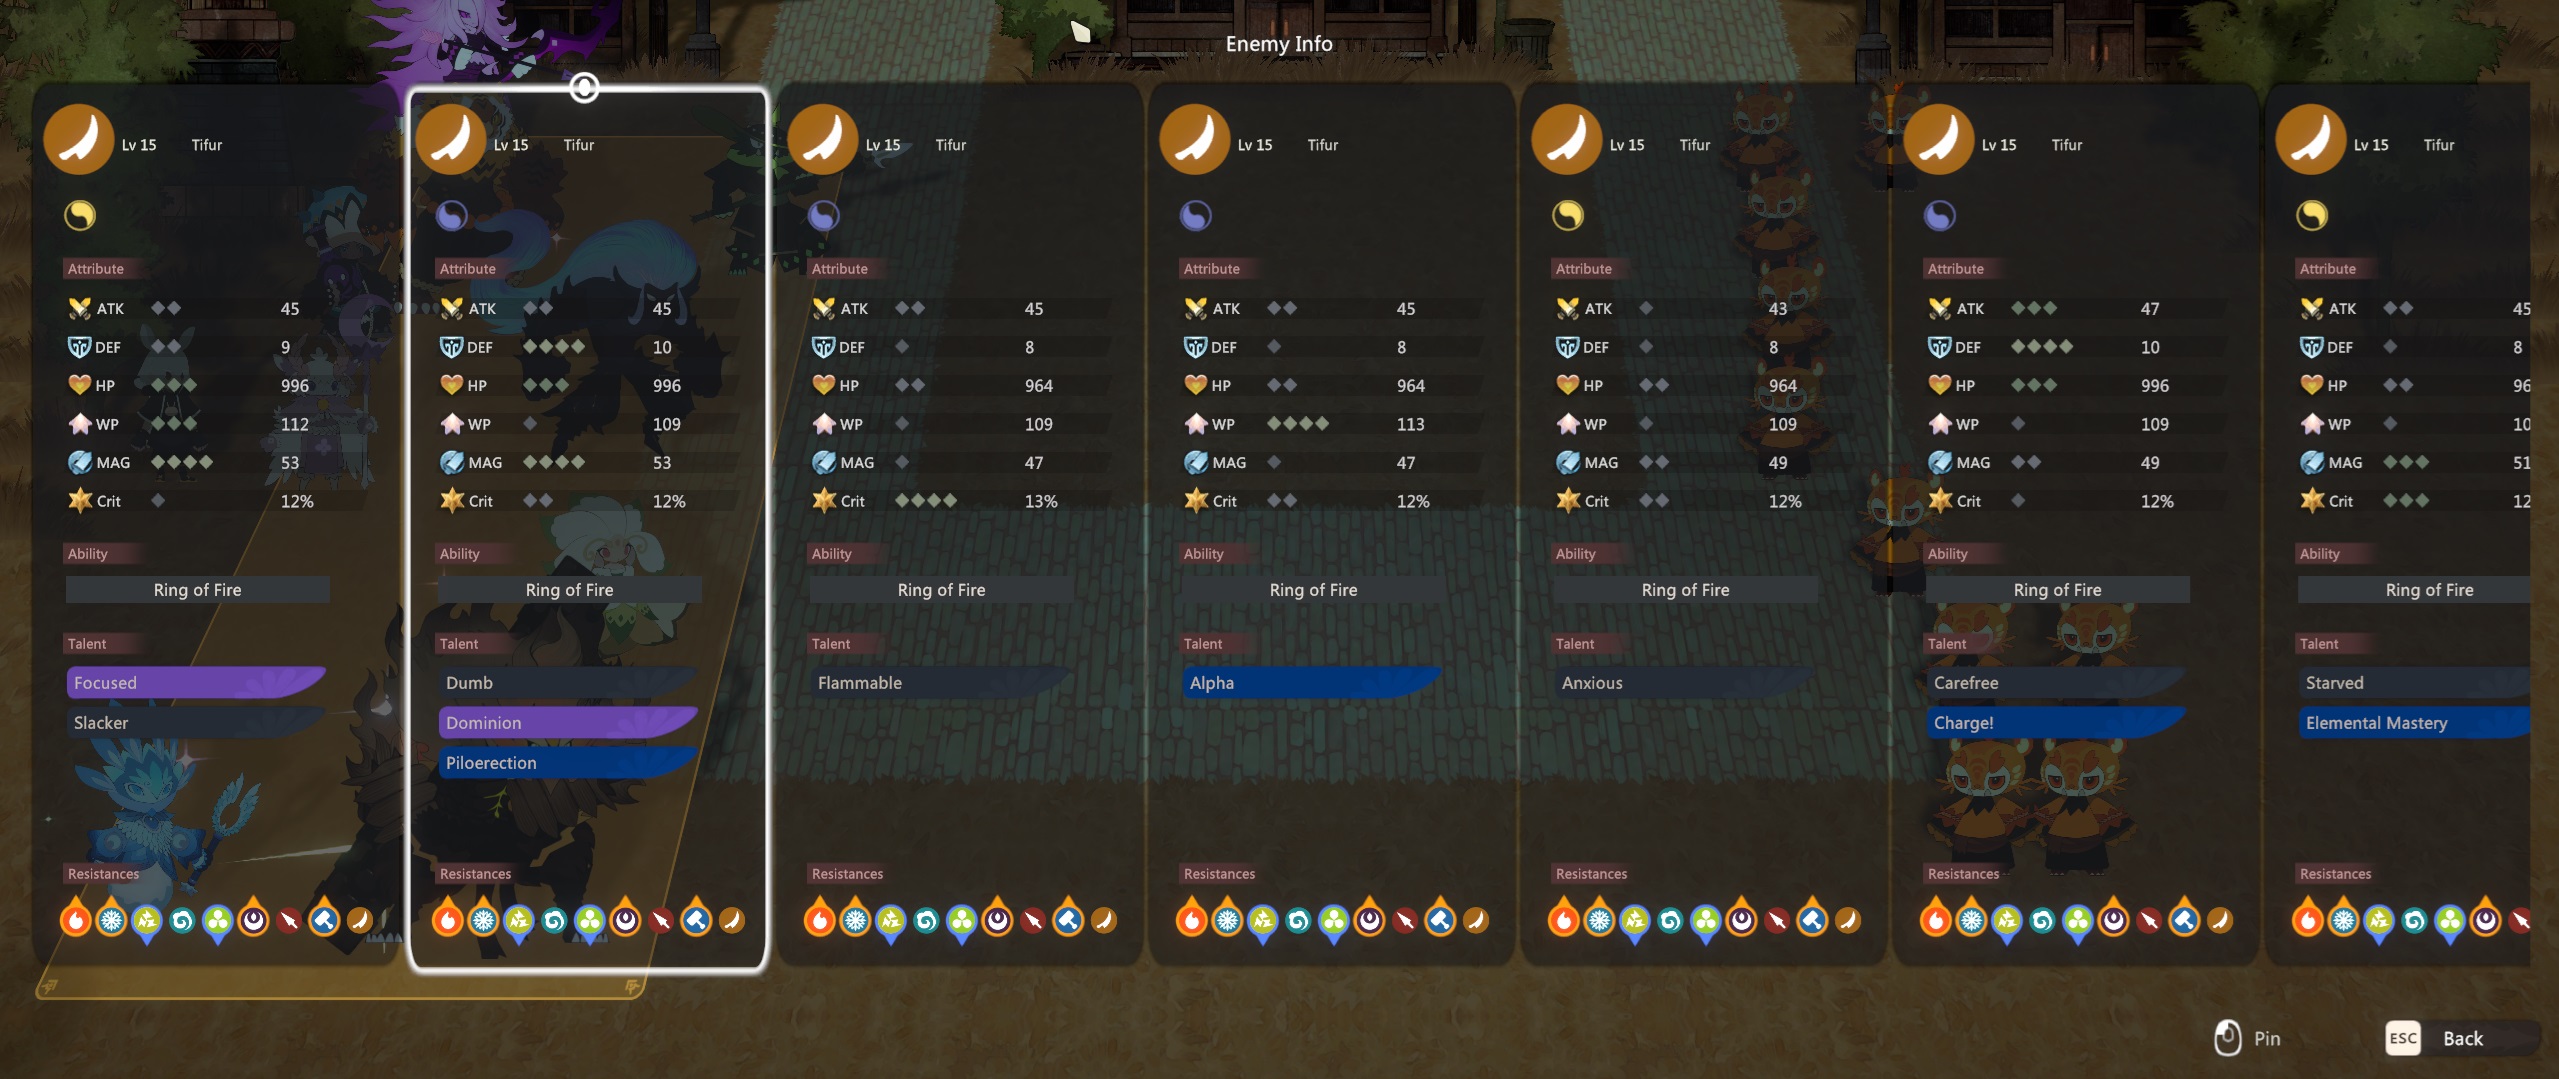
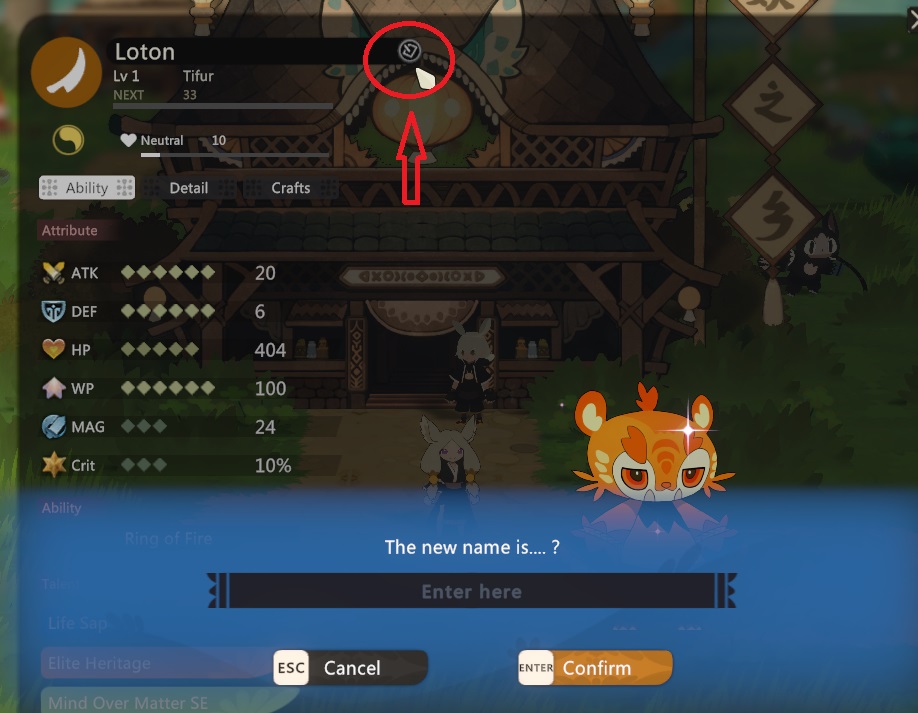
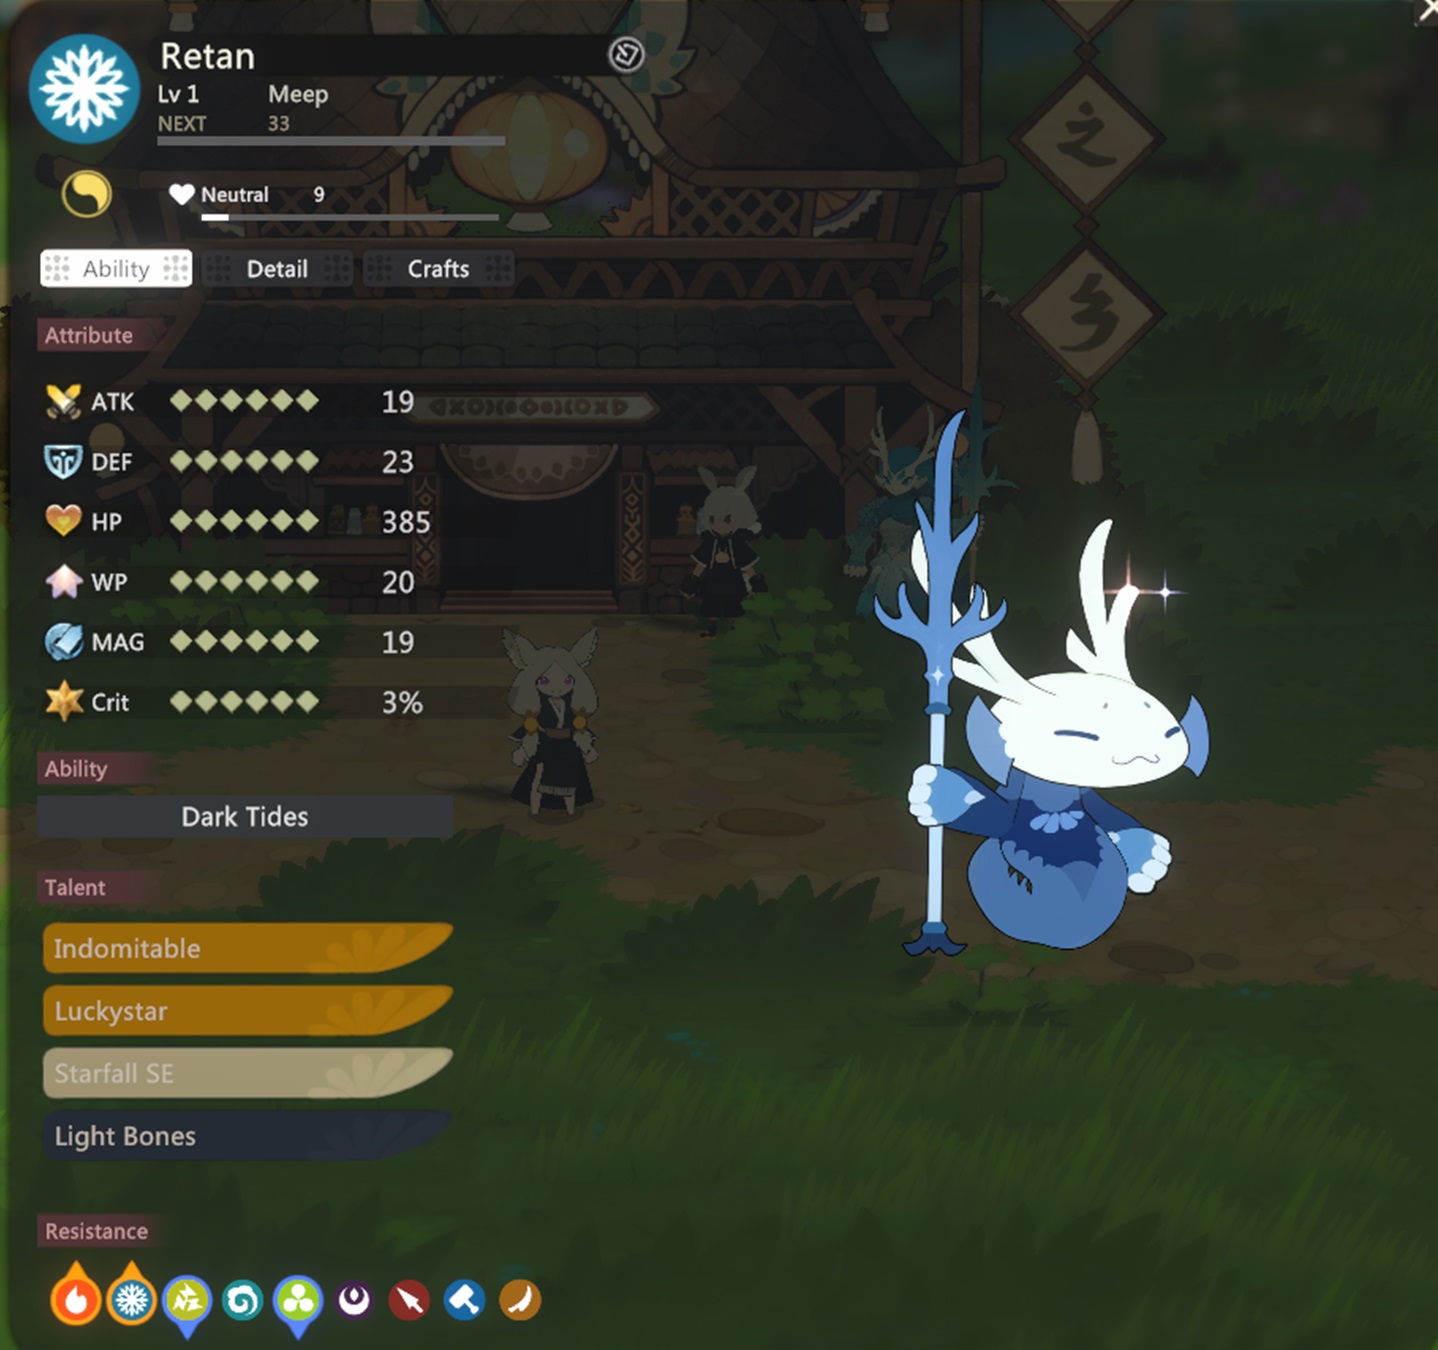
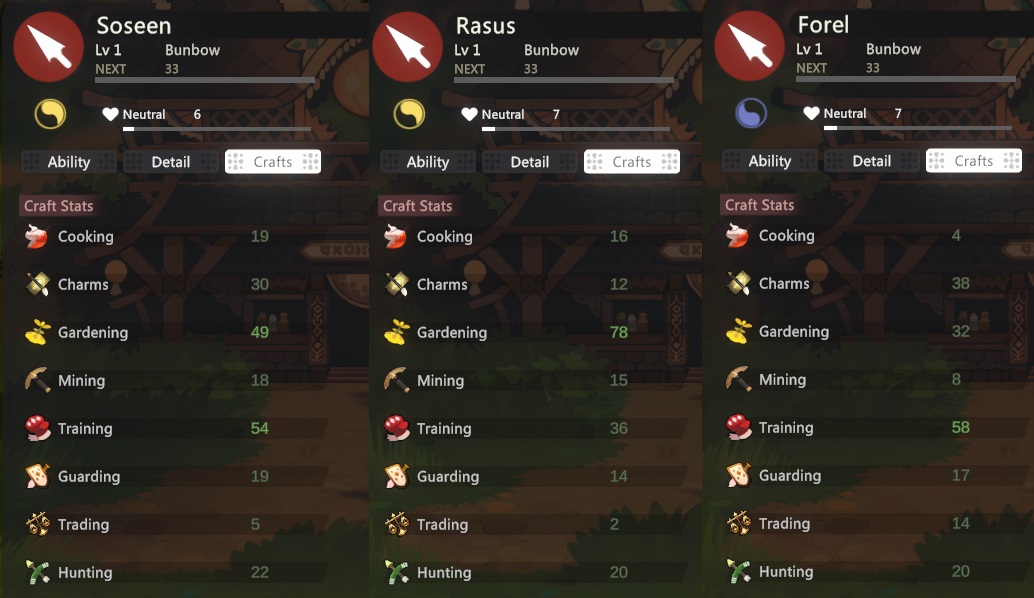
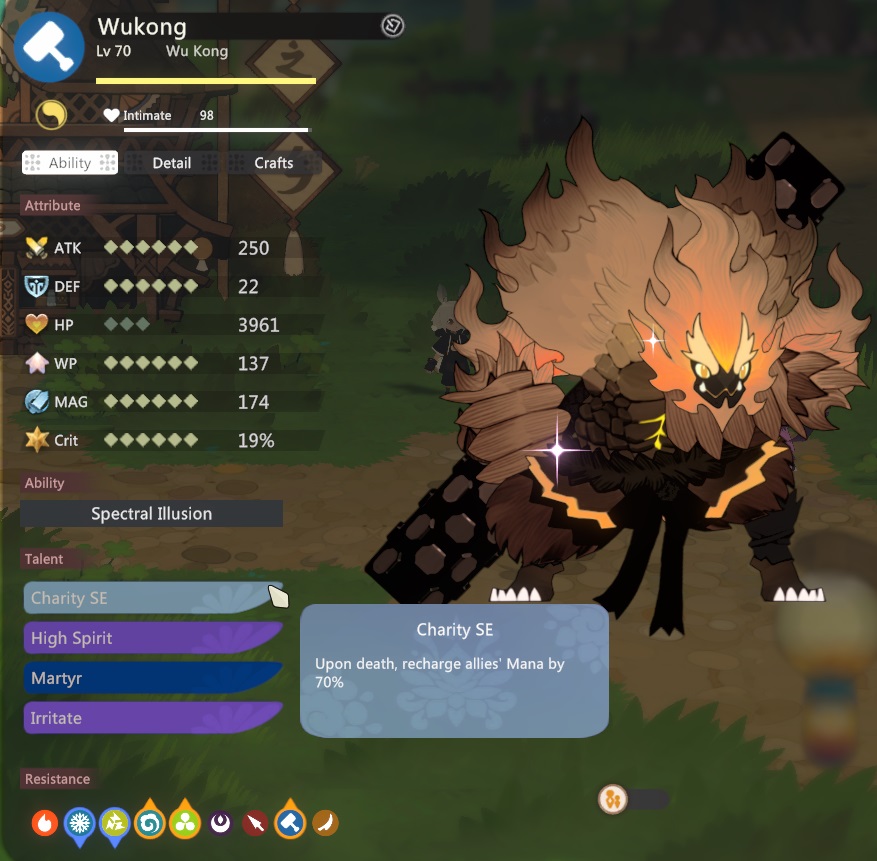
Some abilities/talents are a bit confusing still even though I'm almost at endgame.
Dar  [author] Sep 9, 2024 @ 7:43am 
@Surkk Pedalmoth and Analune aren't true summoners - Pedalmoth doesn't actually create real units and Analune fires an arrow which just happens to summon a clone. Lurkwulf should count as a true summoner, however, so if you cannot put summoning skills on it, it may be an oversight.