Farm Together 2

Farm Together 2

112 ratings
Unlockables, Upgrades, Profits, Data and More
By Mackenzie
A simple compendium of data for unlockables, upgrade milestones, raw data and other various useful information.
8
6
9
3
2
2
   
Award
Favorite
Favorited
Unfavorite
Introduction
Below will be lists of requirements in order to unlock and upgrade objects and other things in Farm Together 2 as you progress through the game.

It will also contain the results of calculations for profits at their minimum and maximum level per object.

Due to the nature of this game being freshly released and in Early Access, some information contained within can become outdated frequently. I will try to keep things up to date and include useful information that people suggest adding to the guide.

Please use the comments section for any questions, suggestions or for notifying me that certain information is out of date or otherwise found some errors in the guide.

Based on the game version update on Friday, May 17th, 2024. (Early Access)

Update May 28th: The game seems to be going through frequent balance changes at the moment and it takes time to update the guide, so you'll need to be patient for things to get caught up. Thanks for understanding.
Unlockables - Town Shops and Stands

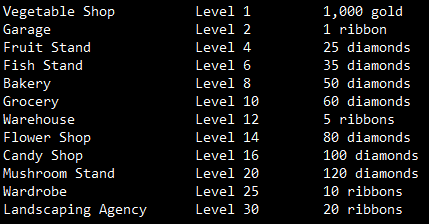
The Town is a hub you can instantly teleport to and from at any time from the map screen. In this town you'll find several empty plots next to the buildings where you can setup various shops and stalls as you unlock them. They're gated by Farm Level, as listed above.

Shops will allow you to trade your harvested resources for diamonds primarily. There is a limited amount of diamonds per merchant and they restock diamonds with time. Upgrading these shops increases their diamond capacity, reduces their restock time and increases your farm's storage capacity for the respective categories of resources pertaining to that shop.

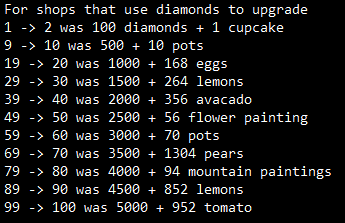
Upgrading these shops costs money or diamonds plus a certain number of a randomly generated resources. If it's a hard to get resource, it will only cost a fraction of the amount of resources that something easy and common to harvest would take. Obviously, it gets more expensive with each upgrade. Use this information as a guideline for what to expect:


Note that the prices on certain stalls might cost 50% or 200% of what you see here and will stay true to their linear progression in-line with what this information shows.

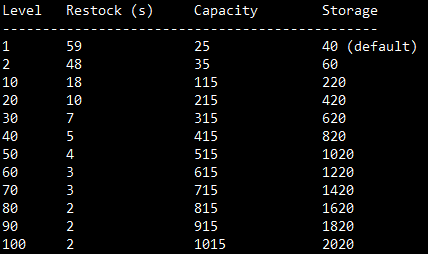
Below are the total benefits when you reach upgrade milestones for the shops:

Unlockables - Town Specialty Buildings
The garage is where you first unlock the ability to summon and ride your tractor at any time on your farm. It allows you to perform actions in a 3x3 range instead of your player's 1x1. It comes packed with an Automatic Mode that you only need to steer when activated and will automatically plow, plant, water and harvest things you drive by.

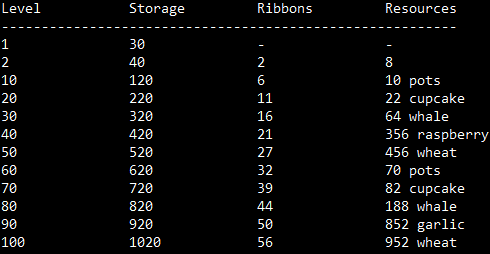
The initial purchase costs a ribbon (medal) and requires you to be at Farm Level 2. It costs ribbons and randomly generated resources to upgrade.

As you upgrade the garage, you will increase how quickly your tractor's fuel gauge refills with time as well as its fuel tank capacity as shown here:


The warehouse is where you'll be able to raise storage capacity for all categories of your farm resources at the same time, globally. The initial purchase cost is 5 ribbons and requires you to be at Farm Level 12. It costs ribbons and randomly generated resources to upgrade.


At Farm Level 30, you will unlock the ability to construct the Terraforming Agency. You cannot interact with this stand at this time, but once it is built, you can terraform the terrain on your farm at the cost of diamonds.

To do this, you open the Buy / Shop menu while on your farm, and on the final tab to the right (Terrain), you will see the 3 terraforming options there.

Hill-Side Ramp, lets you attach and remove ramps connected to the sides of Hills.

Height - Hill, lets you create or flatten cliff-like dirt mounds of elevated terrain.

Height - Slope, is the main tool that allows you to raise or lower the terrain of your farm freely, without any cliff sides or ramps.
Unlockables - Functional Objects & Buildings
Simply under the 'Buildings' tab in the Buy menu.

Unlockables - Crops
Asterisks (*) mean the required Farm Level.

-Beet *2

-Potato *3

-Zucchini *4

-Red Pepper *5

-Tomato *7

-Melon *10

-Lentil *11

-Wheat *12

-Pumpkin *15

-Eggplant *18

-Watermelon *20

-Concord Grape *25

-Cucumber *30

-Strawberry *38

-Yellow Cherry Tomato *44

-Black Beefsteak Tomato *36

-Lombardy Cabbage *9
=Lettuce Lvl 15

-Junin Corn *13
=Corn Lvl 15

-Cosmis Purple Carrot *16
=Carrot Lvl 15

-Carolina Potato *17
=Potato Lvl 10

-Golden Beet *18
=Beet Lvl 10

-Honeycomb Tomato *19
=Tomato Lvl 15

-Beefsteak Tomato *21
=Tomato Lvl 10

-Chickpea *21
=Lentil Lvl 10

-Violette Potato *22
=Potato Lvl 15

-Rye *23
=Wheat Lvl 15

-Yellow Pepper *24
=Red Pepper Lvl 12

-Lodge Zucchini *25
=Zucchini Lvl 20

-Chinese Eggplant *26
=Eggplant Lvl 10

-Kyoto Carrot *27
=Carrot Lvl 25
=Cosmic Purple Carrot Lvl 10

-Acorn Pumpkin *29
=Pumpkin Lvl 10

-Cherry Tomato *31
=Tomato Lvl 15

-Barley *33
=Wheat Lvl 25
=Rye Lvl 15

-Strawberry Red Corn *34
=Corn Lvl 30
=Junin Corn Lvl 12

-Thomson Grape *34
=Concord Grape Lvl 10

-Canary Melon *36
=Melon Lvl 10

-Albino Eggplant *37
=Eggplant Lvl 15
=Chinese Eggplant Lvl 10

-Turnip *38
=Beet Lvl 20
=Golden Beet Lvl 10

-Green Pepper *39
=Red Pepper Lvl 20
=Yellow Pepper Lvl 10

-Lobbericher Carrot *40
=Carrot Lvl 35
-Cosmic Purple Carrot Lvl 20
-Kyoto Carrot Lvl 10

-Cherokee Tomato *41
=Tomato Lvl 30
=Honeycomb Tomato Lvl 15

-Yellow Beefsteak Tomato *43
=Beefsteak Tomato Lvl 18
=Black Beefsteak Tomato Lvl 12

-Cabernet Grape *43
=Concord Grape Lvl 20
=Thomson Grape Lvl 10

-Baby Boo Pumpkin *50
=Pumpkin Lvl 20
=Acorn Pumpkin Lvl 10

-Crimson Grape *52
=Concord Grape Lvl 30
=Thomson Grape Lvl 20
=Cabernet Grape LVl 10

-Black Cherry Tomato *60
=Cherry Tomato Lvl 20
=Yellow Cherry Tomato Lvl 12

-Pineberry *64
=Strawberry Lvl 20
Unlockables - Trees
Asterisks (*) mean the required Farm Level.

-Lemon Tree *2

-Pine Tree *7

-Banana Tree *9

-Peach Tree *13

-Black Mulberry *21

-Flowering Cherry Tree *30

-Bamboo *35

-Plum Tree *45

-Prickly Pear Cactus *37

-Pear Tree *4
=Apple Tree Lvl 10
=Lemon Tree Lvl 5

-Orange Tree *17
=Lemon Tree Lvl 15
=Pear Tree Lvl 10

-Royal Gala Apple Tree *19
=Apple Tree Lvl 20

-Coconut Tree *20
=Banana Tree Lvl 10

-Apricot Tree *23
=Peach Tree Lvl 10

-Lime Tree *26
=Lemon Tree Lvl 25
=Orange Tree Lvl 15

-Canadian Reinette Apple Tree *31
=Apple Tree Lvl 40
=Royal Gala Apple Tree Lvl 15

-Red Mulberry *32
=Black Mulberry Lvl 10

-Raspberry *39
=Black Mulberry Lvl 15

-Fargesia Bamboo *42
=Bamboo Lvl 15

-White Mulberry *44
=Black Mulberry Lvl 15
=Red Mulberry Lvl 10

-Golden Bamboo *49
=Bamboo Lvl 25
=Fargesia Bamboo Lvl 10

-Mango *53
=Apricot Tree Lvl 20
=Coconut Tree Lvl 20
=Pear Tree Lvl 30

-Granny Smith Apple Tree *58
=Apple Tree Lvl 60
=Royal Gala Apple Tree Lvl 25
=Canadian Reinette Apple Tree Lvl 15

-Haden Mango *59
=Mango Lvl 10

-Kent Mango *64
=Mango Lvl 20
=Haden Mango Lvl 10

-Mango Alphonso *70
=Mango Lvl 25
=Haden Mango Lvl 15
=Kent Mango Lvl 10

-Golden Apple Tree *79
=Apple Tree Lvl 80
=Royal Gala Apple Tree Lvl 35
=Canadian Reinette Apple Tree Lvl 25
=Granny Smith Apple Tree Lvl 15
Unlockables - Animals
Asterisks (*) mean the required Farm Level.

-Landrace Pig *6

-Holstein Cow *19

-New Hampshire Chicken *8
=Leghorn Chicken Lvl 5

-Hampshire Pig *15
=Landrace Pig Lvl 5

-Australorp Chicken *17
=Leghorn Chicken Lvl 10
=New Hampshire Chicken Lvl 5

-Jersey Giant Chicken *26
=New Hampshire Chicken Lvl 10
=Australorp Chicken Lvl 5

-Jersey Cow *28
=Holstein Cow Lvl 10

-Large Black Pig *30
=Landrace Pig Lvl 10
=Hampshire Pig Lvl 5

-Orpington Chicken *35
=Australorp Chicken 10
=Jersey Giant Chicken Lvl 5

-Belted Cow *39
=Holstein Cow Lvl 20
=Jersey Cow Lvl 10

-Hereford Pig *45
=Hampshire Pig Lvl 10
=Large Black Pig Lvl 5

-Serama Bantam Chicken *49
=Jersey Giant Chicken 10
=Orpington Chicken Lvl 5

-Ayrshire Cow *51
=Holstein Cow Lvl 30
=Jersey Cow Lvl 20
=Belted Cow Lvl 10

-Duroc Pig *55
=Large Black Pig Lvl 10
=Hereford Pig Lvl 5

-Girolando Cow *69
=Jersey Cow Lvl 25
=Belted Cow Lvl 20
=Ayrshire Cow Lvl 10

-Kunekune Pig *70
=Hereford Pig Lvl 10
=Duroc Pig Lvl 5

-Tyrol Grey Cow *88
=Belted Cow Lvl 25
=Ayrshire Cow Lvl 20
=Girolando Cow Lvl 10
Unlockables - Fish
Asterisks (*) mean the required Farm Level.

-Salmon *6

-Blowfish *10

-Swordfish *14

-Trout *18

-Surgeonfish *21

-Amber Clownfish *7
=Clownfish Lvl 5

-Crimson Salmon *11
=Salmon Lvl 5

-Ebony Clownfish *19
=Clownfish Lvl 10
=Amber Clownfish Lvl 5

-Viridian Salmon *20
=Salmon Lvl 10
=Crimson Salmon Lvl 5

-Cocoa Blowfish *22
=Blowfish Lvl 10

-Coral Trout *27
=Trout Lvl 8

-Topaz Swordfish *30
=Swordfish Lvl 6

-Platinum Surgeonfish *35
=Surgeonfish Lvl 6

-Celurean Blowfish *38
=Blowfish Lvl 12
=Cocoa Blowfish Lvl 6

-Brass Trout *43
=Trout Lvl 16
=Coral Trout Lvl 8

-Emerald Swordfish *48
=Swordfish Lvl 14
=Topaz Swordfish Lvl 6

-Bronze Surgeonfish *50
=Surgeonfish Lvl 12
=Platinum Surgeonfish Lvl 6
Unlockables - Flowers
Asterisks (*) mean the required Farm Level.

-Daisy *5

-China Pink Tulip *9

-Bizet Carnation *20

-Poppy *33

-Ramanas Rose *8
=Rose Lvl 5

-Shasta Daisy *14
=Daisy Lvl 7

-Damask Rose *21
=Rose Lvl 20
=Ramanas Rose Lvl 10

-Swan River Daisy *23
=Daisy Lvl 15
=Shasta Daisy Lvl 5

-Orange Princess Tulip *26
=China Pink Tulip Lvl 6

-Provence Rose *29
=Ramanas Rose Lvl 20
=Damask Rose Lvl 10

-Domingo Carnation *31
=Bizet Carnation Lvl 4

-Cape Daisy *35
=Shasta Daisy Lvl 10
=Swan River Daisy Lvl 6

-Arabian Mystery Tulip *37
=China Pink Tulip Lvl 14
=Orange Princess Tulip Lvl 7

-Gradiflora Rose *40
=Damask Rose Lvl 20
=Provence Rose Lvl 10

-Iceland Poppy *42
=Poppy Lvl 8

-White Liberty Carnation *43
=Bizet Carnation Lvl 8
=Domingo Carnation Lvl 4

-Sevilla Tulip *46
=Orange Princess Tulip Lvl 15
-Arabian Mystery Tulip Lvl 12

-California Poppy *52
=Poppy Lvl 14
=Iceland Poppy Lvl 8

-Salamanca Carnation *54
=Domingo Carnation Lvl 12
=White Liberty Carnation Lvl 8

-Arabian Poppy *61
=Iceland Poppy Lvl 14
=California Poppy Lvl 8

-Flanders Poppy *72
=California Poppy Lvl 14
=Arabian Poppy Lvl 8
Unlockables - Farm Expansions
As you progress through the game's Farm Levels and reach a certain wealth of diamonds, you will be able to invest in additional plots of farm space to become permanently available to you.

You start a new farm with only one expansion unlocked by default.

Each of these plots, contains 800 tiles of farm space in a 40 x 20 grid. The longer side (40 tiles) stretches from West to East (or left to right).

The maximum farm size consists of 49 plots, including the one you start with in a 7 x 7 mega-grid. This means you'll need to purchase 48 expansions in order to fully unlock your available farm space to its maximum property size.

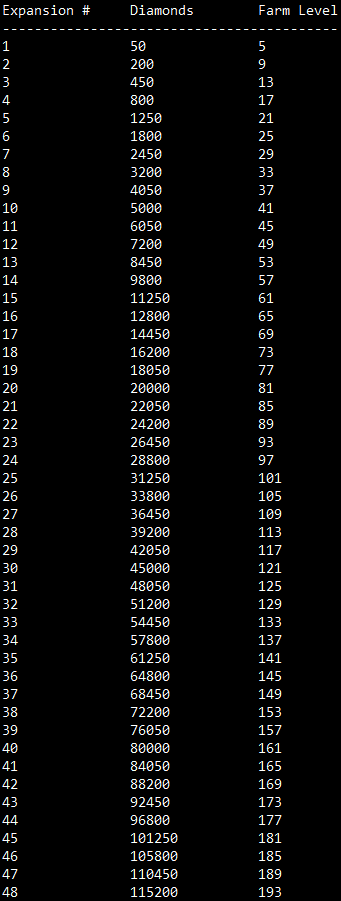
When you've unlocked them all, you will have a total of 39,200 tiles to work with. Below is the cost for every expansion:


The total Diamond cost will set you back a truly massive 1,901,200 diamonds, and you'll need to be at Farm Level 193 minimum in order to do so.
XP Milestones & Mechanics
There are 7 different ways XP is gathered and contributes toward leveling in Farm Together 2.

Character / Player Level

This level is shared between all farms and tied to your account profile for the game. This level will be shown to anyone who can see you, whether you've joined someone else's farm or people have joined yours. It's your global Farm Together 2 level.

As you gain character levels, you will gradually unlock new customization options to alter the appearance of your character, tractor, and eventually (probably) farmhands and pets. In the first game, this also increased your base tractor fuel capacity marginally per level, but as of Farm Together 2 - this is no longer the case, at least for now. The fuel capacity functionality was replaced by the upgradeable Garage in the town.

Harvesting objects, buying certain upgrades and buying objects will result in gaining XP for this.

The XP gained from actions depends on how many XP are yielded from the objects you are harvesting. If it says you got 8 XP, it counts 8 XP toward this level. This amount of XP is also added to your Farm Level.

A note on multiplayer etiquette: If you're a higher level character and joining someone else's farm, try to be considerate of their fuel depots and don't just join, drain their tanks, do a tiny amount of work and leave as that will basically delete their fuel. It's something veterans should be aware of at the very least, as they get into higher level territory.

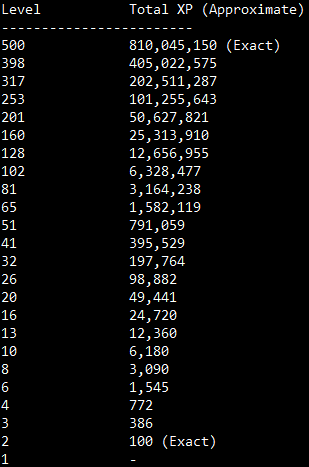
Below is the chart for required XP to hit certain level milestones. It's semi-approximate as the amount of XP you see listed will bring you to the respective level from Level 1.


Farm Level

The Farm Level is used as a gate to be able to unlock almost everything there is to unlock in the game. You have minimum level requirements to unlock the many profitables as well as unlocking town shops and stands and even farm expansions.

Leveling this up is crucial to your progress and should be the main focus of the grind until you have most or everything unlocked.

Harvesting objects, buying certain upgrades and buying objects will result in gaining XP for this.

The XP gained from actions depends on how many XP are yielded from the objects you are harvesting. If it says you got 8 XP, it counts 8 XP toward this level. This amount of XP is also added to your Character Level.

Below is the chart for required XP to hit certain level milestones. It's semi-approximate as the amount of XP you see listed will bring you to the respective level from Level 1.


For both Farm and Character Levels, the total for max level was divided by 2 repeatedly to give a more perceptible amount of XP between level milestones and their thresholds.

Crops

Each Crop has its own level that is raised by harvesting that specific crop.

Unlike Character and Farm Levels, it caps out at level 250 and does not gain the amount of XP listed when you harvest. Instead, how it works is you gain 1 XP toward that crop for each harvested tile.

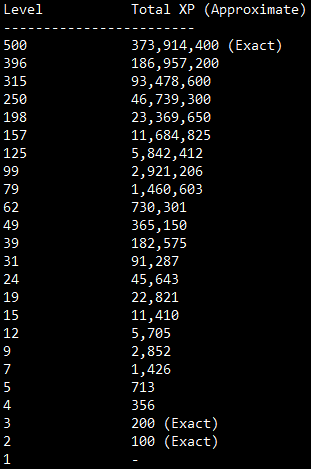
Below is the chart for required XP to hit certain level milestones. These listings are exact total XP required.


Trees

Each Tree has its own level that is raised by harvesting that specific tree.

Unlike Character and Farm Levels, it caps out at level 250 and does not gain the amount of XP listed when you harvest. Instead, how it works is you gain 1 XP toward that tree for each harvested tile.

Below is the chart for required XP to hit certain level milestones. These listings are exact total XP required.


Animals

Each Animal has its own level that is raised by harvesting that specific animal.

Unlike Character and Farm Levels, it caps out at level 250 and does not gain the amount of XP listed when you harvest. Instead, how it works is you gain 1 XP toward that animal for each harvested tile.

Below is the chart for required XP to hit certain level milestones. These listings are exact total XP required.


Fish

Each Fish has its own level that is raised by harvesting that specific fish.

Unlike Character and Farm Levels, it caps out at level 250 and does not gain the amount of XP listed when you harvest. Instead, how it works is you gain 1 XP toward that fish for each harvested tile.

Do note that when harvesting fish ponds, you will harvest the entire pond of all connected fish tiles when you harvest them. It will correctly grant all of the XP, money and resources when this happens.

Below is the chart for required XP to hit certain level milestones. These listings are exact total XP required.


Flowers

Each Flower has its own level that is raised by harvesting that specific flower.

Unlike Character and Farm Levels, it caps out at level 250 and does not gain the amount of XP listed when you harvest. Instead, how it works is you gain 1 XP toward that flower for each harvested tile.

Below is the chart for required XP to hit certain level milestones. These listings are exact total XP required.

The Fishing Ponds Changes
The creators of Farm Together 2 have changed up how the fishing ponds work compared to the first game.

In the first game, you would fish 15 tiles of fish ponds per click / harvest action and you could just spam click until a max size pond (1,000 tiles) was harvested without having to move. A lot of players including myself loved this, and are sad to see it nerfed.

The second game, to compensate for the fact that a single click will harvest the entire pond as well as for general game balance - a diminishing returns effect will cascade on any fish pond size over 36 tiles progressively the more you exceed this number. To top it off, even the best fish in Farm Together 2 aren't all that great for profits when stacked up against Crops, Trees and Animals on a profit-per-tile per-minute comparison. They're not terrible, but they're no longer the king profiteers.

Testing Results

I tested precisely how much of a penalty the player incurred for various amounts of fishing ponds beyond the 36 tile limit where the diminishing returns start to kick in.

You always get 100% of the fish resources (fish, blowfish, whales etc) as well as 100% of the XP.

Money - Pond Tiles -> %

1,639,000 - 1,000 -> 52.04%
1,574,100 - 900 -> 52.75%
1,508,800 - 800 -> 53.59%
1,442,500 - 700 -> 54.58%
1,375,200 - 600 -> 55.77%
1,307,000 - 500 -> 57.32%
1,237,200 - 400 -> 59.37%
1,165,200 - 300 -> 62.25%
1,090,400 - 200 -> 67.04%
1,010,500 - 100 -> 77.82%
993,360 - 80 -> 82.18%
975,420 - 60 -> 88.52%
955,760 - 40 -> 98.17%


A few things of note about how it works in Farm Together 2. The penalty is massive on large amounts of ponds, but it seems you would need truly massive sized fish ponds to get less than half of the income you should've gotten fully if there were no penalty.

The percentages listed are how much yield you got out of the expected. So if the fish yield said 1,000 coins and you had 900 ponds, you would get 52.75% of 1,000 coins, which would be 527 coins.

For consistent results I ensured the fish tests were done on a max level fish with a good money yield.

Another thing I noticed is the fish pond size did not cap at 1,000... I could have made it larger apparently.
Profits - Crops
Listed in order of most profitable at max level (which for the most part also means at Lvl 1 of the crop). Optimal EXP / minute crops tend to line up with the best profit ones as well.

Generally how it works is crops that take longer to grow, are worth less since they're more catered for when you're not playing the game so you can still make decent income while not playing without it being too overpowered. The faster turning around crops require a lot more physical and manual labor, and usually offer far more in the way of profits.

Under seasons, it shows various numbers that always have 1,2 3 and/or 4. This pertains to Spring, Summer, Autumn and Winter, respectively. So for example, 134 would mean it can be planted in Spring, Autumn and Winter.

Crops grow perfectly fine at normal speeds even if they are currently out of season.

Watering crops is optional, but doing so reduces the time it takes for them to grow up to a maximum of -50% if it was watered for the entire duration of its growth. Getting sprinklers unlocked and placed ASAP is recommended to automate this step and save on a ton of tractor fuel.

It's also worth noting that Crops take by far the most time, fuel, money and maintenance to produce and regulate. Usually taking several passes of tractor fuel and time per harvest turnover.

Profits - Trees
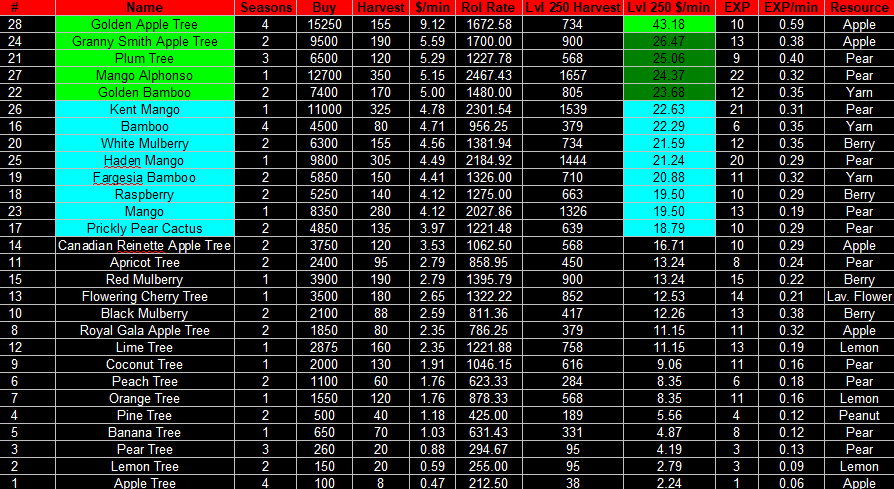
Listed in order of most profitable at max level (which for the most part also means at Lvl 1 of the tree). Optimal EXP / minute trees tend to line up with the best profit ones as well, though Black Mulberry and Royal Gala Apple Trees are exceptionally good for XP considering their cost.

Trees are a set and forget type. You invest the price once and they bear profits forever on specific seasons.

Under seasons, this means how many of the 4 seasons it bears its harvest.

Trees can be good ways to check precisely how much time remains in a season or until a specific season. Basically they're the best clocks.

They do not require watering or any maintenance whatsoever.

RoI stands for Return on Investment. This number indicates how quickly you get your money back from purchasing it. Lower = better.

Profits - Animals
Listed in order of most profitable at max level (which for the most part also means at Lvl 1 of the animal). Optimal EXP / minute animals tend to line up with the best profit ones as well.

Generally how it works is, you buy the animal, then you must feed it every so many minutes (listed with each animal) with a resource you farmed yourself. Currently Grain, Eggplant and Lettuce resources are needed for chickens, pigs and cows respectively. You can extend how long a single feeding lasts by purchasing a Feeder and placing it next to each animal field you wish it to be applied to.

The animals work equally in all seasons and do not have any kind of penalty when sleeping.

RoI stands for Return on Investment. This number indicates how quickly you get your money back from purchasing it. Lower = better.

Profits - Fish
Listed in order of most profitable at max level (which for the most part also means at Lvl 1 of the fish). Optimal EXP / minute fish tend to line up with the best profit ones as well.

Fish ponds are a set and forget type. You invest the price once and they bear profits forever after a specified number of seasons rollover.

They bear harvest at the start of a season. For example, if you place a 2-season fish 1 minute before a season changes, you will have to wait 1 minute + 1 season of time to be able to harvest and then 2 seasons of time from then onward.

A season is 17 minutes, so minutes is calculated by how many seasons the fish lists. Which seasons currently do not impact their harvest times or yields.

RoI stands for Return on Investment. This number indicates how quickly you get your money back from purchasing it. Lower = better.

Unlike Farm Together 1, there is a newly implemented penalty which causes the player to yield diminishing returns when harvesting any ponds that are larger than 36 tiles in size. See the The Fishing Ponds Changes section for more details.

Profits - Flowers
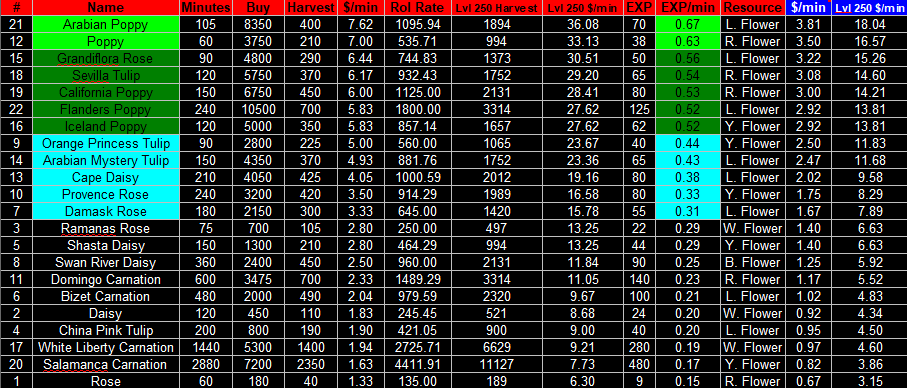
Listed in order of most XP/minute. Optimal $ / minute flowers tend to line up with the best XP ones as well.

Flowers are a set and forget type. You invest the price once and they bear profits forever after a specified amount of time.

I'm not entirely sure if it's intended to be like Farm Together 1 in this regard, but it appears to still be following the suit of "Flowers are mainly meant for farming XP". This doesn't mean you can't make a mean profit from flowers whatsoever, it's just a thing of note if XP is what you're particularly most interested in grinding at any given time.

Unlike Farm Together 1, there currently are no negative weather effects such as cold snaps in winter which would prevent sprinklers from watering them.

Watering doesn't reduce the growth time for flowers like it did for crops. It instead gives up to double the money upon harvesting if it was watered the entire duration of its growth.

Getting sprinklers unlocked and placed ASAP is recommended to automate this step and save on a ton of tractor fuel.

The blue columns are Unwatered yields. Watering only affects money, not XP.

L. Flower is short for the Lavender colored Flower resource.

Lastly, it's worth noting that Poppies (and of course Arabian Poppies) are currently really reeeeeally good flowers for money and XP.

Profits - Spreadsheet
The Google spreadsheet for the profits can be found at the following link:

Spreadsheet[docs.google.com]
Conclusion
I've reviewed the game on Day 1 in a fairly critical manner. I intend to edit and update it as significant changes are made. I still believe the game is worth buying and recommend checking it out in its beginning stages if you haven't already made the plunge.

Review here.

Special Thanks to Milkstone Studios for giving us another installment of the beloved Farm Together franchise! I'm truly excited to see what y'all can do with it.

Further thanks to the readers and any potential contributors of information to include or update over time.

This guide has been brought to you by me, Mackenzie. I hope it will help people, even if only a little bit.

Please enjoy it, and Happy Farming everyone!
30 Comments
Darkness Vortex Nov 3, 2024 @ 4:58pm 
I believe the Resource you are needing is a flower painting.
I could be wrong, but that's what it sounds like to me.
Hunter Killer Nov 3, 2024 @ 4:56pm 
Greatly appreciate this! The one thing I cannot find is a master guide for the inventory icons. There are no tooltips on any of these icons, so when going to the bakery and attempting to upgrade, there is a white square with what looks like 4 seeds in between... yet doesn't say what it is and completely stops progress. Are there no guides to include these icons, or tooltips just not enabled in this version? Thank you!
Mod_Queen Aug 3, 2024 @ 12:01pm 
Thank you for your time in showing & explaining this guide to us all.
Nighthawk1973 Jul 6, 2024 @ 3:47am 
Diamond cost expansion land is not accurate
teetert Jul 4, 2024 @ 11:31am 
Thank you for your hard work and for sharing it with us!
k Jul 1, 2024 @ 4:53am 
any updates or changes ?
CherryKiss Jun 22, 2024 @ 8:13pm 
fantastic guide! Favorited, thumbs up, awarded, and now, commented :D so much useful information here! Thanks for taking the time to share with us.
Cynful ツ May 23, 2024 @ 12:18pm 
@Mackenzie Thank you so much for taking the time to write this up and compare everything and share it with us.
Rain May 23, 2024 @ 11:59am 
needs to be updated after todays update please. I love this guide and use it everyday, thank you
Mackenzie  [author] May 19, 2024 @ 6:38am 
@[DE]Topperharly Early game clownfish can be very lucrative yes. They have the best RoI rate after all.

If you take a few extra minutes to harvest pools of 100 or 200 size, you could drastically reduce the penalty as well.

@ogr384 That's cool, I like to see what people do with their own spreadsheets