
Install Steam
login
|
language
简体中文 (Simplified Chinese)
繁體中文 (Traditional Chinese)
日本語 (Japanese)
한국어 (Korean)
ไทย (Thai)
Български (Bulgarian)
Čeština (Czech)
Dansk (Danish)
Deutsch (German)
Español - España (Spanish - Spain)
Español - Latinoamérica (Spanish - Latin America)
Ελληνικά (Greek)
Français (French)
Italiano (Italian)
Bahasa Indonesia (Indonesian)
Magyar (Hungarian)
Nederlands (Dutch)
Norsk (Norwegian)
Polski (Polish)
Português (Portuguese - Portugal)
Português - Brasil (Portuguese - Brazil)
Română (Romanian)
Русский (Russian)
Suomi (Finnish)
Svenska (Swedish)
Türkçe (Turkish)
Tiếng Việt (Vietnamese)
Українська (Ukrainian)
Report a translation problem


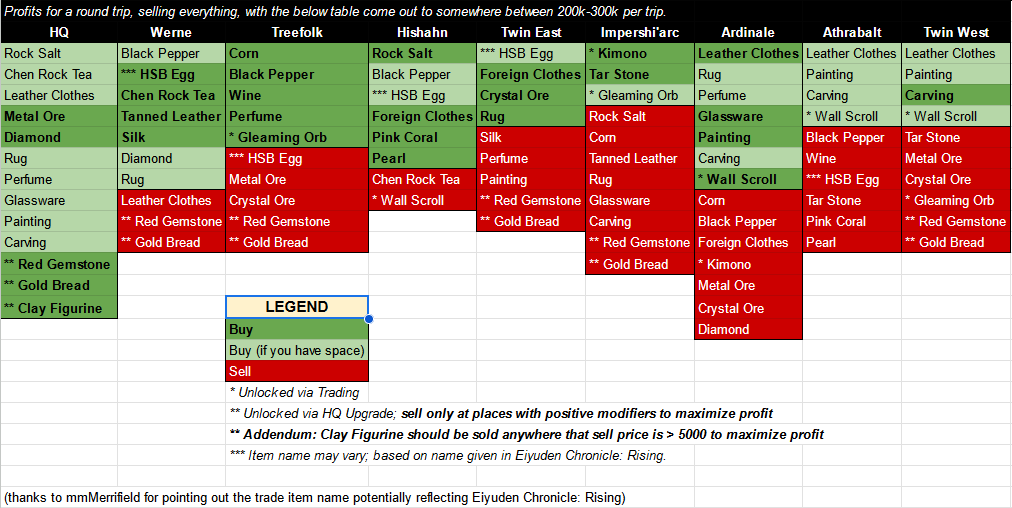


@ Marcus - It's not, no - each location has their own price for each item, and that value alone is generally substantially different enough to make some places a clear profit to sell at. The arrows are just to add some variability to the trading, but in reality, they can be safely ignored in almost every scenario.
In my last run using this going left to right starting in Werne, I made 250k. Buying and selling at every step.
You're only missing the three HQ materials. I'd leave out the one that fluctuates a lot, but the other two are still viable. In fact checking the guide, I skipped those as well in the above number.
@mmMerrifield - I will definitely be adding them, yes! I got really busy and haven't had much time to play in the past week and a half, but hoping to update shortly!
That said, I'm always willing to adjust my information if I'm wrong. If you can provide in-game screenshots of any of my suggested buy/sells ultimately leading to a loss, please share and I will adjust my info accordingly.