Persona 3 Reload

Persona 3 Reload

33 beoordelingen
Persona 3 Reload General Fusion Guide
Door BothDoorsCares
In this guide, I will explain the best ideas to have while fusing in Persona 3 Reload. Focusing on the general mindset when determining a build, how to create said build, and grinding methods here and there to increase efficiency.

The goal of this guide is to inform a reader of every possible parameter to consider when building personas. With that in mind, I will not be recommending specific persona builds. As I believe that will always be to the player's discretion.
2
   
Prijs
Toevoegen aan favorieten
Toegevoegd aan favorieten
Verwijderen uit favorieten
Fusion Mechanic Basics
Fusing at 4 AM sounds fun.

To start with, we are going to outline some of the common mechanics that are involved in fusion. First of, the types of fusions. This game took in the more simplified fusion of P5 somewhat. In the sense that only Bi-Fusions are available for General Fusions. While Special Fusions would be any fusion needing 3 specific personas and up for the ingredients with deterministic results. Bi-Fusions are locked to only 4 inheritance slots from the ingredients. While Special Fusions can inherit only 5 practically (Except Orpheus Telos, who will have 8 slots).

"Affinity" refers to the spread of types of skills that personas can inherit. The rule of thumb is that Passives (In the right Skill Rank), Support skills, and Almighty spells (except Black Viper) are universal for all personas. In most cases, there will be a template present per Element's Affinity that most personas would have. An example being a Wind Affinity persona only being unable to inherit Elec spells. But there are some variations between Elemental Affinities. These variations can add some more restrictions compared to the more common version of the Affinity. This will be elaborated on later.

"Skill Change" (More conventionally known as Skill Mutation) is a mechanic wherein a persona's skill might change after a fusion. This happens more often the closer you are to a Full Moon. Generally, what this does is that after a fusion is performed, the skills that can undergo Skill Change will start to flicker. And if you accept the change, the flickering skills will morph to either sidegrade or be a total upgrade from the original skill. The factors that facilitates this mechanic is called "Skill Rank". As skills are generally ranked from number 1-9 (Some skills that are uninheritable have no rank). What Skill Change essentially does is it either morphs the existing skill into another skill of the same Skill Rank. Or go up or down a rank or two (Except for Rank 8 skills, which has a chance to morph into a skill with no rank such as Heaven's Blade or Magic Mastery). This will be elaborated on later.

"Skill Cards" are items that allows certain skills to be passed on personas without the need of fusions. The availability of these are dependent on your progress in Tartarus as it is tied to locked chests in certain sections of the blocks at Tartarus, Shuffle Time, and Arcana Burst. That and what the Antique Store sells every month. The convention is that a higher-ranked Sword Card would yield better skills. The pool of Skill Cards from locked chests differ from the ones in the ranks of Sword Cards available for that section of a block. Being smart on what Skill Card to obtain is key.

It must also be best noted what skills are exclusive to specific personas. The most common example would be the skills from DLC personas, like Driver passives. But for Vanilla skills, these would be:
  • Satan with Black Viper
  • Daisoujou with Samsara
  • Alice with Die For Me!

With DLC, these would be:
  • Cendrillon with Slash Driver
  • Vanadis with Masquerade
  • Johanna with Strike Driver
  • Anat with Cosmic Flare
  • Milady with Pierce Driver
  • Astarte with One-Shot Kill
  • Carmen with Fire Driver
  • Hecate with Blazing Hell
  • Goemon with Ice Driver
  • Kamu Susano-O with Ice Age
  • Captain Kidd with Elec Driver
  • Seiten Taisei with Wild Thunder
  • Zorro with Wind Driver
  • Mercurius with Vacuum Wave
  • Robin Hood with Light Driver
  • Loki with Rebellion Blade
  • Arsene with Dark Driver
  • Satanael with Sinful Shell

"Stat Inheritance" has returned after not appearing after P3P. It does as it says, stats from the ingredients can be inherited towards the resulting persona. But this only applies to stats applied via Stat Incenses, like before. This will be elaborated on later.

These elements of fusion all come together when planning to fuse a persona build. Determining the viability of a build idea means having to consider every aspect of the given parameters to increase efficiency. But the most important aspect is being able to have the best mindset when creating a persona build. Which would be the first thing to tackle for this guide.


Appropriate Fusion Mindset (Part 1)
Well, what do I exactly mean by "appropriate"? Fusion can be extremely varied, how would there be an appropriate mindset for it?

More or less, awareness of the fundamental questions to assessing is key. Personally, I would list it as:
  • How to assess a build idea's merits.
  • How to determine the most appropriate skills for a build.
  • How to obtain said skills efficiently.
  • Is the build idea doable for the level you are in? How about availability based on S.link locked personas?
  • Is it worth the trouble to grind a little bit for better gains or build now?

And a bit more of little details that I will elaborate on later.

A proper mindset in fusion would take in all of these information before deciding to take time going into the Velvet Room to make the build into reality. Make it into a habit of sorts. That list might look daunting but I can assure you that it is simpler than it looks. And I prescribe to be very critical in this subject. The idea is to be more comfortable to think for themselves when creating builds.

I'll give a practical example that many new players would be likely to be aware of. A bit of an exercise to show how a bit of skepticism can give a better answer. Everyone recommends the creation of Siegfried. Forums, videos, conversations from players, you name it. Many people tout him as the objectively best persona to target for at level 50s. And there is a great reason for that. Ease of mind. Well, what do I mean by that? Let's try to apply the given list.

How to assess a build idea's merits
This step is more on checking the purpose, feasibility, ease of work, and more for a build. With this example, Siegfried passes with flying colors, especially with the purpose in mind. The purpose is more akin to "Unlock Scarlet Havoc while also creating a strong general phys persona in the 50s". Feasibility and Ease of work can go hand-in-hand in assessing. As each questions "Is this build idea even possible?". The answer obviously being yes. and "If yes, how easy is it to make?", in which the answer is also a big yes.

Siegfried seems perfect since majority of the good skills for a Slash-based persona are in his innate skillset. Here is the common things one would point out after analyzing his moveset:

  • Best regular Slash skill (Brave Blade).
  • Amp for the skill in question (Slash Amp).
  • A good Critical Booster (Crit Rate Amp).
  • Has Charge (Next phys skill deals 2.3x damage. Or 2x for a Theurgia skill.)
  • Has Auto-Rebellion and Auto-Masukukaja (Meaning, if he's the starter persona the player uses, he has a Critical buff to get Criticals better and less likely to miss. As hit rates can be called a soft weakness of physical skills).
  • Has good resistances (Null Slash, Resist Strike, Null Light. The Null Slash basically translates to being safe if one's skill gets Repelled somehow).
  • Has very high St and is biased towards adding points into St in level up (Meaning that he gets stronger at what he does the more he levels up).

Many reasons to have him as a target. For the given purpose, he is very easy to build on, even if just using the innate skills. As shown here, there is quite a lot of merits to building on Siegfried in both effectiveness and ease of mind. I did not try much with this fusion in my playthrough and he seems to be mostly effective.


How to determine the most appropriate skills for a build
This step is straightforward. Determining what are the missing skills in the build, where the skills can be obtained and the methods of obtaining said skills towards the build. For this example, you can clearly see that Siegfried's decent innate skills for the build idea is around 4-7 depending on what you want to do. Let's assume it's these four for the sake of the example:
  • Brave Blade
  • Crit Rate Amp
  • Slash Amp
  • Charge

Given this, asking what skills are missing is imperative. For the given purpose of the build, there is some variations possible. An AoE attack doesn't sound like a bad idea. So maybe keeping his innate Deathbound is important. Perhaps you want to maximize Critical Rate, so adding in the other Critical Booster is important. Maximizing Slash Damage and perhaps, the Theurgia Scarlet Havoc as well can be important. Ergo, adding in Slash Boost and Multi-Target Boost is important. Perhaps you are weary of the Darkness weakness. So Resist or Null Dark is important. There's many things that one can do in this case. And I believe this is to the player's discretion. However, for this example, let's try maximizing Slash damage and Theurgia, alongside Critical rate. So we'll aim for these skills:

  • Slash Boost
  • Multi-Target Boost
  • Single-Target Boost
  • Apt Pupil

Now that we have a planned skillset, it's time for the next question

How to obtain said skills efficiently.

Now we have around 2 methods to imbue a persona with skills in this game. That being inheritance via fusion and Skill Cards. The mentioned types of fusion beforehand is important here. As Siegfried is only a Bi-fusion, he will only be able to inherit 4 skills. The second method being Skill Cards. As many skills can be given using these items without worry about inheritance at all. But here's the big disclaimer. I urge that people to not rely on Skill Cards as much as possible. As it stands, the method to gain Skill Cards is not infinitely sustainable unlike how it is in P3P. And as such, the usage of the Cards is more valuable. I will elaborate on how to grind Skill Cards and make it somewhat more sustainable later.

As much as possible, maximize the 4 inheritable skill slots to not waste Skill Cards. In this example, with proper planning, you won't need a Skill Card at all. Which is actually a decently rare example, because this needs the target to have many innate skills that are worthwhile to put into the build. As such, being more conservative with Skill Cards in general is good as a rule of thumb because you are most likely to use one or two of them generally.

Anyways, as for fusion paths. Many would be inclined to simply look into a fusion calculator for this. And that is a valid move, honestly. But I would prescribe to not be as reliant on the Recipe Generators that are around. As it is not very efficient due to many factors such as not being aware of the actual state of your compendium, the algorithm not being very efficient and more. Try practicing to manually making a recipe using your knowledge of the state of your stock in mind. If you're very attentive in fusion at all times, more than likely the good skills would be more spread out in your stock. So this practice helps a lot over time in making fusions easier. Since, more or less, the way you would fill up the stock would also give the personas decent skills that can be passed down later at least. Here's some general tips in creating efficient fusion recipes:

  • Try to reduce the number of fusion steps taken.
  • Keep the skills that can be obtained via S.link bonuses in mind.
  • As much as possible, find recipes that doesn't need level grinding for skills (Lovers Card is great for this).
  • Always register your stock, any of the personas you have can be used later.


Appropriate Fusion Mindset (Part 2)
The idea is to make recipe creation as easy as possible with these little things in mind. Also, try to pick what skill you want to use Skill Cards for. More or less, the best skills to use Skill Cards with are passives that completes a build. Such as Resists/Null/Drain/Repels, Boosts, Endure/Enduring Soul, Spell/Arms Master, and more. Support spells are good as well. As much as possible, it is not a good idea to use Skill Cards for the attacking skill, with some exceptions such as Anubis.

Anyways, for the example we have here. In case that four skills is not possible in fusion, trying to go for Slash Boost and Apt Pupil is a good idea to use Skill Cards for. As they are available from Sword Cards in Shuffle time in previous blocks. Technically, Single-Target and Multi-Target Boost is as well. However, these are only behind Locked Treasure Chests, so it is inherently rarer.

Planning this before the actual process is a great habit to pick up on in general, in order to reduce mistakes made. Keep this in mind.

Is the build idea doable for the level you are in? How about availability based on S.link locked personas, Requests, Link Episodes and more?

This step is short and simple. It simply asks if you are required to grind to achieve the goal in mind or not. Of course, this can mean a lot of things. Either for skills from the ingredients. Or needing the level to fuse the target persona in the first place. For our example here, we don't need to worry about this with the given skillset that's picked. The only requirement is reaching level 54 for Siegfried himself. Although if we were to pick an example for Siegfried where we need a higher leveled persona for a skill, that would be likely be Null Dark from Daisoujou.

It is imperative to think ahead based on the aimed skillset in this step of assessing. This is definitely a step that becomes less relevant as you play the game. But it is definitely important to have it in your mind regardless.

The second part of this step is more relevant if one is doing a challenge run of sorts with restrictions that involves these parameters. Such as a no S.link run. Or maybe one simply did not unlock certain fusions as of yet. This can be disregarded somewhat over time, especially if the player is not that keen on making builds until endgame where everything is accessible.

Overall, I believe both of these are very important in improving in fusion throughout the entire game. As this being in consideration helps in building throughout the entire duration of the game instead of just endgame.

Is it worth the trouble to grind a little bit for better gains or build now?

Now this is likely the step that little to no one really considers. Mostly because if something works, it works. But there can always be room for improvement if analyzed enough. But I believe it's best for people to be more flexible in finding improvement for builds. As it would help mid-playthrough in finding better targets. Instead of just sticking to one persona the entire game.

This is most relevant to the example I've been using the entire time. While I did write the main reasons why Siegfried is considered as the best by many, it is imperative to be skeptical in building. As mentioned before, being critical on the other details can let you to get better build ideas.

So let's go back to the beginning, while looking for a better option with the same parameters present.

The purpose would be the same, creating a strong general phys persona in the 50s. With similar resistances, similar innate skills and more. But with some improvements. With that kind of parameter, people would be inclined to use Chernobog instead for many reasons. Similar advantages in terms of innate skills, resistances, level (but is slightly higher by 2 levels) and more. But there are key differences that makes him a better target. The knowledge of the little details that makes this true is what truly sets apart the people that are decent with fusions with the ones that have mastered it. This is the actual persona I've used in my playthrough.


Little Details

These are the kind of details that many players wouldn't really think about learning much. Not exactly fun for many, either. But I think it's important to teach to those that are interested. Usable with other Megaten titles as well.

Firstly, determining the stat growth of the personas used. This is relatively easy to pick up. Perhaps a bit too on the nose to mention. But really, it's simply just looking into the base stats of the persona in question. Whatever is the highest would also be their most prioritized stat. Personas would have one or two of them, usually. For the example we have, Siegfried's St/En, while Chernobog's St/Ma. In Megaten in general, biases on stat growth is usually present. So this kind of detail being taken into account can help in the other games as well. Anyways, this detail will be important with the next bit.

Secondly, knowing how the damage formula works. This can be pretty similar from a game-to-game basis for modern Megaten titles. It could also differ due to different mechanics present to the game itself. Reload somehow managed to be both. And that is mainly due to the mechanic of Theurgia and how damage from this is calculated differently from the normal damage calculations. Here is the simple equation used by the game for normal skills (Keep in mind that St scales with Strength-based skills. While Ma scales with Magic-based skills. And this assumes individual hits, add in a multiplier for number of hits):

√[Base Damage of the Skill x (St or Ma of the Persona used/ En stat of target)] x 2√(15) x Level Factor x Weakness/Critical or Resistance Factor x Other Factors (Such as Elemental Boosters) x Effect of Buffs x Effect of Debuffs x Damage Variance Factor (+/- 5%)

Theurgia damage:
√[Base Damage of the Skill x (St + Ma stat of the Persona used)] x (Player level of the user of the Theurgia skill + 20)/(En stat of the target) x 0.7√10 x Level Factor x Weakness/Critical or Resistance Factor x Other Factors (Such as Elemental Boosters) x Effect of Buffs x Effect of Debuffs x Damage Variance Factor (+/- 5%)

Sounds complicated, right? But really, it can be simplified with a few pointers.
  • The Player Level (Not to be confused by the Persona Level) of the caster is important for higher damage.
  • The sqrt of the base damage of skills is used (Meaning, directly comparing skills with each other would assume that the sqrt of the base is used for both. A common staple of modern Persona damage formulas).
  • Boosters have a larger sway in terms of increasing damage compared to Base Damage and Damaging Stats.
  • Buffs and Debuffs apply damage multiplicatively.
  • Theurgia scales off of both St and Ma, regardless of the type of skill the Theurgia is.
  • Each hits of skills that do multi-hits are calculated individually

Another thing to mention is that boosters stack multiplicatively. And this has a cap of 5x (Although this is only achievable with DLC Driver Passives). Now with this info in mind, we can see some places of improvement for doing builds. We can see that since Theurgia scales off of both St and Ma, personas with innately low stats in either damaging stats is a bit of a bad idea. For the example we have, Siegfried seems to be a bit of a bad idea in this case, unless stat incenses are used. But Chernobog's stats are much more appropriate as is. There will be little to no need to use incenses for him. A trait that can be desirable for many. Taken these two details in mind to the extreme, we can see how Siegfried can be inferior to Chernobog with little to no extra work done. As shown here:
Appropriate Fusion Mindset (Part 3)
Lastly, affinity analysis. Now this is a little detail that's more relevant if you're replaying. Not very applicable for newly released megaten games. Honestly, something that I wouldn't really look into actively. It's a simple concept but very tedious to do. Analyzing enemy types, encounter formations, skills used, boss fight movesets and more. In order to find skills that are used more, or the ones used less. In order to determine the best things to resist or the ones that you can be more confident to allow to be exposed. With the example we have here, we can determine some simple facts relevant to both options.

  • Dark IKs is oddly more common than a usual persona game
  • Dark spells used by enemies are a bit stronger than elemental magic spells
  • Bosses after level 50s uses this decently often

Which basically translates to Dark weakness being a tad more dangerous to have than any of the elemental weakness. And Drain Dark helps a lot. Another reason (albeit, very small due to the options available to patch dark weakness) against using Siegfried.

And I believe that is all. Hopefully this can paint a clear picture in the process and mindset of theorycrafting builds. Really, the takeaway here is to be critical and take into account these many details when needed. These kind of things becomes less relevant depending on where you are in the game, however. So I suggest to not stress about it most of the time, but do keep it in mind. Next up would be the things to keep in mind with the process of fusion itself.
Fundamental Fusion Result Mechanic (Reload Edition)
This section will focus on how results in fusions are determined. Not exactly practical to know since multiple Fusion Calculators exist and are very accurate (If a player writes recipes manually and using it as a reference). However, I believe it would be an interesting thing to learn for those that are interested.

First of all, this game has only two types of fusions. Those being Bi-Fusions and Special Fusions. The latter are all predetermined recipes to make specific personas. And as such, I will not be talking about these kinds of fusions until later for Skill Changes. As for generic Bi-Fusions, the formula is simple to keep in mind. There are two important factors present. The arcanas of the ingredients used, and the base level of the ingredients. It is mostly the same as it is in the previous titles. As shown:

x arcana + y arcana = resulting arcana, (average of the base level of the ingredients then rounded down if not a whole number) + 1 for the calculated level.

As it boils down to, to find out what the resulting arcana that a specific fusion would create, refer to the arcanas of the ingredients and cross-examine where both of these two arcanas intersect in a fusion chart. I believe a practical example is a good idea to visualize this. And so, let's use the Chernobog example used before.

It is imperative that we look for two arcanas that adds up to the Moon arcana. Of course, there's multiple combinations for any arcana possible. So, how does one pick what to use? Simply put, there is no one answer. It's based on what you want to do with the fusion. Do you want to save money? Do you want to increase efficiency so there's only one step? Or are you doing it to create fodder? There's a lot of factors. Although honestly, it's not required to think much about it unless you're aiming for very specific goals. For this example, I would say having Siegfried as an ingredient due to his multiple great skills to pass on is a great reason to look for a combination that creates the Moon arcana using Strength personas. And so, that will be a criteria to consider. Strength + Temperance would satisfy this condition, as shown here:


Perfect. Now, to determine what ingredients to use from these arcanas. We should determine this based on the base levels of the personas from these two arcanas. We must get a calculated level that is higher than 49 but less than 56. So that it will result to Chernobog. As the persona that is lower leveled within the Moon arcana (Dionysus) is level 49. And Chernobog's level is 56. Whenever the calculated level made by the fusion do not match a possible result's level (Which is very much often the case), the game will find the persona with the closest base level to the calculated level. However, it will only look for a persona that has a base level that is higher than the calculated level (Except for a special case that will be explained later. This essentially means that if the calculated level is higher than the base of a persona within the arcana, this persona would instantly be impossible to be a result).

Anyways, with our given ingredient arcanas (Strength + Temperance), and our criteria of using Siegfried specifically, we have the first number for our calculated level (54).

Now, to look at the list of Temperance personas that can satisfy our given condition (Will give a calculated level higher than 49 but less than 56). We can see that both Okuninushi (44) and Suzaku (55) can satisfy the condition to create Chernobog. As shown here:

  • Siegfried + Okuninushi, [(54 + 44)/2] + 1 = 50
  • Siegfried + Suzaku, [(54 + 55)/2] + 1 = 55.5 (Round down when not an integer) = 55

Whatever recipe you pick between the two do not matter much for what result you get. But many would be inclined to pick the Okuninushi recipe for being cheaper and likely having skills that can be beneficial for a Slash build.

Anyways, I will now explain the special case in fusion that is mentioned. As stated beforehand, the game will find the persona with the closest base level to the calculated level. And that it will only look for a persona that has a base level that is higher compared to the calculated level. However, there is a case where it looks for a persona that has a base level that is lower than the calculated level instead. And that is when you fuse personas that both have the same arcana. Specifically marked in the fusion chart here:


To see this in action, let's take a very extreme example by fusing Orpheus. For the first time ever in this series, the initial persona for Reload has more than one recipe that does not involve special fusion materials (Like Treasure Demons in P5) or accidents. Now having two recipes (three with DLC).

And this special case is the main reason why this is possible. Now, let's see all the recipes that creates Orpheus. Which would be Slime (12) + Legion (26), Black Frost (37), or Arsene (23).


Running the calculations, the calculated levels would be:

  • Slime + Legion [(12 + 26)/2] + 1 = 20
  • Slime + Black Frost [(12 + 37)/2] + 1 = 25.5 (Round down when not an integer) = 25
  • Slime + Arsene [(12 + 23)/2] + 1 = 18.5 (Round down when not an integer) = 18

As shown, the obtained calculated levels are way higher than Orpheus' level (1). But all of these recipes creates Orpheus regardless. And there are two mechanics that allows this. The first one being the special case mentioned before. And the second one being that the ingredients cannot appear as the result.

Now, let's analyse these fusions. First, Slime + Legion. This is the most simple out of these. With the given calculated level (20), the game will look for a persona with a base level that is lower than the calculated level (Since the given fusion is a fusion of two personas from the same arcana). And so, it will look into the next persona that has a base level lower than 20. First up would be Slime itself. But since it is an ingredient in the fusion itself, it cannot be a result. And so, the game will now look at the next possible persona. The next being Orpheus. And voila, the result.

Second, Slime + Black Frost. This is a great example to show the special case with same arcana fusions. With the given calculated level (25), it would be expected that the resulting persona would be a Legion (26) if the usual procedure is done. However, the result is Orpheus regardless due to being a same arcana fusion. With the given information, it would make sense that Arsene could appear as a result in this case. However, that could not happen for a simple reason. As Arsene is a special fusion, he does not appear in any Bi-Fusion recipe (This applies to all special fusion personas in general). And as such, it looks downwards to Slime once again instead. But that does not work for the same reason as the previous fusion. And so, it looks downwards once again to Orpheus.

Lastly, Slime + Arsene. This is mostly the same as the second fusion. Same reasoning. Looks down to Slime but is not possible as a result due to being in the ingredients. Ergo, obtaining Orpheus.

There we go, that should be all that one needs to keep in mind to understand how fusion results are determined. Here is the fusion chart once again for easy access:

Affinities (Part 1)
A relatively simple mechanic (Although arguably inconsequential due to Skill Cards existing), Affinity simply refers to the spread of types of skills that are inheritable by a persona in fusion. These are mostly templates, meaning that most of the personas in the game can be classified into certain categories in terms of affinities. However, it seems that there's variations on these categories. So it can be a bit more complicated. In some cases, there are Affinity spreads that are exclusive to certain personas. But anyways, we can classify the categories by associating it with an element. And noting the variations for these categories if it exists. As shown here:

Base General Phys Affinity:
Personas:
  • Oni (Chariot, Level 31)
  • Dakini (Hermit, Level 38)
  • Kali (Strength, Level 63)
  • Futsunushi (Magician, Level 74)
General Phys Variation A:
Personas:
  • Neko Shogun (Star Level 17)
  • Arahabaki (Hermit, Level 68)
General Phys Variation B:
Personas:
  • Take-Minakata (Hanged Man, Level 20)
  • Susano-O (Fool, Level 77)
Base General Elemental Magic Affinity:
Personas:
  • Fortuna (Fortune, Level 15)
  • Queen Medb (Lovers, Level 28)
  • Thunderbird (Sun, Level 35)
  • Thoth (Hierophant, Level 40)
  • Anubis (Judgement, Level 40)
  • Parvati (Priestess, Level 48)
  • Titania (Lovers, Level 49)
  • Kikuri-Hime (Priestess, Level 61)
General Elemental Magic Affinity Variation A:
Personas:
  • Pixie (Lovers, Level 2)
  • Unicorn (Priestess, Level 11)
  • Leanan Sidhe (Empress, Level 21)
  • Sarasvati (Priestess, Level 32)
  • Saki Mitama (Lovers, Level 36)
  • Hariti (Empress, Level 48)
  • Attis (Hanged Man, Level 73)
  • Alilat (Empress, Level 84)
General Elemental Magic Affinity Variation B:
Personas:
  • Inugami (Hanged Man, Level 10)
  • Mokoi (Devil, Level 18)
  • Narcissus (Lovers, Level 23)
  • Mothman (Hermit, Level 31)
  • Incubus (Devil, Level 37)
  • Succubus (Devil, Level 47)
  • Nebiros (Hermit, Level 52)
  • Lilith (Devil, Level 65)
Base Slash Affinity:
Personas:
  • Jatayu (Sun, Level 55)
Base Strike Affinity:
Personas:
  • Yamata-No-Orochi (Moon, Level 25)
Base Pierce Affinity:
Personas:
  • Lamia (Hermit, Level 25)
Base Fire Affinity:
Personas:
  • Jack-O’-Lantern (Magician, Level 15)
  • Oberon (Emperor, Level 16)
  • Hua Po (Magician, Level 19)
  • Sati (Magician, Level 29)
  • Flauros (Hierophant, Level 33)
  • Orobas (Magician, Level 39)
  • Cu Chulainn (Tower, Level 40)
  • White Rider (Strength, Level 46)
  • Mishaguji (Hierophant, Level 48)
  • Mada (Hanged Man, Level 57)
  • Surt (Magician, Level 60)
  • Mara (Tower, Level 75)
  • Saturnus (Star, Level 76)
  • Shiva (Tower, Level 86)
Fire Affinity Variation A:
Personas:
  • Yatagarasu (Sun, Level 24)
  • Suzaku (Temperance , Level 55)
  • Uriel (Aeon, Level 57)
  • Bishamonten (Tower, Level 60)
  • Atavaka (Strength, Level 72)
  • Helel (Star, level 88)
Fire Affinity Variation B:
Personas:
  • Rangda (Magician, Level 50)
  • Abaddon (Devil, Level 76)
Fire Affinity Variation C:
Personas:
  • Chimera (Chariot, Level 9)
  • Orthrus (Hanged Man, Level 27)
Base Ice Affinity:
Personas:
  • Silky (Lovers, Level 5)
  • Jack Frost (Magician, Level 8)
  • Kushi Mitama (Fortune, Level 28)
  • Yakshini (Empress, Level 32)
  • King Frost (Emperor, Level 34)
  • Clotho (Fortune, Level 37)
  • Ganga (Priestess, Level 41)
  • Naga Raja (Emperor, Level 43)
  • Shiki-Ouji (Chariot, Level 45)
  • Atropos (Fortune, Level 56)
  • Qtian Dasheng (Tower, Level 67)
  • Skadi (Empress, Level 68)
  • Lakshmi (Fortune, Level 73)
  • Scathach (Priestess, Level 75)
  • Mother Harlot (Empress, Level 77)
Ice Affinity Variation A:
Personas:
  • Valkyrie (Strength, Level 10)
  • Shiisaa (Hierophant, Level 23)
  • Setanta (Star, Level 29)
  • Byakko (Temperance, Level 63)
Ice Affinity Variation B:
Personas:
  • Pisaca (Death, Level 15)
  • Matador (Strength, Level 22)
  • Belphegor (Emperor, Level 53)
  • Chernobog (Moon, Level 56)
  • Baal Zebul (Moon, Level 72)
  • Beelzebub (Devil, Level 81)
Ice Affinity Variation C:
Personas:
  • Apsaras (Priestess, Level 2)
Base Elec Affinity:
Personas:
  • Ara Mitama (Chariot, Level 6)
  • High Pixie (Priestess, Level 20)
  • Hanuman (Strength, Level 36)
  • Vasuki (Hanged Man, Level 38)
  • Okuninushi (Temperance, Level 44)
  • Dionysus (Moon, Level 49)
  • Barong (Emperor, Level 63)
  • Thor (Chariot, Level 64)
  • Melchizedek (Justice, Level 66)
  • Michael (Judgement, Level 70)
  • Odin (Emperor, Level 74)
  • Satan (Judgement, Level 82)
Elec Affinity Variation A:
Personas:
  • Omoikane (Hierophant, Level 7)
  • Gabriel (Empress, Level 62)
Elec Affinity Variation B:
Personas:
  • Lilim (Devil, Level 8)
  • Baphomet (Devil, Level 30)
  • Girimekhala (Moon, Level 39)
  • Samael (Death, Level 41)
  • Nidhoggr (Aeon, Level 47)
  • Mot (Death, Level 58)
Elec Affinity Variation C:
Personas:
  • Zouchouten (Chariot, Level 14)
  • Rakshasa (Strength, Level 15)
  • Take-Mikazuchi (Hanged Man, Level 23)
Base Wind Affinity:
Personas:
  • Orpheus (Fool, Level 1)
  • Nekomata (Magician, Level 3)
  • Forneus (Emperor, Level 7)
  • Nigi Mitama (Temperance, Level 12)
  • Berith (Hierophant, Level 13)
  • Mithras (Chariot, Level 24)
  • Genbu (Temperance, Level 30)
  • Eligor (Tower, Level 31)
  • Seiryu (Temperance, Level 38)
  • Lachesis (Fortune, Level 44)
  • Kurama Tengu (Hermit, Level 46)
  • Norn (Fortune, Level 65)
  • Cybele (Lovers, Level 67)
  • Ananta (Aeon, Level 73)
  • Chi You (Tower, Level 86)
Wind Affinity Variation A:
Personas:
  • Mitra (Temperance, Level 22)
  • Dominion (Justice, Level 42)
  • Quetzacoatl (Sun, Level 45)
  • Raphael (Lovers, Level 60)
  • Garuda (Star, Level 64)
  • Houou (Star, Level 70)
Affinities (Part 2)
Wind Affinity Variation B:
Personas:
  • Pazuzu (Devil, Level 56)
Wind Affinity Variation C:
Personas:
  • Koumokuten (Chariot, Level 52)
Base Light Affinity:
Personas:
  • Angel (Justice, Level 4)
  • Archangel (Justice, Level 10)
  • Tam Lin (Lovers, Level 13)
  • Principality (Justice, Level 16)
  • Power (Justice, Level 25)
  • Virtue (Justice, Level 32)
  • Ganesha (Star, Level 51)
  • Throne (Justice, Level 52)
  • Siegfried (Strength, Level 54)
  • Horus (Sun, Level 67)
  • Kohryu (Hierophant, Level 71)
  • Yurlungur (Temperance, Level 71)
  • Vishnu (Sun, Level 78)
  • Sandalphon (Moon, Level 80)
  • Metatron (Aeon, Level 87)
  • Messiah (Judgement, Level 91)
Light Affinity Variation:
Personas:
  • Jikokuten (Chariot, Level 25)
Base Dark Affinity:
Personas:
  • Onmoraki (Hermit, Level 8)
  • Gurulu (Moon, Level 14)
  • Naga (Hermit, Level 17)
  • Pale Rider (Death, Level 23)
  • Loa (Death, Level 33)
  • Kaiwan (Star, Level 42)
  • Hecatoncheires (Hanged Man, Level 47)
  • Kumbhanda (Hermit, Level 61)
  • Seth (Moon, Level 62)
  • Hell Biker (Hanged Man, Level 65)
  • Alice (Death, Level 68)
  • Thanatos (Death, Level 78)
  • Lucifer (Judgement, Level 89)
Base Almighty Affinity:
Personas:
  • Slime (Fool, Level 12)
  • Sandman (Fortune, Level 20)
  • Legion (Fool, Level 26)
  • Black Frost (Fool, Level 37)
  • Ose (Fool, Level 41)
  • Decarabia (Fool, Level 54)
  • Daisoujou (Hierophant, Level 59)
  • Trumpeter (Judgement, Level 59)
  • Loki (Fool, Level 69)
  • Masakado (Tower, Level 79)
  • Asura (Sun, Level 85)
  • Orpheus Telos (Fool, Level 91)

And voila. That is all. This list's usability may vary depending on people's preferences in planning fusions. Although I believe it's very likely that it will come in very handy when talking about the next aspect of fusion.
Skill Change (Part 1)
Likely one of the hardest mechanic to utilize, Skill Change does what it implies. It changes the existing skills in a Persona to either a sidegrade of the previous skill, or an upgrade outright. Either directly or indirectly. In order to understand how the game determines this, we need to learn about Skill Ranks.

"Skill Rank" is the value assigned to a skill and ranges from numbers 1-9 (And some skills have no rank, meaning that it is uninheritable. Mostly not in the Skill Change skill pool as well). Generally, the higher number, the more desirable the skill is. This facilitates how a skill morphs in Skill Change, as the way how it works is that the skill morphs into a skill with the same Skill Rank, or falls downwards into a skill with a lower Skill Rank, or jumps upwards to the next rank by one or two.

There are also cases wherein the skill directly morphs into an upgraded version of a skill (In these cases, the jump to the next rank rule is slightly broken, as these can allow these skills that are eligible for a direct upgrade to jump up to three ranks in a specific case). These are set to specific skills only, and have higher odds of occurring compared to a regular Skill Change. So these can be reliably farmed in theory. A great example would be Almighty Boost being very likely to mutate to Almighty Amp. At the time of writing, there is a parameter present that seems to add restrictions to when you can upgrade a skill via skill change based on level. But how this parameter actually works is unknown at the moment. This will be elaborated later on if this has been researched later.

As for the pool of skills to mutate into, this is ultimately based on the combination of arcanas that are used in the fusion. Generally, the arcanas can be split into 6 categories. Internally called Packs. And these Packs have a set skill pool associated with them. Both with what kind of skills can be mutated into and the chance you can mutate into the skill in question. In fusion, the associated packs to the ingredients and its information are merged together to find the actual skill pool for that particular fusion. As a practical example, I'll use an actual fusion I've done recently. And likely many people would like to do as well. A Magic Mastery Mage build. For this case, I picked Tam Lin for the target. And used some sup-optimal skills as targets for the Magic Mastery Skill Change. In order to point out optimizations later on. Inherited skills and recipe below:

Magic Mastery is a skill without a Skill Rank. And so, Rank 8 skills are best to mutate into it. And that is why I loaded Tam Lin with as much Rank 8 skills possible. Notable, being:
  • Panta Rhei
  • Spell Master
  • God's Hand
  • Debilitate
As it is a a Bi-Fusion, I can only put in four Rank 8 skills. And in this case, I also want to keep Panta Rhei, as I am aiming for a Wind Magic Mastery persona. With an ingredient from the Hierophant arcana (Pack 5) and Priestess arcana (Pack 6). In general, the Packs are arranged as such:

Pack 1
  • Justice
  • Temperance
  • Star
Pack 2
  • Emperor
  • Lovers
  • Strength
  • Sun
Pack 3
  • Fool
  • Chariot
  • Moon
  • Judgement
Pack 4
  • Magician
  • Hanged Man
  • Death
  • Tower
Pack 5
  • Empress
  • Hierophant
  • Hermit
Pack 6
  • Priestess
  • Fortune
  • Devil
  • Aeon
I managed to pick ingredients coming from packs that can give Magic Mastery fairly likely overall. As to how this is determined, this will be elaborated later.

Now here comes the hard part....

It's time to constantly fuse the persona, and checking if one of the skill that can turn into Magic Mastery is picked by the Skill Change mechanic, checking if it turns into Magic Mastery when it does. If it does not, reload and try again. I believe that the most important part for this is to recall that you need to keep going. And do not give up. You can pray to whoever you pray to, listen to music or any other way to passively numb the monotony. Just keep going.

If it feels like it's impossible due to how long it's taking, you're more than likely just unlucky if you read and comprehend this entire section. I will talk about the actual impossible cases later on, this will be elaborated later.

It would honestly feel a bit more disheartening when you managed to get the skill but the Skill Change also took the 4th tier elemental spell you want. Happened to me here:
And this is the desired result:

Anyways, that is mainly the process on how to grind the required Skill Change to obtain the skill you want.

Now, to look at places of optimization. Now this requires a bit more intimate knowledge of the rates of obtaining specific Skill Change results. But that is a tad complicated, and there are basically only two or three skills that people would be inclined to obtain (Almighty Amp, Magic Mastery, and perhaps Heaven's Blade), and Almighty Amp being eligible for an upgrade Skill Change. Giving it a reliable method to obtain.

I have elected to personally document every possible pair from the packs to get Magic Mastery via Skill Change. Alongside the best skills to inherit in order to heighten the chances to its peak.
Skill Change (Part 2)
General ideas here is that only Packs 3, 5, and 6 are the only ones that has Magic Mastery in its skill pool. And merging these packs together by fusing two personas that are a part of these three packs would give a higher chance to mutate Magic Mastery. Although only one persona being a part of a Pack with Magic Mastery in its skill pool in the ingredients still has a chance to obtain it. And lastly, in the case of Special Fusions, only the first two ingredients in the recipe will tell the skill pool of the resulting persona.

I will indicate the must haves in terms of importance in bold in this list. If there are no skills in bold in a list, that means that they are all equally weighted (And so, you can choose what to put in). Also, any of the Rank 8 or even Rank 7 skills can technically have the chance to mutate into Magic Mastery. More or less, the best idea is one should load the target persona with all Rank 8 skills if one can help it. But if that is not possible, Rank 7 skills from the innate skills the persona have or even Rank 9 ones would be more preferable than skills with lower Skill Rank. Although in the example with Tam Lin, this is not possible. There will be cases where this is unavoidable, like the example I used because I wanted Tam Lin specifically for his resistances. With all of that in mind, these are the list of Pack combinations and (generally) the best skills to inherit to maximize Magic Mastery appearing:

Pack 3 + 3
  • Vorpal Blade
  • Inferno
  • Diamond Dust
  • Megidolaon
  • Salvation
  • Heat Riser
  • Spell Master
  • Ali Dance
Pack 3 + 5
  • Megidolaon
  • Salvation
  • God's Hand
  • Enduring Soul
Pack 3 + 6
  • Almighty Amp
  • Megidolaon
  • Salvation
Pack 5 + 5
  • God’s Hand
  • Megidolaon
  • Salvation
  • Akasha Arts
  • Thunder Reign
  • Panta Rhei
  • Debilitate
  • Arms Master
  • Firm Stance
Pack 5 + 6
  • Brave Blade
  • Almighty Amp
  • God’s Hand
  • Megidolaon
  • Salvation
Pack 6 + 6
  • Almighty Amp
  • Brave Blade
  • God’s Hand
  • Divine Judgement
  • Demonic Decree
  • Megidolaon
  • Salvation
  • Enduring Soul
  • Unshaken Will
Pack 3 +1 (One Pack only)
  • Primal Force
  • Vorpal Blade
  • Inferno
  • Diamond Dust
  • Heat Riser
  • Ali Dance
  • Spell Master
Pack 3 + 2 (One Pack only)
  • Primal Force
  • Vorpal Blade
  • Inferno
  • Diamond Dust
  • Heat Riser
  • Ali Dance
  • Spell Master
Pack 3 + 4 (One Pack only)
  • Brave Blade
  • Primal Force
  • Almighty Amp
  • Vorpal Blade
  • God’s Hand
  • Akasha Arts
Pack 5 + 1 (One Pack only)
  • Primal Force
  • Akasha Arts
  • Thunder Reign
  • Panta Rhei
  • Debilitate
  • Arms Master
  • Firm Stance
Pack 5 + 2 (One Pack only)
  • Primal Force
  • Brave Blade
  • Almighty Amp
  • Akasha Arts
  • God’s Hand
  • Vorpal Blade
Pack 5 + 4 (One Pack only)
  • Brave Blade
  • Primal Force
  • Akasha Arts
  • Thunder Reign
  • Panta Rhei
  • Debilitate
  • Arms Master
  • Firm Stance
Pack 6 + 1 (One Pack only)
  • Brave Blade
  • Primal Force
  • Almighty Amp
  • Vorpal Blade
  • Akasha Arts
  • God’s Hand
Pack 6 + 2 (One Pack only)
  • Brave Blade
  • Almighty Amp
  • Primal Force
  • Divine Judgement
  • Demonic Decree
  • Unshaken Will
Pack 6 + 4 (One Pack only)
  • Brave Blade
  • Almighty Amp
  • Primal Force
  • Divine Judgement
  • Demonic Decree
  • Unshaken Will
Additionally, I have also elected to map out a Fusion Chart to show the combinations that can lead to Magic Mastery. Simply follow the row and column of the arcanas that creates the intersection to a target arcana that you desire. As shown here:
Legend:
  • Green (Reference Row and Column)
  • Dark Blue (Two Packs)
  • Purple (One Pack Only)
  • Red (Impossible)

Now to talk about special fusions. As mentioned before, the first two ingredients in the recipe determines the Skill Change skill pool of the result. This means that these recipes are applicable to the Fusion Chart and Pack Combinations above. And so, I will list the recipes based on being great to impossible in trying to obtain Magic Mastery.
Great:
  • Pale Rider
  • Norn
  • Mara
  • Beelzebub
  • Satanael
Good:
  • Flauros
  • Parvati
  • Alice
  • Masakado
  • Asura
  • Metatron
  • Lucifer
  • Messiah
Impossible:
  • Fortuna
  • Arsene
  • Mada
  • Kohryu
  • Susano-O
  • Thanatos
  • Shiva
  • Orpheus Telos
And voila. As for Heaven's Blade, I think that can be an exercise for people that are curious to learn how to learn this info. As it is much more common than Magic Mastery by a large margin, I believe this is a more beginner friendly case to learn with. Just keep in mind the general ideas mentioned beforehand such as having Rank 8 skills all in the result after fusion if it's possible, checking if Heaven's Blade is in the skill pool of the ingredient's Packs, determining the best skills to inherit for farming Heaven's Blade by checking if the combination you want has Rank 8 skills that are more likely to appear in Skill Change (Since they are in the ingredient itself, they cannot appear as a Skill Change result. Ergo, heightening the chances of other skills appearing. Including Heaven's Blade), and more.

https://docs.google.com/spreadsheets/d/1dCF7onbPpLt_tHT28d8Dnm2F_-DTCOcbhIe0_tOgdqY/edit

Here is a link to a Skill Change Calculator. Simply press "File" on the upper left corner of the screen and select "Create a Copy". Rename if you desire and press Save. Now you can toy around and find the combo that you need for basically any Skill Change that you want to learn. The information about the Skill Change pool per pack is present here, alongside other valuable information that involves Skill Change.


Notable Skills and Skill Cards (Part 1)
Now, to talk about the notable skills in the game for builds. This section will talk about the specifics on the skills present in the game and the right ideas when going for a specific build in mind. And where they are obtainable as Skill Cards. I'll also write its Skill Rank, first persona to learn it levels wise, Sword Rank card where it is obtainable, and special effect if present).

Let's try to categorize these skills. By Early/Mid/End Game as well (1-30, 30-50, 50 to 99).

Damaging skills (Early game):
  • Vacuum Slash (Light Slash Damage to all foes, Rank 3, Valkyrie Level 13, Sword Rank 4)
  • Zan-Ei (Medium Slash Damage to one foe, Higher Damage when closer to a New Moon, Rank 3, Oberon level 18, Sword Rank 6)
  • Getsu-Ei (Medium Slash Damage to one foe, Higher Damage when closer to a Full Moon, Rank 5, Rakshasa level 20, Sword Rank 6)
  • Blade of Fury (Light Slash Damage to all foes, 2-4 hits, Rank 6, Matador Level 28, Sword rank 8)
  • Sonic Punch (Light Strike Damage to one foe, 35% Distress chance, Rank 2, Jack Frost level 11, Sword Rank 6)
  • Assault Dive (Medium Strike Damage to one foe, Rank 3, Zouchouten level 16, Sword Rank 6)
  • Swift Strike (Light Strike Damage to all foes, 1-2 hits, Rank 4, Zouchouten level 19, Sword Rank 4)
  • Herculean Strike (Medium Strike Damage to all foes, Rank 5, Shiisaa level 29, Sword Rank 8)
  • Arrow Rain (Light Pierce Damage to all foes, 1-4 hits, Rank 3, High Pixie level 20, Sword Rank 4)
  • Torrent Shot (Light Pierce Damage to one foe, 2-4 hits, Rank 4, Naga level 19, Sword Rank 6)
  • Agi (Light Fire Damage to one foe, Rank 2, Orpheus level 1, Sword Rank 2)
  • Maragi (Light Fire Damage to all foes, Rank 3, Nekomata level 8, Sword Rank 5)
  • Agilao (Medium Fire Damage to one foe, Rank 4, Jack-O'-Lantern level 21, Sword Rank 6)
  • Bufu (Light Ice Damage to all foes, 15% Freeze, Rank 2, Apsaras level 2, Sword Rank 2)
  • Mabufu (Light Ice Damage to all foes, 10% Freeze, Rank 3, Jack Frost level 10, Sword Rank 5)
  • Bufula (Medium Ice Damage to all foes, 15% Freeze, Rank 4, High Pixie level 22, Sword Rank 6)
  • Zio (Light Elec Damage to one foe, 15% Shock, Rank 2, Pixie level 4, Sword Rank 2)
  • Mazio (Light Elec Damage to all foes, 10% Shock, Rank 3, Lilim level 13, Sword Rank 5)
  • Zionga (Medium Elec Damage to one foe, 15% Shock, Rank 4, Oberon level 21, Sword Rank 6)
  • Mazionga (Medium Elec Damage to all foes, 10% Shock, Rank 5, Take-Mikazuchi level 28, Sword Rank 8)
  • Garu (Light Wind Damage to one foe, Rank 5, Angel level 4, Sword Rank 2)
  • Magaru (Light Wind Damage to all foes, Rank 3, Onmoraki level 13, Sword Rank 5)
  • Garula (Medium Wind Damage to all foes, Rank 4, Sandman level 20, Sword Rank 6)
  • Kouha (Light Bless Damage to one foe, Rank 2, Archangel level 10, Sword Rank 2)
  • Makouha (Light Bless Damage to all foes, Rank 3, Mitra level 22, Sword Rank 5)
  • Kouga (Medium Bless Damage to one foe, Rank 4, Mitra level 26, Sword Rank 6)
  • Hama (Bless Insta-Kill with low odds to one foe, Rank 3, Unicorn level 12, Sword Rank 3)
  • Mahama (Bless Insta-Kill with low odds to all foes, Rank 4, Principality level 21, Sword Rank 5)
  • Eiha (Light Curse Damage to one foe, Rank 2, Onmoraki level 10, Sword Rank 2)
  • Maeiha (Light Curse Damage to all foes, Rank 3, Pisaca level 18, Sword Rank 5)
  • Eiga (Medium Curse Damage to one foe, Rank 4, Pale Rider level 25, Sword Rank 6)
  • Mudo (Curse Insta-Kill with low odds to one foe, Rank 3, Slime level 13, Sword Rank 3)
  • Mamudo (Curse Insta-Kill with low odds to all foes, Rank 4, Pisaca level 19, Sword Rank 5)
  • Life Drain (35 HP Drain to one foe and taken in by caster, Rank 2, Lilim level 11, Sword Rank 3)
  • Soul Drain (20 SP Drain to one foe and taken in by caster, Rank 3, Leanan Sidhe level 22, Sword Rank 3)

Damaging skills (Mid game):
  • Deathbound (Medium Slash Damage to all foes, medium chance of Criticals, Rank 7, Yakshini Level 37, Sword Rank J)
  • Heat Wave (Medium Strike Damage to all foes, Rank 6, GIrimekhala level 42, Sword Rank J)
  • Cruel Attack (Medium Pierce Damage to one foe, Damage boost on downed opponents, Rank 5, Yamata-No-Orochi level 30, Sword Rank 10)
  • Vile Assault (Heavy Pierce Damage to one foe, Damage boost on downed opponents, Rank 7, Kaiwan level 43, Sword Rank J)
  • Myriad Arrows (Medium Pierce Damage to all foes, 2-5 hits, Rank 7, Cu Chulainn, Sword Rank 8)
  • Maragion (Medium Fire Damage to all foes, Rank 5, Sati level 32, Sword Rank 8)
  • Agidyne (Heavy Fire Damage to one foe, Rank 6, Black Frost level 38, Sword Rank 10)
  • Mabufula (Medium Ice Damage to all foes, 10% Freeze, Rank 5, King Frost level 35, Sword Rank 8)
  • Bufudyne (Heavy Ice Damage to all foes, 15% Freeze, Rank 6, Black Frost level 40, Sword Rank 10)
  • Ziodyne (Heavy Elec Damage to one foe, 15% Shock, Rank 6, Thunderbird level 39, Sword Rank 10)
  • Magarula (Medium Wind Damage to all foes, Rank 5, Kushi Mitama level 32, Sword Rank 8)
  • Garudyne (Heavy Wind Damage to one foe, Rank 6, Quetzacoatl level 45, Sword Rank 10)
  • Makouga (Medium Bless Damage to all foes, Rank 5, VIrtue level 37, Sword Rank 8)
  • Kougaon (Heavy Bless Damage to one foe, Rank 6, Dominion level 47, Sword Rank 10)
  • Hamaon (Bless Insta-Kill with medium odds to one foe, Rank 6, Anubis level 40, Sword Rank 6)
  • Mahamaon (Bless Insta-Kill with medium odds to all foes, Rank 7, Vasuki level 44, Sword Rank 10)
  • Maeiga (Medium Curse Damage to all foes, Rank 5, Baphomet level 33, Sword Rank 8)
  • Mudoon (Curse Insta-Kill with medium odds to one foe, Rank 6, Girimekhala level 39, Sword Rank 6)
  • Mamudoon (Curse Insta-Kill with medium odds to all foes, Rank 7, Girimekhala level 44, Sword Rank 10)
  • Megido (Light Almighty Damage to all foes, Rank 5, Mothman level 36, Sword Rank 5)
Notable Skills and Skill Cards (Part 2)
Damaging skills (End game):
  • Brave Blade (Severe Slash Damage to one foe, medium chance of Criticals, Rank 8, Siegfried level 59, Sword Rank Q)
  • Vorpal Blade (Heavy Slash Damage to all foes, Rank 8, Uriel level 57, Sword Rank Q)
  • Heaven's Blade (Heavy Slash to one foe, high chance of Criticals, no Rank, Uriel level 63, no skill card, can be obtained from Skill Change of Rank 8 skills)
  • God's Hand (Severe Strike Damage to one foe, Rank 8, Thor level 71, Sword Rank Q)
  • Akasha Arts (Heavy Strike Damage to all foes, 1-2 hits Rank 8, Qtian Dasheng level 72, Sword Rank Q)
  • Primal Force (Heavy Pierce Damage to one foe, Rank 8, Bishamonten level 64, Sword Rank Q)
  • Maragidyne (Heavy Fire Damage to all foes, Rank 7, Mada level 58, Sword Rank J)
  • Inferno (Severe Fire Damage to all foes, Rank 8, Saturnus level 76, no skill card, can be obtained from Skill Change of Rank 7 skills)
  • Mabufudyne (Heavy Ice Damage to all foes, 10% Freeze, Rank 7, Titania level 55, Sword Rank J)
  • Diamond Dust (Severe Ice Damage to one foe, 60% Freeze, Rank 8, Gabriel level 67, no skill card, can be obtained from Skill Change of Rank 7 skills)
  • Maziodyne (Heavy Elec Damage to all foes, 10% Shock, Rank 7, Thor level 64, Sword Rank J)
  • Thunder Reign (Severe Elec Damage to one foe, 60% Shock, Rank 8, Odin level 75, no skill card, can be obtained from Skill Change of Rank 7 skills)
  • Magarudyne (Heavy Wind Damage to all foes, Rank 7, Jatayu level 61, Sword Rank J)
  • Panta Rhei (Severe Wind Damage to one foe, Rank 8, Norn level 65, no skill card, can be obtained from Skill Change of Rank 7 skills)
  • Makougaon (Heavy Bless Damage to one foe, Rank 7, Trumpeter level 60, Sword Rank J)
  • Samsara (Bless Insta-Kill with high odds to all foes, no Rank, Daisoujou level 60, no skill card)
  • Eigaon (Heavy Curse Damage to one foe, rank 7, Succubus level 51, Sword Rank 10)
  • Maeigaon (Heavy Curse Damage to one foe, Rank 7, Belphegor level 59, Sword Rank J)
  • Die For Me! (Curse Insta-Kill with high odds to all foes, no Rank, Alice level 69, no skill card)
  • Megidola (Medium Almighty Damage to all foes, Rank 7, Decarabia level 58, Sword Rank 8)
  • Megidolaon (Heavy Almighty Damage to all foes, Rank 8, Alice level 74, Sword Rank Q)
  • Morning Star (Severe Almighty Damage to all foes, Rank 9, Helel level 90, no skill card, can be obtained from Skill Change of Rank 8 skills)
  • Black Viper (Severe Almighty Damage to one foe, no Rank, Satan level 89, no skill card)
Heal/Support Spells (Early game):
  • Dia (Light heal to one ally, Rank 2, Pixie level 2, Sword Rank 2)
  • Patra (Cures Mind Ailments to one ally, Rank 2, Apsaras level 5, Sword Rank 4)
  • Media (Light heal to all allies, Rank 3, Inugami level 14, Sword Rank 4)
  • Recarm (Revives and heals an ally with 50% HP, Rank 3, Nigi Mitama level 17, Sword Rank 6)
  • Diarama (Medium heal to one ally, Rank 4, Leanan Sidhe level 21, Sword Rank 6)
  • Me Patra (Cures Mind Ailments to all allies, Rank 4, Leanan Sidhe level 24, Sword Rank 9)
  • Tarukaja (Buffs Attack of an ally by 40%, Rank 1, Pixie level 5, Sword Rank 3)
  • Rakukaja (Buffs Defense of an ally by 40%, Rank 1, Ara Mitama level 6, Sword Rank 3)
  • Sukukaja (Buffs Accuracy/Evasion of an ally by 40%, Rank 1, Angel level 4, Sword Rank 3)
  • Marakukaja (Buffs Defense of all allies by 40%, Rank 5, Yamata-No-Orochi level 29, Sword Rank 9)
  • Tarunda (Debuffs Attack of a foe by 40%, Rank 1, Orpheus level 5, Sword Rank 3)
  • Rakunda (Debuffs Defense of a foe by 40%, Rank 1, Nekomata level 3, Sword Rank 3)
  • Sukunda (Debuffs Accuracy/Evasion of a foe by 40%, Rank 1, Apsaras level 4, Sword Rank 3)
  • Rebellion (Increases Critical Rate of an Ally by +7%, Rank 2, Omoikane level 8, Sword Rank 3)
  • Dekaja (Removes stat buffs of all foes, Rank 3, Pisaca level 16, Sword Rank 8)
  • Dekunda (Removes stat debuffs of all allies, Rank 3, Matador level 26, Sword Rank 8)
  • Fire Break (Removes Fire Resistances of all foes, Rank 3, Slime level 15, Sword Rank 4)
  • Elec Break (Removes Elec Resistances of all foes, Rank 3, Take Mikazuchi level 23, Sword Rank 4)
  • Wind Break (Removes Wind Resistances of all foes, Rank 3, Kushi Mitama level 29, Sword Rank 4)
Heal/Support Spells (Mid game):
  • Mediarama (Medium heal to all allies, Rank 5, Sarasvati level 35, Sword Rank 9)
  • Recarmdra (All allies fully healed, user's health drops to 1, Rank 5, Vasuki level 39, no skill card)
  • Samarecarm (Revives and heals an ally with full HP, Rank 6, Dominion level 44, Sword Rank 10)
  • Revolution (Increases Critical Rate of all allies and foes by +15%, Rank 4, Power level 30, Sword Rank 9)
  • Ice Break (Removes Ice Resistances of all foes, Rank 3, King Frost level 35, Sword Rank 4)
  • Matarukaja (Buffs Attack of all allies by 40%, Rank 5, Orthrus level 32, Sword Rank 9)
  • Masukukaja (Buffs Accuracy/Evasion of all allies by 40%, Rank 5, Sarasvati level 36, Sword Rank 9)
  • Matarunda (Debuffs Attack of all foes by 40%, Rank 5, Queen Medb level 33, Sword Rank 9)
  • Marakunda (Debuffs Defense of all foes by 40%, Rank 5, Kushi Mitama level 34, Sword Rank 9)
  • Masukunda (Debuffs Accuracy/Evasion of all foes by 40%, Rank 5, Yatagarasu level 30, Sword Rank 9)
  • Makarakarn (Creates a barrier to repel one magic attack to one ally, Rank 5, Anubis level 43, Sword Rank 10)
  • Tetrakarn (Creates a barrier to repel one magic attack to one ally, Rank 5, Seiryu level 40, Sword Rank 10)
  • Charge (Next physical attack will deal 2.3x damage. 2x only if it is a physical Theurgia skill, Rank 6, Setanta level 31, Sword Rank Q)
  • Concentrate (Next magical attack will deal 2.3x damage. 2x only if it is a magical Theurgia skill, Rank 6, Thoth level 25, Sword Rank Q)
Heal/Support Spells (End game):
  • Amrita Shower (Cures Mind Ailments to all allies, Rank 6, Hariti level 52, Sword Rank Q)
  • Diarahan (Fully heals one ally, Rank 6, Hariti level 50, Sword Rank 10)
  • Mediarahan (Fully heals all allies, Rank 7, Trumpeter level 63, Sword Rank Q)
  • Salvation (Fully heals all allies, Cures all Ailments, Rank 8, Norn level 72, no skill cards)
  • Heat Riser (Buffs Attack/Defense/Accuracy/Evasion of one ally by 40%, Rank 8, Raphael level 66, no skill cards on Sword Cards)
  • Debilitate (Debuffs Attack/Defense/Accuracy/Evasion of a foe by 40%, Rank 8, Trumpeter level 65, no skill cards on Sword Cards)
Notable Skills and Skill Cards (Part 3)
Let's organize the passives by function.

Damage Increasing and Critical Increasing Passive Skills:
  • Slash Boost (Increases Slash damage by 25%, Rank 3, Jikokuten level 34, Sword Rank 5)
  • Strike Boost (Increases Strike damage by 25%, Rank 3, Dakini level 41, Sword Rank 5)
  • Pierce Boost (Increases Pierce damage by 25%, Rank 3, Eligor level 33, Sword Rank 5)
  • Fire Boost (Increases Fire damage by 25%, Rank 3, Hua Po level 23, Sword Rank 5)
  • Ice Boost (Increases Ice damage by 25%, Rank 3, Jack Frost level 13, Sword Rank 5)
  • Elec Boost (Increases Elec damage by 25%, Rank 3, Take-Minakata level 25, Sword Rank 5)
  • Wind Boost (Increases Wind damage by 25%, Rank 3, Fortuna level 20, Sword Rank 5)
  • Light Boost (Increases Light damage by 25%, Rank 3, Virtue level 35, Sword Rank 5)
  • Dark Boost (Increases Dark damage by 25%, Rank 3, Baphomet level 34, Sword Rank 5)
  • Almighty Boost (Increases Almighty damage by 25%, Rank 6, Helel level 95, no skill card on Sword Cards)
  • Slash Amp (Increases Slash damage by 50%, Rank 6, Siegfried level 61, Sword Rank 12)
  • Strike Amp (Increases Strike damage by 50%, Rank 6, Mada level 64, Sword Rank 12)
  • Pierce Amp (Increases Pierce damage by 50%, Rank 6, Bishamonten level 66, Sword Rank 12)
  • Fire Amp (Increases Fire damage by 50%, Rank 6, Suzaku level 61, Sword Rank 12)
  • Ice Amp (Increases Ice damage by 50%, Rank 6, Quetzacoatl level 51, Sword Rank 12)
  • Elec Amp (Increases Elec damage by 50%, Rank 6, aThor level 68, Sword Rank 12)
  • Wind Amp (Increases Wind damage by 50%, Rank 6, Atropos level 61, Sword Rank 12)
  • Light Amp (Increases Light damage by 50%, Rank 6, Cybele level 71, Sword Rank Rank 12)
  • Dark Amp (Increases Dark damage by 50%, Rank 6, Thanatos level 73, Sword Rank 12)
  • Almighty Amp (Increases Almighty damage by 50%, Rank 8, not innately learned by a persona, no skill card, can be mutated into by Almighty Boost or Rank 8 skills)
  • Magic Ability (Increases all magical attacks except Almighty spells by 25%, Rank 9, Messiah level 98, no skill card, can be mutated into by Rank 8 skills).
  • Magic Mastery (Increases all magical attacks except Almighty spells by 50%, no Rank, not innately learned by a persona, no skill card, can be mutated into by Rank 8 skills)
  • Single-Target Boost (Increases any attacks that targets one foe by 15%, Rank 4, Yamata-No-Orochi level 26, Sword Rank 7)
  • Multi-Target Boost (Increases any attacks that targets all foes by 15%, Rank 4, Queen Medb level 29, Sword Rank 7)
  • Drain Ability (Life Drain and Soul Drain's effect is doubles, Rank 4, Incubus level 42, Sword Rank 3)
  • Crit Rate Boost (Increases the critical rate of the user by +5%, Rank 3, Zouchouten level 14, no skill card on Sword Cards)
  • Crit Rate Amp (Increases the critical rate of the user by +15%, overwrites Crit Rate Boost, Rank 4, Siegfried level 57, no skill card on Sword Cards)
  • Apt Pupil (Increases critical rate of the user by 2x, Rank 5, Archangel level 15, Sword Rank 6)
  • Shift Boost (Increases damage of the user by 10% when on the receiving end of a Shift, Rank 4, Setanta level 33, no skill card on Sword Cards)
  • Shift Amp (Increases damage of the user by 20% when on the receiving end of a Shift, Rank 4, Cu Chulainn level 46, no skill card on Sword Cards)
  • Hama Boost (Increase the effectiveness of Bless Insta-Kills, Rank 4, Vasuki level 40, Sword Rank 4)
  • Mudo Boost (Increase the effectiveness of Curse Insta-Kills, Rank 4, Loa level 38, Sword Rank 4)

Resist/Null/Repel/Drain Passive Skills:
  • Resist Slash (Slash attacks are halved, Rank 5, Dionysus level 50, Sword Rank 8)
  • Resist Strike (Strike attacks are halved, Rank 5, Genbu level 31, Sword Rank 8)
  • Resist Pierce (Pierce attacks are halved, Rank 5, Legion level 31, Sword Rank 8)
  • Resist Fire (Fire attacks are halved, Rank 5, Setanta level 34, Sword Rank 8)
  • Resist Ice (Ice attacks are halved, Rank 5, Orobas level 44, Sword Rank 8)
  • Resist Elec (Elec attacks are halved, Rank 5, Sandman level 26, Sword Rank 8)
  • Resist Wind (Wind attacks are halved, Rank 5, Genbu level 35, Sword Rank 8)
  • Resist Light (Light attacks are halved, Rank 5, Black Frost level 41, Sword Rank 8)
  • Resist Dark (Dark attacks are halved, Rank 5, Anubis level 45, Sword Rank 8)
  • Resist Phys (All three phys attacks are halved, Rank 7, Lucifer level 96, no skill card on Sword Cards)
  • Null Slash (Slash attacks are nullified, Rank 6, Decarabia level 60, no skill card on Sword Cards)
  • Null Strike (Strike attacks are nullified, Rank 6, Mishaguji level 54, no skill card on Sword Cards)
  • Null Pierce (Pierce are nullified, Rank 6, Naga Raja level 48, no skill card on Sword Cards)
  • Null Fire (Fire attacks are nullified, Rank 6, Shiki-Ouji level 51, no skill card on Sword Cards)
  • Null Ice (Ice attacks are nullified, Rank 6, King Frost level 39, no skill card on Sword Cards)
  • Null Elec (Elec attacks are nullified, Rank 6, Thunderbird level 41, no skill card on Sword Cards)
  • Null Wind (Wind attacks are nullified, Rank 6, Mada level 61, no skill card on Sword Cards)
  • Null Light (Light attacks are nullified, Rank 6, Nidhoggr level 53, Sword Rank J)
  • Null Dark (Dark attacks are nullified, Rank 6, Daisoujou level 65, Sword Rank J)
  • Null Phys (All three Phys attacks are nullified, Rank 9, Messiah level 96, no skill card)
  • Repel Slash (Slash attacks are repelled, Rank 7, Girimekhala level 46, Sword Rank Q)
  • Repel Strike (Strike attacks are repelled, Rank 7, Arahabaki level 76, Sword Rank Q)
  • Repel Pierce (Pierce attacks are repelled, Rank 7, Ganesha level 57, Sword Rank Q)
  • Repel Fire (Fire attacks are repelled, Rank 7, Alilat level 86, no skill card)
  • Repel Ice (Ice attacks are repelled, Rank 7, Seth level 68, no skill card)
  • Repel Elec (Elec attacks are repelled, Rank 7, Metatron level 94, no skill card)
  • Repel Wind (Wind attacks are repelled, Rank 7, Satan level 88, no skill card)
  • Repel Light (Light attacks are repelled, Rank 7, Susano-O level 84, no skill card)
  • Repel Dark (Dark attacks are repelled, Rank 7, Arahabaki level 70, no skill card)
  • Drain Slash (Slash attacks are absorbed, Rank 8, Ananta level 80, no skill card)
  • Drain Strike (Strike attacks are absorbed, Rank 8, Chi You level 93, no skill card)
  • Drain Pierce (Pierce attacks are absorbed, Rank 8, Michael level 77, no skill card)
  • Drain Fire (Fire attacks are absorbed, Rank 8, Skadi level 75, Sword Rank K)
  • Drain Ice (Ice attacks are absorbed, Rank 8, Abaddon level 83, Sword Rank K)
  • Drain Elec (Elec attacks are absorbed, Rank 8, Barong level 69, Sword Rank K)
  • Drain Wind (Wind attacks are absorbed, Rank 8, Lilith level 72, Sword Rank K)
  • Drain Light (Light attacks are absorbed, Rank 8, Mara level 82, no skill card)
  • Drain Dark (Dark attacks are absorbed, Rank 8, Sandalphon level 87, no skill card)
  • Unshaken Will (All Mind Ailments are nullified, Rank 8, Futsunushi level 81, no skill card)
  • Null Poison (Poison is nullified, Rank 4, Virtue level 33, no skill card)
  • Null Shock (Shock is nullified, Rank 4, Saki Mitama level 39, no skill card)
  • Null Freeze (Freeze is nullified, Rank 4, Yamata-No-Orochi level 27, no skill card)
  • Insta-heal (Ailments are immediately recovered from at the start of the turn, Rank 7, Kumbhanda level 67, Sword Rank 11)
Notable Skills and Skill Cards (Part 4)
Special effect Passives:
  • Endure (User is left with 1 HP after taking a mortal blow, Rank 6, Hanuman level 41, Sword Rank 9)
  • Enduring Soul (User is revived with full HP after taking a mortal blow, Rank 8, Koumokuten level 57, Sword Rank K)
  • Ali Dance (The Hit Rate of foes targeting the user is cut in half, Rank 8, Vishnu level 82, no skill card on Sword Cards)
  • Firm Stance (Damage taken by the user is cut in half while also disabling dodging, Rank 8, Atavaka level 79, no skill card)
  • Arms Master (The cost of skills that uses HP are cut in half, Rank 8, Masakado level 84, Sword Rank K)
  • Spell Master (The cost of skills that uses SP are cut in half, Rank 8, Cybele level 73, Sword Rank K)
  • Life Aid (The user recovers 8% HP/SP at the end of battle, Rank 5, Eligor level 36, no skill card on Sword Cards)
  • Victory Cry (The user fully recovers HP/SP at the end of battle, Rank 9, Orpheus Telos level 91, no skill card)
  • Regenerate 1 (The user recovers 2% HP at the start of the turn, Rank 3, Rakshasa level 15, Sword Rank 4)
  • Regenerate 2 (The user recovers 4% HP at the start of the turn, Rank 5, Kushi Mitama level 30, Sword Rank 7)
  • Regenerate 3 (The user recovers 6% HP at the start of the turn, Rank 6, Dionysus level 54, Sword Rank 9)
  • Invigorate 1 (The user recovers 3 SP at the start of the turn, Rank 3, Naga level 22, Sword Rank 4)
  • Invigorate 2 (The user recovers 5 SP at the start of the turn, Rank 5, Kaiwan level 46, Sword Rank 7)
  • Invigorate 3 (The user recovers 7 SP at the start of the turn, Rank 6, Daisoujou level 61, Sword Rank 9)
  • Growth 3 (The persona will gain 100% EXP even if not used in battle, Rank 6, Quetzacoatl level 45, Sword Rank 9)
  • Auto-Tarukaja (Tarukaja is casted on the user at the start of battle, Rank 3, Chimera level 14, Sword Rank 7)
  • Auto-Rakukaja (Rakukaja is casted on the user at the start of battle, Rank 3, Omoikane level 12, Sword Rank 7)
  • Auto-Sukukaja (Sukukaja is casted on the user at the start of battle, Rank 3, Valkyrie level 12, Sword Rank 7)
  • Auto-Matarukaja (Matarukaja is casted on the party at the start of battle, Rank 6, Atavaka level 75, Sword Rank J)
  • Auto-Marakukaja (Marakukaja is casted on the party at the start of battle, Rank 6, Hecatoncheires level 53, Sword Rank J)
  • Auto-Masukukaja (Masukukaja is casted on the party at the start of battle, Rank 6, Siegfried level 55, Sword Rank J)
  • Auto-Rebellion (Rebellion is casted on the user at the start of battle, Rank 3, Siegfried level 54, Sword Rank 7)

DLC skills and passives (Uninheritable and no skill cards):
  • Cross-Slash (Medium Slash Damage to one foe, 2x hit, Izanagi)
  • Masquerade (Medium Slash Damage to all foes, high chance of Criticals, 2x hit, Vanadis)
  • One-Shot Kill (Medium Pierce Damage to one foe, high chance of Criticals, Astarte)
  • Blazing Hell (Severe Fire Damage to all foes, Hecate)
  • Ice Age (Severe Ice Damage to all foes, 35% Freeze, Kamu Susano-O)
  • Wild Thunder (Severe Elec Damage to all foes, 35% Shock, Seiten Taisei
  • Vacuum Wave (Severe Wind Damage to all foes, Mercurius)
  • Shining Arrows (4-8 Light Bless Damage to all foes, Kaguya)
  • Magatsu Mandala (Heavy Curse Damage to all foes, 35% Fear, Magatsu-Izanagi)
  • Cosmic Flare (Heavy Almighty Damage to all foes, Anat)
  • Sinful Shell (Heavy Almighty Damage to all foes, 50% Curse Insta-Kill, Satanael)
  • Rebellion Blade (Heavy Almighty Damage to one foe, Damage boost on downed opponents, Loki)
  • Slash Driver (Increases Slash damage by 75%, Cendrillon)
  • Strike Driver (Increases Strike damage by 75%, Johanna)
  • Pierce Driver (Increases Pierce damage by 75%, Milady)
  • Fire Driver (Increases Fire damage by 75%, Carmen)
  • Ice Driver (Increases Ice damage by 75%, Goemon)
  • Elec Driver (Increases Elec damage by 75%, Captain Kidd)
  • Wind Driver (Increases Wind damage by 75%, Zorro)
  • Light Driver (Increases Bless damage by 75%, Robin Hood)
  • Dark Driver (Increases Curse damage by 75%, Arsene)

And done. Hopefully this is easily comprehensible. Do keep in mind that there's some skills where I wrote that they cannot be obtained a Skill Cards via Sword Cards in Shuffle time. However, some of them are obtainable cards, but only to locked treasure chests in specific blocks of Tartarus. I haven't got around to studying that yet. So that will be elaborated on in a later date.

Next, I should talk about some extra tidbits involving skill combinations. Mostly to talk about recently found information (If you have noticed, I posted a Chernobog build with a mistake associated with it in the guide beforehand due to an info that I am not aware of until now), and some general observations to keep in mind when picking a skill list for a build.

  • When maximizing Critical chances, only put Apt Pupil and Crit Rate Amp, as the latter overwrites the effect of Crit Rate Boost.
  • The damage boost associated with Getsu-Ei/Zan-Ei is 75% when it reaches the peak of its condition being met.
  • Cross Slash is functionally worthless as the base skills in the game can outperform it in any parameter.
  • One-Shot Kill is functionally worthless due to its horrible damage regardless of its Critical rate. Masquerade is there as a DLC option while Heaven's Blade is there for a non DLC one.
  • The 5x boost cap can only be achieved by DLC personas with both Magic Mastery and Driver passives. Alongside the other boosts available. As the way these skills add up is multiplicative, trying to multiple all boosts without Driver would result to roughly 4.1x (1.25x 1.5x 1.25 x 1.5 x 1.15). In order to achieve the boost cap, a combination of Boost x Amp x Magic Ability x Magic Mastery x Driver is enough to achieve this. Without Magic Mastery, only roughly 4.7x is achievable.
  • The 4th tier AoE Magic Spells are weaker damage wise than their Single-Hit counterparts. And that Blazing Hell and Vacuum Wave are slightly stronger than the remaining two for some reason.
  • Even then, the 4th tier AoE Magic Spells can be stronger than 5x boost cap AoE Dyne spells, regardless of the lower amount of boost available for the former. It would require Magic Mastery, however.
  • Magatsu Mandala is weaker than Eigaon. And so, is functionally worthless. Apart from the Fear chance.
  • Light and Dark Driver are functionally worthless due to the lack of decent Bless/Curse spells in the game.
  • Dark Driver especially is worthless due to Arsene being unable to obtain Magic Mastery with normal means.
  • Light Driver is on the same boat, Shining Arrows can outdamage even 4th tier Elemental Magic with Magic Mastery and Driver. Even though Kaguya cannot obtain Light Driver with normal means.
  • Charge and Concentrate's effect is 2.3x when it applies to regular skills. But it will only be 2x when it applies to a Theurgia skill.

I believe some more observations can be made, in which I missed.
Stats and Stat Inheritance (Reload Edition)
And lastly, let's talk about Persona stats. More or less, these are the parameters the game uses to calculate quite a lot of things. Damage dealt, Damage taken, Critical Rates, Hit/Miss Rates, and many more. There's quite a lot of oddities in terms of how the game calculate these sorts of things in certain cases (Such as Critical rate when Shock is involved, or Healing spells will only have an increase every 4 stats allocated to Ma), but I believe those oddities are not going to be a requirement in terms of having a great grasp of persona building itself.

Anyways, to start with. Persona stats are split into five, and these do:
  • Strength (St, this influences the power of physical attacks)
  • Magic (Ma, this influences the power of magical attacks, and somewhat influences the power of healing spells)
  • Endurance (En, this influences how much damage the user can tank)
  • Agility (Ag, this influences the accuracy and evasion rates of the user, and also their order in the turn order if it is a random encounter)
  • Luck (Lu, this influences the rate of success of ailments and criticals. And also susceptibility to these)
More or less, that's about what you need to recall (With the exception of Theurgia scaling off of both St and Ma, regardless of the type of Theurgia it is).

Intuitively, there is no reason to not max these stats out when building, especially at endgame. And that's correct. So being able to max out your builds is best. Moving on, the game provides many methods to do this. Those being Persona level up, Empress, Emperor, and Tower Cards in Shuffle Time, Arcade stat bonuses, and Stat Incenses.

There's many methods, so it can be overwhelming to which one to pick. But I believe that there's an objective best method among those four to maximize efficiency.

And that's combining Persona level up and Stat Incenses. For two simple reasons. One, Persona level up is basically free to get, especially with the Reaper giving quite a lot of Money and EXP. Even better if Growth 3 is used to increase efficiency. Two, Stats from Incenses are inheritable in fusion, unlike the other methods to increase stats.

So here's the general idea, level the persona to level 99 so that the amount of incenses required to boost the target to all 99 are decreased, and fill in the gaps with Stat Incenses. Do this to a persona that can be chained into a lot of other desirable target for builds so Stat Inheritance can be taken advantage of.

Speaking of which, it's best to explain how Stat Inheritance work. As mentioned before, Stat Inheritance only works from stats obtained from Stat Incenses. And the amount of stats inherited depends on how many steps in fusion is done. At the first step, using the persona with the stats from incenses, all the stats from incenses will be passed on that fusion. And subsequently after that, the amount of stats inherited from incenses will be halved. This is assuming that the other ingredients used did not have stats from incenses whatsoever. This will continue on until the stat decays to 0.

As an example, if I create a Thanatos that has 60 innate St, and I used 10 Power Incense III on him to give him 90 St after, he will have 30 stats from incenses. With that as the initial condition, let's fuse him with an Orpheus that does not have stats from incenses whatsoever.

Messiah is created, who has 65 St innately. Let's assume that S.link bonuses do not add any St whatsoever. With these conditions, The stats from incenses from Thanatos (30 St) will all be inherited to Messiah. So in the fusion menu, he will have 95 St. Now, in order to see how decay works, let's try to do another fusion. And to also see how to take advantage of Stats Inheritance, let's try a recipe that would also have Thanatos in the fusion.

So let's fuse Orpheus Telos. Since he has both Messiah and Thanatos in his ingredients. Due to decay, Messiah will only give 15 St to give to Orpheus Telos (Since he is a second step, so the halving decay applies now). But here is the kicker, if you registered Thanatos before the fusion at the first step, he retains his stats from incenses and being a first step. And so, he will give 30 St to Orpheus Telos (Keep this in mind, this is the principle of Stat Batteries). Continuing on, this means that Orpheus Telos will receive 45 St from Thanatos and Messiah combined. And Telos innately has 63 St. Assuming, once again, that S.link bonuses do not add any St to him. Orpheus Telos will have 99 St in the fusion menu. Although even if 63 + 45 is not equal to 99, Orpheus Telos recalls how much stats from incenses it obtained fully (Meaning, it did not actually disappear. It just appears as 99 because that's the cap for the stats).

If you used Orpheus Telos for fusion, due to decay, he will give off half of the stats he obtained. So that being 45/2 = 22.5. Given that there are no decimal places for persona stats, the game will round the number down to 22. And that would be the number of St Orpheus Telos will give to the next step in the chain. Keep going down until it hits 0. I believe that is enough to understand how Stats Inheritance works.

Now, as to how to exploit this, I have given a great example already. Pick a persona that will be used in quite a lot of fusions. Thanatos is a classic example, as he is used in quite a lot of fusions in the previous versions. The same is the case for Reload. A persona that has been boosted by Stat Incenses is called a Stat Battery. And the merits of a good Stat Battery depends on how often it appears in fusion. Another example I have shown is stacking two ingredients that has stats from incenses. in order to increase the amount of stats inherited to the result.

Now that we created a Stat Battery or Batteries and created the personas we want to boost, let's start leveling up personas to 99 to finish things off. This is more than simple. The fastest way to gain EXP in this game is by defeating The Reaper multiple times. Even better if the personas have Growth 3 in order to hasten the grinding of the personas. Since this also gives quite a lot of money via Bloody Button, this will help in buying more incenses for the previous steps. Much better if you have a Devil Card from Shuffle Time activated.

With this info and techniques in mind, it can be clearly seen that the more personas you have with stats from incenses, the more efficient this becomes. So overall, Stat Inheritance makes fusion easier the more you do it. Creating a positive feedback loop. This can significantly reduce the amount of incenses required to boost personas for the builds you want to make. So keep this in mind.

It seems that based on the prices of gems that can buy incenses, Stat Incenses II are marginally more efficient than Stat Incenses III. With this in mind, however, it's much more better to simply get as much as you can. The more, the merrier. This might be the grindiest bit for any build. I bid you good luck.
Closing Remarks
And I believe that is mostly all that is to keep in mind in fusion of this game. There is a decently high chance that I made a mistake when writing this guide in the course of a week. With that being said, I will update some of the sections for better visuals when possible at a later date.

If there is a portion that you believe is a mistake, please message below so it can be fixed immediately. If there is a portion that you are confused about, please message below as well and I will try to assist you.

I would like to give thanks to CTOBN for teaching me many of the concepts that are tackled in this guide. Especially in terms of pointing out the special cases in fusions and the intricacies of the Skill Change mechanic. He is also the creator of the previously linked Skill Change calculator. Very much made this guide the best it can be. Hopefully I managed to breakdown everything they have taught me properly here. Thank you very much.


18 opmerkingen
BothDoorsCares  [auteur] 10 mrt om 5:25 
Now that the skills we need to inherit is settled, you simply grind the fusion. There's no other way around this. You can complain, you can pray, you can curse whoever it is you pray to. The important part is to keep going. On average, I took some 3 hours of grinding to get one of these. My luckiest being just 30 minutes. So it will take a long time. Just keep on going, you'll get it eventually.

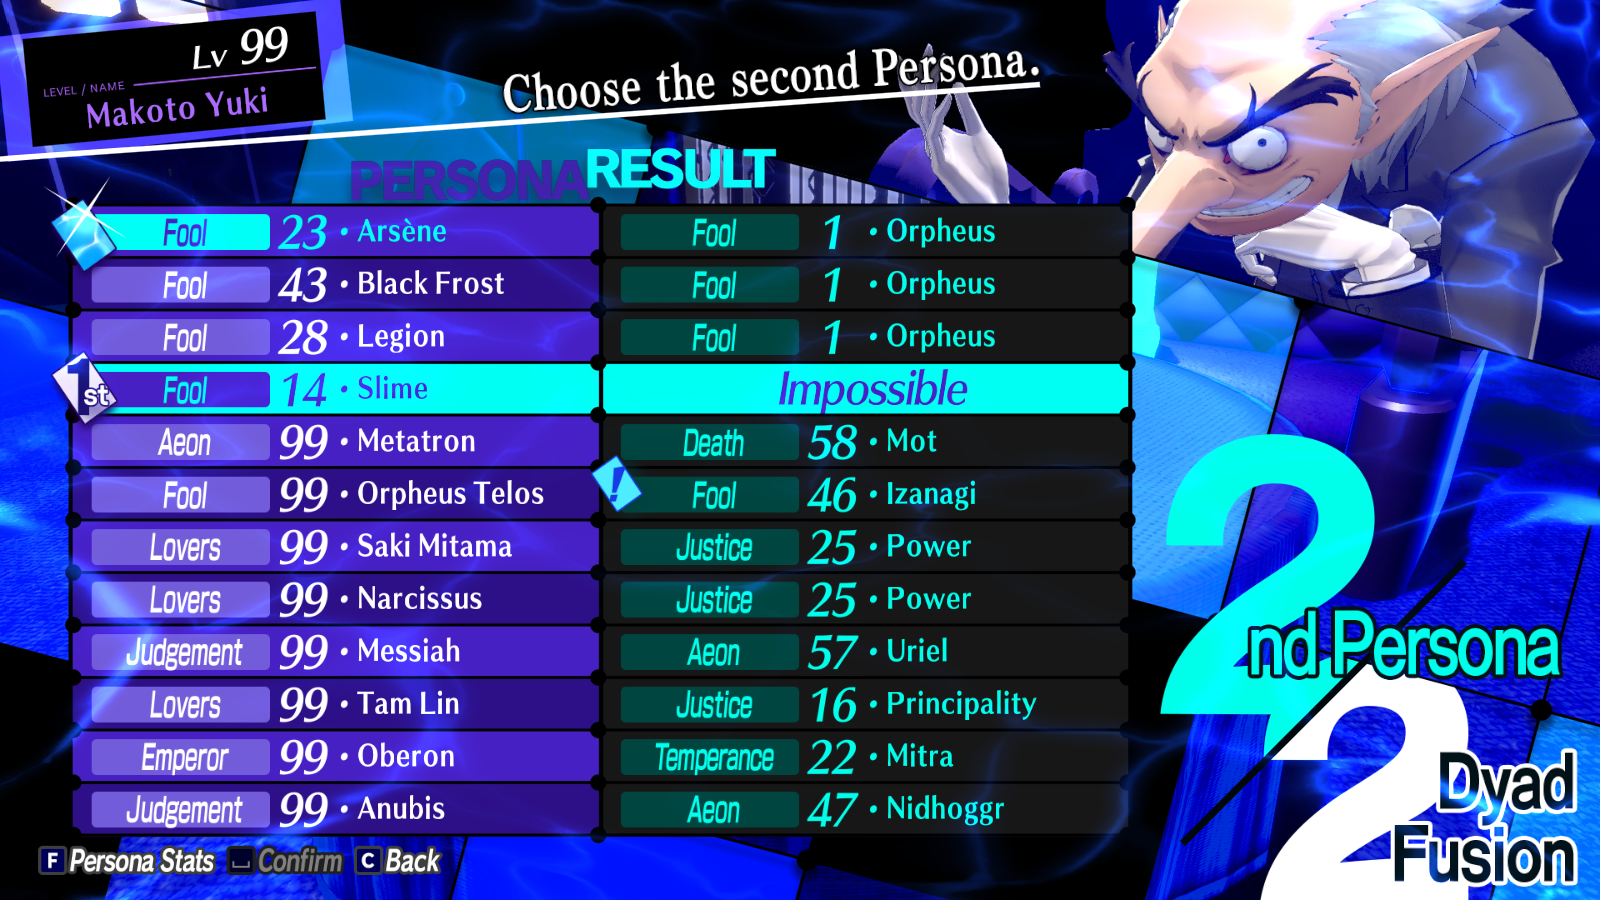
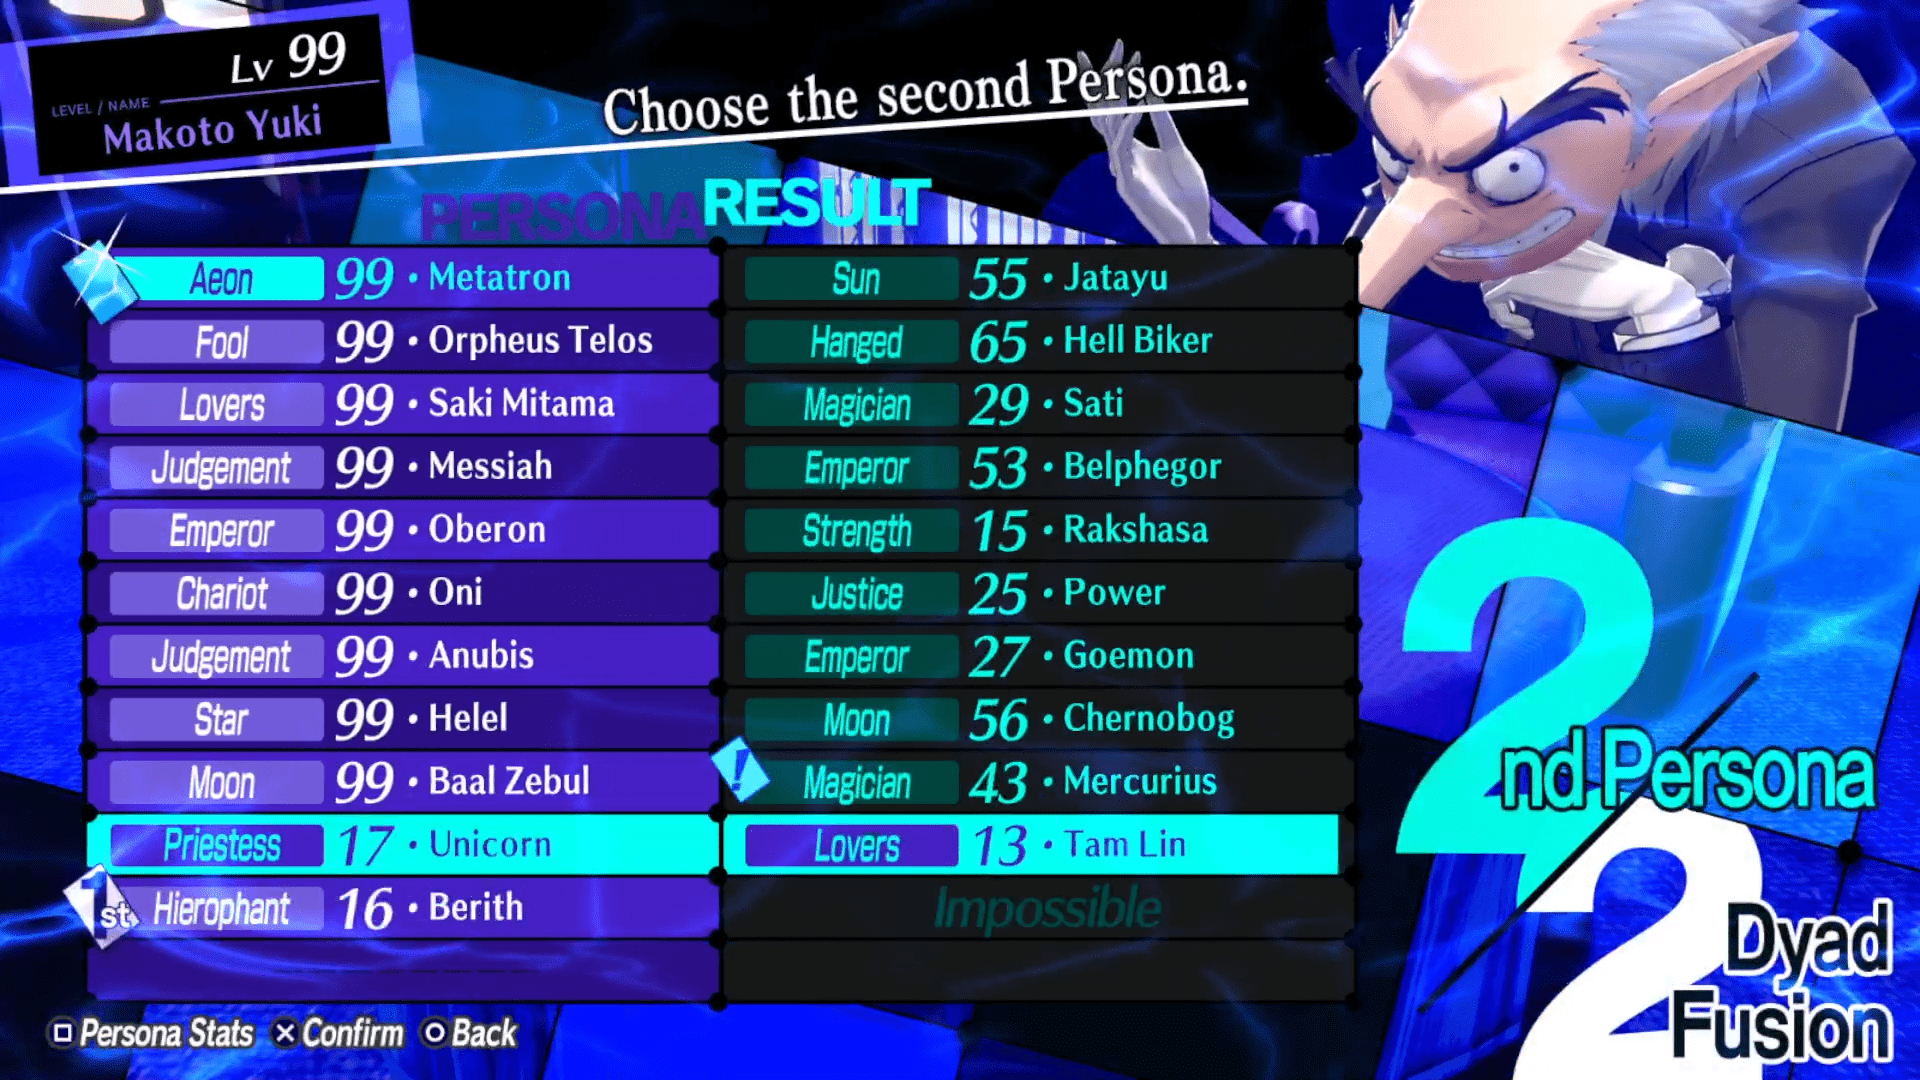
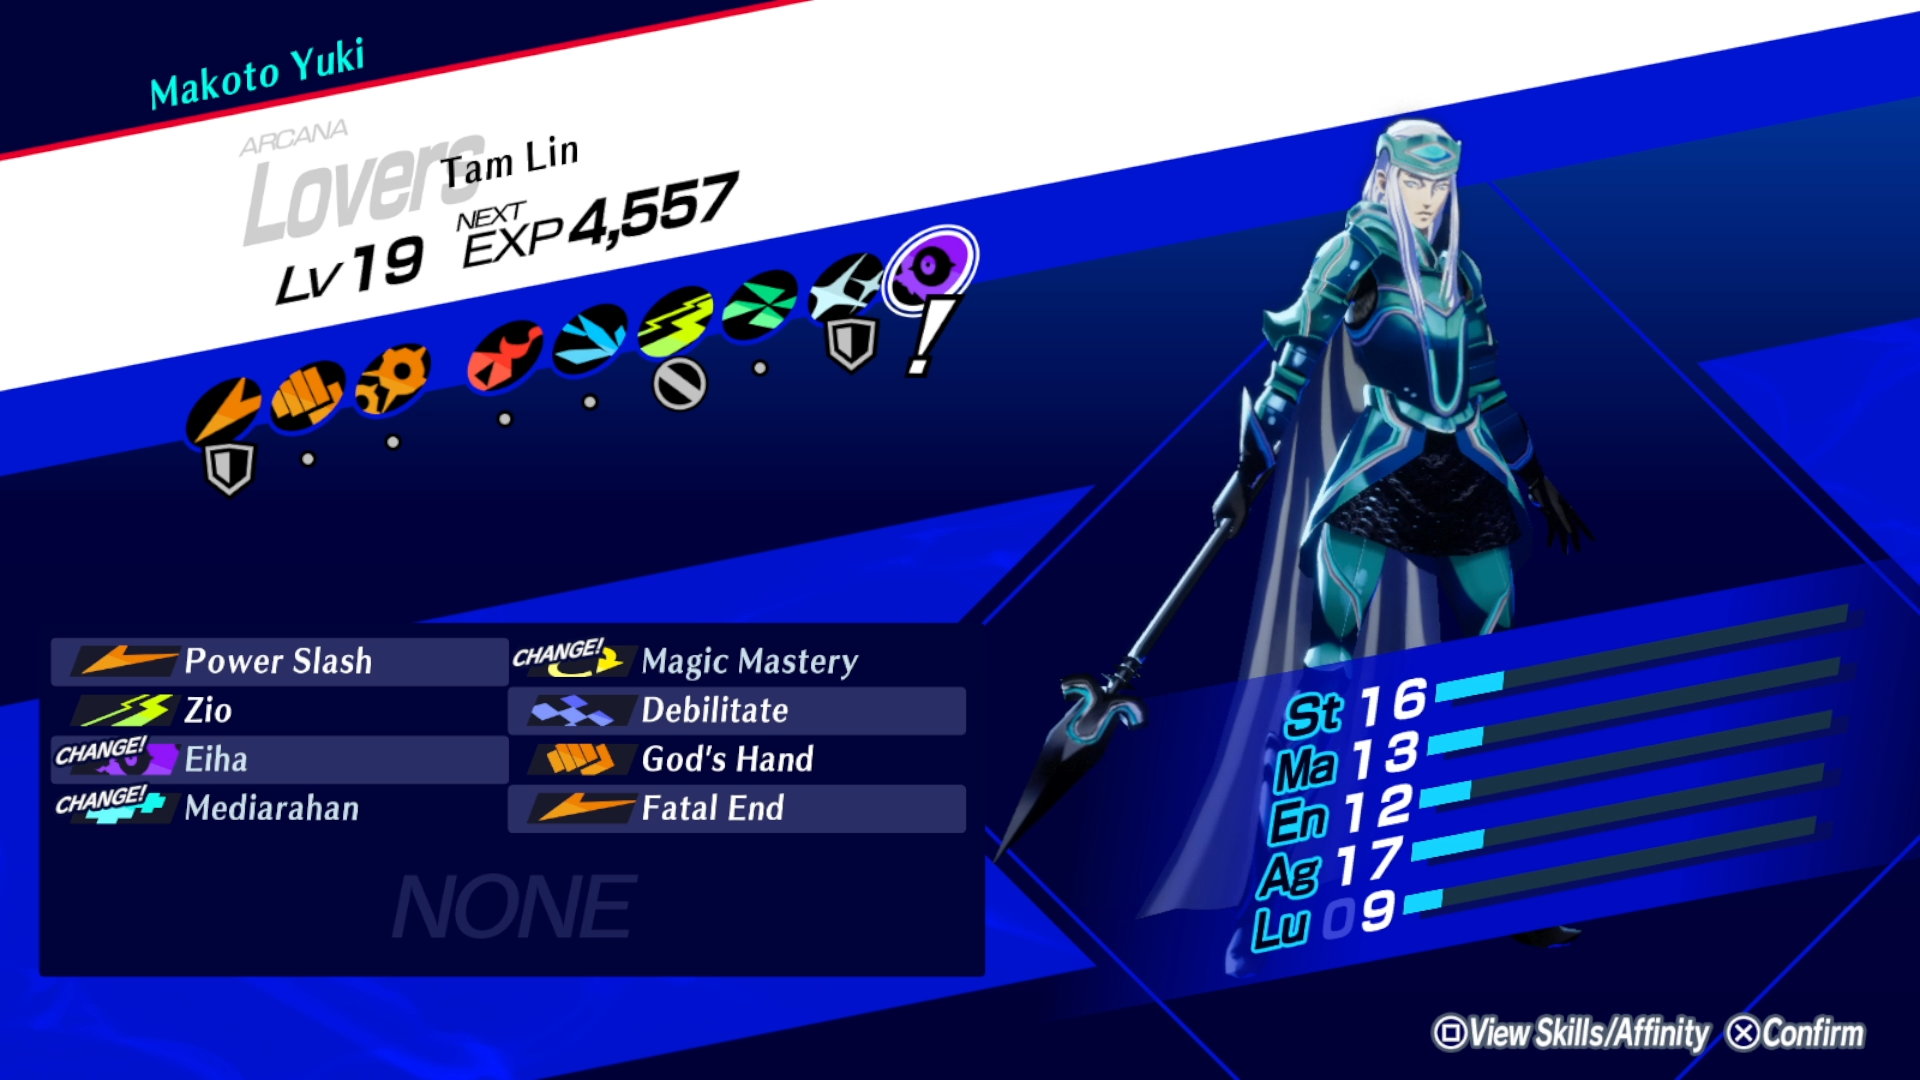
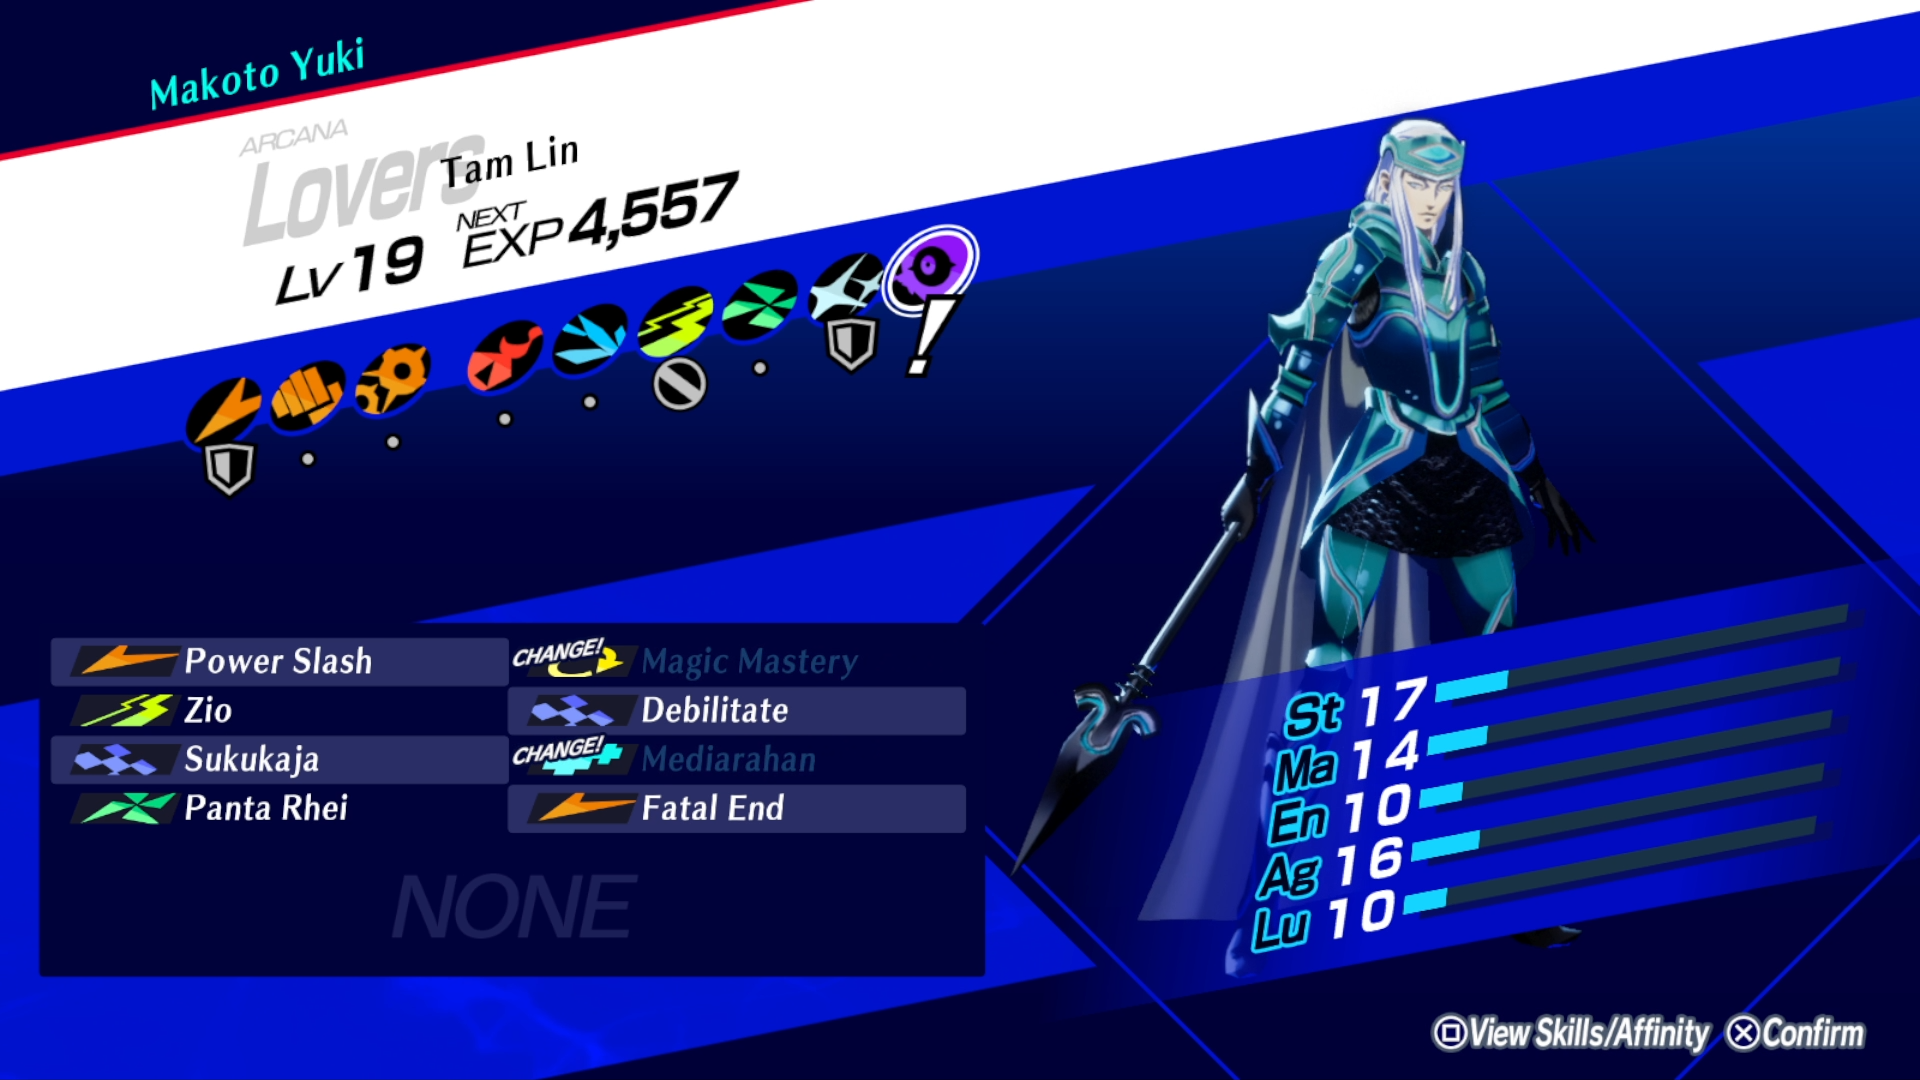
As for Almighty Amp, I just got that skill randomly in my playthroughs. But a surefire way to get that skill is to fuse a persona that has a lot of rank 8 skills and more importantly, Almighty Boost in its skill pool in fusion. As I recall, all the packs have Almighty Amp in its skill mutation pool. And Almighty Boost has a strong tendency to mutate into Amp. Luckily, this is easier to get than Magic Mastery, that's for sure.
BothDoorsCares  [auteur] 10 mrt om 5:25 
In this example, there's two skills on bold and another two that aren't. Since in Reload, the maximum of inheritance skill slots for regular fusions caps to four skills, inheriting these four skills to Goemon is ideal. But if, say, you're targeting a persona that is a special fusion (Like Lucifer, for example), and there's not enough skills on the list given for the pack combination you have (Remember, only the first two ingredients' pack determines this for special fusions), you simply add another random rank 8 skill to round it all off. If you're targeting a persona that have innate rank 8 skills in its skill pool, put it in the persona, replacing skills that are of lower rank. Or if you got skills that are rank 9, put that in as well. This maximizes chances of the mutation targeting a skill that has a chance to transfer into Magic Mastery in the first place.
BothDoorsCares  [auteur] 10 mrt om 5:25 
Now that we settled on a specific recipe, my list in Skill Change Part 2 comes into play. The idea is to reference this list for the most optimal rank 8 skills to be passed down on fusion for grinding Magic Mastery. Reference the pack combination our ingredients have (packs 3 + 5). The skills in here have higher chances to mutate into Magic Mastery for this combination. And the bold ones especially have the highest chances. So picking these to be passed down on fusion is ideal.
BothDoorsCares  [auteur] 10 mrt om 5:24 
To give an example (Or just a personalized guide for your situation), for Goemon, there are combinations of recipes that belongs to packs that has Magic Mastery. Fool + Chariot is packs 3 + 3, Priestess + Devil is packs 6 + 6, Hierophant + Judgement is packs 3 + 5, Empress + Justice is packs 5 + 1 (one pack only), Hermit + Strength is packs 5 + 2 (one pack only), and Hermit + Tower is packs 5 + 4 (one pack only). I have listed what the multiple packs entails in Skill Change Part 1.

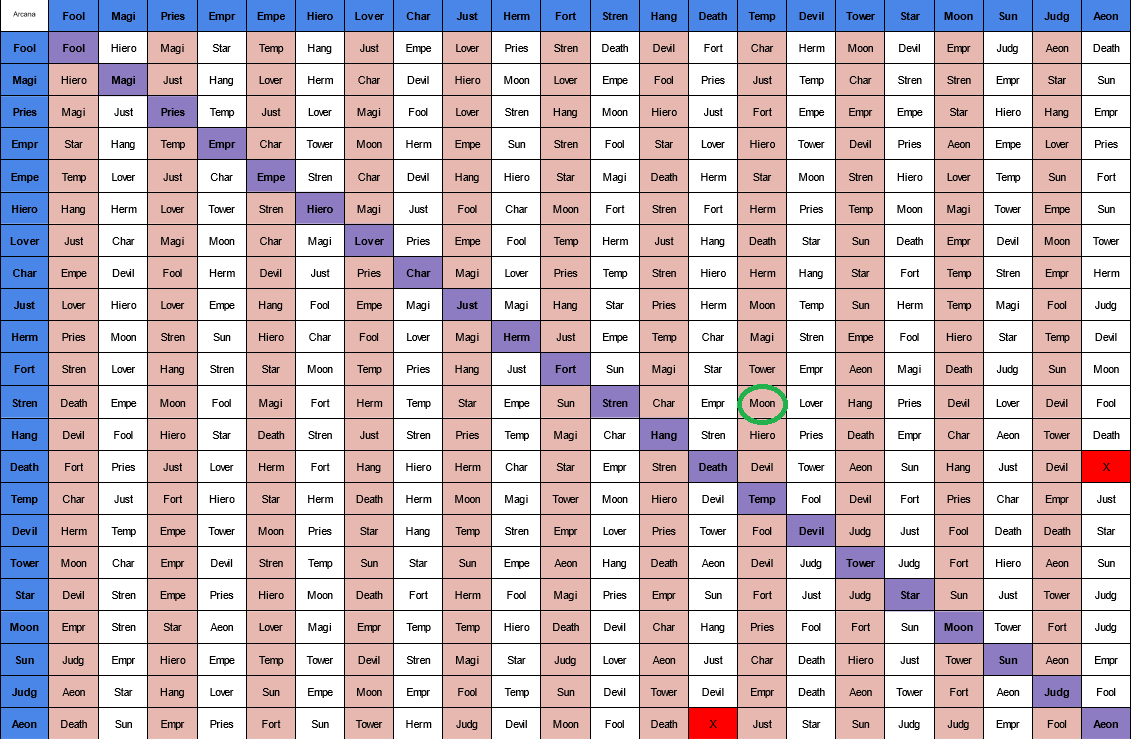
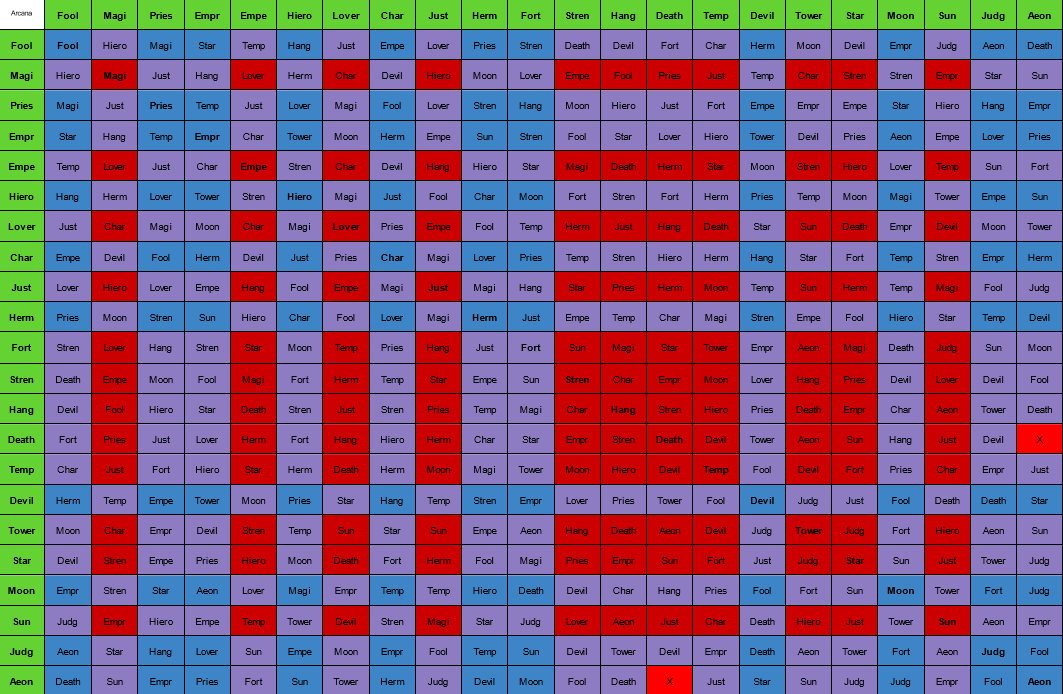
We have multiple options here. With cases where both ingredients belong to packs with Magic Mastery or only one. The best course of action here is logically picking a recipe that has both ingredients belonging to said packs (So, recipes that are 3 + 3, 3 + 5, or 6 + 6). You can pick whichever of the three in this case is suited best for you. But for the sake of this example, let's pick the middle 3+ 5 recipe (So in the case of Goemon here, a Hierophant + Judgement recipe. Let's say it's Berith + Anubis).
BothDoorsCares  [auteur] 10 mrt om 5:24 
When saying "Pack 3 + 2 (one pack only)" in that section, this is telling that there's only one of the two ingredients that belongs to a pack that has Magic Mastery in its skill mutation pool. The idea I've presented in this guide for that section specifically is what skills are best on the target persona's skill pool (Inherited or innately learned) to get Magic Mastery. The most ideal of ideal for your situation is you're using a recipe for that Goemon of yours that has the two ingredients be part of the aftermentioned packs (So, a combination of personas belonging to pack 3, 5, or 6)
BothDoorsCares  [auteur] 10 mrt om 5:23 
When talking about grinding Magic Mastery, you need to keep in mind what are the ingredient's arcana and what pack they belong to. These packs essentially boils down to that set of arcana's skill mutation pool. And for Magic Mastery's case, there's only three packs that have Magic Mastery in its skill mutation pool. That being packs 3, 5, and 6.
kimxtn 9 mrt om 19:16 
Although your guide is very detailed, I feel like I'm not completely sure I know the steps I should be taking. Should I be fusing down the rank 8 skills onto a persona that fits the pack required and can be fused into goemon? Or should I use skill cards (even though you said I shouldn't really be relying on them or something like that)? I'm

If you could possibly help me through this, it would really help me out. I've been trying to figure it out all day. I have no clue what is even going on in the spreadsheet. The more I try to understand, the more confused I'm getting. I also don't have almighty amp, so if you could walk me through that process as well, you'd be a life saver.
kimxtn 9 mrt om 19:16 
I'm not sure what you mean when you say "pack 3+2 (one pack only)". Are you saying I should put all those skills on one persona and the skills on the other persona doesn't really matter?

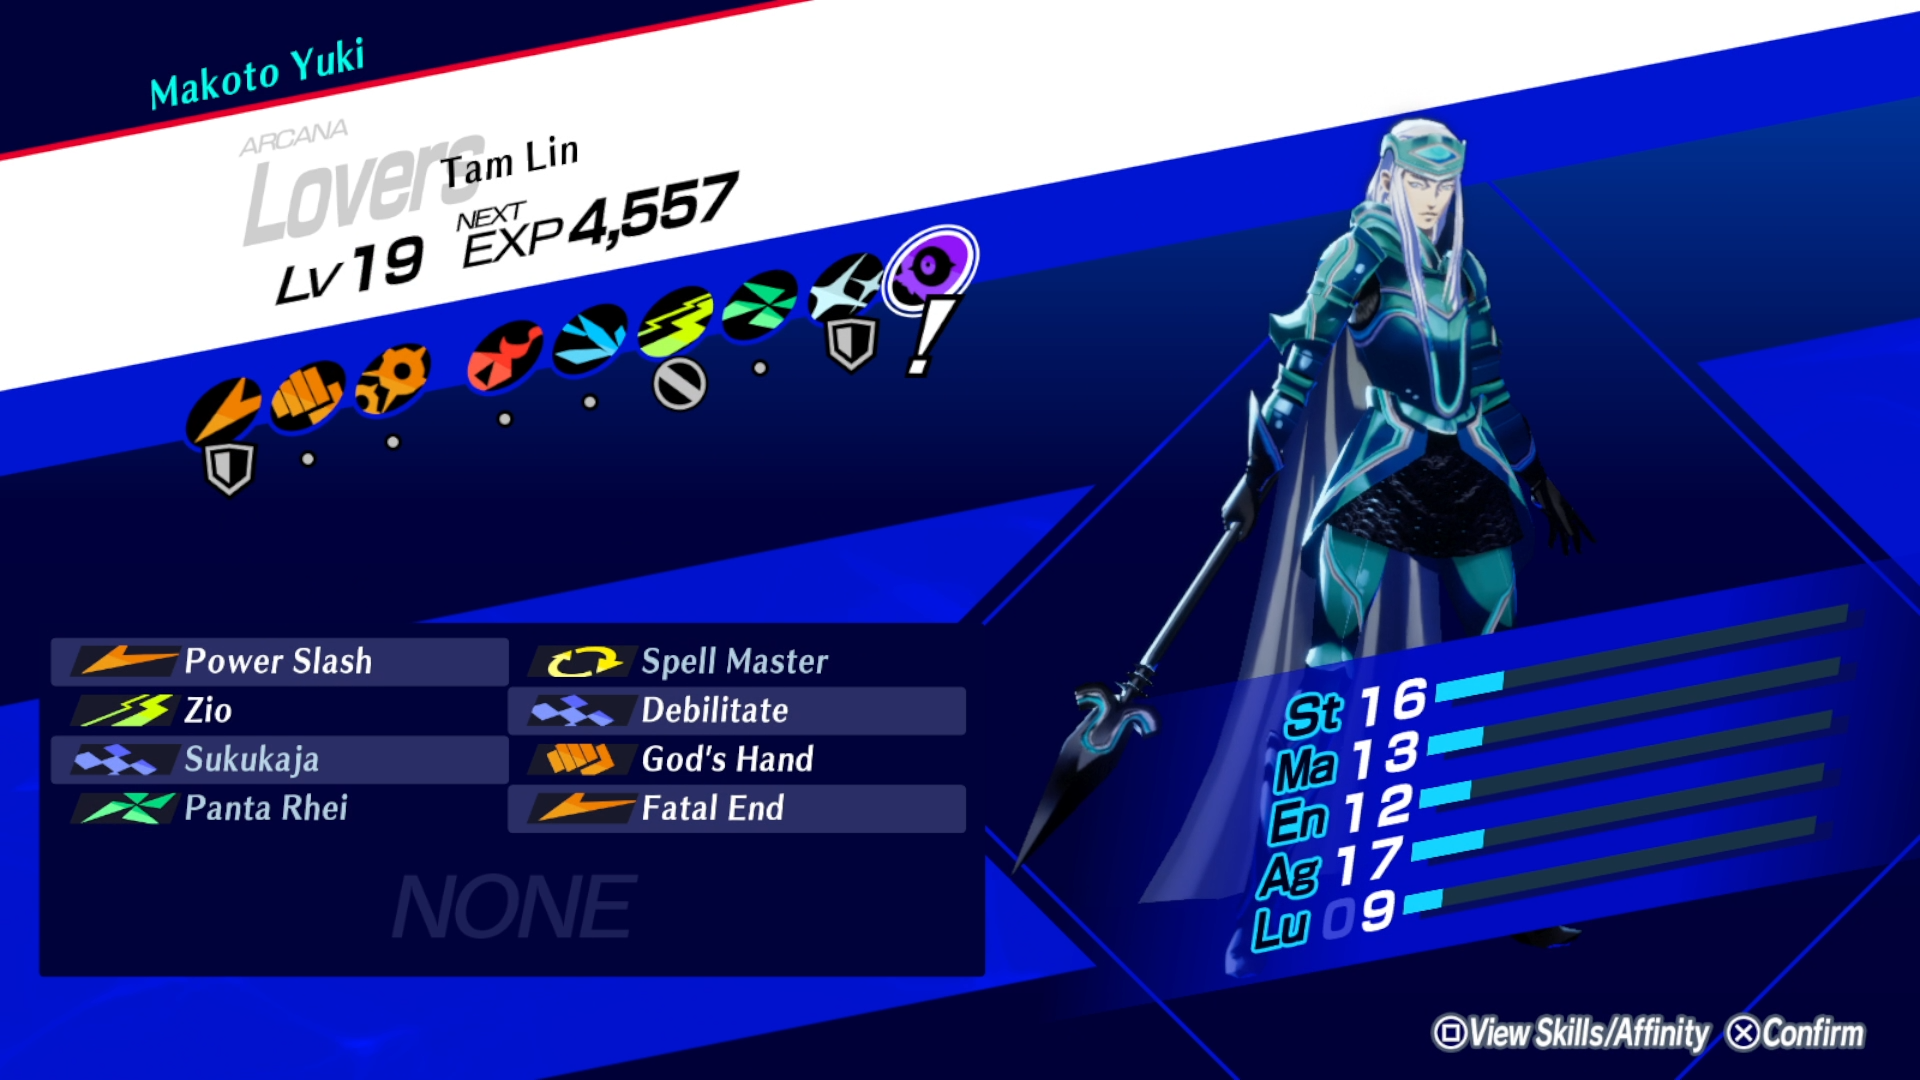
I just got magic mastery on chi you by accident and didn't know that the skill can't be passed on. It made me curious on how to get it on the persona I want, which is Goemon. Tuvvie's video on youtube ( https://www.youtube.com/watch?v=9lGk20ZMvp8&ab_channel=Tuviee ) created the exact build I was creating, but I'm still confused.
★[ᴛᴜʀʙᴏ ᴅᴏɢ]★ 26 apr 2024 om 23:58 
It's fine dude it's not serious everyone will finish the game anyways eventually, the guide is good as it is now, just tweak a few sections if you feel like it and it's fine.
BothDoorsCares  [auteur] 26 apr 2024 om 2:09 
Or I simply show off my stock or something along those lines, although honestly it would be a bit confusing without knowing the majority of the functions of the personas made.