State of Decay

State of Decay

97 ratings
State of Decay: Quick Start Guide
By cruinne
My State of Decay: Quick Start Guide covers a few topics that I had a lot of questions about when I first started playing. I hope it can help you, too.
   
Award
Favorite
Favorited
Unfavorite
Introduction
This is a quick-start guide for those completely new to State of Decay. The questions answered here are pretty much the first questions I had when I started playing -- and which I either had to figure out on my own, or spend way too much time watching video tutorials to finally learn.

If you have any other newbie questions, just leave a comment below -- the worst I can do is tell you that I don't know the answer.

And if you're feeling generous, please rate and thumbs-up, because I'm insecure like that.
1) Time and Zed
Neither time nor zed ever stop.

You can cause brief pauses in the game by hitting the Escape key until you are in the game menu (which can save your butt when someone knocks on your door or the phone rings in the middle of an intense zombie attack) but otherwise, time marches on: it passes whether you are looking at a character sheet, examining a character's inventory, choosing upgrades in a home base menu, looking at the map, or even completely exited from the game.

Don't get caught unawares and get completely mauled by zed because you stopped to look through inventory or to stare at the map to find out what the hell Lily is babbling about. Zed will keep coming, so be sure your character is somewhere secure before getting too distracted.

And remember that while you're not playing, zed's getting stronger and more numerous and your fellow survivors are gobbling supplies, fighting zombies, and trying to heal up too. When you come back, things may have changed.
2) Clearing and Searching
When your character enters a structure, the first thing to do is clear it -- that is, to make sure it's free of zombies.

You'll want to move from room to room, eliminating any zombies you find in the process. You'll know the building's been cleared because three things will happen:
  • One: Your character will say the place is free of zed, and a little tip will appear at the upper right saying "House Clear", "Office Clear", what-have-you.

  • Two: All the dark circles will disappear from the building outline on the HUD. That is, when you first enter a building, you'll see several dots inside it on the HUD; those indicate the rooms that must be "cleared" before the building can be declared zed-free. The dots will disappear one-by-one as you visit each room. See the image to the right for what an uncleared building looks like on the HUD.

  • Three: On the HUD, a white circle with a red border will appear around the building indicating a temporary "Safe Zone" in which no zombies will spawn for the time being (though they can still wander in from outside).

It's useful to clear a building before searching it for loot because searching for loot causes noise and, if the building isn't completely clear, the noise can attract a lot of zombies.

Once the building is clear, your character can then begin searching for loot by moving from highlighted object to highlighted object and using the Search command. This should be a relatively safe endeavor if the building has been properly cleared.
3) Loot and Caches
While searching, your character can find two different types of things: loot (individual items they place in their backpack or can use immediately) and caches (bundles of goods that can be broken apart into smaller items or carried in a rucksack). See more on inventory and rucksacks in Section 4, below.

Loot
Loot comes in a variety of forms: weapons, ammunition, food, medicine, backpacks, distractions, junk, and so on. Loot is generally consumable items that can be placed in the backpack or used/equipped immediately.

Some items, though, are useless but for story flavor, such as various notes and diary pages. Most of the others stuff can be brought back to your character's home base and stored (if you don't want them for your own character) which gains them some influence.


Caches
Caches come in five varieties: Ammunition, Food, Fuel, Construction Materials, and Medicine. Ideally, it's best to leave caches whole and carry them back to your character's home base since this provides more goods than does breaking the cache apart. The catch is that carrying a rucksack always means that the character is "encumbered" and will tire far more quickly.

The good news: Vehicles can store multiple caches, so if you're sending your character out to do a serious scavenging run, it might be good to have a vehicle -- trucks and police cars, for example, can store six items, and so can transport six rucksacks home at one time.

Depositing a cache at home base will increase morale, add influence, and increase the number of supply crates of the resource (construction materials by 15; food or medicine by 8; and ammo or fuel by 5).

4) Inventory and Rucksacks
Your character has two ways to lug items around: their inventory or in a rucksack.

Inventory
Left to their own devices, a character has four inventory slots in which to carry items. Adding a Small Backpack gives them four additional slots (for a total of 8 slots) and adding a Large Backpack gives them six additional slots (for a total of 10 slots -- a Large Backpack has two more slots than a Small Backpack.

There are a variety of appearances to the backpacks in the game but the only difference in packs is whether they are "Small" or "Large".

Rucksacks
Rucksacks can be carried in addition to anything/everything else in your character's inventory, but whenever they're carrying a rucksack, they will be encumbered and will tire more quickly. The trunks of vehicles can be used to transport multiple rucksacks back to home base with modern pick-ups, taxis, and police cruisers having the most storage in them. To access a vehicle's storage, just walk around to the back of it and use the action key (usually, E).

When carrying a rucksack, a character has to run up to the home base Storage Locker to deposit it (rucksacks cannot be deposited at Outposts); when the rucksack is in a vehicle, just parking in one of the Home Base's official parking spots (always marked with a sign with a blue P), will automatically deposit the materials among the home base's supplies.

And one almost-final note about rucksacks: If you drop one, it will stay marked on the map. This can be useful if you find more rucks than your character can easily get back to base. Instead of leaving them in their stash, take them out then drop them on the floor (X key by default). You'll then have a nice marker to make them easier to find on a second trip.

That said, one more important thing: remember that you can have, at most, ten rucksacks out at any one time. This means ten in vehicles and out on the map. If you already have ten and get out an eleventh, the first will disappear.

5) Bases and Outposts
Your character will establish two kinds of structures in the game, Bases (their main home) and Outposts, which help fight zombies and are convenient places to restock.

Bases
Your character can only have one Home Base at a time, and only certain structures can be designated home bases (they will show up on your map as "Potential Home Site" when you discover one). The Home Base is where your character and their fellow survivors rest and recuperate.

The Home Bases each start with a few pre-built facilities, but they have to be fixed up before they can be used. They also have empty "slots" so that other facilities (of your choice) can be built, as well as a number of designated parking spots and Outpost slots.

Outposts
Each base also has a number of "Outpost" slots, and you can establish one Outpost for every available slot. There are several benefits to Outposts:
  • Outposts improve the security of the Home Base; they can set traps that take out approaching hordes.
  • Each Outpost creates a "safe zone" around it, and the safe zone will be larger if the Outpost is armed with traps.
  • Every Outpost contains a supply locker, allowing characters to re-supply while away from Home; characters can also drop off spare equipment at the Outpost so they don't have to lug it around (except rucksacks, which have to go to the Home Base).
  • For.each Outpost you have, there is an increased chance that any missing survivors from the Home Base will come home safely on their own.
Outposts can be established in most any building that is searchable/lootable if the character has the Influence to do so and the Home Base has an available Outpost slot.

What's not obvious: Before an Outpost can be established, it has to be cleared of zombies, then thoroughly searched (that is, every lootable item in it has to be searched). But leaving supply caches in the Outpost (rather than looting them and taking them away) is beneficial: if an Outpost is built where some resources remain, the Outpost will automatically produce a small amount of that resource (3 crates) for your Home Base every day at the cost of using 1 material crate per day. Outposts established in empty buildings (or Outposts which run out of their cache resource) will produce Ammunition in the State of Decay version of the game, or nothing in the YOSE edition of the game.

  • Example 1: Establishing an Outpost on a building with a "Food" cache still in it decreases the Home Base's usage of food by 3 crates per day, but increases its materials usage by 1 crate per day.

  • Example 2: Establishing an Outpost on a building with a "Construction Materials" cache still in it decreases your Home Base's usage of materials by 3 crates per day, but then also increases its materials usage by 1 crate per day for a net gain of 2 crates of materials per day.
6) Missions and Opportunities
In the basic game (plain State of Decay or State of Decay: YOSE), there are Missions which run you through the game's story, and Opportunities which offer rewards but don't move the story forward. (In Breakdown, there are really only Opportunities as there is just one "Story Mission" to find and fix up the RV.) Note that some call these "Storyline Missions" and "Simulation Missions", respectively, but in this guide I use different terms so that it is more clear what I'm talking about.

Missions
Missions are generally fairly static: they don't change on different play-throughs and they are not time sensitive. A Mission will wait until you get around to having your character do it, which means that you can take care of many other things first and the Story usually won't go along without you* (though Lily will nag you relentlessly about them). Missions move the story forward, and focus on your group of survivors and their relationships with the Wilkersons, the Grange, the Courthouse, and the Army.

* Note that it's been reported that in the early mission where your character is tasked with finding a doctor for Ed, the story will resolve without your input if you ignore it long enough.

Opportunities
Opportunities are events generated by the game and they come in a variety of shapes and sizes. Their names are: Zed Hunt; Clear an Infestation; Strangers in Need; Friend in Trouble; Under Siege; Evidence of Scavengers; Combat Training; Trading Goods; Having a Talk; and Mercy Shot.

Opportunities are usually only available for a short amount of time; if one of your characters doesn't resolve them, they will resolve themselves (sometimes with negative consequences). They do repeat, however, so passing up one "Zed Hunt" doesn't meant that another will never be offered -- in fact, sometimes multiple instances of the same opportunity is available.

7) Exhaustion, Illness, and Injury
Characters in the game can be come Tired, Sick, or Hurt.

Tired Characters
Tired is the easy one: just switch to a different character, or log out of the game a while, and they will rest and be ready to go again. Having enough beds in your Home Base (at least one for each survivor) will ensure that they get rested in the shortest time possible.

Sick Characters
Characters can become ill from exposure to certain zombies (Bloaters), or from random events, and suffer from a variety of ailments such as "Black Fever", "Cough", "Rash", or other conditions. When sick, a character's Stamina and Vitality can be affected, making survival a lot more difficult for them.

Keeping the Home Base well supplied with medicines helps avoid disease outbreaks, and having a Medical Area at the Base means that characters who are ill are unlikely to spread their illness to other survivors. Additionally, having a Medical Area increases the chance of the sick character being cured, as does having a Trained Healer at the Base.

Hurt Characters
When fighting zombies, it's not uncommon for a character to be wounded and suffer a temporary loss of Vitality. Sometimes, however, a character becomes Injured, which is a more serious condition such as "Broken Arm", "Mauled", "Busted Leg", and so on. Injuries reduce maximum Vitality until they are healed.

Most survivors can recover from injuries by just resting a while, though some serious injuries benefit from having a Medical Area and/or a Trained Healer. Having a Training Area at the Home Base with a Fitness Guru on hand can reduce the chance that characters receive injuries during fights.

Switching Characters
You should be able to switch to any other character from your character's Home Base who is also friends with your character, except Lily (Lily is never playable). To do this, pull up the journal (Tab) to the list of characters, click the one you want to switch to, and press Q.

Sometimes, however, the game will tell you that the character is unavailable. This can happen if they are out of the Home Base doing something (scavenging), or if they are waiting for an Opportunity (usually Having a Talk or Combat Training) to be completed with them. Before they'll be available again, another character has to talk to them and do the associated Opportunity.
8) The Radio and Your Friends
Remember that you can radio back home using (by default) the alt key. Initially, radio calls can be used to establish outposts and call in scavengers to take goods home for you.

As the game progresses, there are more options available by radio - be sure that you take advantage! Some of the options in the base game are:

  • Call for Backup - if Sheriff Carl is around, you can call for back up, which will bring in a team to assist you for a few minutes.

  • Sharpshooter - if you've completed the mission Nervous Survivor, this radio call becomes available. When used, it brings in sniper support to your immediate area.

  • Death from Above - with the completion of the Insubordination mission, you can radio Erik Tan for this. It will spawn a marker grenade in your character's inventory; you'll receive an artillery strike wherever you toss that grenade (be sure you're well clear of it).

  • Vehicle Delivery - after completing Sweet Ride, this radio call will bring in a car near your character's location.

    Construction Advice - after completing Stranger in Trouble, you can use this radio call to instantly complete construction projects.

  • Medical Advice - once you've done Help Doc Hanson, this call can be used to radio home and heal an injury.

  • Words of Inspiration - with Pastor Mulroney in your enclave, you can radio back to him to restore maximum stamina for your tired character.
All these cost some Fame to use, and have a cooldown before they can be used again, but they can be real lifesavers.
Appendix: Mouse & Keyboard Controls
Movement
W, S, A, and D for moving forward, backward, left, and right respectively. On ladders, W ascends and S descends the ladder. Holding down the Shift key while moving causes your character to move faster: indoors they will jog, outdoors they will sprint, and on ladders they will ascend or descend more quickly. (Sprinting and ascending ladders more quickly will drain Stamina.)


You can also hold down the C key to toggle crouching; and moving while crouched is called sneaking. While sneaking your character doesn't make so much noise and isn't as easily noticed by zombies*. Crouching while in a bush makes your character effectively invisible to zombies that didn't see them enter that bush, too.

The Space Bar will cause your character to jump, and if they are facing a ledge or a fence. W + Space Bar will cause them to scale it or vault it, depending on its height. The Control key causes your character to roll.

* A note on noise: on the HUD you will be able to see a small blue circle around your character. The more noise your character is making, the larger that circle will get.

Driving
Use the E key to enter a vehicle, or exit it again. Driving is a lot like moving: W accelerates (moves forward) and S either brakes or moves backward, while A and D cause the vehicle to turn. Sharper turns can be made using the Space Bar, which is the handbrake.


While driving, the LMB can be used to open the driver's side door to knock zombies off, or paste them as your character drives by. Meanwhile, the Q key will blow the horn and the Control key will turn on the siren, if the vehicle has one.

Exploring
The mouse is used to direct the camera so your character can look around, and determines what direction they'll run when you press W. LMB attempts to force a locked door open, though often multiple attempts are needed to be successful.

The T key toggles your character's flashlight (which doesn't cost anything to use), or their vehicle's headlights. E causes them to interact with nearby objects: use it to cause them to open/close doors, get in/out of cars, or to search items. "Inside" searched items, use Q to immediately equip an item or to break apart a cache, and the Space Bar to transfer items to your character's inventory. Hold down the Space Bar to transfer a cache to your character's rucksack.


From atop certain structures (water and cell phone towers), your character can Survey the nearby area. To do this, climb to the top and hold down the right-mouse button (RMB), then hunt for the query marks inside the dashed circles -- pause on them long enough for their circle to complete and that location will then be marked on your map.

To view the Map, use the M key. Inside the Map, only the scroll-wheel will zoom in and out (I have had no success in re-assigning this), and use the Escape key to exit. Using the Tab key in the Menu will cycle through points of interest.

Combat
The left-mouse button (LMB) is used to strike with your character's melee weapon, if they have one, or with their hand if they have no weapon. The E key can be used for kicking, whether or not they are armed. The C key is for dodging. The Z key can be used to shove a zombie away, or to perform a fatality on it if it is kneeling or prone (usually at significant stamina cost). Note that the Z key can also be used to perform a fatality on a standing zombie if your character is crouching and the zombie is unaware of your character's presence. Note that zombies get very distracted by trying to tear down barricades, so it's pretty easy to sneak up on them and eliminate them this way.


When your character has a firearm equipped, the right-mouse button (RMB) is used to aim and the LMB is used to fire. The R key is used to reload firearms, however if your character is not actively using the firearm (that is, you don't see it in their hand on screen), you may need to use the RMB for a moment to put it back in their hand so that it can be reloaded. You can also use the RMB to aim in order to throw a Molotov cocktail, pipe bomb, flare, or grenade; that said, your character's success in using this technique is based on their firearms skill (but it's still usually better than pressing the F key and hoping).

The F key is used to activate the currently selected inventory item. This might be anything from painkillers to a Molotov cocktail or even a creepy talking doll. The mouse-wheel is used to change the currently-selected item, though this can be successfully rebound through the menus for those of us without mouse wheels.

Finally there are keyboard combinations in combat as well:
  • Strong Attack: Shift + LMB
  • Drop Kick: Shift + Space
  • Takedown: Shift + E

The User Interface
The Tab key opens your character sheet and inventory, and shows other details (such as your home base development, your event log, and so on). Inside the interface, you can use Tab and Z to move forward and back through the tabs, and the Escape key to exit.

On your character's sheet, you can use the Q key to select your character's specializations, once those become available. To do this, left-click the specialization you want them to have, then press the Q key, then hold down the Q key to confirm the choice.

Inside the Base menu, use the LMB to select rooms and see what improvements are available, then LMB again to select improvements to work on. Use the Escape key to back out of these menus.

Finally, the Alt key is used to make radio contact with home base. Using the radio, it's possible to call for scavengers, to establish an outpost, to offer comforting words to those back home, and so on.

Appendix: Questions from Others
  • Does loot respawn? (h/t Yimmibimmi)
    No, loot does not respawn in the game. Once a loot container or a structure is scavenged, it remains looted.

  • What happens if everything is scavenged in the whole valley? (h/t Der Hexer)
    Then nothing else can be scavenged for the most part. You can ask Lily to call out for various supplies, and she will fail frequently, though occasionally she may turn up a rucksack of something you've asked for.

  • What happens if I ignore missions?
    For the most part, the optional missions will resolve themselves one way or another -- the character involved may come out fine or they may die. At least one story mission (where your character is charged with finding a doctor for Ed) will also resolve without your action if you completely ignore it for a long time.

  • How do you give another character a new gun? (h/t curtyuiop)
    You need to either put the gun in a locker (or a vehicle trunk), then switch into that character and take it out. If you put it in a vehicle trunk then no Fame is needed to withdraw it as it would be to take it out of a locker.
48 Comments
cruinne  [author] Dec 31, 2020 @ 11:48am 
I dunno either. It's always left alt key for me. If that doesn't work, post a request in the forums for more help, and be sure to include your system information.
JasonVtec Dec 31, 2020 @ 4:14am 
HEY! HELP ME PLEASE! I CAN´T USE THE RADIO, IDK WHY....
curtyuiop Nov 2, 2017 @ 11:25pm 
thanks alot!
cruinne  [author] Nov 2, 2017 @ 2:47pm 
You would need to put in a locker (or a vehicle trunk), switch into that character, and have them take it out.
curtyuiop Nov 2, 2017 @ 1:31pm 
Thanks for the guide, how do you give another character a new gun?
cruinne  [author] Jan 3, 2015 @ 12:48am 
Sorry to take so long to answer, Tynon_1221 -- I totally got lost in the holiday season! :steamflake: Anyway: is there a difference between Rucksacks and Caches - yes. A cache is what's still in its container, unlooted. A Rucksack is materials that have been removed from the container/looted.

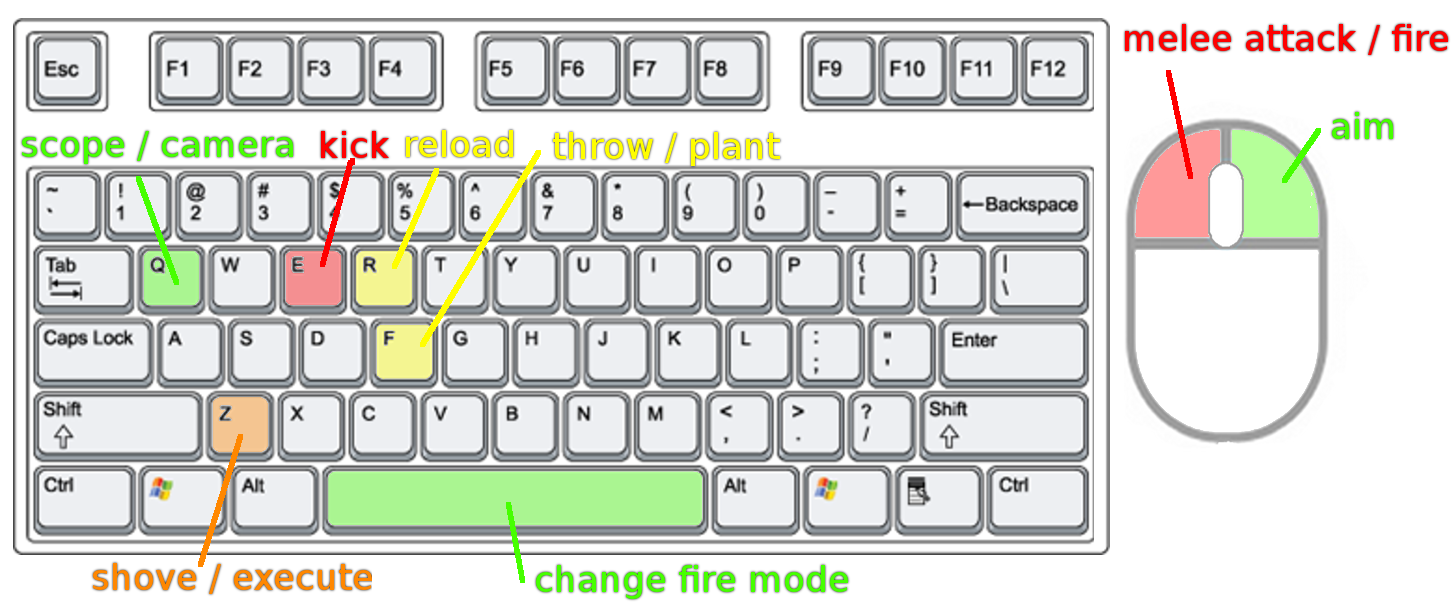
As Midas indicates: leave the material you want the Outpost to generate "unlooted" in its original container when you turn it into an Outpost. Not only will that outpost then generate that item, but you can also then loot that cache and take the initial resource home as well.
Midas Jan 2, 2015 @ 11:35pm 
An Outpost is based on its avaible resources, so if you have 1 food in it left, it becomes a food outpost, if it has food + ammunition it becomes one of the types, so you can loot the resources you dont whant to have as outpost and so "force" the outpost type
7 4 17 0 17 _twelvetwenty-one Dec 3, 2014 @ 1:17am 
As for Outposts being built in structures that still have "Caches" in them... please elaborate.
IS there a difference between Rucksacks and Caches? I've been dropping a rucksack into a building every time before I build an Outpost, not sure if it's having any effect.
You say it's necessary to loot every item 'fore a building can become an outpost; if I find a cache in a building, should I loot everything else, leave that cache untouched and then build the Outpost? Or does dropping a rucksack into an Outpost before it's an oupost net the production bonus?
cruinne  [author] Dec 2, 2014 @ 4:16pm 
old pete: Thanks for the comment, and I hope you enjoy the game :steamflake:

Swaggy: LoL :pixeldead: Good point.
Eugene Garkin Dec 2, 2014 @ 2:15pm 
You should also say that you need to level up new or bad characters cause if you die, you are left with a shitty character