Atelier Resleriana: Forgotten Alchemy and the Polar Night Liberator

Atelier Resleriana: Forgotten Alchemy and the Polar Night Liberator

47 valoraciones
Game Mechanics Basics Explained
Por Scout
Not sure if you understand something about the game? Look here!
2
4
2
   
Premiar
Favoritos
Favorito
Quitar
WARNING: End of Service Imminent
Unfortunately, Koei Tecmo has announced that the global server for Resleriana will end service on March 28, 2025. Here is the official Twitter post announcing it:

https://x.com/Resleriana_EN/status/1883818691709796796


It is worth noting that the Japanese server is NOT ending and is still ongoing. I don't believe they plan to EoS JP anytime soon, so if you do wish to continue playing, you'll unfortunately have no choice but to migrate there.
INTRO: What does this guide explain?
The purpose of this guide is to explain the basics of most of the major mechanics of the game, including synthesis, attributes, roles, and so on. The game doesn't explain everything clearly, so this might be helpful to you if you don't quite understand something.


Everything will be separated into sections, so you can easily jump to what you wanna know more of.


Character Attributes & Damage Types
Each character has a specific "attribute" which are basically elements. These determine what type of damage the character will deal. The most important aspect to keep in mind is what constitutes as Magic damage and Physical damage.


Disclaimer: The "Wind" attribute is actually referred to as "Air" in-game. I mistakenly remembered the name as Wind.


These are all the attributes/elements in the game. It's important to know what is Magic damage and what is Physical damage, because when synthesizing/picking Memoria, you will want to know what type of damage a character deals so you can take advantage of the bonuses.


Physical and Magic damage attributes


Any character that has Fire, Ice, Bolt, or Wind attributes will deal Magic damage to enemies.


Inversely, any character that has Slash, Strike, or Stab attributes will deal Physical damage to enemies.


If you need to check what attribute a character has just to be sure, you can either check the color of the icons near their name or skills (In this case, Escha's icons are green, indicating she's Wind.

The Physical attribute colors can kinda look similar to one another, so if you really need to check, click their skill icon and you'll see the attribute icon on the left (3rd screenshot)


Like I said, when it comes to picking memoria or synthesis traits, you'll want to pick the appropriate things so you can take advantage of those stat bonuses. To show just how helpful that is, here is a piece of gear i have for Resna, who is a Magic Attacker. These two "Magic Damage Boost" traits, along with the armor's inherit skill, increases her magic damage by a whopping 38%.


Character Roles
Each character also has a role, which showcases what kind of specialization that character excels in. The roles are as follows:


  • Attackers deal lots of damage to an enemy's HP bar; basically your primary damage dealers. They're also proficient in either boosting their own damage and/or dealing critical hits.
  • Breakers can easily deplete an enemy's Stun gauge which makes them take more damage and greatly take back their position in the turn order. Some breakers might also be proficient debuffers as well.
  • Defenders can take more damage from enemies than usual, evade enemy attacks, will almost always be targeted by singe-target attacks, and/or can protect their teammates from incoming damage.
  • Supporters are good at buffing or healing allies to keep them in good shape. They may also focus on debuffing enemies as well.


Generally, it's recommended you have a team of 1 Defender, 1 Supporter, 1 Breaker, and 2 Attackers. While this is the most well-rounded team setup you can have, you can also have more specialized setups depending on what enemies their are and what gimmicks they use. You'll just need to think of which strategies would work best against what enemies there are, which you'll learn through experience.

You can easily check what role a character has next to their name when you select them, just like the attributes (In this case, you can see Escha is a Breaker).

Leader Skills & Tags
Leader skills and tags go hand in hand with each other mechanically, so we'll go over these one at a time.


Leader Skills

Every character in the game has a unique "Leader Skill" which you can see on the top left of the Characters screen. When appointed as the leader, this effect will take place during battle, and can be a very useful asset in powering up your team to take on tougher challenges. You might even want to build teams entirely around leader skills if their ability is significant enough.

If you wanna appoint someone as leader, click the icon next to their leader skill name.

If a Leader Skill's effect applies to other characters on your team, they'll have a special blue icon near them showing that it'll apply to them. In this case, you can see that Valeria, Corneria, and Mu have these icons showing that Lydie's skill applies to them.

However, be aware that each variant of a character will have their own unique leader skill that's different from their others. For example, this skill on Lydie's Rose variant is not the same as her normal variant's leader skill.


Clicking the magnifying glass icon will show the details of the leader skill, and will show the tags it applies to (if applicable; some skills apply to all allies).


Tags

Now, every character also has tags associated with them. This usually relates to the character's personality, subseries of origin, and/or physical appearance, and they typically have 2-3 tags each. The purpose of these tags is to know what characters are classified as when trying to decide what Leader Skills you want to use.


In the above screenshot, you can see that Lydie's Leader Skill says that she increases all "Laid-Back" character's skill damage and stun damage by 50%. When you click on that tag, you'll be given a list of all characters that are classified as Laid-Back. You can use this to fully plan out what team you wanna have for the most optimized damage.

It is also worth noting, each character will have the same tags no matter what variants they have. For example, Resna has "Merchant" as a tag, so any version of Resna will always have the Merchant tag, even if it's her Christmas or 3* variant.

Emblems
You can complete various objectives to earn emblems in the game which will apply a universal buff of some sort. The vast majority of these are simply milestones that you will earn just by playing naturally, like synthesizing specific items, spending stamina, completing research and so on.

Time-limited events also have their own emblems to earn with their own stat increases, but of course you can only earn them during the event's period, so try to get them done if you're able. They usually relate to completing the EX Challenges which are higher difficulty. If you did miss an event, it will eventually be permanently re-available in the "Permanent" section of the events tab, and you can earn the emblems there too. You need an item called "Key of Memories" to access each event, which can either be earned via currently ongoing event rewards, or purchashing in Flocke's shop.


Emblems do offer meager stat increases, and that may not motivate you to care about doing them, but it all adds up over time. When synthesizing items can be such RNG hell at times, you should learn to hold universal buffs like this close to your heart and try to get as many as you can. As you continue to play and earn more, they could give you just the edge you need to overcome a difficult challenge.


Also, it is worth noting, there are multiple ranks of each emblem: Bronze, Silver, and Gold. ONLY the highest rank you've earned will be the buff that applies for that emblem; they do not stack together.


Research
Early on in the main story, you'll unlock the "Research" feature in the atelier. Much like the emblems, these will apply universal buffs to your characters and equipment.


For Combat and Alchemy research, it costs cole to upgrade the research level. The cole cost slowly but surely increases for each subsequent upgrade.

You may sometimes need to complete a specific task to continue upgrading the research levels. Most of the time, it involves clearing the lower floors of some of the Elemental Towers.

At the time of writing, the maximum research level for Combat and Alchemy research is 150. It is possible this maximum level can increase in future updates, because the previous level cap was 100.


For reference, this is the cumulative total all the buffs grant at max level 150 for Combat research.


Now, the "Training" research works a bit differently. How this works is...

Training research will allow ALL of your owned characters match the minimum level of the 5 highest-leveled characters in your roster*. This is separated 5 levels at a time.

(*However, each character must advance their Growboard to the one with the appropriate level limit break in order for the effect to actually take place.)


Training research costs Shiny Coins to upgrade the level threshold. You can obtain Shiny Coins by "Converting" (i.e Dismantling) synthesized items in the atelier. You must also have at least 5 characters manually leveled to the level shown before you can continue upgrading.


That isn't super clear, so here's an example to better visualize:

Say that Resna, Valeria, Izana, Roman, and Juna are all at least level 60. If you have the upgrade purchased, every other character in your roster will also be level 60 assuming they've advanced their growboard enough. The next level threshold is 65, so you gotta advance Resna and the gang to 65, spend your shiny coins, and rinse and repeat until you reach level 80.


(As a protip: I recommend having Resna and Valeria's free 1* variants as two of the five characters to manually level, because you can only get their pieces required for awakening by leveling them up. You can't obtain them anywhere else.)
Synthesis Basics
For the most part, Synthesis is pretty self-explanatory, but there might be some aspects you might be confused on, so let's go over the mechanics.


Recipe Development

However, before we start the actual synthesis, it's worth noting how to acquire new recipes.

In order to develop new recipes, you need to fulfill the "Idea" requirements for each item, which you can view in the "Recipes" menu. More often than not, these are simple tasks like clearing a certain difficulty level in Score Battle/Dungons, gather specific materials, or reach a certain point in the story.

The main reason I bring this up is to encourage you to regularly check the idea requirements for locked recipes, because it might require you to do some oddly specific things, or you can unlock an item much sooner than you'd expect if you simply focus on it. In general, the recipes are ordered pretty naturally in terms of progression, but some of the later-end items could probably be unlocked early if you're strong enough. An example of that is this Fire Staff, where the only requirement is synthesizing multiple Attack Items, and this is one of the very last recipes on the current page.


Character/Material Selection & Gifts

Next, you'll be selecting which two characters will be participating in Synthesis (The first three characters are purely cosmetic and do not effect the outcome of the synthesis)., along with an extra material. These characters/mats you select will determine what traits will potentially be put onto the item. Their traits might change depending on what type of item it is.

What traits are actually applied to the final item, along with their rank, is random.

In general, these traits are known as "Gifts". Each character has specific gifts which could appear on a synthesized item, as stated before. Each character also has a "Gift Bonus" which affect the synthesis as a whole.

Let's look at Escha's gift as an example.


The three gifts next to Escha's icon are the traits that can potentially be applied to the synthesized item. The Gift Bonus on the bottom affects the synthesis as a whole, as previously stated.

The gifts often have different ranks, likely from I to V (1 to 5). The higher the rank, the more powerful the trait will be.


It should be noted, not every gift a character has will work on every item. The traits that won't do anything will be darkened on the prep screen, but will still have a chance of being applied to the final item. Do keep in mind that using a character with a trait that doesn't apply will lessen your chances of having a more useful item.


Character and Material Colors & Color Matching


The other important aspect to keep in mind is the color of each character's icon during synthesis. In general, it works like this:

- Each character has two colors on their icon. You want to match the colors of each character and material in order to get the most benefits. Think of it like putting two pieces of a puzzle together.


Let's look at an example to better illustrate this.


- As you can see, the initial material will have 3 colors on it's icon, this indicates the starting point of who to select. The color on the left side of a character's icon should connect to the previous icon, while the color on the right side should connect to the upcoming icon. In this example, one of the colors of the sword is Red, and Escha's left color is Red, therefore they will connect. Resna follows Escha; Escha's right color is yellow, and Resna's left color is yellow, therefore they will connect. Makes sense, right?


By the way, just in case you don't know, the character icons are automatically sorted by whether their color will connect or not, for easier sorting.


- Now, after you select your two characters, the second character's right color will determine what type of materials you can select. Each material also have their own traits which can potentially apply to the final item. In this case, Resna's right color is green, so we can only pick materials that are colored green. If we wanna pick from a different list of materials, we would have to use somebody other than Resna as the second character.


Item Rarity


Most items and equipment have more than one rarity, and which rarity you get is also random much like the traits. Higher rarity items will have more powerful effects compared to their lesser counterparts. The current four rarities are: R, SR, SSR, and UR.


The vast majority of synthesizable items/equipment will only be either SR or SSR rarity. R rarity is only on beginner recipes that you get very early on in the game; one of the first you get. UR Rarity does exist, however, this rarity is not currently synthesizeable to my knowledge. The only time UR items have been available was being a purchase from a time-limited event. On top of that, UR weapons have fixed traits they already come with by default. This weapon is an example of such; you obtain this from the summer beach event. Chances are likely UR rarities will only be limited event shop purchases for the forseeable future.


To show a visual example of effect power difference, look at this Healing Bell as an example, the SR variant heals allies for 10% HP, and the SSR variant heals for 15% by default.


You can see the maximum rarity an item can potentially have on the "Recipes" menu, or seeing it's color when selecting what to synthesize in the Atelier. Blue is R, Yellow is SR, and Purple is SSR

Item & Equipment Quality
You'll notice these numbers that show up near your synthesized items. This is it's quality. Quality is, more or less, a visual representation of how good your traits are on that synthesized item in relation to it's effects, and takes the trait's rank into consideration.


The color represents the general tier of effectiveness of the traits. The order from least to greatest is: Gray, Blue, Green, and Gold.


Now, in a general sense, quality is a good indicator of how appropriate your traits are and it's relative effectiveness will be represented by the quality number. Having damage-related traits on equipment that increases skill damage for example (Like in the above screenshot). However, there are cases where the quality will be misleading because your traits either are on equipment that's the next best thing to something you don't have, or you're building traits around your character's passives and/or skills.


An example in my case is Sophie, who's a Bolt Defender. Sophie's Skill 1 causes her to recover her own HP, and boosts the recovery the lower her HP is. So naturally, you would want to put recovery-related traits on her equipment. You would ordinarily put these on healers, but the recovery effect can apply to anyone with any role as long as they recover HP that stems from their own skills in some way.


Sophie's weapon has 90 quality, but I have two "Recovery Boost [D]" Rank IV traits that boosts her recovery by 42% in total. Meanwhile, the ring accessory only has resistance-related traits on it, and it's 190 quality despite being equipment centered around HP recovery. It's clear that quality places stock on the role above all else, so it thinks resistance traits are better for defenders. This just shows you can't always trust quality all the time and use your own judgement on what's best for your characters.


So to put it short it's good as a baseline, but don't wholly rely on quality to tell you if something is good or not, because it's not always accurate. You should look at your character's skills first and foremost and think about what traits they would benefit from most.
Battle Basics
There honestly isn't too much to explain for battles, but it's worth highlighting the few bits there are because it could potentially be unclear to some.


Common Panel Effects


On the battle timeline, you'll see various icons above a character's panel. These 3 are the ones you'll see in practically every level you come across. There are more uncommon ones, but let's go over these basic ones first:


- The blue crystal icon will Increase that character's damage by 40% on that turn. Obviously, a big deal that you wanna take advantage of. Ideally, your Attackers will be able to take advantage of this buff. Keep away from enemies.


- The red crystal icon does the opposite, it decreases that character's damage by 40% on that turn. Ideally, you want either your non-damage characters (such as supports) to have this burden, or even better, the enemies so they deal less damage to you. It would be a shame if your Attackers happen to have this debuff.


- And this one is most important: the burst icon. This means the character will be able to use their burst ability on that turn. Bursts are basically ultimates. If you choose not to use your character's burst on that turn, then the opportunity is lost, so in most cases, you wanna use someone's burst whenever you're able to.

However, there might be cases where it's best to not use a burst, such as a supporter with a damage-based burst when you'd rather they heal.

Obviously, it's bad news for you if the enemy is able to use their burst on you. Prevent that from happening at all costs.


Uncommon Panel Effects


While the aforementioned three effects are ones that you'll experience in just about every battle, there are also various other effects that'll appear on a circumstantial basis. Maybe it only shows up later in the story, during events, during bosses, and so on. It's worth knowing what's what regardless.


- The hammer icon will increase an ally's Stun Damage by 40% on that turn. As a reminder, Stun Damage contributes to how much of the enemy's stun gauge is broken by attacks. So yeah, your Breakers are gonna want this for sure, but Attackers can be okay too since they can sometimes do just enough damage to stun an enemy if their gauge is very low.

Also, since your allies don't have stun gauges, enemies don't benefit from this panel at all and won't change their behavior or damage.


- The blue shield icon will inflict all allies or enemies with a Buff Effect making them taking 40% less damage for one turn; The faction that gets this buff is determined by who's on that panel when it's their turn. This and the effect following this one work a bit differently from the other panel effects in that it lasts past the character's turn and affects the whole team.


- The red shield icon will inflict all allies or enemies with a Negative Effect making them take 40% more damage for one turn; The faction that gets this debuff is determined by who's on that panel when it's their turn.


- The orange icon will guarantee the character will unleash a critical hit on that turn. You should keep in mind that while enemies are ordinarily unable to perform crits on you, they absolutely can crit if they attack and have this panel effect. At the very least, try to keep it away from enemies.

It is worth noting that this effect is considered as a Buff/Positive Effect, so if a character has the "Nullify Positive Effects" debuff on them, then they will not be guaranteed to crit.

You don't need me to tell you that your Attackers will benefit greatly from this, but especially characters that have All-Target attacks such as Izana and Mu. Every single on-screen enemy getting crit can make a HUGE difference in more difficult battles.


There is also a myriad of panel effects that will inflict the character with a Status Effect. I personally have only witnessed Paralysis and Blind as of the writing of this text, but more will likely be added in the future. These are primarily reserved for boss fights, but certain normal enemies can conjur these up too. This specific effect was used in a main story boss. Redacted for spoiler reasons.


Using items


-Items you create via synthesis are able to be used in battle. Now it's important to know: These items will not disappear if you use them too much and will exist forever, but they have finite uses in individual battles.


- Using an item DOES count as a turn independent from the prior character's turn. Good to know for modes that have turn-related factors like Score Battle and Roman's Grand Tournament.


- Firstly, you gotta fill up the item gauge which is on the left side of the screen. It fills up a little bit every time one of your character's turns end. Certain skills from characters and certain equipment/memoria can affect how quickly the item gauge fills up, too.


- After that, you can pick either one, or multiple items to use. And yes, you can use multiple items in a single go if you so please. Simply click the items in the order you want them to be used, then execute the action.

- You can use up to 3 items in a single turn.

- The number counter on the top right of the item's window indicates how many more times the item can be used in this battle. In this case, the Dry Biscuits have 2 uses, and the Witch's Potion only has 1 use. Use them at just the right time.

Battle Basics (Cont.)
Analyzing Status Effects

You know what they say, knowledge is power. This is something the game also never explains, but you can pull up every single ally or enemy's status page to see things like what status effects they currently have, their resistances, and other useful stuff. During more difficult and complicated battles, it would be in your best interest to check up on statuses when you need to in order to maximize your efficiency.


So here's how you do it: For allies, click and hold on their respective icon near the timeline to bring up their status page.


For enemies, click and hold their respective icon on the top of the screen whilst you're targeting an enemy.


And this is what the status page looks like. The most important part is knowing what status effects everyone has to maximize/minimize damage.

If you take the buff names such as "Dealt Damage Down" at face value and not think too hard about it, it's gonna bite you in later areas. There are certain enemies that can lower your skill damage by up to 90% in extreme cases, and you don't want to waste items/skills on that, so you gotta prioritize enemy targets. On the opposite end of the spectrum, enemies can also immensely reduce their damage taken for a certain amount of hits. All that is to say... know the buffs and debuffs everyone has, and by how much.


I wasn't kidding about that 90% damage reduction by the way.


Influencing the Battle Timeline

So you wanna take advantage of these buffs, but you're completely helpless as to control them right? Wrong, there are a few ways you can influence the battle timeline so you can line up these buffs the way you want them to happen. Generally, keep these three methods in mind:


- Think of which skill to use. In general, a character's first skill does weaker damage than their second skill, but the wait time between actions is shorter, so that character will be able to perform their next turn sooner. You can see the specific amount of delay a skill will cause by looking at the clock icon on their skill description by hitting the "i" icon near the skill window.

You will also see where on the timeline that character will be next time before you execute the skill, indicated by the "NEXT" text below them.


- Use items. If you decide to use an item, every character's action in the timeline will go back 1 space. This can give you just the right amount of space you need to get the right buffs or debuffs you want. In this example, you can see Resna (an Attacker) is able to take advantage of the damage buff instead of Escha because of using an item.


- Break enemy's stun gauges. Clearing the timeline of enemy turns just makes things cleaner so you can have more opportunities to get the buffs you want. Pretty self-explanatory.


"Double-Up" Effects

This is a specific strategy I wanted to personally share with you because i believe this is a very helpful tactic.


Remember when I said that using an item makes everyone's action in the timeline go back 1 space? Let's take advantage of that, and use two effect at once.

So, when a character's turn begins and there's a buff/debuff above them, that effect will IMMEDIATELY be applied and will persist throughout their turn. However, if there's another buff/debuff right next to them in the timeline, then using an item will also give them that effect IN ADDITION to the one they already have.

So, you can potentially have the 40% damage buff and the Burst ability at the same time. OR, you can stack two +40% buff crystals to result in the character getting a whopping 80% damage increase.

Take a look at this video. In this example, Resna begins her turn with the 40% damage buff. Next, I use an item to make her action go back 1 space, and after the item is used, she now also has access to her burst ability in addition to the previous 40% damage buff, inflicting massive damage on all enemies.


https://youtu.be/dToXGm9zwWs


Remember this strategy and use it when you're able. You can also force one of your Supporters or Defenders to double-up on debuff effects so your Attackers don't need to deal with it.
Know Your Status Effects
It wouldn't hurt to brush up on the various buffs and debuffs you see during battle, because some aspects of these are rather important to know if you're doing in blind.


Effect Categories


First of all, I wanna note the actual categories in which these effects are in. This is important to know because certain weapon/character skills will specify affecting ONLY certain types of effects. But don't worry, it's very simple. The 3 categories are basically these:


- Positive/Buff Effects: Effects that boost stats or give a beneficial passive (i.e Evasion, Counter etc)

- Negative Effects: Effects that weaken stats or inflict harmful passives (i.e Null Recovery, etc)

- Status Effects: A bit different from the Negative Effects; these are often Damage-Over-Time (DoT) effects such as Poison/Burn, or immobilizing effects such as Paralysis.

(The game also sometimes refers to Debuff Effects which is just an applicable alternative name for both Negative Effects *and* Status Effects.)


The main reason I pointed this out was so you know exactly what an ability or trait's description is referring to when you wanna strategize using effects.

This weapon for example increases the power of Negative Effects inflicted from a character's skill by 6% (So not Status Effects).


How Effect Turns Pass

This may sound silly, but the game isn't being entirely true about how Effects pass. It will always say an effect will be active for X number of turns, but it's a bit different from that. When you check the status page and see their icons, you'll see a number next to each one indicating how many more "uses" it has.

In reality, in addition to turns passing naturally, Attack/Damage-oriented buffs/debuffs will count as a "turn" when the character hosting that effect attacks on their own turn. Defense-oriented buffs/debuffs will count as a "turn" when the character hosting that effect is attacked at all.

So for example, if Resna is inflicted with a debuff that lowers her Magic Defense by 10% and it lasts for 3 turns, that effect will go away once Resna has been attacked 3 times by enemies no matter how long it's been. This is something good to know so you don't waste the debuffs you inflict on enemies on someone like your supporters.


Unique Buff Effects


Now I'll be going over most of the effects that don't revolve around stat boosts, starting with Buff Effects. You'll mostly see enemies use these rather than yourself, so you should know how these work. The turn count works a bit differently depending on the effect unlike the ones I explained above, so I'll specify those.


  • Evasion: Character has a chance to completely negate any incoming attack and it's associated effects; number goes down every time evasion is activated. For allies, burst attacks supersede this and are guaranteed to hit regardless of chance; however, the evasion counter will not go down if hit with a burst. You must use any Skill 1, Skill 2, or battle item that deals damage.

    It is worth noting that enemies who grant evasion on themselves and their allies will almost always be 100%. Allies (Such as Monika) might only have a partial chance of evasion, but some have 100% such as Judie and Rose Lydie.

  • Damage Immunity: Any damage character takes will be 0. However, Negative Effects can still be applied, and the stun gauge can still be damaged (There's also variants of this that only apply to Physical or Magic damage).

  • Counter: If character is attacked, they will immediately counterattack their aggressor afterward; number goes down with each counter used (Some enemies/bosses have permanent counter unless stunned). If an enemy has counter status, but a character breaks their stun gauge, that enemy will be unable to counter that ally.

  • Protection: If someone other than the character hosting this effect is about to be attacked, the protector will take the hit for them instead. Protection does NOT activate against all-target attacks, only single-target attacks. Number goes down every time protection is activated.

  • Reflect: If character is attacked, a percentage of the damage they took will be reflected back at their aggressor (There's also variants of this that only apply to Physical or Magic damage).

  • Regen: Character will recover a certain amount of HP when their turn begins.

  • Initiative: Character will be the first acting unit at the beginning of the wave and supersedes any other mechanic or property regarding SPD and turn order. If multiple characters have Initiative at once, then turn order between them is determined by the usual things like SPD.


Unique Negative Effects


  • Nullify Recovery: Character is unable to be healed by any means if inflicted with this. This effect also cannot be removed with items/character skills that remove Negative Effects; this effect can only be removed by a character skill or item that specifically eliminates Nullify Recovery. Nady is an example of a character that can eliminate Nullify Recovery from a character.

  • Received Recovery Down: Any healing the character receives is reduced by a certain percentage.

  • Given Recovery Down: Any healing the character hosting this effect gives out is reduced by a certain percentage.

  • Nullify Positive Effects: Character can't gain any sort of Buff Effects for as long as this is active. Do keep in mind that this will NOT remove any current Buff Effects a character has on them; they just can't gain new ones.

  • Remove Positive Effects: Character will lose all current Buff Effects they have on them except for ones provided that have permanent effects via stage gimmicks (such as in dungeons), Memoria, Equipment and character passive skills.


Status Effects:

  • Poison: Character takes a certain percent of damage when their turn begins; can stack. Characters can be KO'd by this if their health is too low to take the poison damage.

  • Burn: Same as poison, but doesn't go away on it's own unless cured

  • Blindness: Character has a chance of missing their attack, but healing/buffing allies are unaffected

  • Paralysis: Character has a chance of being unable to act when their turn begins

  • Sleep: Character 100% will be unable to act if inflicted with sleep, and they take more damage. However, getting hit once will get rid of the effect.

  • Dazed: Character 100% will be unable to act as long as they're dazed, even if on a Burst panel.

  • Taunt: Character will only be able to target the enemy that taunted them. All-target attacks will still hit all enemies. Taunt goes away if the enemy that initiated the taunt is defeated

  • Brittle: Every hit character takes will be a critical hit
Dungeon Basics
One of the primary ways to gather materials is within dungeons. These require combing through areas that Resna and the gang have to travel through, defeating enemies along the way.


Dungeon Basics

The basics of dungeons work like this:


- The counters in the top left of the screen show how many sections of the dungeon there is and your progress (left icon), and how many gathering spots you've interacted with in this specific section (right icon)

- The modifiers near those icons persist throughout the entire dungeon, and are always the same; use them to your advantage. The words in brackets, such as [Weakness], means that effect will only apply if the condition in the brackets is met. For example, the "[Weakness]" text implies this effect will only work if the enemy the character is attacking is weak to their attribute (Such as an enemy being weak to Fire). Another example is "[Stun]" where the effect will only apply if the enemy currently has a broken Stun Gauge.

- You must defeat all enemies in your way to advance.

- At the end of each section will be a more powerful enemy, and at the very end, a boss fight. Be prepared.

- Once you've cleared a dungeon at least once via the Quest menu, you'll be able to skip it any subsequent time you wanna gather materials.


This is something important to know:

- The differences between dungeon runs in the main story and selecting from the "Quest" menu is VERY different.

In the main story dungeons, KO'd party members are revived with full health in the next battle, alongside surviving members having their health refilled. Also, item use is also replenished to full after each battle. The Item Gauge also reverts back to being empty in the next battle.

In the Quest dungeons, KO'd members are not revived, and surviving members will not be healed at the start of the next battle; they'll enter the fight with the health they had at the end of the previous battle. And, item uses are not replenished whatsoever. The status of the Item Gauge also will persist throughout battles.


Risk Level

All dungeons have multiple "Risk Levels" which is basically it's difficulty. Higher risk levels feature the same layout and enemies, but the stats of enemies are increased each time. You're more likely to get higher rarity materials on higher risk levels, AND a higher quantity of them. Try to clear the highest risk levels you're able to so you can get the most good stuff possible. You might be able to clear more than you think thanks to those modifiers I previously mentioned.


It is worth noting that Risk Level 10 for every dungeon is a "challenge run" of sorts. At level 10, you do not gain any materials and you only fight enemies, and you're strongly encouraged to take advantage of the dungeon modifiers to make it through to the end. The only gameplay purpose level 10 serves is that it grants you 30 Player/Account EXP for each level 10 dungeon you clear the first time. A higher account level will increase your maximum stamina and will increases your chances of getting Rank IV/V traits during synthesis.

So for all intents and purposes, if you're only concerned about gathering materials, Risk Level 9 is the furthest you need to go.


Dungeon Party Formation


In the "Party" menu, you'll notice there's a separate tab for dungeon runs. This is mostly the same as the regular party setup, but you can use a lot more items than usual, up to 5. Try to make a lot of items to make dungeon runs a lot smoother. By the way, you are still limited to using just 3 items in a single turn, you're just allowed to bring along 5 items total for dungeon runs.


Selecting Party Leader


This is purely cosmetic, but if you didn't know, you can choose which character will be the one running through the dungeon in between battles. Simply fit the character you want into the leftmost slot on your party roster.


Disclaimer: Resna or Valeria will always be the one traversing in main story dungeons.

18 comentarios
Scout  [autor] 17 NOV 2024 a las 22:28 
UPDATE 11/18:

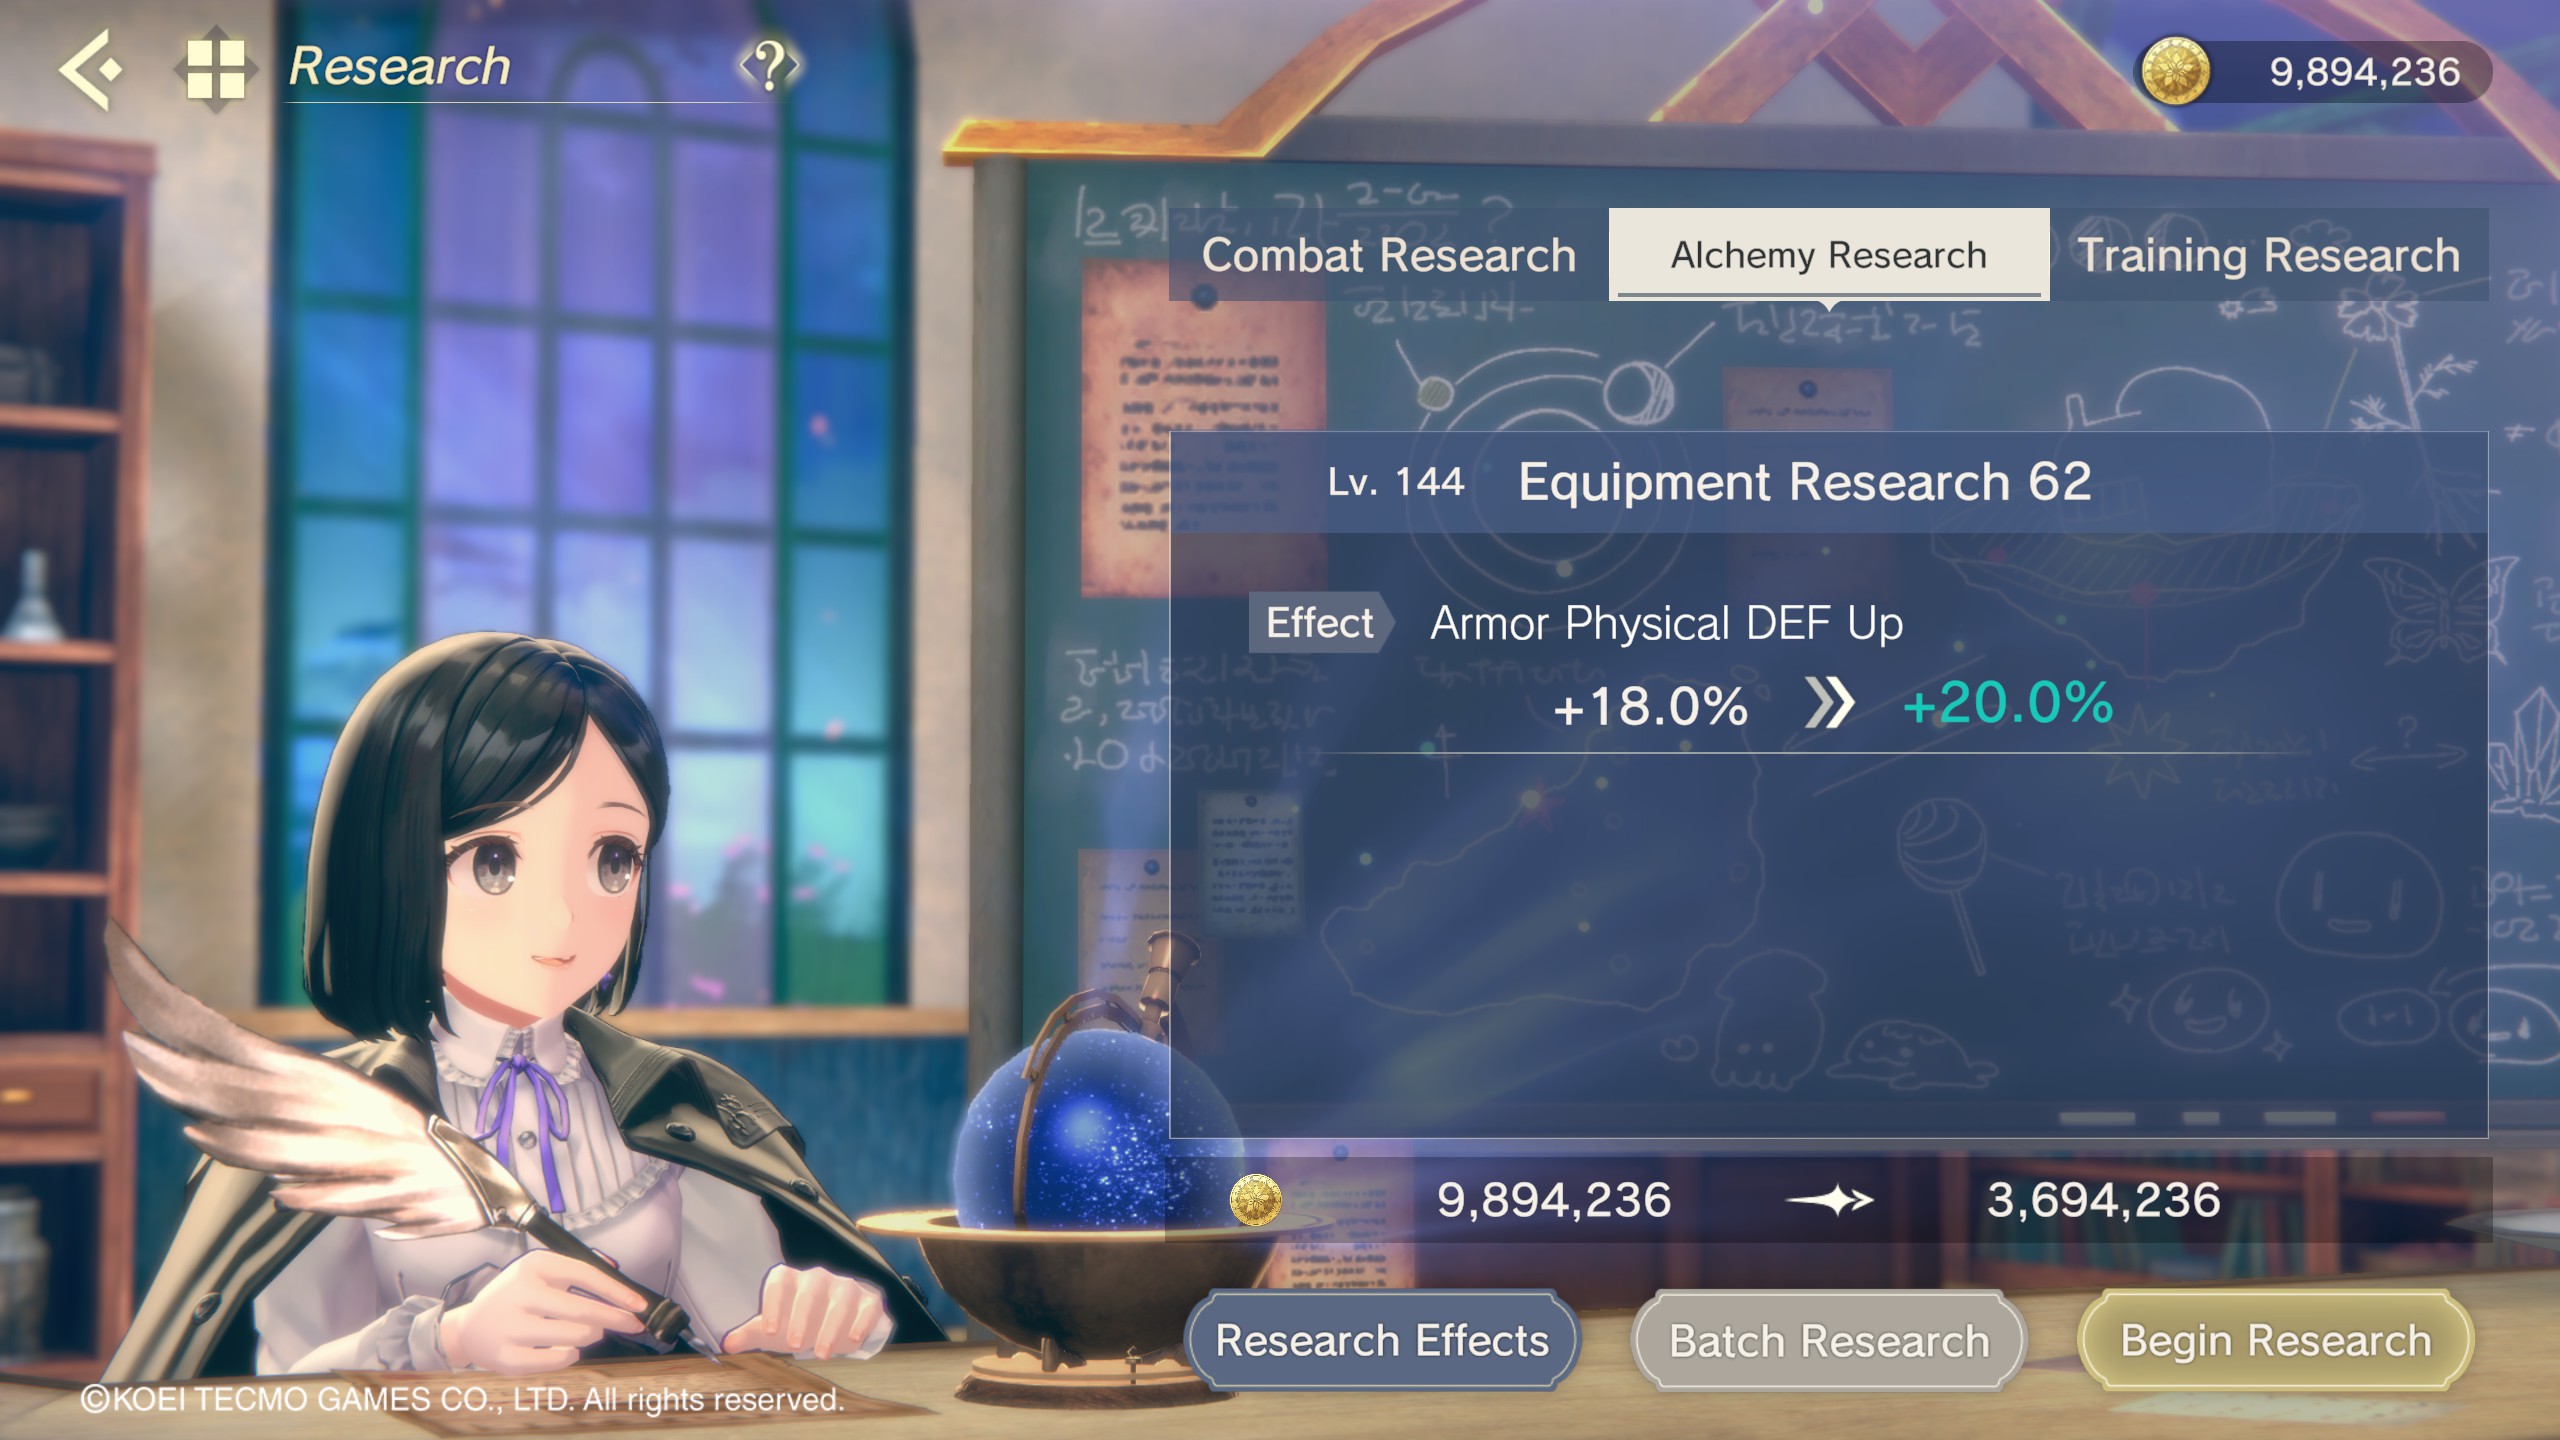
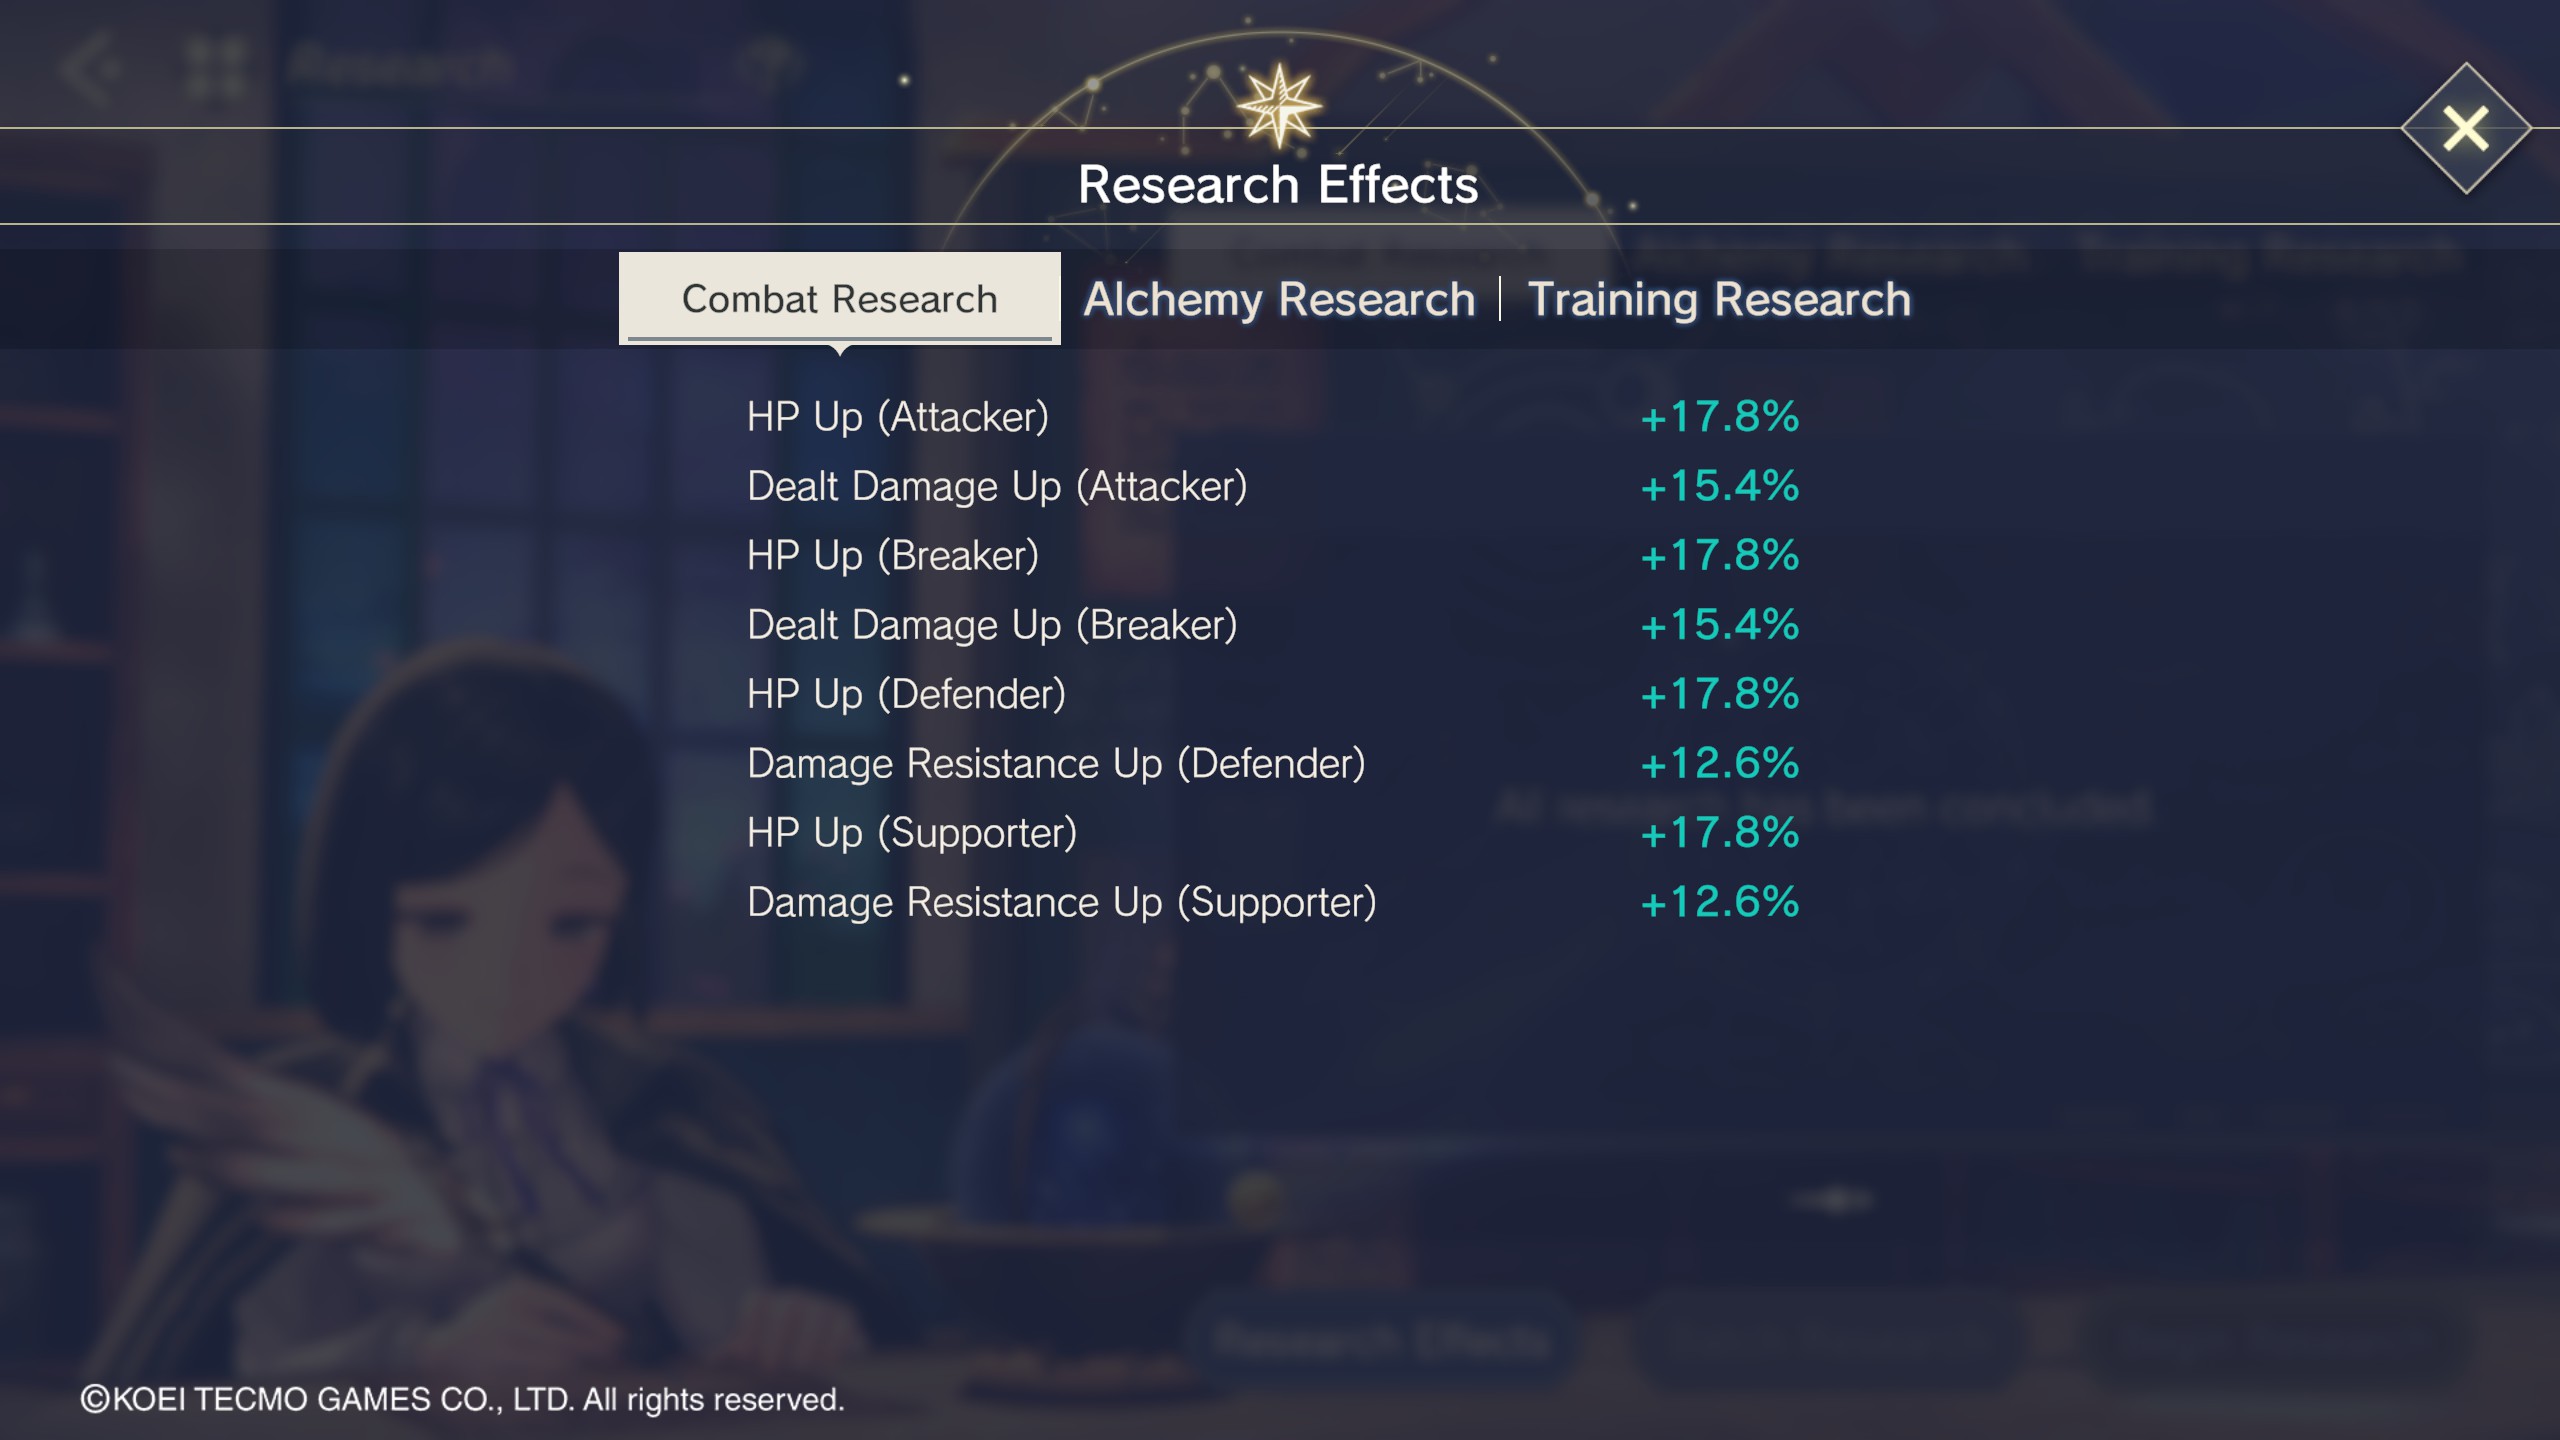
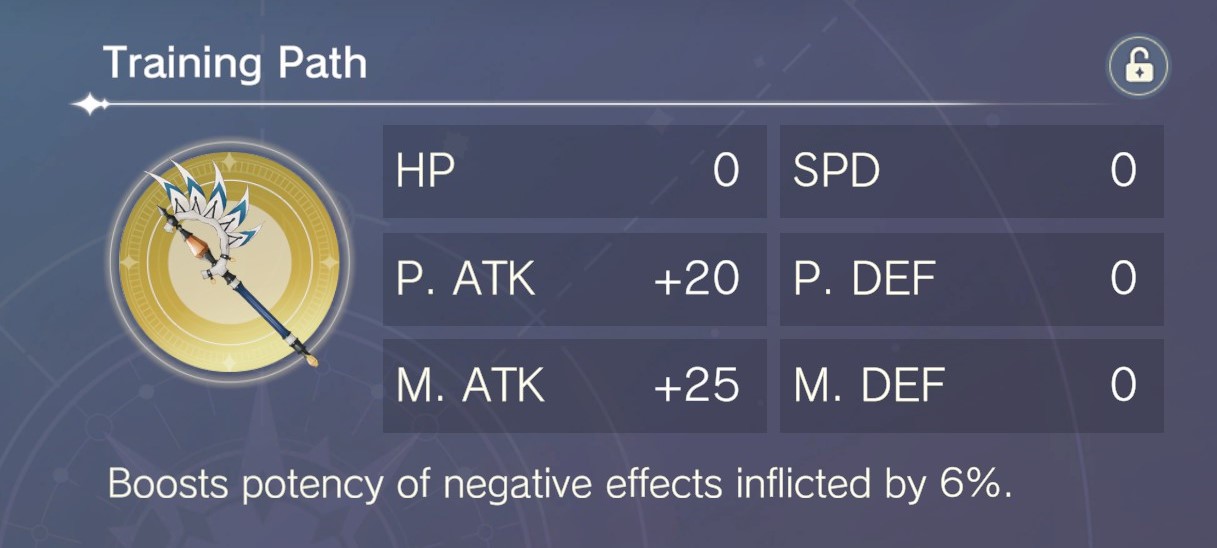
- Added a section explaining Research.
Scout  [autor] 12 OCT 2024 a las 9:51 
UPDATE 10/12:

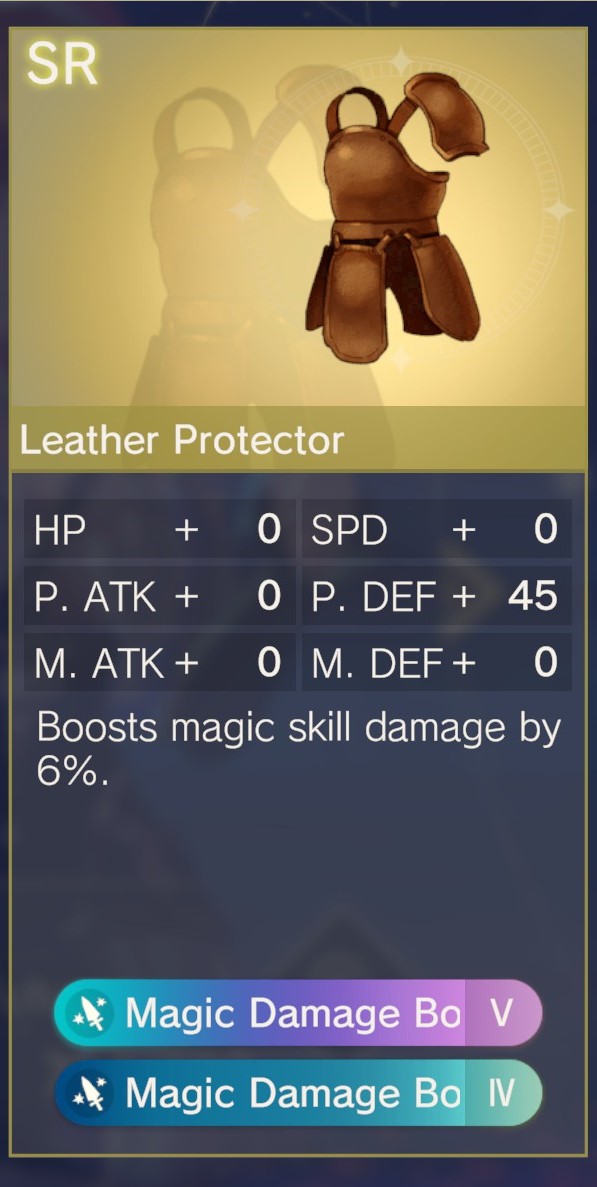
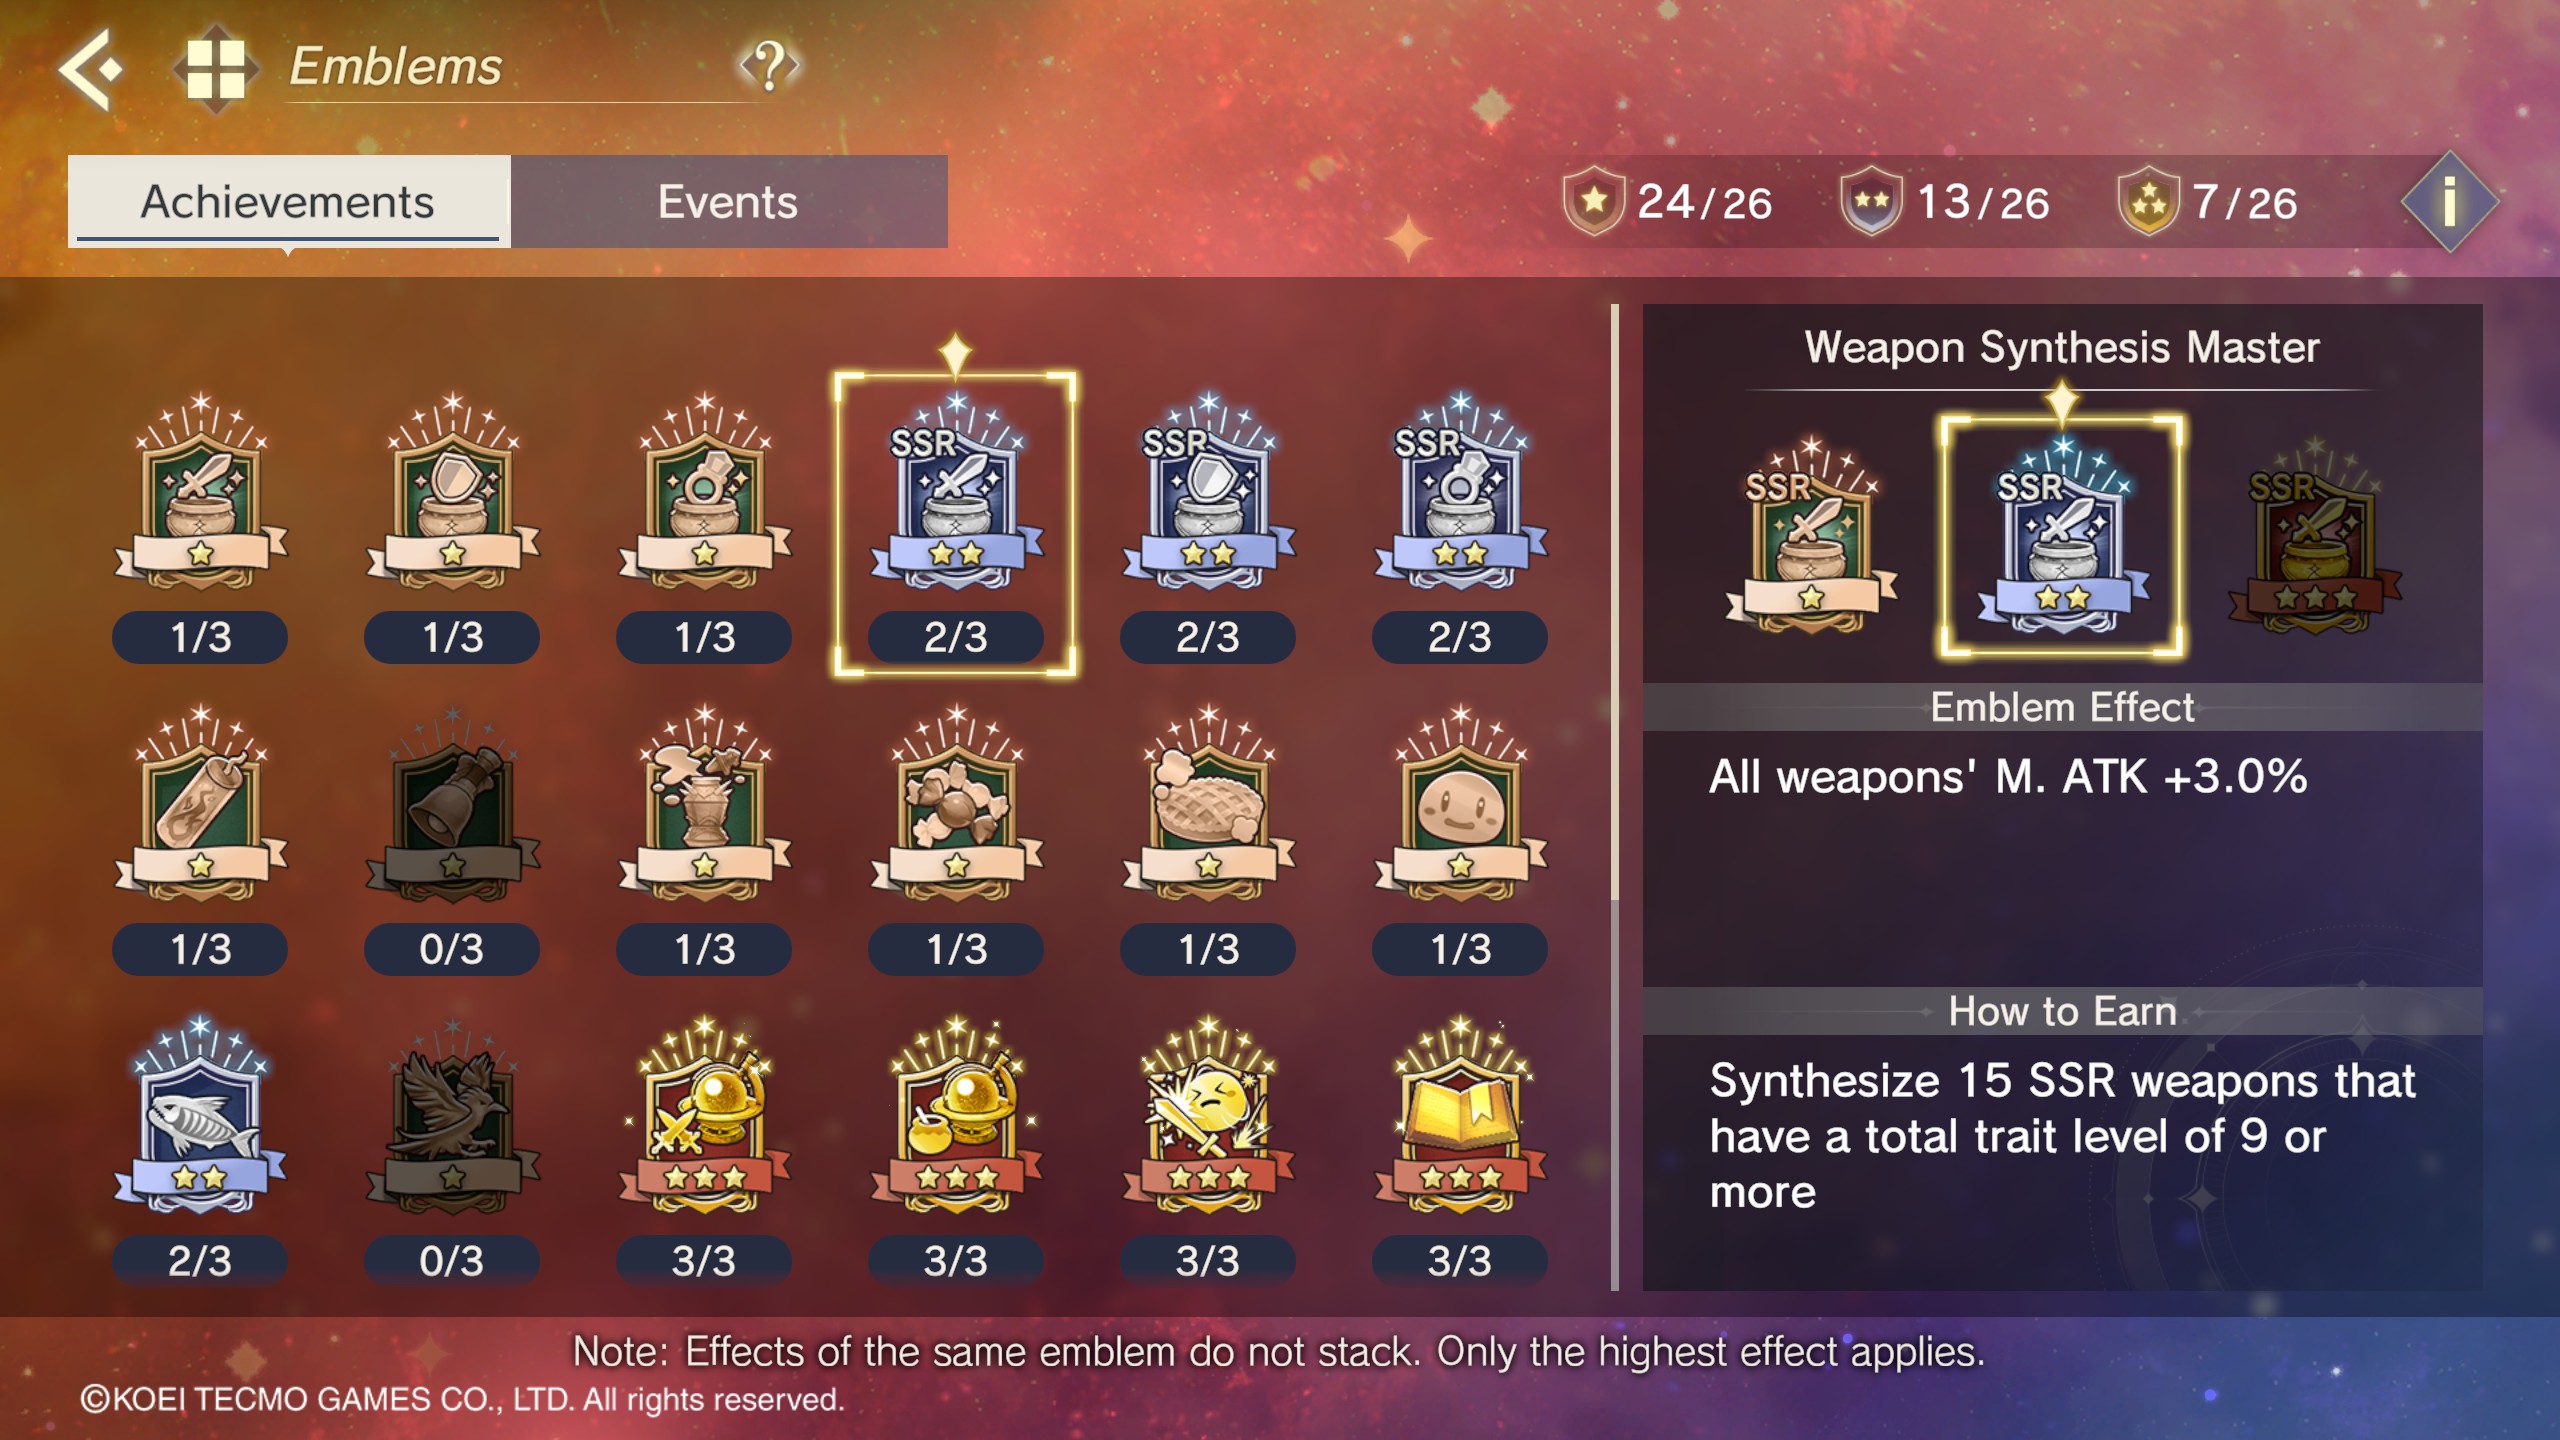
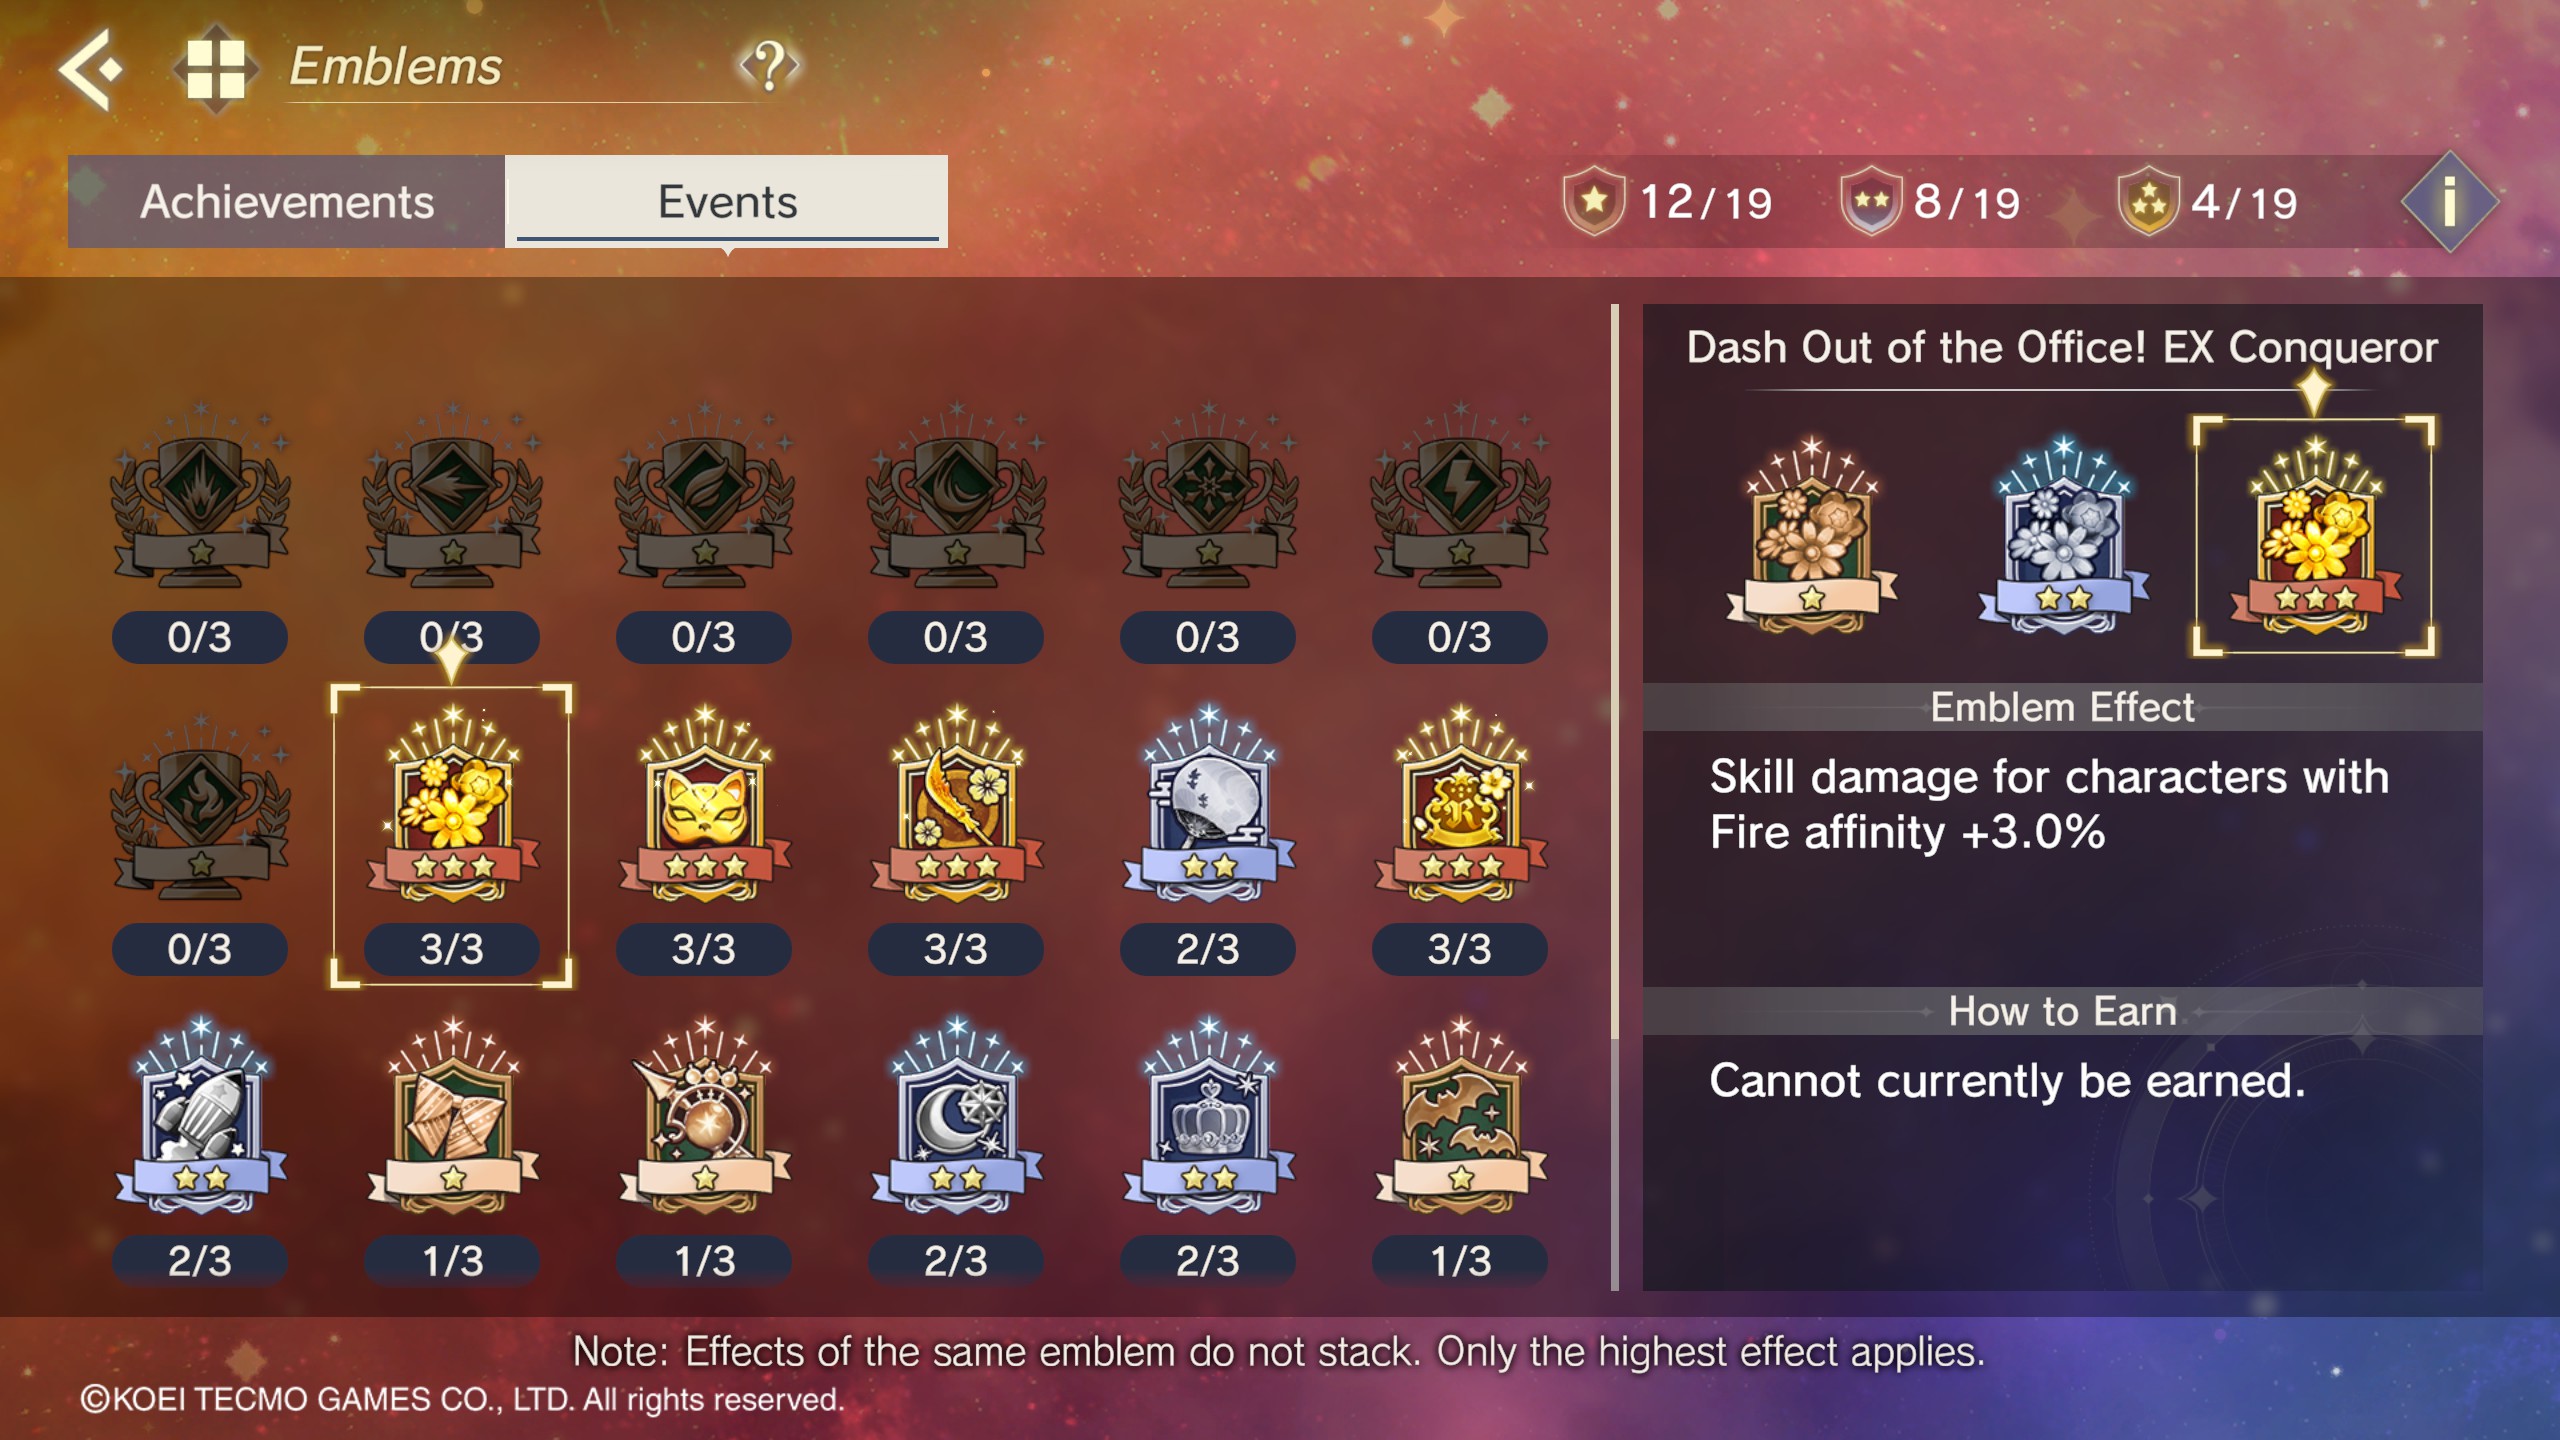
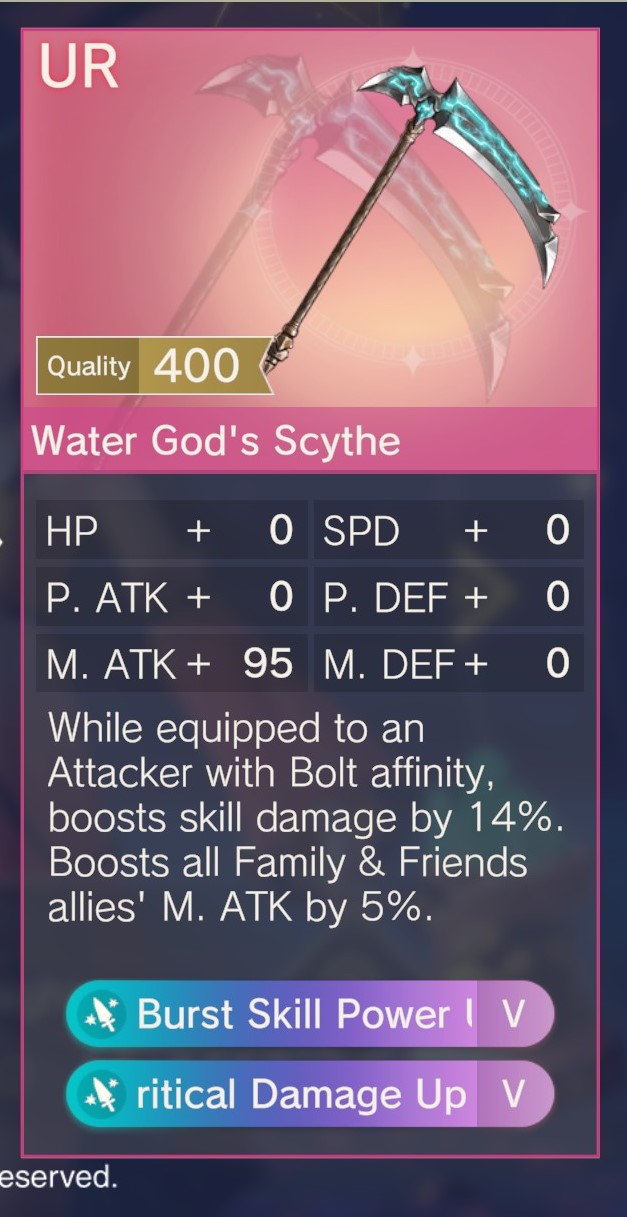
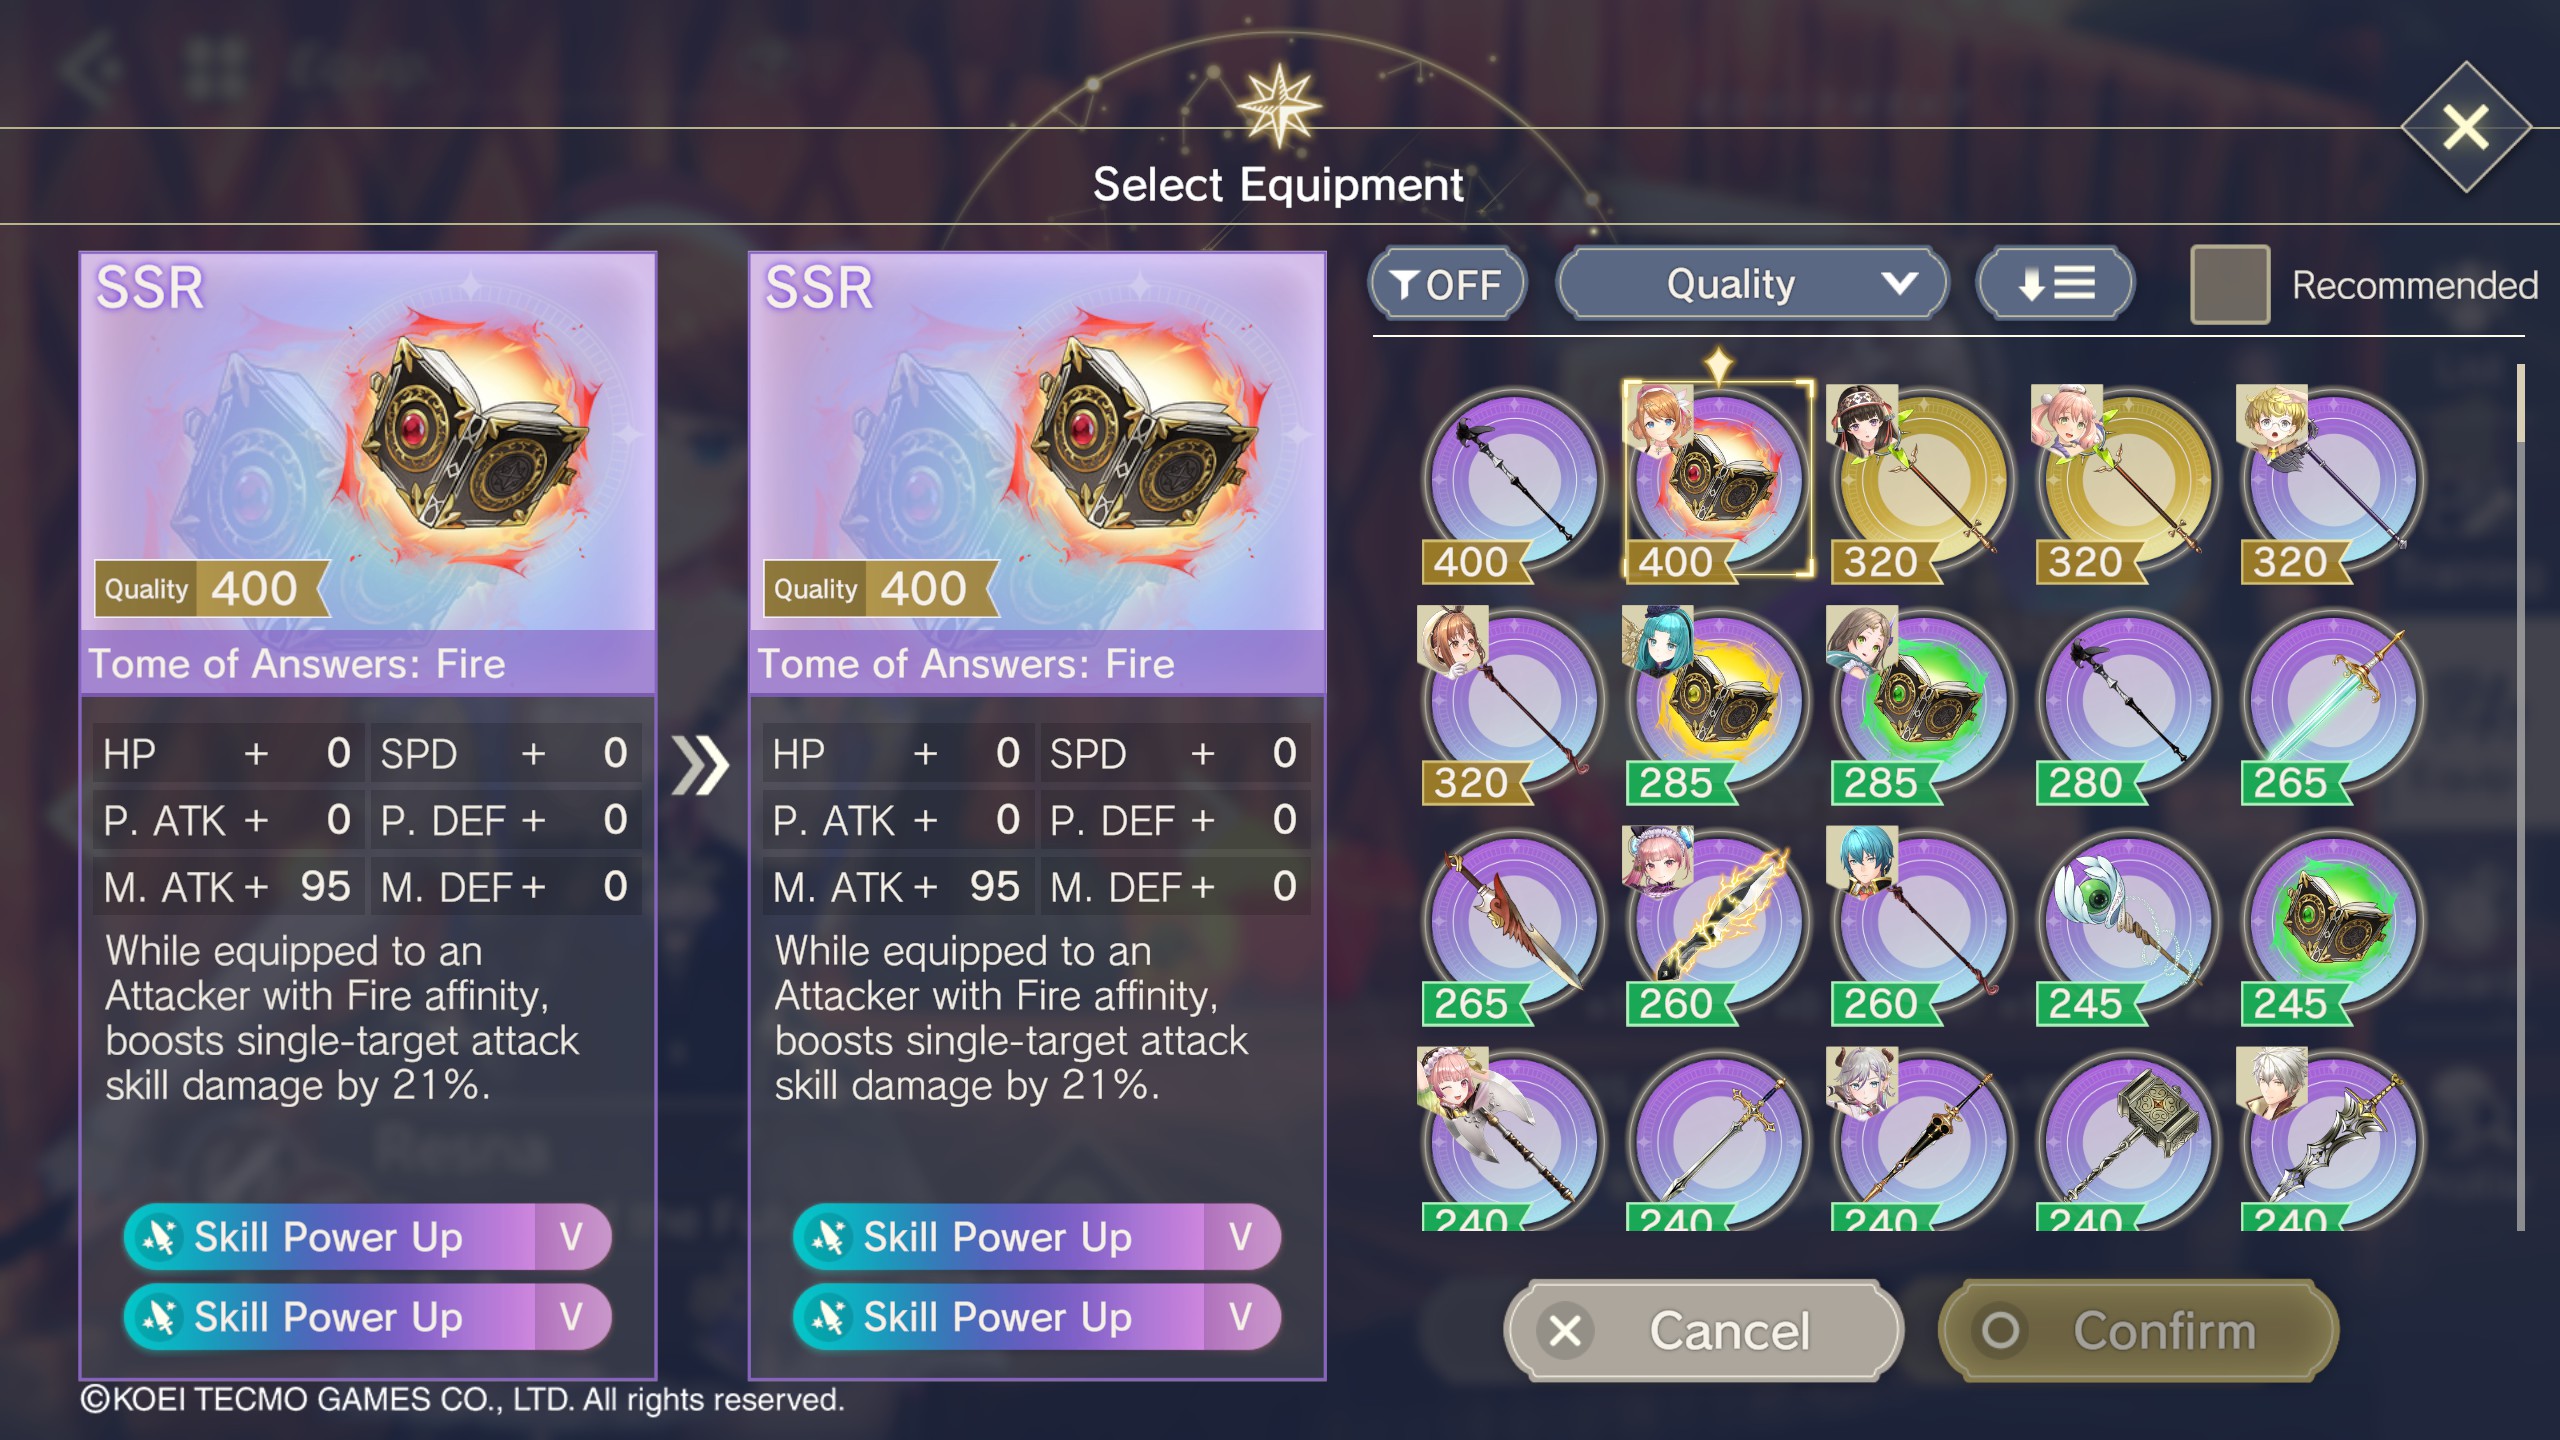
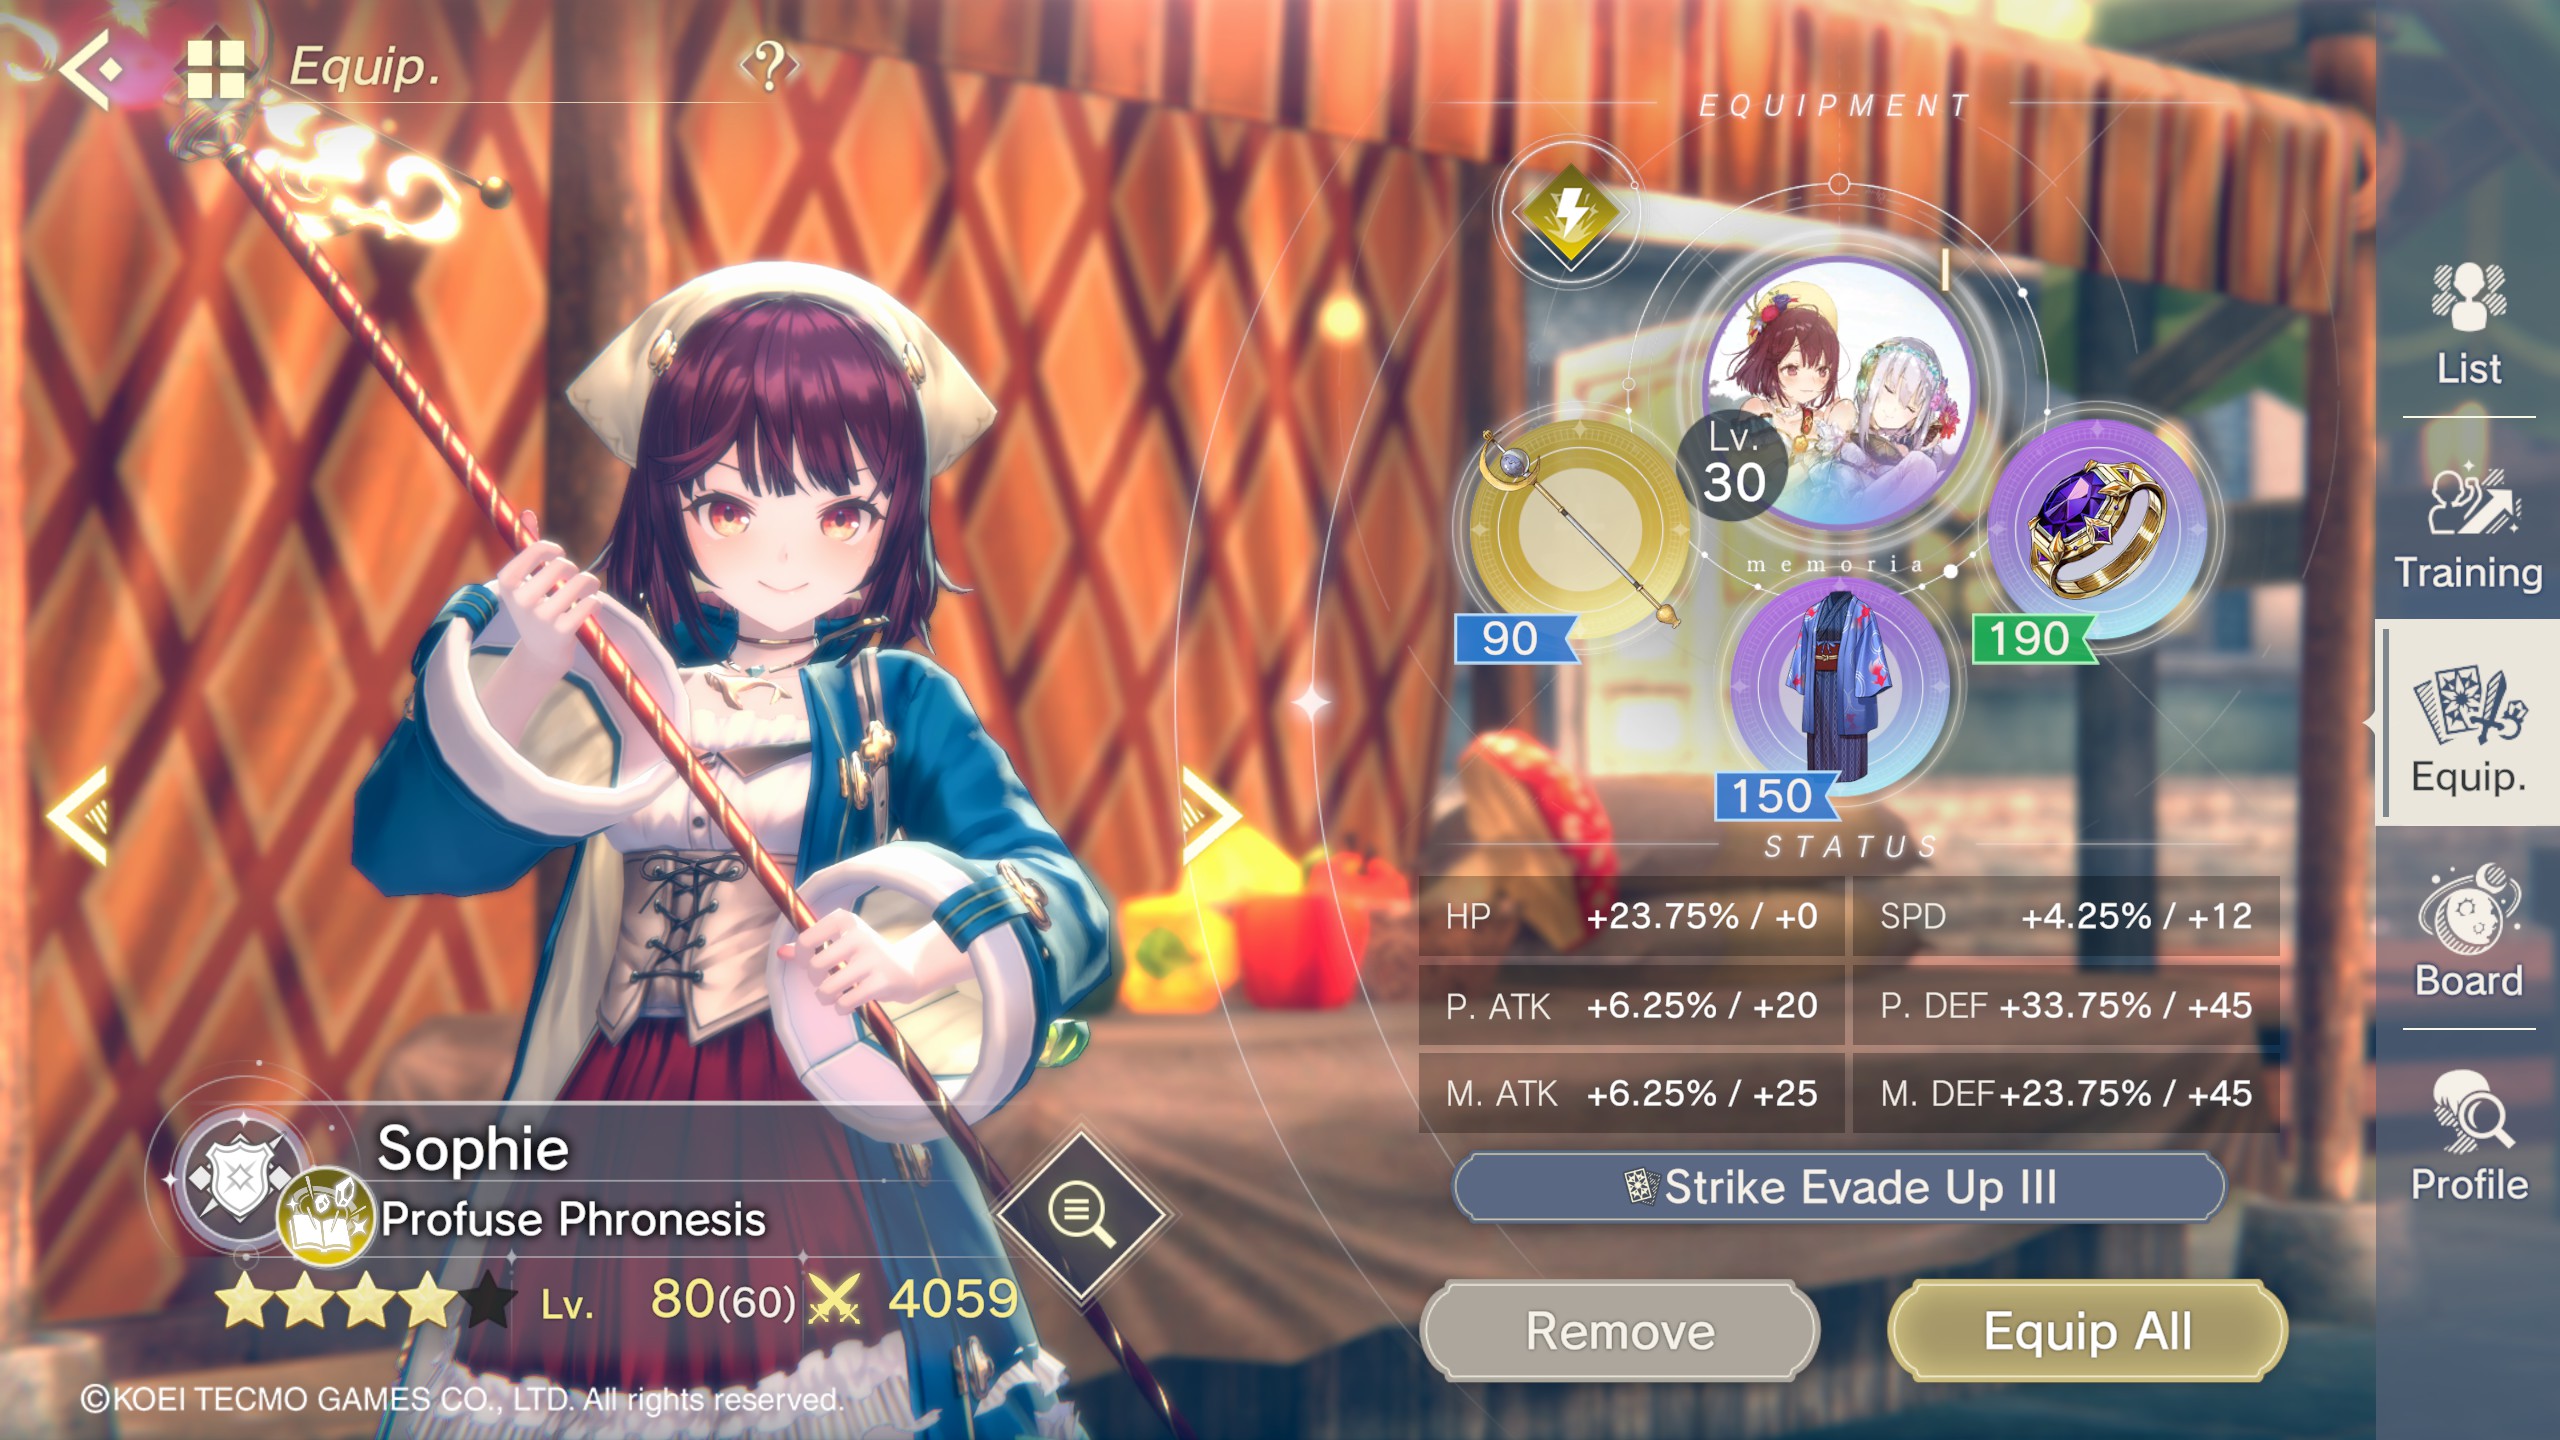
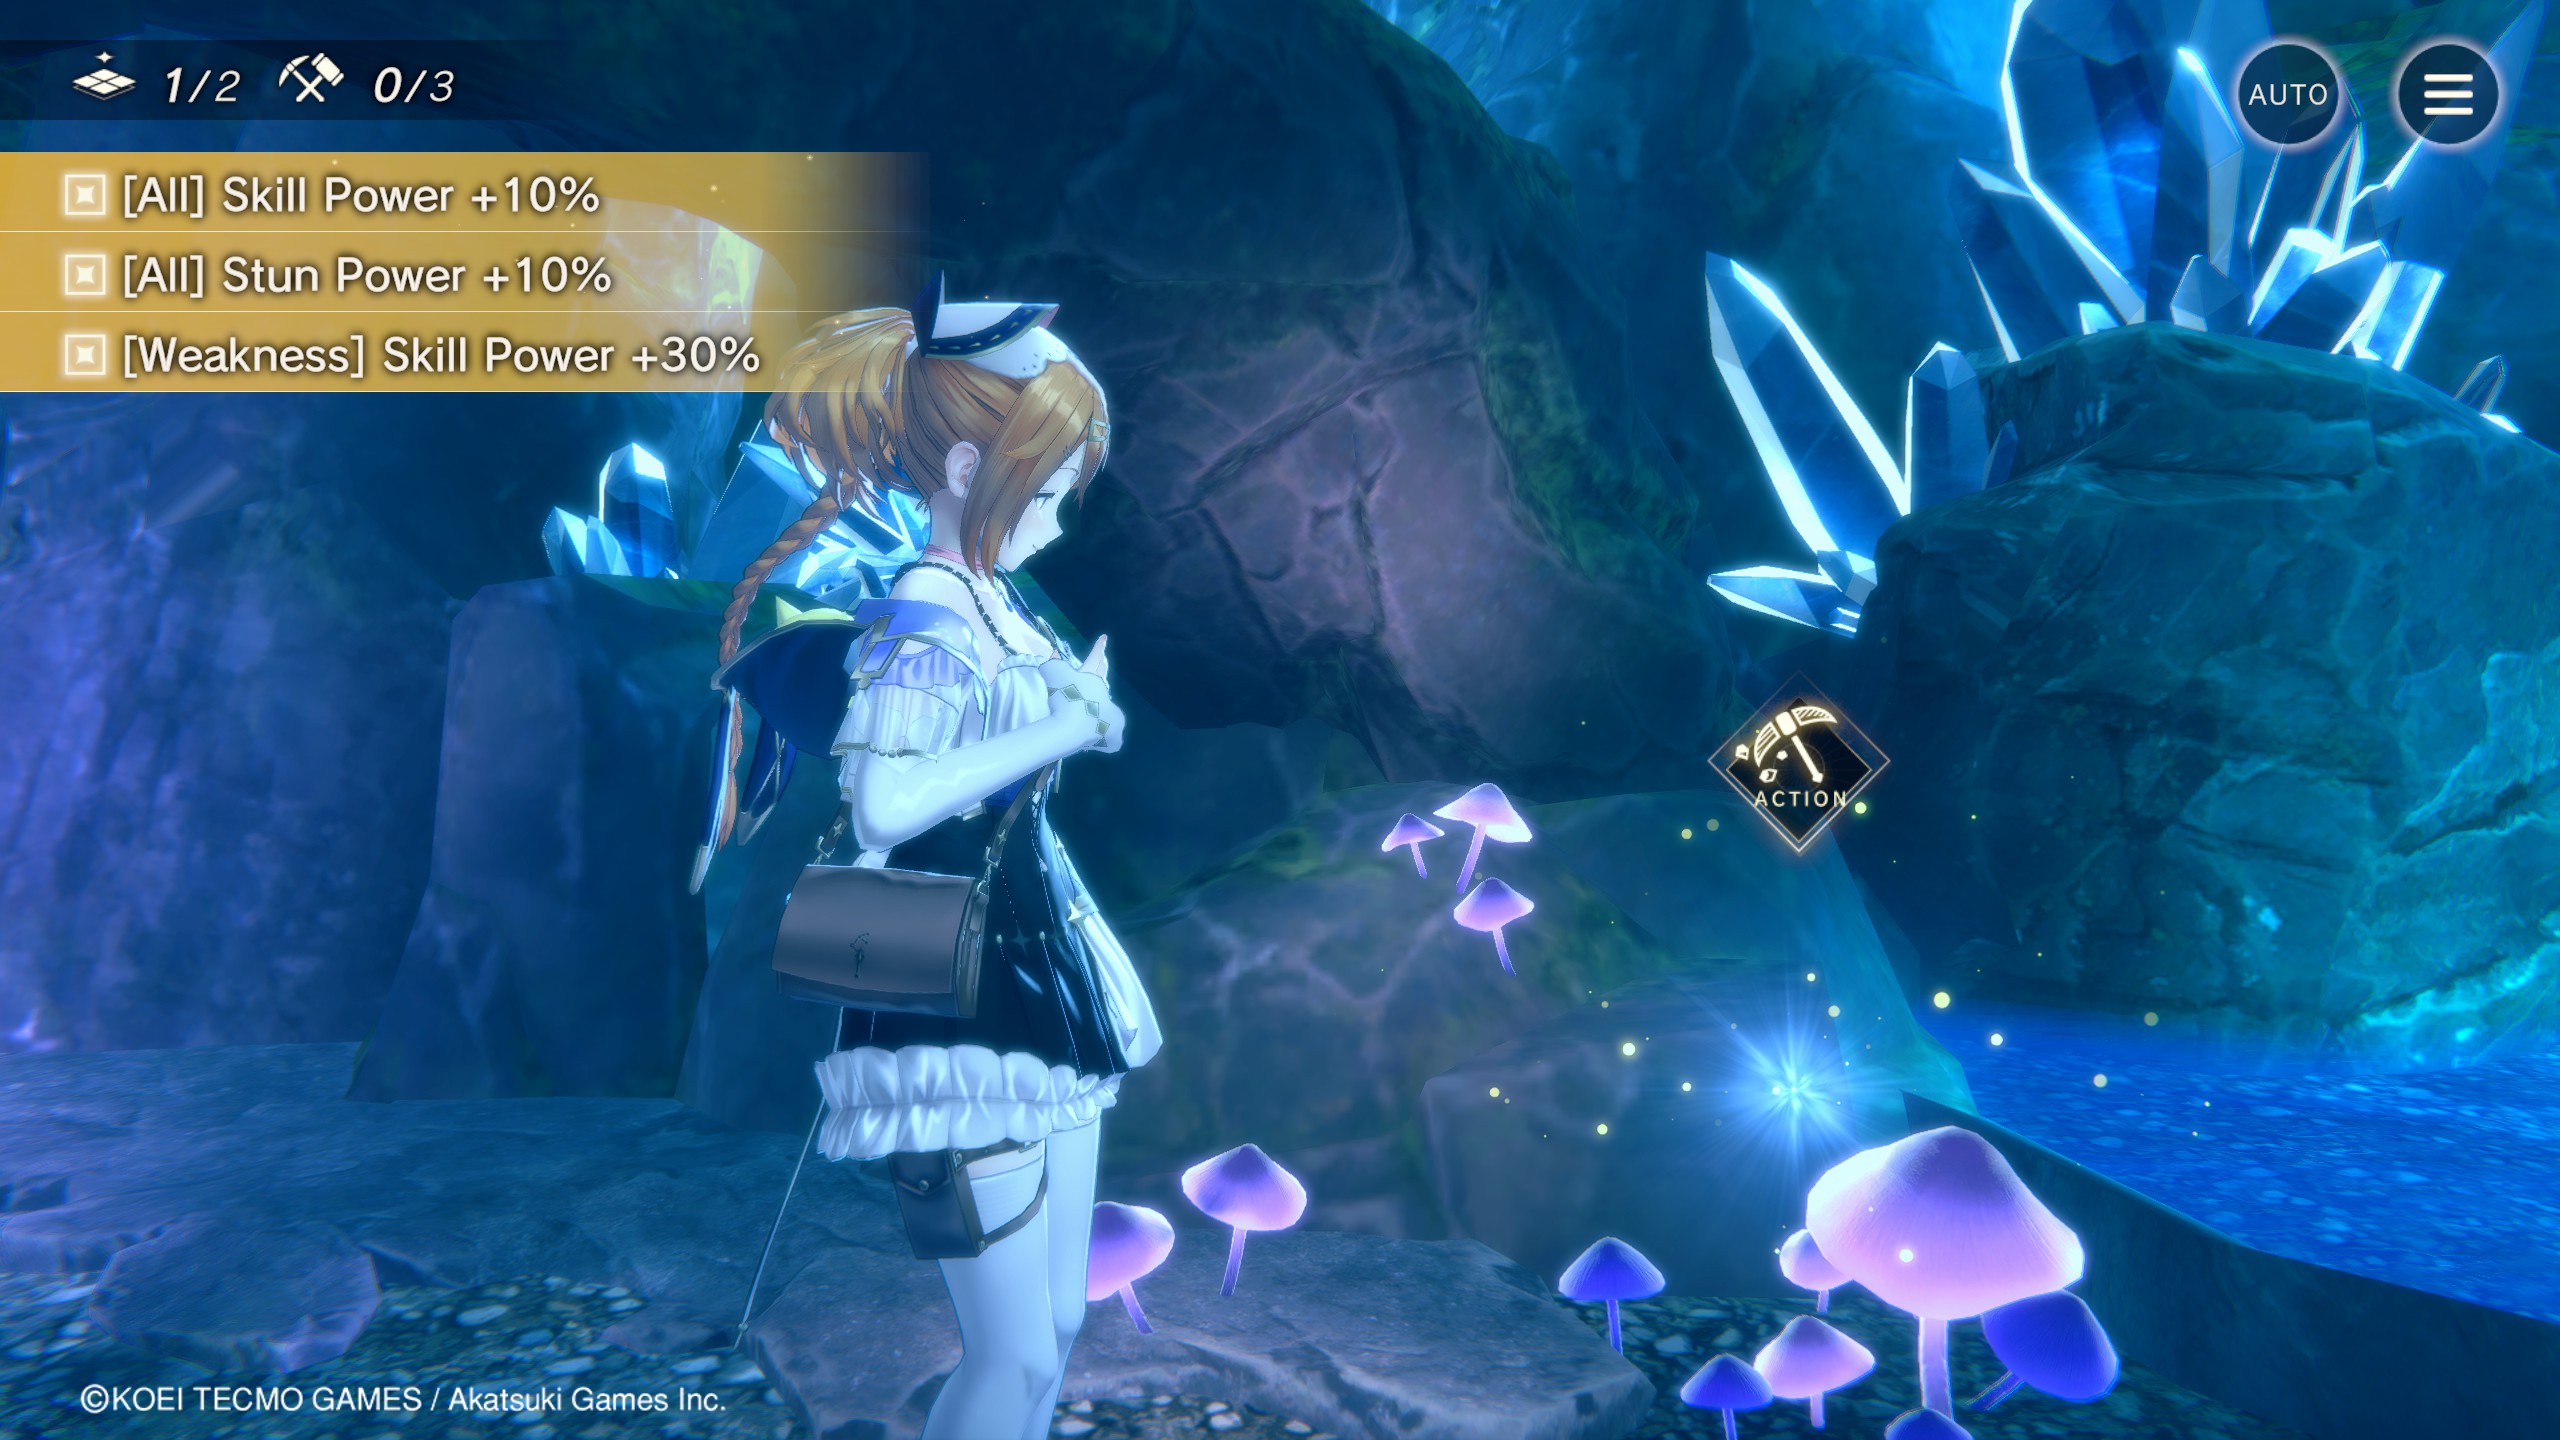
- Added sections about Emblems and Item/Equipment Quality
Scout  [autor] 6 JUL 2024 a las 1:10 
UPDATE 7/6:

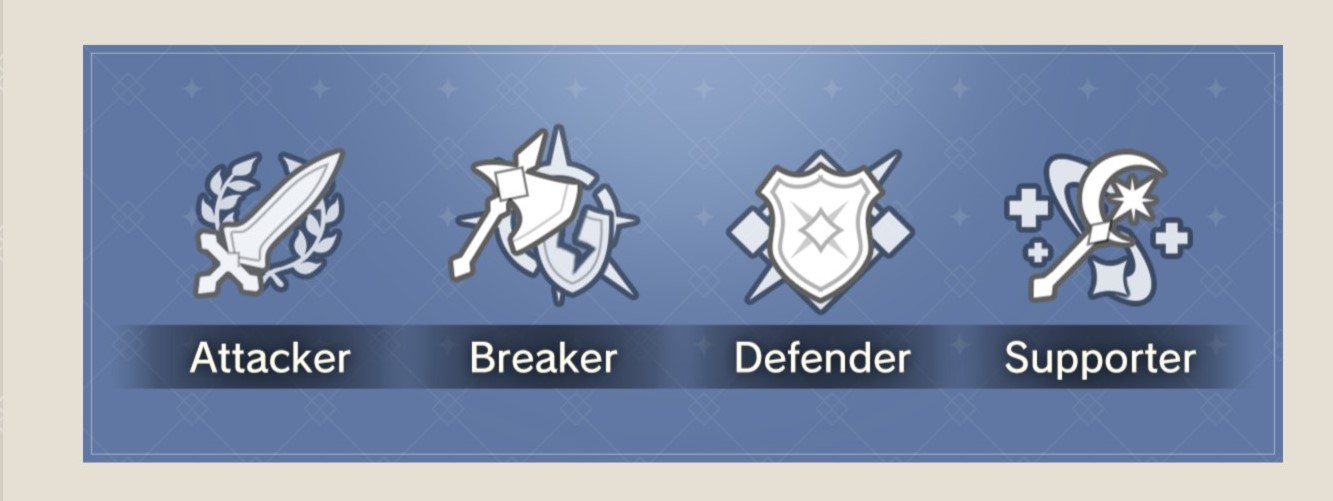
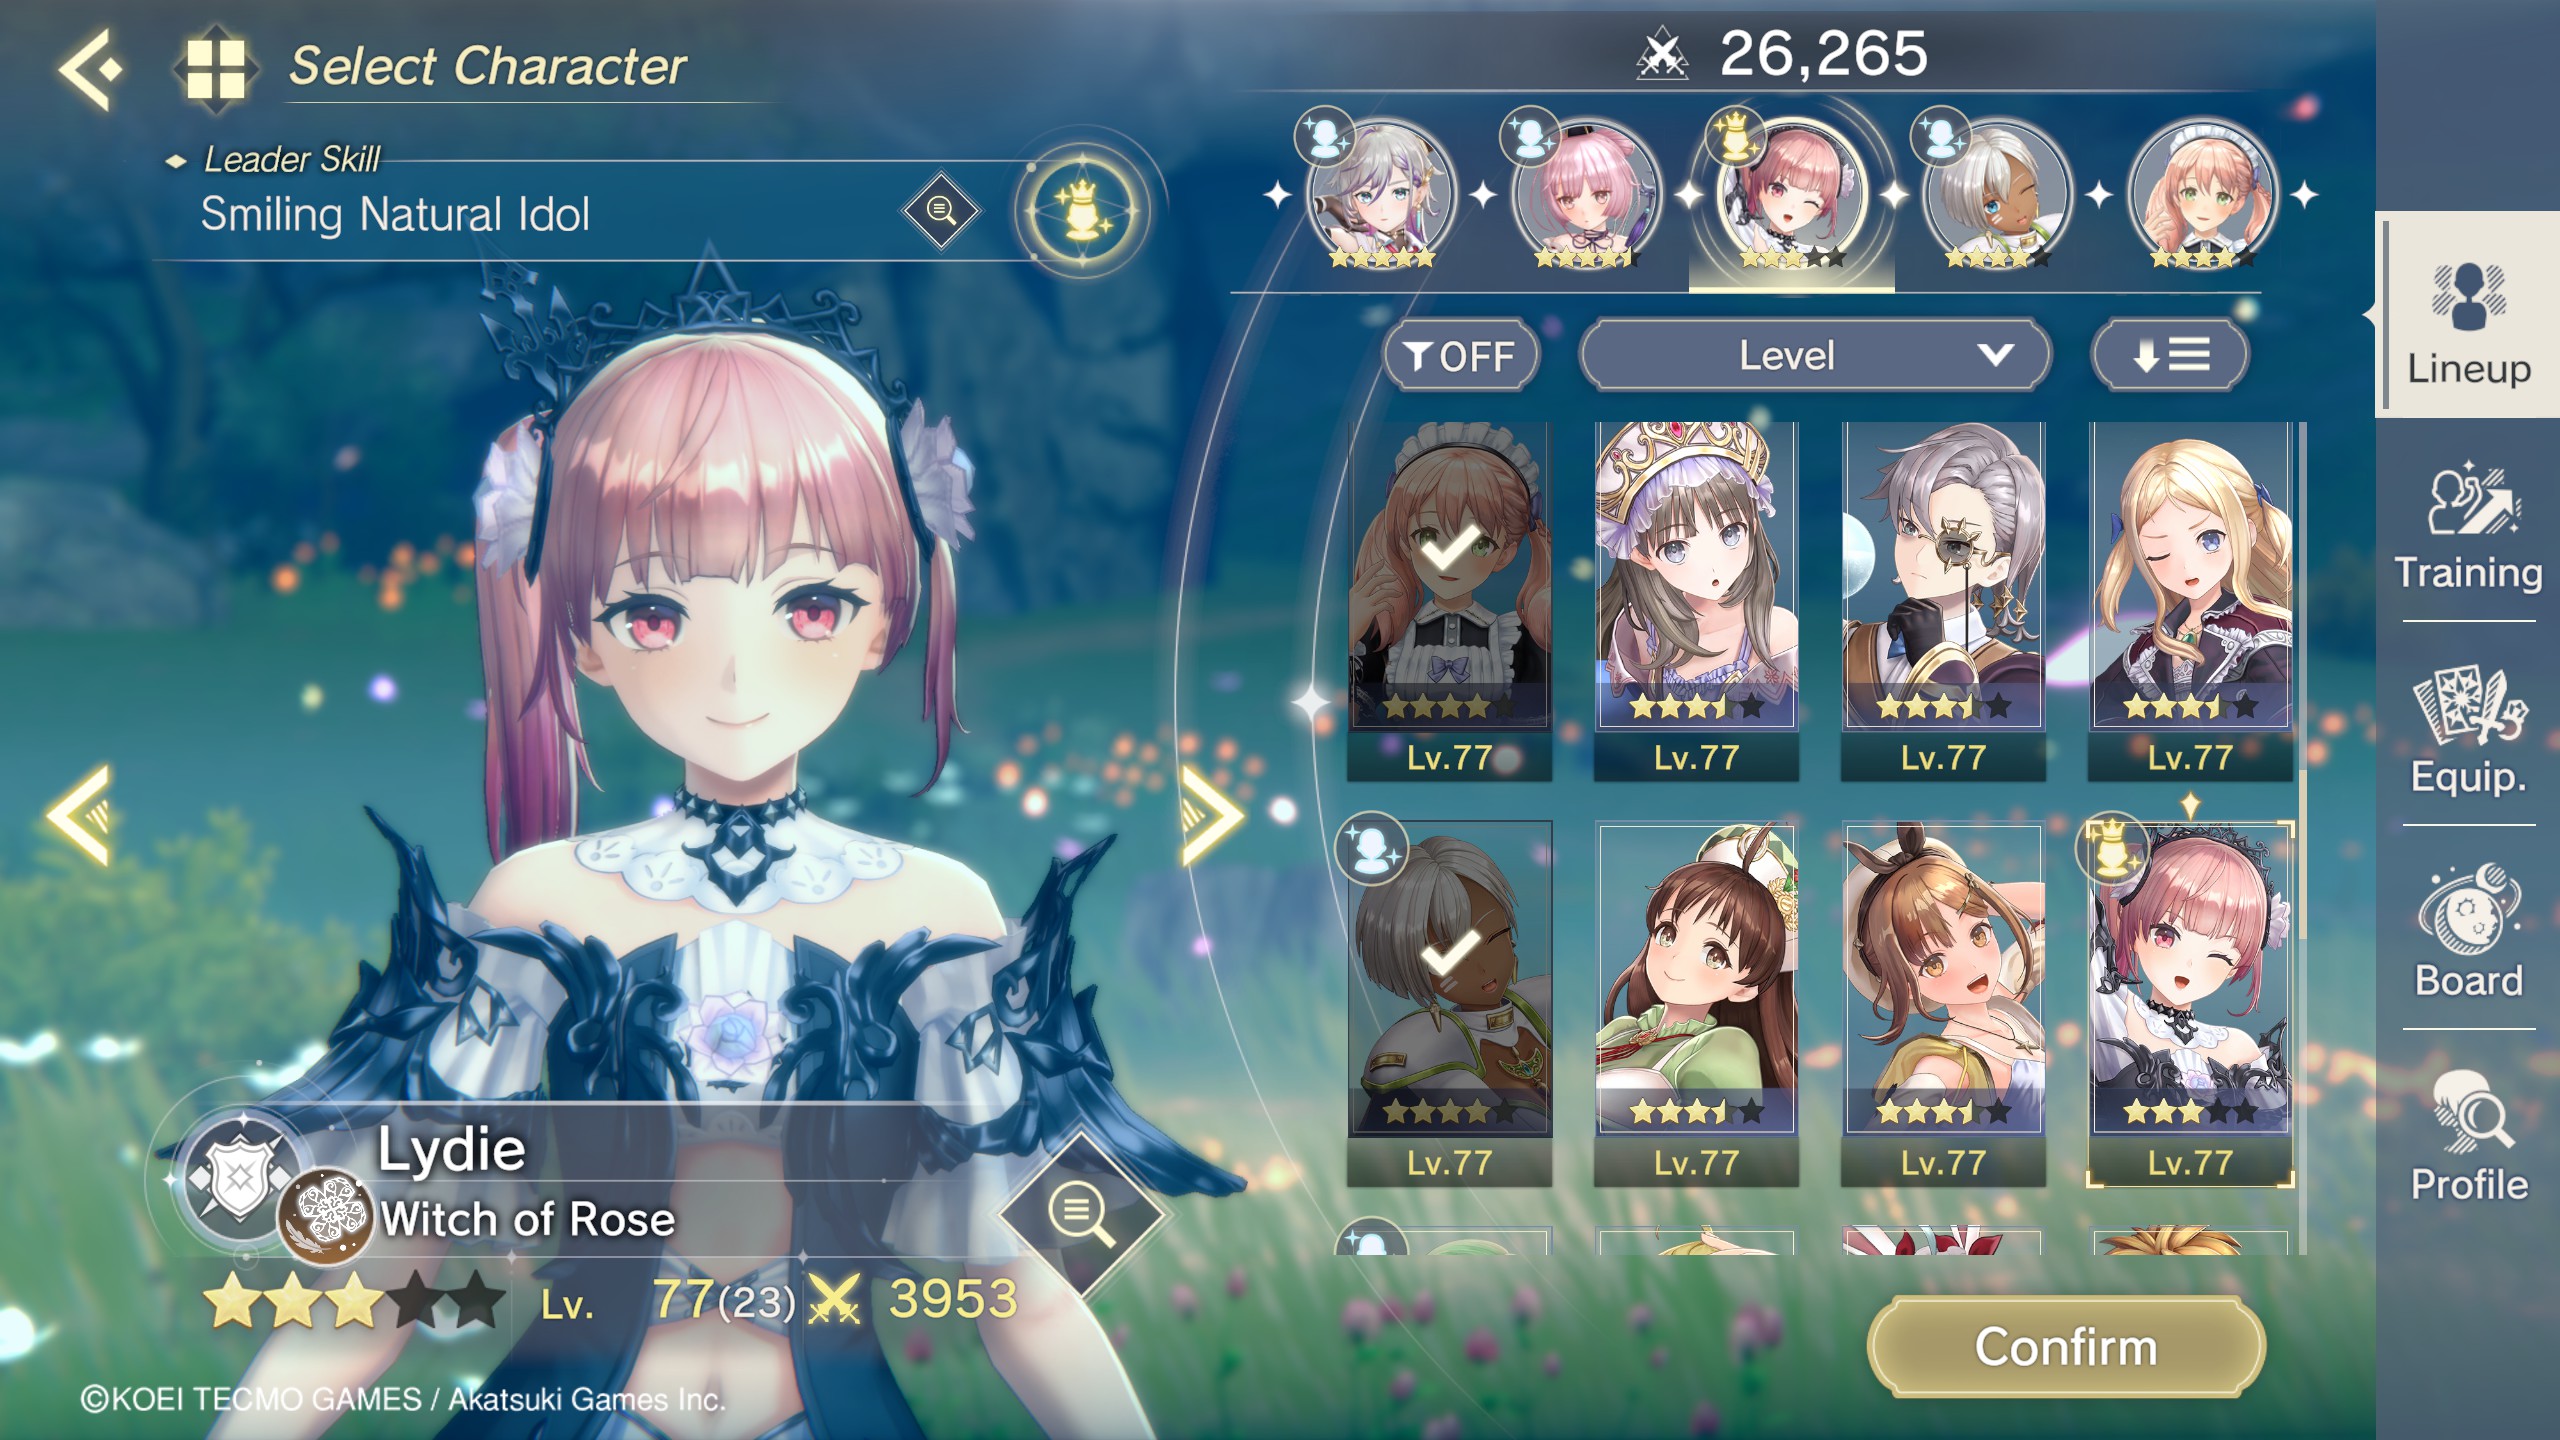
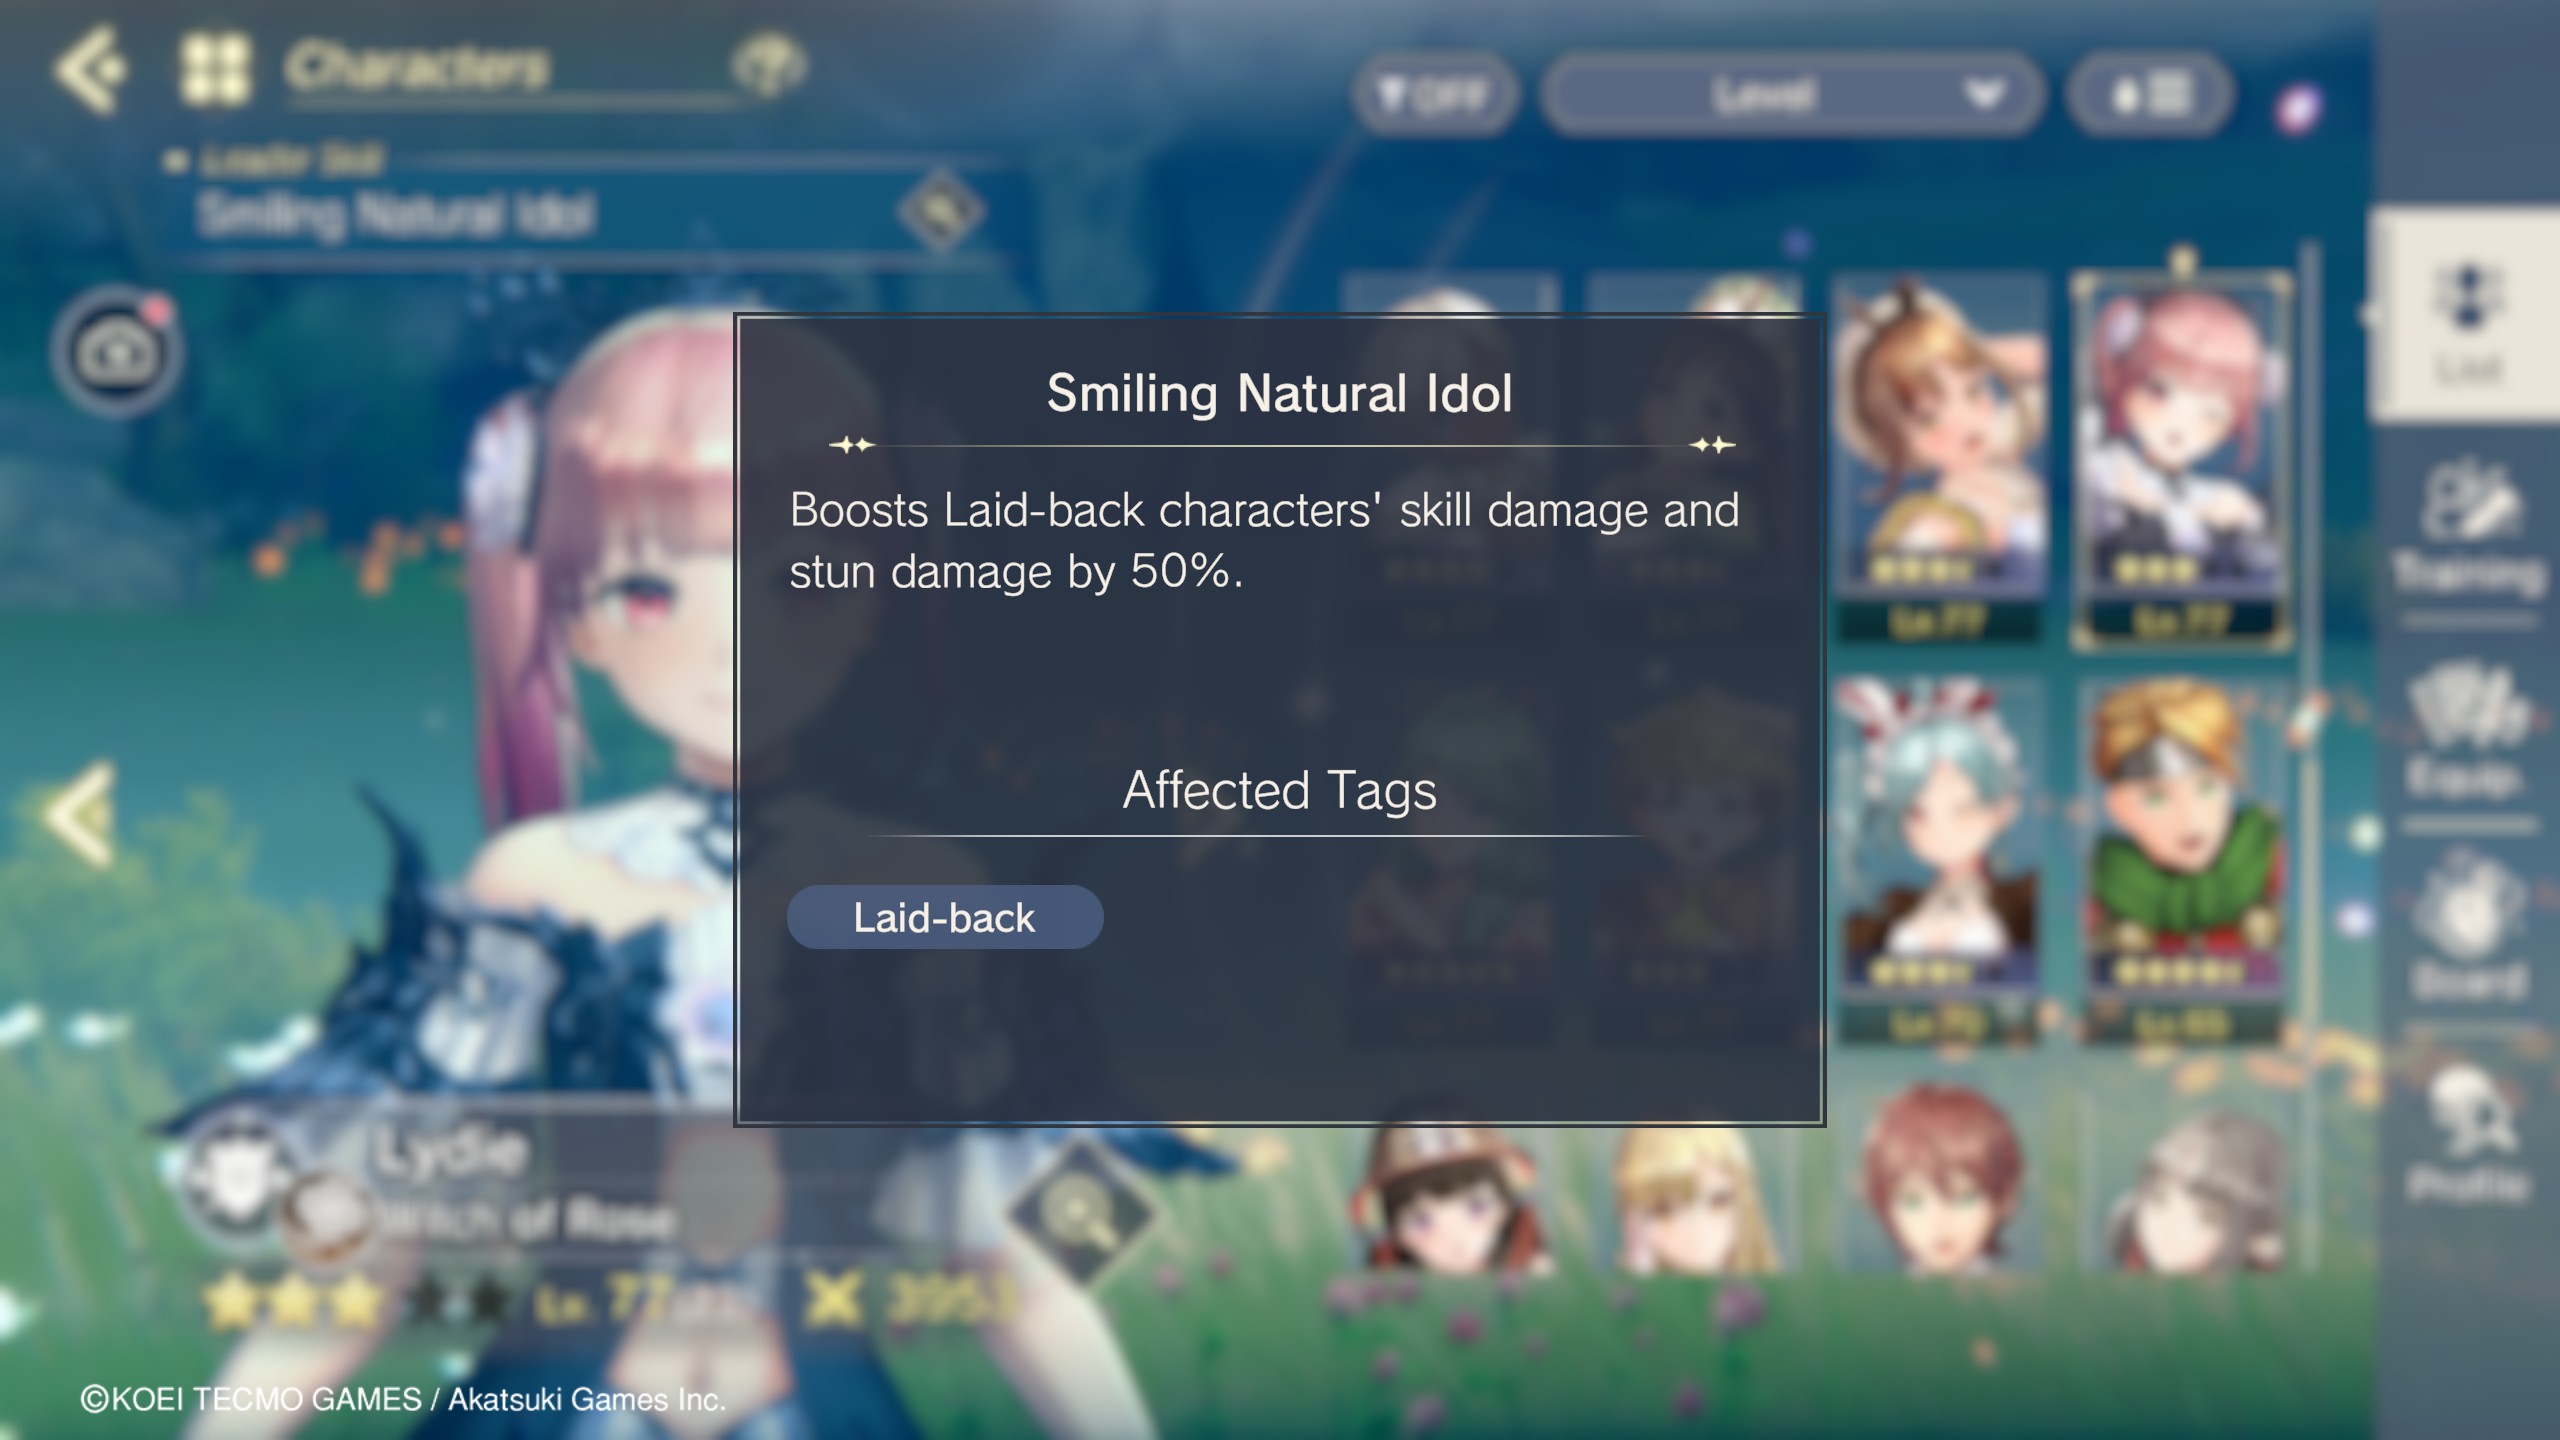
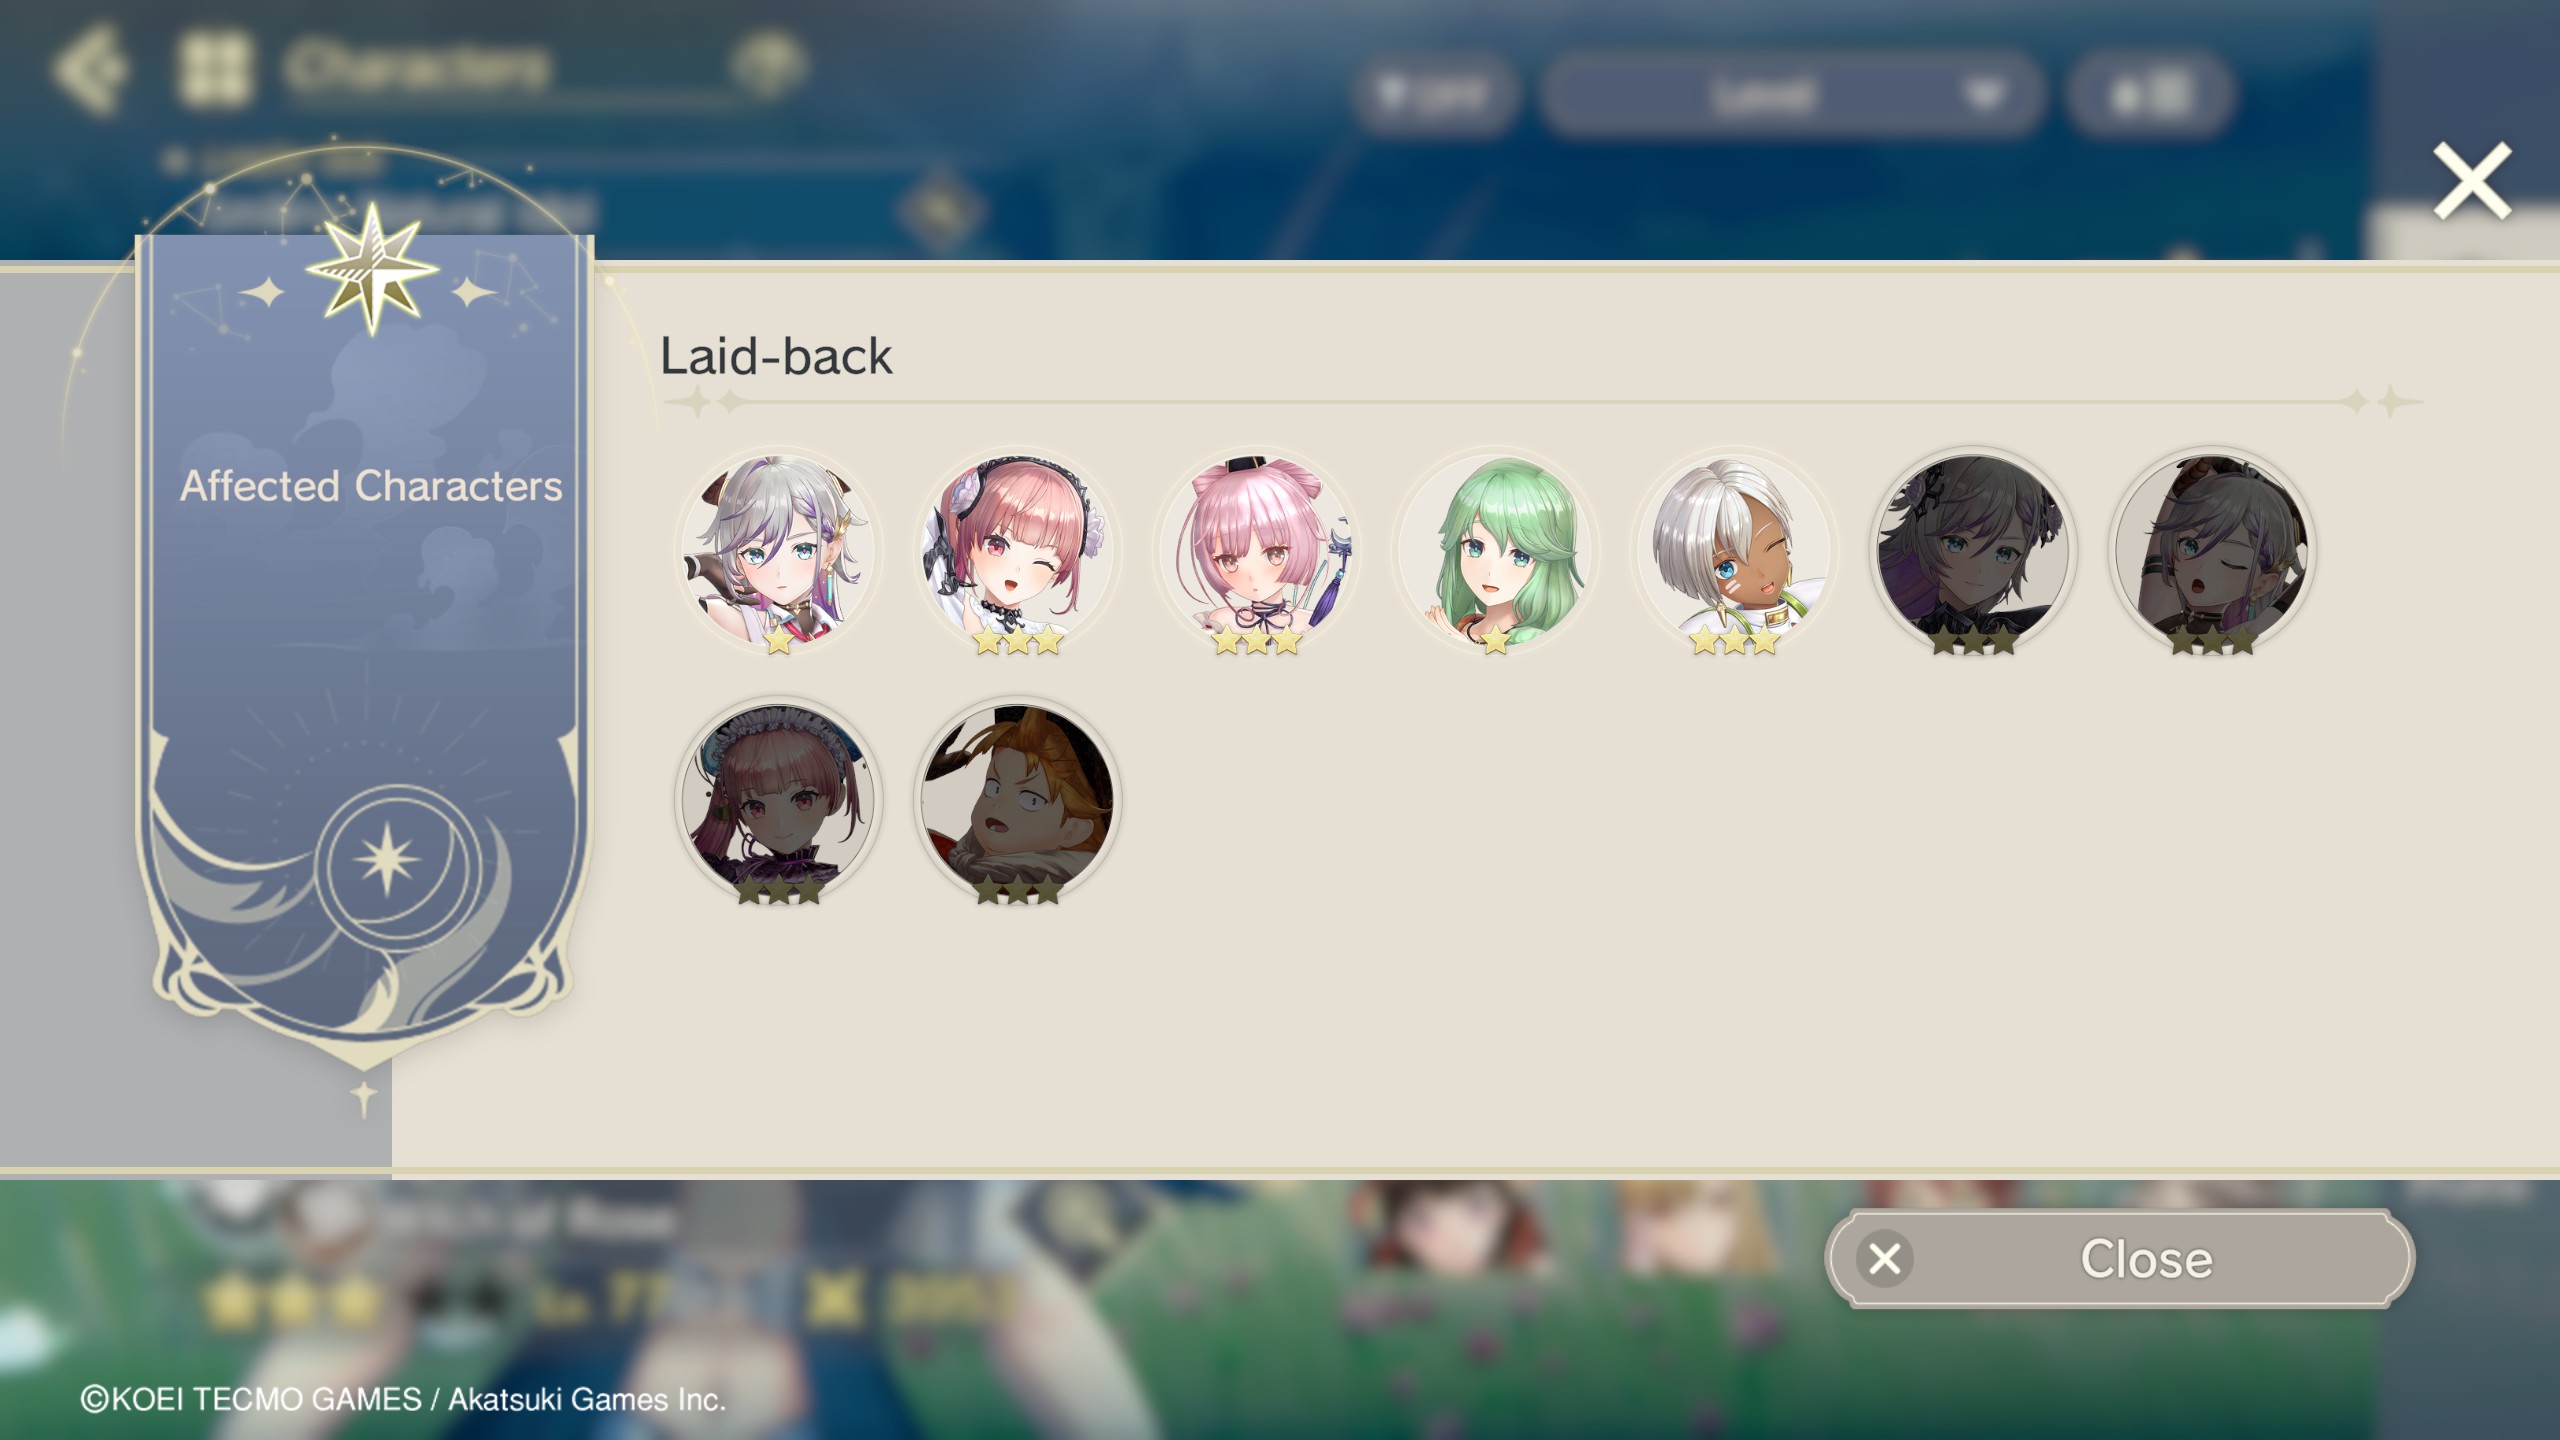
- Added a section explaining Leader Skills and Tags
Scout  [autor] 22 JUN 2024 a las 11:47 
UPDATE 6/22:

- Restructured the Battle Basics section a bit because it hit the character limit, and accounted for the new addition of various Panel Effects
Scout  [autor] 30 ABR 2024 a las 13:47 
UPDATE 4/30:

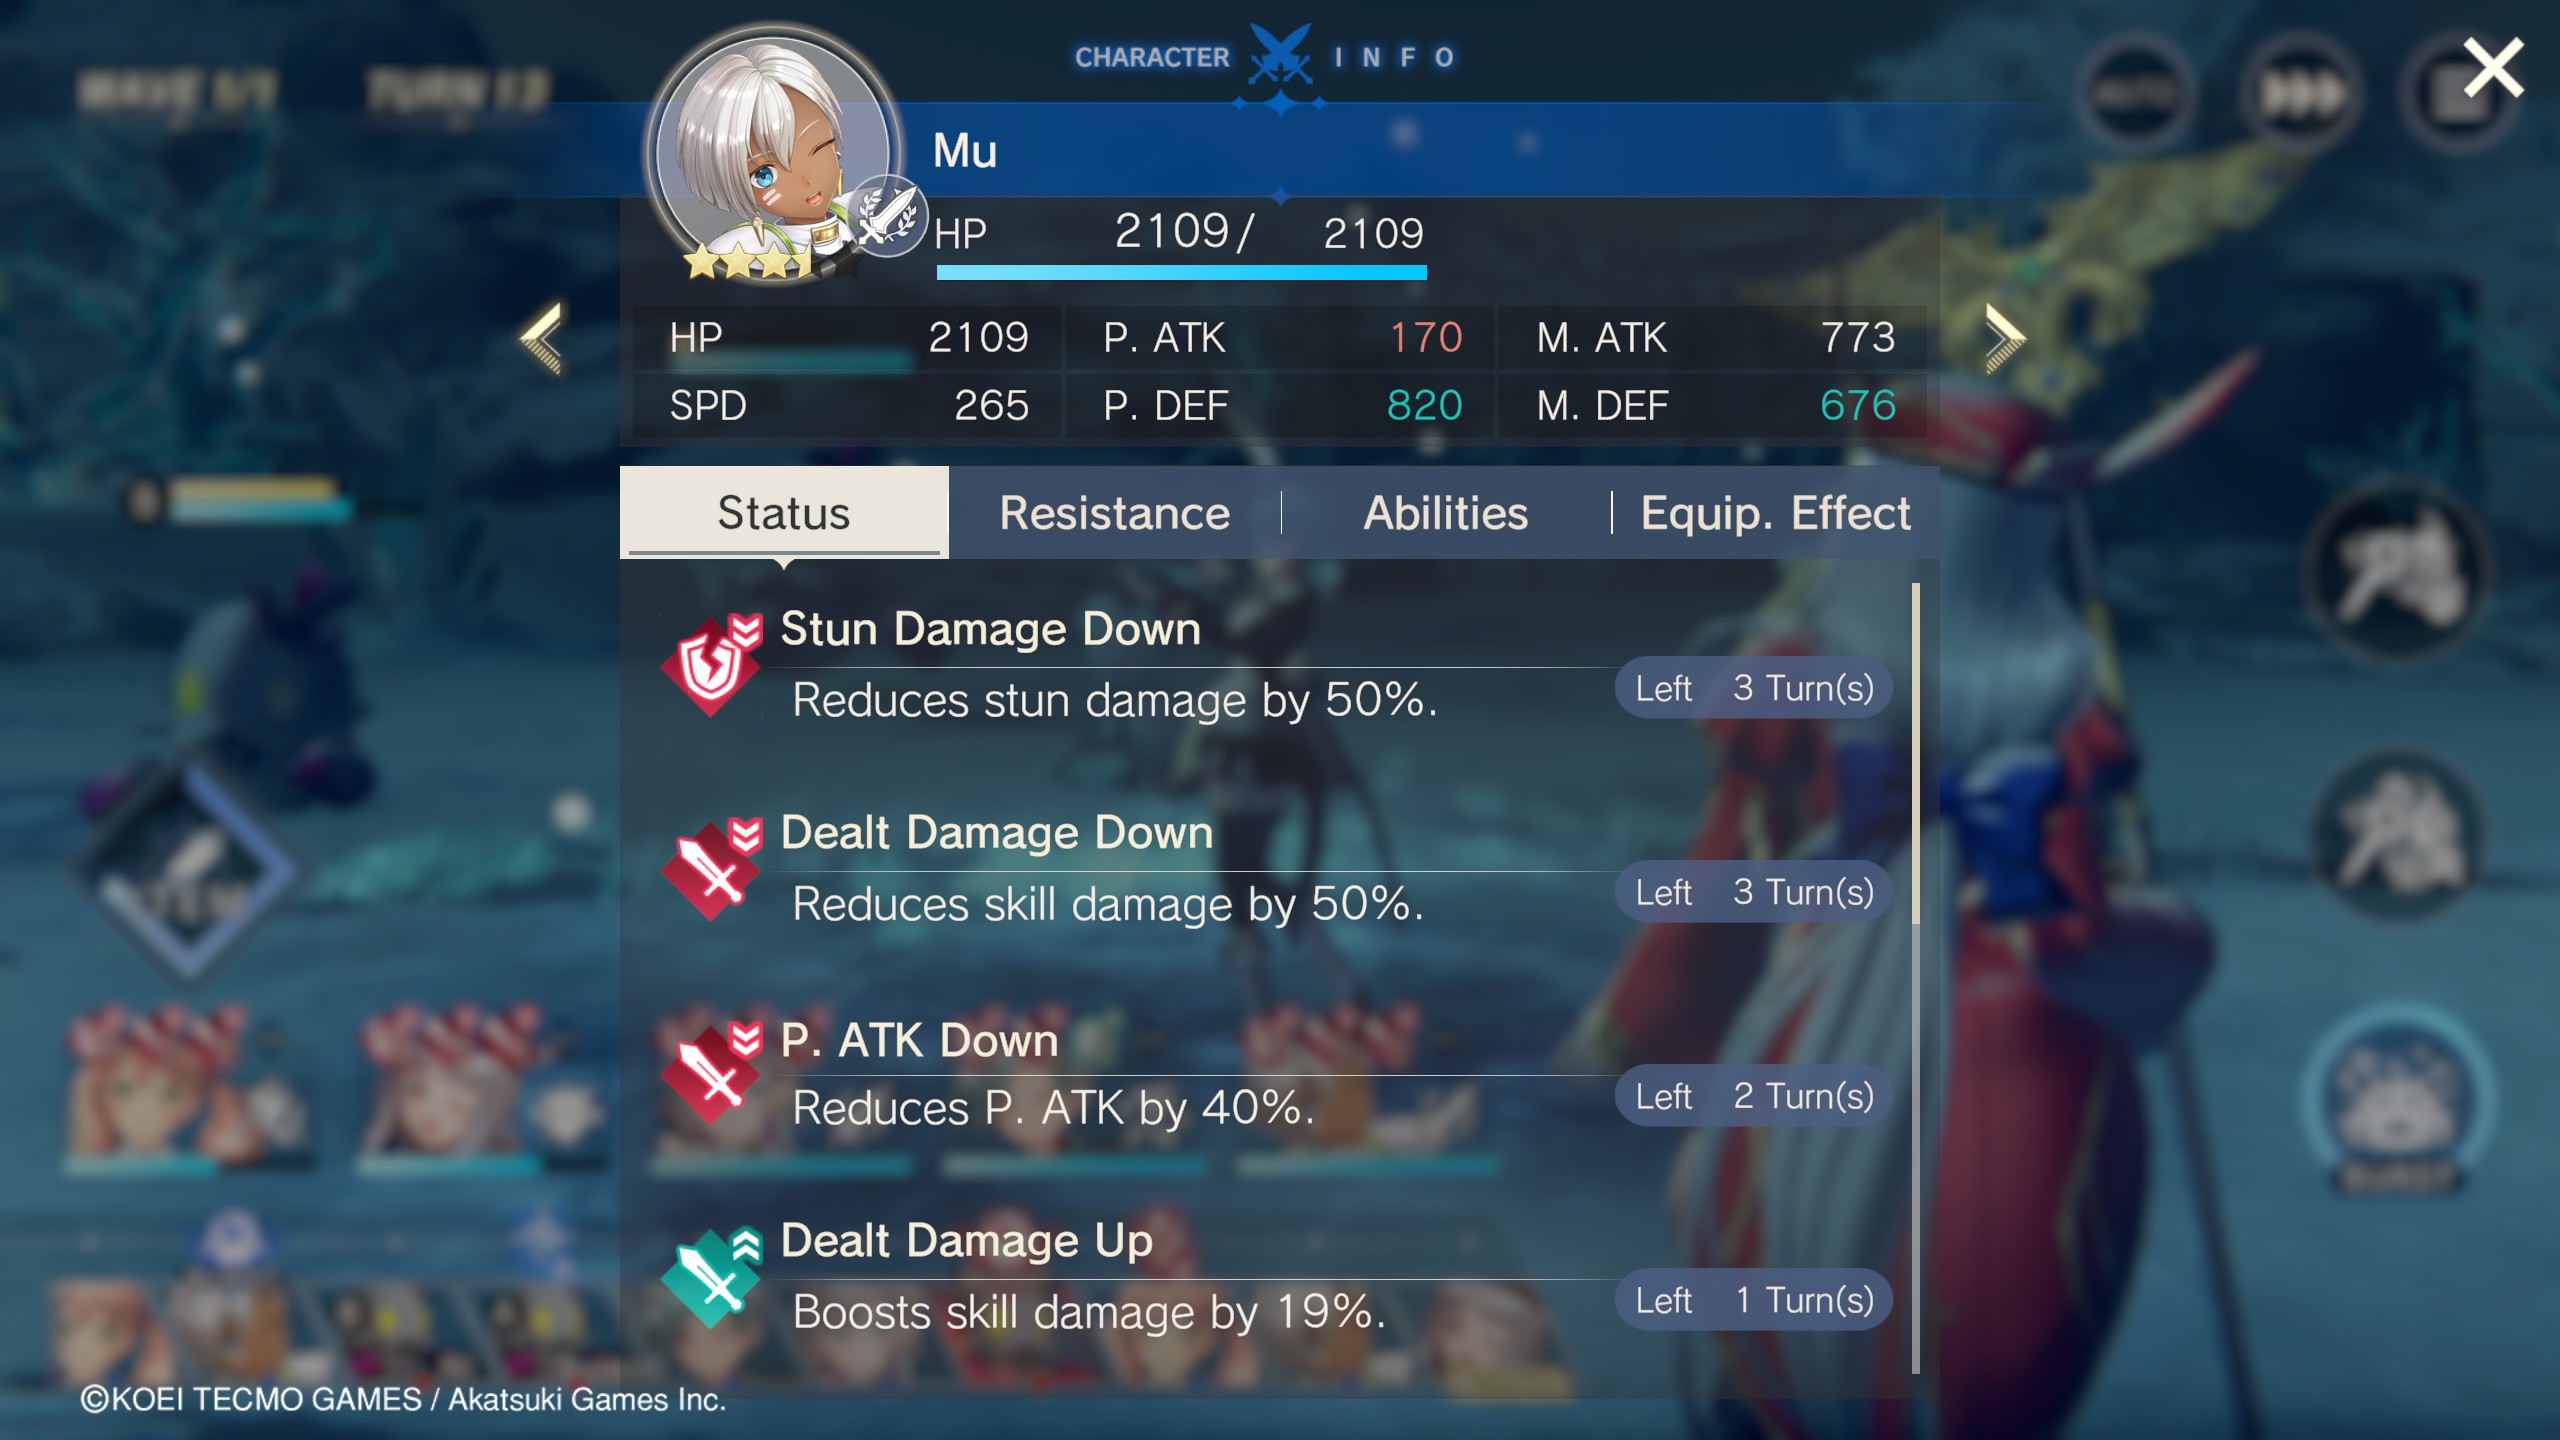
- Added a section explaining Status Effects in depth
Scout  [autor] 4 FEB 2024 a las 15:57 
UPDATE 2/4:

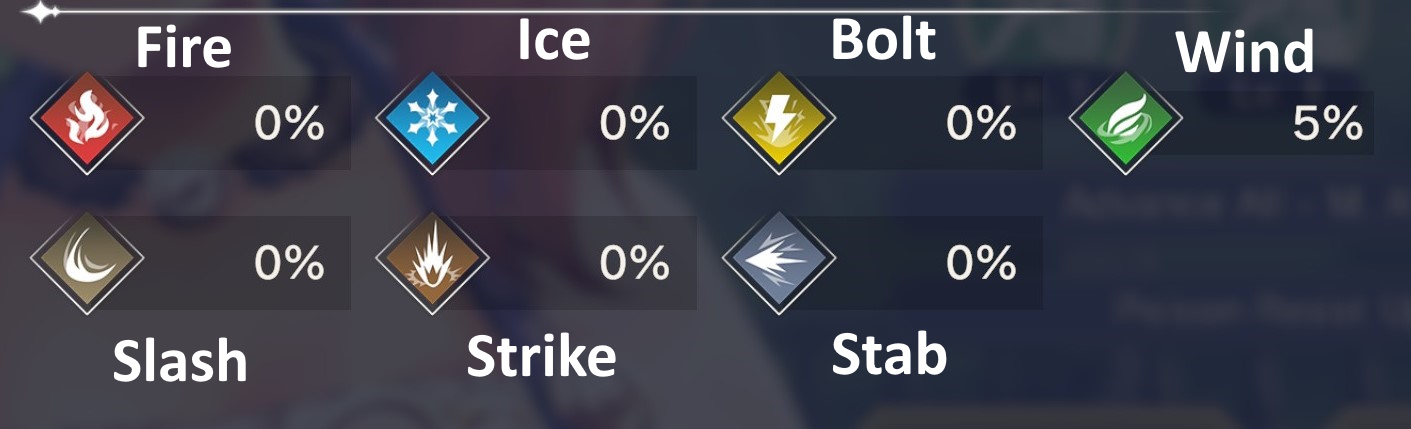
- Restructured the "Character Attributes & Damage Types" section so it flows better and explains more clearly

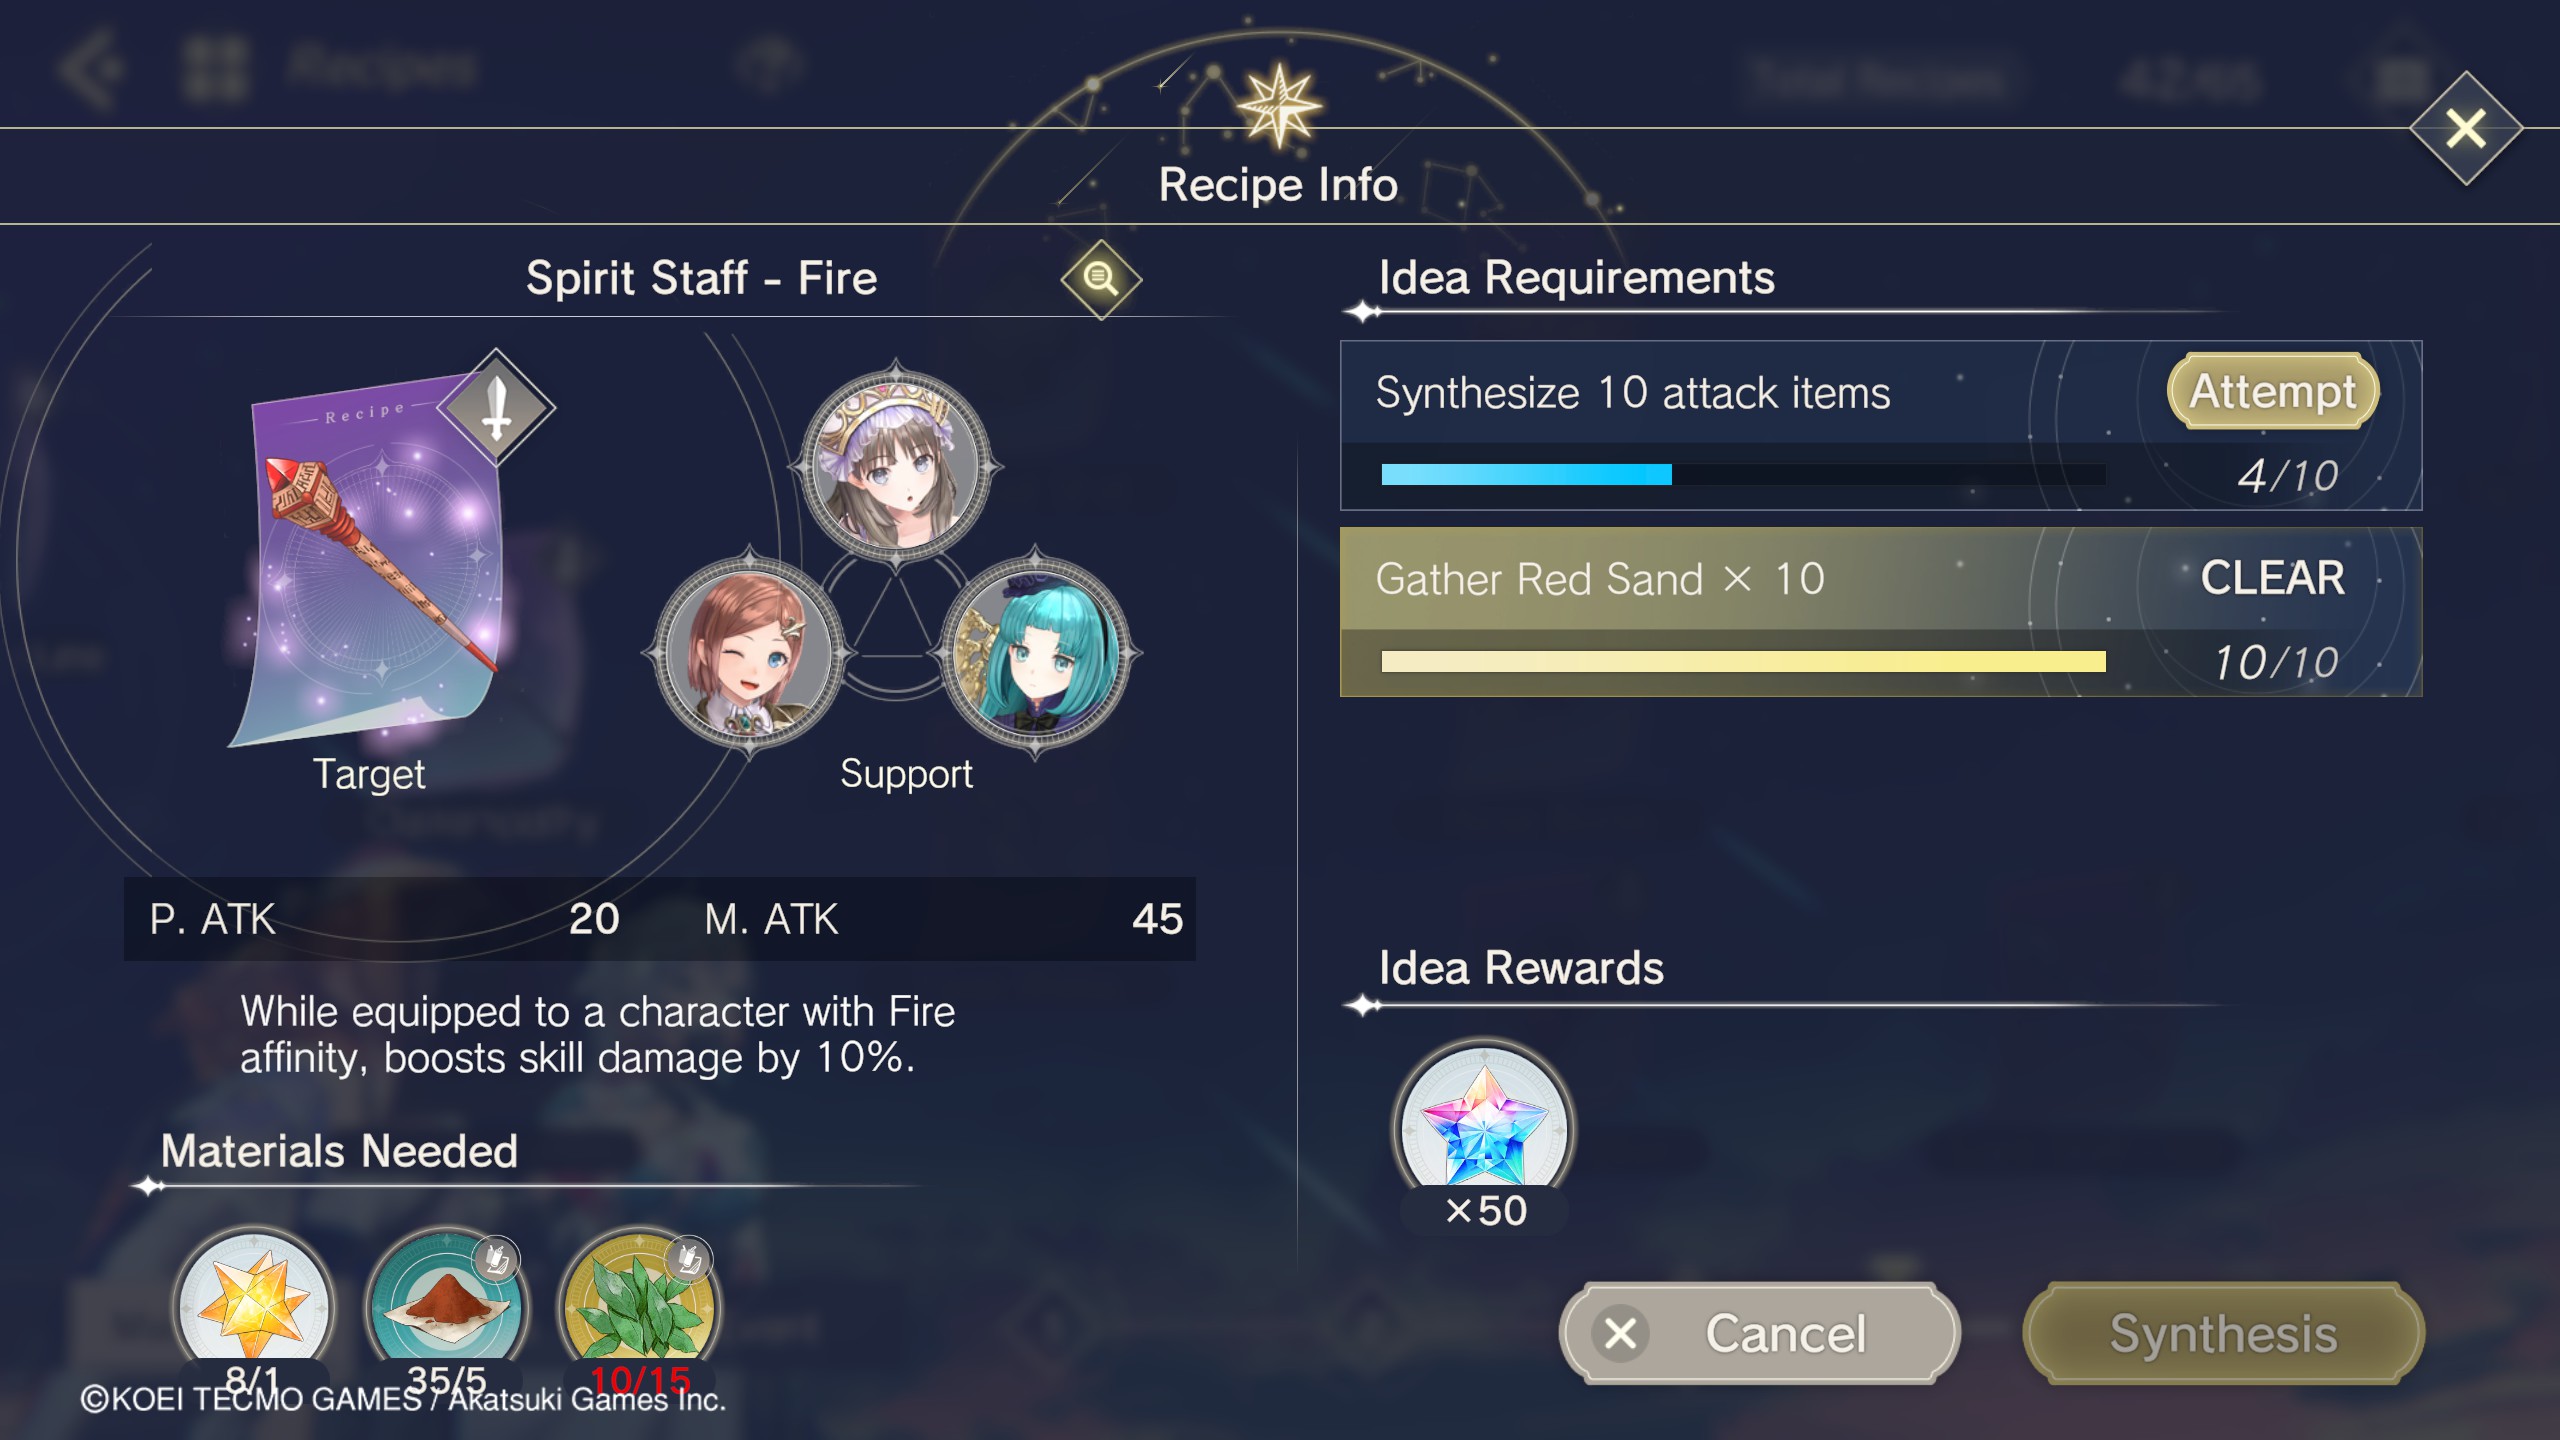
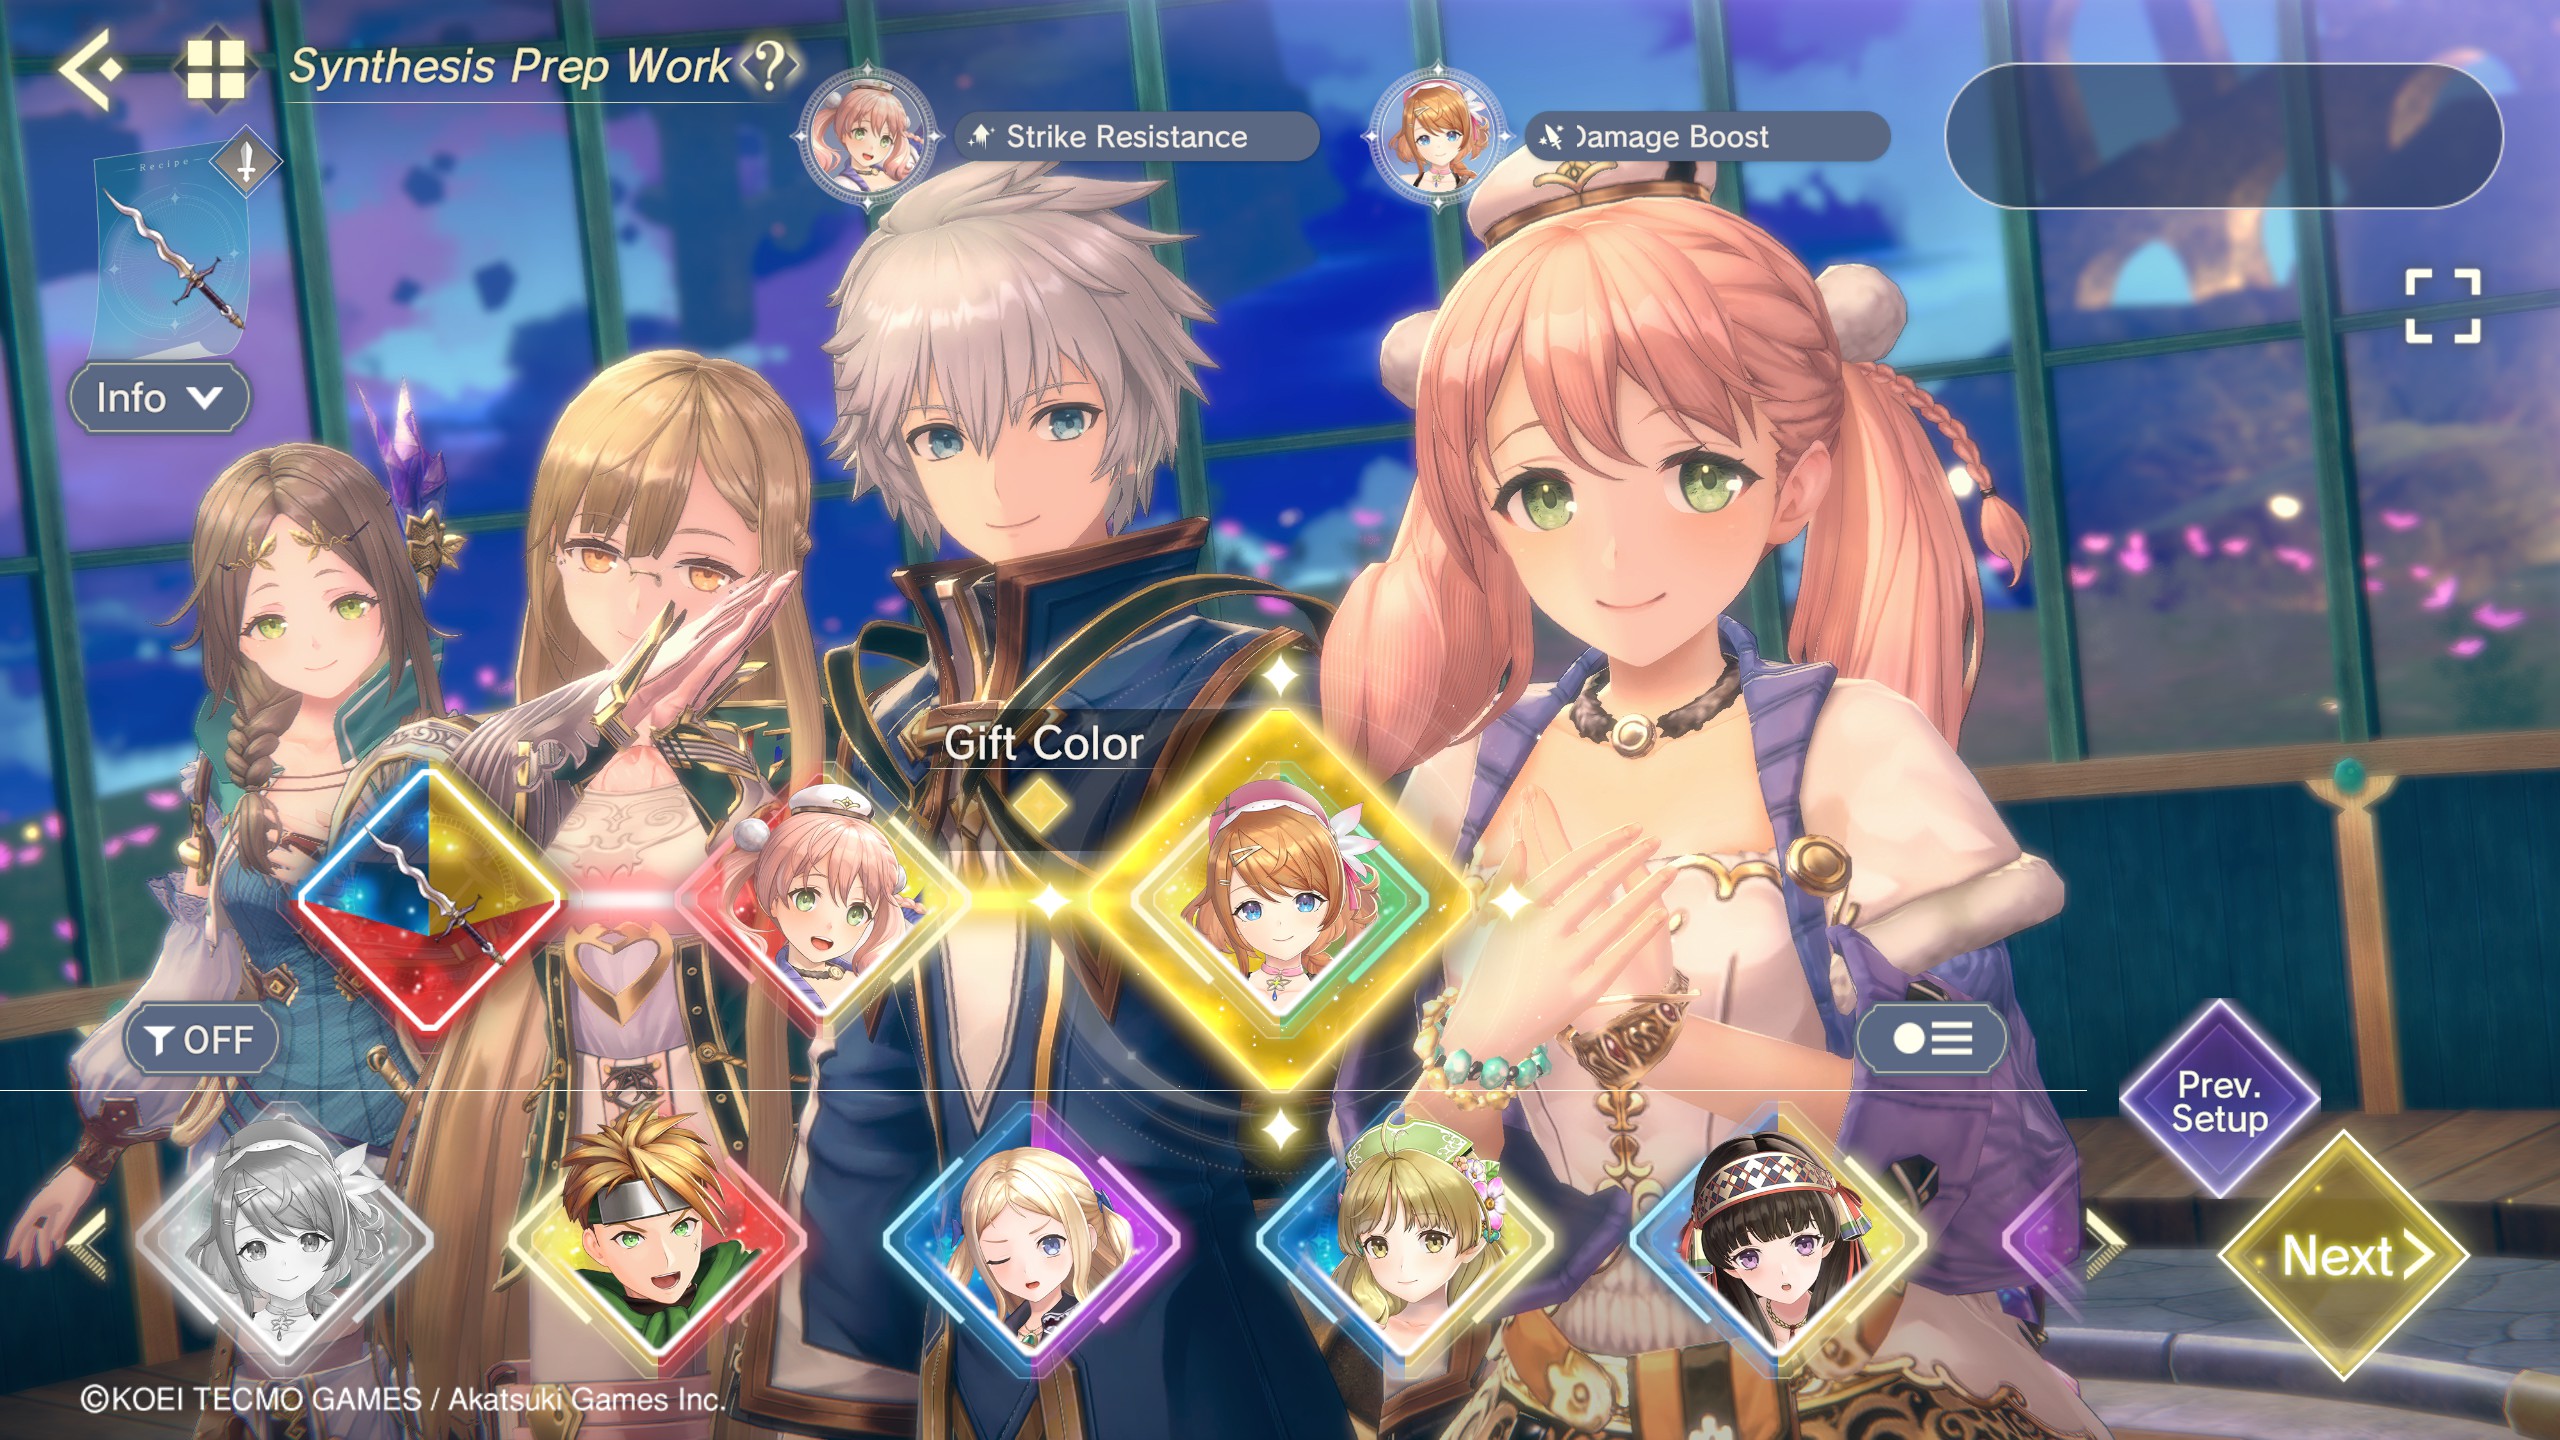
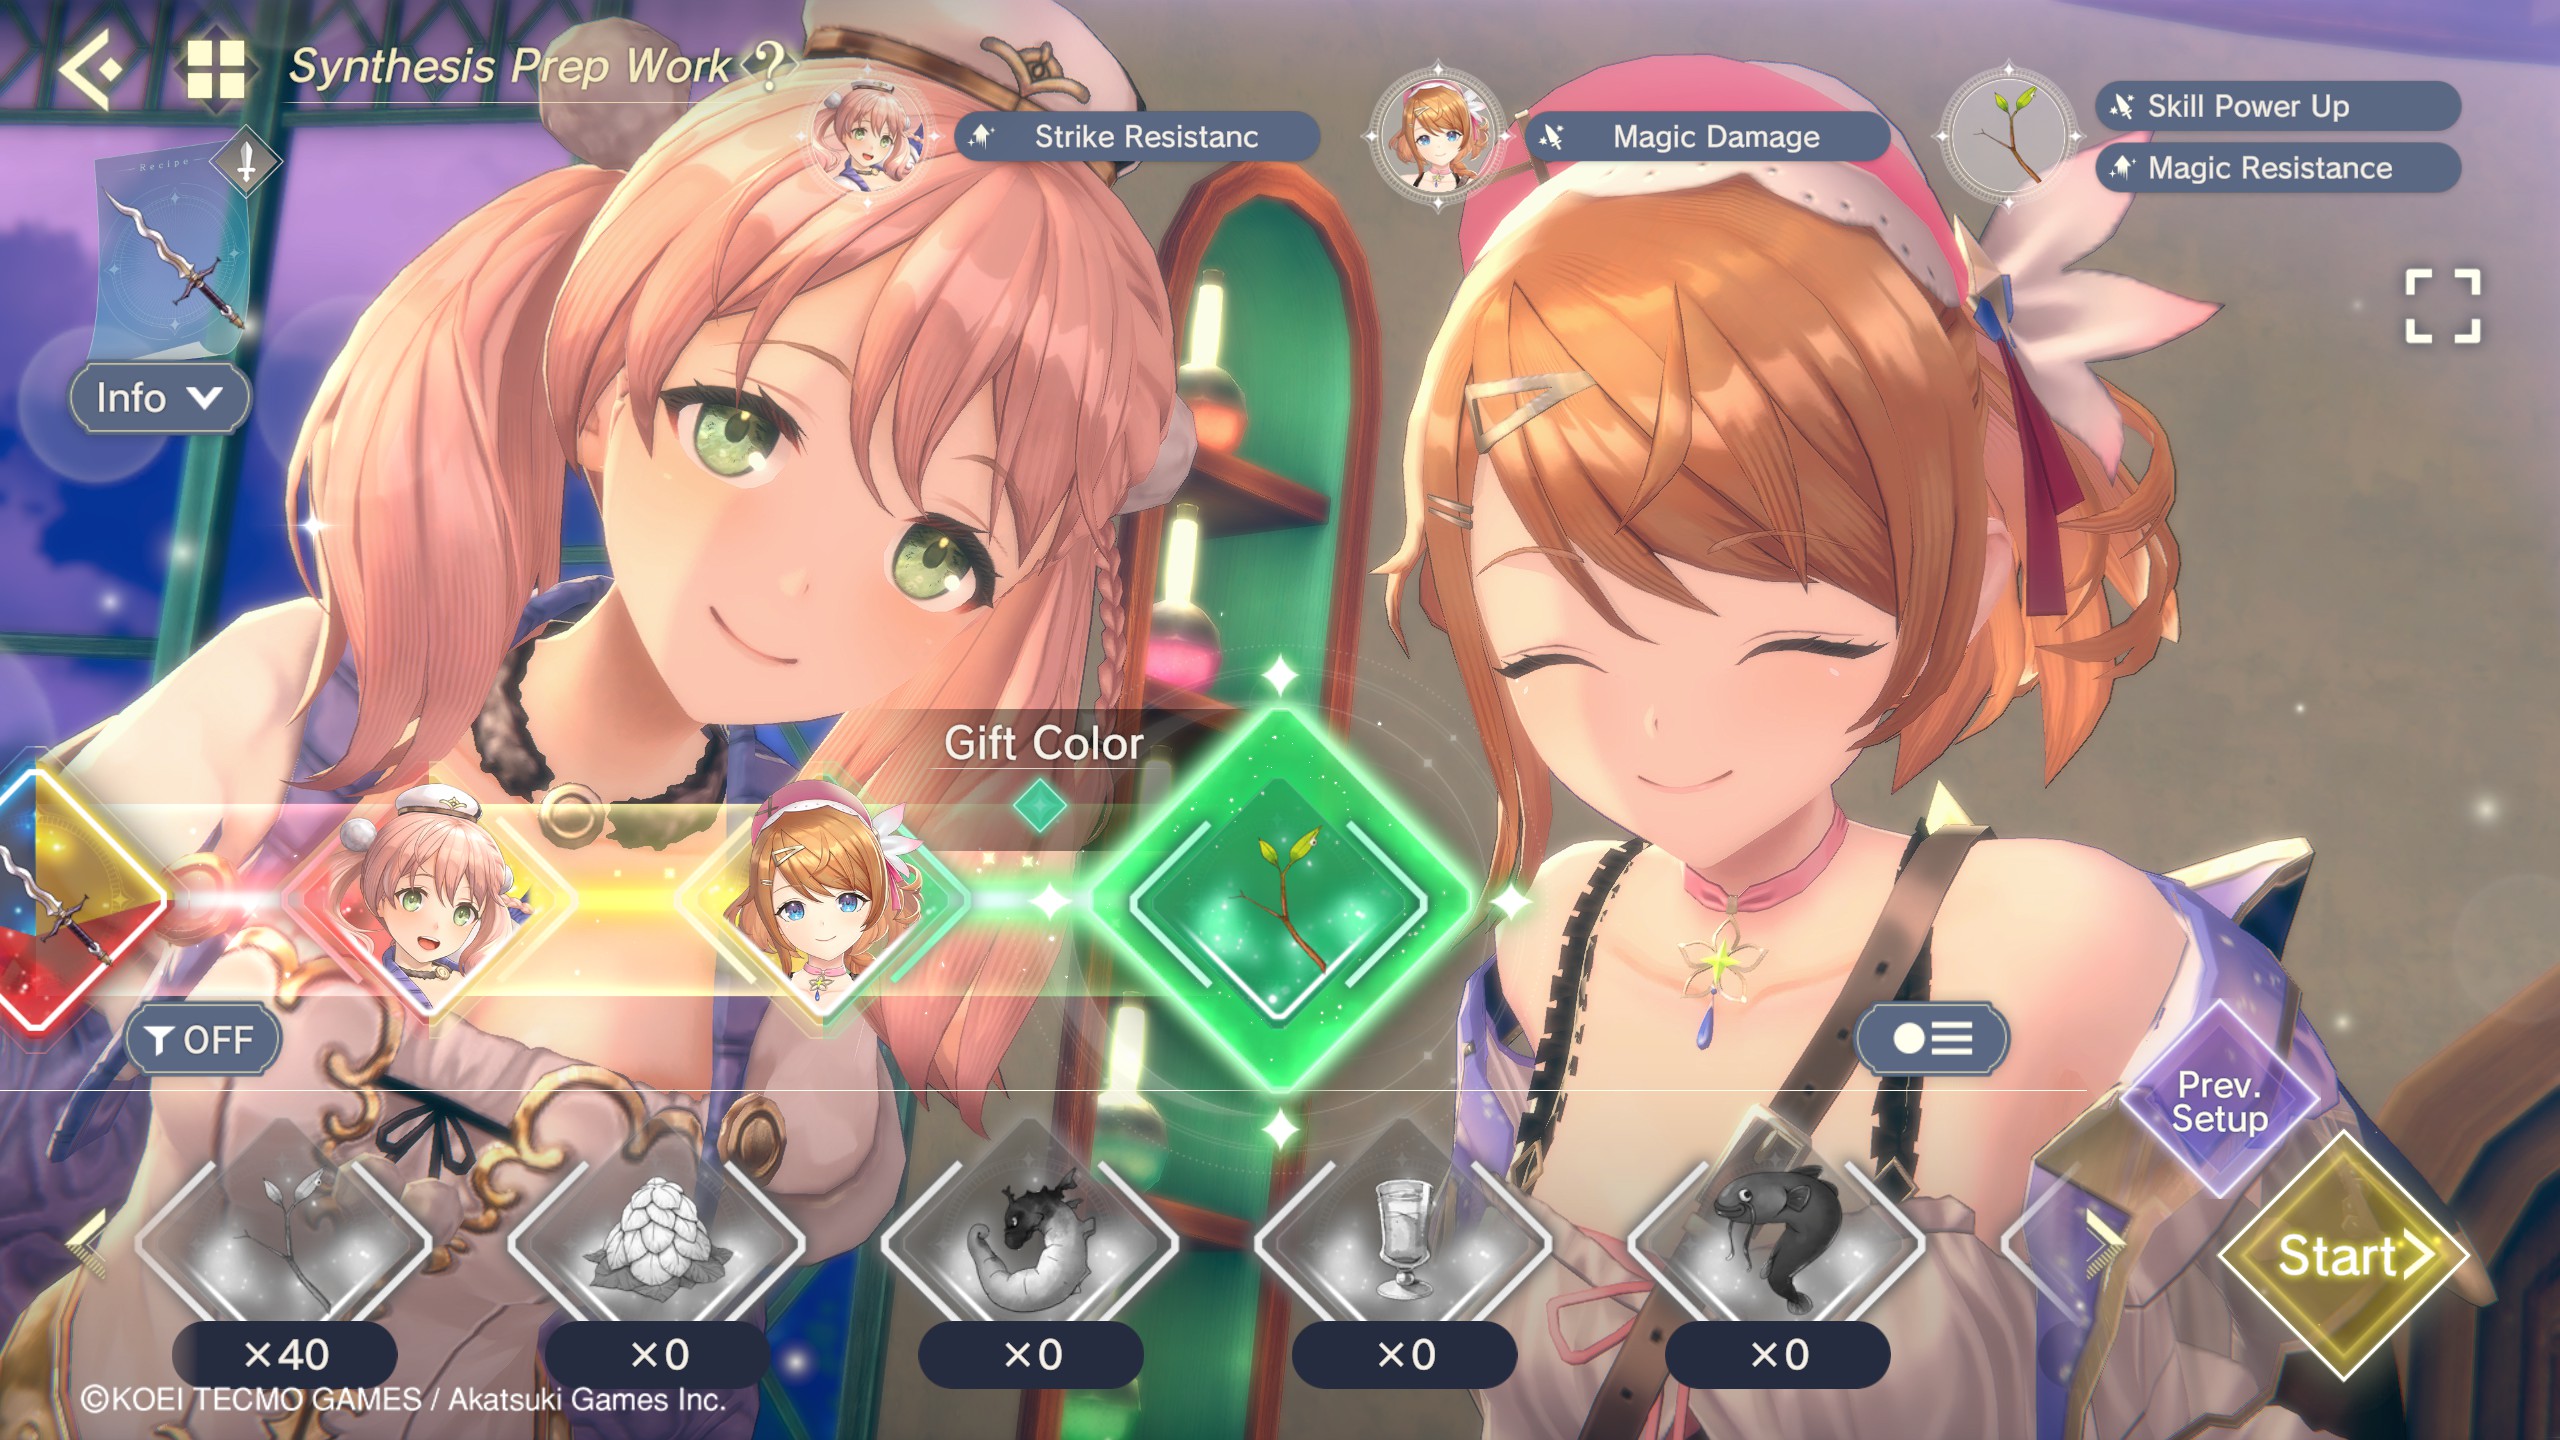
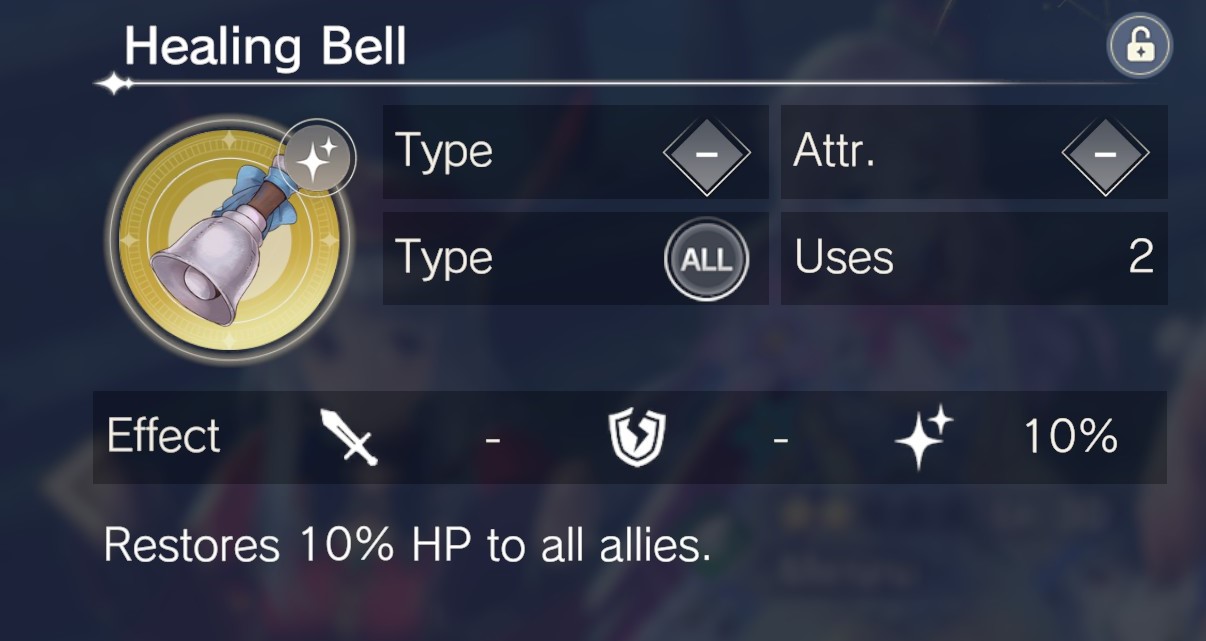
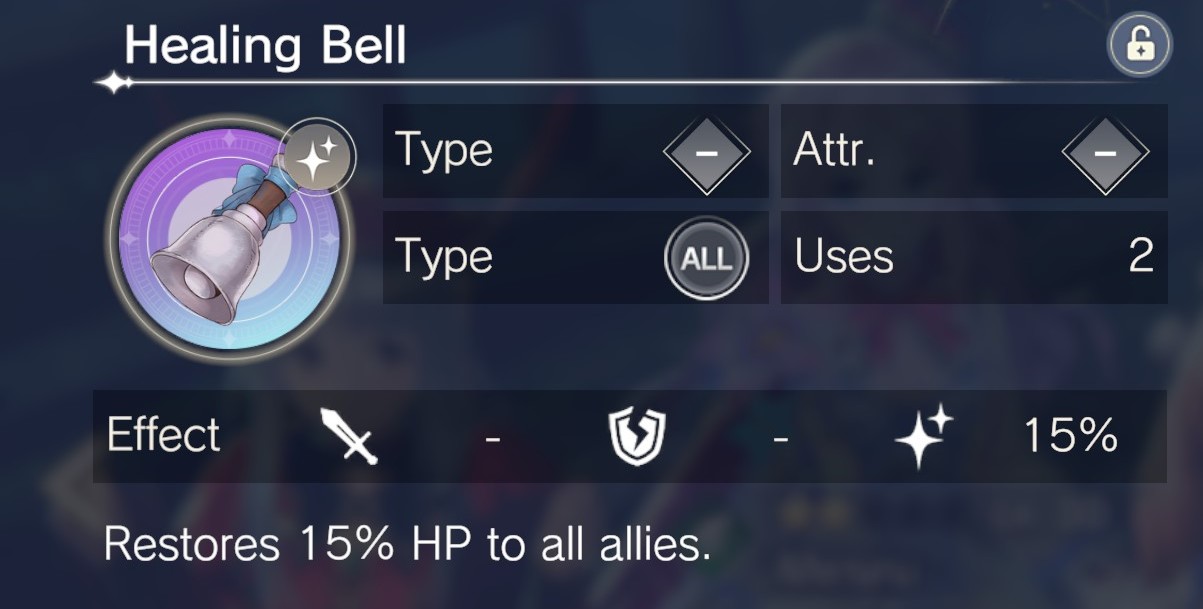
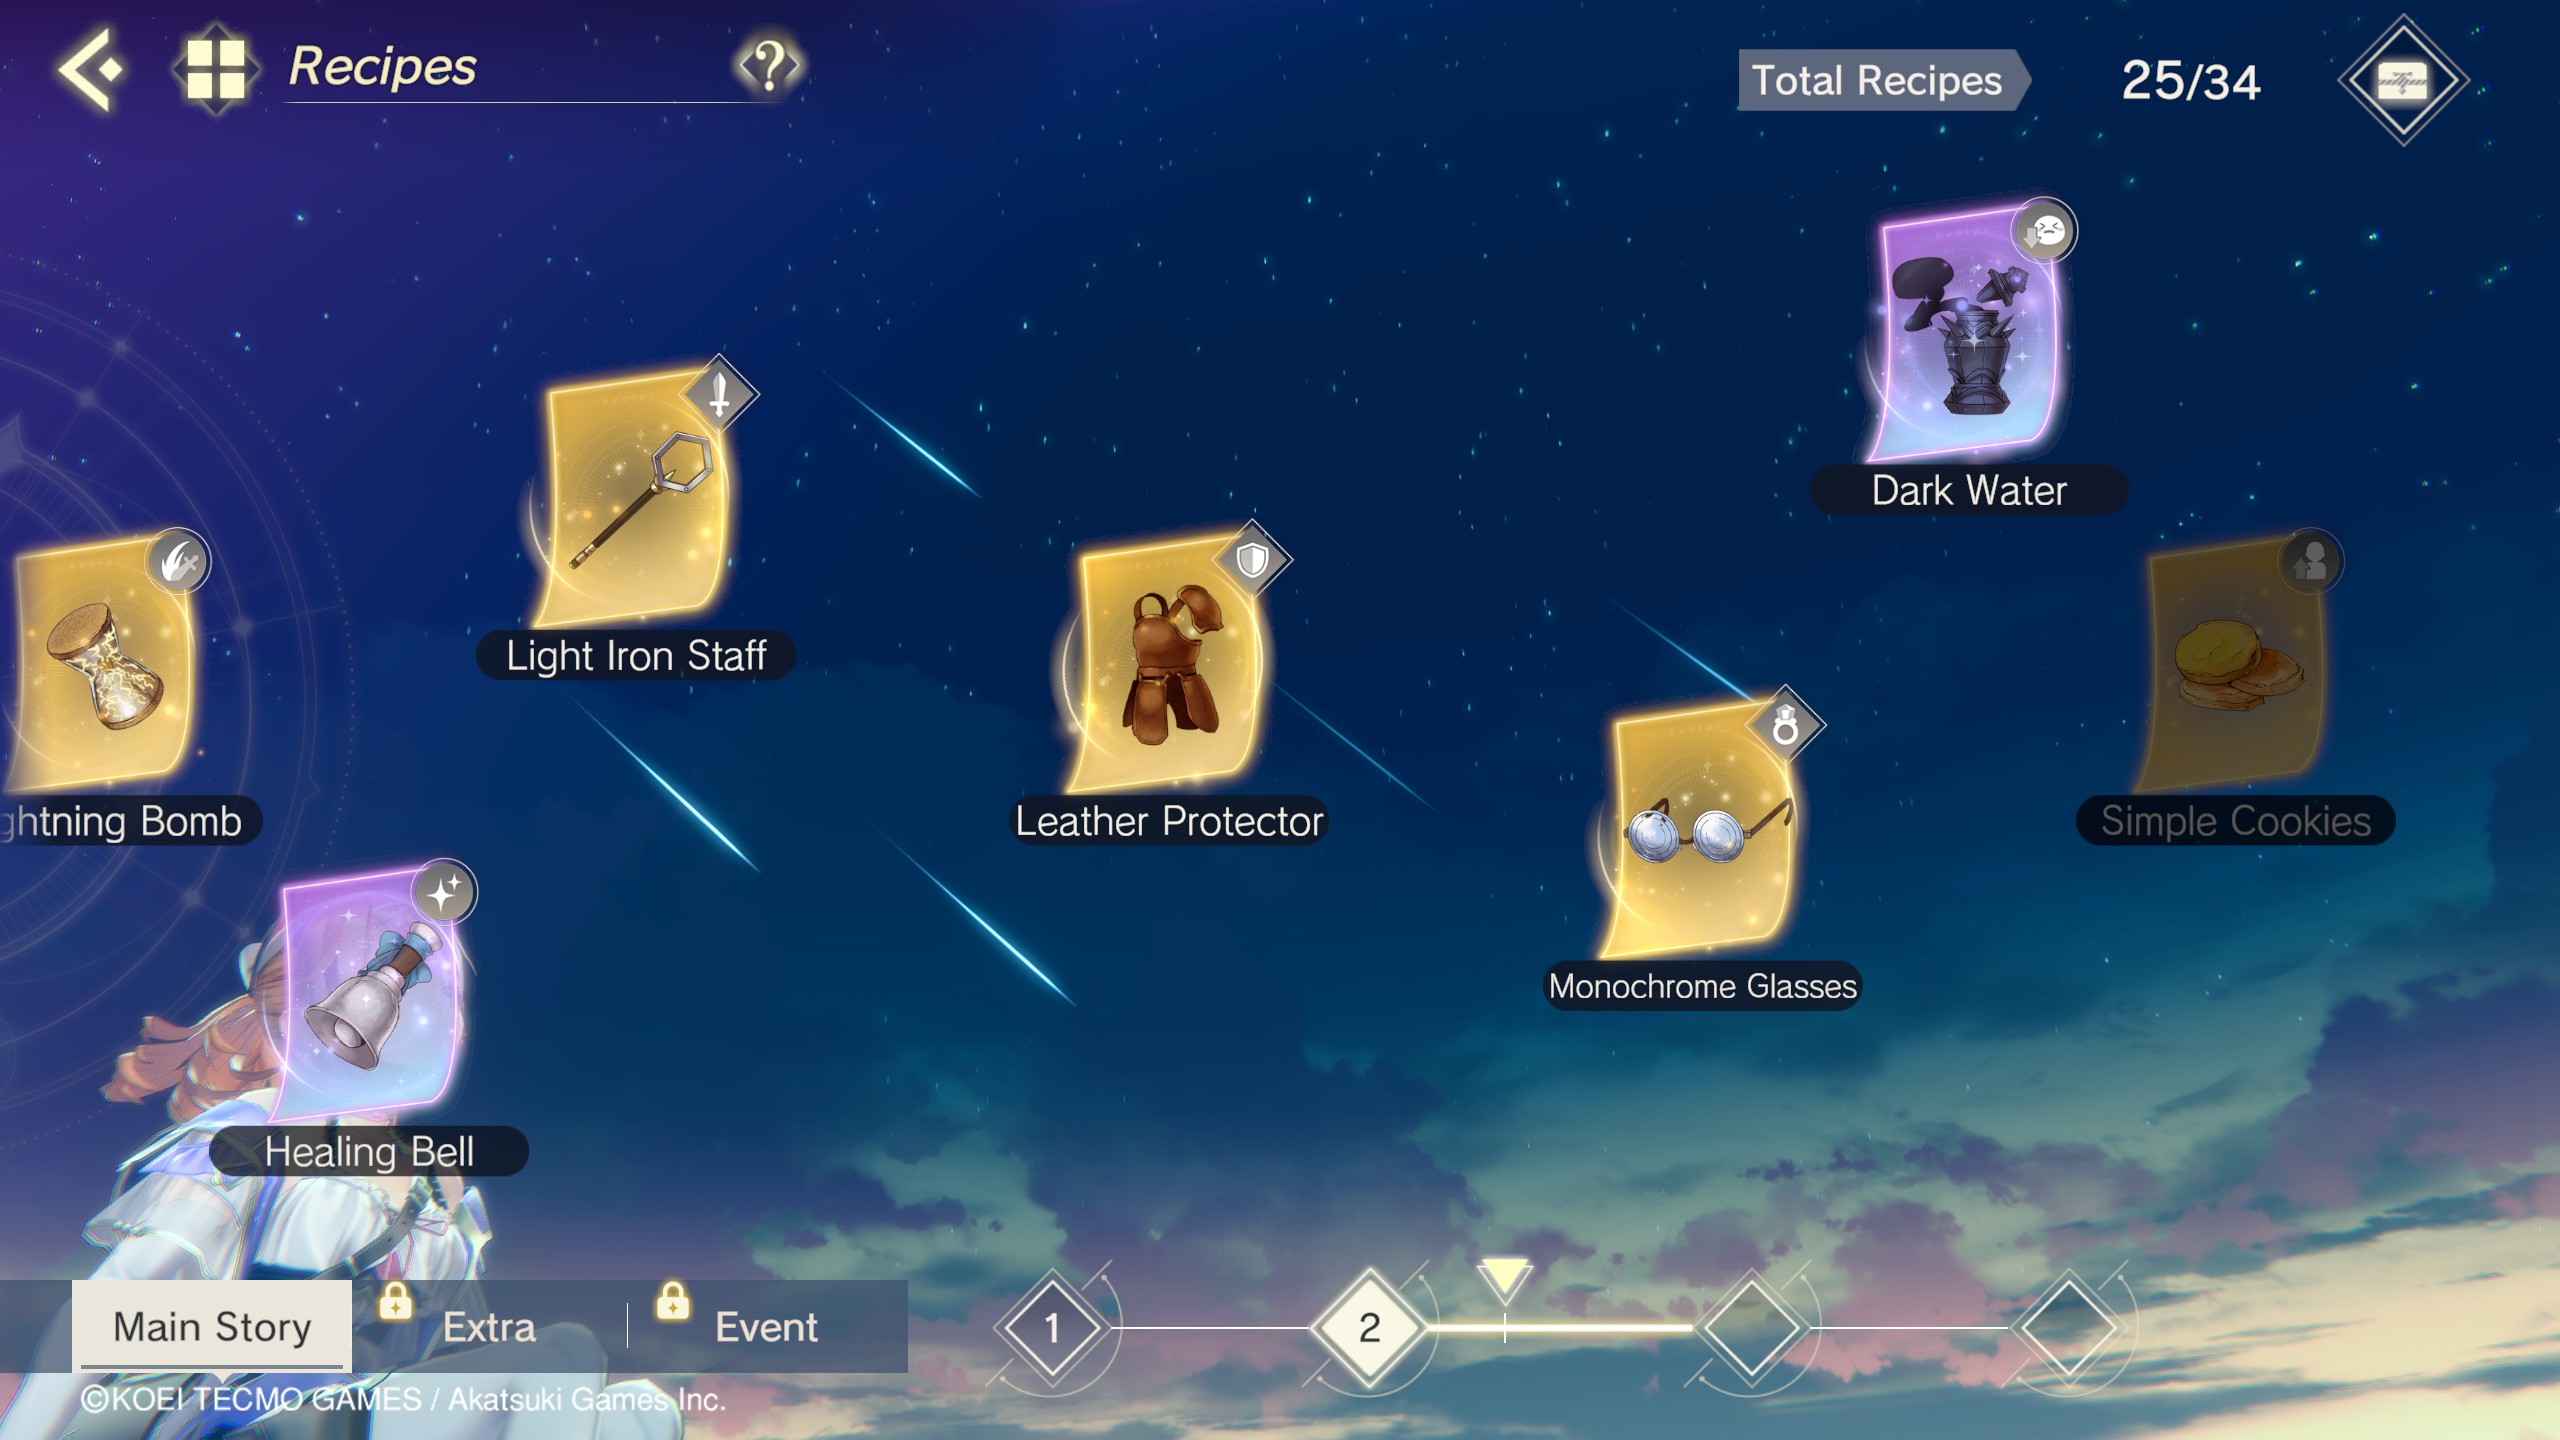
- Added a snippet in the "Synthesis Basics" section explaining Recipe Development

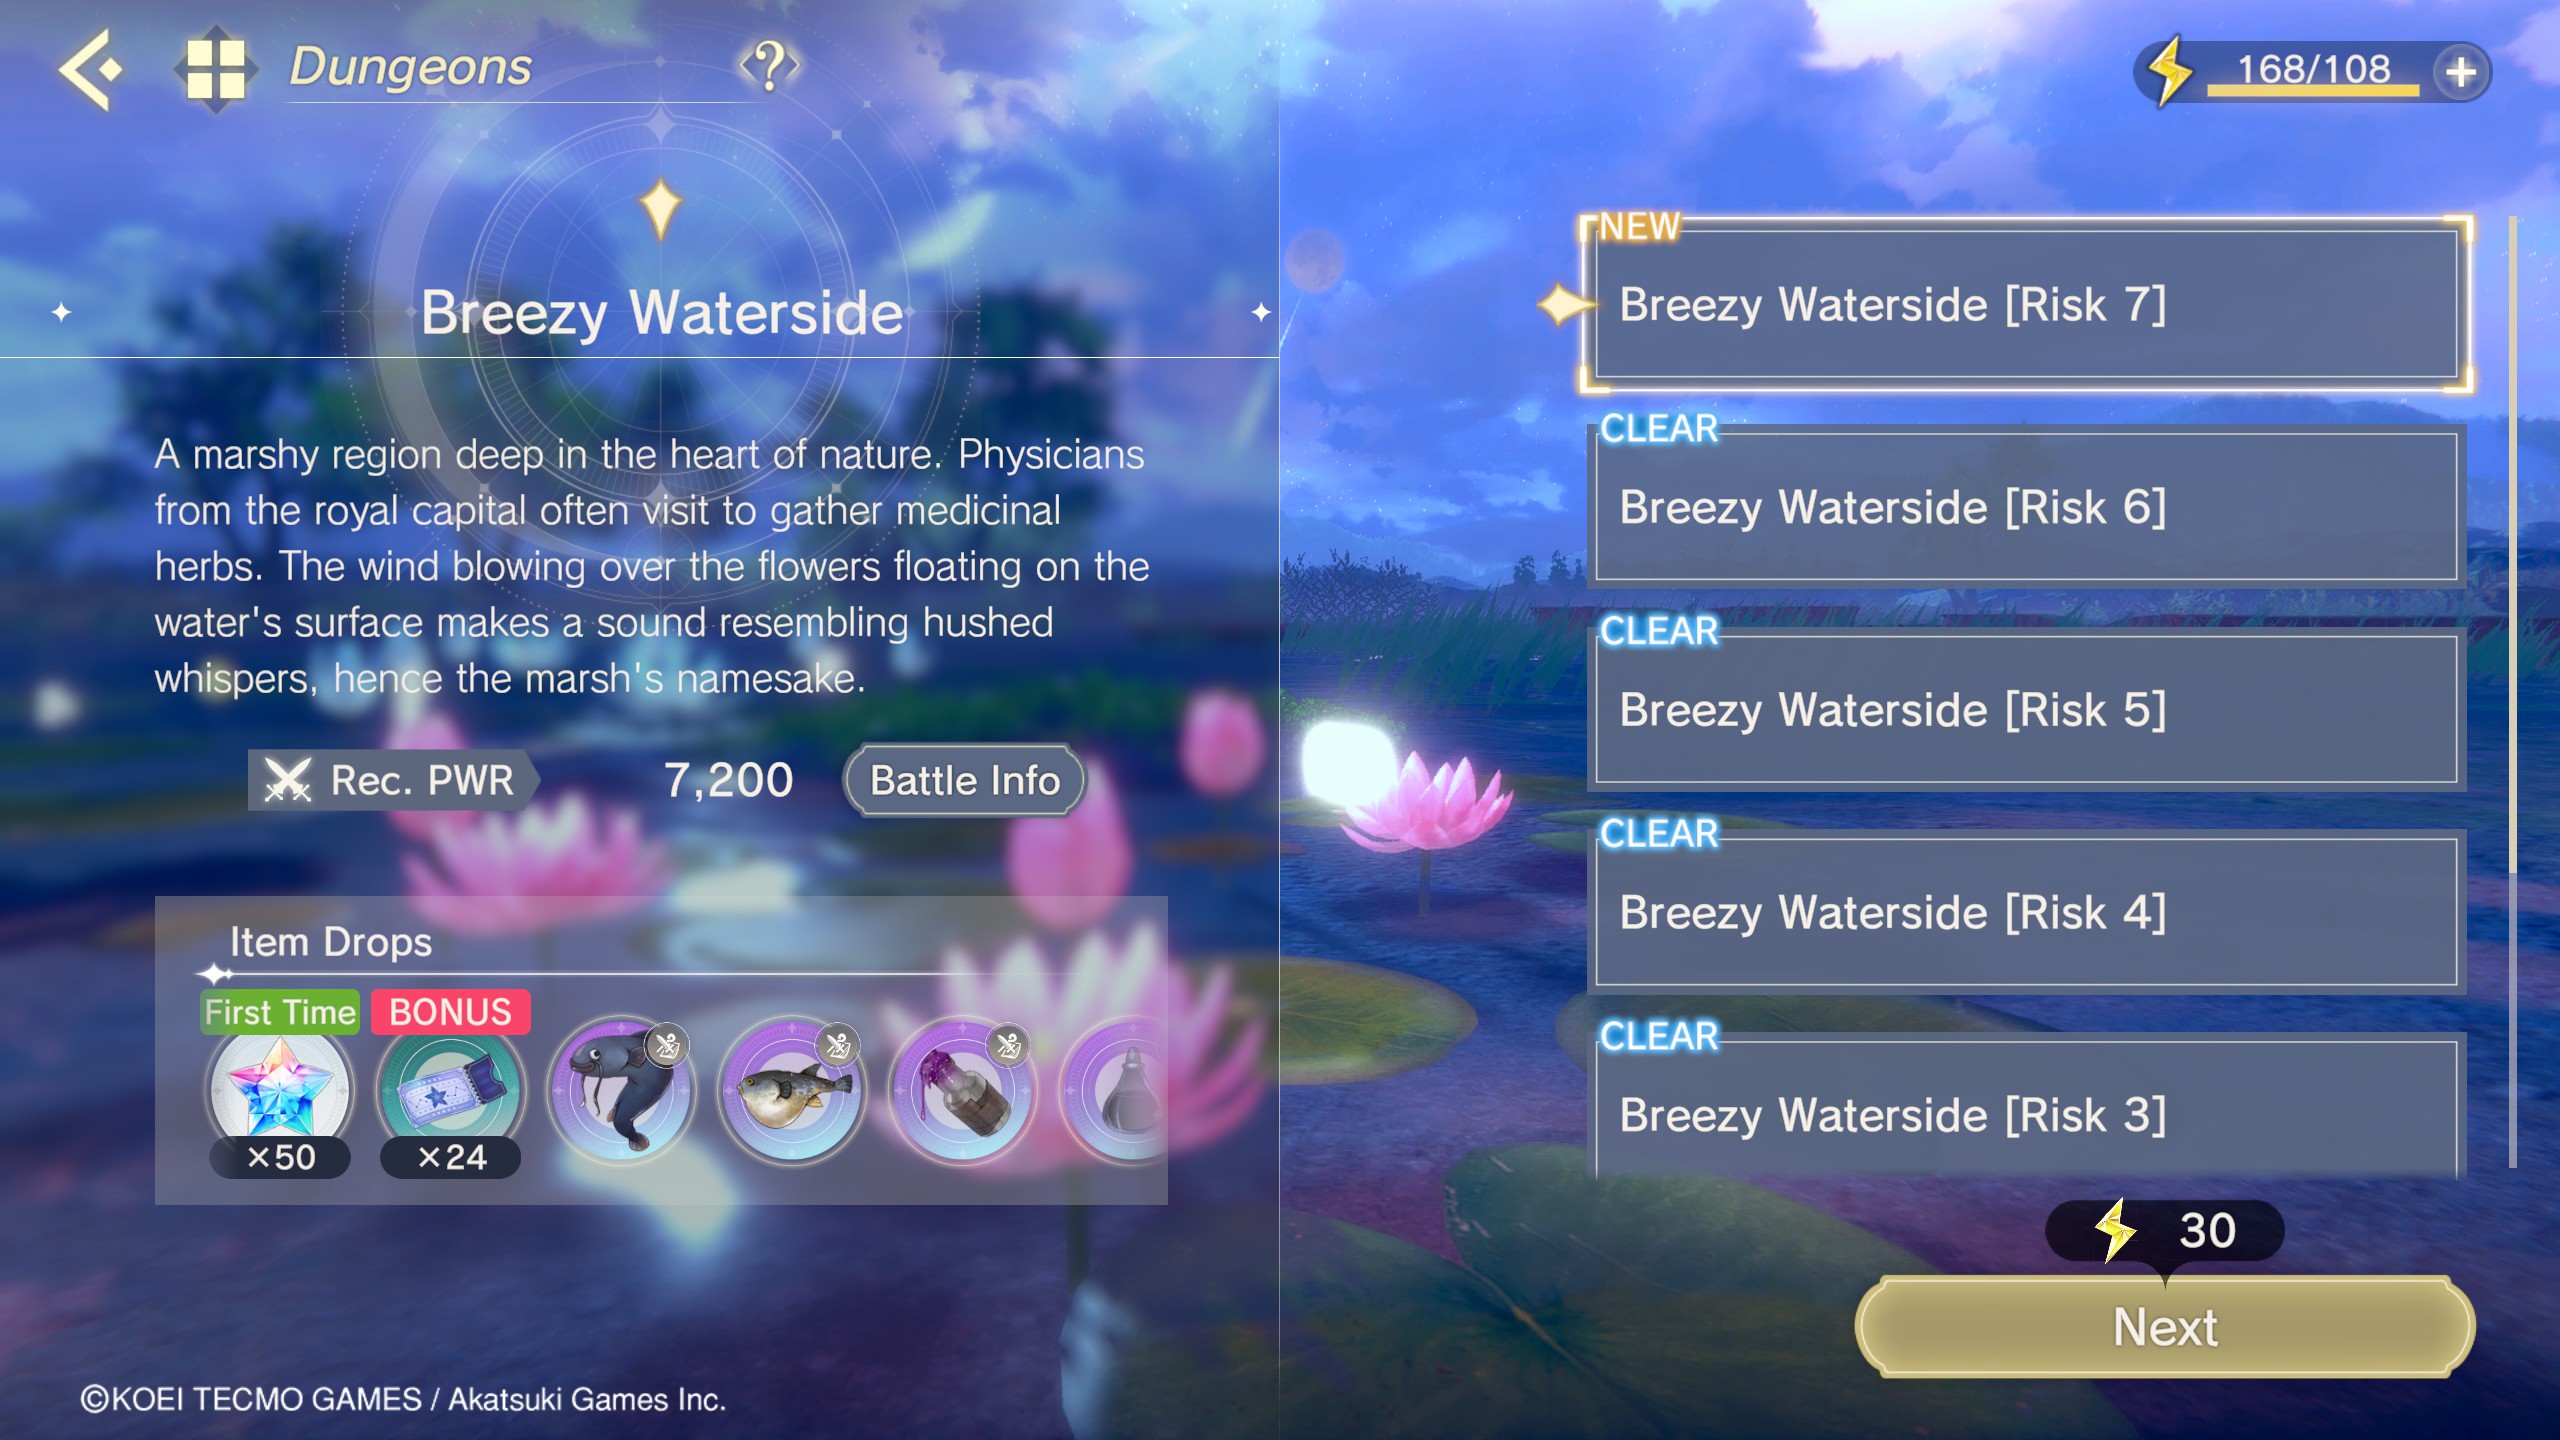
- Added a snippet in the "Dungeon Basics" section explaining Risk Levels
Scout  [autor] 2 FEB 2024 a las 13:02 
Yeah, the skill icon colors for Strike and Slash can look pretty similar to each other. I did fail to mention this, but you can see the actual attribute icon if you click on a character's skill in the "Training" tab so you can more easily identify.
Chloe Wolf 2 FEB 2024 a las 12:34 
It may be worth mentioning in the section about damage types that the type can be found on the upper-left side of the memoria in the equipment screen (and probably elsewhere too.) The color is a good way to get a good guess, but if you don't have the various shades of bronze memorized for physical types or you have difficulty differentiating different colors, I think that could be more reliable. Just something to consider.
Scout  [autor] 1 FEB 2024 a las 19:18 
UPDATE 2/1:

- Added yet another snippet in the "Battle Basics" section explaining the existence of the status page during battle, and how to access it.
Scout  [autor] 31 ENE 2024 a las 23:43 
Further updates:

- Added a snippet in the "Battle Basics" section explaining certain rare buffs and debuffs that might appear on rare occasions.