Risk of Rain Returns

Risk of Rain Returns

39 ratings
The UES Pilot's Handbook
By 404
[WELCOME NEW PILOT TO THE UNITED ENTERPRISE SHIPPING CERTIFIED PILOT TRAINING]
[WHERE YOU’LL BECOME AN ACE PILOT FOR ALL OF OUR STARSHIPS IN NO TIME!]
2
   
Award
Favorite
Favorited
Unfavorite
[WELCOME TO THE UES, PILOT]
Please read this provided handbook to assist you in your training, as it lists off plenty of useful information to help you in your journey to becoming an expert pilot, in addition to listing off several programs should you choose to become more invested within the company, such as our Preferred Pilot Commissions program!
[OVERVIEW]
[THE PILOT IS AN AIRBORNE FIGHTER THAT EXCELS AT RAINING DAMAGE FROM ABOVE]
[WITH THE STRONG RECOIL OF HIS WEAPONRY AND RAPID DEPLOYMENT OF HIS PARACHUTE]
[HE CAN LEAP HIGH INTO THE SKY TO READY FOR A PRECISION AIRSTRIKE]

The Pilot - a quick and nimble ranged character who can fight on the ground and in the air, with high damage output and proc rates all-around. As an excellent generalist, the Pilot won’t lose out to anyone or anything, and will fly high with its abilities.

[PLAYSTYLE]
Pilot is an aggressive generalist, preferring to stay relatively close to his targets in order to deal the most damage to them. However, he has all the tools for every situation, and is capable of fighting at a longer distance and staying mobile.

Compared to his contenders, that being Loader and Drifter, he is a bit more complex to pick up compared to those two, requiring a moderate understanding of his kit to make the most of, but mastery allows him to destroy his competition with high damage, crowd control, and mobility.

[STAT BREAKDOWN]

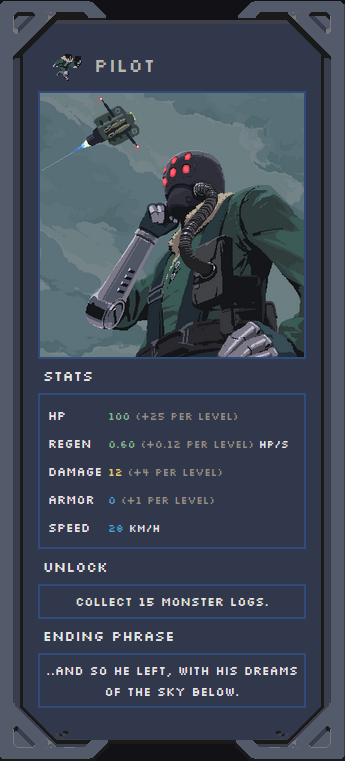
The Pilot is an effective generalist with fair all-around stats

Health Pool
100 [Base]
25 [Per Level]

Average health pool and health scaling

Regeneration
0.6 [Base]
0.12 [Per Level]

Average regeneration and regeneration scaling

Damage
12 [Base]
4 [Per Level]

Average damage and damage scaling

Armor
0 [Base]
1 [Per Level]

Average base armor, but lower than normal armor scaling

Speed
28 km/h

Average speed
[CLUSTERFIRE]
[WEAPON CLASS - PERSONAL CROWD DEFENSE ORDNANCE]
[RECHARGE - NONE]
[CHARGES - NONE]

Pilot’s default primary skill.

Fires at a semi-quick interval, with 95% damage on its initial 2 shots, and 190% damage on its 3rd consecutive shot. This third shot also possesses infinite piercing with a 50% pierce decay (every target after the first takes 50% less damage from the previous target).

Clusterfire fires at an approximate interval of 1 shot every 0.85 seconds. There does not appear to be a significant recovery period between the 3rd consecutive shot and the start of a new set of 3 consecutive shots.

Do note that you must fire Clusterfire at a certain speed (or faster) in order to achieve the 3-shot combo - tap firing at a lower speed will simply cause it to continue to fire off normal shots. Automatic fire of Clusterfire will always fire at the right interval needed.


[RAPID FIRE]
[WEAPON CLASS - PERSONAL DEFENSE WEAPON]
[RECHARGE - NONE]
[CHARGES - NONE]

Pilot’s alternate primary skill.

Fires at a very fast rate for 65% damage per shot (despite the description, Rapid Fire actually deals 65%). Rapid Fire possesses infinite range, but does have a noticeable spread after short to medium range, growing wider as you get to farther ranges.

Rapid Fire fires at an approximate interval of 1 shot every 0.2 seconds, significantly faster than the approximately 0.5 second interval of Commando’s Double Tap, being a roughly 60% increase.

As such, like Clusterfire, you should stay somewhat close to your targets to maximize the attack, though as it is infinite range, you can try and spam out targets over longer distances. Compared to Clusterfire, Rapid Fire goes all-in on single-target damage, but owing to its high rate of fire, is capable of quickly whittling down targets and getting multiple procs against them - try a Sticky Bomb or ATG Mk.2!

[TARGET ACQUIRED]
[WEAPON CLASS - MULTITARGET ANTI-AIR/GROUND]
[RECHARGE - 4 SECONDS]
[CHARGES - 2]

Pilot’s sole secondary skill.

On activation, unleash a burst of 3 hitscan shots in a semi-wide spread that deal 125% damage each (in-game description of 115% is incorrect), at either an upwards angle if you are grounded, or downwards angle if you are airborne.

The angle is determined by nearby enemies, with a “homing” effect being applied which changes the angle of each shot. Target Acquired! will not “home” onto targets if they are past a certain angle above you (if grounded) or below you (if airborne).

Holds 2 charges, and has a cooldown of approximately 4 seconds for each charge.

This is your bread and butter as Pilot, serving as a very high-damage skill (being able to total 675% total damage), made even more prominent with its infinite piercing and fast cooldown. In addition, the skill can fire its charges off continuously by holding down the secondary skill button, including extra charges from Backup Magazines. If used while airborne, Target Acquired! can even stall you in the air, which is made more prominent if using Rapid Deployment or when hitting a target, allowing the skill to even be used for some level of mobility.

[RAPID DEPLOYMENT]
[WEAPON CLASS - RAPID-DEPLOY AERIAL MOVEMENT]
[RECHARGE - 8 SECONDS]
[CHARGES - NONE]

Pilot’s default utility skill.

On activation, you deploy a parachute and are launched a moderate distance into the air, immediately dealing approximately 200% damage to nearby enemies (with the damage falling off based on how far they were from you on skill use) and stunning them for approximately 3. While you have the parachute deployed, your falling rate is slowed by a noticeable amount. Upon touching the ground (or using your jump button while airborne from this skill), the parachute deployed is lost.

You do not take falling damage from contacting the ground while the parachute is active, no matter the height. If you possess additional charges of this skill, or the cooldown finishes before the parachute is lost, reactivating this skill while you currently have a parachute deployed instead boosts you forward at an upwards angle.

Holds 1 charge, and has a cooldown of 8 seconds.

Compared to the alternate utility, Rapid Deployment is a more methodical skill, granting great vertical mobility and vertical control, as well as keeping you airborne to rain death from above with either Target Acquired! or Airstrike/Air Raid. Do keep in mind however that your primaries and Aerial Support/Aerial Barrage do not change their targeting if you are airborne, and will continue firing forward. This is made up by the fact that with proper cooldown management, Rapid Deployment can not only give you great vertical mobility, but also be effective invincibility, as the majority of enemies within the game are unable to hit an airborne target. Keep an eye out for flying enemies however, or those with projectiles who can hit you (such as Temple Guards).


[AEROBATICS]
[WEAPON CLASS - BIONIC-ENHANCED RAPID MOVEMENT]
[RECHARGE - 5 SECONDS]
[CHARGES - NONE]

Pilot’s alternate utility skill.

On activation, immediately dash forward a fair distance, gaining invincibility for the duration of this dash. You can slightly angle the dash up or down by holding those respective keys (holding up to angle upwards, holding down to angle downward).

If you contact a wall before or just as the dash ends, you cling onto it, allowing you to freely climb up or down the wall. If you climb to the top of a wall and go over its edge, you will hop up, and you are treated as airborne while clinging to a wall. You can stay clung to a wall for about 5 seconds, after which you will start to slide down and be unable to climb up the wall. Reactivating Aerobatics into the same wall will renew this timer.

Holds 1 charge, and has a cooldown of approximately 5 seconds.

A fast-paced and more aggressive mobility option for Pilot, granting a much faster cooldown in return for shorter duration compared to Rapid Deployment, allowing for quick dashes both in and out of combat to traverse the map or evade damage, as well as being able to climb walls and cling to them to stay “airborne”, sort of like with Rapid Deployment, albeit a bit more limited as you need a high enough wall.

[AIRSTRIKE]
[WEAPON CLASS - AERIAL BARRAGE]
[RECHARGE - 12 SECONDS]
[CHARGES - 2]

Pilot’s default special.

On activation, place down a marker for an airstrike and dash backwards, gaining invincibility for the dash. If used while airborne, drop the marker directly below you and instead gain a slight boost upwards, also gaining invincibility for the duration of the boost. Marker immediately arms on contact with ground, and triggers when a hostile walks over it for 150% damage to all hostiles within the explosion radius, throwing them up into the air.

Markers can rearm and retrigger, taking approximately 2.3 seconds to rearm. Markers can trigger a maximum of 8 times, and last for 15 seconds.

Holds 2 charges, and has a cooldown of approximately 12 seconds for each charge.

If Target Acquired! is the bread and butter, then Airstrike is like the bacon, eggs, whathaveyou to accompany it. With its long duration, ability to rearm and trigger multiple times, ability to throw hostiles up, hitting hostiles within an area of effect, and granting invincibility on placement, Airstrike is a great crowd control option that can last through multiple skirmishes.

If you possess an Ancient Scepter, Airstrike is upgraded to Air Raid, increasing its damage to 187.5% and also stunning hostiles it affects.

[AERIAL SUPPORT]
[WEAPON CLASS - AERIAL SUPPRESSION]
[RECHARGE - 12 SECONDS]
[CHARGES - NONE]

Pilot’s alternate special.

On activation, fire a short-ranged marking laser in front of you, also granting invincibility for a brief moment. If the laser contacts a hostile, it marks them for aerial bombardment - over the course of the next 10 seconds, a bomb will drop onto them each second, dealing 125% damage (in-game description of 120% is incorrect).

This aerial bombardment ceases once the duration ends, or once the target dies. The bombs can deal area damage to nearby hostiles, and if the original target dies, but the skill has not yet finished, it will mark a nearby hostile close to the original target to finish out the duration.

Holds 1 charge, and has a cooldown of approximately 12 seconds.

Compared to Airstrike, Aerial Support is far more “fire and forget”, allowing you to quickly mark a target and leave them to die (or at least suffer heavy damage) while you continue fighting off a horde. It’s also serviceable in that regard, marking a hostile in the crowd and watching bombs rain down on the whole horde. Do keep in mind that Aerial Support only fires the laser straight forward however, so make sure you have a straight line of sight to your target, and try not to miss - you will incur the cooldown of this skill regardless of whether you hit or miss with the laser.

If you possess an Ancient Scepter, Aerial Support is upgraded to Aerial Barrage, increasing the total amount of bombs drop to 20, for a total of 20x125% damage.


[PURCHASING ARMAMENTS]
[PLEASE ENSURE YOU HAVE THE APPROPRIATE CREDENTIALS]
[TO MAKE THE FOLLOWING PURCHASES]

[BIONIC UPGRADES]
[COLLECT 15 MONSTER LOGS]
[UNLOCKS PILOT]

To unlock Pilot, you must collect 15 monster logs, which are found simply by playing the game. Keep an eye out for book-like objects that will sometimes drop from monsters you defeat. Once you have a monster log, monsters of that kind will no longer drop their log, allowing you to track what logs you have.

[PERSONAL DEFENSE WEAPONRY]
[KILL 30 ENEMIES AFTER LAUNCHING THEM USING AIRSTRIKE]
[UNLOCKS RAPID FIRE]

To unlock Rapid Fire, the alternate primary, you must kill 30 enemies after you've first launched them airborne with Airstrike, Pilot's default special. This will more likely than not be achieved as you simply play the game, as an inherent synergy in Pilot's kit is launching enemies airborne with Airstrike and following up on it using Target Acquired! to quickly shred through enemies.

[RAPID-MOVEMENT BIONIC UPGRADES]
[COMPLETE THE PROVIDENCE TRIAL "RACE TO THE FINISH"]
[UNLOCKS AEROBATICS]

This trial for unlocking Aerobatics isn’t too difficult, but requires good timing and precision to properly angle Aerobatics and get the bonus charges. Take a few runs to try and explore the map and get your bearings, then go for a serious run. Remember you can angle Aerobatics up and down using your up or down keys. if you find the trial too hard though, you can also unlock the skill by collecting 300 items as Pilot.

Below is a video of completing the trial. This route can also be refined to get a Gold rank on the trial with practice.


[SATELLITE SUPPORT]
[KILL 10 ENEMIES WITHOUT TOUCHING THE GROUND OR GEYSERS]
[UNLOCKS AERIAL SUPPORT]

To unlock Aerial Support, you must kill 10 enemies before you touch the ground. It is highly advised to use Rapid Deployment over Aerobatics for this to keep yourself airborne for as long as possible. Take advantage of high ground, and if you can, it is recommended to prioritize Hardlight Afterburners and/or Alien Heads to have as low of a cooldown as possible on Rapid Deployment to continue using it while in the air - the Artifact of Command can help with this.
[WEAPON RECOMMENDATIONS]
[PRIMARY]
[CLUSTERFIRE V RAPID FIRE]
[CONCLUSION - PREFERENCE]

Clusterfire and Rapid Fire each fulfill different niches, and they do quite well in said niches. If you want crowd damage, take Clusterfire for its piercing, and if you want to ruin the days of individual targets, take Rapid Fire.

[UTILITY]
[RAPID DEPLOYMENT V AEROBATICS]
[CONCLUSION - PREFERENCE]

Like Clusterfire and Rapid Fire, Rapid Deployment and Aerobatics fulfill different niches, with Rapid Deployment serving a more slow and methodical style with long windows of safety thanks to its slow falling, while Aerobatics fits a more aggressive player who also wants to slide around at the speed of sound, which will be discussed soon.

[SPECIAL]
[AIRSTRIKE V AERIAL SUPPORT]
[CONCLUSION - AIRSTRIKE]

Aerial Support is solid single-target and AoE damage if there is a crowd, but Airstrike’s total damage, high uptime, and ease of use for kiting around prove simply superior overall compared to the more single-target Aerial Support. That said, Aerial Support isn’t a bad skill by any means, and if you like it, then by all means use it.


[WEAPON TECHNIQUES]
[TECHNIQUE - GEYSER BOOST]
[BOOST HEAVILY UPWARD USING YOUR PARACHUTE]

If you fly into a geyser (those jump pad-looking things that throw you into the air) while you have the parachute from Rapid Deployment deployed, you get an incredible vertical boost, allowing to easily maintain air time.


[TECHNIQUE - AEROSLIDE/GLIDE]
[QUICKLY GAIN MOMENTUM TO FLY ACROSS THE STAGE]

This tech goes by many names, so what you use is up to you - however, the end result is the same. By jumping into the air, then holding down without pressing any other movement keys, and then activating Aerobatics when somewhat close to the ground (about halfway through your jump), you can essentially “wavedash” across the ground at incredible speeds.

This works as Aerobatics inherits your momentum, so when you press no other movement keys except for down, it converts the falling of your jump into speed as you “bounce” of the ground with it, letting you, at minimum, double the distance of Aerobatics when done right, going even further if you have any movement speed-boosting items, like a Red Whip. You can prematurely stop this boost by pressing either the left or right movement keys, allowing to go quite far without losing control or overshooting.

Do keep in mind Aerosliding (as I like to call it) does not grant you iframes however - you will only get the iframes from the initial Aerobatics dash. Aerosliding will also end prematurely if you contact an obstruction, unless you b-hop.


[TECHNIQUE - B-HOPPING]
[RETAIN SOME MOMENTUM FROM JUMPING]

To be clear, there isn’t actually true b-hopping - each consecutive hop decreases your current speed until it more or less reaches your normal base speed, and is really only useful for negating the mobility loss from skills, like when you’re firing Clusterfire or are scavenging in your bag as Drifter. However, on Pilot, it is incredibly useful for further extending the distance of your Aeroslides after the slide would normally be over.

Firstly, remember to turn on the Auto Jump option under Settings -> Controls -> Accessibility Options. I would recommend turning on Rapid Fire (the setting, not the skill) while you’re there too, though the reasons for that do not pertain to b-hopping.

Next, Aeroslide. When you see that you’re starting to lose speed from the Aeroslide, or if there is an obstruction in your way that you can jump over, press and hold your jump button. Remember not to hold the left or right movement keys unless you want to stop the Aeroslide entirely. You will see that you execute a b-hop of sorts, persisting some of the speed from the Aeroslide, which will keep degrading as you continue to hold jump and b-hop. Once you’ve lost enough speed or you’re now just jumping in place, you may stop and continue onwards, perhaps executing another Aeroslide into b-hop.


[TECHNIQUE - MAP CLIMB]
[CLIMB THE SIDES OF THE STAGE]

The borders of each map count as walls for the purposes of Aerobatics’s wall cling. Make of that what you will.
[OTHER ADVICE]
  • Pilot is an inherently close-mid to mid-ranged character, so try to keep enemies at arm’s length when you can
  • To that end, Airstrike is very useful for keeping enemies off your back - try kiting them into a placed marker!
  • Understand what enemies are the biggest threat to you. Owing to Pilot’s more ranged nature, enemies who can fight him at range will be a larger threat. However, don’t gloss over immediate threats either
  • Run if you have to. Pilot wants to maintain a moderate range. Use the variety of mobility tools and tech he has to escape
  • Understand what items work best on Pilot - as he frequently strikes multiple enemies or rapidly fires on one, on-hit items such as ATGs and Sticky Bombs work wonders on him. Backup Magazines are also big, as they further extend the damage of his already incredible Target Acquired!
  • Always stay on the move. You never want to be stuck in one spot if you can help it
[RECOMMENDED MODIFICATIONS]
Risk of Rain Returns now has a modding scene, so below is a list of recommended mods to utilize.

[CREATED BY хебутри]
Adds more detailed item descriptions from the logbook to items in a run so you know what the items do.

[DPS INDICATOR][thunderstore.io]
[CREATED BY SmoothSpatula]

A simple DPS tracker to show how much damage you are doing.

[STATS INDICATOR][thunderstore.io]
[CREATED BY SmoothSpatula]

A simple HUD addition that shows your current in-run stats.

[NO WALL CLIP][thunderstore.io]
[CREATED BY Klehrik]

A bugfix mod that prevents clipping when going at too high of a speed.

Extremely useful for Pilot to prevent accidentally clipping when going too fast from Aerosliding.
[CLOSING]
Pilot is my favorite character and main, just straight up. He’s very strong, but requires thought to use compared to the likes of Drifter and Loader. He’s agile and nimble and can play at all ranges. He is a beast in both single-target and multitarget. He’s just a really, really versatile character, and I think a lot of people would have fun with him, especially with Aerosliding giving him the equivalent of Titanfall movement.

Now, on terms of balance… well, he’s not in a bad spot. Some of his stuff is definitely really strong currently and needs toning down - or other characters need toning up. For example, Rapid Fire is just straight up a better Double Tap in pretty much all cases, with (at minimum) a 60% faster rate of fire and 5% more damage. What I would do here for example would be lowering Rapid Fire to 60% damage like Double Tap currently, and instead raise Double Tap to 75% damage. Just some food for thought. Overall though, Pilot is actually quite cohesive in terms of design and I find is a generally entertaining character with good kit flow, compared to the likes of Loader or Drifter who just kinda… whack people.

Currently, I've placed my ideas into a balance document[docs.google.com] which all are free to read.

For now though, cheers!
[CREDITS]
[FADESHOCK]
[FadeShock#9427]

Author
Number-cruncher

[RISK OF RAIN RETURNS WIKI TEAM]
[RoRR Wiki][riskofrainreturns.wiki.gg]

Provided skill descriptions and clarifications
Provided demonstration gifs for skills
Provided unlocks

8 Comments
404  [author] Jun 19, 2024 @ 9:59am 
Getting stuck in a wall is half the fun haha - the no wall clip is linked though for a reason
Scaling with movement boost items is already mentioned in the tech itself
The Anime Lurk Jun 19, 2024 @ 9:57am 
Man, you gotta add a warning for the aeroslide. It gets more powerful with movement items and can easily have you going through walls if stack too much speed. Also the better name is Wavedashing IMO.
404  [author] Feb 1, 2024 @ 1:30pm 
The thing with total damage v flat damage is while flat damage is initially higher, total damage constantly scales since it's percentage based, so overall, total damage boosting is better than flat damage boosting (in the case of Hyper Threader, it's also percentage based, just not total damage - it keys off of your base damage)

Something I forgot to mention in the previous comment is that Target Acquired is not 115% damage - as mentioned in its section, it's 125% damage, which is even better (if it was the as-written 115%, it'd still be one of the best skills in the game)
nonanonanonanona Feb 1, 2024 @ 1:23pm 
i seeeeeeeee
404  [author] Jan 26, 2024 @ 12:41pm 
Total damage items are always a DPS up, so yes, it's worth getting them, especially with the high proc rates of Rapid Fire
nonanonanonanona Jan 26, 2024 @ 10:08am 
Wonderful comprehensive guide made fun with all the flavor text and animations!

Unrelated tangent:

Command run w/ Rapid Fire, I wonder if it's worth taking "total damage" on-hit items.

AtG Missile Mk.2 procs often, but .65 damage of Rapid Fire brings damage down, compared to
Hyper-Threader which just uses Pilot's base damage (+4 per level!)

Say the Pilot has 80 ATK. One AtG Missile Mk.2 procced from Rapid Fire is an avg. of 22 damage (80*.65*6*.07) to a single target per hit, while a Hyper-Threader is 32 damage(80*.40) per hit.

But here's only a few on-hit items that don't work off total damage. And whenever I try ignoring total damage items, it feels like I can't keep up mid run as I don't have enough ATK yet to make stacking items like insecticide worth it.

Target Acquired's damage is 1.15 and Backup Magazines exist, so maybe it's not as big of a deal as I think it is.

I wonder why Pilot has the highest ATK per level in the game.
404  [author] Dec 25, 2023 @ 9:06pm 
Thanks, glad you enjoyed it!
Dr. Pretzeldude Dec 25, 2023 @ 8:52pm 
This guide is really well made great job