Sons Of The Forest

Sons Of The Forest

148 oy
Sons of the Forest: Gameplay Guide
Sylar tarafından
The comprehensive guide provides an in-depth exploration of crucial campsite locations, offering detailed strategies and tactics tailored for beginners. This guide delves into a wealth of insights, ensuring players not only progress effectively but also enhance their combat skills. Additionally, it includes a specialized section dedicated to mastering winter survival, equipping players with the knowledge to thrive in the harshest conditions. This guide is an essential tool for those seeking to navigate the challenges of the game with confidence and skill.
12
2
2
5
   
Ödül
Favorilere Ekle
Favorilere Eklendi
Favorilerden Çıkar
Recommended Graphics Settings
To eliminate "jaggies" and improve visual clarity, disable Dynamic Resolution and set Anti-Aliasing to TAA. This adjustment minimizes visual artefacts, such as the trailing distortions behind fast-moving objects or birds in flight. However, it does demand a system capable of handling higher rendering quality.

For the best in-game visuals, you can raise all Graphics Settings to Ultra. Some players also experiment with ReShade to further enhance appearance. I don't recommend this for Sons of the Forest—not primarily due to GPU performance concerns (though that's a valid consideration)—but because ReShade's effects often produce inconsistent results.

The game's environments fluctuate dramatically between surface and subterranean zones, and from day to night cycles. Effects that look impressive in one setting may appear unnatural or disruptive in another. For the most consistent and balanced visual experience, it's wiser to rely solely on the in-game graphics options.

That said, if you choose to use ReShade despite these limitations, ensure you install the version with full add-on support. Without it, the game will crash every time you load a save file or start a new game. That specific version is essential for stability.
Zone Reference Map
Welcome to the definitive guide for mastering the wilderness of "Sons of the Forest."

Whether you're a newcomer seeking guidance or a seasoned survivor aiming to sharpen your skills, this comprehensive resource is designed to equip you with the insights and strategies essential for thriving in this unforgiving world.

A crucial first step is to familiarize yourself with the distinct regions of the island. Each area presents unique challenges, resources, and threats, and understanding their terrain will significantly improve your chances of survival.

Throughout this guide we refer to the zones by two-letter codes. You can used this as a general reference point to understand which zones are being discussed or highlighted:

This map of zone codes is currently the most accurate.

I couldn't find another with exact centre-points, so I decided to map these myself using the in-game GPS and the "showdebugzones" and "gotozone" commands. After determining the centre-points, I created this new map of zone codes, which is more accurate than any other I've found.

If in doubt, I highly recommend using the above map for reference.
Key Highlighted Zones
Recommendation: Build various bases and strategic outposts to streamline your access to critical resources for successfully completing the story, even on the highest difficulty setting. This will give you the best odds for victory on your mission.

For a better view of the various zone codes for each of these critical locations, some of which AI has helped us highlight, see below...

Blueprints:

Cooking Pots:

Turtle Nesting:

Munition Stores:

Medicinal Herbs:

Mushrooms:

Starting Points:

Artefact Pieces:

Recommended Base Locations:
Map for Pathfinding
As you journey deeper into the heart of the island in "Sons of the Forest," you'll encounter not only the challenges of survival but the enigmatic remnants of those who came before you. Explore the key locations, holding pieces of the island's mysterious past, essential story items crucial to your journey.

While there are multiple ways to approach the game, you'll inevitably encounter distractions and discoveries that may lead you off the recommended path. That, however, is part of the experience. The suggested route exists to help balance gameplay pacing with story advancement, ensuring a smoother, more cohesive journey.

Following this path also minimizes the risk of unnecessary backtracking in search of vital items—many of which are easily missed but essential to unlocking new areas and progressing the narrative.


Knowing how to read this map will be useful for understanding trade-offs for building a base in a certain checkpoint as opposed to another area.

But, before you begin the journey, the "Golden Route" may intrigue you in terms of subsistence and a proper defensive base. There are only two eyots (little islands in a very large dam) within this game which may not always be as important for base-building to certain players.

For those seeking tactical advantages, these eyots offer natural defenses and seclusion, making them ideal locations to fortify and thrive, particularly during the island's warmer seasons when threats become more persistent.
Secret Symbols
In "Sons of the Forest," navigating the vast and perilous landscape requires precise knowledge of key locations and coordinates.

Let's consider the laptop locations first, which will highlight additional locations for us in the game, eliminating the need to search for these locations specifically, making this a logical start.

Laptop Location Points:

However, if you have only the laptop location points, the problem quickly arises of where to begin to progress in the story most effectively. To solve this problem, we need to know where certain items are and what their priority level is for progression. We'll look at that soon.

What's interesting to point out is you'll find the following compiled list of symbolic pictures are highlighted on the map's geography in a very useful manner as landmarks.

Symbolic Landmarks:

You may be wondering how this was conceived.

With the assistance of Artificial Intelligence, I compiled and analyzed a comprehensive set of known facts and data about the game. The AI was then tasked with identifying meaningful patterns across the island’s map, drawing from this extensive information. What’s surprising is how the AI-generated route proved not only accurate but also highly practical for gameplay.

Whether this alignment is the result of deliberate design by the developers or a byproduct of the AI’s pattern-seeking tendencies—what some may call hindsight bias—remains unclear.

Regardless, the outcome offers a reliable and efficient path through the game’s challenges.

  • AI Generated: "The metal bird descends, on its mission quick, next to a helmet perched firmly upon a stick.” Learned: The helmets on sticks have ammunition as loot. There are indeed landing sites nearby. One landing site is a secret runway. The other appears to be two helipads. Both near a helmet on a stick.

  • AI Generated: “Fingers point to treasures, eyes to hidden doors, guiding us to secrets, keeping hidden stores.” Learned: The bodies of water that resemble crude little fingertips surprisingly point accurately in key directions. I followed them and discovered all initial items needed to progress in the story and so much more. Like a secret topographical guide.

  • AI Generated: "Golden stick man in armor bright, mines by day, bathes by night; in the hot spring’s gentle light.” Learned: I mined here to collect solafite for crafting armour to prepare for the end-game. Surprisingly, it's a hotspot for solafite. As I left the mine, the mutants began approaching me. I jumped in the hot spring for safety. Useful for drowning mutants.

  • AI Generated: “By the mushroom road where paths unwind, grow mushrooms of the greatest kind.” Learned: I found two locations that exactly match the description early in the game, as used AI to highlight the locations. I found every single variety of mushroom in those two locations, together. This made it easier to revisit these later in the game, for more.

  • AI Generated: “Where sprouting leaves reveal their glow, medicinal plants in great variety grow.” Learned: Once again, thanks to AI and common sense, I found an area that clearly resembles the location. To my surprise, I found every single variety of plant needed right around the landmark for crafting medicinal combinations. This is an extremely resourceful medicinal herb harvesting location.

But, let's stop talking about it and actually visualize these hidden symbols (see below).

First Iteration:

Second Iteration:

Third Iteration:

Notice, the third iteration overlays the laptop location points. Now, we use this to have AI generate for us a pathway that's optimized based on the topographic details and the location points.

Optimized Pathways:

The entire map is now available to us, revealing all the key locations that will guide you to every essential item, blueprint, resource, and artifact piece required to complete the game.

From tools and weapons to herbs, mushrooms, and hidden relics, this path ensures you won’t miss anything critical to your survival or story progression. At the same time, it leaves certain mysteries untouched—deliberately reserved for post-game exploration.

These remaining secrets provide opportunities for continued discovery, long after the main narrative has concluded. But to really use this map, we need to break it up into parts.
Reliability of Symbols
How reliable are these landmarks? Let's take a closer look.


If you investigate the Medicinal Herb landmark, the smaller leaf (left side of the plant) points you directly in the direction of aloe, mushrooms, and fireweed.

But that's not all.

Following its stem (resembled by the stream) down to the cotyledon (or where the water looks like a seed from which the plant sprouts), you will find copious amounts of arrowleaf, yarrow, devli's club, and horsetail.

Following the larger leaf (right side of the plant), it points you directly towards the stream of a very important waterfall, and going this direction, you'll find extra twinberries, snowberries, and closer to the river it points to you will find chicory.

One simple run-through can easily and fully stock you on Energy and Health Mix, which will prove extremely valuable to you in the long haul. The seeds for planting the herbs as well:


The important thing is remember the legends (and the areas highlighted) which facilitate critical discoveries for story progression across the map. Utilize the coordinates as your guideposts, aiding you in your exploration and survival efforts across the diverse landscapes of the island.

Players should familiarize themselves with the relative directions between these locations for when they need to be active during the night. When visibility is low and you have no choice but to travel at night, it's a completely different experience that brings its own set of challenges:


Each location holds not only vital supplies for survival but also fragments of the island's past waiting to be unearthed. Journey forth with courage and curiosity as you uncover the secrets hidden within the shadows of "Sons of the Forest."
Kukri Route (Before You Begin)
There's one heavily underrated weapon, extremely effective in caves and above ground against a number of enemies. That weapon is the Kukri.

Due to the unique importance of this weapon, I've committed this separate section just to express, very emphatically, not to overlook this weapon (and/or its location of interest), especially early in the game. The Kukri Route can give you a major tactical advantage very early.

When you start a new game, and your objective is perhaps to pace yourself, not just going with the flow or rushing, but also to be more strategic, the Kukri location is a top priority when it comes to survival and effective weapons you can obtain in the early stages of gameplay.

In my opinion, the Kukri is outclassed only by the Katana, as a bladed weapon. The Modern Axe and Fireman's Axe are of a different class, even though axes are also bladed articles, so not really as comparable, given the speed and ability of the Kukri to stagger enemies.

The axes have a power advantage, but damage per second is sometimes more important than damage at range, especially when you have the skill to avoid enemy attacks, skills we will also look at later in this guide, (i.e., "Breaking the Circle").

To obtain this weapon, rather follow the special "Kukri Route" sooner than later:
Route from Beach Crash Site
Kukri Route/Detour

Along this route you will discover an empty shoe standing on a rock, hinting at an ideal base-building location (but mainly pointing out North relative to the island), which may seem redundant given that players have a GPS from the very start of the game. In this area, your base would predominantly rely on nearby sticks and stones, but there are blueberry bushes nearby.

As well as very lengthy shallows far into the waters, which give you sanctuary as the enemies tend not to venture very deep into these shallows (hot tip), making it ideal for a base where you can easily trap fish and craft your subsistence.

Moreover, you may find some important loot nearby and a very special location where plenty of turtles lay their eggs (only about two or three stone throws away).

However, the main focus of the Kukri Route is obviously obtaining the Kukri quickly, without necessarily having this detour dictate your entire playstyle. That said, don't underestimate this brand of Machete.


Used correctly, and with some sensible timing, the Kukri allows you to be extremely agile against a multitude of foes. Whether in combination with other weapons and tactics, or on its own, the Kukri truly is a game-changer.

That said, if you want to know how to defeat Puffies, stay evasive, aiming for the face:
Recommended Game Runs
Depending on your initial spawnpoint (crash site), the most time-efficient runs to obtain your initial resources will vary slightly, but remains largely the same during the initial phase of the game.

Here are the recommended phases or runs (black arrows indicate priority):


This is for the mountain crash site.


This is for the forest crash site.


This is for the beach crash site.

As you can see, the beach crash site is the most convenient starting location for players, as it places them in close proximity with their initial story-progression location, to obtain the Rebreather.

However, these recommended runs will take players through all of the time-critical initial paths to obtaining all the necessary starting items, such as the Canopener, Rebreather, Rope Gun, Shovel, Flashlight, Modern Axe, and the first Maintenance Bunker location to begin making decent story progress.

It's up to you when to begin this run, but the sooner the better, as more challenging enemies will begin to spawn into the game the longer you wait to make critical progress for your survival.

The use of the North-Western Eyot Lake is central to the first half of your gameplay, as one of the safest locations to set up base before the winter sets in and enemies begin to cross the frozen lake.

To collect the firearms in a time-critical manner, you need to start by taking on the first bunker without any firearms, and collect the Pistol and Shotgun before you reach the second bunker.


This is for the bunkers and firearms.

With firearms collected, you should be just in time to choose between one of your unique base-building locations for surviving the winter. The secret is to keep it simple and strike an offensive and defensive balance. Remember, you have a Rope Gun, so there's no reason for you to get cornered if you know how to manoeuvre, and make use of your ranged weapons.

Don't forget, meat dries faster when the drying rack is placed near a fireplace, and you can use fish-traps to stock up on food for the winter time.

Stockpile sodas ahead of time, and stockpile adequate non-perishables and medicines and herbal medicines, not only for post-combat recovery, but in case you are forced to drink dirty water if you haven't yet found a cooking pot.

The good news is, you will find a cooking pot near the Modern Axe, if you follow the recommended run-through, with two additional cooking pots in abandoned camping areas merely a stones throw away from these same routes.

After surviving your first winter, you need to use the opportunity of warmer seasons to build up enough strategic resources to begin embarking on the mountain cave system run which is one of the most challenging runs where you may or may not die.

You will need more advance weaponry, and should reserve these (sticky bombs, molotovs, arrow bombs) for when you enter the lake cave systems, which takes you through the interconnected mountain cave network, which is massive. Be prepared.


This is preparing for the mountain cave network.

Once you've discovered all of the mysteries in the mountain cave, you will emerge from it a champion, equipped with new blueprints, Night Vision Goggles, and a Hunting Rifle.

Remember to use any deep water to your advantage inside of caves, as the enemy is unable to swim, and there are several ways of manoeuvring your position to deliver critical damage. Making use of mutant armour and strategically backtracking, even using traps, will be critical.

But entering the mountain cave without Bone Armour, reserve armour, and not collecting enough mutant armour may be unwise and extremely dangerous. Use the Cross against demons, and remember that you can use the cross to scare off mutants before they decide to charge.

After emerging victorious from the mountain caves, you should now have all the blueprints and artefact pieces to show for your efforts, and you should get ready for the semi-final game run.


This is for the semi-final exploration cycle.

Pay attention to the way this circles back to the Glider A location. If you didn't start the game from the mountain crash site, you now have the choice of landing at this location and walking to the ice cave for some extra supplies before resuming your glide path.

Alternatively, you can skip this and continue along the glide path, as you already have the can-opener and there are no blueprints to find within that cave. Ultimately, it's your choice.


This is for the end-game cycle.

During this run, after collecting the Pick Axe, you will easily find the solafite ore you need along the pathway that runs through the snowy mountain area. After this, you'll be ready for Item Plating, to enhance your weapons or to craft solafite armour.

You will now have a choice of building the Item Plating machine at your nearest recommended base location, or to glide back to the second, South-Eastern Eyot Lake. Remember, you want to stay out of enemy reach when activating the device to enhance your weapons or crafting solafite armour. For cautious players, I recommend backtracking to a safe location.

The recommended pathway will take you along a route for last-minute ammunition and other supplies you may need to consolidate inventory and supplies. Whatever you decide, after plating your weapons and crafting your armour, you should be ready for the end-game run. For which you will need all the luck you can get. Use this opportunity to take the glider to the key locations along the run path, where more secrets await you.

Make sure you've mined enough solafite ore, plated key weapons, and crafted enough extra solafite armour for the end-game mission. Firepower for the final boss fight is critical. The Hell Cave will be your final destination in the story progression.

Once you enter it, there's no going back for more resources. The Giant Demon inside the Hell Cave is not the final boss you will fight. No when to use Ancient Armour (against the Giant Demon) and when to use Solafite Armour (against the Final Boss), to avoid wasting your armour resources.

Ancient Armour does not protect you against regular mutants (non-demons). Before entering the Hell Cave, remember to check out the helipad landing areas for some last-minute resources, and preparation work. These helipads should be right nearby.

After beating the final boss and emerging from the Hell Cave alive, the game doesn't end there. You now have the choice of remaining on the island, and should you choose to stay, there's some important advice for surviving indefinitely, which involves turning out-of-reach holms on the most South-Eastern part of the map from baron locations into a self-sustainable escape point.

However, due to the current lack of rafts/boathouses, players cannot do this yet. Which means, those holms the furthest South-East of the map have no benefits at this stage for post-game continuation or story progression in a different way.
Sticks and Tricks
Building a base by relying mainly on sticks and stones may seem like a very bad idea to most players, and for good reason. Without a truly effective strategy, it's a terrible idea. Especially because you will need to have at least a small wooden hut to stay warm during winter.

However, there's plenty of time to make those preparations and even do without a hut if you use sticks and stones to build a lightweight but super-deadly base. The added benefit is that it's highly stamina efficient because rocks and sticks weigh very little.

Here are some examples of why they're so useful:
Skull lamp stand

Fish trap finding

Food preservation

One of the best defences is the use of the following inverted punji barrier techniques:

Initially, it won't look like much:

But eventually it can become everything you need to fend off hordes of even the most deadly enemies. It's easy to maintain, but more than that, if you build it correctly, it's almost 100% foolproof, or what you can simply call the "Barrier of Death."

Building it is straightforward, but a few guidelines must be followed:
  • The first layer is a regular punji stick barrier.
  • The second layer is a stick fence spaced just far enough to walk between the fence and those punji sticks safely, within a very tight margin for error. This disables the enemy's run-up leaps, and also confuses its retreat path-finding.
  • The third and final layer is a series of punji sticks that aim through the fence in the opposite direction.

Essentially, what all of this does in combination is that enemies attempting to scale the fence will immediately get hit by the first layer of punji sticks, stagger backwards into the inverted layer, not know where to go, and if not dead yet, the very few lucky ones may crawl towards sudden death, but won't be in any condition to climb back over the fence, and the most extremely lucky ones perhaps may flee early and survive the day.

Next, something I love, that I haven't really seen explained anywhere else yet, are "Deceiver Sticks" as I like to call them:

These sticks are extremely useful in physically manipulating not only the enemy's range of motion, but to shield you from key angles of attack by spearthrowers or other enemies with exceptional jumping skills in critical ways.

Here's an example of the spear-catcher functionality:

Followed by sudden death using the enemy's spear:

What's more is that strategic shielding and archer perching becomes less bound to tree houses and can be made more dynamically terrain-bound. For example:

I'd be remiss not to include the little walkway between the rocks:

You can also be more creative to add superficial supporting structures that make it more difficult for mutants that can leap quite high to reach you:

This is how sticks and stones can indeed be a form of psychological warfare through enemy logic manipulation, such that enemies with unique AI can be prevented from catching you off guard.

You will notice that this stick base was built along the "Kukri Route." We previously touched upon the importance of the Kukri Route. Here's something else to consider for post-game continuation. You can head back to this Kukri Route, and build something unique there:

You can always turn this pyramid base into an actual golden pyramid, adding a repeller device and a solafite generator, to establish your own tranquil space for selective peace and relative harmony:

Don't make the mistake of building a pyramid base and not insulating it. The same applies to roof level floors during winter. Use the double-roof method, and you'll avoid losing progress:
Rafts and Resource Transportation
If you're looking for the best mid–late game raft-building locations for a custom port or out-of-reach docking station, look no further than a corner of the map perfectly triangulated near the south-eastern corridors, ideal for a raft-based strategic approach:


However, I'm not going to showcase some elaborate build at this location. I'd rather leave that entire process up to your own creative endeavours. Instead, I'm going to show you the simplest, most effective survival raft setup for taking the necessary items with you and subsisting on the lightest raft build possible, with as much QoL on-deck as possible...

Here's an example:

Try to make it even better yourself, think of how you want it set up for convenience. Consider how you want your port or docking station to look as well. What features do you want to allow you to resupply munitions or restock food easily when venturing back and forth? For example:

You'll notice a way of transporting logs using ziplines. But there are now other ways of doing this too, using rafts or boathouses. If you choose a sled instead of a log holder, you may bump the sled off the raft, and good luck getting it back on board.

Here are some examples:

Making a one-way trip with the sled built on a raft can be useful. You'll get more logs to your target destination using sleds built on small rafts than using the small log holder, and it will cost you a lot of sticks for this one-way drop-off tactic. But, if that's what you need, the option now exists.

To subsist, you may wish to opt for a solid combination that won't fail: One houseboat that is your Out-of-Reach site, and a small raft that is your new mobile OpSec reconnaissance, hunting, and gathering unit for coastal–inland operations.

This way, you can survive in peace while preparing for war.

For example, the houseboat can be fully rigged:

Now, finally, you can use the small raft in combination for a more comprehensive ocean rig:

The power to choose whether you want an ocean base or a land base is now finally entirely up to you, and you have total freedom of motion. You can also build a launcher on your boathouse, and begin aggressively intercepting your targets from above or surveying the area to plot your course. Add spotlights to your houseboat, add a glider launcher and glider holder to your docking base in the event you've circled back to your dock or port without the raft/boathouse which you left with (and need a quick way to reach it and row it back to base).

For the larger raft, you will move a lot slower without a partner, making it more suitable for multiplayer. Here's example of what's possible:
Operational Security
Some of you may choose an OpSec (Operational Security) approach to playing this game rather than building extensive bases. Doing so can provide a unique opportunity to explore "Sons of the Forest" in a more gritty and mobile fashion that requires continuous vigilance.

It's a no plan, pure-improvization strategy, where you go for what you can see right in front of you, ignoring everything else to seize the immediate opportunity and advantage, and take your own approach to dominating your path.

This is perhaps one of the best ways to play, more fun, which critics often contrast with the GPS reveal-all issues versus "The Forest" where you had to explore and map out the territory.

In my honest opinion, it would have made sense to have both charted and uncharted locations. Where charted locations are closer to the Puffton Corporation's operational areas and the resorts, with the rest of the GPS requiring exploration to reveal the map through satellite tracking. This would make the exploration less spoiled by the GPS revealing every single detail of the map.

Perhaps developers will consider addressing this in a future patch. But for now, you'll have to tackle the OpSec approach as more of a choice than a serious challenge, which I'm sorry about because it does make this part of the Guide less relevant, but maybe still a more fun play-style decision.

In "Sons of the Forest," an effective OpSec strategy is paramount for players seeking mobility and tactical advantage. Given the dynamic and unpredictable nature of the game environment, a blend of offensive and defensive tactics, coupled with prudent resource management, is essential.

One of the best OpSec strategies tailored for such players is perhaps the Porcupine:
Name
Name
Name
Name

As you can see, the Porcupine can come in many varieties and above all is scalable. You can begin with a small and basic Porcupine structure that gives you initial protection as you scale up your defences and expand your main base.

Porcupines are great OpSec outposts that can be dispersed around where you are building a Fortress or much larger basecamp. The idea is they are light on initial resources, easy to set up, and provide a modicum of security and intimidation.

Once you have secured enough Porcupines around a perimeter, as resource-gathering OpSec outposts, you can more easily begin the construction of your Fortress:

With a Fortress established, you can even add your own custom Quality of Life (QoL) structures. An example of a very rudimentary QoL is an lonestanding parking garage for your golf cart:

What's important to remember is for higher difficulty levels, this makes securing your main base more possible. The Porcupine is arguably the best high-defense, low-resource shelter you can craft in this game to create tactical advantages for yourself. They also distract enemies from your main base, which is especially beneficial in Single-player. But also creates a unique Multiplayer experience where your team can coordinate their entire OpSec approach for main base development and maintenance at higher difficulty levels.

More challenging, but definitely a great way to have fun when you work together.

The extra storage space provided by the wall shelves can keep you cognizant of how many small rocks, duct tape, rope, and plant medicines you have available.
So make use of wall shelves if possible inside your Porcupines, as those outposts will require medicine and munitions crafting reserves when enemies decide to swarm your location.

Two things you need is Leaf Armour and a Cooking Pot. But the most important initial tool for keeping your Porcupines alive is the Repair Tool. Crafting a repair tool leverages the close proximity of the structural design of the Porcupine so that quick and critical repairs remains within reach, all while hiding inside of your Porcupine.

You will also notice that initial ambushes, when inside your Porcupine, will result in confused cannibals for roughly 30 seconds and sometimes even an entire minute before they attack. Perhaps to do with visibility.

The leaf armour helps maintain camouflage while the cooking pot optimizes your survival in a dramatic way. So, you need to get these resources early. Therefore, I cannot stress the Golden Route enough, which is the path from the beach crash site to the Kukri.

Spears and Arrows, always have extra

Your ability to keep a surplus of Spears and Arrows within reach will prove vital, so build those birdhouses, collect those sticks, and make sure you have enough small stones.

Out-of-Reach Campsites (ORCs) will save you when all else fails.

ORC Location Example
How to get logs to your ORC
Subsistence at your ORC

ORCs can save you from an inconvenient sudden ambush. They may hold you back in terms of time spent building them, but as the challenge grows, they will offer you valued sanctuary.

Hit-and-Run Tactics (HART) can be used to overwhelm a mob of cannibals into fleeing.

HART is essential to force enemies into a strategic retreat, giving you time to flee in another direction or reach a better vantage point.
Engagement Tactics
Maim, Ambush, Disrupt (MAD) tactics can be explained as a combination of Hit-and-Run Tactics (HART) and the use of traps and/or Punji Sticks placed in a variety of strategic angles that give you a defensive obstacle course that only you can safely navigate.

So that you can Reposition or/and Re-acquire (a.k.a. ROAR).

Maim, Ambush, Disrupt (MAD) tactics in combination with the Porcupine can be extremely effective. By using Shadow Sticks (like the ones in "Treehouse Ecosystem" for tracking time, and building covers that slow the enemy, you can keep track of the time, strategically moving through obstacles, to facilitate MAD tactics by augmenting your campsite with Porcupines and trap varieties. Marking your territory with devastation, so enemies regret encroaching it.

If all of this sounds over-complicated, remember these two simple rules to staying alive:
  • situational awareness
  • appropriate proaction

Use fear but don't rely on it. Whether it's the severed head used to scare away muddies, the lucky arrow shot that dismembers a giant's leg clean off leaving it to bleed to death, or the traps giving you confidence luring your enemies to their demise, you always need backup options.

These ideas might seem great, but they don't always go as planned:

Being reactive, and not proactive, that's like the kiss of death (getting you in a bad situation you're not prepared to deal with and unable to escape, all for underestimating a certain scenario).

Name
Age
Age
Age

MAD tactics, that allow you to ROAR with HART are the key to surviving even when you have little initial firepower, or end up dispensing a lot of fire-power during some interim period of a difficult mission or an emergency, and are left in need of a way to survive a potential horde by constantly moving without wasting stamina.

Without effective MAD tactics, your constant need to evade every attack, rather than breaking the circle to line up your opponents and stay in motion, can more severely and even critically drain your stamina, and without energy for your HART, you'll eventually lose too much stamina to even ROAR.

In real-life OpSec, you would encounter situations that often require being aware of how to apply a lot of these same principles. Which is why counter-insurgency in jungle or forest environments often also require the use of ranged weapons, surveillance, trapping, close combat if the opportunity is ideal, and other techniques strongly overlapping with these principles.

This is what makes the challenges that feel extremely overwhelming easier to overcome. All you need to do is plan and take early action to stay prepared, seize the opportunity, and take the initiative, especially at higher difficulty modes.

If you aren't properly prepared, run away.
Sometimes that means running away really, really fast:
Breaking the Circle
Your enemies will immediately attempt to surround you.

Breaking the circle means strafing (or sometimes strafing and jumping) out of the way, so you continuously line up enemies. This prevents them from attacking your blind-spot.

This may occasionally also result in a spear from an enemy being thrown into another. Always break the circle and control your distance. That's critical. Once you get used to doing so, and timing your parries and strikes well, you will soon begin to master hand-to-hand combat almost flawlessly.

There are common ambush patterns cannibals will try to use as they increase in number. However, the terrain will influence their decision-making. Try to ensure the environment works in your favor.

Common Ambush Patterns:

Watch the way an enemy moves. The direction an attack party approaches from gives you good information, what to expect in future. But they may still try a new angle. Be ready. When certain cannibals give chase, they may be of the type you don't want to engage but lead into a trap.

Breaking the Circle:

Remember, if you break the circle, the enemy closest to the side you are breaking towards will be your first target. You can strike that enemy with a torch and then focus on parrying the next, to deliver a counter attack. Or, perhaps you choose to concentrate all your attacks briefly on the first enemy.

Whether you stun an enemy to fall down forwards, make them fall backwards by throwing stones against their heads, or they fall back due to a well-placed attack, you want to immediately dismember an exposed limb, as soon as they hit the ground.
Know Your Enemy
Demons aren't really worth mentioning much because they rarely appear in most of the game, and are easy to defeat using the cross (while simply remaining evasive).

Attribution: Pumpkinjacko25

The Armsy in the previous image is perhaps one of the most dangerous entities you will ever come across. If you ever do, it won't be smart to attack it close-combat or melee style. It has very strong health, no specific weakness, and is ruthlessly aggressive. It will hunt you down until you lose stamina. Use explosives, or ranged attacks, from a tree or across deep enough water.

The Creepy Virginia is also highly aggressive, but is very minimally weaker at the top of its head compared to the rest of its body. Therefore, the best attacks are directed at its head.

Unfortunately, John 2.0 also deals a lot of damage, and is uniformly strong, meaning no part is weaker than another part of its body. It's insanely aggressive too.

But, the one that scares me the most, due to its very brutish attack style and potential early encounter in one of the caves, is the Legsy. Although the Armsy is far more dangerous than the Legsy, you only encounter the Armsy in the end-game phase. The Legsy has a domineering nature and is also uniformly strong.

The Twins and Fingers may seem scary, but they are far less intimidating due to their innate weaknesses and limitations. The Fingers is naturally aggressive, yes. But its legs are particularly vulnerable to a spear or any sort of arrow or melee attack. Which brings it down into a kneeling position very easily. I recommend a spear.

However, the Twins are easier to out-manoeuvre when you run sideways and keep facing it. Taking advantage of its slower turning ability when it's charging. Something the Creepy Virginia has no problem doing is moving right at you. The Twins much less so than it seems.

The Twins can turn fast, but when moving forwards, they can't change direction as quickly as the Fingers or many other mutants. It's stronger than the Fingers, and its attack sequence isn't something you want to try and stop (as with most mutants). You want to time your attack.

The Twins and most mutants' weakness is simple timing. For the Twins, this means repeatedly attacking their inner arms, which sends them into a quick retreat. Again, a spear will do. You want to typically use that brief opportunity when the Twins retreats to try and strike it with a torch. Repeating that a couple of times will make quick work of it.

Should you choose a melee approach, here is my recommendation for Twins:
- Spear to the inner arm, torch, evade, repeat.

Should you choose a melee approach, here is my recommendation for Fingers:
- Spear to the leg, torch, kukri, repeat.
- Spear to the leg, torch, axe, repeat.

My best recommendation aside from conserving explosives for the most dangerous mutants, and timing your use of explosives (or molotov cocktails) really well, is to have energy drinks and energy mix stocked up before entering the caves. When you encounter the more powerful mutants, you may end up doing a lot more running than you bargained for and to remain evasive you need copious amounts of energy drinks or energy mix.

In multiplayer, you'll want to hotkey an energy drink/mix, but in singleplayer the game will pause when you open your inventory, so take advantage of that fact.

Sometimes a strategic retreat is the best way to plan the ultimate comeback. Knowing how to ambush enemies helps. Hiding in a bush to remain undetected will result in one-hit kills of regular cannibals from behind, if you can remain undetected. However, the one-hit kill must be delivered to an exposed leg, upper-back, or head. Using a knife will only down your enemy, but a subsequent stab or two, to an exposed area, will finish them:


But this will only get you so far, and executing a proper ambush when you are alone takes a lot of time. You simply can't always rely on ambushing the enemy, especially when you're the one being ambushed.

Let's suppose you are being ambushed by a bunch of regular cannibals. What now? If you wish to conserve munitions, the following melee tactics will work surprisingly well against cannibals:
- Strike with torch, quickselect katana/kukri/axe, attack while strafing, and repeat.
- Stun, once fallen, quickly dismember the exposed arm or leg with an axe.

Both of these methods will bypass enemy armour and blocking.

Attribution: Pumpkinjacko25

However, when dealing with various cannibal types, there's a lot more to consider. Frank has the most health and will set himself ablaze to charge at you. Followed by Henry (perhaps the most dangerous, best attacked from a distance).

Igor has makeshift antlers and will charge at you like a moose or buffalo. Igor is dangerous but has slightly less health than Henry. Igor is best lured towards a trap by running away strategically.

Then there's that guy I call Albert (a regular cannibal, but the one who wears the gold mask).
Elise is the female with sharp weapons attached to her hands. She has less health than your typical Albert but is more dangerous.

Elise is the most aggressive of the females and will engage in a flurry or acrobatic attacks you should try to side-step really fast or jump out of the way to avoid.

Eddy the spear-thrower is particularly annoying. But, we've already dealt with him using his own weapon against him. Eddy is just as weak as Andy, Billy, Carl, or Danny, and their female companions, Angel, Destiny, Crystal, and Brandy.

Attribution: Pumpkinjacko25

The strongest cannibals, not necessarily the most dangerous, are typically the heavy giants, who may not have armour on their heads, but they still require multiple arrows to the head, at least three, before they stop getting up again.

Whereas the fat cannibals are easier to eliminate if you dodge their attacks. The fat cannibals can be killed with a simple arrow or spear-throw into the head (as they come running towards you).

Attribution: Pumpkinjacko25

Whether giants, fat cannibals, or regular cannibals, the ones wearing a golden mask are the leaders of a specific party or ambush. Kill the leader, and the rest instantly be more afraid of you.

They may run away, but they will return with more.

Muddies are annoying, and best scared off using a decapitated muddy head. This keeps them at bay, but they may still try to hide and flank you. They are about as frustrating to deal with as mutant babies. Except, they can run away very fast, so it's a bit of a challenge. Then, there are sharks. Best dealt with using a spear, arrow, crossbow, or gun. The choice is yours.
Extreme Difficulty Testing
To test if this game guide is genuinely worth your time, I made my custom game extremely difficult, and used the results from that experience to refine this game guide.

Please note, you'll finish the game a lot quicker on easier settings. See the settings below which I used to make extra sure this guide holds up:


By keeping the season long, starting in winter, it's the most difficult. Short days and long seasons mean you get hungry and thirsty very quickly but the resources will be the scarcest possible.

The only reason I kept precipitation at default instead of high or low is because it's an advantage in terms of drinking water when high and also an advantage in terms of less cold or wetness when low. It's the only thing I kept neutral. Even though I hardly relied on rain water because of the pot.

Results:
Of course, I died several times initially. However, I learned a lot along the way, which went into improving this guide. Saving regularly is extremely important. You will die, very likely, at these game settings. Especially in the early stages, as your play-style adapts to a more extreme difficulty.

However, utilizing this guide has proven extremely useful throughout. I was able to easily zipline logs for constructing the waterfall, eyot, and cliff-top bases. The base locations recommended in this guide genuinely are the best I've come across after scouring the entire map.

There are other locations with some potential but poor access to resources which makes them a bad choice at the highest difficulty. This game guide, therefore, satisfies the extreme. My advice is to use tarps to save regularly, pay attention to trap placement, and prepare well.

Go ahead, master your skills through expert strategy, and make it an experience to remember.

You might not feel this guide is complete. But this guide is not meant to tell you exactly what to do. It's not an instruction manual. It's not supposed to dictate your every move.

You will find at extreme difficulty settings, preparing for the lake cave is very difficult. The grind is intense. In fact, the grind is beyond intense. There are no words. It's extremely painful. Remember, you won't always have luck on your side or have it easy.

It will get hard, Kelvin and Virginia can only help so much:

But with this guide, no matter how hard it gets, you will have the best chance of survival. Remember, the base marker locations, especially the waterfall base before entering the lake cave, will prove critical to your survival when enemies become overbearing. It gives you safety, to get beyond the event horizon of the story, to consolidate resources for the lake cave.

The lake cave, or mountain cave, will be the most intense grind.
Cave Safe Spots - Part 1
Many players appear to require additional guidance on identifying safe spots within the diverse cave systems of "Sons of the Forest." Therefore, I have compiled a comprehensive list of these optimal locations where you can remain completely secure and effectively neutralize your adversaries.

Rebreather Cave
Best Weapons
How to Reach
Goto Coordinates
Image
Ranged
Parkour or use the goto coordinates.
-527,6 18,4 1426,6
image
Ranged
Parkour or use the goto coordinates.
-507,9 15,6 1417,3
Ranged
Parkour or use the goto coordinates.
-487,0 17,4 1436,7
Spear
Crawl underneath or use the goto coordinates.
-440,6 16,4 1431,1
image

Rope Gun Cave
Best Use
How to Reach
Goto Coordinates
Image
Spear or ranged
Parkour or use the goto coordinates.
-1139,1 114,4 -204,9
Spear or ranged
Parkour or use the goto coordinates.
-1050,1 115,8 -266,9
Spear or ranged
Parkour or use the goto coordinates.
-1060,9 115,9 -253,3
Spear or ranged
Parkour or use the goto coordinates.
-954,7 119,9 -288,1
Spear or ranged
Parkour or use the goto coordinates.
-940,7 120,9 -265,7
Spear
Crawl underneath or use the goto coordinates.
-1006,2 96,3 -374,9
Spear
Crawl underneath or use the goto coordinates.
-1153,4 121,7 -321,0
Spear
Crawl underneath or use the goto coordinates.
-1184,9 125,5 -305,7

Shovel Cave
Best Use
How to Reach
Goto Coordinates
Image
Machete or ranged
Parkour or use the goto coordinates.
-533,3 181,9 139,7
Ranged
Parkour or use the goto coordinates.
-483,4 148,3 -9,5
Spear or ranged
Parkour or use the goto coordinates.
-508,9 141,8 -37,2
Ranged
Parkour or use the goto coordinates.
-558,7 144,2 -82,3
Cave Safe Spots - Part 2
Continuing from the previous list of caves, one cave system that players really want to know safe spots for is the larger lake or mountain cave system. Because this is one of the most difficult caves within the game, especially at maximum difficulty settings.

Lake or Mountain Cave
Best Use
How to Reach
Goto Coordinates
Image
Spear
Crawl underneath or use the goto coordinates.
-488,1 280,0 -583,4
Ranged
Parkour or use the goto coordinates.
-490,3 287 -584,6
Spear or ranged
Parkour or use the goto coordinates.
-166,9 161,2 -409,0
Spear or ranged
Parkour or use the goto coordinates.
-152,8 155,0 -390,6
Spear or ranged
Parkour or use the goto coordinates.
-86,6 150,5 -455,6
Ranged
Parkour or use the goto coordinates.
-63,5 156,7 -346,6
Ranged
Parkour or use the goto coordinates.
-1,2 154,0 -392,1
Ranged
Parkour or use the goto coordinates.
-9,4 154,7 -396,6
Ranged
Parkour or use the goto coordinates.
45,0 153,6 -443,0
Ranged
Parkour or use the goto coordinates.
80,3 158,8 -453,5
Ranged
Parkour or use the goto coordinates.
75,1 153,4 -522,0
Cross
Parkour or use the goto coordinates.
-321,6 204,6 -802,3
Cross
Parkour or use the goto coordinates.
-343,0 205,5 -825,0
Cross
Parkour or use the goto coordinates.
-358,7 204,4 -844,6
Cross
Parkour or use the goto coordinates.
-465,3 204,8 -893,7
Ranged
Parkour or use the goto coordinates.
-499,2 205,1 -991,6
Ranged
Parkour or use the goto coordinates.
-509,1 206,7 -1001,2
Cave Safe Spots - Part 3
Continuing from the previous lake or mountain cave, this cave is technically the second part of the lake or mountain cave. But for purposes of distinguishing, we can refer to it as the rifle cave.

Rifle Cave
Best Use
How to Reach
Goto Coordinates
Image
Spear or ranged
Parkour or use the goto coordinates.
894 244,7 -380,8
Spear or ranged
Parkour or use the goto coordinates.
788,0 238,2 -383,1
Spear or ranged
Parkour or use the goto coordinates.
776,0 238,9 -332,7
Spear or ranged
Parkour or use the goto coordinates.
774,5 235,7 -321,0
Cave Subsistence
Utilizing the cave safe spots previously discussed, you can subsist within caves using grow boxes and strategic setups that help you stay fed, dry, and rested. Another important aspect of laying claim to the cave systems is that clearing them out means they now belong to you.

Those safe spots are subsistence zones where you can prepare yourself for ambushing a cannibal camp, or simply retreat to safety. Keep your friends close but keep your enemies closer. Use caves to get the ultimate tactical advantage. Thriving where even the toughest cannibals fear to tread.

Hint: Ask Kelvin to fill stick holders and rock holders that you place near a cave entrance. This will allow you to restock before you go deeper into the cave system, to craft important items for subsistence or trap-making.

Ziplines between certain safe spots can help you avoid running out of stamina.


Beating the Caves
Foreword:

Given the extremely unforgiving difficulty settings, my strategy will be to have Kelvin fetch me a non-stop supply of sticks and rocks. This is extremely important, as I'll need to craft enough bone armour, a bow and enough arrows, a spear, collect enough energy drinks, and boil meat.

This must be done before entering the first cave. It seems too easy, and some of you are probably thinking, "No ways, not with those insane difficulty settings." Oh, but there's more. When it comes to this degree of difficulty, you need to be strategic. You essentially want to use energy drinks and bone armour to make the run towards the re-breather chamber as quickly as possible.

The reason is because there's a crawlspace there. You'll want to utilize that crawlspace to kill your enemies out of reach. In fact, all of the cave systems have a hidden advantage point, or choke point, where you can lure enemies to their death.

This is either a side of the cave you can scale, a crawlspace you can hide underneath, or a nearby body of water you can use to drown your enemies (provided you know how to cautiously lure them into it without getting hit). This will significantly improve your survival odds.

When entering the cave for the rope gun, or zipline gun, there's a nook just in front of the cross pickup, where you should place a flyswatter trap. The purpose is to hold back your enemies, once again taking advantage of the terrain to bottleneck them into a kill corner that's safe for you.

Rebreather Cave
  • After the hanging skulls, there's a little waterfall, where you'll see a lifebuoy. That's where the danger begins. Save before you go down this waterfall.
  • Going straight, you'll see a light pointing at another cave passage ahead. Do not go there first.
  • Keep left, running passed all your initial foes, until you pass the life jackets. There's a crawlspace, move through it immediately.
  • Kill the shark, and take the rebreather. But, do not swim out yet. Head back to the crawlspace.
  • Here's where the challenge begins. You must now lure your enemies to that crawlspace from other parts of the cave.
  • Once you've reduced the threat in number to perhaps one Fingers, you can take it on directly. Spear to the leg, dodging it's attack, and when it kneels, torch it, stick it with the spear, and repeat.
  • Swim out of the cave once you've cleared it completely and taken all possible loot.

Rope Gun Cave
  • This is a tricky cave system involving a lot of dangerous areas. However, once again, there are crawlspaces you can use to lure most of your enemies too, as well as a perch within one of the tunnels.
  • This sounds cowardly, but it's true. You must save before you enter the danger zone in the caves. Then, run, all you do is use your torch and run. Get a complete view of the cave system. Avoid enemies.
  • Eventually, you will stumble upon these perches and crawlspaces where your enemies cannot reach you but a spear can reach them.
  • You'll get the hang of this, and soon, you'll rely on this so often, as you reach more difficult caves, the concept of running through to find crawlspaces and perches, as well as strategically retreating to safety, will destabilize and unbalance the mutant activities.
  • By disrupting their routines, you're able to get the advantage, controlling them by their aggression, luring them into bottlenecks, kill corners, and traps you place inside the caves.

Shovel Cave
  • By now, you should be able to combine all the tactics you've learned in the first two caves with trap-setting. You will need to learn how to set traps inside of caves.
  • Alongside the other strategies, the traps you set are essentially what's going to guarantee you tipping the odds into your favour. As you move back and forth from safety to danger to reset or place new traps, you will learn trap placement.
  • Trap placement is essential in caves, as they are best placed in corridors as opposed to wide open spaces. Use your tarps, save regularly, and you will get passed the legsy mutants.
  • Utilize traps and explosive arrows against legsy. Remember, at the high difficulty settings this game guide is tested at, you shouldn't feel ashamed of having to leave a cave and return later.
  • Sometimes, leaving to prepare better and then returning when ready is part of the game.

Maintenance Bunker A
  • This bunker systems is relatively straightforward and easy to clear. Simply stay vigilant.

Dining Bunker
  • Leaving to prepare better and then returning when ready is part of the game. I'm repeating this because it's important, as you'll discover it is true for this bunker and the next at the highest difficulty settings.
  • Utilize the same principles you've learned from the previous cave systems. They apply in bunkers too. Lure enemies into traps. Stay out of reach.

Entertainment Bunker
  • Before entering this bunker, ensure you're well-prepared after exiting the previous.

Maintenance Bunker B
  • Here, you'll find the compound bow and various other supplies.

Lake Cave A
  • Before entering this cave, ensure you're well-prepared.
  • You will need resources for placing at least one Uber Trap.
  • You will need explosive arrows.
  • You will need time bombs.
  • You will need hand grenades.
  • You will need the pistol and shotgun with enough ammunition.
  • You will need bone armour.
  • You will need hide armour as a backup.
  • You will need plenty of energy and health mix and pills.
  • You will need fire arrows too, likely.
  • You will need everything.
  • When completing this cave, do not celebrate too soon or move on too quickly to the next bunker.

Residential Bunker
  • After the first lake cave, you'll need to take your time to consolidate your resources again.
  • Once consolidated, almost back to the same level, complete this bunker.

Maintenance Bunker C
  • You should be fully stocked up on solafite from the solafite hill area indicated on the map.
  • Use this maintenance bunker as an opportunity to consolidate your resources. You want to craft solafite armour at a location not too far away that's safe from mutants. The cliff-top base location. Indicated by the north-western base marker.
  • Return here to consolidate some more and ensure you have all the resources you possibly can have for the end-game.

Hell Cave
  • There's no turning back. Do not waste your resources fighting demons. Use the cross and ancient armour.
  • After killing the giant demon, you want to switch out of ancient armour and into solafite armour.

Afterword:

I died several times. The lesson being, use your tarps to save regularly as you make progress. But don't save when you've wasted critical resources. The section to this guide called "Cave Subsistence" is the most important for reaching progressive milestones.

You want to be able to reload instead of restart your game. So, make use of the cave safe spots mentioned earlier in this guide. What I learned was the earlier mentioned tactic of luring them into choke points worked extremely well. It was a combination of this and the other methods mentioned that helped. There are several places in this game you can lure enemies to for the advantage of killing them out-of-reach.

That's the most important: You control the Rules of Engagement.

Sometimes you have to get them to chase you. They will chase you from one end of the cave to the other. If you can run it, then the mutants can follow you.

Remember:
  • Stockpile firepower.
  • Find crawlspaces and perches.
  • Pay attention to trap placement.
  • Save your game regularly.

Use this to your advantage. Mutants are not your greatest threat, a bad strategy is.
Uber Trap Explained
You may be thinking, "This trap is absolute junk. It's so unlikely for a cannibal to ever wander in it, and it's very expensive for the protection it offers versus a reinforced punji-stick setup."

That's because the Uber Trap is ideally used in the cave systems. There's a reason why this trap is recommended to be obtained before entering the very large mountain cave area. By investing your time and resources properly, you can place multiple Uber Traps inside the cave system.

My recommendation, on higher difficulty settings, is to try to set up at least six of these in the large mountain cave system. Using three of them for a retreating defense and three more for an advancing defense. This way, you can always run back, to disassemble the previous trap, and reassemble it at advancing positions, as you progress through the cave.

This does mean it will take you longer to complete your mission, yes. However, it will also ensure that you're properly protected at higher difficulty levels. This way, you don't have to expend all your resources and force your way through at high risk but can pace yourself.

Even if it means leaving the cave and returning later with more resources to properly clear it.

The Uber Trap is ideal for the cave systems as the narrower space will often guarantee that mutants can be easily channelled or lured into the Uber Trap. This will prove especially useful against much tougher mutants, like the legsy. However, at higher difficulty, with structure damage enabled, you should be careful not to use explosives near these traps if possible.

I recommend crafting fire, poison, and explosive arrows too, and collecting bone armour.
The bone armour will serve you well. But try to craft hide armour too, as a backup.
The North-Western Eyot
An Out-of-Reach Campsite (ORC Site), where no enemies can reach you for 3/4 in-game seasons, conveniently on the island's northern hemisphere, offering an excellent glider launching/landing site.

Log Transport
Insulate Roofs
Repair Walls
Log Transport
Insulate Roofs
Repair Walls
It makes base-building during warmer seasons easier and safer on the Eyot when you use ziplines to transport stones and logs.
By insulating the roof, the highest floor right up against the roof can be utilized without getting cold in the winter.
Always ensure that you frequently repair the perimeter to avoid having to lose progress.

You can create a simple Tower Base like this:

Or, you can build a version that contains a Granary for a type of food storage focus.

Or, you can swap out the Granary for a Skull Room instead:

It's all up to you and what you need the ORC site to facilitate. A defensive retreat, a food storage facility, an armour store, or a balance between all three? It's your strategy that matters.

Tip: When you've built a building, a great way of ensuring you have a perfectly square perimeter wall around your base is to lean logs against the corners of your base and then try to make a straight wall using those reference points. Only straight walls can be used to build gates.

Don't forget to sharpen the top of your gate walls too. When winter arrives, and the base isn't up to scratch yet, leave it behind. Don't stay there, otherwise the enemies will take it apart to get to you. If you leave it, to tough out the winter, you can return after winter, and will have 3 whole seasons to finish your base-building safely on the Eyot.
The South-Eastern Eyot
An Out-of-Reach Campsite (ORC Site), where no enemies can reach you for 3/4 in-game seasons, conveniently on the island's southern hemisphere, offering an excellent glider launching/landing site.

What makes the South-Eastern Eyot particularly unique is the vast amount of water that surrounds it, the beautiful and captivating view of the snow mountains, and the sense of being truly remote with enemies rarely seen.

It's important to know, there's only one place for ziplining logs onto the island, but this matters not because the abundance of trees more than make up for it:

You can then use a log sled to quickly move the logs to the other side of the lake island:

Due to the slender shape of this eyot, you'll need to consider adapting your base accordingly. Here's what worked out the best for me and provides a truly fierce defensive position that can only be made more deadly with time:

As you can see, the two Eyot lakes mentioned in this Guide provide players with a unique advantage, a place to stay 3/4 seasons where you will be completely safe and out of enemy reach. Here, subsistence and combat preparation can be easily orchestrated. With a glider, the ability to reach other locations that are safer during winter give extra peace of mind to players.

Next, we'll take a look at one—if not the only—location that is safe 4/4 seasons (or 100% of the time) from base destruction, and still has the best access to resources I've come across in the entire game. Moreover, it's a place that players can develop quite significantly, but will initially require being methodical and very strategically organized to realize.
Cliff-top and Cliff-side Bases
On the image shared in "Secret Symbols," the final iteration of the map with optimized pathways also reveals two base markers in the far upper-right corner, on the North-Eastern shoreline of the island. These are two very special locations, although they are pretty remote from story elements within the game. These two base-building locations offer a very unique experience.

That's why, for the sake of full disclosure, you can see for yourself if these locations have value to you for building a base. Here's an aerial view of both:


One is very spacious and open beach with some shallows but no enemy camps in sight, ideal for constructing a beach base. Then, on the second image, notice the out-of-reach and relatively flat cliff surface areas, offering a excellent place to build a cliff-top base, perhaps even using a rope, making it easy to climb up and down for an intriguing strategy.

Here's an example:
Cliff-top
Cliff-side
Cliff-top
Cliff-side
Cliff-top
Cliff-side
Cliff-top
Cliff-side

The cliff-top base was constructed beginning with a well-placed lookout tower, allowing the player to easily access the top while resting the base independently, so that if the bottom is destroyed, the cliff-top base will still remain perfectly intact and out of enemy reach. The cliff-side base is easily constructed using a lean-to prefabricated structure, placing it as close to the side of the cliff as possible, with enough levels to allow for subsistence, medicinal farming, and fishing.

You can customize the concept any way that suits you. This is only a recommendation for the fundamental aspects that will get you started. Personally, the cliff-top base is my favorite. But the cliff-side base is also near an excellent open beach for creating more elaborate base structures. It depends on your strategy. Consider what matters more to you: Out of reach or large scale?

Both those locations are ideal for resting and preparing yourself for the final mission through the Hell Cave, and to beat the final boss of the game. But the cliff-top is recommended for the highest difficulty setting, as it provides the most reliable safe space from enemy raids or mutant parties at the location closest to the Hell Cave or final game run. Making it a worthwhile option.
The Ultimate Base Location
There is one base-building location that is perhaps one of the best-kept secrets in this game. But it happens to be one of the trickier places to build due to the difficulty of placing the logs.

However, I believe this location exists by design, as it's surrounding by deep water that never freezes, even during winter. This makes it one of the safest on-land locations for a base in-game.

The reason why it's not as widely preferred by players is either because they don't know about it or because it's not one of the easier initial base-building locations and is a distance away from the initial caves and bunkers required to progress in the early phase of gameplay.

What makes this base extremely useful is as a safe space to consolidate your resources and devise a solid strategy of preparedness before venturing into the larger lake cave nearby.

You can access this location at the following co-ordinates by using the "gotocoords" console command after typing "cheatsticks" to activate the console (or simply by navigating to the GPS location provided): -975.4 227 -653.6


Important Hint: Remember to insulate your roof system for winter. Double-roof your buildings so that the highest floor right up to the ceiling isn't cold as ice. This requires additional beams, quarter logs, and split logs (but is very much worth the effort if you plan to utilize all the space right up to your ceiling, or when building a base with more of a pyramid-like structure to it).
Treehouse Ecosystems
As you grow your base-building skills, you'll become better at identifying unique opportunities for construction. Often, the most difficult of these are an appealing treehouse ecosystem that satisfies and is effective at gaining the upper hand in combat and survival.

For the purposes of showcasing how treehouses can be integrated into the ecosystem, we'll consider the waterfall location previously mentioned. Here are some examples:

Make effective use of ziplines and the geography for defensive angles, using spotlights, skull lamps, or wall torches to detect approaching enemies from a distance:

With various angles accessible with ziplines, bridges, and rope, you'll be able to safely manoeuvre around your enemies. However, to ensure enemies don't leap onto your treehouse structures or bypass your defenses, you need to cut down trees that too closely surround them:

Take full advantage of where your ziplines can reach to make the treehouse extensible to important access points. For example, by the waterfall, you may wish to reach loot at two locations quickly:

Build with the idea of everything you need being within a single line of sight but from multiple angles (or perches) from which you can attack your enemies:

One helpful advantage is having access to vital resources that are always available. For example, a river that contains fish and does not freeze over during winter provides the best location:

Know how to read your environment to keep track of the time as you prepare your next moves, consolidating resources, and stocking up for battle. One idea is using antenna sticks to cast a shadow. Here, the shadow cast by the antenna sticks on this building will cross the two sides of the river, signalling a critical interval for restfulness and making preparations:

Because when winter comes, you don't want to travel too far to survive:

And you don't want to face the darkness alone without a plan:

Cannibals can be difficult to catch off-guard. When they retreat, it's usually the best time to take the fight to their campsite. Be so well-prepared that you can defend your position without serious damage and still have enough firepower to immediately attack their camps as they flee.

By taking the fight to the nearest enemy camp, and extinguishing that campfire, fewer cannibals will ambush your base. However, this may disrupt the cannibal ecosystem, leading to other threats taking their place. It all depends on when and where you are, and how thoroughly you've cleared the caves.

Certain locations are more likely to see mutants wandering around due to solafite proximity. Leaving caves uncleared, and with open entrances, may result in dangerous consequences at unexpected times. Growing more dangerous each passing day.

Especially if your base isn't safe or secure enough. Which is why an effective base by the waterfall (where this treehouse base is demonstrated), or bases at the North-Western and North-Eastern Eyots, are particularly helpful when you need to run instead of staying to fight.

Also remember that it's safer to sit in a chair or on a couch or bench for rest than to fall asleep in an exposed, outside tent. Because you may be awoken by a serious threat before you're well-rested.

The key to taking no nonsense from a cannibal or mutant attack is ambush readiness:
Even More Base-building Tips
There are more beautiful places for building in this game:

But, you shouldn't underestimate what's often right in plain sight:

Every location has potential and it's up to you to utilize it in the best possible way:
Gliding to Higher Altitudes
Yes, it's possible to glide higher and higher up, to increase your altitude, and not just gliding in a manner that causes you to lose altitude. It requires a very brief nose dive, followed by a quick upturn that isn't too vertical, and then tapering off the incline until you level out again.

Rinse and repeat.

Use the green level ball to assist you in staying level.

Example:


This can be especially helpful if you found a glider before you're able to obtain the Glider Launcher blueprint. Allowing you to gain access to higher ground. This works by taking advantage of the offset between downward acceleration and the upward deceleration, for an altitude gain. Done right, you should be able to quickly gain a significant doubling or more of altitude within 60 seconds.

Of course, unless you're already very high up in which case the altitude gains diminish in ratio with your previous altitude, but the gains remain marginally the same. It just appears to be less effective once you're already quite high up. But the incremental altitude gains don't change if you manoeuvre consistently. So, no worries. You can always glide higher if you need to reach something.
Winter Survival
This can be kept short and sweet based on everything we know to be true about the game.
Before winter, get to the location mentioned in the "Treehouse Ecosystems" section of this guide. The same location as discussed in "Treehouse Ecosystems" offers you the best survival advantages for the winter.

One thing I don't like is rehashing old news. But, this happens to be one of the best locations for winter survival too as you will discover. As explained regarding the coordinates, those shallows are surrounded by waters just deep enough for enemies to not be able to reach you. They don't freeze over during the winter season. This isn't a must, however, it's highly recommended, especially playing on highest difficulty settings, to lodge here for the winter.

Once you get there, for the most ideal experience, you'll want to:
- Build in the shallows of the waterfall (use prefab platform structures, as they're easiest to place).
- Double-insulate your roof system for winter (and then your highest floors will not be cold).
- Have a flask full of the recipe "Kitchen Sink" (as this is crucial for surviving the season).
- Have a pot full of the recipe "Egg Nog" (as this will warm you up when cold reduces stamina).
- Have a torch and deer hide armour (as this will keep you the warmest).
- Prepare lots of energy mix (to stay alive inside cave systems).

You will find that this will provide you with the easiest means of surviving winter no matter the difficulty mode that you are playing. You can have the most unforgiving difficulty. That location, and these tips for preparation, will give you the fighting chance you need.

If you're playing on Normal mode, no need for any serious luck.
If you're playing the most difficult mode imaginable, you'll need this location and plenty of luck.

What many players may not realize is winter is ideal for exploring the caves in the daytime. The combination of daytime and cold means mutant activity in the caves are at a minimum. If you have enough Egg Nog and the Kitchen Sink in your flask to travel, and plenty of energy mix for use inside the caves, you will find that mutant activity is at its lowest during the winter daytime.

Your choice of armour depends on the resources you have on-hand, the season, and ultimately the strategy you want to use:
- Leaf Armour is best for stealth but offers poor protection.
- Deer Hide Armour is stronger and much better for cold protection.
- Bone Armour is expensive in terms of duct tape and offers no warmth but is stronger.
- Creepy Armour is obtained only by killing mutants but is stronger than bone armour.
- Tech Armour is even stronger than Creepy Armour but is too high-maintenance to replace.
- Ancient Armour is only useful against demons, not against other threats at all.
- Solafite Armour is the most durable of all the armour types.

Solafite Armour is best created on the Eyots (North-western and South-eastern) before winter, as they are surrounded by water. It's made using bones, solafite ore, and the armour plating device. Where you activate the device is important because the plating device will attract a dangerous wave of diverse mutant spawn that will descend on you pretty quickly.

That is why this recommended location, where the water doesn't freeze over, is ideal as your only safest alternative for generating Solafite Armour during winter. Because when the mutant horde descends, you will be just outside their reach.

However, pay special attention to construct the armour plating device where it is furthest away from both sides of the river (meaning equidistant; meaning the middle). This will prevent Legsy and Holey from jumping across. You, yourself, should also remain out of their jumping range.

While it is unlikely they will cross, if you stay out of reach of them, or inside your base in that location, with a simple repair tool handy and ready, you're most likely to be perfectly find. In fact, I've yet to encounter a single incident where a Legsy or Holey has crossed.

But rather be safe than sorry.
Go-to Blueprint Commands
As you traverse the captivating landscapes of "Sons of the Forest," keep your eyes peeled for the hidden caches containing invaluable blueprint items. Each location holds secrets waiting to be unveiled, along with blueprints that offer the promise of enhanced survival and ingenuity.

Explore the following key locations to discover these coveted treasures.

However, if you want to obtain all blueprints, quickly, for your Day 0 save game file, then you can use the following "Goto" commands:

Blueprint Item
Go-to Commands
Powered Cross
goto BlueprintPoweredCrossPickup
Repel Shrine
goto BlueprintRepelShrinePickup
Solafite Generator
goto BlueprintSolafiteGeneratorPickup
Teleporter
goto BlueprintTeleporterPickup
Hang-glider Launcher
goto BlueprintHangGliderLauncherPickup
Armour Plating
goto BlueprintArmourPlatingPickup
Item Plating
goto BlueprintItemPlatingPickup
Multi Trap
goto BlueprintUberTrapPickup
Spear Thrower Trap
goto BlueprintSpearThrowerTrapPickup
Spin Trap
goto BlueprintSpinTrapPickup
Grind Trap
goto BlueprintGrindTrapPickup
Clock
goto BlueprintClockPickup
Spotlight
goto BlueprintSpotlightPickup
Gore Chair
goto BlueprintGoreChairPickup
Gore Couch
goto BlueprintGoreCouchPickup
Leg Lamp
goto BlueprintLegLampPickup

Please note, the "Goto" command for the Armour Plating blueprint may only work in a progressed stage of the story. But all other blueprints can be collected using these commands.

Remember to use the same "Goto" command twice to access blueprints within caves. This is because the first pass engages the cave/bunker event trigger, while the second pass puts you right on top of the blueprint inside the cave/bunker.

If you notice your GPS isn't working despite being outside of the cave/bunker system, and are struggling to get back to normal gameplay after using these "Goto" commands, simply use the following command to reset your position outside of any cave/bunker system:
"gotocoords -228 20 1425"

If this fails, go to your nearest cave entrance, enter it and then exit it again to fix the bug.

Each location holds not only the promise of valuable blueprint items but also the opportunity to unravel the island's mysteries and chart your own path to survival.

Note: To access the command console, type "cheatstick" on your keyboard and press F1.
Go-to Weapons and Tools Commands
As you traverse the captivating landscapes of "Sons of the Forest," keep your eyes peeled for the hidden caches containing invaluable blueprint items. Each location holds secrets waiting to be unveiled, along with blueprints that offer the promise of enhanced survival and ingenuity.

Let's begin with a weapons run for those players more focused on finding all the weapons (while at the same time being able to complete the story without backtracking too much), and prepare for the end-game battle through the Hell Cave with Timmy.

The following map shows a time-efficient means of doing just that:

However, if you want to obtain all essential tools alongside weapons, quickly, for your Day 0 save file, then you can use the following "Goto" commands:

Weapon Item
Go-to Commands
Taser Gun
goto StunGunPickup
Taser Baton
goto TaserStickPickup
Slingshot
goto SlingshotPickup
Cross
goto CrossPickup
Crossbow
goto CrossbowPickup
Tactical Bow
goto TacticalBowPickup
Tactical Chainsaw
goto TacticalChainsawPickup
Rebreather
goto RebreatherPickup
Rope Gun
goto RopeGunPickup
Shovel
goto ShovelPickup
Pickaxe
goto PickaxePickup
Machete
goto MachetePickup
Katana
goto KatanaPickup
Modern Axe
goto ModernAxePickup
Fire Axe
goto FireAxePickup
Guitar
goto GuitarPickup
Flaslight
goto FlashlightPickup
Binoculars
goto BinocularsPickup
Revolver
goto RevolverPickup
Rifle
goto RiflePickup
Pistol
goto CompactPistolPickup
Shotgun
goto ShotgunPumpActionPickup
Pistol Rail
goto CompactPistolRailPickup
Shotgun Rail
goto ShotgunRailPickup
Flashlight Attachment
goto FlashlightModPickup
Laser Sight
goto LaserSightModPickup
Pistol Silencer
goto PistolSuppressorPickup

One reason for using "Goto" commands is to avoid the risks of cloned pickups despawning at a later stage of development or after a patch to the game.

Remember to use the same "Goto" command twice to access weapons within caves. This is because the first pass engages the cave/bunker event trigger, while the second pass puts you right on top of the item inside the cave/bunker.

You may get stuck in some random slimy mesh when you try the "goto FireAxePickup" command, but that's just a technical issue. Try using "gotocoords -416 78 712" to resolve this issue. For some reason, only the Night Vision Goggles (NVG) pickup location isn't working, and perhaps it's easier to simply spawn the item ("spawnitem 354") if need be.

Again, if you notice your GPS isn't working despite being outside of the cave/bunker system, and are struggling to get back to normal gameplay after using these "Goto" commands, simply use the following command to reset your position outside of any cave/bunker system:
"gotocoords -228 20 1425"

Note: To access the command console, type "cheatstick" on your keyboard and press F1.
Go-to Artifact Piece Commands
As you progress through the mysterious depths of "Sons of the Forest," you'll encounter artefacts shrouded in ancient mystique, each holding a fragment of a secret power waiting to be unleashed. To unlock their full potential and gain a coveted advantage, seek out the following artefact pieces scattered across the island:

Artifact Lunes
Go-to Commands
Artifact A (1/7)
goto ArtifactPieceAPickup
Artifact B (2/7)
goto ArtifactPieceBPickup
Artifact C (3/7)
goto ArtifactPieceCPickup
Artifact D (4/7)
goto ArtifactPieceDPickup
Artifact E (5/7)
goto ArtifactPieceEPickup
Artifact F (6/7)
goto ArtifactPieceFPickup
Artifact G (7/7)
goto ArtifactPieceGPickup

The final artifact piece will not be available until the end of the game's story progression. If you want to bypass that, you can use the command "disablego CaveHEntranceCover" and then use the final "goto" pickup command.

This will take you straight to the final artefact, to assemble it before you finish the story.

If you prefer to finish the story instead, remember to save your game before you enter the Hell Cave with Timmy, to ensure you can unlock the different achievements for your ending choices (one for leaving the island and another for staying behind).

Remember to use the same "Goto" command twice to access artifact pieces within caves. This is because the first pass engages the cave/bunker event trigger, while the second pass puts you right on top of the artefact inside the cave/bunker.

If you notice your GPS isn't working despite being outside of the cave/bunker system, and are struggling to get back to normal gameplay after using these "Goto" commands, simply use the following command to reset your position outside of any cave/bunker system:
"gotocoords -228 20 1425"

As you collect each artefact piece, you draw nearer to unlocking the full potential of a secret post-game continuation advantage hidden within "Sons of the Forest." Harness their power wisely.

Note: To access the command console, type "cheatstick" on your keyboard and press F1.
Timeline of Story Events
Event
Date
Description
Plane Crash
2010-2011
Eric LeBlanc and his son Timmy crash on the Peninsula. Eric begins his quest to find Timmy.
Discovery of Sahara Lab
2010-2011
Eric discovers the underground Sahara Therapeutics lab and learns about the resurrection experiments.
Encounter with Megan Cross
2010-2011
Eric encounters Megan Cross who transforms into a mutant, leading to a boss fight.
Resurrection Obelisk Activation
2010-2011
Eric attempts to use Megan’s body to resurrect Timmy but needs a live sacrifice.
Use of Power Obelisk
2010-2011
Eric uses the power obelisk to bring down another plane to obtain a live sacrifice for Timmy’s resurrection.
Timmy's Resurrection and Aftermath
2011-2012
Timmy is resurrected, but experiences side effects. Eric and Timmy are featured on a talk show.
Timmy's Seizure
2011-2012
Timmy experiences a violent seizure, hinting at future mutations similar to Megan Cross.
Timmy’s Research on Peninsula
Unknown
Timmy researches the Peninsula, discovering another island, which he designates as ‘Site 2’.
Jack Holt's Arrival on Site B
April 28, 2027
Jack Holt, Kelvin, and Fisheye crash on Site B. Jack begins his journey to uncover the island’s mysteries.
Helicopter Crash
April 28, 2027
Jack’s helicopter is shot down, leading to a crash. Kelvin suffers major brain damage and becomes deaf.
Encounter with Jianyu Zhang
April 28, 2027
Jack is struck unconscious by Jianyu Zhang shortly after the crash.
Exploration of Site B
2027
Jack and Kelvin explore Site B, encountering hostile cannibals, mutants, and befriending a mutated Virginia Puffton.
Battle in the Food Bunker
2027
Jack witnesses mutated Edward and Barbara Puffton attacking Jianyu’s team. Jack defeats the mutated duo.
Encounter with Tim LeBlanc
2027
Jack encounters Tim LeBlanc, who warns him to leave before another incident occurs.
Battle with Sluggy in Residential Bunker
2027
Jack encounters Tim and Eric LeBlanc battling a Sluggy, resulting in Eric being shot by Jianyu. Jack is knocked unconscious.
Journey through the Hell Cave
2027
Jack and Tim traverse the Hell Cave, fighting off demons and discovering an ancient cube made of Solafite.
Mutated Jianyu and Final Battle
2027
Jack battles and defeats a mutated Jianyu Zhang as they attempt to escape the island.
Escape from Site B
2027
Jack, Kelvin, Virginia, Tim, and Eric escape the island via helicopter amidst a mutant attack.
Tim’s Mutation and Solafite Discovery
2032
Heavily mutated Tim discusses his condition with a doctor and reveals a piece of Solafite.
Kelvin's Recovery
2032
Jack visits Kelvin in a brain recovery ward, showing him slowly recovering from his injuries.
Virginia’s Surgery and Pregnancy
2032
Virginia undergoes surgery and is later shown pregnant, suggesting she and Jack are together.
Tim’s Pharmaceutical Company
2032-2033
Tim rises to power in the pharmaceutical industry, using Solafite to create miracle cures and buys a new island with the largest deposit of Solafite.
Tim’s Disappearance
2035
Tim goes missing after buying the new island, with contact lost, potentially setting up the next installment of the saga.
Understanding the Entire Story
The Comprehensive Lore of "The Forest" and "Sons of the Forest"

Ancient Activity and History:

900 AD: An ancient civilization on the peninsula develops the resurrection obelisk and other artifacts. These artifacts possess the power to manipulate life and death but also result in horrific mutations. The civilization mysteriously vanishes, leaving behind these powerful relics.

19th-20th Century: Christian missionaries arrive on the peninsula, leaving behind Latin writings, crucifixes, and mummified remains. They encounter early mutants, likely caused by the ancient artifacts.

Late 20th to Early 21st Century: Sahara Therapeutics purchases the peninsula, establishing a research facility to study eternal life and resurrection through the obelisks. Dr. Mathew Cross leads the Jarius Project, initially marketed as a program to heal terminally ill children.

Escape of Armsy: An Armsy mutant escapes containment, leading to chaos and the downfall of the facility. Most human inhabitants are killed or turned into mutants and cannibals.
Mathew Cross: After the facility's collapse, Dr. Cross uses the power obelisk to bring down planes to obtain live children for his experiments, aiming to revive his daughter, Megan.

Events of "The Forest":

2010-2011: Eric LeBlanc and his son Timmy crash on the peninsula due to Mathew Cross's use of the power obelisk. Eric embarks on a quest to find and rescue Timmy.

Endgame: Eric discovers the resurrection obelisk and realizes Mathew Cross's plan. He battles a mutated Megan and uses the obelisk to revive Timmy, sacrificing another child.

Post-Rescue: Eric and Timmy return to civilization, but Timmy shows signs of mutation. During a talk show, Timmy has a violent seizure, implying a latent mutation.

Post-"The Forest" Ending: Timmy grows up, driven by an obsession to understand the artifacts and the peninsula's mysteries. His research leads him to discover another island, which he designates "Site B."

2027: Timmy organizes an expedition to Site B.

Events of "Sons of the Forest":

June 21, 2027: Jack Holt, a journalist, along with mercenaries Kelvin and Fisheye, are hired by Puffcorp to locate the missing Puffton family. Their helicopter crashes on Site B due to the island's mysterious temporal anomalies.

Survival and Exploration: Jack and Kelvin explore the island, encountering a mutated Virginia Puffton, cannibals, and various mutants. They uncover clues about the Pufftons and the island's history.

Encounters: Jack encounters Jianyu Zhang, the antagonist, and battles various mutants. He witnesses the deaths of the mutated Edward and Barbra Puffton and interacts with Tim LeBlanc and his father Eric, who are also on the island.

Final Confrontation: Jack, Tim, Kelvin, and Virginia enter the Solafite Cube, revealing its connection to a futuristic city. Jianyu attempts to enter but is mutated instead. A final battle ensues, resulting in Jianyu's defeat.

Rescue and Escape: The team escapes the island as mutants attack. Tim and Eric are reunited, and they fend off the mutants, ultimately escaping in helicopters.

Recovery and Adaptation: Jack visits Kelvin, who is recovering from his injuries. Virginia, now pregnant, and Jack appear to be together. Timmy, heavily mutated, rises in the pharmaceutical industry using Solafite.

Future Developments: Timmy purchases another island with a large deposit of Solafite but eventually goes missing, leading to a potential new chapter in the saga.
Explaining the Lore
Solafite is a fictional, newly synthesized element introduced in the game, which plays a central role in the game's lore. It is formed through geological interactions with exotic matter, likely linked to the island's anomalous properties and its connection to a wormhole. The interaction between volcanic activity on the island and the exotic matter creates solafite, which possesses unique and mysterious properties that affect the island and its inhabitants.

The element seems to interact with the human psyche as well, potentially amplifying negative emotions or subconscious fears. It may even act as a conduit for negative energy, which is why the mutated beings and "demons" that players face are not merely external creatures, but reflections of the darker parts of human consciousness.

The cube in the game serves as a technological device designed to tap into the wormhole, acting as a conduit between dimensions. Its role is crucial in enabling the island's anomalies, and it connects the game's reality to the alternate dimension. The demons and other religious manifestations encountered by the player are not the result of an actual spiritual affliction on the island, but rather the transmogrification of the cultists through exposure to solafite, a new element created by the interaction of volcanic activity with exotic matter.

The religious symbols, such as crosses, which appear throughout the game, may not possess intrinsic supernatural power. Instead, they function as psychological resistances to the solafite-induced manifestations. This interpretation suggests that these symbols have significance in the human psyche, tapping into deeply ingrained cultural beliefs. The power of belief itself becomes a potent force, allowing the crosses and similar symbols to act as a barrier against what appears to be demonic forces.

This phenomenon could be rooted in the mind's ability to channel the energy surrounding it. In this case, the belief in these symbols of protection or purity may resonate with the player’s psyche, creating a force strong enough to disrupt the energy formed by solafite, causing the demons to burn or retreat when exposed to these symbols. This highlights a connection between human consciousness and the negative energy released by the exotic matter, suggesting that the human mind plays a crucial role in shaping the physical world around it.

The mutations and demonic manifestations are not merely physical aberrations but are expressions of the consciousness that interacts with the solafite-induced energy. This connection offers an explanation for why some mutations differ from others—essentially, they represent psychological and emotional manifestations of the individuals’ inner demons. The game’s story, therefore, serves as a magnifying lens for exploring how consciousness interacts with and shapes reality.

The demons encountered in the game can be interpreted as metaphorical projections of the darker sides of human nature. They symbolize how individuals may react when faced with greed, the desire for power, or the instinct to survive in the face of disaster. In this sense, the truest expression of a person’s character, often hidden beneath a veneer of normalcy, is revealed under extreme circumstances. These monsters are not just external threats but reflections of the internal battles that every character must face—revealing the ugliness within that only emerges when survival and moral compromises are at stake.

The island in the game is located in the Northern Hemisphere, as evidenced by the visibility of the North Star (Polaris) in the sky, around which the constellations appear to rotate. This observation indicates true north. While players can use a compass in the game, the North Star’s presence is primarily aesthetic and serves as a reference to the hemisphere in which the island exists, providing important context for the game’s lore. The constellation's significance lies in its ability to help explain the world of the game, which includes details like the time of day.

For players, the key time-related elements are the sunset time (18:05) and sunrise time (05:50). These times suggest that daylight lasts for 12 hours and 15 minutes within the game, which is equivalent to 1 hour and 20 minutes in real life. This means that players have approximately 80 minutes, or 4,800 seconds, of daylight in each cycle to use strategically.

This concept of 12 hours of daylight isn’t a universal reality in the real world, but within the lore, it ties to a significant astronomical event. Since the game begins during the Summer Solstice at Site B, and the daylight lasts 12 hours, we can infer that the island exists during an equinox, which is when days and nights are nearly equal in length. This suggests a likely location for the island between the latitudes of 42° N and 45° N, corresponding to a time frame around June 21.

The moon’s rise from the north indicates a lunar standstill, which occurs in specific periods, such as 2043 or later, adding an anomalous element to the game’s timeline. Although this may initially seem out of place, the discrepancy becomes clearer when considering the game’s setting in 2027. This time dilation hints at the island’s unique, possibly otherworldly nature.

The game’s lore suggests the island could be located near the Kuril Islands or Hokkaido, areas known for their geological activity and volcanic islands. These regions align with the island’s environmental characteristics but, notably, no known islands in this region perfectly match the island in the game.

In the game, when the player character, Jack Holt, crashes on the island, it’s likely April 28, 2027. This is supported by communications between Jianyu Zhang and Chuck Dagger, where they discuss Jack Holt’s arrival. The game is set in 2027, and the island exists within a temporal and dimensional anomaly that links to an unknown future year, explaining certain events seen at the game’s conclusion, particularly the mysterious giant cube before the final boss fight.

Though no real islands correspond to the fictional island’s characteristics, the lore suggests the island’s peninsula could have emerged due to volcanic activity in an alternate dimension, possibly connected through a wormhole. This theory supports the game’s discoveries and lore, providing a rich, imaginative backdrop for the story.

Understanding the lore requires a suspension of disbelief, as the story makes sense in some ways but remains mysterious in others. The game’s lore is well-developed, offering players a sense of immersion in a world where time, dimensions, and reality intertwine.

The island’s emergence from a wormhole connects it to both the present and a future timeline, with players unknowingly stepping into a future physical world accessible only through the wormhole. This accounts for energy anomalies and disruptions in satellite communication, adding further depth to the game’s narrative.

The concept of time travel through wormholes, while speculative, suggests that energy bursts and storms might be a byproduct of the dimensional rift. However, the process of time travel itself appears seamless to players, adding to the game’s mysterious and immersive experience. While the game does not provide a perfect explanation for these phenomena, it offers a compelling and well-crafted narrative that leaves room for imagination and interpretation.
Feedback and Suggestions
To assist the developers, I decided to curate list of player feedback that I collected by scouring through the Discussions Forum from the very beginning, since the launch of Early Access. By doing so, I was able to collect and post those requests into a very comprehensive thread:
https://steamcommunity.com/app/1326470/discussions/0/3829791007688130746/

The above thread also cross-references the following:
https://steamcommunity.com/app/1326470/discussions/0/3819659084179487915/
https://steamcommunity.com/app/1326470/discussions/0/3829791007699305387/

Unfortunately, since Early Access, not much has been done to fulfil these requests. Leaving many players including myself disappointed, especially seeing as the star field in the skydome has yet to be re-enabled. Not being able to see stars has meant that some of my own friends are unwilling to return to play this game until significant progress has been made. As they do not like the lack of stars (a basic atmospheric quality) that leaves the current state of the v1.0 game unacceptable to them.

This is sad because it means I cannot enjoy Multiplayer as the developers have yet to fix this basic aspect of the night-time environment. It's one of those issues that just tip the scale too far. Meaning, players, like my friends, would rather wait until the game is more fleshed out.

Toni Macaroni, however, provided an excellent mod for players to address this issue in the interim, which I will provide below (but installing mods outside a mod manager isn't something my friends necessarily want to attempt or spend a lot of time doing):
https://sotf-mods.com/mods/aedev/sonsstars

Additionally, I requested the following fix to the game for realism:
https://steamcommunity.com/app/1326470/discussions/0/3805031043423610220/

By the way, Farket, if you're reading, well done on all the incredible feedback you give on YouTube to the community, and your enthusiasm for the genre and franchise, and a solid bluetooth 'clink' of the beer glass to you, good man. It's refreshing to see loyalty to a genre that emerged with Endnight, but may or may not be taken much further by... who knows?

I've never met Farket, but he seems like a cool dude. Also, a shout-out to Toni, whom I've also never met, but whose data dump on all things Sons of the Forest makes it easier for me to improve this guide with my own content.

Please find Toni's data dump here: https://tonihub.com/
Future Updates
Here's what you can expect Endnight to slowly—at a snail's pace—dripfeed us in the coming months:

Printer-related (definitely):
- 3D-printed underwater mask
- 3D-printed flower pot
- 3D-printed knife

Trap-related (maybe):
- Spring
- Contact Trigger
- Contact Spring Trigger

Weapons-related (definitely):
- Airgun
- Airgun Scope
- Scope Mod/Attachment
- Tracker Dart
- Climbing Axe

Quality-of-life (definitely):
- Tactical Boots
- Battery Charger
- Laser Pointer
- Stick Ladder
- Storage Box

This DLC stuff may or may not include raft-building, and may or may not fix the invisible stars and the invisible stars has been fixed. The information was shared with me by a source I trust. Don't expect much after this, regarding ambience or stars or raft-building, if by reaching the end of this list those things are still missing.

Because that will likely be the end of development. Well, that's what I believe. Although I believe the aforementioned list is definitely going to be included, what I'll speculate is the following:

The Printed Knife will likely be like a Karambit, Kunai, or type of ceramic Machete, to make it different to the Combat Knife, but will depend on the effort they'll invest in it, or if it's going to be cut. Most likely it will probably be a replacement for the Machete Type I not realized yet, something that makes sense as a Printed Knife, since the Kukri (or Machete Type II) makes sense being steel. The Airgun will likely only be useful for killing smaller animals using darts, and crafting Tracker Darts will likely be used to track sharks or moose or deer for hunting purposes. I think the Spring, Contact Trigger, and Contact Spring Trigger will become a type of intermediary component for making advanced traps, to add a layer of construction complexity to the Glider Launcher, Spring Traps, and Spear Traps. Or, it could be to trigger lights, if enemies step on the Contact Triggers.

The Scope Mod is likely a better scope for the Rifle, where the current rifle scope will become the new Airgun Scope, or at least that's what I think. That's just guestimation. The Climbing Axe will likely return for scaling the inclines and cliffs, as an ode to the Forest franchise, while something like Tactical Boots will be used to offer a kind of travelling buff, likely a stamina buff, or stamina reduction debuff; potate-oh, potah-toe.

The Battery Charger will likely mean batteries are not restored to full by virtue of reloading a save game, to balance out the Taser Stick mechanic and to recharge the flashlight. Again, I'm speculating. I do believe if they still include the Laser Pointer, it will probably have an effect on dispersing birds or nudging small animals into your traps, or flash-blinding an enemy for a quick attack. To close the distance. The Stick Ladder will likely be exclusive to walls, as a means of accessing roofs or replacing the need for interior staircases, as players have been demanding interior features for reaching higher floors with aesthetic appeal that rope doesn't offer.

Whereas the Storage Box will likely become a transportable via Golf Cart as a means of mobilizing extra resources. The underwater mask totally eludes my imagination, though. I'll admit. If they do include some kind of mask of underwater use, it may be a separate collectable item, or be cut because of the diving gear already available in the game.

I'm not sure if the Blueprint Book that is likely intended to offer players a means of creating custom construction blueprints will be an inclusion added to this game anymore as a DLC feature, or something the developers may decide to cut from their plans, but we'll see.
More to Come?
The rollercoaster ride of the Forest franchise has been nothing short of wild. From humble beginnings to soaring heights, and now, a bittersweet farewell looming on the horizon.

It's a tale of anticipation, excitement, disappointment, and maybe, just maybe, a touch of acceptance. Picture this: Back in 2014, when "The Forest" emerged into the gaming scene, it was like a beacon of hope for survival game enthusiasts. With a modest average of 6,673 concurrent players for its first month at launch, it carved its niche. Fast forward to 2022, and the hype train was unstoppable. "Sons of the Forest" was teased, and suddenly, we had 74,816 players revisiting the original title, reliving old memories, and building new ones in anticipation.

Then came the big day - "Sons of the Forest" hit the Steam libraries, but in a plot twist as Early Access instead of a final version. Despite that, the hype train meant it hit with a bang, boasting an impressive 411,804 concurrent players out of over 2 million copies sold in 24 hours.

Expectations were sky-high, but alas, reality hit hard. Bugs, unmet promises, and dashed hopes led to a mass exodus, dwindling down to a mere ♥♥♥♥♥8 players by May 2023. Mere months after Early Access launched. More than 85% of players left, compared to the first-month concurrent player numbers, a first for the franchise.

While eliciting positive reviews, so too, disappointment echoed through the community as they returned to the safety of "The Forest," where numbers peaked once again, but this time at a record 76,107 concurrent players for the month of October 2023, reminding us of its enduring appeal. This record set by "The Forest" is a record month-average that even "Sons of the Forest" couldn't return to since February 2023, and was set during the launch of the sequel.

Eventually, a year later, February 2024 marked the official release of "Sons of the Forest" version 1.0, but the reception was lukewarm, understandably. With only 53,964 concurrent players, it was a far cry from its Early Access glory days. As time trickled by, so did the player count. The writing on the wall became clearer - the end was nigh for Timmy's saga and for the Forest as we know it.

Many players seemed to be willing to accept, graciously, that "Sons of the Forest" was a half-baked ending to the franchise at half the price, and therefore a fairly priced farewell. Yet, many such as myself still remain hopeful this isn't the end because so much has been left unfinished.

Even now, on 29 September, 2024, as I write this and wonder, "Will we see that game-changing, bug-fixing, content-boosting, balance-improving, and worth-the-wait update in November?"

Endnight's strategy seemed clear yet highly controversial. By diving deep into initial revenues by hyping the game on Twitter, search engines, and Steam, they aimed for the stars, scooped them up, but risked losing touch with their loyal fanbase. Now, as the dust settles, it's evident that the franchise could be reaching its ultimate conclusion which is understandable.

"Sons of the Forest" could very well be the swan song, the final chapter in Timmy's adventure. Every journey must come to an end. Maybe for Endnight, it's time for a new story to begin. But perhaps, amidst the disappointment, there's a silver lining. A chance for closure, for both the developers and the fans. A farewell to the old, paving the way for something new.

It's an unfortunate sudden end to what was expected to be an enduring franchise, with a chance of revival along parallel lines, but its new journey away from what made "The Forest" great may have been a bridge too far. It's unlikely future versions will be rooted in exactly the same story as one building on the origins of today's Timmy, leaving a lot of holes in the Forest narrative and unexplored possibilities.

The conclusion being, the game might not have been what everyone expected, but it has been a conclusive opportunity for Endnight. If not for the current community, at least for Endnight to deliver on potentially new frontiers where, hopefully, whatever comes next is that new, more realistic hit (without extensive delays and bugs), and without so many unanswered questions.

The controversy over the Forest franchise now rests largely in the two vastly different ways EA was approached for each of the two titles. That's largely the source of criticisms and contentions today.

The first was open about what was lacking from the beginning. However, the second title took advantage of hype and made a very questionable pivot, one that seemed like a cash-grab wrapped up in a last-minute cop-out on what initially was marketed as something more complete than what was actually received by fans.

We now have the released v1.0 of this game, which means this Guide will be updated accordingly. based on DLC content to come (if scheduled), to ensure this Guide still has all the new elements covered for new players.

The essential aspects of this guide will remain unchanged. I hope more content will be added, as Endnight updates towards the final conclusion.

Whatever happens, I hope you have a fun experience, whether solo or with friends.
Potential for Executing Macros
At present, the game's developers have not yet provided detailed documentation on how to utilize the "openmacrosfolder" and "loadmacros" commands. As a result, there is uncertainty regarding the exact method for implementing and executing macros within the game environment.

Despite this, I've prepared both .txt and .json versions of macros that can be used once the developers clarify if and how these features are going to be supported. The macros folder appears to be located in the following location under your drive's username folder: "...AppData\LocalLow\Endnight\SonsOfTheForest\Macros"

Once the implementation of the macros folder is better understood, the updates will reflect here too. In the meantime, here's a list of important commands:

Arrow Craft:
  • additem 373
  • additem 618
  • additem 507
  • additem 420
  • additem 527
  • additem 416
  • additem 418
  • additem 414
  • additem 415
  • additem 448
  • additem 400

Herb Mixes:
  • additem HealthMix
  • additem HealthMixPlus
  • additem EnergyMix
  • additem EnergyMixPlus

Egg Nog:
  • additem TurtleEgg
  • additem VodkaBottle

Liquid Battery:
  • additem Blueberries
  • additem GuaranaBerries

Kitchen Sink:
  • additem KingOysterMushroom
  • additem Meat
  • additem Fish
  • additem Oyster
  • additem Ramen
  • additem TurtleEgg
  • additem KingOysterMushroom

Clothing:
  • additem 487
  • additem 490
  • additem 491
  • additem 492
  • additem 493
  • additem 495
  • additem 499
  • additem 500
  • additem 555
  • additem 556
  • additem 557
  • additem 558
  • additem 619
  • additem 639
  • additem 703
Zipline Tips and Tricks
Coming soon...
Best used in conjuction with Cave Safe Spots and general defense tips; triangles; keeping your distance; escaping spear throwers and charging opponents; using distance to tire out enemies before attacking them; slingshot; spear; arrows; sword...
15 Yorum
Sylar  [yaratıcı] 19 Oca @ 9:00 
UMeffert

I was indeed able to restore the images, thank you for bringing this to my attention.
I hope this guide serves you well.
UMeffert 3 Ara 2024 @ 2:22 
Thanks so much for all the time your put into this Guide!

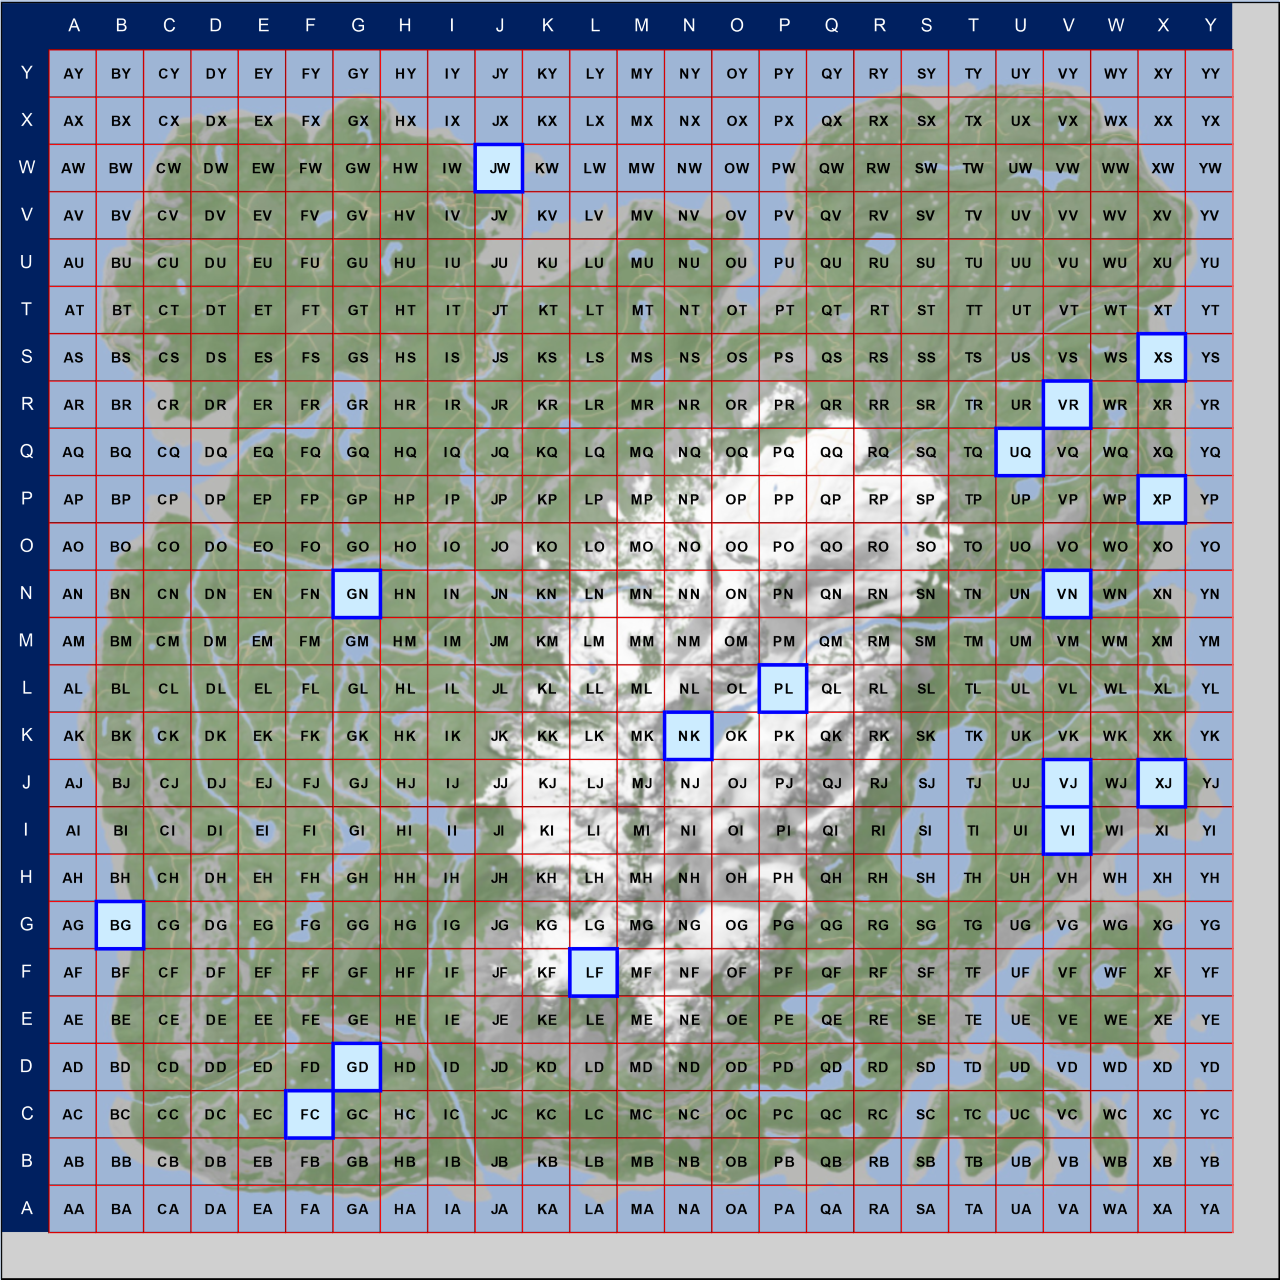
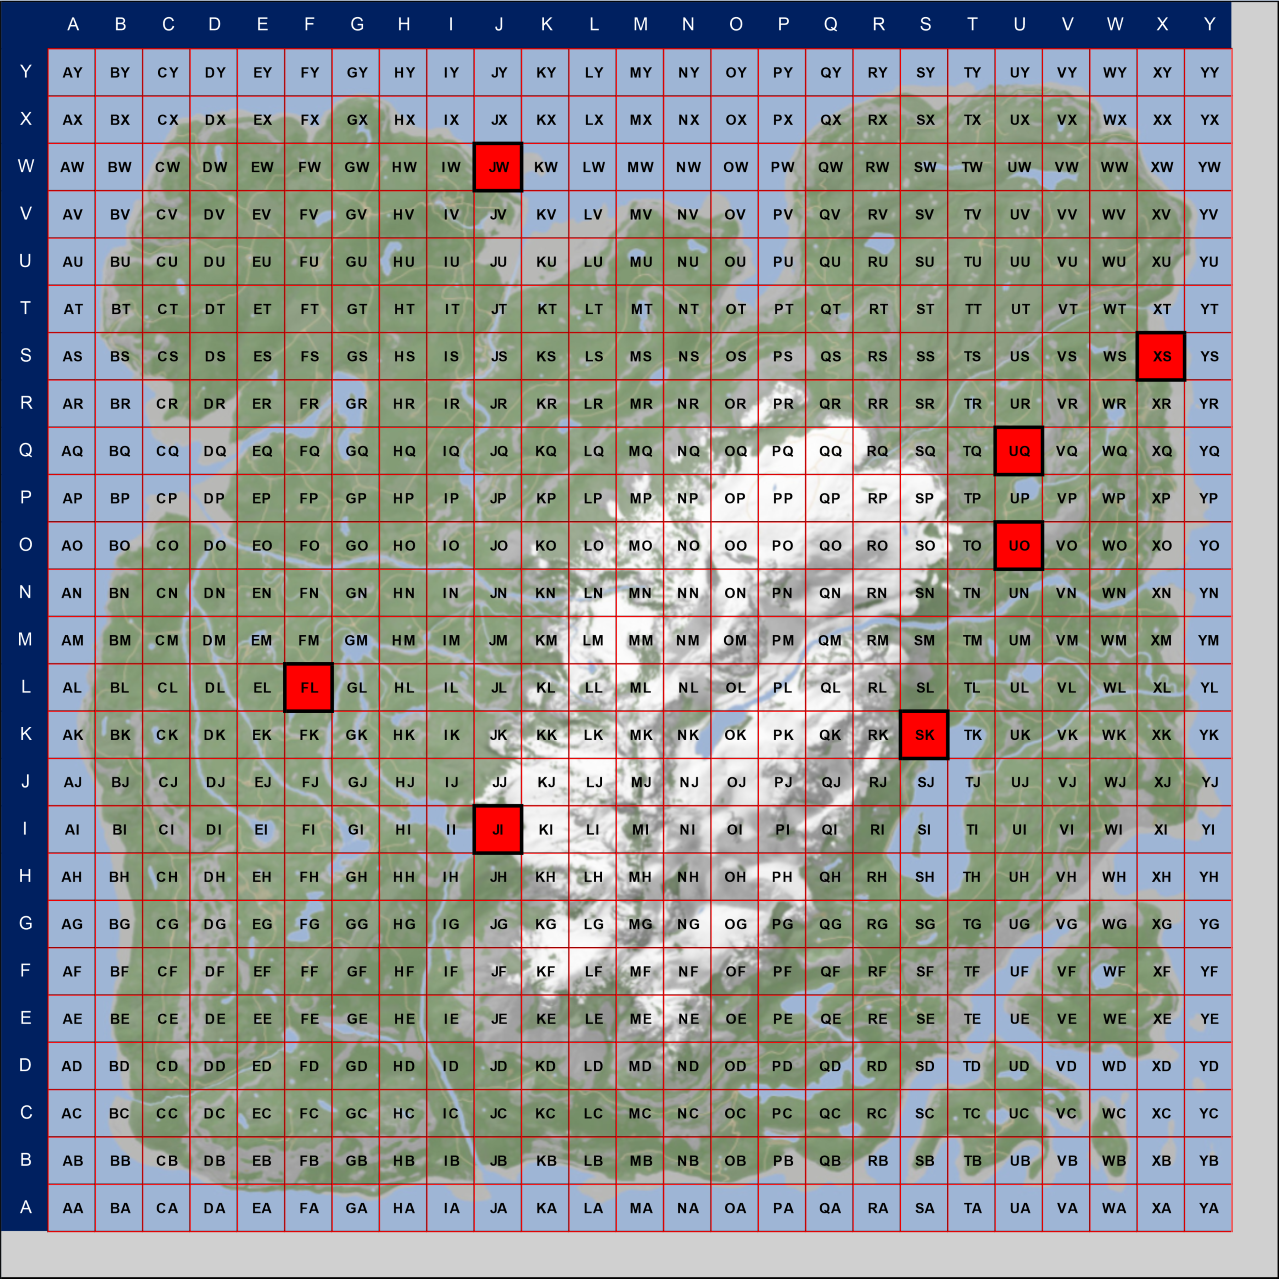
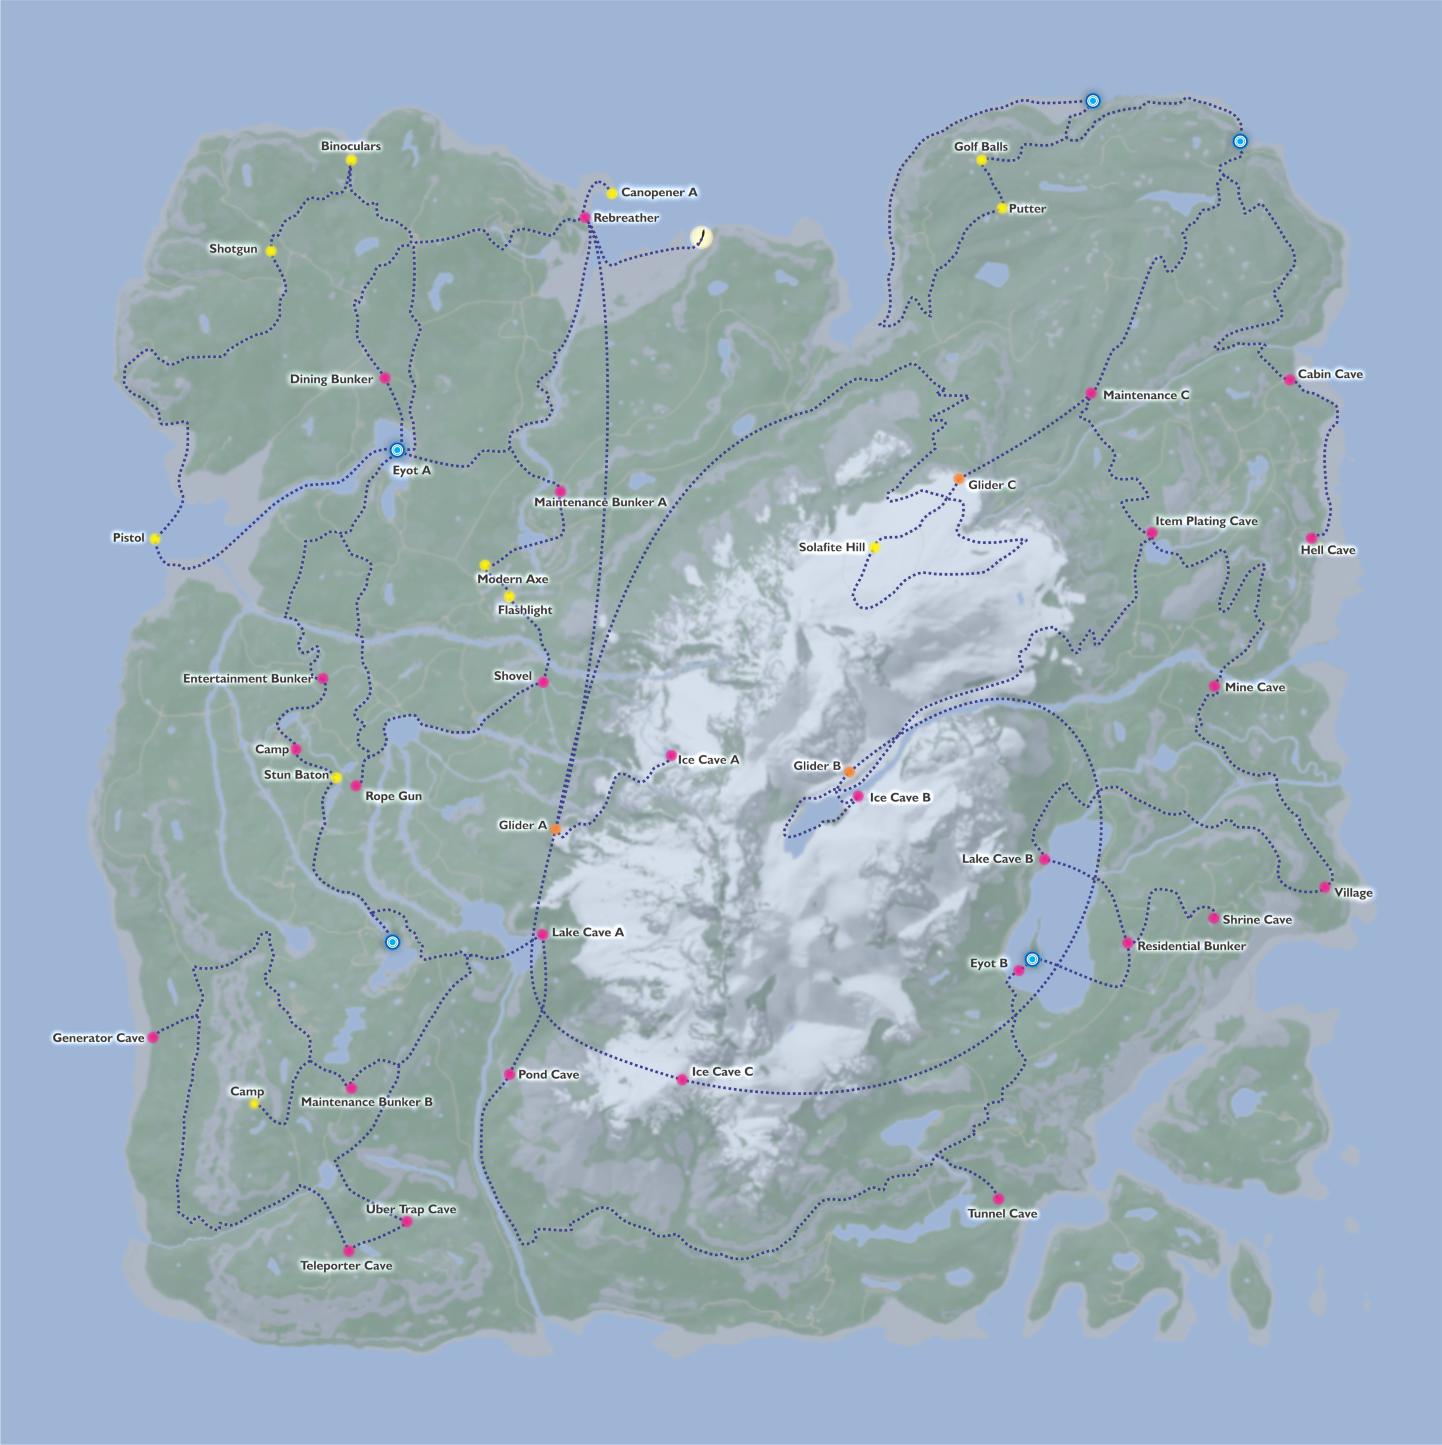
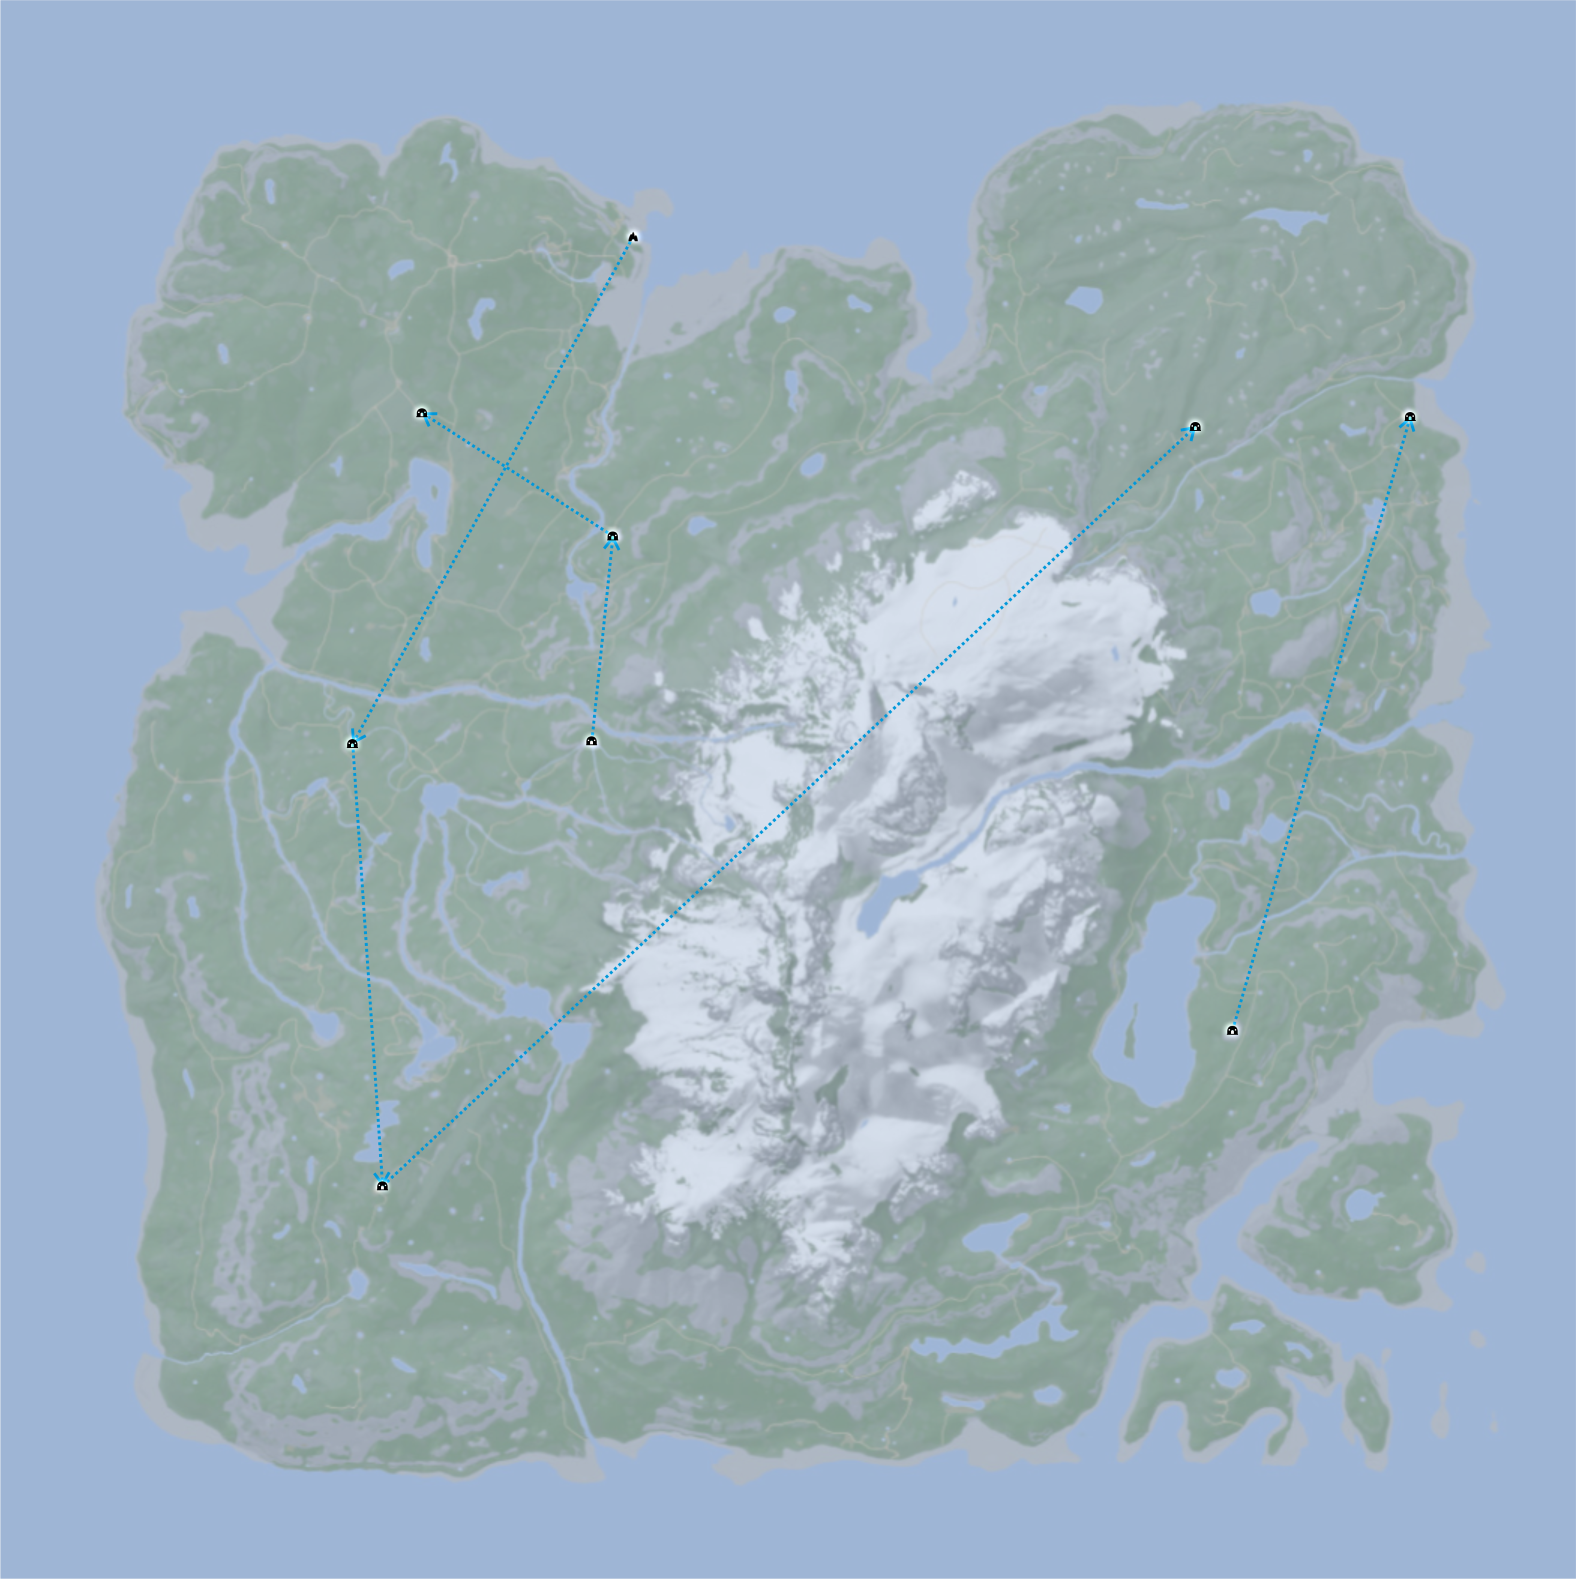
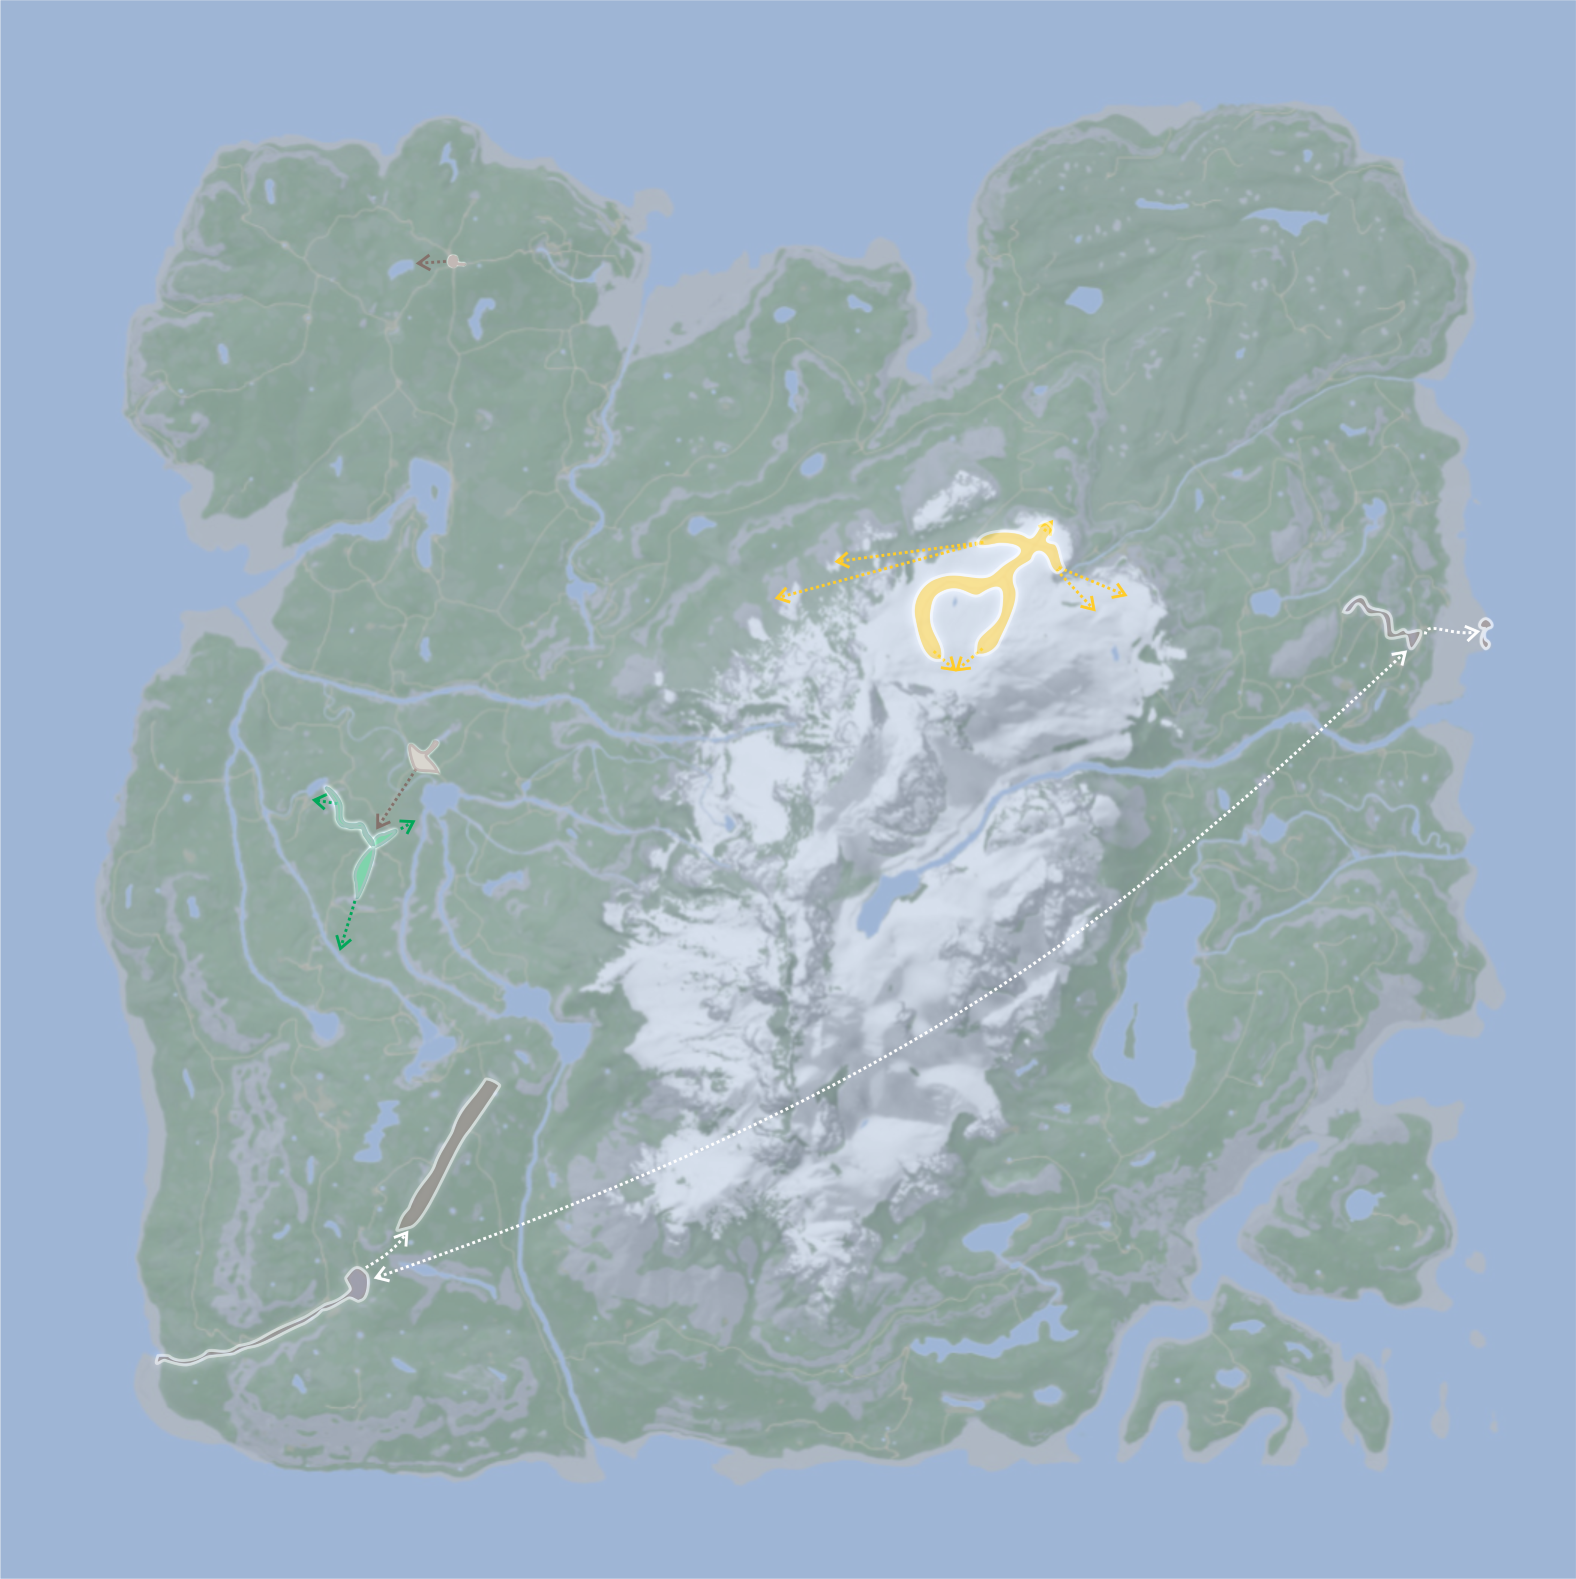
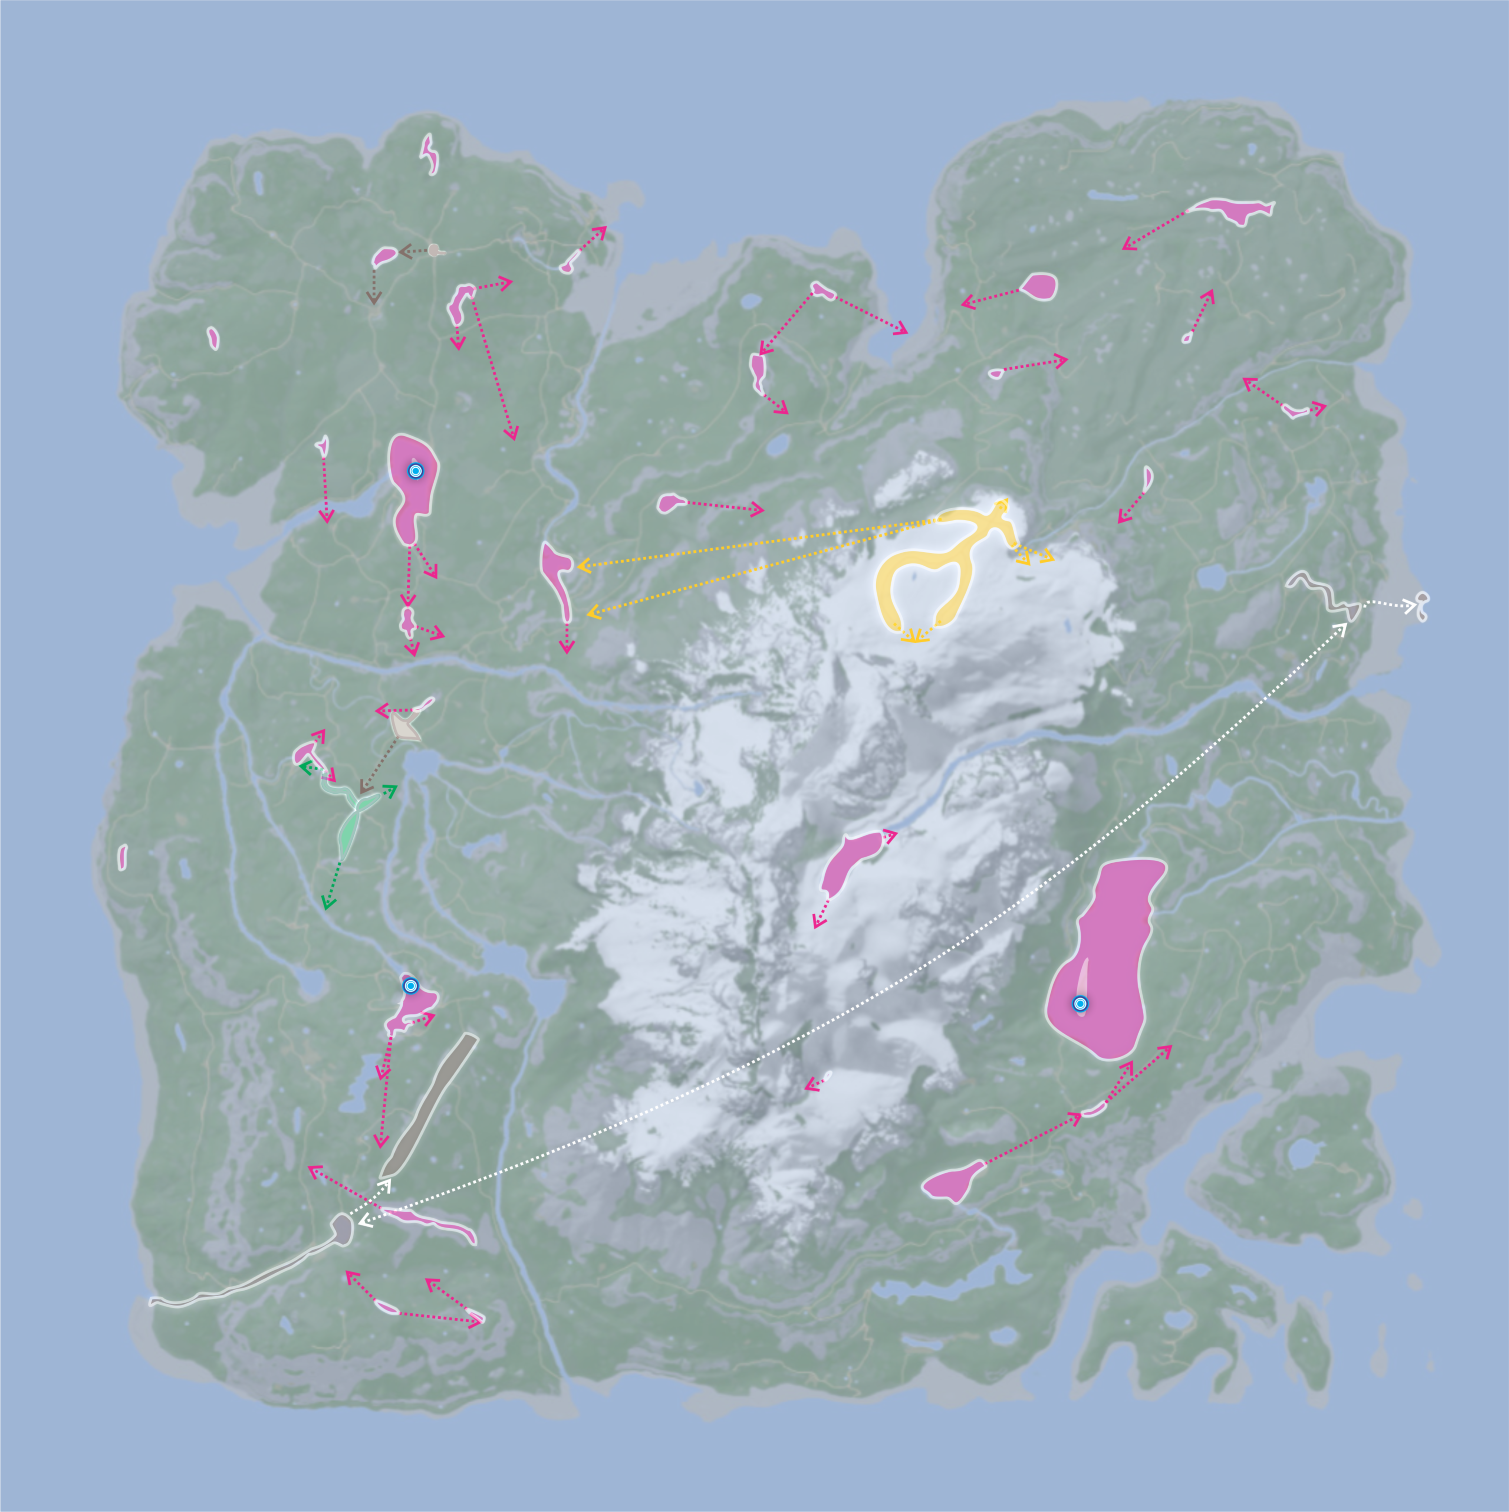
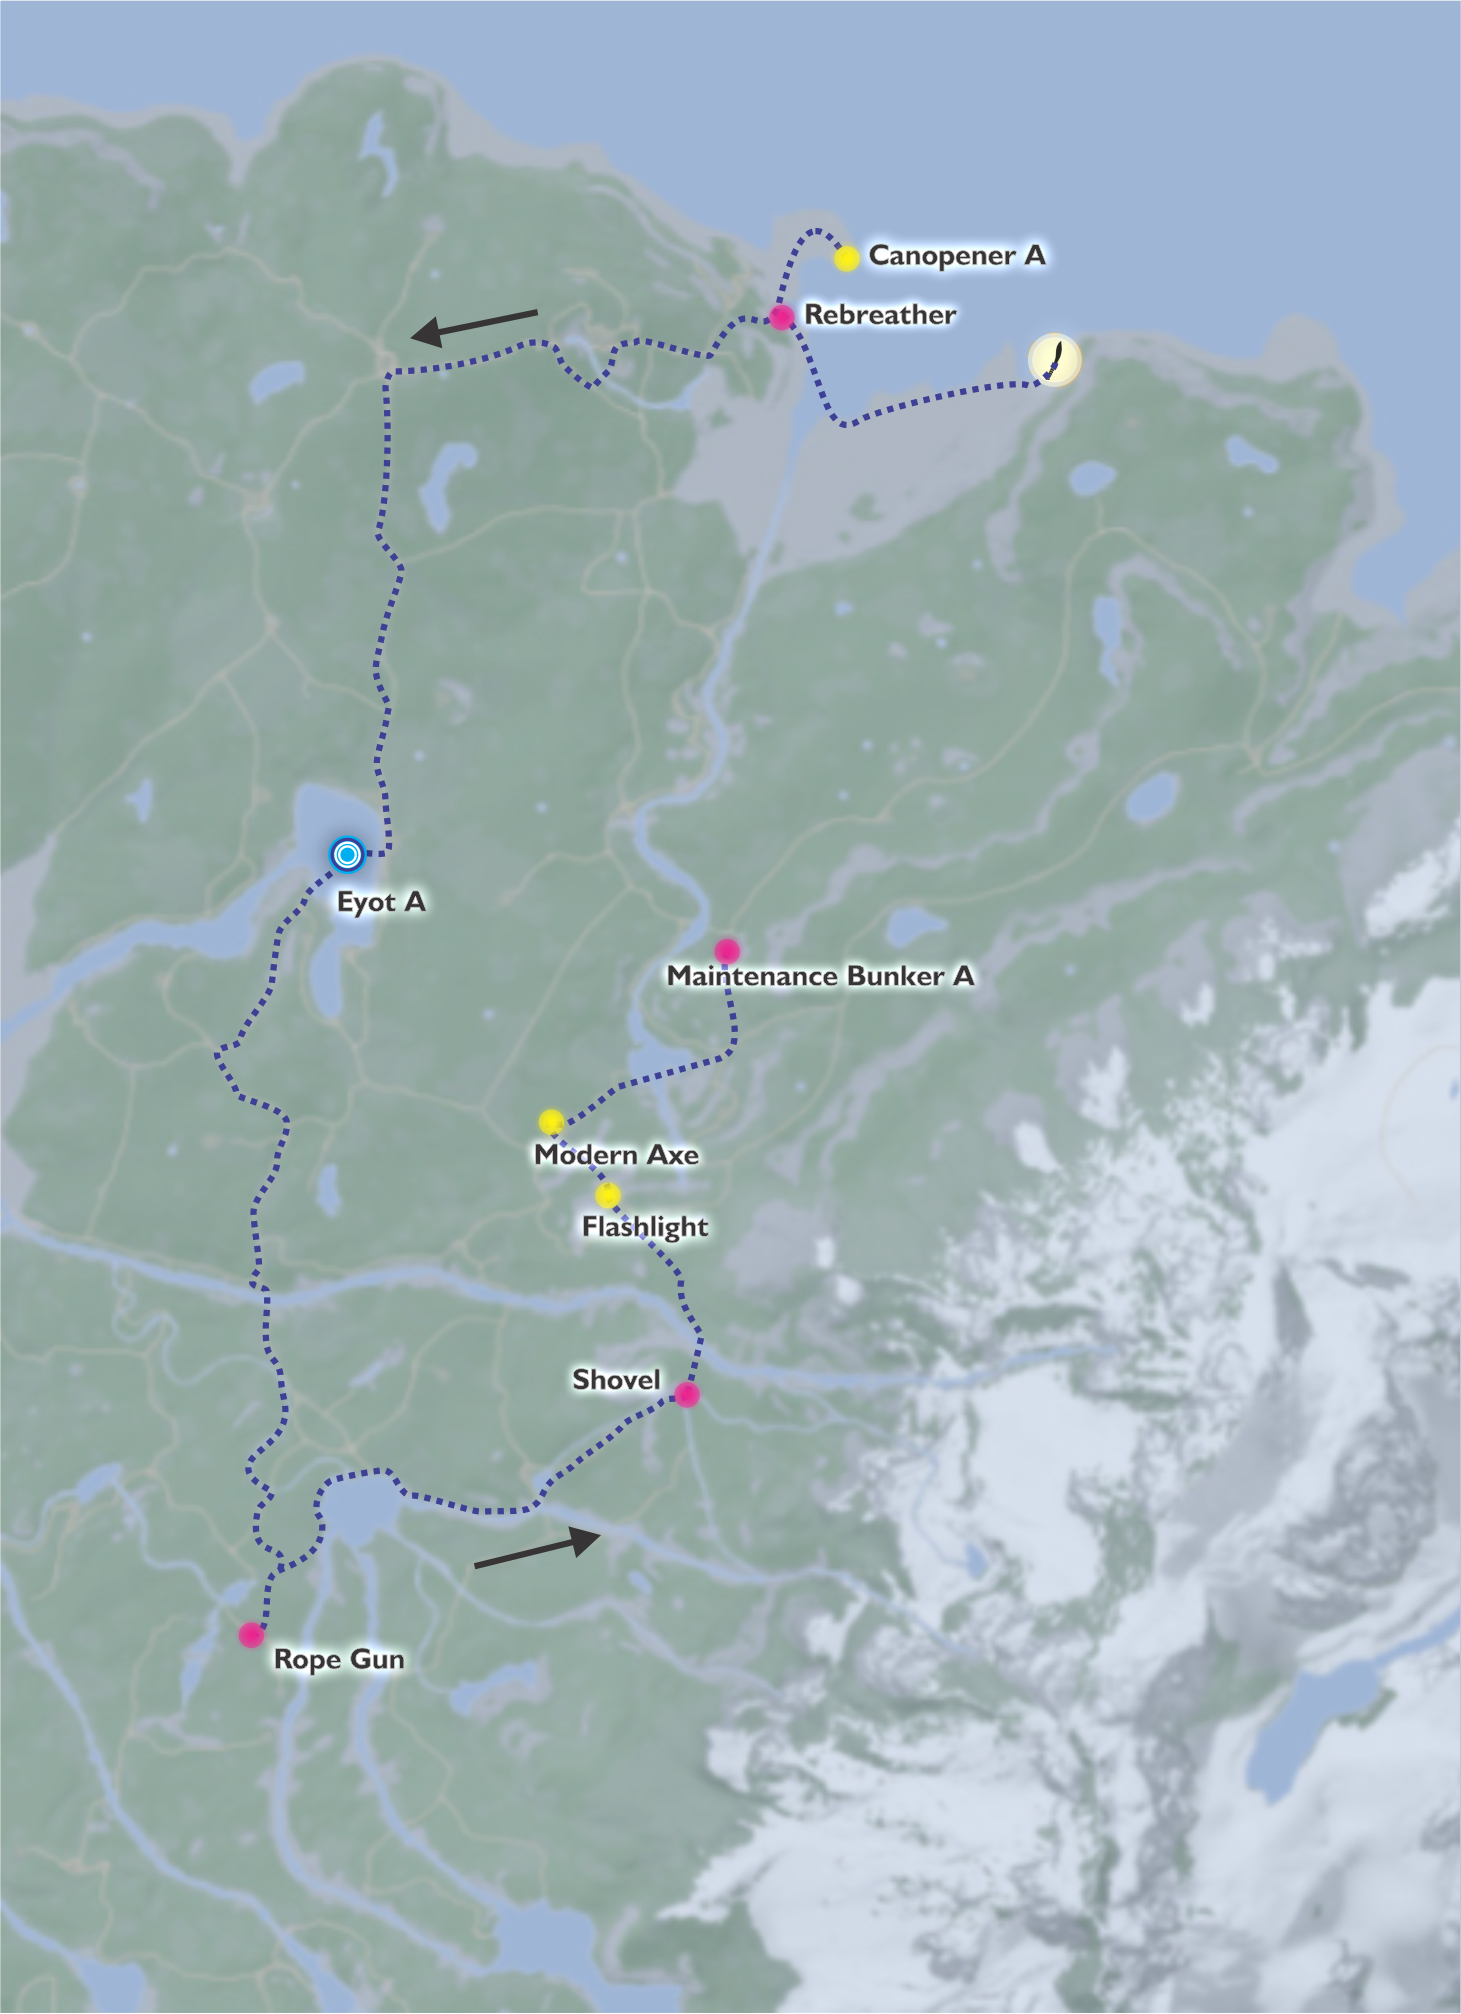
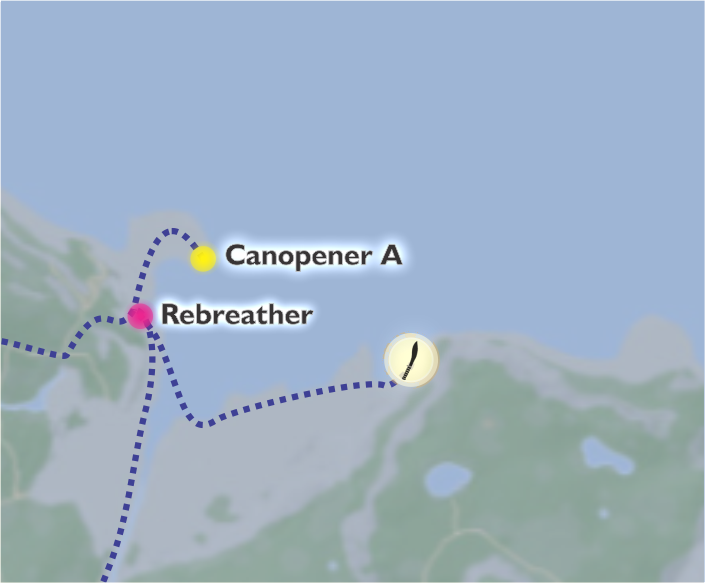
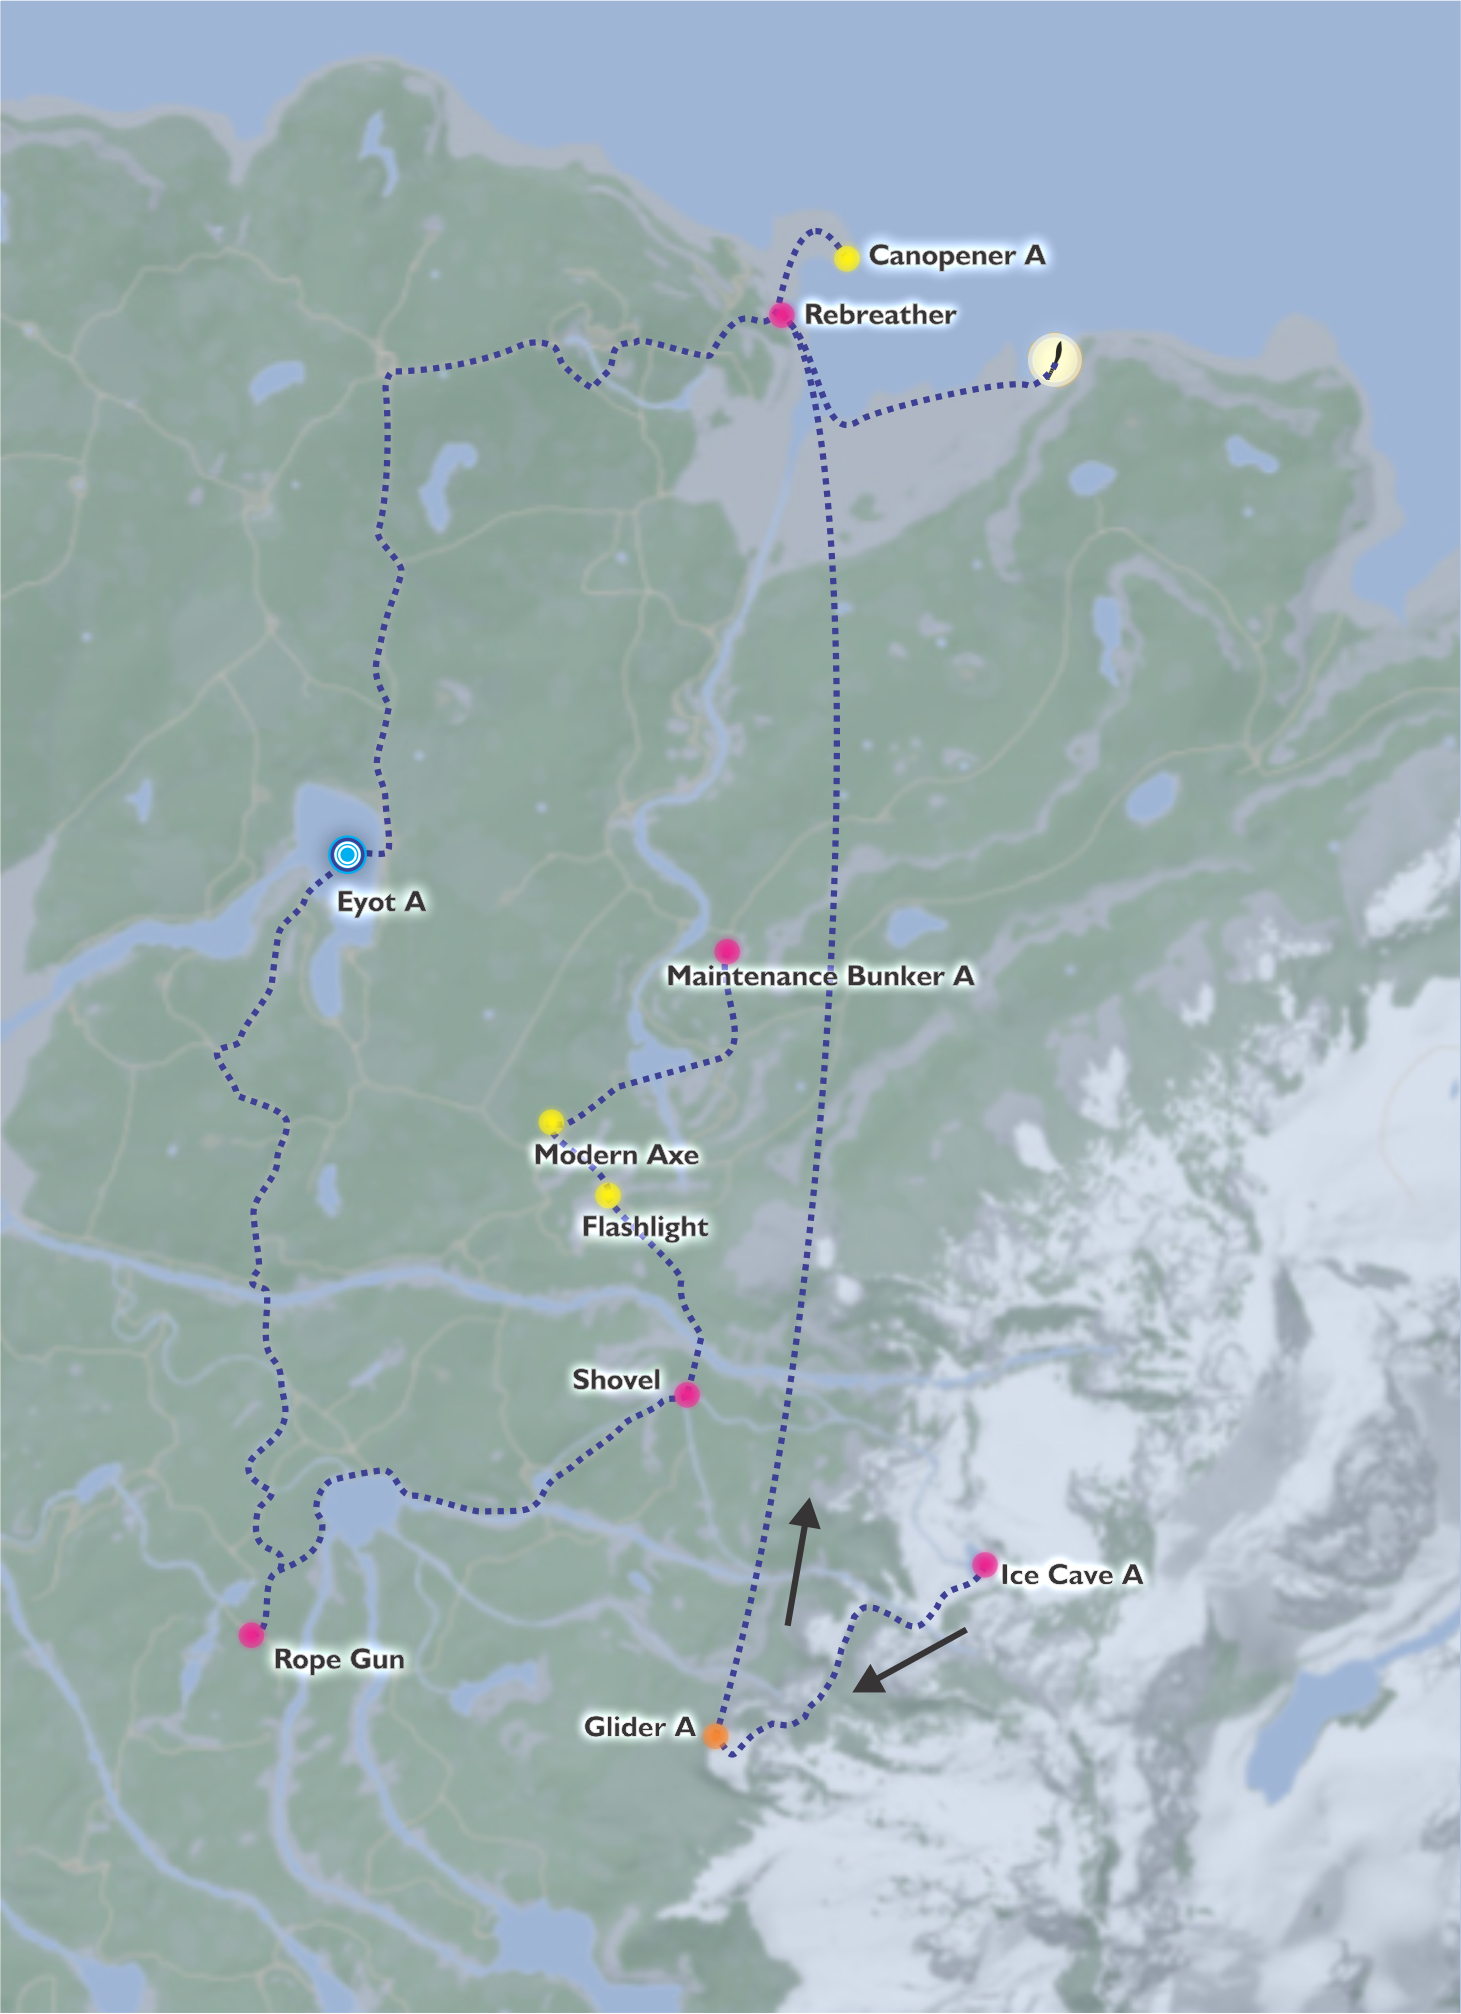
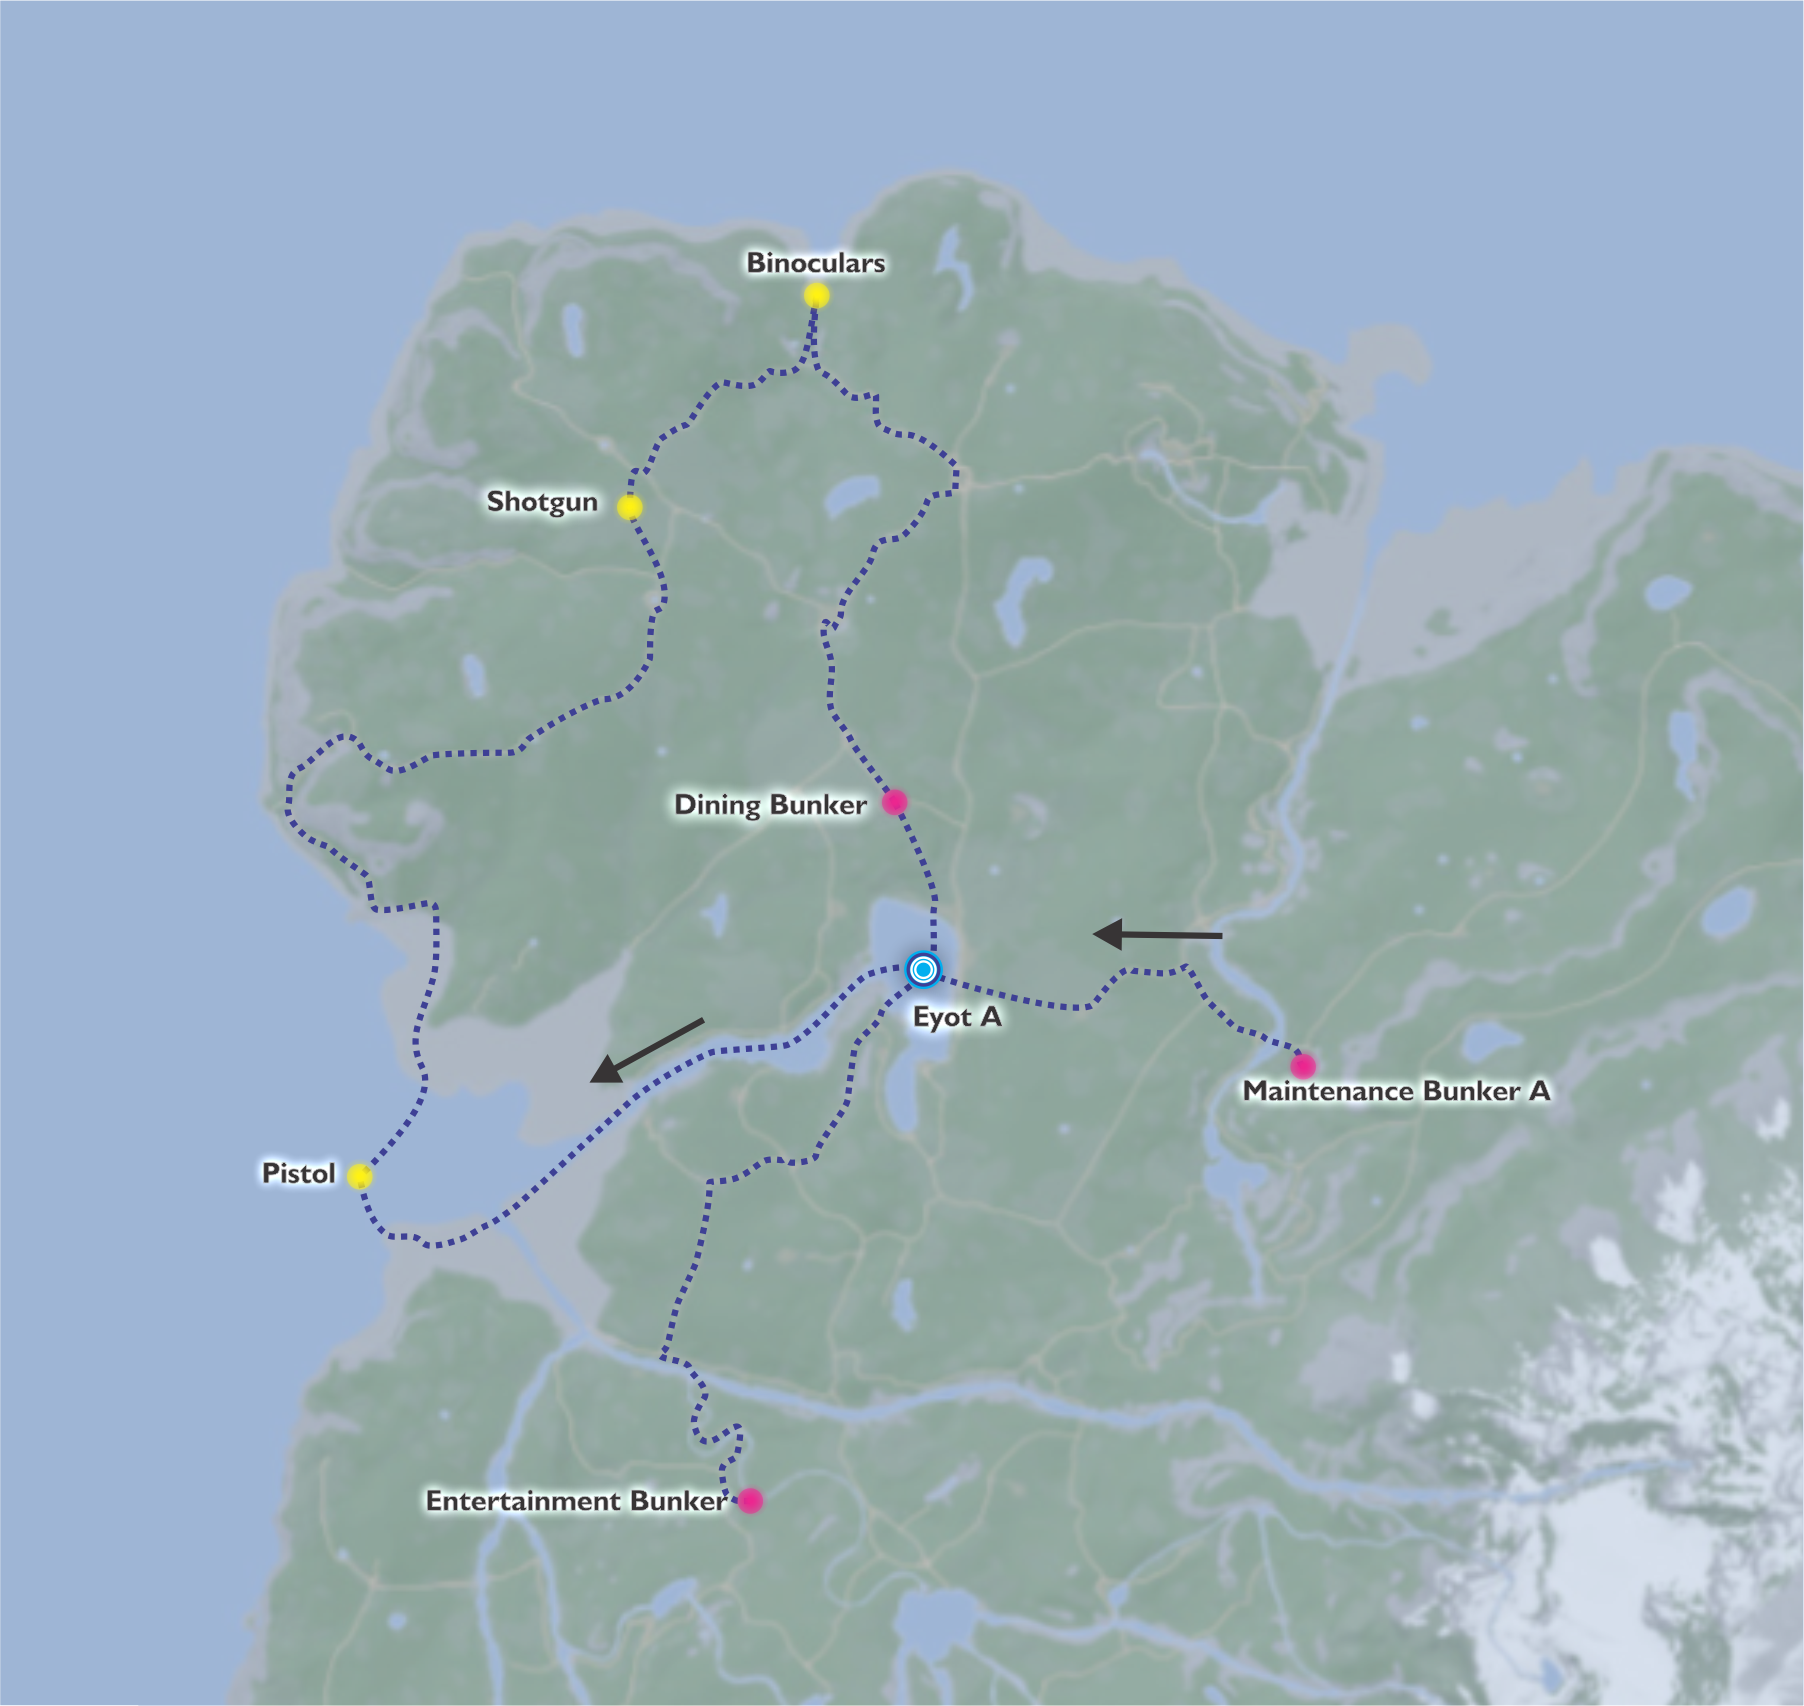
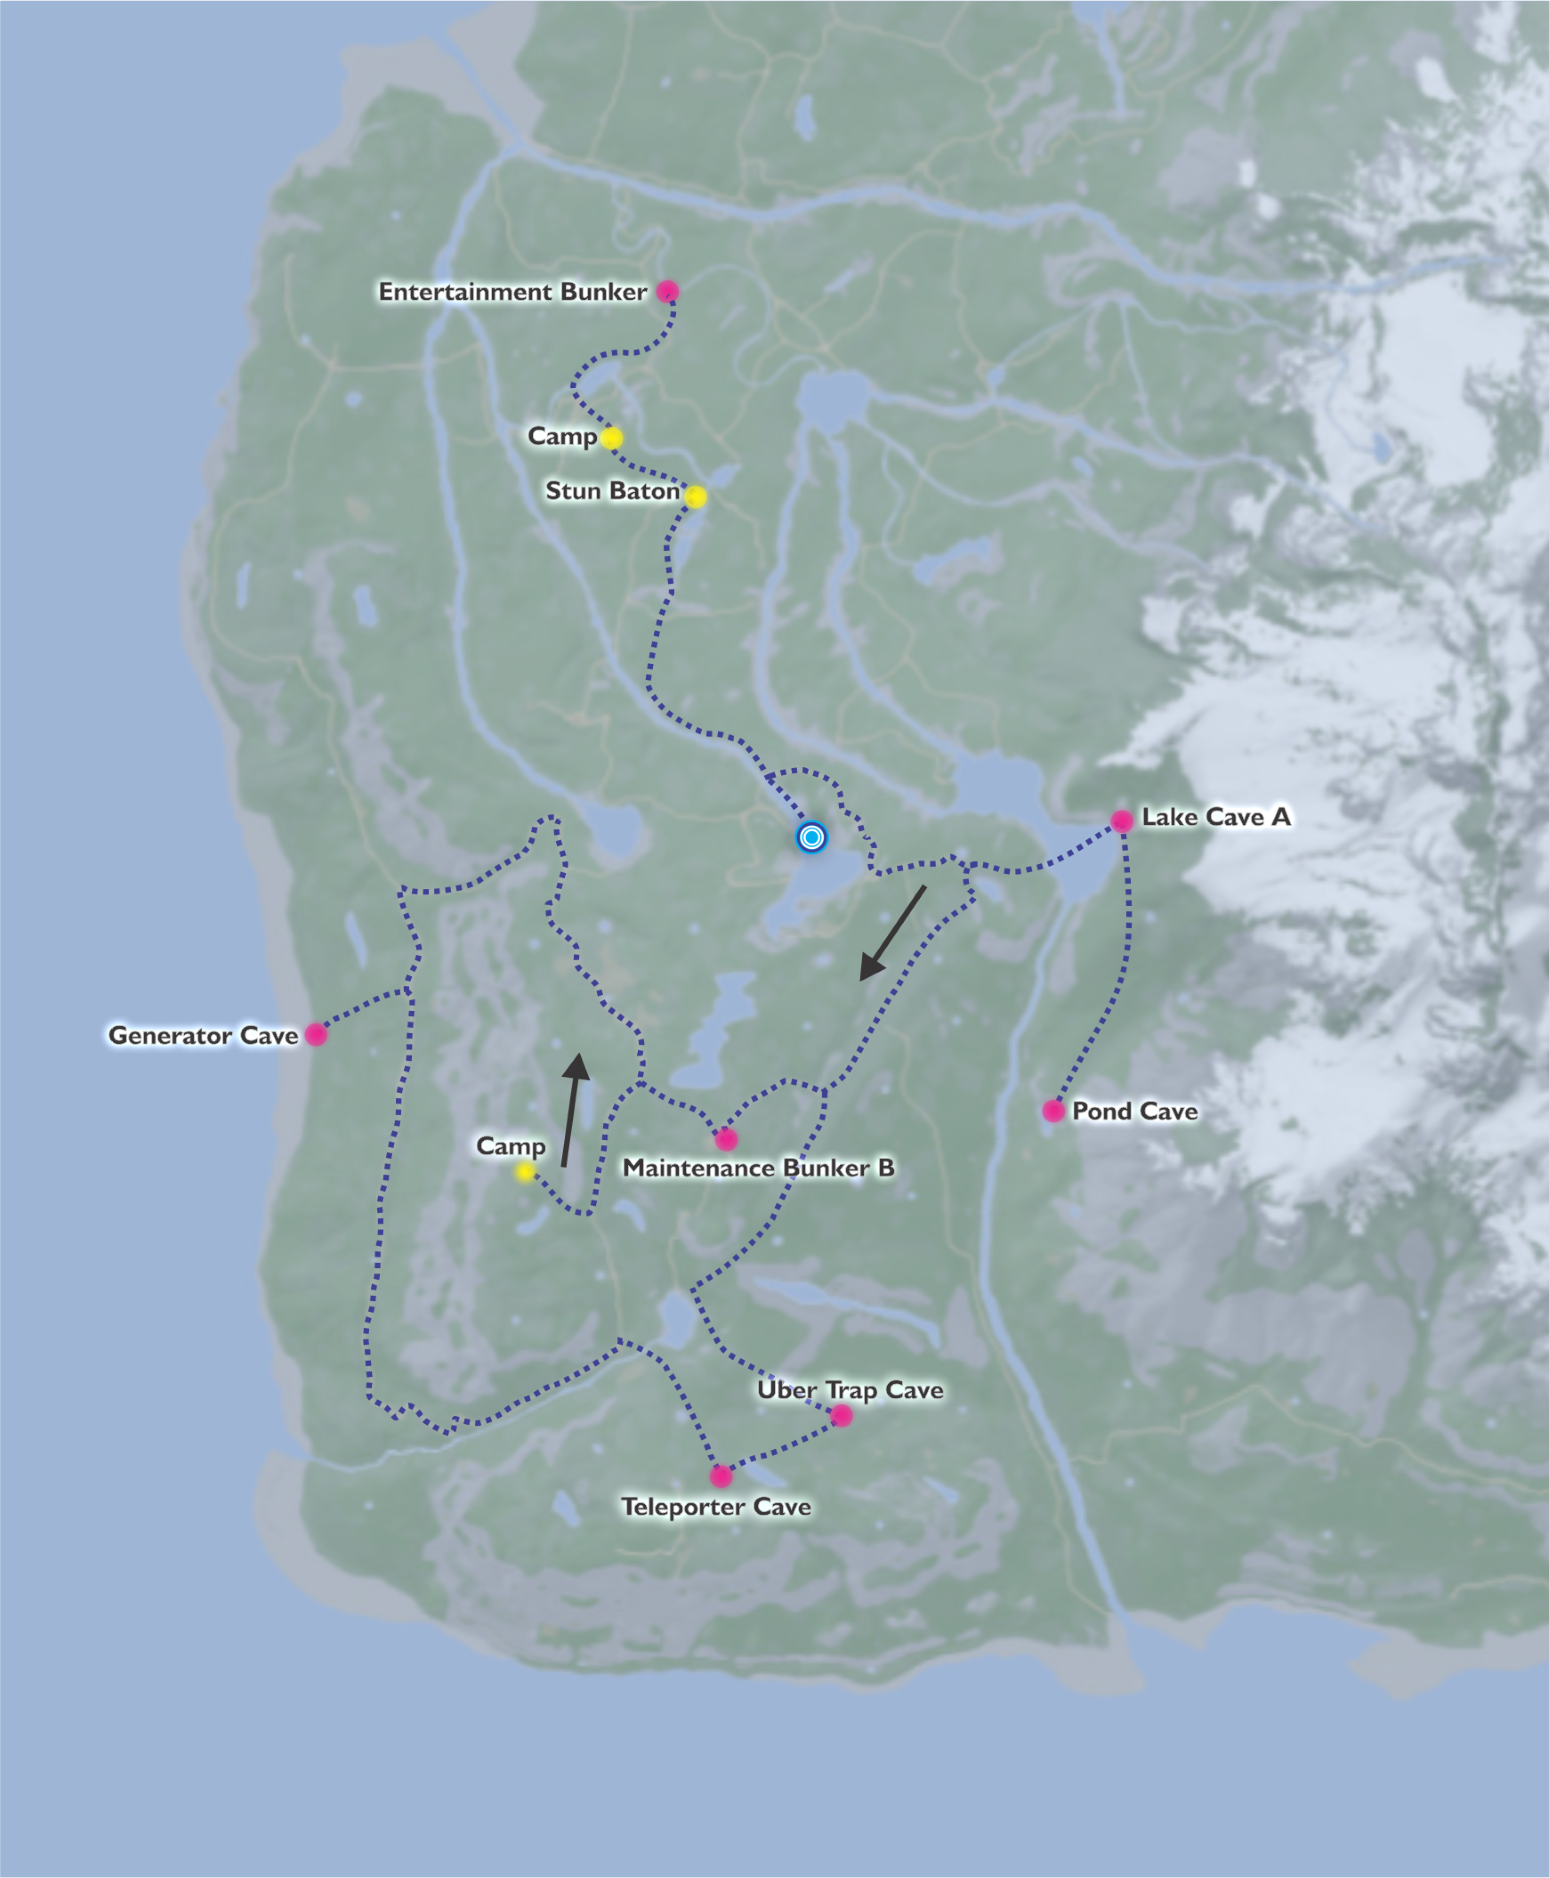
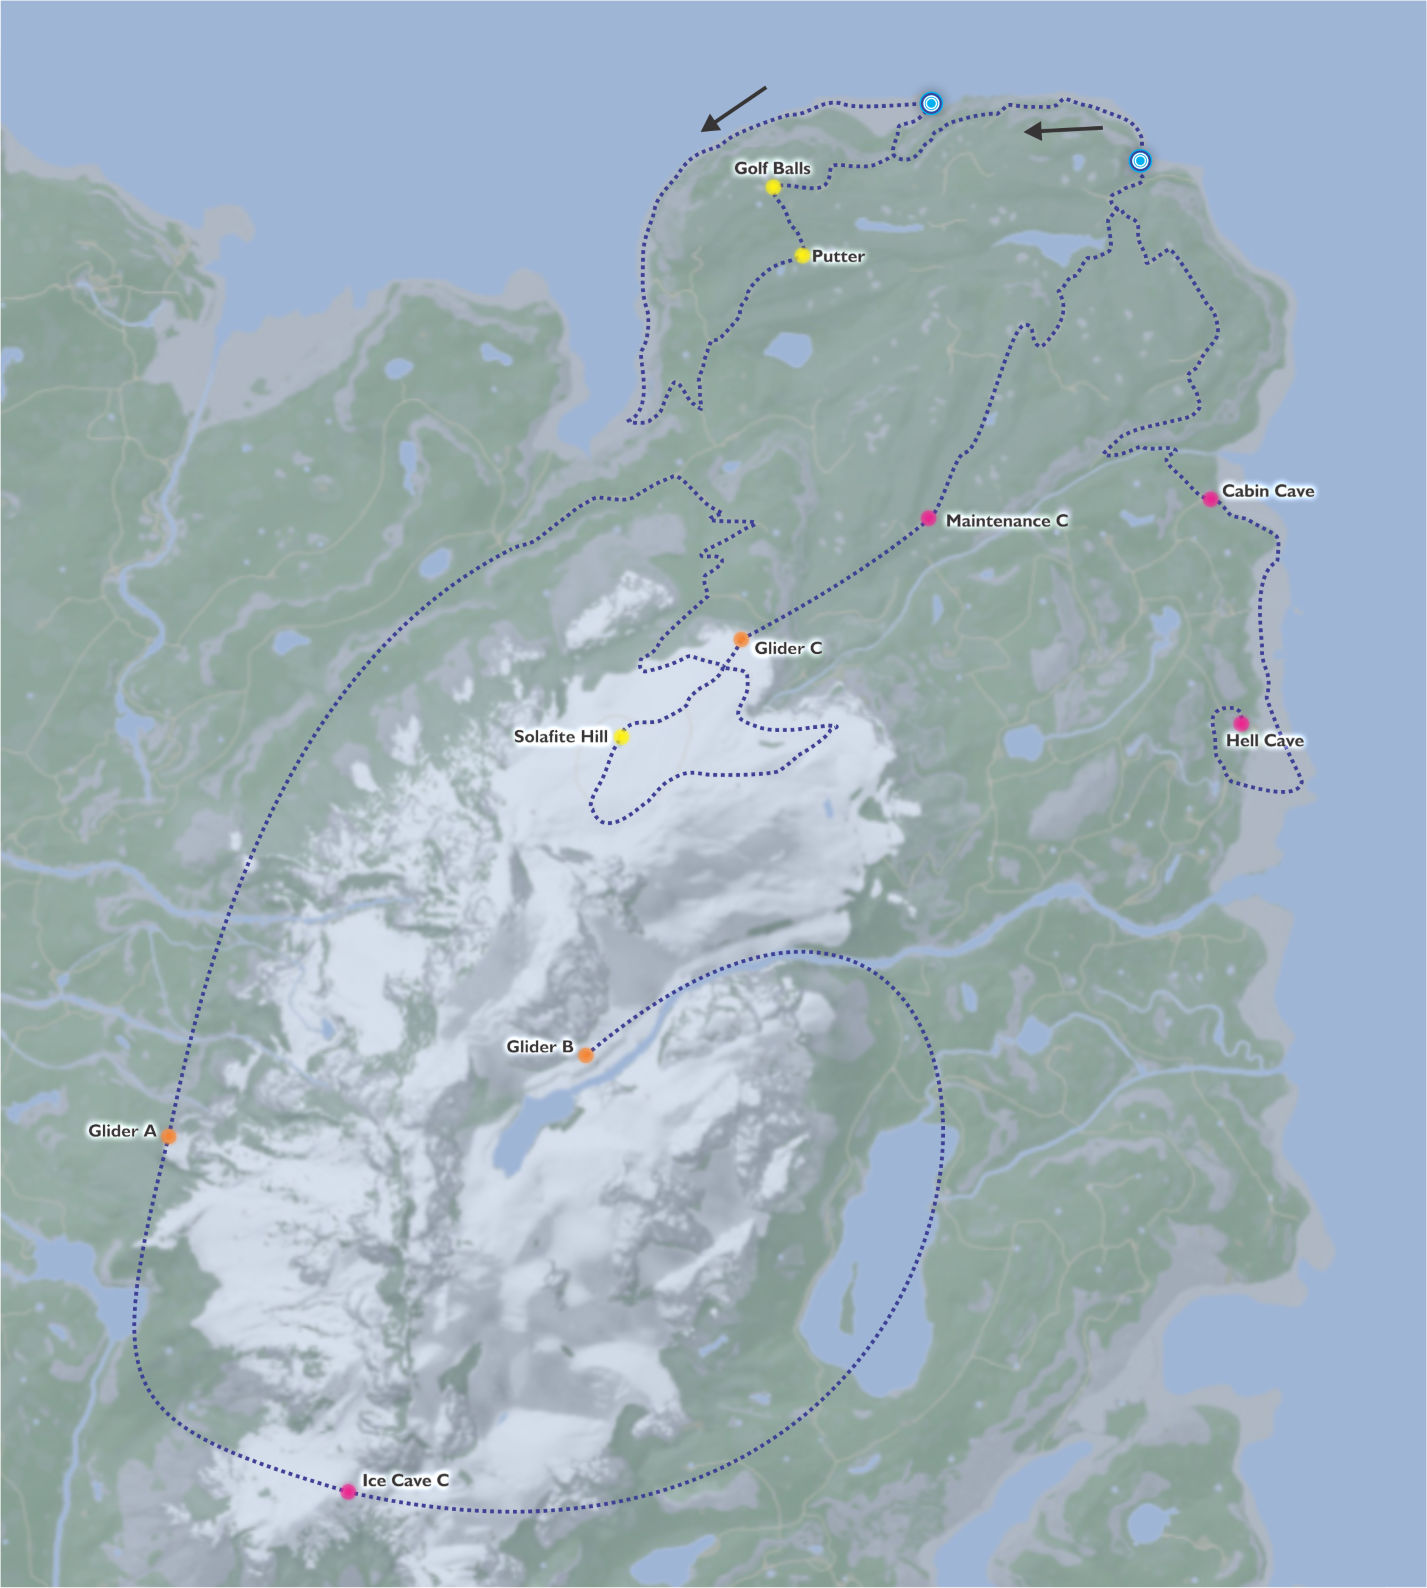
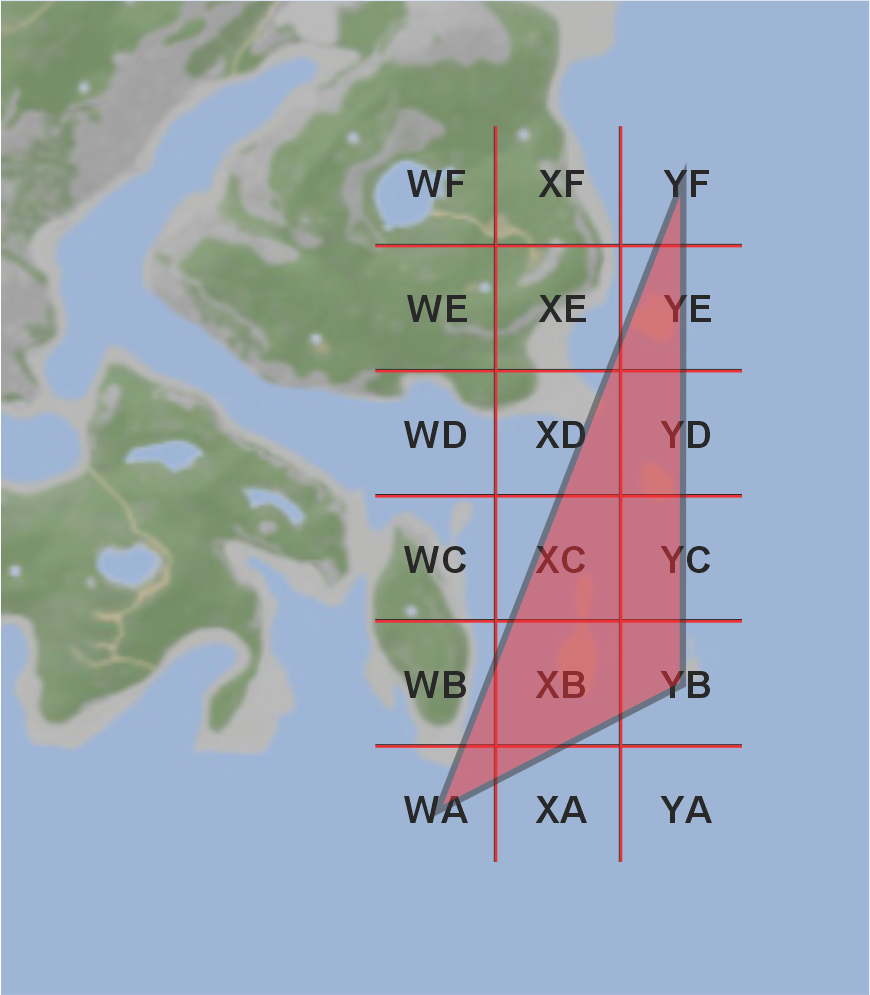
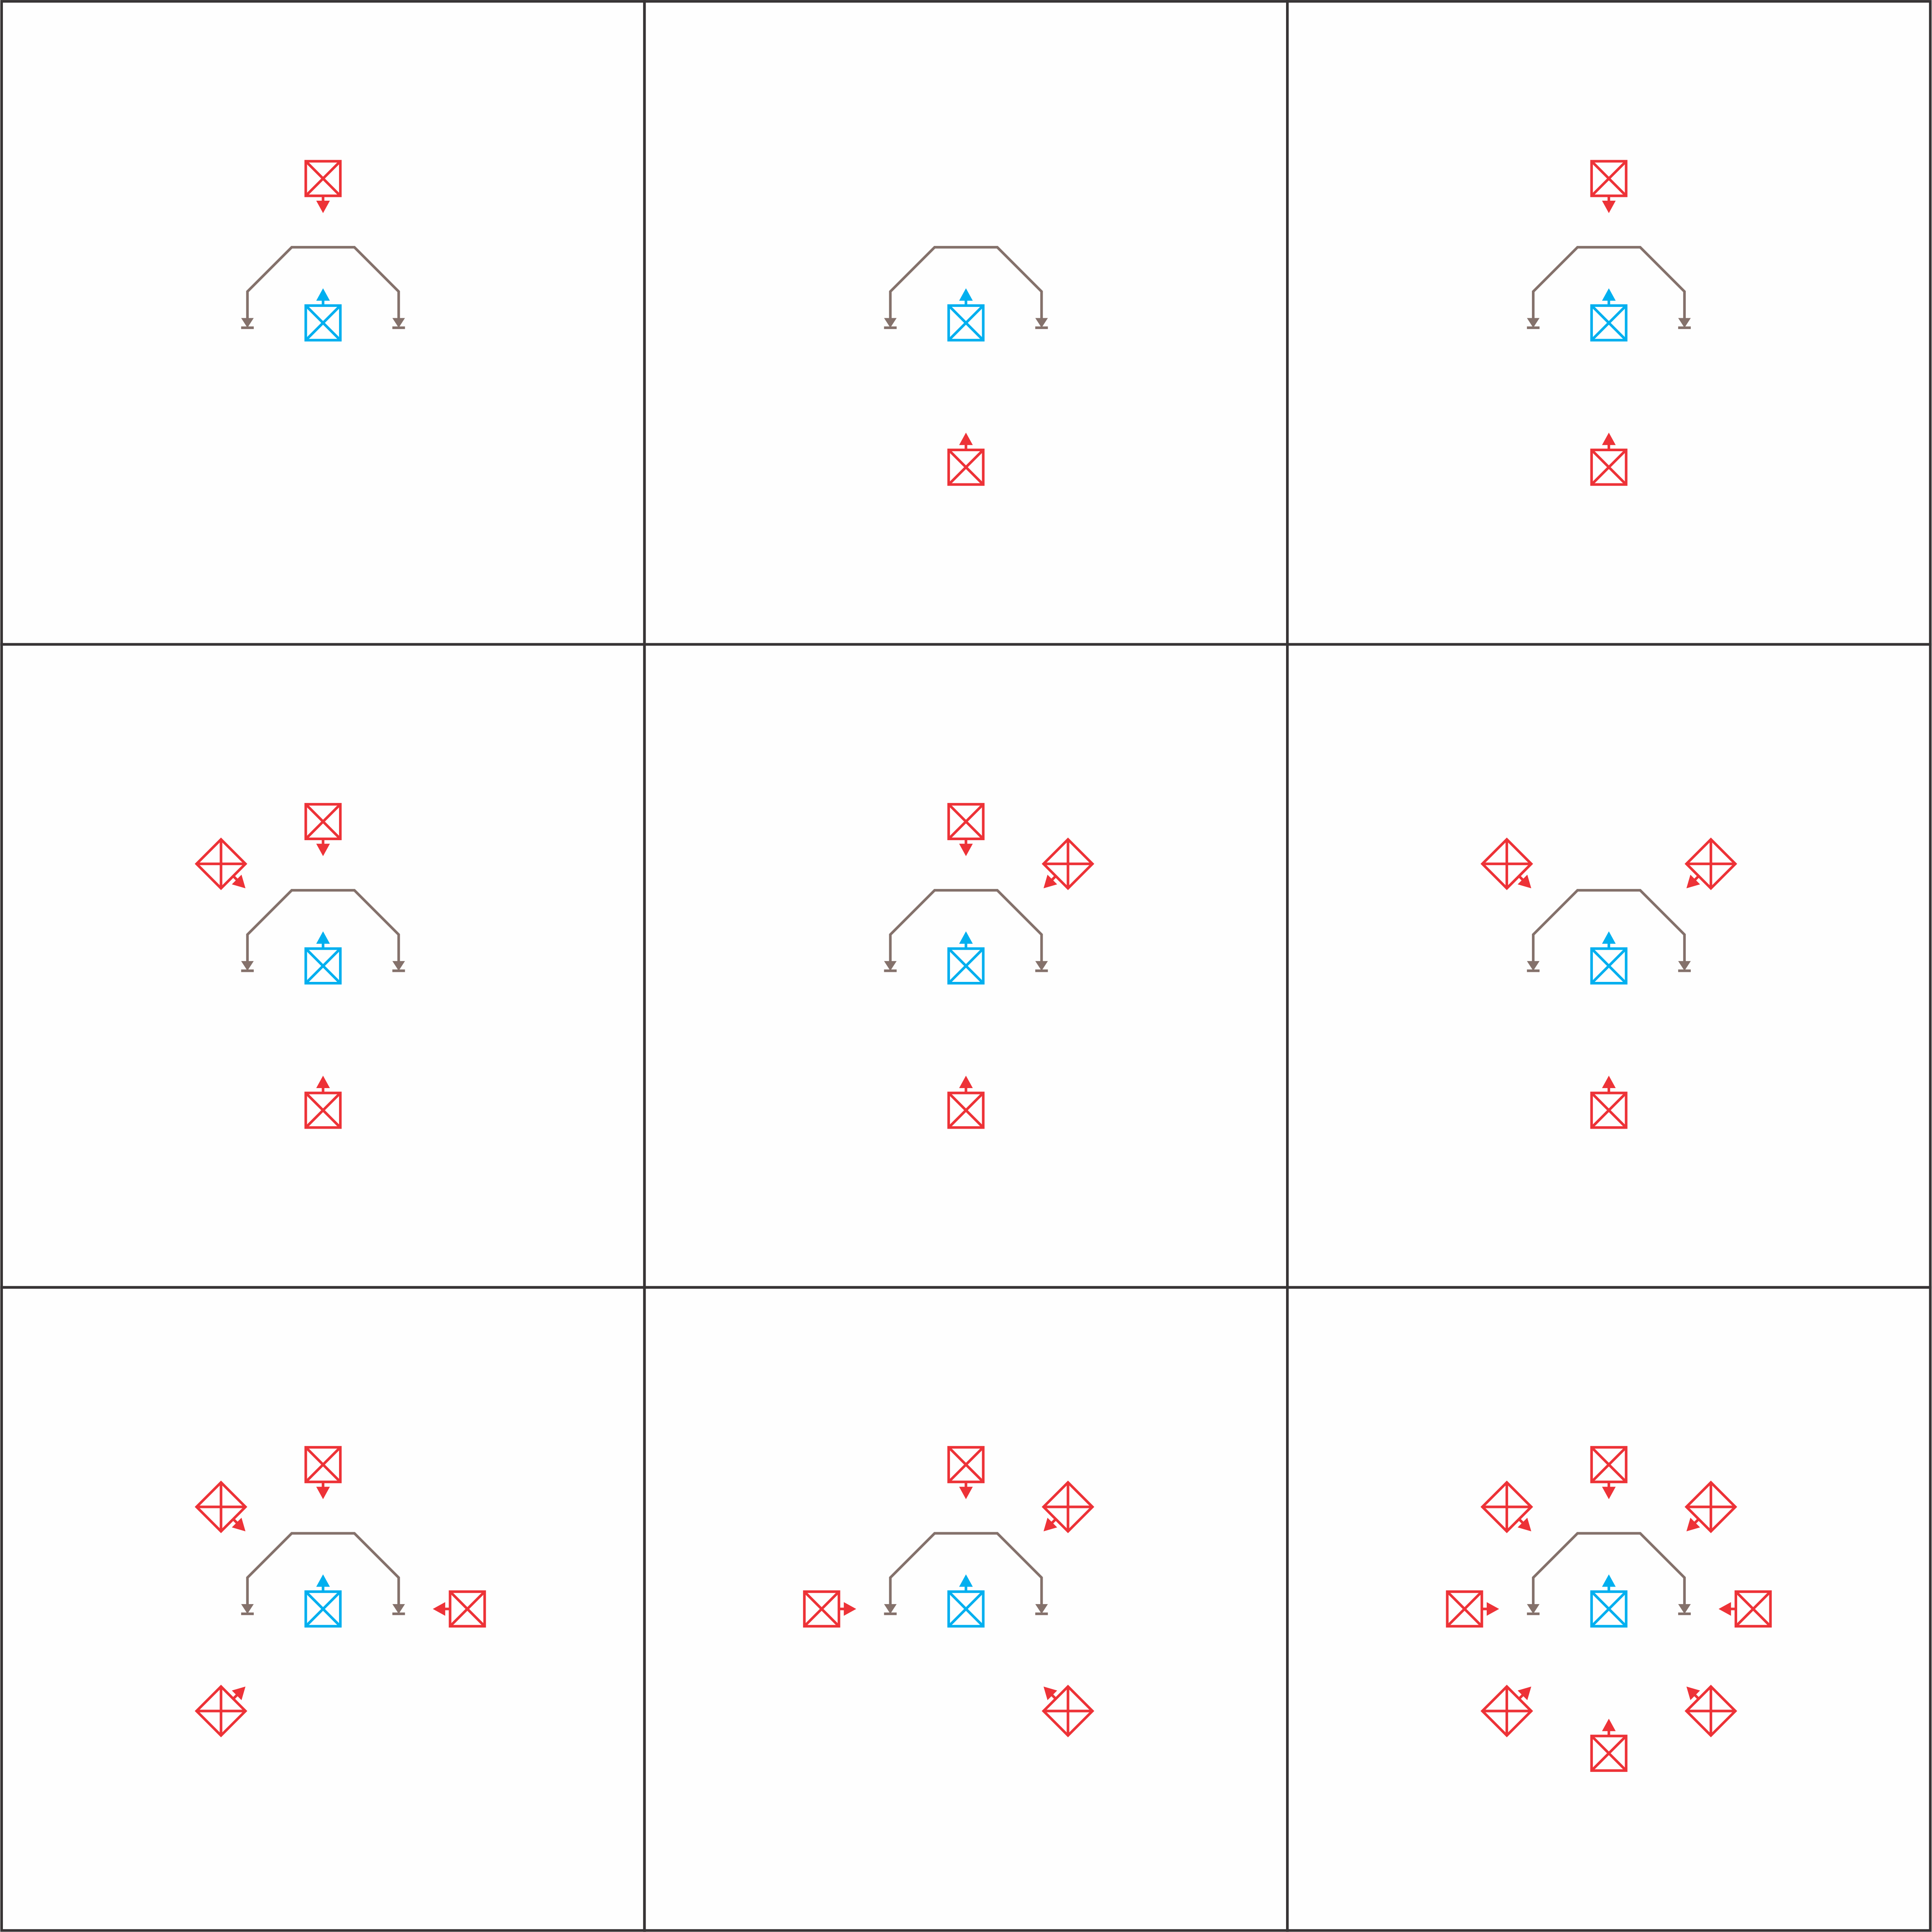
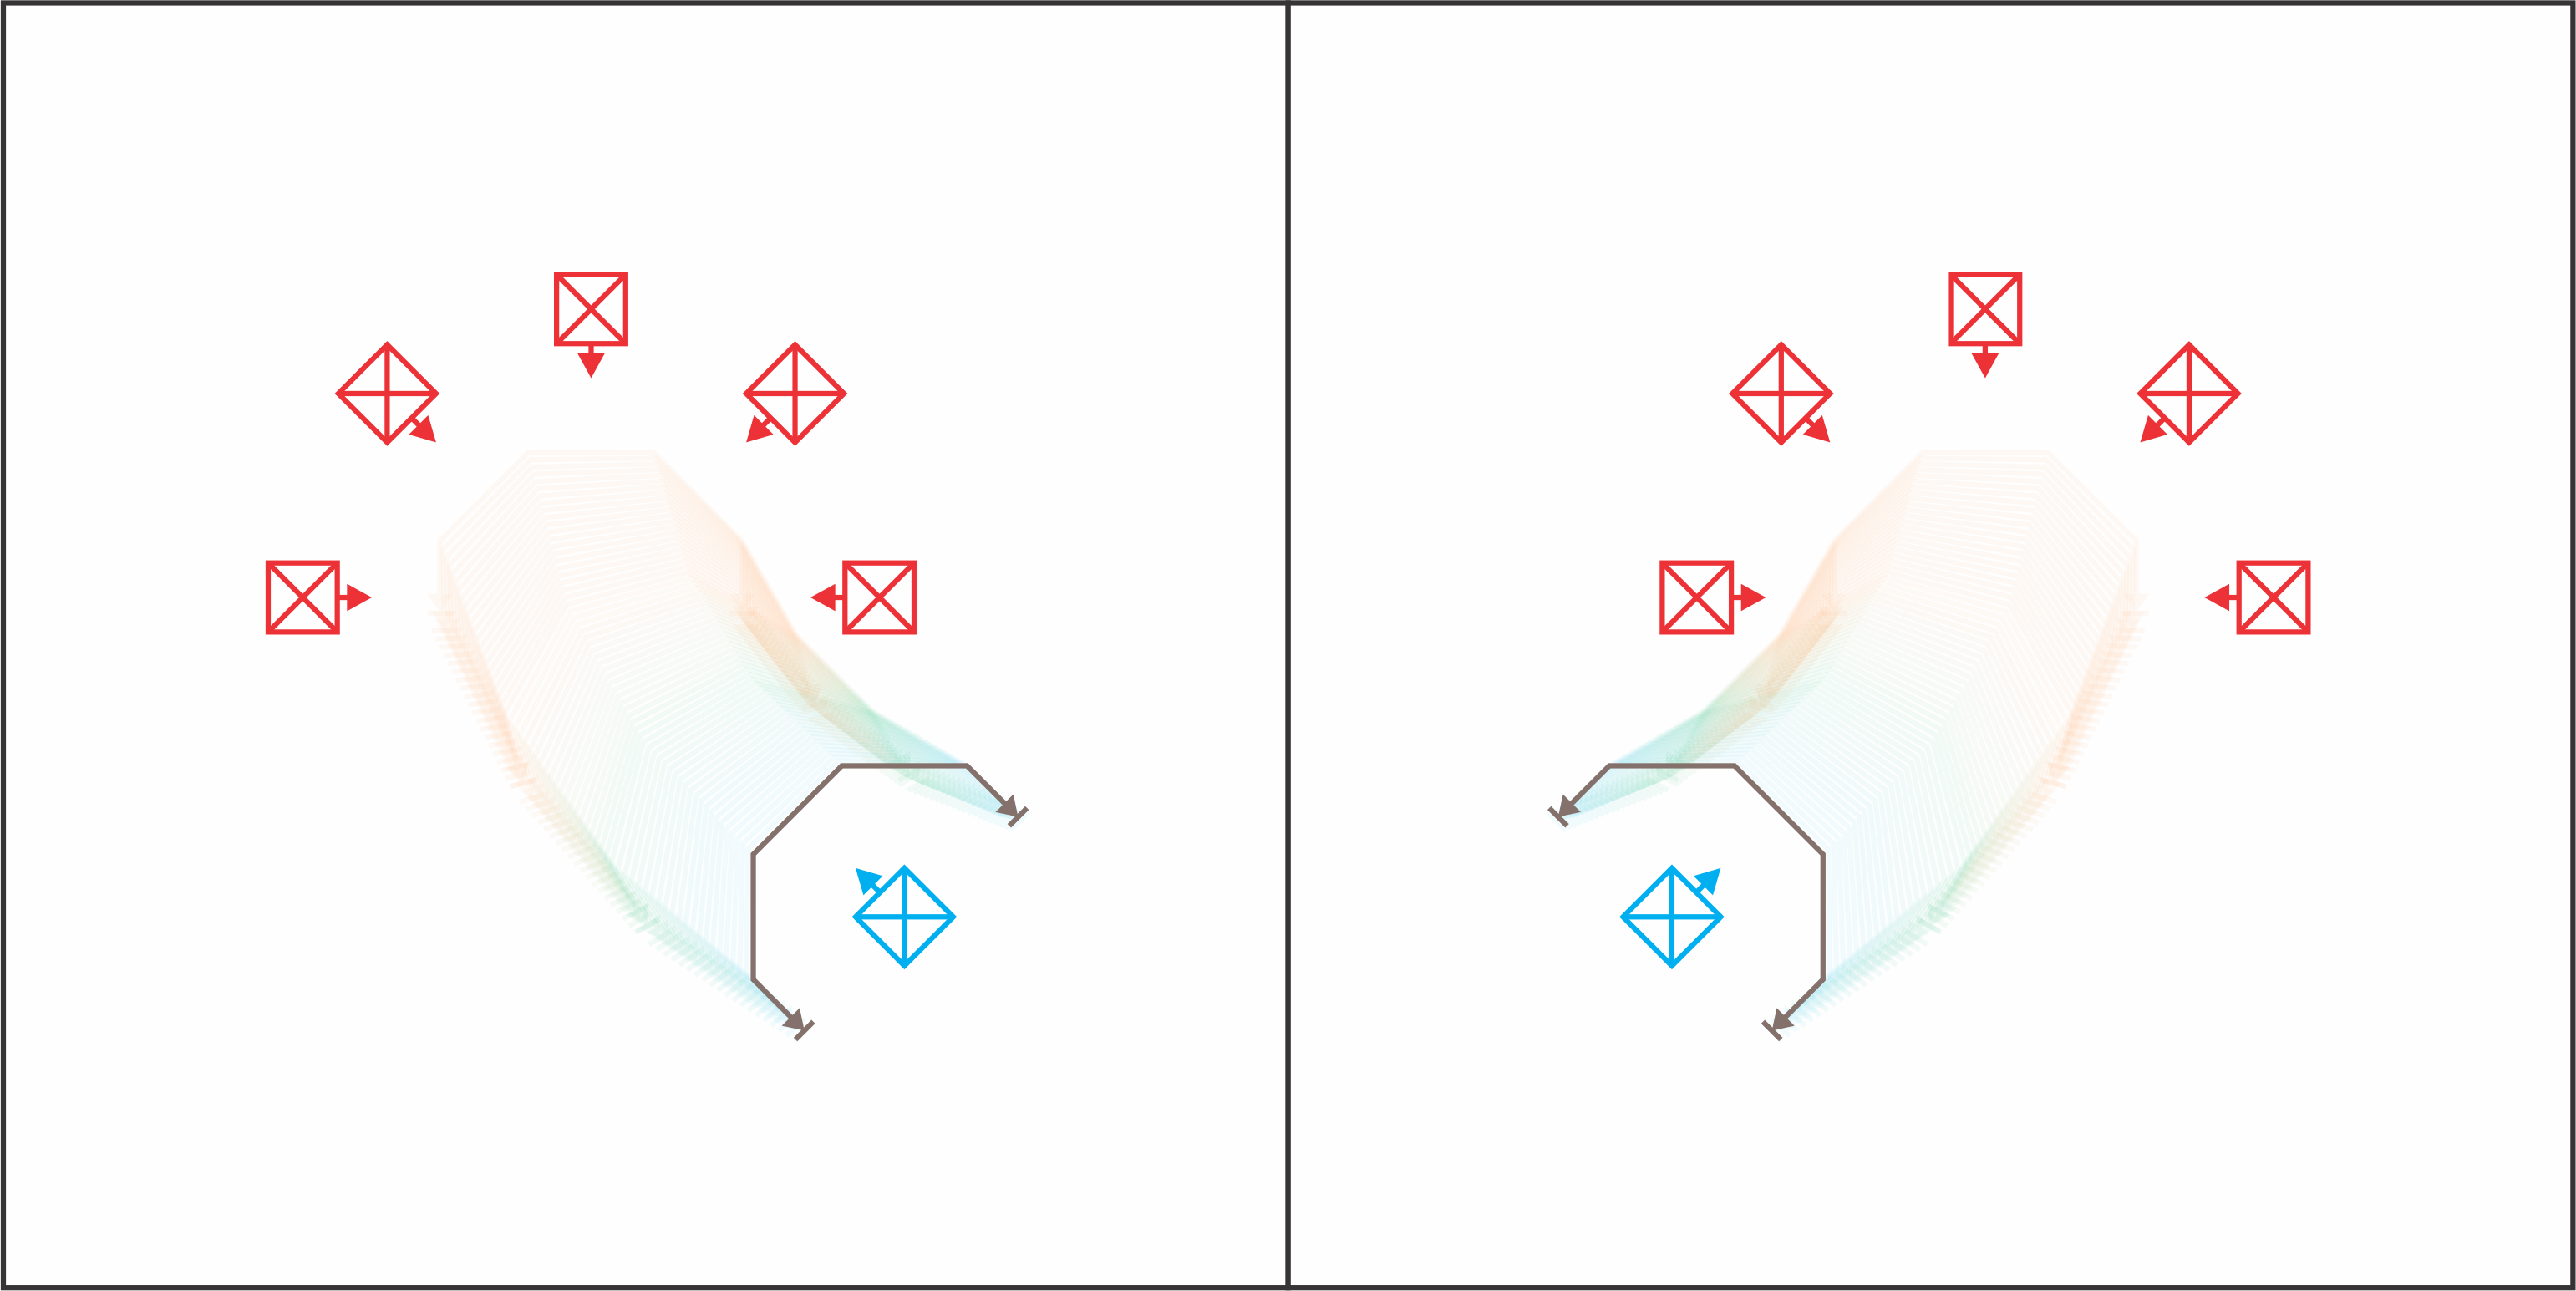
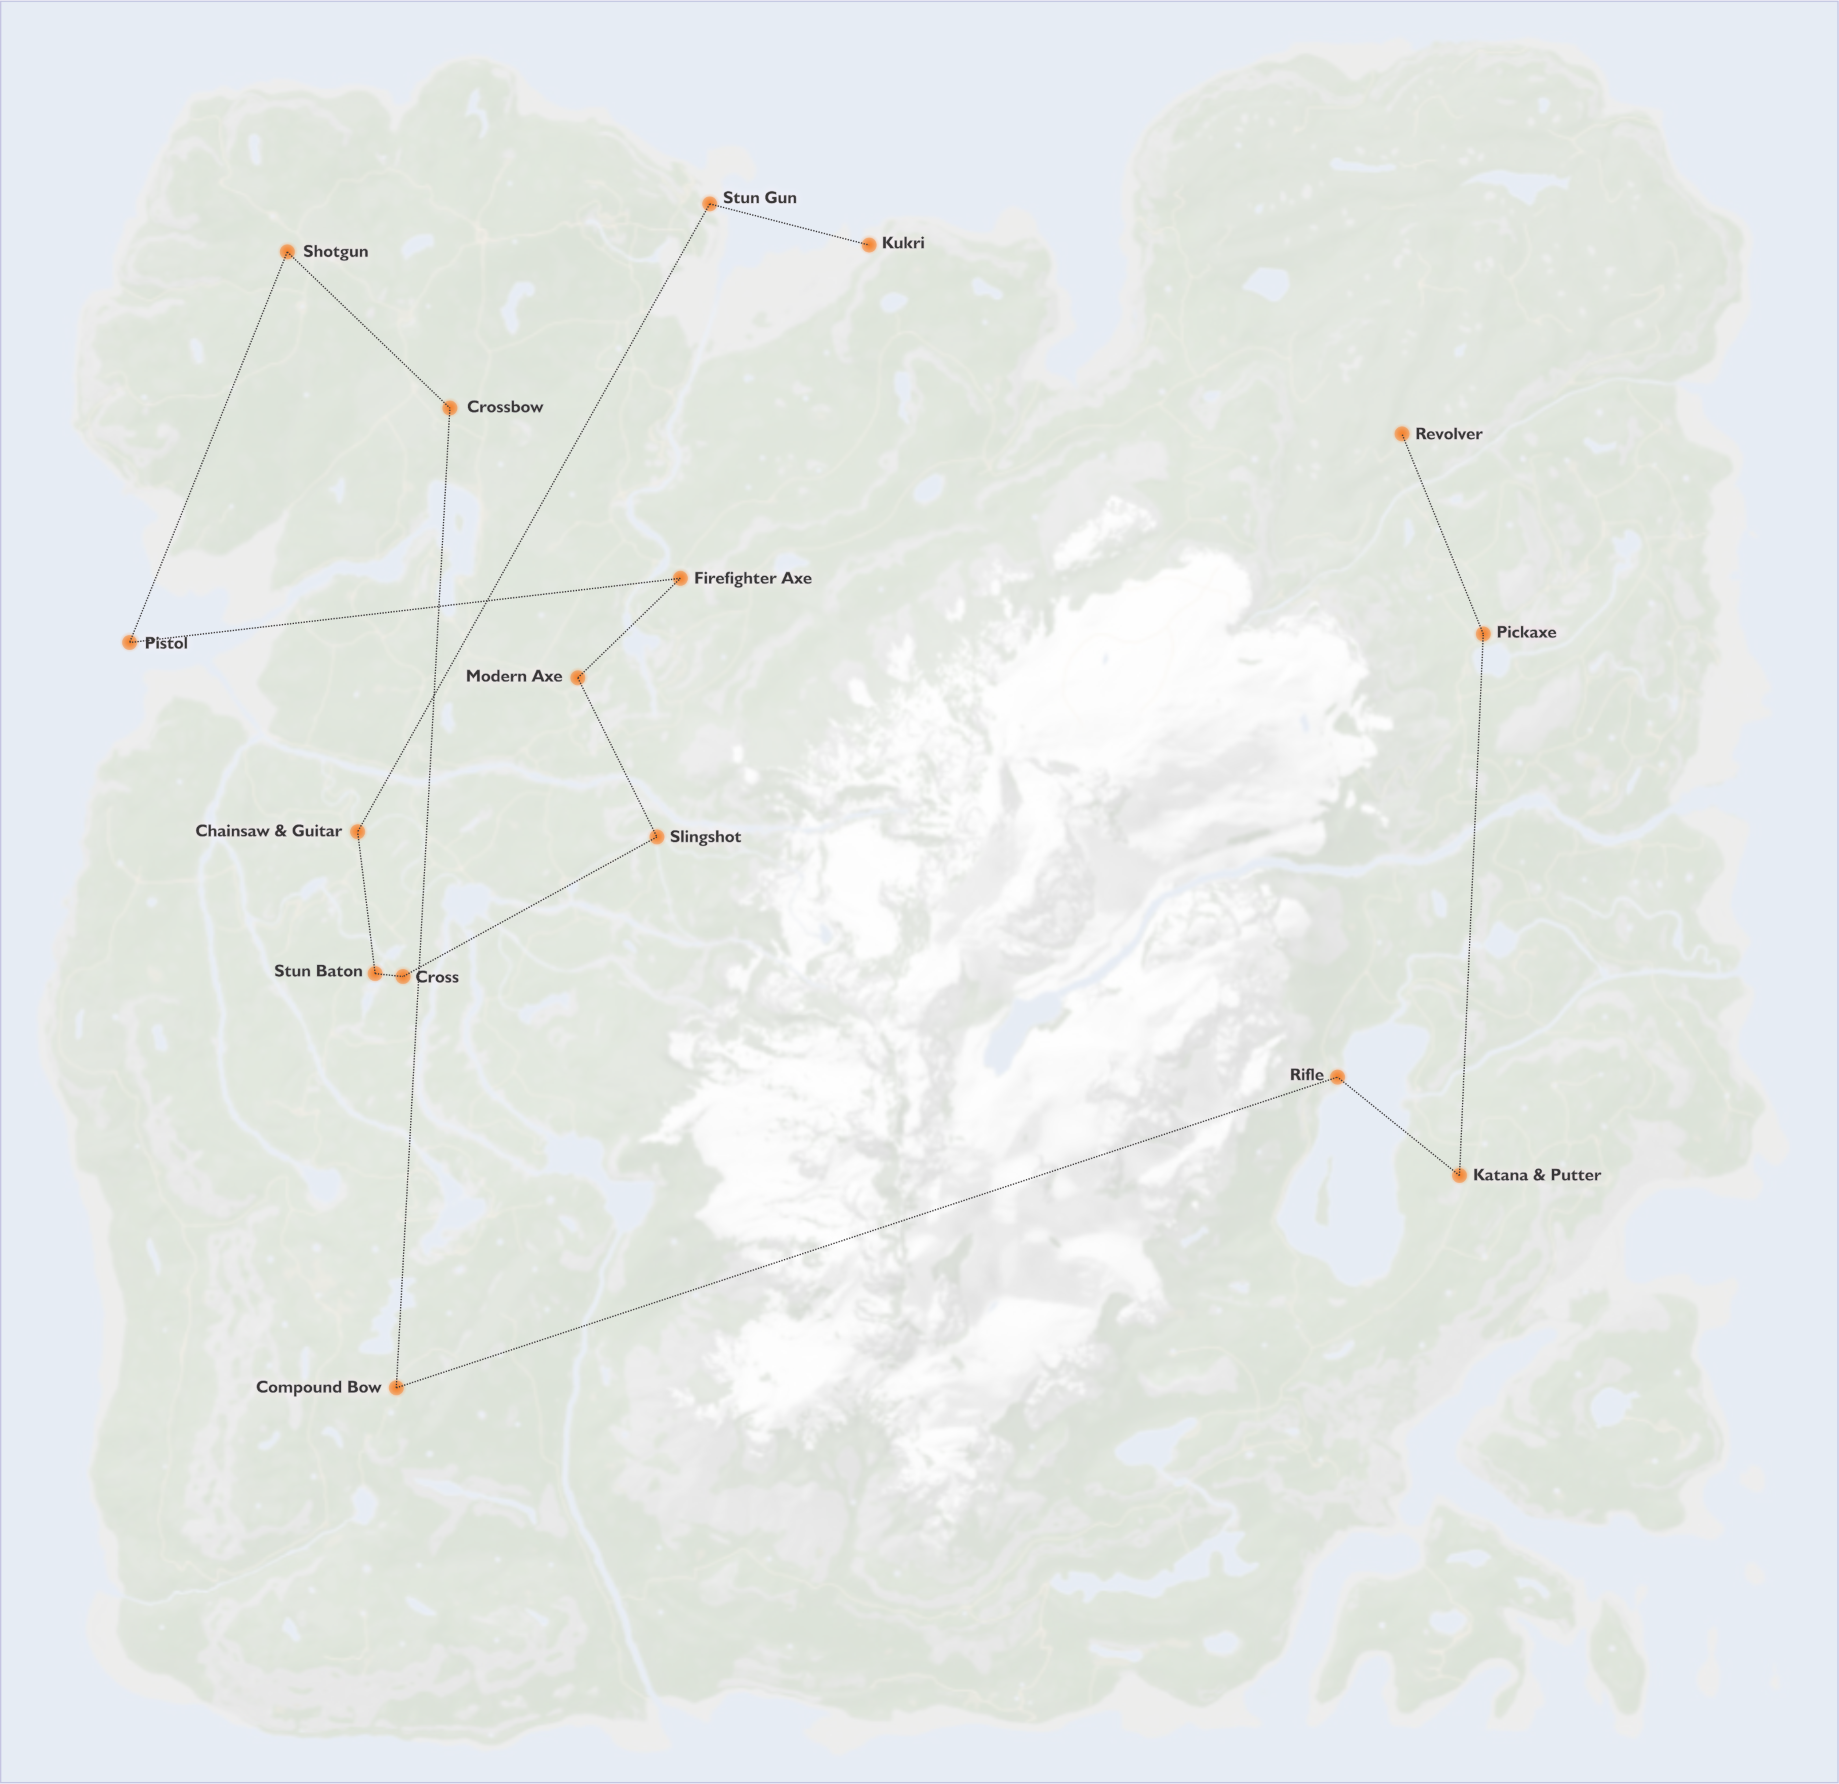
There are a few images missing in the beginning, where you talk about the Map path-finding, symbols, the Kukri Route and recommended game runs that makes things hard to follow.

Are you able to restore the images?
whitelicorice_ 20 Kas 2024 @ 14:08 
Why does the recommended game run start with maintenance bunker A if you don't have a shovel? Am I missing something?
Everything 22 Eki 2024 @ 13:53 
geeked out hard on this one.
The Tree 21 Eyl 2024 @ 15:32 
Endnight needs to go ahead and make this an official book
Sylar  [yaratıcı] 17 Eyl 2024 @ 8:43 
@Lizzy for "which letters"

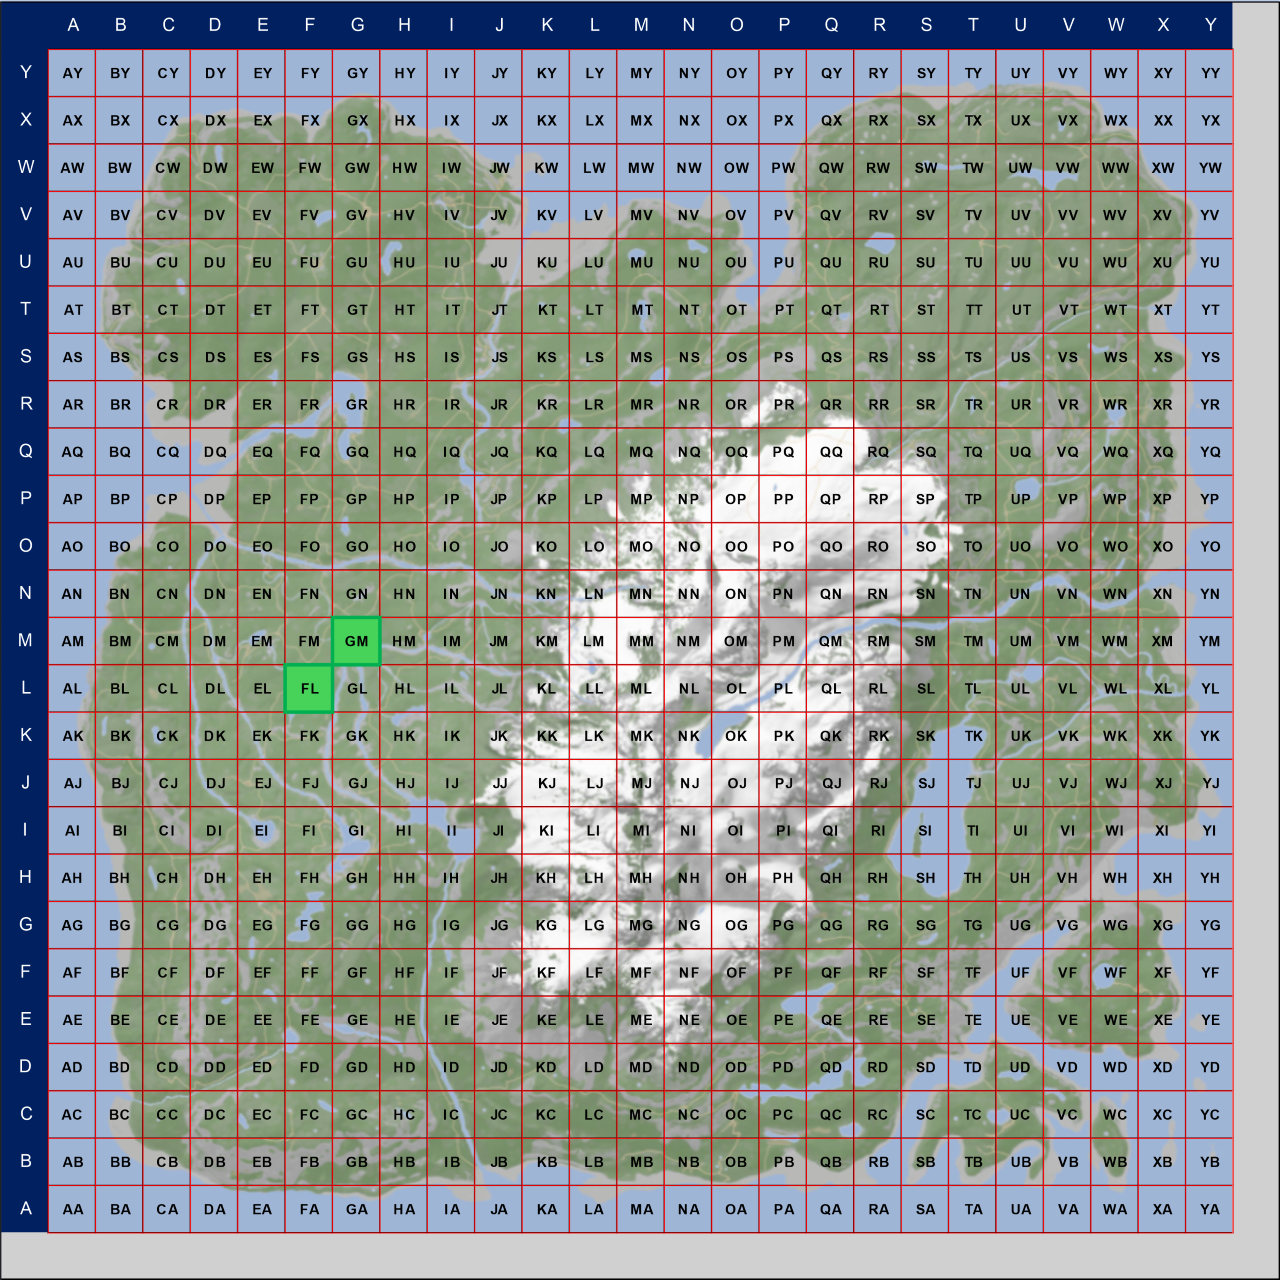
That would be zone GI (or -975.4 227 -653.6 for more precise coordinates)
Lizzy 18 Ağu 2024 @ 13:09 
which letters are the waterfall location for the winter
Mini Gangster 23 Tem 2024 @ 12:16 
BRUH...
Sylar  [yaratıcı] 22 Nis 2024 @ 4:51 
Reply to: "Я правильно понимаю. Что стоит собрать предметы по золотому пути в первые дни из за малого количества врагов в пещерах?"

Da, vy ponimaete pravil'no. Poka v peshcherakh malo vragov, stoit sobirat' predmety po zolotomu puti v pervye dni.
XAHTEP 27 Mar 2024 @ 1:48 
Я правильно понимаю. Что стоит собрать предметы по золотому пути в первые дни из за малого количества врагов в пещерах?