METAL GEAR & METAL GEAR 2: Solid Snake

METAL GEAR & METAL GEAR 2: Solid Snake

164 ratings
Metal Gear Maps & Walkthrough
By tallonkhan
Walkthrough by Bagman007
7
10
2
   
Award
Favorite
Favorited
Unfavorite
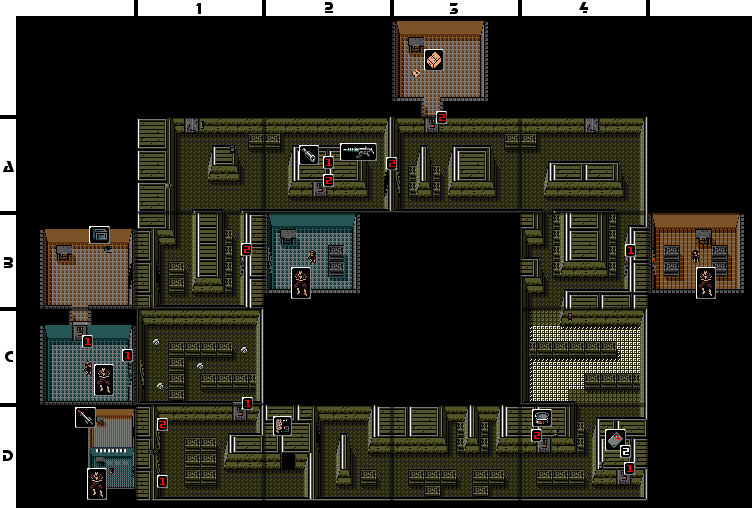
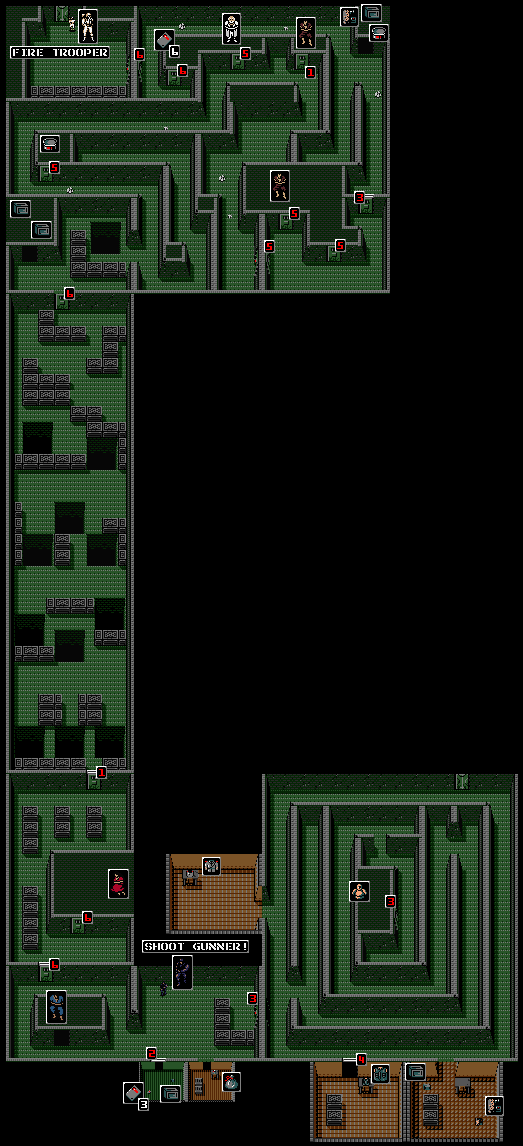
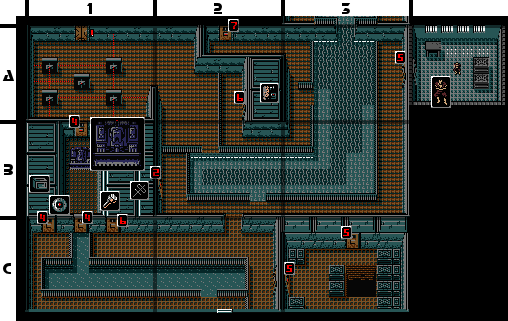
1 - Solid Snake's Entrance
You(Solid Snake) start off swimming down a river around the terrorist base, Outer Heaven. Snake receives a call from the commander-in-chief of FOX-HOUND, Big Boss. He tells you that your mission is to infiltrate the terrorist fortress Outer Heaven and destroy the ultimate weapon, Metal Gear. He will tell you that your first objective is to search for the missing FOX-HOUND operative Grey Fox and search for Metal Gear.

He will tell you that if you need any help to contact him at transceiver frequency 120.85. Make a note of that and end the transmission. When you start the game, you will be outside of BUILDING ONE in Outer Heaven.


Proceed inside the building and you will get another call from Big Boss. He will suggest that you try not to be discovered on your mission. End the transmission and head up to the next screen.

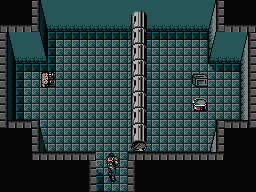
On this screen, you'll see two guards and lots of crates. Sneak past the guards and head right. On this screen, you'll see three trucks. Go in the one on the left to find some RATIONS. Exit that truck and hide behind the center truck. When the guard exits the center truck, quickly go in and get CARD 1. Exit the truck. Enter the truck on the right to find BINOCULARS.

Exit the truck and head back to the screen with the two guards and a lot of boxes. From here head down to the entrance to BUILDING ONE. Now go right. Sneak past the two guards on this screen by using the tanks as cover and head right. Use CARD 1 to enter the room.

In here will be one guard and a GAS MASK on the table. Wait until the guard falls asleep and take him out. Then grab the GAS MASK off the table and head back to the entrance screen to BUILDING ONE.

From here, head north until you get to an elevator with two guards guarding it. Head east from here. On this screen you'll find three more trucks, a door on the south wall, and a door on the east wall. Enter the truck on the left to find the HANDGUN. Don't try to use it just yet as you don't have and AMMO for it yet.

Exit the truck and hide behind the trucks. Wait for a guard to come out of the far right truck and enter it. In here you will find some MINES. Exit the truck and head back to the screen
with the elevator.

Wait until the two guards leave the screen, and enter the elevator using CARD 1. Take the elevator to the third floor.


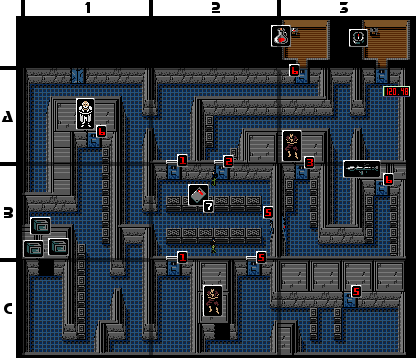
Here you'll see two cameras in this room. One on the west wall and one on the north side of the square in the middle of the room. Sneak past the cameras and head down on the far right wall. Avoid the two guards in this area and go in the open door on the left. In here you will find the AMMO. Use CARD 1 to enter the door on the south wall. In here, you will find a POW (num.1) tied to a chair. Go over to him to release him. Now use CARD 1 to OPEN the door on the east wall. Now equip your GAS MASK and enter the room.

Originally posted by bagman007:
You will now receive a call from Big Boss. He will tell you to put on your GAS MASK in the gas room (I guess he's a little late on that one, huh).

Make it through the gas room and use CARD 1 to enter the door in the southeast corner of the room. In this room, take out the guard by punching him when he comes to you.

Then avoid the camera and use CARD 1 to enter the door on the southwest part of the room. In this room, you will find another POW (num.2). He will tell you that another FOX-HOUNDER infiltrated Outer Heaven a few days ago and was captured by the enemy. Exit the room and head east.

On this screen, you will see an open door, enter it. In here you will find a rolling pin rolling across the room and a PLASTIC EXPLOSIVE.


Wait for the rolling pin to go to your right, and run and grab the PLASTIC EXPLOSIVES and hide in the slot on the left side of the room. When you get the chance, run back to the entrance of the room. Now wait for the rolling pin to go to your left, and run through the open door on the right side of the room.

Sneak past the guard on this screen and proceed right. On this screen, two guards will come down from the slots on the north part of the room. Take them out by punching and proceed to the next screen. On this screen you will see a guard, two cameras, and two doors, one on the north wall and one in the southeast part of the room. Avoid the cameras and use CARD 1 to enter the door in the southeast part of the room. In here, go to the desk and grab CARD 2.
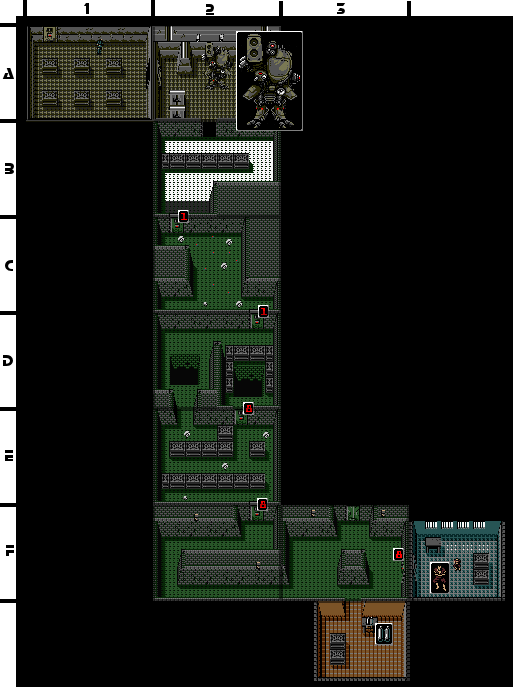
Exit the room and use CARD 2 to enter the door on the north wall. In here you will find RATIONS. Exit the room and head back to the room after the gas room. In this room, take out the guard and avoid the camera again. Use CARD 2 to enter the door in the northwest corner of the room. In here you will find REMOTE-CONTROLLED MISSLES. Exit the room and head back to the screen with two cameras, a guard, and two door (the southeastern most screen on the floor).

From here, head up to the next screen. Here you will see a flashing white floor and a control box on the other side of the room. Big Boss will call you and tell you to use your REMOTE-CONTROLLED MISSLES on the power box to turn off the high-voltage.

Use your REMOTE-CONTROLLED MISSLES to destroy the control box. That will turn off the electric floor and allow you to cross it to the next screen.
2 - Captured on Purpose
Originally posted by bagman07:
The first and one of the hardest parts of the game is now completed. You've also picked up about 25% of your weapons up to this point. Well, enough of my talking, it's time to move on to the second chapter of the first Metal Gear.


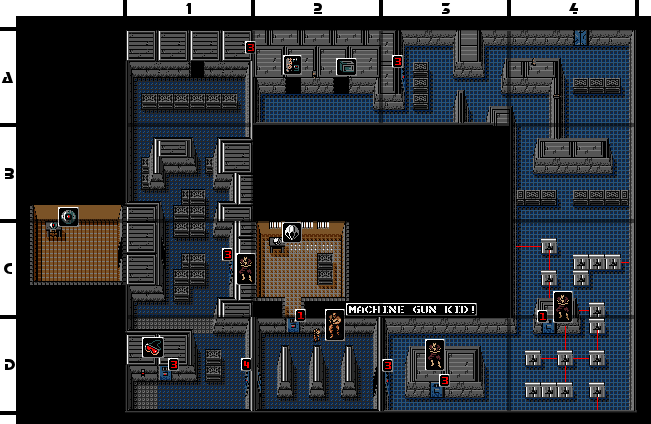
On this screen (cell B4) there will be two guards and a door on the east wall. Take out the guard walking east and use CARD 1 to enter the door. In the room you will find the third POW (num.3). Rescue him and he will tell you that resistance member Diane will help you on frequency 120.33. Make a note of that and exit the room.

Head north to the next screen (cell A4). On this screen you will see an elevator guarded by two guards from a distance. Ignore it for now and head west. On this screen, you will see three guards patrolling the area. As long as you stay lined up with the wall, they won't see you. Take out the two guards that approach you by punching them. Now you'll want to enter the door on the north side of the room. Wait until the guard on the west dies of the room is moving towards the south and use CARD 2 to enter the room.

In the room you will find the CARDBOARD BOX. Now exit the room. When you come out of the room, there will be two guards on this screen, the guard in the south part of the room and the guard in the west part of the room. Take out both guards and use CARD 2 to enter the door. Once in this room (cell A2), you will need to quickly move to the south wall and use CARD 2 to enter the room. In here you will find four trigger happy guards just waiting to kill you.

Originally posted by bagman007:
I like to call them Ultra Box (if you've played Metal Gear 2: Solid Snake, you'll know what I'm talking about).

Take them out, one shot a piece and pick up the SILENCER that appears after you kill them. Now that you have the SILENCER you may use your gun without the guards hearing it.

Use CARD 1 to enter the room on the east wall. In here you will find the GRENADE LAUNCHER. Exit the rooms and head west(cell A1).

You will notice that you are back by the elevator that you entered the floor at. Watch out for the camera and head south down the right path. Use CARD 2 to open the door here and rescue the fourth POW (num.4). Exit the room and head back to the elevator guarded by two guards from a distance (cell A4). Take out the two guards and use CARD 2 to enter the elevator. Take the elevator down to the second floor.


When you exit the elevator, you will see two cameras. Both are fairly close together on the left side of the room. Use the crates to avoid the camera and head down to the next screen. On this screen, you will see a guard wandering around. Wait until he falls asleep, kill him, and head south once again. On this screen you will see peach colored walls with gray lines on them. These are laser traps.

Originally posted by bagman007:
Unlike Metal Gear Solid, your ---CIGARETTES--- won't detect the lasers. Since you currently have nothing to get through the laser traps, I'll do my best to give you directions on how to avoid the lasers.

  • From the top center of the screen, head down until you hit a wall.
  • Then turn right until you hit a wall.
  • Then go down to the next screen.
  • This screen it similar to the last, but there is a room you need to enter at the top of the screen. From the entrance of the screen, go down.
As you proceed down, count the number of laser trap walls you see. When you reach the second and third ones, go between them.
  • Now go down until you hit a wall and then go right until pass three laser walls.
  • Now go up past two laser walls.
  • Now you go right until you are standing in front of the door.

Use CARD 1 to enter the room. In here you will find the fifth POW (num.5). Rescue him and you will notice that your star rank is now up to two stars. Your star rank will move up with every five POWs that you rescue. If you kill a POW, your rank will decrease by one.
You can now carry more equipment and AMMO. Check the Ammo/Equipment Chart in the weapons/Ammo/Equipment section to find out exactly how much you can carry at your current rank.

Exit the room and head back through the laser traps until you come to the screen with the sleeping guard (cell B4). Take him out again and head up the left path. Go left again on the next screen and you will come to a screen with three guards. Watch their walking pattern and take them out one at a time. Then down the path on the southwest part of the room. On this screen you will see a security camera and two open doors. Avoid the camera and head in the door on the right to find AMMO. Exit that room and enter the room on the left to find PLASTIC EXPLOSIVES. Exit the room and head back to the elevator (cell A4).

Take the elevator to the first floor.


When you exit the elevator you will see two guards patrolling around three tanks (cell A4). Take them out and head south. On this screen you will see three cameras. Two on the right wall and one on the left. Use the crates to avoid the cameras and use CARD 2 to enter the room on the left. In here you will find the sixth POW (num.6). Rescue him and he will tell you that a FOX-HOUNDER named Grey Fox is confined in a secret cell. Exit the room and head south.

When you enter the next screen, DON'T MOVE!

Two guards will be patrolling the area and if you move, the one on the right can see you. Take out the guard on the left, then the one on the right when he's not looking. Use CARD 2 to enter the door on the right. Inside you will find a SUB MACHINE GUN. Exit the room and use CARD 1 to enter the door on the left. Inside you will find the seventh POW (num.7). He will tell you that the best way to gain access to the secret cell is to allow yourself to be captured. Exit the room and head south.

On this screen (cell D4), you will be behind two tanks and two guards will be patrolling the area. Take them out and head left. As you proceed through the next screen, a guard will come behind you and say "DON'T MOVE". Another guard will then come and tell you that you are captured. The screen will then fade to black as Snake is captured...
3 - Rescuing Grey Fox
After getting captured, it's time for Snake to complete his first objective of the game and to gain a new objective in his operation. You will also fight the first boss of the game.

With Snake captured and taken to the secret cell its time to figure out a way to rescue Grey Fox. Big Boss will call you and tell you to move out and locate Grey Fox's solitary cell. He suggest to you that you punch the walls to get out. End the call and punch on north part of the west wall until you hear a strange tap. Keep punching on it to open up a passageway to the next cell. Proceed into the next cell. Inside you will find the missing FOX-HOUND operative, Grey Fox. Rescue him and he will tell you that Metal Gear is nuclear armed and that you must destroy it before it is completed. He says that Dr. Pettrovich Madnar, the designer of Metal Gear, is the only one who knows how to destroy it.

Punch on the south wall until you hear a strange tap and keep punching that spot until the wall breaks. Exit the solitary cell. You will find yourself in a sewer looking area.


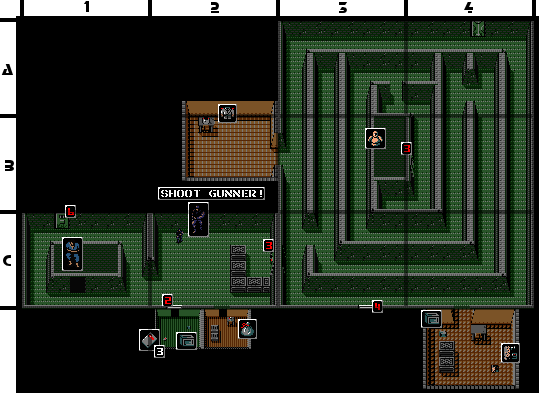
This is the first floor basement of BUILDING ONE (cell C1).


You have no equipment and no weapons so you must be cautious as you proceed. Head right from here. In this room the first boss of the game, Shoot Gunner, will meet you.
Boss Fight 1 - Shoot Gunner
Originally posted by bagman007:
Ok, you must fight this boss on your own with no weapons. Good luck....
Just kidding:) You didn't think I would make you fight him with no boss strategy did ya?


If you notice in this room you will see two doors on the south wall. Hide behind the crates on the right side of the room and call Big Boss(120.85). He will tell you that your weapons and
equipment must be in one of those rooms. He will tell you to break the door to get in. Break the door on the right by punching it and you will get your weapons and equipment back. Exit that room and break the door on the left. Enter the room to find CARD 3 and AMMO.

Exit the room and hide back behind the crates again. Shoot Gunner will fire a spray of bullets at you as you move across the room. When your behind the crates, equip your REMOTE-CONTROLLED MISSLES and fire them at Shoot Gunner. Three or four hits with it will kill him.
3.1 - Rescuing Grey Fox
After the battle, check your equipment. You will notice that you have a new little item called the TRANSMITTER. The TRANSMITTER will alert the guards of your presence as long as you have it on you.

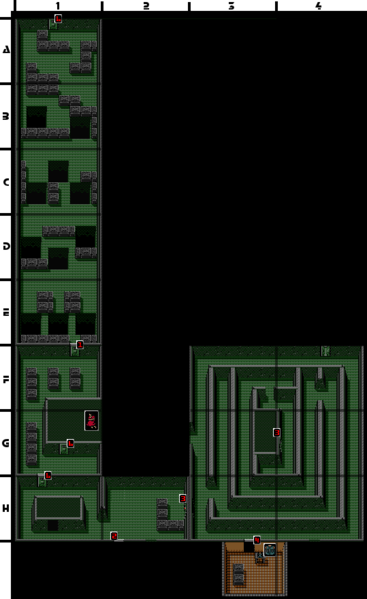
Press Use Button on it to get rid of it. Use CARD 3 to exit the room via the door on the east side of the room. This next area is one big spiral with guard dogs littered around it. Kill the dog next to the door and go north of the door and punch the wall across from it.


You should hear that strange tapping sound again. Use a PLASTIC EXPLOSIVE to destroy the wall. Head east from here. Watch out for dogs on your way. Follow the path until you can go no further. Use another PLASTIC EXPLOSIVE to destroy the wall on the left. Enter the passageway and continue along the path.

When you reach a wall, go back one screen. Punch the south wall until you hear that strange tapping sound again.

Use another PLASTIC EXPLOSIVE to blow up that wall and follow the path until you reach a door.

Use CARD 3 to open the door and enter the room. Inside the room you will find a BOMB BLAST SUIT on the desk. Take it and head back around the spiral from where
you entered it.

When you are back on the screen where you entered the spiral (cell C3), head north. On this screen, tap on the center of the west wall until you hear that strange tapping sound once again. Use a PLASTIC EXPLOSIVE to blow it up. Enter the room to find the UNIFORM.

Exit the room and head back down. Follow the path around the outside of the spiral to the next screen. Tap on the left-center part of the south wall until you once again hear that strange tapping sound.

Use a PLASTIC EXPLOSIVE to blow it up. Inside you will find AMMO and PLASTIC EXPLOSIVES. Exit the room and follow the path north. Keep going until you reach an elevator. Take the elevator to the second floor.


On the second floor, use the crates to avoid the camera again and head south. Take out the sleeping guard and take the left path up.

When you emerge from the path, you will see the room with the three guards again. Take them out and use CARD 3 to enter the door on the west wall. Proceed through this room. In the next room you will see a rolling pin.

Proceed quickly through this room and exit the room via the door on the south wall. In the next area (cell A1) you will see a bunch of crates and a single guard behind them. Just easily avoid the guard and head south.

In this room you will see a large wall in the middle of the room and three guards roaming the south part of the room. Take them out or avoid them and head south.

In this area you will see an open door to your left and a closed door to your right. There will also be two guards patrolling the south part of the screen. Enter the door on the left and you will find MINES on a desk surrounded by three sleeping guards. Quietly take out the guards, grab the MINES, and exit the room.

Avoid the guards and use CARD 3 to enter the door on the right. Inside you will find a POW (num.7). Rescue him and he will tell you that the only way to reach the courtyard is by parachute.

Exit the room, avoid the guards, and head south. On the next screen you will see a blue colored floor with gray colored floors near the entrance to the area and the room in the center of the room. If the guard in this area sees you, he will turn on the electric floor.

Use the crate to avoid the guard or take him out with a REMOTE CONTROLLED MISSLE and use CARD 3 to enter the door in the center of and grab the INFRARED GOGGLES. Exit the room and head back to the room with the sleeping guard (cell B4).

Take him out and head down. You will now be in the laser trap area from earlier. Use your INFRARED GOGGLES to ses where the lasers are. Snake through the first screen of lasers to the south and through the second screen of lasers and head west. In this area you will see one guard patrolling the area and a room in the middle of the area.

Use CARD 3 to enter the room in the middle and rescue the POW (num.8). He will tell you that Dr. Pettrovich is confined to a solitary cell in the courtyard. Exit the room and use CARD 3 to enter the door on the left. In here you will find the second boss of the game, Machine Gun Kid.
Boss Fight 2 - Machine Gun Kid
Machine Gun Kid will run around the north part of the room firing several shots downward. Hide behind a wall in the south part of the room and use REMOTE CONTROLLED MISSLES to kill him. Four REMOTE CONTROLLED MISSLES should do the trick.

After the boss fight, use CARD 1 to enter the door in the north part of the room. In here you will find the PARACHUTE.
4 - Parachuting to the Courtyard
One objective completed and another one gained. Your goal now is to find Dr. Pettrovich and find out information about Metal Gear.

From here you will need to head to the roof. But before you do that, now is a good time to restock your entire inventory. You should know where everything is in BUILDING ONE at this point in the game.

After you restock your inventory, head to the elevator in the northeast part of the building (cell C4 on all floors). Take the elevator to the roof.


When you exit the elevator, you will get a call from Big Boss. He will tell you that the wind barrier is extended on the roof and that you should look for a BOMB BLAST SUIT.

Originally posted by bagman007:
If you listened to me earlier and got the BOMB BLAST SUIT from the basement, equip it for use on the roof. If not, then go back to the basement and get it.

After you equipped the BOMB BLAST SUIT, head south. This screen will have two guards patrolling the area. Take them out of sneak past them and head south. The next screen will
have one guard and a door in the southeast part of the area. Take out the guard and use CARD 3 to enter the room. Inside you will find REMOTE CONTROLLED MISSLES. If you don't have those completely stocked yet, do it now.

Exit the room and head back to the elevator area. From here, head west. Here you will see three guards patrolling the north part of this area. Just stay south behind the walls and you should be
safe.

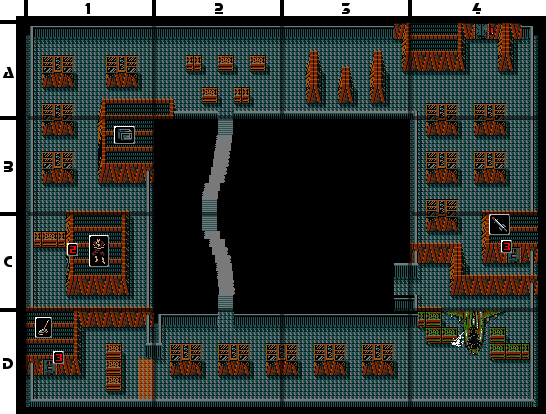
Head west again from here. This screen will have two guards patrolling around a bunch of crates. This screen is also easy to get by on as long as you stay south and head west. Here will be two more guards. Take them out or sneak past them and head south to the next screen (cell B1). No guards here just enter the open door and grab the AMMO.

Exit the room and head south via the right path. Use CARD 2 to enter the room here and rescue the POW (num.9). Exit the room and head back to the screen with the two guards and a bunch of crates (cell A2). Head south from here.

On this screen you will see a swaying bridge. You have to make it across the bridge. If you fall off, you die. It's tricky at first, but you'll get the hang of it. Just try to head straight down very slowly.

On the next screen you have to do the exact same thing, but the bridge is swaying the other direction. Head down slowly and as straight as possible. One across the bridge to the next screen, you will see a rocket man type guard. He'll probably spot you and more will come.

Quickly move out of that screen to the west (cell D1). Use the REMOTE CONTROLLED MISSLES to destroy the control panel to the electric floor in this area and use CARD 3 to enter the room. Stand by the door and take out all the rocket guards that enter the room until they are all dead the alarm stops.

Grab the MINE DETECTOR on the desk and exit the room. Head back to the screen after the bridge (cell D2) and head east.

Here you will face more rocket guard troubles. Just run past them east to the next screen. On this screen the third boss of the game, the Hind D, will confront you.
Boss Fight 3 - Hind D
The Hind D will sit on the ground and fire rapid shots at you. Stand directly left of the cockpit grenade target distance away and he won't touch you.

Use your GRENADE LAUNCHER and fire that at him until he's dead. The most RATIONS you should use if you are hit is one or two.

After the boss fight, head north. Then head west through the passageway here. You will now be on a balcony and the rest of the screen will be black. Equip the PARACHUTE and jump off the balcony to the courtyard.
5 - Desert Storm
After beating the first Hind D in a Metal Gear game, it's time to continue on and fight two boss fights in a row.


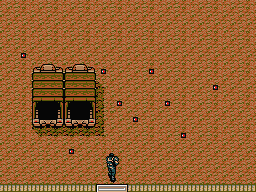
When you land in the courtyard (cell B3), you will land in the middle of three guard dogs. Take them out and head south. Here you will see two trucks.

DON'T ENTER THE TRUCK ON THE LEFT!

If you do you will have to go all the way up to the roof again and PARACHUTE all the way back down.

Equip your MINE DETECTOR and make your may through the MINES and enter
the truck on the right. In here you will find CARD 4. Exit the truck and head back up. You can go into the room on this screen using CARD 4, but it's empty. From here head left (to the cell B2). Take out the two dogs on this screen and use CARD 4 to enter the room on the far left side of the screen.

Inside you will find a POW (num.10). He will tell you that Dr. Pettrovich was moved to BUILDING TWO which is 10K north of here. Exit the room and use CARD 4 to exit the courtyard via the north door.

Use CARD 4 on this screen to enter the door on the east side of the room. In this area will be six crates with four guards between them. Snake past the guards and use CARD 4 to exit BUILDING ONE.


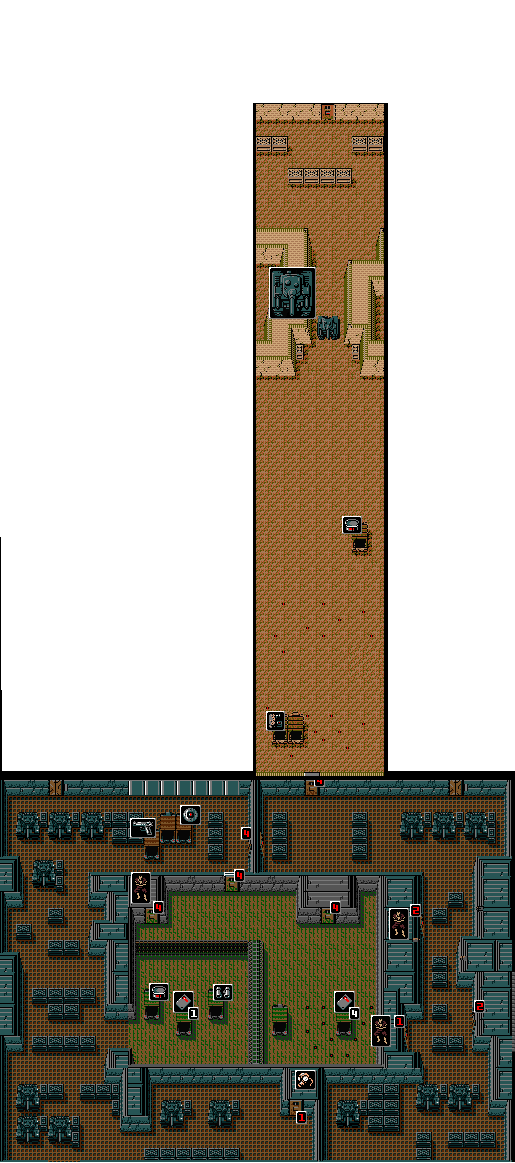
You will now be in the DESERT. The DESERT is covered with MINES so equip your MINE DETECTOR to see them.


If you enter the truck on the right, it will take you back to the truck I told you not to enter earlier. If you enter the truck on the left, you will get PLASTIC EXPLOSIVES. Exit the truck and head north.

There are more MINES on this screen. Just go through them and head north. This next screen will have a truck and no MINES.

When you start moving, something will be dropping bombs on you. Try to get out of their way and enter the truck. In here you will find a RATION. Stock up on them to the max and exit the truck and head north.

The next screen you will once again have to avoid bombs. Dodge them and head north. Use a RATION if needed. On the next screen you will encounter the fourth boss of the game, the Tank.
Boss Fight 4 - Tank
The Tank will fire machine gun rounds at you.

Hide behind the wall to stay away from it. When the tank backs up, place a MINE down in front of the Tanks path. It will hit the MINE when it comes forward.

When placing the MINE, watch out for the missiles that it shoots out. If it hits you, it will likely kill you. To avoid getting hit by the missile, just place the MINE to the side of the missile cannon. Try to place two or three MINES at a time to make the battle quicker. You might need to use a RATION or two if your hit by his machine gun.
5.1 - Desert Storm
When the tank is destroyed, proceed north. This next screen is pretty much empty. Proceed on to the next screen (cell A1).

Here you will see three guards talking and their commander will tell the other two that a FOX-
HOUNDER infiltrated the base and they need to stop him at all costs.

Big Boss will then call you and tell you that you have reached the checkpoint. He will tell you that you need an enemy uniform to sneak past the guards in this area. He will also inform you that his new frequency is 120.13. Make a note of that. End the transmission and
equip the UNIFORM.

Proceed forward and the guards will open the door and tell you to come in. Enter the door to go in BUILDING TWO.


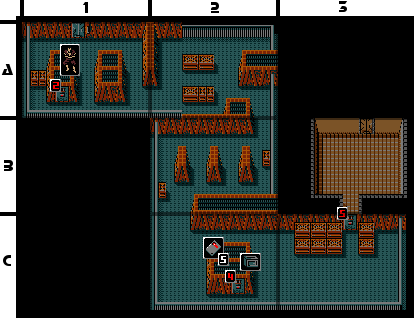
From the entrance of the building, head right (from cell C2 to C1). On this screen you will see two guards. One will be patrolling the northwest corner of the screen and the other will be patrolling the other side of the drainage system. Head up to the guard in the northwest corner of the screen and
take him out. Use CARD 4 to enter the room.

Grab the MINES and the AMMO and exit the room. When you exit the room, the guard will probably spot you across the drainage system. Take out the guard near you and the one across the drainage system. Then proceed back to where you entered the building.

From here, go down into the drainage system and head left. Run through the drainage system and use CARD 4 to enter the door in the drainage system. If the guards see you, just ignore them and keep going. In this room the fifth boss of the game, the Bulldozer, will confront you.
Boss Fight 5 - Bulldozer
When you enter this room the Bulldozer will be slowly approaching you. You must defeat it before it crushes you. Exit the room and equip your GRENADE LAUNCHER.

Enter the room again and fire the grenades at him as fast as you can. After it is hit with eight grenades, it will explode and the path will be cleared.
5.2 - Desert Storm
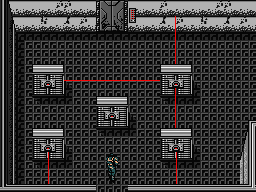
Use CARD 4 to enter the next room. In this room you will see five laser walls. Equip your INFRARED GOGGLES to see the lasers.


The lasers will flash in different directions. Get past them and enter the elevator take the elevator to the roof.
6 - Rescuing Dr. Pettrovich Madnar
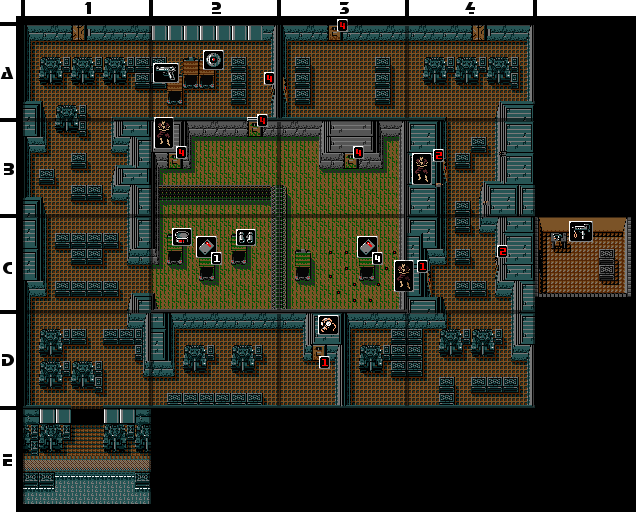
In this section you will complete another objective and gain another objective. This is one of the hardest areas in the game. There are tons of guards in this area so be careful.


The second you enter the roof; you will be attacked by three guards. You can't stop the alarm so use CARD 2 to enter the room on the left. Inside you will find a POW (num.11). He will tell you that Dr. Pettrovich is being held in the basement. Exit the room and proceed east.

Here you'll see four guards that will attack you. Sneak past them and head south. On this screen three guards will be patrolling the south area.

Run past them and proceed south (cell C4). The next area will hold several of those rocket guards. Use CARD 4 to enter the door in the center of the screen. Inside you will find a rocket guard, AMMO, and CARD 5. Grab those, exit the room, and head east.

More rocket guards will come. Run past them and use CARD 5 to enter the room. Once again a rocket guard will greet you. Run past him and use CARD 5 to enter the elevator. Take the elevator down to the first floor basement.


Once you exit the elevator you will see two guard dogs. Take them out and use CARD 5 to exit the room. In this area (cell C3) you will see several doors. Use CARD 5 to enter the door in the northwest corner of the room. In here you will find a POW (num.12). Rescue him and exit the room.

Use CARD 5 to open the door on the far west wall. Before entering the door, equip your GAS MASK. After you have your GAS MASK on, enter the door. From here head north and follow the path until you reach a dead end (cell B2). On the opposite side of the dead end wall, you should see two paths. A north path and a south path. Punch the north path wall and you will hear that strange tapping sound. Use a PLASTIC EXPLOSIVE to blow up the wall and proceed.

Follow the path until you reach a door. Use CARD 1 to open the door. Inside you will find a POW (num.13). Rescue him and exit the room. Be sure to re-equip your GAS MASK before exiting the room.

Head left from here. Use CARD 5 to enter the room. Inside you'll find Dr. Pettrovich Madnar. Approach him and he will tell you that you are caught in a trap. He will reveal that Dr. Pettrovich is really on the second floor. The floor will create a large hole. At this
time you will need to run away from the fake Dr. Pettrovich and to the door. After the hole stops expanding, head through the open door on the left side of the room.

In here you will find CARD 6. Take CARD 6 and exit the room. Head back out of the fake Dr. Pettrovich's room and head south. Follow the path until you reach a door (cell B1). Use CARD 5 to enter the room. Inside you will find RATIONS on the desk. Stock up on those and head east.

On this screen you will be in a small corner. Head south from here. On this screen you will need to punch the center of the west wall until you hear a strange tapping sound. Use a PLASTIC EXPLOSIVE to destroy the wall. Head through the passageway.

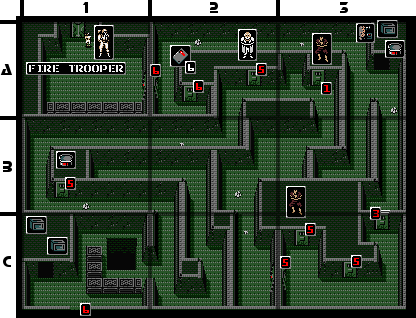
As soon as you enter the next screen a trap will open in the floor. Go around it and head into the open door. In here you can stock up on AMMO. After your finished stocking up, head back to the room where you found CARD 6 (cell A2). Use CARD 6 to exit that room via the south door. On this screen you will see a door on the west wall. Use CARD 6 to enter it. In here you will find the sixth boss, the Fire Trooper.
Boss Fight 6 - Fire Trooper
Fire Trooper will stand by the elevator and fire his flamethrower at you. Run up to behind him or right next to him and unload on him with your HANDGUN.

About ten shots should put an end to Flame Troopers torching. You might need to use a RATION if you were touched by his flame or him while running up to him.
6.1 - Rescuing Dr. Pettrovich Madnar
Exit Fire Trooper's room and head east. Don't forget to use your GAS MASK in the hall. Follow the path until you reach an open door. Enter the open door and you will be in a room with a rolling pin, AMMO, a RATION, and PLASTIC EXPLOSIVES.


Grab those while avoiding the rolling pin and exit the room. Head back to Fire Trooper's room and take the elevator to the first floor.


When you exit the elevator you will notice that you are in the laser wall area. Use the INFRARED GOGGLES to maneuver through the lasers and head right. On the next screen, head south.

Enter the water in this area and go around the shallow area to the opposite side and head south. On this next screen, head west. You will now be on the opposite side (cell C1) of the drainage system from earlier.

Kill the guard and use CARD 3 to open the door. Inside you will find the FLASHLIGHT. Grab the FLASHLIGHT and head back to the drainage system. In this room you will see three guards.

One will be on the other side of the drainage system, one will be walking in front of you, and the third will be near the door on the west wall. Kill the guard in front of you and the one near the door.

Use CARD 2 to enter the door. In this room you will find a guard patrolling around some crates. Kill him and grab the ANTENNA on the desk and you will get a call from Big Boss. He will tell you that the transceiver was jamming, but now it's ok.

Exit the room and head east.On this screen you will see two guards on your side of the drainage
system and one on the other side of the drainage system. Take out the guards on your side of the drainage system and head up. Use CARD 5 to enter the door on the west wall. Inside you will find a POW (num.14). Rescue him and he will tell you that the drainage system will lead you to BUILDING THREE. Exit the room and head back to the elevator. Take it to the second floor.


When you enter the second floor the guards will see you and sound the alarm. Run past them and head south. On this screen, head right. You will now be in a room with the seventh bosses of the game, the Arnold's (cell B2).

It's not time to face them just yet. Run through the crates in the middle of the room and use CARD 5 to enter the door on the east wall. In here you will see three guards. Take out the one closest to you and use CARD 3 to enter the room on the northwest part of the screen. Inside will be a POW (num.15). Rescue him and he will tell you that
you can contact resistance member Jennifer on frequency 120.48. He says
that she is proud and might not answer. Exit the room and take out the guards.

Now call Jennifer at 120.48. If you don't have a four star ranking, she won't answer you. If you rescued all the POWs that I told you to rescue up to this point, then you shouldn't have a problem.

She will tell you that she can arrange a ROCKET LAUNCHER for you to pickup. End the transmission and use CARD 6 to enter the door in the northeast corner of the room. Inside you will find the ROCKET LAUNCHER. Take the ROCKET LAUNCHER and head back to the room with the Aronlds.

When the Arnold in the north part of the room isn't looking, use CARD 1 to enter the door in the northwest part of the room. When you enter the door, guards will spot you. Run right down the path and use CARD 6 to enter the room. Take out all the guards in the room until the alarm stops and grab the ANTIDOTE on the desk.

Exit the room and head back to the Arnold's room. When the Arnold in the south part of the room isn't looking, use CARD 1 to enter the door in the southeast part of the room. Take out the guard in front of you when you enter the room and head left.

In this room you will see four guards patrolling and an open door in the northwest section of the
room. Take out the four guards and enter the open door.

In here you will find three boxes of AMMO and two guards. Kill the guards, grab the
AMMO, and exit the room. Kill the guards again and head north.

On this screen, you will see three guards patrolling the area. Take them out and head north again (cell A1).

Here you will need to use CARD 6 to enter the room. In here you will find the real Dr. Pettrovich. He will tell you that he is Dr. Pettrovich and that his daughter, Ellen, was taken
hostage. He says that he won't discuss Metal Gear unless you rescue his daughter. Exit the room and head back to the room with the Arnolds.
Boss Fight 7 - Arnolds
The Arnolds are pretty easy to beat. Just stand in front of them and launch four rockets at each of them.
The only way they can touch you is by running up and touching you. Use a RATION if needed during this fight. After the fight is over, collect CARD 7 that they leave behind.
7 - Rescuing Ellen Pettrovich
Your pretty close to the end of the game. This section is pretty short and somewhat easy. Dr. Pettrovich will reveal an important piece of information at the end of this section, so pay attention.


After the fight with the Arnolds, use CARD 2 to exit the room via the door in the northeast corner. Kill the guard in front of you and proceed east. This next room has three guards. Kill them and call Jennifer at 120.48. She will tell you that she opened the door (cell A3). The door on the north wall will open.

Enter the room and grab the COMPASS. Exit the room and head back to the room where you fought the Arnolds (B2).

Use CARD 5 to enter the door in the southeast corner of the room. In this room you will see three guards. Kill them and enter the open door in the west part of the room. In here you will find a POW.(num/16) Rescue him and he will tell you that you must have a COMPASS to get through the SCORPION DESERT. Exit the room and head right. On
this screen there will be a sleeping guard between the four crates.

Sneak past him and use CARD 5 to enter the door. In this room you will see a rolling pin. Get past it and enter the elevator. Watch out for the trap on the right side of the room. Take the elevator to the first floor basement.


Kill the dogs in this room and exit the room. Schneider will contact you here and warn you about the gas. Use and enter the door on the left. Equip your GAS MASK and follow the path until you reach the room with the trap (C1). Use CARD 6 to enter the door on the south wall.

This next area has LOTS of traps so be careful. When you enter the room, it will be dark. Diane will call you and tell you to watch out for pitfalls. End the transmission and equip the FLASHLIGHT.


This screen is clear of traps, head down via the left path. When you enter this screen, go left by the crates to avoid the trap. Then quickly run down to the next screen to avoid the second trap.

This next screen is tricky. There is a trap in the top center of the screen. Slowly walk towards it to activate it and step back. Another trap connects to the southeast corner of that trap. Quickly move that way and avoid the trap. Head down to the next screen.

This screen isn't as hard as the last. There are crates on all parts of this room except for the south part. The north crates have two big boxes in the middle and two small ones on the sides. Your first objective in this room is to get on the south side of the north crates. The northeast corner of the trap on the left connects with the southwest corner of the crates the same way the two traps did on the last screen. Do the same thing as last screen to get to the south side of that crate. Now position yourself directly in front of the small crate on the right side and head straight down to the next screen.

This next screen, is a little tricky, but easily avoidable. Stay on the west side of the box on the right and head down and two steps to the right. Here you should be just to the right of the small box and half in front of the door. The trap on the right should have also activated, but it shouldn't have touched you. Proceed down and use CARD 1 to enter the door.

You will now be in the first floor basement of BUILDING ONE. You will see five guard dogs on this screen that will be alerted and run to attack you. Take them out as they come and head south. Two more guard dogs here. Take them out and use CARD 6 to enter the room on the east side of the screen.

Inside you will see nothing, but someone will say, "HELP ME!". Precede right along the wall and north along the east wall until you reach the middle of it. You will then hear someone say, "HELP ME!" again. Punch the north part of the east wall until you hear that strange tapping sound. Use a PLASTIC EXPLOSIVE to blow open the wall and enter the room.

Inside you will find Ellen Pettrovich. Rescue her and she will thank you and tell you that she is the daughter of Dr. Pettrovich. She will tell you that her father was forced to create Metal Gear. She will tell you to help her father. Exit the confinement cells (remember to stay on the wall while exiting the
room). Use CARD 6 to exit through the door on the south wall.

You will now be In the area outside of the confinement cell where you rescued Grey Fox earlier (H1). Move through this room and through the room where you fought Shoot Gunner earlier in the game. When you get to the spiral room, use CARD 4 to enter the door on the south wall. Inside you will find the BODY ARMOR. Take it and exit the room.

From here you must head back to Dr. Pettrovich. There are two paths you can take to make it back there.

You can either go through the DESERT again or go back through the trap screens again.


Whichever you choose is up to you. If you go through the DESERT, remember to use your
MINE DETECTOR to avoid the MINES.


When you reach Dr. Pettrovich, he will tell you that Metal Gear is in the 100th floor basement of BUILDING THREE. He will tell you that the only way to destroy Metal Gear is to attach PLASTIC EXPLOSIVES to his feet. He will tell you that you need to attach them to his feet in this order: R, R, L, R, L, L, R, L, L, R, R, L, R, L, R...

He says that he forgot the last one (it's R). He will then talk about the Arnold's and stuff you've already done. After the conversation, exit the room and take the elevator down to the
first floor.
8 - Ambushed
Once on the first floor, you will see two guards firing at you in a room with crates (C3).


Kill them and exit the room. The next room is empty so exit the room via the door on the west wall. Once here, head north. Kill the guards here and enter the water. Swim to the other side of the
shallow water and head east. On the next screen, head north until you can't go any further and get on the dry land.

Head south. Take out the guard here and head west. There's another guard on this screen, kill
him and head up.

Use CARD 6 to enter the room on the right wall. In here you will find PLASTIC EXPLOSIVES. Stock up on those and head back to where you got on land.

Head north from here. Use CARD 7 to exit BUILDING TWO.

You will now be in the SCORPION DESERT.


The scorpions will run towards you when you enter the desert. If they sting you, your life will gradually drain. Use the ANTIDOTE to cure yourself of the poison.

Equip yourself with the COMPASS and head north. You will have to go through several screens of scorpions. Kill them or run past them. Use a RATION if need.

Keep going until you reach the trucks and the door. Several guards will come out of the trucks and ambush you. Then Big Boss will call you. He will tell you to enter the truck on the far right. Don't listen to him! . There are only two trucks that you need to enter, the center truck on the left and the truck near the door on the right. Inside those trucks you will find AMMO.

Only enter the truck on the right if you really need AMMO as four guards guard it. When your done there, use CARD 7 to enter BUILDING THREE.


You will be ambushed once again by four guards (it seems that someone from your side is leaking your location to the enemy... Big Boss will contact you and tell you to enter the door on the left. Use CARD 1 to enter it to get the guards off your tail, but DON'T MOVE when you enter this room as it is a trap. Exit the room and use a PLASTIC EXPLOSIVE on the right side of the north wall.

Hug the right wall and head north. This room has several traps on your way to the elevator. Stay on the right wall and head up until you reach the boxes. Now head left and up at the corner of the box. That will keep you out of the way of the first trap. Now head on the top of the first trap all the way
until you pass the elevator.

Now head north and right to enter the elevator. Now take the elevator down, down, down to the 100th floor basement and exit the elevator.


This room will have two cameras on the north wall. They are easy to avoid if you hide behind the wall in the center of the room. Jennifer will call you and tell you that there is an OXYGEN TANK beyond the wall. Use a PLASTIC EXPLOSIVE to blow open the wall in front of the wall in the center of the room.

Grab the OXYGEN TANK and head back up to the first floor and back to BUILDING TWO. Don't forget to use your COMPASS in the SCORPION DESERT.

When you're back at BUILDING TWO, head right.


Now equip your OXYGEN TANK and swim north. Keep swimming north until you come to
shallow water. Get out of the water; avoid the guards, and head north (head north directly in front of where you got out of the water).

On this screen you will see an electrified floor. Use your REMOTE-CONTROLLED MISSLES to destroy the control panel next to the door on the left.

Enter the door on the left using CARD 1. Inside you will find two boxes of AMMO.

Schneider will call you. He will tell you that the person in charge of Outer Heaven is... The transmission gets cut off before he can tell you. Take the AMMO and exit the room. Use
CARD 7 to enter the door on the right. In here you will find the eighth boss of the game, Coward Duck.
Boss Fight 8 - Coward Duck
At the start of the fight, you will get a call from Jennifer. She will tell you that Coward Duck has CARD 8. She will also tell you that her brother is among one of the captives so don't kill and of the POWs.

After the transmission, head north along the left wall. Now head up hugging the boxes and rescue the POW on the left. Now use you HANDGUN to kill Coward Duck. 10 shots should do it with ease.

After the fight, grab CARD 8 that Coward Duck leaves. Rescue the POW on the right and the POW in the center, who is Jennifer's brother. When you rescue him, he will tell you that he is Jennifer's brother.

He will tell you that when escaping from Outer Heaven; use the ladder on the left. Keep that in mind and exit the room.
9 - The Traitor
Now that you have all eight CARDS, you have access to any area in the game. First you will need to stock up on AMMO, PLASTIC EXPLOSIVES, and as many RATIONS as you can carry. You can stock up on AMMO in the room next to the Coward Duck room. You can find PLASTIC EXPLOSIVES in the room before you exit BUILDING TWO and you can find RATIONS in the first floor basement of BUILDING TWO.

Stock up on as many of each as you can carry and head back to the 100th floor basement of BUILDING THREE.


As soon as you arrive at the 100th floor basement, avoid the cameras and use CARD 8 to enter the door on the right wall. Don't worry too much about the camera seeing you. All it will do is fire a laser at you, it won't alert the guards.

Enter the room and rescue the POW. He will tell you that the leader of Outer Heaven is none other than.....................the Commander-in-Chief of FOX-HOUND, Big Boss!

Exit the room and head west. Big Boss will call you and tell you to stop the operation at once! He will tell you to switch off your MSX. Ignore him of course.


This screen has one camera on each of the walls facing south. Run past them and use CARD 8 to enter the door on the north wall. Equip your GAS MASK and head up to the northeast part of the room.

Punch the wall until you hear that strange tapping sound. Use a PLASTIC EXPLOSIVE to blow up the wall. Head through the passage to enter the next room. Head along the left wall of the
room until you reach the door.

Use CARD 1 to enter. This room has MINES and gas. Equip you MINE DETECTOR and quickly move through the room. Use CARD 1 to enter the door. This room has an electric floor with no switch. Jennifer will call you and tell you that you must run through it as quick as you can.

Run through it as quick as you can and enter the open door on the north wall. Before entering the
door, heal yourself with a RATION. Through the door is the ninth boss of the game, Metal Gear.
Boss Fight 9 - Metal Gear
To defeat Metal Gear, you must use PLASTIC EXPLOSIVES and the order that Dr. Pettrovich gave you earlier.

Put the PLASTIC EXPLOSIVES on his feet in the order R, R, L, R, L, L, R, L, L, R, R, L, R, L, R,
R.


The cameras move back and forth along the wall firing lasers at you when they see you. Use RATIONS to heal you when needed.

When you place all 16 PLASTIC EXPLOSIVES in the correct place, Metal Gear will explode taking the two cameras with it and setting off the Outer Heaven self-destruct system. A timer will appear on the bottom of the screen and an emergency message will appear in a text box. The door to your left will then open. Heal yourself with a RATION . Enter the door to fight your final battle.
Boss Fight 10 And Escape
Big Boss will tell you that you were sent here to get false information on Metal Gear, but you accomplished too much. He will tell you that you have crushed his ambitions. He will then say that he will not die alone and that you are coming with him. Diane then calls you and tell you that she doesn't know how to defeat Big Boss. She then attempts to say she loves Solid Snake, but then says that it was nothing.

The fight begins. You must use your ROCKET LAUNCHER to defeat Big Boss. 5-10 hits with the ROCKET LAUNCHER should take care of the traitor. Use the crates for protection from his gunshots. The BODY ARMOR also comes in handy for that too. Use a RATION or two if needed.

After the fight, smoke some CIGARETTES to give yourself more time to escape. The door on the north wall will open.

Enter the door. There will be three ladders. Climb the one on the left like Jennifer's brother told you to do earlier. Climb up to the surface and it will cut to a scene where Solid Snake is running away from Outer Heaven just as it explodes.

Solid Snake then calls Big Boss's frequency and says that Metal Gear was destroyed and Operation Intrude N313 was a success. He then tunes into a radio station and they saw that there was a large
explosion at Outer Heaven around midnight.

The credits will then role and the screen will fade to black. It will then display a text box with Big Boss saying that it's not over yet and he'll meet Snake again someday...
16 Comments
UdderJuice Apr 22 @ 8:40pm 
There were a couple of minor mistakes, but I would never have been able to find my way though this game without this guide!
tallonkhan  [author] Mar 11 @ 6:12pm 
You are welcome!
LucisKitsune Mar 11 @ 5:25pm 
Thanks a lot for the guide!
Flying Turnip Dec 28, 2024 @ 3:52pm 
Thx brah :sigma_logo:
PLord Dec 23, 2024 @ 8:33am 
>Kill the guard and use CARD 3 to open the door. Inside you will find the FLASHLIGHT.
It's card 6 not 3
Fgyjt Oct 5, 2024 @ 3:28am 
Haha, i got into the truck of the left without knowing it would move.

Gread experience 10/10 would not do it again.
irgend1 L4rry Jul 14, 2024 @ 3:53pm 
Great guide.
But why do you only have 4/5 rating? It covers everything but the Boss Survival.
People, wat is dis
Digitol Jul 14, 2024 @ 3:17pm 
Great guide. Thank you sir! :Miller:
Skuffy Snake Jul 10, 2024 @ 12:31pm 
I joined you as a friend in order to get permission to translate and adapt your manual into another language. I tried to play the game according to your guidance, but I got confused and decided to do my own, based on yours, so that my compatriots and I could finally touch the classics and have detailed instructions with all the nuances
Catgirl Jihad >:3c Dec 11, 2023 @ 9:03am 
Thanks for putting this guy's guide on Steam. I would never have been able to beat the game without it.