Ni no Kuni™ II: Revenant Kingdom

Ni no Kuni™ II: Revenant Kingdom

25 vurderinger
100% Achievements: A Comprehensive Guide
Af ErickaUnlimited
An accurate, detailed and complete guide on how to unlock every achievement in Ni no Kuni™ II: Revenant Kingdom.

4
   
Pris
Føj til foretrukne
Gjort til foretrukken
Fjern som foretrukken
Introduction
Here's a detailed list of every achievement in the game and the method(s) I went to obtaining them. The game offers a multitude of difficulties to play from that can alter how you may approach certain challenges, enemies or skirmishes. The end game to Ni No Kuni 2 is exceptionally grindy.

For reference, this guide will focus on everything from the highest difficulty, "expert", as that is what I played the entire game in; this also includes manual weapon swaps activated, but that will matter less than the difficulty rating. Overall, there are many, many things to collect, search for and complete, so prepare for a vast array of activities to complete this game.

The guide will be in order of how I did everything, but not exactly step-by-step, as I had to do backtracking for things I might have missed. Regardless, every collectible, monster, treasure..etc is meticulously documented. This guide covers the main game and all subsequent DLC added.

Simply hit Ctrl+F and type in the achievement name for a quick look at how to get that particular achievement. If you have any further questions or need additional help, feel free to post in the comments below and I'll address them the best that I can.

Happy hunting!

General Achievements
"Wakey Wakey"
Awarded for being awakened by a golden ball.
The golden ball, or glim as they called them in the first game, is a golden orb that will appear on the battlefield on rare occasions. These start becoming available once you bond with your kingmaker.


During battles, your kingmaker will, on occasion, throw out glims during the batter. They aren't always gold, but when they are, be quick to pick it up.

Collecting it will enhance your abilities for a short while.

Doing this for the first time will unlock this achievement, which you should get early on once you have your kingmaker. They're rarer, but common enough to not have to worry about earning this one or the subsequent one for even more golden glims.


"Wide Awake"
Awarded for being awakened 50 times.
Collect 50 golden glims during battle to unlock this achievement. If you complete all your quests as you enter new chapters and fight regularly, you'll unlock this around chapter 7-8, so don't grind for it; you'll get it naturally.

If you want to speed the process up, you can always research the "Kingmaker's Bounty" from the Kingmaker's Cathedral building to get better chances, but it isn't necessary.

"Soldier King"
Awarded for defeating 1,000 enemies.
You'll earn this pretty early on, usually it unlocks around Chapters 6, or about the 40-50 hours mark if you're fighting fairly consistently, so don't worry about it.


"Warrior King"
Awarded for defeating 2,000 enemies.
You'll earn this pretty early on, usually it unlocks around Chapters 4 or 5 if you're fighting fairly consistently, so don't worry about it.


"Ocean-Going King"
Awarded for making your first sea voyage.
You'll earn this in chapter five when you obtain the necessary wood needed to travel to Hydropolis as part of the main story.


"Master Builder"
Awarded for building 20 facilities in Evermore.
To build 20 facilities in Evermore, you'll need to level up your kingdom to level two in order to have enough plots of land for the various types of building available. You can upgrade it to level two as early as chapter five.


"Weapon Whizz"
Awarded for creating 50 different types of weapon.
From your weapons shop in Evermore, craft 50 different weapons to unlock this achievement. They can be any 50 types and of any quality. You just can't make 50 of the same thing, as duplicates do not count.


"Armor Ace"
Awarded for creating 50 different types of armor.
Awarded for creating 50 different types of weapon.
From your armor shop in Evermore, craft 50 different armor related items to unlock this achievement. They can be any 50 types and of any quality. You just can't make 50 of the same thing, as duplicates do not count.


"Superpower"
Awarded for increasing your influence to 70,000,000.
You will be able to earn this at the tail end of chapter nine if you upgrade every building you can at the time, otherwise you will get this in the post game.


"Ball Boy"
Awarded for collecting a total of 2,000 balls.


"King of the Castle"
Awarded for upgrading Evermore Castle to Level 4.
This is only obtainable postgame and will require you to recruit all 84 additionally available citizens from around the world.
General Achievements
"Higgledy Hotshot"
Awarded for cooking up 50 different higgledies.
At your nursery in Evermore, you'll need to "cook up" 50 different higgledies to unlock this. There's a total of 75 possible once you fully research all eight cookbooks, but it'll be some time before that's viable. In order to research the last one, you need to have Evermore upgraded to the max (level 4), which is only obtainable in the post game.

However, with the first seven books researched, you can still unlock this achievement.


"Royal Mint"
Awarded for amassing 500,000 guilders.
Don't worry about collecting guilders until the postgame. Some of the side quests focusing around The Labyrinth can fetch upwards of 300,000 guilders upon completion, plus the need to farm end game (gold) weapons and armor will net you plenty of guilder without doing anything out of the ordinary.


"Higgledy Gaggle!"
Awarded for getting a set of matching higgledies!
Equip four higgledies in your party that have the same, or similar accessories. They don't need to be exact, but something like all goggles/aviator glasses. For this, I used these four:


"One True King"
Awarded for achieving 100% completion.
The very last achievement you'll earn. Well done! You did it!

Trip Door Achievements (1-17)
Tripple Threat
Awarded for having 50 trip doors remember you.
There are a total of 54 trip doors (teleportation spots) that are scattered across the world.


Some of these you'll find naturally as you progress through the main story, though some are off the beaten path, or completely optional entirely.

We'll cover all 56 locations, a map for easy viewing (click for a bigger view) and any notable things to consider along the way.

Below are all 56 locations as they were found; they are by no means in any particular order. Each Trip Door is marked by a small trip door icon.

Trip Door
Method
Location
▆▆▆▆▆▆▆▆▆
▆▆▆▆▆▆▆▆▆▆▆▆▆▆▆
▆▆▆▆▆▆▆▆▆▆▆▆▆▆▆▆▆▆▆▆▆▆▆▆▆
Trip Door №1
Hideaway Hollow - You'll come across this one after fleeing the castle. It's part of the main story and the introductory one; you can't miss it.
Trip Door №2
Overworld - Outside Auntie Martha's house once you save her from danger.
Trip Door №3
Overworld - On the Rolling Hills, south of Ding Dong Dell.
Trip Door №4
Cloudcoil Canyon - Right when you enter the canyon for the first time; it will be just on your right.
Trip Door №5
Cloudcoil Canyon - Midway through when you have to follow your Higglie to gain access to a higher plateau and learn your first spell.
Trip Door №6
Cloudcoil Canyon - Before you reach the 3rd save stone in the canyon, just before entering a cutscene. It is right next to the first Higgledy Stone you find.
Trip Door №7
Sky Pirate Base (Top) - At the end of Cloudcoil Canyon, after the cutscene when you first enter the base, head down the staircase to the front gate to find this Trip Door.
Trip Door №8
Snaketooth Ridge - South of the Sky Pirate's Base you'll find this Trip Door.
Trip Door №9
Rubbly Ruins - You should have access to it once your first skirmish is completed. It will appear at the very end of the fight.
Trip Door №10
Wiggly Way - Just outside the forest is this Trip Door.
Trip Door №11
Forest of Niall - As soon as you enter the Forest of Niall, this Trip Door will be on your right.
Trip Door №12
Forest of Niall (Sunnypatch Pond) - Within the forest, you'll find Niall inside a section of the forest called Sunnypatch Pond. To the left of the entrance is this Trip Door.
Trip Door №13
Calmlands - The center of the Calmlands will have this Trip Door among the sand.
Trip Door №14-17
Goldpaw - Right when you enter the city, west of the library, outside the casinos and right outside Fortune Square.

Trip Door Achievements (18-30)
Trip Door
Method
Location
▆▆▆▆▆▆▆▆▆
▆▆▆▆▆▆▆▆▆▆▆▆▆▆▆
▆▆▆▆▆▆▆▆▆▆▆▆▆▆▆▆▆▆▆▆▆▆▆▆▆
Trip Door №18
Forest of Niall - On your 2nd visit, you'll be able to access a previously inaccessible area of the woods after visiting the city of Goldpaw. Niall will teach you the "Quicken Growth" spell to access it.
Trip Door №19
Sunshine Shore - You'll reach this area by chapter five.
Trip Door №20
Shipyard - You'll reach this area by chapter five.
Trip Door №21
Jumblewoods - See side quest 26 for a map if needed.
Trip Door №22
Forest of Niall - Hard Woods
Trip Door №23-26
Hydropolis
Trip Door №27
Leucippes' Labyrinth
Trip Door №28
Abyss - 500 Fathoms
Trip Door №29
Abyss - 1,500 Fathoms
Trip Door №30
Abyss - 3,000 Fathoms
Trip Door Achievements (31-56)
Trip Door
Method
Location
▆▆▆▆▆▆▆▆▆
▆▆▆▆▆▆▆▆▆▆▆▆▆▆▆
▆▆▆▆▆▆▆▆▆▆▆▆▆▆▆▆▆▆▆▆▆▆▆▆▆
Trip Door №31
Island of Makronos
Trip Door №32
Junkyard Mire
Trip Door №33
Broadleaf (Entrance)
Trip Door №34
Broadleaf (Uptown)
Trip Door №35
Broadleaf Factory Fl#1
Trip Door №36
Broadleaf Factory - Testing Floor
Trip Door №37
Broadleaf Factory - Cradle of Wisdom
Trip Door №38
Cosy Cove - Tidewash Cave
Trip Door №39
Backwater
Trip Door №40
Memoria Moor
Trip Door №41-42
Ding Dong Dell
Trip Door №43
Ding Dong Dell - Old Well
Trip Door №44
Ding Dong Dell - Slums
Trip Door №45
Drylands
Trip Door №46
Cradle of Life
Trip Door №47
Farflung Cape
Trip Door №48
Jack Frost's Playground
Trip Door №49
Shivery Shrine
Trip Door №50
Drylands - Blowtorch Cave
Trip Door №51
Drylands - Coldera
Trip Door №52
Horned One (Inside)
Trip Door №53
The Lost City
Trip Door №54
The Lost City - Allegoria Castle
Trip Door №55
Faraway Forest
Trip Door №56
Rubbly Ruins - The Labyrinth
Inside the Labyrinth when you first explore and make a permanent camp there. You can't miss it.
Treasure Chest Achievements
There are two achievements linked to opening treasure chests. This includes chests within areas that you can explore, such as dungeons (starting as early as when you first flee the Castle) to the open world itself. One achievement is for 100 treasure chests and the other is for 200. There are a total of 281 treasure chests in the game, so you have a little bit of leeway if you miss some. The achievements linked to treasure chests will be:

"Lord Treasurer"
Awarded for opening 100 treasure chests.


"Royal Treasurer"
Awarded for opening 200 treasure chests.


Below are the locations of more than enough treasure chests needed to unlock this achievement. There are some not shown, so keep that in mind.

Click on each map to view a larger, clearer version as needed. They are as follows:
Treasure Chest Achievements (1-71)
Treasure Chest №
Location
Additional Comments & Maps
▆▆▆▆▆▆▆▆▆▆▆▆▆
▆▆▆▆▆▆▆▆▆▆▆▆▆
▆▆▆▆▆▆▆▆▆▆▆▆▆▆▆▆▆▆▆▆▆▆▆
Treasure Chest №1-7
Ding Dong Well
There are a total of seven treasure chests in Ding Dong Well when you're first escaping the Castle during Chapter #1.

One is near the save point, one on the path west of it, one by the gate south of it and one west of chest #3.

There are three more after falling down into the water below after the cutscene. If you explore every room (the interior map isn't very big), you should find each one without incident.
Treasure Chest №8
Overworld - Just outside Hideaway Hollow.
Treasure Chest №9
Overworld - Just outside Hideaway Hollow.
Treasure Chest №10
Overworld - Just outside Hideaway Hollow above Auntie Martha's house.
Treasure Chest №11-14
Treasure Chest (Locked) №1
Overworld - Above Auntie Martha's house on the hill.
Treasure Chest №15-16
Overworld - East of Auntie Martha's towards the water (one on either side).
Treasure Chest №17-18
Treasure Chest (Locked) №2
Overworld - Rolling Hills, just under the Nogo Plateau.
Treasure Chest №19
Overworld - Rolling Hills (west) by the river.
Treasure Chest №20-25
Cloudcoil Canyon - When you first enter the canyon, you won't be able to access every area. The treasure chests here are obtainable on your first visit. Some are guarded by enemies that are well above your capabilities in the beginning.
Treasure Chest №26-28
Cloudcoil Canyon - After learning how to use the flowers in the canyon to reach new areas, you'll find these three aditional treasure chests as you hike to the end of the canyon.
Treasure Chest №29-30
Cloudcoil Canyon - Just after reaching the Higgledy Stone (first one) and the sixth trip door is a flower to take you to the top ridge where these two chests are locationed.
Treasure Chest №31
Cloudcoil Canyon - At the very end of the canyon; if you're here for the first time, a cutscene will trigger before it and take you elsewhere, so you'll have to double back here to pick this one up.
Treasure Chest №32-37
Treasure Chest (Locked) №3
Snaketooth Ridge - When you first enter Snaketooth Ridge, there are several treasure chests you can obtain, one locked one and several others out of your reach for the time being, as they are on high plateaus not accessible by foot.
Treasure Chest №38
Wyvern's Den - Just inside the den, by the save stone. You can't miss it. Well,m hopefully you didn't...
Treasure Chest №39-44
Treasure Chest (Locked) №4
Rubbly Ruin - Once you start buiding your kingdom and complete your tutorial skirmish, double back to this area and collect the treasure chests that you can. There are some that aren't accessible, though, so those are unmarked for now (except the locked one)
Treasure Chest №45
Treasure Chest (Locked) №5-6
Plainsview Plateau - Once you establish your kingdom-to-be, double back to collect the one treasure chest on the lower portion of the plateau across the bridge. We'll come back to the locked ones later.
Treasure Chest №46-50
Heartslands - Once you establish your kingdom-to-be, explore the immediate area around it to find five more treasure chests that are currently accessible to you.
Treasure Chest №51-54
Treasure Chest (Locked) №7
Wiggly Way - Once you establish your kingdom-to-be, explore south into the woods. The areas marked with a red "X" are not factored into this map; just the surrounding areas in Wiggly Way
Treasure Chest №55-62
Treasure Chest (Locked) №8
Forest of Niall - Upon your first visit, you can check off eight more treasure chests and tag one more locked treasure chest for later on.
Treasure Chest №63-71
Treasure Chest (Locked) №9-11
Calmlands - The shown treasure chests are what you can obtain on your first visit. The area over the Crossover Bridge isn't explored on this map. The area up north is missing a land bridge to access the chest at the moment, so ignore it for now.
Treasure Chest Achievements (72-100)
Treasure Chest №
Location
Additional Comments & Maps
▆▆▆▆▆▆▆▆▆▆▆▆▆
▆▆▆▆▆▆▆▆▆▆▆▆▆
▆▆▆▆▆▆▆▆▆▆▆▆▆▆▆▆▆▆▆▆▆▆▆
Treasure Chest №72
Cloudcoil Canyon (2nd visit) - Once you're an adequate level (around level 20), I'd recommend returning to collect this last treasure chest in the area.
Treasure Chest №73-76
Forest of Niall - Once you learn the spell "Quicken Growth", you'll be able to access this area as part of the main story. There are only four treasure chests in this area.
Treasure Chest №77
Grotty Grotto - This cave outside of Auntie Martha's house has one chest. You'll have to come here as part of your introductory side quest for the main story.
Treasure Chest №78
Calmlands - This lone treasure chest is inaccessible until you've learned the spell "Bridge", which you will in Chapter 4 as part of the main story. You have to come to this area to fetch a "red red rose" for Boddly in the library of Goldpaw, so just grab it when you do so.
Treasure Chest №79-80
Cloudcoil Canyon - Once you're tasked to collect an Inceniraptor Horn, you'll gain access to a plateau at the top of the canyon. Defeat the monster, collect the horn and then collect the two treasure chests before you leave.
Treasure Chest №81
Crossover Bridge - South of Goldpaw, over the bridge, you'll find this treasure chest.
Treasure Chest №82-83
Sunrise Shore
Treasure Chest (Locked) №12
Sunrise Shore
Treasure Chest №84-89
Sunrise Shore (1st visit) - The first time you come here, you won't be able to pick up all the treasure chests. Some are gated off by steep cliffs, some behind monsters you can't defeat. This first list is all the ones I was able to pick up safely; the rest will come later on.
Treasure Chest №90
Wiggly Way
Treasure Chest №91
Capstan-upon-Hull
Treasure Chest №92-94
Treasure Chest (Locked) №13
Shallow Shoals
Treasure Chest №95
Jumblewoods
Treasure Chest №96-100
Forest of Niall (Hard Woods)
Treasure Chest Achievements (101-125)
Treasure Chest №
Location
Additional Comments & Maps
▆▆▆▆▆▆▆▆▆▆▆▆▆
▆▆▆▆▆▆▆▆▆▆▆▆▆
▆▆▆▆▆▆▆▆▆▆▆▆▆▆▆▆▆▆▆▆▆▆▆
Treasure Chest №101-102
Dugout
Treasure Chest №103
Floodfall Cave
Treasure Chest №104-107
Spineshiver Grove
Treasure Chest №108-112
Treasure Chest (Locked) №14
Leucippes' Labyrinth
Treasure Chest №113-115
Abyss - 50/500 Fathoms
Treasure Chest №116-117
Abyss - 1,000 Fathoms
Treasure Chest №118-120
Abyss - 1,500 Fathoms
Treasure Chest №121-123
Abyss - 2,000 Fathoms
Treasure Chest №124-125
Abyss - 3,000 Fathoms
Treasure Chest Achievements (126-167)
Treasure Chest №
Location
Additional Comments & Maps
▆▆▆▆▆▆▆▆▆▆▆▆▆
▆▆▆▆▆▆▆▆▆▆▆▆▆
▆▆▆▆▆▆▆▆▆▆▆▆▆▆▆▆▆▆▆▆▆▆▆
Treasure Chest №126
Crosswater Cavern
See side quest #32/Higgledy stone #12 for further information on accessing this cavern.
Treasure Chest №127-134
Makronos (1st visit)
Treasure Chest (Locked) №15
You won't be able to obtain every treasure chest on your first visit. Here are the ones you can for now:
Treasure Chest №135
Capaneus's Crypt - Island of Makronos
Treasure Chest №136
Leucippes' Labyrinth
Treasure Chest №137-140
Starboard Isle
Treasure Chest №141
Larboard Isle
Treasure Chest №142
Shiverwood Shrine
Treasure Chest №143-144
Crawlspace Cave (Outside)
Treasure Chest №145-148
Broadleaf - Factory Fl #1
Treasure Chest №149-151
Broadleaf - Factory Fl #2
Treasure Chest №152-156
Broadleaf - Factory (Testing Floor)
Treasure Chest №157
Cosy Cove - Tidewash Cave
Treasure Chest №158
Greenglade Cave
Treasure Chest №159
Snaketooth Ridge - Looksee Cave
You'll need either the bridge spell to access this treasure chest, or if you have the zippelin from Broadleaf, you can just fly there.
Treasure Chest №160
Snaketooth Ridge
This treasure chest will require the zippelin to reach.
Treasure Chest №161
Rubbly Ruins
This treasure chest requires the zippelin to access.
Treasure Chest №162-167
Snaketooth Ridge
These treasure chests all require the zippelin to access.
Treasure Chest Achievements (168-244)
Treasure Chest №
Location
Additional Comments & Maps
▆▆▆▆▆▆▆▆▆▆▆▆▆
▆▆▆▆▆▆▆▆▆▆▆▆▆
▆▆▆▆▆▆▆▆▆▆▆▆▆▆▆▆▆▆▆▆▆▆▆
Treasure Chest №168-169
Rolling Hills
Treasure Chest №170-171
Calmlands - West
You will need the zippelin to access these treasure chests.
Treasure Chest №172-173
Backwaters
You will need the zippelin to access these treasure chests.
Treasure Chest №174
Cosy Cove - Upper Region
You will need the zippelin to access this treasure chest.
Treasure Chest №175
Wiggly Way - West
You will need the zippelin to access this treasure chest.
Treasure Chest №176
Powder Keg Cavern
Treasure Chest №177-178
Mikronos
You will need the zippelin to access this treasure chest.
Treasure Chest №179-187
Treasure Chest (Locked) №15-16
Pinwheel Flats
Treasure Chest №188-189
Faraway Isle
Treasure Chest №190-193
Upheer Plains
Treasure Chest №194
Western Woods (outside)
Treasure Chest №195-196
Overworld - North of Ding Dong Dell
Treasure Chest №197-207
Ding Dong Dell - Sewers
Treasure Chest №208-209
Sunrise Shore (Airship Needed)
Treasure Chest №210
Rolling Hills
Treasure Chest №211-215
Farflung Cape
Treasure Chest №216
Drylands - Mugsburrow
Treasure Chest №217-218
Captsun-upon-Hull - Overworld (Airship Needed)
Treasure Chest №219
Western Woods
Treasure Chest №220-231
Treasure Chest (Locked) №17
Drylands - Overworld
Treasure Chest №233-234
Coldera - Shrine of Unity
Treasure Chest №235
The Horned One (Inside)
Treasure Chest №236-242
Treasure Chest (Locked) №18
The Lost City
Treasure Chest №243
East Wood
Treasure Chest №244
Drylands - Sunshade Shrine
Treasure Chest Achievements (245-271)
Treasure Chest №
Location
Additional Comments & Maps
▆▆▆▆▆▆▆▆▆▆▆▆▆
▆▆▆▆▆▆▆▆▆▆▆▆▆
▆▆▆▆▆▆▆▆▆▆▆▆▆▆▆▆▆▆▆▆▆▆▆
Treasure Chest №245
Tumbledown Shrine
Treasure Chest №246-247
Shine That Time Forgot
Treasure Chest №248
Sublime Shrine
Treasure Chest №249
Unsung Shrine
Treasure Chest №250
Death's Door
Treasure Chest №251
Bleachbone Shrine
Treasure Chest №252
Freezybone Cave
Treasure Chest №254
Dampshoe Cave
Treasure Chest №255
Makronos Island
Treasure Chest №256
Ice House
Treasure Chest №258-259
Drylands/Blowtorch Cave
Treasure Chest №260
Runaway Cave
Treasure Chest №261-271
Treasure Chest (Locked) №19
Frozen North
Higgledy Stone Achievements (1-11)
There are a plethora of these little stones scattered around the world. By giving the Higgledy what it desires, you'll be rewarded with a new companion from within.


The first one you'll find is in Cloudcoil Canyon by one of the Trip Doors By feeding it a "munchy nut" (found within the canyon), you'll gain a new Higgledy companion.

If you're unsure of where the first stone is, you can find it about 2/3 the way up the canyon. See the picture below. In addition to this first introduction, see below for a list of all Higgledy Stone locations and what is needed to unlock them.

With the collection of your first stone, you'll unlock the first achievement related to these little critters:

"Make Your Best Offer"
Awarded for giving the right gift to a higgledy stone.


Higgledy Stone №2 - Dollop of Single Cream
The second Higgledy Stone is going to be in the Wyvern's Den on the west side of SnakeTooth Ridge. You'll see a save point when you first enter; the stone will be tucked away to your right.


If you were following along with the treasure chests in the area, you should have three of them at this point. What is it that you need, you ask? Why, a dollop of single cream of course!

The treasure chest is in Snaketooth Ridge (see above for a map of all treasure chests in that area.) This is a treasure chest that you can obtain on your first visit to the ridge, so if you're missing it, then backtrack as needed to obtain it.

Once you have it, return to the stone to unlock the second stone of many!

Higgledy Stone №3 - Hardwearing Wool
You'll find the third Higgledy Stone in the Tightfit Cavern within the Rubbly Ruins, but you'll need to leave it for now; it requires a type of wool that you don't have access to right now. Once you make your way through the story a bit more, you'll find what you need in the Calmlands south of your new kingdom.


Here you'll find some Hardwearing Wool, either as a drop or from one of the resource spawns that dot the landscape, which is exactly what is needed for this Higgledy.

Once you obtain some, return here when you have a chance and offer it up to claim your third Higgledy so far.

Higgledy Stone №4 - Gunkshrooms
Take the Auld Woods Trip Door in the Forest of Niall.


Head over to the Dice Factory and too the right of it, you'll find this stone.

You can access it once you defeat the boss sentry monster for the Dice Factory.

The Higgledy will request some Gunkshrooms, which can be found within the forest as resource drops, or the Buding Lumberyard. Return with one to have your 4th Higgledy join your ever-growing party.


Higgledy Stone №5 - Prism Pepper
Head back to Cloudcoil Canyon during Chapter 4 or afterwards to find this stone. You can't get to it until you're tasked with defeating an Inceniraptor and taking its horn for the librarian in Goldpaw. The stone is located high on a large plateau where the battle starts and ends. Before you leave with the horn, stop by this stone!


This Higgledy Stone will request a very specific vegetable; one that has a spot of yellow in it (that's all you're given to go by. Located in the Heartlands, the Dugout cave west of Rubbly Ruins you can find these as drops, but they are quite uncommon.

Higgledy Stone №6 - Rugged Fur
North of the Forest of Niall is a small patch of dense forestry called the Jumblewoods.
If you accessed the Trip Door there, head there to find this stone. The Higgledy there will request a fairly common item that you should have plenty of: Rugged Fur.


You can find plenty of it scattered around the area of the Wiggly Way or the Heartlands if you don't want to just buy some outright.

Higgledy Stone №7 - Sackcloth
The next Higgledy Stone is along the shore shown below. It is in a narrow cavern out of the way and easily missed.

You'll need some sackcloth for this stone, which you can either buy, obtain from your kingdom resources, or just by scouring the Calmlands for resource drops.

Regardless, by the time you reach the stone, you should have plenty to spare.

Higgledy Stone №8 - Slumbergull Feather
This stone is located in the Jumblewoods, towards the back-end of the forest; you can't really miss it since the area is rather small. This Higgledy requests a feather of a bird before joining your team.

You can earn them from the Hunting Lodge 4 once you upgrade Evermore enough, or trade 15 Tokens of Gratitude for it from Swift Solutions.

Higgledy Stone №9 - Nightmare Prism
This stone is located in the Forest of Niall, in the Hard Woods area of the forest. You'll eventually gain access to this naturally through the main story.
This particular stone is looking for a dark, evil and otherwise moody prism as an offering.

The prism this Higgledy wants is only found in two places: Faraway Forest on the island outside Broadleaf, or from Swift Solutions for 70 Tokens of Gratitude. Locating one in the forest is extremely difficult because this item is exceedingly rare.

I'd recommend trading for one from Swift Solutions once you've advanced far enough in the game to be able to trade for it. Until then, just put a bookmark in this one for now.

Higgledy Stone №10 - Bright Button
Located deep in the Abyss of Hydropolis at 1,000 fathoms deep, you'll find this Higgledy Stone on a secluded perch. The item in question is a bright button, which can be found in Makronos, or right there in the Abyss itself.
You can also trade in three Tokens of Gratitude at Swift Solutions.

Additionally, you can get some from Evermore's bazaar and Everyday General Store. You can find the stone here:

Higgledy Stone №11 - Bighorn Shell
Located deep in the Abyss of Hydropolis at 2,000 fathoms deep, you'll find this Higgledy Stone asking for a sea shell that turns the ocean red.
You can access the stone both at the 2,000 fathoms and 3,000 fathoms deep locations.

The shell in quest is a bighorn shell, which has red crystals around it that illuminate the ocean. Return with one to satisfy this Higgledy and earn another companion.
Higgledy Stone Achievements (12-21)
Higgledy Stone №12 - Snow-White Thread
You'll need the "Bridge" spell to access Crosswater Cavern outside Auntie Martha's cottage. Once Martha joins Evermore, you'll ask you to find a stray Higgledy as part of side quest 32 (see that side question for more information).

This item can be found in Evermore from the Humble Bazaar, the Rolling Hills and in Cloudcoil Canyon.

It is a very common item, so you'll probably already have some by the time you come across this particular stone.

It should be noted that you cannot access this cavern by boat, even if you go all the way around the map and come up the mouth of the river; it simply won't let you access it.

Higgledy Stone №13 - Twisty Bone
Located at the end of the Shiverwood Shrine outside the Forest of Niall in Wiggly Way, you'll find this Higgledy Stone hidden in the rear of the shrine.

It will want a twisty bone before joining your group of companions.

Higgledy Stone №14 - Briar Coral
Once you obtain the zippelin from Broadleaf, head to Mikronos island outside of Hydropolis and enter the cave there called Seaspray Tunnel. The stone inside will ask for Briar Coral, which you should have plenty of at this point. If not, you probably haven't upgraded your buildings enough in Evermore to obtain it.

If not, Makronos will have some, or around any waterway as well.

Higgledy Stone №15 - Scented Sap
In Broadleaf, head to the Factory Floors and go to Dynafloor 2. Here, you should see a higgledy stone on the map in the corner of the room among the moving gears. Once you make it there, turn in some scented sap to satisfy this higgledy stone.

You can find scented sap from Evermore by means of the Branching Lumberyard, the Eastwoods, at Swift Solutions and in Pinwheel flats outside Broadleaf.

Higgledy Stone №16 - Blossomwheat
As you progress through the main story, the plot will lead you down to the Old Well under the city of Ding Dong Dell. Here you'll find a Higgledy Stone in the early exploration of the well, here:
Bring this stone some Blossomwheat, which can be found natively in the Pin Wheel Flats, East Woods, or as a product from the Fertile Farm that can be bought in Evermore from the general store.

Higgledy Stone №17 - Forked Tail Bone
In the latter half of the Old Well under the city of Ding Dong Dell, you'll find a second Higgledy Stone. This one can be found here:
These forked tail bones are found in a number of places, but are a bit on the rarer side. You can find them here: Drylands, Jack Frost’s Playground or from Evermore's Hunting Lodge No. 4/Hunting Lodge No. 5.

Higgledy Stone №18 - Glacier Crystal Cluster
Found inside the lone cave that dots the Farflung Cape, this higgledy stone will request a very specific crystal. These are rare drops that can, eventually, be found within the Abyss, or farmed from Mine Camp 4 within Evermore.

You'll need to acquire the airship, but once you do, head north of the Rubbly Ruins and you'll find the stone within the cave:

Higgledy Stone №19 - Whole Milk
You can find this Higgledy among the puzzle of gears and switches in Broadleaf's Dyno Floors. You'll need some whole milk to satisfy this one before they join Evan on his adventure.

Higgledy Stone №20 - Bolt Eagle Feather
You'll need to have the spell "Rejuvenate" to restore the Shrine That Time Forgot, but once you do, bring with you a bolt eagle feather to secure anything Higgledy Stone for the books.

Higgledy Stone №21 - Coarse-Grained Lumber
Inside the Sublime Shrine, east of Broadleaf, you can find this next Higgledy Stone inside. Opposite the Dreamer Door, this Higgledy needs some coarse-grained lumber to join Even and company.
Higgledy Stone Achievements (22-30)
Higgledy Stone №22 - Heavenly Wonderwater
You'll need to have access to the "Rejuvenate" spell to bring the shrine back to life, but once you do, head in there to find another Higgledy Stone. You'll have to defeat the tainted monster inside in order to gain access to the stone. You can obtain the item needed from Evermore at Mining Camp №5.

Higgledy Stone №23 - Knight's Brocade
Located in Death's Door, this cave has a Higgledy Stone near the entrance that requires some Knight's Brocade to join your troop. You can find some from the Wondrous Bazaar back in Evermore.

Higgledy Stone №24 - Fluffy Cloth
Located in the southern portion of the desert, you'll find this stone inside the Bleachbone Shrine. Bring with you some fluffy cloth, which can be obtained from the Thriving Bazaar back in Evermore.

Higgledy Stone №25 - Enigma Prism
In the frosty north, you'll find this cave that contains another Higgledy Stone. Bring with you an enigma prism, which can be found through Evermore's Mining Camp №5.

Higgledy Stone №26 - Fine Fur
North of Broadleaf, head to the Fathomless Forest to locate this Higgledy Stone. You'll need to defeat the tainted monster that lies within to gain access to it, but once you do, you just need to give it some fine fur to have it join.You can find the fur from Evermore's Hunting Lodge №3.

Higgledy Stone №27 - Clear Prism
Tumbledown Shrine is located outside Ding Dong Dell, up on the hills to the west, There is another tainted monster protecting this stone and will need to be dealt with first. Before going, bring with you a single clear prism for your offering to this Higgledy. Clear prisms can be obtained from Evermore's Mining Camp №1.

Higgledy Stone №28 - Coral Huebloom
Dampshoe Cave is located at the top of Makronos Island, just south of Hydropolis. Inside this expansive cave is another Higglety Stone. Bring with you some coral huebloom (obtainable at Evermore's Minor Market Garden) to unlock this Higgledy. You can find the cave here:

Higgledy Stone №29 - Sturdy Bone
You'll need the spell "Rejuvenate" to restore this dilapidated shrine back to life before entering. You'll find it at the west end of the Permafrost Planes. Bring with you a sturdy bone for the Higgledy as tribute. You can find the Ice House shrine here:

Higgledy Stone №30 - Sunnysmile Cotton
This final Higgledy is located in Sunshade Shrine and needs some Sunnysmile Cotton to join Evan. You can obtain some from Evermore's Wonderous Bazaar, Faraway Forest Cave, or in The Labyrinth. You can find the shrine here:
Skirmish Achievements (1-10)
Skirmish battles are army vs. army battles that Evan will face throughout his adventure to become king. Your first battle won't be introduced until Chapter 3, so you have some time before encountering your first one.

A very important note to remember is that skirmishes rotate; some are only available after completing others and completing some move around what is or is not available. Towards the end, you may find none on the entire map, but if you save, exit the game, open it back up and check again, you'll see new skirmishes are available. It's extremely frustrating.

Skirmish №1 - The Battle for the Heartlands
Recommended Level: 1
This will be your introductory skirmish and shouldn't be much of an issue since the recommended level is just level one. There are no pre-requites other than getting to this point in the story.

Skirmishes aren't active until you activate them from the standard. Once you do, follow the tutorial and you should do just fine on your first one. Once you complete it and drive the bandits out, you'll be rewarded with your first achievement linked to skirmish battles.

"To Arms!"
Awarded for winning your first skirmish.
The first skirmish is a story-based one and cannot be skipped. You'll encounter it at the beginning of Chapter 3.


Skirmish №2 - Here Come the Whamsters
Recommended Level: 3
Your second skirmish is, for now, optional. Once you establish your kingdom-to-be, you'll see a standard just south of your kingdom. The recommended level for this skirmish is level three.


This skirmish isn't too tough, even on expert difficulty. If you keep your archers in the back, or trigger enemy agro and then flip them behind, you should have plenty of might to replenish as needed.

Once you're at the end with the boss is the only time I'd recommend using any call-ins if needed, but overall you can do this without them as long as you play it carefully.


Skirmish №3 - Wallop the Whamsters
Recommended Level: 4
Once you reach Chapter 4, several overworld skirmishes will dot the landscapes. The first one I tackled was just outside the Grotty Grotto, so fast travel there. The recommended level is going to be four, so it shouldn't be too difficult for a third skirmish.

The only thing to remember with this one is that right before you face the leader, you'll be ambush from the rear, so pull back, rearm and take them one at a time. If you stay to fight, you'll probably be defeated.


Skirmish №4 - Invaders in Evermore I
Recommended Level: 5
The fourth skirmish will be right outside Evermore itself. I'd recommend returning to this one once you've completed the main story up to recruiting two additional generals for your army while doing tasks for Boddly the Librarian in Goldpaw.

The added firepower will make the battle fairly easy; just don't let all your command posts be destroyed and you'll do fine. You can still win if two of the three go down though, so keep that in mind.

Skirmish №5 - Invaders of Evermore II
Recommended Level: 11
Once you finish skirmish "Invaders in Evermore, you'll eventually be tasked with another invader skirmish that will appear outside the castle in the Heartlands. This one is a multiple wave-type scenario that involves defending your base/towers from three waves of foes.

Defeat all three waves to complete this skirmish.

Skirmish №6 - Steal Back the Starlight Stone
Recommended Level: 6
The fifth skirmish is going to be part of the main story; you're tasked to retrieve a mysterious stone that was stolen from the librarian, Boddly, in Goldpaw.

I'd recommend completing skirmish four mentioned above to help level up your troops just that much more.


This one plays out a bit differently, as you finally have the ability to destroy and rebuild command posts, cannons and towers to help defeat the enemy and replenish your troops.

Towards the end, make sure you invest in building command posts so you get a steady, albeit slow, resupply of might to bring in more troops. Once you can replenish them, you shouldn't have any trouble completing this skirmish and retrieving Boddly's stone.

Skirmish №7 - Batter Those Bandits
Recommended Level: 7
After entering chapter five, you'll have this skirmish battle available outside of Evermore that you can try and tackle.
There's nothing real remarkable about this skirmish except the bridge can cause some issues with units' pathfinding, causing them to get stuck on opposite sides of the river. Once you clear out the main forces of bandits, an ambush wave will spawn right on your command post, but losing this one doesn't incur a loss.

Skirmish №8 - Verninate the Horde
Recommended Level: 10
The next skirmish I'd recommend tackling would be just outside of Goldpaw in the Calmlands. Once you've recruited a few more citizens, you should have a few different army squadrons you can deploy to make sure you exploit any weaknesses.

The wyvern enemies are all strong melee attacks, coupled with a range fire attack.

The very end will have you fighting porcs and more wyverns, but they will be much stronger, but there are several cannons that will engage them, so kite them when they change up attacks and let the cannons soften them up if you're low on man power.

Completing this skirmish will also complete side quest 22 and earn you Long Mein as a citizen for Evermore.

Skirmish №9 - Special Delivery: Forest of Niall
Recommended Level: 8
If you haven't done this one already, head to the Plainview Plateau outside Evermore to check this one off the list. By now, you'll be plenty strong to deal with it without much trouble.


This skirmish is more in line with an escort mission; you'll be transporting goods to the Forest of Niall and you need to protect the transportation groups (there are two). I'd recommend more hand-to-hand combat units over ranged.

The transportation NPCs go from battle to battle and do not stop, so bring heavy hitters and a group that does more damage to enemy fortifications. I wouldn't waste your time or resources on building your own fortifications though, otherwise the NPCs will run off on their own in the meantime and most likely be killed.

Skirmish №10 - Fabricas's Fortlets
Recommended Level: 9
Over in the Calmlands, you'll find this skirtmish outside Goldpaw, northeast of the city.
Skirmish Achievements (11-19)
Skirmish №11 - Going at it with Goldpaw
Recommended Level: 14
To start this, you'll need to have recruited Min Ti to Evermore from the kingdom of Goldpaw. You can do so as part of side quest 11 (see above for further), which then will cause her to travel to Evermore.

Once there, speak to her to start side quest 34 and a chance to participate in this "trial" skirmish between Goldpaw and Evermore.

Skirmish №12 - Labor of the Labyrinth
Recommended Level: 12
This skirmish is part of the main story and cannot be missed. You'll attempt it after reaching Hydropolis and being told by the residing Queen to come here and defeat Cetus. I'd recommend doing some of the less difficult skirmishes above before coming here so you have your troops adequately leveled up.

Skirmish №13 - Tyran, Reel King
Recommended Level: 19

See the side quest Side Quest №31 - Bandits at the Boarder for more information on how to have this skirmish appear. It will show up just outside Evermore in the Heartlands.

Skirmish №14 - Lost Souls' Lament
Recommended Level: 16
See the side quest Side Quest №51 - Speio, Priestess in Training for more information on how to have this skirmish appear. It will show up in Leucippes' Labyrinth once you speak to Speio as part of the quest.

This skirmish is a straightforward brawl between your forces with Speio having her own group of mages and the undead. There's no fortifications; I found it easy to just go four melee groups, charge in haphazardly and I managed just fine.

Skirmish №15 - Criminal Capture: Bandit Gang
Recommended Level: 16
Located just outside of Goldpaw, you'll find this skirmish blocked off until you have the "Bridge" spell to combine the two sections of land, giving you access to attempting it.
This one will require some specific coordination in what you do; the bandit leader here will actually run away if you're not quick enough, so utilize your troops' running ability wisely.

I recommend taking two shield leaders and then two melee of your choice. When you advance to the walled off area with the two cannons to the right, defeat the leader to re-open the doors. Once you do, make a rush to the boss and skip everything in your path; use those shield battalions to push everything aside. Focus on killing the bandit leader.

Once you do, the skirmish will automatically end.

Skirmish №16 - Whamsters Wanting Wizardy
Recommended Level: 20
Located in Leucippes’ Labyrinth on the south side of the island, this skirmish awaits you:
This skirmish is dotted with mage users and giant Porcs. There are no bases, but there is one ambush at the end of the mission that you should be cognoscente of so you don't rush into it unprepared.

Skirmish №17 - Criminal Capture: Angling for Fangfish
Recommended Level: 25
Located in Leucippes’ Labyrinth, you'll need to speak with Helena in Evermore and start Side Quest №52 - Helena, the Hearty Hunter. Once you do, you'll be given another side quest (Side Quest №61), which will open up this skirmish.

You'll need to kill six Fangfish in the allotted time (yes, this is a timed skirmish). They are hidden underground, so you'll need to search out the area to find them. I'd recommend bringing Long Mein with his ability to stun them; it makes the fights extremely easy.

Once you defeat all six, you'll need to return to Helena in Evermore to complete this side quest.


Skirmish №18 - Joint Exercise: Metal Test
Recommended Level: 28
Talk to Oz in Evermore to start Side Quest №92 - Big Unveiling in Broadleaf. To recruit Oz, see (see side quest №73); speak to him and accept an invitation to Broadleaf to test out their latest robots. Speak to the soldier outside of Broadleaf to gain access to a skirmish.

Win the fight to complete this side quest. You can find the skirmish here:

Skirmish №19 - Fight Back Fabricas
Recommended Level: 44
STart Side Quest №118 - Building Up to an Attack - Talk to Gao Jia in Evermore to receive word of some suspicious activity on the outskirts of the kingdom. Speak to the solider outside Evermore in the field to open up a level 44 skirmish "Fight Back Fabricas" mission. Win the fight to complete this side quest.

This skirmish is mostly against a slew of siege cannons and arrow towers. At the very end you'll fight Fabricas, but other than that, plan accordingly to quickly take down towers and you should be fine, even if you're not near level 44 for your troops; I believe the level is a bit overblown due to the number of siege towers.

I completed it with soldiers around level 28-30 without any real issues.
Skirmish Achievements (20-31)
Skirmish №20 - Tyran's Lucky Country
Recommended Level: 34
Side Quest №90 - Tyran 4 Evermore needs to be activated in order to attempt this skirmish.

Speak to Chingis in Evermore (assuming you've already finish side quest 31) to accept this side quest. Tyran is back at it and wants to dish it out with Evan in another skirmish for Evermore. Speak to the soldier right outside the kingdom to open up this skirmish.

The skirmish marker will appear right outside the kingdom.

Skirmish №21 - Delivery at Any Price
Recommended Level: 17
This skirmish will appear outside of Goldpaw as part of Side Quest №74 - Price's Delayed Deliver. See that side quest for more on how to unlock it.

Skirmish №22 - Joint Exercise: Code Blue
Recommended Level: 24
This skirmish will appear in Leucippes' Labyrinth as part of Side Quest №62 - Skirmish With the Sea's Finest. See that side quest for more information on how to activate this skirmish with the army of Hydropolis.

Skirmish №23 - Rage of the Righteous
Recommended Level: 17
Available once you reach chapter eight, head to Goldpaw and accept Side Quest №122 - Ya Pi, the Proud Soldier (see the side quest section for more). You'll find this skirmish in the Rolling Hills, by Cloudcoil Canyon.

Skirmish №24 - Marlene; A Conjurer Corrupted
Recommended Level: 18
Starting from chapter nine, you can accept Side Quest №138 - Marlene, Good Girl Gone Bad (see the side quest section for more information). You'll head out south of Ding Dong Dell to meet up with a soldier on scene. Speak to them to activate this skirmish. You can find it here:

Skirmish №25 - What's Rightfully Ours
Recommended Level: 54
This skirmish banner will appear right outside Broadleaf. See Side Quest №144 - The Dark Side of Development for instructions on how to accomplish this.

Skirmish №26 - Bots Gone Bonkers
Recommended Level: 26
West of Broadleaf stands this banner of war in the overworld. There aren't any side quests or story-related activities associated with this one, so feel free to do it at any time. It's rather short; there aren't any ambushes or noteworthy things that occur.

Defeat the robot squads and the two cannons (optional) in the valley to win the fight.

Skirmish №27 - Approaching the Ultimate
Recommended Level: 21
This is a main story skirmish and cannot be missed. You'll approach it during the course of chapter nine.

Skirmish №28 - The Final Fight
Recommended Level: 23
This is a main story skirmish and cannot be missed. You'll approach it during the course of chapter nine, after completing skirmish №27.

Skirmish №29 - Flames of the Firedrake
Recommended Level: 19
See Side Quest №124 - Callianeira, Priestess of Water on how to spawn this skirmish in the Drylands.

Skirmish №30 - Joint Exercise: Code Green
Recommended Level: 46
Activate Side Quest №152 - Ding-Dong vs. Ding Dong Dell. See the side quest section of this guide for more information. To find this skirmish head here:

Skirmish №31 - Tyran's Last Stand
Once you've completed the side quest №90, speak to Chingis in Evermore to activate Side Quest №147 - The Bandits are Back... Again!, which will open up this skirmish outside Evermore.
Skirmish Achievements (32-50)
Skirmish №32 - March of the Wyverns
Recommended Level: 33
This skirmish is found in the overworld and has no pre-requisites to fight. You can find this one in the middle of the Drylands desert; it's pretty hard to miss. You'll be fighting four waves of fire wyverns before your reinforcements arrive to assist. Completion is at the end of the fourth wave.

Skirmish №33 - Bag That Brute Bruce!
Recommended Level: 41
This skirmish will appear right after completing skirmish №33 shown above. This one has you under a strict time limit, so fighting everything isn't possible. You need to run past the wyverns and make your way through all the walls to reach Bruce in time. Bring one or two squads that have the ability to stun enemies for a short time and you'll be fine. You'll find it here:

Skirmish №34 - Invaders of Evermore III
Recommended Level: 17
You'll have to complete the first two before this one appears. You'll find this skirmish just outside of Evermore, so you can't miss it. I forgot about this one, so that's why it is so far down the list.

Skirmish №35 - Whamelie Feud I
Recommended Level: 28
Available at any time once you reach the frozen north, this skirmish can be found around the crash site here:

Skirmish №36 - The Frosty Fortress
Recommended Level: 27
Available at any time once you reach the frozen north, this skirmish can be found around the crash, just west of skirmish №36.

Skirmish №37 - Whamelie Feud II
Recommended Level: 33
After completing skirmish №36, you'll be able to tackle the sequel, located just outside Freezybones Cave here:

Skirmish №38 - Snowy Survey Party
Recommended Level: 29
This skirmish is found in the frozen north, just outside the Coldera here:

Skirmish №39 - Joint Exercise: Winter Warfare
Recommended Level: 50
Another joint exercise one between Evermore and another kingdom. It is a static skirmish and can be completed at any time. You can find it here:

Skirmish №40 - Survey Protection Party
Recommended Level: 30
This next skirmish is in the Permafrost Plains. You'll need to protect the two command posts you're given from waves of enemies. The last wave comes from post sides, so focus on protecting any one command post and you'll be fine. You can find this skirmish here:

Skirmish №41 - Escort Mission: Shock and Ore
Recommended Level: 30
Located just outside of Power Keg Cove, you'll find this skirmish:

Skirmish №42 - Joint Exercise: Desert Strike
Recommended Level: 55
Another joint exercise skirmish, this time located in the Drylands here:

Skirmish №43 - Whamalie Feud III
Recommended Level: 40
After completing the joint skirmish, head to the southern Drylands for the third installment of Whamalie and their drama. You can find this skirmish here:

Skirmish №44 - Sandy Survey Party Rescue
Recommended Level: 34
Once you've finally driven Whamalie and company from the Drylands, a survey party will come on scene and need defending. Much like the other survey missions, this one is timed and has you fighting several whamster groups along with three Incenaraptors against the clock. Just north of your last skirmish is this battle:

Skirmish №45 - Invaders of Evermore IV
Recommended Level: 26
The fourth installment of this type of skirmish, you'll find this one right outside Evermore. If you're doing this in the postgame like I was, sometimes it doesn't show up or won't spawn the banner. I had to save it and re-open the game file to get it to appear.

Skirmish №46 - Whamster Base Obliteration
Recommended Level: 48
Next up on the list is this skirmish in the Rolling Hills. You can find it here:

Skirmish №47 - The Battle for Broadleaf
Recommended Level: 32
This skirmish is just north of Broadleaf and can be found here:

Skirmish №48 - Invaders of Evermore V
Recommended Level: 35
The fifth installment of defending Evermore from a never-ceasing horde of enemies. This one plays out similar to the others, in which you're going to be defending multiple command posts from waves of enemies. You can find this skirmish right outside Evermore.

It isn't very difficult; the enemy keeps bringing in siege cannons that I'd recommend taking over to bolster your defenses. Doing so will make it a pretty smooth ride; just bounce back and forth between each side and rebuild as needed and you should have a very easy win on your hands.

Skirmish №49 - Invaders of Evermore VI
Recommended Level: 42
The sixth installment of defending Evermore. If you're having trouble getting this to appear (I did), I got it to show up by manually entering Evermore, then I let the game sit for a few minutes and manually walked out (no fast travel) and it came up. It took a few times to work, though.

Anyway, it will be right outside Evermore like the others.

Skirmish №50 - Invaders of Evermore VII
Recommended Level: 49
The sixth installment of defending Evermore. If you're having trouble getting this to appear (I did), I got it to show up by manually entering Evermore, then I let the game sit for a few minutes and manually walked out (no fast travel) and it came up. It took a few times to work, though.

Another alternative I tried and had work is doing the skirmish that appears instead, which is one of the first ones in the game, and completing it again to make the banner disappear, then fast traveling to anywhere, then if it appears, use the zippelin to return.

Once you finish this last skirmish, you'll be awarded your achievement for completing them all:

"God of War"
Awarded for overcoming 50 skirmish challenges.
Cooking Achievements
Cooking comes into play after you have established your kingdom in the Heartlands. You'll meet your cook, Floyd, in the Forest of Niall as part of the main story. He'll agree to be your cook and head back to your camp on his own.

Once you return, speak to him and he'll explain how you need to bring him ingredients and he'll make special dishes for you. At first, he only knows how to make bread, but as you gather ingredients, learn recipes and craft new items together, Floyd's skills and menu will grow.


"Cooking Up a Treat"
Awarded for cooking your first dish.
When you have time and return home, speak to him and craft some bread. Crafting this first recipe will award you with this achievement.


Over time, you'll find various recipes and cookbooks to help bolster your options and increase Floyd's expertise. Here is a list of all notable times you'll earn new recipes:

  • Bread - Part of the main story. The first item you can make when you recruit Floyd from the Forest of Niall.
  • Recipe List #1 - Part of the main story. This list will grant you several new items to make. It will be given to you as part of side quest nine.
  • Recipe List #2 - Complete Side Quest №29 - High-Speed Hot Streaks! any time after chapter four. See the side quest portion of this guide for more.
  • Recipe List #3 - Complete Side Quest №58 - The Best Seafood in Seatown any time after chapter six. See the side quest portion of this guide for more.
  • Recipe List #4 - Complete Side Quest №88 - A Matter of Taste. See the side quest portion of this guide for more.
  • Recipe List #5 - Complete Side Quest №160 - Dekkah's Grand Tour. See the side quest portion of this guide for more.

If you have all the above listed recipe books, then you'll be able to craft the necessary 50 items to unlock the next cooking achievement:

"Cooking Up a Storm"
Awarded for cooking 50 dishes.
Tainted Monster Achievements
Tainted monsters are extremely tough versions of monsters you see out on the overworld. They have a purple vortex around them on the field. There are, in total, 50 monsters that you'll have to dispatch; you will earn one achievement for the first one you fight and one achievement for defeating all 50 of them in the world. The tainted monsters listed below are in, mostly, no particular order and are listed purely by the order in which I encountered them.

You'll need to utilize your tactics tweaker menu to make the battles a bit more manageable. Adjust it according to the emblem each monster represents. You can learn what to focus on by walking up to them and observing their level. Pay attention to the marker so you know what to put points into:


The first one you find is on the way to the forest for wood for your kingdom. Outside of the Wiggley Way, the game will introduce you to it, what they are and other basic information. Defeating them will net you two different achievements:

Awarded for defeating your first tainted monster.


Upon defeating every tainted monster, you'll earn:

Awarded for defeating 50 tainted monsters.
Once you defeat all 50 original tainted monsters below, ten more will spawn around the world. While killing them isn't necessary for any achievement(s), if you're looking for additional challenges, feel free to tackle them at your leisure.


You can fight the first one you find as soon as you end the tutorial, but, if you're on expert like I was, you will die...rather quickly. You'll have to come back to it when you're stronger. In no particular order, they are:

Conflagra
Monster Level: 26
Available once you enter chapter five of the main story. Speak to one of the side quest gives in Goldpaw to start: Side Quest №28 - Tales of Derring-Do. After accepting this quest, Conflagra will appear on the cliffs of the Sundown Coast just outside of the Calmlands.
As the name says, Conflagra is fire-based, so bringing water-based attacks and plenty of fire protection will help ease the fight.

Also, make sure to use your "Tactics Tweaker" to boast your fire resistance if you haven't prior to the fight. She has two tactics: one where she does a backflip before propelling herself forward in a ball of fire and the other where she brings her hands together and shoots a fireball.

If you pay attention to her movements, they are easy to dodge; if you don't they can easily do 500-1,200 damage. I defeated her by abusing Roland's "Circular Sword" ability since it knocks her down every time, giving you time to dish out damage safely.

Googah
Monster Level: 22
You'll recognize this one from the tutorial explaining tainted monsters back when you first passed by.
Googah is a slime-based enemy (obviously), so use your tactic tweaker to increase your damage output against slime-based enemies, along with any weapons that boost damage to slimey monsters.

Googah several really quick physical attacks, along with the ability to split into multiple slimes and become silver, effectively nullifying physical damage done to him. I found keeping my distance to be the best course of action since he has one fairly easy ranged attack to dodge.

Couple that with some higgeldies that favor water (it's weakness), I mostly spammed ranged attacks and used fire higgeldies to deal extra damage.

Magmanimus
Monster Level: 22
This tainted monster is part of side quest four that you probably accepted back in Goldpaw quite a while ago, but were too weak to actually defeat it.

Magmanimus is a fire-based slime and shares a lot of the same attacks and techniques as Googah mentioned above. The difference? Fire damage.

You can find this creature at the southern edge of the Sunrise Shore. Make sure to tweak your tactics sliders to deal extra damage against slimes and to protect yourself from fire-based attacks before charging in. If you haven't been doing so, upgrade your water-based spells or weapons while in Evermore; even at level one, "Water Pistol" makes short work of it.

Prangles
Monster Level: 22
See Side Quest №27 - The Hard-Nosed Huntress to start this tainted monster hunt. Head to the Shiverspine Grove just northwest of Evermore.

There you'll find a stubborn huntress who is tracking a tainted monster. Agree to dispose of it for Prangles to spawn in the back of the grove.

Prangles is a lot like Clangston in the sense that they deal only physical damage. Prangles is a long-range bow fighter, so close the gap early on and simply roll dodge when they string up an arrow and you're most likely going to escape unscathed.


Mortimer
Monster Level: 23
Mortimer is associated with side quest number five, which you can find in Goldpaw early on into the game (pre-chapter five). Although you can early, you probably won't be strong enough until later on, so I left this one for a bit before returning.

Mortimer falls under a "slime-like" enemy, so adjust your tactics accordingly to deal more damage to slime-based foes.

The battle is fairly easy, as Mortimer has a bad habit of telegraphing its attacks. Close range it will do standard swings, typically two in succession, so block or dodge roll them. It will charge you to close the gap by leaning back and running before doing a cleave attack; simple roll away, then strike. Rinse and repeat.

Clangston
Monster Level: 23
Clangston appears just outside the Heartlan, northwest of Evermore. This Whamster is, by all accounts, one of the easier tainted monsters to defeat. I felt he was probably the easiest one in the game.

Clangston's attacks are slow, physical only damage. He doesn't attack consistently and often times doesn't for extended periods of time, making the window to dish out heavy damage fairly easy.

In addition to this, he's very susceptible to heavy attacks, which will often knock him off his feet.

Yvan
Monster Level: 31
Yvan is located just before Capstan-upon-Hull on the cliffs. Access the plateau by jumping where the rocks meet the cliff to face him.

They are all physical damage, so adjust accordingly. Yvan has two moves using their weapons that are fairly easy to dodge.

They also can fly for extended periods of time and swoop in on you very, very quickly, which can be hard to get out of the way.

Hitting them while in flight won't knock this monster down and they fly so high it makes it difficult to do so, so it is best to just wait and block or dodge their aerial attack(s) until they ground themselves.

Overall, a fairly easy tainted monster to deal with.
Tainted Monster Achievements
Femurus
Monster Level: 30
This is a unique tainted monster tied to the DLC that only appears in the Rubbly Ruins when you approach the doors to the Labyrinth that Lord Cumbish mentioned. If you never venture close, it will not appear.


This tainted monster is also connected to side quest 31. If you don't defeat this monster, then you're unable to complete, or even start that side quest the way to two are linked. If you started side quest 184 already, Chingis will be fixed to the center of town just outside the castle.

In order to get him to move back to the farm and allow you to start side quest 31, defeat Femurus in battle.

Femurus is purely physical damage, but his ax attack can hard-lock you if he catches you in one of his cycle attacks, which will hit you over and over before they deliver a sweeping ax blow.

It can deal a substantial amount of damage, so keep your finger on the dodge roll button and stay mobile.

Scintilla
Monster Level: 34
Scintilla can be found on the island of Makronos just outside Hydropolis (use the Makronos trip door) inside the Capaneus's Crypt at the very top of the island. This is part of side quest 48 - "A Career Cut Short".


Do note, this tainted monster will not be here unless you accept this side quest. As with all tainted monsters, adjust your tactics to deal more damage towards beautiful foes and protect yourself from fire magic.

This tainted has similar attack patterns to other Delphine-type monsters: quick, agile and hits like a train. Stay mobile and abuse knockdown attacks to give you small windows to deal damage.

Getting hit, even many levels above the monster can be grounds for a one hit KO on any team member, so have revives handy as well.

Grimwit
Monster Level: 35
Grimwit is high up on the Upheer Plains, which can only be accessed with the use of the zeppelin from Broadleaf. Grimwit is by no means a tough tainted monster. Very susceptible to knockdown and confusion, you can juggle him pretty easy to render them almost completely vulnerable the entire fight.

Lay down constant attacks and you'll make short work of this monster. You can find Grimwit in the overworld at any time here:

Grimpopo
Monster Level: 37
At the base of the island known as Makornos, just north of the trip door location, is this tainted monster.

Grimpopo specializes in ranged attacks, shooting arrows and extremely potent firebomb arrows that do massive splash damage. Adjust your tactics tweeker to protect against fire, otherwise he can potentially kill off your whole team in one attack if you're close together.


Even with a max resistance boost to fire, the firebombs still do tremendous damage, so either be quick to dodge, or interrupt his attacks when he readies a shot with something like Batu's "Cannon Shot". Just watch your mana closely!

Abnorma
Monster Level: 37
This tainted monster is located in the Eert Grove just outside of Goldpaw in the Calmlands. THis monster won't be present until around chapter six, in which you can accept side quest №56 - Unfun Fungus from a ship builder in Capstan-upon-Hull.


Once you accept it, head to the grove and you'll find this giant, mutated mushroom at the end of the pathway.

Abnorma is a huge pain in the butt (at least I thought so). It constantly spawns the little mushrooms to annoy you, it has extremely powerful close-range attacks and sweeping AoE if you linger near it too long.

Fire magic is going to be your friend, as well as any fire-based weapons you might have on you at the time. I'd highly recommend keeping your distance, or only going for short bursts of close-range attacks because staying near too long is a recipe for death.


Quilla
Monster Level: 29
Quilla is located on Starboard Island, among several wyverns that are must, must tougher than they are. You need to defeat them in order to access the treasure chest they're guarding behind them.

The fight is quite easy; this tainted has one charged up attack that launches them forward and some basic, but quick melee attacks if you go in close range.

Waiting for them to charge up and get a few whacks in, then following up once they finish and recover will make this fight go quickly.

Lily
Monster Level: 30
Lily can be found on the sands of the Shallow Shoals outside Capstan-upon-Hull.

Adjust your tactics to do extra damage towards beautiful foes for some extra umph, then go in for the kill.

Lily has the same attacks as lesser creatures of the same and uses water-based magic attacks, so, if need be, bring resistance to water if you're having issues. Lily also takes an exceptionally long time to recover from knock down.

Dampo
Monster Level: 43
Dampo resides on the smaller island just east of Makronos outside Hydropolis. He doesn't appear there until you accept: Side Quest №53 - Lycorias, the Doughtful Guard, which can be done any time after saving Hydropolis.

You can find the guard, Lycorias, inside the palace of Hydropolis after taking the portal below the city to the queen's chambers. Speak to her to trigger Dampo's appearance here:
Dampo is quite easy to deal with. Stay close to them, abuse knockdown attacks when they charge up a magic attack, or dodge as needed (being hit by one of their spells will surely one-hit kill you); Dampo is also very vulnerable to confusion.

Puddley
Monster Level: 33
Located in the shrine southeast of Hydropolis, Puddley is a slime-based tainted monster at the back of the Shrine of Pining.
Tainted Monster Achievements
Stormigan
Monster Level: 25
Found inside Looksee Cave in Snaketooth Ridge, you'll need either the Bridge spell, or if you have the zippelin from Broadleaf and missed this one, you can simply fly to it. I missed it completely and double-backed around chapter seven.

Whammy
Monster Level: 27
Whammy can be found in the Dugout Cavern in the northwestern side of the Heartlands.

Accessible by boat or by airship, Whammy is your standard whamster.

Boasting zero magic, some rudimentary physical attacks and not much else, dealing with this tainted monster shouldn't give you much trouble.

BL-Ivion
Monster Level: 44
To get this machine monster to spawn, you'll first need to start Side Quest №78 - Robot on the Run. Talk to the same group of scientists in Broadleaf to accept this quest. They are the three to the right of where you spoke to Chip. Kimmy, Cindy May and Drew will ask for your help.

You can find the machine west of Broadleaf in Powder Keg Cavern here:
I found this to be one of the more difficult tainted monsters to defeat. The robot hits extremely hard and can often one-shot you in close range. It has a devastating charged laser attack that kills anything in its path and rolls around in a ball, but that is fairly easy to dodge.

It is susceptible to knockdown during the charged attack, as well as while in the ball, so use that to open it up to some damage. It doesn't have very high defense.

Skrych
Monster Level: 45
Accept Side Quest №74 - Kent, the Magical Ore Analyst any time after saving Broadleaf (see that section of the guide for more information). Once you do, you can head west of the city to find this tainted monster.

Do note, that until you accept the quest, Skrych will not spawn. You can find him here:

Klogg
Monster Level: 44
Klogg is found in the Drylands, west of Splitstone Canyon, in an area only accessible by use of your zeppelin. Klogg won't surface until you've accepted Side Quest №42 - Daddy Come Home and spoken to Keeley's father (see that quest for further). Klogg spawns here:


Akheilos
Monster Level: 44
This tainted monster is reptilian by nature, so adjust your tactics tweaker accordingly. Nestled in the depths of Leucippes' Labyrinth, you'll encounter this one as part of Side Quest №109 - Return to Sender.

While ominous, Akheilos isn't very difficult. He has a huge HP pool, but his moves are easily telegraphed, giving you ample time to dodge out of the way. Since he likes to constantly go underground, I'd recommend bringing something to poison him to deal consistent damage.

He isn't very prone to being knocked down, but it is possible. Just avoid him charging to the surface and his tail swipe by looking for the dust rising and you'll be good to go.

Madusa
Monster Level: 40
Found on Larboard Isle, you'll find this tainted monster chilling in the overworld, waiting for you. There are no pre-requisites to fighting it, just be prepared level-wise and rememeber to adjust your tactics tweaker accordingly.

Flappy
Monster Level: 46
By chapter eight, you should return to Greenglade Cave and accept Side Quest №82 - Rumpel, the Village Vet by talking to the lone Grimalkin that is residing there. This will activate a fire dragon that will appear at the end of one of the passageways deep in the cave. You can find the cave here:

Swellhorn
Monster Level: 46
Swellhorn resides in the Wiggly Way, just outside of the Forest of Niall. You probably noticed it early on in the game, but he was far too powerful for you to defeat at the time. Once you've established yourself, return to the area to defeat him.

Grimbaba
Monster Level: 54
This tainted monster hangs out in the overworld, outside Ding Dong Dell. You'll be able to fight it as early as chapter eight, just before entering Ding Dong Dell with Evan and company. Similar to over monsters of the same type, Grimbaba is a physical attack specialist. You can find the monster here:

Gryndl
Monster Level: 45
Gryndl is located in the Drylands and is present in the overworld from the start. You'll need the airship to reach this tainted monster, but once you have it, head to the southern tip of the area to fight'em:
Gryndl is extremely vulnerable to water magic, as well as being one of the most susceptible to knock down and interrupts attacks. You can almost juggle him the entire fight to the point they never attack.

Fanger
Monster Level: 34
Fanger sits atop the passage from Broadleaf to Chattertooth Ridge, blocking all foot travel between the two points. Fanger occupies the overworld map, so you're free to dispose of them at any point in the game.

Twygg
Monster Level: 51
Once you've reached chapter nine, head back to the Sky Pirate base and accept Side Quest №141 - The Tainted Wyvern. See that side quest for more information.

Leolynx
Monster Level: 59
See Side Quest №132 - Grimm's Determination for more on how to spawn this tainted monster. You'll find Leolynx in the Western Woods, just outside of Ding Dong Dell as part of this side quest.

Use your tactics bars to adjust accordingly and protect yourself from fire magic. Bring attacks that provide knock down as well; this tainted monster is fast and deadly.

Boarcher
Monster Level: 41
Boarcher is located in Runaway Cave, west of Evermore at the back of the cave. Boarcher is all physical attacks and is similar to Porcs you've encountered before. You can find this monster here:
Tainted Monster Achievements
Snotley
Monster Level: 48
After chapter eight, head to Ding Dong Dell and accept Side Quest №134 - Pollution Solution. The tainted monster will be located outside the city, at the entrance to Ding Dong Well.

Crystolith
Monster Level: 47
Crystolith spawns in the East Wood, east of Broadleaf once you accept Side Quest №115 - A Not-So-Watchful Eye. If you've gone to the woods and the quest giver isn't there (he'll confront you right when you enter and give you the side quest), then wait until you've progressed the main story and return.

BL-Ammo
Monster Level: 57
Standing on a high ridge just east of Broadleaf, you'll find this mechanical menace in the overworld as soon as you travel to the Broadleaf area, though I'd advice waiting until you're stronger before facing it.

Since it sits so close to town, just pull up your map to see the marker; you honestly can't miss'em.

Charmigan
Monster Level: 59
Found at the end of Sunshade Shrine, Charmigan is a fire-based bird, that, for all intents and purposes, is extremely easy to be dealt with. While he does stay airborn most of the time, he's one attack requires a great deal of charge up, so attacking him constantly is key. Charmigan doesn't have a high HP pool either, making the fight conclude fairly quickly.

Boarzerker
Monster Level: 58
Boarzerker is a tainted Porc warrior found in the back of Tumbledown Shrine. Boarzerker is physical damage and a LOT of it. He can easily one-shot you with any of his attacks, making good defense and quick movements paramount to defeating him.

Toxina
Monster Level: 56
Toxina is a giant squid-like monster located west of Sunshine Shore. Toxina is in the overworld and can be fought at any time during your adventure.

Sindulata
Monster Level: 65
This tainted monster is located in the northern part of the Drylands in the overworld. It has no requirements and spawns at the beginning of the game and is ready when you're able to make your way to it.

Gaialith
Monster Level: 42
Located north of the "Crash Site" in the frozen tundra, you'll find this tainted monster sitting atop a sheet of ice in the ocean. This monster is in the overworld, so you're free to fight it any time after obtaining the airship.

Sporespew
Monster Level: 62
Located insdie the Shabby Shrine, this is a rather unique monster. During the fight, it will burrow underground and pop up four pods that rain spores down around them. One is the real one, while the other three are decoys. You need to disrupt the real pod to keep the monster from coming back up and initiating a full heal of its health.

I found the easiest way to deal with it, is just leaving it alone until later in the game (postgame); once I was around level 90-100, you can dispatch it insanely quick, even before it burrows once.

Twinky
Monster Level: 38
This slimy monster is located in the Unsung Shrine, east of Goldpaw. You'll need the "Rejuvenate" spell to access it, but once you do, head here and you'll find the monster at the back of the shrine, guarding a Higgledy Stone.

Doombo
Monster Level: 52
This lovely little slime is located inside the Shiver Shrine, in the deep, frozen north. Much akin to other slimes, this one dishes out extremely quick, close-ranged attacks and is best dealt with from a distant with strange light-based magic. Evan's "Sunrise" spell does wonders for taking this monster down.

You can find the tainted monster's shrine here, north of the Crash Site:

Florette
Monster Level: 38
This fairy monster is located within the Fathomless Forest, north of Broadleaf. You can find them in the center, protecting a treasure chest and Higgledy Stone from outside access.

Tusker
Monster Level: 49
Deep within Dampshoe Cave on the top of Makronos Island, you'll find this tainted Porc monster within. There are no pre-requisites to spawning Tusker, so return at any time when you're strong enough and ready to fight. You can find Dampshoe Cave here:

Zapple
Monster Level: 63
A Whamster Mage dealing in light magic, Zapple is extremly easy to tackle, even if you're significantly lower leveled due to his only attack requiring a charging period before casting. Sure, the spell will kill you on hit, but it is easy to dodge and Zapple is extremely easy to stun-lock with Roland. You can find Zapple in the back of the Ice House here:

Snickersnarl
Monster Level: 64
Available only in the post game during Side Quest №170 - The Divine Silence, Snickersnarl will appear in the frozen tundra near the Crash Site once the side quest is activated and a marker will appear on the world map to guide you to the monster's location.

Mystral
Monster Level: 24
Mystral is a fairy-type tainted monster that claims home from within the Sundown Woods outside of the FOrest of Niall. You can find this monster in the southeastern most corner of the woods. The entrance to the forest is located here:

Starless Knight
Monster Level: 66
Only available postgame during Side Quest №161 - Testing the One True King (see that section of the guide for more information). This tainted monster will only appear once the side quest is activated. Once you accept it, head to the Bleachbone Shrine in the Drylands.

Storme
Monster Level: 69
This dark dragon is located on Farflung Cape and stands as one of the toughest tainted monster on the overworld map.

Dahlia
Monster Level: 53
Dahlia isn't available until you defeat The Horned One and gain access to free roam Nazcaä. To enter Nazcaä, select the island that came about when The Horned One appeared and select "World Map" to enter free roam. You'll find this dark fairy in the middle of the island.
Side Quest Achievements (1-10)

Side quests have several achievements tied to them, including upwards of completing 150 side quests around the land. However, side quests won't become available until Chapter 4, once you've established your kingdom of Evermore. The final achievement in this section is for completing 150 side quests, but there are far, far more than that.

From this point forward, I'll list every side quest you can do, what you need to find it and how to go about completing it. It'll be a long list, so let's get started! You'll earn achievements for the first, 50th, 100th and 150th side quest completed:

"A Bit on the Side"
Awarded for completing your first side quest.


"Side-Tracked"
Awarded for completing 50 side quests.


"Beside Yourself"
Awarded for completing 100 side quests.


"No Downside."
Awarded for completing 150 side quests.


Side Quest №1 - Auntie Martha's Scrubber
Recommended Level: 15
Fast travel to Auntie Martha's house south of the Rolling Hills to learn a Whamster has stolen her rub-a-dub scrubber; without it she can't join your kindgom. Head to the Grotty Grotto.

Defeat the small bandit group of Whamsters inside to find her missing scrubber and return it to Auntie Martha to complete the quest and obtain your first achievement.

Side Quest №2 - Top Marks for Trying
Recommended Level: 60
Given to you by Professor Mileniyah in the Grotty Grotto after you obtain the item needed in your first side quest for Auntie Martha. You'll need to be stronger before tackling this side quest, so hold off for now.

Once you're ready, see the "Dreamer Door Achievements" section of this guide.

Side Quest №3 - Munokhoi, the Shy Pirate
Recommended Level: 16
Re-visit the Sky Pirate's main base; at the entrance you'll be stopped by Munokhoi, but before he can ask you his question, he'll run off due to incredible shyness. Track him down three separate times before Tani will step in and demand he answer.

Once she does, he'll ask to join Evermore to start a vegetable farm. Accept his request to complete this quest. The recommended level is rather arbitrary, as you don't have to fight anything to complete this side quest.

Side Quest №4 - A Favor for Nu Bi
Recommended Level: 28
Inside the Goldpaw weapon's shop is a dogfolk named Nu Bi. He is a weapons master in training, but lacks motivation. He asks if you could slay a monster for him before joining the ranks of Evermore: Magmanimus.
Magmanimus is a fire-based slime and shares a lot of the same attacks and techniques as Googah mentioned above. The difference? Fire damage.

You can find this creature at the southern edge of the Sunrise Shore. Make sure to tweak your tactics sliders to deal extra damage against slimes and to protect yourself from fire-based attacks before charging in. If you haven't been doing so, upgrade your water-based spells or weapons while in Evermore; even at level one, "Water Pistol" makes short work of it.

Side Quest №5 - Hang On, Hoi Den!
Recommended Level: 29
Speak to a lovely lady by the name of Hoi Den in Goldpaw, west of the inn up the staircase. She needs help protecting the citizens of Goldpaw's outskirts from a monster named Mortimer. The monster can be found in Tightfit Cave in the northern part of Rubbly Ruins.

For a few pointers on how to fight the monster, see "Mortimer" in the "Tainted Monster" section of this guide. Once you defeat the monster, return to Goldpaw and speak to Hoi Den, who will then join your kingdom upon completion.

Side Quest №6 - Pi Chi, the Skillful Seamstress
Recommended Level: 17
By the library in Goldpaw, Pi Chi will be talking to her teacher when you stop by. She wants to strike out on her own and will ask to come to Evermore if you honor their craft's tradition and bring her some spools of grass-green thread to seal the bond between you two.

You can get several spools of the thread from finishing one of the main story side quests, side quest 11. In doing so, you'll obtain some thread, which you should return to Pi Chi in Goldpaw to recruit her to your kingdom.

Side Quest №7 - Persha, A Maid Like No Other
Recommended Level: 17
Go to the inn inside the city of Goldpaw and speak to former Ding Dong Dell resident, Persha. Evan will ask her to join him at Evermore, but she needs to finish a quilt for the inn before leaving.

You can find her the necessary cotton, called Greenglade Cotton, around the Calmlands outside Goldpaw, or in the Forest of Niall. Once you have four of them, return to her to complete the quest.

Side Quest №8 - Li Li, The Troubled Genius
Recommended Level: 17
As part of the main story, you'll visit Boddly at the library in Goldpaw. She'll direct you to speak to Li Li in Goldpaw, who wants to join Evermore if you can prove you're capable by defeating three Skeleplasms.

You can find these just outside of Goldpaw around the Calmlands, among other places as well. Once you defeat three, return to Li Li and she'll fulfill her promise and join Evermore.

Side Quest №9 - Gao Jia, the Sullen Soldier
Recommended Level: 18
As part of the main story, you'll visit Boddly at the library in Goldpaw. She'll direct you to speak to Gao Jia inside the casino nearby. You'll need to win a skirmish to retrieve something that was stolen from her.

However, the soldier is too hungry to fight and gives you a recipe to take back to Evermore to have made. Go talk to Floyd. If you have the ingredients (you should), make at least one and return to the famished soldier.

Give Gao Jia the om-nom-nomelet to stave off his hunger and complete this side quest. Additionally, he will join your kingdom if you promise to keep bringing him delicious meals.

Side Quest №10 - Bai Gon, the Grizzled Veteran
Recommended Level: 18
As part of the main story, you'll visit Boddly at the library in Goldpaw. She'll direct you to speak to Gao Jia inside the casino nearby. Once you complete side quest nine (see above), Gao Jia will give you the location of two other soldiers within Goldpaw. Head to the northern marker first.

Bai Gon will ask you to defeat three Grimchilla Bangers. Exit Goldpaw and view your map to see a blue circle of where they spawn.

Once you defeat three of them, return to Bai Gon to complete this quest and enlist him into your army and the kingdom of Evermore.
Side Quest Achievements (11-22)
Side Quest №11 - Min Ti, the Sharp Shooter
Recommended Level: 18
After completing side quest 10, head to the southern portion of Goldpaw to the next marker on your map and talk to Min Ti, who also needs a favor, but her's is rather easy.

Fetch her a single sleep-be-gone, which can be found for sale at most towns, including your own kingdom. Return to her with it and she'll join your ranks. For completing this quest, you'll obtain some grass-green thread, which is needed for Side Quest №6 - Pi Chi, the Skillful Seamstress.

She'll be just east of you, so once you recruit Min Ti, bring the thread to her to recruit her as well!

Side Quest №12 - Fai Do, the Downbeat Armorer
Recommended Level: 19
Once you've completed side quest 10 and have relocated Bai Gon to your kingdom, a new side quest will appear in Goldpaw. Fai Do will be standing outside the library, lamenting Bai Gon's disapproval for him not being a warrior like he was.

He wants to prove him wrong by making quality armor, but needs three silver nuggets to repair all his tools prior to relocating to Evermore.

You can find some in the Abyss or on Makronos, but even more easily from your kingdom's mining camp once you upgrade it to level two.

Side Quest №13 - Yung Mein, the Trainee Guard
Recommended Level: 18
In Goldpaw, you should be able to start doing errands for Swift Solutions (see that portion of the guide for more). You need to collect 10 Tokens of Gratitude to start the side quest. Once you turn them in, talk to Yung just noth of Swifts Solutions to recruit her to come to Evermore.

Side Quest №14 - Tabbias, the Trusting Traveler
Recommended Level: 19
After combing the library in Goldpaw with Roland (main story) during Chapter four, you'll exit the main doors and a side quest will be just on the other side of the road in town. A grimalkin named Tabbias was set to protect a traveling merchant and failed.

He'll ask you to travel to Cloudcoil Canyon to Sidewinder Gorge and speak to the main at the start of the area. He'll direct you to Crookneck Cavern, west of Snaketooth Ridge here:
Talk to the questionable merchant in the cave and purchase Tabbias' pack for 1,000 guilder, then defeat the ambush and return to Goldpaw with his stuff in hand.

Tabbias will then join your kingdom for helping him.

Side Quest №15 - Wanted: Exemplary Armor
Recommended Level: 21
To start this side quest, you'll need to have completed both side quest four and side quest 12. Once you have, speak to Fai Do outside the armor shop in Evermore. This side quest mirrors side quest 16 in process, so buy or use some pre-existing iron armor that you have and improve it to level five and return it to Fai Do to complete this side quest.

Side Quest №16 - Wanted: A Well-Good Weapon
Recommended Level: 21
To start this side quest, you'll need to have completed both side quest four and side quest 12. Once you have, speak to Nu Bi outside your weapons shop in Evermore and he'll ask you to bring him a level five or above hybrid bow so he can improve his weapon crafts.

To start this out, research "Level 1 Ranged Weapon Development" so you can make the bow. Craft one using the materials required to make a level two bow, then go to the improvements menu to increase the rate of the bow.

The "star" level is just the rarity of said item and has no bearing on the improvement level, which is denoted by the hammer icon, is what you need to raise to level five. Once you have, speak to Lu Bi to complete the quest.

Side Quest №17 - A Gift for Gao Jia
Recommended Level: 19
Once you have recruited both Gao Jia and Yung Mein to Evermore, speak to Yung at the mining camp to accept this quest. She'll ask you to bring her five scariwinkles so she can give them as a gift to Gao Jia for spear practices they've been having.

You can find them either in Makronos, Coral Cave, the Everday General Store, any of Evermore's fish markets or, if you haven't leveled your kingdom's buildings enough, head to Hydropolis and buy some for 350 guilder each from Bakalario's fish market on the west side of town.

Side Quest №18 - Chi Pi, the Master Carpenter
Recommended Level: 18
Speak to the Taskmaster at Swift Solutions and trade 18 Tokens of Gratitude to start this quest. Speak to Chi Pi in Goldpaw to recruit him to Evermore as your new carpenter.

Side Quest №19 - Ah Chu, the Caring Blacksmith
Recommended Level: 18
Speak to the Taskmaster at Swift Solutions and trade 8 Tokens of Gratitude to start this quest. Speak to Ah Chu in Goldpaw to recruit her to Evermore as your new blacksmith.

Side Quest №20 - Yu Kan, the Kind Teacher
Recommended Level: 18
In Goldpaw, you should be able to start doing errands for Swift Solutions (see that portion of the guide for more). You need to collect 11 Tokens of Gratitude to start the side quest. Once you turn them in, talk to Yu at the top of Goldpaw in Fortune's Square to recruit her to come to Evermore.

Side Quest №21 - Fitch, the Friendly Blacksmith
Recommended Level: 18
Head over to Swift Solutions and trade five Tokens of Gratitude to start this small side quest. Speak to Fitch, who also fled Ding Dong Dell when the coupe took place, and he'll join Evermore and head there.

Side Quest №22 - Long Mein, Ardent Guardsmen
Recommended Level: 25
Once you reach chapter five, Long Mein, a guardsman-in-training will be at the entrance to Goldpaw.

He demands your visitors papers, which you're told don't exist. He'll run off and make you chase him all over Goldpaw trying to speak with him. Once you reach him for the final time, he'll ask you to show your worth.

He'll ask you to defeat a band of Porc Choppers and other critters just outside Goldpaw. It turns into a skirmish battle. Win the fight and return to complete the quest.
See skirmish battle seven for additional information on what to expect from the fight.
Side Quest Achievements (23-34)
Side Quest №23 - Hau Ling's Fall from Grace
Recommended Level:19
South of Fortune's Square in Goldpaw, a fortune teller will read your future, but before he accepts your olive branch to join your kingdom, he needs you to clear his reputation, which has been soured lately.

Head to the casino and start asking questions, then head to the front gate of Goldpaw and talk to the tourist sitting in the middle of the road like a weirdo.

Once you do, find the imposter and chance him around Goldpaw until you corner him. Hau Ling will confront him, thank you and join your kingdom.


Side Quest №24 - Miss Henny's Misfortune
Recommended Level: 23
There will be two young boys in Goldpaw starting from chapter five that will bring up Evan's old tutor, Miss Henny. She went to the Forest of Niall, but they are worried about her due to the plethora of wolves in the area. Head to the forest.

You'll find her surrounded by, you guessed it, a pack of wolves. Dispatch them to complete the quest; Miss Henny will then join your kingdom.

Side Quest №25 - Alice, AKA Mini Martha!
Recommended Level: 22
Once Auntie Martha has moved into Evermore, travel back to her old home and you'll find a young girl there looking for her. Turns out, Martha forgot to mention she moved. However, the girl doesn't buy that you're a king at all and asks you to bring Auntie Martha's favorite food: Country Corn Soup.
Head over to your cook, Floyd, and have him make some up with one loonycorn and two bottles of fresh milk. Return to the cottage and give Alice the soup to finish this quest. She'll then move into your kingdom.

Side Quest №26 - Muuuriellll!
Recommended Level: 21
By chapter five, you should be able to pop on back to the Forest of Niall and speak to one of the Greenlings that let you pass through the forest entrance a while back. They'll mention a girl named Muriel, who was on her way to your kingdom.

She apparently is lost in the Jumblewoods north of the forest. You'll find Muriel at the entrance, but her llapaca has gone missing, so you're new job is to find her llapaca, Paco.

You'll find Paco among various enemies within the woods. Defeat anything nearby and go up to Paco to return to Muriel and complete the quest. She'll then head to your kingdom.

Side Quest №27 - The Hard-Nosed Huntress
Recommended Level: 26
Go defeat Prangles. At least, that is all you have to go by.

Head to Spineshiver Grove northwest of Evermore. Inside is a huntress who won't join your kingdom unless you help defeat this aforementioned "Prangles" in the grove.

Accept the quest and get to killing. Mind the arrows!

Side Quest №28 - Tales of Derring-Do
Recommended Level: 32
By chapter five, you will have the chance to complete this quest. Speak to the portly man just before Swifts Solutions and he'll ask you to defeat a tainted monster called, Conflagra.

Conflagra will appear within the Clamlands on the cliffs of the Sundown Coast. As the name says, Conflagra is fire-based, so bringing water-based attacks and plenty of fire protection will help ease the fight.

Also, make sure to use your "Tactics Tweaker" to boast your fire resistance if you haven't prior to the fight. She has two tactics: one where she does a backflip before propelling herself forward in a ball of fire and the other where she brings her hands together and shoots a fireball.

If you pay attention to her movements, they are easy to dodge; if you don't they can easily do 500-1,200 damage. I defeated her by abusing Roland's "Circular Sword" ability since it knocks her down every time, giving you time to dish out damage safely.

Once she is defeated, return for your reward.

Side Quest №29 - High-Speed Hot Streaks!
Recommended Level: 19
By chapter five, you'll be able to visit Master Chow Chow at the Sweet Saffron Tea House at the base of Goldpaw. He'll mistake you for a delivery boy; deliver the noodles to three residents of Goldpaw! No, seriously, you have three minutes. Chop chop!

Once you deliver the spicy noodles, return to Master Chow Chow for your reward: a cook book full of recipes!

Side Quest №30 - The Seeds of Righteousness
Recommended Level: 23
By chapter five, you should have a marker for a mother and her son who were making their way to the shipyard and were attacked by a rogue monster. Head over to Goldpaw and speak to her to accept the quest. You can find the creature here, south of Goldpaw along the shoreline:

Side Quest №31 - Bandits at the Boarder
Recommended Level: 25
Speak to Chingis in Evermore to begin this quest. Do note, if Chingis is in the middle of town outside the castle (i.e. you have started side quest 184 "The Labyrinth"), you have to defeat the tainted monster "Femurus" in the Rubbly Ruins.

Unless you do, Chingis will not give you this quest and will stay in this area. Once Femurus is defeated, he will move to the farm and have this quest available for completion.

Speak to Chingis and he'll give you a letter addressed to Evan about a former foe looking to take over Evermore. A skirmish will now become available once you speak to the scout outside Evermore.

Win the skirmish to complete the quest.

Side Quest №32 - Baby Higgledy's Big Adventure
Recommended Level: 23
Once Auntie Martha joins Evermore, speak to her to accept this quest; she lost a brand new Higgledy and needs you to go to Crosswater Cavern to fetch them.

When you head here, you'll need to have access to the "Bridge" spell to access the cave. Inside is one treasure chest (#126) and a Higgledy stone (#12) within the cavern.

Side Quest №33 - Higgledy Hide-and-Seek
Recommended Level: 21
Once Alice joins your kingdom (see Side Quest №25 - Alice, AKA Mini Martha!), speak to her about locating five lost Higgledies that have run off. They didn't run far, but if you can't find any of them, the five missing Higgledies are located here:
Return to Alice, who will say there is one more outstanding, which can be found behind Evan's throne in the castle.

Side Quest №34 - Going at it with Goldpaw
Recommended Level: 25
Once you enter Chapter five, you'll be able to accept this quest from Min Ti in your kingdom. She's there to pass a message along that Goldpaw wants to do a mock battle to practice battle tactics and whatnot.

Once you accept it, a banner will appear outside Goldpaw in the Calmlands. It's a great way to build experience and level up your platoons because the battle is so long compared to others you've done to this point.

You can also repeat it as well, so it makes a decent place to build up new arrivals to your army from time-to-time.
Side Quest Achievements (35-45)
Side Quest №35 - Fun with Fungi
Recommended Level: 20
Once you recruit Miss Henny (see side quest 24) to Evermore, speak to her to start this quest. She'll ask you to help her with a test about fungi she's giving in class. If you start it right away, you won't have the proper mushrooms to give her, so hold off for now.

Once you do, talk to her again to take the test. The first mushroom she'll quiz you on is a "Toadstool", so bring her one to answer the question correctly. The second mushroom is a "Bluesky Buttontop".

The last one she needs you to bring is a "Cutesy Pop". Cute, pink and downright awful tasting! After turning in the third mushroom, you'll have completed this side quest.

Side Quest №36 - Against the Grain
Recommended Level:20
Speak to Muriel at the llapaca farm in Evermore once she joins your kingdom (see side quest 12 for more). She wants to upgrade the fence around her farm with some better wood.

She'll ask for five logs of fine-grained lumber. You can get some from the Pinwheel Flats, Fathomless Forest, trade tokens at Swift Solutions for some, or from your lumberyards in Evermore eventually.


Once you have the lumber, return it to Muriel to complete this side quest.

Side Quest №37 - Tiller, Long-Distance Rower
Recommended Level:25
Once you free everyone from danger and the shipwrights return to Capstan-upon-Hull, speak to the man by the fire pit. He plans to row around the world, but you convince him otherwise and he takes off to a nearby beach.

Hop in your boat and head to Starboard Island just south of where you are now and speak to Tiller. He'll then make his way out to Hydropolis on a neighboring island. Speak to him there and he'll move on towards a cave up northeast.

The cave is called Crawlspace Cave and it is west of Broadleaf, but you can't access it from there. You'll have to reach it by boat from the other side from something like Hydropolis. Bring one four-leaf soraway with you, as you'll need it for Triller.
Once you rescue Tiller, return to Capstan-upon-Hull and speak with him. Tiller will then join Evermore as a new shipwright.

Side Quest №38 - Sick of Sandals
Recommended Level:28
Once you rescue everyone that lives in Capstan-upon-Hull, speak to the cobbler in the back of the yard. He's willing to move to Evermore if you can show him his business of shoe repair will thrive. Head back to Evermore and craft at least 25 different armor items at your Evermore Outfitters shop.

You have to create 25 different items; anything you've already made will count towards the total, so anything that has a checkmark by it counts towards this side quest (even if made before accepting it). Once you make 25 or more formula, talk to Crispin and he'll move to Evermore.

Side Quest №39 - The Chicest of Shoes
Recommended Level:25
Once you complete side quest 38, speak to Crispin outside the outfitters shop and offer to help him finish a pair of shoes. You'll need five lengths of chic ribbon, which can be obtained through Swift Solutions, or located in Pinwheel Flats, the Facotry Floors of Broadleaf or even from your general store via your bazaars.

Side Quest №40 - Bao Wao the Street Trader
Recommended Level:26
By Chapter six, in Goldpaw, you'll find a street trader with a side quest for you. Before you do anything, he'll ask you for 10,000 guilder for a special souvenir. Hand over the money and he'll give you "special yaht peas".

He'll quickly run off since you've clearly been swindled. Go chase him. Once you track him down, he'll return your money and explain his situation. Now you'll need to head to Floodfall Cave to find the real magic yaht peas he speaks of...
Head to the cave via your ship and collect them in the area marked on your map. Return to Goldpaw and deliver the peas and Bao Wao will apologize and eventually become a citizen of Evermore.

Side Quest №41 - Ringing Around
Recommended Level:25
This side quest is actually part of the main story once you reach Hydropolis. The trade Peleus will ask you to make three deliveries for him in exchange for a red coral ring.

Side Quest №42 - Daddy Come Home
Recommended Level:44
Once you rescue everyone in Capstan-upon-Hull, speak to Keeley at the entrance to the area who is waiting for her dad to return from a voyage. She said he was heading to the Drylands and has never returned.

You'll need to travel to Crackskin Cavern, but before you can do that, you'll need to advance the main story far enough to take possession of the Zeppelin from Broadleaf. Until this, put this side quest on the backburner. You can find the cavern here:
Once you have access to the cave, you'll also need to learn "Spirit Medium" to be able to speak to the wandering spirit in the cave. Once you do, you'll learn that Keeley's dad has been killed, but he asks you to defeat the monster that killed him and return his necklace to her back in Capstan-upon-Hull.

Exit the cave to find the monster in question. Klogg is extremely tricky, so adjust your tactics bar accordingly, stock up on healing, physical defense food and get ready for a tough fight. He hits extremely hard, is extremely fast and has a huge HP pool.

Once you defeat Klogg, return to Keeley's dad in Crackskin Cavern, then talk to Keeley in Capstan-upon-Hull to complete the side quest.

Side Quest №43 - Filippos, the Novice Hunter
Recommended Level: 33
Once you reach chapter six, you can visit Swift Solutions and trade 30 Tokens of Gratitude to start this side quest.
Filippos is will only become available after the events conclude in Hydropolis and you bring Leander into your kingdom as a Junior Consul member under Roland.

Once you do, visit Filippos by the docks in Hydropolis and he'll join your kingdom as part of your Explorers Guild.

Side Quest №44 - Pontus's Ocean of Knowledge
Recommended Level: 34
After you save Hydropolis, one of the newly available side quests will be from an oceanographer named Pontus. He mistakes you for someone that wants to be his assistant and asks you to complete a few tasks for him:

Obtain a poisonous fish "Blimpfish" from the fish market in Hydropolis for 1,000 guilder, one pincushion coral that can be found in Makronos or the Aybss if you haven't received any from your collections in Evermore and finally some seasilk from Fresh Fish Market in Evermore.


Side Quest №45 - Glaucus, the Ambitious Angler
Recommended Level: 34
To recruit Glaucus to Evermore, you'll first need to complete side quest 57. Until then, you cannot exchange Tokens of Gratitude at Swift Solutions for his assistance at Evermore. If you've already completed the side quest, speak to him at the harbor in Hydropolis and he'll join the kingdom of Evermore.
Side Quest Achievements (46-57)
Side Quest №46 - Thaumas, the Suave Sorcerer
Recommended Level: 33
Upon entering chapter six, visit Swift Solutions and trade 29 Tokens of Gratitude to be able to accept this side quest. Thaumas can be found in Hydropolis, in the Kardia Square.

Fast travel there and you can't miss him...since he is surrounded by women fawning over him now that the love ban has been lifted.

Side Quest №47 - Peleus, the Amiable Armorer
Recommended Level: 33
Head over to Swift Solutions starting from Chapter six onward to trade in 32 Tokens of Gratitude to unlock this short side quest for a new citizen of Evermore. Speak to Peleus at the market in Hydropolis and he'll join your kingdom.

Side Quest №48 - A Career Cut Short
Recommended Level:39
Once you save Hydropolis and enter chapter six, speak to Nereus east of Swift Solutions in Hydropolis to learn he has lost his singing voice to a witch who resides on Makronos, an island just southeast of Hydropolois.
You'll be battling the tainted monster Scintilla to retrieve the stolen voice. See that section for more on the monster itself. Once you defeat them, return to Nereus to complete the side quest.

Side Quest №49 - Proteus, the Gloomy Jeweler
Recommended Level:34
Head over to any Swift Solutions after saving Hydropolis and trade in 20 Tokens of Gratitude for Proteus to join Evermore. Speak to him at the lower levels of Hydropolis and he'll make his way to your kingdom.

Side Quest №50 - Triton, the Honest Scholar
Recommended Level:33
By chapter six, you can visit any Swift Solutions and trade in 22 Tokens of Gratitude to unlock this side quest. Triton can be found in Hydropolis.

Side Quest №51 - Speio, Priestess in Training
Recommended Level:39
In the palace chambers of Hydropolis, a young girl named Speio is tasked with seeking the "Sea God's Trumpet" and has asked for your assistance to help her do that. Head to Leucippes' Labyrinth to meet up with Speio, which will then open up a skirmish you'll need to complete in order to continue on with the side quest.
Once you win the skirmish and locate the Sea God's Trumpet, return to Hydropolis to find a solution to the seashell's deterioration.

To remedy this, head back to Evermore; if you haven't already, level up your Spellworks building to at least level three so you can learn the spell "Rejuvenate". Once you do, return to Hydropolis. Evan will repair the Trumpet and Speio will become an Evermore citizen.

Side Quest №52 - Helena, the Hearty Hunter
Recommended Level:33
Once you free Hydropolis and enter chapter six, you can speak to the Taskmaster at Swift Solutions and trade in 24 Tokens of Gratitude to unlock this side quest. Helena can be found cooking in the city of Hydropolis.

Speak to her and she'll join Evermore as both another skirmish party for battle and as help towards any hunting lodge.

Side Quest №53 - Lycorias, the Doughtful Guard
Recommended Level:43
Head inside the palace of Hydropolis and speak to one of the guards there. She's duty-bound to guard the queen, but wants to stop a monster from terrorizing the island of Makronos. As always, leave that to Evan and co.

The monster is a tained monster by the name of "Dampo", who appears on a smaller island east of Makronos once you accept this side quest. You can find the monster here:

Side Quest №54 - Hansel, the Fanciful Gardner
Recommended Level:33
Once you free Hydropolis and enter chapter six, you can speak to the Taskmaster at Swift Solutions and trade in 16 Tokens of Gratitude to unlock this side quest. Hansel can be found in the Forest of Niall.

Speak to Hansel there and he'll move into Evermore.

Side Quest №55 - Secret Sweet Tooth
Recommended Level:36
After finishing chapter five, re-visit Goldpaw and speak to a citizen north of the casino, who will ask you to fetch him something sweet; it is called a rosehip tart. You cannot even begin this quest until after you've finished the entire game.

Once you have, you'll gain access to Side Quest №160 - Dekkah's Grand Tour. Complete this side quest to obtain a recipe book that Floyd can make the tart from. All the ingredients are easily obtained in Evermore. Head back to Goldpaw to finally finish this long-standing side quest.

Side Quest №56 - Unfun Fungus
Recommended Level:40
Once you save the ship builders of Capstan-upon-Hull, one of the quests come from a man who loves his mushrooms, but needs you to cull an invasive species of the same. Head over to Eert Grove outside of Goldpaw.


On arrival, you'll find a lone tainted mushroom. Follow it into the end of the grove to find a large, tainted monster.

Once you encounter Abnorma (see that tainted monster section for more), you'll need to defeat the monster to end the spread of the invasive species. Keep in mind that this tainted monster can be quite bothersome to deal with, so save prior at the save spot nearby before challenging it.

It is very easy to die unless you're drastically overleveled.

Once you do, return to Capstan-upon-Hull, speak to the man and you'll complete the quest.

Side Quest №57 - The Way to a Man's Heart...
Recommended Level:34
Once you've saved Hydropolis, talk to Sibylla, a troubled woman who will ask your help in seeing if a local fisherman will reciprocate her interest in him.

Oddly enough, the man she admires it right by her, so go over and speak to him, trhen return to Sibylla.

She'll decide to cook him something to show him she cares and asks you to bring her a cuttyfish, which can either be found at sea from resource spots scattered about, or from your Everyday General Store in Evermore once you have your fish markets up and running.
Side Quest Achievements (58-70)
Side Quest №58 - The Best Seafood in Seatown
Recommended Level:34
By chapter seven you can stop by the Taverna Kalamari in Hydropolis and speak to the woman out front for this side quest. She'll ask for both socktopuses and splendid squid to make a meal for you.

You can find the squid in various locations while traversing the ocean or near the water, or earn them from Evermore's Fresher Fish Market, Freshest Fish Market or Fine Fish Market. Socktopuses can be found from the same as well.

Side Quest №59 - By Hook or By Crook
Recommended Level:34
After completing chapter five, head to Hydropolis' docks to find a fisherman with the need for some help. He lost his line and hooks and fears he's in trouble by a merperson due to fishing in restricted waters.

He asks you speak to his pursuer. You can find her by the fishery west of town in the corner by the shop. Speak to her, then return to the fisherman. He'll request you help him obtain the three gold nuggets needed to complete his work.

You can forage for them in the Drylands or Blowtorch Cave, get them from your mining camps in Evermore (Mining Camp 1 doesn't produce them, just the other two) or the Everday General Store. Additionally, you can trade 10 Tokens of Gratitude for one from Swift Solutions.

Return with the gold to the fisherman and his admirer will follow you, ending the sidequest.


Side Quest №60 - Who's the Big Boss?
Recommended Level:37
West of the Forest of Niall is a cave known as Greenglade Cave. Inside you'll be tasked with removing an invasive Porc that took it over. Head into the deepest part of the cave to find him. You can find the cave here as well:
Once you've defeated the "Big Boss", return to let them know to complete this side quest.

Side Quest №61 - Fangs for Everything
Recommended Level:39
Once you've recruited Helena from Side Quest №52 - Helena, the Hearty Hunter, speak to her in Evermore and accept this side quest to gather some fish for her. Head to Leucippes’ Labyrinth and speak to the soldier on the shoreline for more information.

Once you do, a skirmish will appear. Enter the level 25 skirmish.

Side Quest №62 - Skirmish With the Sea's Finest
Recommended Level:39
Speak to Lycorias (once recruited) in Evermore to accept this side quest for a joint skirmish with the army of Hydropolis. Head to Leucippes' Labyrinth and talk to the Hydropolitan soldier there to unlock the skirmish. Win the battle to complete the side quest.

Side Quest №63 - Tasy Treats Among the Trees
Recommended Level:36
Once you recruit Filippos (see side quest 43) and Moggie May (see side quest 27) speak to him in Evermore. He wants to take up cooking while out with Moggie, but needs help learning.

He asks if you could fetch him some Hydropolis Stew, which, if you want to be quick about it, can simply be bought in Hydropolis at the vendor by the docks for 1,300 guilder. Once you've collected some stew, return to Filippos to complete the quest.

Side Quest №64 - A Most Distressing Dream
Recommended Level:34
Speak to Speio once she has joined Evermore. She'll ask you to locate a distressed citizen in Evermore, who happens to be Long Mein. Head to whichever area you have him staffed in and talk to him (check your citizen roaster to see his appointment area). Usually they wonder around near their assigned building.

Speak to Long Mein, learn of his silly antics and he'll tell you he needs five venom-be-gones because he ate a bunch of poisonous mushrooms like a goof. Return the medicine to him to complete the side quest.

Side Quest №65 - A Love Supreme
Recommended Level:34
In order for this quest to even appear, you'll need to do two things: have Thaumas recruited to your kingdom, as well as crafting a "lullaby lance" from the weapon shop.
Once you have done both, speak to him where ever you have him assigned to accept the side quest. Now, all you need to do is bring him some heavenly wonderwater.

You can find it in the Rolling Hills, Tumbledown Shrine and in Evermore from the Mining Camp No. 4/Mining Camp No. 5. Just make sure to staff your mining camps and upgrade them so they start producing the item needed.

Side Quest №66 - Triton's Lost Treasure
Recommended Level:35
If you've recruited Triton and placed him in one of the buildings in evermore (see Side Quest №50 - Triton, the Honest Scholar), you can speak to him to accept this side quest to locate his missing book. It will be to the left of the Evermore Outfitters; it will be a glowing blue dot.

Side Quest №67 - A Cuttyfish Above
Recommended Level:34
To even have a chance at this side quest, you'll need to craft 30 different weapons from the Evermore Weaponshop. Once you do, Peleus will be outside its doors and ask you to bring him ten fresh cuttyfish to make a...weapon...?

Cuttyfish can be earned from the Fresh Fish Market in Evermore, or around any body of water using your ship. Either way, return once you have ten of them. and you'll complete this side quest and unlock the ability to make these weird little swords for yourself.

Side Quest №68 - You Can’t Make an Omelet…
Recommended Level:34
Speak to Persha in Evermore once she has joined your kingdom. She'll talk to you about breaking her best frying pan and needs ten steely nuggets to bring to Evermore's blacksmith to make a new one.

You should have these already, but if not, trade some Tokens of Gratitude at Swift Solutions, or assign someone to Mining Camp No. 1 to harvest some over time.

Once you have them, return to Persha to complete the side quest and unlock the ability to make a weapon based on the frying pan called the "Foolproof Pan".

Side Quest №69 - Daphne, Glaucus's Biggest Fan
Recommended Level:40
Upon entering chapter seven, you can stop by Swift Solutions and trade 18 Tokens of Gratitude to unlock this side quest. Speak to Daphne in Hydropolis and she'll instantly join Evermore.

Side Quest №70 - Sense and Sensibilities
Recommended Level:41
In Hydropolis, once you progress the story past chapter six, speak to a woman named Halimede in Kardia Square. Before she joins Evermore, she'll ask you to bring her several assorted hueblooms of different colors. She'll want:

  • Sapphire huebloom
  • Citrine huebloom
  • Amethyst Huebloom

Some of these can be purchased in Evermore depending on your kingdom's output of resources; if not, you can pick them up from Swift Solutions as well.
Side Quest Achievements (71-83)
Side Quest №71 - Thetis, Medicinal Merperson
Recommended Level:42
Upon entering chapter seven, head to Hydropolis for additional side quests. One will be from a doctor, Thetis, who is healing a patient inside the inn there. Speak to her and she'll ask you to fetch an ingredient for her: a jar of deep seawater.

Hop aboard your airship and head to Cosy Cove, where the cave is located.
There is a trip door there you can access for later as well. Head inside and collect it, then return to Thetis to complete the quest.

Side Quest №72 - Chip, the Child Prodigy
Recommended Level:41
Starting from chapter seven, speak to the confused robot by the entrance of the city of Broadleaf and accept their package to be delivered to a researcher named Chip. Travel to Midtown and up the staircase to his office.

Once you deliver it, he'll ask for two jars of oasis water as well, which you probably have tons of at this point. Afterwards, he'll also ask for three dark crystals.

Bring him these items to complete the quest and recruit Chip to Evermore as well. Dark crystals can be found in the Pinwheel Flats, or Factory Floors nearby. Oasis Wonderwater can be found on Makronos or inside the Abyss. You can also get them from your mining camps (#1, #2) in Evermore.

Side Quest №73 - Oz Wants Out
Recommended Level:44
After saving Broadleaf, head to the entrance to the city and take a right. You'll see a quest marker on the left and enter a cutscene. A security guard is trapped after the system went down and needs you to access the security lab to unlock the door so he can get out.

Head to the security room between Dyna Floors 2 & 3, trigger the security drones by forcing the door open, defeat the response team and use the terminal to unlock the door. Return to Oz to complete the side quest.

Side Quest №74 - Price's Delayed Deliver
Recommended Level:46
Head to Broadleaf and take the elevator to Midtown. Speak to Price at the restaurant to learn about a delivery that has gone missing.

Your first clue is possibly in Goldpaw where the robot with the delivery was supposed to stop at. Head to Goldpaw and, just outside it, talk to the robot just over the Crossover Bridge. It'll ask for your help traveling through bandit territory safely.

Once you finish talking, a skirmish will appear in its place.

To complete this side quest, you'll need to win the skirmish, which involves you escorting two robot groups through bandit territory without either group being completely wiped out. It's a short mission, so I'd recommend always going out in front of the groups and taking the brunt of the damage.

The robot battalions aren't very strong on their own. Once you complete it, speak to Price to complete the side quest.

Side Quest №75 - Kent, the Magical Ore Analyst
Recommended Level:45
Once you save Broadleaf, speak to Kent, who is at the entrance of the city, right by where you talked to Oz in the above side quest. He needs you to head to Crawlspace cave and retrieve his stolen tablet [memolith] so he can continue his work.

The tainted monster that stole it is actually just north of the cave itself. Upon accepting this side quest, the monster will spawn. Until then, you cannot defeat or even fight the monster. You can find it here:
Defeat the monster to obtain the stolen goods; head back to Broadleaf and complete the side quest.

Side Quest №76 - An Upgrade for Andy
Recommended Level:40
Right next to side quest №73, speak to this robot in Broadleaf to accept a quest to defeat some marauding BL-Itzer 2.0 that stole all the new processor upgrades for the city's robots.

You can find the rampaging robot among the testing floors of the Factory Floors. Defeat the robot to obtain the missing processor; return to Andy to complete this quest and have Andy join the kingdom of Evermore as well.

The robots are taking over!

Side Quest №77 - Kimmy, the Cool-Headed Cop
Recommended Level:40
Once you complete Side Quest №78 - Robot on the Run, head to Swift Solutions to accept this side quest for an exchange of 21 Tokens of Gratitude. Kimmy won't be available to recruit until then.

Return to Broadleaf and speak to Kimmy in Midtown; she'll pack up and move to Evermore.

Kimmy will also give you access to another skirmish battalion when doing skirmish battles as an added bonus.

Side Quest №78 - Robot on the Run
Recommended Level:46
Right next to Chip and side quest #72, in Broadleaf, you can find Kimmy and other scientists scrambling to locate a new assault droid, BL-Ivion.Upon asking, they'll recruit your help disposing of...but it ran away. You can find it west via your airship here:
BL-Ivion is a tainted monster and quite tricky to deal with. If you'd like to know more, see that portion of the guide for more. Once you defeat the robot, return to claim your reward.

Side Quest №79 - Candy, the Spirit-Seeker
Recommended Level:46
Once you enter Chapter seven, talk to the Taskmaster at any Swift Solutions to accept this side quest to recruit Candy, another person who can see Higgledies. She can be found in Broadleaf and will join upon speaking with her.

Side Quest №80 - The Search for Eternal Youth
Recommended Level:44
Complete Side Quest №79 - Candy, the Spirit-Seeker and then speak to Krystal in Broadleaf outside the Dome Park. She wants you to cast "Rejuvenate" on her as an experiment. If you haven't already, research the spell from your spellworks in Evermore and return.

Cast the spell to complete the side quest.

Side Quest №81 - Brodie's Last Big Job
Recommended Level:44
Once you've saved Broadleaf and entered chapter seven, head back to the Factory's Dynafloor #1 and speak to Brodie in the archives facility. He'll ask you to decommission five old model robots for him so he can make his way to Evermore.

The first batch of them are located on the second floor. Flip the red switch when you enter the room to gain access to them. Now head to the third floor and you'll find the last three up on a ledge to your immediate left.

Once you defeat all five, return to Brodie. Brodie will move to Evermore and you can now complete side quest #94 if you've already activated it.

Side Quest №82 - Rumpel, the Village Vet
Recommended Level:47
Head over to Glendale Cave, west of the Forest of Niall:
Speak to the Grimalkin inside to start the side quest. His good friend, Flappy, is ill and needs help. Flappy, unbeknownst to you, is a giant, tainted dragon.

Side Quest №83 - Lady Forget-a-Lot
Recommended Level:40
Once you enter chapter seven, head back to Goldpaw and speak to the woman with the side quest marker near the front of town. She has lost her purse.

A general location is near the Lucky Lotus. Head there and speak to the three residents she gave you a description of, then speak to the mermaid from Hydropolis one more time to retrieve the purse and return it to the woman.
Side Quest Achievements (84-94)
Side Quest №84 - Head-to-Head in Hydropolis
Recommended Level:40
When you enter chapter seven, head to Hydropolis to find a quest icon and two sky pirate children who refuse to return to the pirate's base unless you beat them in a race. He'll be much faster than you in a straight on race, so you'll have to take a shortcut.

The line in red is your route, the purple is the route the kid will take. Follow this route to win the race and complete the side quest:

Side Quest №85 - Green Fingers, Idle Hands
Recommended Level:42
After saving Broadleaf, speak to the quest marker west of the entrance to the city. He'll ask you to find out who is in charge of the plant-life in Broadleaf. Take a trip to Dome Park and speak with the environmental officer there, then return. You'll need to find some Breatheasy plants for the worker.

They can be found in Spineshiver Grove in the Heartlands, northwest of Evermore, over the bridge in the clump of trees at the end (past the manticore spawn).

Side Quest №86 - Bulking Up Batu-Style
Recommended Level:41
Once you've saved Broadleaf, you can accept this quest from Jared, who will speak to Batu about bulking up. Batu wants you to bring him the following:

  • Lean Meat
  • Fresh Milk

Both items are extremely common, so you should have plenty of them by now. If not, you should be making them from your shops in Evermore. Once you do, you'll complete the side quest shortly after.

Side Quest №87 - Do You Believe in Higgledies?
Recommended Level:41
In Broadleaf, in their sleeping quarters, you'll find a woman and child not too far from the entrance of the city. She wants to show her daughter her favorite Higglety; the problem is that she cannot she them to do so and asks for your help.

Head back to Evermore and, if you haven't done so already, cook of the following Higgledy and return:

Side Quest №88 - A Matter of Taste
Recommended Level:41
In lower Midtown in Broadleaf, speak to the lady at the table by herself to start this side quest. You'll need to bring the robot some "middling meat", which you should be able to just pick up from Evermore if you don't already have a bunch on you. Next, bring the robot some "tender tripe".

With both ingredients delivered, he'll make the meal and complete this quest.

Side Quest №89 - At the Cutting Edge
Recommended Level:41
Speak to the group of three women in Dome Park in Broadleaf. You'll need to bring them some interesting trinkets you find on your travels. First, bring Briana a littlehorn shell, which can be found in Makronos, from your Fine Fish Market, or trade 20 Tokens of Gratitude to the Taskmaster at Swift Solutions for one.

Next bring Brooke a coral huebloom, which you should have plenty of at this point. If not, you can buy some in Evermore at your general store, or pick some up around the Rolling Hills or Cloudcoil Canyon.

Lastly, Krystal will ask you for a Dream Prism, which can be earned from Mining Camp №5 in Evermore, or purchased for 50 Tokens of Gratitude at any Swift Solutions.

Side Quest №90 - Tyran 4 Evermore
Recommended Level:42
Speak to Chingis in Evermore (assuming you've already finish side quest 31) to accept this side quest. Tyran is back at it and wants to dish it out with Evan in another skirmish for Evermore. Speak to the soldier right outside the kingdom to open up this skirmish.

Defeat the skirmish "Tyran's Lucky Country" to complete this side quest.

Side Quest №91 - The Great Higgledy Hunt
Recommended Level:42
Once you've recruited Cindy May to Evermore, you'll eventually be able to speak to her about her missing yarn balls. There are a total of five missing that have been scattered about Evermore. Locate the five roaming Higgledies to retrieve the yarn balls back.

Once you have all five, return to Cindy May to complete this side quest.

Side Quest №92 - Big Unveiling in Broadleaf
Recommended Level:46
Once Oz has been recruited and assigned a station in Evermore (see side quest №73), speak to him and accept an invitation to Broadleaf to test out their latest robots. Speak to the soldier outside of Broadleaf to gain access to a skirmish.

Win the fight to complete this side quest. You can find the skirmish here:

Side Quest №93 - New Model Armor
Recommended Level:43
After completing Side Quest №15 - Wanted: Exemplary Armor, return to Fai Do and accept his next quest. Bring him a Chieftain's Cloak, rank 6 or above and afterwards he'll ask for some Brute's Boots of the same rank to go with the heavy armor. You'll need to make sure at the armor shop if you haven't found any from fighting; to do so, you'll need to have researched "Level 4 Armor Developement" from the Evermore outfitters.

Side Quest №94 - Seeking Superior Weapons
Recommended Level:43
Once you expand your kingdom to level three, you'll be able to accept this side quest and should have enough citizens/upgraded resource gathering facilities to have plenty of the required ingredients.Speak to Nu Bi just outside the weapons shop to start this side quest.


Craft the spear from your weapons shop in Evermore, then increase the stats on it to maximum (5/5). Return to Nu Bi with the spear and he'll explain he can't decipher the craftsmanship. You'll offer to bring in a weapons expert to help him learn. You'll need to complete side quest 81 now (see that side quest for further).

Once you recruit Brodie to Evermore from the quest, return to Nu Bi and talk to him.
Side Quest Achievements (95-106)
Side Quest №95 - Da Xing, the Haughty Herbalist
Recommended Level:42
Once you've made it to the start of chapter eight, speak to the Taskmaster and trade 23 Tokens of Gratitude to unlock this side quest. Da Xing can be found in Goldpaw and will join your kingdom upon talking to him.

Side Quest №96 - Yip-Yip, the Master Tailor
Recommended Level:42
Once you've made it to the start of chapter eight, speak to the Taskmaster and trade 33 Tokens of Gratitude to unlock this side quest. Yip-Yip can be found in Goldpaw and will join your kingdom upon talking to her.

Side Quest №97 - Mylas's Big Adventure
Recommended Level:43
Speak to Mylas by Swift Solutioons in Hydropolis. Evan invites him to his kingdom, but he has been barred from ever leaving Hydropolis, so you need to go talk to his parents to find out why. Directly next to him is the door to his home; his mother is just inside.

She'll grant his wish if you bring her three bolts of seraphic silk so she can make him some protective outfits for his travels. You can easily obtain them just next door for 15 Tokens of Gratitude per bolt of silk. Head over to the Taskmaster if you don't have three of them.

Side Quest №98 - Ladies Love Fabulous Phorkys
Recommended Level:46
After chapter seven, speak with the guard, Phorkys, in Hydropolis; he'll be the one surrounded by women in Nautes Harbor.

For Phorkys to join, you will need to achieve a "Rank A" rating for your army. To view your raank in any given category, go to Evermore and view your kingdom's details via the castle.

Here you can see the rankings as shown to the side. To increase your rank for your military, recruit other citizens that favor fighting, assign them to your war-related building and begin researching perks, bonuses and research that is available.

The better you make your army, the higher the rank. Once you reach Rank A, speak to Phorkys and he'll join Evermore. If you already achieved it prior to accepting it, he'll join right away.

Side Quest №99 - Hipponoe, the Shy Artist
Recommended Level:43
Out in the furthest section of Hydropolis, you'll find Hipponoe. She's painting something, but requires a color-changing egg to finish her work.

Accept the quest. First, you'll need to bring her a Jazz Egg, which can be found both from your Everyday General Store (if you don't have a bunch already), or from Swift Solutions.

Return it to her and she'll ask for a special type of colorful delicacy that is only colorful once sliced open: Sweet Dream Truffles. You should be able to pick them up the same as the Jazz Egg. The truffle can also be found in the Forest of Niall, or from staffing someone at your Flourishing Lumberyard.

Finally, meet her at the rendezvous point at the harbor, just past your ship and she'll join your kingdom and complete the side quest.

Side Quest №100 - Sybilla, the Decisive Diver
Recommended Level:42
Once you've made it to the start of chapter eight, speak to the Taskmaster and trade 25 Tokens of Gratitude to unlock this side quest. Sybilla can be found in Hydropolis and will join your kingdom upon talking to her.

Side Quest №101 - Drew, the Capable Cop
Recommended Level:42
Once you've made it to the start of chapter eight, speak to the Taskmaster and trade 28 Tokens of Gratitude to unlock this side quest. Drew can be found in Broadleaf and will join your kingdom upon talking to him.

Side Quest №102 - Eli, the Dapper Designer
Recommended Level:42
Once you've made it to the start of chapter eight, speak to the Taskmaster and trade 40 Tokens of Gratitude to unlock this side quest. Eli can be found in Broadleaf and will join your kingdom upon talking to him.

Side Quest №103 - Brooke, Committed Careerist
Recommended Level:46
If you've completed Side Quest №89: At the Cutting Edge, speak to Brooke in Broadleaf. She'll join Evermore if you show her its an equal opportunity kingdom.

If you haven't, complete side quest №11 as well; it is needed to recruit Brooke. return to Broadleaf and speak to her. She'll join up as another sword-based battalion for your kingdom.

Side Quest №104 - Briana, Bold Weapon Designer
Recommended Level:42
After completing Quest №89 - At the Cutting Edge, accept this quest from Swift Solutions by trading in 26 Tokens of Gratitude. Speak with Briana near Dome Park in Broadleaf to complete this quest.

Side Quest №105 - Francine, the Impresario
Recommended Level:42
After completing chapter seven, head to the Taskmaster and pick up this side quest for 36 Tokens of Gratitude.

Francine will be at the entrance to Broadleaf once you accept the quest from Swift Solutions. Speak to Francine in Broadleaf and she'll move to Evermore.

Side Quest №106 - The World's Best Buyer
Recommended Level:44
Head to Midtown in Broadleaf and make a right over to the restaurant. On the other side of the kiosk, speak to the man there and he'll talk to you about some rare, never-before-seen items from a buyer named "Morgan".

Speak to the robot manning the self-defense kiosk on the other side of Midtown and it'll tell you Morgan ran off to a town harbor. Head to Capstan-upon-Hull.

Talk to Morgan and buy the songbook for 5,000 guilder. Next, Morgan will tell you to head over to the Rolling Hills and take the Zippelin to the top (see map). You'll need to look exactly where the marker shows and pick up the incredibly tiny blue orb.

Retrieve it and return to Morgan in Capstan-upon-Hull. Morgan will join Evermore and even stock your general store with new and improved healing items for battle.
Side Quest Achievements (107-119)
Side Quest №107 - Furnest, the Inscrutable Author
Recommended Level:42
Starting on chapter nine, head over to any Swift Solutions vendor. Go to the errand board and look for specific errands asking you to bring material, but the ones asking for one of each item. An example is something like this:
Once you completed a handful of these tasks, talk to the Taskmaster again and he'll tell you something new for a change.

The Taskmaster will only tell you about this mysterious character once you've done enough.

You'll know because the next time you meet him, he'll tell you the following shown below. Once you recieve this message, head to Ding Dong Dell and talk to him.

He'll then move to Evermore.


Side Quest №108 - Wolf-Poker Incarnate
Recommended Level:43
In Capstan-upon-Hull, hear the docks at the end of the shipyard, a name claiming to be the reincarnation of a once powerful canine fighter. He tells you he's off to go poke some wolves as proof of his strength, so Evan is tasked with preventing him from being eaten alive. What a dolt...

Track him to the Hidey-Hole Cave by the beach and defeat the pack of Hedgehounds to complete the side quest.

Side Quest №109 - Return to Center
Recommended Level:50
Speak to the girl in front of the tavern in Emporion Market at the docks in Hydropolis. She needs you to investigate what appears to be a love letter-type poem she mysteriously received.

You can find the letter's author in Hydropolis. Through the power of poor communication, you'll be dragged into defeating a tainted monster to show you're no coward. Head to Leucippes' Labyrinth to find Akhelios; defeat this monster and return to Hydropolis to complete the quest.

Side Quest №110 - Drakon in Distress
Recommended Level:46
In Hydropolis after chapter seven, you'll find a girl who needs help looking after her pet lizard that is in Coral Cave. Her mother forbids her from returning due to the supposed danger the lizard poses. You'll need to head here to find said lizard:

Side Quest №111 - Three Minute Steaks
Recommended Level:42
Head to Broadleaf and speak to the Robo Chef to accept a delivery side quest. This side quest will become available after completing chapter seven.

  • Take the elevator to the upper floor and past the Dome Park will be a kid with a red shirt. Give him a steak.
  • Return to the entrance and give the next steak to the lady by Swift Solutions.
  • Finally, head back to Chef Robo, go up the stairs by him and deliver the final steak to the man at the balcony.

Return to the robot to complete this side quest.

Side Quest №112 - Healing Rifts with Higgledies
Recommended Level:45
The girl from Side Quest №87 needs another favor. By chapter eight, return to her in Broadleaf and she'll ask you to bring her a Higgledy. Specifically, Slingsby the Scorcher, who can be found in Broadleaf in Dynafloor №3. You'll need whole milk to get them to join your party.

Side Quest №113 - Energy for Everyone!
Recommended Level:43
In Broadleaf, you'll find a nutritionist just past Dome Park who will ask Evan to try a new food item, but she wants to add an absurd amount of garlic to it first. Bring her five deathbreath garlics to complete the formula, which can be found in SNaketooth Ridge or Crookneck Cavern, though it is a rarer item to find.

It also comes from Evermore's Bountiful Bazaar and Wondrous Bazaar. When you have all five, return to Broadleaf and talk to her and she'll ask you to give it to five exhausted citizens. Once you do, return to complete the side quest.

Side Quest №114 - Screw Loose!
Recommended Level:43
Speak to a man in the Uptown Broadleaf section of town and he'll need help locating a lost screw. Really, man? A screw? Head to downtown and in the very corner past Swift Solutions, you'll see a glowing blue dot. That's the screw.

Some jerk will steal it from Evan, but will trade you for it if you give him a Bully Button. Once you make the trade with the deranged thief, return the boring-looking screw to its rightful owner.

Side Quest №115 - A Not-So-Watchful Eye
Recommended Level:
Head to the forest of East Wood, east of Broadleaf. Upon entering, you'll meet a Monster Inspector and be given this side quest automatically. Your goal is to venture into the forest and defeat the tainted monster, Crystolith.

Side Quest №116 - The Secrets of the Sauce
Recommended Level:44
Upon entering chapter eight, head over to Goldpaw for the only new side quest in the city; Master Chow Chow will mention Floyd stopped by to exchange cooking techniques. Return to Evermore and speak with Floyd.

He'll need help making the dish and requires: (1) Honey Apple found below:
You won't be able to simply take an airship to it directly (unless you've already joined Ding Dong Dell to Evan's Declaration of Interdependence), so land where the main quest instructs and walk there.

Collect the apple and return. Next, Floyd will ask for a specific type of unripe pepper, found south of Hydropolis here:
Return the firepepper to Floyd and he'll give you the location of the final ingredient: ripe garlic. The garlic in question is located in the Drylands, so hop back into your airship and head to the Drylands. You'll find some by the small lake around the marker; it'll be easy to find. Return the final ingredient to complete this side quest.

Side Quest №117 - The Sweet Stink of Success
Recommended Level:45
Once you've recruited Morgan to Evermore, speak to her to accept this quest. It's an...odd one, to say the least. She needs some shoes to move for profit, but not just any shoes: stinky ones.

This is a tough side quest because the item she wants is considered "low level" loot and can be hard to come by and when you eventually accept this side quest, you might have already sold any you've found.

You can also find them as drops, or inside treasure chests within The Labyrinth, which is where I collected my pair for this side quest.

If you still have some in your inventory, bring them to Morgan to quickly end this side quest, otherwise you'll have to find the dog merchant in the Dreamer Maze, as they sell them. Keep in mind that there are multiple merchants and they aren't the only ones that show up, so it takes a bit of luck.

Side Quest №118 - Building Up to an Attack
Recommended Level:48
Talk to Gao Jia in Evermore to receive word of some suspicious activity on the outskirts of the kingdom. Speak to the solider outside in the field to open up a level 44 skirmish "FIght Back Fabricas" mission. Win the fight to complete this side quest.

Side Quest №119 - Sweet Salvation
Recommended Level:43
Speak to Thetis after completing Side Quest 095: Da Xing, the Haughty Herbalist. She'll explain that Chi Pi has become gravely ill and needs...a tropical drink...? Don't ask questions! Go to the Taverna Akheilos in Hydropolis to buy some and return.

Guess it was just a case of swimming for an entire day?!. Returning will complete this side quest.
Side Quest Achievements (120-134)
Side Quest №120 - Rocking the Boats
Recommended Level:44
After recruiting Ketch and Bracken (see their respective names on the citizen list for instructions on how to recruit them), talk to Ketch in Evermore to try and put and end to their squabble. Talk to Bracken, then head to the Dugout Cave in the Heartlands either by boat or airship to collect a "blitz prism".

Once you enter the cave, head to the marked area on the map and you'll find a large crystal protruding from the wall of the cave. Pick up a prism and return to Ketch in Evermore.

After talking to Ketch, you'll take the two of them to the castle to discuss the problem. Once an agreement is made between the two, the side quest will conclude.

Side Quest №121 - Tying the Knot
Recommended Level:43
After completing Side Quest №96: Yip-Yip, the Master Tailor, speak to Yip-Yip again to learn her daughter is getting married. She needs "pure wool" to make the traditional Goldpaw wedding dress, but needs you to clear out the monsters that have infested the area.

That leaves one option: Evermore's Wondrous Bazaar. Staff this building and upgrade it to start gathering pure wool right in town. Once you do, return to Yip-Yip to complete this side quest.

Side Quest №122 - Ya Pi, the Proud Soldier
Recommended Level:56
At the start of chapter eight, head over to Goldpaw and up to the palace where you'll find citizens collapsed on the ground and Ya Pi in an argument about bandits. Accept the side quest, then head to the Rolling Hills, eastern side and meet up with Ya Pi.

Speak to him and you'll unlock a level 17 skirmish here:
Complete the skirmish while keeping Ya Pi alive. Once completed, return to Goldpaw and speak with him.

Side Quest №123 - The Goddess of Good Luck
Recommended Level:53
Once you reach chapter nine, head into the casino and talk to Yo Ho-Ho. Evan will ask her to join Evermore's forces, but she requires three items before switching her allegiance. Bring her the following items:

  • A pair of Gaudy Galoshes, which you can make back in Evermore if you don't already have some.
  • If you have level six of armor development researched, you can make these in Evermore as well.
  • This last one you cannot make: prism spear. You can get one as a reward from Side Quest №130, or from enemies Sunshade Shrine or Bleachbone Shrine in the Drylands. Lastly, one is dropped from the tainted monster in Sunshade Shrine, Charmigan.

    Once you give her all three items, you'll relocate to Evermore.

    Side Quest №124 - Callianeira, Priestess of Water
    Recommended Level:56
    If you've already completed Side Quest №51, return to the throne room of Hydropolis and speak to Callianeira. She wishes to request aid from Volko, a fire dragon in the Drylands. Head there and meet up with her.

    Volko wishes to go to battle before joining, so a skirmish banner will appear. Win the skirmish to complete the side quest and have Callianeira join Evermore.

    Side Quest №125 - Trey's Missing Memolith
    Recommended Level:50
    In chapter nine, speak to Trey in Broadleaf (below the entrance to the city) to assist him in locating his missing menolith. Head to the Smartstick Lab on the second Dynafloor to speak with Wally.

    After speaking to Wally, head to the Reactor Control Room and speak with Tad, who apparently is now in possession of the device. Tad will mention he sold it. Head to the entrance to Broadleaf to the shop out front and pick it up for 10,000 guilder.

    Side Quest №126 - Jared, the Elite Officer
    Recommended Level:50
    Once you reach chapter nine, head over to Swift Solutions to accept this side quest for 34 Tokens of Gratitude. Head to Broadleaf to recruit Jared to the kingdom of Evermore. He'll be on the same floor as Dome Park.

    Side Quest №127 - Alexis, the Hard-Nosed Cop
    Recommended Level:50
    Once you reach chapter nine, head over to Swift Solutions to accept this side quest for 50 Tokens of Gratitude. Head to Broadleaf to recruit Alexis to the kingdom of Evermore. She'll be on the same floor as Dome Park.

    Side Quest №128 - Herbert, the Future Historian
    Recommended Level:50
    Once you reach chapter nine, head over to Swift Solutions to accept this side quest for 41 Tokens of Gratitude. Head to Ding Dong Dell to recruit Herbert to the kingdom of Evermore.

    Side Quest №129 - Klaus, the Master Merchant
    Recommended Level:50
    Once you reach chapter nine, head over to Swift Solutions to accept this side quest for 43 Tokens of Gratitude. Head to Ding Dong Dell to recruit Klaus to the kingdom of Evermore. For your trouble, you'll also obtain Songbook 11 in the process. Another one down!

    Side Quest №130 - Raxel, the One-Eyed Mercenary
    Recommended Level:51
    Raxel is located in Ding Dong Dell starting from chapter nine and onward. He'll need you to prove your strength before he joins Evermore's army.

    You'll need to take your airship or travel to the Drylands to find them. They range from level 55 to around the low 60s, so plan accordingly. Once you've defeated the required number of them, return to Ding Dong Dell and speak with Raxel.

    Side Quest №131 - The Engraver's Riddle
    Recommended Level:53
    In Ding Dong Dell, speak to Evan's former engraver when he was King of Ding Don Dell and he'll ask you to solve his final riddle for Evan.

    Once you do, he'll move to Evermore to server Evan once more. He requires a ring made of four aterials For those looking for the answer, you'll need: An Underdog’s Ring. It consists of Maelstrom Shells (x2), Tranquilium Nuggets (x2), Jolly Lumber (x2) and, finally Clear Prisms (x2).

    You can make one from the armory in Evermore if you don't have one already. Once you have this ring, return to complete the side quest.

    Side Quest №132 - Grimm's Determination
    Recommended Level:49
    Once you liberate Ding Dong Dell, talk to one of the patrol mice in the center of town. They'll ask you to save a fellow soldier who is looking to go out in a blaze of glory in the Western Woods outside the city. Defeat the tainted monster Leolynx to complete the side quest.

    Side Quest №133 - Ritter's Got Tailor's Block!
    Recommended Level:49
    In Ding Dong Dell, once you can traverse freely in the city, talk to Ritter, a purple-clad tailor looking for inspiration. He'll be intrigued by your request to come to Evermore, but he needs a few articles of clothing to garner enough inspiration before coming. Bring him: (1) Cascading Robe, (1) Chieftain's Cloak and (1) Wolfsbane Mail. All of these can be made from the armory in Evermore if you've researched up to level six armor development.

    Side Quest №134 - Pollution Solution
    Recommended Level:48
    Once you enter chapter nine, go to the front of Ding Dong Dell and speak to the trio of architects in front of the kingdom. Agree to help Roden search for the solution for the water pollution in the city's wells. The entrance is just outside the city.
Side Quest Achievements (135-151)
Side Quest №135 - The Misunderstood Magician
Recommended Level:50
Once you reach chapter nine, head over to Swift Solutions to accept this side quest for 45 Tokens of Gratitude. Head to Ding Dong Dell to recruit Grisella to the kingdom of Evermore.

Side Quest №136 - Kitty, the Bubbly Baker
Recommended Level:50
Once you reach chapter nine, head over to Swift Solutions to accept this side quest for 37 Tokens of Gratitude. Head to Ding Dong Dell to recruit Kitty to the kingdom of Evermore.

Side Quest №137 - The People's Patissiere
Recommended Level:54
In chapter nine, talk to Rosamund in Ding Dong Dell about coming to be a baker in Evermore. Her requirement is to have recruited and hold at least 70 new citizens for her to join, as that is her customer base in Ding Dong Dell. Once you have enough citizens in Evermore, return and speak with her; she'll join your kingdom after that.

Side Quest №138 - Marlene, Good Girl Gone Bad
Recommended Level:56
Once you start chapter nine, head to Ding Dong Dell and you'll find an injured soldier on the west side of town. He'll explain that Marlene, the palace's sorceress, has gone rogue and joined a ring of bandits. Due to his injury, he'll ask you to retrieve her in his stead.

You can find the soldier and the skirmish you must win here:
Once you complete the skirmish, you'll confront Marlene and you'll tell you why she left and accept your offer to move to Evermore.

Side Quest №139 - Lady Trudy, Charming Farmer
Recommended Level:
Available from Swift Solutions starting in chapter nine, Lady Trudy can be recruited from Ding Dong Dell. Trade 47 Tokens of Gratitude at Swift Solutions to obtain the side quest, then head there to complete the side quest. Trudy is needed in order to build the "Full-Fledged Farm" in Evermore.

Side Quest №140 - Taming Tyger
Recommended Level:54
Head inside Hermit's Hollow when you reach chapter nine and speak to Tyger inside. He'll join Evermore if you show you can craft superior weapons; make sure you are at least level five in weapons crafting in Evermore's weapon shop to give you access to enough individual items to make. Once you make 30 different ones, return and Tyger will join you.

Side Quest №141 - The Tainted Wyvern
Recommended Level:51
By chapter nine, you should return to the Sky Pirate's den for this lone side quest. The Wyverns have grown suspicious again after being dormant since Evan rescued Tani. Head back to the Wyvern Den where you saved Tani to find this tainted monster waiting for you.

Side Quest №142 - The Perfect Present
Recommended Level:51
Once you reach chapter nine, speak to the casino employee in Goldpaw. He'll give you 10,000 guilder to buy him a present for his son in Broadleaf. Off to Broadleaf we go! Talk to the shop keep at the entrance to the city and bring him an enigma prism to repair the machine that makes them.

Mining Camp 4 & 5 in Evermore make these, so you should have one on hand. Return to Goldpaw and give him the yo-yo. He'll ask you to bring his son there (he is also in Goldpaw) to finish the side quest.

Side Quest №143 - Make My Sister Smile Again
Recommended Level:53
Head back to Broadleaf to the sick child you helped in Side Quest №87/ №112. She is all better now, but refuses to leave the house without another Higgledy to help her. Research the 5th Higgledy Cookbook in Evermore and bring along Jumblie the Lovely to complete this side quest.

Side Quest №144 - The Dark Side of Development
Recommended Level:56
Once you complete chapter eight and enter chapter nine, head to Broadleaf's entrance and meet up with Broadleaf's security down below. Agree to defeat the horde of monsters outside the Treehouse in the form of a skirmish battle.

Before the skirmish appears, defeat the lone group of enemies marked on your map. Once you do, the banner will appear. Win to complete the side quest.

Side Quest №145 - Fresh Fish Suppers for All!
Recommended Level:50
Speak to Hootenanny by the fish shop in Ding Dong Dell any time after chapter eight and agree to do more delivery runs for hungry customers. Deliver them all in under 3:00 minutes to complete this side quest.

Side Quest №146 - Time for Tea
Recommended Level:50
In Ding Dong Dell, speak to the woman on the western side of the city; she'll ask you to locate her four missing kids around the city. Three are located near the stars indicated in the map below; the fourth is running around the city and crosses the green line in front of the fountain shown below. You can either track him down or wait for him to run by.

Side Quest №147 - The Bandits are Back... Again!
Recommended Level:56
After completing Side Quest №90, talk to Chingis once more for the final confrontation between Evern and Tyran out on the battlefield. Locate the soldier outside the city walls and speak to him to open up the skirmish battle. Win to complete the side quest.

Side Quest №148 - Power Dressing
Recommended Level:51
This is only possible if you've complete Side Quest №125 and have advanced to chapter nine.

Trey in Evermore is tasked with building a power suit for Bracken, but requires two sunset prisms to complete the project. By now, you'll probably have plenty from your first two mining camps. Bring them to him along with two somnium nuggets that he'll ask for next to complete the side quest.

Somnium nuggests are mined from your fourth and fifth mining camps in Evermore.

Side Quest №149 - An Unexpected Windfall
Recommended Level:52
As long as you've completed №74, speak to Price once you've reached chapter nine and he'll mention a lost, scientific component was lost over the desert from an airship. He asks Evan to retrieve it for use in Evermore. You can find the prism here:

Side Quest №150 -On Cold Ground
Recommended Level:51
Talk to Lady Trudy in Evermore once you reach chapter nine and have completed both Side Quest №3/№139. Speak to Munokhoi wherever you have them stationed and bring them some Simmering Water to help in their soil developement. You should have a ton of this from Evermore already, so hand some over and this side quest is done.

Side Quest №151 - Almost Too Good to Be True...
Recommended Level:54
Once you reach chapter nine, speak to Niall in Evermore. He'll show you a suspicious letter he received that has informed him he won a mysterious grand prize. Accept the side quest and go take a look for him.

Head to the Drylands and on the coast, you'll see the marker to Mugsburrow Cave. A little on the nose for a name, don't you think? Head to the back of the cave, defeat the bandits and foil their obvious trap, then return to Evermore and speak with Niall.
Side Quest Achievements (152-163)
Side Quest №152 - Ding-Dong vs. Ding Dong Dell
Recommended Level:56
Once Raxel has joined Evermore, speak to him to initiate a practice fight between Evermore and Ding Dong Dell. You can find the skirmish here:

Side Quest №153 - A Gruff, Gruff Grandad
Recommended Level:53
Once you reach chapter nine, talk to Bai Gon, who is looking for Fai Do to do some work for him, but he is nowhere to be found. You'll find him in Evermore (see the map marker) and you'll have to do a bit of back and forth messenger work to complete the side quest.

You'll also need three balls of cuddleywarm cotton and a set of Warlord Armor to complete this side quest.

Side Quest №154 - Nu Bi's Crisis of Confidence
Recommended Level:53
Speak to Brodie at the weapons shop in Evermore to learn about Nu Bi running off after a misunderstanding. He'll solicit your help in solving the issue. Talk to Nu Bi by the Everyday General Store and then return to Brodie.

Brodie suggests making a mask to protect Nu Bi from the fumes and asks for a few frostyfluff cotton to make it, which can be found at: Jack Frost’s Playground, the Freezybones Cave, Evermore's Bustling Bazaar or by trading tokens at a local Swift Solutions.

Once you have the cotton, talk to Nu Bi, then Brodie will ask for a grade 8 or higher Radiant Blade so they can practice making the weapon he mentioned. You can craft one from Evermore's weapon shop once you research level six in weapon development.

Side Quest №155 - Toil and Trouble
Recommended Level:51
In chapter nine, once you've completed Side Quest №135, speak to Grisella in Evermore. She's trying to finish a potion and is missing one final ingredient: Delicate Wing Bones.

If you don't have any, you can gather some from Hunting Lodge №4 and Hunting Lodge №5. Once you have two of them, return to Grisella so she can finish her work and complete the side quest. You'll earn Songbook №28 for your troubles.

Side Quest №156 - Longing for Lustrous Locks
Recommended Level:51
In chapter nine, if you've already completed Side Quest №103 & №123, speak to Brook in Evermore to start the side quest. Bring her two dollops of "sweet sap", which is obtained through either the Towering Lumberyard or the Flourishing Lumberyard in Evermore.

Side Quest №157 - Wish Upon a Stone
Recommended Level:51
Once you've reached chapter nine and have already completed Side Quest №129, speak to Kalus who asks you to find a "flavorsome mineral that has fallen from the heavens above". The answer is simply Shooting Star Salt, which can be obtained from the the bazaars in Evermore. Return with some to complete this side quest.

Side Quest №158 - Dressed to Kill
Recommended Level:58
Once you've unlocked Allegoria in chapter nine, speak to Ritter in Evermore and he'll recommend improving your armor (and earning a free costume, too!) for Evan.

He'll ask for the following items: wild leather from Hunting Lodge №4 & №5, stylish string from the Thriving, Bustling, Wondrous and Bountiful bazaar once they are level two or three and finally some tranquilium nuggets, which can be obtained from any mining camp (aside from the first one).

Return with the required items to complete the side quest.


Side Quest №159 - A Man of Many Names
Recommended Level:65
Head to Capstan-upon-Hull once you've entered the postgame content. Speak to the musician at the entrance named Sin-Gul. He has forgotten his name and requests Evan's help. This side quest can be lengthy because it requires you to seek out citizens in each town that have musical-based names and speak to them.

Each one holds a part of the bard's name. Technically, you do not have to speak to any of them if you don't want to. You can select the right names from the last below if you just want to quickly finish the side quest:
  • Musical Sky Pirate by where the merchant once stood in Cloudcoil Canyon: "Donwaribihapi"
  • Musical Man on a bridge by the inn in Goldpaw: "Tstaykenamyt"
  • Musical Girl in Kardia Square in Hydropolis: "Haoozbizniss"
  • Musical Old Fellow past Dome Park in Broadleaf: "Sbinawile"
  • Musical Lady leading to the path to the Old Well in Ding Dong Dell: "Watsamata"

Side Quest №160 - Dekkah's Grand Tour
Recommended Level:68
Head to the large ridge in the Rolling Hills once you've entered the postgame content. Speak to Dekkah atop the ledge. He can be found here:
He'll ask you to bring him a steak dinner as his last meal (he thinks the world is going to end after all). If you already have one, give him one to complete the side quest. If not, you can either cook one up in Evermore real quick, or if you're really unlucky, harvest the ingredients yourself. Three of the items come from Evermore and are of no consequence, but stardust pepper must be bought fromthe food vendor in Broadleaf, melt-in-the-mouth meat is only obtainable from the Windwyrms above Ding Dong Dell.

Go after Dekkah to the Calmlands where the marked area is; bring with you a lucky lobster dish (all ingredients can be found in Evermore) for him this time. He'll be on the cliff's edge of the Unsung Shrine. Lastly, head to Makronos Island, east of Dampshoe Cave to find Dekkah once more. Bring with you some Hydropolitan stew (purchasable in Hydropolis).

Finally, bring with you an executive steak (purchasable in Broadleaf) and go to the ledge west of the city to find Dekkah one last time before he sets off to an unknown destination. Next, you can find him here:
He'll ask for some gooey curry, which you don't have, but he'll provide the recipe book to make it. Return to Evermore and speak to Floyd to learn the recipe and cook up the dish. You should have plenty of all the necessary ingredients by now, as they all come from Evermore. Return to Dekkah with the curry to complete this side quest.

Side Quest №161 - Testing the One True King
Recommended Level:66
This postgame side quest starts by visiting the mysterious woman at the entrance to Evermore. She will ask you to defeat a corrupted knight to show you are worthy of being the One True King. Head to the Drylands and enter the Bleachbone Shrine. The Starless Knight is a level 66 skeleton knight, so adjust your tactics accordingly. Upon defeat, you'll earn a songbook for your efforts.

Once defeated, return to Evermore to complete this side quest. Upon turning it in, you'll receive a second songbook!

Side Quest №162 - Tyran's Lament
Recommended Level:65
After completing №147, speak to Chingis again to review another letter from our good pal, Tyran. Head to Squeezethrough Grotto to speak to him:
Next, head to the three markers on the map and speak to the bandits Tyran talked about, then return to Tyran to complete this side quest.

Side Quest №163 - Kingdom of Crystal Seas
Recommended Level:69
In your postgame adventures, head to Hydropolis and speak to the researcher there (marker on the map) to begin collecting water samples for him in their aid to save Sequoia Valley. Head to the three areas marked on your map in Hydropolis and collect the needed samples, then return to the researcher in Kardia Square.

Next, head to the small island east of Makronos, defeat the giant jellyfish to collect your control sample and return.
Side Quest Achievements (164-175)
Side Quest №164 - A Tall Order
Recommended Level:68
Head to Ding Dong Dell once you've reached chapter nine and speak to the servant on the west side of town with the lone quest marker shown on the map. Next, head to Jack Frost's Playground and all the way on the east coastline, a tainted monster will appear by the marker. Defeat Ziggy, the tainted monster and return to complete this side quest.

Ziggy is a powerhouse, so make sure you're properly prepared for the fight ahead. Once you topple the beast, you'll be rewarded with Songbook 23. Upon returning to Ding Don Dell to deliver the rose, you'll be gifted Sonbook 26 as a reward from the servant.

Side Quest №165 - A Higgledy and a Half
Recommended Level:67
During the postgame, go talk to Da Xing and he'll mention something about a legendary higgledy in Evermore; he also mentions the littlies have run off again and we need to locate them in order to find the legendary one. The five higgledies are located here:
Once you collect all five, speak to Da Xing again, then head to the Hard Woods in the Forest of Niall and head to the becon there. Talk to the legendary higgledy to complete the side quest.

Side Quest №166 - A Blossoming Art Career
Recommended Level:66
Talk to Hipponoe in Evermore during your postgame play and after you've completed Side Quest №99. She'll ask you to find her an opal huebloom, which are only located in the Dreamer Maze around levels 21-30.

Once you have one, return it to Hipponoe to complete the quest.

Side Quest №167 - Legend of the Bright Bellies
Recommended Level:68
Speak to Furnest in Evermore. He wants some Sultan’s Crown, a recipe from one of the cookbooks you'll find around the land. Firest, you'll need to make sure you've completed Side Quest №106. Next, make sure the Raucous Ranch, Massive Market Garden and Full-Fledged Farm are level three, which means you need all 100 citizens recruited to upgrade your kingdom to level four. All the ingredients can be obtained from Evermore. Return to Furnest with the dish to complete this side quest.

Side Quest №168 - Currying Flavor
Recommended Level:68
Speak to Norbert in Evermore once you reach the postgame content and he'll ask you to make and bring him some special curry called, "Gloopy Curry". If you've completed Side Quest №160 (see that one for more details), then you have the recipe to make it.

All the ingridients can be obtained through Evermore itself, but if you haven't maxed out your kingdom to level 4 yet, you will only be able to find the Melt-in-the-Mouth as a drop from defeating the high-level Windwyms around Ding Dong Dell (check the elevated areas).

Side Quest №169 - Sap for the Sapper
Recommended Level:66
Speak to Alexis in Evermore and she'll ask for a few drops of aromatic sap; you should be earning plenty from your Towering Lumberyard in Evermore, so just return when you have some to complete this side quest.

Side Quest №170 - The Divine Silence
Recommended Level:64
This side quest is available only in the postgame content. Speak to Nu Bi and Fai Do in Evermore and he'll tell you about some legendary equipment called the "Divine Silence", rumored to be available to only those deemed worthy.

First, head to the frozen north of Jack Frost's Playground. You'll find a marker showing the location of a new tainted monster: Snickersnarl. Defeat Snickersnarl in battle. The wolf is extremely fast and kind of twitchy, so dodging is important to avoid one-hit kills.

Bring plenty of fire magic/weapons and you should be able to make short work of this monster. Once you defeat Snickersnarl, return to Evermore and speak with Nu Bi and Fai Do.

Side Quest №171 - A Costume Fit for a Consul
Recommended Level:75
In the postgame, speak to Grimm in Evermore to start another gathering side quest for a unique costume, this time, for Roland.

You'll need some rook's brocade, snazzy string, and moonrise thread. The brocade can be gathered in Evermore from your Bountiful Bazaar, or inside the Labyrinth.

The same goes for snazzy string, but you'll need to go to the Dreamer Maze, or the Labyrinth for it. The moonrise thread is probably the toughest of the three items to find, the brocade being the easiest of the three.

Once you have all the ingredients, return to Grimm in Evermore to complete the snazzy looking outfit.


Side Quest №172 - Pretty as a Princess!
Recommended Level:75
In your postgame, talk to Halimede about making a new outfit for Tani. She'll ask for some flowing fur, which comes straight from Evermore, so you should have plenty. Next, some queen's brocade, which comes from both The Labyrinth or the Dreamer Maze. Lastly, some celestial silk, which also comes from The Labyrinth or the Dreamer Maze. Return once you have all the pieces to complete this side quest.

Side Quest №173 - Classy Cloud Snake Clobber
Recommended Level:75
This quick postgame side quest will net Batu a new outfit to wear. Talk to Evan and he'll ask for five pieces of savage leather to make the outfit. You can find some in Jack Frost's Playground, the Drylands, as well inside the Dreamer Maze. Additionally, you can earn it in Evermore, so coming across five shouldn't be any issue.

Next up, is three spools of classic cord and two champion buttons, which are only found in the Faraway Forest Cave, inside the Dreamer Maze, or the Labyrinth. Once you have all three items, return to complete this side quest.

Side Quest №174 -Jazzing Up the Junior Consul
Recommended Level:75
This side quest will unlock a new outfit for Leander. Speak to Kent in Evermore during the postgame and he'll ask for some knight's brocade, which you can obtain in Evermore from your Bountiful Bazaar. Next, some Sumptuous String, found in the Labyrinth, the Dreamer Maze and finally, some sparkly leather, also from the same locations.

Side Quest №175 - Outfit Upgrade for Bracken
Recommended Level:75
Talk to Andrew, the android in Evermore for more costume crafting activities. You'll need some footman's brocade, and night-white thread, as well as some suscitanium nuggets from the Dreamer Maze or Labyrinth.

Night-white thread can be obtained from Evermore via the Bountiful Bazaar or Wondrous Bazaar, or the Dreamer Maze or Labyrinth. You can obtain the brocade and thread from the Labyrinth pretty easily as well as trading Tokens of Gratitude for the brocade from Swift Solutions.
Sword of the Gods Achievement
To start this string of side quests, first you'll need to complete the main story and enter the postgame content. Once you do, go to Goldpaw and speak to Boddly in the library to accept a shabby black token from her.

It is recommended to be around level 90 or so when starting this side quest.

The side quests in this section are short, rapid ones over an overarching story, so they'll go quickly until you get to the end when you have to pass the trials via a boss fight.

Let's get started!

Side Quest №176 - The Winnower Wakes
Recommended Level: 99
This will begin side quest №176 - The Winnower Wakes. To advance further, learn the spell "Sunrise" in Evermore. If you haven't learned it already, go and do so, then return to Boddly to transform the token.

Once the token is full transformed by completing the Zeta Trials at the end of Side Quest №183 - The Trial of Zeta, speak to Boddly to learn about the dragon that resides on floor 40 of the Dreamer Maze. Defeat the dragon to complete this side quest.

Do note, if you've already defeated the dragon, simply talk to Boddly and she'll acknowledge it and you'll complete this side quest.

Side Quest №177 - The Timeworm Token
Recommended Level: 27
Next, speak to Boddly again in the library, then go speak to Pugnacius in the High Roller's Hall. This will open the next side quest.

Side Quest №178 - Pugnacius Points the Way
Recommended Level: 38
After speaking to Pugnacius, complete any 60 side quests. By now, you should have this done. If not, return to him once you do, then return to the library once more and strike up a conversation with Boddly.

Side Quest№179 - Hail the Higgledy Heroes
Recommended Level: 43
After speaking with Boddly, head to Hydropolis and talk to Queen Nerea, who will ask you to create and bring her four specific higgldies: Grabe the Glowering, Mumbian the Mover, Calooh the Carabinier and Coronach the Cranky. If you don't have them, return to Evermore to make them.

You'll need to put them in your party, then talk to Queen Nerea. You'll pass this trial and need to head back to Goldpaw to obtain further instructions from Boddly.

Side Quest №180 - Zip's Firing on All Cylinders
Recommended Level: 49
With new information in hand, it is off to Broadleaf to have a word with Zip Vector; he's located on the reactor floor. He'll ask you for 100 bottles of oasis wonderwater to overclock the fission reactor. You can buy these in bulk from the Evermore Everyday General Store if you need more. Return to Zip once you do.

Side Quest №181 - When Souls Collide
Recommended Level: 75
Lastly, you'll need to prove yourself worthy of the Zeta Trials by facing off with King Mausinger in Ding Dong Dell. Head there and speak with him. You'll learn he has gone to the Crypt of the Cat Kings just outside the city; meet him there, then return to his throne room to do battle.

Once you're victorious, return to Goldpaw once more and speak to Boddly; return to Evermore afterwards and talk to Mileniyah. If you have access to the Dreamer Maze Door in Faraway Forest, you'll need to make your way to floor 30 for this next part...

Side Quest №182 - Forest of Mystery
Recommended Level: 78
After defeating the mini-boss on floor 30, you can head back outside the Dreamer Maze and talk to Mileniyah once more, then return to Boddly in Goldpaw's central library.

Side Quest №183 - The Trial of Zeta
Recommended Level: 80
Now that you've completed all the tasks necessary, head north of Evermore to the Farflung Cape and climb the small hill on it. The Sealed Shrine will appear before Evan and company; head on inside.

Win the battle to complete the trials and earn some splendid weapons as a gift, as well as this achievement:

"Sword of the Gods"
Awarded for acquiring Zeta's blade.
Side Quest Achievements (184-195)
Side Quest №184 - The Labyrinth
Recommended Level:120
As early as chapter 4, you can accept this quest from Khunbish and Chingis in the center of Evermore. Khunbish has been possessed by the spirit of a fallen kingdom who has pledged to defeat the Prince of Wraiths from overtaking Evan's kingdom and even the world.

As strange as it is, this DLC quest can be obtained extremely early, but you'll need to be much, much stronger before you even attempt at dealing with everything revolving around the Labyrinth. For now, put a pin in this one if you accepted it; we'll come back to it much later.

Side Quest №185 - Family Ties
Recommended Level:70
Speak to Batu in Evermore during the postgame content and he'll ask you to locate an area that is in your Leafbook: the Wistwillow Woods. This new area will be just west of the Forest of Niall entrance, here:
This DLC side quest is self-contained in this one area, so once you're done you'll be able to leave as the quest is completed. I won't go into detail, as it isn't a hard side quest, but it is littered with spoilers.

Side Quest №186 - Back to Black
Recommended Level:70
While running through the first twenty or so levels of the labyrinth as part of Side Quest №184 - The Labyrinth, you'll come to a point where you cannot progress any further (level 23). You'll receive a letter from Ding Dong Dell and have to make a detour to the sewers of the city to see about mysterious monsters that have been causing issues for the kingdom.

You'll complete this side quest once you defeat the Black Knight in the sewers. For a reward, you'll unlock the Ding Dong Dell Disciple abilities, which you can access back in Evermore.

Side Quest №187 - What Color is the Sky?
Recommended Level:80
While running through the first half or so levels of the labyrinth as part of Side Quest №184 - The Labyrinth, you'll come to a point where you cannot progress any further (level 43). You'll be pulled to investigate a weird phenomenon in Broadleaf. Complete the side quest by collecting three password parts from three different level 77 robots on the various levels of the Dyno Floors (1-3).

Once you obtain all three parts, you'll face off with P.U.R.L., a level 88 tainted robot. Defeat them to complete the side quest.

Side Quest №188 - Follow the Rabbit!
Recommended Level:60
With Tani in Evermore, you'll be able to accept this quest as early as chapter six, but will most likely be far too underleveled to start it. Regardless, speak to her around Evermore and accept this quest; we'll come back to it later on.

Once you're far enough along, or even in the post game, stay at the inn within the city of Goldpaw. Once the cutscene is over, travel to any other city and stay at their inn to continue the quest.

Repeat this with the inn located in every city on the map. The further along you go, the more difficult the enemies, bosses and trials will be. At the very last inn, you will gain a very special item, along with the ability to build an inn within Evermore, the "New Moon Rooms", unlocking a hidden achievement in the process:

"Inn Business"
Awarded for building the New Moon Rooms.
This postgame achievement is unlocked at the completion of Side Quest №188 - Follow the Rabbit!.


At the end of all this, you'll unlock the Wizard's Companion, which is will allow you to complete several additional secret achievements associated with different martial perks in the training grounds within Evermore.

Side Quest №189 - The Saga of the Saviors
Recommended Level:130
Once you've completed the previous side quest and built the New Moon Rooms in Evermore, stay a night at the inn to meet the Conductor once more and learn about memory lanes, high higgledies and what you need to do to save them from the ever-growing nightmares behind each door.

At the end of your discussion with the Conductor, you'll, you'll start the next side quest immediately.

After completing Side Quest №190-195, you'll need to speak with the Conductor once more. He'll tell you his real plan and open the last Memory Lane Door using all the high higgledies you've saved. Enter Zaiyn's Dominion through the Midnight Gardens; be prepared, as it is time to face down the Madshadow. Once you defeat this boss, you'll unlock:

"The Nightmare is Over"
Awarded for defeating the Great Madshadow.


Side Quest №190 - The First High Higgledy
Recommended Level:80
After speaking with the Conductor for the first time, head back to where your adventure all began: Auntie May's Cottage. Inside will be three red sparkles; collect them all, then Evan will cast his new spell, "Materialize" and obtain a photograph, your first key.

Return to the Conductor in the Midnight Gardens in Evermore to unlock the first door.

Side Quest №191 - The Second High Higgledy
Recommended Level:90
After completing the first Memory Lane door, speak to the Conductor again to obtain the location of the next key. Head to the Abyss at 3,000 Fathoms Deep and take the water jet to the sea floor. Collect the two red sparkles to craft a small ring, your second key.

Side Quest №192 - The Third High Higgledy
Recommended Level:100
After completing the second Memory Lane door, talk to the Conductor and then take a trip to Ding Dong Dell Castle. Close in on the marker inside the castle for the third key and collect the three red sparkles to materialize one of Nella's earrings.

Side Quest №193 - The Fourth High Higgledy
Recommended Level:110
After completing the third Memory Lane door, talk to the Conductor and then take a trip to the overworld of Nazcaä. Head to the staircase immediately in front of you; one red sparkle will be at the top, one at the base to the left and the last at the base to the right of the staircase.

Side Quest №194 - The Fifth High Higgledy
Recommended Level:115
After completing fourth Memory Lane door, talk to the Conductor and take a trip to where it all began: Evan's room in Ding Dong Dell. Collect the red sparkle in front of the mirror to find an empty book of all things.

Return to the Conductor in Evermore and enter the Empty Book door.

Side Quest №195 - The Final High Higgledy
Recommended Level:120
After completing fifth Memory Lane door, talk to the Conductor and take your final trip to collect a teacup; the key to the final Memory Lane door. Once you have it, return to the Conductor and enter.
Wizard's Companion Achievements
There are several hidden achievements surrounding the Wizard's Companion that you obtain at the end of Side Quest №188 - Follow the Rabbit! (see that side quest for more).

They are broken up into four categories, which will be detailed below with how to start each and where to obtain all the necessary manuals for each. The four types are as followed:

Wizard's Companion
To start this section, complete Side Quest №188 - Follow the Rabbit!, which requires you to reach the post game and then finish this side quest.

Gizmo Supremo
To start this section, complete Side Quest №186 - Back to Black, which requires you to reach the post game and then clear out enough levels (43) of The Labyrinth to trigger an event in Broadleaf. Complete Side Quest №187 - What Color is the Sky? to unlock the use of Gizmo Supremo points using this martial method.

Ding Dong Disciple
To start this section, complete Side Quest №186 - Back to Black, which requires you to reach the post game and then clear out enough levels (23) of The Labyrinth to trigger an event in Ding Dong Dell. Return to Ding Ding Dell's sewers, defeat the Blank Knight and you'll unlock this section, which is accessed in the training grounds within Evermore.

Martha's Methods
To start this section, complete Side Quest №188 - Follow the Rabbit!, which requires you to reach the post game and then finish this side quest. Once you complete it and build the New Moon Rooms in Evermore, you can enter dreams at any time and speak with the Conductor to tackle new challenges in the Memory Lanes within.

You'll start Side Quest №190 - The First High Higgledy before entering the first door (see the side quest portion for additional information) and during your battles within, you'll be granted access to Martha's Methods.

  • Manual №1 - Buy it at the Labyrinth Shop for 100,000 guilder.
  • Manual №2 - Clear the Labyrinth floor 30.
  • Manual №3 - Clear the Labyrinth floor 40.
  • Manual №4 - Buy at Labyrinth Shop Available after Clearing Labyrinth floor 40 for 200,000 guilder.
  • Manual №5 - Clear Labyrinth floor 60.
  • Manual №6 - Clear Labyrinth floor 60.
  • Manual №7 - Buy at Labyrinth Shop Available after Clearing Labyrinth floor 60 for 400,000 guilder.
  • Manual №8 - Clear Labyrinth floor 80.
  • Manual №9 - Clear Labyrinth floor 80.
  • Manual №10 - Buy it at the Labyrinth Shop after you've cleared floor 80 for 700,000 guilder.
  • Manual №11 Clear Labyrinth floor 90.
  • Manual №12 Clear Labyrinth floor 100.
  • Manual №13 Buy at Labyrinth Shop Available after Clearing Labyrinth floor 100 for 1,000,000.
  • Manual №14 Evermore - Talk to Rumpel after doing Side Quest №185.
  • Manual №15 Ding Dong Dell Castle - Talk to the Mellow Maiden after doing Side Quest №186.
  • Manual №16 - Memory Lane Door - The second area of the Little Ring Door has a treasure chest containing one at the end of one of the dead end routes.
  • Manual №17 - Memory Lane Door - The second area of Nella's Ring Door has one in the southeast corner of the area inside a treasure chest.
  • Manual №18 - Memory Lane Door - The third area of the Cutlery Door has one on the roof of one of the buildings inside a treasure chest.
  • Manual №19 - Memory Lane Door - Located in the second area of the Empty Book Door, you'll see a part of the cave that leads to a dead end: a treasure chest contains the manual.
  • Manual №20 - Memory Lane Door - The fifth is located in the China Teacup Door, in the second area, western side at the dead end. A treasure chest holds this manual.
  • Manual №21 - Memory Lane Door - The sixth is located in the Wizard Companion Door, in the house, first floor, in the room with the TV is a red sparkle; pick it up.
  • Manual №22 - Memory Lane Door - The seventh is located in the Little Ring Door, ithird area (Hydropolis). Once you enter the town, take your immediate left and go down below to find a red chest containing this manual.
  • Manual №23 - Memory Lane Door - The eighth is located in Bella's Ring Door, third area, behind the fountain in Ding Don Dell.
  • Manual №24 - Memory Lane Door - The ninth is located in Cutlery Door, second area in the northern most path that dead ends in the forst. It'll be in a red chest.
  • Manual №25 - Memory Lane Door - The tenth is located in Empty Book Door, first area, all the way in the southeastern corner behind a large rock.
  • Manual №26 - Memory Lane Door - The eleventh is in the China Teacup Door, first area, at the end of the large, round room that dead ends mid map.
  • Manual №27 - Broadleaf - Chief's Office on the Testing Floor. Talk to the robot to obtain it.
  • Manual №28 - Broadleaf - Cradle of Life - Talk to the man next to the robot to obtain it.
  • Manual №29 - The Solosseum Slog Tournament - Stage 4 as a prize.
  • Manual №30 - The Solosseum Slog Tournament - Stage 8 as a prize.
  • Manual №31 - The Solosseum Slog Tournament - Stage 14 as a prize.
  • Manual №32 - The Solosseum Slog Tournament - Stage 18 as a prize.
  • Manual №33 - The Solosseum Slog Tournament - Stage 24 as a prize.
  • Manual №34 - The Solosseum Slog Tournament - Stage 28 as a prize.
  • Manual №35 - Speak to Rumpel after doing Side Quest №185
  • Manual №36 - At Ding Dong Dell Castle; speak to the Mellow Maiden after doing Side Quest №186.
  • Manual №37 - Wistwillow Woods (Beside Forest of Naill) It doesn't show on your map, but it was where you went with Tani regarding her and Batu. Sin Gul is at the end of the map (2nd portion). Talk to him to get this manual.
    ******************************************************************
  • The rest of the manuals are in Evermore. Pull up your map and talk to all the citizens with a (!) above their name and they'll hand them over to you.

    You'll unlock the following achievements once you collect all the manuals, even without using the points:

    "Ding Dong Done"
    Awarded for maxing out Ding Dong Discipline points.


    "Higgledy Hotshot"
    Awarded for maxing out Martha's Methods points.


    "Tech It to the Max"
    Awarded for maxing out Gizmo Supremo points.


    "Magic Master"
    Awarded for maxing out Wizard's Companion points.
Solosseum Slog Achievements
In all, the Solosseum Slog is one of the most time consuming and annoying achievements to complete and will undoubtedly be what you put most of your postgame time into; having the game call it a slog is a very on-the-nose description of it.

If you've played the first game, it is similar in scope, but I found it to be much more grind-oriented in terms of time. Similar in structure, the Solosseum Slog has you go against an ever-increasing set of enemies.

You'll have anywhere from three to four sets of enemies, some solo fights, some enemy waves, but all against a vicious timer. Your ranked on how quickly you can defeat the mobs and have to complete all 30 sets and obtain an S-Rank to earn all respective achievements associated with the Solosseum Slog. To do that, here's how I went about that, but keep in mind that this isn't the only method possible; it is just the method I used.

First, I obtained the following:
  • Level 150 - Getting everyone to their maximum level (150).
  • Max Spells - It is critical to maximize your spells, especially for Leander and Evan; their dark and light magic, respectively, is paramount to winning matches.
  • Gold Gear - You need exceptional armor and weapons in the form of gold gear, which is best farmed from The Labyrinth floors 81-100 using the last portal. 500 orbs per chest will net you a guaranteed gold item, though duplicates are common, so it takes some repeated runs to fill out your gear setups.
  • Higgledies - Level them up to their maximum level (10). I recommend ones that do weakness to melee or weakness to magic. That means using ones with the "Dopey, Dopey" or "Flimsy, Flimsy" ability.

There are 30 floors in total for the Solosseum. For the first twenty or so, if you've done the above, you can simply brute force your way through them by simply adjusting to whatever the tablet says is the enemy's weakness and spamming the appropriate magic ability. Once you get higher, it gets hard enough to the point that you need to focus and do a bit of micromanaging of your team. For the entire Solosseum, I used Evan and Leander, swapping Roland and Tani as needed and vetoing Batu and Bracken due to their slow, but heavy hits. Yours may very.

Once you've reached the lower 20s (especially round 23 and 27), you need to really focus on your loadouts for each teammate. From 21-23, my builds were as follows:

Team Members: Floor 21-26
Evan, Leander, Roland

For both Evan and Leander, I equipped them both with the Wizard Companion ability and put all the points into damage boosts, forgoing the stinger abilities. For whatever I had left, went into faster casting and reducing knock-down during said casting. The damage boosts (when you don't miss any inputs) have a profound impact on dealing enough damage quick enough. Nothing up until round 27 is weaker to melee attacks than damage from magic, so forcus all your efforts there.

For Roland, I went Gizmo Supremo and invested in the more effective restoratives and increasing the amount you can use; these battles are long and require tons of magical attacks, so having the most restoratives you can is imperative. To use the Gizmo Supremo ability, whenever you need to use those extra restore items, swap to controlling Roland, use them on your magic caster, then swap back.

Between Evan and Leander, you can cover all the elements needed. Check the stone tablet at the beginning of the match to identify the weapon's and spells necessary to capitalize on your foe's weaknesses. Even should focus on light, fire and water magic, while Leander is dark, wind and can substitute for water as well. All these spells must be maxed to level 15.

For gear, bring all gold weapons/armor from farming The Labyrinth's end levels (81-100). You should have each character have something that has attributes that compliment their needed build for each, individual fight, so acquiring duplicates isn't a bad thing. Components that boost overall magical abilities and the attributes that let you "hang on" with 1HP after a heavy hit, as well as damage boosts to specific enemy types (especially dragons for round 27). Your goal is to avoid getting hit, but if you take a hit that would otherwise one-hit-KO your character, you'll survive.

Team Members: Floor 27
Evan, Bracken, Leander

Floor 27 kicks off with four battles:

Floor 27 - First Round - The first is a horde battle, followed by three Evan & Co. VS Monster. For the first fight, you'll be dealing with Lost Souls, those monsters that explode if left alone while you're near them, or if they charge into you.

Regardless, you need to be hyper-aggressive in fighting them. Have Gizmo Supremo equipped to one of your party members and any light-based or light-imbued weapon(s). Cast a Baby Black Hole (BBH) and either have Evan cast Astra to wipe them all out; alternatively, you can also go in with melee, as the black hole seems to interrupt their ability to self-destruct.

Floor 27 - Second Round - This will be a toss up between seeing a Mossy Monument (weak against wind magic) or a Crystal Crypt (weak against fire magic). Here you'll go magic-based for your attacks and either take Evan for fire magic, or Leander for wind magic.

Equip either party member with any armor or weapons that help increase magic attacks or how much magic you can have. For your martial style, take Wizard's Companion; you should have enough points (18/20) to invest in everything except Faster Caster and Stout Heart. Your goal should be to avoid interruptions and I felt the ability to use more inputs with Faster Caster to be too difficult to reliably use and preferred the guaranteed extra damage.

The other two party members should be assigned Gizmo Supremo for extra restoratives for magic, as you'll be burning through them and need as many as you can carry. Remember that, in order to use those extra restoratives, you need to move to switch to that character, use the restorative, then switch back.

When you start the fight, they will immediately call in backup, so cast your magic right when the fight starts. As long as you maintain consistent damage, avoid the monster's attacks and keep your mana up, you shouldn't have any issue.
Solosseum Slog Achievements
Floor 27 - Third Round - Here you'll be facing off with a Nightmare Rook. Pay attention to its attack pattern; its quick and deadly unless it is summoning the firestorm ability, in which case it is free for the picking.

You should be casting inbetween attacks, so timing is key. Keep Leander on the Wizard Companion and the other two on Gizmo Supremo for extra restoratives.

Floor 27 - Fourth Round - Cletus will make or break this run very easily. You need to have two weapons, one imbued with light and the other with dark depending on its weakness. It is always weak to one of these elements.

Equip Evan with whichever sword Cletus is weak to, switch him over to Ding Dong Discipline Martial and bring "Flurry" to disrupt Cletus' backup calls. For both Leander & Bracken, swap them to Gizmo Supremo for extra restoratives if necessary. For Evan, try to have his physical attack power hovering around 2,000. I gave him the following swords depending on Cletus' vulnerabilities.

In addition, if you have one imbued with the necessary weakness and poison, or anything that does more damage to "dragon" types, try to incorporate that if you can. Do note, poison only works if it states on the tablet prior to battle that Cletus is weak towards it. If he isn't, poison is ineffective (he's immune). It isn't a deal break, though, as I did it without it.

Bring all four higgledies that cast the negative effect of lowered defense to physical attacks. They are the are the following:

To win this fight we need to do a couple things. During the battle, Cletus will call for backup roughly twice in total. Use Evan's "Flurry" skill to disrupt it, so save your "Zing" until he starts the call in. Even if you don't, it is still possible to win, but it will be a more difficult fight.

To deal optimal damage, you need to time your evade at the last second before being hit by Cletus, which will have Evan enter slowdown and allow you to do five regular attacks, followed by one powerful attack to deal the most damage. Outside of slowdown, keep hammering him with heavy attacks.

Floor 28
Evan, Tani or Leander and Roland

Floor 28 is much easier than the previous. On the first round, Tani should be your primary, using "Hail of Arrows. Equip the others with fairy-based swords, or weapons weak to the enemy; this is a mob round, but the majority of the enemies will be off the platform. You can dispose of each group with one well-placed hail of arrows attack with Tani.

The second round is either a Brilliantcore or Tropical Fangfish. The Brilliantcore is weak to light magic, so your main attacker should be Evan, Hiddledies with casting weakness to magic and the others should be Gizmo Supremoi builds for extra magic restores.

If the Tropical Fangfish, take Roland with Martha's Method for Higgledy bombs and your best water weapon. You only need to use the bombs to interrupt the backup call-ins; otherwise, just keep swinging with strong melee attacks until its defeated.

The third battle is the Nightmare Rook, who is weak against dark or water. Leander should be your primary, the others bring Gizmo Supremo builds for extra magic restores. It has the same attack pattern as all the others: fast, strong and relentless. If you swap characters to confuse it on who to attack, it will open up more possibilities to attack, otherwise, time them in between its attacks the best you can.

The last Thwomp; your primary should be Leander or Evan with water balloon and higgledies to lower the enemy's weakness to magic attacks, as well as Gizmo Supremo for the other two for magic restores. Make sure to interrupt its call-ins, because the dragons it brings are HP sponges and massive time sinks.

Floor 29 & 30
I didn't have too much trouble with either of these. On 29, the only thing you need to watch out for is the one boss that can heal itself by going underground; if you lay on consistent damage and keep them either stun-locked or if they happen to be weak against freeze, that can keep it from ever burrowing underground and make the battle go quickly.

Floor 30 is quite simple and just requires you to adjust your magic ability to whatever the weakness of the enemy is and, in the first round, cleave through the mob of slimes as quickly as possible, but the rest just adjust accordingly and have the other two members not casting the spells bring Gizmo Supremo for the extra restoratives.

Always make sure you have your higgledies set to weaken against magic and you shouldn't have much trouble. Once you finish, you'll earn your achievement. Finally!

"Solosseum Supremo"
Awarded for an S-Rank Solosseum Slog clearance.
Dreamer Door Achievements
Dreamer Doors will be introduced in Chapter 4 during your first side quest as part of the main story. Once you complete your first task for Auntie Martha, a mysterious professor by the name of Professor Mileniyah.

She'll explain that there are nine doors in total across the world to explore. The first one will be right where you are in the Grotty Grotto, so make sure you check it out before returning to Auntie Martha!

Dreamer Door №1
Located in the Grotty Grotto, this introductory door will be introduced in Chapter 4 once you complete the first side quest as part of the main storyline.

Once you enter the Dream Doors for the first time, you'll be rewarded with your first achievement on these:

"Dream a Little Dream"
Awarded for entering your first Dreamer's Door.


At this point, you won't be able to clear any one door, as you'll be too low of a level to do so, but feel free to check them out and get a feel for them. They are maze-like, there is no map, and the enemies get substantially stronger the longer you stay in the maze.

Now you will need to complete all nine Dreamer Doors that are scattered about the world. Entering them will bring you to a maze you must traverse without a map, locate the next door and climb the levels of each maze to the end. At the last level of every maze, you will fight a boss of sorts, that will drop a dream fragment upon death.

Collect all nine fragments is the first step. Here are the locations of all nine doors.

Dreamer Door №1 - Grotty Grotto (Red Dream Fragment)

Dreamer Door №2 - Sundown Woods (Blue Dream Fragment)

Dreamer Door №3 - Eert Grove (Emerald Dream Fragment)

Dreamer Door №4 - Shrine of Pining (Yellow Dream Fragment)

Dreamer Door №5 - Sublime Shrine (Ocher Dream Fragment)

Dreamer Door №6 - Blowtorch Cave (White Dream Fragment)

Dreamer Door №7 - Crooked Cavern (Purple Dream Fragment)

Dreamer Door №8 - Tidewash Cave (Orange Dream Fragment)

Dreamer Door №9 - Shivery Shrine (Black Dream Fragment)
Dreamer Door Achievements
Once you have completed the above Dreamer Doors, you'll gain access to the Dreamer Maze. To complete all the achievements, you'll need to finish the maze in its entirety; the maze consists of 100 floors. The hitch is, to access floors 31-100, you need to change the difficulty setting to either "hard" or "expert". If you've been playing on easy from the start, this will not affect your ability to complete the Dreamer Maze, so don't worry about that.

There are several achievements revolving around the maze and they are as follows:

"Bad Dream"
Awarded for hitting Danger Lv. 5 in a Dreamer's Maze.

"Dream Big" & "Plumbing the Depths"
Awarded for surviving 10 Dreamer's Doors & Awarded for clearing floor 40 of the Dreamer's Maze.
Complete all nine Dreamer Doors to gain access to the 10th and final door located inside Faraway Forest. Complete the 40th floor and escape successfully to unlock this achievement.


The Labyrinth Achievements

The Labyrinth is part of the DLC for Ni No Kuni II; the entrance to the Labyrinth will be shown at the early stages of your playthrough. Being much more difficult than what you're able to do in the beginning when it comes up, once you're well suited for tackling it, head to the entrance found in the Rubbly Ruins outside Evermore.

The Labyrinth is broken up into five portals that cover 20 levels each. Every 20 levels you finish, you'll open another one, sort of as a "checkpoint" so you don't have to start from the first floor like the Dreamer Maze.

During your venturing, you'll have to face various tainted monsters within the floors whenever you complete a section of ten floors. Now, these tainted monsters don't count towards the achievement, just like the treasure chests don't. However, The Labyrinth is a great place to farm end game gear, weapons and experience points.

During The Labyrinth exploration, you'll collect pink orbs and be tasked with completing "Orbjectives". These are used to unlock special chests, as shown above, to earn gold items, which are the best of the best. These will be critical to surviving the Prince of Wraith within and completing the Dreamer Maze as well. Try to do as many "Orbjectives" as you can; they change with each floor you enter.

In experimenting, you can earn a gold item as low as 400 orbs when opening it, but it isn't a guarantee. To guarantee it, bring with you at least 500 orbs, but the more the better.

The Labyrinth is also a great place to farm end game resources needed to identify attributions of gold items, remove curses from gear and improve the quality of items in Evermore. I highly recommend spending some time grinding both gear and levels because, as you progress, enemies become increasingly tougher and the Prince of Wraiths pulls no punches the four different times you must face him; be prepared.

If you need to grind levels, or are looking for better gear, I found the best method, in my opinion at least, would be the levels 81-100 (the last portal). While the Solosseum Slog can, potentially, net you better overall gear, the amount of time it takes to farm the ingots is astronomical by comparison.

I would highly recommend going this route for gear. Upon completing all 100 levels of The Labyrinth and defeating the Prince of Wraiths on Hard or Expert difficulty, you'll earn these achievements:

"How Low Can You Go"
Awarded for fully exploring the labyrinth.


"Ruiner of Wraiths"
Awarded for clearing the labyrinth in Hard Mode or above.

Errand Achievements
Errands, much like side quests, are scattered about the land as small job postings by random citizens of each town. To start an errand, you'll have to make your way to Goldpaw and progress the story long enough for Swift Solutions to appear outside the casino doors. Do note, as you explore further in the game and visit other cities, all Swift Solutions will be tied together and offer the same side quests, rewards and errands.

The Taskmaster, as he is known, has a sign and marker that you can see from the map of the city. Speak to him to select a variety of tasks; some hard, some easy, some long, some short.

There are three achievements tied to errands, which include completing one errand, 50 errands and even 100 errands. For those that played the first game, you use to bring the item(s) to the citizen in need, but in this game, you return the necessary items back to the Taskmaster directly.

The other change is that the errands aren't finite and numbered, meaning that they change regularly and are, literally, infinite. The Tokens of Gratitude you get for completing them are used to trade for resources and new citizens for Evermore, so make sure you do them not only for the achievements associated with them, but for the citizen achievements as well.

Since the errands aren't cataloged and repeat, I won't be listing any here, as you can essentially just do simple tasks when they are available to get enough tokens for trade and completions for the achievements.

"All About the Errands"
Awarded for completing 50 errands.
Complete any 50 errands from Swift Solutions to unlock this achievement.

"Knight Errand"
Awarded for completing 100 errands.
Complete any 100 errands from Swift Solutions to unlock this achievement.
Magic Achievements
"Master of Magic"
Awarded for upgrading your spells 50 times.
The magic achievement is self-explanatory; you just need to upgrade any spells, across all characters, a total of 50 times, to unlock it. You can obtain this easily before you enter the postgame content, so don't worry about it.

I'd recommend doing it over time, though, as the DLC requires some hefty spells to brute force your way through the challenges to come, so work on it over time is best advised.

One recommendation is to work on errands from Swift Solutions. Tokens of Gratitude will come in handy to level up Evan's final light spells and Leander's final dark spells. They require some very rare items that, while you can earn them elsewhere, you can simply trade for them with tokens.

It's much easier this way, so occasionally do some throughout your playthrough and save some extra aside from just doing them to recruit new citizens for Evermore.


Citizen Achievements (1-25)
Once you complete your first side quest (see that portion of the guide for more), you'll be given your first new citizen. There are a total of 84 that you can recruit by doing various errands, side quests and other objectives along your travels. You'll start your kingdom with 16, so you don't need to recruit all 100 individually.

Recruit the following amount of citizens to unlock these corresponding achievements:

"Raw Recruiter"
Awarded for recruiting your first new subject.


"Recruiting Sergeant"
Awarded for recruiting 50 new subjects.


"Recruiting Consultant"
Awarded for recruiting 100 new subjects.


Here is a list of all 100, where to obtain them and how to do so. If there are any other requirements, I will list them as well. The list is as follows:

Citizen Name & №
Location
Requirements
▆▆▆▆▆▆▆▆▆▆▆▆▆
▆▆▆▆▆▆▆▆▆▆▆▆▆
▆▆▆▆▆▆▆▆▆▆▆▆▆▆▆▆▆▆▆▆▆▆▆
№1 - Auntie Martha
Auntie Martha's Cottage
Complete the first introductory side quest "Auntie Martha's Scrubber". Once you return to her, she'll move to your kingdom.
№2 - Persha, A Maid Like No Other
Goldpaw
Complete side quest seven in Goldpaw (see side quest section for further) to have Persha join your kingdom.
№3 - Li Li, The Troubled Genius
Goldpaw
Complete side quest eight for Li Li to join Evermore. See "Side Quest №8 - Li Li, The Troubled Genius" for further instructions.
№4 - Munokhoi the Sky Pirate
The Sky Pirate Base
Complete side quest three for Munokhoi to join Evermore. See side quest "Side Quest №3 - Munokhoi, the Shy Pirate" for further instructions.
№5 - Gao Jia, the Sullen Soldier
Goldpaw
Complete side quest nine, which is part of the main storyline to have Gao Jia join your kingdom.
№6 - Bai Gon, the Grizzled Veteran
Goldpaw
After completing side quest nine, you'll find him resting in Goldpaw in the northern portion of the city as part of the main story. He'll join you, but he has a request first. Complete side quest 10 to recruit him.
№7 - Min Ti, the Sharp Shooter
Goldpaw
After completing side quest nine, you'll find her tucked away in an alley in Goldpaw in the center portion of the city as part of the main story. She'll join you if you bring her one sleep-be-gone. Complete side quest 11 to recruit her.
№8 - Pi Chi, the Skillful Seamstress
Goldpaw
After completing side quest 11, you'll be rewarded with five spools of grass-green thread. Bring one back to Pi Chi to complete the bond between you two and she'll make her way to your kingdom.
№9 - Fai Do, the Downbeat Armorer
Goldpaw
Complete side quest nine and side quest 12 will appear in Goldpaw. Fai Do is related to Bai Gon and will join your kingdom once you bring him three silver nugets. You can easily find these from your mining camp if you've upgraded it to level two.
№10 - Tabbias, the Trusting Traveler
Goldpaw
Complete Side Quest №14 - Tabbias, the Trusting Traveler (see that section of the guide for more information).
№10 - Hau Ling the Fortune Teller
Goldpaw
Complete Side Quest №23 - Hau Ling's Fall from Grace (see that section of the guide for more information).
№11 - Miss Henny, the Teacher
Goldpaw, then the Forest of Niall
Complete Side Quest №24 - Miss Henny's Misfortune (see that section of the guide for more information).
№12 - Nu Bi, the Weapons Maker
Goldpaw
Complete Side Quest №4 - A Favor for Nu Bi (see that section of the guide for more information).
№12 - Hoi Den, the Martial Artist
Goldpaw
Complete Side Quest №5 - Hang On, Hoi Den! (see that section of the guide for more information).
№12 - Muriel, the Llapaca Herder
Forest of Niall
Complete Side Quest №26 - Muuuriellll! (see that section of the guide for more information).
№13 - Yu Kan, the Kind Teacher
Goldpaw
Complete Side Quest №20 - Yu Kan, the Kind Teacher (see that section of the guide for more information).
№14 - Yung Mein, the Trainee Guard
Goldpaw
Complete Side Quest №13 - Yung Mein, the Trainee Guard (see that section of the guide for more information).
№14 - Ketch, the Boat Builder
Capstan-upon-Hull
He'll join you as part of the main story once you get to the point where you ask him to build you a boat.
№15 - Long Mein, Ardent Guardsmen
Goldpaw
He'll join you once you finish side quest 22 by winning a skirmish battle (see skirmish battle six for more details).
№16 - Fitch, the Friendly Blacksmith
Goldpaw
Complete Side Quest №21 - Fitch, the Friendly Blacksmith (see that section of the guide for more information).
№17 - Ah Chu, the Caring Blacksmith
Goldpaw
Complete Side Quest №19 - Ah Chu, the Caring Blacksmith (see that section of the guide for more information).
№18 - Chi Pi, the Master Carpenter
Goldpaw
Complete Side Quest №18 - Chi Pi, the Master Carpenter (see that section of the guide for more information).
№19 - Moggie May, the Hard-Nosed Huntress
Shiverspine Grove
Complete Side Quest №27 - The Hard-Nosed Huntress (see that section of the guide for more information).
№20 - Leander of Hydropolis
Hydropolis
He'll join your kingdom at the end of chapter five as part of the main story.
№21 - Fillippos, the Novice Hunter
Hydropolis
Complete Side Quest №43 - Filippos, the Novice Hunter (see that section of the guide for more information).
№22 - Alice, AKA Mini Martha
Auntie Martha's Cottage
Complete Side Quest №25 - Alice, AKA Mini Martha! (see that section of the guide for more information).
№23 - Bao Wao, the Street Trader
Goldpaw
Complete Side Quest №40 - Bao Wao the Street Trader (see that section of the guide for more information).
№24 - Peleus, the Amiable Armorer
Hydropolis
Complete Side Quest №47 - Peleus, the Amiable Armorer (see that section of the guide for more information).
№25 - Hansel, the Fanciful Gardner
Forest of Niall
Complete Side Quest №54 - Hansel, the Fanciful Gardner (see that section of the guide for more information).


Citizen Achievements (26-50)
Citizen Name & №
Location
Requirements
▆▆▆▆▆▆▆▆▆▆▆▆▆
▆▆▆▆▆▆▆▆▆▆▆▆▆
▆▆▆▆▆▆▆▆▆▆▆▆▆▆▆▆▆▆▆▆▆▆▆
№26 - Glaucus, the Ambitious Angler
Hydropolis
Complete Side Quest №45 - Glaucus, the Ambitious Angler (see that section of the guide for more information).
№27 - Proteus, the Gloomy Jeweler
Hyropolis
Complete Side Quest №49 - Proteus, the Gloomy Jeweler (see that section of the guide for more information).
№28 - Nereus, the Singer
Hydropolis
Complete Side Quest №48 - A Career Cut Short (see that section of the guide for more information).
№29 - Triton, the Honest Scholar
Hydropolis
Complete Side Quest №50 - Triton, the Honest Scholar (see that section of the guide for more information).
№30 - Helena, the Hearty Hunter
Hydropolis
Complete Side Quest №52 - Helena, the Hearty Hunter (see that section of the guide for more information).
№31 - Tiller, Long-Distance Rower
Capstan-upon-Hull
Complete Side Quest №37 - Tiller, Long-Distance Rower (see that section of the guide for more information).
№32 - Crispin, the Cobbler
Capstan-upon-Hull
Complete Side Quest №38 - Sick of Sandals (see that section of the guide for more information).
№33 - Chip, the Child Prodigy
Broadleaf
Complete Side Quest №72 - Chip, the Child Prodigy (see that section of the guide for more information).
№34 - Candy, the Spirit-Seeker
Broadleaf
Complete Side Quest №79 - Candy, the Spirit-Seeker (see that section of the guide for more information).
№35 - Thetis, Medicinal Merperson
Hydropolis
Complete Side Quest №71 - Thetis, Medicinal Merperson (see that section of the guide for more information).
№36 - Pontus, the Oceanographer
Hydropolis
Complete Side Quest №44 - Pontus's Ocean of Knowledge (see that section of the guide for more information).
№37 - Broadie, the Engineer
Broadleaf
Complete Side Quest №81 - Brodie's Last Big Job (see that section of the guide for more information).
№38 - Halimede, the Beautician
Hydropolis
Complete Side Quest №70 - Sense and Sensibilities (see that section of the guide for more information).
№39 - Cindy May, the Security Guard
Broadleaf
Complete Side Quest №78 - Robot on the Run (see that section of the guide for more information).
№40 - Kimmy, the Police Officer
Broadleaf
Complete Side Quest №77 - Kimmy, the Cool-Headed Cop (see that section of the guide for more information).
№41 - Oz, The Security Guard
Broadleaf
Complete Side Quest №73 - Oz Wants Out (see that section of the guide for more information).
№42 -Andy, the Robot
Broadleaf
Complete Side Quest №76 - An Upgrade for Andy (see that section of the guide for more information).
№43 - Da Xing, The Haughty Herbalist
Goldpaw
Complete Side Quest №95 - Da Xing, the Haughty Herbalist (see that section of the guide for more information).
№44 - Yip-Yip, the Master Tailor
Goldpaw
Complete Side Quest №96 - Yip-Yip, the Master Tailor (see that section of the guide for more information).
№45 - Sybilla, the Decisive Diver
Hydropolis
Complete Side Quest №100 - Sybilla, the Decisive Diver (see that section of the guide for more information).
№46 - Drew, the Capable Cop
Broadleaf
Complete Side Quest №101 - Drew, the Capable Cop (see that section of the guide for more information).
№47 - Kent, the Magical Ore Analyst
Broadleaf
Complete Side Quest №75 - Kent, the Magical Ore Analyst (see that section of the guide for more information).
№48 - Briana, Bold Weapon Designer
Broadleaf
Complete Side Quest №104 - Briana, Bold Weapon Designer (see that section of the guide for more information).
№49 -
№50 - Francine, the Impresario
Broadleaf
Complete Side Quest №105 - Francine, the Impresario (see that section of the guide for more information).
Citizen Achievements (51-75)
Citizen Name & №
Location
Requirements
▆▆▆▆▆▆▆▆▆▆▆▆▆
▆▆▆▆▆▆▆▆▆▆▆▆▆
▆▆▆▆▆▆▆▆▆▆▆▆▆▆▆▆▆▆▆▆▆▆▆
№51 - Mylas, the Sorcerer
Hydropolis
Complete Side Quest №97 - Mylas's Big Adventure (see that section of the guide for more information).
№52 - Speio, Priestess in Training
Hydropolis
Complete Side Quest №51 - Speio, Priestess in Training (see that section of the guide for more information).
№53 - Price, the Trader
Broadleaf
Complete Side Quest №74 - Price's Delayed Deliver (see that section of the guide for more information).
№54 - Morgan, the Buyer
Capstan-upon-Hull
Complete Side Quest №106 - The World's Best Buyer (see that section of the guide for more information).
№55 - Phorkys, the Hydropolitan Guard.
Hydropolis
Complete Side Quest №98 - Ladies Love Fabulous Phorkys (see that section of the guide for more information).
№56 - Hipponoe, the Shy Artist
Hydropolis
Complete Side Quest №99 - Hipponoe, the Shy Artist (see that section of the guide for more information).
№57 - Keeley, the Ship Builder
Capstan-upon-Hull
Complete Side Quest №42 - Daddy Come Home (see that section of the guide for more information).
№58 - Krystal, the Magical Researcher
Broadleaf
Complete Side Quest №80 - The Search for Eternal Youth (see that section of the guide for more information).
№59 - Brooke, the Programmer
Broadleaf
Complete Side Quest №103 - Brooke, Committed Careerist (see that section of the guide for more information).
№60 - Jared, the Elite Officer
Broadleaf
Complete Side Quest №126 - Jared, the Elite Officer (see that section of the guide for more information).
№61 - Alexis, the Hard-Nosed Cop
Broadleaf
Complete Side Quest №127 - Alexis, the Hard-Nosed Cop (see that section of the guide for more information).
№62 - Ya Pi, the Proud Soldier
Goldpaw
Complete Side Quest №122 - Ya Pi, the Proud Soldier (see that section of the guide for more information).
№63 - Herbert, the Future Historian
Ding Dong Dell
Complete Side Quest №128 - Herbert, the Future Historian (see that section of the guide for more information).
№64 - Marlene, the Palace Sorceress
Ding Dong Dell
Complete Side Quest №138 - Marlene, Good Girl Gone Bad (see that section of the guide for more information).
№65 - Grisella, the Mage
Ding Dong Dell
Complete Side Quest №135 - The Misunderstood Mage (see that section of the guide for more information).
№66 - Kitty, the Baker
Ding Dong Dell
Complete Side Quest №136 - Kitty, the Bubbly Baker (see that section of the guide for more information).
№67 - Trey, the Industrial Engineer
Broadleaf
Complete Side Quest №125 - Trey's Missing Memolith (see that section of the guide for more information).
№68 - Grimm, the Palace Guard
Ding Dong Dell
Complete Side Quest №132 - Grimm's Determination (see that section of the guide for more information).
№69 - Ritter, the Tailor
Ding Dong Dell
Complete Side Quest №133 - Ritter's Got Tailor's Block! (see that section of the guide for more information).
№70 - Roden, the Architect
Ding Dong Dell
Complete Side Quest №134 - Pollution Solution (see that section of the guide for more information).
№71 - Rosamund, the Baker
Ding Dong Dell
Complete Side Quest №137 - The People's Patissiere (see that section of the guide for more information).
№72 -Raxel, the One-Eyed Mercenary
Ding Dong Dell
Complete Side Quest №130 - Raxel, the One-Eyed Mercenary (see that section of the guide for more information).
№73 - Grampuss, the Engraver
Ding Dong Dell
Complete Side Quest №131 - The Engraver's Riddle (see that section of the guide for more information).
№74 - Rumpel, the Village Vet
Greenglade Cave
Complete Side Quest №82 - Rumpel, the Village Vet (see that section of the guide for more information).
№75 - Furnest, the Author
Ding Dong Dell
Complete Side Quest №107 - Furnest, the Inscrutable Author (see that section of the guide for more information).
Citizen Achievements (76-84)
Citizen Name & №
Location
Requirements
▆▆▆▆▆▆▆▆▆▆▆▆▆
▆▆▆▆▆▆▆▆▆▆▆▆▆
▆▆▆▆▆▆▆▆▆▆▆▆▆▆▆▆▆▆▆▆▆▆▆
№76 - Yo Ho-Ho, the Gambler
Goldpaw - Casino
Complete Side Quest №23 The Goddess of Good Luck (see that section of the guide for more information).
№78 - Tyger, the Weapon Sharpener
Hermit's Hollow
Complete Side Quest №140 - Taming Tyger (see that section of the guide for more information).
№79 - Callianeira, Priestess of Water
Hydropolis - Throne Room
Complete Side Quest №124 - Callianeira, Priestess of Water (see that section of the guide for more information).
№80 - Sin-Gul, the Bard
Capstan-upon-Hull
Postgame - Complete Side Quest №159 - A Man of Many Names (see that section of the guide for more information).
№81 - Dekkah, the Geomancer
Rolling Hills - Overworld (Postgame)
Postgame - Complete Side Quest №160 - Dekkah's Grand Tour (see that section of the guide for more information).
№82 - Senturi, the Minstrel
Evermore (Postgame)
Postgame - Complete Side Quest №161 - Testing the One True King (see that section of the guide for more information).
№83 - Tyran, the Bandit
Squeezethrough Grotto
Complete Side Quest №162 - Tyran's Lament (see that section of the guide for more information).
№84 - Mileniyah, the Professor
Goldpaw
Complete Side Quest №2 - Top Marks for Trying (see that section of the guide for more information).
Songbook Achievements (1-15)
Songbooks are scattered all over the world; some in treasure chests, some rewards for helping others, defeating foul beasts and lots more. They don't come into play for a while and you'll get through the first three chapters without coming across any of them.

There are 30 in total you'll need to collect over the course of your adventure in order to obtain the achievement for collecting them all. Here are all 30, where to find them and what you need to do to acquire them to make it easy on you. The songbooks are numbered in game, so keeping track of what you do have will be easy.

Do note, you won't collect them in order. The first one you find will be Songbook 13.

Songbook №
Location
Additional Comments & Maps
▆▆▆▆▆▆▆▆▆▆▆▆▆
▆▆▆▆▆▆▆▆▆▆▆▆▆
▆▆▆▆▆▆▆▆▆▆▆▆▆▆▆▆▆▆▆▆▆▆▆
Songbook №1
Hydropolis
Complete Side Quest №48 - A Career Cut Short (see that section of the guide for more information).
Songbook №2
Evermore (Postgame)
Complete Side Quest №161 - Testing the One True King (see that section of the guide for more information).
Songbook №3
Rolling Hills - Locked Chest
Songbook №4
Starboard Island
South of Capstan-upon-Hull and guarded by a level 29 tainted monster, this treasure chest will contain this songbook.
Songbook №5
Upheer Plain
Songbook №6
Evermore
Complete Side Quest №170 - The Divine Silence (see that section of the guide for more information). This side quest is only available in the postgame.
Songbook №7
Evermore
Once you get to chapter five, you'll be able to speak to Min Ti who will give you a message to participate in a skirmish with Goldpaw under Side Quest №34 - Going at it with Goldpaw. She'll be in Evermore with the side quest. The skirmish is level 14, so you'll have to complete it later on when you're stronger.
Songbook №8
Evermore
Complete Side Quest №62 - Skirmish With the Sea's Finest (see that section of the guide for more information).
Songbook №9
Broadleaf
Complete Side Quest №92 - Big Unveiling in Broadleaf (see that section of the guide for more information).
Songbook №10
Evermore
Complete Side Quest №152 - Ding-Dong vs. Ding Dong Dell (see that section of the guide for more information).
Songbook №11
Ding Dong Dell
Complete Side Quest №129 - Klaus, the Master Merchant (see that section of the guide for more information).
Songbook №12
Ding Dongf Dell - Sewers
Located in the sewers beneath the city, you can find it in a treasure chest marked here:
Songbook №13
Cloudcoil Canyon (3rd visit)
As part of the main story, you'll be tasked with collecting an Inceniraptor's horn. Once you collect the horn, there will be a chance to raid one of the treasure chests on the plateau for this songbook. This will happen in Chapter 4.
Songbook №14
Forest of Niall
Once you have access to this area of the forest by progressing through the main story, grab this treasure chest shown on the map to collect this songbook.
Songbook №15
Abyss - 3,000 Fathoms
Found in one of the two treasure chests in the deepest part of the Abyss of Hydropolis. If you missed it, take Trip Door №30 to the bottom of the Abyss to pick it up.
Songbook Achievements (16-30)
Songbook №
Location
Additional Comments & Maps
▆▆▆▆▆▆▆▆▆▆▆▆▆
▆▆▆▆▆▆▆▆▆▆▆▆▆
▆▆▆▆▆▆▆▆▆▆▆▆▆▆▆▆▆▆▆▆▆▆▆
Songbook №16
Broadleaf - Factory Fl #3
Songbook №17
Evermore (postgame)
Complete Side Quest №168 - Currying Flavor (see that section of the guide for more information).
Songbook №18
Rubbly Ruins - Locked Chest
Songbook №19
Snaketooth Ridge
Requires the zippelin to reach this treasure chest containing this songbook.
Songbook №20
Crawlspace Cave - West of Broadleaf
Obtained after defeating the tainted monster called: Skrych. This is part of side quest №75 - Kent, the Magical Ore Analyst. See the side quest portion of this guide for more on how to complete this side quest.
Songbook №21
Wiggly Way
Obtained by defeating the tainted monster: Swellhorn outside of the Forest of Niall.
Songbook №22
Evermore (Postgame)
Complete Side Quest №161 - Testing the One True King (see that section of the guide for more information).
Songbook №23
Ding Dong Dell
See Side Quest №164 - A Tall Order for further on how to complete this side quest.
Songbook №24
Capstan-upon-Hull
Side Quest №106 - The World's Best Buyer. You'll end up buying this songbook for 5,000 guilder.
Songbook №25
Broadleaf
See Side Quest №144 - The Dark Side of Development for further on how to complete this side quest.
Songbook №26
Jack Frost's Playground
See Side Quest №164 - A Tall Order for further on how to complete this side quest.
Songbook №27
Greenglade Cave
See Side Quest №60 - Who's the Big Boss? for further on how to complete this side quest.
Songbook №28
Evermore
Complete Side Quest №155 - Toil and Trouble (see that section of the guide for more information).
Songbook №29
Evermore
Once you recruit Triton to Evermore (see Side Quest №50), speak to him to start Side Quest №63 - Triton's Lost Treasure. Complete it to be given this songbook as a reward.
Songbook №30
Broadleaf
Complete Side Quest №87 - Do You Believe in Higgledies? (see that section of the guide for more information.)
Songbook №31
Goldpaw
After finishing chapter four and entering chapter five, a citizen named Long Mein will appear at the entrance to the city demanding papers for your visit. Complete the quest to earn this as a reward.

This is Side Quest №22 - Long Mein, Ardent Guardsmen (see that section of the guide for more information.)
Roland's Journal Achievements (1-30)
Journal Entry №
Location
Map
▆▆▆▆▆▆▆▆▆▆▆▆▆
▆▆▆▆▆▆▆▆▆▆▆▆▆
▆▆▆▆▆▆▆▆▆▆▆▆▆▆▆▆▆▆▆▆▆▆▆
№1
Cloudcoil Canyon - Sidewinder Ridge
№2
Cloudcoil Canyon
№3
Cloudcoil Canyon - Snaketooth Ridge - Wyvern's Den
№4
Sky Pirate's Base (Airfield)
№5
Hideaway Hollow
№6
Heartlands
№7
Goldpaw - Fortune's Square
№8
Forest of Niall - Auld Woods
№9
Evermore - Throne Room (Behind the throne)
N/A - Simply go to the thrown room and search behind the chair to locate this journal entry.
№10
Forest of Niall - Sunnypatch Pond (Center of the tree roots)
№11
Grotty Grotto
№12
Goldpaw - Library
№13
Capstan-upon-Hull (Outside)
№14
Hydropolis
№15
Hydropolis (Throne Room)
N/A - Take the elevator down to the throne room. Right before you enter the room, you should see the entry on the left just before the door.
№16
Abyss - 1,000 Fathoms
№17
Broadleaf - Dome Park Elevator
№18
Broadleaf - Dynofloor №1
№19
Broadleaf - Cradle of Wisdom
N/A - You can easily spot this one right by the singular staircase.
№20
Broadleaf - Reactor Room (Take the Cradle of Wisdom elevator down to it)
№21
Evermore
№22
Ding Dong Dell - Behind Fountain
№23
Crypt of the Cat Kings (Inside)
№24
Ding Dong Dell (Castle)
№25
Ding Dong Dell (Castle - Evan's Room)
№26
Goldpaw - Library
№27
Lost City
№28
Allegoria
N/A - After you defeat Doloran for the first time, but before you speak to him again to face the final boss, you'll find this journal entry right behind Doloran.
№29
Nazcaä - Overworld
№30
Ding Dong Dell (Castle - Evan's Room (Secret Room))
Story Achievements
"King in Exile"
Awarded for finishing Chapter 1.
Main story; complete chapter one to unlock this achievement.


"King Reborn"
Awarded for finishing Chapter 2.
Main story; complete chapter two to unlock this achievement.


"Kingdom Creator"
Awarded for finishing Chapter 3.
Main story; complete chapter three to unlock this achievement.


"A Destiny Discovered"
Awarded for finishing Chapter 4.
Main story; complete chapter four to unlock this achievement.


"A Matter of Time"
Awarded for finishing Chapter 5.
Main story; complete chapter five to unlock this achievement.


"The Price of Progress"
Awarded for finishing Chapter 6.
Main story; complete chapter six to unlock this achievement.


"The Mark of Kings"
Awarded for finishing Chapter 7.
Main story; complete chapter seven to unlock this achievement.


"Peace Breaks Out"
Awarded for finishing Chapter 8.
Main story; complete chapter eight to unlock this achievement.


"Onward to Unity"
Awarded for finishing Chapter 9.
Main story; complete chapter nine to unlock this achievement.
⠀⠀⠀⠀⠀⠀
For more of my guides, check out the link below:

https://steamcommunity.com/sharedfiles/filedetails/?id=1304735272
⠀⠀⠀⠀⠀⠀⠀⠀
7 kommentarer
Kayo Moon 8. feb. kl. 17:27 
The main two weapons that are pretty much mandatory are Slithy Sword, and 2 bawbee wands. Those help IMMENSELY with runs. (And they aren’t too hard to grind for).

Also round 28 for me was definitely harder than 27. 27 is about skill with Cetus and 28 has so many tanky enemies, getting Lofty to pull a gold ball is paramount to your run. I beat it with a minute left on the clock thanks to Lofty’s gold ball. Otherwise I’m not sure I would’ve made it.

Good luck to anyone attempting all s rank. The amount of micromanaging gets insane and the difficulty curve compared to the base game gets really tough round 20 +

There’s also really good resources on YouTube that you can watch.
Kayo Moon 8. feb. kl. 17:27 
To help even more, use accessories that massively increase elemental damage. So a wind imbued weapon with a gusty IV ring or similar will do so much more damage than a gold weapon with no element.

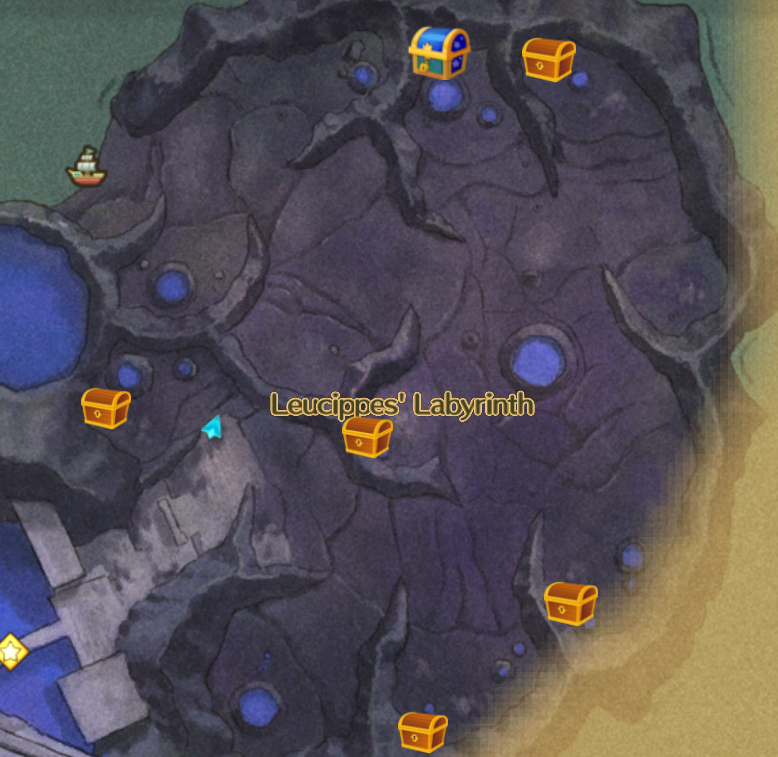
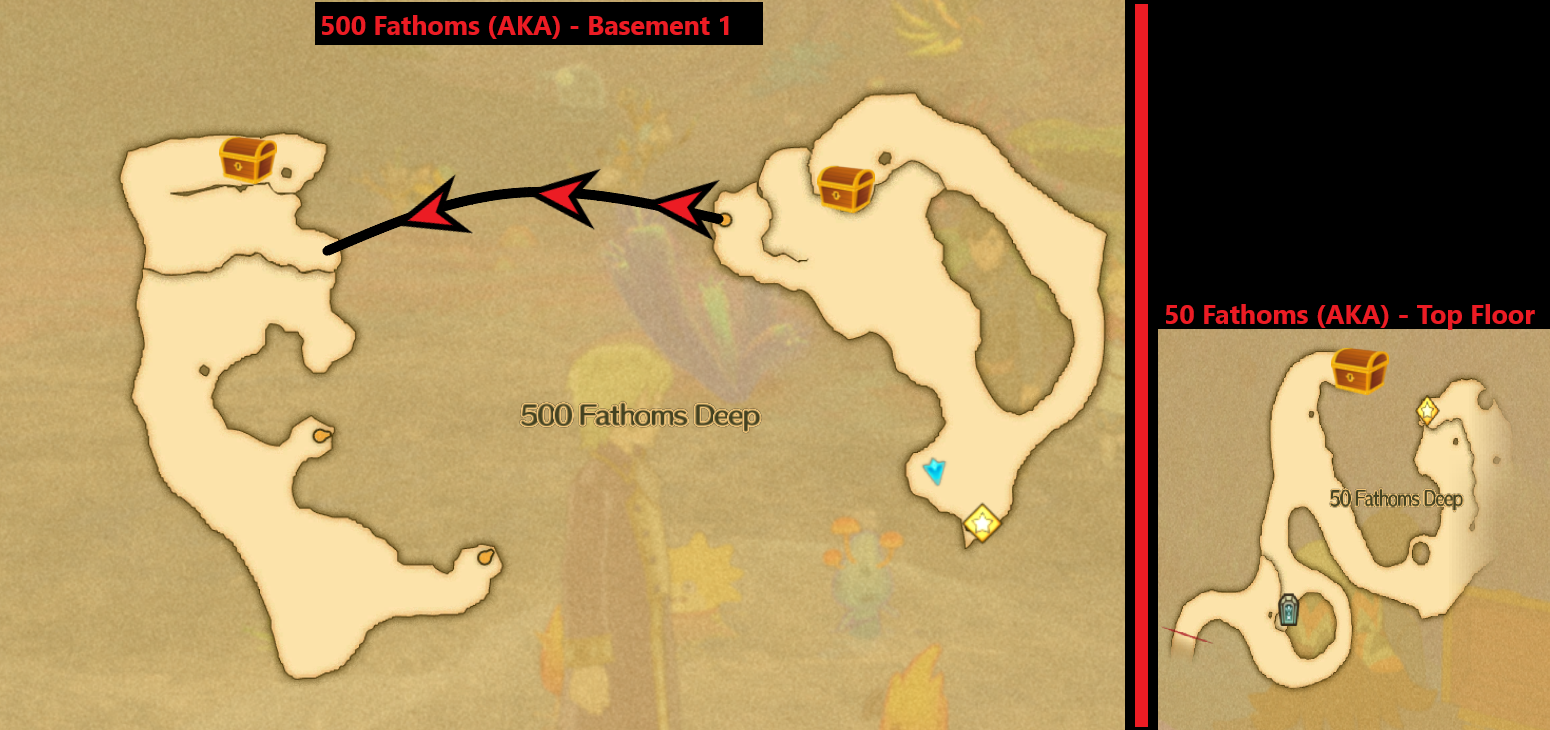
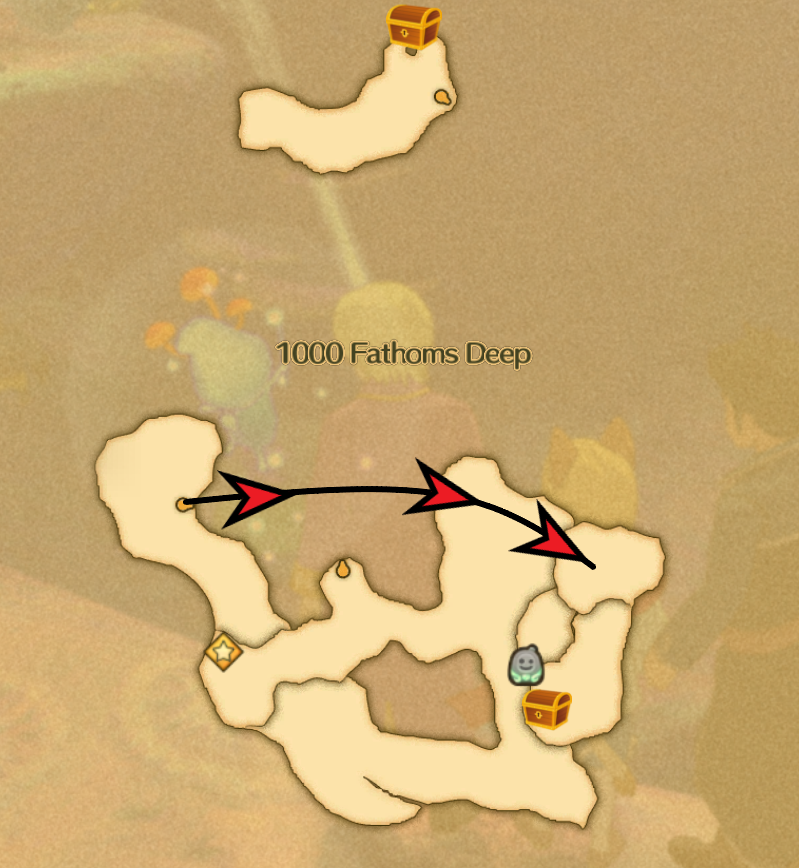
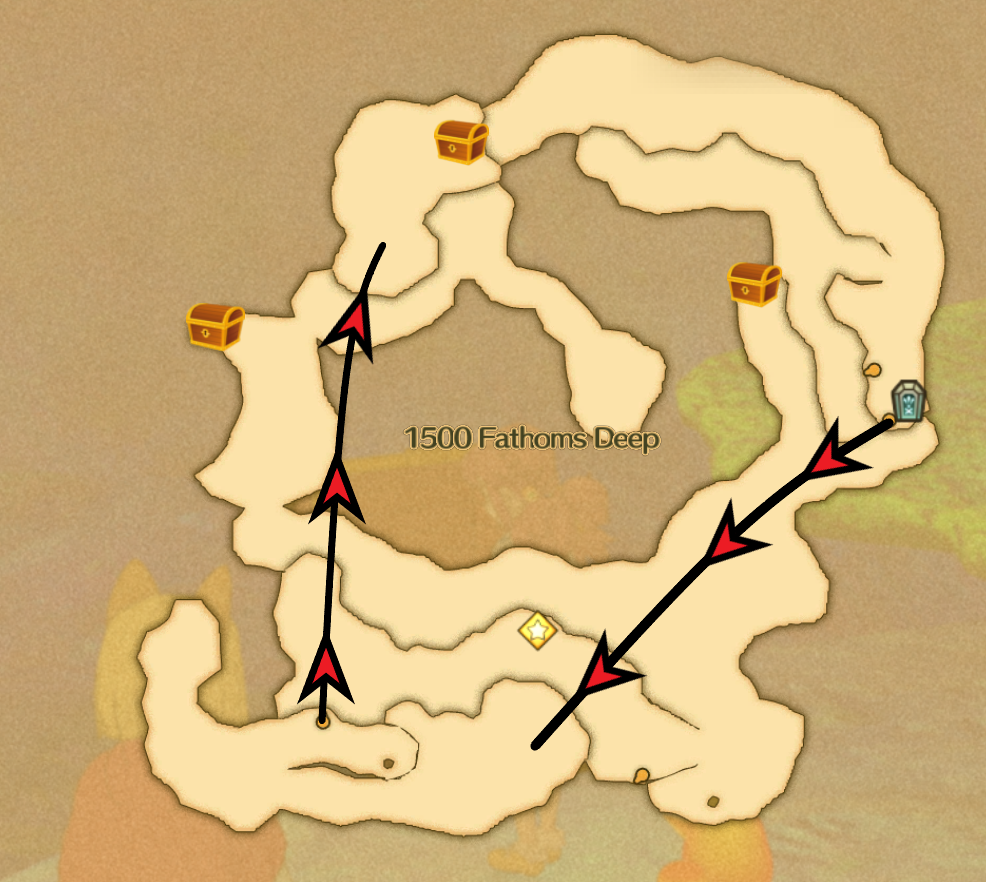
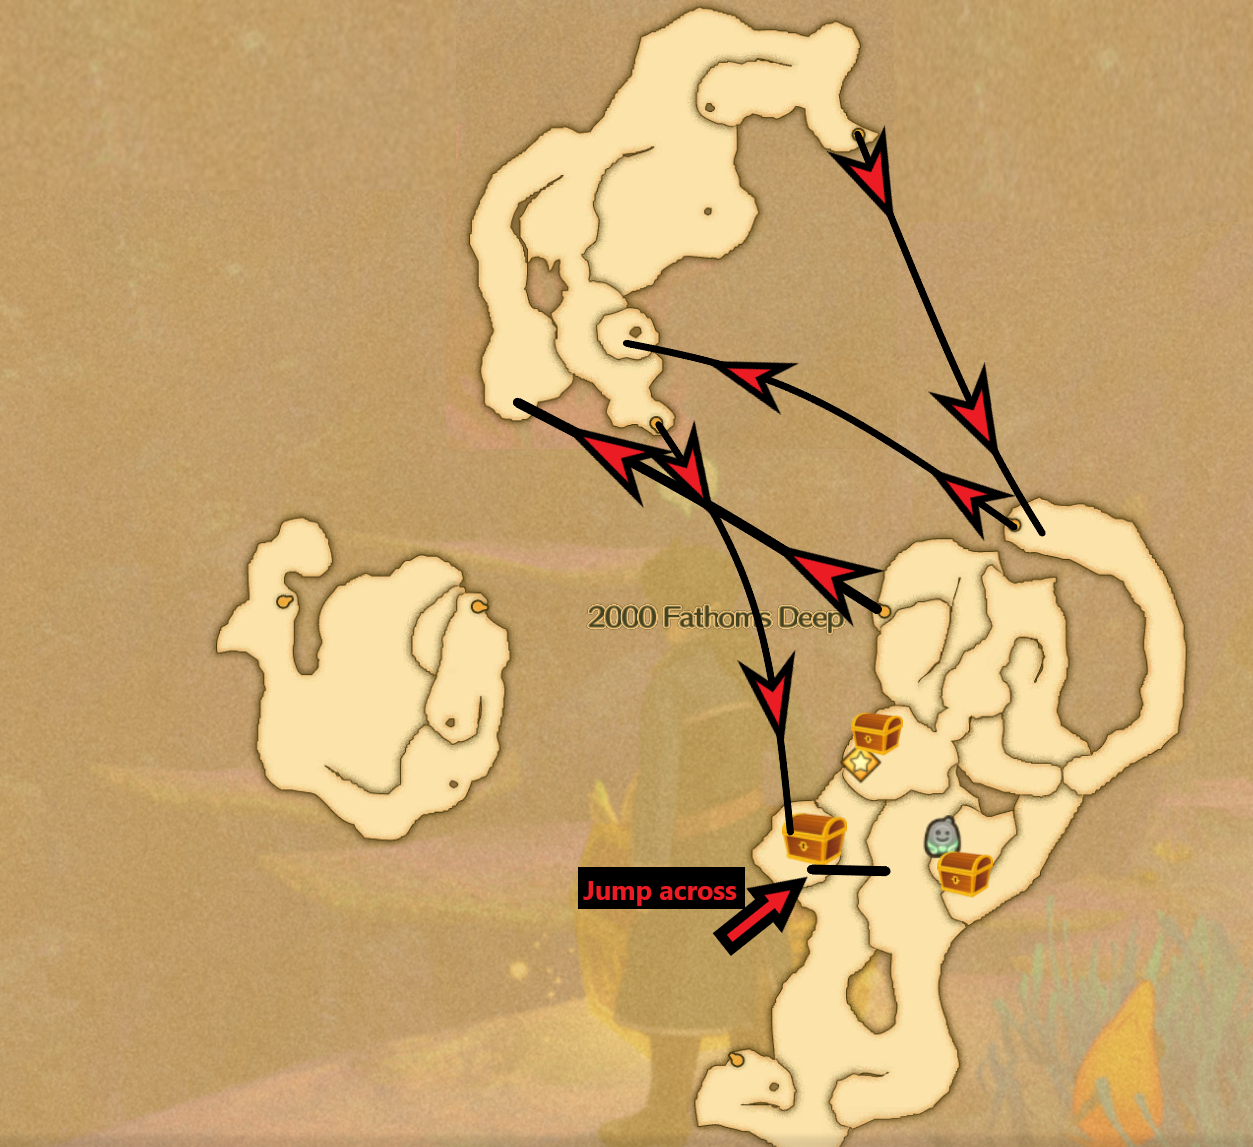
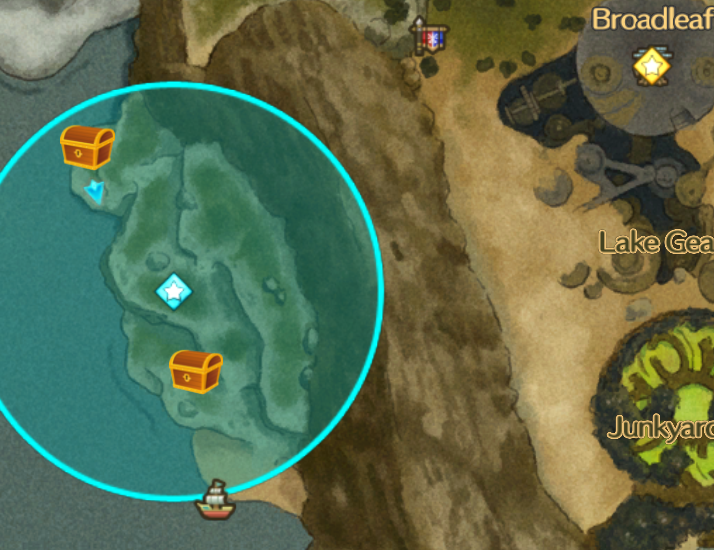
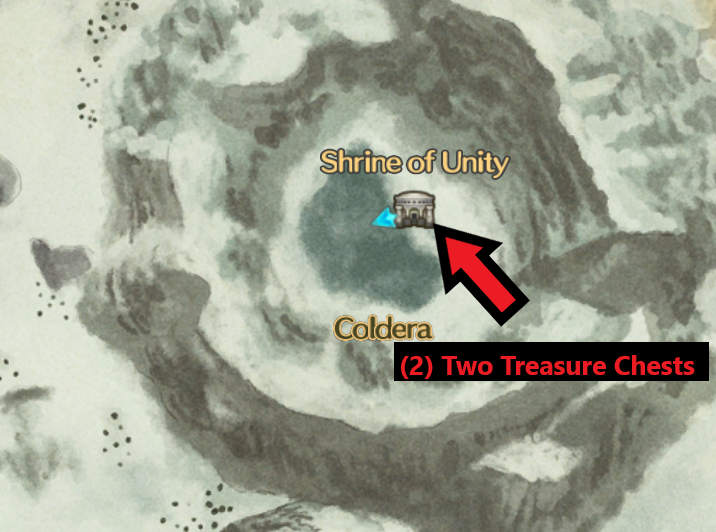
I didn’t bother grinding for the godhead sword as the silver ingot just didn’t drop but the sword of unity worked perfectly fine. (For light element).
Kayo Moon 8. feb. kl. 17:22 
Hello! Just finished the solosseum on s rank and wanted to share a few tips if anyone else sees this. It is NOT required to have the best of the best weapons in the solosseum. Running the labyrinth a few times is definitely helpful for gold weapons but the most important items are actually weapons which are imbued with a certain element.

For ex. An enemy is weak to wind. I’ve found that even the best gold weapon DOES NOT even compete with a weapon that is imbued with that element. Elemental weakness is so important to the solosseum. So if you don’t have a certain gold weapon you need with that element, just use any weapon imbued (when it’s weak too that element) even if it’s weak. A imbued weapon > random gold weapon especially for rounds 27 and 28.
ErickaUnlimited  [ophavsmand] 15. jan. kl. 9:43 
@Kayo Moon - Thank you very much for the kind words. Glad it has been helpful! :smilekit:
Kayo Moon 15. jan. kl. 8:36 
Thank you so much for this guide!! Should be 5 stars. It's very detailed and laid out nicely. Love how you included everything and appreciate the pictures for the locations. :HatHealth:
ErickaUnlimited  [ophavsmand] 9. apr. 2024 kl. 20:56 
Much appreciated.
hana-bi 9. apr. 2024 kl. 18:51 
great guide! :pm2rf_love: