Aliens: Fireteam Elite

Aliens: Fireteam Elite

Not enough ratings
Comprehensive Recon Guide
By DrunkBunny94
People think that Recon is just a walking ammo bag and i see players barely help beyond that but as Recon you bring so much damage in the form of your CQW, chain reaction, red is dead and auto reloading weapons as well as loads of utility in the form of Cooldown Reduction, ammo and slows all of which lets you set your team up for a successful fight while keeping up in damage/kills.
This guide is to teach you how.
   
Award
Favorite
Favorited
Unfavorite
How to use this guide:
Use the contents on the left to jump to the specific builds --->

Perks will be at the top with their description and a quick analysis refer to this if you want to double check what a perk does.

This guide is made mostly with Extreme and Insane in mind. On lower difficulties the aliens have little HP and so loads more weapons hit useful kill thresholds so build plays a much smaller role in your success and "anything goes".

Perks
Essential:

Red is dead: 10% team damage perk against Revealed targets, 3 tiles – This is a debuff on enemies so the whole team gets that 10% damage bonus and with pups or weapon optics with the "reveal" keyword most enemies will get revealed.

Got your back & Back in the fight: Killing an enemy attacking an ally will reload both your weapons & gives you both 10% ability recharge 2 tiles each for 4 total – Position where this proc's constantly and you reload less and both you and your ally can spam your abilities more.

Unbreakable focus & Eye on the prize: 50% reload speed and 50% handling at max focus for 1 tile & 5% fire rate and stamina regen per stack of focus for 3 tiles – Benefits both weapons and the 50% reload speed gives you amazing solo/clutch ability.

Pups modifiers:

Standard Pups: Reveals everything and lowers their damage by 20%. Great all round ability for both vision, teamwide damage boost and slow with our other perks – Super strong for if your team lacks CC or horde control.

Bloodhound: highlights a single target making it take 25% more damage from all sources, 2 tiles – Very useful for elite heavy missions or team comps that are lacking DPS.

Best Friend: gives the team 15% ability recharge, stumble chance, reload speed, damage resistance and makes it so all their weapons Reveal targets, 2 tiles – Has a unique interaction with Threat Detected giving you the 50% accuracy and stability permanently which is really good (but selfish).

Guard Dog: PUPs defends an area revealing and slowing everything inside, pups attacks doeal a little damage and stumble enemies, 2 tiles – Unfortunately it deploys where you are standing so you have to run forward to place it like a Suppression station with a 20sec duration, if you could throw it this would be way more viable.

Pups dependant:

Threat Neutralised: 15% CDR on a weakpoint kill – This is bugged and gives you 15% CDR on every weakspot HIT not kill, so with an automatic rifle you can get your abilities off cooldown in like 2 seconds although even if it did what it said on the label its still solid.

Threat detected: 50% accuracy and stability bonus, 3 tiles – Very powerful with your CQW.

Distracting Howl: 30% slow on targets revealed by pups – Yes this works with Standard pups that reveals everything.
Note, doesn't work with Best Friend.

Drone:
Spawns 3 magazines, gives 20% accuracy and stability and players heal 10hp per kill they make inside its area.

Adrenaline Rush: 20% more healing from the drone, 1 tile – Easy to fit into a lot of builds although it shines on fodder heavy missions.

Duration 1: the drone should spawn 3 magazines but sometimes due to lag or tick rates it will only spawn 2 – 7% more duration ensures you always get 3 magazines to spawn for just 1 tile.

Good all round:

Down Range: deal 20% more damage at max distance, 3 tiles – With all the extra acc we can use the shotgun effectively at extended ranges and this increases our damage at those ranges too.

Hit & Run tactics: 10% move speed, 20% stun recovery and 20% grapple resistance – Solid all round mobility helps us keep up as we want to stand at the rear for got your back.

Technician CQW Training: Increases your shotguns performance, 4 tiles for the base and 2 for each additional mastery – Since CQW's are already so strong giving them % buffs gives you more than buffing a weaker weapon.

Niche/pecific:

Chain reaction: 30% damage after a kill, 2 tiles – With the scout rifle this lets you 1 tap runners on consecutive headshots which is very nice.

Down & out: 20% damage against stunned/knocked/frozen enemies, 3 tiles – More damage for weapons that can equip a tanker muzzle.

Demo/Recon rifle Training: increases your rifles performance, 4 tiles for the base and 2 for each additional mastery – Normally its better to buff your shotgun but sometimes its fun and effective to have a stronger rifle.

Combined Arms: Increases reload speed, handling and range by 20% when both abilities are active, 4 tiles – This is decent with Threat Neutralised if you want to go the full support route.

Hard sells:

Jackpot: auto reloads your gun when you kill anything above a runner – i still take this from time to time as it allows for more independence but ideally if you position properly got your back will be doing this for you.

Painkillers: 10% damage resistance for 2 tiles – Super niche as we want to avoid damage meaning rolling out of the drone if needs be, the drones duration isn't that long and Adrenalin rush helps manage damage for 1 tile making it easier to fit into builds.

Quick charge – There is no reason to take CDR when we have access to Threat neutralised and back in the fight.
Weapons
CQW:

Zadak – Great weapon for Recon, can Equip a laser sight, can get a tanker muzzle giving us our own source of CC which is huge for helping to unpin teammates or deal with elites it also has one of the longer base ranges of all the Shotguns which is amazing when we can get a huge accuracy bonus.

M37 Pump – Old faithful, its long reload doesnt matter when we are auto reloading and its an extremely consistent 1 shot kill shotgun against runners.

Heirloom – Similar damage to the M37 pump but it shoots faster and its got access to the miller twist once again searching for some extra CC and while normally the heirloom suffers from awful accuracy, we can fix that fairly easily.

Rifles:

Twilight – all around solid DMR that’s probably the “meta” rifle at this point thanks to its consistent 2 shot kill without needing any masteries with a decent RoF to boot. Whats not to love.

Scout – The scout is normally not that impressive because its just shy of 1 shot head shotting runners but thanks to Chain Reaction we can hit that 1 shot threshold if we can land back to back headshots.

X45 Ballista Flechette – 1 shot kills runners like the scout but without needing chain reaction making it very consistent, but it shoots noticeably slower has a smaller mag.

Sokol – Not as good as the Twilight as its just short of the 2 shot kill on Insane without some set up and its accuracy is normally an issue but there's a few builds that can fix this and as its an "automatic" its nice on the trigger finger.

Snipers in general are really good on recon because of the high single shot damage you are more likely to secure kills on a headshot which interacts with your passive and perks.

If you prefer an automatic then any other assault rifle will do the job for killing runners but I would recommend the Halberd or Gruppa they both have more firing DPS than than the Kramer (slower reloads shouldn’t be as noticeable thanks to the auto reloads) and they can both use the laser sight for Red is Dead.

Heres a full breakdown of weapon stats:
https://1drv.ms/x/s!AmZIWebhFO4clk8wx44K_7X-xZVR?e=0x6riP
Attachments
For scopes anything with a reveal effect is going to activate red is dead for 10% more damage so these should always be considered when available.

For magazines regardless of the weapon we don't have to worry about max ammo because we can deploy more ammo and we aren't as reliant on reload speed either so we should be looking for Fire Rate, magazine capacity and possibly some other nice to have stats like stability.

Muzzles are no different to any other class, we should be looking for damage.
Fire snipers weakpoint damage is important because if it can break a kill threshold going from 3 to 2 shots or 2 to 1 shot to kill is a massive TTK improvement.
Fire rate gives more raw DPS than weakpoint damage as it stacks multiplicitively with the guns fire rate while weakspot damage stacks additively (10% fire rate results in shooting 10% faster for 10% more DPS, 10% weakspot damage on a weapon with 200% weakspot damage goes to 210% which is only 5% more DPS on a weapon with 300% weakpoint damage it would go to 310% which is only 3.3% more DPS) so for other weapons this is usually the better choice.

Standard PUP's Build

Standard PUPs is great if you team already has enough damage for elites so you want to focus on making the runners easier to deal with.

- We have our essential perks to boost both our team and ourselves combat effectiveness, Red is dead gives all players 10% damage to everything while pups is active.
- Got your back and Back in the fight is more team utility great when someone with a shotgun is clearing stuff close by and you are able to thin out the farther runners no one is aiming at.
- Unbreakable focus & Eye on the prize getting good as recon revolves around learning to make the most of these perks 50% reload speed and handling with 15% fire rate and stam regen gives you the ability to clutch and solo out games.
- Standard pups reveals all enemies so distracting howl to slow them all is a no brainer.
- Pups lasts about 20 seconds so we get great value from Threat detected.
- Threat neutralised effects both abilities and stacks with Back in the fight so why not. This also means we don't need any CDR or duration for either abilities because we will be spamming them often.
- CQW training so we can shoot the Zadak faster and also get some more accuracy.
- Chain reaction is nice with the Zadak but you could also just take another mastery.
- Down and out can is nice damage with 2 tanker muzzles but can easily be swapped out for down range or hit n run or even another mastery and Adrenaline Rush.
Bloodhound Build

This is a more DPS focused build using blood hound this is for when the team lacks a lot of single target damage or has a lot of runner clear.

- Red is dead along with BH means we are giving the whole team a 35% damage bonus against an enemy and this stacks multiplicitively with their damage buffs.
- Got your back & Back in the fight, again this is our team utility increasing not only our damage output but also someone elses.
- Unbreakable focus & Eye on the prize we are still going to be killing runners and getting this stacked up and ready for an elite and you will be surprised how much damage you can dish out - the extra accuracy from our passive is also important for shotgun value.
- Since we are placing BH on high value targets slowing them with Distracting Howl is very strong.
- Threat detected isn't as good here but 50% acc on a shotgun against a special/elite is too gross to pass on.
- Down n out for more damage.
- Extra masteries/Expertise for the CQW as we want to hit those elites hard.
- I have jackpot here because with BH i can run forward and kill prowlers in like 4-5 pumps and for burster waves where i dont have time to use BH like 4-6 times the auto reload after each kill is actually useful.
- We don't need CDR for Bloodhound so no Threat neutralised instead opting for the 1 duration on the drone to ensure we are getting full ammo with every use.
Best friend Build

This is a more selfish build giving ourselves loads of QoL combat stats so get creative with your weapons as the permanent accuracy and stability bonus makes a lot of things much stronger.

I have the Sokol and M39 here because they are fun but honestly most things will work, the Type 88 Heavy Assault rifle is solid, Kramer is a favourite, Gruppa is fun too - for CQW's the Heirloom is INSANE its base accuracy is awful but its DPS is sky high but the Jaipur and M39 are just fun.

- Threat detected is bugged with Best Friend giving us its massive 50% accuracy and stability bonus permanently after the abilities first use.
- Essentials Red is dead, Got your back & Back in the fight (although this might be the 1 case where you swap this for combined arms if you want to stand at the front), Unbreakable focus & Eye on the prize.
- No distracting howl this time as it doesn't work with this PUPs
- Threat neutralised as explained its bugged and gives 15% CDR on HIT so this allows us to spam our pups and drone so no need for anything on the drone.
- Hit and run for some survivability this can be changed to down & out or down range for more damage if you prefer.
- You can buff either weapon with masteries or take combined arms to get 20% reload speed for both weapons and your team (worth if you are using an automatic weapon). The whole point of this is to be super flexible and use whatever weapons you want to try out.
Guard Dog Build

This build is really limited by how you deploy guard dog where you are stood making a lot of campaign missions a bit awkward - but its solid on Horde modes where you might be moving a bit more.
- Essentials again: Red is dead, Got your back, Back in the fight, Unbreakable focus & Eye on the prize. Again these are just so good its hard not to take them.
- Duration so we don't have to run forward and activate pups as often, hard choice between that and hit and runs move speed.
- Threat Detected because pups lasts 24 seconds
- Threat Neutralised as it effects both abilities
- CQW training again because shotgun is OP
Support/Ammo build


This build is sacrificing some of our individual carry power to try and empower the team more, this is combo of automatic weapon + Threat neutralised is also what i would use if you wanted to just spam ammo down for ammo hungry team comps.

- We have Threat Neutralised with the halberd which will allow us to spam our drone and pups which means we can get good value from Combined arms to give the team more reload speed, handling and range.
- Distracting howl and Threat Detected gives us a lot of stability and accuracy while pups is active and slows down all enemies, since we should have pups constantly active we will get a lot of value from this.
- CQW mastery with extra fire rate and weakspot, we already get a lot of reload speed and accuracy and stability.
- We have our essential perks, i will say that in this build they are less "essential" in this loadout compared to others as without a DMR getting the last hit is going to be a bit harder with our rifle - but we can still use our pump to do this.

Here you can see pup's 20 second cooldown and the drones 11 second cooldown being refreshed in under 3 seconds via rapid fire headshots:

Anti-Synth sniper Build


Whole point of this build is to break shot thresholds with the sniper so we can decimate synths.

- Recon Rifle training with Doc expertise and Gunner mastery will give us +45% weakpoint damage.
- Blood hound, red is dead and chain reaction are required to hit the damage we need.
- For the sniper the Tactical scope and Tanker muzzle are the highest weakpoint damage.

Trooper Synths (shotgunners) have around 10,000hp~
Synth Guards (assault rifle) have Around 15,000hp~

With the Masteries the Pike does 5,800 WP damage, with we can easily make it 2 shot kill with just blood hound. With a vuln drone in event rooms you don't even need to use the blood hound just read is dead is enough.
It is possible to take double damage half speed and hit the 1 shot kill breakpoint for guards - but its a big clunky with the reduced fire rate.

The M42 does 4,300 WP damage, with just blood hound we can 3 shot kill, with almost any weapon damage card like Extraordinary weaponry or high calibre or a consumable like a vuln drone we can 2 shot kill with red is dead, blood hound and chain reaction.
There is a bug with chain reaction, i think its host related as i can consistently get it when playing solo, where you get the 30% damage bonus for a full second rather than for the next shot - this means if you take both shots back to back very quickly then you kill.

-Down & out is there so if we don't have chain reaction active theres a chance we can still score a 2 shot kill, its also just nice to have for the Zadak.

- Got your back & back in the fight should proc often meaning we aren't even reloading that much.
- Eye on the prize and Unbreakable focus are so the shotgun has some extra capability.
- Threat detected since we are putting BH on every guard the 50% stability will make a big difference for firing our 2nd shot faster but also the accuracy will help the Zadak when we use it.
- Distracting howl arguably its not needed - but it can be useful for the bugs even if theres not many.
- Adrenaline Rush Extra healing will mitigate more chip damage for just the 1 tile which is why i have it.

Beautiful butterflies / Explosions build


- Butterflies have about 8.5k hp
- Exploders have about 5.5k hp
- The M42 with the 400% weakspot damage and red is dead hits for 4.5k and allows us to 2 shot these Xeno allowing us to more easily land killing blows for our passive and got your back.
- For explosions you could use the ballista flechette as it does 3.3k damage per shot and shoots a bit faster with a larger mag.
- Its very important that we are able to get our passive online for Unbreakable focus as the 50% reload speed because these runner variants have so much HP they WILL reach you multiple times during a mission and you are going to want that reload speed on the pump if you ever get targeted.
- The Zadak can work and can be nice for the stun if someone gets grabbed but it shoots slower and doesnt 2 shot the butterflies like the pump does so i do recommend the pump here.

- Because of the increased HP of the runners the team is going to need all the DPS it can get which is why we are also buffing the shotgun for extra fire rate and accuracy which is why there's such a large focus on weapon buffs.
- If you are struggling with ammo you could swap "eye on the prize" for threat neutralised for the extra CDR but i found the fire rate and stamina regen useful.

- If your team is very CC heavy like with a tech+demo or if you have a lot of elites to deal with like 5-1 you might want to use bloodhound instead but it will mean giving up a mastery on the pump.
5-3 Queen Build

For the queen i have a specific loadout because her because you cant burst her down like you can other elites so you MUST kite her for 2min+ while fighting adds.

- We want bloodhound to increase our damage against her and perma slow her with distracting Howl.
This also means we have have Thread detected's accuracy and stability bonus for the entire fight.
- Hit and runs move speed is a no brainer the extra move speed will make kiting much easier and the stun recovery is very useful for avoiding the runner combo's.
- Bedside manners, 25% extra bleed out time is noticeable on Extreme/Insane when the bleed out times are so fast and we also revive people 50% faster which is great for clutching.
- Got your back and back in the fight will buff you and a team mate while you deal with the fodder.
- Eye on the Prize and Unbreakable focus can be easy to get value from (although this depends on how much spam your team brought with them).
That said the consistent 20% stamina regen from fitness training and 150 extra HP is a solid option making it easier to dodge and letting you take 1 extra hit at the cost of Eye on the Prizes fire rate.

- Can use almost any rifle, Twilight is nice as it can 1 tap poppers.
- The Heirloom is equipped with the Miller twist barrel for a 50% slow combined with distracting howls 30% on the Queen and our extra 10% from Hit and run we have a pretty easy time kiting by just shooting backwards while running.

If you have a demo the focus of this fight is to just not die and let the demo's bleed do its thing, you are going to be spamming the miller twist onto the elites and runners so you and your team can safely kite. Since you have a fast res staying alive is important for picking up anyone else that goes down.
Save as many cryos for the end as possible, if you need to use a vuln for the 2 triple brute events. Place a cryo' in each choke point as you run from 1 ammo box to the other.
Same with the sentry's hold onto them until the queen spawns as if you place them at the start of the event then they might run out of ammo or be destroyed by the brutes.
The Queen herself isn't that bad and once you kill all the adds and its just her things normally go very smoothly but that initial chaos can be tricky to manage, all the CC we bring should make that more manageable.
Playstyle
Headshots

All of recons damage comes from his weapons because of that you have to be a good shot to get good damage but, even if you are not the best there are some things you can do to greatly increase your accuracy and damage.

Aliens tend to follow the same paths as one another and if you use a choke point they will end up nice and single file lane making them easy targets. Sometimes its fine to just find a line they take on the the ceiling or a wall and as long as its proc'ing Got your Back just just keep on killing those.

The tanker muzzle and stumble change with our snipers and shotguns there's a high probability that a body shot will either stun or stumble them making for an easy follow up shot, so land a body shot see what happens and then drill the head.
This is arguably why the Twilight is so popular, it shoots fast enough that you can stun/stumble and get your 2 headshots to kill very easily.

Target Priority

Because of Got your Back its often a good idea to try either focus on runners or try and kill a runner with the last half of your magazine to automatically reload both yours and a team mates weapon.

When there's a lot of specials or elites you should be pulling your shotgun out, this is because CQW's just have some 33%+ more DPS than most rifles.

Positioning

Aliens agro is determined when they spawn and doesn't seem to change until they have done at least their first attack or are CC'd and generally speaking they target the closest target to them.

Because of this we can ensure we get little agro by simply standing behind our team mates. Here are some crude paint drawings to show what i mean:


As you can see you don't have to be miles back just a few feet will do it but it makes a pretty big difference.

On Extreme/Insane most people should know by now that they should not be ADAD strafing constantly and will stand still for the most part while shooting, but don't rely on it, this is why i like scopes with less zoom i want to be aware of my team mates to make sure i can see if they decide they want a haircut.
Same applies to you, once you have found your spot and been shooting don't suddenly move as your team mates wont know you have and if they then move you could tag them.
Team composition
Recon works in just about every team comp because hes got a very supportive and generalist kit.
He likes dealing with runners to make use of some of his stronger perks and passive so he fits in well with high damage compositions like Gunner + tech or Gunner + Lancer as more of the crowd control/runner killer
But if you get stuck with a low damage team comp like Demo+tech or Demo+Doc then you can take a Blood hound build to boost the teams damage to help deal with specials and elites.
Closing words
Hopefully this has helped some people improve their recon game. I made this mostly so when someone asks me about recon or my builds i can shoot this over to them.
If you have any further questions or suggestions please let me know in the comments.
I'm tempted to do one of these for Technician as well since i have a lot of loadouts for that class too, let me know if you would be interested in that.
5 Comments
Dr. Diesel Sep 29, 2024 @ 2:43am 
:steamthumbsup:
Lorem Mar 3, 2024 @ 9:01am 
Hello, thank you again for the explanation! As well, for the Explosions build, what weapon perks do you use?

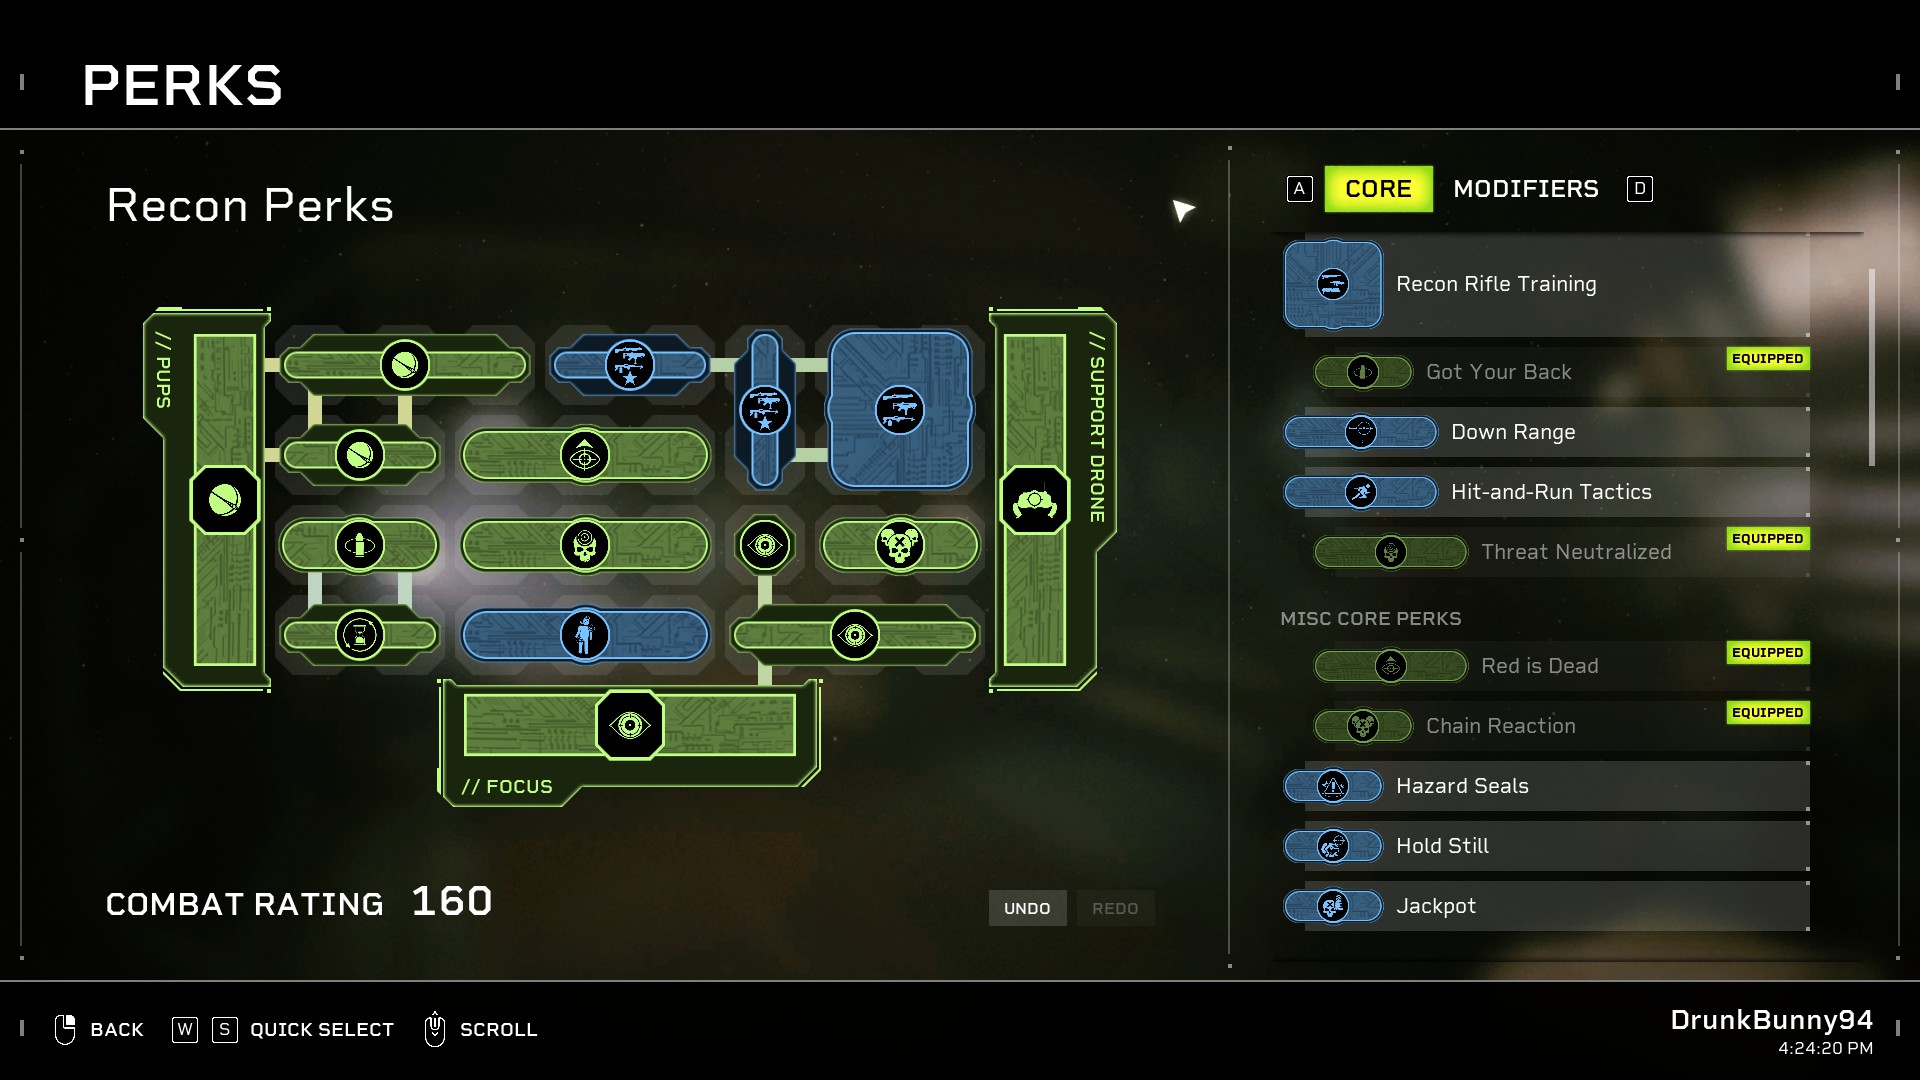
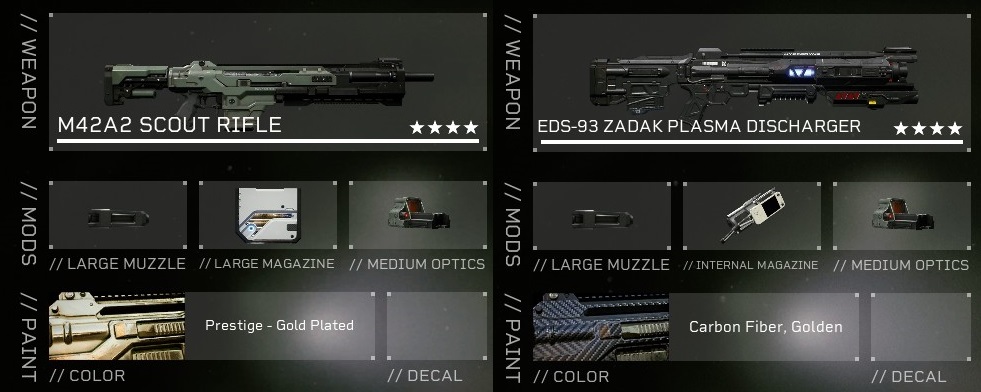
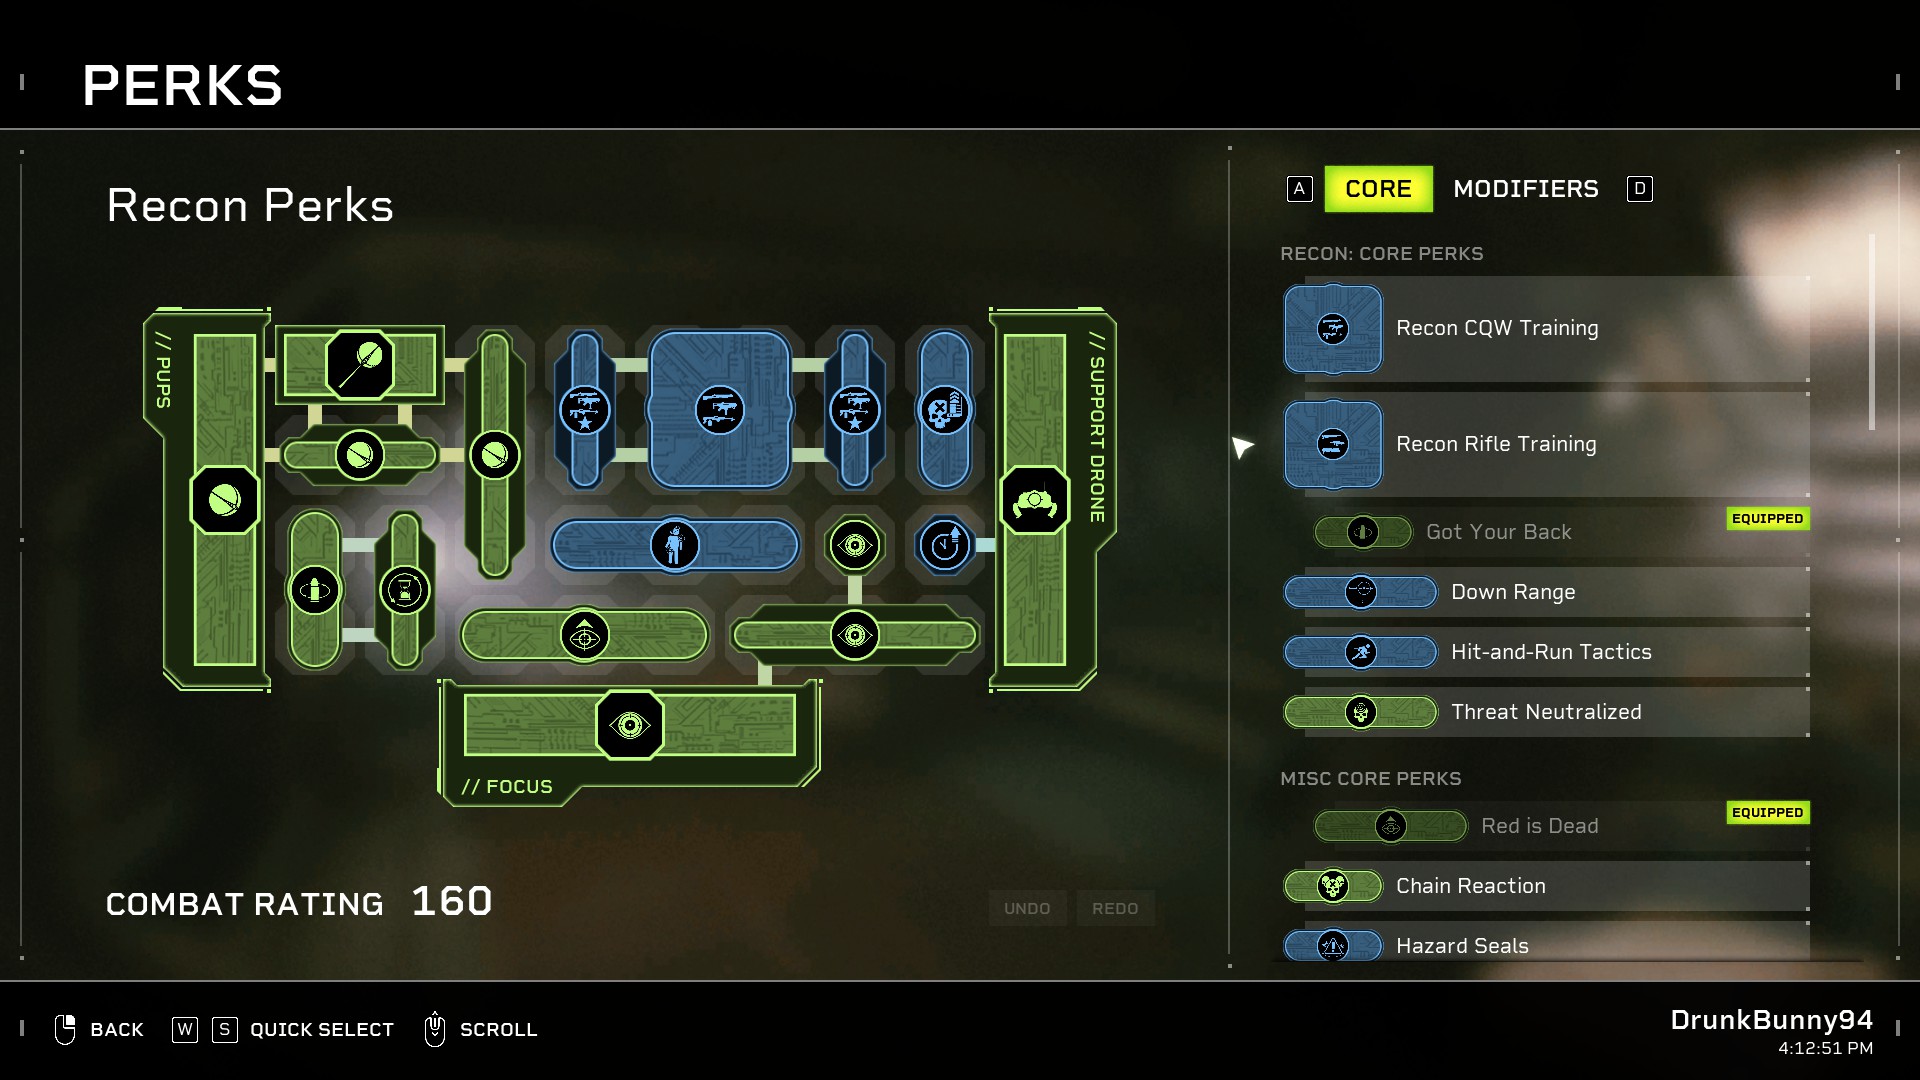
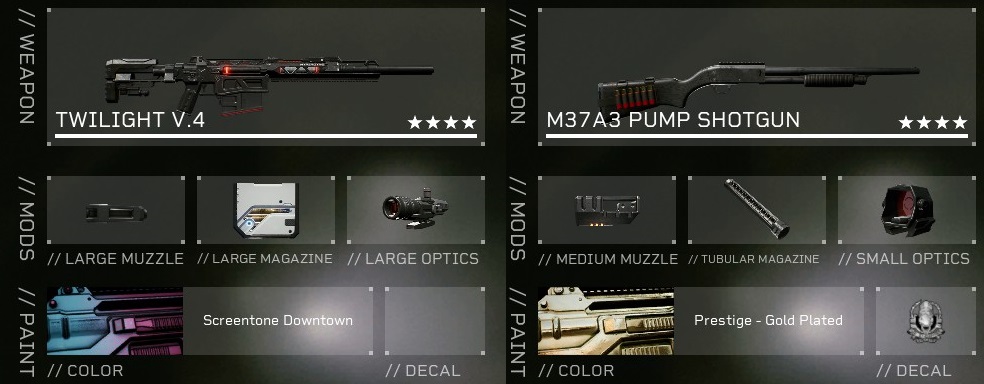
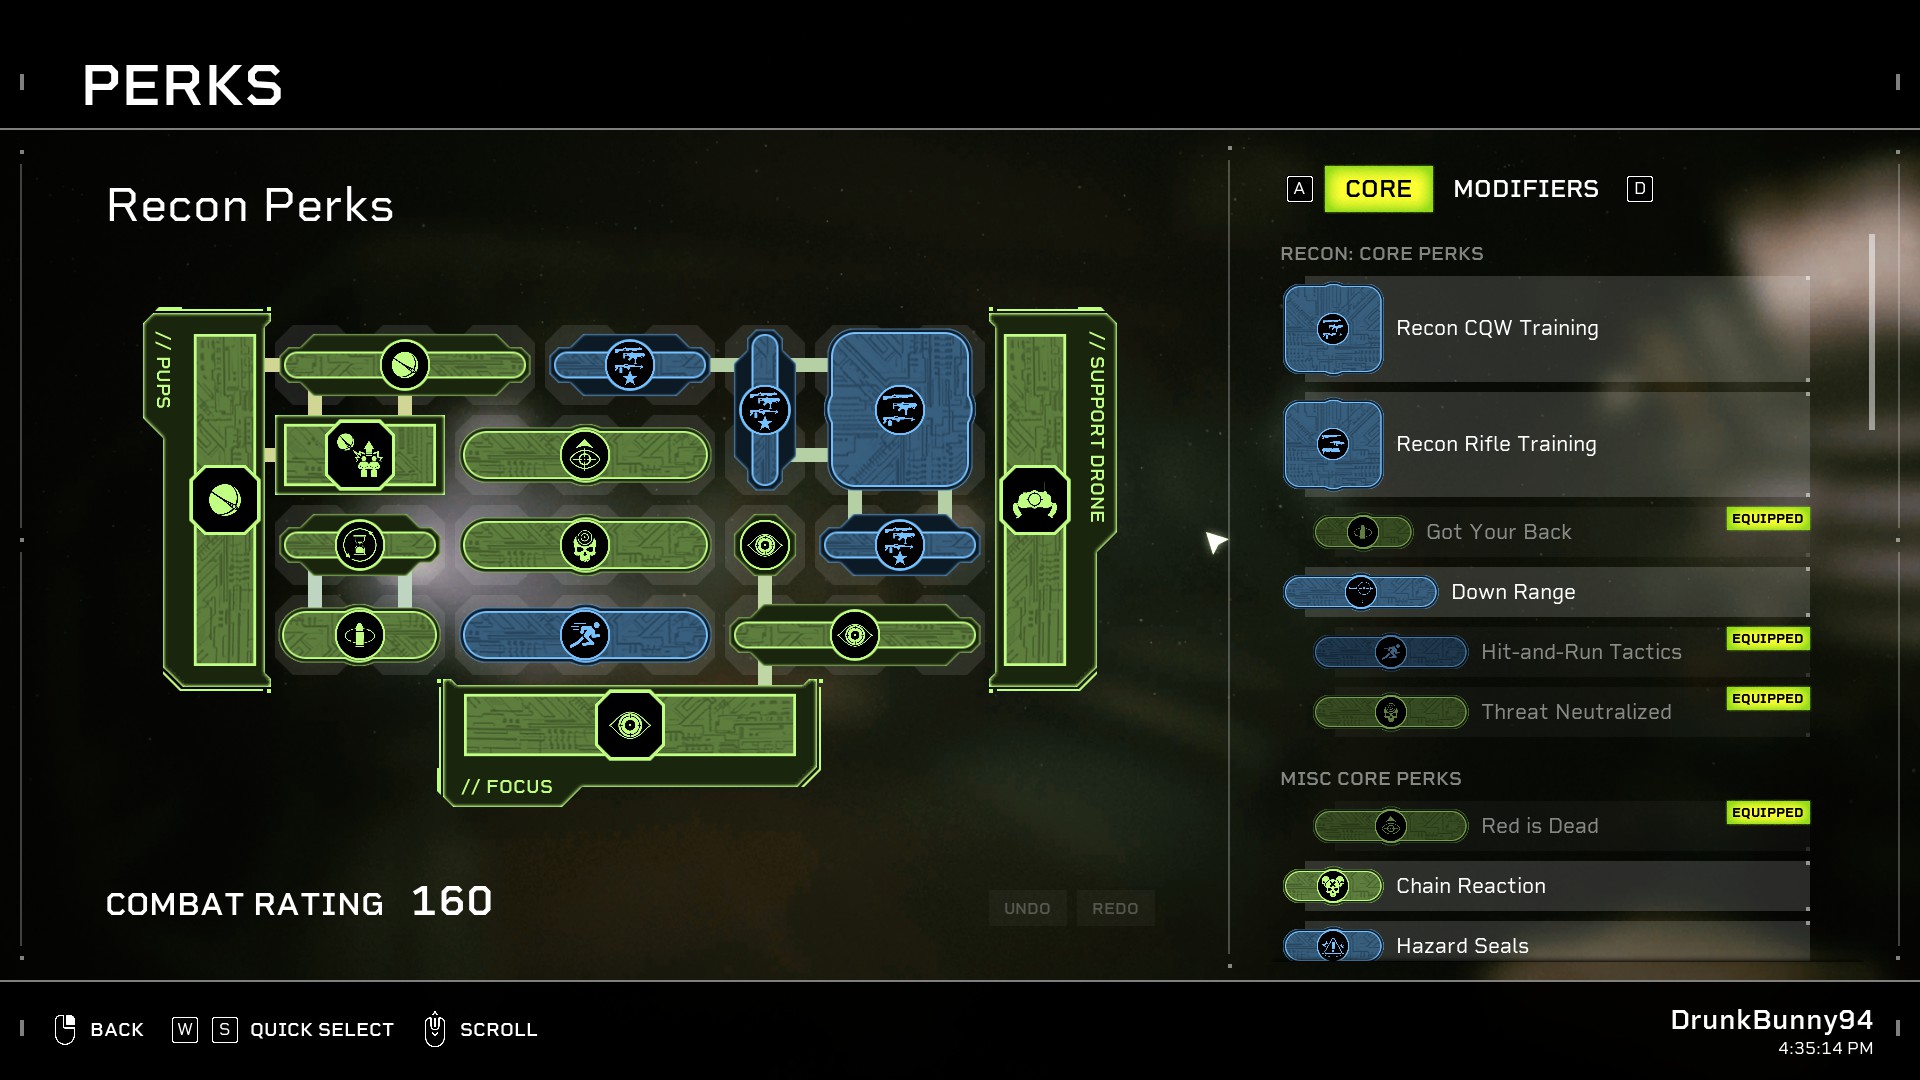
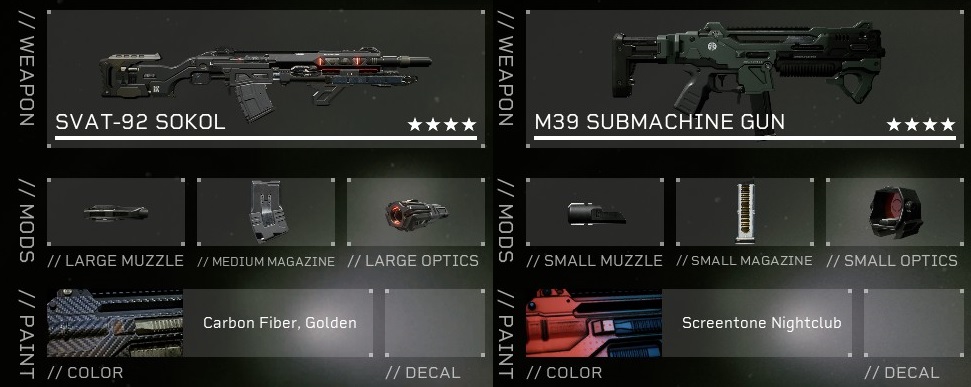
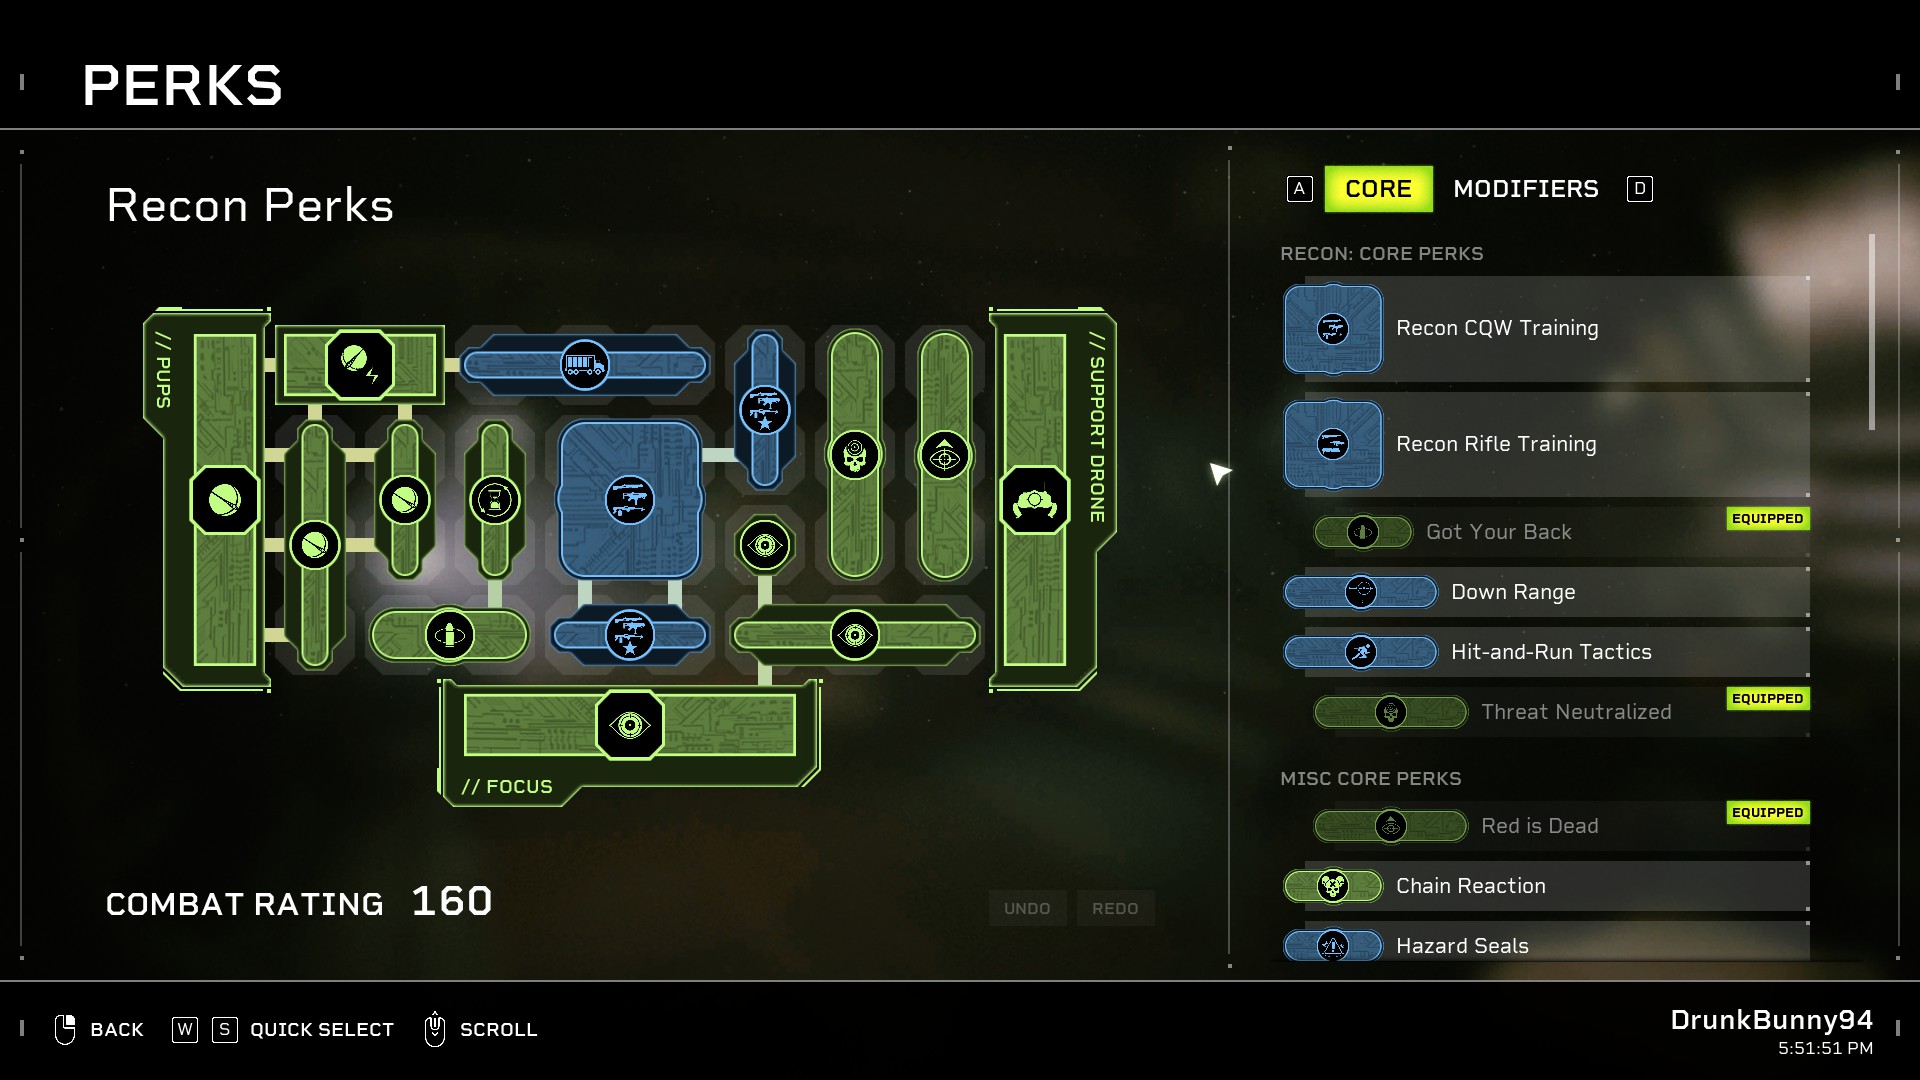
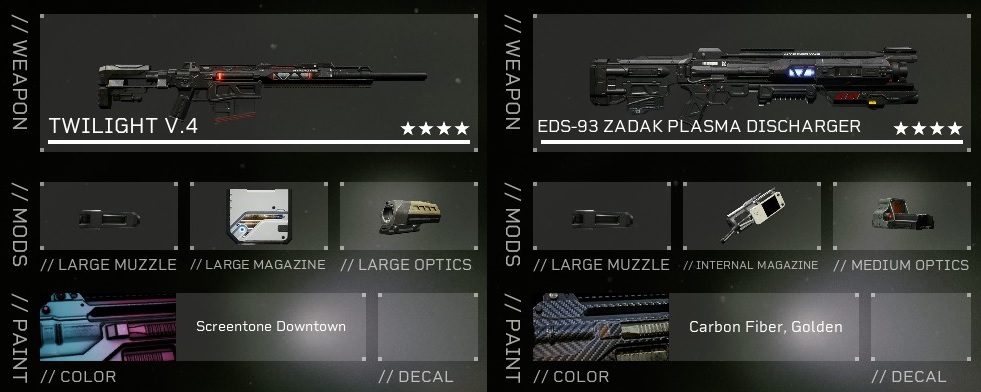
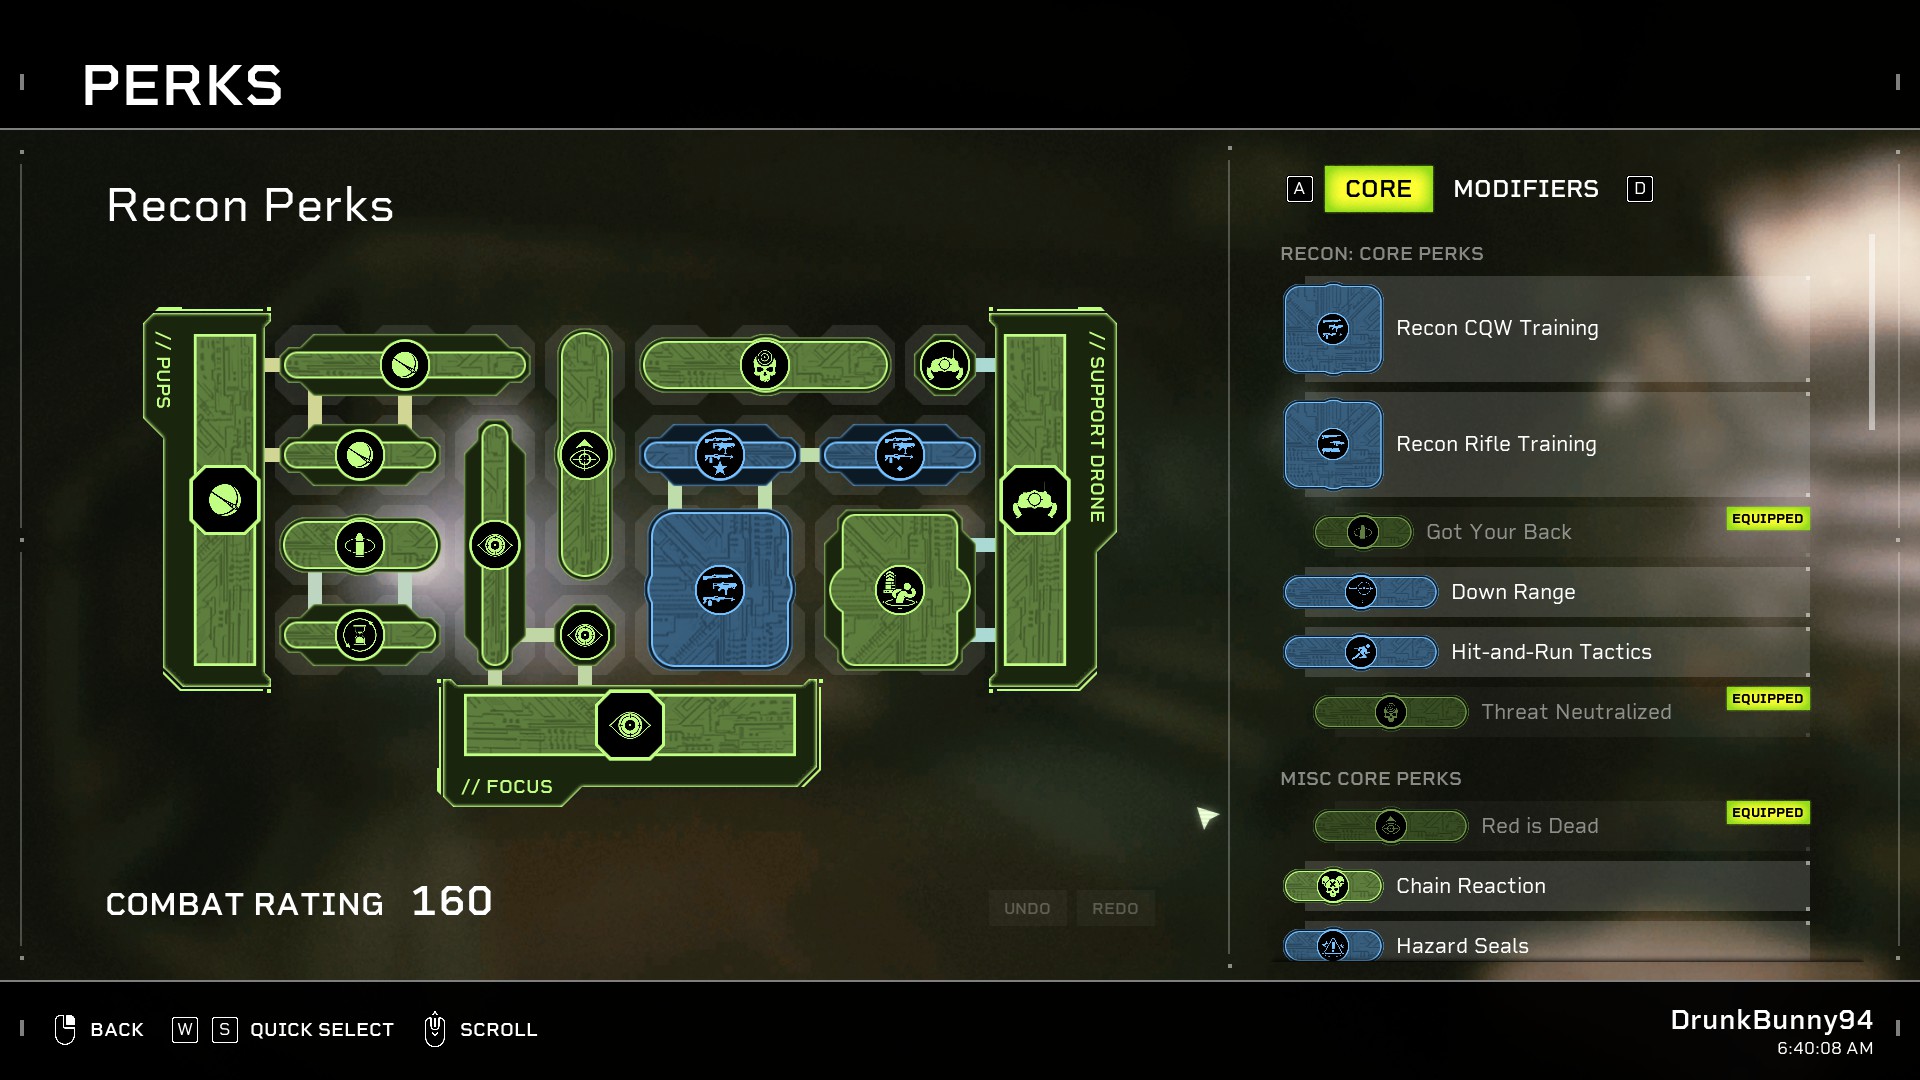
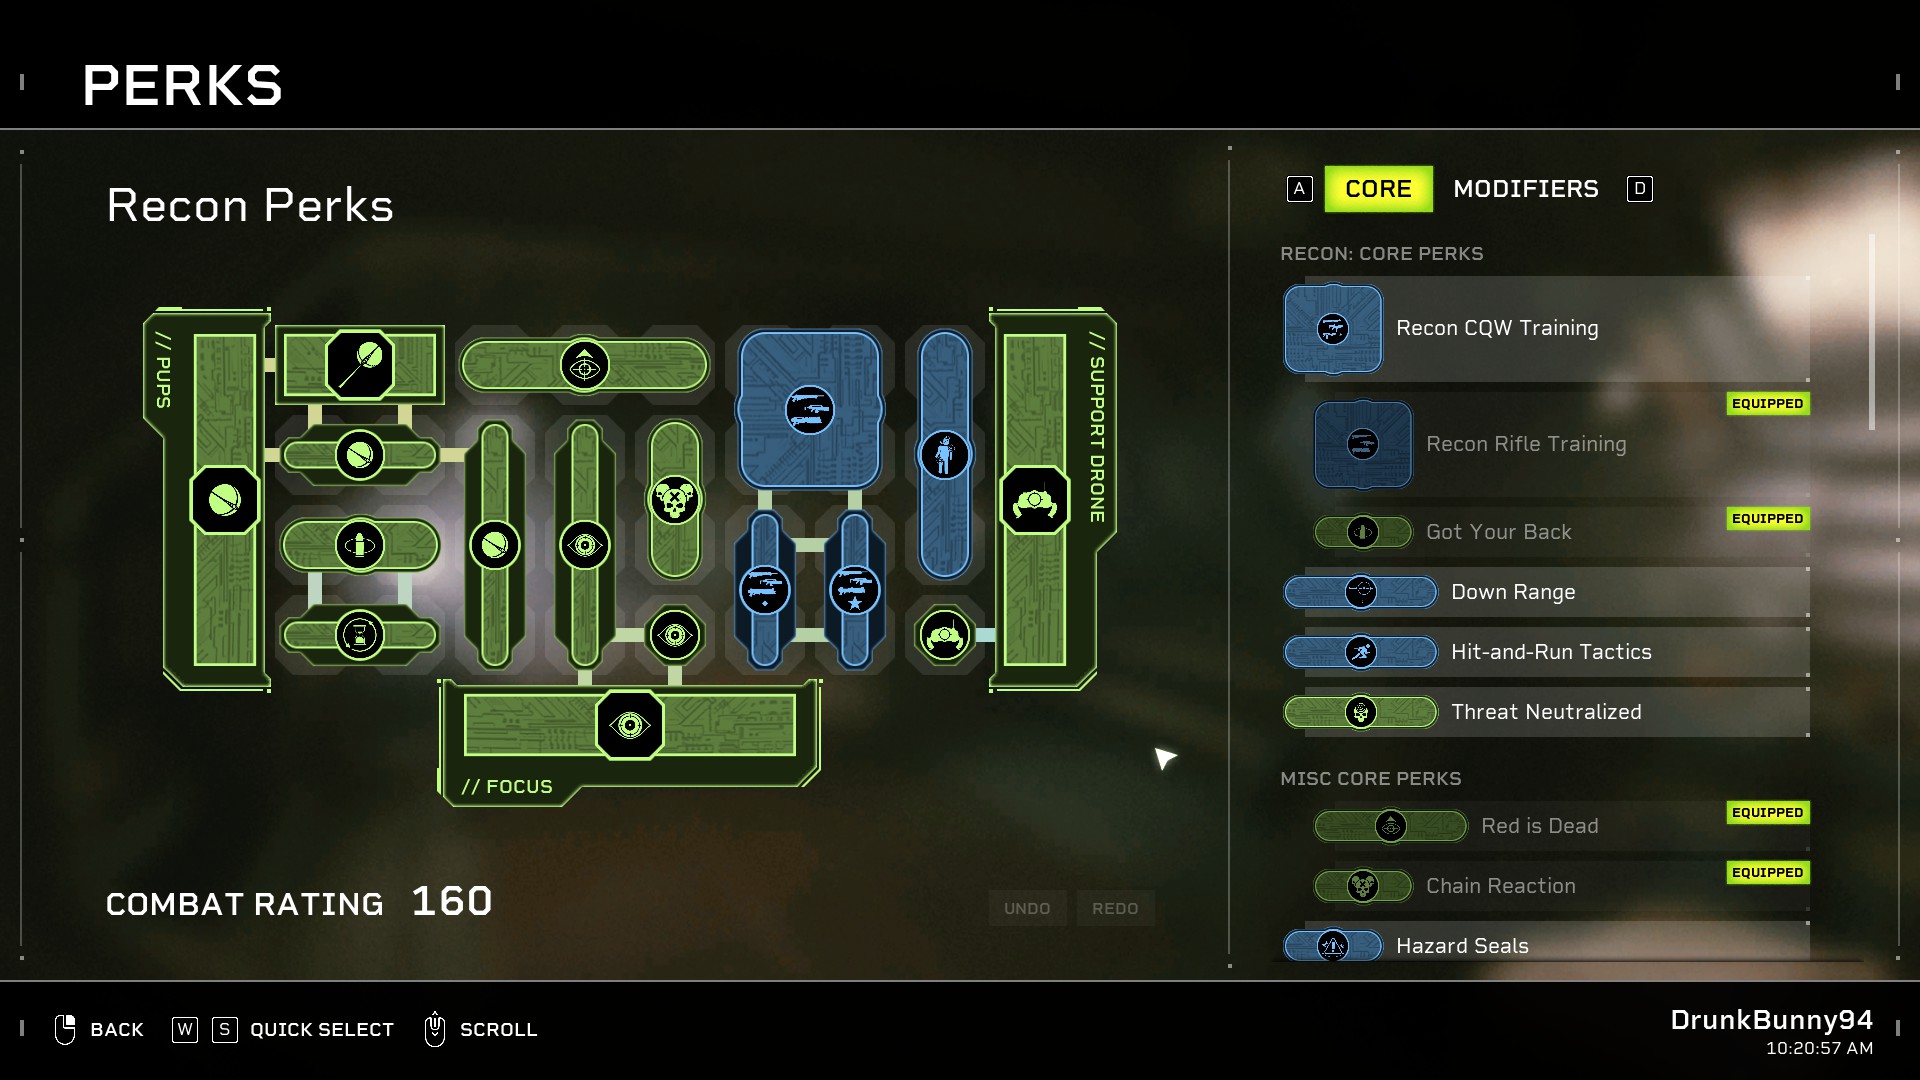
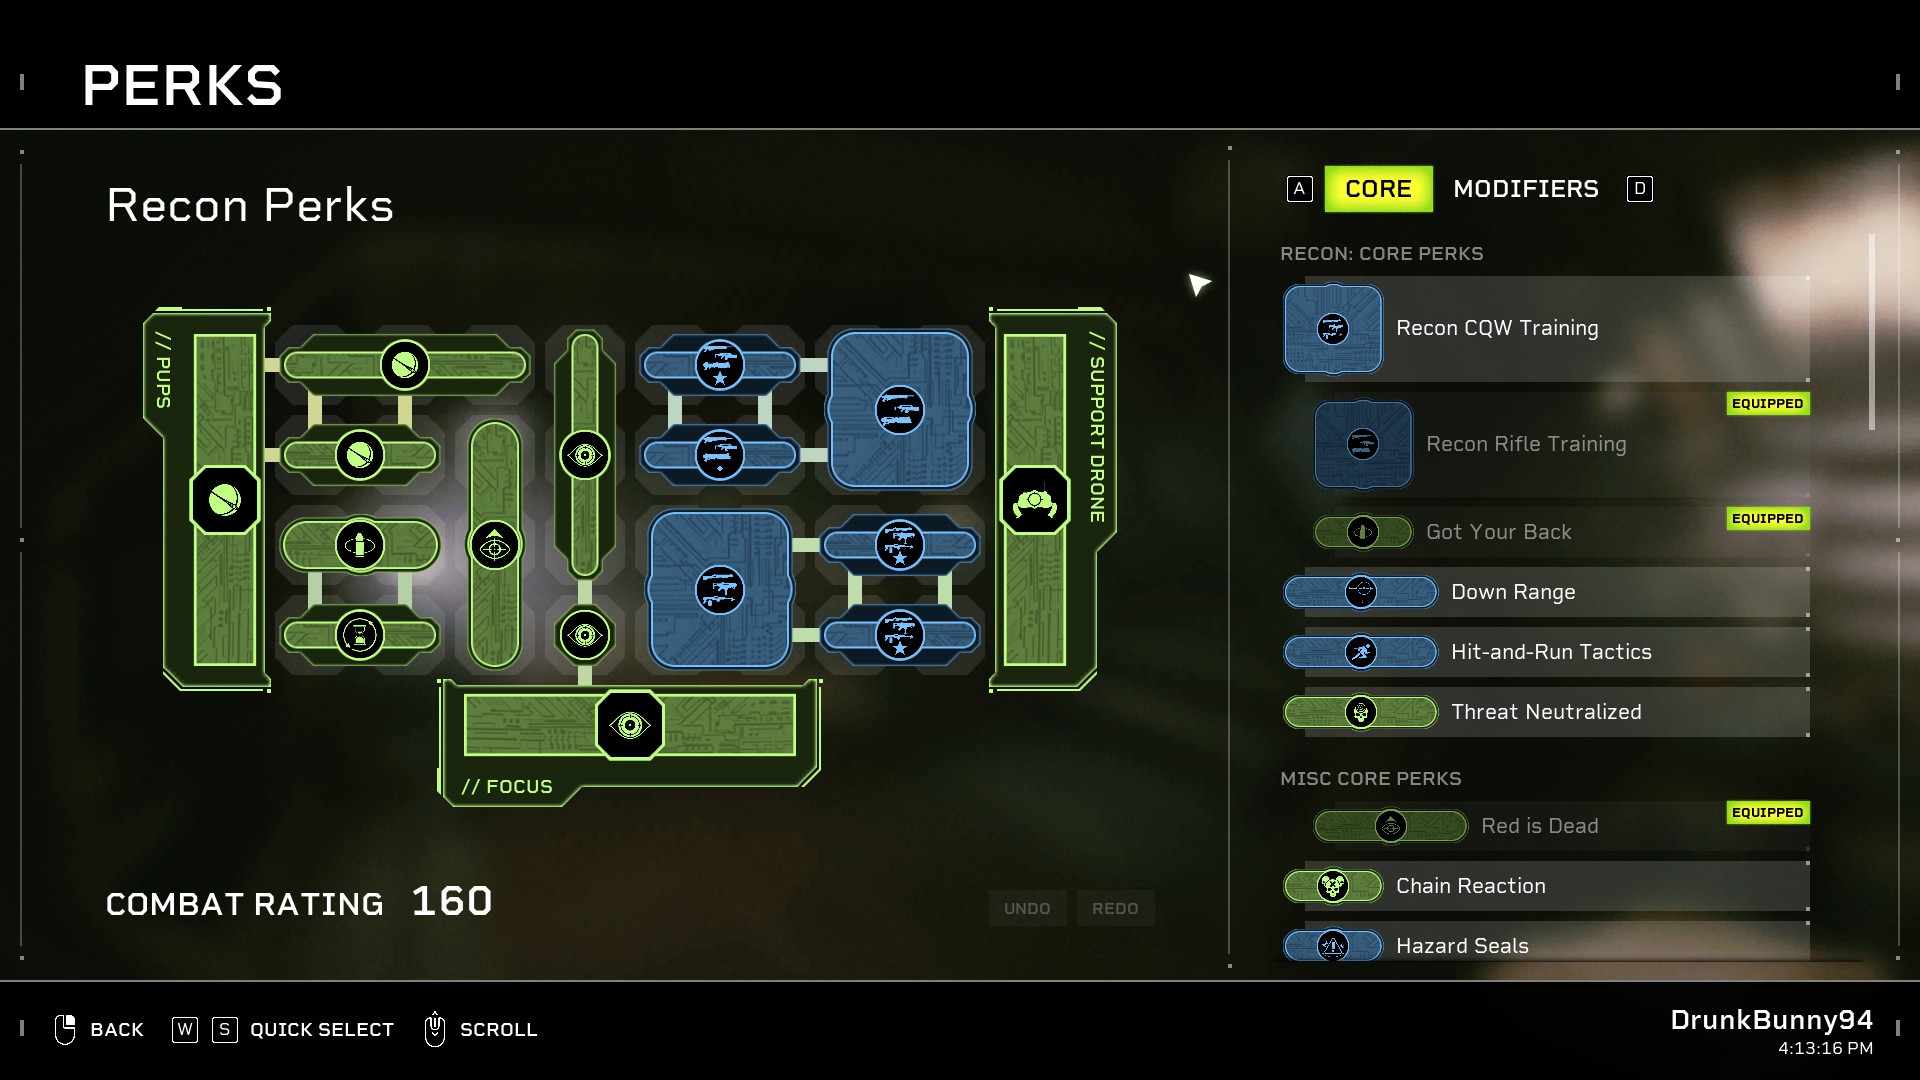
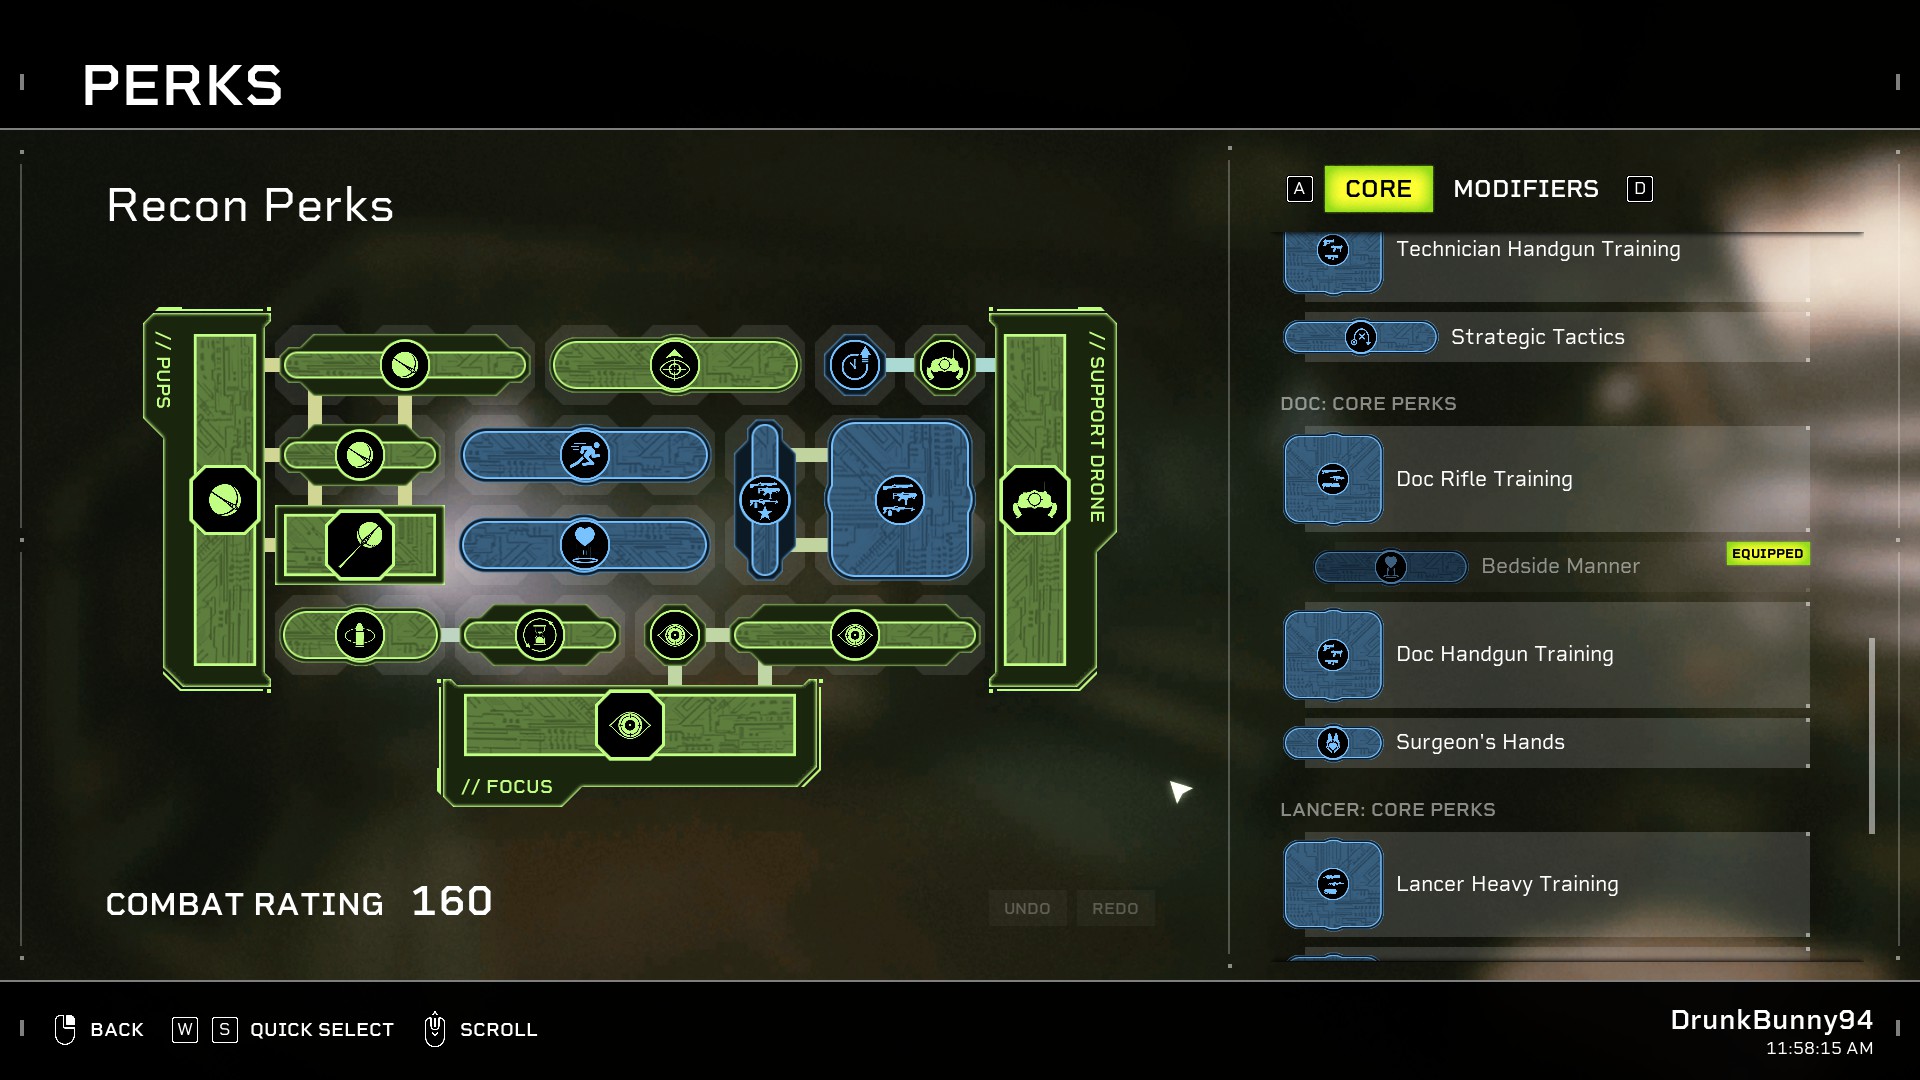
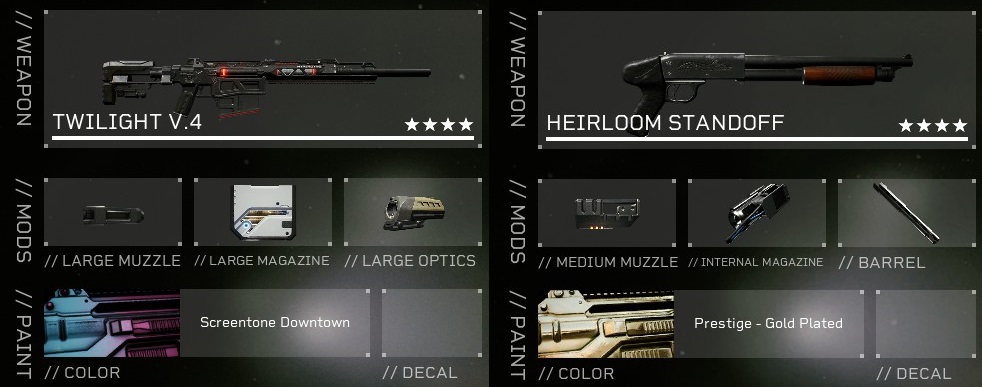
Also, if you're still thinking about making a comprehensive Technician guide, I'd be interested to read on your theories and builds. Please also list the name of the perks/attachments used. Especially the weapon perks since they all look the same.
DrunkBunny94  [author] Jan 29, 2024 @ 12:24pm 
For CQW's accuracy is the most important thing until your spread is reduced to the point where you're effectively getting damage on target that should be your priority.
So its almost always going to be Tech Training for the 15% acc and 15% reload speed and Gunner Mastery for 15% Accuracy and 15% Fire rate.

Thats all i have on the queen build but after that it can vary a little bit, theres another 15% accuracy some weapons like the heirloom would like, theres a 15% range and 15% weakspot that the Zadak makes good use of and then you can grab the other fire rate's which the pump likes.
Lorem Jan 29, 2024 @ 9:58am 
What CQW perks do you use for Queen build?
HazardousMonkey Jan 5, 2024 @ 10:50pm 
but when are we playing space beasts