Gloomwood
167 valoraciones
Gloomwood Comprehensive Guide
Por Star Lord
Fully comprehensive guide to Gloomwood, containing in-depth information on weaponry, items, UI elements, enemies, research and game areas.
8
10
3
5
2
2
2
   
Premio
Favoritos
Favorito
Quitar
*** Introduction ***
Welcome to the guide.

You will find in-depth information of many aspects of the game here.
The guide is up to date with the Research pt. 1 update.

The guide consists of three section types: assistants, information sections and area registries.
Assistants appear at the top of the guide for ease of access.
Information sections appear in order of importance and provide information on their topics.
Area registries provide useful information on each area in the game. Please note that the guide's area registries will not list every hidden item in the game - this would take too long and would eliminate the fun of searching for them yourself.

The guide will provide you with information that generally spoils the game content. If this bothers you in any way, consider completing the game once and reading the guide later.
*** Code & Research Reminder ***
Coming back for safe codes? The guide has you covered.

(Fishery) Croup's office safe - 363
(Fishery) Flare pistol safe - 415
Slaughtered Goat safe - 255
(Market District) Gun shop safe - 625
(Underport) Shipping warehouse safe - 115

Funny code (warning - explodes the safe) - 451


Forgot the research formula ingredients? We have that too.

Goatman (H0mo Caprae) serum - Canister of Tongues, Palm Reliquary, Engorged Heart
Batbeast (Vesper Sapiens) serum - Crystal Claw, Hypnotic Toad, Tendril Vessel
Crowman (Corvus Orthograde) serum - Worm Cluster, Toothed Gel, Gulper Gullet
*** Shop Assistant ***
Below is a table with item selling prices in the Emerald Eye and additional information about certain items. Prices have been checked on Bloodmoon difficulty and testing implies that they remain the same on lower difficulties. Many items cannot be sold; they are not present in the table to avoid clutter. Assume that if an item is not in the table, you simply cannot sell it.
Items are listed in order of their type: weapons, ammunition, serums, utility items, valuables.


Item name
Selling price
Additional information
Canesword
500
Invaluable weapon. Avoid selling it unless you are a game veteran.
Bonesaw
500
Only one is available. Avoid selling it.
Shotgun
150
Harpoon Gun
100
Only one is available. Avoid selling it.
Flare Pistol / Undertaker
100
Revolver
75
Flashbomb
50
Chokebomb
40
Leg-hold Trap
25
Shotgun Shell
20
Incendiary Bolt
35
Inexpensive, considering their rarity and utility. Avoid selling them.
Flare Bolt
35
Choke Bolt
20
Baton Bolt
5
Very common, hence almost worthless. Consider storing them for later.
Revolver Cartridge
7
Harpoon
5
Capra Serum
500
Extremely valuable. Consider selling it if you choose not to use it.
Vesper Serum
350
Corvus Serum
350
Wax Cylinder
125
Only appears on Bloodmoon difficulty.
Vitalizing Tonic
100
Unexpectedly valuable. Consider selling a few if you are in large supply.
Horn of Ulmar
350
Emerald Ring
350
Currently the most valuable one-slot item in the game.
Gold Chalice
300
Gold Pocket Watch
300
Canopic Jar
300
All three are equal in value.
Goatman Horn (Left/Right)
200
Left and right horns are equal in value.
Red Gem Brooch
200
Bloodstone (Small)
150
Emerald Gem (Large)
125
White Gem (Large)
75
Bloodstone (Tiny)
50
Stackable, but only one can be found at a time.
White Gem (Small)
30
Low singular value, but a large stack will be worth the inventory space.
Ancient Coin
25
Only worth getting as a stack.
--- Weaponry ---
Below is an information section about weaponry available in the game.
Weapons are listed in order of their type: melee, sidearms, two-handed, special, seasonal.


Canesword
A unique melee weapon only obtainable at the start of the game. Has two means of attack.
  • Swings are always performed in an "X" pattern, hitting most targets within a roughly 50 degree radius in front of you.
  • Armoured huntsmen take twice as many swings to kill, and their armour cannot be penetrated with the canesword. Consider shooting or avoiding them instead.
  • Charged stabs have more range than a swing, are pinpoint accurate and deal roughly 3 times the swing damage in combat.
  • A stab initiated from a hiding state will instantly kill huntsmen, fishdogs and batbarbers. The attack does not have to be a backstab - hitting a limb will also provide an instant kill.
  • Contrary to popular belief, the tip does not have to shine for an instant stealth kill to occur. It is possible to slightly charge a stab and still instantly kill an enemy, although if done too fast this will make you swing the canesword instead.
  • Hitting an explosive barrel with one charged stab will make it instantly explode after one revolver shot. Consider doing so to lay an instant explosion trap for enemies.


Bonesaw
A special melee weapon that serves as a research tool. Obtainable after reaching the Emerald Eye.
  • Bonesaw swings are performed in an identical pattern as the canesword, though the bonesaw is shorther and has less reach than the canesword.
  • Bonesaw strong attacks are unable to stealth kill enemies, but deal more combat damage than canesword stabs. A bonesaw strong attack deals roughly 4 times more damage than a swing, more than the 3x modifier of the canesword.
  • The bonesaw can gib every enemy in the game, which is required to get their body parts for research.
  • It is impossible to instantly parry with the bonesaw after performing a strong attack. This is possible with a canesword, making it a generally safer melee weapon for combat.


    Revolver
    The most abundant weapon in the game. Every revolver is functionally and visually identical.
    • There are nine obtainable revolvers. Three can be found in the Fishery, one in the Slaughtered Goat, two in the Market District, two in the Underport and one in the Hive.
    • Headshots do not provide additional damage but will briefly flinch an enemy.
    • Shot placement is relevant when fighting armoured huntsmen. They will die to 4 shots if they are only hit in the chest or head. If they are hit in a limb at least once, then they will die to 3 shots regardless of other shot placement.
    • Upon reloading, all spent rounds are thrown onto the ground and can be picked up. Spent rounds are stackable and can be used to distract enemies. Spent rounds will disappear shortly after a reload, unless they are picked up and then dropped again. If the revolver is reloaded from inventory by dragging ammunition onto it, spent rounds within it will be lost.
    • There is no limit to how many weapons of the same kind you can have bound in the inventory. Binding at least two revolvers to different keys allows you to pull out a fully loaded revolver when you run out of ammunition in your first one. This is called a New-York reload and is a legitimate tactic, if you can spare the ammunition and inventory space.


    Flare Pistol / Undertaker
    Special purpose weapon and utility tool that fires unique ammunition types.
    • There are three obtainable flare pistols. The first one can be obtained in a hidden area behind the Fishery. It rests in a safe with the code 415. One can be purchased in the Emerald Eye for 700 coins and comes loaded with an incendiary bolt. The last one can be found in the Hive.
    • The flare pistol is pinpoint accurate and has no bullet drop-off. However, its shots are real projectiles and bullet travel should be accounted for when shooting moving targets.
    • Although physics would imply otherwise, baton bolts can turn levers, which can be used to skip large parts of the game.
    • Baton bolts deal practically no damage to enemies - 20 batons are needed to kill a huntsman. However, since the flare pistol is silent, you can use baton bolts to aggravate an enemy from a distance without alerting a whole group.
    • Choke bolts make an enemy cough for 9 seconds. An enemy coughing from a choke bolt will stop coughing if he flinches. Revolver headshots cause flinching, so avoid headshotting a coughing enemy.
    • Choke bolts do not have to make contact with a huntsman's torch to extinguish it. You can shoot a huntsman in the legs and his torch will still get extinguished.
    • The shot is silent, the aftermath is not - enemies will hear lanterns being broken and will notice that a wall torch was extinguished. This will trigger an area search, so consider standing away from your target. Shooting an enemy with a choke bolt makes him and anyone nearby suspicious as well.
    • Incendiary bolts can ignite more than one enemy at once, but they must stand incredibly close for this to happen. You would need to bait them to get them that close together.
    • An incendiary bolt shot is a death sentence to normal enemies. 4 bolts are needed to fully burn a goatman. Enemies turn into ashes shortly after dying from the fire. Body parts are lost as soon as an enemy becomes ash, but it is possible to gib enemies before it happens to get their body parts for research.
    • Flare bolts are fired in an arc and cannot travel very far. They light up the surrounding area for one minute.


    Shotgun
    Powerful combat weapon for loud encounters.
    • There are five obtainable shotguns. One can be found in the Slaughtered Goat, two in the Market District, one in the Underport and one in the Hive.
    • Shotgun headshots will flinch enemies, just like revolver shots. However, since most enemies die to just 1 shot, aiming for the head is usually not necessary.
    • Shot placement is relevant when fighting armoured huntsmen. They will instantly die to a limb shot, but will survive a chest or head shot.
    • Once a shell is fired, it will immediately fly out to the right of the shotgun. Spent shells are stackable and can be used to distract enemies, just like revolver rounds.
    • Two boxes of 5 shotgun shells provide 10 huntsman kills. The same inventory space can hold 10 revolver rounds for 3 huntsman kills. This gives shotgun ammunition roughly 3 times more "kills per inventory slot" than the revolver, although the base weapon is larger.
    • Shotguns have considerably more range than expected. Do not be afraid to use it at medium distances.
    • Shooting a corpse with the shotgun will instantly gib it. This can be used to acquire body parts without using the bonesaw.
--- Weaponry part 2 ---

Harpoon Gun
A fishing rifle used as a utility tool for climbing.
  • There is only one obtainable harpoon gun, which can be found in the Hive.
  • Harpoons can only be deployed on wood. They do not have to hit a ceiling - they will deploy from wooden walls and trees as well. Harpoons will bounce off of hard surfaces, like concrete or metal.
  • Fired harpoons can be retrieved, regardless of whether they were deployed or not.
  • The harpoon gun can be used for combat and will deal moderate damage. Huntsman armour is completely impervious to harpoons. Harpoons cannot be retrieved after hitting an enemy.
  • The harpoon gun is completely silent, although it will aggravate enemies after a hit.


Leg-hold Trap
Area-denial deployable weapon and an excellent baiting tool.
  • There are too many obtainable traps for the guide to list. Expect to find them in most areas, however most of them can be found at the Cliffs.
  • Traps are stackable up to 3 per stack and are disposable - they break after being triggered once.
  • Trapping huntsmen, fishdogs or batbarbers twice will kill them. Alternatively, trap and stab them with the canesword for a one-trap kill - but be wary of counterattacks, especially if the trapped enemy can use ranged attacks.
  • A trapped huntsman will loudly yell for help, which can be used to bait enemies from afar. If you place an explosive barrel near your trap, you will be able to use it to blow up other huntsmen once they arrive to help.
  • A trapped enemy will be released regardless of received help - a triggered trap stops working after a short timer.


Flashbomb
Throwable non-lethal grenade that stuns nearby enemies with a bright flash.
  • The amount of obtainable flashbombs depends on difficulty. Expect to find more of them on lower difficulties.
  • The flash stuns every enemy in the game for 8 seconds. The player is only stunned for 4 seconds, however.
  • Holding left mouse button will both increase throwing range and cook the bomb, causing it to explode sooner after a throw. It cannot explode in your hand and will be automatically thrown once it is fully cooked.


Chokebomb
Throwable non-lethal grenade that stuns nearby enemies with CS gas.
  • The amount of obtainable chokebombs depends on difficulty. Expect to find more of them on lower difficulties.
  • Chokebombs deploy gas 1 second after hitting the ground. The gas persists for 14 seconds.
  • The gas stuns every enemy that walks into it. Enemies are stunned for the entire gas duration. The player will also start coughing if he walks into the gas.
  • The chokebomb's throwing range will increase after cooking it, but doing so will not cause it to deploy gas sooner.


Jack-o-Lantern / Turnip
Turnip turned into a throwable incendiary device. Seasonal - only appears during Halloween.
  • There are too many obtainable turnips for the guide to list. Expect to find them in every area.
  • Turnips ignite whatever they hit upon being thrown. The fire effect is the same as an incendiary bolt.
  • Turnips do not have a fuse and therefore cannot be cooked. Their throwing range is always the same and does not increase while holding left mouse button.
  • Turnips that cannot be put into inventory do not share the incendiary properties of handheld ones.


Snowball
A clump of snow turned into a throwable stun device. Seasonal - only appears during Christmas.
  • Snowballs can be obtained from snow stockpiles found on the ground in open areas.
  • There are too many obtainable snowballs for the guide to list. Expect to find them in every area.
  • Snowballs stun whatever they hit upon being thrown. The stun effect is the same as a flashbomb, albeit weaker - it stuns enemies for roughly 4 seconds.
  • Just like turnips, snowballs always have the same throwing range and cannot be cooked.
  • Snowballs can extinguish fire sources on top of stunning enemies. Hitting a torch huntsman will both stun him and extinguish his torch.
--- Utility Items ---
Below is an information section about utility items present in the game.
Items are listed in order of their type: phonograph ammunition, medicine & food, support equipment, special.


Wax Cylinder
Phonograph ammunition that only appears on Bloodmoon difficulty.
  • Cylinders are stackable up to 10 per stack. One cylinder is used every time the game is saved via phonograph.
  • Most cylinders can be found next to phonographs, but hidden ones exist as well.
  • Cylinders can be sold for a very high profit. Consider doing so if you reached the Emerald Eye with a large supply of them.


Medical items - Vitalizing Tonics, Cheese, Small food items
While tonics are the only dedicated healing items, the rest of these can also restore health.
  • Health is restored regardless of difficulty. Tonics restore 35 HP, cheese restores 10 HP, small food items restore 5 HP.
  • Four small food items will restore 20 HP, which is 10 more than cheese that takes the same inventory space.
  • In addition to their healing applications, organic food can also be used as creature bait.
  • Food items cannot be sold. Canned food also cannot be used as creature bait, making it the medical item with the least utility.
  • Food can be eaten off the ground with right mouse button. This is not the case for tonics.


Handlantern
Equippable portable light source.
  • There are four obtainable handlanterns. The first one can be found behind the electrified door within the Caves. There is also one in the Slaughtered Goat basement, one in the Market District power station and one in the Hive.
  • If a dropped handlantern is damaged in any way, it will break and stop working. One such broken handlantern can be found in the Emerald Eye. A handlantern held by the player cannot be broken, even in combat.


Distraction tools - Bottles, Empty Cans & Bricks
Ordinary items that can be used as improvised distraction devices.
  • Bottles break after a throw and take more inventory space, but can attract enemies from far away.
  • Empty cans never break and can attract enemies from medium distances.
  • Bricks break after hitting the ground four times and can attract enemies from medium distances. Since their attraction range is similar to empty cans, there is generally no reason to carry bricks instead of empty cans.
  • Generally speaking, every item in the game can be used for distraction, however these items are the dedicated tools for that purpose.


Replacement parts - Buttons, Valves, Crank Handles & Levers
Parts necessary to restart various mechanical systems.
  • All valves and buttons are functionally identical. A valve or button found in one area can be used in another.
  • There are three obtainable buttons, and all of them are used to activate elevators. The first one can be found in the Fishery power room, there is one in the Slaughtered Goat and one in the Market District power station.
  • There are three obtainable valves. The first one can be found in the Slaughtered Goat attic and can be used to open an alternative path to the Market District. There is one in the Market District barber shop and can be used to open the door to the Market District's power generator. The last one is in the Hive and can be used to open a shortcut door.
  • There are two crank handle types - a standard one and a golden one. The golden crank handle can be found in the Underport shipping warehouse safe and is required to get into the Hive. The standard crank handle can be found in the Hive and can be used to open a shortcut door.
  • There is one obtainable lever. It can be found in the Hive and can be used to open gate 4, which is where the Hive secret exit is at.


Cannon equipment - Powderflask Horns, Cannonballs and Cannon Fuses
Equipment necessary to fire a muzzle-loaded cannon.
  • Powderflask horns have a gunpowder capacity of 3. Loading the cannon uses 1 charge.
  • If a cannonball is dropped onto an enemy, it will instantly kill him. This will not work if the cannonball is thrown - it must be dropped with the use key. Since cannonballs can be carried in the inventory, consider taking one or two to easily kill enemies from above.
--- Valuables ---
Below is an information section about inventory-carried valuables present in the game.
While coins, pouches and gold ingots are also certainly valuable, they are always picked up without placing an item in the inventory; making additional information about them irrelevant.
Valuables are listed in order of their appearance in the game.


Red Gem Brooch
The first valuable obtainable in the game.
  • There are three obtainable brooches. There is one in the Fishery safe, one in the Market District and one in the Hive.
  • They do not stack, but are highly valuable and take little inventory space.


White Gems - Large and Small
Gems of medium value that often appear throughout the entire game.
  • Small white gems are stackable and usually come in large quantities.
  • Large white gems do not stack, but are of significantly higher value.


Bloodstones - Small and Tiny
Gems of significant value.
  • Both types are stackable and can be obtained in ancient ruins in the Caves and in the Hive.
  • Tiny Bloodstones are rare and are of little worth. If you decide to pick one up and later run out of inventory space, consider leaving it behind and picking up other valuables instead.


Goatman Horns - Left and Right
Once a goatman's corpse is gibbed, it will drop two horns in addition to other body parts. These horns can be researched but can also be sold, so consider getting them even after having researched the goatman.


Horn of Ulmar
One of the most valuable two-slot items in the game. Only one can be obtained - in the Slaughtered Goat. It is possible to sneak up and acquire it without alerting the goatman, so consider getting it regardless of killing him if you decide to go into the Slaughtered Goat.


Gold Chalice
Only one can be obtained - inside the tower manor in the Market District. It is highly valuable, so consider getting it if you decide to explore the manors.


Emerald Ring
The most valuable one-slot item in the game. While it is intended to be used as a disposable key that grants access to the Emerald Eye, it is possible to get there via alternative paths. If you decide to take such a path, consider getting the ring anyway to sell it for a very high profit.


Emerald Gem - Large
Two can be obtained. There is one in a Fishery hidden area and another one in the Market District, on top of the entrance to the Emerald Eye. Due to how easily the Emerald Eye gem can be acquired, consider getting it once you reach the store.


Gold Pocket Watch
Two can be obtained. There is one inside the Underport shipping warehouse safe and another one in the Hive.


Ancient Coins
There are three obtainable ancient coins - all found in the Hive.


Canopic Jars
There are three distinct Canopic Jars - Crow, Lion, and Goat. All three can be obtained in the deepest part of the Hive.
--- User Interface ---
Apart from the pause menu, there are two functional user interfaces in the game - the Gentleman's Case and the journal. The Gentleman's Case (hereinafter: case) serves as the player's inventory, while the journal provides you with status information, stores your notes, keys, maps and assists in research. Some aspects of these interfaces are exhaustively explained in the game and the guide will not provide any additional information about them - this includes the inventory part of the case as well as the files section of the journal.


Gentleman's Case - Flip side
Upon scrolling the mouse wheel, the case will flip sides and reveal additional contents. This side of the case is special - it contains slots that only accept specific items.
  • The journal cannot be moved or dropped.
  • The ring slot only accepts the light gem ring, which cannot be moved or dropped. The emerald ring cannot be used in its place.
  • The melee slot accepts the canesword and bonesaw. These weapons can still be used while in the main inventory, but why bother using inventory space if they have their own slot.
  • The offhand slot only accepts the handlantern. The broken variant cannot be used in its place.
  • The eye slot only accepts the monocle. It cannot be taken off or dropped.
  • The head slot is currently unused. Please do not try putting on a citizen's head.
  • Coins cannot be dropped from the inventory.
  • You can lock doors that you have keys for by pressing R on them while they are closed. Metal doors that get locked by the player can often block entire areas to enemies.

Journal - Status section
The status section is arguably the most important part of the journal, allowing you to check your health at will.
  • Although health is only displayed as excellent, fine, caution or danger, it always has a numerical value that is not revealed to the player. The maximum health value is 100 HP and is displayed as excellent.
  • Health becomes caution at less than 70 HP and danger at less than 30 HP. It is worth noting that danger health reduces speed and jump height, making some parkour jumps impossible.
  • Mind gets slightly lowered upon using a serum, however it currently cannot go lower than fine. It does not affect anything.
  • Symptoms section is currently unused.
  • The journal can be opened at any point with its own keybind. Doing so is much faster than opening it through the case.

If you desperately want to check your exact health value, you can do it through the console. Enable the developer console in gameplay settings, then open said console with ` and type "life".

--- Enemies ---
Below is an information section about enemies present in the game.
While enemy behaviour is always the same, their attack speed and damage dealt depends on difficulty.
Enemies are listed in order of their appearance in the game.


Huntsmen - Rifle & Torch and Woodsmen - Axe & Torch
The most abundant enemy type in the game. Fearless warriors working for a mysterious enemy.
  • Huntsmen are dressed in black & red and speak with a lower toned voice. They can use rifles and torches.
  • Woodsmen are dressed in brown & green and speak with a higher toned voice. They can use axes and torches. For the sake of simplicity, the word "huntsmen" in this game usually refers to both huntsmen and woodsmen.
  • Huntsmen will die to 8 canesword swings, 7 bonesaw swings, 3 revolver shots, 1 shotgun shot or 2 harpoons.
  • Huntsmen can carry keys or valuables on their belts, which can be pickpocketed or taken off their corpses.
  • Huntsmen rifle shots are real projectiles and can be dodged. If the shooter is far away from you, simply move to the side and avoid touching the bullet. Otherwise, crouch right after the shot - if timed correctly, the bullet will fly above your head.
  • Woodsmen axe attacks can also be dodged, even on Bloodmoon difficulty - although it makes it significantly harder to do so. When the enemy is attacking you, keep walking backwards and the axe should not reach you. Alternatively, move on the attack's axis by going to the side as the axe is being swung. Jumping is detrimental to axe dodges and makes you more likely to get hit. Charged axe attacks deal more damage and are almost impossible to dodge, so consider blocking them at all cost.
  • Axe woodsmen will continuously throw axes at the player if they cannot reach him. Thrown axes can be blocked with the canesword. This makes the torch huntsman the only huntsman type that has no ranged attacks whatsoever.


Armoured Huntsmen & Woodsmen
Special huntsmen variants that often appear on high difficulties.
  • Armour protects a huntsman's chest and head. The entire head is technically armoured, although visually most of it appears the same as usual.
  • Canesword attacks and harpoons do not deal any damage against armour. Armoured enemies also take twice as many canesword attacks before dying, making it an ill-suited weapon against them.
  • As explained in the guide's weaponry section, armour generally allows enemies to survive an additional shot, unless they are only hit in their limbs.


Fishdogs
Hungry hunting dogs that run rampant in the Caves.
  • Fishdogs will die to 5 canesword swings, 4 bonesaw swings, 2 revolver shots, 1 shotgun shot or 2 harpoons.
  • Fishdogs eat whatever is available, even corpses of other fishdogs.
  • After spotting the player, a fishdog will stop and howl for a moment - this can be used to your advantage. You can charge a canesword stab and attack while the fishdog is busy.


Goatman
Ruthless monster that resides in the Slaughtered Goat.
  • On Bloodmoon difficulty, the goatman will die to 95 canesword swings, 28 revolver shots or 10 shotgun shots. Please do not try to with it with a canesword.
  • Blocking the goatman's melee attacks with the canesword halves their damage. Some health will always be lost, however.
  • The goatman will continuously throw hatchets at the player if it cannot reach him. Thrown hatchets can be blocked with the canesword.
  • There is only one goatman that can be fought, although there are more in existence, since one has been crucified in the Market District.
  • Once its corpse is gibbed by a shotgun shot or an explosion, two valuable horns will drop among its other body parts. The crucified goatman cannot be gibbed, however.


Batbarbers
Mutated creatures first encountered in the Market District.
  • Batbarbers will die to 8 canesword swings, 7 bonesaw swings, 3 revolver shots, 1 shotgun shot or 2 harpoons.
  • Batbarbers will often throw knives at the player. Thrown knives can be blocked with the canesword.
  • Batbarbers can jump immense heights, which makes running away from them very difficult.


Crowmen
Tough mutants that infest the Underport and the Hive.
  • Crowmen will die to 12 canesword swings, 10 bonesaw swings, 4 revolver shots, 2 shotgun shots or 4 harpoons.
  • Crowmen cannot be instantly killed with a canesword backstab. A backstab will still deal combat damage, however.
  • Crowmen can vomit at the player, which serves as their ranged attack.
  • Since crowmen do not die from 1 shotgun shot, a follow up attack is required. The most efficient way to kill one is to shoot it once with the shotgun, then once with the revolver. They can also be stabbed from stealth, then finished off with a shotgun shot.
  • Crowmen eat whatever is available, even corpses of other crowmen.


Infected Rats
Hostile rat variants infesting the Hive.
  • Infected rats are extremely weak and can be killed with just one canesword swing.
  • Infected rats will attack everything on sight, including healthy rats.


Crowbabies and Crowkings
Special crowman variants found in the deepest parts of the Hive.
  • Crowbabies spawn from eggs found in the environment or laid by a crowking. An egg will spawn a crowbaby if the player approaches it. Eggs can be destroyed with the canesword to prevent them from spawning crowbabies.
  • Crowbabies are extremely weak and can be killed with just one canesword swing.
  • Crowkings are tougher compared to regular crowmen. They will die to 29 canesword swings, 25 bonesaw swings, 9 revolver shots, 3 shotgun shots or 8 harpoons.
  • Crowkings are weak to fire and will die to just 1 incendiary bolt. However, after being set on fire, they can extinguish themselves by walking into nearby water.
  • Crowkings use the same attacks as regular crowmen. Their slow speed makes them focus on ranged attacks, however.
--- Research ---
Research is a special mechanic that allows the player to gain additional information on enemies and concoct serums that provide active or passive bonuses. Research gets unlocked after the player returns to the lighthouse after reaching the Emerald Eye. It consists of two main parts - researching enemy body parts and concocting serums using ingredients. After an enemy gets researched, the combination of ingredients for that enemy's serum will be discovered. Once those ingredients along with that enemy's body part are combined, the serum will be created.
It is important to note that all serums can be sold for very high prices.
All serums last roughly 40 seconds.
The available serums and their special effects are listed below in order of enemy appearance.


Goatman (H0mo Caprae) - Capra Serum
Serum that gives extraordinary strength concocted using a Canister of Tongues, Palm Reliquary and Engorged Heart.
  • Capra serum allows the player to instakill every enemy besides goatmen and crowkings.
  • The player takes roughly 4 times less damage while under the effect of the Capra serum.
  • Capra serum form attacks are highly destructive, being able to instantly break wooden doors and destroy lights of any kind.
  • Capra serum increases the player's height, making vents and other tight passages impossible to enter.
  • Capra serum does not make goatmen friendly to the player.
  • Capra serum also slightly increases throwing force, though this change is not of significant importance.


Batbeast (Vesper Sapiens) - Vesper Serum
Serum that increases parkour abilities concocted using a Crystal Claw, Hypnotic Toad and Tendril Vessel.
  • Vesper serum increases jump height roughly 5 times and negates all fall damage.
  • Vesper serum form attacks deal damage roughly equivalent to 2 canesword stabs. The attacks also have a slightly higher destructive force than the canesword, being able to break wooden doors and gib corpses.
  • Vesper serum does not increase damage resistance. It is not advised to attack multiple enemies while under the effect of it.
  • Vesper serum makes batbarbers neutral to the player. They will fight back after being hit twice, however.


Crowman (Corvus Orthograde) - Corvus Serum
Serum that increases movement speed concocted using a Worm Cluster, Toothed Gel and Gulper Gullet.
  • Corvus serum increases movement speed by roughly 70%.
  • Corvus serum form attacks deal damage roughly equivalent to 3 canesword stabs. The attacks can also break wooden doors and gib corpses.
  • Corvus serum does not increase damage resistance.
  • Corvus serum makes crowmen, crowbabies and crowkings friendly to the player. They will fight back after being hit twice, however.
=== Fishery Area Registry ===
Below is a registry containing useful information on the Fishery area.
Since the appearance and quantity of most items depends on difficulty, only items that appear regardless of difficulty are named whenever supplies are mentioned. This rule applies to every area registry.
Information is presented in order of area progression.


Parkour skips
A substantial amount of obstacles in the Fishery (and in the game in general) can be skipped with elaborate parkour usage. The images present two examples at the start of the level.
First image - jump on the wooden beam then jump to the ledge.
Second image - jump on the crate, climb onto the pipe then jump to the ledge.
There are too many parkour skips in the game for the guide to list - only the most important ones will be presented from now on.


Fishery power generator
The door to the Fishery power generator can be technically opened with a crank handle, though one is not available in this area. You can instead turn the generator off by shooting its lever through the fence with a flare pistol baton bolt.


Croup's office safe
There is a safe in the owner's office that can be reached from the staircase. The safe contains a revolver and a red gem brooch. The code can be found by turning off the light and looking at the painting . The code to the safe is 363 .


Flare pistol safe
There is a safe in a hidden area behind the Fishery that can be reached by swimming to it. The safe contains a flare pistol and one of each of its ammo types. The code can be found on a note later found on a wooden boat at the Cliffs . The code to the safe is 415 .


Cargo hold locked area
There is a locked underground area in the Fishery cargo hold. The trapdoor leading to it cannot be opened from the top by any means, making the area completely inaccessible at the moment. The area contains a large emerald gem and other supplies.


Fishery tower key
The key to the Fishery tower can be found in the carriage garage. The tower contains a revolver and other supplies. There are bear traps placed at the top - be careful not to trigger them.


Carriage garage
The basement garage of the carriage building can be entered prematurely by shooting the elevator lever with a flare pistol baton bolt. It can be normally accessed after reaching the Emerald Eye store. The generator must be working for the elevator to move.


Waterfall hidden area
There is a hidden area behind the waterfall. It contains five cheese wheels and other supplies.


Fishery cabin underground passage
There is a hidden area under the Fishery cabin that can be reached by climbing down the well. It contains a small white gem that lies underwater. The metal gate there can be later opened from the other side and is a direct path between the Fishery and the Cliffs.


Fishery swimming skip
Most of the Fishery can be skipped by simply swimming to the destroyed bridge at the end of the area. The huntsmen at the bridge stand next to an explosive barrel - bringing a revolver will allow you to blow them up and open the path ahead.
=== Caves Area Registry ===
Below is a registry containing useful information on the Caves area.
Information is presented in order of area progression.


Caves generator trick
Once you enter the Caves, you need to turn the generator off to continue past the electrified door. However, once the door is opened, it will always stay open. If you go back and turn the generator on, you will be able to walk past the open electrified door, allowing you to later use the exit elevator right away.


First handlantern
The first handlantern in the game can be found behind the electrified door. More handlanterns can be found later, but there is generally no reason not to take this one.


Caves small white gems
Five small white gems can be found throughout the Caves. The images present the first two as examples.
First image - next to a corpse & food that one of the fishdogs will try to eat.
Second image - behind a small waterfall in the large cave with many fishdogs.
The third one is next to the blue crystals in the open cave with huntsmen.
The fourth one is under the large waterfall in the open cave with huntsmen.
The fifth one is in the minecart in the open cave with huntsmen.


Caves storage room
There is a storage room next to one of the sleeping fishdogs. It contains three explosive barrels and other supplies. On Bloodmoon difficulty, the key to the door can be found next to a corpse lying at the bottom of one of the fishdog caves. On other difficulties, the key can be found next to a corpse lying in the large cave with many fishdogs.


Caves alternative paths
The top of the Caves can be reached with elaborate parkour usage or by using a flare pistol. You can lower the rope from the wooden scaffolding by shooting its lever with a flare pistol baton bolt or climb up there without the rope. Place a barrel on the fence, jump onto it, climb onto the stalagmite then climp up the scaffolding.


Caves secret area
There is a secret area behind a destructible wooden wall in the open cave with huntsmen. It contains two small bloodstones, one tiny bloodstone, two small white gems and other supplies.


Caves secret area entry methods
In order to enter the secret area, you are meant to blow up the wooden wall with an explosive barrel from the storage room. The canesword does not deal any damage to the wall, but the revolver does. Due to reasons unknown to the guide's writer, the wooden wall can actually be destroyed with just one revolver shot. Shoot the highlighted plank and the wall will immediately fall apart. Who needs explosives nowadays?


Caves secret area small white gems
The two small white gems within the secret area can be reached with elaborate parkour usage. Place two barrels next to the pillar, jump onto them, climb onto the stalagmite then jump to the ledge.
=== Cliffs Area Registry ===
Below is a registry containing useful information on the Cliffs area.
Information is presented in order of area progression.


Mine building large white gem
There is a large white gem on top of the mine building. It can be reached with elaborate parkour usage.
Red path - place two boxes and a sack below the large rock, jump onto them, climb onto the stalagmite then jump to the ledge.
Orange path - place a barrel on the edge of the drop, jump onto it, jump & strafe sideways to the ledge.
There are also two small white gems in the Cliffs area - one at the mine building phonograph and another one in a minecart at the city gate.


Fishery direct path
The aforementioned direct path to the Fishery can be reached by going right from the mine building and entering a tunnel. The key on the wall opens the previously locked metal gate.


Cliffs swimming skip
The house guarded by huntsmen can be easily skipped by swimming past it. The other side can be reached with basic parkour usage. Simply climb over the obstacles.


Drawbridge flare pistol skip
The drawbridge can be lowered from the other side by shooting its lever with a flare pistol baton bolt.


Slaughtered Goat rope flare pistol skip
There is a rope that connects the Cliffs lake with a tunnel under the Slaughtered Goat. It can be lowered from below by shooting its lever with a flare pistol baton bolt.


Slaughtered Goat wall parkour skip
The wall next to the Slaughtered Goat can be climbed over. In order to safely reach the path below, first get to the lowest platform, then jump onto the rock and slide down to the path.


City gate huntsmen cannon usage
The huntsmen at the city gate will fire the cannon if the player crosses the red line at any point. Interestingly, the cannon will be fired even if it will be facing the wrong direction. If you sneak up to the cannon controls and aim it at the huntsmen operating it, you can make them shoot themselves once you cross the line.


City gate destruction methods
Using the cannon is not the only way to destroy the city gate. It can also be blown up with 3 explosive barrels, destroyed with 34 revolver shots or 12 shotgun shots. The canesword does not deal damage to it.
=== Slaughtered Goat Area Registry ===
Below is a registry containing useful information on the Slaughtered Goat area.
It is important to note that the Slaughtered Goat is an entirely optional area - entering it is not required to complete the game.
Information is presented in order of area progression.


Elevator parkour skip
Once the elevator is lowered, the first floor can be reached with elaborate parkour usage. Place two barrels on the elevator, jump onto them then jump to the ledge.


Slaughtered Goat power generator
The Slaughtered Goat power generator can be turned off manually to decrease the amount of working lights on the upper floors. It is important to note that this will also disable the elevator.


Basement wooden door skip
There is a wooden door connecting the basement with the upper floors on the other side of the basement barricade. It can be destroyed to open an alternative path to the first floor. The most efficient method is to take one of the nearby boxes, put it on fire using the wall torch then throw it at the door. Burning the door is silent - the goatman will not be alerted. The door can also be destroyed with a revolver, although this will both require ammunition and will alert the goatman.


Attic access
There is an attic that can be accessed from the second floor. The lever that lowers the attic staircase is hidden on a wooden pillar. The attic contains various supplies and several items of interest - a basement key, a button and a valve. The valve can be used to open an alternative path to the Market District, allowing the city gate to be skipped.


Slaughtered Goat safe
There is a safe in the guest room with a shotgun case on the second floor. The safe contains the case key and shotgun ammunition. The code can be found by combining the prices of whiskey and whalers ale from the bar price board . The code to the safe is 255 .


Horn of Ulmar
The highly valuable Horn of Ulmar rests on a rack on the first floor. The goatman frequently stands next to it, but with enough patience it can be acquired without alerting him.


Goatman behaviour
The goatman will always patrol the area in which the player is in. If you enter the guest rooms on the second floor, the goatman will break through the doors and search for you. If you head down to the basement, the goatman will either jump down the elevator shaft (if the elevator is lowered) or break through the basement barricade and patrol around.
=== Market District Area Registry ===
Below is a registry containing useful information on the Market District area.
Information is presented in order of area progression.


Market District power generator
The Market District power generator can be reached from the canals area. The gate to it can be opened using a valve, which needs to be acquired elsewhere. The generator can be turned off manually or through the fence by shooting its lever with a flare pistol baton bolt. This will disable lights in the Market District for 90 seconds - after which the generator will automatically start working again.


Market District gun shop safe
There is safe in one of the apartment rooms that can be reached from the gun shop. The safe contains a gold ingot and coins. The code to it can be found on a note found in the barber shop basement . The code to the safe is 625 .


Tower manor secret area
There is a secret area in the manor with the tall wooden tower. It contains a gold chalice. It can be opened by turning four switches hidden around the manor - more information below.


Tower manor hidden switches
The switches are presented in order of appearance.
First picture - behind books on a bookshelf next to the wooden tower stairs.
Second picture - next to a statue near the secret area entry.
Third picture - on the back of a large angel statue in one of the library rooms.
Fourth picture - on an observation deck above the library room with a green lamp.


Emerald ring
The emerald ring required to open the Emerald Eye's elevator gate can be found in the barber shop basement. The ring does not have to be used if the player takes an alternative path to the Emerald Eye.


Emerald Terrace gate flare pistol skip
The gate to the Emerald Terrace can be opened from the other side by shooting its lever with a flare pistol baton bolt.


Ashfall Bridge wooden barricade parkour skip
The other side of the wooden barricade blocking access to the Ashfall Bridge can be reached with elaborate parkour usage - the Emerald Eye can be reached this way as well. Place two barrels at the barricade, jump onto them then jump to the ledge. Once you are on the other side, follow the nearby pipes and jump onto the stairs leading to the Emerald Eye.


Barber shop rooftop parkour skip
The barber shop rooftop can be reached with elaborate parkour usage - the Emerald Eye can be reached this way as well. Jump onto the cash register in the barber shop, climb onto the wooden wall, climb to the attic above then climb to the rooftop. The ladders on the rooftop will lead to the Ashfall Bridge - follow the instructions above to then reach the Emerald Eye.


Market District hidden shotgun
There is a hidden shotgun on a platform below the stairs leading to the Emerald Eye. In order to safely reach the platform, jump down from the point highlighted in the first picture. The fall will cause some damage - consider healing up before attempting the jump. Jumping down to the platform from other areas may be lethal.


Emerald Eye large emerald gem
The large emerald gem on top of the entrance to the Emerald Eye can be reached with basic parkour usage. Climb onto the lamp then jump to the ledge.
=== Underport Area Registry ===
Below is a registry containing useful information on the Underport area.
Information is presented in order of area progression.


Public works pump station fishdog pit
The gate at the public works pump station can be opened by turning or shooting its lever. This will set off an alarm and cause the fishdogs from the nearby pit to run inside the building and fight the huntsmen, inflicting losses on both sides and distracting the enemies from the player.


Shipping warehouse wall parkour skip
The shipping warehouse can be reached from the Underport's entry with elaborate parkour usage. Jump onto the lower pillars from the wooden plank, climb onto the water pipe, climb onto the upper pillar then jump to the ledge.


Tunnel A flare pistol skip
The Tunnel A gate can be opened from the other side by shooting its lever through the bars with a flare pistol baton bolt.


Underwater white gem chest
There is a chest in the Underport's second water pit that contains a large white gem and a small white gem.


Watchdogs
Watchdogs can spot the player, which will put all nearby enemies into caution (yellow) state. Some watchdogs can be disabled by turning a lever next to them (on top of them). They can also be destroyed with a canesword stab to the back or 4 flare pistol choke/incendiary bolts. Revolver shots, shotgun shots and flare pistol baton bolts do not deal damage to them.


Shipping warehouse safe
There is a safe in the foreman's office in the shipping warehouse that can be reached by turning off the area's power in Lampfire Electric Co. The safe contains a gold pocket watch and a golden crank handle, which is required to enter the Hive. The code can be found on a note found under the office door . The code to the safe is 115 .


Shipping warehouse panic room
There is a hidden panic room in the foreman's office in the shipping warehouse that can be opened by pressing a button under the desk. It contains a shotgun and a mirror.
=== Hive Area Registry ===
Below is a registry containing useful information on the Hive area.
Information is presented in order of area progression.


Hive crank handle
There is a crank handle in one of the canal maintenance rooms. It is required to open Gate A in the Power room.


Sewer supervisor's key
The sewer supervisor's key can be found next to a dead body in a room with an eating crowman and a pipe end. The key opens the sewer control room and storage lockers in the supervisor station. A red gem brooch can also be found next to the key.


Canal B gold pocket watch
There is a gold pocket watch at the Canal B gate. It can be reached with elaborate parkour usage. Jump onto the wall piece, jump to the other wall piece, jump onto the wooden plank, climb onto the arch then enter through the gate. A small white gem can be picked up along the way, being held by a dead citizen.


Hive secret exit
There is a secret exit from the Hive through the water turbines. The turbines are located behind gate 4 near the control room, though the lever for that gate is missing. On Bloodmoon difficulty, the lever can be found in a hidden area that can be reached from the infected rat room by swimming into it. On low difficulties, it can be found in the monitoring station. In order to safely swim through the turbines, all of them have to be disabled by turning their control levers hidden throughout the Hive - more information below.


Hive secret exit control levers
The control levers are presented in order of appearance.
First picture - in the canal maintenance corridors next to the crank handle.
Second picture - on a wall in the power room.
Third picture - in the water below the monitoring station.
Fourth picture - in the engineering corridor near the Underport seal.


Harpoon gun
Using the harpoon gun is necessary to leave the Hive after going up the elevator. If you decide to exit the Hive through the elevator, make sure to take the harpoon gun with you.


Hive small bloodstones
Two small bloodstones can be found in the Hive ancient ruins. These are highly valuable and take little inventory space, so consider getting them if you decide to explore the ruins. Both of them are being held by stone statues. The first statue is on an elevated area next to a fire pit. The second statue is at the bottom of a large room with three floors. Two ancient coins can also be found next to the second statue.


Canopic jars
Three canopic jars can be found in the Hive ancient ruins. They are worth more than small bloodstones but take significant inventory space. If you cannot get them during your first Hive visit, consider picking them up on a return trip. All three of them can be found in the Hive ancient ruins corridors, though it is difficult to explain exactly where they are.


Barrel fabricator
The barrel fabricator in the Hive ancient ruins can produce an infinite number of barrels, though it is loud and will attract nearby crowmen. Filled barrels can be used as explosive traps, so consider setting them up before calling the elevator.


Hive elevator hiding trick
If you do not want to fight crowmen at the Hive elevator, you can simply hide and wait for the elevator to come down. One of the best hiding spots is in a nearby pond. Simpy stand near the wall and wait for the elevator. Reaching the elevator after coming out of hiding may be difficult due to patrolling crowmen, however.
+++ Bonus Missions +++
Finished the game and looking for more content? Make use of everything that you learned in the guide in these bonus missions that redefine the areas from the base game.
Every mission provides a Google Disc link which contains the mission save file. The missions can be installed by dragging their save file into Steam/steamapps/common/Gloomwood/Saves on your device. Please note that every mission uses the 9th save slot by default. This can be changed by renaming the save file folder to Slot_(number up to 9).
All bonus missions are on Full Moon difficulty. Missions can be added or removed at the creator's discrection. If you made a bonus mission for the latest release of Gloomwood and want it posted here, please contact the guide's writer on Steam.


Slaughtered Goat Hostage Rescue

https://drive.google.com/drive/folders/1t5lvcvZQfaKLH-aye3EjmHwTD-YhSpkQ?usp=sharing

This mission uses an outdated game version. Play at your own discretion.
A local Huntsmen group has ambushed a merchant carriage and kidnapped a group of merchants, taking them to a nearby tavern. The Huntsmen are armed & dangerous and are refusing to release the hostages. Since negotiations have failed, the Gloomwood Doctors Agency has sent you in to resolve the situation through other means. You will be inserted into the tavern through an underground basement. Your entry will be silent – stealth is optional. Playing as a GDA Agent, your primary objectives are as follows:
  • Rescue all 4 hostages taken to the Slaughtered Goat (locate the hostages and ensure that there are no enemies near them).
  • Eliminate all Huntsmen outside the Slaughtered Goat.
A second entry team can take over once the outside is clear and the hostages are safe. You can finish the mission after completing primary objectives or choose to stay and complete the bonus objectives. Your bonus objectives are as follows:
  • Eliminate all Huntsmen within the Slaughtered Goat.
  • Locate and secure two stolen gold shipments within the Slaughtered Goat.

For this mission, you will be provided with:
  • Portable handlantern.
  • GDA issue C.A.N.E sword (Close Attack Narrow Edge).
  • Folding pump action shotgun with 4 shells.
  • Two GDA issue flashbombs.
  • “Vitalizer” Combat Stim.
  • Two cans of “Bean” Bandages.
  • An array of distraction devices.
  • Slaughtered Goat basement key.
Other equipment can be acquired in the mission area.

Additional mission rules:
  • The mission area is restricted to the Slaughtered Goat and its exterior. The border is marked with metal crates.
  • The game can be saved at the Slaughtered Goat phonograph.
  • Do not leave the Slaughtered Goat through the basement exit that you start at.
12 comentarios
Markedone 19 ABR a las 1:30 p. m. 
Fantastic guide Star Lord, your notes about the research update are a life saver, I wasted so many ingredients trying to figure it all out by trial and error.
Nucleus 19 ABR a las 2:45 a. m. 
Peak Guide
Star Lord  [autor] 10 DIC 2024 a las 7:29 a. m. 
@Seel
Thank you for the kind words.
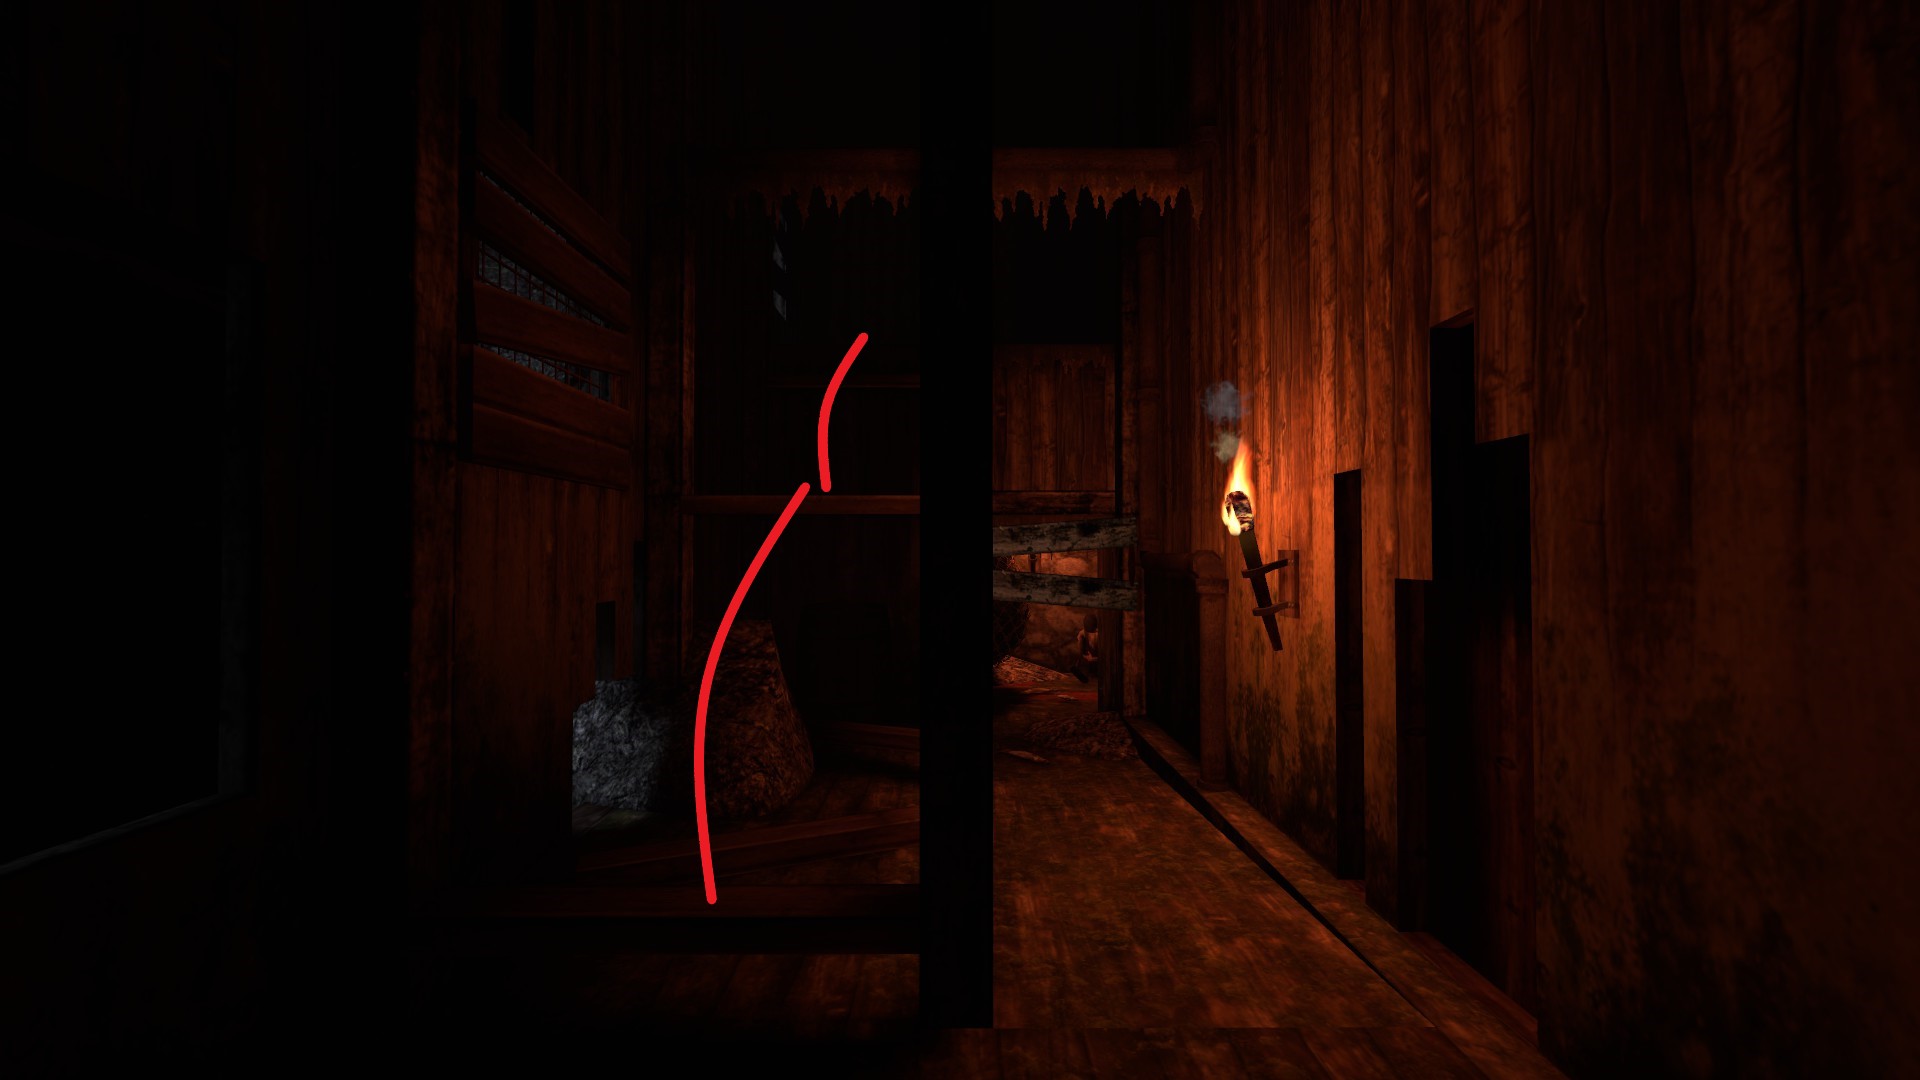
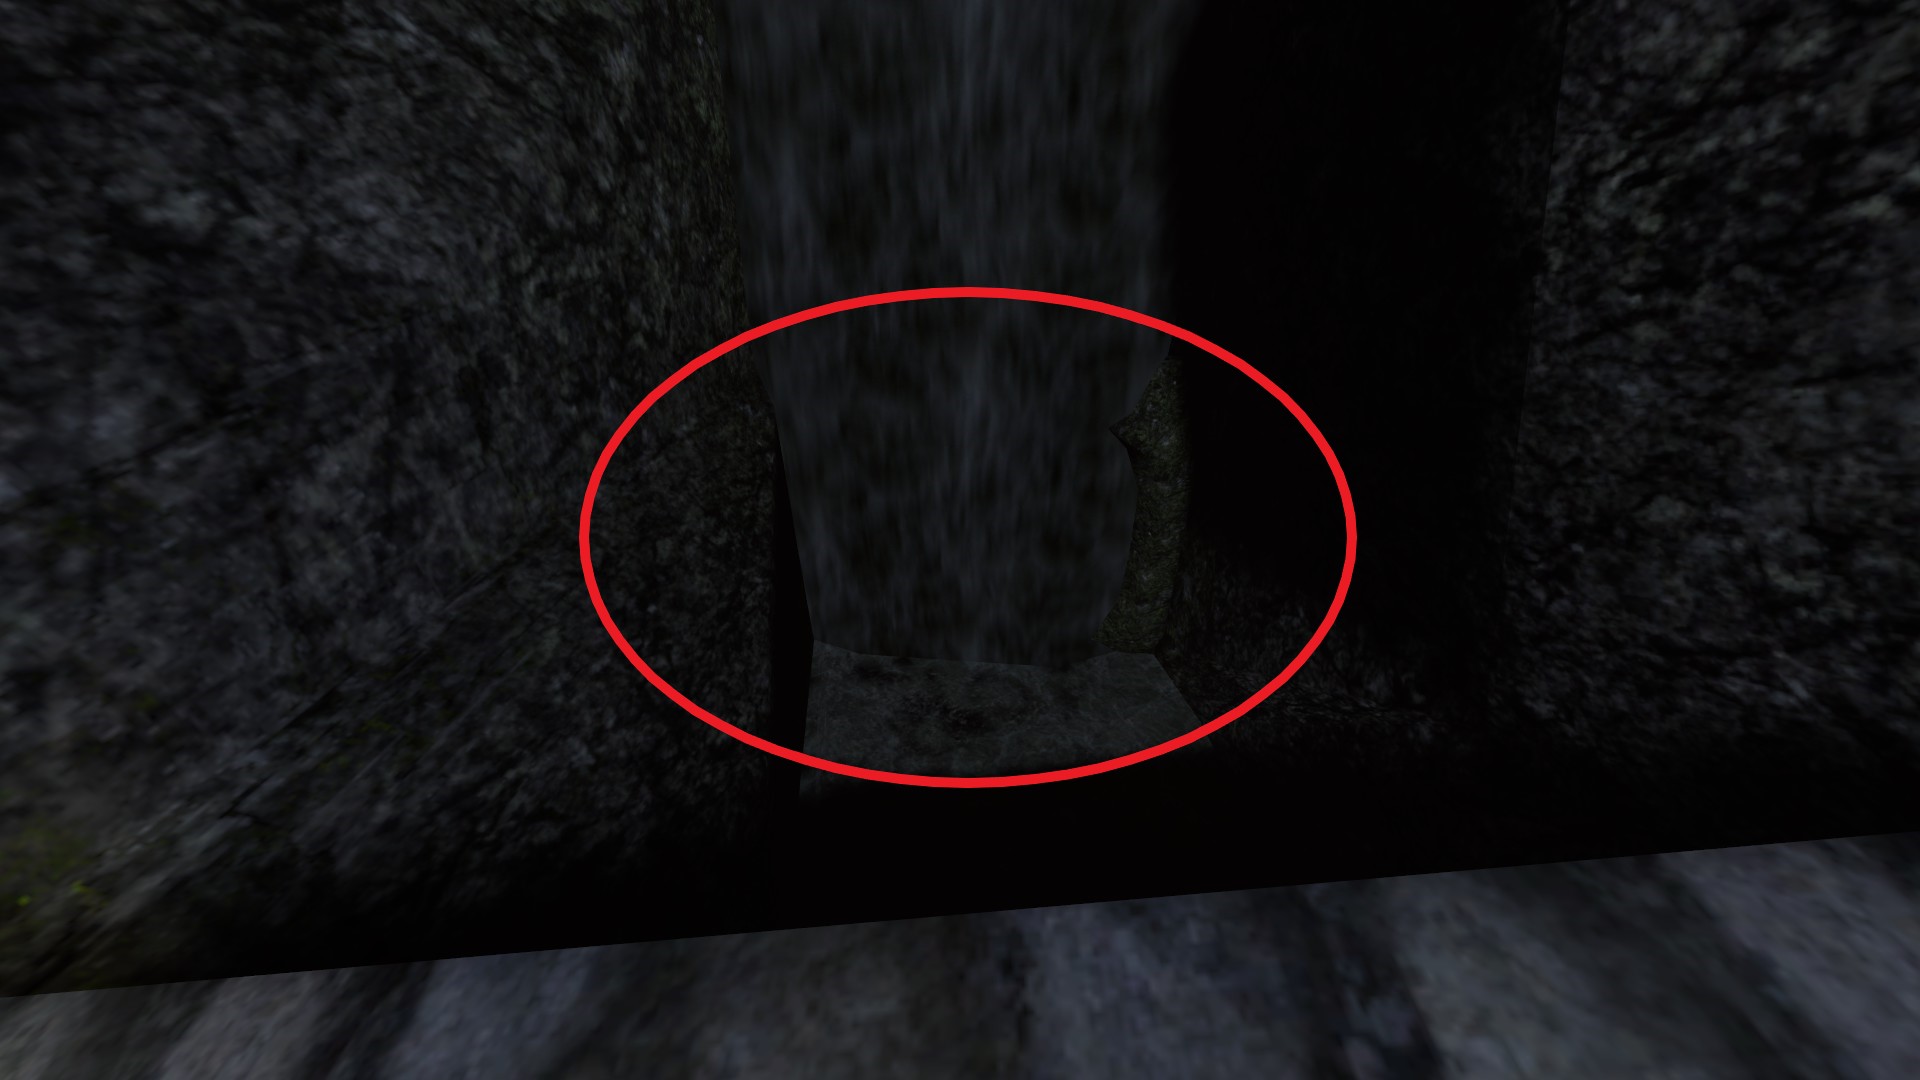
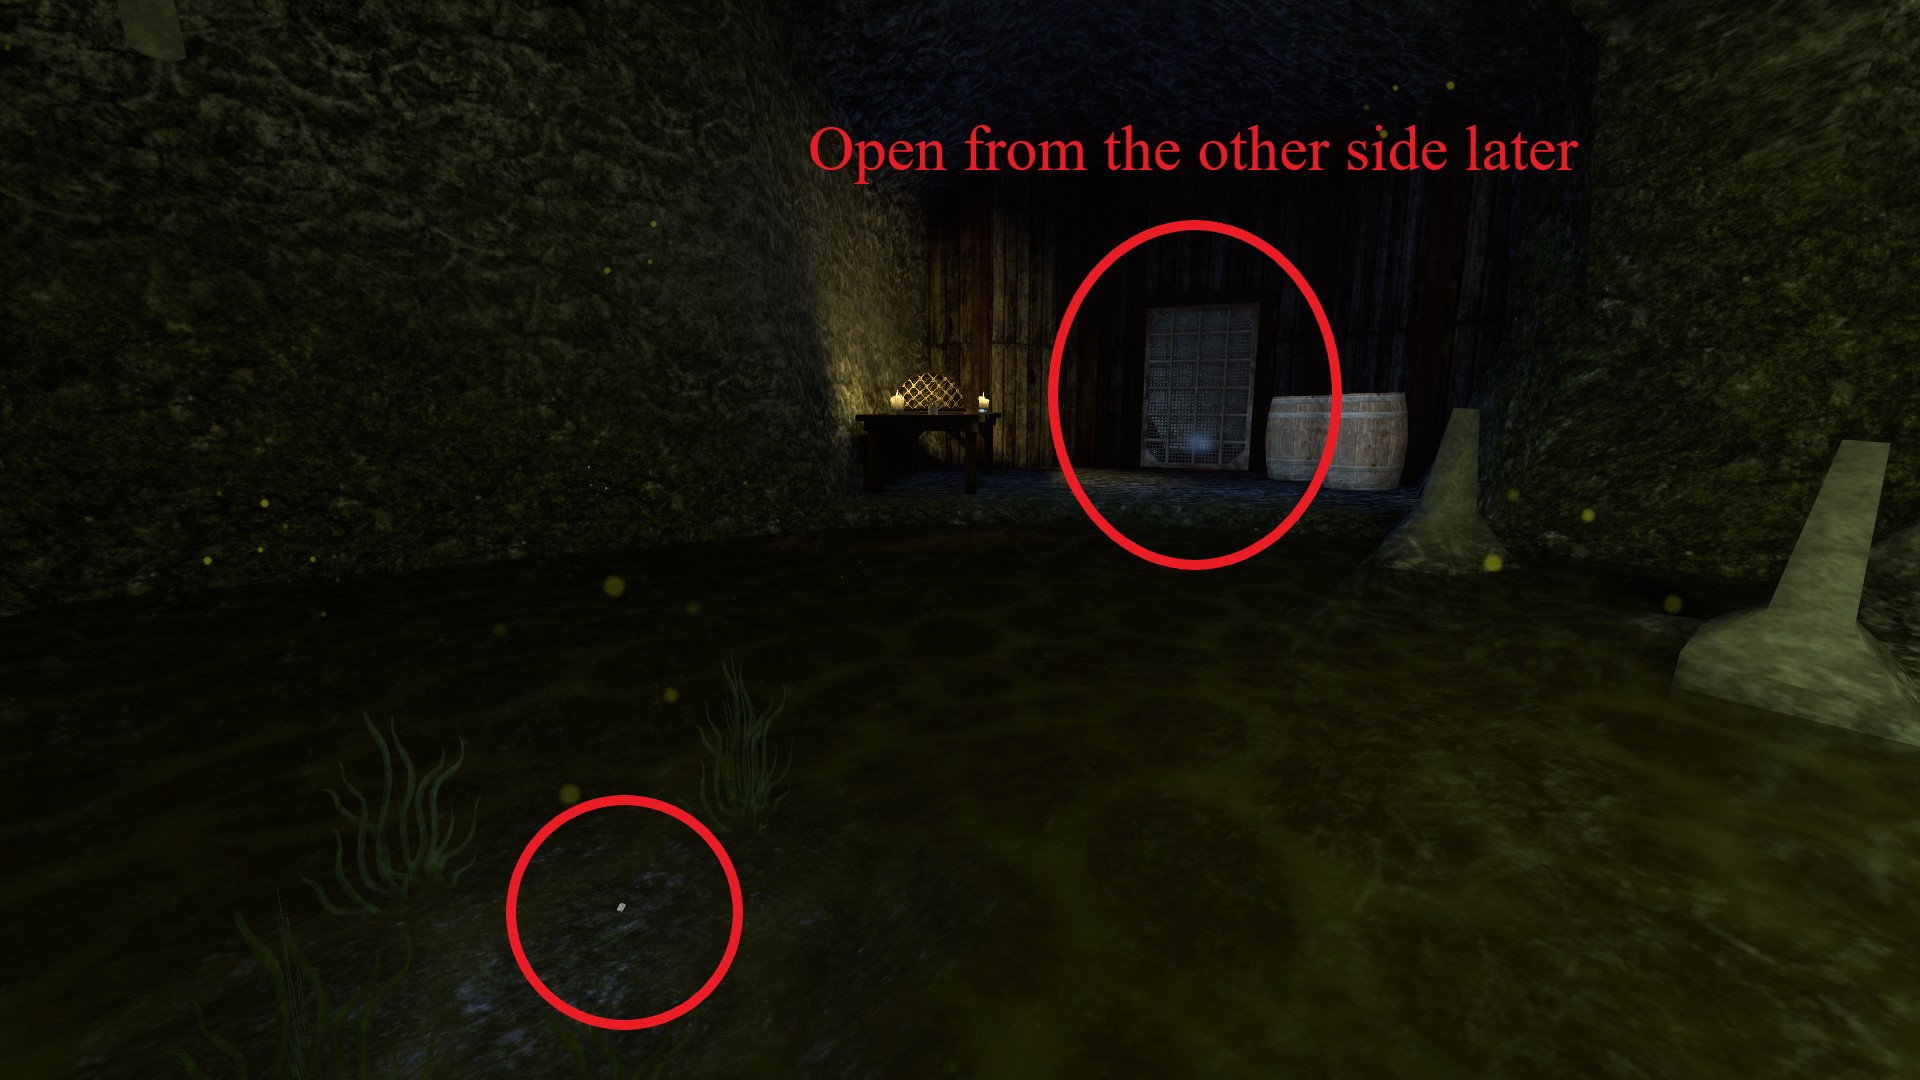
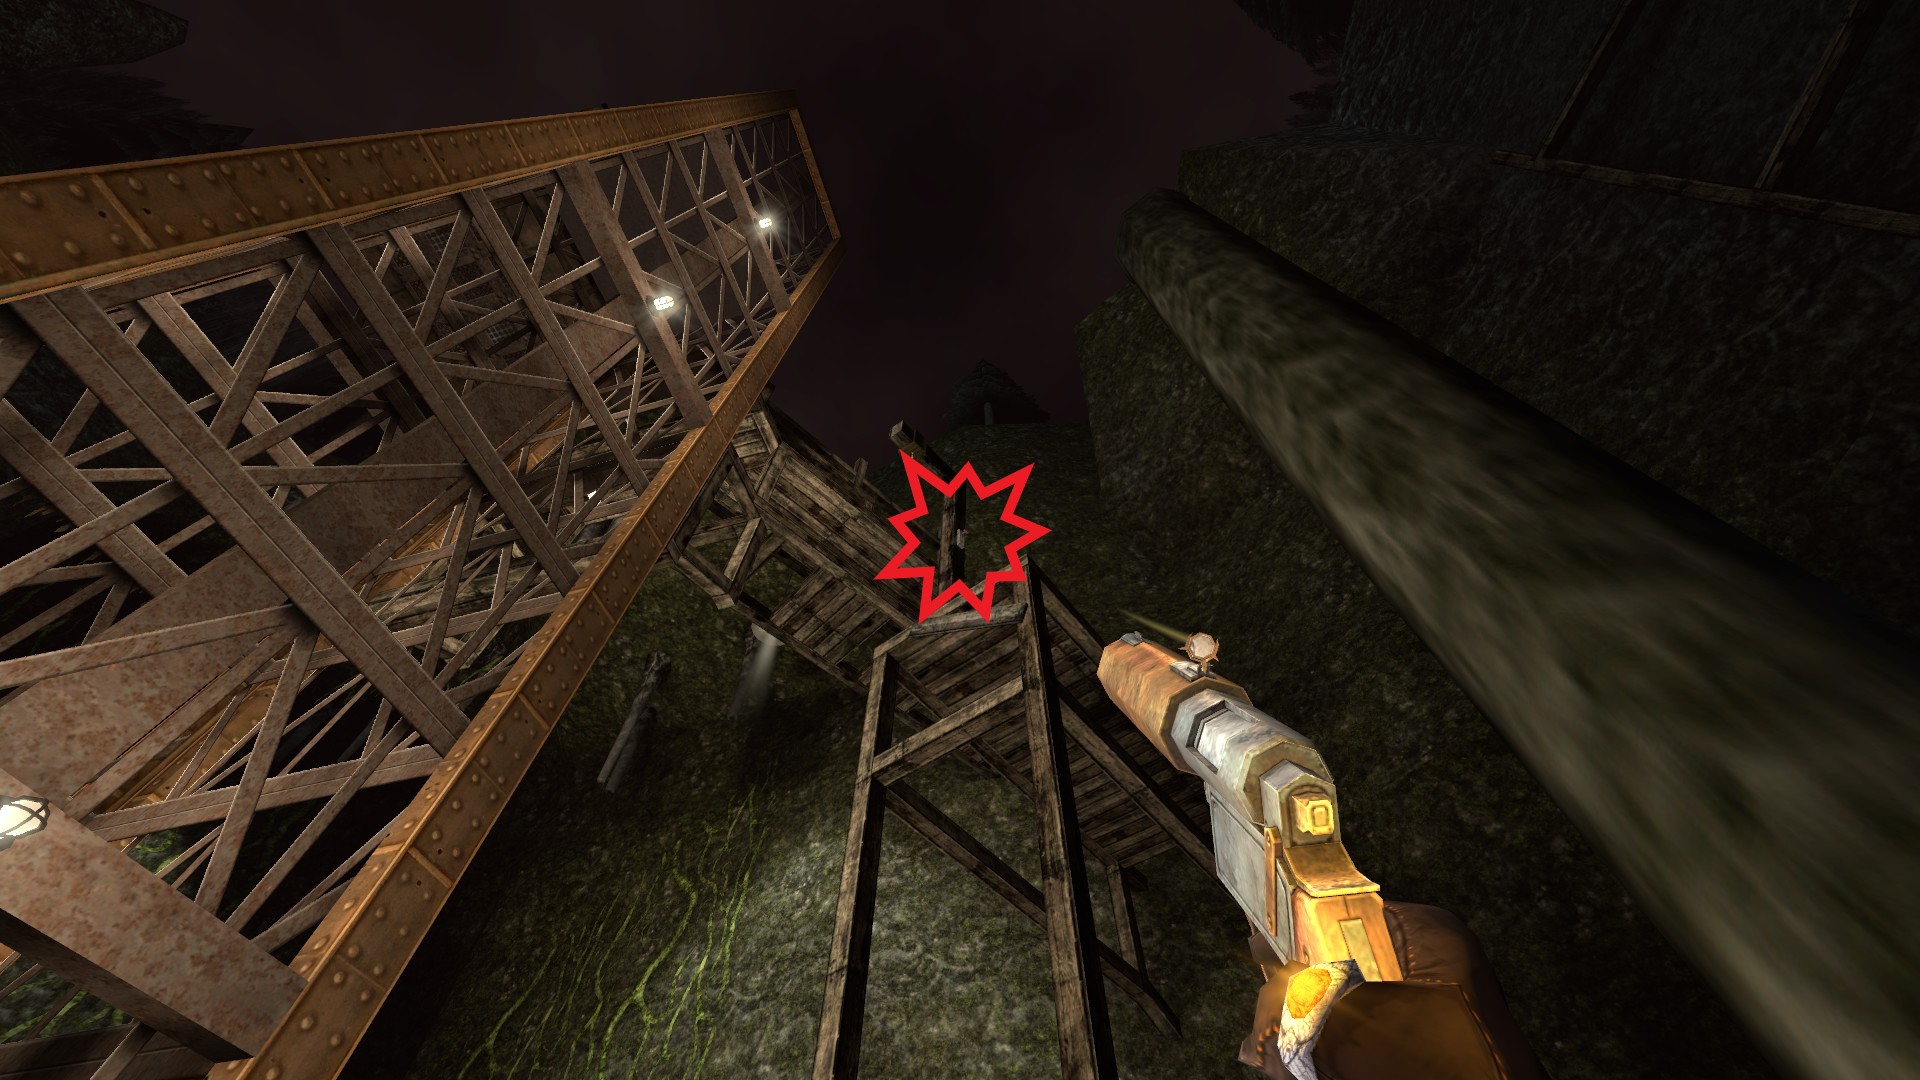
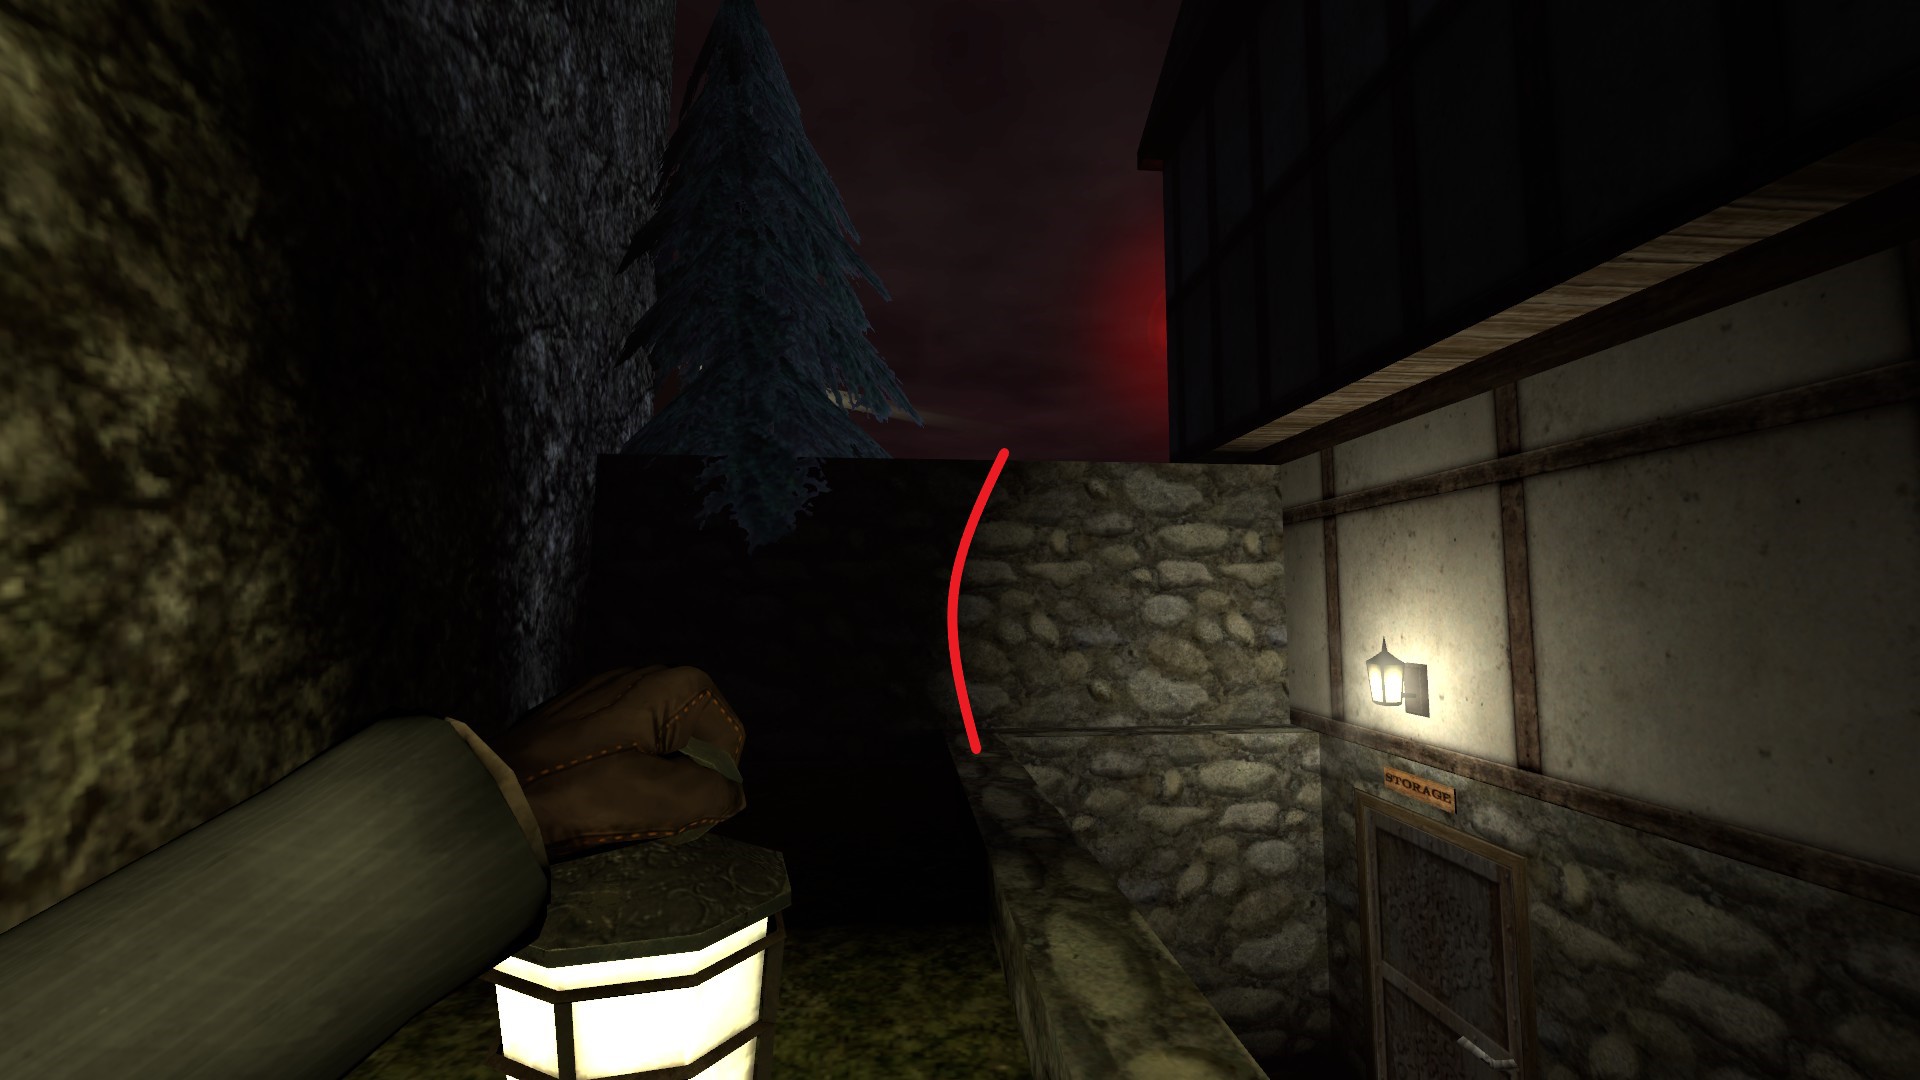
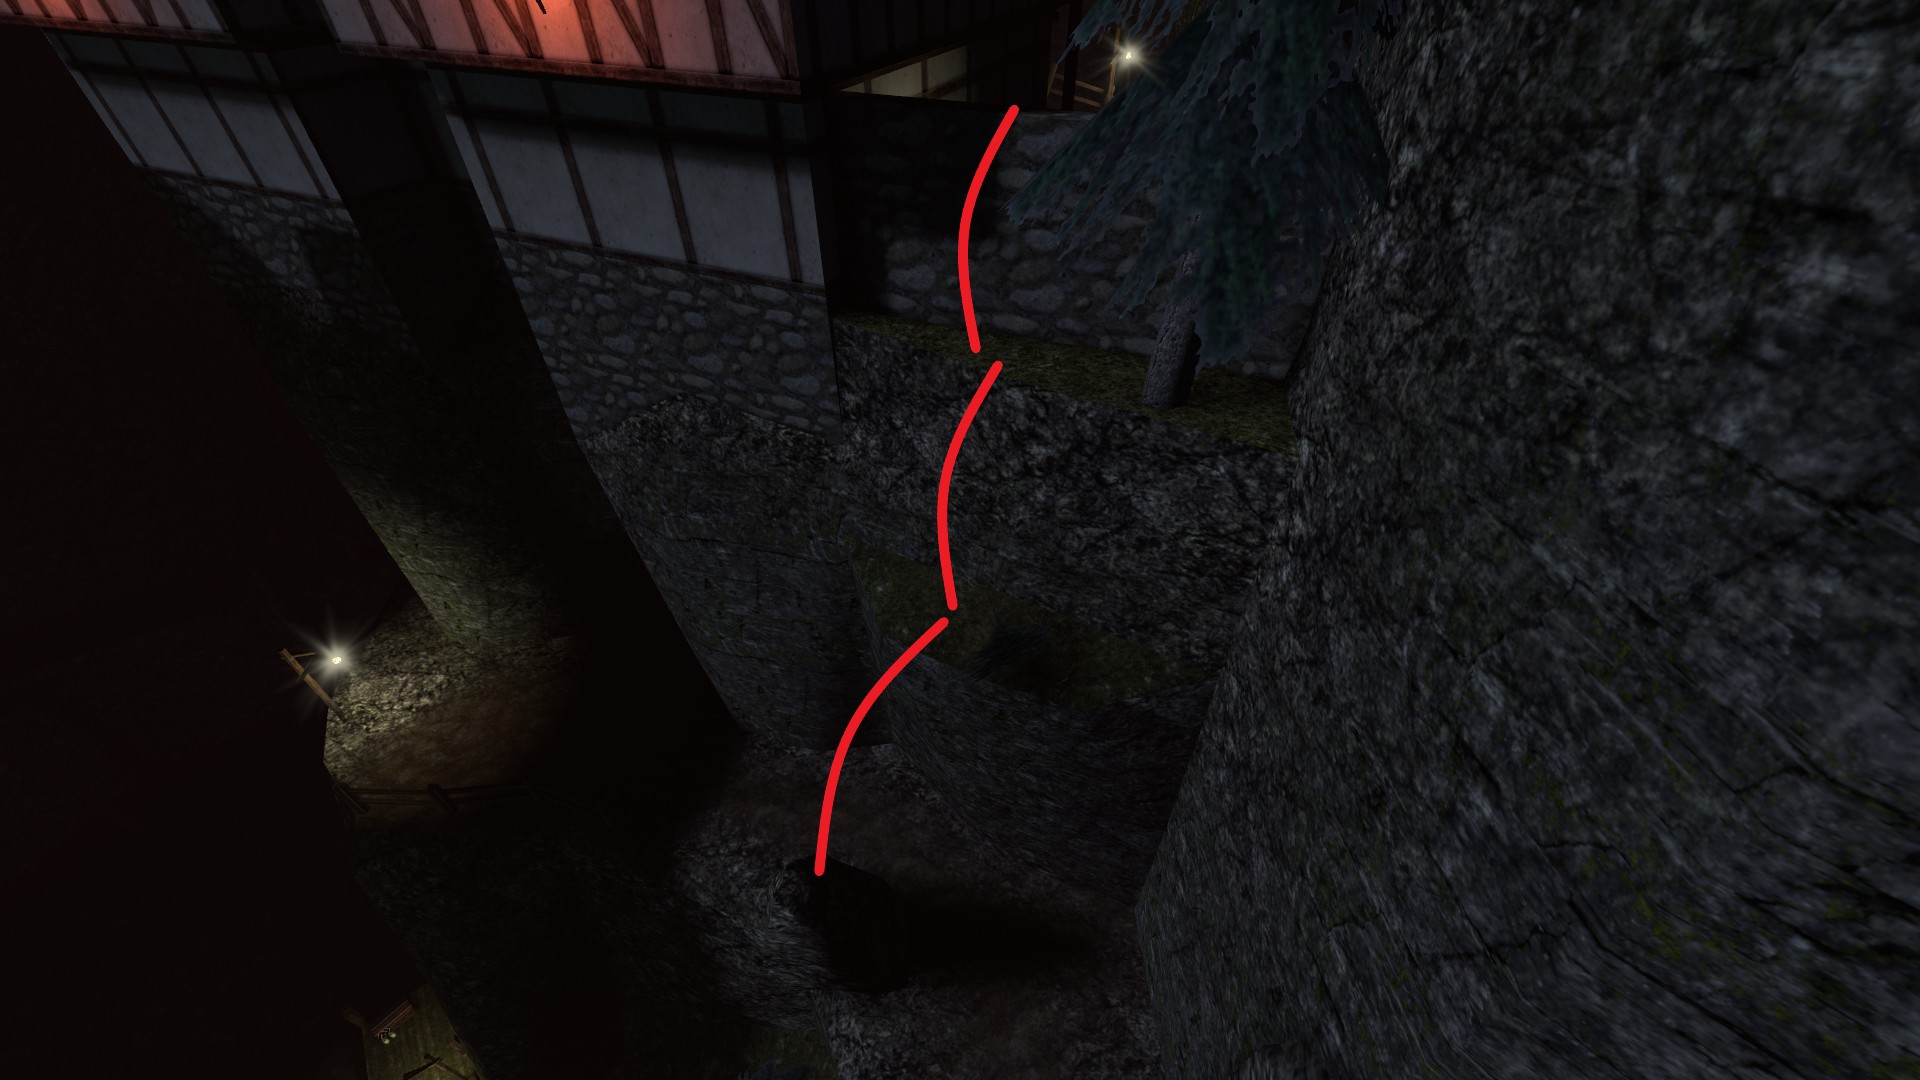
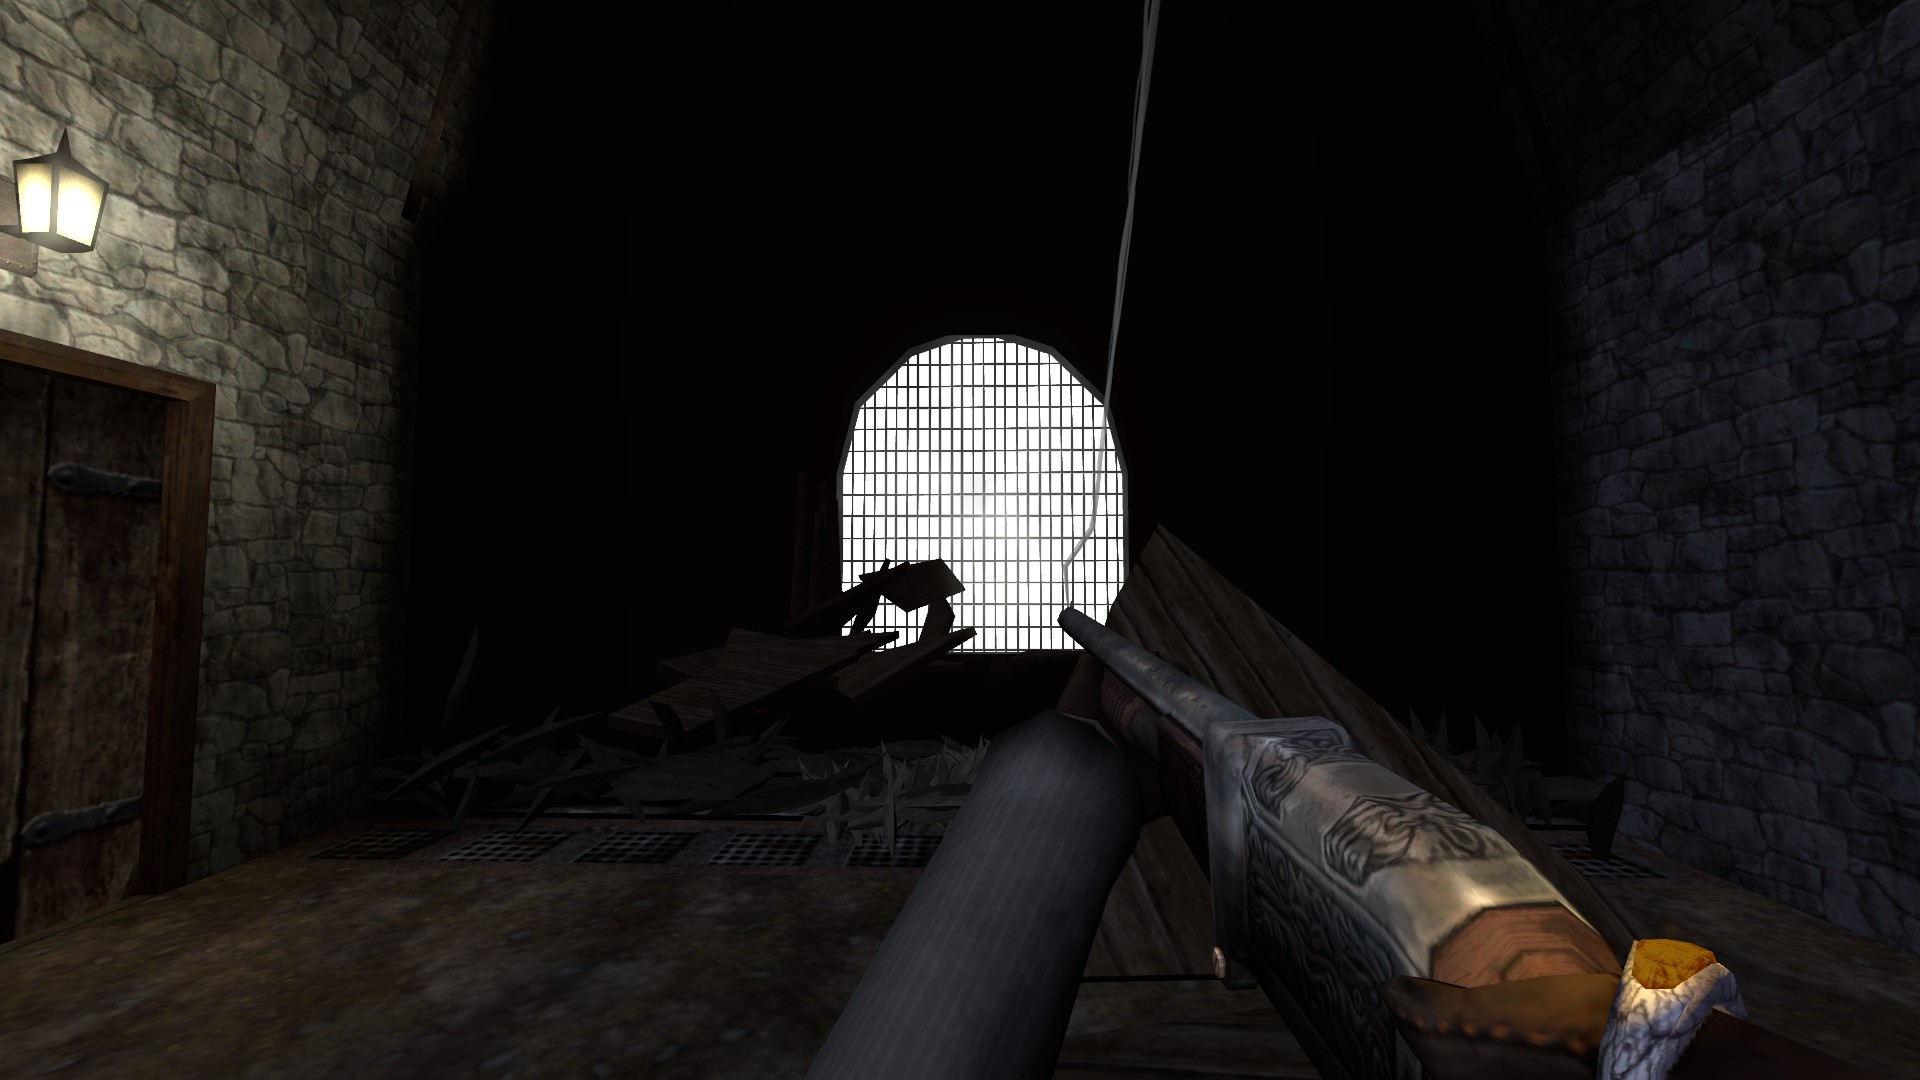
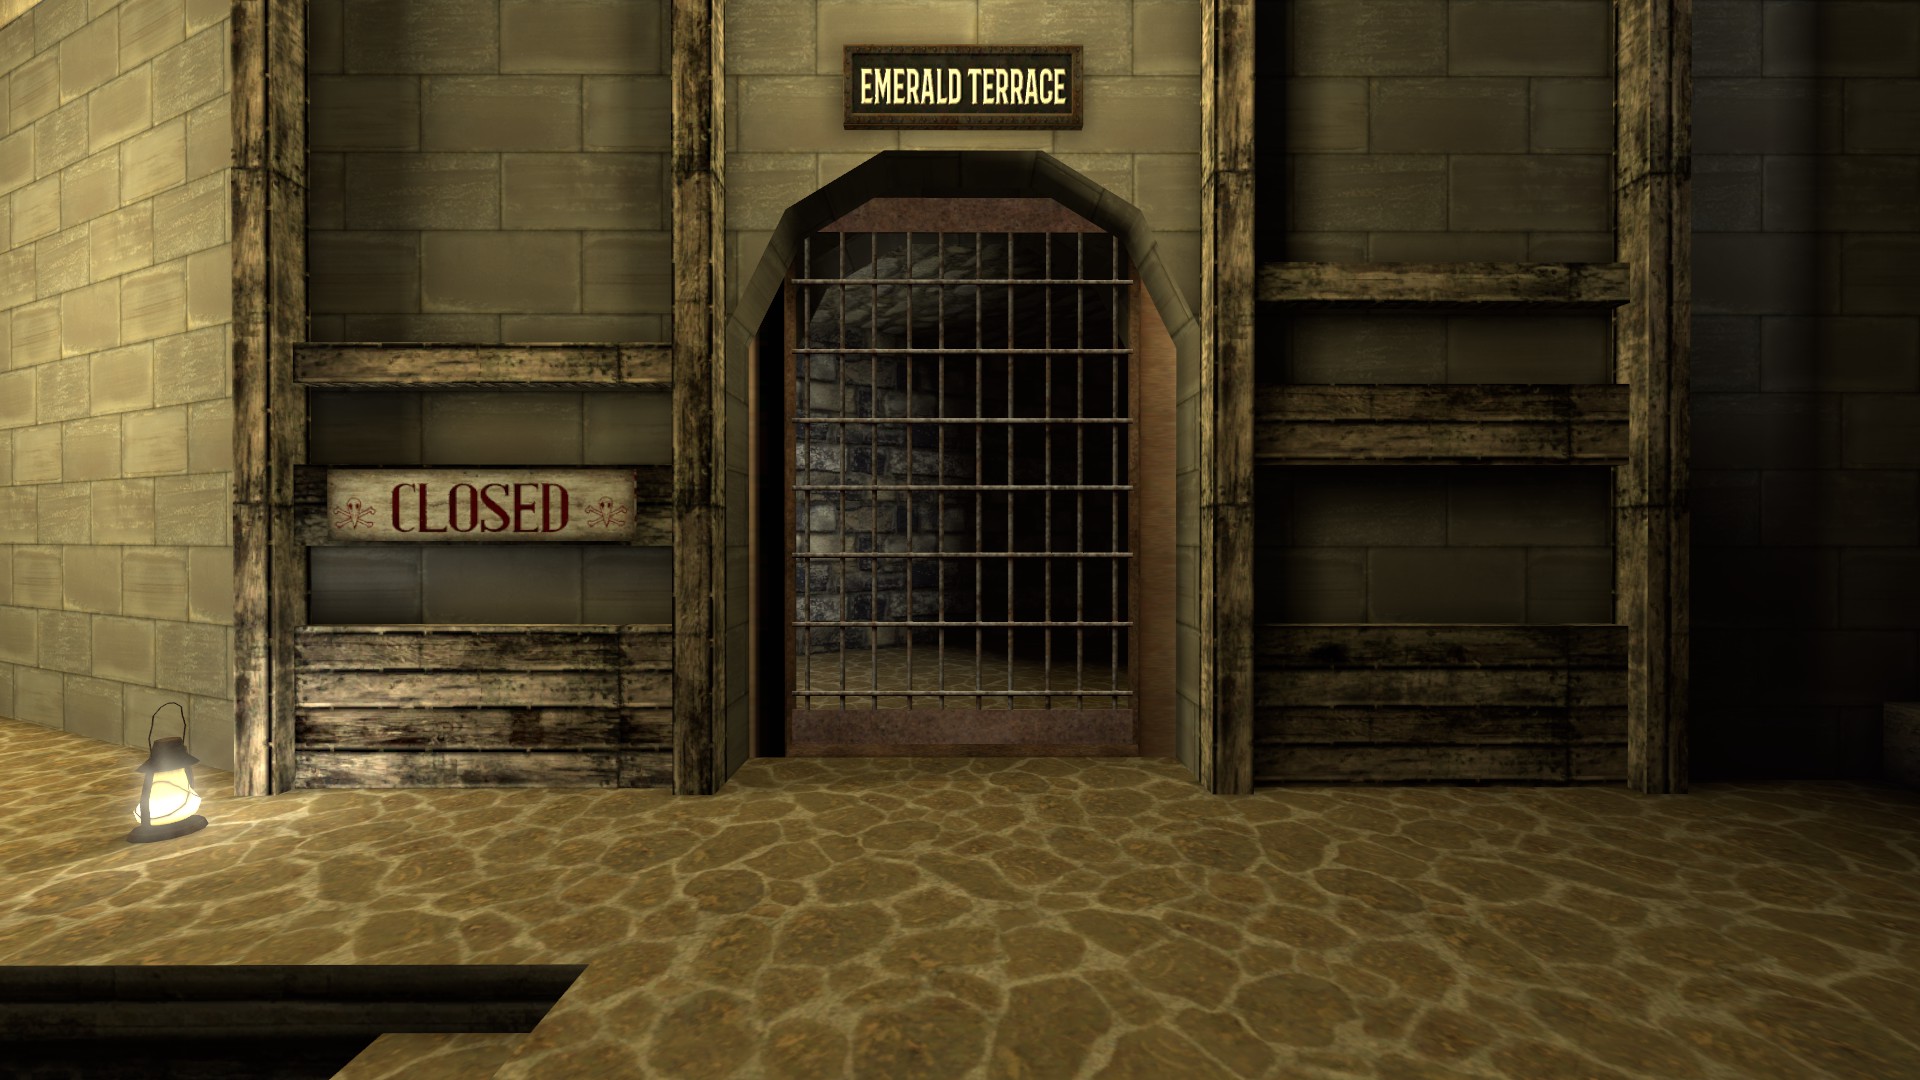
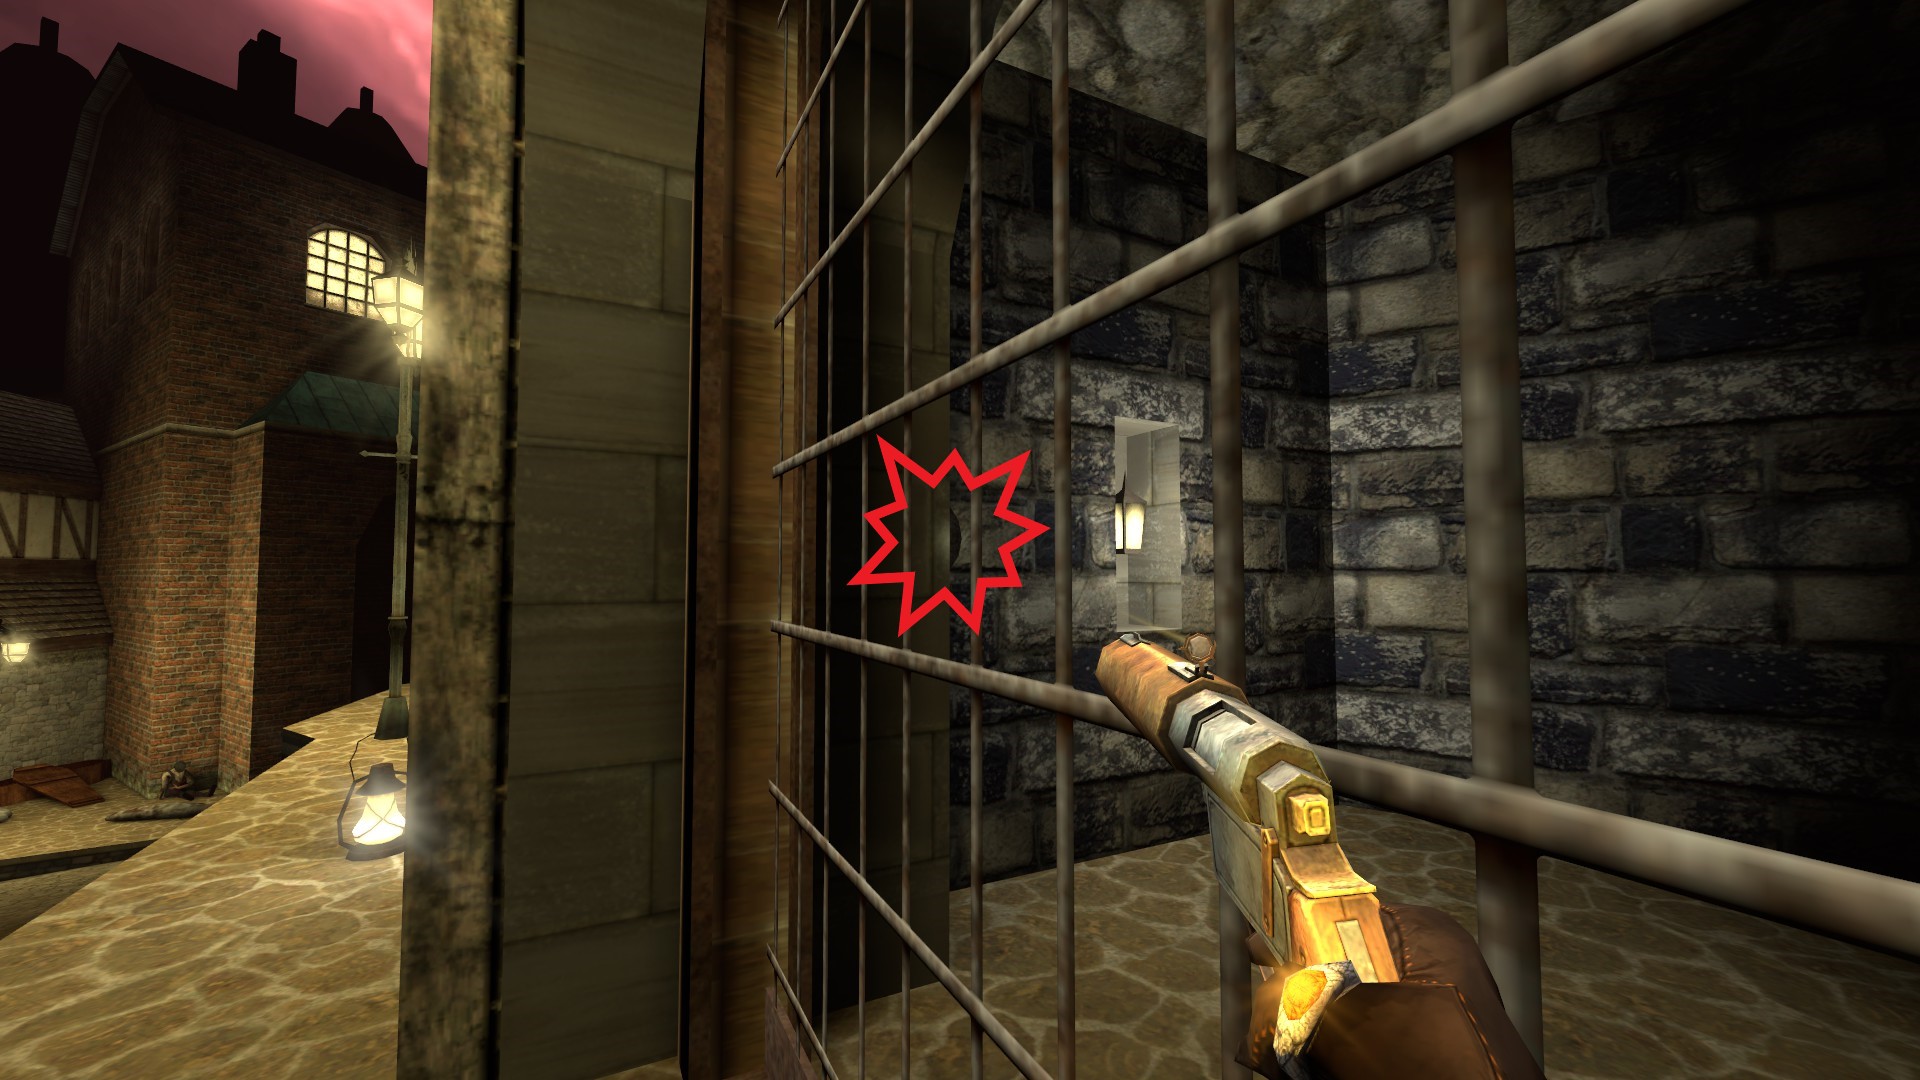
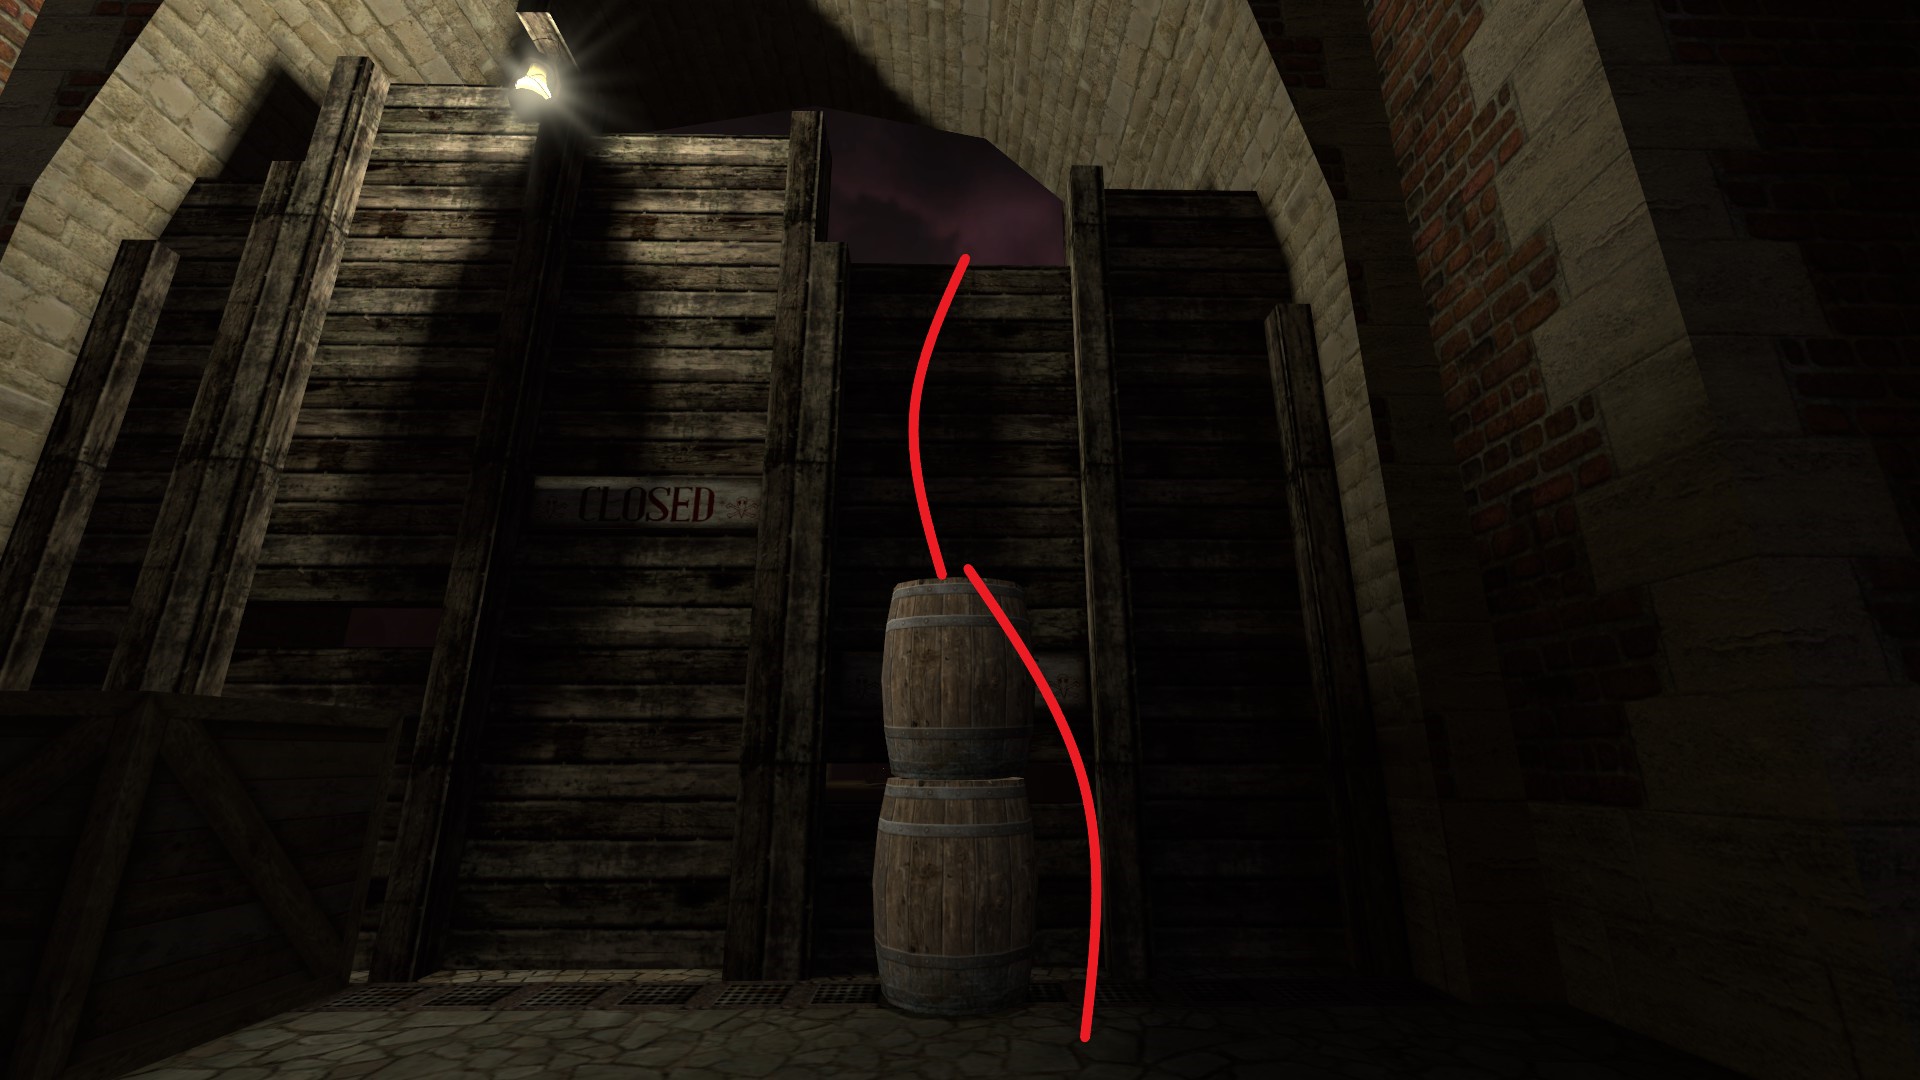
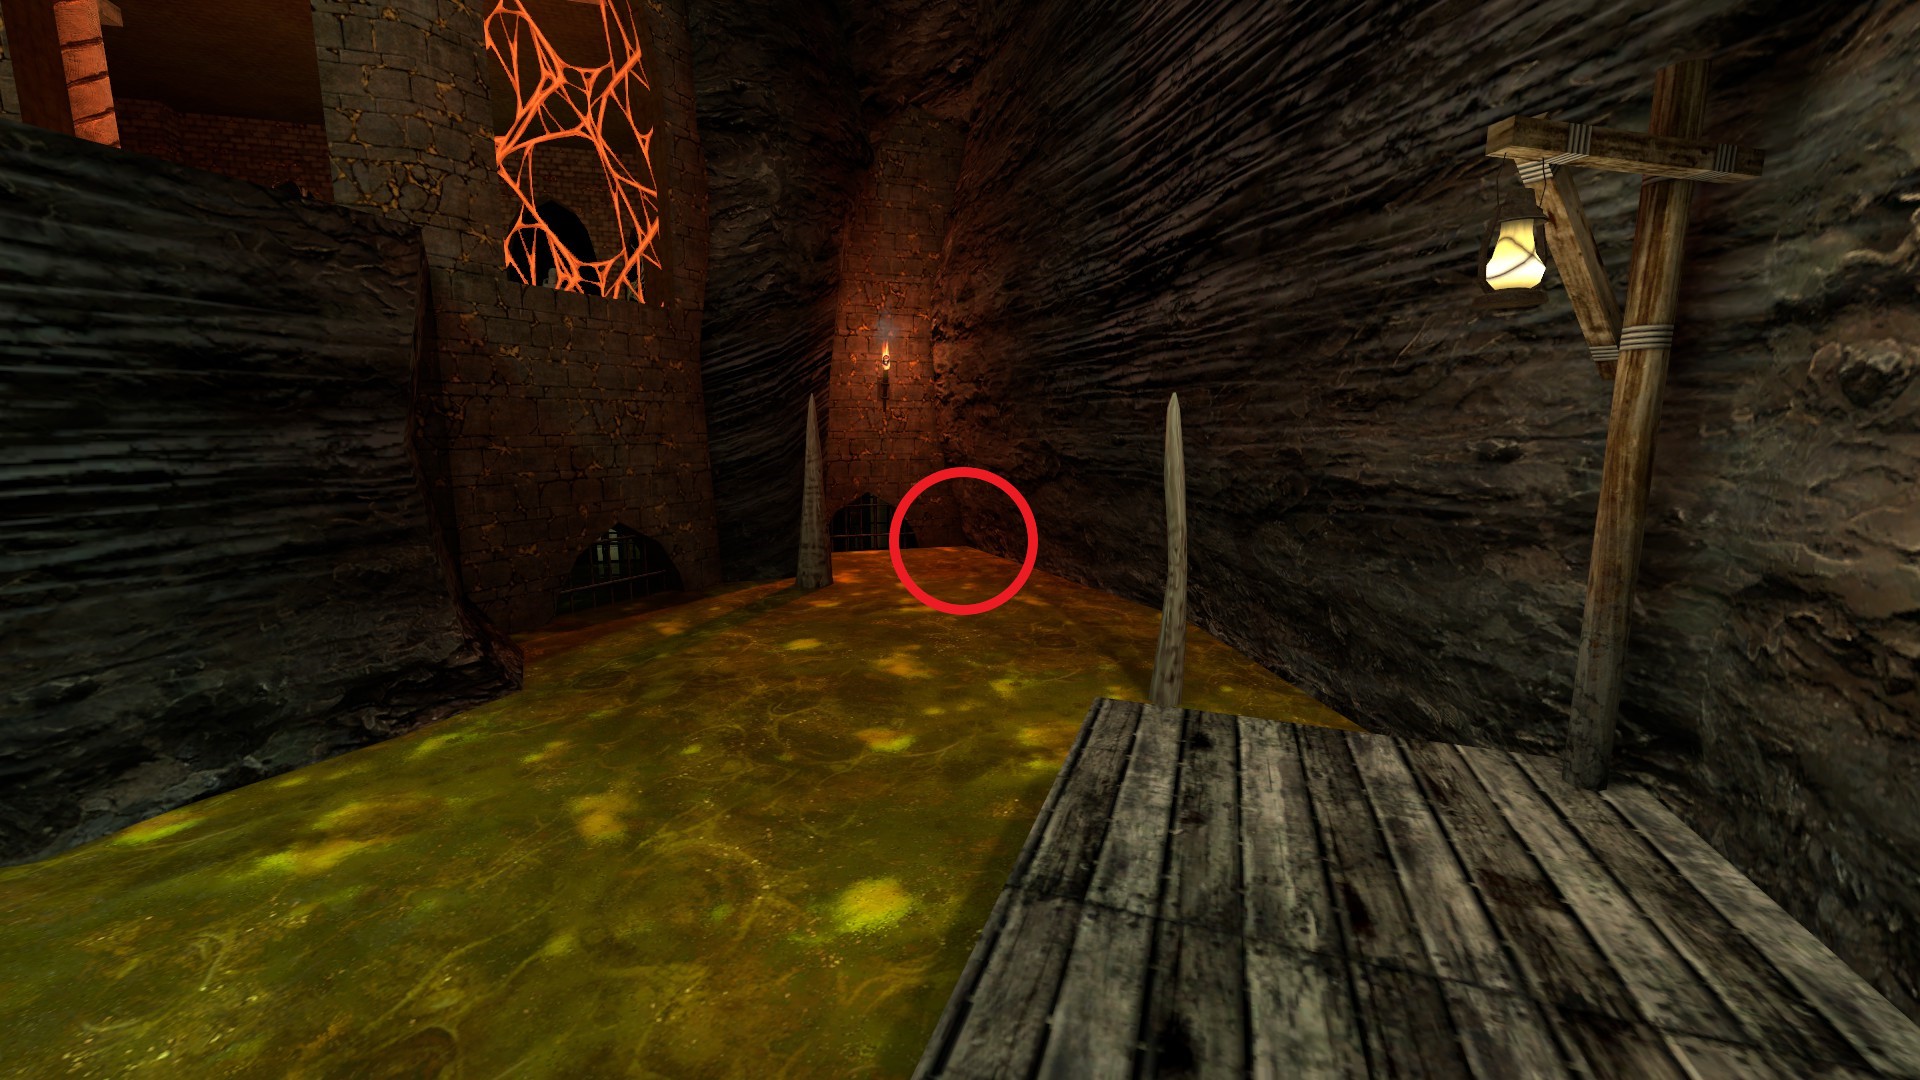
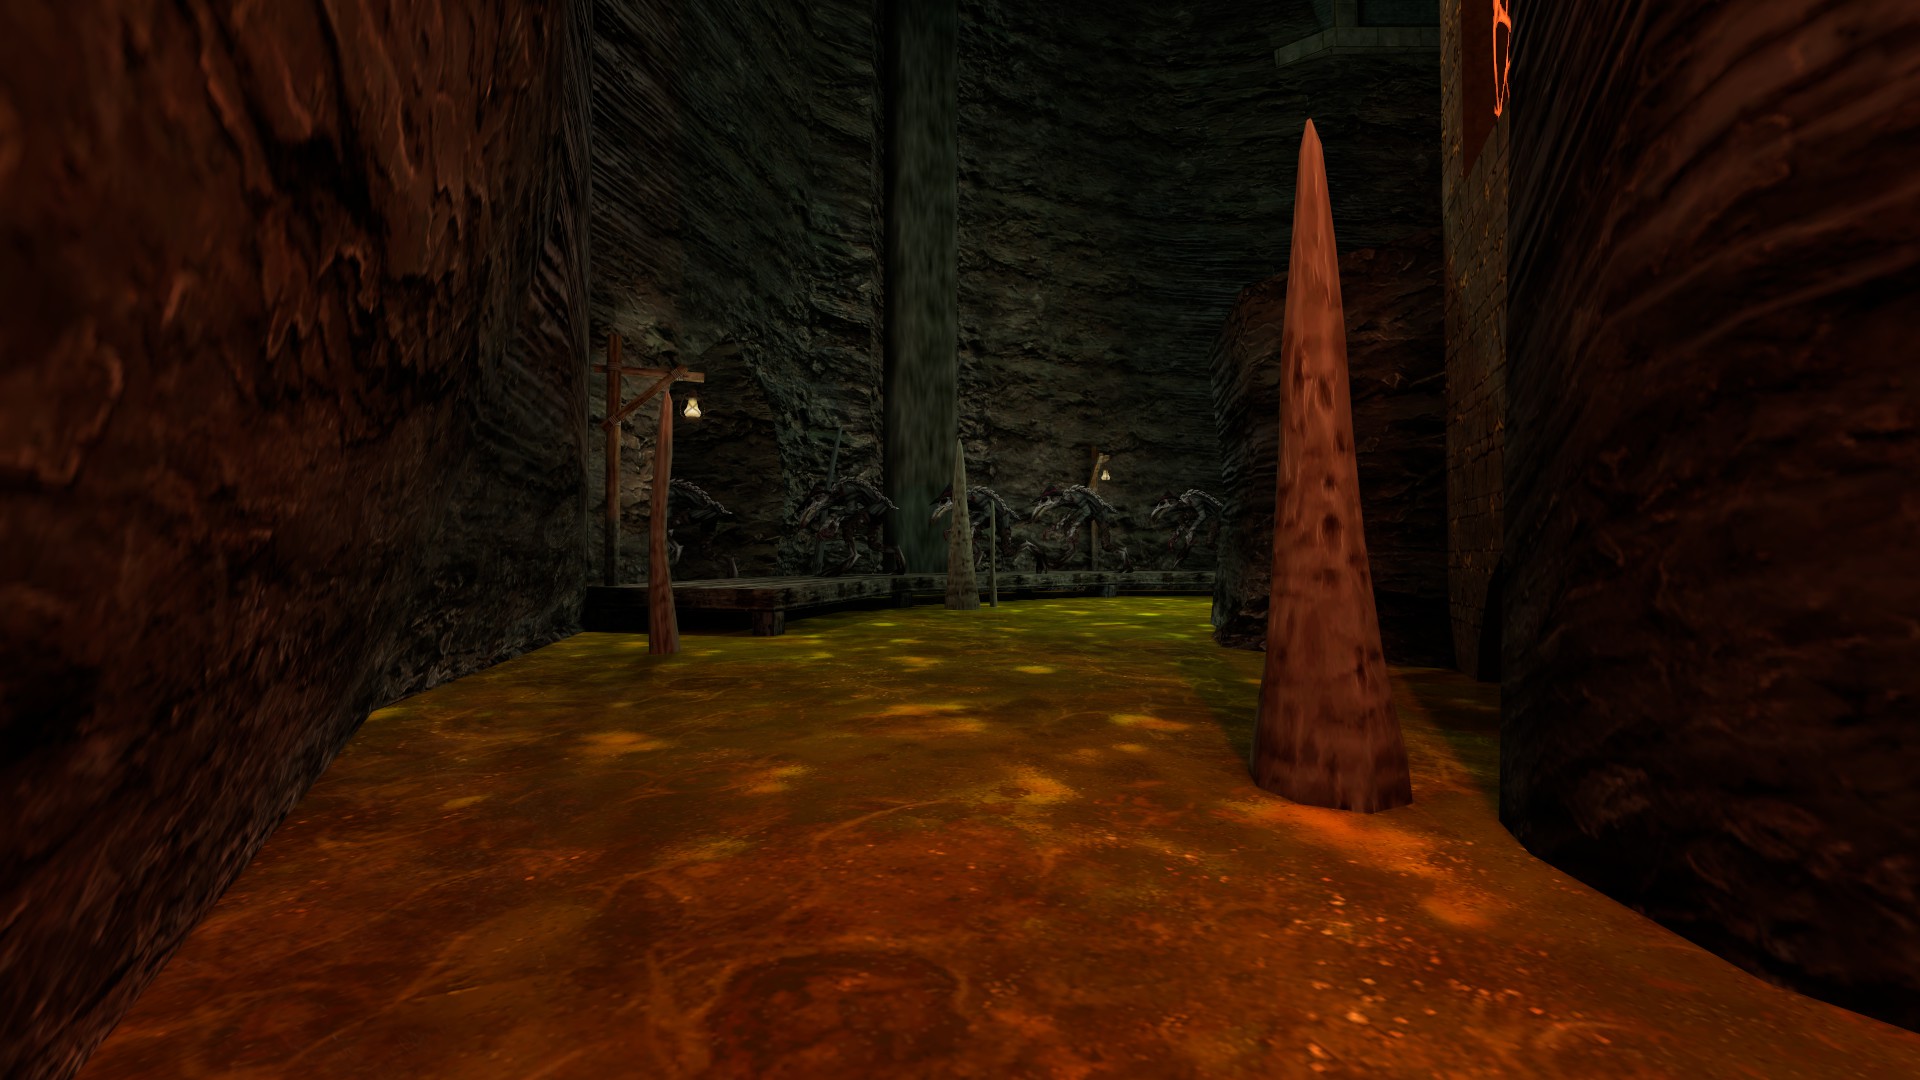
The location you mentioned is currently unaccessible - though it is highly probable that we will be entering it in one of the future updates.
Seel 9 DIC 2024 a las 2:28 p. m. 
Thanks for the guide, I know it's a lot of work to compile something like this.

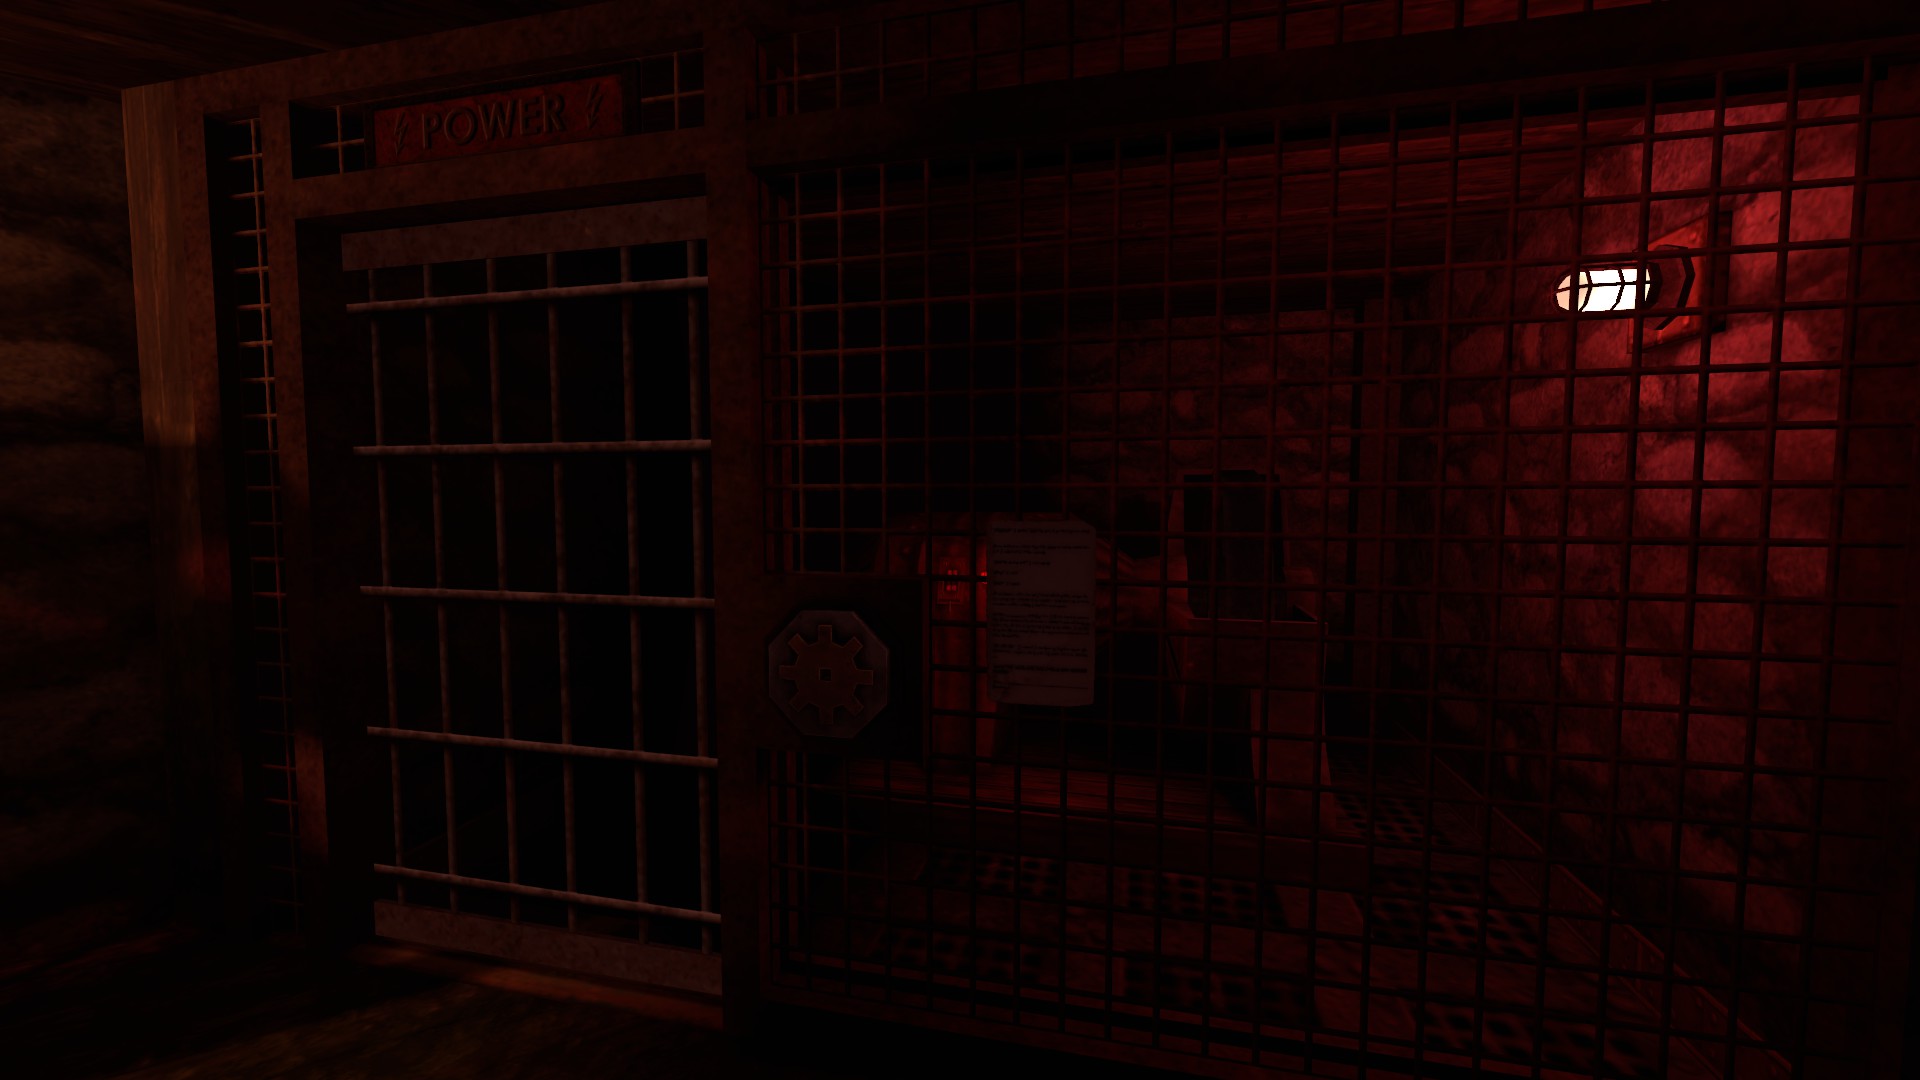
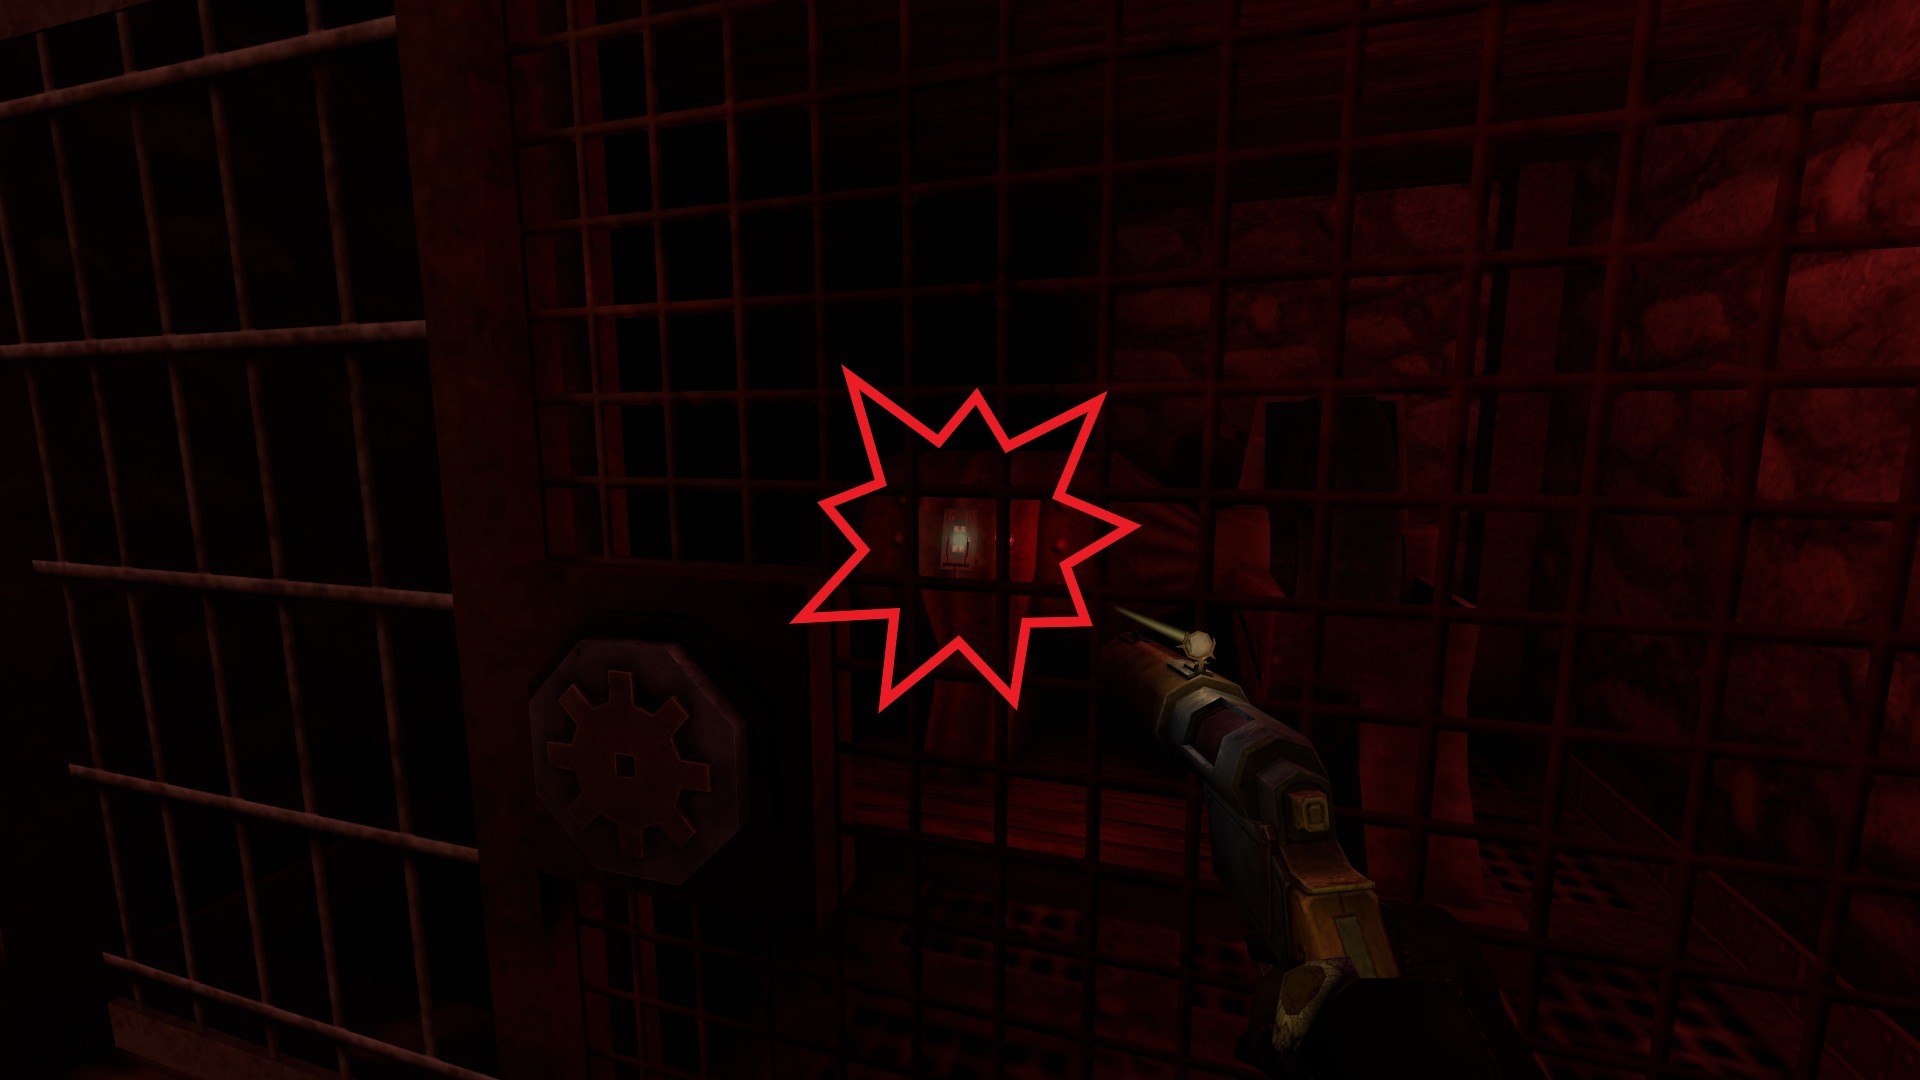
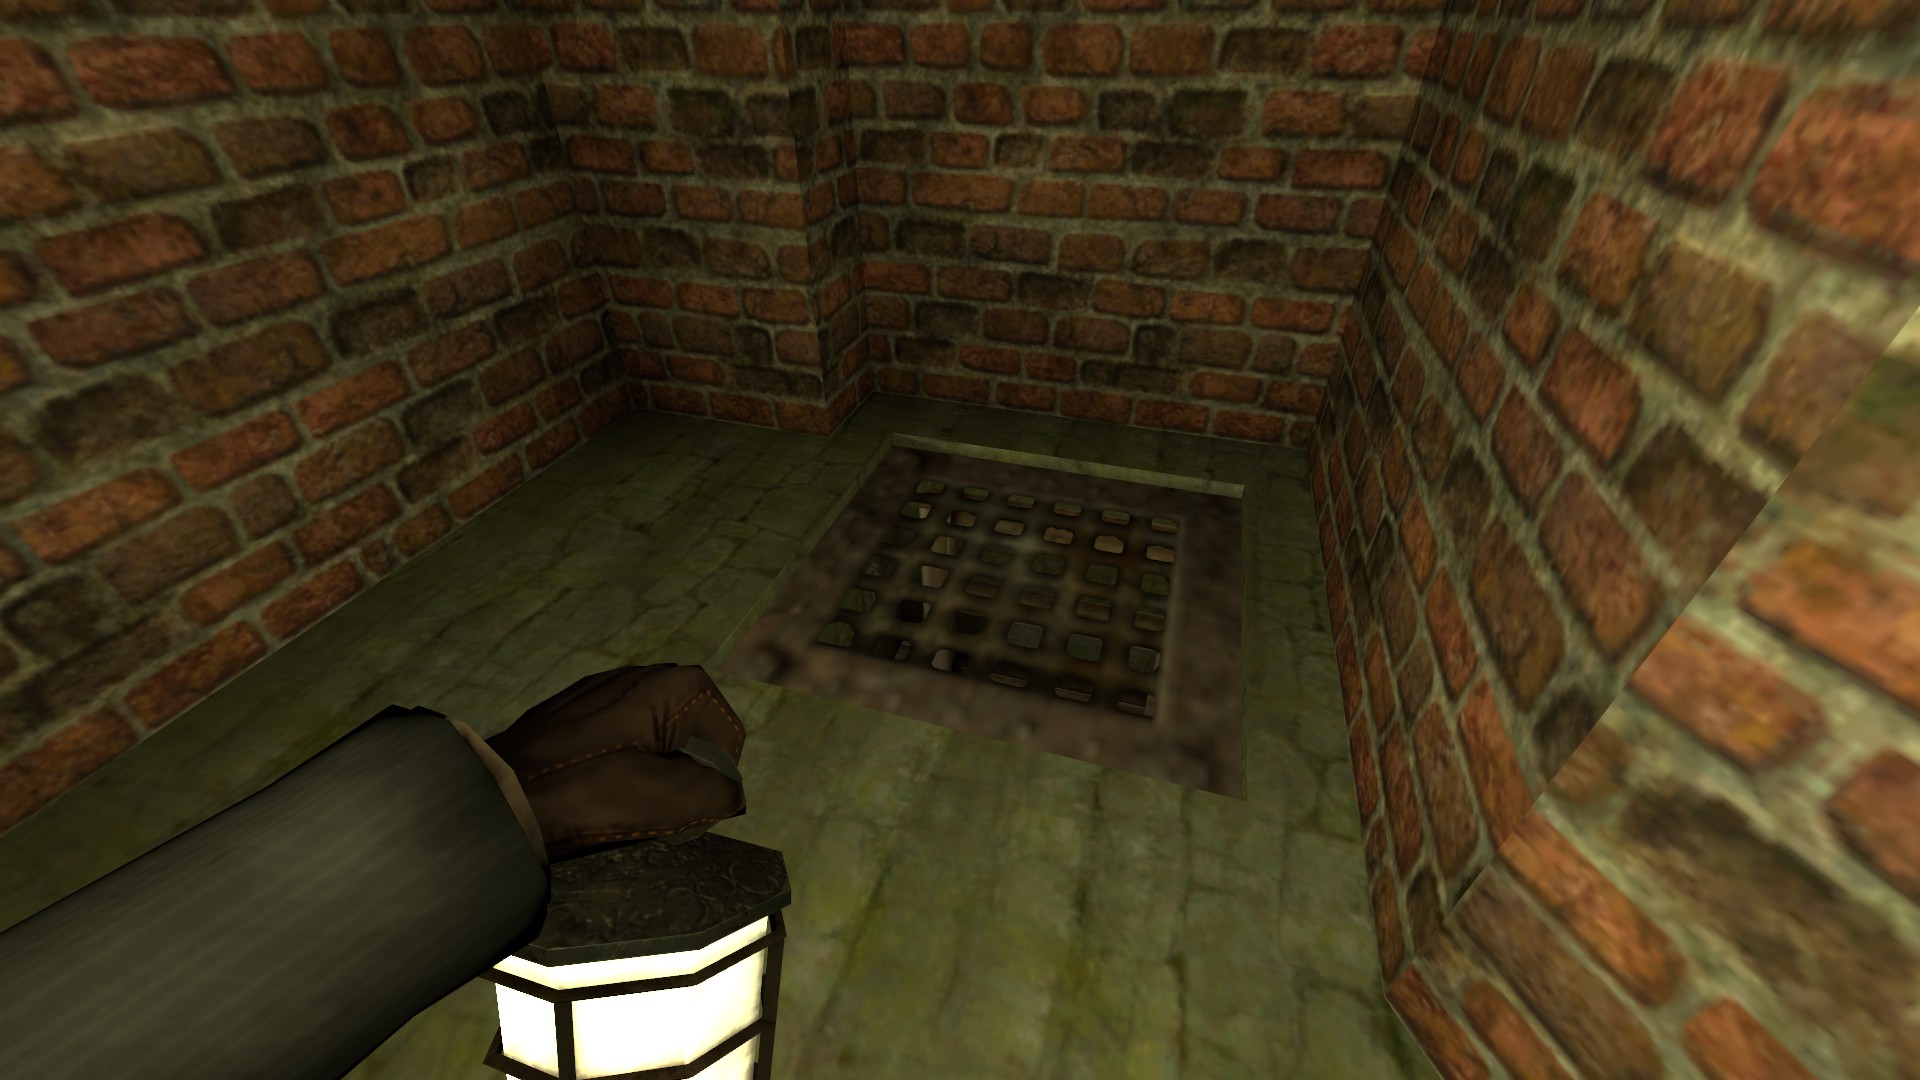
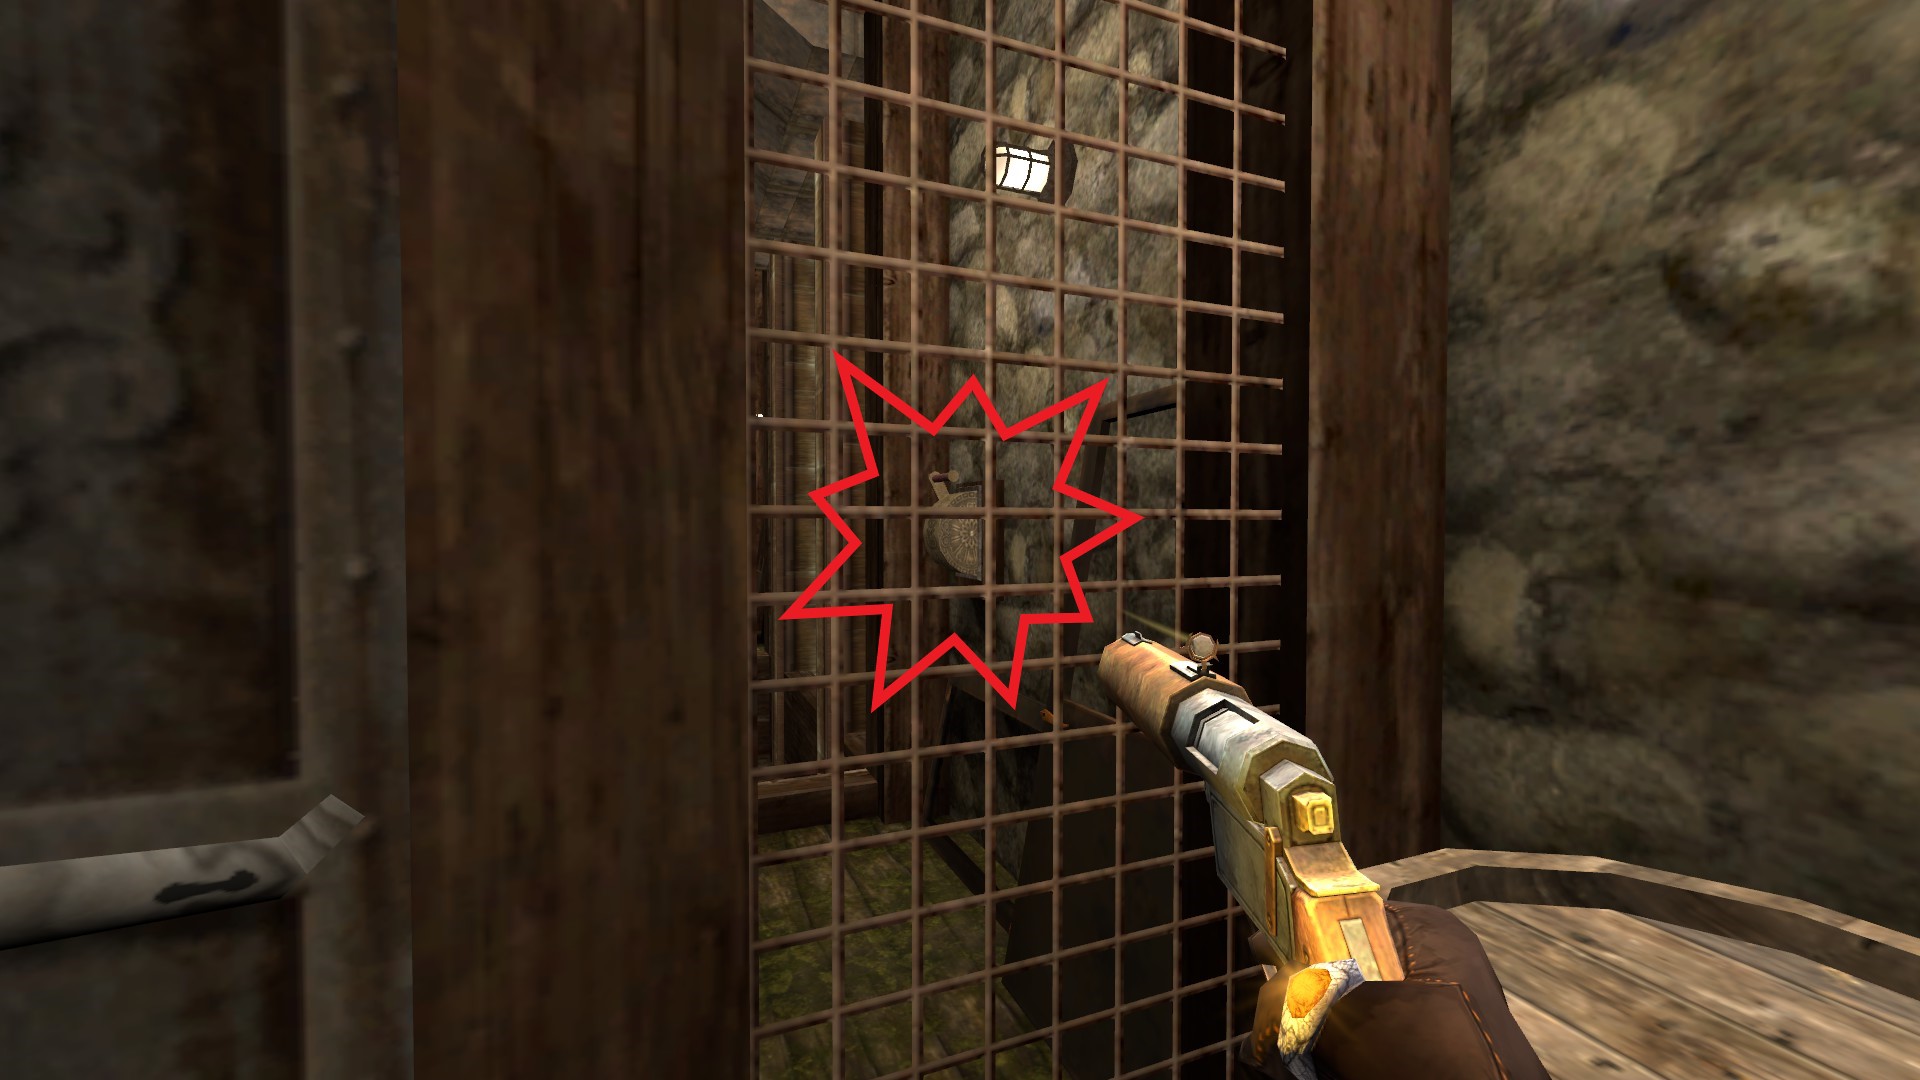
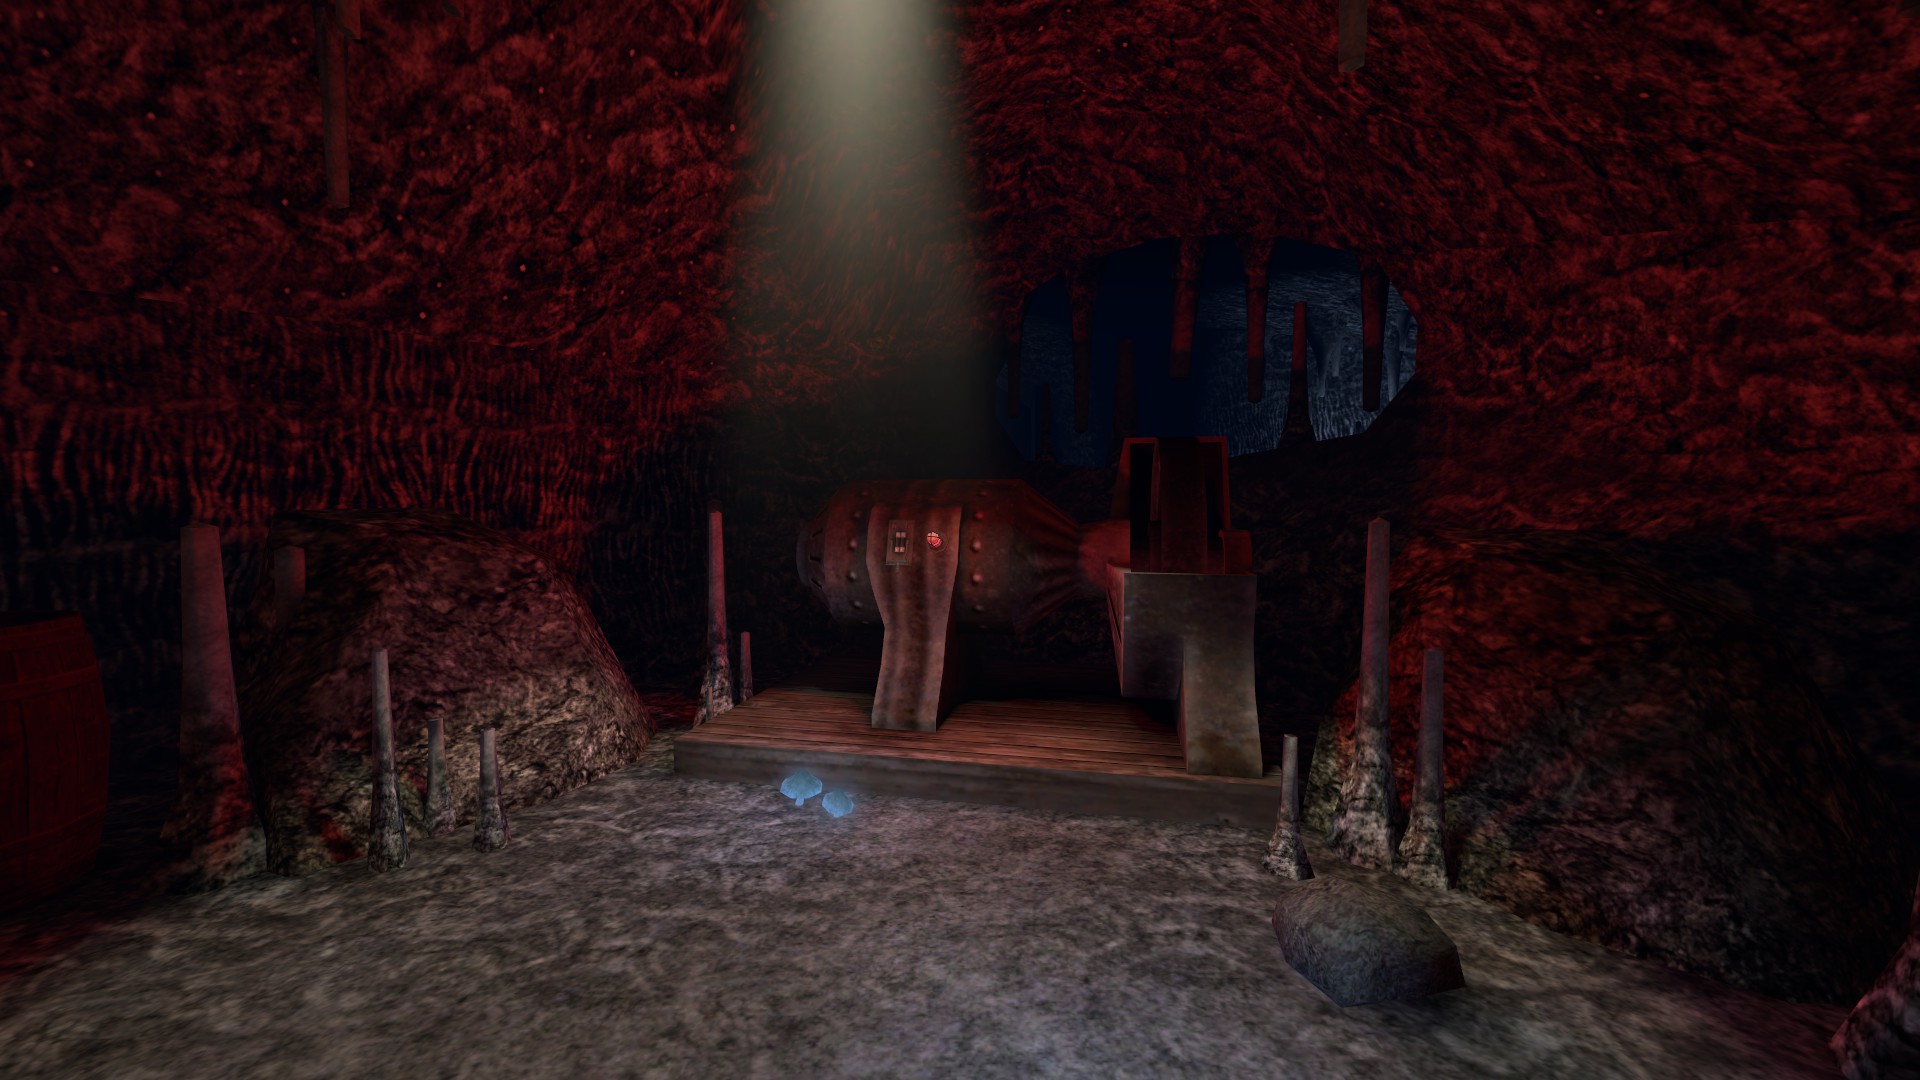
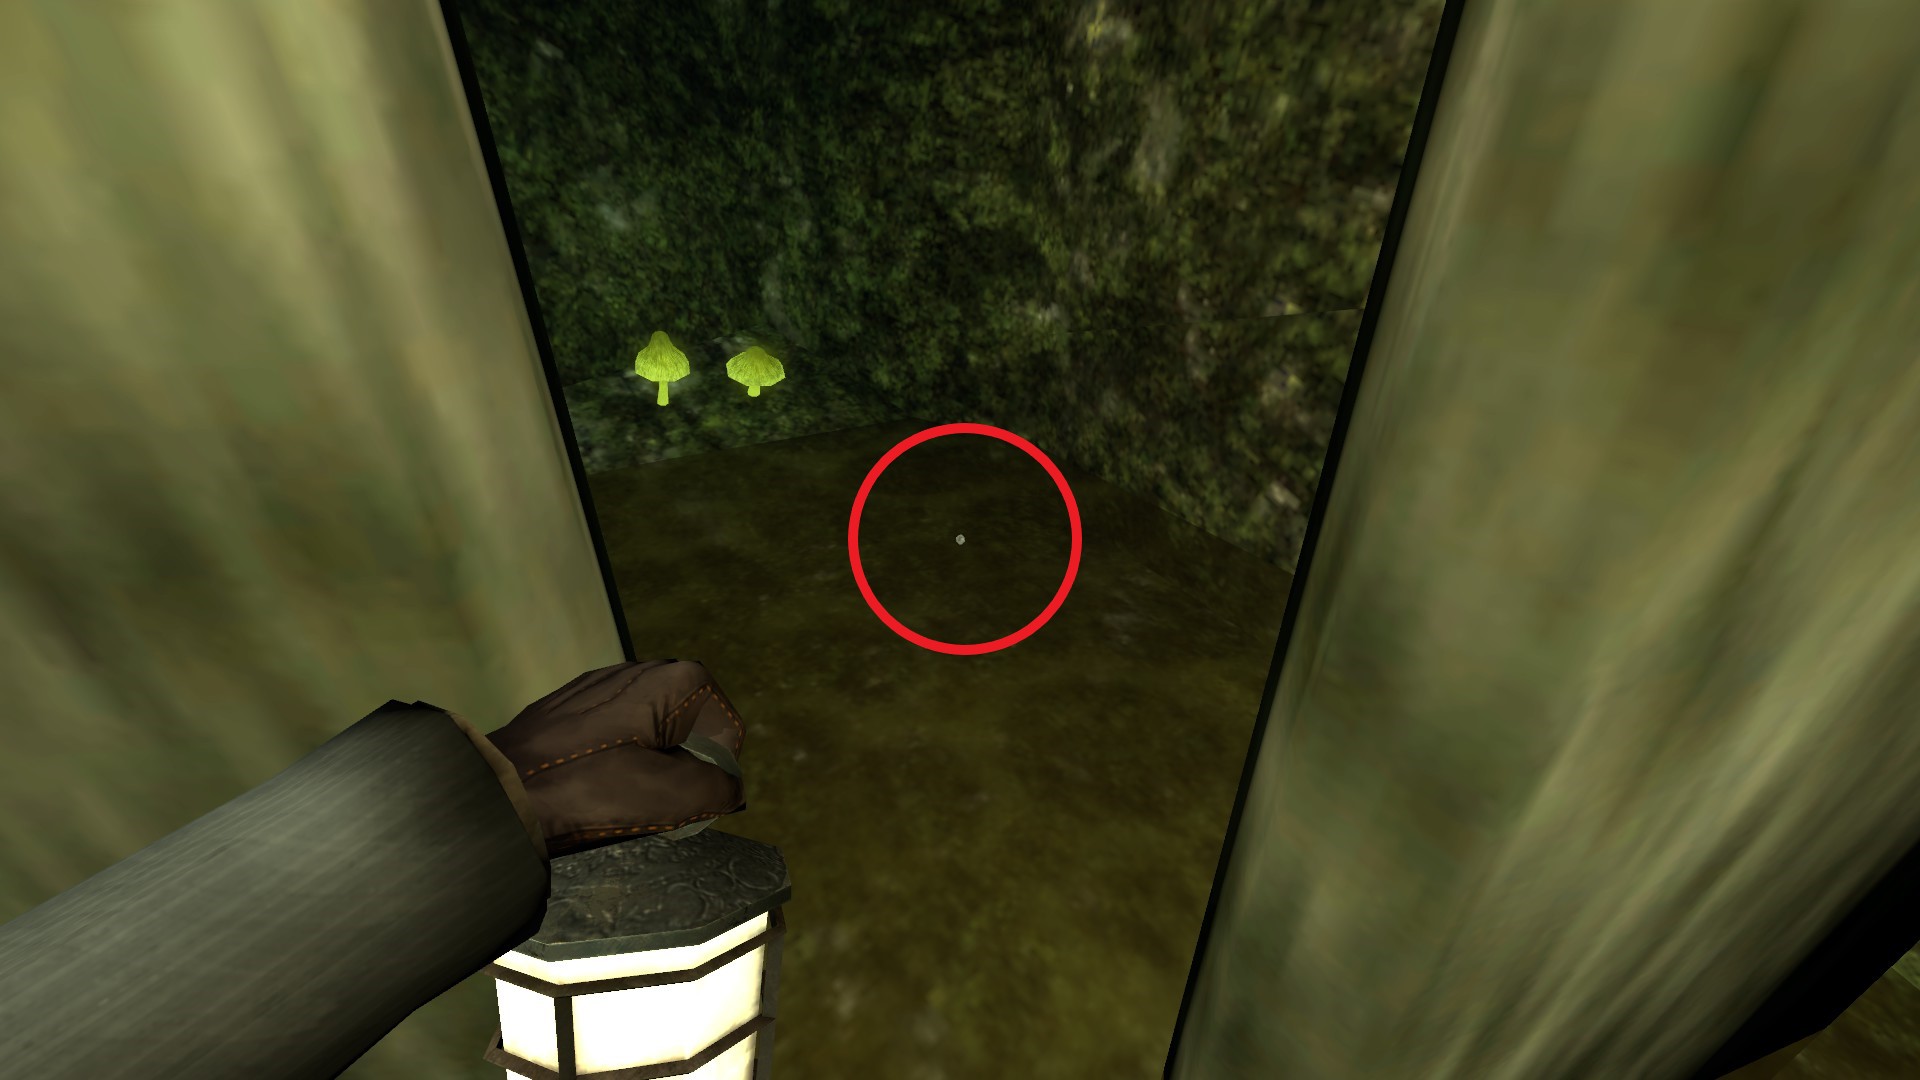
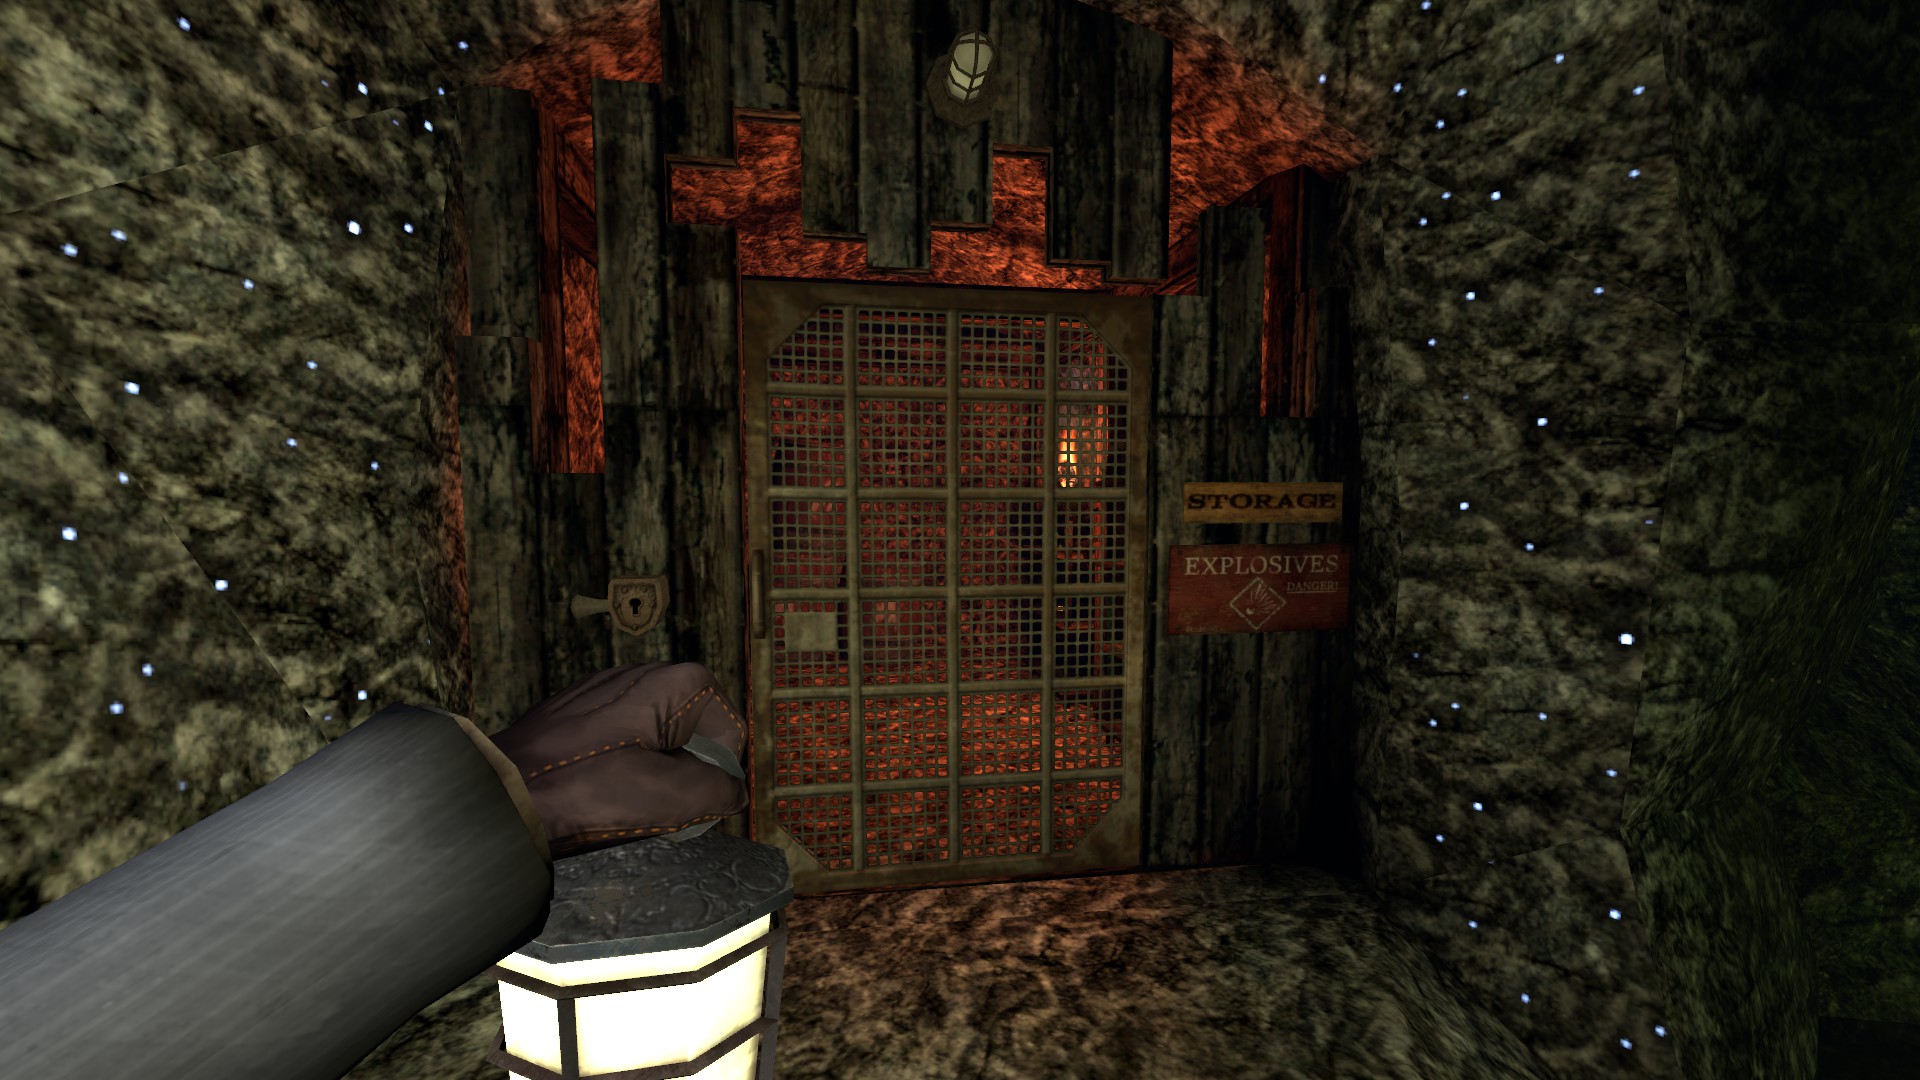
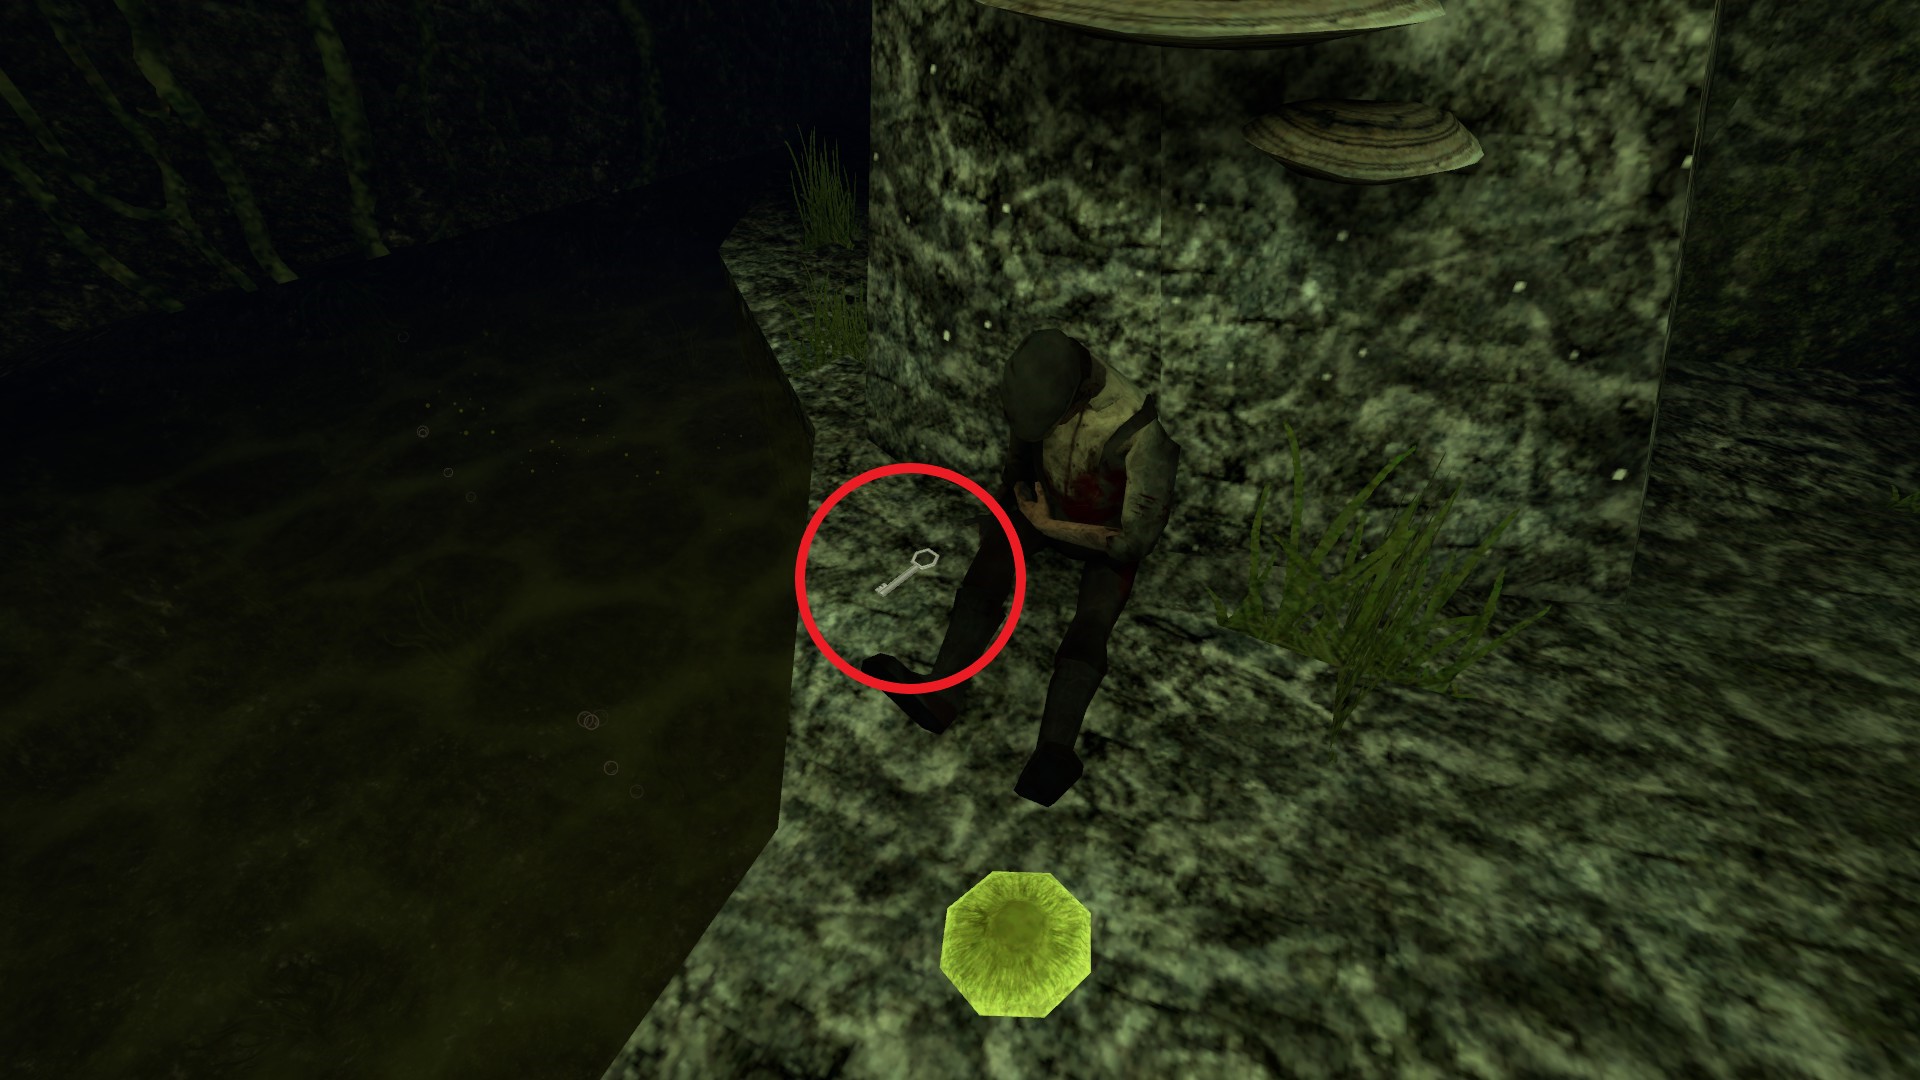
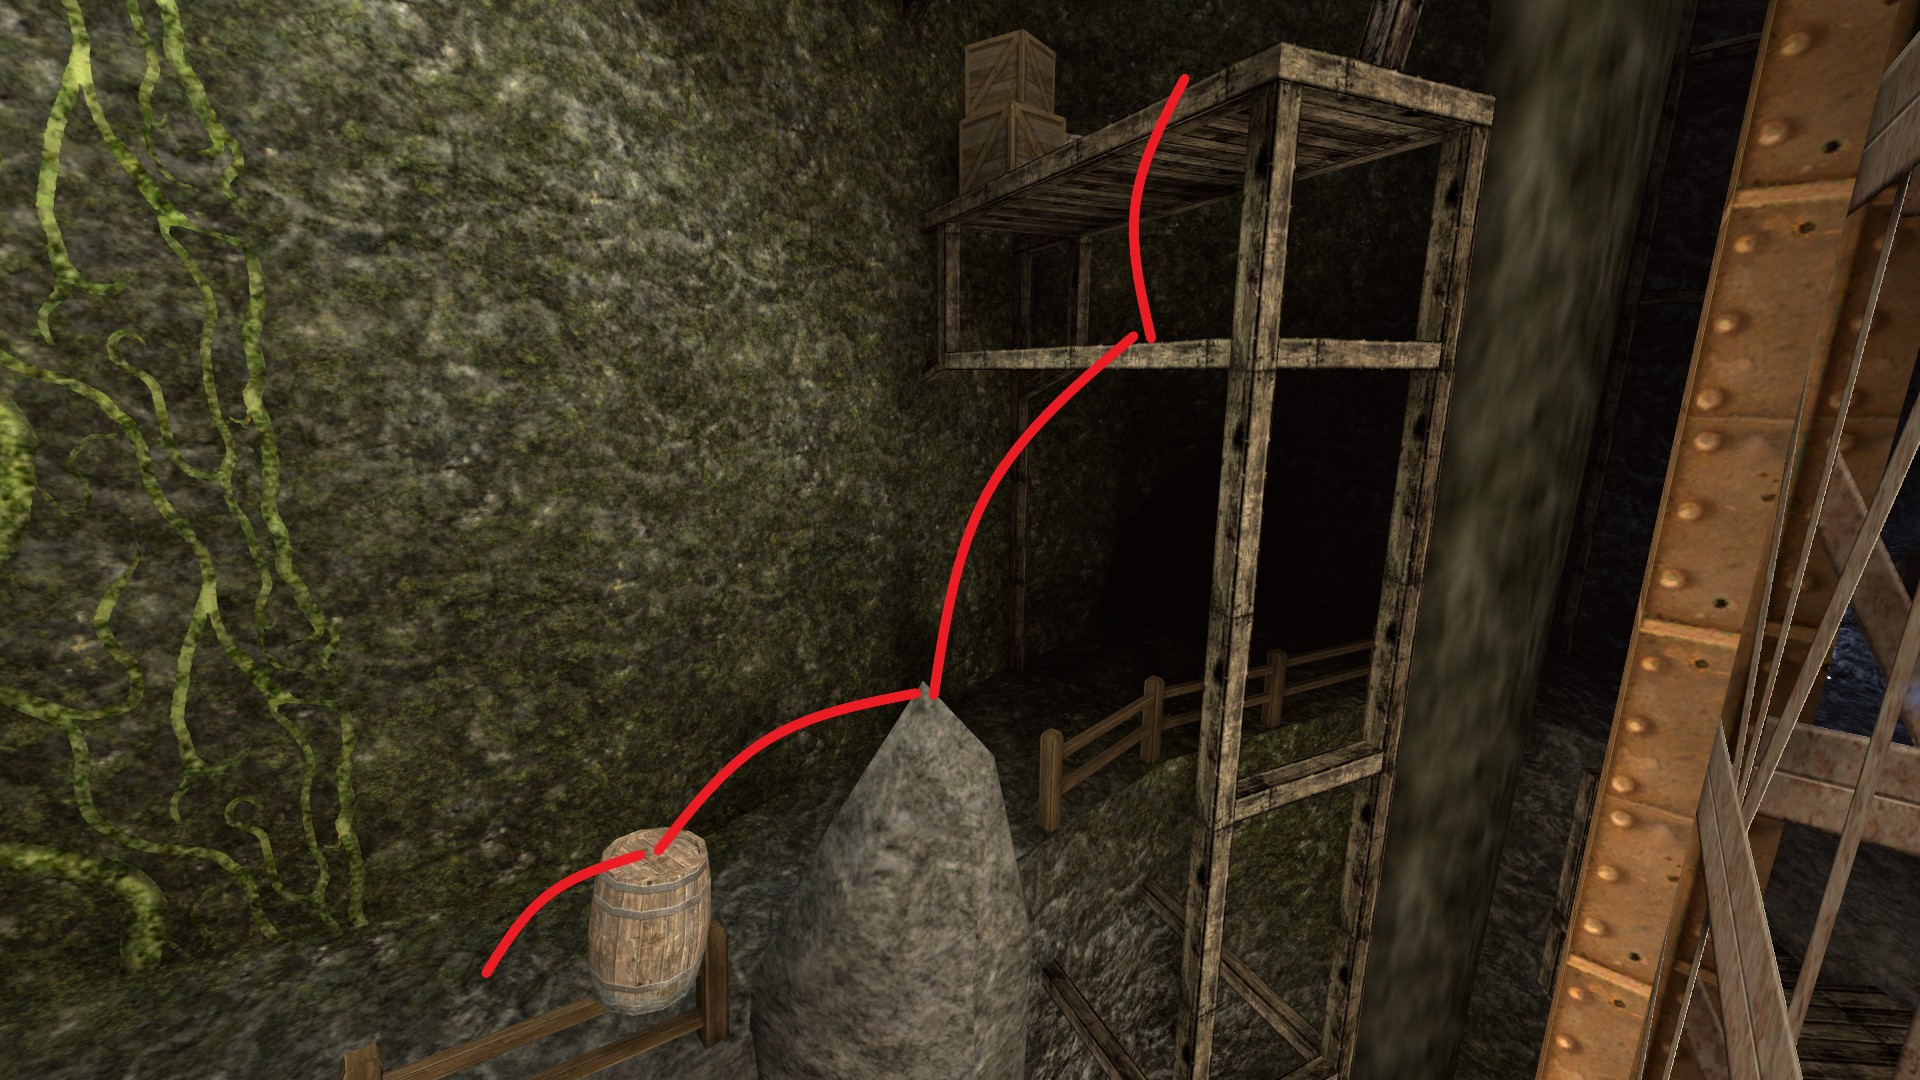
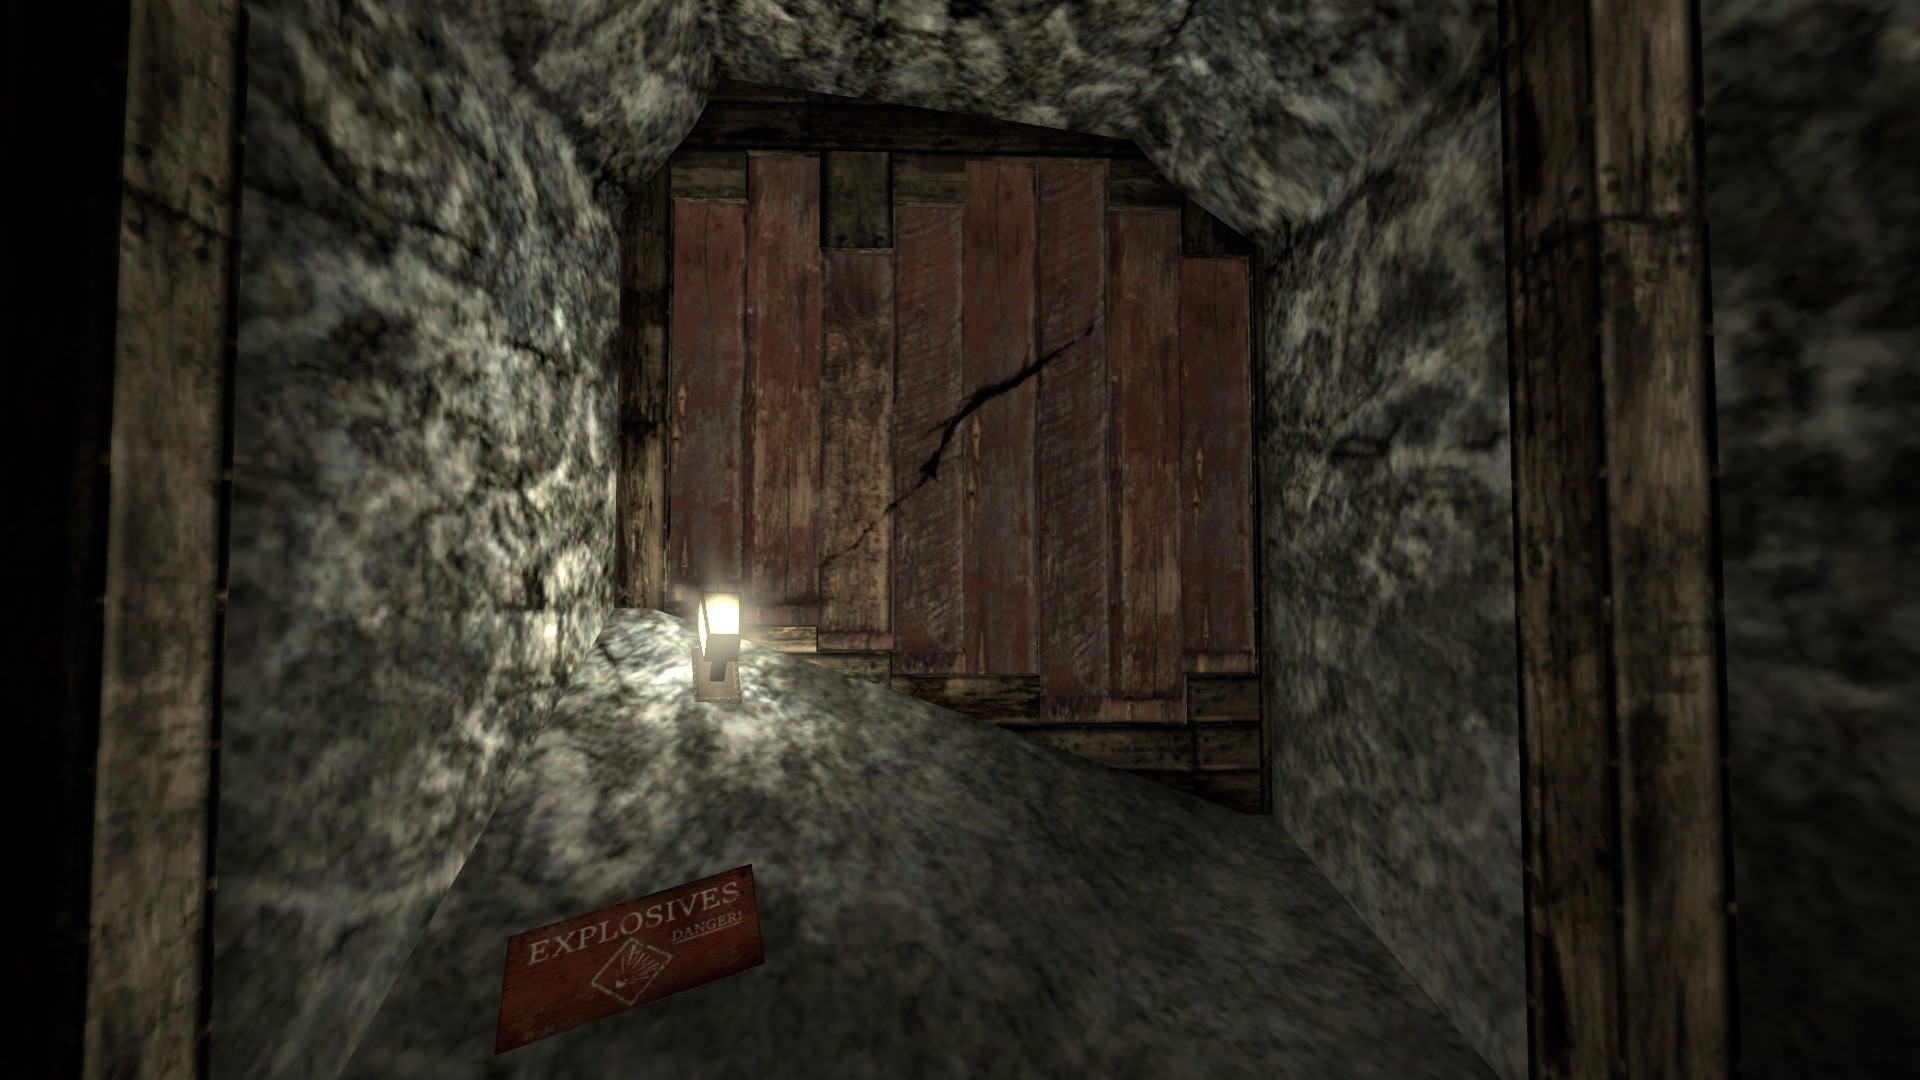
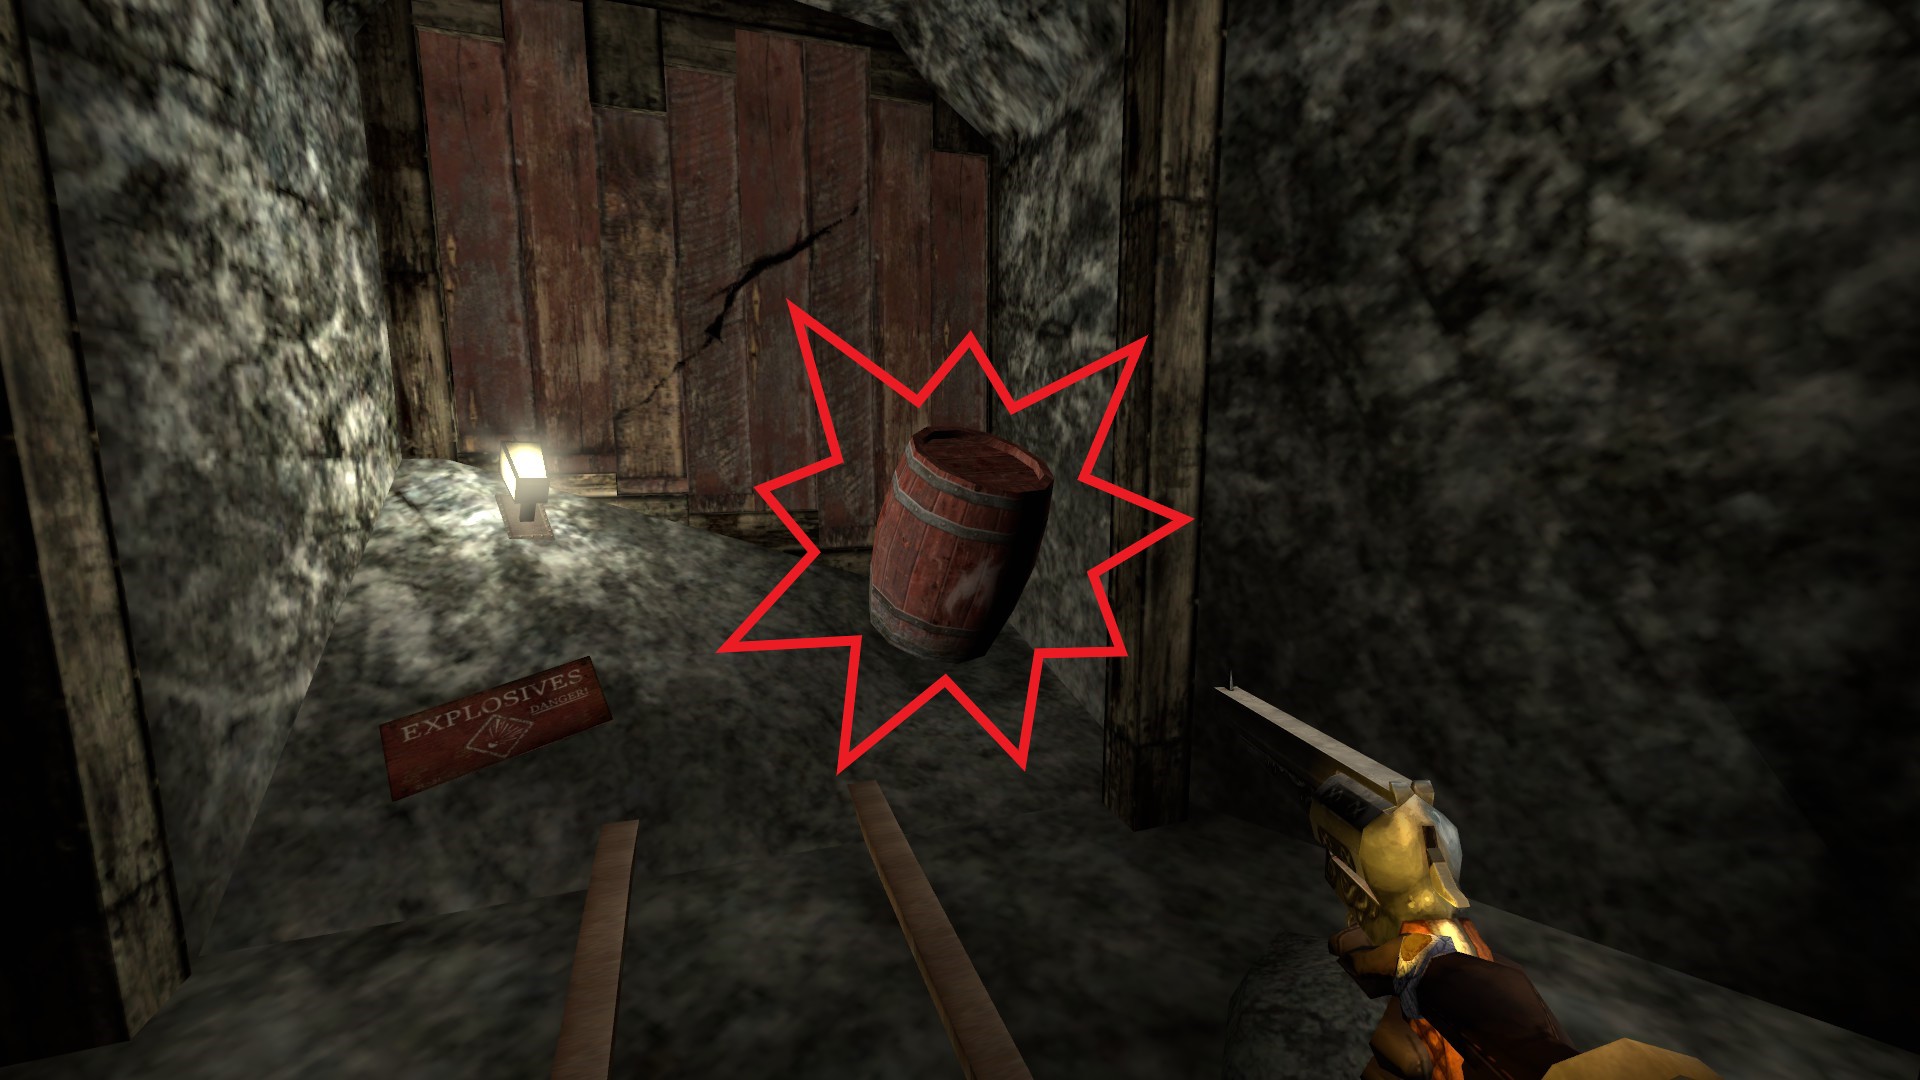
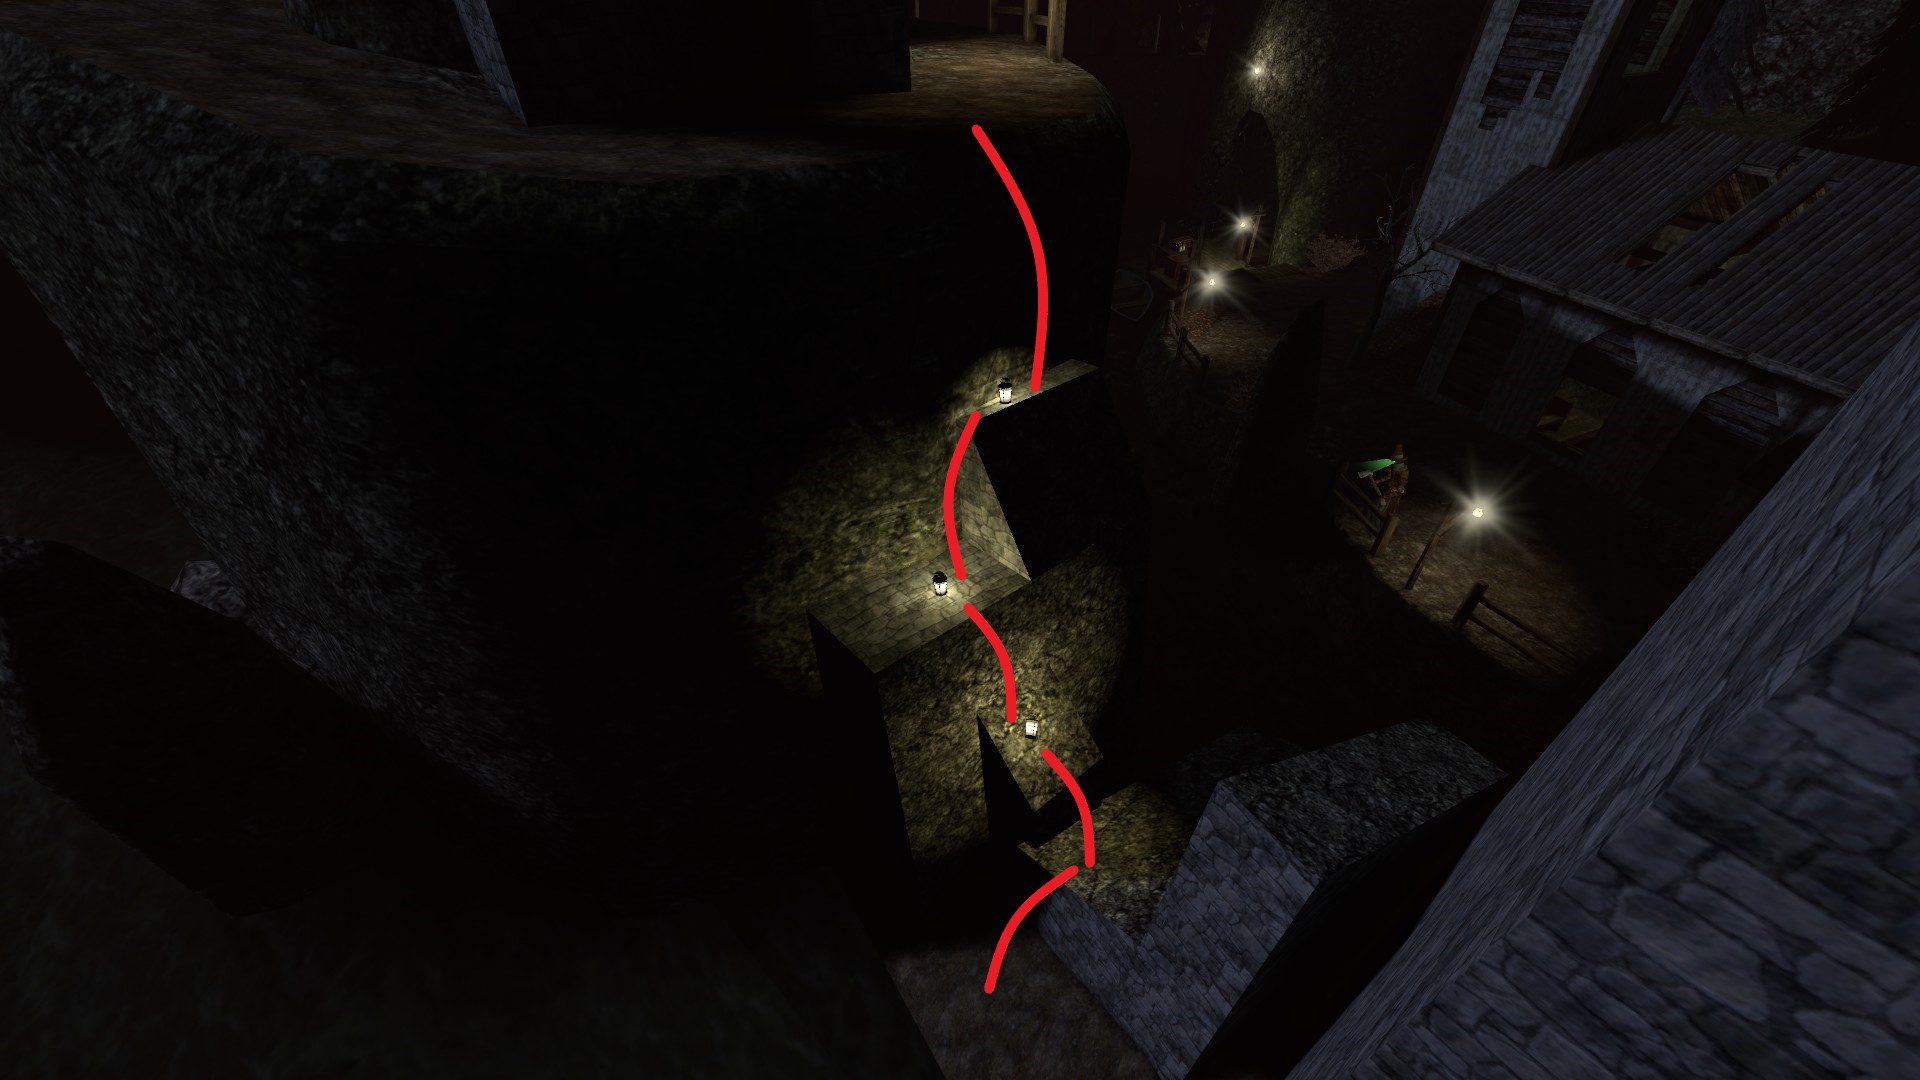
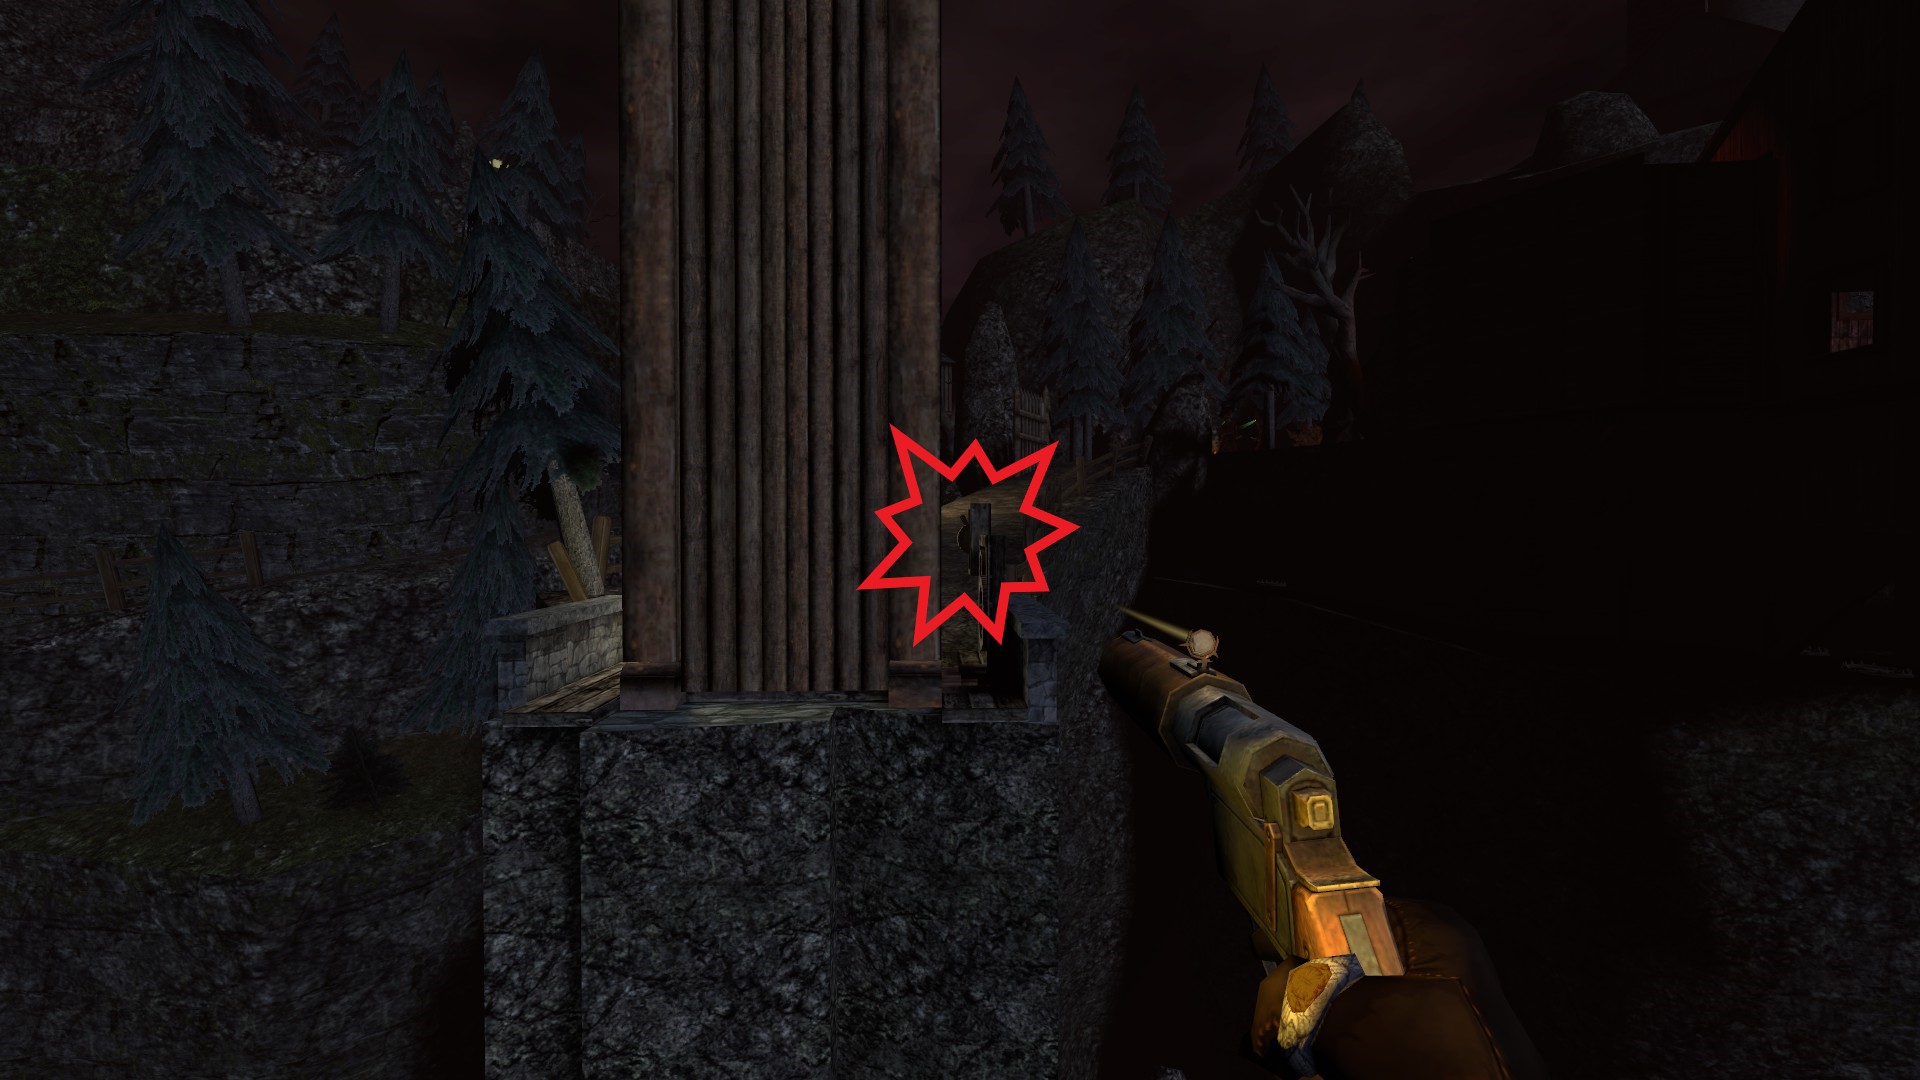
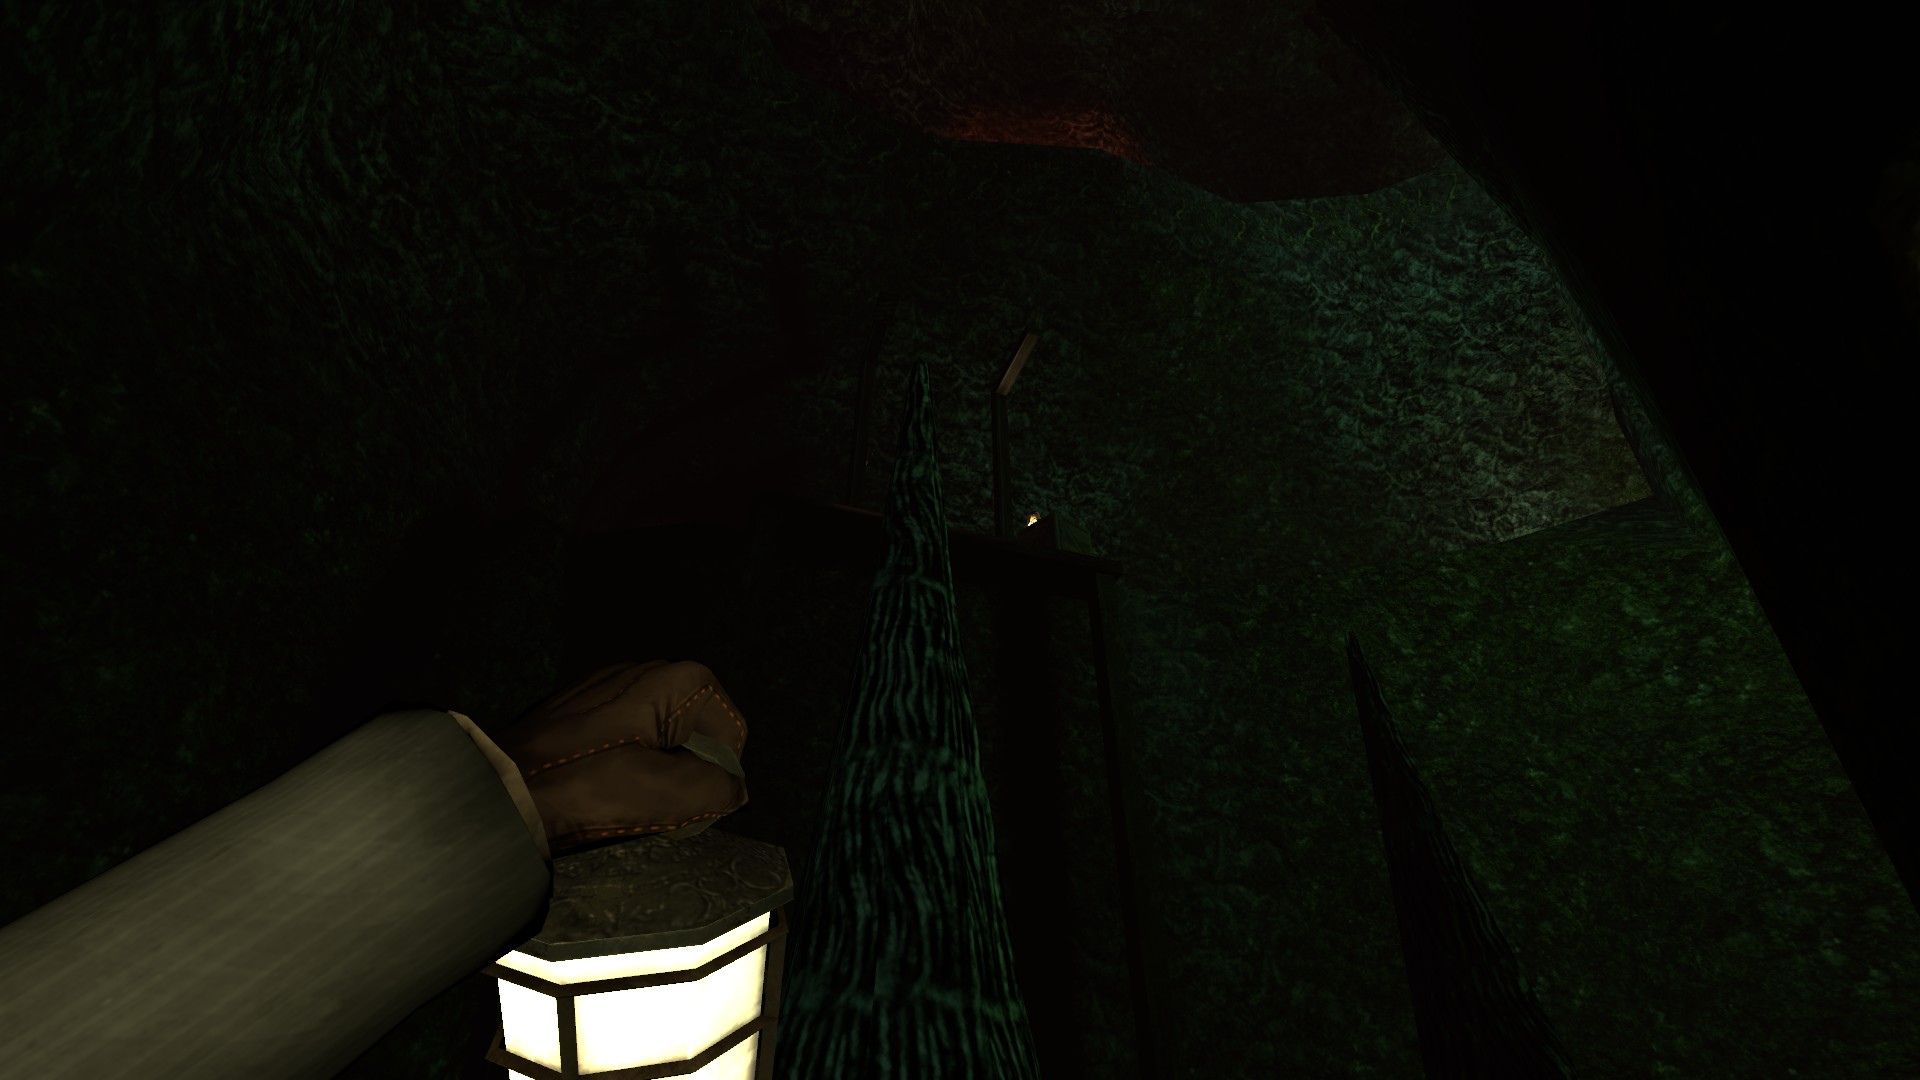
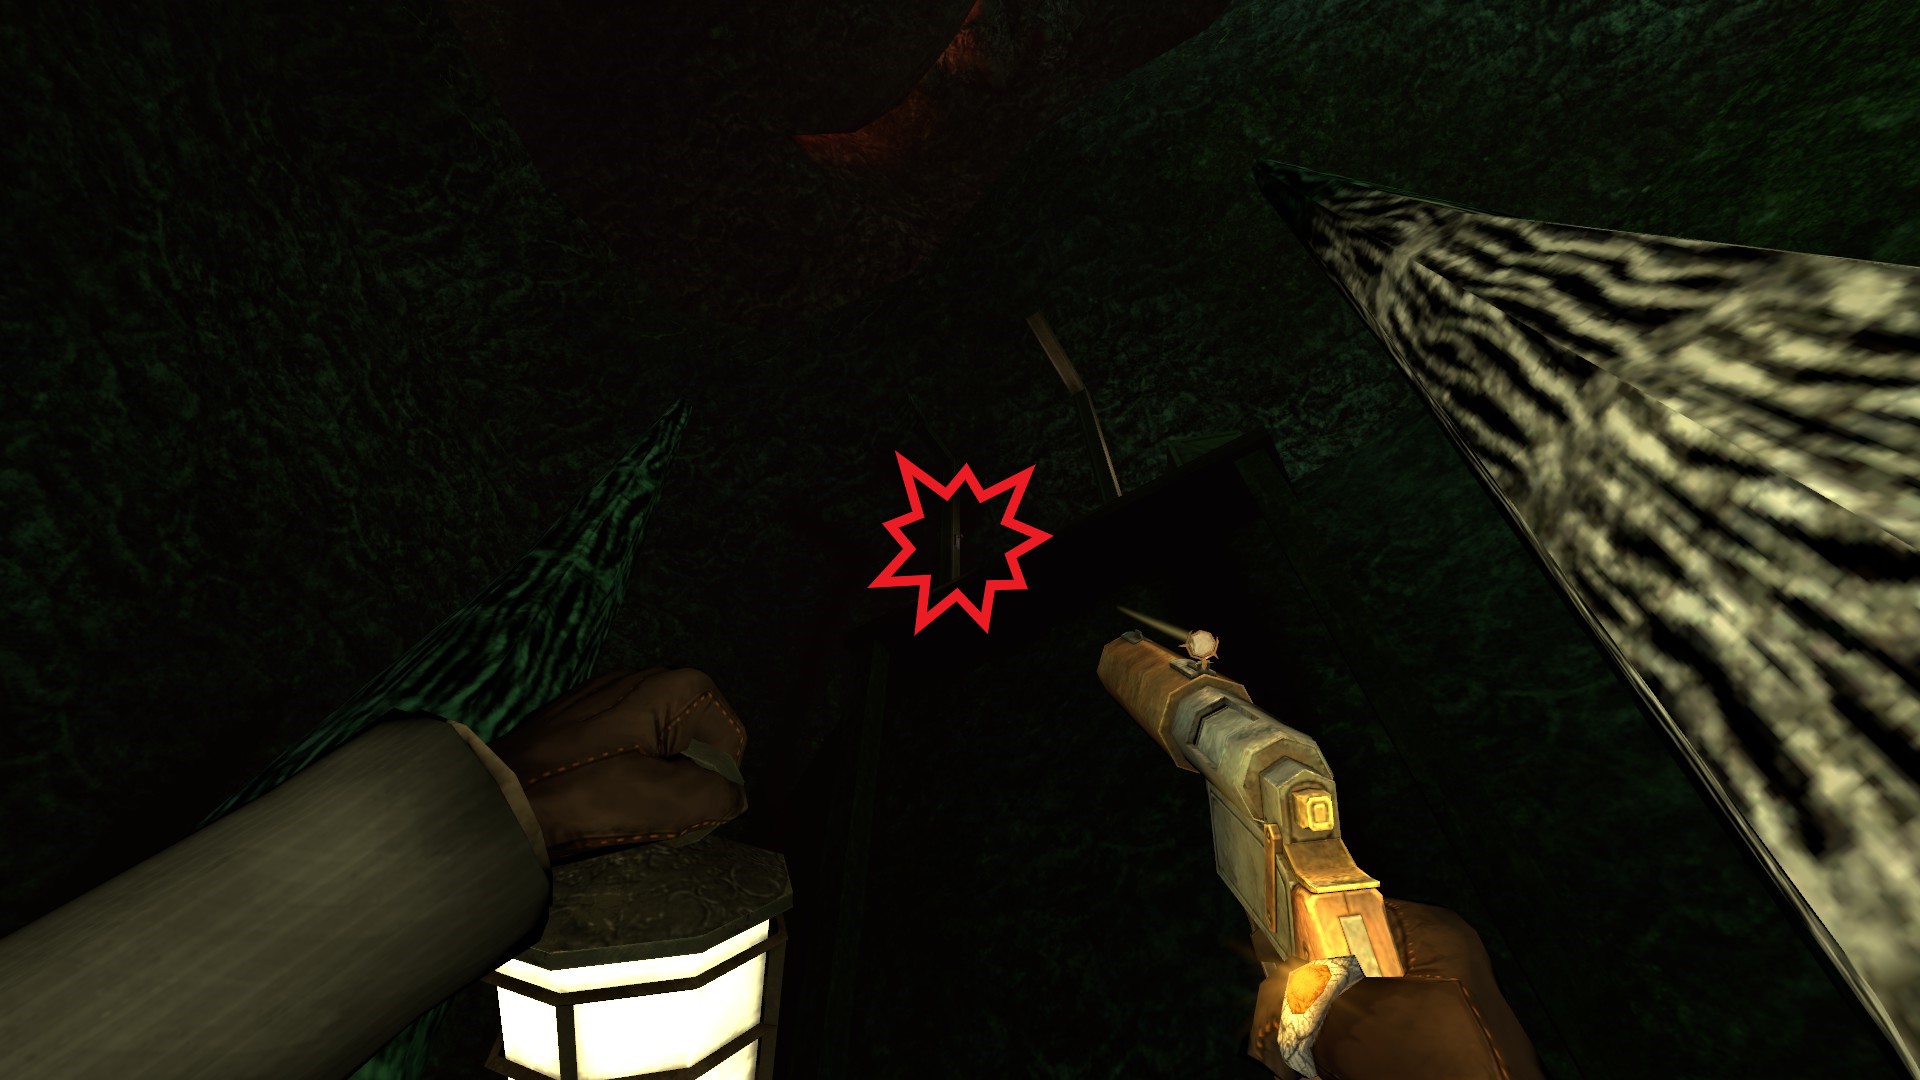
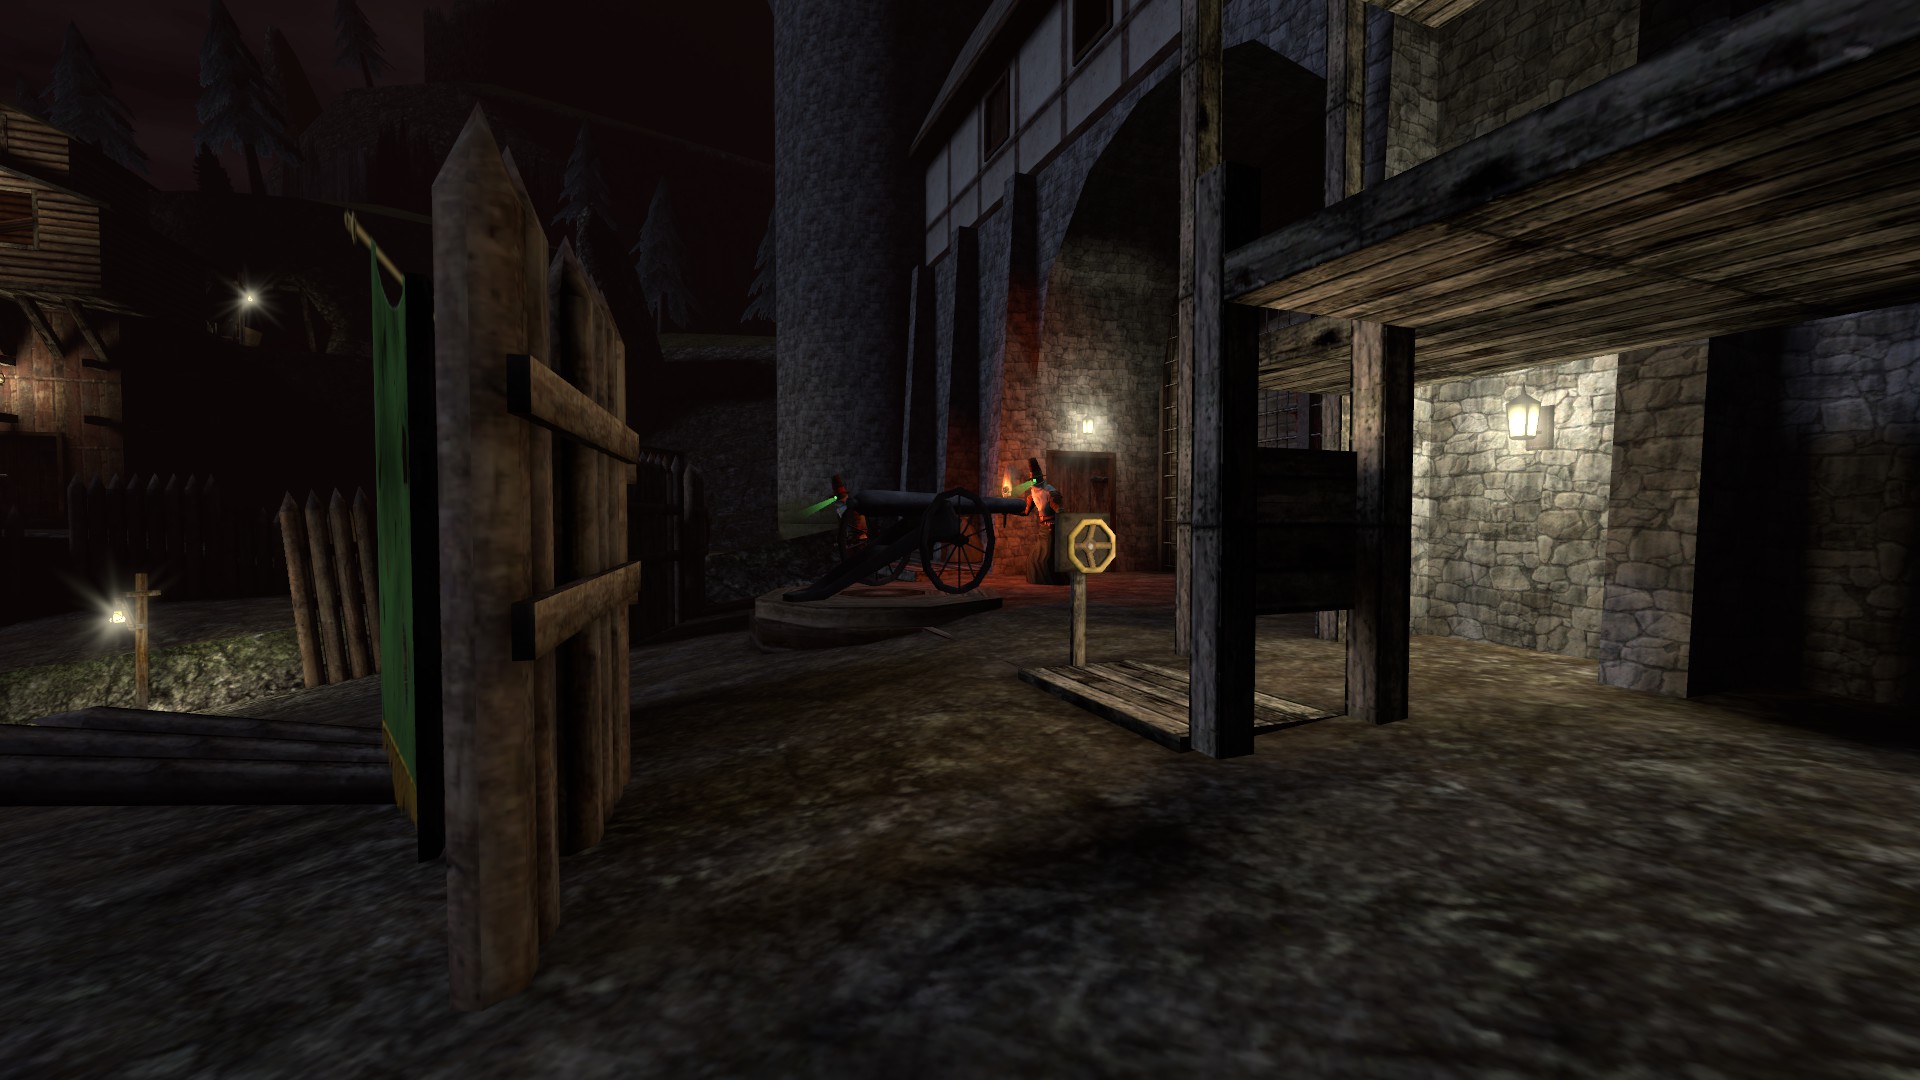
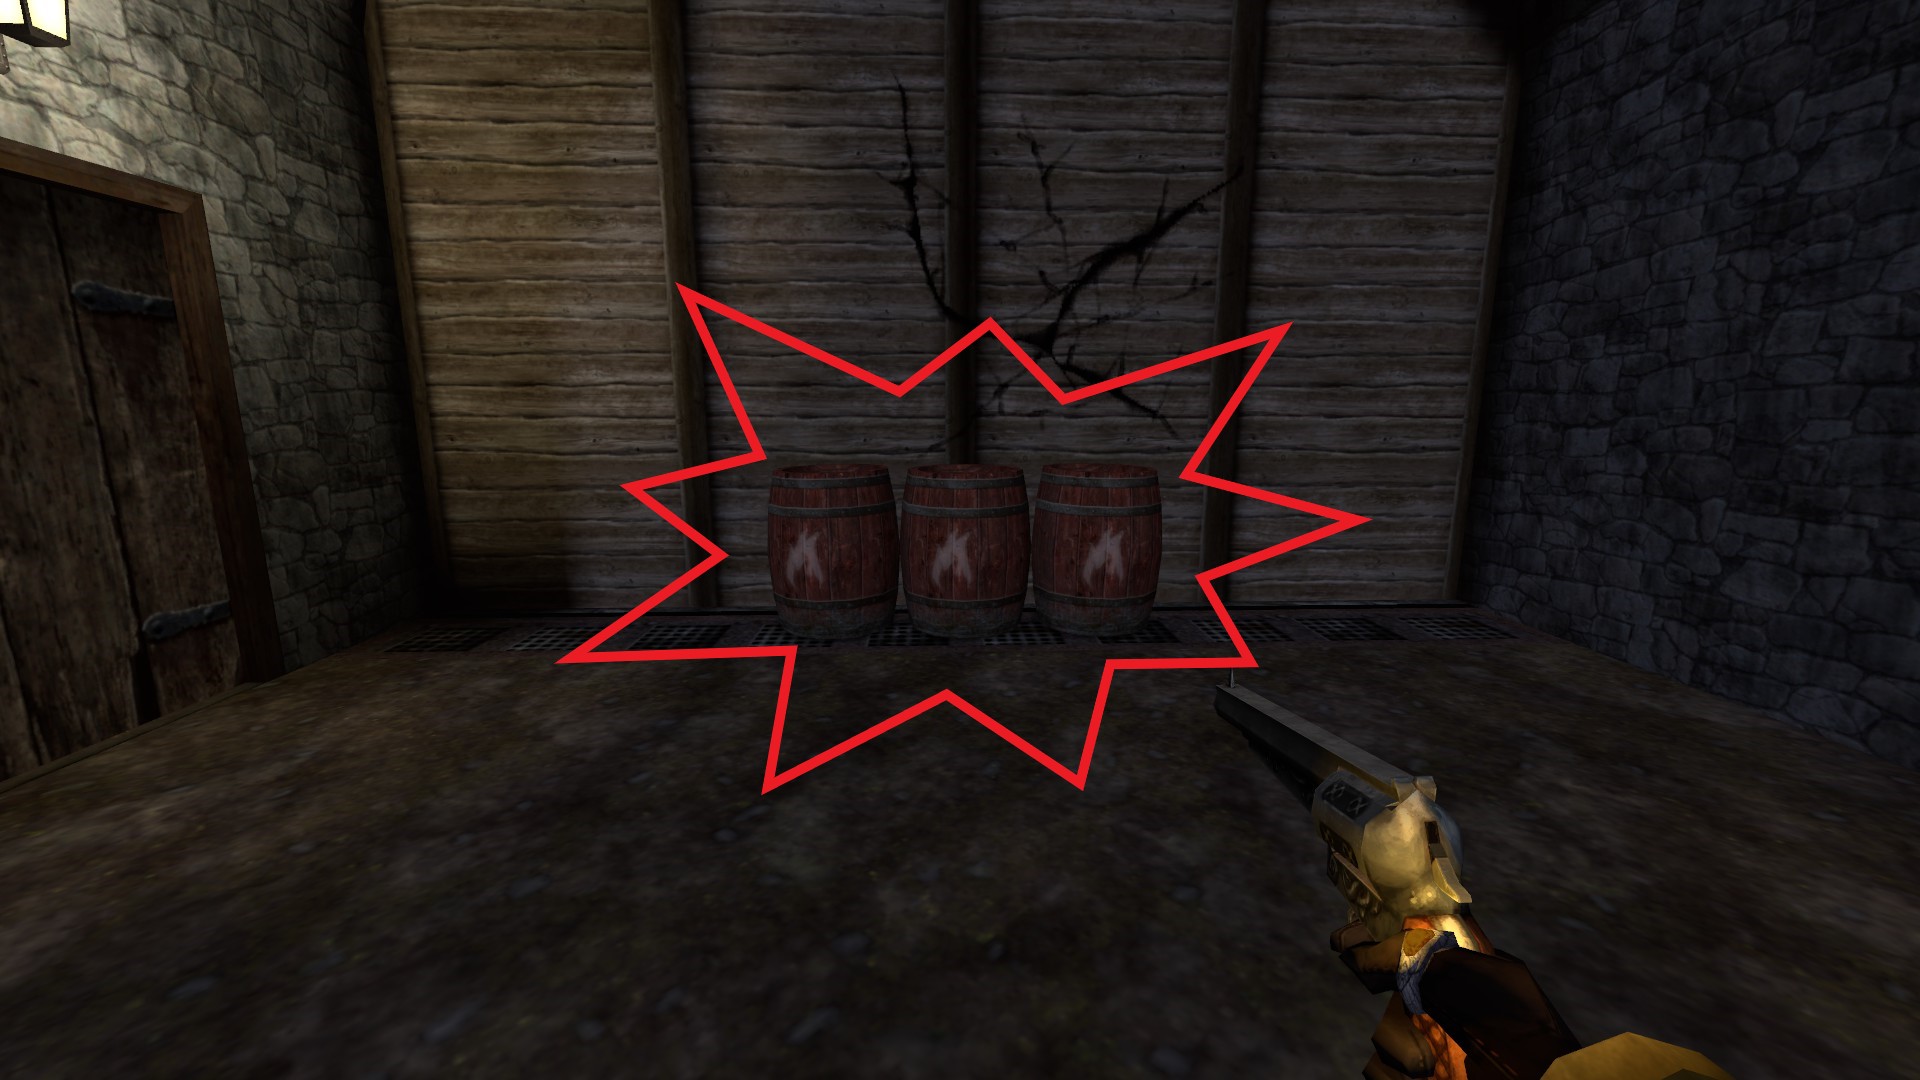
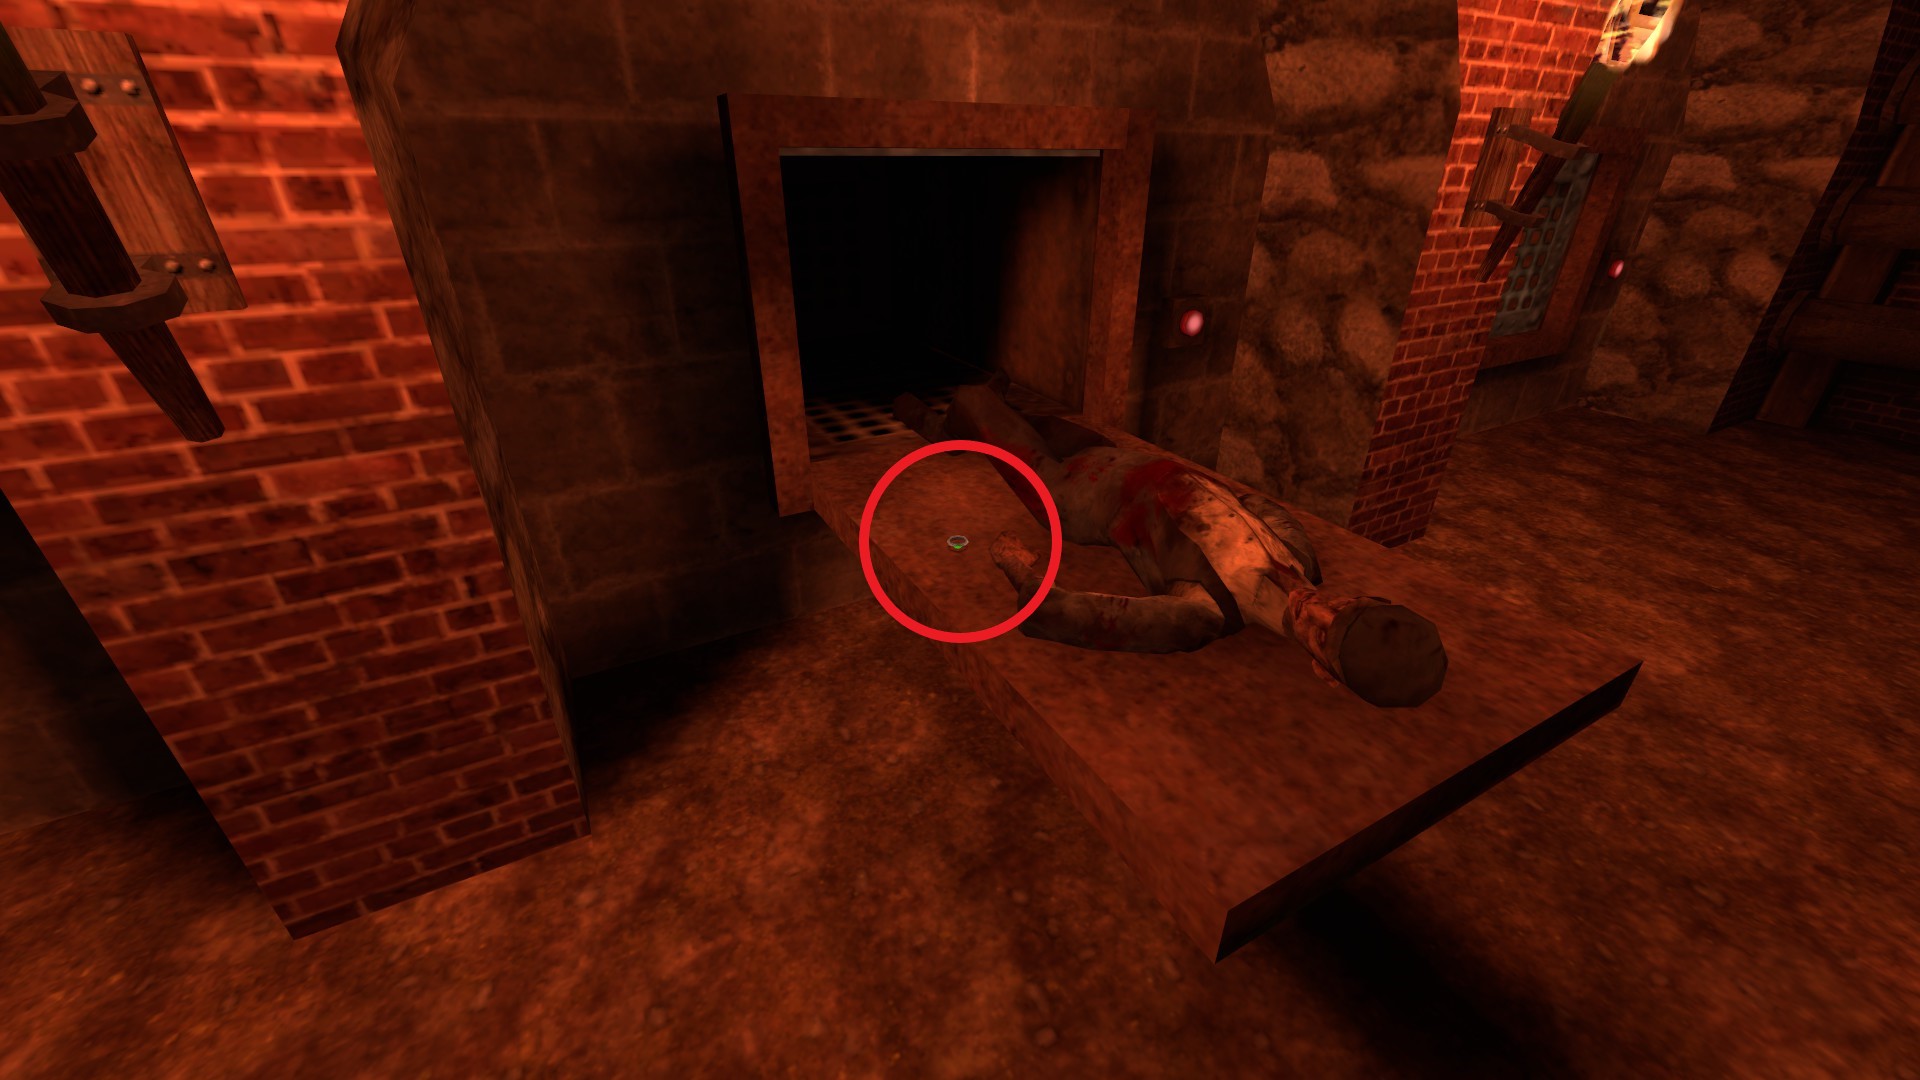
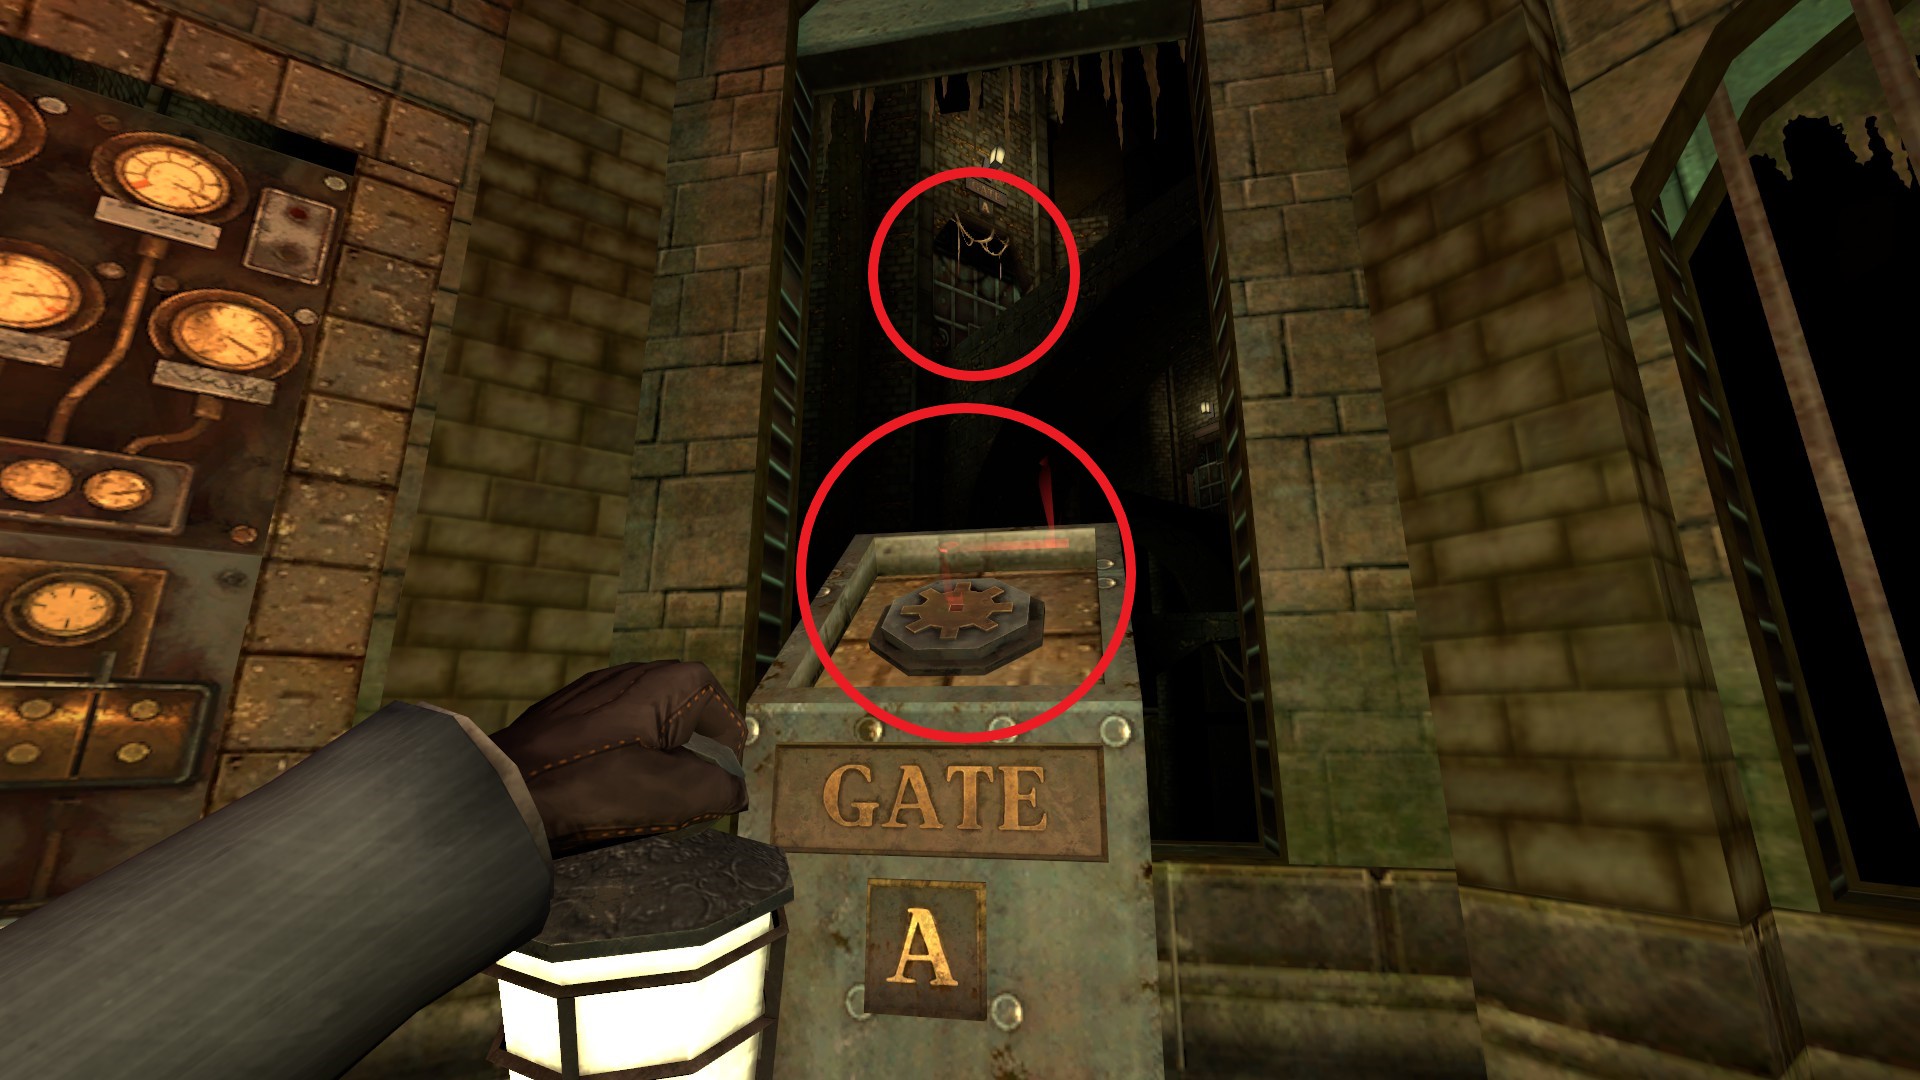
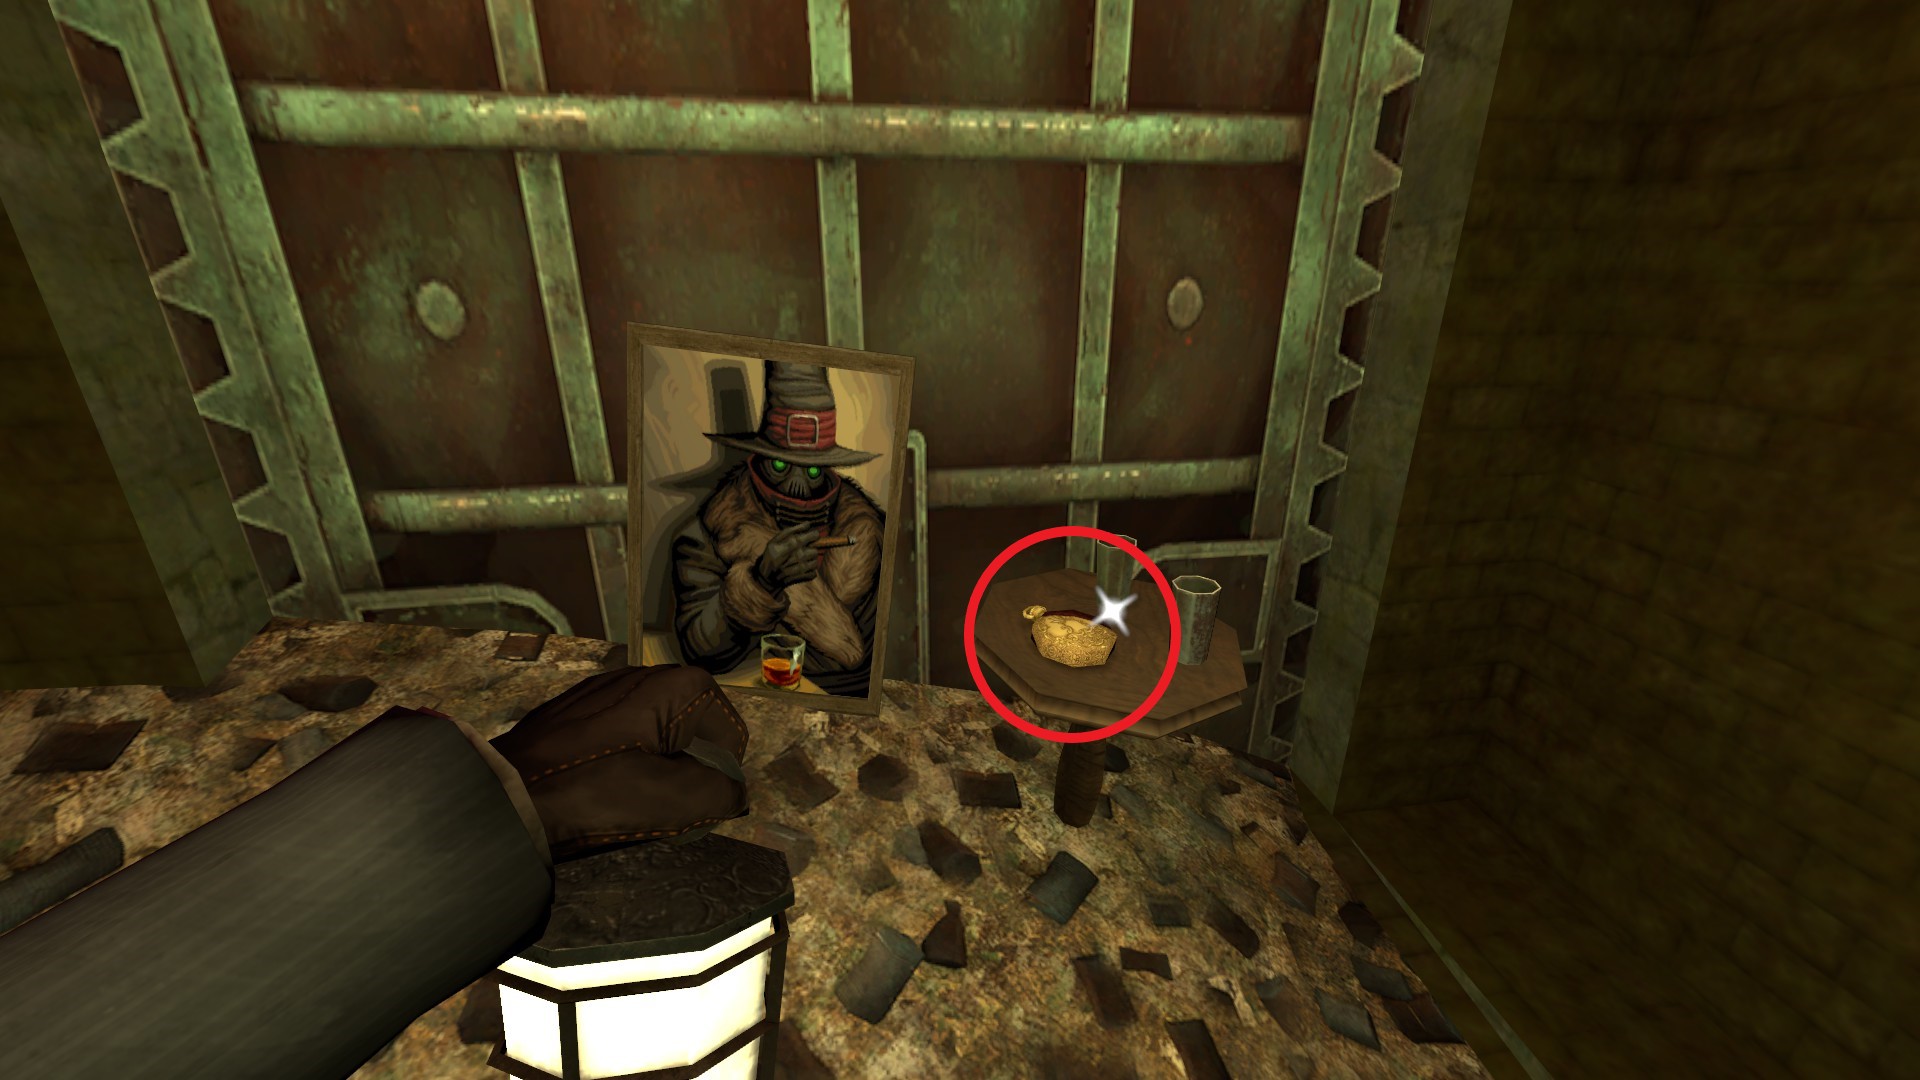
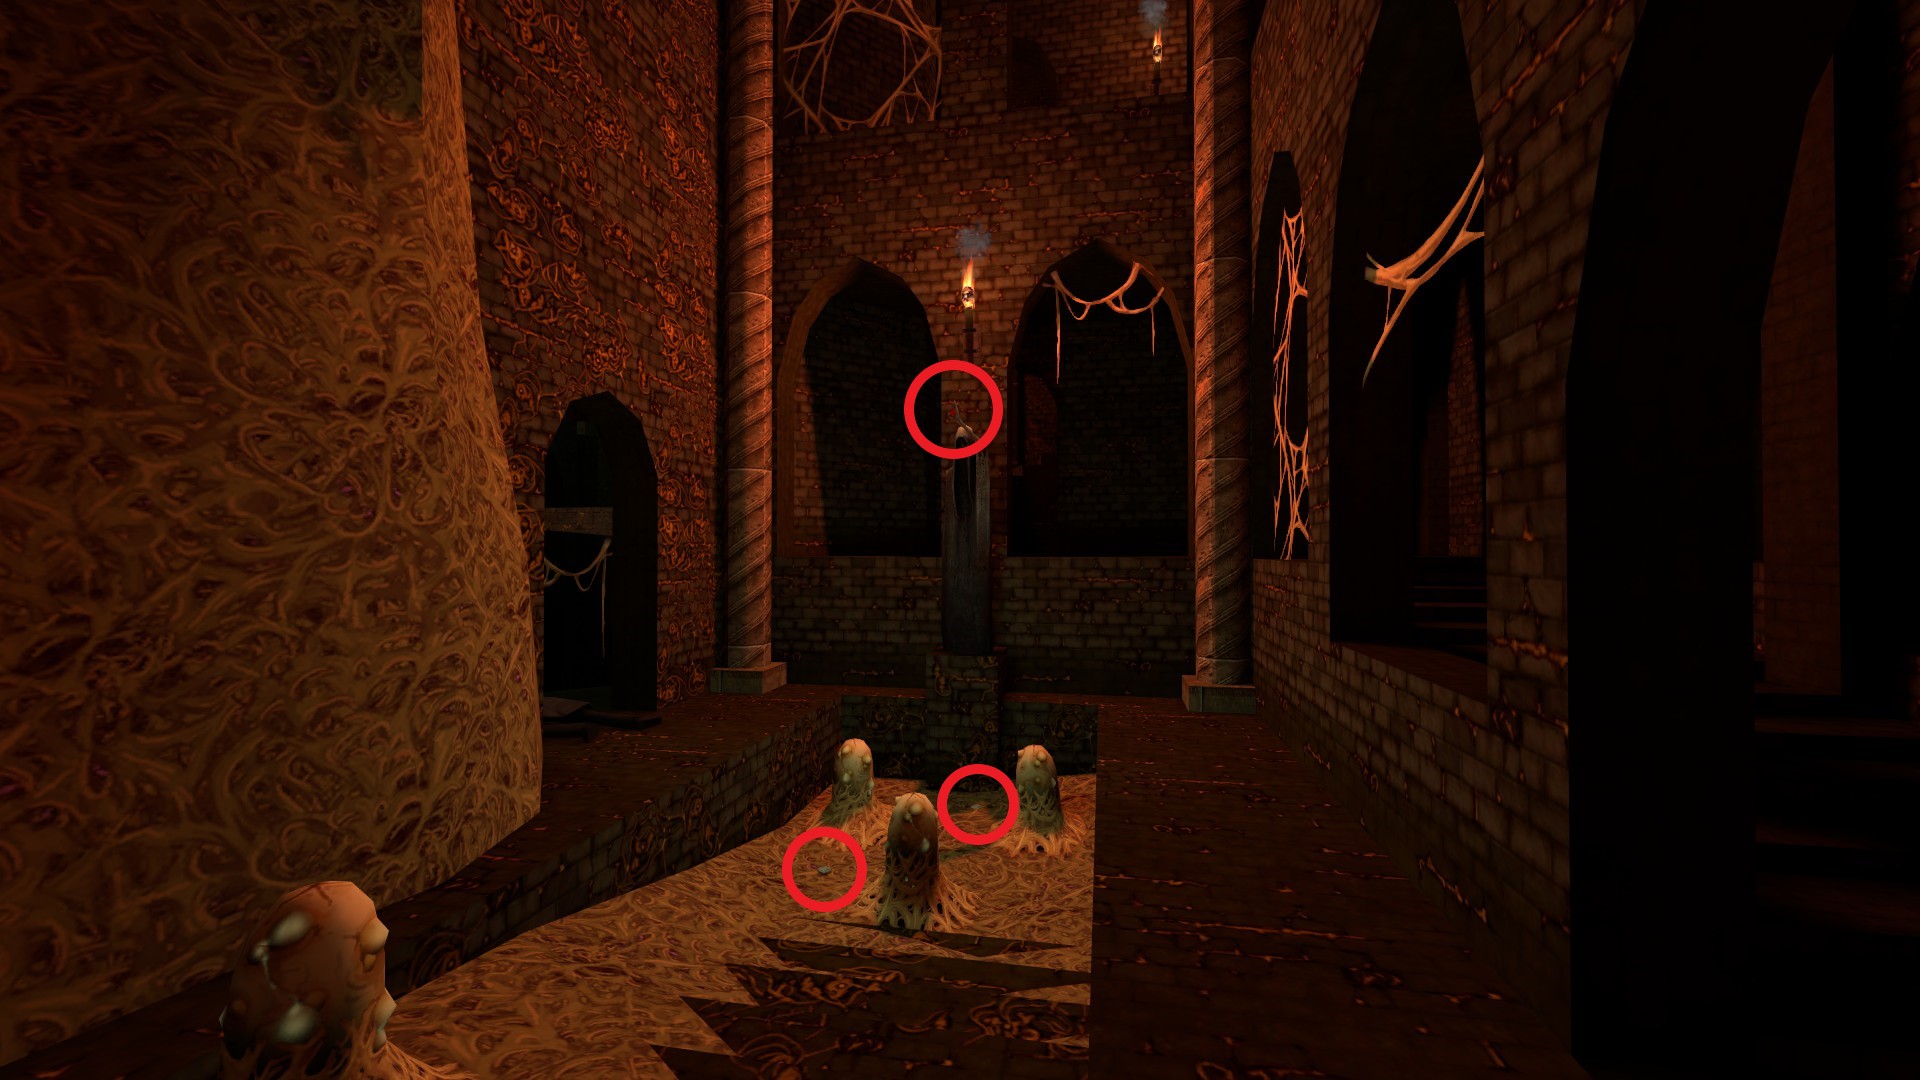
On another note, have you found a way into the ancient door at the bottom of the mines? . I've been looking for the star-shaped seal that goes into the groove next to the door, but haven't found anything in all of the areas. It may be in the Hive and I just haven't found it yet .

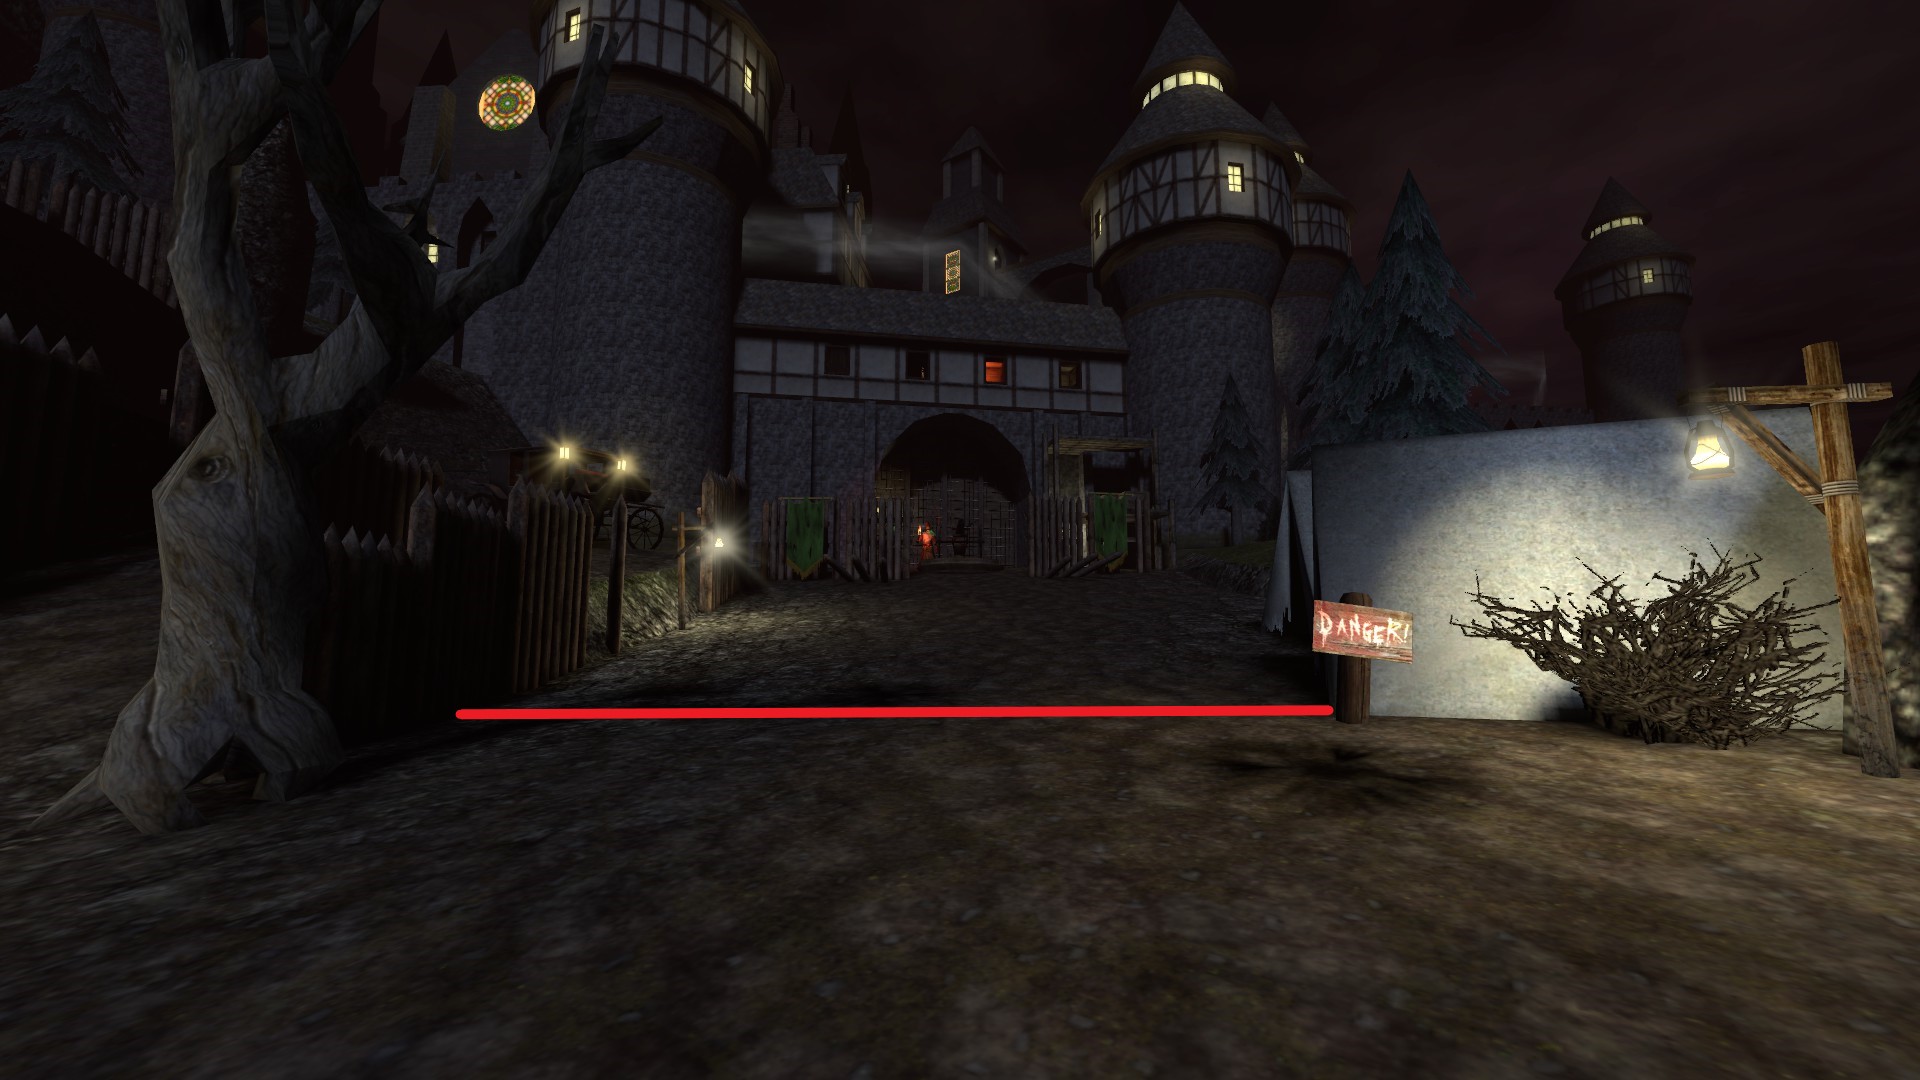
Just curious since the next content update confirms that Hightown and the Bank is going to be the next area so I'm wondering if they just put this it in as a extra bit of content or if it's supposed to be further-future content.
MaestrovskiySP89 21 JUN 2024 a las 11:52 p. m. 
thanks:steamthumbsup:
RatRatRatRatRatRatRatRatRatRat 3 JUN 2024 a las 9:36 p. m. 
I just spent like an hour stacking barrels to get into the fishery tower. I should've checked first. Anyways it takes like, 14 barrels and 5 boxes to get up there!
https://steamcommunity.com/sharedfiles/filedetails/?id=3260845469
vita 19 MAY 2024 a las 10:39 a. m. 
WOW
Star Lord  [autor] 15 NOV 2023 a las 9:59 a. m. 
@Cheese Person
Is that Sir Ser Sor himself? I am honored to have you here. Your Gloomwood videos have provided me with a lot of entertainment.
Cheese Person 15 NOV 2023 a las 9:54 a. m. 
Oh my! I feel... Informed.
Nicely done :krstar:
Star Lord  [autor] 15 NOV 2023 a las 7:04 a. m. 
The guide has been completed and is no longer in a WIP state as of this comment.

Thank you to all readers and users that left comments on the guide.

Please note that every question comment on the guide has been given an answer - and that any further question comments will also be answered by the writer.
In order to avoid clutter, every question comment along with its answer are removed after a few days of being posted - this is why there are no questions in the comments at the moment.

The guide will be actively supported and will receive updates in line with game development.
Tune in a few days after each game update & the guide should be up to date.