DAVE THE DIVER

DAVE THE DIVER

591 voti
Achievements, All Marinca, GYAO!, Photo Ops, Fishmon, guides. (Godzilla Updated)
Da Lt.Col. Anon Xer0
Currently updating to version v.1.0.2.1420.Steam Post Godzilla DLC.
Originally made on version v1.0.0.990.Steam

Sea Blue hates him,
find out how to do everything ever,
with this one weird simple guide.

Expect Spoilers. Comment if something new needs to be updated or corrected.
22
6
4
25
9
3
5
2
3
2
   
Premio
Aggiungi ai preferiti
Preferito
Rimuovi dai preferiti
Achievements
================================
Please remember that this game is about fun,
and all achievements aren't anything to stress over,
as they can all be gained in time,
if you are achievement hunting,
please enjoy the game as you complete those achievements.
This guide should only serve you as a guide,
not a bunch of rules or a checklist for you to abide by and ruin your experience.
Missable Achievements
Ration Eater (Secret)
Ate rations
During game progression, you will be tasked to infiltrate the Sea Blue base.
On the 3rd floor, after sneaking past several guards, Just before entering the container room off a conveyor belt. There's a bronze can on the floor, interact with it for a metal gear reference.
Speaking of Missable, there is also an exclusive creature, not found in the Marinca that can be captured only during a certain quest which can make a max level dish. It is Listed as entry "???" at the bottom of the Hydrothermal Vents section of the Marinca guide below. Search for the entry in this guide using Ctrl+F
Bancho Sushi Achievements
Bancho Sushi is Back!
Fixed the Sushi Restaurant.
The quest triggers at the start of the game, Make $100 Gold to pay for repairs.
Shop's Lookin' Good!
Bought First Interior Item
1.Go to Bancho Sushi
2.Select interior
3.Confirm a purchase -cheap, or expensive, any will do.

Culinary Master
Enhanced 5 dishes
1.Select menu
2.Select add
3.Here, you will have list of dishes to add or enhance. Enhance 5 different dishes.
It requires ingredients, so it is recommended to enhance dishes with surplus. Later in the game, a fish farm will make gaining surplus for most dishes easier.
Culinary Researcher
Researched 5 new dishes
1.Select research
2.Select a new dish to research
It requires "Artisan Flame," a numerically quantified commodity apparently, gained by providing good service each night at Bancho's, resulting in 1 Artisan Flame per star rating. Decimal points do not get rounded up, so a 4.9 rating will never net you 5 Artisan flame.
Artisan's Flame
Researched 30 new dishes
More dishes are unlocked as the game progresses. Via events, or Cooksta levels. Remember to save your Artisan's flame for events to unlock related dishes to net yourself more money.

Influencer
Reached Bronze Level in Cooksta
The requirements are 10 Followers, or more specifically, 10 satisfied customers. After meeting the requirements, go to the Cooksta app on your phone, select the rank up page and get your achievement.
A Bancho Sushi Regular
Achieved Platinum rank in Cooksta
Skipping silver, and gold ranks, you will need:
  • 200 Followers
  • 250 Best Taste
  • 19 Researched Recipes
Cooksta Influencer
Achieved Diamond rank in Cooksta
The Final Cooksta rank, you'll reach it eventually, take your time, it will happen.
Requirements are:
  • 720 Followers
  • 375 Best Taste
  • 32 Researched Recipes


Manager
Bancho Sushi formed a branch restaurant
Available as a reward after you have completed all cooking competition events. Every couple of days, a challenger comes along, requiring you to get ingredients for new dishes, and facing them in a cook off before opening Bancho's. Besting them at minigames after that earns your victory. The dishes from these events are very lucrative and make great menu regulars if you're in need of cash.
Leadership
Trained employees to level 20
Most employees require somewhere over 300,000 Gold to get to level 20. It's a big investment, and best spent on servers, because it's always harder to please customers. I recommend training Employee Drae, who has the highest well-rounded stats and usefulness.
Further information in the "Employees" section below.

Momo's Secret
Got to know Momo a little better
Feed Momo 5 times, and after closing Bancho's for the night you'll encounter Momo as an event. You'll have to sneak and follow him until he reaches his destination.
Catman
Fed cat 20 times
After feeding Momo 5 times, you get to feed his secret. There's no penalty for missing feeding or need to hold on to more cat food of any type, so feed them daily or as much as you like.
Blue Hole General Achievements
Saved Dave!
First time bringing Dave back from the brink of death
Dive into the water, and hit zero oxygen.
New Undersea Friend
Completed the Dolphin's request
You will encounter the Dolphins twice. Three times if you count a photo op with them separately. On your second encounter, bring a gun, you'll see pirates bothering the dolphins. Shoot pirates to....incapacitation. Dolphins are secretly the most cruel and evil creatures under the sea by the way.
A Peaceful Blue Hole
Watched the ending credits
Complete the game. Tied to the Dev Killer Achievement.
Dev Killer
Wiped-out all the developers
The ending scene offers a minigame.
You'll have 29 Developer's names to shoot at with weapon that functions like the icegun.
If you are unable to achieve that before the credits run out on the first time, don't worry, you'll have unlocked a new minigame on your phone called "space diver" to get the achievement. I heard that many can't get the achievement the first time for some reason, and can only do it after using the phone minigame.
GYAO! Master
Raised 5 GYAO!s
Anyone old enough to remember Tamagotchis, and Gen 0 Digimons? Feed it and play with it. snacks give affection, and playing with it does too. Different combinations of Food, Affection and Discipline result in different types of GYAO!s. A more detailed GYAO! guide below.
Strange Fish
Captured 5 FishMon
Each weekend, a photographer will send you on a last minute quest to go capture a rare fish. Instead of capturing them, "this achievement can be speed up if you kill but don't catch, because you will be able to kill same FishMon again. Every kill counts..." - casi ツ
Detailed guide below for catching them.
Creature Hunter (Secret)
Caught all bosses
The main quest, and several side quests that occur as encounters usually involving a vortex in the ocean, are indications of boss fights. No boss is particularly difficult.
These quests are usually related to Sato visiting, or encountering an old lady on the raft, and lastly Encountering a shy girl named Maki at Bancho's, whom if you provide a specific dish involving White Trevally, will send you on a quest to catch some Cliones, resulting in a boss fight.
Combat Achievements
Undersea Gunslinger
Completed the gun tutorial
No comment.
Angry Shark!
Caught first shark
Shoot a shark with whatever you have until it dies and fillet it underwater.
Most common sharks are the Whitetip Reef shark, and the Longnose Sawshark.
Mister Melee
Caught 20 fish with melee weapons
As most fish run away, and you're having trouble with this particular achievement, I recommend going after fish that attack you, like the Lionfish, or the Triggerfish, but if that's out of the question, the slow moving Green Humpback Parrotfish or the Giant Trevally at lower depths will make this easier if you don't want to take a swipe at jellyfish.
Dave the Sniper
Caught 10 fish with a Sniper Rifle
By catch, they mean blow a hole through, and pick up the pieces of your victim. It doesn't matter what fish, just don't miss, or you'll have to spend oxygen looking for more ammo.
Predator of the Blue Hole
Caught 300 fish
It's more likely you'd get it through natural progression of the game. However, If you're feeling progression is too slow, you will eventually unlock a Netgun. Shooting schools of small fish allows you to get several fish at once, just mind your weight capacity. The striped catfish, found on the map with long seaweed, is ideal to be shot at with the netgun, more for self-defense purposes, dealing with many of them at once. Alternatively, if you have made it to the glacier zone, schools of Capelin are incredibly easy targets to bag many fish at once.
Gear Achievements
Weapon Collector
Collected all the blueprints
You are required to search chests and pickup each weapon 3 times. You don't need to carry those weapons to the surface, so you can drop it after picking it up for your desired weapon or even dismantle it. The weapons are:
  • Basic Underwater rifle
  • Triple Axel
  • Hush Dart
  • Red Sniper rifle
  • Small net gun
  • Grenade Launcher
  • Sticky Bomb gun
  • Ice gun
Do note that some guns will not appear in chests until after further storyline progress have been achieved.
Arms Craftsman
Enhanced gun 3 times
Eventually, Duff will offer upgrades to any existing weapons you happen to have. However, they require parts, these are usually found on the more aggressive fish you kill, to bosses. Some gun upgrades require items from a blacksmith who requires a quest to open their workshop which is tied to an achievement: "Feeble Blacksmith," and a different currency of Bei, which there is a guide for obtaining below.
Better Equipment
Made first equipment upgrade
The Idiver app is your go-to for all your regular equipment upgrades. Pick whatever you can afford and suits your fancy.
Scrap Metal Collector
Picked up 100 items
Most things that you pick up are pretty light, and you'll be doing a lot of that for the challenges on the Ecowatcher app, or materials that you specifically need to upgrade your guns.
God of Lightning (Secret)
Caught a fish with Mjolnir
This is a rather RNG based achievement. As Mjolnir will randomly spawn in only the Glacier zone, and under the condition of rainy or stormy weather. As of later versions, there have been reports of finding the hammer on sunny weather as well, however it all boils down to luck in the Glacier zone.
If you're lucky, you'll find a hammer, usually on the right side of the Glacier zone, but also in the First and Third Glacier Caves trapped in ice, just chip it out and then yank it out.
The achievement unlocks after you kill several fish with it and pick them up. Personally, I think the achievement only unlocks specifically upon picking up a fish that has died to the chain lightning effect.
Photo Ops Achievements
Photographer
Took 10 photos at Photo Spots
There appear to be 14 Photo Spots, involving side quests, or Sealife that do not involve murals. Some Photo Spots appear to be an RNG Encounter if missed There's a total of 22 known Photo Spots, Which are detailed in the "Photo Ops" Section below.
Sea People Historian
Captured all of the Sea People murals
There are about 8 of them. More details in the "Photo Ops" Section below.
Exploration Achievements
Deep-sea Diver
Entered the Deep Sea for the first time
Non-missable as part of the main story.
Remember to upgrade your diving suit's depth Limit.
Undersea Civilization!
Discovered the under-sea village
Non-missable as part of the main story.
A Dark and Cold Place
Discovered the Glacier Passage
Non-missable as part of the main story.
Achoo!
Entered the Glacier Passage for the first time
Non-missable as part of the main story.
Sea People Village Achievements
Dumplings in the Water
Mima's restaurant opened
Mima's shop is located just after Kazhin's seed shop, second from the left side of the village. Her quests involve feeding the guards, fetching her some tube corals, and checking up on her friend Tsuchi and his turtle in the depths.
The Seaweed is Growing!
Gumo's seaweed farm opened
Just above the workshop next to the gambling den on the right side of the village. Similar to Duwa's 2 quests, you'll be making Gumo something to eat from Bancho's then helping him find a baby Manatee. He'll open up his seaweed farm, and you can buy seeds from Kazhin's shop on the left end of the village to plant.
Feeble Blacksmith
Duwa's workshop opened
The quest giver is in his house, the 3rd from the left in the Village, next to the gambling den. Similar to the princess' quest, find Feather and lily corals to make a Porridge for. Return later after opening the glacier zone, and provide him with 5 opal ore, and finish his fruit catcher minigame.
Blacksmith Helper
Sold 200 items at workshop
After the workshop is opened(see above) you will probably have a lot of junk to sell, like scrap metal or wood, as they aren't needed by ecowatcher and it's unlikely you need 20 of the same basic underwater rifles. Sell whatever you don't need. It's not about the Bei you're getting out of it, as much as it is about the quantity of what you're selling. There's a guide for getting Money below anyway.
Farm Achievements
My Wonderful Rice Field!
Rice field expanded to maximum
Michael Bakuretsu visits and requests better rice. Otto, will gladly provide a field. Purchase expansions for that rice field, until it can be expanded no more and you have your achievement.

Thought I'd mention that "Sushi" translates to "with rice," and anyone can dump expensive fish on top of any old short grain white rice, but preparation of the rice is what makes the sushi chef a respected profession. So weed your rice fields.
My Wonderful Field!
Vegetable farm expanded to maximum
Some Rapper, whose father went out to get some milk in the sea, and never came back will want you to make some vegetable sushi, Otto will unlock the vegetable section of the farm. Expand that to maximum and sell extort unsuspecting customers by selling vegetable dishes for outrageous prices.
Professional Farmer
Installed sprinklers in the garden
After unlocking the vegetable farm, you will have the option to upgrade your watering can. Keep upgrading it to maximum, swapping out the watering can for automatic sprinklers.
Guides
================================
Fishmon
All Fishmon quests are given each weekend by Udo, the man whose appearance and humor suggests that he sniffs feet while hugging a Dakimakura of a an aquatic creature, with feet.

001 Warrior Parrotfish
Minimum required weapon: Harpoon

Location: Blue Hole Shallows

Strategy: When it charges, harpoon it in the back. It will go unconscious.
Ignore what you know about hush darts.
002 Wizard Barrel Jellyfish
Minimum required weapon: Tranq Sniper .

Location: Lower Blue Hole Shallows

Strategy: It will teleport upon being attacked, or move very fast away when you aim at it. Post-dredge update, it can no longer be captured with a Hush Dart. The Tranq Sniper and using an underwater Scooter to pick it up is the simplest means of capture. So be prepared before you dive, or come back to it next week.
003 Poison Ghost Squid
Minimum required weapon: Harpoon, Rifle, Anything will do, just don't overdo it, avoid melee

Location: Blue Hole Depths

Strategy: In preparation, while diving through the Blue Hole Depths, make sure to pick up a UV Flashlight. This Squid has a habit of being invulnerable to hits, until the light is shined on it. Shoot it after it stops being transparent. Ecowatcher has a poison resist bracelet if you're that afraid of being poisoned.
Fun fact: A squid usually turns white or transparent when it dies, or to repel other males
004 Silver Titan Triggerfish
Minimum required weapon: (((Lightning))) Rifle, or any other Lightning weapons. Do not use Shock weapons. These are two different classes of weapons. You can even bring the Mjolnir hammer if the stars align, and it's raining

Location: Blue Hole Shallows

Strategy: I kept shooting it with the Lightning rifle, but for some reason, it only went unconscious when the lightning chained to another fish. I'd assume that may be a requisite
005 Spotted Moray Eel
Minimum required weapon: Tranq Rifle or Sniper rifle, you don't want to get close to it
Location: Night, Blue Hole Shallows
Strategy: It doesn't handle corners well, but if you really want, you can harpoon it for a minute til it passes out. regular damage works alright as well
006 Prismatic Fanfish
Minimum required weapon: Harpoon

Location: Underwater Lake

Strategy: It will waste your ammo by making mirror image clones of itself, so flicking shots at it with a harpoon and damaging it until it goes unconscious is pretty easy
007 Explosive Vampire Squid
Minimum required weapon: Anything non-Melee, sniper rifle, because the further, the better

Location: Glacier Passage

Strategy: It will leech off health if you get too close, so keep it at a distance, and keep firing until incapacitated
008 Ice Stingray
Minimum required weapon: Any Flame or fire element weapon, You can pick up fire Tips for your harpoon gun, but it's easier just to make a weapon yourself

Location: Third Glacier Cave

Strategy: Clear the area of other fish and hostiles before attacking, as you will want space to maneuver as it gives chase. Only fire element damage affects it. Burn it into unconsciousness.
009 Magma Turtle
Minimum required weapon: Ice Gun, or any Ice element weapon, You can pick up ice Tips for your harpoon gun, but it's easier just to make a weapon yourself.

Location: Left cave in the Divine Tree Control room

Strategy: Be mindful of your surroundings, as active Volcano vents hinder your mobility, but thankfully, your Ice gun will freeze the turtle from chasing you. When fully frozen, hit it with a preferred melee weapon.
Mural Photo Ops
Most are unmissable, unless you count backtracking as that big a chore.

Target: Sea People Record Chamber Mural
Location: Sea People Record Chamber
Requisite: Camera, and Part of quest
Optional Goal: None
Target: Sea People Mural
Location: Glacial Passage
Requisite: Camera, and Part of quest
Optional Goal: None
Target: Sea People Mural
Location: Glacial Passage
Requisite: Camera, and Part of quest
Optional Goal: None
Target: Sea People Mural
Location: Glacial Passage
Requisite: Camera, and Part of quest
Optional Goal: None
Target: Sea People Mural
Location: Glacial Passage
Requisite: Camera, and Part of quest, While not strictly Missable, this is the one of the murals most people have to go back and get.
Optional Goal: None
Target: Sea People Mural
Location: Glacial Passage
Requisite: Camera, and Part of quest
Optional Goal: None
Target: Sea People Mural
Location: Glacial Passage
Requisite: Camera, and Part of quest, While not strictly Missable, this is the one most people have to go back and get.
Optional Goal: None
Target: Sea People Mural
Location: Glacial Passage
Requisite: Camera, and Part of quest, While not strictly Missable, this is the other one most people have to go back and get.
Optional Goal: None

Target: Stone Slab Text
Location: Glacier Zone, immediate Right side
Requisite: Access to the Glacier zone, Not a Sea People Mural, but connected as a part of the story quest.
Optional Goal: None
Sea Creature Photo Ops
Target: Opah(s)
Location: Depths, 180m Below
Requisite: Camera
Optional Goal: Take a picture of 2 of them at Once
Target: Oarfish
Location: Depths, 160m Below
Requisite: Camera
Optional Goal: Take a picture of the glowing blue plankton, they glow when the Oarfish gets close
Target: LoggerheadTurtle
Location: Blue hole Shallows
Requisite: Camera
Optional Goal: Take a photo of it eating the jellyfish. Don't hesitate when it approaches the Jellyfish Focus and snap when it's in the Turtle's mouth.
Target:Manta Ray
Location: Night, Blue hole Shallows, 19m below.
Requisite: SubQuest, requires you to interact with a few objects in the area before you can take the photo
Optional Goal: None
Target: Lake
Location: Underwater Lake
Requisite: A village subquest will unlock this area, allowing you to take your time to snap the perfect photo, ignoring the child in danger
Optional Goal: None
Target: Red-Lipped Batfish
Location: a Seabed in Blue hole Shallows around 40m
Requisite: a Camera
Optional Goal: "While Target is looking ahead" It means, when the hideous thing is looking in your direction.
Target: LeatherBack Turtle
Location: Blue Hole Depths left side, just outside the weed collector's house.
Requisite: subquest, given by mima, to find the pet turtle and owner. After that, becomes an encounter
Optional Goal: "feeding time." When it eats, snap your photo.
Target: Pink Dolphin
Location: An encounter on the right side of the Blue Hole Shallows
Requisite: Having finished dolphin related quest.
Optional Goal: Heart-Shaped Water Drop, if you fail to catch it, it repeats in a loop, so you've got plenty of chances to do so, but honestly, I think that dolphin is pure evil
Target: Baby Humpback Whale
Location: Having finished baby whale related quest.
Requisite: An encounter on the right side of the Blue Hole Shallows, very RNG. You may have to try many, multiple times to get the encounter. Doesn't appear at night.
Optional Goal: "Splashing water." By that, it means when the baby whale is blowing water out of its blowhole. If you too feel dirty calling it a blowhole, apparently it is also called a Spiracle.
Target: Lion's Mane Jellyfish
Location: Left side of the Glacier zone
Requisite: Access to the Glacier zone
Optional Goal: Capture with Narwhal, not difficult
Target: Arandaspis
Location: Hydrothermal Vents area
Requisite: Quest, Opening switches to control room
Optional Goal: Take a picture of four creatures at once
Target: Southern Right whale Dolphin
Location: To the right side of the Glacier zone, near the entrance of the seaweed cave.
Requisite: Access to the Glacier zone
Optional Goal: Take a picture of five creatures at once
Target: Bathynomus
Location: First Glacier Zone Switch cave
Requisite: Quest backtracking, It will be where you defeated a boss before
Optional Goal: Take a picture of three creatures at once
Target: Coelacanth
Location: Hydrothermal Vents area, on the right of the entrance to the control room
Requisite: Quest, Opening switches to control room
Optional Goal: Capture whole side, this is one of the more tricky ones, as the opportunity occurs once per dive. You have 2 shots at taking the picture. Memorize its movements as it darts out of cover, if you fail the first time to try again the next.
Target: Bowhead Whale(Future patch?)
Location: Glacial Area, right side
Requisite: ??? This whale appeared as part of the October Patch, and is likely the subject of future quests, and may be a new photo op.
Optional Goal: None
Employees
Serving Tea, beer, or Cocktails can break your flow if you aren't used to these kind of serving games, so I recommend having servers that pour drinks, and cocktails, or whichever you consider your weakness, which allows you to regulate Dave to, for example only deliver dishes, and clean tables, which are the least attention demanding roles.

Also, It appears that upgraded employees may also unlock new dishes to research.

Here's the lvl 20 breakdown:

Branch Manager/Server
Your All-rounders, or best of the best, or worst that you can't figure out where to put them. Organized from statistically best to worst.

He probably Lied about lying on his resume. The best employee money can hire and invest in.
Useful all-rounder at earlier levels, but easily outclassed at higher levels, not an employee to invest in.
The least best all-rounder, meant to be a server, from the active skill set if you paid money for it.

Cooks
You need only 4 Cooks, like 4 servers, fortunately, you don't have a need for that much Variety.

Can be hired for free as part of a subquest Value as an employee is defined by skillful cooking, and only Cooking. Oh, and also free child labour.
Second highest Cooking skill, nothing much else to say.
Stats are almost identical to Charlie, laugh as she has 3 lower appeal than that nerd.
While being the 4th highest rated Cook, you may not staff him as that role due to the high procure skill, making him one of the best for sending out on dispatches.
More appealing than the nerd and pink haired anime girl, and slightly more useful for sending out into the wild, where he'll probably murder teenage tourists for the soy sauce in their bags.
All his skills are placed in cooking, yet has the lowest stats of all cooks, the definition of hard work, which is what makes him so very appealing with one of the highest appeal stats.

Servers
While organized by stats, Skills matter here, Wiping down tables, and Pouring drinks are essential to getting that 5 star rating, because Dave ain't fast enough to do it all, having those skills on your staff will save yourself a lot of trouble.

Extremely useful skills, and high serving stats, a must have for any lineup at the branch or the main shop.
Starts off at the lowest stats. 01 for all of them. She is an employee that must be invested in, so not a good starter employee if you're short on cash.
Great Skills and Great stats, he'll probably be Drae's replacement as a server in most cases.
While supposedly unappealing, his Cocktail serving skill and high Serving stats are always welcomed. Chances are, there will usually be a need for at least one server who can make cocktails in the main and branch shops.
Despite having better appeal stats than Raptor, you will likely always pick raptor over him because of the Cocktail Serving skill. That and dinosaurs are cool, which he is not.
Has the cleaning master skill, which isn't bad, but it's easier in most cases to mash buttons cleaning than it is to focus to pour drinks perfectly.
While more suited to be a manager, she is a good pick for a server very often in the early game, out of most choices.

Dispatchers(aka Errand boys and girls)
Dave can find ingredients in the sea, because the blue hole is a dumping ground for hermetically sealed cooking pots with soy sauce, and other condiments. However that takes space, and it's also RNG what you get. So having surplus staff to get ingredients for the dishes you want is essential to planning your dishes.

Has the best Procure skills, but lacks the Dispatch Master skill.
Has the Dispatch Master skill, which means more items per dispatch, high appeal, and stats, but too valuable running errands than to run your branch
Has the Dispatch Master skill, which means more items per dispatch, a chef, but you've got enough dedicated chefs.
A secondary server, but having the supplies to serve is preferable.
Making Money
Making Gold
It's unlikely to need a guide on this, as the game never really incurs costs where money is an issue.
But If you want money as an easy investment, with little work:

The fish farm
unlocks after completing your first night fishing quest. Breed Fish by simply having 2 or more of the same fish together, then saving as many of them sell. Here's a chart for the most expensive fish worth breeding and selling:
  • Depth ~50m
    Thresher Shark - $322
  • Depth ~130m
    Sailfish - $350
  • Depth ~250m
    Megamouth Shark - $217
  • Depth ~420m
    Pelican Eel - $235
  • Depth ~540m
    Porbeagle Shark - $385
  • Depth 540m~
    Dunkleosteus - $399
  • Depth ~130(Night)
    Humboldt Squid - $336
I recommend, fishing out the Blobfish, and Vampire Squid out of the Glacier passage just for their abundance, ease of capture/management, price, and how fast they multiply when given priority.
The Depths of ~250, or specifically, the Blue hole Depths are probably the least Lucrative, but Cliones multiply rapidly.

The Branch
Will double your income when managed well, but that's for the Employee Section, and generally, it's more complicated to think about.

Menus
The 7 most expensive items on the menu, Which all recipes are sold by Jango(As of the October Patch) are:
  • Truffle Sailfish Tartare
    Max Value: $1727
    Best Taste: 295
    Ingredients: Sailfish Meat, Purple Sea Urchin, Truffle

  • Truffle Blue Lobster Tail Sushi
    Max Value: $1716
    Best Taste: 282
    Ingredients: Blue Lobster, Truffle

  • Truffle Shark Sandwich
    Max Value: $1705
    Best Taste: 273
    Ingredients: Frilled Shark, Megamouth Shark, Truffle

  • Grilled Antarctic Octopus & Truffle
    Max Value: $1694
    Best Taste: 253
    Ingredients: Antarctic Octopus, Kajime, Truffle

  • Hyalonema Tuna Sashimi
    Max Value: $1683
    Max Value: $1554
    Best Taste: 265
    Ingredients: Bluefin Tuna Ootoro, Yellowfin Tuna Ootoro, Hyalonema

  • Boiled Asian Sheephead Wrasse & Truffle
    Max Value: $1661
    Best Taste: 280
    Ingredients: Sheephead Meat, Kelp, Truffle

  • Steamed Hyalonema Anglerfish
    Max Value: $1650
    Best Taste: 248
    Ingredients: Atlantic Anglerfish, Hyalonema, Soy Sauce

In the early game, of the most expensive dishes learnt, is the Seagrapes Jellyfish Sushi at a maximum price of $832, learnt after receiving the challenge from VincentIngredients are often found spawning together in the Limestone caves at Medium Depth. However, Post Chapter 5, with the Godzilla DLC; The Deep Sea Kaiju Ramen becomes one of the easiest recipes to farm and make money out of, requiring Seaweed, Comb Jelly, and miso.

Making Sea People money(Bei)
Gambling

Shark teeth game
100% Chance of winning.

Always bet 100Bei.
I'm keeping it simple, because we don't need to think too hard:
It seems we know which tooth is the one not to press, but this...."thing" plays like he doesn't.
That said we only need to concern ourselves with the the last 4 teeth before the trap tooth.
Do not play this game with a defensive mindset, play it with the mindset of wanting amputate his fingers.

1.Push 3 teeth until last 4 teeth before the trap tooth, we want it to be his turn when there are 4 teeth.
2.Whatever number of teeth he presses now, all you have to do is press the remaining teeth before the trap tooth, so he can turn his finger into a stump.

1a.If there are 4 teeth before the trap tooth on your turn, always press down 2 teeth. I don't know why, but whenever there are 2 teeth remaining before the trap tooth, he always seems to pick 1 or 3, and I intend to take full advantage of that.
If you are particularly distracted, you can always alt+tab after the trap tooth shines, and if you're playing on fullscreen windowed, your mouse cursor will remain on the screen, you can use the cursor to identify the trap tooth, so you can play the minigame more braindead than before.


Card Matching
90% Winrate.
The first rule, is that revealing cards is something he does for you, not the other way around. Leave the gambling to your opponent, your main goal is only to have the lead on him in points, so seize any pair revealed, because the odds are so stacked against you, that you'll often win by default of having the last pair on your turn, or forcing him into having no other choice but to gamble revealing new cards.

The strategy is simple:
1. On your first 1-2 turns, you will pick the exact same cards that have already been shown, unless you see an obvious pair. Your opponent will play the risks and reveal new cards for you, taking a loss early is not as bad as being stuck in a loop that reveals cards for your opponent every turn.
2. From then on, your first pick is a new card that has not been flipped before, and every second card you pick, will be a card that has been flipped before, preferably a match, but if not, go with a card you've already seen before.


The rationale is to lower your chances of your first card picked being a new symbol being 1in10 chance that your opponent also has to risk. Your second card, if it is not a previously flipped card that you know is a match, is more of a loss to you to gamble on an unknown card.
The risk of failure, is to reveal to your opponent a new card that will increase his chances to match, or reveal a matching card, which he will take advantage of with his near-perfect memory.

Here's a link to a github thing to keep track of your cards to turn this memory game into a strategy game. It appears to be made by, Abstract, featured on his guide to gambling.
https://grays42.github.io/dave-matching-helper/matching_helper.html
https://steamcommunity.com/sharedfiles/filedetails/?id=3005524355
While I did not notice his guide's instructions until I after started writing my guide, I've now noticed how alike, if not way more to the point, his card matching guide is than my instructions are, and I respectfully would not wish him to think I plagiarized his guide, go over to his guide and give him a like for making his guide earlier than mine, and also that neat github utility that I wish I knew about earlier.
See this thing? God I hate him so much.

I hate Junak the Gambler to the core, as he is very likely to be cheating with no other explanation for so consistently beating of the odds, with 1in17 chance of getting duplicates, he often manages to match cards through something beyond sheer luck.

Find the Pearl
Winrate: Reaction time dependent.
Tried it once, won my 100Bei, and never wanted to try it again.
play it if you want to gamble rather than win Bei.

Selling
The Jade marble is most common, selling for 30Bei, the Jade Pedestal, sells for the 2nd most, at 100Bei, while the Jade fish Statue sells at 300Bei.

The First Glacial Cave usually yields 3-4 Jade Marbles, and 1-2 Jade Plates That Sell for 60Bei. The Third Glacial Cave often yields a Jade Pedestal.

I have also just noticed that Sylphine Sylphgale has made a detailed guide for Artifact hunting, that provides a more detailed explanation of artifact spawns here
https://steamcommunity.com/sharedfiles/filedetails/?id=3013667096
I Recommend going over to give that guide a like if you find it helpful.

Overall, there's little reason to try to make Bei out of selling as much it is more time consuming than the other alternatives of doing quests on the board, and gambling. I recommend Artifact hunting as a "by the way" activity when hunting specific fish.
There's an achievement for selling 200 items, so sell surplus copper, wood, and lead.
Ecowatcher
Ecowatcher quests
listed here just so you know what to hold onto, and what you don't:
Here's the total for what you need, and the individual quest logs are below.

Total Collecting
  • Red Starfish 30
  • Orange Starfish 35
  • Purple Starfish 11
  • Brittle(Spider) Starfish 11
  • Blue Shell 50
  • Brown Shell 50
  • Pink Shell 43
  • Agar 10
  • Kajime 10
  • Kelp 15
  • Seagrape 15
  • Seaweed 15
  • Animal Leg Bone 9
  • Animal Foot Bone 9
  • Animal Skull 9
  • Black Coral 13
  • Southern Bull Kelp 8
  • Buck Bean 3
  • Red Clam Shell 15
  • Ocean Quahog Shell 5
  • North Pacific Seastar 15
  • Jade Marble 1
  • Jade Plate 1
  • Jade Pedestal 1
  • Aquamarine 2
  • Torbernite 2
  • Ruby 2
Total Creatures
  • Fried Egg Jellyfish 15
  • Barrel Jellyfish 3
  • White Spotted Jellyfish 10
  • Comb Jellyfish 15
  • Blood-belly Comb Jellyfish 15
  • Red Lionfish 10
  • Titan Triggerfish 8
  • Great Barracuda 8
  • Titan Triggerfish 5
  • Fangtooth 5
  • Bluespotted Stargazer 2
  • Striped Catfish 30
  • Sheepshead 2
  • Any Fish (Glacial Area)(2 star+) 65
  • Bring a Narwhal up to the surface 1(Drone required)
  • Bring a Dunkleosteus up to the surface 1(Drone required)


Research Starfish 1
  • Red Starfish 5
  • Orange Starfish 10
Research Starfish 2
  • Red Starfish 10
  • Orange Starfish 10
Research Starfish 3
  • Red Starfish 15
  • Orange Starfish 15
  • Purple Starfish 1
  • Brittle(Spider) Starfish 1
Research Starfish 4
  • Purple Starfish 3
  • Brittle(Spider) Starfish 3
Research Starfish 5
  • Purple Starfish 7
  • Brittle(Spider) Starfish 7
Research Shell 1
  • Pink Shell 3
Research Shell 2
  • Blue Shell 5
  • Brown Shell 5
  • Pink Shell 5
Research Shell 3
  • Blue Shell 10
  • Brown Shell 10
  • Pink Shell 10
Research Shell 4
  • Blue Shell 15
  • Brown Shell 15
  • Pink Shell 10
Research Shell 5
  • Blue Shell 20
  • Brown Shell 20
  • Pink Shell 15
Research Marine Plants 1
  • Agar 5
Research Marine Plants 2
  • Agar 5
  • Kajime 5
Research Marine Plants 3
  • Kelp 5
  • Kajime 5
Research Marine Plants 4
  • Seagrape 5
  • Seaweed 5
Research Marine Plants 5
  • Kelp 10
  • Seagrape 10
  • Seaweed 10
Research Fossils 1
  • Animal Leg Bone 1
  • Animal Foot Bone 1
  • Animal Skull 1
Research Fossils 2
  • Animal Leg Bone 3
  • Animal Foot Bone 3
  • Animal Skull 3
Research Fossils 3
  • Animal Leg Bone 5
  • Animal Foot Bone 5
  • Animal Skull 5
Investigate Glacial Marine Plants 1
  • Black Coral 3
Investigate Glacial Marine Plants 2
  • Black Coral 5
  • Southern Bull Kelp 3
Investigate Glacial Marine Plants 3
  • Black Coral 5
  • Southern Bull Kelp 5
  • Buck Bean 3
Collect Glacial Clams 1
  • Red Clam Shell 5
Collect Glacial Clams 2
  • Red Clam Shell 10
  • Ocean Quahog Shell 5
Defeat Invasive Starfish 1
  • North Pacific Seastar 5
Defeat Invasive Starfish 2
  • North Pacific Seastar 10
Investigate Sea People Artifact 1
  • Jade Marble 1
  • Jade Plate 1
Investigate Sea People Artifact 2
  • Jade Pedestal 1
Investigate Dangerous Gemstones 1
  • Aquamarine 2
Investigate Dangerous Gemstones 2
  • Torbernite 2
Investigate Dangerous Gemstones 3
  • Ruby 2
Remove Jellyfish 1
  • Fried Egg Jellyfish 5
Remove Jellyfish 2
  • Fried Egg Jellyfish 10
  • Barrel Jellyfish 3
Remove Jellyfish 3
  • White Spotted Jellyfish 10
Remove Jellyfish 4
  • Comb Jellyfish 5
  • Blood-belly Comb Jellyfish 5
Remove Jellyfish 5
  • Comb Jellyfish 10
  • Blood-belly Comb Jellyfish 10
Overpopulated Invasive Fish 1
  • Red Lionfish 5
Overpopulated Invasive Fish 2
  • Red Lionfish 5
  • Titan Triggerfish 5
Overpopulated Invasive Fish 3
  • Titan Triggerfish 3
  • Great Barracuda 3
Overpopulated Invasive Fish 4
  • Titan Triggerfish 5
  • Great Barracuda 5
Overpopulated Invasive Fish 5
  • Fangtooth 5
  • Bluespotted Stargazer 2
Overpopulated Invasive Fish 6
  • Striped Catfish 30
  • Sheepshead 2
Investigate Regional Ecology 1
  • Any Fish (2 star+) 15
Investigate Regional Ecology 2
  • Any Fish (2 star+) 25
  • Bring a Narwhal up to the surface 1(Drone required)
Investigate Regional Ecology 3
  • Any Fish (2 star+) 25
  • Bring a Dunkleosteus up to the surface 1(Drone required)

Ecowatcher rewards
The Last reward makes it worthwhile.

Eco Poison Resist Bracelet
-Increases Poison Resistance
Not particularly helpful.


Eco Health Bracelet
-Reduces Damage taken by 10%
Good if you don't have anything else.


Eco Gemstone Bracelet
-Increases the amount of Mineral acquired by mining
"amount" increased by 1.


Eco Waterproof bag
-Increases weight limit by 30kg
Actually useful, and even has your face on it.
Merchant Jango, (And new Update Recipes)
Spoilers obviously.
The Perpetually cold, Merchant Jango will visit Bancho Sushi, assuming you aren't playing an older version of the game or live in the past.


He offers a quest, Involving a dish which provides the Hot pepper Tuna Recipe


Providing Jango with this dish, will provide you a recipe, turn him into a Merchant, becoming the only source of the Truffle Ingredient, selling them to you about 5-6 at at time for $650 each.

He will visit you every Tuesday, Thursday, and Saturday Afternoon


The other notable thing he sells are Secret Recipes.
To my knowledge they are:


The other recipes that came with the October Update are, and have to be researched with Cooking Inspiration and come from other quest's game progression are:

New recipes of the Godzilla DLC are:
Ice Pick Minigame
For the lazy, who despise the trial and error minigame.
Hit the 3 circled areas.
It's not hard, but who wants to repeatedly dig around their entire screen looking for it?
Boat Skins
Basic - First skin you get.
Big Wave - Second skin you get.
Poseidon - Complete quest:Finding the Baby Whale
Thunderstorm - Complete quest:Revenge Time!
Monster Of the Blue Hole - Defeat Lusca

Sweet Dream - Finish the game and end credits
Stra Stella - Complete Duff's Dream Concert(Phone minigame)
GYAO! - Raise a GYAO!

Bancho Sushi - DAVE THE DIVER Digital Extra
Dave Supporter - DAVE THE DIVER Digital Extra
The Diver - DAVE THE DIVER Digital Extra
Banana - DAVE THE DIVER Digital Extra
Coro Dragon - Call the Operator, and use promotion code: [5656DRAGON]
Seablue - Call the Operator, and use promotion code: [SEABLUEFOREVER]
Aegis Boat Skin - Call the Operator, and use promotion code: [AEGISTHEDIVER]
Godzilla (1995) head - Complete DLC quest:Godzilla In Crisis!
30th Aniversary - Call the Operator, and use promotion code: [30BDAY]
Dredge Update Troubleshooting
Lets start with downloading and knowing whether the free DLC is working.
First after downloading the update and installing the DLC, check if the DLC is ticked.

If the DLC is enabled, your savegames from now onward, will include a yellow icon on the right of every new save circled in red
:
This includes manual saves.

All you need to do now is check your weather app for the next day you encounter foggy weather, and the Dredge DLC will start on that day.


Game progression is reported to be after dave has obtained the chicken farm, meaning Egg dishes. So that's usually past chapter 4. Someone in the discussion forums said that it's chapter 6. Either way, unlocking crab traps prior to the event should also be worthwhile as 6 of the 34 new marinca entries require them, and steel netguns are definitely a boon due to the ferocity of the new fish as almost all of them are hostile. There has been no reports to my knowledge, of the DLC event not occurring when the game is in the epilogue.
Simple Dredge and Godzilla DLC changelog.(For returning players)
Dredge DLC

-catching lobsters and crabs provides eggs for your fish farms.(Was updated in October)

-no new achievements

-no new bosses

-3 kinda the same areas, but with different fish. While almost all hostile, all are fugly.

-All new fish can be caught with a 3 star rating Using either a hush dart, or crab traps.
with the exception of theBony Wreckfish(requiring a steel netgun) of the black cliff area

-34 new max level dishes, with no research or leveling required.

-new customers are so easy to please they never leave dirty dishes, nor ask for drinks. Have I disappointed them? nope, they have a timer on their food, but my staff is so good that their dishes have always been served on time.

-no aberrant fish can be kept by the next morning, so sell them or waste them.

-new gun, the Drain Gun: trade a fish's health for your benefit, gaining oxygen.

-new minigame, dredging for stuff.

Godzilla DLC

-3 new dishes

-2 new decorations

-20 collectibles to get with cards for them

-1 boss fight, but you beat him twice.
GYAO! Guide
================================

Alright,
Quick and dirty info is in these charts:
Here's a link source for the chart:
https://docs.google.com/spreadsheets/d/e/2PACX-1vQVZRA9-PmCTRl191EA0nQte-Ws2GOjS3NBNBD8xCaGgjLMvDWhJWO4bn7wQY69DUZWk7rTSgzi8Cxq/pubhtml#
Credits to some Chinese site here.
Source: https://forum.gamer.com.tw/C.php?bsn=35628&snA=152
The wikia however, has incorrect info in one of their entries, hammerhead I think.

Now, I'll explain how all this works, and if you want exact or more detailed info to evolve each one without trying to figure out the table, it will be in the GYAO! Cards section below. I've underlined the most relevant info if you prefer to skim through things.
For instance you can skip feeding and playing animations by tapping esc or right click, if you're using a keyboard.

Basics: Influencing our resulting GYAO! with minimal RNG.
This will still be tedious, but the difference here, is that we're able to
do it without stabbing randomly in the dark, and playing the lottery until we get our desired results.
If you want to get incredibly lucky, or want have 20 dead Belugas and play this by luck, go for it.
I'm only providing the most expedient method without cheating, unless savescumming is considered cheating to you, then that's like your opinion, man.
The Factors we are looking at are:
  • Food.
  • Affection.
  • Discipline.(Training)

While affection is important in the first stage, deciding on whether you get a blue or orange fish, Only discipline is the difficult factor that we will need to be dealing with.
High Affection sends you down the Orange Fish track, and Low Affection puts you in the Blue fish track for the first evolution. GYAO! pop out of their egg 1 period after they rebirth, that period after rebirth is their evolution day. While they can live to a maximum of 20, Most GYAO! do not live past 12, This is an important consideration if you're going after the orca and whale shark.
but who cares about that, this guide is about collecting them all. That said,
4-5 years old for most GYAO! is the day of their final or penultimate evolutions. So plan ahead.


As for what we're doing, there are 3 classes of GYAO,
Easy:
  • Indo-Pacific Bottlenose Dolphin (Orange)
  • Green Sea Turtle (Orange)
  • Yellowfin Puffer (Blue)
  • Blue Humphead Parrotfish (Blue)
  • Devil Fish (Blue)
  • Great Hammerhead Shark (Blue)
Annoying:
  • Stubby Squid (Orange)
  • Trumpetfish (Orange)
  • Manatee (Orange)
  • Beluga (Orange)
  • Ribbon Eel (Blue)
  • Lemon Shark (Blue)
Tedious:
  • Whale Shark (Orange)
  • Orca (Blue)

The issue with evolving the difficult to get GYAO! is discipline.
Easy GYAO! require no discipline.
Annoying ones requires some finessing with discipline or some RNG,
Tedious ones demand that savescumming is required to get your GYAO! without having to restart the entire process.

Rebirth is best done in the morning
Why? Evolution occurs the period after.
So If you have a rebirth in the morning, evolution will be in the afternoon.
Rebirth of GYAO! during the night, means it's not only harder to pick the final Evolution of your GYAO! Food and affection decreases by (1) between every in-game time period, of morning, afternoon, and night. So make sure there's at least (2) points of food/affection stats each afternoon to prevent discipline loss every night, as you can't feed/play with the GYAO! at night. However, when evolution occurs in the morning, you cannot max out stats required to complete the final evolution of the Whale Shark, and Orca.


Discipline(Training)
Always be aware of discipline loss. The warning indicator in the picture will confirm discipline loss for any of these reasons:
  • Not enough Food.
  • Not enough affection.
  • The GYAO! crapped itself.
  • The GYAO! is sick.
  • The lights are not turned off when it needs to sleep.
  • Absolutely no reason other than described in the wiki of the GYAO! "Swimming funny." Though this is also an opportunity to raise discipline.
Discipline loss is unavoidable if the warning indicator is on at night, even after you turned out the lights for the GYAO! and it's not sick/crapped itself. The only way to prevent this is savescumming.

Savescumming:
I recommend that you go through the game normally, and attempt to get the Easy GYAO! first. Attempting the Annoying and Tedious ones as an endgame/epilogue goal activity instead, so that you can listen to a podcast, watch a show, or something while not really paying attention.

For all of this, saving at least $600k to pay for operating costs as you skip time may be necessary, as skipping time is the only way to efficiently savescum without wasting your time diving, or serving customers, only to find that you need to reload because of an event causing unavoidable discipline loss or discipline events never occurring.

Every Morning and Afternoon, along with food and affection needs, any and all of random 3 events occur by RNG:
  • Falling Sick.
  • Crapping itself.
  • Discipline opportunity/loss.
These RNG events occur at the start of every morning/afternoon, and all it takes to force these events to occur, if to
save and skip time, and until your GYAO! gets a discipline opportunity; Reload.
That's really it and all you have to do that will force events that raise discipline. Have a personal limit though, I give up reloading at 10 times and move on to the next day.
Discipline loss will occur at night for any of the combinations of ailments/conditions of discipline loss. As night is a time you cannot discipline, feed, play, or snack, make sure that your affection and food stats are at least above 2 out of 4, and the GYAO! is not sick. The GYAO! crapping itself can be cleaned up, but the GYAO! still having a warning indicator even after the lights are off, requires you to reload the last save.
GYAO! Cards pt.1 Orange
Quick note: Requisite Stats Displayed are the stats required during the period before the evolution occurs. So if a GYAO! requires 4 food to evolve into whatever you're looking for, the stat needs to be 4 when you skip time or however you end the period.

Green Sea Turtle
Number:2001
Difficulty: Easy
Requisite Stats:
  • Food: 2
  • Affection: 1-2
  • Discipline: Less than 8 bars, but best to have some.
Requisite Evolution: Orange fish(high affection)
Special notes: Reasonably easy. Disciplining the GYAO! once or twice, but never over-disciplining it, so as long as it's under 8 bars of discipline, you'll get this GYAO!


Indo-Pacific Bottlenose Dolphin
Number:2002
Difficulty: Easy
Requisite Stats:
  • Food: 1-4
  • Affection: 3-4
  • Discipline: Less than 8 bars.
Requisite Evolution: Orange fish(high affection)
Special notes: One of the evolutionary paths to a Whale Shark. It might live longer, at about 11 years, allowing you more time to evolve it into a whale shark, but I evolved mine from savescumming a beluga, which is more expedient anyway.


Beluga
Number:2003
Difficulty: Annoying
Requisite Stats:
  • Food: 1-4
  • Affection: 3-4
  • Discipline: 9 bars or more.
Requisite Evolution: Orange fish(high affection)
Special notes: It will die at 7-9 years old, So that Discipline bar better be high if you're not already save scumming to max out discipline to a whale shark. It's one of the more common GYAO! due to the sheer amount of people trying to get a whale shark by constantly trying to max out all stats, but falling short of discipline for the final evolution to a whale shark because of the RNG.


Manatee
Number:2004
Difficulty: Annoying
Requisite Stats:
  • Food: 2
  • Affection: 1-2
  • Discipline: 9 bars or more.
Requisite Evolution: Orange fish(high affection)
Special notes: Due to the need for high discipline, savescum or pray to RNJesus for discipline events to get your evolution.


Stubby Squid
Number:2005
Difficulty: Annoying
Requisite Stats:
  • Food: 1-4
  • Affection: 0-2
  • Discipline: 0
Requisite Evolution: Orange fish(high affection)
Special notes: This and the Trumpetfish, are annoying because they are not influenced by discipline to my knowledge, and RNG instead, evolving to one or the other. Save scumming may be your only option here to get the desired GYAO! Maybe fiddling around with the discipline might help.


Trumpetfish
Number:2006
Difficulty: Annoying
Requisite Stats:
  • Food: 1-4
  • Affection: 0-2
  • Discipline: 0
Requisite Evolution: Orange fish(high affection)
Special notes: This and the Stubby Squid, are annoying because they are not influenced by discipline to my knowledge, and RNG instead, evolving to one or the other. Save scumming may be your only option here to get the desired GYAO! Maybe fiddling around with the discipline might help.


Whale Shark
Number:2007
Difficulty: Tedious
Requisite Stats:
  • Food: 4
  • Affection: 4
  • Discipline: 18 bars(Max)
Requisite Evolution: Orange fish(high affection)>Beluga or Dolphin.
Special notes: If you want to get this GYAO! rebirth in the morning is a must, and Save scumming is also a must, as maxing out discipline as early as possible will secure this GYAO! If all requisites are met, it will evolve around 9 years old from a Beluga. Or die.

GYAO! Cards pt.2 Blue
Yellowfin Puffer
Number:2008
Difficulty: Easy
Requisite Stats:
  • Food: 0-2
  • Affection: 0-2
  • Discipline: 0
Requisite Evolution: Blue fish(low affection)
Special notes: While stats can be higher, keep stats low, and Ignore discipline. Which will force the GYAO! down this evolution track. It's very easy with no discipline at all.


Ribbon Eel
Number:2009
Difficulty: Annoying
Requisite Stats:
  • Food: 2
  • Affection:
  • Discipline: 9 bars or more.
Requisite Evolution: Blue fish(low affection)
Special notes: The discipline stat must be high early in the evolution cycle, which means savescumming may be a necessary factor.


Blue Humphead Parrotfish
Number:2010
Difficulty: Easy
Requisite Stats:
  • Food: 1
  • Affection: 3-4
  • Discipline: 0
Requisite Evolution: Blue fish(low affection)
Special notes: Make sure discipline is kept at 0. Without having to care about discipline, it's an easy GYAO!


Lemon Shark
Number:2011
Difficulty: Annoying
Requisite Stats:
  • Food: 1-4
  • Affection: 3-4
  • Discipline: 9 bars or more.
Requisite Evolution: Blue fish(low affection)
Special notes: Required to get an Orca. Another one which savescumming is crucial as discipline events must be RNG'd into existence.


Devil Fish
Number:2012
Difficulty: Easy
Requisite Stats:
  • Food: 1-4
  • Affection: 1-4
  • Discipline: 8 bars or more.
Requisite Evolution: Blue fish(low affection)
Special notes: This GYAO! is the result of a common failure to get the Lemon Shark or any higher disciplined GYAO!


Great Hammerhead Shark
Number:2013
Difficulty: Easy
Requisite Stats:
  • Food: 2
  • Affection: 1-2
  • Discipline: 0
Requisite Evolution: Blue fish(low affection)
Special notes: Simple, as discipline is not a factor, as long as all other requisites are acquired, just pay no attention to discipline.


Orca
Number:2014
Difficulty: Tedious
Requisite Stats:
  • Food: 1-4
  • Affection: 4
  • Discipline: 18 bars(Max)
Requisite Evolution: Blue fish(low affection)>Lemon Shark
Special notes: Less tedious than the whale shark, as Belugas die at age 9, giving you more time to discipline this GYAO! Save scumming is required for consecutive discipline events. Unavailable if you decided to rebirth at night, as you can't max stats at night for evolution. If all requisites are met, it will evolve around 12 years old from a Lemon Shark. Or die.
Marinca Guide
================================
Remember that Ctrl+F is your friend, use it to find the card number of the specific fish you're looking for.
As of the October update, some information on the cards may not match the text, please refer to the text regarding card numbers and cross-reference day/night availability.
Blue Hole Shallows Pt.1
Clownfish
Number:0001
Location: The 2nd lower canopy of coral reefs
Disposition: Tied to coral reef areas, school of 2-3
Requisite: None
Recommended Tool to capture: Netgun or Hush Dart
Dishes:
  • Roasted Tropical Fish and Garlic
    Max Value: $1480
  • Clownfish Sushi
    Max Value: $7


Comber
Number:0002
Location: 1st/2nd sea level canopy
Disposition: wandering, can be found among schools of other fish
Requisite: None
Recommended Tool to capture: Netgun or Hush Dart
Dishes:
  • Comber Sandwich
    Max Value: $1443
  • Comber Sandwich
    Max Value: $7


Cardinal Fish
Number:0003
Location: 1st Sea Level Canopy
Disposition: doing laps in schools of 5 or more
Requisite: None
Recommended Tool to capture: Netgun or Hush Dart
Dishes:
  • Cardinalfish Sushi
    Max Value: $11


Sea Goldie
Number:0004
Location: Mainly 1st sea level canopy, Sometimes lower
Disposition: Uncommon, RNG based map spawning
Requisite: Patience
Recommended Tool to capture: Netgun or Hush Dart
Dishes:
  • Sea Goldie Sushi
    Max Value: $11


Pyramid Butterflyfish
Number:0005
Location: Reasonably Common, 1st/2nd Sea level Canopy
Disposition: Can be seen traveling inbetween both Sea level Canopies
Requisite: None
Recommended Tool to capture: Netgun or Hush Dart
Dishes:
  • Roasted Tropical Fish and Garlic
    Max Value: $1480
  • Pyramid Butterflyfish Sushi
    Max Value: $14


Yellow Tang
Number:0006
Location: 1st Sea level Canopy
Disposition: Of the most commonly identified fish, with the Blue Tang
Requisite: None at all
Recommended Tool to capture: Netgun or Hush Dart
Dishes:
  • Yellow Tang Sushi
    Max Value: $14


Salema PorgyBlackspot Seabream
Number:0007
Location: 1st Sea level Canopy
Disposition: Just as common as Blue Tangs
Requisite: None
Recommended Tool to capture: Netgun or Hush Dart
Dishes:
  • Salema Porgy Sushi Blackspot Seabream Sushi
    Max Value: $18


Orbicular Batfish
Number:0008
Location: Just under the 1st Sea level Canopy, Common, but easy to miss due to size
Disposition: Usually seen in a minimum of pairs
Requisite: None
Recommended Tool to capture: Netgun or Hush Dart
Dishes:
  • Batfish Ricebowl
    Max Value: $1480
  • Circularbat Batfish Fry
    Max Value: $18


Blue Tang
Number:0009
Location: 1st sea level Canopy
Disposition: Can be found in groups of 4, of the most commonly identified fish.
Requisite: None
Recommended Tool to capture: Netgun or Hush Dart
Dishes:
  • Roasted Tropical Fish and Garlic
    Max Value: $1480
  • Blue Tang Sushi
    Max Value: $22


Rainbow Wrasse
Number:0010
Location: 1st Sea level Canopy
Disposition: Oddly uncommon
Requisite: None
Recommended Tool to capture: Netgun or Hush Dart
Dishes:
  • Wrasse Curry
    Max Value: $1480
  • Rainbow Wrasse Sushi
    Max Value: $22


Lagoon Triggerfish
Number:0011
Location: 2nd-3rd Sea level Canopy, Can be seen at the edge of Medium depth
Disposition: A common fish
Requisite: None
Recommended Tool to capture: Netgun or Hush Dart
Dishes:
  • Reef Triggerfish Sushi
    Max Value: $25


Small Spotted Dart
Number:0012
Location: 2nd Sea Level Canopy
Disposition: Common, but small and easy to miss
Requisite: None
Recommended Tool to capture: Netgun or Hush Dart
Dishes:
  • SmallSpotted Dart Kajime Soup
    Max Value: $555
  • SmallSpotted Dart Sushi
    Max Value: $29


Yellowback Fusilier
Number:0013
Location: 1st Sea level Canopy
Disposition: Common
Requisite: None
Recommended Tool to capture: Netgun or Hush Dart
Dishes:
  • Boiled Yellowback Fusilier
    Max Value: $185
  • Yellowback Fusilier Sushi
    Max Value: $25
Blue Hole Shallows Pt.2
Ornate Wrasse
Number:0014
Location: Seabeds and reefs of the 2nd/3rd Sea Level canopy
Disposition: Has been known to stay in specific seabeds like the Clownfish
Requisite: None
Recommended Tool to capture: Netgun or Hush Dart
Dishes:
  • Wrasse Curry
    Max Value: $1480
  • Ornate Wrasse Sushi
    Max Value: $29


Longfin Batfish
Number:0015
Location: Has been seen moving in dispersed pairs on the 2nd Sea level
Disposition: Unique shape makes them easily identifiable
Requisite: None
Recommended Tool to capture: Netgun or Hush Dart
Dishes:
  • Batfish Ricebowl
    Max Value: $1480
  • Longfin Batfish Sushi
    Max Value: $37


Mediterranean Parrotfish
Number:0016
Location: 1st/2nd Sea level Canopy
Disposition: Often seen in pairs, travel path is often near eels for some reason
Requisite: None
Recommended Tool to capture: Netgun or Hush Dart
Dishes:
  • Black Vinegar Braised Parrotfish
    Max Value: $1424
  • Mediterranean Parrotfish Sushi
    Max Value: $37


Redtoothed Triggerfish
Number:0017
Location: I've seen this one move throughout the 1st-3rd Sea Level Canopy
Disposition: Schools of 2-3, Common
Requisite: None
Recommended Tool to capture: Netgun or Hush Dart
Dishes:
  • Salt-Grilled Redtoothed Triggerfish
    Max Value: $177
  • Redtoothed Triggerfish Sushi
    Max Value: $33


Black and White Snapper
Number:0018
Location: 2nd/3rd Sea level lower canopies, traveling near sharks
Disposition: Schools of 3, very obvious, appears at later game progression
Requisite: None
Recommended Tool to capture: Netgun or Hush Dart
Dishes:
  • B&W Snapper Sushi
    Max Value: $33


Green Humphead Parrotfish
Number:0019
Location: Lower 1st/2nd Sea level Canopies
Disposition: Often found at a rate of 2 per map, filleted when killed.
Requisite: Drone Pickup
Recommended Tool to capture: Steel Netgun or Hush Dart, and Drone
Dishes:
  • Humphead Parrotfish Curry
    Max Value: $1387
  • Green Humphead Parrotfish Sushi
    Max Value: $59


Barrel Jellyfish
Number:0020
Location: RNG based, Map dependent, Protecting entry to coves
Disposition: Stationary, but hostile on contact, will not pursue
Requisite: None
Recommended Tool to capture: Netgun or Hush Dart
Dishes:
  • Seasoned Jellyfish
    Max Value: $1480
  • Barrel Jellyfish Sushi
    Max Value: $37


Fried Egg Jellyfish
Number:0021
Location: Coves, blocking entry
Disposition: More common than the Barrel Jellyfish
Requisite: None
Recommended Tool to capture: Netgun or Hush Dart
Dishes:
  • Seasoned Jellyfish
    Max Value: $1480
  • Fried Egg Jellyfish Sushi
    Max Value: $29


Whitetip reefshark
Number:0022
Location: Often found near shipwreck, on the left side of the map on the 2nd Sea Level Canopy
Disposition: While slightly less common than the Longnose Sawshark, is present at night
Requisite: Drone Pickup
Recommended Tool to capture:Hush Dart, and Drone
Dishes:
  • Whitetip reefshark Sushi
    Max Value: $88
  • Whole-Roasted Shark head
    Max Value: $277


Starry Puffer
Number:0023
Location: Usually blocking entrances to coves or pathways
Disposition: Will expand, on approach, injuring upon contact, Hostile
Requisite: None
Recommended Tool to capture: Netgun Or Hush Dart, Hush dart only effective when unaware
Dishes:
  • Stellate(Starry) Puffer Special Sushi
    Max Value: $814
  • Stellate(Starry) Puffer Nicogori
    Max Value: $666
  • Pufferfish Dumpling Soup
    Max Value: $1554


Red Lionfish
Number:0025
Location: Near choke points, in pairs and trios, found both Day and night
Disposition: Hostile, and common
Requisite: None
Recommended Tool to capture: Netgun, or Hush Dart
Dishes:
  • Deep-fried Luna Lionfish
    Max Value: $1443
  • Red Lionfish Sushi
    Max Value: $37
Blue Hole Shallows Pt.3
Titan Triggerfish
Number:0026
Location: Near choke points, alone, but often close to other Hostile Red Lionfish, found both Day and night
Disposition: Hostile, common, but solo
Requisite: None
Recommended Tool to capture: Steel Netgun or Hush Dart
Dishes:
  • Tropical Fish Sushi Set
    Max Value: $1387
  • Titan Triggerfish Sushi
    Max Value: $55


Bluefin Tuna
Number: 0027
Location: Speeding between the 1st/2nd Sea Level Canopy
Disposition: Traffic Danger, otherwise not exactly hostile
Requisite: Tuna Event, Drone pickup
Recommended Tool to capture: Steel Net Traps, Steel Netgun, Hush Dart
Dishes:
  • Bluefin Tuna Ricebowl
    Max Value: $1332
  • Bluefin Tuna Akami Sushi
    Max Value: $296
  • Bluefin Tuna Chutoro Sushi
    Max Value: $351
  • Bluefin Tuna Ootoro Sushi
    Max Value: $499
  • Hot Pepper Tuna
    Max Value: $1461
  • Hyalonema Tuna Sashimi
    Max Value: $1683
Yellowfin Tuna
Number:0028
Location: Speeding between the 1st/2nd Sea Level Canopy
Disposition: Traffic Danger, otherwise not exactly hostile
Requisite: Tuna Event, Drone pickup
Recommended Tool to capture: Steel Net Traps, Steel Netgun, Hush Dart
Dishes:
  • Hawaiian Poke
    Max Value: $980
  • Yellowfin Tuna Akami Sushi
    Max Value: $270
  • Yellowfin Tuna Steak
    Max Value: $1128
  • Yellowfin Tuna Chutoro Sushi
    Max Value: $333
  • Yellowfin Tuna Ootoro Sushi
    Max Value: $462
  • Hyalonema Tuna Sashimi
    Max Value: $1683
Flame Angelfish
Number:0029
Location: 1st/2nd Seabed Canopy, RNG Based, Tall Seaweed Map
Disposition: Schools of 5 or more
Requisite: None
Recommended Tool to capture:
Dishes:
  • Flame Angelfish Sushi
    Max Value: $18


Sheephead
Number:0030
Location: 1st/2nd Sea Level Canopy, RNG Based, Tall Seaweed Map
Disposition: Hostile, but slow
Requisite: Drone Pickup
Recommended Tool to capture: Hush Dart
Dishes:
  • Sheephead Sushi
    Max Value: $55
  • Boiled Asian Sheephead Wrasse & Truffle
    Max Value: $1661


Emperor Angelfish
Number:0031
Location: 1st/2nd Sea Level Canopy, RNG Based, Tall Seaweed Map
Disposition: Often found wandering in schools of 3
Requisite: None
Recommended Tool to capture: Hush Dart or Net Gun
Dishes:
  • Emperor Angelfish Sushi
    Max Value: $37


Stingray
Number:0032
Location: 1st Sea Level Seabed
Disposition: It will leave the seabed to chase and attack you, but not very far.
Requisite: Drone Pickup
Recommended Tool to capture: Hush Dart or Steel Netgun
Dishes:
  • Dried Stingray
    Max Value: $1480
  • Stingray Sushi
    Max Value: $92


Marbled Electric Ray
Number:0033
Location: 1st/2nd Seabed Canopy, RNG Based, Tall Seaweed Map, Rainy or Stormy Weather
Disposition: It will leave the seabed to chase and attack you, but not very far.
Requisite: Drone Pickup
Recommended Tool to capture:
Dishes:
  • Dried Stingray
    Max Value: $1480
  • Marbled Electric Ray Sushi
    Max Value: $185


Whiteleg Shrimp
Number:0034
Location: Commonly found on Coves and Seabeds
Disposition: None
Requisite: Requires net, from completion of reticent girl sub-quest
Recommended Tool to capture: Net
Dishes:
  • Deep-fried Eggplant Shrimp Meatballs
    Max Value: $1480
  • Special Fried Shrimp Sushi
    Max Value: $1406
  • Mianbao Xia
    Max Value: $1387
  • Boiled and Deep-fried White Shrimp
    Max Value: $832
  • Cooked Whiteleg Shrimp Sushi
    Max Value: $129

Striped Catfish
Number:0035
Location: 1st/2nd Sea Level Canopy, RNG Based, Tall Seaweed Map
Disposition: In massive schools, All very hostile
Requisite: RNG based, Tall Seaweed map
Recommended Tool to capture: Netgun or Steel Net Trap
Dishes:
  • Plotosid Pie
    Max Value: $1424
  • Striped Catfish Sushi
    Max Value: $18


Purple Sea Urchin
Number:0036
Location: 1st-3rd Seabed Canopies
Disposition: None
Requisite: Thicker Gloves provided by main game story progression
Recommended Tool to capture: Gloves
Dishes:
  • Rice with Purple Sea Urchin Sushi
    Max Value: $1424
  • Purple Sea Urchin Sushi
    Max Value: $92
  • Truffle Sailfish Tartare
    Max Value: $1727
Blue Hole Shallows Pt.4
Shortfin Mako
Number:0037
Location: 1st/2nd Sea level Canopy
Disposition: Hostile
Requisite: Shark Party Event, Drone pickup
Recommended Tool to capture: Hush Dart
Dishes:
  • Shortfin Mako Sushi
    Max Value: $388


Marlin
Number:0038
Location: Higher 2nd Sea Level Canopy
Disposition:
Requisite: Drone Pickup, Swordfish Party Event
Recommended Tool to capture: Hush Dart
Dishes:
  • Marlin and Soybean Paste Roast
    Max Value: $1406
  • Marlin Sushi
    Max Value: $314


Thresher Shark
Number:0039
Location: 1st/2nd Sea Level Canopy, Rainy/storm weather
Disposition: Hostile
Requisite: Shark Party Event, Drone pickup
Recommended Tool to capture: Hush Dart
Dishes:
  • Thresher Shark Sushi
    Max Value: $333


Baby Humpback Whale
Number:0901 (Previously 0342)
Location: Photo Op, Random Map seed, upon moving right, you'll hear whale noises
Disposition: RNG encounter, Check Photo Ops section for more info
Requisite: Complete a related quest, and the photo opportunity encounter will eventually occur
Recommended Tool to capture: Camera
Dishes:
None, unless you're Japanese, from Greenland, Norwegian or an English Sailor from the Early 1800s


Pink Dolphin
Number:0902 (Previously 0343)
Location: Photo Op, During quest involving Dolphins
Disposition: Annoying, needy, probably bothering innocent pirates who hunt them in retaliation
Requisite: Related to "New Undersea Friend" achievement, assist the dolphins, and a Photo Op will appear.
Recommended Tool to capture: Camera(unfortunately)
Dishes:
Many, all inedible and irrelevant


Loggerhead Turtle
Number:0907 (Previously 0345)
Location: Easily found random encounter in the open just after diving, More details in Photo Ops section
Disposition: Eating Jellyfish
Requisite: A camera
Recommended Tool to capture: Camera
Dishes:
None
Blue Hole Medium Depth Pt.1
Bluehead Tilefish
Number:0101
Location: wandering further above seabeds
Disposition: At least schools of 3, and without many
Requisite: Minimum 80m+ rated diving suit for depths
Recommended Tool to capture: Netgun or Hush Dart
Dishes:
  • Bluehead Tilefish Sushi
    Max Value: $55


Clown Frogfish
Number:0102
Location: along seabeds at 60m, have been seen with clownfish, oddly
Disposition: pairs, but up to 3
Requisite: Minimum 80m+ rated diving suit for depths
Recommended Tool to capture: Netgun or Hush Dart
Dishes:
  • Crimson Fish Roll
    Max Value: $1480
  • Warty Frogfish Sushi
    Max Value: $55


Painted Comber
Number:0103
Location: common, and wandering up and down between regions
Disposition: at least 2, to 3
Requisite: Minimum 80m+ rated diving suit for depths
Recommended Tool to capture: Netgun or Hush Dart
Dishes:
  • Comber Sandwich
    Max Value: $1443
  • Painted Comber Sushi
    Max Value: $62


Bigeye Scad
Number:0104
Location: Wandering
Disposition: Small, but common
Requisite: Minimum 80m+ rated diving suit for depths
Recommended Tool to capture: Netgun or Hush Dart
Dishes:
  • Big-eyed Scad and Soybean Paste Roast
    Max Value: $684
  • Bigeye Scad Sushi
    Max Value: $62


Striped Red Mullet
Number:0105
Location: Usually hanging around seabeds
Disposition: quite common, RNG map dependent
Requisite: Minimum 80m+ rated diving suit for depths
Recommended Tool to capture: Netgun or Hush Dart
Dishes:
  • Striped Red Mullet Tangle Roll
    Max Value: $296
  • Striped Red Mullet Sushi
    Max Value:$59


Mackerel Scad
Number:0106
Location: Common
Disposition: Common, but often mistaken for the Bigeyed Scad
Requisite: Minimum 80m+ rated diving suit for depths
Recommended Tool to capture: Netgun or Hush Dart
Dishes:
  • Mackerel Scad Hotdog
    Max Value: $1480
  • Mackerel Scad Sushi
    Max Value: $55


Harlequin Hind
Number:0107
Location: Also common
Disposition: Found from 1 to 3.
Requisite: Minimum 80m+ rated diving suit for depths
Recommended Tool to capture: Netgun or Hush Dart
Dishes:
  • Tropical Fish Sushi Set
    Max Value: $1387
  • Harlequin Hind Sushi
    Max Value: $66


Bigeye Trevally
Number:0108
Location: Often found high, at a 60m depth
Disposition: Pairs
Requisite: Minimum 80m+ rated diving suit for depths
Recommended Tool to capture: Netgun or Hush Dart
Dishes:
  • Trevally Sandwich
    Max Value: $1154
  • Bigeye Trevally Sushi
    Max Value: $70


Coral Trout
Number:0109
Location: Often found high, at a 60m depth
Disposition: groups of 2, to 3
Requisite: Minimum 80m+ rated diving suit for depths
Recommended Tool to capture: Netgun or Hush Dart
Dishes:
  • Tropical Fish Sushi Set
    Max Value: $1387
  • Trout Sea Grapes Ricebowl
    Max Value: $647
  • Coral Trout Sushi
    Max Value:$66


Grey Triggerfish
Number:0110
Location: Often found high, at a 60m depth
Disposition: Pairs
Requisite: Minimum 80m+ rated diving suit for depths
Recommended Tool to capture: Netgun or Hush Dart
Dishes:
  • Grey Triggerfish Sushi
    Max Value: $62


Atlantic Bonito
Number:0111
Location: Map RNG
Disposition: Uncommon but present fish that is easily mistaken for others
Requisite: Minimum 80m+ rated diving suit for depths
Recommended Tool to capture: Netgun or Hush Dart
Dishes:
  • Atlantic Bonito Curry
    Max Value: $1406
  • Atlantic Bonito Sushi
    Max Value: $77


White Trevally
Number:0112
Location: Often found high, at a 60m depth
Disposition: Found in Pairs
Requisite: Minimum 80m+ rated diving suit for depths
Recommended Tool to capture: Netgun or Hush Dart
Dishes:
  • Trevally Nanbanzuke
    Max Value: $1480
  • White Trevally Kombu Ochazuke
    Max Value: $344
  • White Trevally Sushi
    Max Value: $81


Cuttlefish
Number:0113
Location: Often wandering around other threats and hostile fish
Disposition: Groups of 3, sprays ink upon contact
Requisite: Minimum 80m+ rated diving suit for depths
Recommended Tool to capture: Netgun or Hush Dart
Dishes:
  • Fried Onion Cuttlefish
    Max Value: $1480
  • Three-Colored Squid Roast
    Max Value: $1480
  • Cuttlefish Sushi
    Max Value: $74


Dusky Grouper
Number:0114
Location: Found varying, throughout medium depth
Disposition: Often seen solo, or in pairs
Requisite: Minimum 80m+ rated diving suit for depths
Recommended Tool to capture: Netgun or Hush Dart
Dishes:
  • Dusky Grouper Steak
    Max Value: $1480
  • Dusky Grouper Sushi
    Max Value: $81


Atlantic Mackerel
Number:0115
Location: Often in Limestone Caves, or spawning at the shipwreck interior if you can't find it.
Disposition: Solo, or Groups of 3
Requisite: Minimum 80m+ rated diving suit for depths
Recommended Tool to capture: Netgun or Hush Dart
Dishes:
  • Smoked Atlantic Mackerel Scramble
    Max Value: $1431
  • Atlantic Mackerel Sushi
    Max Value: $77
Blue Hole Medium Depth Pt.2
Giant Trevally
Number:0116
Location: A common fish, Sharks can be found nearby to them
Disposition: Solo, or in pairs
Requisite: Diving suit upgrade rated at 80m+, Drone Pickup
Recommended Tool to capture: Steel Netgun or Hush Dart
Dishes:
  • Trevally Sandwich
    Max Value: $1154
  • Giant Trevally Sushi
    Max Value: $111


White Spotted Jellyfish
Number:0117
Location: Usually guarding Stalactite Caves(Limestone Caves)
Disposition: Hostile, but Stationary. It is always recommended to catch these along with Seagrapes, as they often spawn together, and the earliest Money making Workhorse dish is usually the Seagrapes Jellyfish Sushi
Requisite: Diving suit upgrade rated at 80m+
Recommended Tool to capture: Netgun or Hush Dart
Dishes:
  • Seagrapes Jellyfish Sushi
    Max Value: $832
  • White Spotted Jellyfish
    Max Value: $66


Tiger Shark
Number:0118
Location: Usually above entrances to the Depths
Disposition: Hostile
Requisite: Diving suit upgrade rated at 80m+, Drone Pickup
Recommended Tool to capture: Hush Dart
Dishes:
  • Tiger Shark Sushi
    Max Value: $185


Great Barracuda
Number:0119
Location: Almost Everywhere you don't want them to be, but if you're specifically looking, the Sea People Chamber Mural usually has a confirmed spawn. As of the October Patch, can no longer be found at night, replaced by the new Blackfin Barracuda
Disposition: Hostile
Requisite: Diving suit upgrade rated at 80m+
Recommended Tool to capture: Steel Netgun or Hush Dart
Dishes:
  • Great Barracuda Canape
    Max Value: $1572
  • Great Barracuda Sushi
    Max Value: $74


Narrow-Barred Spanish Mackerel
Number:0120
Location: Usually found among other fish by accident, but hard to figure out where exactly
Disposition: Uncommon
Requisite: Diving suit upgrade rated at 80m+
Recommended Tool to capture: Netgun or Hush Dart
Dishes:
  • Narrow-Barred Spanish Mackerel Arancini
    Max Value: $1443
  • Narrow-Barred Spanish Mackerel Sushi
    Max Value: $74


Longnose Sawshark
Number:0121
Location: Often guarding entrances and exits to the medium depths
Disposition: Hostile
Requisite: Diving suit upgrade rated at 80m+, Drone Pickup
Recommended Tool to capture: Hush Dart
Dishes:
  • Longnose Sawshark
    Max Value: $129


Atlantic Anglerfish
Number:0122
Location: Stalactite Caves Only(Limestone Caves)
Disposition: Hostile
Requisite: Diving suit upgrade rated at 80m+,
Recommended Tool to capture: Netgun or Hush Dart
Dishes:
  • Atlantic Anglerfish Sushi
    Max Value: $81
  • Steamed Hyalonema Atlantic Anglerfish
    Max Value: $1650


Sally Lightfoot Crab
Number:0123
Location: Shipwreck Interior Only
Disposition: Hostile, Jumps to get you
Requisite: During and after the quest to pick up a crowbar
Recommended Tool to capture: Steel Netgun, or Steel Trap
Dishes:
  • Fried Rice with Galapagos Red Crab
    Max Value: $1424
  • Sally Lightfoot Crab Sushi
    Max Value: $185


Black Tiger Shrimp
Number:0124
Location: Shipwreck Interior, but I've had it spawn elsewhere
Disposition:
Requisite: Defeat the Giant squid for Access to the Shipwreck interior, and progress quest reticent girl for the net.
Recommended Tool to capture: Net
Dishes:
  • Deep-Fried Eggplant Shrimp Meatballs
    Max Value: $1480
  • Special Fried Shrimp Sushi
    Max Value: $1406
  • Manbao Xia
    Max Value: $1387
  • Raw Black Tiger Shrimp Sushi
    Max Value: $185

Smooth Hammerhead
Number:0125 (Previously 0127)
Location: Shipwreck Interior, but has been rarely spotted outside at 70m
Disposition: Hostile, Very hostile
Requisite: Drone Pickup, Shark party event?
Recommended Tool to capture: Hush Dart
Dishes:
  • Smooth Hammerhead Sushi
    Max Value: $340


Sailfish
Number:0126
Location: Shipwreck Interior Only
Disposition: A decreasingly rare spawn during the marlin event, to a point that it is almost a confirmed spawn in the shipwreck interior
Requisite: Marlin Event, Drone Pickup
Recommended Tool to capture: Netgun or Hush Dart
Dishes:
  • Boiled Sailfish and Seaweed
    Max Value: $1572
  • Sailfish Sushi
    Max Value: $336
  • Truffle Sailfish Tartare
    Max Value: $1727


Giant Squid
Number:1001
Location: Shipwreck Interior
Disposition: Boss
Requisite: Quest progression
Recommended Tool to capture: None, defend yourself
Dishes:
    Nothing you're selling, Enjoy it with your friends at Bancho's
Blue Hole Depths Pt.1
Chambered Nautilus
Number:0201
Location: Commonly hanging around with Cliones
Disposition: Minding its own business
Requisite: Complete Reticent Girl sub-quest, to obtain net
Diving suit upgraded for lower depths
Recommended Tool to capture:Net
Dishes:
  • Chambered Nautilus Sushi
    Max Value: $129


Fangtooth
Number:0202
Location: Wandering Depths
Disposition: Hostile, will chase
Requisite: Diving suit upgraded for lower depths
Recommended Tool to capture: Netgun or Hushdart
Dishes:
  • Fangtooth Sushi
    Max Value: $166
  • Fried Habanero Fangtooth
    Max Value: $1517


Frilled Shark
Number:0203
Location: Uncommon, but found in larger areas
Disposition: Hostile
Requisite: Diving suit upgraded for lower depths, Drone Pickup
Recommended Tool to capture: Hush Dart
Dishes:
  • Frilled Shark Sushi
    Max Value: $314
  • Truffle Shark Sandwich
    Max Value: $1705


Bluespotted Stargazer
Number:0204
Location: Hiding in the Seabeds of the Depths
Disposition: Hostile, defeated by dropping rocks on it
Requisite: Diving suit upgraded for lower depths
Recommended Tool to capture: Steel Netgun, or Steel Trap(Recommend the trap, as it's very fast)
Dishes:
  • Sweet and Sour Stargazer
    Max Value: $1443
  • Bluespotted Stargazer Sushi
    Max Value: $203


Rhinochimaeridae
Number:0206
Location: Confirmed to Spawn in Underwater Lake
Disposition: Hostile if attacked.
Requisite: Diving suit upgraded for lower depths, Drone Pickup
Recommended Tool to capture: Hush Dart
Dishes:
  • Crimson Fish Roll
    Max Value: $1480
  • Rhinochimaeridae Sushi
    Max Value: $333


Spider Crab
Number:0207
Location: Sitting around in the Seabeds of the Depths
Disposition: Hostile, defeated by dropping rocks on it
Requisite: Diving suit upgraded for lower depths
Recommended Tool to capture: Steel Netgun, or Steel Trap
Dishes:
  • Rice with Great Spider Crab meat
    Max Value: $1517
  • Great Spider Crab Curry
    Max Value: $1480
  • Great Spider Crab and Cucumber Sushi
    Max Value: $1198
  • Spider Crab Sushi
    Max Value: $185

Megamouth Shark
Number:0208
Location: Usually found wandering the larger caves of the depths
Disposition: Hostile, will try to suck you closer in
Requisite: Diving suit upgraded for lower depths, Drone Pickup
Recommended Tool to capture: Hush Dart
Dishes:
  • Megamouth Shark Sushi
    Max Value: $351
  • Truffle Shark Sandwich
    Max Value: $1705


Cookiecutter Shark
Number:0209
Location: Found wandering the depths
Disposition: Hostile
Requisite: Diving suit upgraded for lower depths
Recommended Tool to capture: Steel Netgun, or Hush Dart
Dishes:
  • Deep Fish Tempura
    Max Value: $1461
  • Cookiecutter Shark Sushi
    Max Value: $277


Clione
Number:0210
Location: Floating around, very common
Disposition: Part of Reticent Girl sub-quest
Requisite: Diving suit upgraded for lower depths, sub-quest
Recommended Tool to capture:Net
Dishes:
  • Clione Sushi
    Max Value: $129


Sea Toad
Number:0211
Location: Most often noticed outside the entrance of the Sea People Village
Disposition: without a care in the world
Requisite: Diving suit upgraded for lower depths
Recommended Tool to capture: Netgun or Hush Dart
Dishes:
  • Sea Toad and Cucumber Gunkan Sushi
    Max Value: $1184
  • Sea Toad Sushi
    Max Value: $203


Salmon Snailfish
Number:0212
Location: Most often noticed outside the entrance of the Sea People Village
Disposition: Not actually a Salmon as much as it is Salmon Pink coloured
Requisite: Diving suit upgraded for lower depths
Recommended Tool to capture: Netgun or Hush Dart
Dishes:
  • Fried Tomato and Snailfish
    Max Value: $1443
  • Salmon Snailfish Sushi
    Max Value: $222
Blue Hole Depths Pt.2
Pacific Fanfish
Number:0213
Location: Wandering depths
Disposition: Will "fan out" and run away if threatened.
Requisite: Diving suit upgraded for lower depths
Recommended Tool to capture: Netgun or Hush Dart
Dishes:
  • Pacific Fanfish Sushi
    Max Value: $240


Threetooth Puffer
Number:0214
Location: Wandering depths
Disposition: Non-hostile, often found solo, like most fish in this area
Requisite: Diving suit upgraded for lower depths
Recommended Tool to capture: Netgun or Hush Dart
Dishes:
  • Threetooth Puffer
    Max Value: $259


Comb Jelly
Number:0215
Location: Blocking routes around the Depths
Disposition: Hostile, will seek you and electrify
Requisite: Diving suit upgraded for lower depths
Recommended Tool to capture: Netgun or Hush Dart
Dishes:
  • Comb Jelly Sushi
    Max Value: $166
  • Deep Sea Kaiju Ramen
    Max Value: $1295


Blood-Belly Comb Jellyfish
Number:0216
Location: In the same locations, but in fewer number as Comb Jelly
Disposition: Hostile, will seek you with speed and explode
Requisite: Diving suit upgraded for lower depths
Recommended Tool to capture: Netgun or Hush Dart
Dishes:
  • Blood-Belly Comb Jellyfish Sushi
    Max Value: $185


Red Bream
Number:0217
Location: Wandering depths
Disposition: Common, and easy to spot
Requisite: Diving suit upgraded for lower depths
Recommended Tool to capture: Netgun or Hush Dart
Dishes:
  • Crimson Fish Roll
    Max Value: $1480
  • Red Bream Sushi
    Max Value: $129


Leatherback Turtle
Number:0903 (Previously 0220)
Location: outside Tsuchi's house after the end of that quest
Disposition: Photo Op
Requisite: Diving suit upgraded for lower depths, Finding the Seaweed Collector,
quest given by Mima, Camera
Recommended Tool to capture: Camera
Dishes:
    None


Opah
Number:0905 (Previously 0218)
Location: Depth of 180m
Disposition: Photo Op
Requisite: Diving suit upgraded for lower depths, Camera
Recommended Tool to capture: Camera
Dishes:
    None


Oarfish
Number:0906 (Previously 0219)
Location: Depth of 160m, left side of the Depths usually
Disposition: Photo Op
Requisite: Diving suit upgraded for lower depths, Camera
Recommended Tool to capture: Camera
Dishes:
    None


Clione Queen
Number:1002
Location: fulfill requisites, and It comes to you
Disposition: Boss
Requisite: Diving suit upgraded for lower depths, reticent girl quest
Recommended Tool to capture: a very, very, very big net. Or a gun, that works too
Dishes:
  • Clione Queen Soup
    Max Value: $ 550


Giant Wolf Eel
Number:1003
Location: Depths, Entrance to Sea people Village
Disposition: Boss
Requisite: Diving suit upgraded for lower depths
Recommended Tool to capture: Something that kills animals through their tails for some reason
Dishes:
  • Steamed Wolf Eel
    Max Value: $550


Goblin Shark
Number:1005
Location: Underwater Lake
Disposition: Boss
Requisite: Diving suit upgraded for lower depths, Quest from the SeaChildren "Curious Child"
Recommended Tool to capture: No capture, KILL!
Dishes:
  • Goblin Shark Belly Roast
    Max Value: $600
Nocturnal Pt.1
Clearfin Lionfish
Number:0501
Location: 1st/2nd Sea Level Canopy, Night only
Disposition: Hostile, and exactly like the Red Lionfish, but in greater numbers
Requisite: Night
Recommended Tool to capture: Netgun, or Hush Dart
Dishes:
  • Moonlight Bladderwrack Roll
    Max Value: $1498
  • Clearfin Lionfish Sushi
    Max Value: $88


Longspine Squirrelfish
Number:0502
Location: 1st/2nd Sea Level Canopy, Night only
Disposition: Passive, in a large school, likes to follow you around
Requisite: Night
Recommended Tool to capture: Netgun, or Hush Dart
Dishes:
  • Moonlight Bladderwrack Roll
    Max Value: $1498
  • Longspine Squirrelfish Sushi
    Max Value: $33


Longspine Porcupinefish
Number:0503
Location: 1st/2nd Sea Level Canopy, Night only
Disposition: Hostile, and exactly like the Starry Puffer
Requisite: Night
Recommended Tool to capture: Netgun, or Hush Dart
Dishes:
  • Pufferfish Dumpling Soup
    Max Value: $1554
  • Seasoned Longspine Porcupinefish Skin
    Max Value: $666


Box Jellyfish
Number:0504 (Previously 0029)
Location: 1st/2nd Sea Level Canopy, Night only
Disposition: Hostile, but slow
Requisite: Night
Recommended Tool to capture: Netgun, or Hush Dart
Dishes:
  • Box Jellyfish Sushi
    Max Value: $203


Moray Eel
Number:0505 (previously 0024)
Location: Found in coves during the day time, wandering the 2nd Sea Level at night.
Disposition: A trap that is best avoided during the day, and a reasonably easy Hostile target at night
Requisite: Unlocking Night maps, Drone Pickup
Recommended Tool to capture: Hush Dart
Dishes:
  • Moray Eel Curry
    Max Value: $351
  • Moray Eel Sushi
    Max Value: $185
  • Godzilla Vs Ebirah Curry
    Max Value: $1369


Blacktip Reefshark
Number:0027 (Previously 0027)
Location: A standard shark spawn, uncommon, 2nd sea level Canopy, Night only
Disposition: Hostile
Requisite: Drone Pickup
Recommended Tool to capture: Hush Dart
Dishes:
  • Shark Karaage
    Max Value: $1480
  • Blacktip Reefshark
    Max Value: $222


Copper Shark
Number:0507 (Previously 0028)
Location: A standard shark spawn, uncommon, 2nd sea level Canopy, Night only
Disposition: Hostile
Requisite: Drone Pickup
Recommended Tool to capture: Hush Dart
Dishes:
  • Shark Karaage
    Max Value: $1480
  • Copper Shark Sushi
    Max Value: $240


Zebra Shark
Number: 0508 (Previously 0047)
Location: 3rd Sea Level Canopy
Disposition: Hostile
Requisite: Shark Party Event, Drone pickup
Recommended Tool to capture: Hush Dart
Dishes:
  • Zebra Shark Sushi
    Max Value: $399


White Shrimp
Number:0509 (Previously 0128)
Location: Common and everywhere, find it on a night dive if you can't find it during the day
Disposition: Doing nothing
Requisite: progress quest reticent girl
Recommended Tool to capture: Net
Dishes:
  • Humboldt Ink Pasta
    Max Value: $1554
  • Rice with White Shrimp Meat
    Max Value: $1480
  • White Shrimp Sushi
    Max Value: $196


Blackfin Barracuda
Number:0510
Location: Night diving, Lower end of Medium depths
Disposition: Found in groups of a maximum of 3, Hostile and will try to chase you.
Requisite: Night
Recommended Tool to capture: Netgun or Hush Dart
Dishes:
  • Moonlight Bladderwrack Roll
    Max Value: $1498
  • Blackfin Barracuda Roll
    Max Value: $222


Spear Squid
Number: 0511
Location: Night diving, Lower end of Medium depths
Disposition: Found in groups of a maximum of 3, Hostile and will try to spear you with a charge attack.
Requisite: Night
Recommended Tool to capture: Netgun or Hush Dart
Dishes:
  • Spear Squid Sushi
    Max Value: $188


Humboldt Squid
Number:0512 (Previously 0129)
Location: Night diving, Lower end of Medium depths
Disposition: Usually found a maximum of 2 per night dive, Hostile and will spray ink
Requisite: Night
Recommended Tool to capture: Netgun or Hush Dart
Dishes:
  • Humboldt Ink Pasta
    Max Value: $1554
  • Humboldt Squid Sushi
    Max Value: $536


Devil Scorpionfish
Number:0513 (Previously 0130)
Location: Hiding in Seabeds at night
Disposition: Hostile, and will chase you down with quite some speed, but easy to deal with
Requisite: Night
Recommended Tool to capture: Netgun or Hush Dart
Dishes:
  • Devil Scorpionfish Sushi
    Max Value: $499


Manta Ray
Number:0904 (Previously 0344)
Location: Photo Op, a quest to take a photo is available at night, Check Photo Ops section for more
Disposition: Big
Requisite: Night
Recommended Tool to capture: Camera
Dishes:
None


Red-Lipped Batfish
Number:0908 (Previously 0347)
Location: The Seabed of a cove, Lower regions
Disposition: Ugly
Requisite: A Camera
Recommended Tool to capture: Camera
Dishes:
Nope


Nocturnal Pt.2 (Optional and hidden Bosses)
Truck Hermit Crab
Number:1004
Location: Vortex, Stormy Night
Disposition: Boss Battle
Requisite: Sato lets you know about Stormy night Vortexes
Recommended Tool to capture: Bring a Gun, Grenade Launcher, whatever does high damage
Dishes:
  • Stir-fried Hermit Crab and Seaweed
    Max Value: $550


Mantis Shrimp
Number:1006
Location: Vortex, Stormy Night
Disposition: Boss Battle
Requisite: Sato lets you know about Stormy night Vortexes
Recommended Tool to capture: Bring a Gun, Grenade Launcher, whatever does high damage
Dishes:
  • Boiled Mantis Shrimp with Soy Paste
    Max Value: $650


Great White Shark Klaus
Number:1007
Location: Vortex, Stormy Night
Disposition: Boss Battle
Requisite: Encounter an Old lady on a raft later in the game, she'll start the quest.
Recommended Tool to capture: Bring a Gun, Grenade Launcher, whatever does high damage
Dishes:
  • White Shark Omelet
    Max Value: $650


Lusca
Number:1012
Location: Vortex, Stormy Night
Disposition: Boss Battle
Requisite: Complete the entire Marinca. After Sato Congratulates you, the Opportunity to hunt Lusca will be on the next stormy night
Recommended Tool to capture: Whatever does high damage will set you straight. The triple axel's generally good enough. After screaming at you, it has a habit of turning around, shooting it in
the back when its tentacles are facing you does crit damage. Shooting it until it dies is the advice I'd give to kill everything ever though.
Dishes:
  • Blanched Lusca Tentacle
    Max Value: $1350
  • Lusca Neck Tadaki
    Max Value: $1350


Getting Lusca's card completes the Marinca as of now, and you get a reward just as significant as the Marinca Trophy:
A depiction of how 30 years of collecting Marinca cards can cause male pattern balding.
Oh, and also the Marinca Master hat.


By the way, you can't wear it, you gotta hang it up somewhere.


Chu-Chu!

Glacier Passage
Peacock Squid
Number:0301
Location: Glacier Passage
Disposition: Loitering
Requisite: Glacier Passage access, main story progress
Recommended Tool to capture: Netgun or Hush Dart
Dishes:
  • Peacock Squid Ripieni
    Max Value: $1517
  • Three-Colored Squid Roast
    Max Value: $1480
  • Peacock Squid Sushi
    Max Value: $277


Dumbo Octopus
Number:0302
Location: Glacier Passage
Disposition: Same as all other squids
Requisite: Glacier Passage access, main story progress
Recommended Tool to capture: Netgun or Hush Dart
Dishes:
  • Dumbo Takoyaki
    Max Value: $1554
  • Dumbo Octopus Sushi
    Max Value: $296


Barreleye
Number:0303
Location: Glacier Passage
Disposition: Loitering
Requisite: Glacier Passage access, main story progress
Recommended Tool to capture: Netgun or Hush Dart
Dishes:
  • Deep Fish Tempura
    Max Value: $1461
  • Barreleye Sushi
    Max Value: $259
  • Ebirah Chasing Sashimi
    Max Value: $1258


Blobfish
Number:0304
Location: Glacier Passage
Disposition: Usually also found at the bottom of the 3rd chamber
Requisite: Glacier Passage access, main story progress
Recommended Tool to capture: Netgun or Hush Dart
Dishes:
  • Blobfish Spring Roll
    Max Value: $1387
  • Blobfish Sushi
    Max Value: $444


Vampire Squid
Number:0305
Location: Glacier Passage
Disposition: Best kept at a distance
Requisite: Glacier Passage access, main story progress
Recommended Tool to capture: Netgun or Hush Dart
Dishes:
  • Three-Colored Squid Roast
    Max Value: $1480
  • Deep Fish Tempura
    Max Value: $1461
  • Vampire Squid Sushi
    Max Value: $425


Pelican Eel
Number:0306
Location: Glacier Passage, 3rd Chamber on the bottom
Disposition: Hostile, tries to eat you, but always solo on a fixed spawn
Requisite: Glacier Passage access, main story progress
Recommended Tool to capture: Hush Dart
Dishes:
  • Pelican Eel Jelly
    Max Value: $1380
  • Pelican Eel Sushi
    Max Value: $518
Glacier Zone pt.1
Arctic Cod
Number:0307
Location: Common Fish, can easily be found in the entrance of the Glacial Zone
Disposition: a school of 2 or more
Requisite: Access to the Glacier zone
Recommended Tool to capture: Netgun or Hush Dart
Dishes:
  • Arctic Cod Risotto
    Max Value: $1509
  • Arctic Cod Sushi
    Max Value: $351


Gelatinous Snailfish
Number:0308
Location: Common Fish, can easily be found just outside of the entrance of the Glacial Zone
Disposition: dispersed 2 to 3
Requisite: Access to the Glacier zone
Recommended Tool to capture: Netgun or Hush Dart
Dishes:
  • Fried Tomato and Snailfish
    Max Value: $1443
  • Gelatinous Snailfish Sushi
    Max Value: $314


Antarctic Octopus
Number:0309
Location: Usually hanging around seabeds of both ends of the Glacial areas
Disposition: Hostile, sprays you with a poisonous cloud before running away.
Requisite: Access to the Glacier zone
Recommended Tool to capture: Netgun or Hush Dart
Dishes:
  • Antarctic Octopus Carpaccio
    Max Value: $1498
  • Antarctic Octopus Sushi
    Max Value: $444
  • Grilled Antarctic Octopus & Truffle
    Max Value: $1694


Greenland Shark
Number:0310
Location: One usually spawns At 520m just above the Hydrothermal vents area
Disposition: Hostile, Slow and tanky
Requisite: Access to the Glacier zone, Drone Pickup
Recommended Tool to capture: Hush Dart
Dishes:
  • Greenland Shark Sushi
    Max Value: $592


Polar Eelpout
Number:0311
Location: Common Fish, can easily be found in the entrance of the Glacial Zone
Disposition: usually found in 2s
Requisite: Access to the Glacier zone
Recommended Tool to capture: Netgun or Hush Dart
Dishes:
  • Polar Eelpout Sushi
    Max Value: $333


Porbeagle Shark
Number:0312
Location: One usually spawns lower to the right of the glacier zone, at around 500m
Disposition: Hostile, very aggressive, might be the most aggressive of all the sharks.
Requisite: Access to the Glacier zone, Drone Pickup
Recommended Tool to capture: Hush Dart
Dishes:
  • Boiled Porbeagle Shark
    Max Value: $1480
  • Porbeagle Shark Sushi
    Max Value: $610


Ice Fish
Number:0313
Location: Common Fish, can easily be found in the entrance of the Glacial Zone
Disposition: Groups of 2-3 easily the most common almost entirely blue against the blue sea background
Requisite: Access to the Glacier zone
Recommended Tool to capture: Netgun or Hush Dart
Dishes:
  • Ice Fish Curry
    Max Value: $1480
  • Ice Fish Sushi
    Max Value: $351


Capelin
Number:0314
Location: can easily be found just below the entrance of the Glacial Zone
Disposition: Large School of fish, makes me want to eat Shishamo
Requisite: Access to the Glacier zone
Recommended Tool to capture: Netgun
Dishes:
  • Roasted Capelin
    Max Value: $1443
  • Capelin Sushi
    Max Value: $166


Narwhal
Number:0315
Location: Can easily be found outside the entrance of the Glacial Zone
Disposition: Hostile, and there's almost always one just below the entrance. Which is weird, because they aren't recorded as being aggressive to humans in real life, and only ever use their horn to smack and stun small fish
Requisite: Access to the Glacier zone, Drone Pickup
Recommended Tool to capture: Hush Dart
Dishes:
  • Narwhal Miso Soup(I hope you feel bad)
    Max Value: $1480
  • Narwhal Sushi(They usually swim away from humans)
    Max Value: $518
Haddock
Number:0316
Location: Common Fish, can easily be found outside the entrance of the Glacial Zone
Disposition: 2-3 usually around narrower ice caves.
Requisite: Access to the Glacier zone
Recommended Tool to capture: Netgun or Hush Dart
Dishes:
  • Haddock Acqua Pazza
    Max Value: $1498
  • Haddock Sushi
    Max Value: $407
Glacier Zone pt.2
Starry Skate
Number:0317
Location: Hiding in the Seabed, mostly on the right side, One can always be found in the small brick chambers of the 3rd glacial cave
Disposition: Hostile, will do the same as most enemies hiding in the seabeds
Requisite: Access to the Glacial area, Drone Pickup
Recommended Tool to capture: Steel Netgun or Hush Dart
Dishes:
  • Dried Stingray
    Max Value: $1480
  • Starry Skate Sushi
    Max Value: $481


Arctic Telescope Fish
Number:0318
Location: First Glacial cave
Disposition: Hostile, 2 or more spread out in the area
Requisite: Access to the Glacial area
Recommended Tool to capture: Netgun or Hush Dart
Dishes:
  • Arctic Telescope Fish Sushi
    Max Value: $444


Alaska Pollock
Number:0319
Location: First Glacial cave
Disposition: Quiet large, but easily missed, and sometimes RNG
Requisite: Access to the Glacial area
Recommended Tool to capture: Netgun or Hush Dart
Dishes:
  • Alaska Pollock Sushi
    Max Value: $499


Lumpfish
Number:0320
Location: Abundant in the Third Glacial cave
Disposition: Usually in pairs
Requisite: Access to the Glacial area, then The Third Glacial cave
Recommended Tool to capture: Netgun or Hush Dart
Dishes:
  • Lumpfish Sushi
    Max Value: $444


Snub-nosed Spiny Eel
Number:0321
Location: Third Glacial Cave
Disposition: 2 spawn dispersed from each other
Requisite: Access to the Glacial area, Drone pickup
Recommended Tool to capture: Hush Dart
Dishes:
  • Snub-nosed Spiny Eel Sushi
    Max Value: $499
  • Grilled Eel with Habanero
    Max Value: $1572


Golden King Crab
Number:0322
Location: Seabed caverns of the Left side in the Glacial Area
Disposition: Same as any other crab
Requisite: Access to the Glacial area
Recommended Tool to capture: Steel Traps, or Steel Net gun
Dishes:
  • Soy Sauce Marinated Crab
    Max Value: $1609
  • Golden King Crab Sushi
    Max Value: $499


Southern Right Whale Dolphin
Number:0910 (Previously 0980)
Location: Glacial Area, left side if I recall
Disposition: Photo Op
Requisite: Camera
Recommended Tool to capture: Camera
Dishes:
    None


Bathynomus
Number:0911 (Previously 0981)
Location: First Glacial Cave
Disposition: Photo Op
Requisite: Camera
Recommended Camera
Dishes:
    None


Lion's Mane Jellyfish
Number:0912 (Previously 0982)
Location: Glacial Area, left side if I recall
Disposition: Photo Op
Requisite: Camera
Recommended Tool to capture: Camera
Dishes:
    None


Phantom Jellyfish
Number:1008
Location: Second Glacial Cave
Disposition: Boss
Requisite: Story progression into opening the Second Glacial Cave
Recommended Tool to capture: High Velocity Assault Bump Melon Beluga, with Illegal extended fins
Dishes:
  • Phantom Jellyfish Jelly
    Max Value: $700


Bowhead Whale(Future patch?)
Number:????
Location: Glacial Area, right side
Disposition: ???
Requisite: Unknown, added as part of the October patch, likely to be a new Photo Op
Dishes:
  • none
HydroThermal Vents
Waptia Fieldensis
Number:0401
Location: The left and right Corners of the entrance to the control room
Disposition: wandering
Requisite: Reticent girl Sub-quest for net
Recommended Tool to capture: Net
Dishes:
  • Seasoned Waptia Fieldensis
    Max Value: $1572
  • Waptia Sushi
    Max Value: $381


Pikaia
Number:0402
Location: The left and right Corners of the entrance to the control room
Disposition: Solo
Requisite: The area is unlocked after hitting the switches to open up the control room
Recommended Tool to capture: Netgun or Hush Dart
Dishes:
  • Pikaia Ramen
    Max Value: $1554
  • Pikaia Sushi
    Max Value: $425


Allenypterus
Number:0403
Location: Usually in covering entrances into the trenches flanking the control room
Disposition: Hostile
Requisite: The area is unlocked after hitting the switches to open up the control room
Recommended Tool to capture: Netgun or Hush Dart
Dishes:
  • Allenypterus Sushi
    Max Value: $462


Qingmedous
Number:0404
Location: Dispersed in the main area
Disposition: solo wandering fish
Requisite: The area is unlocked after hitting the switches to open up the control room
Recommended Tool to capture: Netgun or Hush Dart
Dishes:
  • Qingmedous Sushi
    Max Value: $444


Falcatus
Number:0405
Location: Usually found in the left or upper main area of the Hydrothermal Vents area
Disposition: Hostile
Requisite: The area is unlocked after hitting the switches to open up the control room
Recommended Tool to capture: Netgun or Hush Dart
Dishes:
  • Falcatus Soybean Paste Soup
    Max Value: $1554
  • Falcatus Sushi
    Max Value: $481


Drepanaspis
Number:0406
Location: Hidden in the Seabed of the trenches on either side of the entrance to the control room
Disposition: Hostile, Seabed attacker
Requisite: The area is unlocked after hitting the switches to open up the control room, Drone Pickup
Recommended Tool to capture: Steel Netgun or Hush Dart
Dishes:
  • Drepanaspis Sushi
    Max Value: $555


Dunkleosteus
Number:0407
Location: Usually Just above the entrance to the control room
Disposition: The front of this creature is armoured, so it is required to shoot it's belly or back
Requisite: The area is unlocked after hitting the switches to open up the control room, Drone Pickup
Recommended Tool to capture: Hush Dart
Dishes:
  • Dunkleosteus Sushi
    Max Value: $629


Megalograptus
Number:0408
Location: Control Room
Disposition: Hostile
Requisite: Access to control room, Main Story Progression
Recommended Tool to capture: Steel Netgun or Steel Net Trap
Dishes:
  • Megalograptus Sushi
    Max Value: $518


Xenacanthus
Number:0409
Location: Usually in covering entrances into the trenches flanking the control room
Disposition: Hostile
Requisite: The area is unlocked after hitting the switches to open up the control room, Drone Pickup
Recommended Tool to capture: Hush Dart
Dishes:
  • Xenacanthus Sushi
    Max Value: $592


Arandaspis
Number:0909 (previously 0990)
Location: a Seabed of the Hydrothermal Vents
Disposition: Photo Op
Requisite: The area is unlocked after hitting the switches to open up the control room
Recommended Tool to capture: Camera
Dishes:
    None


Coelacanth
Number:0913 (previously 0991)
Location: Just to the right of the entrance to the control room
Disposition: Photo Op
Requisite: The area is unlocked after hitting the switches to open up the control room
Recommended Tool to capture: Camera, this guy is fast, and you only have 1 opportunity per dive to catch him
Dishes:
    None


Helicoprion
Number:1009
Location: Third Glacial Cave
Disposition: Boss
Requisite: Progression to opening the control room entrance
Recommended Tool to capture: Suwam
Dishes:
  • Roasted Helicoprion Tail
    Max Value: $710


Kronosaurus
Number:1010
Location: Control Room Entrance
Disposition: Boss, and more hostile to incredulous, but dogmatic activists and their submersibles than you, fortunately
Requisite: Progression to opening the control room entrance
Recommended Tool to capture: Rockets, looted from the wreckage of a Navy seal's purchased bribe money
Dishes:
  • Steamed Kronosaurus Tongue
    Max Value: $724


Yawie
Number:1011
Location: Control Room
Disposition: Boss
Requisite: Main Story Progression
Recommended Tool to capture: The best weapons you got
Dishes:
  • Yawie Steamed meat
    Max Value: $750
Seahorse Pt.1
White Seahorse
Number:0601
Location: The Depths, almost the rarest, of most of the seahorses in the depths, but more easily noticed
Disposition: Has better stats for racing, but only slightly
Requisite: Progress quest reticent girl Subquest for net
Recommended Tool to capture: Net
Dishes:
  • Seahorse Salad
    Max Value: $1480
  • Seahorse Udon
    Max Value: $1387
  • Fried Seahorses
    Max Value: $814
  • Seahorse Skewers
    Max Value: $111

Big-Belly Seahorse
Number:0602
Location: Quite commonly found while looking for the other Seahorses
Disposition: Found in Coves like most Seahorses
Requisite: Progress quest reticent girl Subquest for net
Recommended Tool to capture: Net
Dishes:
  • Seahorse Salad
    Max Value: $1480
  • Seahorse Udon
    Max Value: $1387
  • Fried Seahorses
    Max Value: $814
  • Seahorse Skewers
    Max Value: $111

Crowned Seahorse
Number:0603
Location: Found in the depths, in tunnels blocked by Tubeworms
Disposition: The most common for medium racing with decent stats
Requisite: Progress quest reticent girl Subquest for net
Recommended Tool to capture: Net
Dishes:
  • Seahorse Salad
    Max Value: $1480
  • Seahorse Udon
    Max Value: $1387
  • Fried Seahorses
    Max Value: $814
  • Seahorse Skewers
    Max Value: $111

Dwarf Seahorse
Number:0604
Location: RNG based, found in Coves
Disposition: The smallest, and also relatively uncommon
Requisite: Progress quest reticent girl Subquest for net
Recommended Tool to capture: Net
Dishes:
  • Seahorse Salad
    Max Value: $1480
  • Seahorse Udon
    Max Value: $1387
  • Fried Seahorses
    Max Value: $814
  • Seahorse Skewers
    Max Value: $111


Giraffe Seahorse
Number:0605
Location: Medium depth, RNG based
Disposition: Relatively uncommon, but found while looking for other Seahorses
Requisite: Progress quest reticent girl Subquest for net
Recommended Tool to capture: Net
Dishes:
  • Seahorse Salad
    Max Value: $1480
  • Seahorse Udon
    Max Value: $1387
  • Fried Seahorses
    Max Value: $814
  • Seahorse Skewers
    Max Value: $111


Hedgehog Seahorse
Number:0606
Location: I found this one slightly lower in the shallows in U shaped Coves
Disposition: Those spines don't make it a faster Racing Seahorse
Requisite: Progress quest reticent girl Subquest for net
Recommended Tool to capture: Net
Dishes:
  • Seahorse Salad
    Max Value: $1480
  • Seahorse Udon
    Max Value: $1387
  • Fried Seahorses
    Max Value: $814
  • Seahorse Skewers
    Max Value: $111

Jayakar's Seahorse
Number:0607
Location: It's common and found pretty high in the Blue Hole Shallows
Disposition: You're given one to race at the Gambling Den, it's terrible so mash buttons
Requisite: Progress quest reticent girl Subquest for net
Recommended Tool to capture: Net
Dishes:
  • Seahorse Salad
    Max Value: $1480
  • Seahorse Udon
    Max Value: $1387
  • Fried Seahorses
    Max Value: $814
  • Seahorse Skewers
    Max Value: $111

Lined Seahorse
Number:0608
Location: Almost found this one Last, very low at the depths
Disposition: also less easy to find due to it blending with the background
Requisite: Progress quest reticent girl Subquest for net
Recommended Tool to capture: Net
Dishes:
  • Seahorse Salad
    Max Value: $1480
  • Seahorse Udon
    Max Value: $1387
  • Fried Seahorses
    Max Value: $814
  • Seahorse Skewers
    Max Value: $111

Long-Snouted Seahorse
Number:0609
Location: a common relatively Seahorse found High in C shaped Coves
Disposition: despite not as common as some other seahorses, is featured as the poster horse to all Seahorse menus
Requisite: Progress quest reticent girl Subquest for net
Recommended Tool to capture: Net
Dishes:
  • Seahorse Salad
    Max Value: $1480
  • Seahorse Udon
    Max Value: $1387
  • Fried Seahorses
    Max Value: $814
  • Seahorse Skewers
    Max Value: $111
Seahorse Pt.2
Pacific Seahorse
Number:0610
Location: Found in the high Seabeds of the Blue Hole shallows
Disposition: Loligagging
Requisite: Progress quest reticent girl Subquest for net
Recommended Tool to capture: Net
Dishes:
  • Seahorse Salad
    Max Value: $1480
  • Seahorse Udon
    Max Value: $1387
  • Fried Seahorses
    Max Value: $814
  • Seahorse Skewers
    Max Value: $111


Spotted Seahorse
Number:0611
Location: A Rare one in the depths
Disposition: its colour makes it harder to notice in the dark depths
Requisite: Progress quest reticent girl Subquest for net
Recommended Tool to capture: Net
Dishes:
  • Seahorse Salad
    Max Value: $1480
  • Seahorse Udon
    Max Value: $1387
  • Fried Seahorses
    Max Value: $814
  • Seahorse Skewers
    Max Value: $111


Tiger-Tail Seahorse
Number:0612
Location: Was found outside Entrance Sea People Mural Chambers, in Limestone Cave areas
Disposition: best to eat it than keep it
Requisite: Progress quest reticent girl Subquest for net
Recommended Tool to capture: Net
Dishes:
  • Seahorse Salad
    Max Value: $1480
  • Seahorse Udon
    Max Value: $1387
  • Fried Seahorses
    Max Value: $814
  • Seahorse Skewers
    Max Value: $111

Zebra Seahorse
Number:0613
Location: A real rare RNG based one, I found 2 around the Yellow Shipwreck, just above the entrance to the interior, and one below it at 120m, at ceiling spikes but it's stated that it's found in the Stalactite(Limestone) Cave. Perhaps it only spawns with its presence
Disposition: Rarity does not confer good racing stats
Requisite: Progress quest reticent girl Subquest for net
Recommended Tool to capture: Net
Dishes:
  • Seahorse Salad
    Max Value: $1480
  • Seahorse Udon
    Max Value: $1387
  • Fried Seahorses
    Max Value: $814
  • Seahorse Skewers
    Max Value: $111

Spiny Seahorse
Number:0614
Location: Found at medium depth, in the same locations as the Zebra Seahorse,
Disposition: Quite common
Requisite: Progress quest reticent girl Subquest for net
Recommended Tool to capture: Net
Dishes:
  • Seahorse Salad
    Max Value: $1480
  • Seahorse Udon
    Max Value: $1387
  • Fried Seahorses
    Max Value: $814
  • Seahorse Skewers
    Max Value: $111


Weedy Seadragon
Number:0615
Location: Found emerging from mined Topaz and other deposits in the Glacier Zone(High RNG Chance) But can also be found floating around on Glacier Seabeds and Glacial Caves
Requisite: Progress quest reticent girl Subquest for net, Access to Glacier Zone
Requisite:
Recommended Tool to capture: Net
Dishes:
  • Seadragon Onigiri
    Max Value: $388


Leafy Seadragon
Number:0616
Location: Found emerging from mined Topaz and other deposits in the Glacier Zone(Low RNG Chance) But can also be found floating around on Glacier Seabeds and Glacial Caves
Disposition: The go-to Seadragon for racing
Requisite: Progress quest reticent girl Subquest for net, Access to Glacier Zone
Recommended Tool to capture: Net
Dishes:
  • Seadragon Onigiri
    Max Value: $388


Ruby Seadragon
Number:0617
Location: Found emerging from mined Ruby deposits(Very rarely) in the left side of the Hydrothermal Zone
Disposition: Despite its rarity, it's stats are average
Requisite: Progress quest reticent girl Subquest for net, Access to Glacier Zone
Recommended Tool to capture: Net
Dishes:
  • Seadragon Onigiri
    Max Value: $388


I was rather lucky that I found 2 rather early, so I haven't tried the Easy method that is described by the Youtuber: phinqs
He describes that upon entering the Glacial area, either a Gun Crate or a red cooking pot will spawn to the right of the portal. The presence of these mean that a ruby crate has spawned on the left trench(Cooking pot) and just left of the Entrance to the control room(Gun crate). If neither spawn, there's no ruby deposit, so save yourself the trip, and try again next dive.
https://www.youtube.com/shorts/If9uhCuUAuM
If his method worked out for you, send his video a like or something. Either way, I hope it helps you.
Crab Trap Pt.1
Red-Banded Lobster
Number:0701
Location: Night Diving, Seabed Rockpile, higher Sea level Canopy
Disposition: Entirely RNG, but not difficult to catch 3 Star quality with a little persistence.
Requisite:Duwa's Final Quest, to visit Mima who wants to make a dish requiring crab traps.Rainy Night.
Dishes:
  • Red-Banded Lobster Sushi
    Max Value: $277


American Lobster
Number:0702
Location: Seabed Rockpile, higher Sea level Canopy
Disposition: Entirely RNG, but not difficult to catch 3 Star quality with a little persistence.
Requisite:Duwa's Final Quest, to visit Mima who wants to make a dish requiring crab traps.
Dishes:
  • Lobster Platter
    Max Value: $1609
  • American Lobster Sushi
    Max Value: $477


Blue Lobster
Number:0703
Location: Night Diving, Seabed Rockpile, higher Sea level Canopy
Requisite:Duwa's Final Quest, to visit Mima who wants to make a dish requiring crab traps.Rainy Night.
Dishes:
  • Blue Lobster Sushi
    Max Value: $521
  • Truffle Blue Lobster Tail Sushi
    Max Value: $1716


European Lobster
Number:0704
Location: Seabed Rockpile, higher Sea level Canopy
Disposition: Entirely RNG, but not difficult to catch 3 Star quality with a little persistence.
Requisite:Duwa's Final Quest, to visit Mima who wants to make a dish requiring crab traps.
Dishes:
  • European Lobster Sushi
    Max Value: $255
  • Godzilla Vs Ebirah Curry
    Max Value: $1369


California Spiny Lobster
Number:0705
Location: Seabed Rockpile, Lower Sea level canopy
Disposition: Entirely RNG, but not difficult to catch 3 Star quality with a little persistence.
Requisite:Duwa's Final Quest, to visit Mima who wants to make a dish requiring crab traps.
Dishes:
  • California Spiny Lobster Sushi
    Max Value: $244
  • Ebirah Chasing Sashimi
    Max Value: $1258


Fan Lobster
Number:0706
Location: Night Diving, Seabed Rockpile, Lower Sea level canopy
Disposition: Entirely RNG, but not difficult to catch 3 Star quality with a little persistence.
Requisite:Duwa's Final Quest, to visit Mima who wants to make a dish requiring crab traps.Night.
Dishes:
  • Fan Lobster Sushi
    Max Value: $244


Tropical Rock Lobster
Number:0707
Location: Seabed Rockpile, Lower Canopy
Disposition: Entirely RNG, but not difficult to catch 3 Star quality with a little persistence.
Requisite:Duwa's Final Quest, to visit Mima who wants to make a dish requiring crab traps.
Dishes:
  • Lobster Platter
    Max Value: $1609
  • Tropical Rock Lobster Sushi
    Max Value: $499


Crab Trap Pt.2
Crystal Lobster
Number:0708
Location: Night Diving, Seabed Rockpile, Lower Sea level canopy
Disposition: Entirely RNG, but not difficult to catch 3 Star quality with a little persistence.
Requisite:Duwa's Final Quest, to visit Mima who wants to make a dish requiring crab traps.Night.
Dishes:
  • Crystal Lobster Roll
    Max Value: $1369
  • Crystal Lobster Sushi
    Max Value: $521


Norway Lobster
Number:0709
Location: Seabed Rockpile, Depths Sea Level Canopy
Disposition: Entirely RNG, but not difficult to catch 3 Star quality with a little persistence.
Requisite:Duwa's Final Quest, to visit Mima who wants to make a dish requiring crab traps.
Dishes:
  • Stir-fried Habanero Lobster
    Max Value: $1443
  • Norway Lobster Sushi
    Max Value: $277


Eastern Rock Lobster
Number:0710
Location: Seabed Rockpile, Depths Sea Level Canopy
Requisite:Duwa's Final Quest, to visit Mima who wants to make a dish requiring crab traps.
Dishes:
  • Steamed Eastern Rock Lobster & Egg
    Max Value: $1406
  • Eastern Rock Lobster Sushi
    Max Value: $521


Snow Crab
Number:0711
Location: Seabed Rockpile, in Glacial area
Disposition: Entirely RNG, but not difficult to catch 3 Star quality with a little persistence.
Requisite:Duwa's Final Quest, to visit Mima who wants to make a dish requiring crab traps.
Dishes:
  • Soy Sauce Marinated Crab
    Max Value: $1609
  • Snow Crab Sushi
    Max Value: $444


Horsehair Crab
Number:0712
Location: Seabed Rockpile, in Glacial area
Disposition: Entirely RNG, but not difficult to catch 3 Star quality with a little persistence.
Requisite:Duwa's Final Quest, to visit Mima who wants to make a dish requiring crab traps.
Dishes:
  • Soy Sauce Marinated Crab
    Max Value: $1609
  • Horsehair Crab Sushi
    Max Value: $555


Dollocaris Ingens
Number:0713
Location: Seabed Rockpile, in Hydrothermal Vents
Disposition: Entirely RNG, but not difficult to catch 3 Star quality with a little persistence.
Requisite:Duwa's Final Quest, to visit Mima who wants to make a dish requiring crab traps.
Dishes:
  • Dollocaris Ingens Sushi
    Max Value: $499


Tokummia Katalepsis
Number:0714
Location: Seabed Rockpile, in Hydrothermal Vents
Disposition: Entirely RNG, but not difficult to catch 3 Star quality with a little persistence.
Requisite:Duwa's Final Quest, to visit Mima who wants to make a dish requiring crab traps.
Dishes:
  • Lobster Platter
    Max Value: $1609
  • Tokummia Katalepsis Sushi
    Max Value: $610


Anomalocaris!!!Missable!!!
Number:???0715
Location: Control Room
Disposition: This creature spawns prior to the final bossfight, they explode after QTE contact, and will not spawn again after the game, get as many as you can, as you won't see them again There now is a fixed spawn in the left chamber of the control room, post-game. Pictured at the bottom.
Requisite: Access to control room, Main Story Progression
Recommended Tool to capture: Steel Netgun or Steel Net Trap, Crab Trap(Epilogue)
Dishes:
  • Young Anomalocaris Sushi
    Max Value: $224
Aberrations Pt.1 Fog Coast
Fanged Cod
Number:1101
Location: Fog Coast
Disposition: Hostile
Requisite: Foggy Night
Recommended Tool to capture: Steel Netgun or Hush Dart
Dishes:
  • Fanged Cod Sushi
    Max Value: $380


Three-Headed Cod
Number:1102
Location: Fog Coast
Disposition: Hostile
Requisite: Foggy Night
Recommended Tool to capture: Steel Netgun or Hush Dart
Dishes:
  • Three-Headed Cod Sushi
    Max Value: $450


Grotesque Mackerel
Number:1103
Location: Fog Coast
Disposition: Hostile
Requisite: Foggy Night
Recommended Tool to capture: Steel Netgun or Hush Dart
Dishes:
  • Grotesque Mackerel Sushi
    Max Value: $383


Many Eyed Makerel
Number:1104
Location: Fog Coast
Disposition: Hostile
Requisite: Foggy Night
Recommended Tool to capture: Steel Netgun or Hush Dart
Dishes:
  • Many Eyed Makerel Sushi
    Max Value: $453


Tusked Grouper
Number:1105
Location: Fog Coast
Disposition: Hostile
Requisite: Foggy Night
Recommended Tool to capture: Steel Netgun or Hush Dart
Dishes:
  • Tusked Grouper Sushi
    Max Value: $425


Volcanic Grouper
Number:1106
Location: Fog Coast
Disposition: Hostile, I'd assume it would have some sort of shock attack, but shooting it with a netgun made it no contest.
Requisite: Foggy Night
Recommended Tool to capture: Steel Netgun or Hush Dart
Dishes:
  • Volcanic Grouper Sushi
    Max Value: $515


Barbed Eel
Number:1107
Location: Fog Coast
Disposition: Hostile
Requisite: Foggy Night
Recommended Tool to capture: Steel Netgun or Hush Dart
Dishes:
  • Barbed Eel Sushi
    Max Value: $500


Host Eel
Number:1108
Location: Fog Coast
Disposition: Hostile
Requisite: Foggy Night
Recommended Tool to capture: Steel Netgun or Hush Dart
Dishes:
  • Host Eel Sushi
    Max Value: $610


Bloodskin Shark
Number:1109
Location: Fog Coast
Disposition: Hostile
Requisite: Foggy Night, Drone Pickup
Recommended Tool to capture: Hush Dart
Dishes:
  • Bloodskin Shark Sushi
    Max Value: $1225


Sallow Sailfish
Number:1110
Location: Fog Coast
Disposition: Hostile
Requisite: Foggy Night, Drone Pickup
Recommended Tool to capture: Hush Dart
Dishes:
  • Sallow Sailfish Sushi
    Max Value: $1000


Cerebral Crab
Number:1111
Location: Fog Coast Higher Depth Seabeds
Disposition: Entirely RNG, but not difficult to catch 3 Star quality with a little persistence.
Requisite:Duwa's Final Quest, to visit Mima who wants to make a dish requiring crab traps.Foggy Night.
Recommended Tool to capture: Crab Trap
Dishes:
  • Cerebral Crab Sushi
    Max Value: $515


Malignant Pincer
Number:1112
Location: Fog Coast Lower Depth Seabeds
Disposition: Entirely RNG, but not difficult to catch 3 Star quality with a little persistence.
Requisite:Duwa's Final Quest, to visit Mima who wants to make a dish requiring crab traps.Foggy Night.
Recommended Tool to capture: Crab Trap
Dishes:
  • Malignant Pincer Sushi
    Max Value: $880
Aberrations Pt.2 Black Cliff
Scouring Bass
Number:1113
Location: Black Cliff
Disposition: Hostile, will attempt to chase and explode.
Requisite: Foggy Night
Recommended Tool to capture: Steel Netgun or Hush Dart
Dishes:
  • Scouring Bass Sushi
    Max Value: $375


Gnashing Perch
Number:1114
Location: Black Cliff
Disposition: Hostile
Requisite: Foggy Night
Recommended Tool to capture: Steel Netgun or Hush Dart
Dishes:
  • Gnashing Perch Sushi
    Max Value: $420


Shattered Wreckfish
Number:1115
Location: Black Cliff
Disposition: Non-hostile fish
Requisite: Foggy Night, Drone Pickup
Recommended Tool to capture: Not sure, I put it to sleep with a toy hammer, so a Steel Netgun or Hush Dart ought to work
Dishes:
  • Shattered Wreckfish Sushi
    Max Value: $560


Bony Wreckfish
Number:1116
Location: Black Cliff
Disposition: Non-hostile fish, but immune to Hush darts and all weaponry.
Requisite: Foggy Night, Drone Pickup
Recommended Tool to capture: Steel Netgun, or Net trap
Dishes:
  • Bony Wreckfish Sushi
    Max Value: $620


Gelatinous Stonefish
Number:1117
Location: Black Cliff
Disposition: Hostile
Requisite: Foggy Night
Recommended Tool to capture: Steel Netgun or Hush Dart
Dishes:
  • Gelatinous Stonefish Sushi
    Max Value: $385


Enthralled Stonefish
Number:1118
Location: Black Cliff
Disposition: Hostile
Requisite: Foggy Night
Recommended Tool to capture: Steel Netgun or Hush Dart
Dishes:
  • Enthralled Stonefish Sushi
    Max Value: $465


Sprouting Eel
Number:1119
Location: Black Cliff
Disposition: Hostile, will use ranged bullet hell Touhou attacks.
Requisite: Foggy Night, Drone Pickup
Recommended Tool to capture: Steel Netgun or Hush Dart
Dishes:
  • Sprouting Eel Sushi
    Max Value: $1040


Translucent Sturgeon
Number:1120
Location: Black Cliff
Disposition: Hostile, can and will go invisible before attacking.
Requisite: Foggy Night, Drone Pickup
Recommended Tool to capture: Steel Netgun or Hush Dart
Dishes:
  • Translucent Sturgeon Sushi
    Max Value: $1235


Withered Ray
Number:1121
Location: Black Cliff, hiding in seabed.
Disposition: Hostile, will emerge from seabed to chase. Immune to Steel Netgun
Requisite: Foggy Night, Drone Pickup
Recommended Tool to capture: Hush Dart
Dishes:
  • Withered Ray Sushi
    Max Value: $995


Splintered Crab
Number:1122
Location: Black Cliff Higher Depth Seabeds
Disposition: Entirely RNG, but not difficult to catch 3 Star quality with a little persistence.
Requisite:Duwa's Final Quest, to visit Mima who wants to make a dish requiring crab traps.Foggy Night.
Recommended Tool to capture: Crab Trap
Dishes:
  • Splintered Crab Sushi
    Max Value: $405


Cortex Decorator
Number:1123
Location: Black Cliff Lower Depth Seabeds
Disposition: Entirely RNG, but not difficult to catch 3 Star quality with a little persistence.
Requisite:Duwa's Final Quest, to visit Mima who wants to make a dish requiring crab traps.Foggy Night.
Recommended Tool to capture: Crab Trap
Dishes:
  • Cortex Decorator Sushi
    Max Value: $740
Aberrations Pt.3 Jellyfish Basin
Aurora Jellyfish
Number:1124
Location: Jellyfish Basin
Disposition: Hostile, Stationary, but will engage in slow chase
Requisite: Foggy Night
Recommended Tool to capture: Steel Netgun or Hush Dart
Dishes:
  • Aurora Jellyfish Sushi
    Max Value: $345


Parhelion Jellyfish
Number:1125
Location: Jellyfish Basin
Disposition: Hostile, Stationary, but will engage in slow chase
Requisite: Foggy Night
Recommended Tool to capture: Steel Netgun or Hush Dart
Dishes:
  • Parhelion Jellyfish Sushi
    Max Value: $390


Radiant Squid
Number:1126
Location: Jellyfish Basin
Disposition: Hostile, Will Charge a dash attack.
Requisite: Foggy Night
Recommended Tool to capture: Steel Netgun or Hush Dart
Dishes:
  • Radiant Squid Sushi
    Max Value: $365


Seizing Snailfish
Number:1127
Location: Jellyfish Basin
Disposition: Hostile, moves weird, and is one of the fish that locks you into a Quicktime event on attack.
Requisite: Foggy Night
Recommended Tool to capture: Steel Netgun or Hush Dart
Dishes:
  • Seizing Snailfish Sushi
    Max Value: $455


Perished Loosejaw
Number:1128
Location: Jellyfish Basin
Disposition: Hostile
Requisite: Foggy Night
Recommended Tool to capture: Steel Netgun or Hush Dart
Dishes:
  • Perished Loosejaw Sushi
    Max Value: $395


Bursting Anglerfish
Number:1129
Location: Jellyfish Basin
Disposition: Hostile
Requisite: Foggy Night
Recommended Tool to capture: Steel Netgun or Hush Dart
Dishes:
  • Bursting Anglerfish Sushi
    Max Value: $530


Savage Barracuda
Number:1130
Location: Jellyfish Basin
Disposition: Hostile
Requisite: Foggy Night
Recommended Tool to capture: Steel Netgun or Hush Dart
Dishes:
  • Savage Barracuda Sushi
    Max Value: $440


Concertina Barracuda
Number:1131
Location: Jellyfish Basin
Disposition: Hostile
Requisite: Foggy Night
Recommended Tool to capture: Steel Netgun or Hush Dart
Dishes:
  • Concertina Barracuda Sushi
    Max Value: $470


Gazing Shark
Number:1132
Location: Jellyfish Basin
Disposition:
Requisite: Foggy Night, Drone Pickup
Recommended Tool to capture: Hush Dart
Dishes:
  • Gazing Shark Sushi
    Max Value: $1250


Imperious Lobster
Number:1133
Location: Jellyfish Basin Higher Depth Seabeds
Disposition: Entirely RNG, but not difficult to catch 3 Star quality with a little persistence.
Requisite:Duwa's Final Quest, to visit Mima who wants to make a dish requiring crab traps.Foggy Night.
Recommended Tool to capture: Crab Trap
Dishes:
  • Imperious Lobster Sushi
    Max Value: $945


Entangled Crab
Number:1134
Location: Jellyfish Basin Lower Depth Seabeds
Disposition: Entirely RNG, but not difficult to catch 3 Star quality with a little persistence.
Requisite:Duwa's Final Quest, to visit Mima who wants to make a dish requiring crab traps.Foggy Night.
Recommended Tool to capture: Crab Trap
Dishes:
  • Entangled Crab Sushi
    Max Value: $510
Fish, no longer in the marinca
Blackspot Seabream
Number:0007
Location: in older version game files
Disposition: as of version 1.0.0.1022.Steam, can no longer be found, being replaced by the Salema Porgy
Requisite: None
Recommended Tool to capture: Can no longer be caught
Dishes:
  • Blackspot Seabream Sushi
    Max Value: $18
75 commenti
dethtrain 26 apr, ore 15:22 
Is there a list where you need to use the drone to get the gold card?
Lt.Col. Anon Xer0  [autore] 28 feb, ore 23:32 
@akiren.
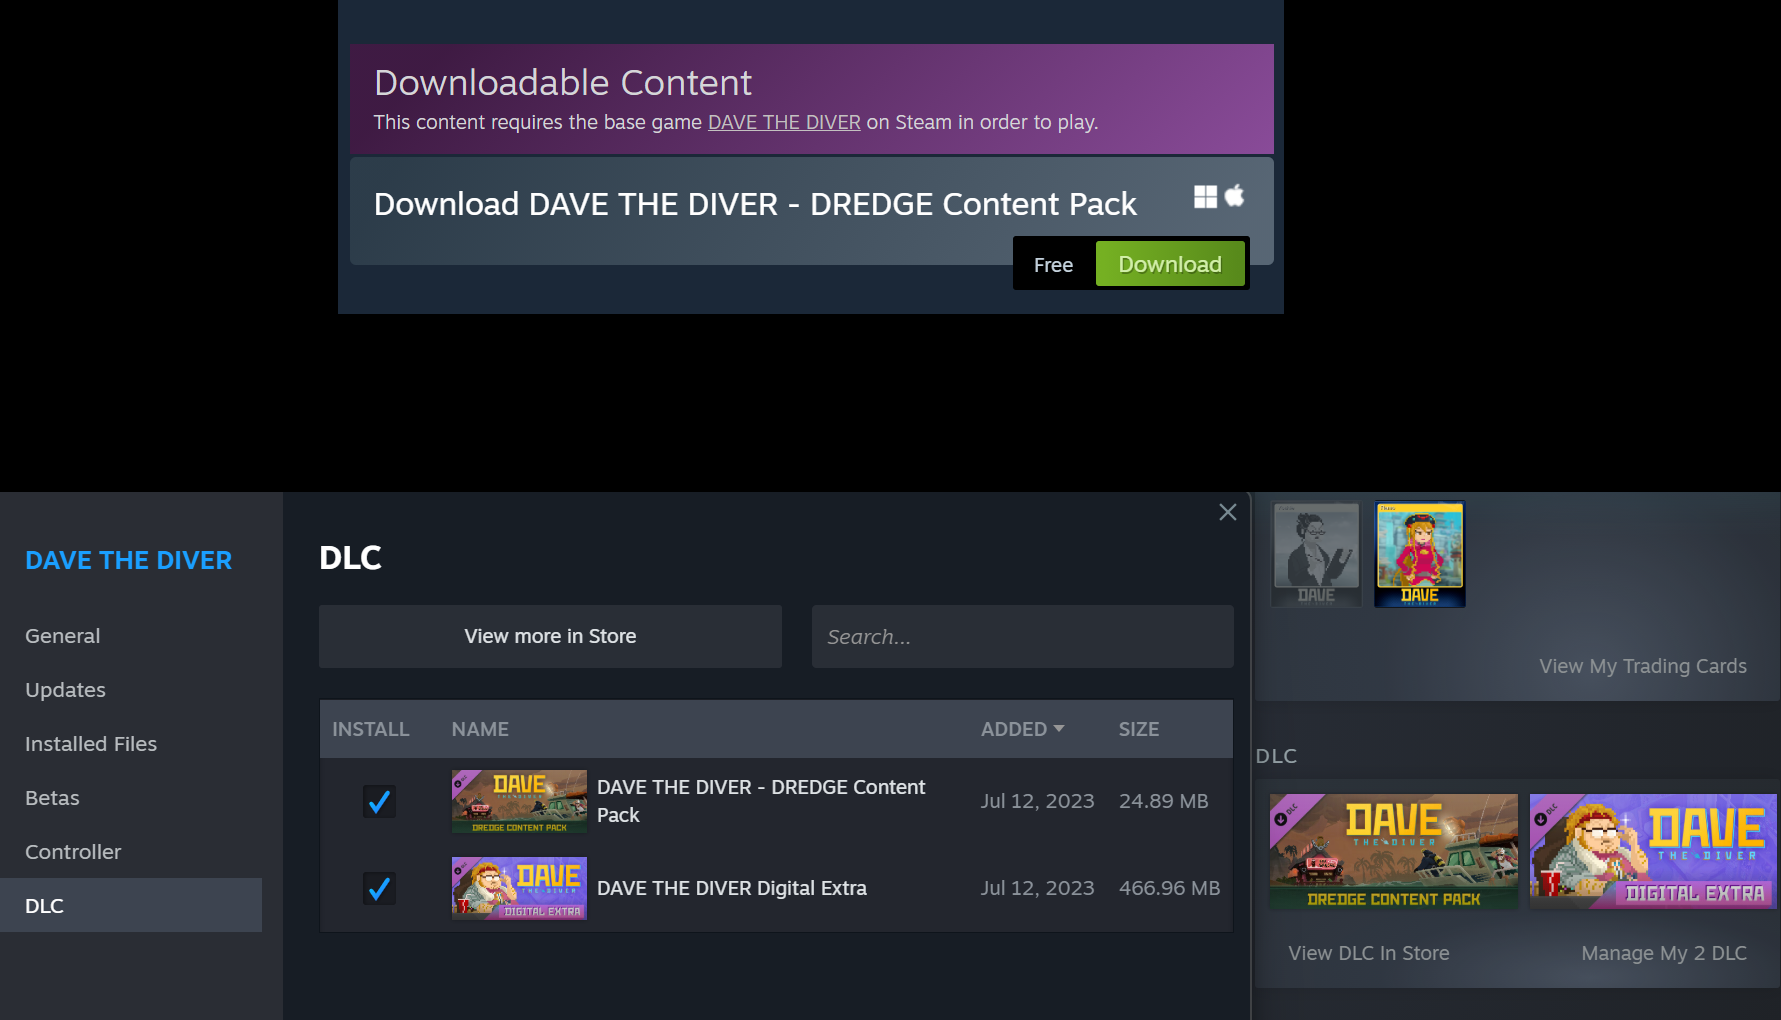
You happen to be right. I investigated this, and it would appear that:
"Before DLC you can do this, after DLC I tried but couldn't."
Since that post was about a year ago, and I made this guide around release,
it might have been post-Dredge DLC.
I'll update the guide to reflect this.
akiren 28 feb, ore 23:12 
Piss off you can't tranq the wizard jellyfish
P4wn4g3 27 nov 2024, ore 16:50 
You also need to add the Green Urchin.
P4wn4g3 20 nov 2024, ore 17:52 
And Frilled shark. Not Thresher sharks, notably.
P4wn4g3 20 nov 2024, ore 17:38 
So does whitetip reefshark
P4wn4g3 20 nov 2024, ore 17:20 
Longnose sawshark can be netted as well
P4wn4g3 20 nov 2024, ore 16:57 
I might do it as well, I found a new resource and can post something with more updated info than that guide.

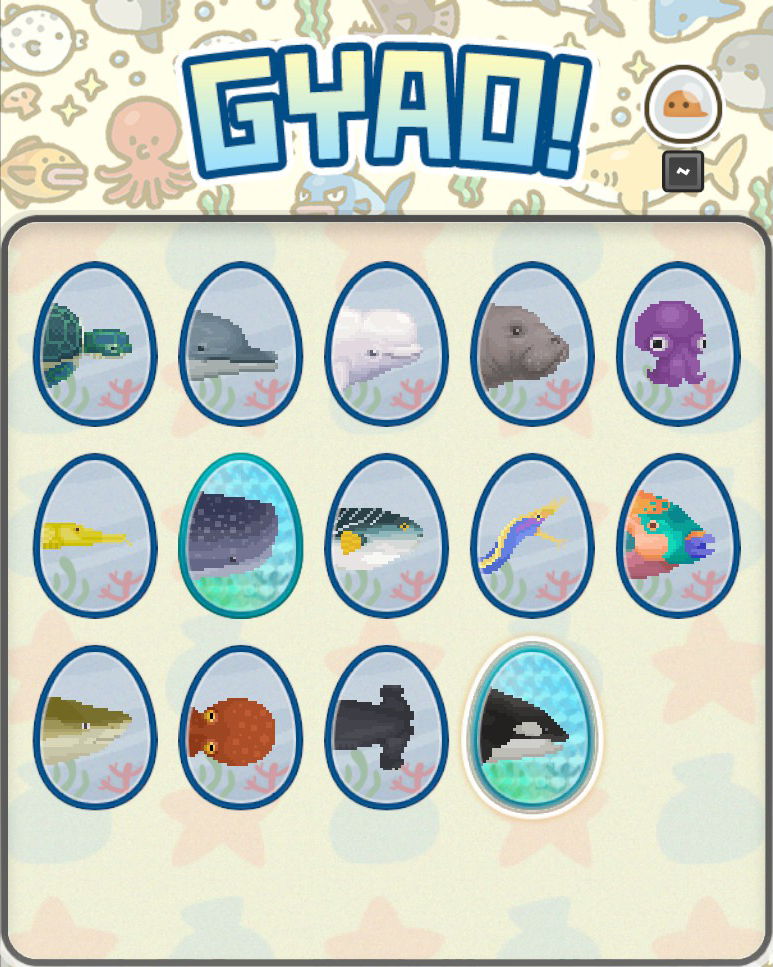
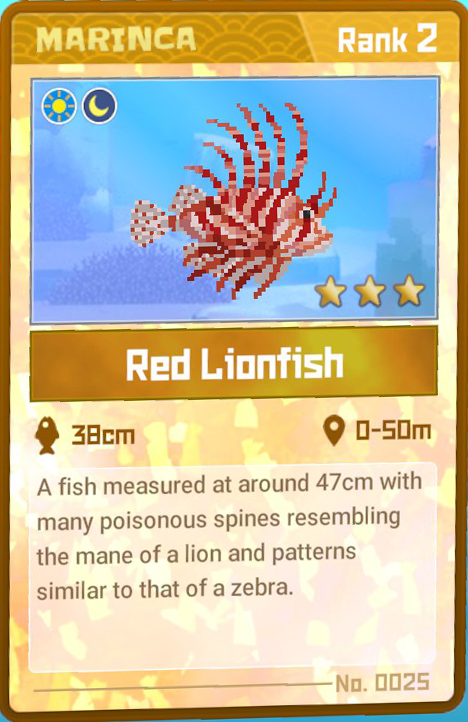
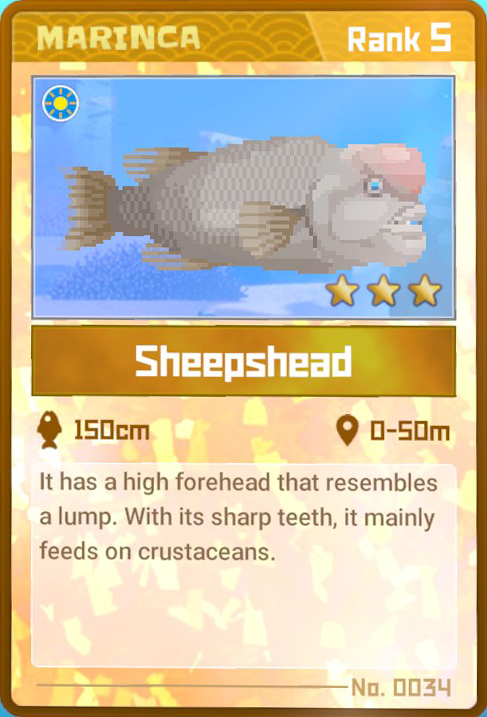
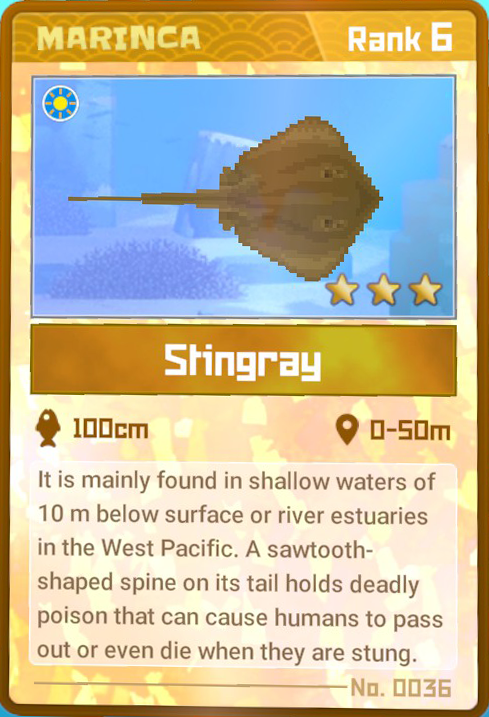
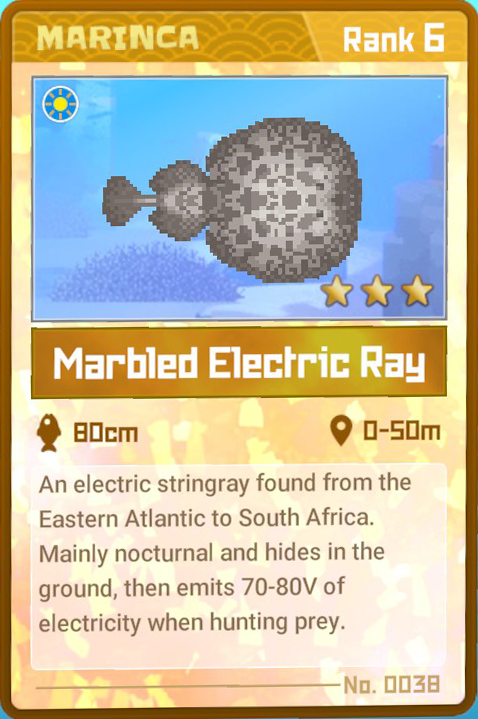
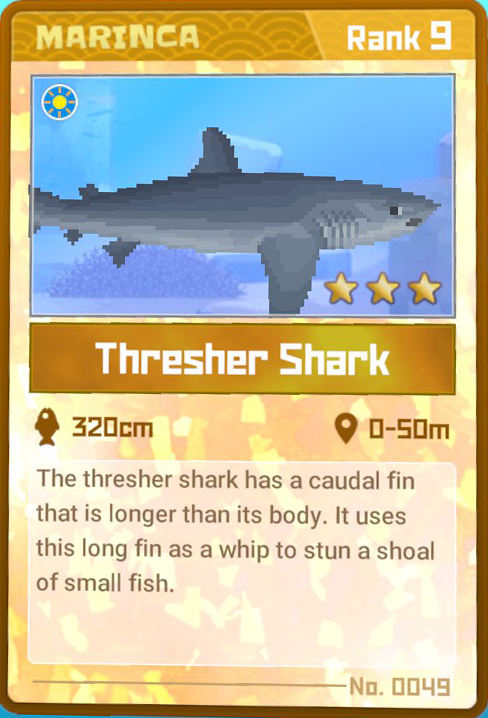
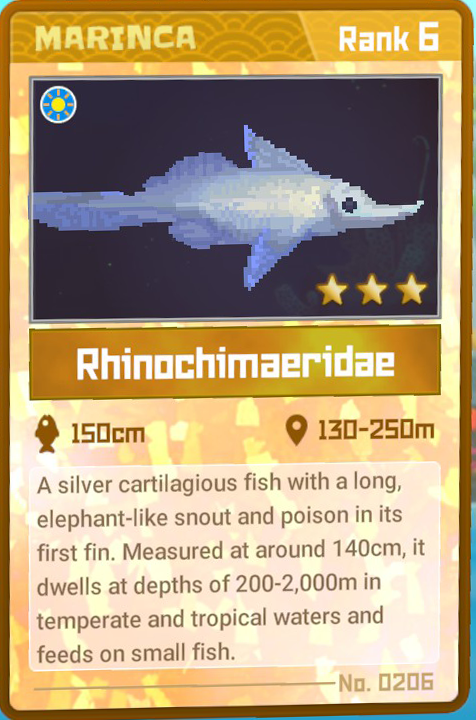
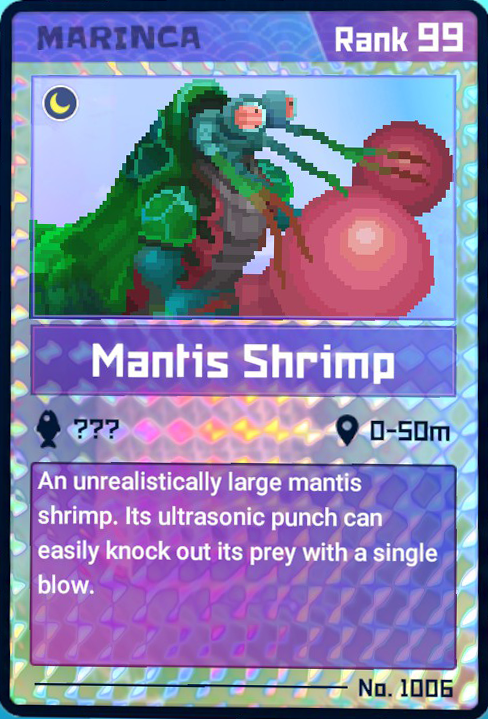
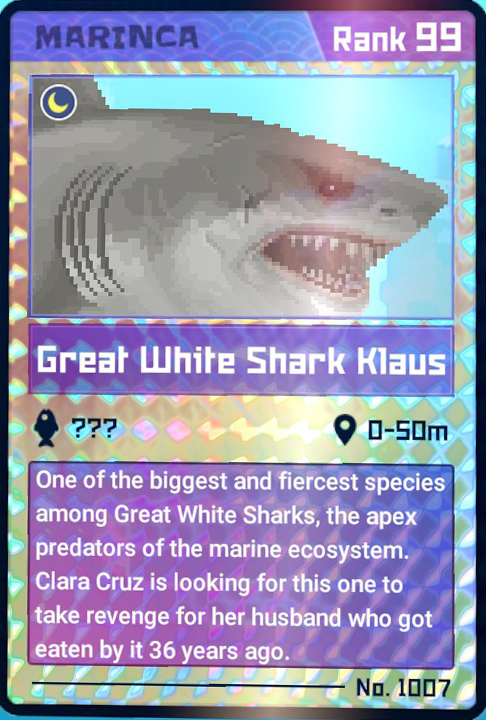
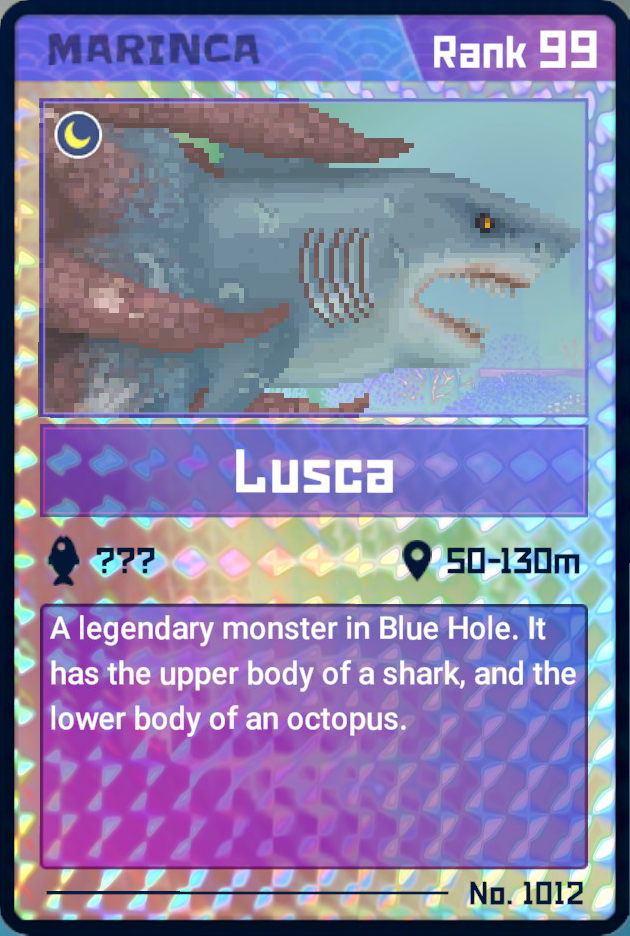
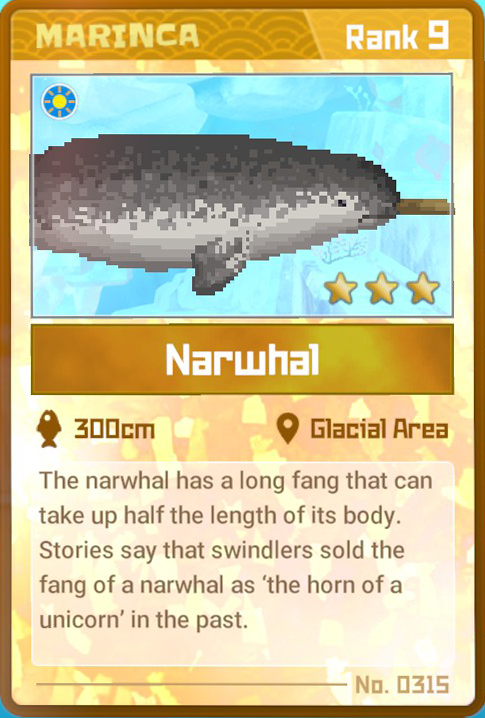
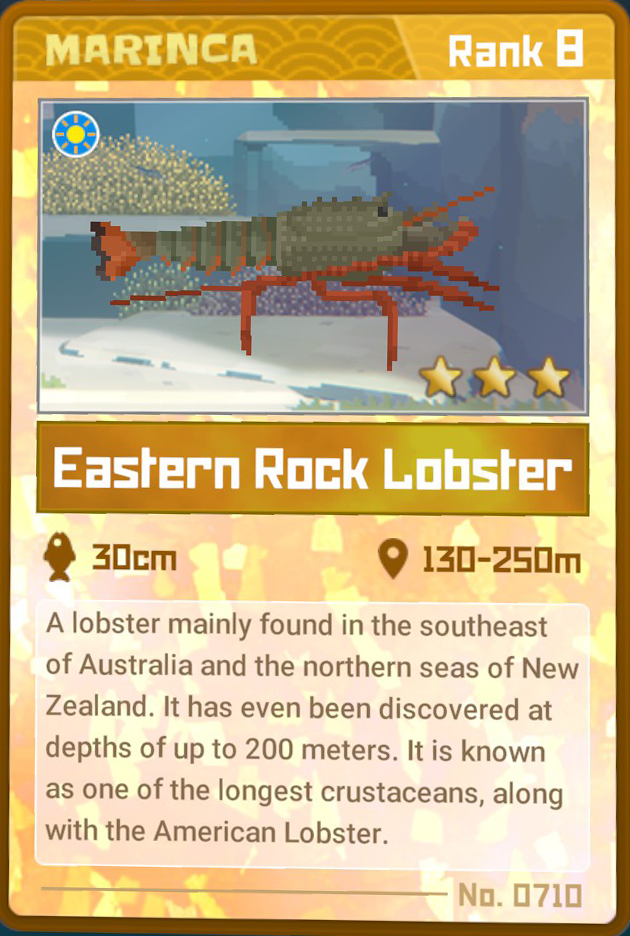
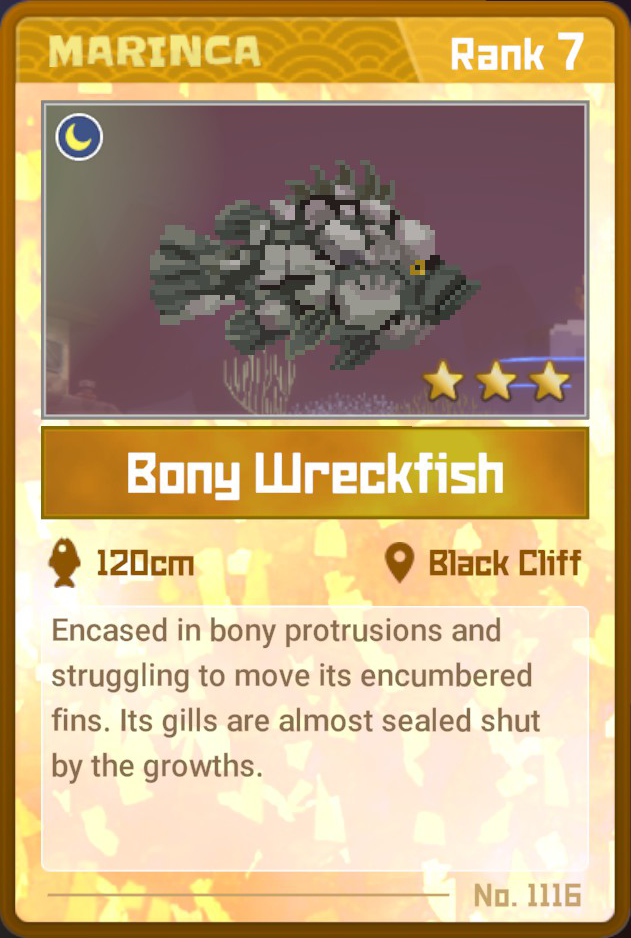
I found that Rhinochimaeridae and Narwhal can both be caught with a steel net, assumedly some other similarly sized sharks can as well. You should update these in your guide, it's useful to know you can catch them with steel net instead of a hush dart.
Lt.Col. Anon Xer0  [autore] 18 nov 2024, ore 23:02 
@P4wn4g3 I'll have to consider that when I get back. Overseas right now.
P4wn4g3 17 nov 2024, ore 20:25 
Any thoughts on adding a cooking guide? The other one stopped getting updates last year. https://steamcommunity.com/sharedfiles/filedetails/?id=3028315609