Limbus Company

Limbus Company

215 arvostelua
Limbus Company: Beginner / Intermediate / Advanced Strategy Guide
Tekijältä Flamesystems
This game is ridiculously complicated, which is great!! If you've hit a wall or just want to check some strategies, here's a guide for you that covers several different team building strategies, damage numbers, basically secret (unexplained) mechanics, and how to overcome some of the difficulty spikes. I also run through some of the good / bad units real quick!

This was supposed to be a beginner guide. Then I couldn't stop writing. You're welcome.

(Yi Sang maid outfit courtesy of @plutopri on twitter)
8
3
2
2
   
Palkinto
Lisää suosikkeihin
Lisätty suosikkeihin
Poista suosikeista
The Basics
Hello! This guide expects you to have played Limbus's tutorial (even if you didn't understand it). Feel free to hop around to any section you like.

Here's a quick speedrun of important (non-combat) game facts!

Uptie is the most important thing
Increasing the level of your units does make them stronger (raises HP, defense level (survivability), & offense level (damage & clashing)). The weird thing is that raising level doesn't actually improve their abilities that much: you can be 5ish levels lower than enemies and still EX clear with a reasonable team as long as you uptie. Turning egoshards (from gacha) into thread is basically required to progress, which is fine because uptie buffs your units way more than getting new units.
Getting units to uptie 3/4 will:
  • Increase base skill power and/or coin power
  • Add/increase effects on coins or the skill itself
  • Improve speed ranges
  • Unlock passives
  • Unlock skill 3, which is very powerful
  • All of the above are also true for EGO skills: UT 2 gives passive, UT 3/4 give power/effect improvements
  • Give you small amounts of lunacy (40 per UT 3 character)
UT cost scales with rarity (0/00/000 for units, rank for EGO)

Uptie 4 is less of an upgrade than UT 3, and the benefit varies a lot between identities. This is because it was originally a balance patch, but newly released ID's usually have powerful UT 4's.

How to combat?
For most of the game, clash power is the most important aspect. Winning clashes means you don't take damage, so using good clashers (high speed, coin power/number, offense level) is often the deciding factor. This isn't true for many of the difficulty walls though, as you have to pay attention to your defense types for those boss fights.

Directly related to clash power is the number of coins on a move. More coins = better clashes (and higher damage), regardless of sanity. This is because there are more retries. If a 3 or 4 coin skill clash is "favored," and they flip all tails the first time, they still have several more tries.

Defense skills are a thing! Dodge skills are useful for multi-coin attacks and insanely good for level differences / mirror dungeon buffs, while defense skills are better for high base power attacks. Counter skills are usually bad, unless they have multiple coins. Remember that you can force a defense clash against a slower skill slot. This can let you make units that have damage resistances tank the hits instead.

EGO passives will not activate until the turn after the EGO skill has been used. They do not activate upon being equipped. EGO sin defense bonuses also activate this way.


Unit rarity: Does it matter?
yes and no. 000 units are objectively better but they are not better than team building and require uptie to be strong. A full team of 000's at uptie 1 will be crushed by the starting units after they become uptie 3.
Generally speaking, higher rarity units have more status effects, coin effects, coins, and better offensive/defensive level modifiers (ex. a 000 can have a +4 atk +0 def, while lower rarities cannot).

TL;DR: if you just started, you might want to invest in uptie III / IV for good 00 ID's, rather than pouring resources into 000 ID's. You basically need a full team of uptie 3 by Canto 3. For all other players, make sure you can use a 000 ID in a team before spending all those resources.

The only basically universally agreed upon bad 000 units are W. corp Meursault & Sunshower Heathcliff at uptie 3 or lower. Uptie IV tried to save them, and made them below average but usable.
The arguably broken 000 units are R corp Heathcliff (high damage + 4 fragile), N corp Sinclair (really high damage), and Warp Ryoshu (really high damage, but you need uptie IV for her).
See notable units sections for more info.


The Luxcavation
The luxcavation is annoying because only the higher levels are really worthwhile, and you have to progress story to unlock some of them. If you don't have an excess of enkephalin modules, and you don't need thread or exp, don't bother, as events / pass provides more resources.

It's worth noting that the game literally adds new units faster than you can enhance them (000s need 250 thread for UT4, and we're getting ~3 a month)

That being said:
You Will Need Exp, and the luxcavation is much better than any other method (5th level is 3600 exp / module).
The highest level of thread luxcavation is the best way to get thread, as it's more efficient to get thread from it than to do dungeon farming for egoshards. If you can do it 3x a day, that's ideal, but you'll probably have to log in 3+ times a day to get enough enkephalin modules.

The mirror dungeon is definitely more bang for your buck, with the exception of the highest level thread bosses.


I don't have enough lunacy!
yes, it's a gacha game, so they do want your money to collect 'em all. But the game's pretty generous, and the gacha rates don't suck. TL;DR: You get 8 pulls a week from mirror dungeon & update compensation.
  • 300 lunacy is gifted after maintenance every week (only lasts in mailbox for a week)
  • 300/500/1000 lunacy is gifted whenever bigger issues are found/hotfixed
  • 750 lunacy (5.7 pulls) can be acquired from mirror dungeon every week
  • EX clears give 40 per level (33 levels to a ten pull)
  • events and the limbus pass will give both lunacy & draw tickets (often a guaranteed 000 unit)
  • getting identities to uptie III gives you 40 lunacy each time (not worth the resources, but true).

  • If you really want a unit, buy them from the store with shards, but only if you already have a good team of 5 at minimum (as shards can be turned into thread to uptie).

  • If you really want an EGO, you can buy it from the store, but EGO are never extracted twice: This system screws over new players, as they have to buy all previous pass EGO and don't have great luck at getting any particular standard fare EGO, but you'll eventually get all "Standard Fare" EGOs. Pass EGOs are not in the extraction table, and must be bought. If you want Faust Fluid Sac or Yi Sang Sunshower, buy them immediately.

  • Statistically speaking, it's 200 nominable egoshard crates for 400 shards (for a 000 identity or an EGO)
  • buying the limbus pass triples your nominable egoshard crate acquisition, and therefore triples the things you can buy from the shop.

Should I buy the Limbus Pass? How are the rewards?

First, let's talk pass levelling. Every week you can get:
  • 225 pass exp from mirror dungeons (18 enkephalin modules)
  • 70 from daily quests (6-7 modules * 7 days: enter exp luxcavation to get 10 kills)
  • 20 from weekly quests (will be achieved from doing above).
That's 31.5 pass levels a week, at a cost of 60-67 enkephalin modules.

There are 3 reasons to buy the pass:
1) paid EGO that you would otherwise have to wait months for
  • When the next season starts, all EGO in the pass you don't have will become available in the shop, not the draw table. You must then re-stockpile resources to buy them.
2) improved EX pass level rewards
  • Every level past 120 will give 2 extra nominable egoshard crates, which is crazy. You can get 95 nominable egoshard crates a week max, meaning you can buy from the shop about twice a month.
3) wanting to support the developers

The actual paid rewards for pass levels aren't incredible, but they aren't that shabby either, considering fulfilling the daily missions & mirror dungeon will get you to level 60 in 2 weeks. Most notably, a 000 unit extraction ticket, level boost ticket, and cosmetic items.

I'd say its much more worth it than just buying lunacy, as the egoshard creates it unlocks are more useful than just praying to gacha luck.
Beginner's Manual for Game Mechanics
Here's a guide that runs through the game mechanics very carefully, if you're confused about anything. Example questions that are answered include:

How does staggering work? Why are some coins red? How do I navigate the menus? How does clashing work? What are some canned templates for good teams? What makes an identity or EGO universally useful?

https://steamcommunity.com/sharedfiles/filedetails/?id=3340613524

If the answers you get there arent detailed enough, keep scrolling on this guide as I cover some of those concepts (like offense and defense level) in more detail here. But i'd rather not remake a "how does this game work?" tutorial when there are excellent ones elsewhere, like the guide above and the videos that follow this section.
Basic combat mechanics: Video(s)
If you were confused by the game's ""tutorial"" (it's bad) and don't think you have a good feel for clashing, sanity management, and how EGO / EGO resources work, I'd recommend watching the following video. It's 20 minutes, and does a much better job of explaining combat than I can do in text form, as it's the best intro to combat video I've seen.
The videos are by ESGOO, who mostly makes well edited Limbus Company videos about kits, bosses, and the like.
Semi-Secret Mechanics
The game lies about resistances/weaknesses :)
You may have noticed: even if a skill is both damage & sin type "fatal," the percentage bonus on a skill won't pass "+300% damage." That's weird. It should cap at 2*2 = 4x damage. What's going on? Secretly, the sin/type calculations are a bit wonky.

see this table for the actual values, with the sin / damage type resistances the two axes.


The percentage bonuses on the attack UI is correct, logical thinking is incorrect. So pay attention to that number!


Offense level differences change clash power
TL;DR: if you have a higher offense level than the opponent, your clash power goes up. If you have a lower offense level, enemy clash power goes up. However, this does nothing to actual damage rolls (damage is attacker's offense level vs target's defense level).

For every 3 offense levels higher than the opponent, clash power gets a +1. No rounding.

*Note that these images are from the older UI
Here, we can see that Yi Sang's clash range should be 3-9, but it isn't. There is a 7 level difference between offense levels, so he gets +2 clash power, bringing the range to 5-11. Remember, the final skill power (for damage dealing) will still be 3-9.

This is also the reason why you need to level up your characters: +3 levels is +1 clash power.
It's also the reason why high damage low defense characters are better at clashing, even if the skill power is the same.


The Clash UI lies about negative coins (and auto listens to it)
This, of course, only applies to characters that use negative coins, such as He Who Shall Grip Sinclair, and enemies.
The reason for this is pretty obvious: the "dominating" to "hopeless" messages are calculated based on statistics. I don't know what statistics, but it's easy to see the problem, so i'll use a simple calculation.

Self destructive purge has a range from 0-30, but in a clash this range changes based on the number of coins:
3 coins: 0-30
2 coins: 6-30
1 coin: 18-30.

Clash power goes up as coins break! This fact makes most negative coin skills really good at clashing, with the caveat that they usually won't win with all coins intact.

Let's say he's using self-destructive purge at max (45) sanity. A clash win calculation would look something like clash power = 30 + (-12 *95%)*3 (30 base power, changed by the coin power * heads chance * number of coins). This calculation gives a result of 30 - 34.2 = 0 (as negative clash power isn't a thing).
You get low clash power calculations at most sanity levels. at a sanity of -3 (as in the picture), the calculation would be clash power = 30 + (-12 *47%)*3 = 13.1.
The game has decided that Nclair's chance of winning this clash is "normal" but we know he can't lose, because once he's down to one coin, his minimum clash power is over the enemy's maximum. This is incredibly useful for clashing!

The real issue is that the auto buttons use the game's clash calculations, and will avoid powerful negative coin skills in favor of weaker skills that have higher minimum rolls, or screw you over and pretend that you have "dominating" clashes against negative coin skills that you're going to lose.


You can "Dodge" unclashable attacks
This is self-explanatory. Characters with dodges can avoid being hit by unclashable attacks, which trivializes a couple of bossfights, like kqe-1j-23's imprisonment move.


Speed, Clash Control, & Staggering before a Clash
In a focused fight, if several sinners with high speed are attacking the same slot, whoever you order to attack last will be the one to clash. This means you can do a little trick:

You can order the identity with high speed to attack first, and then order the identity with lower speed to clash. the slower skill will clash after the faster skills have dealt damage & effects. This is very useful for low HP or near stagger threshold enemies: you get unopposed attacks BEFORE you clash, so the actual success/fail of the clash is irrelevant. This can shut down an enemy's entire turn. This is particularly useful as it makes buffs/debuffs guaranteed.

The only drawback to this is that (winning) clashes are useful for sanity gain, and you quite literally avoid the clash. It also doesn't work in chain battles where you can't pick individual targets.

It's worth noting that the auto buttons will always clash with the fastest sinners, which is often the wrong answer.


Attack Weight Manipulation
When you are using a multi-target ego in a focused encounter (where you choose everyone's attacks individually), EGO with more than 1 attack weight will prioritize untargeted skill slots. This means you can direct where the EGO atk weight goes by using all your other sinners to clash with skill slots you don't want the AoE EGO to hit. Once you've got the right skill slots, you can remove all the dummy skill targeting and rearrange their attacks as you like.


Controlling Defense Clashes
If you are faster, you can use a defense skill to set an identity as the attack target. This is very useful! Targeting an enemy defense skill with one of your own will "offset" their defense move, meaning they can't use it to dodge/counter that turn, which is very useful for a couple of particularly nasty counters. There are 3 types of defense skills:
  • Dodge skills are very useful because they can dodge multiple skills (per body part) as long as they don't break. To do this, target the fastest / leftmost enemy skill slot. Most bosses have 50-50 heads odds, so dodge chances are really high. A Dodge also ignores offense level, making them disgustingly effective against level differences / mirror dungeon buffs.

  • Defense skills are useful against all attacks. Note that the defense skill's defense level is often higher than the identity's defense level, so damage will be reduced even if the guard is broken. The forced targeting means that you can pick an identity that resists the damage type(s).

  • Counter skills aren't normally good. Why? A sinner can get staggered before counterattacking, and the damage output is low. What's the solution? Multi-coin or conditional counters (if X, counterattack with skill 3 instead). Counters do usually have higher defense level than the identity, so it will decrease damage.


Status effect counts are weird
There are several strange things about the status effect system that can be confusing, notably:
  • some status effects like paralyze have ambiguous spending conditions. If a status effect doesn't have a count number, assume it will expire at the end of the turn.
  • A skill that adds effect count when no potency is present will also add 1 potency, and vice-versa. This will not happen under any other conditions.
    • ex. +1 tremor to an enemy w/o tremor: gets 1 tremor potency & count. + 1 tremor count does the same thing.
    • +1 tremor to an enemy with 5 tremor already just gets you 6 tremor, no change in count.

  • A skill that adds +1 count often appears to do nothing: for sinking & rupture, the act of hitting them subtracts the count that is immediately added. Skills that add poise to self often also do nothing, as it immediately expires after the move takes place and the turn ends.
Unexplained Damage Modifiers
Remember how the game just announces that things deal more or less damage? here you go, some actual numbers!


Offense levels & Defense Levels
An attackers offense level will be compared to the target's defense level, to give a damage modifier with the following formula:
[Modifier] = ([Defense Level] - [Offense Level]) / (Abs([Defense Level] - [Offense Level]) + 25)
  • a difference of 1 between offense/defense level gives a +/- 3% damage bonus.
  • a difference of 3 is +/- 10%
  • a difference of 6 is +/- 19%
  • a difference of 9 is +/- 26%
  • a difference of 20 is +/- 44%
  • a difference of 30 is +/- 55% damage, basically only obtainable with Tremor - Decay or Mirror Dungeon Hard buffs
TL;DR you get diminishing returns on the damage bonuses.

Resonance Shennanigans (Offense levels 2: electric bogaloo)

Sin resonance & Absolute Sin resonance use very similar damage buff tables. Resonance will increase the offense level of the moves in question, which (in chains of 3 or more) will also increase clash power.
Skill's position in chain (left to right)
- 1 -
- 2 -
- 3 -
- 4 -
- 5 -
- 6 -
- 7 -
- 8 -
- 9 -
- 10 -
- 11+ -
Resonance offense level buff
0
1
3
3
5
5
7
7
9
9
11
Absolute Resonance offense level buff
3
5
5
7
7
9
9
11
11

All skills used past the 11th will continue to receive the same buff (it does not increase endlessly).


Sin Resonance
We're not talking about absolute resonance here, just regular resonance (no 3+ chains of the same sin affinity).
  • The bonuses can be seen above. Remember that every 3 increases in offense level is 1 increase in clash power, and about a 10% increase in damage.
  • the "first skill" in a resonance chain gets no bonuses
  • Note that the damage increases as you move through the chain. If you have 4x lust resonance (NOT absolute resonance):
    • The first skill does regular damage
    • The second does 3%, and the 4th will do ~10% more damage due to the offense level buff.
  • This means that slower identities / skills get higher damage bonuses.

  • You'll also notice that these numbers are pretty low. Sin resonance definitely helps increase damage, but it basically does nothing unless you have a 4+ resonance chain.

Absolute SIn Resonance
  • Absolute resonance uses a slightly different table to acuqire the offense level buff, but All skills in the Absolute resonance chain gain bonus damage equal to the A. res chain length.
  • So a 4x absolute resonance chain gives all 4 skills +5 offense level (about +15% damage)

    • If you use the skills "pride lust pride pride pride envy pride," the damage would be as follows:
      • The first pride skill gets no damage bonus
      • the next 3 pride skills get +3 offense level / 10% bonus damage, as it's a 3 chain absolute resonance
      • the final pride skill gets +5 offense level, as it's the 5th pride skill used.


    Clash Count
    Every clash gives a flat 3% bonus damage, with no upper limit. This means that clash count basically doesn't have a damage modifier for all intents and purposes, as most clashes are won after 1-5 clashes. That bonus (3-15%) is also present in the normal distribution of offense & defense levels: A +5 offense level identity gets a bonus like that against every enemy.

    I've been told that technically, due to how the damage calculation works, it ends up being a bit less than 3%, because fixed damage buffs are weird in this game.

    Observation Level
    Damage against abnormalities increases by 3% per level, up to 15% bonus damage at observation lv 5.
    • Observation level only goes up on enemy kill. Observation level rises on the 1st kill, and then kills 3, 6, 10, and 15.
    • Note that observation level is not necessarily present in all forms of combat, it was specifically removed from RR3, and will probably stay out of future railways.
    • Observation level does not track between versions of combat. The alleyway watchdog you beat up for thread is not the same alleyway watchdog you beat up in mirror dungeon, even though they are literally exactly the same but different levels. idk bro.
    • Usually, dying and retrying doesn't save any observation level / enemy kill information.
    Skill Effect Order Clarification
    Here's a list, in order, of how skill effects trigger, in case anything is getting you confused.

    effects that aren't on a coin and don't have an activation marker apply to the entire skill. these are usually "at X+ effect count, + coin power," or % damage bonuses. Either way, these are important, because they can activate in the middle of skill usage if/when their conditions are met.

    For example, let's look at W corp Ryoshu:
    Let's say at the start of the turn, she has 5 charge. That's not enough to trigger a coin power bonus. But on skill use, she'll gain 7 more charge. What does that mean? By the time she's actually clashing with an opponent, she'll have 12 charge, and +1 coin power. Magic! This can also happen literally in the middle of an attack move with certain skills, so you can watch coin power rise through the hits.

    The other effect that differs greatly in usefulness depending on where it's placed is [on kill]. To use W corp Ryoshu as an example again, her skill 3 (which is very high damage) has an on kill effect! Except it's on the 4th coin and the 4th coin only.

    This is actually an issue, because this skill is so high damage that it's rather unlikely for a regular enemy to survive to coin 4 and then die to it, they either die on the 3rd hit or resist the damage type and live. If we're talking about a boss, [on kill] effects don't matter at all, because the fight ends with their death. So in conclusion, this ability to give charge barrier basically doesn't exist. It's not that it will never trigger, but it's more of a once in a blue moon perk.


    The Order of Actions & Triggers
    1) Combat start effects
    2) Whoever is the fastest (as well as anyone the same speed as them) will use their skills and begin to move / defend. [Attack Start] and [On Use] happens here.
    3) Clashing, if applicable
    4) Before attack effects, which occur immediately before damage rolls
    5) Coin effects, usually on hit / crit / on kill, during damage rolls
    6) After attack end effects
    *) Whichever group is the next fastest in the speed order will use their skills, rinse and repeat, until all skills have been used. If you're in a focused fight, sinners will just go in order, left to right.
    7) The turn ends; status effects expire / lose a count, some passives may be triggered.
    8) The turn starts (before you can pick skills): most passives activate. Passives & sin resistances from EGO used last turn are applied.


    1) [combat start] These effects trigger immediately upon the start of the turn, before anyone starts moving.
    • Skills that can change attack weight conditionally are always [combat start]. This is an issue because you must have all the resources required at the start of the turn, even if the identity has multiple skill slots. If the unit begins the round without meeting the conditions, but reaches the requirements in the middle of the turn, before they use the multi-target skill, it will not trigger because conditions were not met at start of combat.


    2) [on use] effects trigger when the sinner tries to use said skill (aka, when their speed group starts moving).
    • If they get staggered before it is their turn in the speed order, they cannot trigger these effects.
    • Defense skill [on use] effects will always trigger, even if they aren't actually attacked that turn.
    • If the target of an attack skill dies or becomes untargetable, attack skills aren't used, so their [on use] effects aren't activated.

    *) As far as I can tell, [Attack start] happens after [on use], but they seem to be basically identical, with the exception that [Attack start] only exists on attack moves. [Attack Start] is used by some enemies, and I think it happens before clashing.


    3) clashing, as well as [clash win] & [clash lose] conditions.


    4) [before attack] effects occur after the clash, but before any attack coin rolls.
    • If the clash is lost, the attack won't happen, so neither will the effect. You have to win the clash or have a one-sided attack.


    5) Coin hit effects: [on hit / on crit / heads hit / tails hit] occur when that specific coin lands its hit. [On Kill] triggers only if that specific coin kills the enemy.
    • These effects can actually be on an entire skill, or a passive ability, but it's not very common, and not always labeled the same way.
    • If the coin was broken, the effect will not take place (coins break from lowest to highest).
    • ex. If you have a 3 coin skill and 2 coins are broken clashing, only the [on hit] effects of coin 3 will trigger.


    6) [after attack] as well as [heads attack end / tails attack end] occur after damage is dealt, but before the next speed value group starts moving. This tag only exists to prevent sanity increases or other buffs for affecting the user's attack roll, but still benefiting the rest of the team on that same turn.
    Team Building Advice
    There are several ways to build teams, and I think one of the main problems is that people end up settling into a specific archetype without realizing what other options are available.

    Status Effect Synergies
    This is the team building method that I would recommend to start with. There are several reasons for this:
    • A lot of units that share status effect types also share sin affinities.
    • Status effects can deal incredible damage (especially in dungeons), and some (like sinking) have benefits for long fights.
    • You don't need to have a team dedicated to only one status effect if you don't have the ID's for it: I'd recommend 2, such as bleed and poise, or anything & sinking or rupture. This is because it's difficult to make a 6 man team of (good) identities focusing on one status effect unless you own a lot of IDs.
    Building a team this way is pretty quick and easy to do, just make sure you aren't caught up in maximizing a status effect over level or uptie tier, as you have to have good clashing. Some enemies (the f♥♥♥ing robots) also have status effect resistances. Remember your passives! many identities will cause your active units to inflict more status effects, or deal more damage around those status effects. It is true that support passives often contribute very little to the fight, but that problem lies with you more than it does with the support passives.

    Check out the status effects sections for more info (it's much too long to fit here)


    Making a team based on damage type
    Self-explanatory. Clicking on the "details" option will reveal the damage type of all skills, but there isn't a way to see defense modifiers without clicking into every identity. These teams are especially useful in the story chapters, if you're getting crushed (by a boss) this is probably why. Most human enemies don't have specific sin weaknesses, so pay attention to their attack type (as well as sin atk types). There are two ways to build these teams:
    • Use identities that deal "fatal" damage most or all of the time (this is usually the most important)
    • use identities that have "ineffective" defense type to most/all of the enemy attacks, or at least not fatal.
    • Use EGO on purpose to raise your defense of the sin(s) that enemies use. Changing the Zayin EGO changes starting resistances (not that there are many Zayin EGO in the game...)
    • use EGO that buff the damage type in question, if they exist and you happen to own them.
    Ideally, you want all of the above. The hardest thing about team building this way is figuring out the enemy types by getting bodied once. This also doesn't work great in mirror dungeon or railway, as you have to be able to deal and take all damage types.


    The Pure Damage Team
    This team is exactly what it sounds like. As opposed to regular team building, focus on making your team full of identities with high offense levels, high numbers of coins, powerful skill 2's, nuke skill 3's, rerolling coins, and evade defense moves. This works disgustingly well for most fights, and can trivialize bosses by hitting them so hard they just can't hit back. The downside is the requirement of specific high rarity identities (and ideally multi-target EGO) to be viable.

    There's also a version of this team that's made only with ID's that have multi-target skills, which tears through regular encounters like ripping tissue paper.

    (updated Dec 2024) Some Damage monster Identities include....
    (S0) Ring Yi Sang, W corp Ryoshu, Cinq Sinclair, W corp Don, Deici Hong Lu, R Corp Rabbit Heath
    (S1/S1E) N corp Sinclair, Tingtang Hong Lu, R.B Chef Ryoshu
    (S2/S2E) Molar Boatworks Ishmael, Molar Office Outis
    (S3/S3E) Pequod Heathcliff & Captian Ishmael, BL mentor Meursault
    (S4/S4E) MultiCrack Faust, Wild Hunt Heathcliff
    (S5) Princess Rodion
    (SW) Regret Faust, Red Eyes & Penitence Ryoshu, Dawn Office Sinclair, Solemn Lament Yi Sang's skill 3

    The Resonance Team
    Here's a fun trick to make a good resonance team! Take a team you like, and try to make it use only 6 or 5 types of sin affinities. That's the whole exercise! Making teams this way has a few benefits:
    • Whichever EGO you can still cast will be easier to cast without trying to teambuild for EGO
    • it's now easy to get high resonance numbers, which can be really good for passives.
      • there are 3 inbuilt resonance team archetypes. Lust & bleed (S1 N corp faust), Envy & (S3) Little Sister Don, and Pride & (S3) Pequod Ishmael or (S0/S3E) Kurokumo/blade lineage IDs.
    • sin resonance damage bonuses are really only useful with chains of 4 or more. Suddenly, they'll be useful a lot.
    Also a couple of cons:
    • You will be unable to use several EGO, and that may be a problem (basically all good EGO in this game use gloom, sorry).
    • In mirror dungeon or railway, where EGO resources are saved forever, a team that deals slightly lower damage but gains all resources is better. EGO gifts can fix this.

    EGO based teams
    First off, EGO based teams are powerful. The issue is that they require a pile of max rarity units and EGOs that I don't expect you to have.
    The most notable example of this is the charge team: W corp Don, Ryoshu, & Outis, Multicrack Faust, all 3 telepole EGO, R corp Reindeer Ish + blind obsession, R corp Heath, Dimension Shredder EGOs, electric screaming EGOs, etc. Unless you want to drop a pile of money or already have the units, that kind of team building info won't help you anyways.

    Here's how to build an EGO focused team:
    • Pick a multi-target EGO, ideally one that has 5+ attack weight (3+ will work).
    • a lot of uptie IV for EGO increase the targets without improving much else; you can get 7 slot EGO (most WAW ego or outis ebony stem).
    • Build a team around the resources required for that expensive multi-target ego
    • Make sure that one or two base egos will easily be fulfilled (this will probably happen anyways), and equip any other EGO that can be fulfilled by the resulting team comp.
    • Ideally, make a team that only uses 6 types of EGO resources
    The general strategy is to spend the first wave building up EGO resources, before using multi-target EGO to sweep later waves. Use base EGOs against hard clashes. You will also probably need some sanity management. With the current way SP works, clash victories and having EGO kill/stagger enemies tends to make up for the sanity cost. Without sanity boosts from units/passives, the second you start losing clashes your team will fold immediately.

    • If you're making this team for a boss fight (you probably shouldn't be, EGOs are lower damage than strong skill 3's), you can swap the starting EGO out for a high damage one specific to the boss's weaknesses, rinse, and repeat. However, a lot of bosses summon minions anyways, or have a lot of parts, so multi target may still be more useful.
    Status Effects: Extra Damage
    Please note that I will be pointing out the season of EGO and identities mentioned. For example, "S2E" means "season 2 event," and SW-2 refers to the 2nd Walpurgisnacht. "S0" refers to standard fare. You can't acquire the EGO/identities from the previous season in gacha, except in character banners sometimes. Event EGO/ID's won't be obtainable in shop or pulls for the following season (ex. It's season 5, so S4E ID/EGO cannot be bought). Pass EGO are only available in the shop.

    The Advantages of Fixed Damage
    Just to make this very clear, fixed damage status effects have one very noticeable benefit: they completely ignore resistances, level differences, and defensive buffs like protect.
    • For example, My Form Empties, everyone's favorite boss, usually has 10-20 stacks of protect on himself at all times (reduce incoming damage by 100-200%, aka, take zero damage)
      • you can fight the boss the intended way
      • you can inflict a lot of fragile with identities like R heathcliff & LCCB Ishmael (S0)
      • OR you can just have a burn team whoop his ass dealing 99 fixed damage a turn, staggering him every turn.
      • OR use bleed/sinking/rupture instead for more damage.

    • Because Sinking deals damage to abnormalities, it currently has the highest single hit damage potential:
      • (S2) Spicebush Yi Sang's sinking deluge having a theoretical max fixed damage of 99*99 = 9,801 gloom damage. That's right, you can execute any boss you want with a sinking team (and probably a lot of ego gifts).
      • this is not counting weaknesses. You can actually surpass 20,000 damage.

    Because of the way HP scales in this game, pure additional damage effects get less powerful as level (and HP) goes up. This means status effects are much stronger against enemies with lots of parts with less HP, or highly defensive enemies, ironically. It's the "normal" enemies pure damage works the best for.


    Burn
    Burn is very easy to stack (both potency and count), but only deals damage equal to burn potency at turn end (max of 99 per part per turn). It's alright, but not good. Burn is easy to use, but bosses with over a thousand HP make that level of turn based damage pretty minimal, when skill 3's can output damage in the 150-300 range. 000 Magic Bullet Outis (SW-2) tried to fix this with "dark flame," but a single kinda OP ID isn't a solution. Burn works best against enemies with many parts. All Burn identities have wrath skills. The identity pool for burn is currently low, but there's a lot of EGO.
    • Liu South Section (S0) Identities are the burn team.
      • 000 Ishmael & Rodion are the best burn identities, as they get coin power against enemies that are burning and have good burn potency/count application. Ish has better burn EGOs: Ardor Blossom Star (S0, damage, burn application) + Capote (S2, burn, wrath damage)
    • 000 Magic Bullet Outis (SW-2) has "dark flame" A special burn that deals damage by burn potency * dark flame potency as pride damage, allowing for 99 * 7 = 693 damage a turn (this cannot be done every turn). Also can hit a max of 7 slots with her 3rd skill.
    • 000 He who Shall grip Sinclair (S1) + lifetime stew EGO's burn from tail coins (S1E)
    • 000 Dawn office Sinclair (SW-3) has a lot of burn, but annoying sanity conditions.
    • Other Burn EGO: 4th Match Flame (S1, 3 characters), Lifetime Stew (S1E, x2), and [9:2] (S3, x2).


    Rupture
    Rupture causes constant bonus damage, but because it activates on hit, it's incredibly hard to get high stacks without carefully controlling who your attackers are. If you do get high rupture stacks, the damage is incredible, as you hit a boss ~10-20 times a turn, dealing 99 extra damage each time. Rupture Ego gifts are always good because they basically add free damage to everyone. Honestly, there aren't that many pure rupture units, which makes teambuilding a little tricky. Rupture units have Gluttony, Sloth, or Pride (usually 2 of the 3)
    • The (S0) Seven Association team is a rupture/debuff team:
      • 000 Faust is the core of a rupture team, as she's net neutral count wise. Deals bonus damage to units with high rupture, and inflicts some debuffs.
      • 000 Outis adds rupture count and a touch of rupture, but is mostly clash focused. EGO Ebony Stem (S1) passive adds rupture count next turn on hit, which is great if she attacks before rupture is applied.
      • For the 00's, Heathcliff is pure rupture and should be on the team, ignore Yi Sang, and Ryoshu is a debuff unit with a +1 rupture potency support passive.
    • 000 Warp Yi Sang is pure rupture. His S3 can apply 11 potency & 5 count. Combine with his dimensional shredder EGO (S0) which can deal +175% damage to a target with 10 rupture potency, on an already high as ♥♥♥♥ damage roll. Passive also adds rupture count (and charge gain!).
    • 000 K corp Hong Lu (S2) is a tank with rupture. His Dimension Shredder EGO (S0) also can inflict some rupture through the "dimensional rift" status.
    • 00 Red Sheet Sinclair (S2) uses high (3-5+) rupture stacks to deal bonus damage, and Sinclair base EGO is one of the best ways to add high rupture potency (it adds 12). his Lantern (S0) EGO's corrosion can add +3 rupture count.
    • 00 LCCB Ishmael (S0) is the second best rupture applier kinda: her 3rd skill gives 8 potency +3 count
    • 00 Rosespanner Gregor (S2) spends tremor count to apply lots of rupture. This can synergize with 00 LCCB ishmael.

    Bleed (and Nails)
    Bleed is hands down the highest damage status effect in the game, as it deals potency damage every single time a coin is flipped. Bleed is probably the hardest status effect to use, but a bleed team can liquefy a boss in a turn or two, as long as you get bleed count up. This is especially true with mirror dungeon ego gifts, with the status effect being kinda iffy in other game modes. It's most effective on bosses you can stagger a lot, and only have 1-2 parts. Stagger, raise count, watch them bleed out.
    Nails cause bleed stacks, and are exclusive to N corp identities (S1). Identities often use both bleed & poise, while N corp uses bleed & nails. All bleed & nail identities have either Pride, Lust or Envy skills.
    • 000 Ring Pontilist Yi Sang (S0) is the best bleed unit, hands down. Insane damage, and wants any status effect support, doesn't even need bleed teammates. 00 Ring Outis is also pretty good. (lust skills)
    • Kurokomo identities (S0) are the basic bleed identities. 000 Kurokomo Ryoshu is probs most important due to high bleed count application. (pride skills)
    • 00 Hook Hong Lu (SW-1) is a great bleed ID, with an execution S3.
    • 000 R corp (S0) Meursault is amazing at bleed count application. (lust skill)
    • N corp (S1) identities all either inflict bleed or use bleed/nail count in their skills (lust skills)
    • R.B. chef (S1E) identities inflict bleed & bonuses on bleeding targets (lust skills)
    • S3 (pequod) Identities are mostly bleed / poise, & get quite powerful bonuses from bleed.
    • There's two good bleed EGO: (SW-3) Rosate Desire Rodion (prevents bleed count from lowering the turn it's cast) & (S4) Contempt, Awe ryoshu with good potency or count application.
    Status Effects: Technically Not Damage
    Tremor
    Tremor is pretty easy to stack on enemies, and harder to burst. Bursting tremor deals stagger damage (raises stagger threshold), not actual damage. Unfortunately, dealing stagger damage is often worthless (already recovered from the only stagger threshold? lol, sucks to be you). For the most part, tremor is a bad status effect because it simply doesn't deal damage, period. What can project moon do to fix this problem? Amplitude conversion & entanglement. Specific identities and EGOs have the ability to convert basic tremor into a different color of tremor with special effects. There's only 5 in the game right now, but it's possible that each of the 12 sinners will get their own version of tremor. These effects are all improvements, but they require specific ID's and EGO to use. Tremor conversion lasts forever unless you run out of tremor count, while entanglement/superposition can overlap 2 types of special tremor, but converts it to normal tremor after the turn ends. (Most tremor identities have pride, gloom, or sloth (often 2 of the 3)

    See the "Status Effects: The Weird Stuff" for a full list of tremor types.

    Tremor Identities:
    • 000 Regret Faust (SW-1) is the best tremor identity right now, as she has multi-target on 3 of her 6 skills, a lot of burst tremor, tremor count, and really good debuffs. She also deals HP damage based on tremor quantity. Also has the best tremor EGO, (S4E) Everlasting.
    • 000 District 20 Yurodivy Hong Lu (S4E) is extremely good at bursting tremor, but applies zero tremor count, which makes him a little bit awkward on a tremor team. However, he's Hong Lu's only tremor identity, and has reverb, so he should be on the team.
    • 00 Yurodivy Ryoshu (S4E) has a "use skill 1 on tremor burst" passive, and applies a good amount of tremor count.
    • Rosepanner Workshop (S2) & Molar Boatworks / Molar Fixers (S2E) are the regular tremor identities.
      • 000 Rosepanner Rodion is a charge/tremor unit that actually has high damage output without any other tremor support, which is nice. Is also a completely tremor neutral identity, applying as much count as she bursts. Her Effervescent Corrosion (S3) EGO applies +7 tremor count.
      • 000 Molar fixer Outis deals good damage and can burst tremor a lot. Discard based, will get scary with multiple skill slots.
      • 00 Molar fixer Yi Sang has good count and a tremor burst on S2. Discard based, will get scary with multiple skill slots.
    • 000 Öufi Assoc. South Section 3 Heathcliff has great clashing, and ok tremor potency/count. Should only be there for his ability to apply tremor - decay.
    • 00 LCCB Ishmael (S0) again can deal 16/+4 tremor/tremor count (skill 2), which is still absurdly good.

    Other Notes:
    • The only good tremor EGO are (S4E) Everlasting Faust & (S3) Effervescent Corrosion Rodion. They both apply a lot of count, and Everlasting bursts tremor a minimum of 4 times.
    • Most skills decrease tremor count after bursting tremor. Conversely, skills that burst tremor but don't decrease the count are great.
    • An increasing number of identities stack tremor on themselves (instead of charge) for skill effects. Check if skills "inflict" (onto an opponent) or "gain" (onto the unit itself) tremor. See next section of the guide.
    • A number of EGO can burst tremor, basically for fun. They don't apply tremor.
    At this point, there's a growing population of identities that raise stagger threshold based on % of damage dealt. This means at high (offense) levels, they can raise the stagger threshold way more than a middling tremor team can.
    • As an example, (S0) 000 R corp Ishmael's skill 3 deals damage this way. If she has a type advantage, this will reliably deal about 40 stagger threshold damage at level 30+, as well as 100+ HP damage, and all it takes is 8 charge.

    Sinking
    Sinking is a debuff and damage all in one. Sinking dealt SP damage on hit, but if the target's SP bottoms out or they don't have SP, it deals fixed gloom damage like rupture. The point of sinking is to cripple opponent's SP, tanking their clashing ability. This status effect works comically well on bosses with SP, and also kinda everything else too. Generally, there's more count and less potency than rupture, meaning that the gloom chip damage won't look like much unless you have a proper sinking team. When you have a proper sinking team, you'll watch bosses roll a 4 and then take absurd extra damage. Every unit of sinking is a 1% decrease in heads chance, so you don't need high values to be useful. All sinking identities have sloth or gloom or both.
    • 000 Spicebush Yi Sang (S2) adds sinking and sinking count, and has "sinking deluge," a skill that basically bursts sinking, dealing all the possible SP damage at once. This can be abused to deal thousands of damage. His first skill is garbage though.
    • 000 Molar Boatworks Ishmael (S2E) is a really good sinking & tremor identity. Can add +7 sinking count. Ideally add 1 tremor ID to the team for her passive (which makes her always sinking count positive) to shine.
    • 000 R corp Ishmael (S0) adds sinking & sinking count, but not a ton. She's tankier and has better clash than Molar Boatworks Ish though.
    • (S0) Diecei ID's are discard / sinking based.
      • 000 Diecei Rodion is one of the best tanks, and has a reasonable bit of sinking. Really just there to carry rime shank into battle and use it, though.
      • 000 Diecei Hong Lu has very high damage, and a reasonable amount of sinking.
    • Some S4 identities use sinking: the manor butlers & Gregor.
      • Butler Outis and Faust both have "echoes of the manor" which gives a 50% chance for a hit to not spend sinking count. This is amazing AND it can spread through groups of enemies.
      • Family Heir Gregor can deal a lot of damage to enemies with lots of sinking.
    • Sinking EGO: Rime Shank Rodion (S1), Fluid Sac Don (S1), Sunshower Outis (S2), Binds Heathcliff (S4), and bygone days Yi Sang / Gregor (S4).
      • (S1) Rime Shank Rodion is the best sinking EGO. Its corrosion will add 10 potency +8 count, which is completely busted and means that a "sinking team" is just Spicebush Yi Sang, Molar boatworks Ish, and Rodion's rime shank (her ID is actually irrelevant, but Deici is best).
      • (S4) Bygone Days Yi Sang can stack up a hefty amount of sinking potency (15-20 or so) if you use it in a gloom resonance chain.

    Status Effects: On Self
    Charge
    Charge is great, but only if you have a charge team or several charge EGOs. The issue with charge isn't actually with the characters themselves: the issue is that you always want more charge faster. "crazy damage potential by turn 5" is not the goal, so you need to Uptie IV basically all of them. A major benefit of charge is that you don't need a charge team; charge IDs can be dropped on any team you want to add more damage to. If at uptie IV, W corp ID's are useful on pretty much any team, and only have a 2-3 turn charge gain requirement. Most of the highest damage dealing units are charge based. All charge identities have envy or gloom or both.
    • Currently, there are five groups of charge EGO: Telepole (S0/S1), Dimension Shredder (S0), AEDD (S2), Blind Obsession (S3), and Electric Screaming (S4). Only Telepole Don, AEDD Gregor, and Electric Screaming Meursault can give charge count to allies.
    • All R corp, W corp (S0) and Rosepanner (S2) units use charge.
      • 000 W corp Don + Telepole overclock gives 10 charge to the team, and has one of the highest damage skill 3's
      • 000 W Corp Ryoushu can deal even more damage than Don, but has a less useful charge EGO (blind obsession).
      • 000 R Heathcliff uses charge for speed, and speed for stupid high damage +4 fragility.
    • 000 R Ishmael is lower damage than the above, but is a tank with a dodge and great clashing.
    • 000 Rosepanner Rodion uses charge for her passive, improving her abilities.
    • Charge teams are better in longer fights, and can have skills that have usage drawbacks at low charge count. Ego gifts fix this problem, Uptie IV fixes this problem, and charge-granting EGO fixes this problem.

    Fake Charge: Self Tremor
    A growing pool of identities use this method: (S2) Spicebush Yi Sang, (S2E) molar boatworks / molar fixer identities, (S4E) Yurodivy / T corp IDs, and (SW-1) Regret Faust. All self-tremor identities have a sloth move. There are a few differences from charge:
    • There are no EGO that can add more tremor count. In that sense, it's more restrictive (and for that reason, kinda more powerful).
    • 000 Molar Office Fixer Outis (S2E)'s passive gives +1 to self tremor gain.
    • Yes it is a regular debuff, it will hurt you (or buff you) if you run into tremor enemies.
    • These identities basically require 2-4 skill uses of startup time before they can fully utilize their kit. However, their tremor spending moves are usually massively buffed.
      • Spicebush Yi Sang gets a multi-target move (with +30% damage from his passive)
      • Regret Faust also gets multi-target.
      • Molar Boatworks Ishmael gets +1-2 coin power and +3 fragile next turn
    • Molar boatworks sinclair gets +1 potency & count to tremor application per coin hit, as well as the ability to transfer all tremor count to an enemy (usually 10-20). he otherwise kind of sucks though.
    • The S4E ID's all gain buffs to their moves while having tremor, and also spend it for coin power / bonuses on their third skills.
    • Unlike charge, tremor count doesn't have a max count of 20, meaning you can properly save it up for a long time.

    Even Faker Charge: Self Sinking
    This is a strategy used only by (S2) 000 Sunshower Heathcliff. The point is to take hits and trigger the sanity reduction on purpose, as it's a negative coin identity. Also gets power ups by spending sinking potency. Nobody else does this, and it's very annoying to play around, so I kind of hope it's kept that way.

    Poise
    Poise is annoying for two reasons. First, it falls off of characters really fast, as a count is spent at turn end *and* whenever a crit is triggered. Second, a critical hit deals 20% extra damage. that's it. That being said, a few poise ego gifts or Pequod Ish (S3) / Blade Lineage Mentor Meur (S3E) can cause poise IDs to become killing machines. The other issue with a "poise team" is that having multiple poise characters doesn't actually benefit you (except for the 3 cases above). Each character has their own poise moves, and mostly can't give poise to others. To put it in perspective, moves that give charge count give 2-7 charge per turn. Identities that grant themselves tremor count also get ~3-6 a turn. Skills that give poise count give 1-3 a turn, and poise count is spent more frequently at higher potency. Poise units have wrath, lust, pride, or envy (usually 2 out of the 4) no I don't know why it isn't as coherent as the other status effects, sorry.
    • The main poise units are blade lineage (BL) (S0/S3E), and most of them need to be at uptie IV to be usable in a team over level 25. (they all have Pride skills)
      • 000 Salsu Sinclair (S0) at uptie IV is the only unit that can gain poise count from other units gaining poise count (as his passive). Not great otherwise though.
      • Ch 5.5 (S3E), "Yield My Flesh to Claim their Bones," gives new blade lineages ID's, which are significantly stronger than the S0 identities that have been around since the game launched.
      • most importantly, 000 Mentor Meursault gives massive buffs to all other blade lineage ID's, and makes running a blade lineage team useful.
      • the biggest benefit of BL Meursault is that 000 Salsu Yi Sang can become a monster, as he gets coin power on all skills raised at higher poise count.
      • 000 Salsu Faust has a unique bleed, red plum blossom, that gives +10% chance to be crit and a bit more crit damage.
    • (S0) some Cinq ID's use poise. The only notable one is Cinq Sinclair, who builds poise count at a very fast rate, turns it into haste, turns the haste into coin power up, and finally spends all the poise count into a lot of poise for a lot of damage.
    • (S3) Pequod ID's are poise / bleed, and require Pequod Captain Ishmael to give them extra poise count with her passive.
    • (S3) [Blind Obsession] Ishmael can give up to 14 poise count, spread throughout the team. this doesn't work on bosses, as it needs to hit 7 things to get 14 poise count. hm.
    • Ryoshu's Blind Obsession EGO (S3), as well as Outis's Sunshower EGO (S2) can give poise potency / count to themselves, but not the team.
    • Other poise identities: Shi Association units (S0) which are bad, L corp Faust who's good, maraca Sinclair who's confusing, and Zwei ID's who are not great.
    • critical strikes deal 20% bonus damage (after modifiers). that's it. it's a good damage modifier, but it's weaker than a type advantage.
    Status Effects: Buff/Debuff type
    Here are all the "uncomplicated" buff/debuff type status effects, that just directly change one parameter of the unit they are applied to. All of these effects expire at the end of the turn, and can be inflicted "next turn" (partially transparent icon).


    Paralyze
    Paralyze is in theory amazing, but in practice it's pretty mid. Paralyze forces coins to roll tails (or changes coin power to zero, same difference) for both clashes and damage rolls. The problem? Every individual coin removes one paralyze to land on tails: A 4-coin move burns through 10 paralyze in a clash (4 + 3 + 2 + 1). Moves that add paralyze add 1-5. This debuff also buffs negative coin skills.
    • paralyze expires at the end of the turn, which is annoying. Several characters inflict paralyze next turn to circumvent this.
    • The main way to utilize Paralyze is to have a faster unit get an unopposed attack & inflict it before the clash you need to win. This is basically up to fate because you need the paralyze inflicting sinner to be faster than your clasher.
    • more than 1 paralyze on an ally makes positive coin EGO usage useless, and negative coin EGO usage OP.
    • The clash UI sometimes gives weird messages when allies/enemies have paralyze inflicted, such as making a clash "overwhelming" even though paralyze will vanish before the clash happens. I hope they fix this.

    Haste & Bind
    These are incredibly useful, and luckily pretty common. Higher speed = more clash options! There's not much to explain here. Most bosses will reduce their own speed to 1 when they have a big attack turn (very polite of them), but if your speed range is the same as your enemies, you will be taking some hits / non-desirable clashes. (S0) Cinq IDs get bonuses from speed differences, and so do Ryoshu's [Red Eyes] EGO's.

    Coin Drops / Boosts
    The plus and minus coin boosts are both buffs. Plus coin boost raises coin power, and minus coin boost raises minus coin power, making rolling a heads less detrimental. Plus coin drop is probably the worst status effect in the game, as it provides increasingly lower clash power / damage the more coins on a move. Unlike paralyze, the sanity level of the unit in question matters quite a bit.

    Offense / Defense Modifiers
    Attack/Defense Power Up/Down (the arrows) change final clash power by their count. This makes Defense power down almost useless, because you rarely want/need to weaken defense skills. This status does not influence damage at all

    Attack/Defense Level Up/Down change attack/defense level. These give a +/- 1 level based on count. These influence damage dealt/recieved more than clash power, but can also influence clash power. They are also invisibly buffed whenever you make a resonance chain. If you manage to get high stacks of them it's a solid damage increase. One stack is unnoticeable. 3 "offense level down" = +1 clash power for your units. "defense level down" makes them take more damage but doesn't influence clashes.

    Damage Up/Down give a damage modifier by 10% per effect count. This makes them simpler than attack level up/down, and generally more impactful, but they do not affect clash values at all. 3 damage up? 30% more damage. That's the equivalent of ~10 offense level up.
    • (S0) 000 W corp Meursault can inflict 8 defense level down, providing ~25% bonus damage for all future attacks that turn. It's good, but its worse than the rest of the warp units or fragile inflicting units.
    • (S0) 000 Kurokumo Wakashu Ryoshu's skill 3 inflicts 5 offense level down, and her skill 2 inflicts 2 damage down.
    • (SW-1) 000 Regret Faust's uptie IV passive makes tremor teams give a nearly perpetual 2 defense level down.
    • (S0) [Rosate Desire] Ishmael (T) inflicts 10 offense level down, crippling future damage and clashing that turn (-3 clash power, approx -30% damage). Only lasts for the remainder of the turn.
    • (S0) [Hex Nail] Faust (T) inflicts curse, an exclusive status effect that inflicts atk/defense power/level debuffs randomly.

    Fragile
    Fragile and all forms of weapon/sin fragility are very good, and are the backbone of most nuke strategies. Each count of fragile inflicts a +10% damage modifier to incoming damage. For fragile, it's all damage types. For weapon/sin/status effect fragility, it's specific to the damage type. Specific units and EGO are super useful against some bosses because of this. Specifically, Identities that inflict fragile next turn are just the best.
    • (S0) LCCB Ishmael can inflict 5 fragile same turn, but low speed range makes it not that useful.
    • (S0) R corp Heath inflicts 4 fragile (same turn), and has fast speed & high damage.
    • (S0) W corp 2nd skills: Ryoshu has 2 slash fragility, and Don has 2 fragile as same turn effects. Both have nuke skill 3's, so if they have multiple skill slots they can get scary.
    • (S0) [Dimension Shredder] Hong Lu (H) can inflict up to 3 fragile same turn.

    • (S0) Seven Association 6 Yi Sang can inflict up to 3 pierce fragility next turn
    • (S2E) Molar Boatworks Ishmael can inflict 3 fragile next turn.
    • (S1) [Telepole] Heathcliff (H) can inflict 3 fragile next turn (corrosion)
    • a lot of EGO moves provide 2-3 of a specific sin fragility same turn or same turn/next turn.
    Status Effects: The weird stuff
    Here's some explanations for the more unusual (more exclusive) status effects / skill effects that show up in the game. These are usually tied to a specific group of identities, and are much less common than "regular" buffs/debuffs.

    I'm not including stuff like sinking deluge or curse, as those are obvious extensions of the main debuff / buff in question and/or only tied to one or two identities or EGO.

    Special Tremor Types (one day we'll have a rainbow)
    • Tremor - Reverb. Currently exclusive to Hong Lu. Deals sloth damage equal to tremor on burst tremor. Absolute game changer, can allow tremor teams to deal 99 extra damage on burst. converted via his (S0) Cavernous Wailing EGO, and entangled by his (S4E) 000 District 20 Yurodivy Identity.
    • Faust: Tremor - Everlasting. On tremor burst, has a set chance to burst tremor again based on tremor potency / count. If both potency / count are over 50, you should get 1 extra tremor burst per burst. Currently can only be entangled by the (S4E) EGO, Everlasting. Disgustingly effective when superimposed with Reverb.
    • Heathcliff: Tremor - Decay. For every 4 tremor potency, target gains 1 defense level down. At max stack, this is approximately 50% more damage at all times. Only applied by (S0) Oufi Heathcliff's Skill 3.
    • Heathcliff again: Tremor - Clockwinding. A weird buff effect that increases tremor potency/count application at the cost(?) of reducing it on the identity itself. This is good, but can only be used by heathcliff identities, as it's only source is (S0) Asymmetrical Inertia Heathcliff.
    • Outis: Tremor - Fracture. if at 20+ tremor potency, On stagger, raise opponent stagger level by 1. This results in +50% damage, which is massive, but is objectively worse than Reverb. Can be converted with Outis's (S4) Binds EGO, which also hits 7 targets, so it's still great for fights with many enemies.
    • Don: Tremor - Chain. Lose 1 clash power for every 10 tremor potency (max of 3). This is good, but it notably does not increase damage, and does not stack well. Great for making a bossfight easier if needed. Applied by (S0) 000 T Corp Collection Staff Don.

    Discard
    Discard is a bit special, because the actual specific rules of skill discarding varies between identities. Simply put, using a skill with a discard condition will delete a skill that fits the condition and is selectable during the chaining phase. Frequently, it will discard X skills from all of the sinner's skill slots. Discarded skills will not activate any affects except for "on discard" effects. Guard skills and EGO skills are not applicable and will not be discarded. If all skills in a skill slot are in use (ex. the skill you are using and a defensive skill, or the skill you are using and an EGO), no discarding will happen.

    Discard is useful because it lets you cycle through your skills faster (1.5x to 2x as fast, depending on if all skills trigger a discard or not), and most 000 discard IDs get buffs from discarding skills, making them monsters when they get multiple skill slots. The guard move often discards skills too, meaning that you can chose to literally never use skill 1's.
    • the most common type of discard prioritizes low ranking skills, discarding skill 1, then 2, etc. it's sometimes the opposite.
    • Discard cannot throw away EGO skills or defense skills, so you can precisely control what you discard if you want to.
    • you can prevent the bottom skill in a skill slot from being discarded by turning it into a defense skill, and then changing it back to normal next turn.

    Insight
    Insight is specific to (S0) Dieci identities, and is directly tied to discard for the most part.
    It's pretty simple: when skills are discarded, the rank of that skill (1, 2, or 3) is saved as the "insight" value until the next skill is discarded. If multiple skills are discarded in the same turn, the highest ranked skill will become the insight value. Again, more useful with more skill slots, just like with discard. Dieci skills have specific notes about "if insight is 2 or higher..." that give various buffs, mostly increasing skill power or damage.
    • The secret trick to Dieci ID's is that you can prevent discarding by creating a defense or EGO skill in the bottom slot. This means once you get 3 insight, you throw in a defense skill you won't use and you've got a monster.
    • 000 Dieci Rodion is an amazing tank because if she discards her skill 3, she gets 60% of her max HP as a shield and 3 insight. This lets her skill 1 roll a 15 (without discarding any other skills). all her other skills get buffed significantly as well.
    • this exact same strategy works on 000 Dieci Hong Lu, and due to all 3 of his skills having discard, it'll take a max of 3 turns to discard a skill 3. Once this happens, his skill 1 will reroll a coin 3 times, and his skill 2 rolls in the 20's. You can use his passive to get free damage up, but 30% damage isn't as good as a rerolling coin, so...
    • Dieci Meursault tries to incentivise discarding skills through his "erudition" effect that gives shield and +1 clash power to identities that discard. This is still much worse than just remaining at 3 insight forever. For example, Rodion's S1 rolls a 9, 12, or 15 based on her insight. +1 clash power is nothing compared to +1 or +2 coin power.

    Aggro
    Aggro is a tank-specific ability that works on whichever skill slot the aggro'ing skill is used in. It simply increases the likelihood that enemy skills will target that skill slot by default.

    The idea is to make your tanks more likely to be targeted, enabling others for one-sided attacks, but in practice this isn't always (visibly) helpful. The other way to control clashes well is to just out-speed your opponent, which is a very easy condition to fulfill (use Yi Sang's base EGO, use fast identities, ego gifts, etc.). Does aggro greatly improve tanks? yes. Does it necessarily make them useful? no, sorry. The other issue is that aggro is still based on chance. It's generally thought that every point of aggro basically adds a duplicate target in the target pool for the aggro using identity. So using a skill of 4 aggro on a team of 6 turns the targeting chances from 1/6 to 5/10. This means that skills that grant ~4 or less aggro are reasonably likely to not actually change any skill targeting, just on pure chance. oh well.

    EGO Resource Amp
    This status effect increases the amount of EGO resources gained by a skill by the effect's count for 1 turn. This is currently only achievable by [lifetime stew] sinclair (S1E) and [Soda] Ryoshu (S2E), EGO that are otherwise not great. It's actually a pretty useful buff though, as it allows you to gain double EGO resources for the turn in both cases. Useful in a pinch, and it would be nice if it gets used more. It's worth noting a handful of EGO have passive effects that grant ego resources, which also fill this niche (such as (S4) Contempt, Awe Ryoshu).
    Mirror Dungeon Advice (Mirror of the Dreaming)
    Mirror Dungeon 5: Normal Mode

    Mirror dungeon runs give lunacy and pass xp (= shard crates), as well as giving a different combat experience focused around collecting and abusing ego gifts. The Limbus Company Wiki[limbuscompany.wiki.gg] has lists of EGO gifts and floor theme packs.

    This guide says what ego gifts you'll get from abnormality event choices:
    https://steamcommunity.com/sharedfiles/filedetails/?id=2940932941

    Other useful guides:
    https://steamcommunity.com/sharedfiles/filedetails/?id=3435555535
    https://steamcommunity.com/sharedfiles/filedetails/?id=3373240610

    What you need for MD5 normal mode:
    • Uptie III on as many identities as possible. level doesn't matter, but uptie III-IV absolutely does.
    • All identities & enemies will be set to level 50, so feel free to test things out!
      • bosses & card packs unlock based on story progression.
      • As you advance floors, enemies will slowly climb ~10 levels higher than the starting level.
    • I recommend having at least one multi-target EGO (5+ atk. weight). Just having base EGO will make this experience rather slow.
    • Ideally, 6 different 12-man teams for max rest bonus.... sorry new players!

    Card Packs & Boss Unlocks
    More card packs will unlock as you progress the story (both main story & event packs), but currently running event packs will always be available. This is a trap, as event bosses are designed to be challenging for people at that point in the main story. A current event boss will usually obliterate teams with poor synergy at uptie III.

    Abnormality events and extra bosses
    Many abnormality events have an option to fight the abnormality in question as a boss to acquire 2 ego gifts, rather than just one. These ego gifts are usually high rarity. I recommend fighting them on earlier floors for one simple reason: their HP pools are smaller than when they were bosses. On floor 1, you can often stagger them before they get to attack, and kill 'em next turn. Also, one boss fight gives 3 bonus starlight because of the EGO gifts and +1 encounter.
    • Note: In normal mode, they're pretty easy. in hard mode, on the later floors they can be very challenging.

    Drop Rates
    The card drop rates are probably the same as for MD4, which are as follows. Full credit to Borderlined (guide linked above) for figuring that out!
    • I don't know what the ego gift drop rates are. My best guess is focused encounters are ~50% and elite encounters are ~80%. abnormalities always give their two associated EGO gifts.
    • combat encounters that don't have a box icon cannot drop ego gifts.

    Card drops
    Card drops are mostly freebie bonuses. They can give ego resources (useless), cost (ok), ego gifts (great), and keyword associated ego gifts (excellent). It's worth noting that given gifts pioritize gifts you don't have over the rarities offered, ex. if you own all tier 1 and 2 charge gifts, it'll give you a tier 3 instead.
    Card drop rewards are of higher rarity (and therefore quality) in the hard mode dungeon or if you pick up specific ego gifts.

    Does team archetype / keword matter?
    Not really, but burn and bleed are the current fastest.
    There are now enough ego gifts that every single team can become completely broken if they get stacked. This is largely due to new EGO gifts that give coin/clash power/damage bonuses. It's also easier than ever to get EGO gifts.

    "keywordless ego gifts" usually heal, increase ego resource gain, or provide buffs, so they are actually a priority to collect.

    EGO gifts & Fusions
    go to this guide to see all ego gifts and fusions:
    https://steamcommunity.com/sharedfiles/filedetails/?id=3115645873
    you can also look at the status effect pages on the wiki.

    This MD5 run is hard: advice
    Some general advice:
    • team synergy is required. This doesn't mean you need 6+ identities focused on one status effect, but you should at least limit the team to two main status effects. You can add nuke damage identities to any team for a power boost! (R corp Heath, W corp Ryoshu / Don, N corp Sinclair, Ring Yi Sang, Devyat identities, etc.).
      • Due to the ease of getting EGO gifts, you can start picking up charge or poise gifts even if your team doesn't use those effects. Once you get several, they'll become quite helpful.

    • Because you get to pick the buffs that enemies get, make sure that you aren't buffing bosses too much in one area. Raising offense level or damage once is fine, but raising those several times can be an issue.

    • If a clash is hopeless, use defense skills as they have higher defense levels. Dodge defense moves are often insanely good because they ignore offense level clash scaling, so at high sanity you can dodge bosses easily.

    • If one of your units is almost killed in a fight and that's a problem, literally just quit the fight and retry it. You won't be able to move and pick a different path, but if you died to RNG, try again with different RNG. This also changes what [indescriminate] attack targets and refreshes starting skills.

    • Get some healing & ego resource generation gifts! they will make it a lot easier.

    EGO use and sin resource management
    Generally speaking, you want to have as many sin resources as possible, and only use EGO when you need to. Several things to note:
    • Zayin EGO skills are very versatile because their sin & SP costs are low. This makes them cheap, and lets their heads chance stay high. They also generally have very high base power.

    • multi-target EGO are your best friends. In a perfect world, save up sin resources, and then whenever you enter a hard fight, spam multi-target EGO. 5 attack weight is okay, 6-7 is what you want.

    • remember how overclocking and corrosion works. This is mostly useful because while most overclocked EGO will still target randomly, some don't. Others will target the highest HP or fastest speed, which lets them be cast as full corrosions as the [indescriminate] attacks won't target your allies.

    • sanity regen is important if you want to use a lot of EGO. This can be done through a couple specific identities (N corp faust (S1) or Pequod Captian Ishmael (S3) ) or EGO that give SP.

    Mirror Dungeon Hard Mode (MD5H)
    First off, scroll back up and read through my normal mode sections, because basically all of that information still stands.


    What you need for MD5 Hard:
    • Identities at level 47-50. 45ish is possible, it'll just be slow and painful.
      • Enemies will slowly climb to about level 65, so being max level is relatively important.
    • Uptie III required, Uptie IV reccomended, especially on identities that have powerful uptie IV's
    • Uptie II or higher for EGO. Increased attack weight from uptie IV's will help, especially with challenge fights, but it's pricey (and sometimes pointless for bosses).
    • you don't need any grace of stars bonuses really. they help of course.
    • A solid team of 5-6 identities with high synergy. Ideally, have benched sinners that help with their support passives, but you can get away with swapping in randos for starlight gain.

    • there are 5 floors, and each floor is 4-7 nodes long.

    Super Shops
    The more cost you spend, the higher your chances of running into a super shop. You'll likely run into 2 of them per MD5H run, and they have a couple differences from regular shops:
    • More ego gifts offered
    • The ability to merge up to 5 EGO gifts together
    • 2 skill replacements per shop
    Overall these bonus shops are just that: bonuses. they help increase your EGO gift gain a bit faster than you can get otherwise.

    So enemy level skyrockets... What does that mean?
    The fact that enemies increase in level, rather than getting flat offense/defense level boosts, is incredibly useful. Why? Because whenever you kill an enemy, your sinners will gain an enormous amount of sanity. This makes EGO spamming nearly free, as you'll regain that 20-30 sanity in a single turn (assuming that you kill something).

    The downside of this level up instead of straight buffing level or coin power or the like is that hits will start to hurt, as increasing offense level of enemies increases damage taken.

    Note that "dodge" skills completely ignore offense levels, resetting the value back to that of a normal skill roll. This is comical, as you'll be struggling on floor 5 before making the easiest dodge check of your life.

    What enemy buffs to pick?
    Some enemy buffs are easier to deal with than others. Remember that every 3 offensive level is +1 clash power for the enemy, and it gives you no benefits (unlike rising level), so be careful about raising it. Buffs that increase Coin power can be taken once, but should not be taken twice or more. Most enemy (or boss) skills are still 1, 2, or 3 coins, so once will be fine. Buffs to enemy defense level or power are basically freebies. HP / damage taken down buffs will make your run take longer, but won't really make it harder unless you don't have any healing sources.

    One critical thing to note about offense/defense level buffs vs. % damage dealt / taken buffs: level buffs become less impactful with level differences, while % damage buffs are always constant. Damage calculations are based on the difference between offense and defense level, and it's not linear. When you're fighting enemies 20 levels higher than you , +5 enemy offense level is probably only going to be ~3% more damage taken. However, +5 offense level is always +1-2 clash power for the enemies. Similarly, raising enemy defense level won't change the damage you deal that much once the enemy is already way over your level, but it will change a lot if you're close in level (like you would be in normal mode). So % damage dealt buffs are more dangerous than offense level if enemies hit, but don't increase clash difficulty.


    Tips Specific to Hard Mode
    • Quitting after beating the floor 4 boss will give you full lunacy and ~210 battle pass exp. Clearing floor 5 gives you 15 more battle pass EXP, so you can skip it if you like.

    • Some of the challenge fights (from abno events or glowing icons) are going to get really, really hard on floors 4 and 5. If your damage/debuffs or ability to use multi target EGO isn't up to par, you might get wiped. On floor 5, these enemies will be approaching level 70, and can have more dangerous clash rolls than the floor 5 boss.
    • Due to the inability to see where you're going, just choose the option with the most branching paths. Shops are set at the end of each floor, so you can't miss them.

    • High tier EGO are now a bit spammable, thanks to easy SP regain! This allows for one very convenient thing (in non-focused encounters).
      • Once you have two skill slots, you can often get away with casting two EGO a turn, preferably a normal EGO (with a + coin) followed by an overclocked EGO (with a - coin), maximizing your clash / coin values for both EGO.
      • It's worth noting that SP gain from clash wins occurs before SP loss from EGO usage. This means that if a sinner is at max SP, they can't gain anything from a clash win. Conversely, using a base EGO at, say, 30 SP will likely see an increase in sanity at the end of the turn, if you win the clash.

      • For example, Ishmael could cast Blind Obsession (W) followed by overclocked Ardor Blossom Star (H), and finish the turn at ~10 sanity, while having a ~40% chance of landing tails on the ardor blossom coin. This lets her deal obscene amounts of damage in a single turn.
      • given a turn of winning clashes / literally anything dying, or the use of an SP regen EGO like Faust's representation emitter fluid sac, she'll be back to 45 easily.

    • Frankly, EGO damage starts being unable to keep up with the extremely high enemy level (and therefore defensive values), due to most EGO having low offensive modifiers. Still great for clashing and multi target damage, but single target damage will suffer unless you're rolling in the 40's, or using wingbeat ishmael (SW-2) / a single target Waw EGO.

    • Overall, EGO gifts are very important for MD5H. While you could sink money into changing skills, EGO gifts will probably help you more in hard mode. Remember to refresh the shop once or twice if there's nothing useful. The targeted refresh can be extremely helpful if you have the money, but it's not a guarantee.

    Merging EGO gifts
    The system for EGO gift merging has been changed to be much better.
    Now, you pick a keyword, and using more, higher rarity ego gifts gives you a higher chance of getting an EGO gift of that archetype.

    If you're on a special floor (event or story boss), you can merge to forcefully acquire the gifts that you can only receive on that floor. This is much easier than praying to run into the event interactions.

    Note that if you don't have any gifts available to merge, such as already owning all of the tier 2 EGO gifts available on a floor, the icon will change to random and there will be a tooltip about the fact that it's now random.

    The previous EGO gift fusions for powerful tier IV gifts still stand:
    https://steamcommunity.com/sharedfiles/filedetails/?id=3115645873
    They are definitely worth it to build around.
    Remember, with the right EGO gifts, you can add poise or charge to any team you want, and get full benefits.
    Mirror Dungeon Infinity (MD5I)
    Mirror dungeon infinity, where the mirror dungeon is expanded to 10 floors with increasingly punishing mounting trials, is very difficult. It's nowhere near impossible, but you have to push the game to its limits to win, especially with minimal thought.

    What to expect
    • By floor 10, you can expect...
      • Enemy level to reach 80-90
      • All enemy rolls to be in the 20s-30s (or higher)
      • Enemy health modifiers to be around +200-300% (not including their level)
      • Enemy damage modifiers to be around +50-100% (not including their level)
    This is, to put it lightly, nasty. So how do you cope with this? You use multiple sets of E.G.O Gifts.

    E.G.O Gift Abuse: A How-To
    The issue with EGO gifts is that many of the powerful merge gifts have restrictions upon them: your team must include 5+ identities who use that status effect. This makes most teams only able to fully use one category of E.G.O gifts, plus the damage type gifts. This simply isn't enough to make the later floors anything less than hell difficulty. So what's the solution? use a multi-status effect team.
    The best team for this is definitely bloise (bleed & poise), because the bleed gifts up damage greatly and debuff enemies while the poise gifts up skill power and damage. Throw in some other slash/pierce gifts, maybe some charge gifts for fun, and you've got a team that will happily roll in the 30's to 50's for a lot of their moves.
    • This team must be made out of at least 4 members who use both poise and bleed in their skills. This severely limits the available identities to use to (S3) Pequod Identities, (S0/S3E/S5E) Blade Lineage / Kurokumo clan identities, and
    Other available teams include charge + rupture (another damage/debuff combo), and rupture + bleed. With one more sinking/tremor ID you could also do a sinking + tremor team (although I wouldn't recommend it).

    Alternatively, just use burn and get a lot of the damage type gifts, aiming for merging "lunar memory."

    To be clear, you don't have to use this team to clear the mirror dungeon, it'll just make things easier. Either way, you should be stacking EGO gifts on top of EGO gifts, over and over. Have you got all the poise gifts? great! move on to slash, charge, pierce, whatever. Remember a lot of damage type gifts give clash power or skill power up, which is extremely useful.

    Other Useful Tips
    Skill replacement is a lifesaver. Because you will encounter 10 shops in this run, and a lot of them will be super shops, replace as many skill 1's with high rolling skill 3's as you can. This will save your ass, especially once you've gotten gifts that boost skill 3's or coin power. This is especially because the longer dungeon means getting EGO gifts is easier in general.

    Take the level up per floor starter buff & long battles. Take a free refresh starter buff. Both of these will make the experience much easier. The first enables you to try and power your level in tandem with enemy level (keeping the overall level difference maxing out at about 20). The second lets you look at more EGO gifts for free, or more theme packs. Both let you spend cost or pick EGO gifts in ways that will really help you.

    It's a good idea to limit your team to 2 damage types, so you can ignore damage type gifts from one category.

    Avoid coin power up if you can, as the later floors will happily present you with "+2 coin power" options. Don't take them.

    If you've got any other tips, leave a comment! I'll add them here.
    RR4 Masquerade: Strategy
    Refraction railway is Limbus Company's endgame challenge content. Test your skills against new bosses and oddly specific turn count clear conditions to get really good rewards and pretty banners. I mean really good rewards, click into the "lost and found" icon and marvel at what you could theoretically own one day.

    I thought that Refraction Railway 4 was very fun! The bonus clear condition is actually pretty easy this time, because if you aren't doing well in a fight, your team will get ground into a fine paste, so turn count can't rise super high. Most of these fights focus on very careful strategizing.

    What you need:
    • Identity levels 40-45. Be really careful about having levels lower than that, as clash is really important
    • A good number of EGO. You pretty much need at least one for team healing, 7+ attack weight, and sanity healing.
    • Uptie III or IV for identities & EGO. Why? Because you'll be fighting shadow entities at uptie IV (both identities and all EGO), so it's important.


    The Basics of fighting shadow Clones
    The gimmick of this railway is that you fight yourself for the majority of the fights. I mean you fight shadow identities that have their own EGO resources and all ego available at time of RR4 being released. They're all at uptie 4. All their EGO is also at uptie 4. They've got combat and support passives. Their speed ranges are exactly the same as yours, which is probably the most annoying part. That being said, there's a couple of things you can exploit with the enemy AI.
    • they politely refuse to use EGO turn 1.
    • The lower their HP, the higher likelihood they will use an EGO. I suspect more damaged identities have priority in consuming EGO resources. This is actually a very useful fact for two reasons:
      • enemies you don't mess with won't use EGO until you mess with them, usually. So leave them alone and focus on killing ones that are damaged.
      • If you're faster, you can stagger/kill enemies using EGO with a faster unopposed attack. This can be done by dragging the faster unit to clash, and then using a slower unit (or the main target of the attack) to clash. This is a lifesaver, AND it spends enemy EGO resources.
      • Single-target EGO's are usually fine. Just guard with a unit that resists the sin or damage type and they'll walk it off, even if it's a Waw. This is because the enemy team comp's aren't bleed or tremor.
    • This is also a very very bad thing for several reasons:
      • you CANNOT end a fight with no ego resources. you will be punished for that after the save point.
      • "almost killed" identities are the worst, especially if they have fast speed ranges. Shadow Rabbit Heathcliff at 12 HP? Well he's using Binds next turn with a speed of 8.
      • Several EGO that roll high are really really annoying. This is most Waw's, but also Sunshower Outis, Pursuance Meursault, and Ardor Blossom Ishmael.

    Some other general tips for fighting the shadow clones:
    • Taking a few hits and casting a healing EGO is much easier than actually trying to counter every attack. remember, unopposed attacks don't generate SP!
    • You have two useful Zayin EGOs: Representation emitter Faust and Crows eye view Yi Sang, for SP and haste respectively. Remember them. Use them.
    • For 2nd & 3rd waves, using 2 7+ atk. weight EGO will pretty much win you the fight. Doesn't work well if you start at 0 SP though.
    • Use healing liberally. The enemies basically won't.

    Notes for Team Building
    You can build 4 completely different teams, one for each section. Specialize teams for the bosses in the coming sequence, or just go with whoever you have. The 'proper' way to do this is to play blind, get enemy information through trial and error, and then return with a better team, but I'll explain each section below if you'd rather skip that.

    For team archetypes your best bets are:
    • Sinking, because most of the enemies you fight will have sanity or gloom weakness.
    • Tremor reverb for high damage output, if you have Cavernous Waliling Hong Lu & Everlasting Faust, as well as 000 Regret Faust. Otherwise, just kinda ignore this recommendation.
    • An SP heal team.
    • A Gloom heavy team. This is because most of the really good EGO use a lot of gloom resources. This is for Fluid Sac Faust of course, but also Rime Shank Rodion, Binds Heathcliff, and the extremely useful Waw's: Sunshower Yi Sang & Blind Obsession Ishmael.
    • A multi-target based team will also be very useful, but several of them fall into sinking or tremor archetypes already.
    • it's important to be able to generate all or almost all types of EGO resources. You can make it without gluttony, but that's about it, for reasons I will talk about later.

    Charge (and/or pure damage) is solid, but it will be difficult to get your sanity and charge up during the first few turns after each rest stop.

    The poise team is pretty meh for this, mostly because it's actually too heavy on pride resources. This ends up resulting in unbalanced EGO resource gain that makes it impossible to keep up with enemies casting about 2 EGOs per turn. Poise teams are pride / lust / envy / wrath heavy, and there just aren't good EGO for that yet.

    Rupture is mostly suffering of not having any new identities recently. Presumably fine, but again the EGO resource spread of a rupture team is not the best. Will work well with Ebony Stem Outis, but lacks the envy & wrath resources necessary for most other multi-target EGO.

    Burn will work pretty well, but struggle per usual against the bosses as the damage output caps out at 99/turn. Again, lacking in gluttony EGO resources can be totally fine.

    Bleed is dead in a ditch, but Yi Sang with a paintbrush is still completely busted, especially because of his SP healing passive.

    You can use support in railway, so you can improve your team by borrowing a unit from someone else as well. This is really good for filling any holes in your team.


    Healing and Sanity
    You need some methods of healing and sanity restoration. Given the inherent RNG nature of this game, you cannot expect to always make it out of fights unscathed. So how do you deal with this? Faust is the best SP restore sinner in the game.
    • Base ego restores SP to 4 sinners, and has SP healing efficiency passive.
    • (S1) Fluid sac EGO restores SP and HP to entire team (you REALLY want this). gives 20% dmg reduction to lowest HP unit as a passive.

    the wiki has categories to show all sources of SP[limbuscompany.wiki.gg] and HP[limbuscompany.wiki.gg] healing.

    SP healing EGO, in order of usefulness:
    • (S1) Fluid sac Faust (H)
    • (S3) Blind Obsession Ishmael (W)
    • (S0) Ya Śūnyatā Tad Rūpam Heathcliff (H) [note: Cannot heal Heathcliff's SP]
    • (Base) Representation Emitter Faust (Z)
    • (S2) Sunshower Yi Sang (W)

    HP healing EGO, in order of usefulness:
    • (S0) Lantern Sinclair (H), heals more the more targets are hit
    • (S1) Fluid Sac Faust (H)
    • (S1) Impending Day Sinclair (T), heals team but only on kill
    • (S0) Pursuance Meursalt & Rodion (H)
    • (S2) Sunshower Yi Sang (W) applies 3 protection to all teammates for 2 turns.
    RR4: The Bossfights

    General tips about the fights, in order (boss walkthroughs below)
    Section 1) Overall, this section is weak to slash and resistant to pierce. Other than that, pretty much anything will work team comp wise, with the understanding that you should build EGO resources for future fights (lust, gloom, envy for fluid sac mostly, add wrath & sloth for blind obession / sunshower yi sang, etc). This means you probably shouldn't run blade lineage, sorry.
    • 1: Portriat of a certian Day This boss uses sinking, which is annoying for future waves, but isn't particularly difficult. The gimmick is to figure out which portrait is the "master portrait," and destroy that one. The first turn the portraits appear, they won't be targetable. After that, destroy the master portrait to give him a handful of fragile for the rest of the fight. Weak to slash, pride, sloth, & Lust.

    • 2: butlers, maids, and a dog This fight is one wave, but there are 10 total enemies, with most arriving as backup on kills. The last two, the minibosses Joesphine & wolf Hindley, will not enter on the same turn, so try to stagger Josephine as fast as possible, or kill all the other butlers that turn, as they'll use 4-5 skills each.

    • 3: Refracted Nelly Tbh this one was pretty easy. It's just nelly again. As long as you can win the clashes (which you should be able to), her SP will tank and it'll be a walk in the park. Again, slash weak and pierce resistant, but it doesn't really matter once she's staggered.

    Section 2) Generally more weakness to blunt or slash than pierce, but not quite as uniform as the last section. Now we start the envy petacculae fights, or mimics, or shadows, whatever you want to call them. The first order of business is getting your SP to 45 ASAP. The second order of business is any multi-target EGO you want. You really want to finish this section with spare EGO resources.
    • 1: N Corp Shadows This fight is pretty straightforward. Beat up shadow Faust & Sinclair first, and get your SP up with fluid sac Faust, Ya Śūnyatā Tad Rūpam Heathcliff, Blind Obsession Ish, or Representation Emitter Faust. Remember shadow Sinclair has negative coins: Do Not Clash his Skill 3. It will lie to you about success rates.

    • 2: Kurokumo Interlude This is the easiest section of the three, because they can't use EGO. If you're low on resources, I'd recommend fooling around a bit to gain more, or you can just wipe them with multi-target slash EGO, like 4th match flame, Contempt, Awe Ryoshu, or dimension shredder. Jun only appears when there is 1 or 0 henchmen remaining, which is hilarious because he can't even use his terrifying counter.

    • 3: Blade Lineage Shadows This fight *could* be scary, but it isn't, because you should be starting it at 35-45 SP and plenty of EGO resources. spam some multi target EGO (ex. overclocked sunshower yi sang into blind obsession) and watch your enemies vanish. The person to kill is shadow meursalt, 100%. Again, DO NOT CLASH THE SKILL 3. use faster unopposed attacks to stagger him before he uses it.

    Section 3) This first fight is the hardest fight of the railway, hands down. Good luck! You should use all damage types for this section. Sinking or tremor - reverb are your best archetypes for sure.
    • 1: Fast Top Tier Shadows Welcome to the world of "oops those are the strongest identities in the game huh." You will be fighting 12, with the same tag-in replacement buffs as your units. Besides generally being top tiers, these identities are FAST. you can counteract this with Yi Sang's base EGO, or just accept that you'll get hit. Besides being afraid of the charge-based damage dealers, you should also be careful of Outis & Meursalt, because Sunshower & Pursuance roll super high. Again, they won't cast EGOs turn 1, and lower health enemies are more likely to cast EGO. Sinking will help. Allowing enemy skill 1's to hit you while you focus on killing other will help. staggering shadows before they cast EGO same turn will really help. Good luck.

    • 2: Sheep :) This bossfight isn't hard at all compared to the shadows. Resists blunt, weak to pierce, but mostly weak to gloom, sloth, and wrath. Again, sinking or tremor-reverb. The gimmick of this fight involves plugging in the sheep! that electric box has to have some wires, right?

    Section 4) This is the final section, and is easier than that top tier round. Again, sinking or tremor reverb are the best, but generally we're seeing weakness to blunt, sloth, and gloom.
    • 1.1: Grand Welcome When you start the fight, you'll have some options for buffs, which are as follows:
      • Joy: max speed +2, 20 SP, grand welcome ego gift (this is probably the best)
      • Sorrow: +1 clash power, 20 SP, grand welcome ego gift
      • Wrath: 1 damage up (+10% damage), 20 SP, grand welcome ego gift
    • 1.2: Sinking shadows you will fight 12 shadows of sinking IDs. they will also get the mask of sorrow effect, just to make it fair I guess. Most of these shadows will be weak to pierce, so multi-target EGO them into the floor! perfect! Again, this is a hard fight, but now that they don't outspeed you most of the time, it's much more manageable. As always, sinking works best against sinking.

    • 2: The King (terminus) On fight start, you'll get to change masks (go for damage up unless you need sanity), and also get an event that will halve sinking potency/count on all your sinners if you pass the check, so make sure people are close to max sanity. This fight is wayyy easier than the shadows. There's a gimmick, but I basically ignored it on my first fight by accident. Basically, just make sure to win clashes with every sinner and you'll be fine. Other than the massive binds attack, he isn't that difficult, as his attacks are only strong if your team has a ton of sinking on them.

    Abnormality Boss Walkthroughs (spoilers)

    Portrait of a Certian Day
    The gimmick of this fight is identifying the master portrait. This can be done in 2 ways: the master portrait will have a brighter glow than the false portraits when attacking the abnormality. The master portrait will have a defense move instead of a dodge move, and will have the skill name "master's portrait." Kill the master's portrait, and the boss will get fragile instead of protection.

    Dreaming Electric Sheep
    The gimmick of this fight is to stop the buffed version of "electric screaming" from happening, because if it does the sheep might just wipe your team. This is done by plugging the sheep in. To plug in the sheep, have a sinner win a clash against the electric generator. The next turn, have that same sinner win a clash against the sheep's pride skill, "grounding refusal" (will be in the first skill slot) to give the sheep 1 'plugged in.' That same turn, a different, slower sinner can get another plug from the box. Once you've given the sheep 3 plugged in, it will get staggered and lose all charge. You have 5 turns to plug the sheep in each time, and it only takes 4 to do so, so you should never get hit.

    The King in Binds
    The general gimmick of this boss is to gain a lot of power to all his skills if your units are under the sinking status effect. Winning clashes against the king will reduce your ID's sinking count, which makes it pretty easy The second gimmick is to avoid is the AOE skill "present thyself before the king" which deals about 150-250 damage to every target. To avoid this, make sure every ally has "bandages of the king in binds" on them by the 3rd turn or earlier. This can be gained by breaking the king's body part, and specifically winning clashes against the Sloth skill "Chains of binding"
    Notable Identities Intro
    Here are my recommendations, shrunk down to ~3 per sinner, as well as any "bad" identities a sinner has. This list is to let new players be able to recognize particularly good identities on acquisition, or decide who to buy. This game is impressively well balanced. There are clear top tier teams or identities, but the difference between a top tier team and a good team is minor in most game modes.

    There's slight general power creep (newer identities are stronger than older ones on average), but this includes newly added standard fare (S0) identities as well. Uptie V will probably try to fix this, whenever that update drops.

    If you want a full tier list, check this one out. You can sort for who uses a status effect, sin type, and sinner. I don't agree with all their sorting methods (mostly there are way too many Identities in the "damage dealers" category), but it's overall pretty accurate.
    Prydwen Limbus Tier List [www.prydwen.gg]


    Notes on Walpurgisnacht, Uptie IV, and max power
    Walpurgisnacht (abbreviated SW) is an event that happens ~4x a year, and drops special, event limited identities and EGO. When the event is happening, you can buy previous SW characters in the Dispenser with shards, and SW identities / EGO become available in the regular draw table for a limited time. Unfortunately, all of these ID / EGO are very strong. The 00's are some of the best 00's, and the 000's are nearly game changing for their archetype. The EGO are also busted, such as having multiple coins, insane passives, insane damage, or all of the above. I get why they do it ($$), just be aware you might want to save up crates & lunacy for when it appears.

    Uptie 4 is... a little bit wonky. New identities have powerful Uptie IV's, but older units (old S0, S1, first half of S2) can have really weak upties, because UT4 was originally a balance patch. This meant that strong identities at the time (ex. R corp Heathcliff) got basically no buffs, while bad identtiies at UT3 at the time (ex. R corp Ishmael) got massive buffs. The majority of units get a big boost in power, but a lot of old 000's get almost nothing. This is less of an issue with 00's, but old 00's just have worse numbers than newer ones.

    UT4 is borderline required for all charge or poise ID's , because the increased charge count / poise count gain decreases the wind up of their skills to 2-3 skill usages rather than 4-5.

    I reference "max power" Several times. This refers to the maximum base power an attack can deal, all coins and effects aligned. For example, One who Grips Faust's 3rd skill has a base power of 6 and 3 +2 coins, with no bonus modifiers, giving a max power is (6+2) + (6+2+2) + (6+2*3) = 30 (this is very low for a skill 3). This is different than clash power, which in this case would be 12 (this is abysmal that's a skill 1 clash number).

    For the record, while I write about trends in sinners, I don't know which ones are intentional and which ones are basically superstition.

    What makes an identity top tier?
    Here's a short bullet point list of what makes an identity really good:
    • High numbers of coins (this translates to more damage)
    • high base rolls
      • Skill 1's average rolling ~9-11 without conditionals, or ~14-15 with conditionals
      • Skill 2's average rolling ~15-17 without conditionals, or an average of 19 with conditionals
      • Skill 3's average rolling ~16-19 without conditionals, extremely variable with conditionals
    • Easy to obtain and powerful conditionals
      • Doesn't require specifc support from other teammates (in status effects, SP, or HP)
      • Conditionals give coin power, rerolling coins, or upgraded skills
      • Conditionals take little or no effort to obtain or aren't important
    • Damage bonuses (there are 3 types):
      • Offense Level Up (also increases clash power! can be given by passives)
      • Damage Up or specific % damage bonuses
      • Fragility application
    • attack weight increases are always good
    • Accelerated Sanity gain is always good

    • Damage is significantly more important than health pool / tanking ability, but team support is still useful.
    Identities: Short form top 20
    Here's a rough outline of what identities are currently the best in the game. News flash, they're all 000's. None of these are in a particular order, because that order can be argued over, and is situational. These identities are here because they're really useful in all versions of combat and don't require super precise team building.

    List updated for the end of Season 4: Clear All Cathy (Early Oct, 2024). Zwei West Ishmael is the most recently released Identity.

    Top Fiveish
    • (S0) Ring Pontilist Student Yi Sang, Stupid high numbers, accelerated SP gain, Offense level gain, works on any team, just wants any debuffs. Best bleed ID.
    • (S0) W Corp Ryoshu, Glass cannon damage dealer who deals very very high damage. Fighting with the other ryoshu for best Charge ID.
    • (SW-4) Red Eyes & Penitance Ryoshu, tank/support with great damage but more windup than W corp Ryoshu.
    • (S3E) Blade Lineage Mentor Meursault, high damage and gives massive buffs to blade lineage ID's. Arguably best poise ID.
    • (S0) Deici Hong Lu, really high damage, very powerful skill 1
    • (S4) Wild Hunt Heathcliff, feed him corpses and watch him beat the game. Complicated but very powerful.

    Spots 6-10ish
    • (S0) Deici Rodion, a very good tank with high damage, coins, and numbers.
    • (S0) W corp Don, great damage and inflicts fragile
    • (S0) Cinq Association Sinclair, great damage and clashing
    • (S1) He Who Shall Grip Sinclair, insane damage but negative coin ID
    • (S4E) Multicrack Fixer Faust, a charge identity that excels in longer fights.
    • (SW-1) Regret Faust, best tremor identity and amazing multi-target for fights with many enemies

    A few more really good ID's Rounding out the top 20
    • (S3) Pequod Harpooner Heathcliff, great tank that can deal a ton of damage at low health
    • (S3) Pequod Captian Ishmael, strong attacker with really really good support for the team, best buffing ID.
    • (S2E) Molar Office Outis, a really good tremor / discard damage dealer
    • (SW-4) Solemn Lament Yi Sang, a special sinking ID that does even more damage you'd expect
    • (S0) R corp Rabbit Heathcliff, amazing for nuke / damage teams, but suffers in long fights
    • (SW-3) Dawn Office Fixer SInclair, less consistent than the above Sinclairs, but probably performs a bit better in an optimal setting. Best burn ID. Needs SP support.
    • (S2E) Molar Boatworks Ishmael, best sinking ID, also some fragile and good damage
    • (S0) Zwei West Ishmael, a tank / tremor ID that just rolls stupid high if she gets multiple skill slots. Also free tremor bursts on clash win and a clashable defense skill that rolls super high.
    • (S4E) Yurodivy Captian Hong Lu, best tremor identity (has tremor - reverb), need I say more

    ...poor Gregor. He's got no ID's on this list. sucks to be him I guess.
    Notable Identities (1/3)
    Yi Sang
    Yi Sang identities usually have debuffs, and they also like inflicting status effect count which is useful. All EGO moves use Sloth.

    (S0) 000 Ring Pontilist Student Yi Sang (damage, bleed, everything). Applies high status effect counts randomly, has a Skill 2 max power of 84 (insane, easy conditionals) and a skill 3 max power of 62 (low nuke range). Wants negative status effect support of any form, can be put on any team, and has SP regen passives. Just scarily good, in the top 5 IDs right now.

    (S0) 000 W corp Yi Sang(charge, rupture). Pretty much the best rupture identity in the game, due to his high damage, rupture count application, and ability to use Dimensional Shredder EGO. Doesn't have an insane damage skill 3, but it's high damage nonetheless. Has the highest rupture potency/count application in the game.

    (S2 / SW-4) 000 Effloresced E.G.O:: Spicebush Yi Sang & Lobotomy E.G.O:: Solemn Lament Yi Sang (sinking, damage). Both identities have unique sinking effects, high offense levels, and great damage. Spicebush has AOE skill 2 and his Skill 3 has sinking deluge, which makes his skill 3 the highest damage potential in the entire game, dealing 10- 20 thousand damage if the enemy has 99 sinking potency & count. Solemn Lament Yi Sang has a unique sinking called butterfly that is useful for the whole team and deals high bonus damage. Better rolls overall, and better against low HP enemies, but can't obliterate bosses in a couple turns.

    (S3) 00 Pequod First Mate Yi Sang (bleed, poise). Good damage. Has a really good skill 2 that rerolls on crit, up to a max power of 80, but requires high poise count to use it (so you also need Pequod Captain Ishmael). Can apply 6 bleed count with his skill 3, which is the highest in the game. Terrifying in mirror dungeon with some poise gifts.

    Yi Sang's worst non-base ID is probably (S0) 00 Seven Association Section 6 Yi Sang, just because his coin rolls aren't good enough anymore and powercreep is now beating him to death

    Faust
    Faust identities don't really have a throughline, although they generally inflict debuffs.
    (S4E) 000 Multicrack Office Rep Faust (Charge, damage) A great charge identity that gains 1 charge potency for every 10 charge count spent, allowing her to increase her coin power and damage a lot. The downside? you always need 3 envy resources to keep her passive active or it all vanishes into thin air. Very strong, especially in longer fights, and needs zero team support of any type.

    (SW-1) 000 Regret Faust (tremor, AoE, debuff) An amazing identity for group fights, regret Faust can hit 2 targets with skills 2 and 3 very easily. Her passive is also a game changer for tremor teams, as it pretty much gives a 10-20% damage boost to moves after tremor burst. Also can apply plus coin drop easily. Probably in the top 10 ID's right now.

    (S4) 00 Wuthering Heights Butler Faust (sinking). Has great sinking count application, and has good clash / damage rolls on a sinking team. not good on any other team. Sinking + echoes of the manor is amazingly good for story fights where enemies have sanity. Has good skill affinities to fuel her fluid sac EGO (S1), one of the best EGO in the game (HP & SP healing, multi-target).

    no bad identities here! Just 0 LCB Faust.

    Don Quixote
    Don identities all do conditional buffing (like haste) or conditional skill strengthening. Her damage type is mostly pierce.
    (S0) 000 W Corp Cleanup Don (charge, damage!!, fragile). One of the best clash/damage units in the game, but needs 10 charge count to do so. With uptie IV, it's really not that bad (2 turns), and with (S0) telepole or (S4) electric screaming EGO, it's easy. You really want a full charge team to use her charge EGOs, but she's quite powerful alone. Skill 3 max power of 95. She's kinda uncontested when compared to other Don ID's just because her rolls are so good.

    (S3) 000 Middle Little Sister Don (A-res, damage). An envy absolute resonance focused identity that has a great counter skill and can dish out insanely high damage IF you have a well-built envy team. The issue is that there isn't a straightforward all envy affinity team, but she's still pretty good with only a short envy chain.

    (SW-2) 00 Lobotomy E.G.O:: Lantern (rupture, self-heal, tank). Nearly unkillable tank that turns aggro and rupture into healing. Also applies enough rupture count to not consume a building rupture stack. Her support passive can be used to give healing to a different tank. Ok damage, pretty good clash for an 00.

    (S1) 00 N corp Don has iffy effects and meh rolls. (S0) Shi Association Don is also pretty bad.

    Ryoshu
    Ryoshu identities usually have high damage and low defense (offense modifier is usually +3 to +5), and she also gets flat % damage bonuses on coins or passives. Almost no gloom, and slash-heavy overall.
    (S0) 000 W corp Ryoshu (charge, damage!!!!, slash fragility, nuke) higher damage than W corp Don, but weaker defense. One of the absolute highest damage dealers in the game. Uptie IV is very useful for her, as it lets her use her skills at max output one after another (higher charge, higher damage), and gets to 15+ charge by turn 3. She has the ability to use her S3 at below 15 charge at the cost of HP, which is quite useful, especially in shorter fights. Amazing damage output on both skill 2 and skill 3. gets charge from killing enemies and damage bonuses from charge. Skill 2 max power of ~56 which clashes in the 20's. Skill 3 max power of ~91 with +5 offense level. Arguably the best identity in the game.

    (SW-4) Lobotomy E.G.O:: Red Eyes & Penitence Ryōshū (healing, damage, charge). An identity that's primarily damage focused, but has the ability to tank and heal HP / SP for the team. Her rolls are great and she's tanky, but she has a longer windup and wants a bit more team support than W corp Ryoshu. You can argue back and forth about which is better, but for the purposes of this list, getting W corp for free whenever you want makes her more useful. Both will serve you extremely well in all modes of combat.

    (S0) 00 Liu Association Section 4 Ryoshu (burn, damage). A burn identity that gets clash and coin power bonuses against burning enemies, making her damage output and rolls very good on a burn team. Shouldn't be used on a not burn team, but is one of the best burn IDs.

    (S3) 00 LCCB Assistant Manager Ryoshu is basically just bad 00 LCCB Ishmael, and every other Ryoshu (including 0 LCB Ryoshu) is probably better.
    Notable Identities (2/3)
    Meursault
    Meursalt identities in general are defensive, which makes them, mmm, bad, because high offense levels are almost required in late game content. Comparatively, a lot of his EGOs are very good, and he's got utility, just not damage (blade lineage mentor aside). He is blunt-heavy in the damage type department.
    (S3E) 000 Blade Lineage Mentor Meursault (poise, damage, support) A very high damage identity that gives massive, and I mean massive, buffs to all other blade lineage identities, singlehandedly making the blade lineage team viable again. His skill 3 requires a clash lose to use "to claim their bones," a counter skill with a max power of 56 (multi target) or 112 (single target) + up to 105% damage boost on crit. The issue is that it's actually kind of hard to lose the clash. Easily in top 5 identities right now (May 2024).

    (S0) 000 Dieci Meursault (sinking, discard, insight) a bad Dieci ID when compared to Hong Lu or Rodion's great numbers, but still pretty decent. He's a Dieci support identity, but his main issue is that he wants other identities to discard their skills, which is kinda not the optimal play for Dieci 000
    s. Can get up to 6 insight and do some weird things with it, but still is in the realm of "good" not "amazing."

    (S3) 00 Middle Little Brother Meursault (bleed, buff, debuff) A pretty good 00 that can apply a variety of debuffs and has an insanely good SP heal support passive. Wants to be used with other Middle finger ID's (of which there are 1, middle little sister Don).

    (S1) 000 N Corp Grobhammer Meur is pretty awful at this point. (S0) 00 Liu Meursault is also not great.

    Hong Lu
    Hong Lu identities frequently have SP healing in their moveset or passives, and heads hit effects.
    (S0) 000 Deici Assocaition Section 4 Hong Lu (sinking, damage, discard / insight).
    Has a full discard kit that wants you to discard a skill 3 ASAP to buff all of his moves to the moon. His first skill will reroll coins on attack, his other 2 skills get coin power, and he gets damage up from discards. A really good damage dealer, and two skills are sinking count neutral which is great. Definitely in top 10 IDs right now.

    (S1) 000 Tingtang Gangleader Hong Lu (bleed, SP healing, coin/skill reuse) his skill 3 is a 30 max power single coin skill that will be rolled again on kill, and his skill 2 will roll a 4th coin with a +50% damage bonus if the enemy (or abnormality part) is at below 25% HP. His passive heals SP and so does his evade. Deals some bleed, and bonuses to bleeding enemies.

    (SW-1) 00 Hook Office Fixer Hong Lu (bleed, haste) inflicts both good bleed and bleed count, turning haste / speed difference into more bleed count & damage. A great all-bleed identity that rolls well and gets super fast without much effort.

    (S0) 00 Liu Association section 5 Hong Lu (burn) inflicts good burn count, and basically nothing else. Requires a burn team to be useful, so he's probably the worst Hong Lu ID. Also burn isn't great, and there are better burn ID's.

    Heathcliff
    heathcliff identities don't really have a strong through line skill set wise.
    (S4) 000 Wild Hunt Heathcliff (sinking, damage!!, AOE). One of the undisputed absolute best identities in the game. His only downside is that he requires corpses (killing enemies or using skill 3's). he uses these to gain coffin, which turns into several types of buffs and damage up, such as attack weight, clash power, and speed. An unstoppable monster that takes some getting used to, as the main game plan is to use his clashable counter to summon a horse and then trigger advanced skill 3 (which loses the horse) every other turn like it's Heathcliff's first attempt at horse riding and he cannot for the life of him figure out how to stay on a horse.

    (S3) 000 Pequod Harpooner Heathcliff (damage, tank, bleed, poise) is one of the best tanks in the game. Due to his passive, the more damage he takes, the more damage he deals, and his extremely low stagger threshold makes this a fact you can actually play with, rather than watching someone get double staggered and promptly ground to a fine paste. He has pretty high pierce damage and very good clashing overall as well. More powerful in longer fights or fights where taking damage is basically unavoidable. Note that his damage up passive also applies to EGO.

    (S4E) 00 Multicrack Office Fixer Heathcliff (Charge, charge support, damage) This identity can increase the charge count gain of your team as well as gaining power as more charge is spent, upping the abilities of his skills just like Multicrack Faust. Really good both as support and just in pure numbers for a 00 rarity ID.

    (S0) 00 Shi Association Section 5 Heath is his worst identity, just because the low HP buffs aren't good enough. This is also an identity that's been here since the game was launched and was powercrept.

    Ishmael
    Ishmael has really really good identities. Her base EGO's passive is very good, and all her 000 identities are powerhouses, with her 00 identities being circumstantial powerhouses (mostly). She has nearly zero slash damage skills. All EGO use Wrath.
    (S3) 000 Pequod Captian Ishmael (buffs, burn, bleed, poise) Yeah, hello, it's a boss ID, they're busted. What I like about her is that she's a busted support, and is not quite OP in her own right. Slot her on a poise/bleed pride team, and she'll provide massive buffs. gives offense/defense level buffs, aggro, and more. She inflicts both burn and bleed, and can give the team an insane amount of poise. Note that she has unusual sanity gain/loss conditions.

    (S2E) 000 Boatworks fixer Ishmael. (sinking, tremor, fragile, damage) Can add the highest sinking stacks/potency in a turn (without EGO). Also generally high damage. Her passive buffs her sinking application if the enemy has tremor, and her self tremor stacks let her 3rd skill apply 3 fragile next turn, which is amazing. Her skill 3 has 61 max power, which is pretty good too. Doesn't need a sinking team, or more than one tremor identity.

    (S0) 000 Zwei West Ishmael (tank, tremor, defense level, aggro). An incredibly powerful tank that gains near ludicrous buffs from using her defense move once every two turns. Also has a clashable guard for fun, the first unbreakable coin, and the ability to trigger free tremor bursts on clash win. Combine this with lots of aggro and defense level up values in the 20s or higher gives you a tank that is nigh unkillable with 2+ skill slots. Also has the ability to force clashes regardless of speed which is bonkers.

    (S0) 00 LCCB Ishmael (rupture, tremor, ammo, fragile, aggro). Can deal the most tremor potency/count and second most rupture potency/count in a turn of any identity, but needs ammo to do so. Will fall off in longer fights (bosses), but is incredibly powerful in short ones. Due to her aggro & higher defense, she can still be useful when she runs out of ammo.

    (S2) 00 Sloshing Ishmael is pretty bad: She's a weak tank, and she's a tremor ID that has a "subtract 4 tremor count" move, which defeats the purpose of putting her on a tremor team at all. Requires uptie IV for aggro skills to be remotely useful.
    Notable Identities (3/3)
    Rodion
    Rodion identities don't have much of a through line, although gambling is often built into her kit with heads hit effects and odd conditional damage bonuses.
    (S0) 000 Dieci South Section 4 Rodion (discard, insight, sinking, aggro) Dieci Rodion is powerful, but a little tricky to wrap your head around. Discarding high ranking skills (with guard or S2/S3) gets higher insight, and gives her massive quantities of shield. Taking damage gives her up to 5 blunt damage up. She's a tank, but deals real damage even before you include that blunt damage up, and the discard shielding makes her able to tank hits without actually tanking damage. Also has good sinking (+ rime shank EGO) synergy.

    (S2) 000 Rosespanner Workshop Rep Rodion (charge, tremor, coin reuse) is a charge/tremor unit that needs zero charge or tremor support to function at basically full capacity. Her skills and passives work to increase her burst tremor damage, and her skill 2 has coin rerolling that can bring it up to 64 max power. She'll put out good damage & stagger threshold damage pretty much regardless if other tremor units are present, although she will be a tremor bursting machine on a tremor team.

    (S0) 000 Liu Association Rodion (burn, more burn) is a burn identity that, you guessed it, burns things and deals more damage if they're burning. Basically self sufficient, as her second skill applies 3 burn count. Coin power bonuses on all skills, which is great.

    (S0) 00 Zwei Rodion & (S1) 00 N Corp Rodion are both pretty meh at this point. Actually, all of Rodion's 00's are meh.

    Sinclair
    Sinclair identities don't really have a throughline.
    (S1) 000 The one who shall grip SInclair (negative coins, burn, damage!!!). Nclair, the negative coin damage dealer supreme. His skill 3 has a max power of ~107 while fanatic (90 normally), which is the highest in the game (without passives). He is an all negative coin identity that loses SP every time he uses a skill, but his guard regains SP. His kit setup means you can basically ignore his sanity until it reaches about -30, but it will generally hover around that value if he's winning clashes. His skills 2 and 3 are amazing at clash and damage, having clash ranges of 12-16 and 18-30 respectively. His ideal team comp is burn or N corp, but his damage output is so high he works on any team. You can also unequip his higher tier EGO to prevent corrosion disasters.

    (S0) 000 Cinq Sinclair (poise, haste, damage). Cinq Sinclair is very powerful, but he does this by gaining a ton of poise count. poise count turns into haste, and a higher speed than his opponent turns into coin power bonuses. He can then spend 10 poise count with his skill 3 to deal a lot of damage & crit. The final coin of that skill gets a whopping +70% dmg crit modifier.

    (SW-3) 000 Dawn Office Fixer Sinclair / Philipclair (Burn, AOE, damage). An identity that really wants sanity regen support (like really really wants it), but once he has it he can do crazy numbers. Basically plays as two distinct identities: a ♥♥♥♥♥♥ egg version that rolls like a 00 and a very strong "waxen pinion" partial E.G.O manifestation version that rolls amazingly well. The problem? the longer he's in his partial E.G.O state and the more skills he uses, the more sanity he burns until he exits his form.

    (S0) 00 Zwei South Sinclair (tank, tremor, buff, debuff) is awful. A tank that isn't really good at tanking, and has 4 coins total across his 3 skills. The debuffs are ok, everything else is not. please don't. Not to be confused with Zwei West Sinclair (Season 5 ID).

    (S2E) 00 Molar Boatworks Sinclair is kinda horrible and weird: technically the highest tremor count application in the game (+10 to 99 count), but has terrible rolls which makes him functionally useless outside of mirror dungeon.

    Outis
    Outis doesn't really have a throughline, but she has zero envy skills.
    (SW-2) 000 Magic Bullet Outis (Burn, damage, multi-target) the most important burn unit, for unfortunate reasons. She has a unique burn, "dark flame," that deals damage by dark flame count * burn potency at turn end, and applies some defense level down. Dark flame can be a value between 1 and 7, and her skill 3 can get an attack weight of 7. The max single turn damage potential of a burn team went from 99 a turn to 792 (7 dark flame + 99 burn) per part per turn. It can't be used every turn, but her general damage rolls are pretty good as well.

    (S4) 000 Wuthering Manor Butler Outis (sinking) is a very good sinking identity that inflicts a bit of sinking count and a lot of sinking potency, as well as the "echoes of the manor" effect which basically gives a 50% chance for an attack to not decrease sinking count. Enough said.

    (S2) 000 Molar Office Fixer Outis (discard, tremor, damage) Uses discard for self-tremor and damage. Has good damage and clash, but it's very difficult to use her skill 3 at full power (with 1 skill slot) as it needs 3 turns in a row of discarding skill 1. Is very powerful if she has multiple skill slots, otherwise she's good but not amazing. Her defense discards, so you can chose to never use skill 1, and her passives are very good. Her support passive's +1 to self-tremor is also extremely useful.

    (S0) 00 Cinq Outis (haste, poise, bind, aggro) A self-reliant poise / haste ID that has a good evade and good clashing. Because her evade can roll an 18, and she has aggro skills, she's amazing at, well, avoiding everything. in longer fights, she tend to build a lot of poise, which translates into more haste, which is used for better clashing and the above 18 power dodge roll.

    (S0) G corp Outis is probably her worst ID, just because Butler Outis is a much better sinking identity.

    Gregor
    Gregor has a lot of self healing, and doesn't have any pride skills. Also all of his identities are kinda bad. Everyone else has at least one easy top tier, Gregor Doesn't.
    (S4) 000 Edgar Family Heir Gregor (sinking, more sinking) is an identity that can deal a ton of damage to enemies with high sinking, making him quite useful on a sinking team, assuming you aren't trying to cash out with Spicebush Yi Sang's sinking deluge. Overall, a little low on sinking count application, but gets a lot of bonuses from highly depressed enemies.

    (S0) 000 Zwei Association Gregor (tank, defense buffs, aggro) Applies defense level/power up to all allies, raising team survivability. Because he can gain coin power from his defense level buffs, his clash abilities and damage are good. He needs multiple skill slots to reach crazy numbers of defense bonuses, but that's usually not necessary unless he's soloing. His shield values are dependent on his buffs, which makes their usefulness inconsistent. Has good passives.

    (S2) 00 Rosespanner Workshop Gregor (charge, tremor, rupture) is an interesting identity that turns both charge and tremor into rupture. Has very good rupture application, but needs the target to have rupture count to use it well. Put him with (S0) 00 LCCB Ishmael in a rupture team and you're all good. Has good clashes but meh damage.

    (S1E) R.B Sous Chef Gregor (bleed, debuff) is only good if you're using him with (S1E) 000 R.B Chef Ryoshu, otherwise he's weak for a bleed identity and has hard conditions to manage. Again, self healing & weird support healing (also requires R.B Ryoshu).


    EGO Details
    There's quite a few EGO in the game at this point (6-7 per character), and they're painfully difficult to compare to each other in game. To fix that, I'll just tell you how everything works, to the best of my observations.

    I will reference the rank of EGO much like the season, abbreviating Z, T, H, W, A for increasing tiers. I will also use slashes between roll values to signal normal / corrosion max rolls (ex. Ebony Stem Outis (H) would be 29 / 36 ). Finally, I refer to attack weight as both "atk. weight" and "slots" (as in, the number of skill slots it targets). Sorry for that, I just can't keep myself consistent.

    What are EGO good for?
    4 things:
    • Very good for clashing: often have very high base values and sky high max values
    • Multi target! The damage output of EGO skills lags behind a lot of skill 3s, but only when there's a single enemy / abno part on screen. Uptie IV often increases attack weight.
    • Multi-coin E.G.O allow for high damage to a smaller number of targets, with the detriment of significantly weaker clashing abilities.
    • Passives that last for the rest of the fight (including future waves)
    • Using EGO changes your sin resistances. People tend to forget about this, but it means you can frequently fight bosses while taking half the damage they deal with a bit of planning (resist damage type + resist sin type).


    Standard EGO values

    First off, some trends. SP healing and Increasing attack weight both increase resource cost, lower damage rolls, and increase sanity cost. Passives and skill effects seem to have minimal impact on cost / damage numbers, with the exception of very high potency & count application. Higher than normal weight or SP regen will either greatly reduce damage values or increase cost by 2-4 resources and/or 5-10 sanity points. ex.
    • (S2) Sunshower Yi Sang (W) is a 7 atk weight 10 cost skill that has a sanity cost of 35 SP, that has a ton of buffs associated with it. This results in 33 / 37 damage rolls (including +20% damage boost makes it a 40 / 44). Also has SP healing passive.

    • (S1) Ebony Stem Outis (H) has the same 7 atk. weight 10 resource cost, and normal sanity cost (20). She has low-average damage rolls for a H (29 / 36) at +0 offense level, and of course high sin resource cost.

    • (S1) Fluid Sac Faust (H) is a 9 EGO cost / 20 sanity cost skill that has abysmal roll values for a He EGO: 24 / 29 at -1 offense level for 5 targets. Why? Because this attack also heals 15-25 sanity points per sinner, or 75-200 SP total.

    Currently, all EGO's resistance types are fatal to 2 sins, neutral to most, and then ineffective/endure to sins related to the abnormality the EGO is from, which is usually the skill's own type (but not always). Higher rank have more and stronger resistances.


    Note that this table is specifically about uptie 4. If you subtract 2 from the atk weight column, it's pretty much the same as an uptie 3 table. The attack weight column assumes max possible atk. weight, including random conditions, just like I assume maximum possible coin roll value. Sanity cost also assumes total sanity cost, as several Waw EGOs have low usage cost but "lose 10 sanity for X turns after use" conditions.

    Rank
    Normal EGO
    Resource Cost
    Normal Sanity Cost
    Normal Atk. Weight Range
    Normal Max Roll Ranges
    Sin Resistances
    (all identical)
    Zayin
    4 (max 6)
    10-15
    (max 20)
    1-3
    23-28
    2 Fatal (2.0)
    1 Endure (0.75)
    Teth
    5-6 (max 8)
    15-20
    1-3
    (4-7 rare)
    25-30
    2 Fatal (2.0)
    1 Ineffective (0.5)
    He
    6-7
    (max 10)
    20-25
    (max 30)
    3-5
    (2- / 6+ rare)
    30-40
    Wingbeat Ishmael can roll a 217 (~4% chance)
    2 Fatal (2.0)
    1 Endure (0.75)
    1 Ineffective (0.5)
    Waw
    10-12
    (max 14)
    30-40 (total cost)
    1, 5-7
    30-40
    45-75 for single target
    2 Fatal (2.0)
    1 Endure (0.75)
    2 Ineffective (0.5)
    Aleph
    ????
    ?
    ?
    ?????
    ????????
    I'm uncomfortably close to entering all this information into an excel spreadsheet and just finding standard deviations & means for everything, but that's a couple hours of my life that I probably shouldn't spend.....

    The long and short of it is that this game is very well balanced, and you can probably see why now that you've looked at the table. Only a couple EGO manage to be incredibly useful or incredibly bad, and those will be below.
    Notable EGO (aka. what to buy)
    I'm debating changing this whole section. Besides fluid sac faust, Walpurgishnacht EGOs and high rarity EGOs are basically the best now. This list is still pretty much best of the best though.

    Here is a short list of the best EGO currently in the game, many of which you have to buy from shops as they are not in the gacha table. Project Moon currently has no plan of adding past limbus pass EGO to the gacha table, instead forcing you to buy it from the shop. This choice is... interesting. Sorry new players I guess.

    (S1) Fluid Sac Faust (H)
    This is a multi-target (5 slot) 9 cost EGO that provides the entire team HP and sanity point healing along with alright damage. It can heal a max of 25 SP and 15% max HP for all teammates (with a team of 8, that's 200 SP healing), as well as doing decent damage and giving some protection. This EGO is amazing for jumpstarting your clash win streak, especially when you are fighting enemies that are an equal or lower level than you, as you get no SP gain from their death. The savior of mirror dungeon floor 1.

    To be clear, the damage dealt to an individual enemy is weak, but the 5 targets makes the total pretty good.

    The corrosion instead deals 20-30 SP damage on hit, making it a lot less useful, although you can harass human opponents/bosses very easily due to the 5 atk weight.

    The passive gives 2 protection (20% damage reduction) to the lowest HP ally every turn, which is good.


    (S2) Sunshower Yi Sang (W)
    This is a multi target (7 slot at uptie IV) 10 cost high damage EGO that provides sloth power up, sloth damage up, and 3 protection to the entire team for 2 turns, as well as being able to regen sanity. Seeing a trend here?
    Jokes aside, the secret to this EGO is the "heads hit effect" of healing 15 SP. Because this is an on hit effect it activates every time an independent enemy is hit, which is up to 7 times (105 SP regen). This means that the EGO, despite its 35 sanity cost, maxes out Yi Sang's SP 60% of the time, which has the added bonus of making it spammable.

    It's also the current highest damage 7 slot EGO, as uptie IV raises its power, resulting in damage rolls of 40 / 44. If you use it twice in a row it will be even higher damage. (let's say you use normal and then corrosion, giving +3 power +40% damage, bringing the max power up to 56 with 7 attack weight. Using the corrosion twice in a row will be even higher.)

    The corrosion inflicts sloth & pierce fragility for 2 turns which is arguably better, and has a higher offense level. (cannot gain sanity from this attack)

    The passive heals 3 SP for every teammate every turn, which is surprisingly useful. It greatly lowers the risk of downward sanity spiraling.

    The only downside this EGO has is that it's a W, and therefore expensive to upgrade. It used to be a He EGO, but got balanced patched :)

    (S3) Blind Obsession Ishmael (W)
    A very powerful EGO that is also the first Waw, and the first EGO to basically require uptie IV to be properly useful. Because of those two facts, and the massive cost associated with upgrading it, I've put it below the other two. It is, holistically, worse than them.

    This is a 10 cost 7 slot EGO, both attacks can roll 35 with +0 offense level. The regular attack heals 25 SP for 4 allies, gives ishmael 42 charge, spreads 14 poise count randomly through the team, and gives 4 allies 2 pierce power up and damage up for the rest of the turn.

    The corrosion is a bit different: heals 3% of Ish's max HP per hit (up to 21%), gives Ish up to 7 poise potency and count, inflicts 3 pride fragility this turn and next turn, and gives 4 allies 2 damage up this turn and next turn.


    All of the rest of the EGO are less consistently useful than these three, because the above are EGO that buff, heal, multi-target damage, and regen the sanity they cost all at once. They understandably cost more EGO resources than other EGO moves, and therefore aren't spammable in normal fights, but you definitely want to have them.

    (SW-1) Regret Meursault (T)
    Yes, the actual attack is good (normal sanity/resource cost, 30 max rolls w/ high offense levels), but this is here because of the passive. The debuff clearing is also very useful, as it can be used to erase the downsides of his base EGO, Chain of others. Alternatively, you can use the base EGO debuffs to make the corrosion multi-target.

    This passive gives meursalt's leftmost move -1 base power and +2 coin power, which is massive, as several of his best identities have 3 and 4 coin moves. For example, W corp Meursalt's 3rd move normally has a max power of
    (5+3) + (5+3+3) + (5+3+3+3) + (5+3+3+3+3) = 50
    but with the passive, this changes like so:
    (4+6) + (4+6+6) + (4+6+6+6) +(4+6+6+6+6) = 76
    That's a 50% max power increase.

    To put it simply, this passive has zero real downsides and increases the strength of every 2 or more coin skill massively. He also has the +1 blunt power at low speed, which is again useful with chain of others.

    (S1) Rime Shank Rodion (T)
    The attack is pretty good (costs 8 resources, but understandable), but this is mostly here for the sinking count application and corrosion effects. First off, the corrosion targets the highest HP unit(s). This means that you can corrode all the time without concern for your sinners being annihilated, as any strong enemies or bosses will have much higher HP.

    Second, the regular attack can have 30 max power and inflicts 5 potency & +5 sinking count. The corrosion has 27 max power but can inflict 10 potency & +8 sinking count (these are at uptie IV). This is the easiest way to get high sinking count by far.

    Third and finally, the passive is an on-hit debuff to targets with 5+ sinking potency, which will always trigger on a sinking team. A pillar of a sinking team.

    (S0) Ardor Blossom Star Ishmael (H)

    This is a high damage EGO that raises stagger threshold by 40% of damage if it lands heads. At uptie IV, it has 3 / 5 atk weight with 41 / 41 max power, as well as inflicting a lot of burn.

    The corrosion can inflict a tremendous amount of burn if you are using a wrath heavy team (6 wrath moves that turn? 12 burn to everyone), and raises the stagger threshold even more. The passive? an "add 1 burn to 3 random enemies" on hit. A pillar of a burn team.

    (S1) Legerdemain Gregor (Z)
    This is an inexpensive, low cost, highly spammable 3-slot EGO: 4 sin resources & 10 sanity make it the same price as single target Zayin EGO, and it inflicts paralyze. It's very useful precisely because it is multi-target and spammable. If you have a fast Gregor, you can cripple enemy clashing (even on multiple abnormality parts), and if he wins a clash, his sanity might not decrease at all due to the low cost. Doesn't have high damage, but that's not really the point.


    Useless EGO (aka. what not to buy)
    Ok, nearly useless EGO. This list is, of course, partially opinion, but I have made an attempt to include the thoughts of the larger community (thanks random tier lists). This section will be a wall of text, as I'm trying to properly explain why the EGO are bad quite exhaustively.
    The EGO are paired up together, because a lot of the generally considered worst EGO are indeed from the same abnormality, so I organized it that way.

    (S2E) The Sodas (wellcheers returns!)
    Soda Ryoshu (Z), the worst in the game
    TLDR: high cost, nearly useless effects, worse than base EGO in every way.
    DO NOT BUY THIS PLEASE. Just terrible, especially compared to her default zayin ego. The skill power is quite literally worse than Forest for the Flames, as are the effects. 6 sinking and EGO resource amp for only Ryoshu is not comparable to 2 fragile next turn at all.

    Also weirdly expensive. Costs 6 sin affinity resources, like other SP heal multi target zayin EGOs, but it only heals 3 SP for the team (15-21 total depending on team size) on kill. Compare that to Faust's Representation Emitter, which heals 48 SP as long as the attack happens, and has an SP on-stagger passive, as well as hitting 3 enemies rather than 2.
    Soda Hong Lu (T)
    TL;DR: It's okay but it's struggling. Low damage, high cost, meh SP healing.
    The issue with this EGO is that it has normal damage rolls but -5 / -3 offensive level (which is -1 or -2 clash power), and it has a high cost at 7. Why? because it can heal SP. But it will only heal 30-38 (worse than [Representation Emitter]). Has a good SP healing passive for multi-enemy fights, but pointless on bosses.

    (S1) 4th Match Flame (from Scorched Girl)
    Note: 4th Match Ryoshu (H) is high tier. The other two are not.
    4th Match Yi Sang (T)
    TLDR: low clash/power levels, very underwhelming effects, abnormally high cost
    The main issue? Terrible max power for its resource cost & effects. This EGO is sitting at 20 / 24 max rolls, which is low for Zayin. His base Zayin EGO rolls 18+6 = 24, which is much better, as the base power is 6 higher!

    Okay, it has 5 atk. weight at uptie IV, and can deal 10 burn to each target, so maybe its comparable to other multi target EGOs? Wrong! This EGO costs 7 sin resources, while most Teth EGOs cost 5, and most Teth EGOs have an attack weight of 2-4 anyways. Sinclair's [lifetime stew] (we'll get to it) costs 6 resources and is a 7 slot. Most of these multi-target EGOs have significantly better effects as well.

    To compare fire to fire, (S2) Capote Ishmael (T) Corrosion costs 5 resources, has 4 atk weight, and has the effects of: applying wrath fragility, wrath damage up to the entire team next turn, inflicts 5 burn, causes 15 SP loss, and bursts tremor. Oh and its power is 27 -7 (corrosion) which is significantly better.
    4th Match Rodion (H)
    TL;DR: only negative coins (-18), pointless passive, good wrath setup but nothing else.
    This EGO is a normal cost, 3-5 slot attack that applies 3 wrath fragility next turn and 6 burn as an extra. The real issue here is the coin rolls: 38 - 18 / 33 -18 (corrosion power goes down because atk weight goes up).

    The issue is that this EGO is nearly useless if you are good at the game winning the fight you are in, as you can often expect the lower value of 20, making several base EGO more useful for clashing/damage.

    It is worth mentioning that the 3 wrath fragility is really good on a burn / wrath team, now that Rodion has a burn identity. on a wrath heavy team, this will be pretty good, as long as you have enough wrath EGO resources to launch the nuke (Ardor Blossom Star Ish).


    (S1E ) Lifetime Stew, courtesy of Basilisoup
    These two EGO aren't that bad, they're just extremely niche and hard to use, so you probably shouldn't buy them.
    Lifetime Stew Don (T)
    TLDR: Passive is largely harmful, needs to be spammed, average values & effects.
    This attack is actually completely normal: 5 cost (all lust), 21+4 / 22 +5 damage rolls, and hits 3 slots w/ +3/4 burn count. The passive and effect get very weird though.

    The passive converts 2 non-lust ego resources into 1 lust ego resource every turn. This is permenant, and will persist through fights in dungeons / railway. Why does this passive exist? Simple, this is a pure damage EGO that gets boosted by quantity & usage of lust ego resources.
    Unlike many other EGOs/skills, there's no damage modifier cap, so if you had an 11 long lust absolute res chain, the damage bonus would be +210% + 50% from resonance.

    But you'll never get these numbers in a regular fight. You can save up lust resources in dungeons, but in long, resource saving game modes, having a variety of sin ego resources is important, as you're not just type checking a specific enemy. The other major issue is that without SP healing support, this EGO isn't actually that spammable, due to its 20 sanity cost. The corrosion targets highest HP unit(s), but the attack will roll low due to its positive coins.
    Lifetime Stew Sinclair (T)
    TL;DR: Actually quite good, just really weird. You need (S1) 000 N corp Sinclair though.
    First, to get the "required Nclair" out of the way, the passive makes all tails coins inflict 1 burn potency, regardless of if the coin inflicts burn. This is only useful on Nclair, a burn and negative coin identity. 100% do not buy it otherwise.

    Unlike most other EGOs, the regular and corrosion versions of this attack are staggeringly different.The "regular" (awakening) attack has 7 atk. weight and is indiscriminate, targeting units with the least HP. It deals zero damage to allies, and its 18 - 8 coin flip makes it deal weak damage to enemies. If it lands heads, all targeted allies heal 10% of max HP. If it lands tails, all targeted allies get EGO resource amp & haste next turn, and all targets get 7 burn. EGO resource amp is nice in this case, as it will double your ego resource acquisition for a large chunk of your team for a turn. So this attack is weird, having middling healing, buffing, and damage. The damage output when it targets all enemies is actually pretty good, considering its much lower cost (6 resources) than regular 7 slot EGO attacks (10 resources). It's got niche case usage.

    The corrosion attack is more straightforward. 3 atk. weight, 24 - 12 coin flip (normal Teth range), and a higher offense level. This attack also targets low HP units, which means that it always hits like a truck, picking off low HP / staggered enemies (or allies). This, of course, makes it an absolute nightmare that can wipe your team if Sinclair hits -45 SP.

    So this EGO is very useful for N corp Sinclair, but also makes him more dangerous for the rest of your team. As long as you're careful about his SP, It'll be fine.


    Pretty much all other EGO are completely dependent on your team loadout for usefulness / uselessness. Hope this helps!
    Useful Resources
    Honestly, the best location to get a question answered about Limbus Company is the steam discussion board. Someone will answer your question, and answer it quickly. Then 2 hours later you'll have a civil argument discussion about your question giving multiple opinions and correct information.

    You can also go to the Limbus Company Reddit as they have a questions megathread, but you can get incorrect information there occasionally.

    If you have a question about code or something you can't find answers to, I'd go ask it in a Discord of a modding community, like at @Womangaming 's Discord Server[discord.gg].

    For game information and lore, head over to the wiki https://limbuscompany.wiki.gg/.

    For directories of skills and for ID and EGO rankings, there are a couple places to look:
    https://www.prydwen.gg/limbus-company/tier-list/ (Identities only)
    https://gll-fun.com/en/tierlist/identities (Has both Identities & EGO)
    Both of them have their problems and they don't agree with each other but there you are!
    Changelog, Friend Code

    Jul 2023: Guide posted, basically constant edits, uptie IV came out
    Sept-Dec 2023: RR2, unexplained facts & damage mod's, Skill usage effects, EGO sections
    Feb 2024: RR3, fixed out of date damage modifiers, updated recommended sinners, etc.
    May 2024: MD4 & MD4H updates, updated recommended sinners
    June 2024: updated status effect sections to be accurate to the current game
    Sept 2024: Late RR4 Update, linking wiki.gg resources, updating tier list for end of season 4.
    Jan 2025: MD5 & MD5H update, redoing status effect sections (in progress)

    Here's my Limbus friend code!
    L023335953


    Fun fact! I've noticed that my guide has been copied / plagiarized / scraped and posted on to some other websites as .....journalism articles??? I don't really think I can do anything about it, and they are often out of date copies, but if you're reading this anywhere that isn't on steam, change that <3
    49 kommenttia
    Bbopthroughhistory 4.12.2024 klo 20.52 
    This is a good guide.
    Randaru 21.10.2024 klo 7.54 
    Was happy to have The One Who Grips Faust until every guilde in existance said she's crap and I may as well restart from scratch since I have nothing else even remotely useful near the end of Canto 3. So sad.
    Scol1t 14.9.2024 klo 8.20 
    Amazing guide holy!!! I dont have words man, the amount of time you spent on it and also the amount of time i spent reading this is insane. I really like and the fact that you update it to this day, and tho i will refrain from sharing my opinion on other parts of best ids, as its the most controversial part (to be expected really), i'll still mention some perspective on meta rn.
    - First, why is there no pirate gregor in gregor section? Its not like he's that bad, cmon. Good clashing with nuke on skill 3 if you can maintain his poise count / have poise count booster.
    - R corp heath gonna suffer a lot in new canto if Ji Hoon keep adding long fights, which he is trying to make more. Rabbit heath will become either situational or not even usable, new heathcliffs are all so strong now, especially in longer fights.
    Everything else that i could mention is new chars, but thats obvious so i wont waste your time anymore. Have a great day:steamhappy:
    matteste 26.5.2024 klo 4.03 
    Soo.... um... any tutorial on how to navigate the main menu? Or what I should do after clearing the tutorial mission?

    I just started the game and I have no clue what I am looking at or what I should be doing.
    Real_Heh 16.5.2024 klo 1.32 
    Jesus fricking Christ, I need the whole week to read AND understand it all, being a new player. But yeah, thank you for writing this! I maybe don't understand anything at all at the moment, but I'm sure I will... someday
    Flamesystems  [tekijä] 13.2.2024 klo 21.13 
    Natnevik & Not02 thanks for all the feedback, especially on changes to damage calculation stuff and the like! Chunks of this guide are several months old, and you've done a very good job of pointing it out. I was starting to go update everything anyways for the RR3 page (i'm going to have to split it into multiple sections anyways).
    MinuteSphinx 13.2.2024 klo 9.14 
    magic bullet outis has an overpowered strategy with LCCB ryoshu's support passive, by sacrificing other teammate with her skill3 at 7 bullet, It will stack a INCREDIBLE damage on boss target, especially with multi parts.
    Not02 11.2.2024 klo 12.57 
    > Useless EGO

    Don’s Basilisoup is decent in an emergency situation due to it being mono-lust.
    Not02 11.2.2024 klo 12.57 
    > Notable EGO

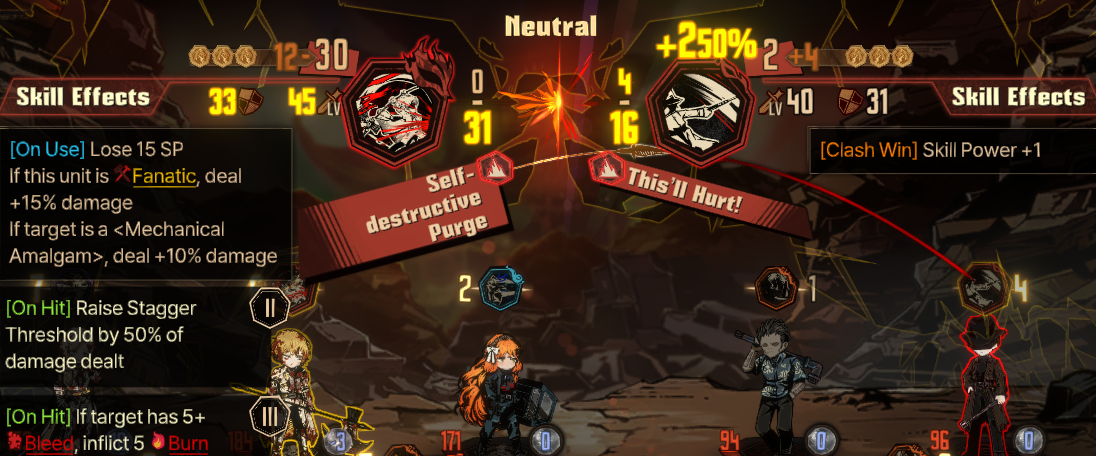
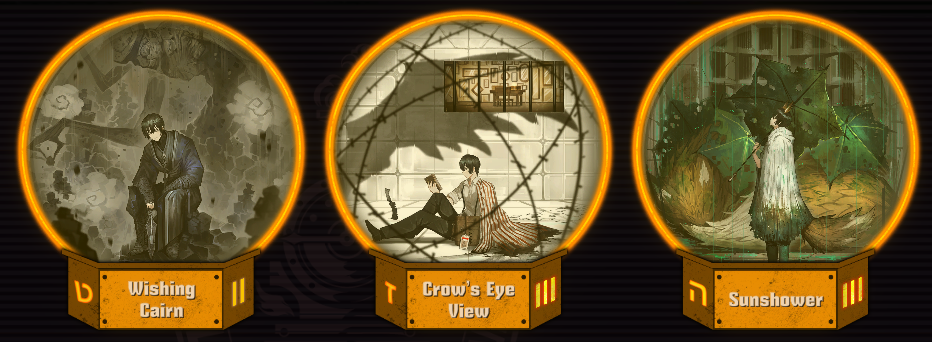
    Sunshower: Possibly outdated info or the limbus tooltip is lying to you, but losing a clash does not lose your sanity.

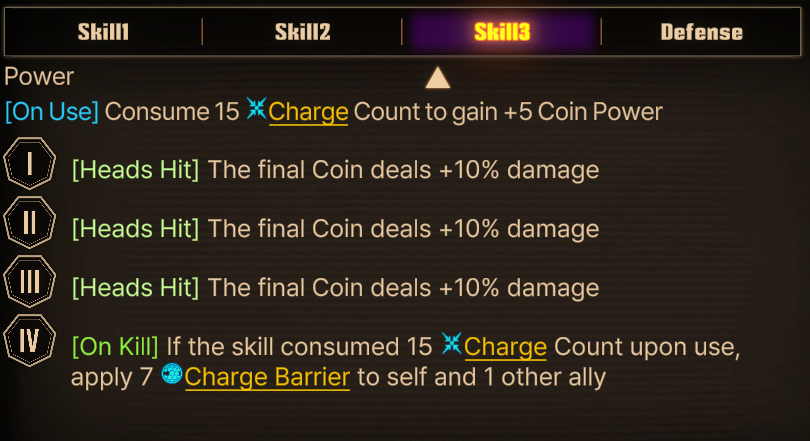
    Telepole Don: This EGO is not meta in charge teams. It’s only meta if you’re attempting low-turn runs. The sanity cost heavily affects the consistency of rip space, and the fact that it requires heads hit to give charge to the team hurts it as well. With UT4 charge units, this is negligible outside of low turns. You do mention this, but still say it’s 100% meta anyway for some reason.
    Not02 11.2.2024 klo 12.56 
    > EGO Details

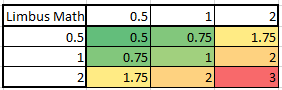
    “Change sin resistances…taking 1/4th the damage” This is incorrect because of a quirk in how Limbus Company calculates skill resistances. Resistances <1 actually have half effectiveness, meaning that what is shown as a 0.5 resistance is in reality, 0.75. This means you can only take half damage at best, not 0.25 damage. This weird damage calculation does not apply to sin-only (ex: sinking) damage, which applies resistances as shown. Resistance is also additive, not multiplicative.
    Here is a a damage chart for resistances/weakness [imgur.com]