Darkest Dungeon® II

Darkest Dungeon® II

Not enough ratings
[Deprecated] Modding Guide - Darkest Dungeon II
By Egthoridon
With the release of official modding tools, the contents of this guide are largely unnecessary or outdated.
This guide will no longer be updated.

The currently finished sections are: Adding Hero Path Skills, Changing Textures, Static Meshes, Rigged Meshes
   
Award
Favorite
Favorited
Unfavorite
Table of Contents
  1. Intro
  2. Tools
    • Unity

  3. Adding Hero Path Skills
  4. Textures and Meshes
    • Changing Textures
    • Static Meshes
    • Rigged Meshes
[WIP] Intro
This will be the intro text


This mentions how modding works by overwriting the files

That there are no official modding tools yet

That mods will be incompatible with any mods that alter the same files

That you should always back up your files

etc.
[WIP] Tools
This explains the different tools to use

AssetStudio (Browse/Export assets)
UABEA (Browse/Edit assets) (See Adding Hero Path Skills [2/3] for a tutorial for now)
dnSpy (Read the game code from ironcrown.dll)
BepinEx + Sinai's UnityExplorer (inspect the Unity objects during gameplay)
BuildPotFile (Localization text. Part of the game files already)

todo:
Fmod (I haven't done any audio stuff yet but maybe one day)
Unity
For some sections of this guide, you will need a Unity project to export your assets into a build, so they appear in the same format as the build of Darkest Dungeon 2 that you are modding. Darkest Dungeon 2 runs on Unity version 2020.3.7f1. Make sure you are using the same version of Unity, as other versions may be incompatible with the game. While having Unity experience is obviously helpful when you're working with Unity, the parts you will be doing in this guide are not especially complex and I'll do by best to describe them properly.

Download Unity here:
Make sure to install Visual Studio as well, so you can edit scripts. I believe this happens during the installation process of Unity anyway.

Setting up Unity
In the Unity Hub Projects tab, click New Project. Make sure you have the correct Unity version selected, and then select 3D Core, give it a name, and click Create Project.


A quick overview of the Unity interface:
  • The Project window at the bottom is where your assets are stored, and where you drag them in to import them.
  • The Scene window on the left is where the GameObjects that are actually in the world are. You can drag your asset over here to make an instance of it.
  • The Viewport in the middle is where you see the game world.
  • The Inspector on the right is where you edit the data of the selected object, such as components or import settings.


Once your assets are in your scene and ready to be exported, click File > Build Settings. In the Build Settings, make sure you change the Architecture to x86_64. Other than that, you don't need to change any settings, and can just click Build.
Select a folder, and Unity will create a build for you with the same format as the Darkest Dungeon 2 game files.


Adding Hero Path Skills [1/3]
This section describes how to add a new variant of a skill to a Hero Path. I'll be demonstrating with an example adding a Nigthsworn path variant of Repartee that only gives 2 dodge (or 2 dodge+ for the upgraded version) instead of 3. It's a very minor change, but it demonstrates that it's possible to add a new path skill variant that didn't exist before.

Warning - Save file corruption
If you uninstall the mod, or the game updates the relevant files, your current expedition/run will be corrupted if you have a hero with the new skills. Your overall game progress will still be fine. When the expedition save is corrupted, the game will be stuck on a loading screen every time you try to play. To fix this, go to your savefile folder
C:\Users\USERNAME\AppData\LocalLow\RedHook\Darkest Dungeon II\SaveFiles\STEAMPROFILEID#\profiles
and delete the profile_#_runs folder that the save is in. You will lose the progress of your current expedition, but the game should work as normal after that.
Note: You could probably fix the save file by re-adding the modded skills to the updated version, so long as they have the same names. You could probably also go and edit the .json save files to remove references to the updated skill names. Feel free to try these methods. I haven't tested them yet.

Warning - Always back up your files before modding.
I haven't had any major issues other than the savefile one mentioned above, but it's always best to be safe.
To uninstall the mod, simply verify your game files in Steam.

You will need:
  • A text editor (default Notepad works fine, I use Notepad++)
  • UABEA
Steps
  1. Change the .csv files that define the skill and the path
  2. Add your new skill as an asset to the hero's .bundle assets file
  3. Add a reference to the new skill asset in the SkillDatabase
  4. Add your skill name to the localization .pot file

1. Change .csv files

The two csv files you want to change are:

hero_gr_data_export.Group.csv to define the content of the skills (normal and upgraded).
actor_paths_data_export.Group.csv to describe how the path changes the skills.
Note: hero_gr_data is for graverobber only. The other heroes have equivalent files.

Located in:
Darkest Dungeon® II\Darkest Dungeon II_Data\StreamingAssets\Excel

This guide doesn't explain the format in much detail (yet?), so just look at the other skills to figure out how it works. If you're making a path variant, in hero_gr_data_export.Group.csv just copy-paste the original skill elements and go from there.

Note: In the csv files, each skill has a normal version and a _u version (for the upgraded skill)

In actor_paths_data_export.Group.csv there's an element for the path called element_start,grv_nightsworn,ActorDataSkillReplacement. This element has a list of skills that the path changes. The names are arbitrary and only refer to the elements immediately following it, but it doesn't hurt to follow the convention. You want to add your skills here. In my case: nightsworn_repartee_replacement and nightsworn_repartee_u_replacement. After that, add a new element afterwards of the type SkillReplacement for each of the skills that defines the original skill and the path variant it gets changed to. The DataSkillId in these elements refers back to names in the other csv file.

Here are pictures of the Nightsworn Repartee changes.
left: hero_gr_data_export.Group.csv
right: actor_paths_data_export.Group.csv
Adding Hero Path Skills [2/3]
2. Add a ZoomInResourceSkill asset to the hero assets file
At this point we need to edit the game assets. For this you will need UABEA:
https://github.com/nesrak1/UABEA

Fundamentally, a skill in Darkest Dungeon 2 is a Unity object of the type ResourceZoomInSkill. Since we are adding a new skill, we need to add a new ResourceZoomInSkill asset. These assets are contained within the specific hero's assets file, in our case hero_grave_robber_assets_all_e588a25db1ffaec536bc56527c028a7d.bundle.
This file is in the folder:
Darkest Dungeon® II\Darkest Dungeon II_Data\StreamingAssets\aa\StandaloneWindows64

Run UABEA, click File>Open, and open this file. The DD2 files are compressed and UABEA will ask you where to decompress the file to. Unless the file is huge you're probably fine just decompressing to memory. If you choose the other option, it'll just make a file that you will have to replace the original file with.
Note: Your resulting file will not be compressed by default. This doesn't matter, but you will probably want to recompress it when shipping your mod so the users don't have to download huge files. Use File>Compress for that.

UABEA should now have the filename in bold letters, and some incomprehensible filename underneath in a dropdown menu. The .bundle files contain different files within them, the one you want selected (which probably is by default) is the one without a file extension at the end.


Click Info to open the list of assets in the file. There are quite a lot of files. What we're looking for is of the type MonoBehaviour, so just click View>Filter and select only that. You can find the asset you're looking for by View>Search by name (Needs to be an exact match) or View>Go to asset if you know the assets Path ID. You can also sort by name and scroll down.


The skills have the name format gr_ability_name, same as in the csv files. There is, however, not a separate skill for the upgraded version. In this case, we are looking for gr_repartee. When you click on the asset, there is information and options on the right side. If you click View Data and expand the <PPtr>MonoScript property, you can see the attached script is of the type ResourceZoomInSkill, like I mentioned above.


We now want to find the script id for the ResourceZoomInSkill script. Close the data view and click Tools>Type Tree at the top (You can also use Tools>Scripts). In the middle is a list of types, including several MonoBehaviours. Look through them until you find the one that says ResourceZoomInSkill in the Script ID field on the right. In this case it's right near the top (MonoBehaviour(0x72/0001)). As you can see, the Script ID for ResourceZoomInSkill is 1. Above that, the type ID for MonoBehaviour is 114.


Time to add our own skill. Close the Type Tree, and click File>Add.
  • The File ID should remain the same (you probably can't change it anyway)
  • The Path ID is arbitrary as long as it's not using the same number as another asset. I like to use the Path ID of the base skill +1 so they're right next to each other when you sort by Path ID.
    Note: There is not a warning if you're overwriting an asset's path. Use View>Go to asset to check if an asset with the path you're using already exists.
  • In Type name/ID write either 114 or Monobehaviour
  • In Mono class ID write the Script ID from before (1 for ResourceZoomInSkill)
  • The checkbox doesn't matter as we'll be replacing the data anwyay, but it's slightly easier if you leave it checked.
  • Click Ok


The asset will be added with the name Unnamed asset and the Path ID you chose. The Path variants of skills are incredibly similar to their base skill, so we'll start by just copying the data from gr_repartee. You can either do this by clicking Edit Data on gr_repartee and copy-pasting it into your new asset's Edit Data, or by clicking Export Dump to save the data as a .txt, and Import Dump on your new asset. If you did not check the Fill asset with 00s box when creating the asset, or if the asset fails to deserialize for another reason, you can only use Import Dump.
Note: The export/import dump option is more of a hassle, but you should definitely use it on larger files, as the Edit Data text editor does not handle large files very well at all in memory. In this case it's not necessary.

Having copied over the information from the base skill, there are only two things we need to change. Click Edit data and change:
  • The name in the line string m_Name = "gr_repartee" to the name of your skill, in this case gr_repartee_p2. This also changes the name of the asset (but doesn't update until you reopen the Assets Info window.)
  • Under PPtr<$ResourceSkillBase> m_OverrideSfxSkill, there's a line that says SInt64 m_PathID = 0. Change the 0 to the Path ID of the original skill. In my case, the Path ID for gr_repartee is -4775731053648175212.
Click Ok, and the process of adding your ResourceZoomInSkill is done.


Click File>Save and close the Assets Info window, and then File>Save again to save the .bundle file. You're now done with the hero_grave_robber_assets_all_e588a25db1ffaec536bc56527c028a7d.bundle file. If you decompressed to a file, you will want to overwrite the original now. You can also compress the file at this point.
Adding Hero Path Skills [3/3]
3. Add a reference to the skill to the SkillDatabase
You will need UABEA again for this step, the process is pretty similar to the last step so I won't explain it in detail. Make sure you have the Path ID from the ResourceZoomInSkill asset that you added for your skill. The file we are editing this time is
addressable_resources_assets_data_5ccede66081eac9c12a5d0e4b89cca5e.bundle
which, again, is in the folder:
Darkest Dungeon® II\Darkest Dungeon II_Data\StreamingAssets\aa\StandaloneWindows64
Once you have the Asset Info window open, navigate to the MonoBehaviour file called SkillDatabase. This file contains references to all the skills in the game in the array in vector m_Resources.

The array has two numbers that define the size: one in parentheses "(807 items)" and then an integer variable int size = 807. Since you will be adding a new skill, increase the two numbers by one.

Each element in the array has two values that point it towards the relevant skill.
  • The File ID represents which file the skill is in, which in our case is the grave robber assets file from the last step. You can find an entry for another grave robber skill to see the file ID for her assets file: 47.
    Note: The proper way to find the file ID is to use Tool>Dependencies. If you for example were adding a whole new class with their own assets .bundle I imagine this is how you would do it.

  • The Path ID is the path of the skill within its own file: the same Path ID we assigned in the previous step.
Add a new element to the end of the list. I recommend copying the last entry and editing it. Remember to edit the index, which should be 1 lower than the array size (counting starts at 0).


Save the files and you're done with the SkillDatabase.

4. Add your skill name to the localization file
At this point your skill will work in game. The final step is to add the name of your skill to the localization file (where the game pulls translatable text from) so the name can be displayed properly.

Go to the folder
Darkest Dungeon® II\Darkest Dungeon II_Data\StreamingAssets\Localization
The file you want to edit is in the Sources folder, called hero_skill_names.txt.
Scroll down to the Path you've added the skills to, in this case ## GRAVE ROBBER - NIGHTSWORN and add your normal and upgraded skills there. The format is skill_name_ + the names from the csv files + =NAME (the name that is displayed in game), and <sprite name={q}icon_upgraded_skill{q}> at the end for the upgraded skill. Then save the .txt file.


Now you need to build the .pot file that the game pulls the text from. Go back to the Localization folder, and open the BuildPotFile folder instead. There's a Readme.txt file in here that explains how to use it, read that.

Use cmd to run the BuildPotFile.exe. To navigate to the folder do CD [filepath] and write BuildPotFile.exe to run it. You won't need any parameters if you're doing it for the English file.

At this point your path variant skill should be finished and playable in game.


Note: I've only done this with Repartee and have only tested 2 battles and 1 inn. It worked fine in those cases, but you never know.
A note on meshes and textures
In Darkest Dungeon 2, the vast majority of visual information comes from the color texture. The models do not use normal maps or specific materials to affect their look. For example, do not change the material of a sword to be metallic, but instead draw a metallic looking texture for your sword.
Also note that the textures are quite dark, and will usually look brighter in game.

Changing meshes and textures shouldn't have any impact on your save files. If the game updates the edited versions will be replaced by the default ones, but I haven't experienced any corrupting of files or other issues.
Changing Textures
This section describes how to change 2D textures. Textures define the visuals of almost everything in the game, including icons, character art, and 3d models' colors. If you edit meshes in the later sections, you will most likely also need to change their texture.

You will need:
  • UABEA
  • AssetStudio (optional)
  • Your edited texture image.
Steps
  1. Change the texture (this one is easy)

1. Change the texture

Use AssetStudio to browse and extract assets from the game, i.e. if you want to find and edit an already existing texture. The majority of game assets are in
Darkest Dungeon® II\Darkest Dungeon II_Data\StreamingAssets\aa\StandaloneWindows64
If you just want to browse the game files, I suggest clicking File > Load Folder in AssetStudio and selecting this folder. When you find the asset you want to change, right click and click Show original file to see which file the asset is in. This is the file you want to edit with UABEA.
Note: Some assets, such as Heroes, have two texture files. A base color and an ink texture

For a tutorial on how to use UABEA, see part 2 of the "Adding Hero Path Skills" section. I'll make a separate 'How to use UABEA' section at the start of the guide in the future.

Textures in Darkest Dungeon 2 are all of the asset type Texture2D. You may see the type Sprite, these are directly derived from the Texture2D, so if you change the texture, the sprite will change automatically.

Editing a texture is pretty simple. Inside UABEA, navigate to the specific Texture2D asset that you want to change. On the right side, click Plugins, then Edit Texture. Click the button at the bottom that says Load and select your texture. Keep an eye on the Texture format at the top. If UABEA fails to convert the image, change that to something that matches your image file, probably RGB24 or RGBA32.


Save the UABEA files and you're done.
Static Meshes
This section describes how to edit meshes that are not animated, or rather, not rigged with a skeleton and bone weights. (Specifically, meshes that use a MeshRenderer instead of a SkinnedMeshRenderer component). I will be using the signpost at the crossroads (the hero select) as an example.

Note: I won't be changing the swinging lamp, but you should still be able to do that with this method. It swings with rigidbody physics, not from a skeleton animation.

You will need:
  • Unity
  • UABEA
  • A 3D model
  • Assetstudio (optional: if you want to edit or match your model to the original)
UABEA does not have a plugin for importing models like it does with textures. However, it is able to copy the exact data of an asset. The method to import meshes is therefore to make your own 'game' in Unity with your mesh in it, use UABEA to copy the mesh data from your own game, and then paste that data into Darkest Dungeon.

Steps
  1. Build your Unity project with the mesh
  2. Export the mesh from your build
  3. Import the mesh into Darkest Dungeon


I will be using this (really quickly made) model. As you can see, I'm just reusing the original texture, but it is entirely possible to use your own texture, you'll just have to change the texture file as well. See the Changing Textures section for that.

1. Build your Unity project with the mesh
Import your mesh into Unity. You can just drag the file into the Project window at the bottom. You will probably want to uncheck the 'Convert Units' box in the Inspector window on the right (while having your imported mesh asset selected), and then click Apply. Feel free to look up a guide on importing meshes into Unity from whatever 3D program you are using.

Drag your mesh into the Scene window on the left side. It should appear in the viewport in the middle. Click File > Build Settings > Build


2. Export the mesh from your build
In UABEA, go to your new build's projectname_Data folder and open the level0 file. Find your mesh (I prefer View>Filter>Deselect All > select Mesh), and click Export Dump to save the data from your mesh as a .txt file.


Before you close your project, make sure to look at your mesh's data, either with View Data, Edit Data or by looking at the .txt dump file. At the very bottom, there should be an element called StreamingInfo with a string called path. If path has the name of a file between the quotation marks, for example string path = "sharedassets0.assets.resS", it means you need this file for the mesh to work. Copy that file, probably from your build's _Data folder.


3. Import the mesh into Darkest Dungeon
In UABEA, open the file from Darkest Dungeon that has the mesh you are trying to edit, and select the mesh. Click Import Dump on the right side and select your .txt dump file from the previous step.

Note: The name of the mesh asset in the file will change to the name from the asset you're importing. Keep this in mind if you try to find it by searching by name. You can change the name in Edit Data or by editing the .txt before importing.

If your mesh has a custom texture, you will want to import the texture now as well. Then save the UABEA files. If your mesh needed a resource file, paste the file into the Darkest Dungeon II_Data folder. If there is already a file with the same name, do not override it. Instead, change the name of your file, and the name in your mesh's StreamingInfo field from the previous step.

At this point, your mesh should work in game.

Rigged Meshes


I procrastinated updating this section, and now a year has passed and I don't really remember it. I've written a quick list, but if it doesn't work maybe you can tinker with it and get it working. It may also just be out of date.

1. Export the skeleton from the game you want your mesh to be rigged to (e.g. man at arms)
2. In a 3D program, e.g. Blender, rig/weight paint your mesh to the skeleton
3. Export the rigged mesh into your unity project. This mesh will have the bones in the wrong order compared to the original.
4. In your unity project in Assets/Editor, add the following script I wrote* to fix the bones: https://pastebin.com/bu92GmS1
5. In the toolbar, click Tools, Mesh, Generate Skinned Mesh Component
6. In the popup, add the original mesh from the game that you're replacing and the new mesh you've rigged, and click Generate
7. This will create a new mesh in your project (I think in Assets/Export), where the bones are all in the correct order
8. Add this new mesh to the game in the same way as the guide explains with Static Meshes

If your mesh is a total mess in game, try scaling the mesh (not skeleton) up x100 in blender before exporting it. Or messing with the import/export settings regarding scale.

*It's based off the script from here, although that apparently isn't the original source either: https://gamebanana.com/tuts/15236
Checklists
Short versions of the guides so you don't have to read all the fluff text.

Adding path skills
Edit csv files

Open hero assets file
  1. Find base skill, export dump
  2. File>Add
    • Path ID: One that isn't used already (View>Go to asset to test). I use the old path id +1
    • Type name/ID: 114
    • Mono class ID: 1
  3. Edit the new asset:
    • Import dump.
    • Change name
    • Add original skill pathID to m_OverrideSfxSkill's m_pathID
  4. Save
Open addressable_resources_assets_data
  1. Edit SkillDatabase:
    • Increase m_Resources array size numbers
    • Add new entry to the end
    • Can ctrl-f the pathID for the original skill to see the fileID for your hero.
  2. Save
Add skill name to localization hero_skill_names.txt path section (eg. ## GRAVE ROBBER - NIGHTSWORN)
Build pot file
[WIP] Game Files
This is where the game file structures are explained
sharedassets
addressables
csvs
localization
bank files
save files
Ending
This is the extent of what I know about DD2 modding so far. I will add more things to the guide as I figure out how to do them.
Changelog
7 Jun 2023
  • Guide created.
  • Adding Hero Path Skills added
21 Jun 2023
  • Unity, Changing Textures, Static Meshes added
17 Jul 2024
  • Final update
  • Rigged Meshes added.
19 Jul 2024
  • Added source for rigged meshes script
19 Aug 2024
  • Added deprecated disclaimer.
28 Comments
Lemon stealer Feb 27 @ 7:20am 
Adding a small clarification for whoever decides to follow the guide: DD2 uses 0.01 scaling on the meshes. When you use the mesh generation script, it assigns the new mesh a scale of 1, but gives it the size of the original mesh on the scene, the one scaled to 0.01. The guide suggests scaling the mesh up x100, which is a valid solution, but I found it easier to edit the script, namely the 3 "vertex.x *= scale.x ;" lines to "vertex.x *= scale.x * 100;" (with x,y,z axes).

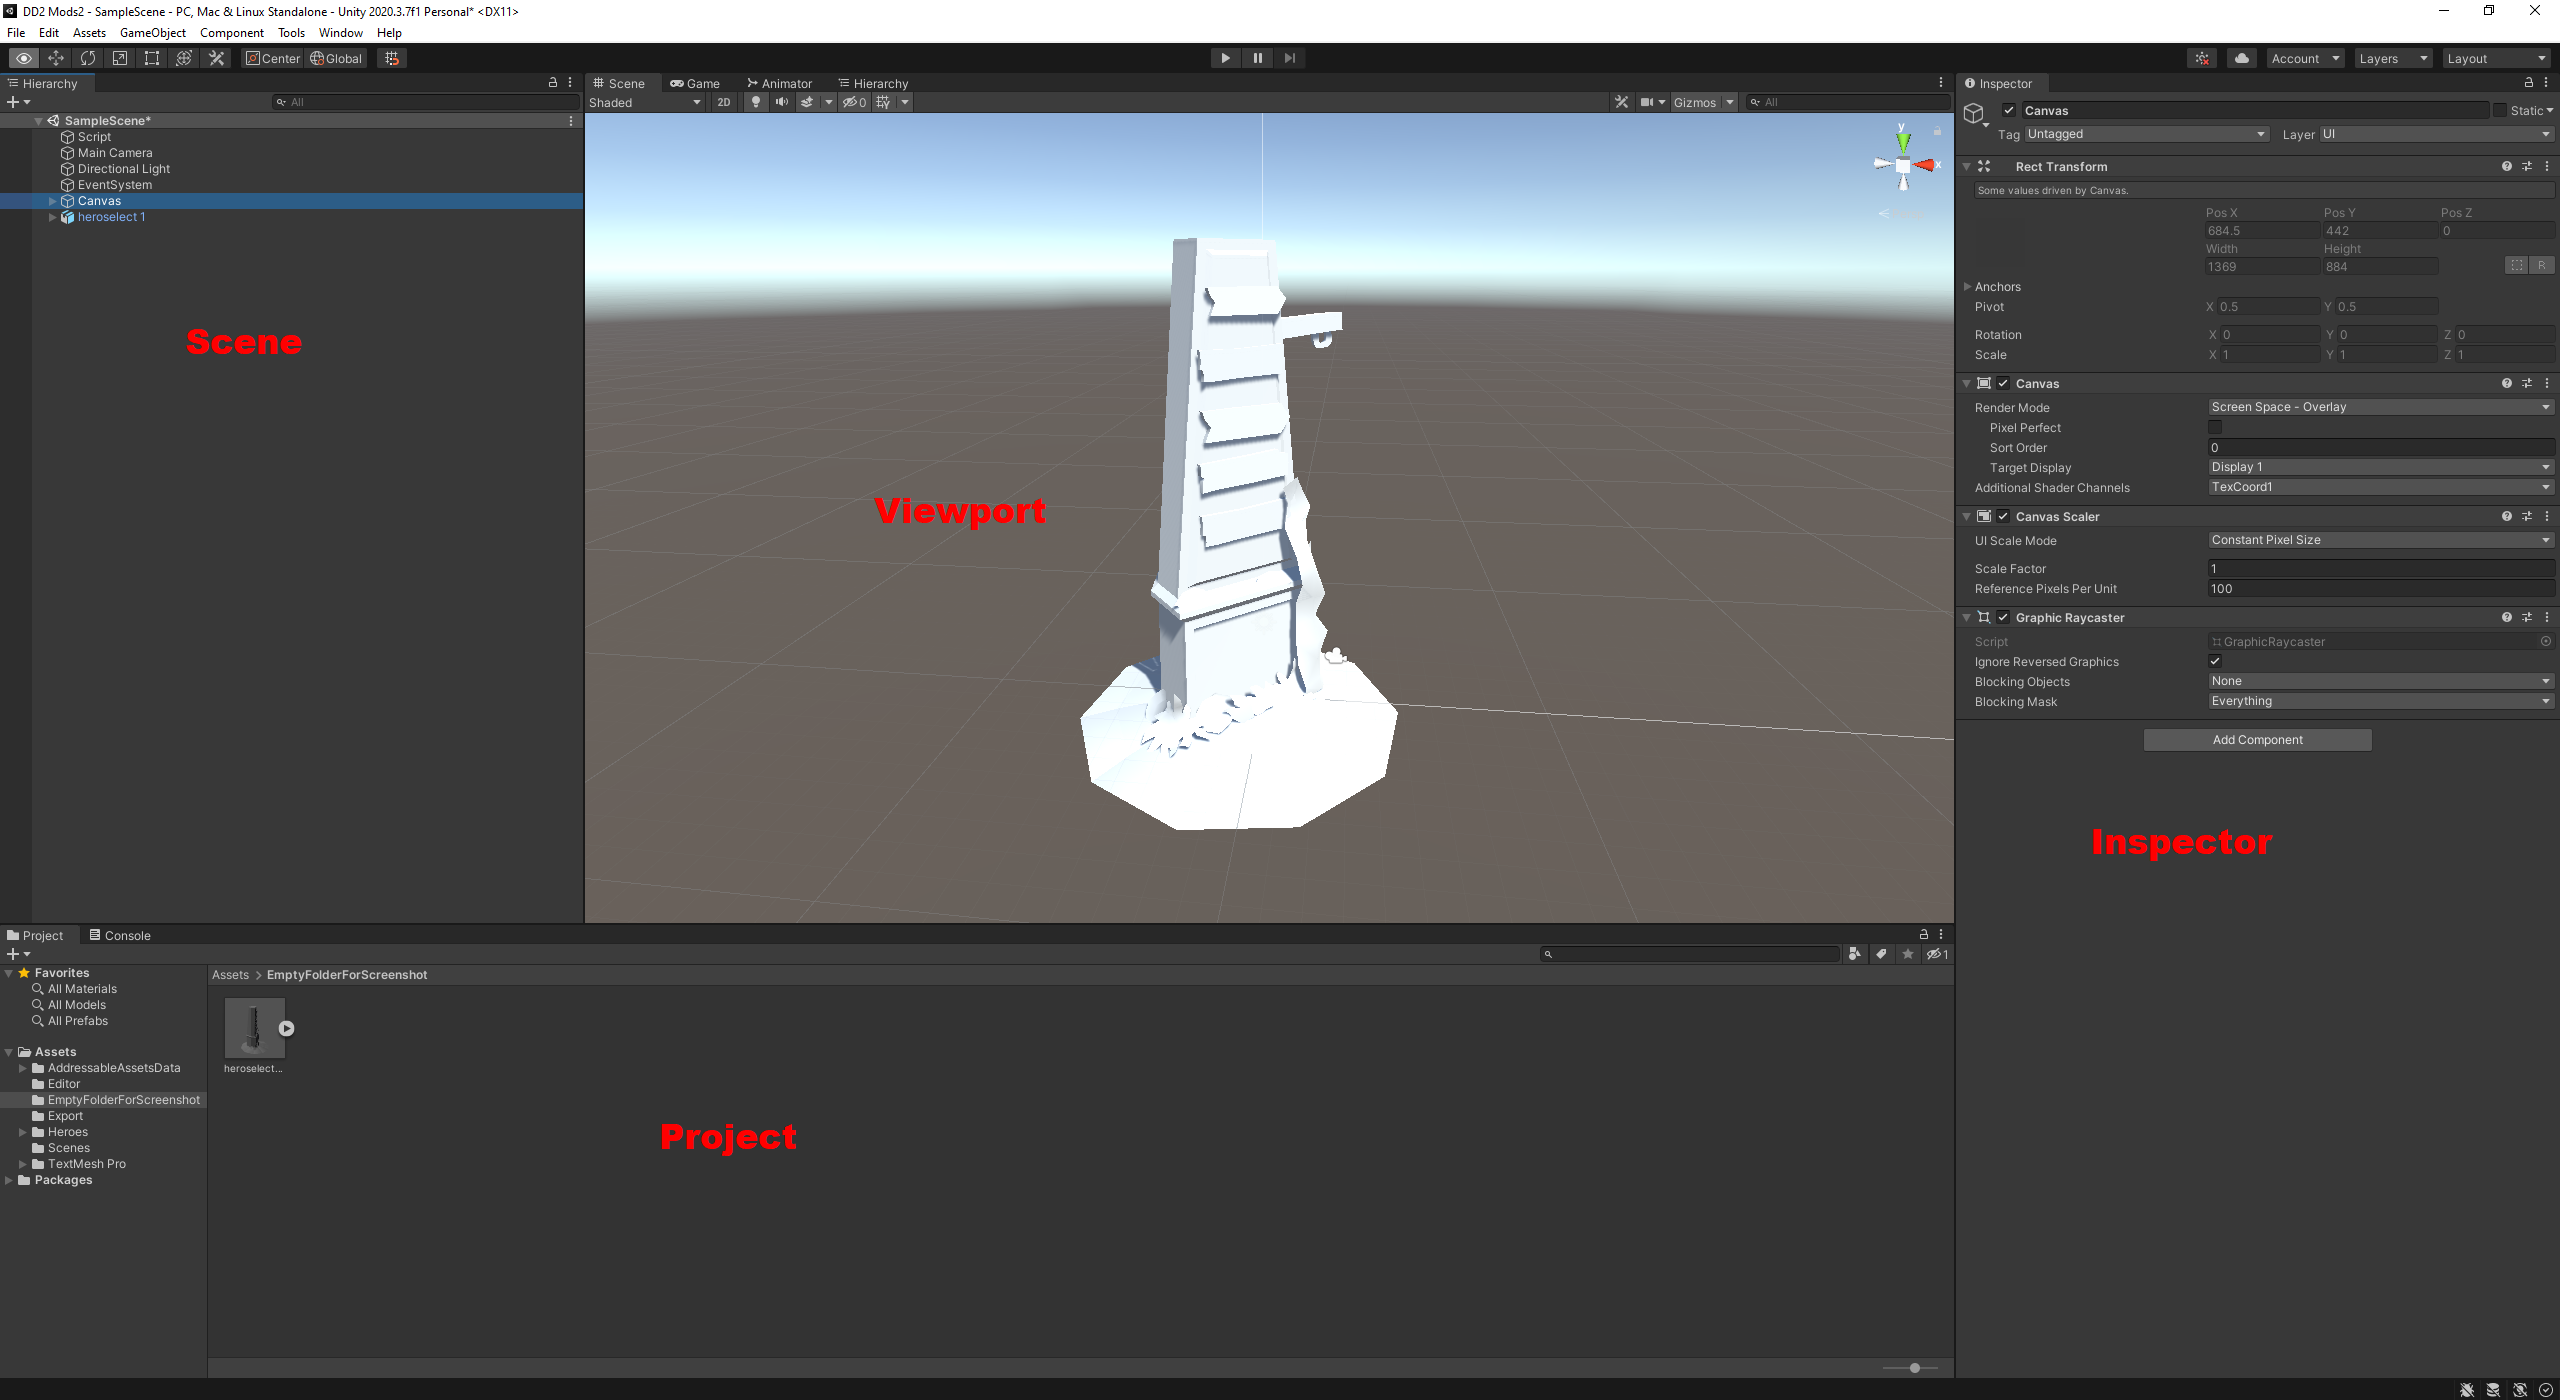
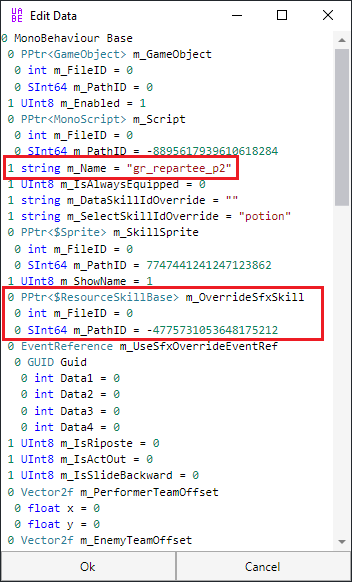
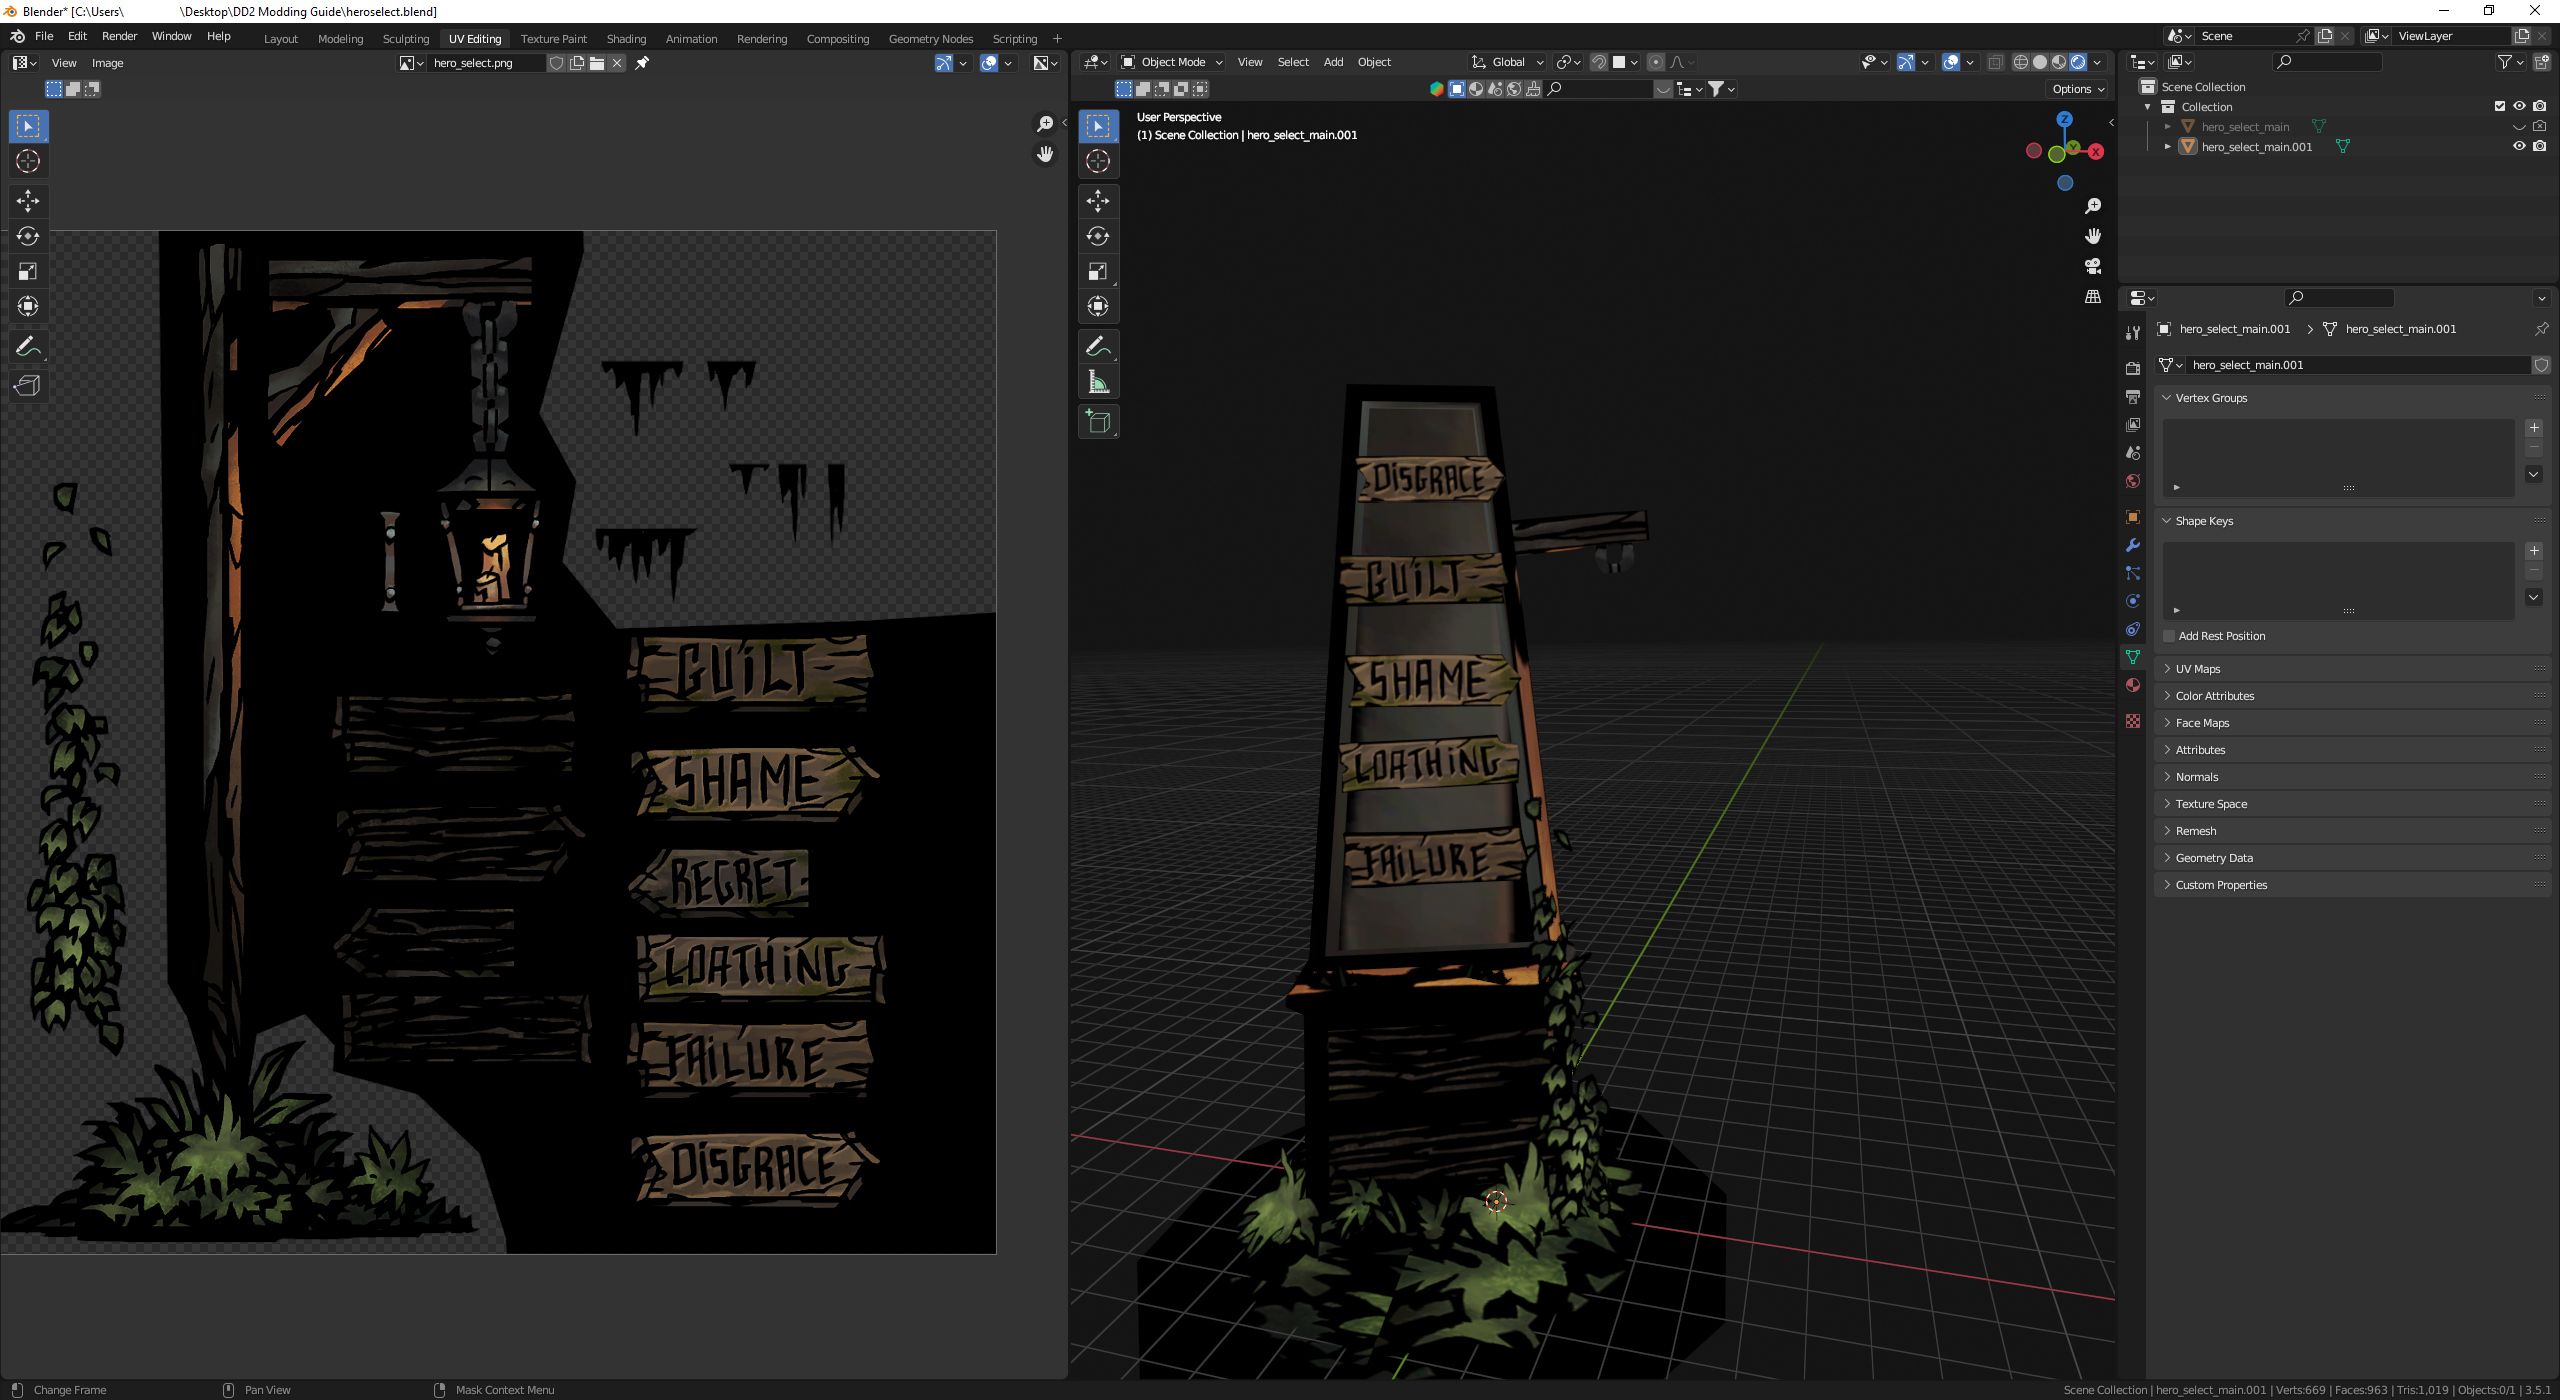
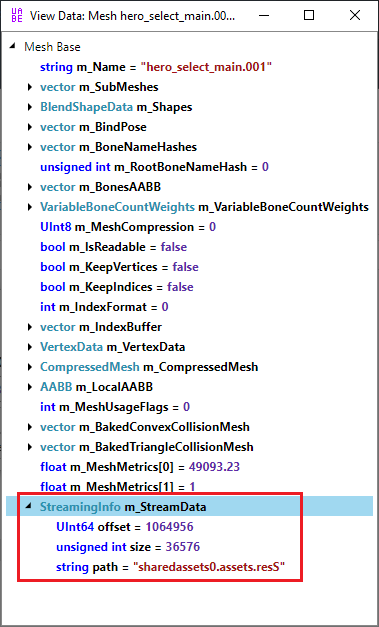
The way to see if you did everything right is to drag the original model onto the scene and swap its mesh for your new one (click mesh, edit the "mesh" attribute) - it should not be distorted.
Egthoridon  [author] Feb 20 @ 12:34pm 
You'll need to make folders called Editor and Export in the Assets folder (tbh i dont think Editor is necessary) and save the text file I linked as .cs instead of .txt, then drag it into Unity and it will add the Generate Skinned Mesh Component button
Lemon stealer Feb 20 @ 8:43am 
I've never worked with Unity before aside from making a couple mods, so I cannot be sure in anything I say, but I didn't find a single UI element mentioned in the steps involving the "bone rearrenging script" (Assets/Editor, Generate Skinned Mesh Component, etc), basically had to skip everyithing involving it entirely. If you say 2020 version works just fine and rigged mesh swap steps are up to date then I'll figure out the rest myself, knowing it can be done is enough. Thank you for the response.
Egthoridon  [author] Feb 20 @ 8:26am 
Yes, I tested it in 2020.3.7f1 with the current version of the game. If you're getting crashes try looking back a few comments for the first time i responded to desync, I mention a fix there. But if building from Unity 2022 works, isnt that fine?
Lemon stealer Feb 20 @ 7:32am 
Although the guide's marked as deprecated, after reading the last comment thread I just had to ask: OP, did you say you got your Space marine mod working in the current version of the game? To clarify, I was testing the texture/static mesh sections and it turned out the game switched to Unity 2022.3.16 - mods built for 2020 would just crash, 2022 works just fine. I just wanted a confirmation that a rigged mesh mod built in 2020 editor works in current DD2.
ShockingDocking Feb 17 @ 7:59am 
It looks like it will take at least a year for an official hero-related tool to be released for DARKSIDE.
Or maybe even longer.
desync Feb 16 @ 10:43am 
This is kinda strange, but what's even more strange is that I get that mess even if I use the original mesh (from the game) - so that I use your script on both original models
I have no idea why is it works this way for me lol
Egthoridon  [author] Feb 16 @ 9:48am 
It's hard to tell from just a screenshot, but I think the only times I had a mesh successfully show up in game but as a jumbled mess was when the scale of the mesh was wrong compared to the skeleton. For blender export settings I just used defaults except no leaf bones
desync Feb 15 @ 3:54am 
Idk, I've tried literally everything and followed each step of your instructions, but still all I get is this mess:
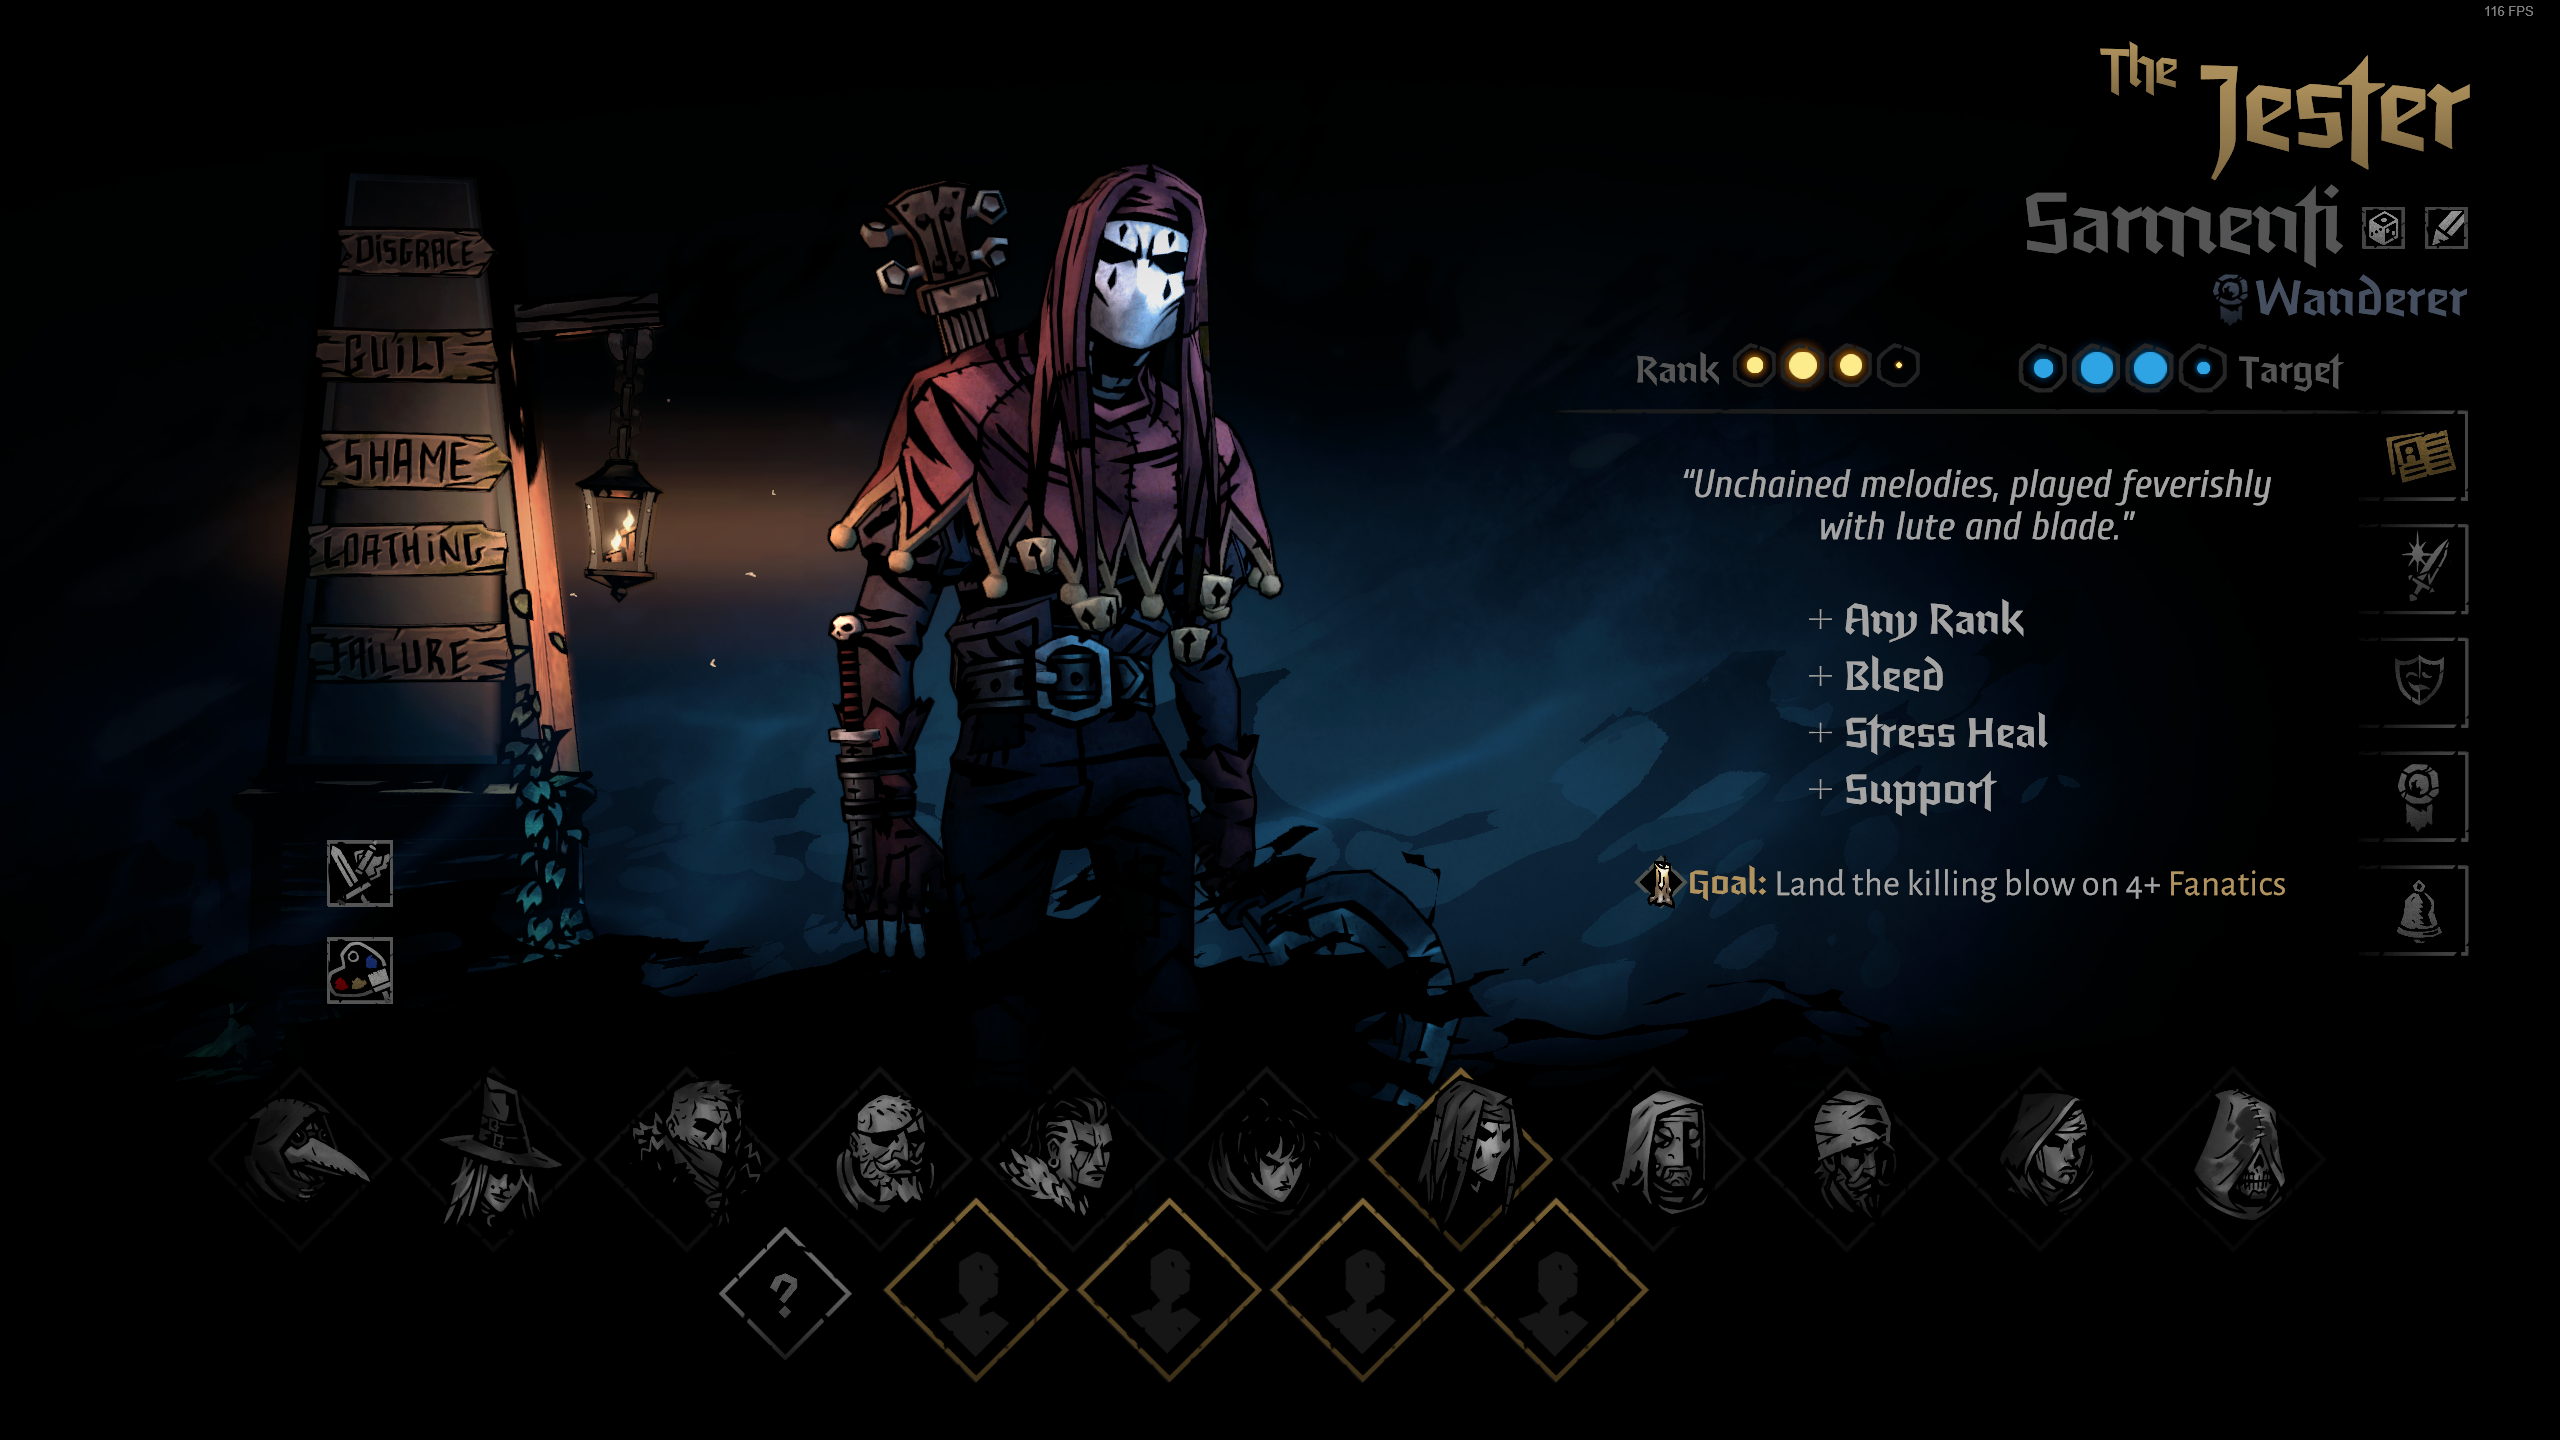
- https://i.imgur.com/Z718VOJ.png

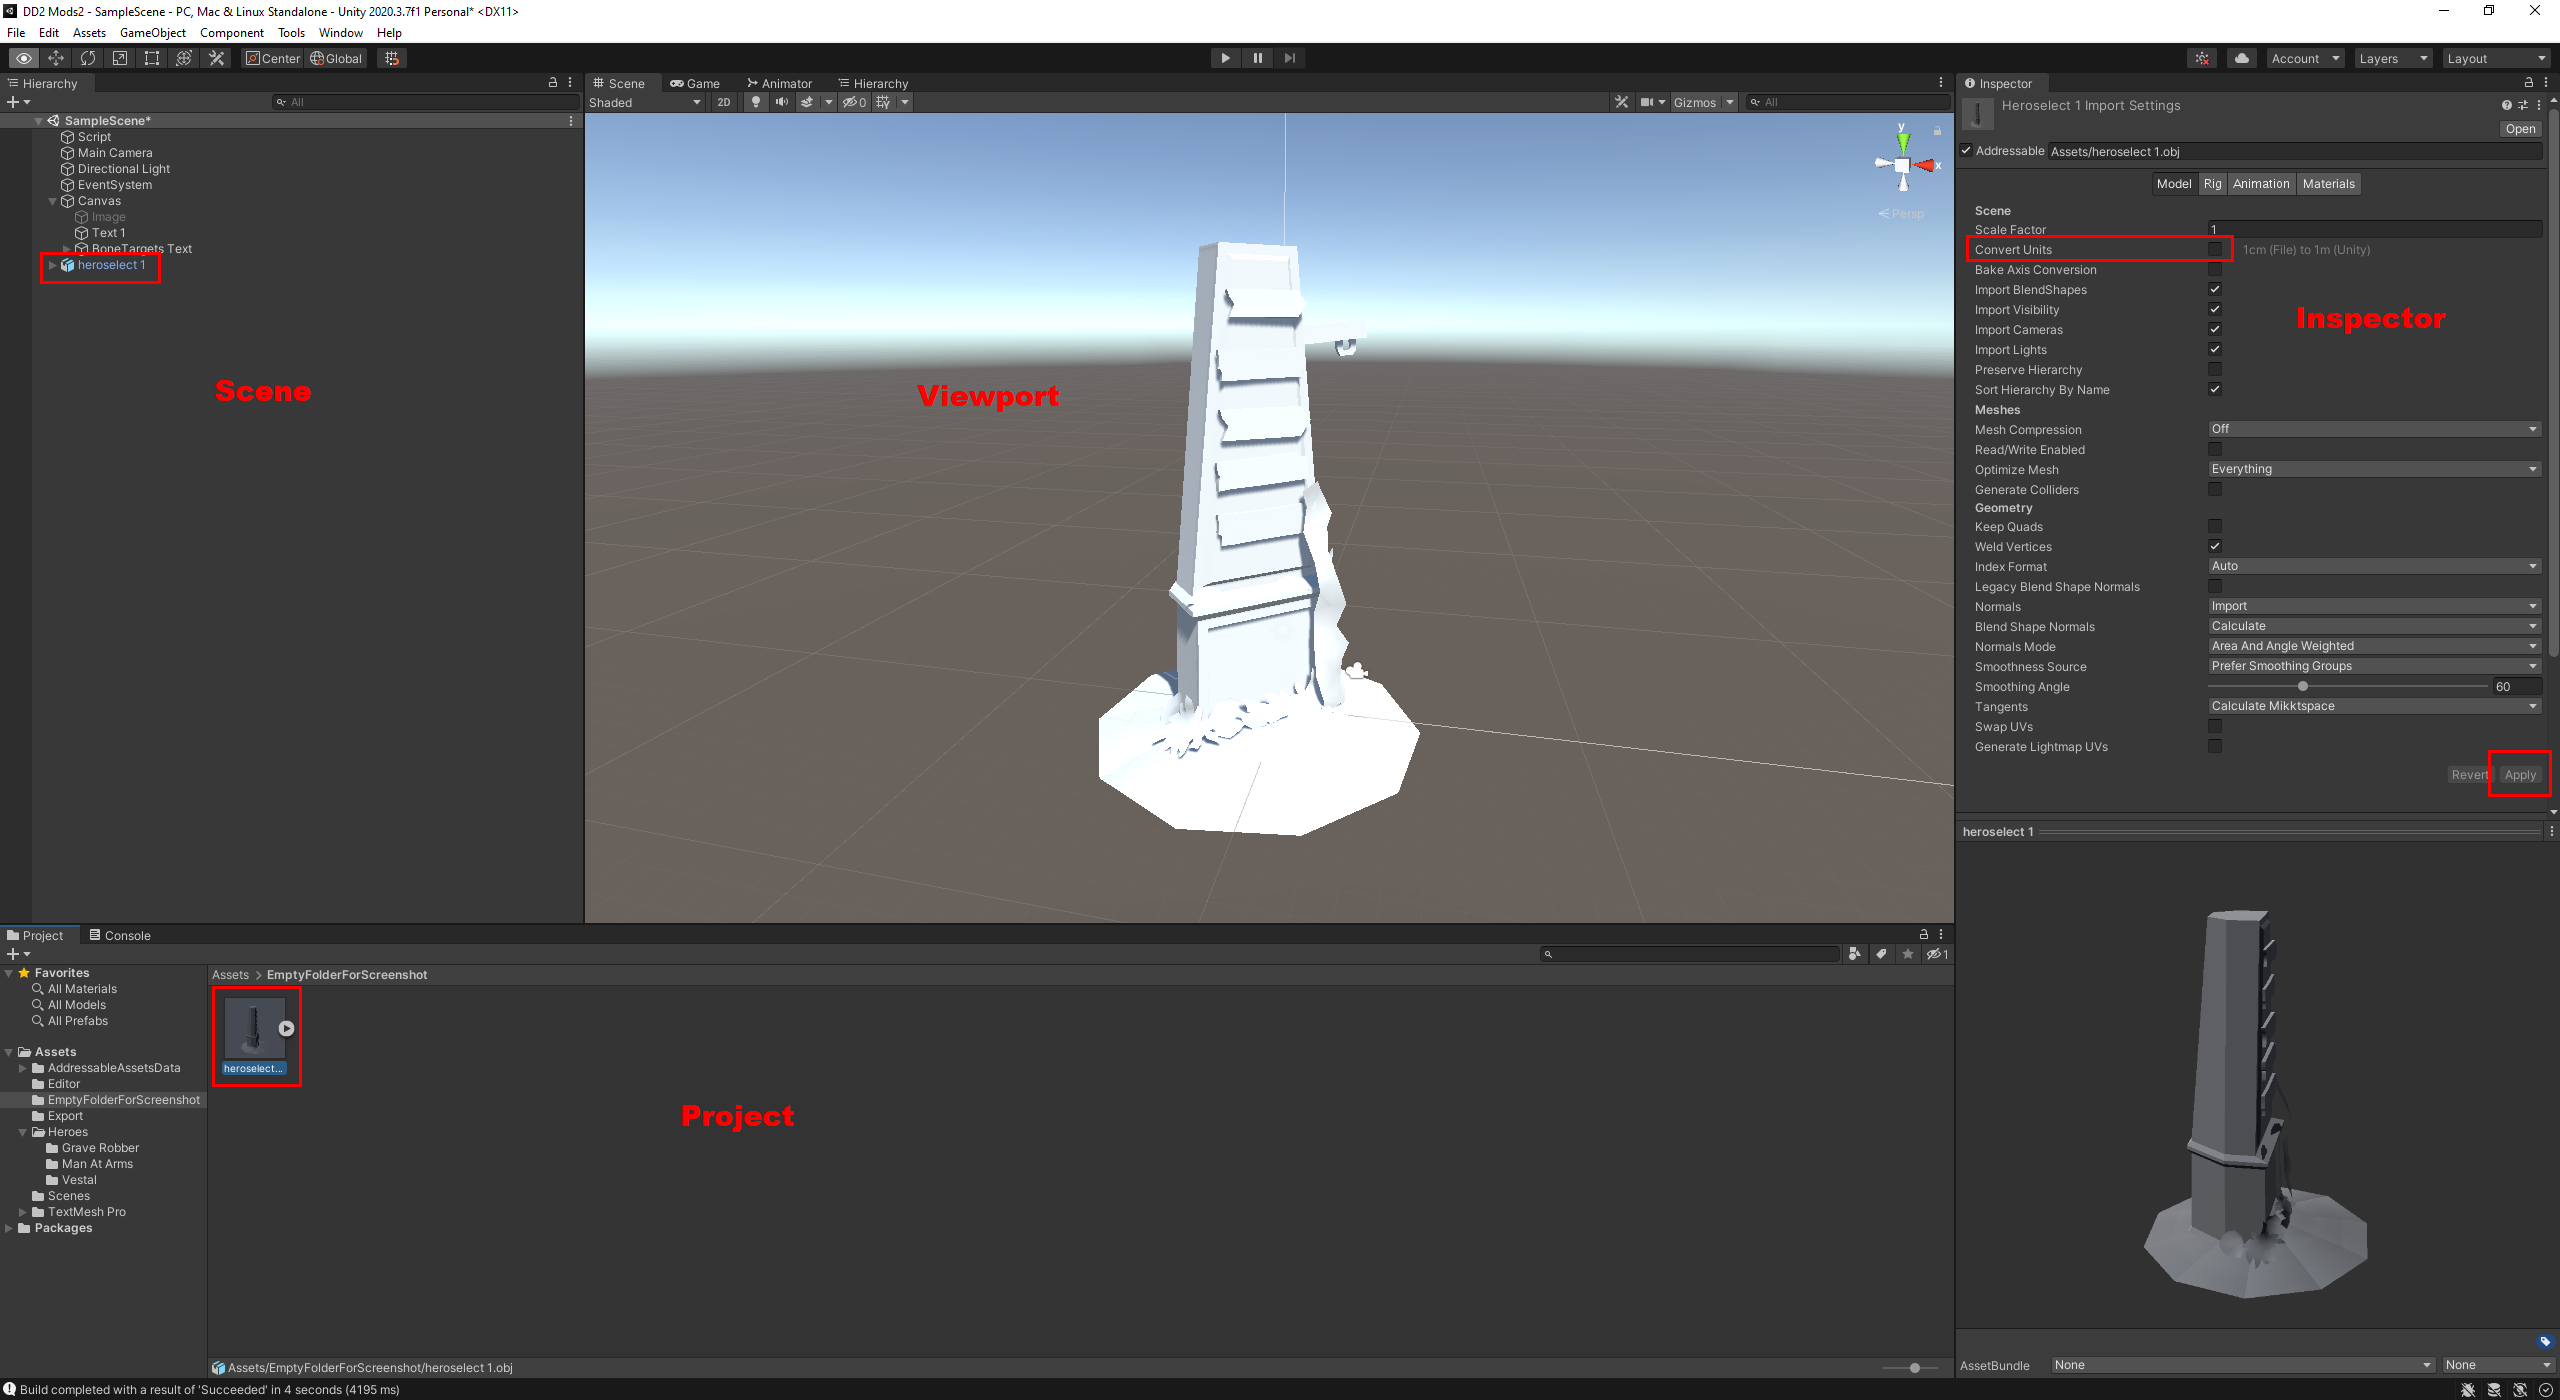
I have checked almost every guide how to export .fbx from blender to unity and even got the same size of the models (original and mine), but it still didn't help
Egthoridon  [author] Feb 14 @ 2:45pm 
To get the skeleton with the mesh, in AssetStudio open the hero's bundle file, search for mdl_heroname (e.g. mdl_hellion), expand the column called Container and look at the filepath, you want the one that ends in mdl_hellion.fbx and is an Animator in the Type column. Select it, then at the top click Export > Animator + Selected AnimationClips