Caliber

Caliber

64 Bewertungen
Beginner's Guide to Caliber
Von BASTION
This guide is meant to introduce new players into the basics of Caliber and will focus on how to survive Point Sweep and work with your squad to complete the mission. This guide was made presuming you either have not played Caliber yet or at least have had a few successful (or unsuccessful) Point Sweep missions under your belt.
3
2
3
   
Preis verleihen
Favorisieren
Favorisiert
Entfernen
Intro
This isn't Call of Duty, Battlefield or Rainbow 6 Siege. You are not a one man army, you are very squishy and if you're foolish the bots and enemy players will have a field day with your corpse, repeatedly.

IT IS STRONGLY RECOMMENDED THAT YOU PLAY PvE FIRST TO LEARN THE GAME BEFORE GOING INTO PvP! Or else you will have a very not fun time. I understand that the game forces you into PvP as part of the Training Objectives, but it is recommended you get the fundamentals down before getting into PvP, this guide will help with much of the info you need.

Be Forewarned: Caliber's community is Merciless, veteran players get excited when they see a newbie on the enemy team because they know the match will be easy. They will not go easy on you, they will not take pity on you.

The purpose of this guide is to help you understand the mechanics at play while in a Point Sweep mission, basic teamwork tips & tricks, and your class role during a mission. The majority of this guide will exclusively cover Point Sweep mission types and will generally not take into account the mechanics and nuances of PvP, PvPvE, Special Operations or Onslaught game modes. That being said, this guide will give you an idea of the fundamentals that will help you and your team in the above gamemodes.

Disclaimer: This is not a How-to-Play guide, much of the information here is rule-of-thumb and based on my own personal experience and observations of what behavior and actions lead to a successful operation. Make of it what you will, you don't have to agree with the guide, the purpose is to help Caliber's newest players establish a baseline for what to do and clue them in on some of the unspoken rules during a mission. That being said, if you have any recommendations or constructive criticism, I will take it into consideration.

Class-Specific Sections of this guide
Some players prefer to specialize in one or two particular classes, and that is okay, you don't need to know all the nuances of every class to play well, but it is recommended.

The class sections below detail the various class-specific tips, tricks and nuances as well as recommended starting Operators for new players.
The Basics Of Teamwork, Rules of Thumb
These are some important tips to keep you and your team alive during a Point Sweep mission, some of these may seem like basic common sense tips to some, but are Vitally important to your success nonetheless.

Rules of Thumb:
  • Don't rush the objective, Wait for your team! I've seen Rank 51 players do this as much as Rank 1 players, it almost always gets one or more of your teammates downed and too far away to be revived. Most of the time this leads to a defeat that could've easily been avoided.

  • Medic is the only class with more than 1 revive so hold off on reviving your teammates unless you're in a dire situation, general rule of thumb is try to keep your revive for the Medic. I've been in more than one situation where all other players are out of revives and the Medic is downed. If you want more revives as a non-Medic class, get the Medic Operator Mikolaj, his personal skill will give you more revives.

  • Stay with your team, the game generally punishes Lone Wolves and unless you have a tried-and-true plan of engagement, you will most likely get downed and force your Medic/team into a dangerous engagement to try and revive you. The game will reward you and your team for moving and fighting as a cohesive unit, communicate if you can, utilize the tag button to keep your team aware of nearby dangers.
    • If you must split up, move in teams of two. Again, the bots will usually pick off a lone operator so do your best to cover for each other.

  • Playing the Medic, your primary job is to heal your squad. Medic operators are generally very squishy, you're not the front-linesman, that's the job for Support and Assault. Your loadout is to help you clear the area when trying to revive your teammates.

  • Stay in cover! This is arguably one of the most important tips, enemy bots are designed to punish players caught out in the open. So stay in cover as much as you can and when you have to move, plan on moving to cover and if you can, keep cover between you and the enemy.

  • If you get downed, crawl to the nearest cover, this is so vitally important and will make your Medic's life so much easier when reviving you. It is very easy to get wiped during a mission because one player went down out in the open and got the Medic killed trying to revive that player.
    • While you're downed try to mark enemies that may be trying to flank the Medic while he revives you, let him know that he is in danger. Ideally, the Medic/other teammates will eliminate the impending danger before reviving you.

  • Don't do stupid ♥♥♥♥ if you want to win the Point Sweep, I myself have been guilty of this. Just because your Recruit teammate blew up your carefully laid mine while you were on top of it does not mean you should strap him with his own mine and turn him into a Jihad suicide bomber, speaking from personal experience. Even a Recruit player is valuable to the team.

  • Bot RPGs, Marksmen and Chemists are high priority targets! These are the team-wiping bots, and if they are not dealt with immediately, they will make completing the mission much more difficult.
    • RPGs are capable of wiping out your entire team, especially the Incendiary variant. One lucky shot may not kill you outright, but the flames will most likely end the mission for your team. The easiest way to outplay an RPG is by not giving it the chance to fire.
    • Chemists will launch gas grenades with extreme accuracy and while the gas may not kill you if you're smart and have some health, it's enough to push you out into the open for other bots to wipe your team. But if your team is heavily wounded, a single gas grenade is enough to down most of you, best way to deal with a Chemist is, like the RPG, by not giving it a chance to fart your team to death.
    • Marksman may not be quite as dangerous as RPGs or Chemists, but they still pose a serious threat, especially during critical moments such as when your injured Medic is desperately trying to revive you. The best way to deal with a Marksman is, you guessed it, kill it before it can get a shot off. Alternatively, bob and weave, ideally you shoot the marksman for some health, duck behind cover, rinse and repeat until the Marksman is dead.

  • Learn the patterns of the mission and their variations. Each mission has 1-3 variations of what your next objective is going to be, and bots spawn at specific spots in each of those variations. The more you can predict where the enemy bots are going to spawn, the less likely you are going to be surprised by a flanking Assault bot and mowed down.

  • Every mission has a timer, you will lose if time runs out, however, every mission gives you ample time to complete it, so if you can, take things cautiously throughout the mission unless you have a plan/know what you are doing. This is especially important during a critical moment if 2 or more teammates are downed, or your team is heavily injured. Take time to heal up, make a visual sweep of your environment, play smart and don't panic.

  • Every defeat is a learning opportunity, make mental notes of what went wrong and how to avoid it in the future. Make note to kill that RPG or Chemist first thing, what mistakes did you make that could've been avoided? Not everyone has learned the mission patterns, not everyone knows that the bots are very dangerous.

  • Group up in a Fireteam there are lots of veteran players who are more than happy to teach, and a lot of people who's playstyle synergizes with yours. Don't be afraid to friend them and invite them to your Fireteam.

  • Your Squad is your backbone, and every one of them, newbie or veteran, is important to successfully completing the mission. Caliber has a relatively small player base and every act of compassion, just like every act of aggression, carries over to the next game for that person or persons. Inspire success, teach what you can, and be a player that people will remember for their kindness not meanness.
Why Bots Are OP
In general, every class operator is slightly better than the average bot, but not by much. What separates your operator from the bots is your abilities, equipment, and most importantly, the human intelligence behind your operator. While you're tougher than the average bot, Bots have a number of frustrating and sometimes unfair ways of wiping out you and your team.

In this section we're going to go over the particulars of each bot type and what to expect from each of them. The bots are listed from lowest priority and lethality to highest priority and lethality. To reiterate, All bots are deadly but some are much much more dangerous than others.

Side note: A very undervalued mechanic in Caliber is callouts, your operator will usually automatically call out a special bot when they see them. (Not when 'you' see them) So as you read up on how awful all these bots are, keep in mind that your operator will try to assist you by calling these out in-game so you can keep an eye out for them.

Starting with the basics, Fighters, the most fodder bots out there and the most basic enemies you're going to encounter in a Point Sweep mission.

Fighter bots are easily dealt with and pose the least threat of all bots out there, they are designed to harass you and keep you occupied so the big brother bots can be the ones to take you down. Not to say they should be ignored by any means, again, they're meant to distract you and they are equipped with stun grenades to try and pull you out of cover so the resident Marksman bot or Gunner bot can mow you down. Best approach is to deal with them quickly so you can handle the higher priority targets.

Shooter bots are a little smarter, they will try to hang back or get up on a perch where they can harass you from a medium distance. Their danger lies in their location and their grenades, location because they're going to spawn in places that will pull your view away from the main field and grenades because that left variant with the stupid hat and headphones has a ♥♥♥♥♥♥♥ incendiary grenade.
Incendiary grenades are cancerous, they create a field of flames over a predetermined area when they go off. You are not safe if an incendiary grenade drops on the other side of your cover, the flames will cross over the cover. Fire DoT is one of the worst effects you can be afflicted with, because it burns for several seconds and your armor doesn't mean ♥♥♥♥ when you're on ♥♥♥♥♥♥♥ fire.

We call these ass-hats P90 bots and Shotgunners, while only equipped with eyebangers, these little ♥♥♥♥-heads will absolutely destroy you at close range, and they're very good about spawning right where you're not looking so they can get close enough to you to ruin your day. Unlike Shooters and Fighters, they will sprint much more often, they're programmed to path to spots that flank you and your team so they can get their dirty little kill in for the day. The trick to these cucks is to kill them as soon as they come into view, even when their close to you. There is a delay of about 1-2 seconds from when they come around corners and lay eyes on you to when they start firing, use that to your advantage and be the first to fill them full of lead before they do. If they lay eyes on you before coming around corners and cover, they will pre-fire you around the cover.

Make no mistake, Gunner bots are dangerous as hell but their behavior is very simple; They're always slow and they are inaccurate when they start firing, but if you let them continue firing they start to get dead-accurate the longer they're shooting. You read that right, their accuracy increases over time when firing and they will lead pellet skull-♥♥♥♥ you if left alone for too long. Deal with them quickly before they can get the chance to zero in on your ugly mug.

Now for Caliber's most dangerous and OP bot types, the three cancers of Caliber:

Marksmen bots will almost always spawn somewhere high up and far away, their fun little quirk is they can beam you from a huge distance with agonizing accuracy. While getting hit from a Marksman bot is not always a death sentence, it creates an opening for fodder bots and Assault bots to down you very easily. The reverse is also true, if you're at low health trying to get to the safety of cover, you're a juicy peace of meat in the crosshairs of a Marksman bot. Their weakness is that they take several seconds to zero in on your skull, use line-of-sight cover to your advantage and take them out before they make things much harder for you.

Chemists are Caliber's noob-checkers, they are a harassment unit that can force your team out of cover and poison low-health teammates oftentimes thinning the squad. If you're not observing your environment, gas can pose a serious threat and though gas does light damage over time, it's enough to give your squad's Medic a headache. I have seen a lot of new players get caught in a gas cloud and not understand that they are being poisoned to death, listen for your operator's callouts and listen for the hiss of the gas grenade. When you hear the callout, always always always assume that the gas is headed for you because more often than not it is. What's more, Chemists usually spawn far away and up on top of structures, much like the Marksmen bots do, this makes them difficult to deal with if you have a close-to-medium range weapon.
If you're the Marksman class, Chemists are your arch-nemesis and it is absolutely your job as Marksman to put that ♥♥♥♥♥♥♥♥♥♥♥♥ down.

RPGs are the absolute worst bot type there is, why? Because the explosion from an RPG does what the Marksman bot does, but to your whole team. What's more the mfer on the left has an Incendiary RPG, YES, AN INCENDIARY RPG not only does it explode and damage your whole team, but it also lays a field of flame around the impact point setting alight whoever was caught in the blast radius. This is the bot that primarily team-wipes because it is so easy to get caught off guard by one of these ♥♥♥♥♥♥. Especially if your squad is all clumped up with the Medic trying to heal, this is the prime situation that the RPG wants from you, top-tier day-ruiner. To deal with an RPG, obviously, kill it before it has a chance to fire off a round. The RPG bot has a firing delay much like the Marksman bot so use that to your advantage. Use line-of-sight cover to block his view and if you see the jetstream of the rocket coming your way ♥♥♥♥♥♥♥ RUN!


Now that you have an idea of what you're up against PvE-wise you're much better equipped to deal with them. Listen for operator callouts, communicate with your team, mark enemy snipers, RPGs and Chemists for your Marksman to dispatch. Remember that nobody is infallible so don't be too hard on your Marksman if they don't get every special bot.

Assault Class

Assault's role in combat is to flank angles on the enemy and employs a hit-and-run performance in the field. When you're not flanking, your providing covering fire for your team, when you're not covering your team, you're clearing the flanks. You're not a bullet sponge, and it is most definitely not your job to press the objective. The point of Assault is to make it easier for your squad to kill the enemy, you're really a distraction to relieve pressure. If you prefer just mowing down enemies as your main role, play Support or Marksman instead.

Many players confuse the Assault role with an a-typical CoD role where you bum rush everything, the enemy, the objective, the nearest explosive, etc. You are, and I can't emphasize this enough, NOT THE ONE-MAN-ARMY BUM RUSHER because if you play like that you will die and your teammates will not like you. Every time I'm in a point sweep and we get wiped because we're swarmed by bots or because they destroyed that objective we're trying to protect, 9 times out of 10 there's an Assault way ahead of the team starting the objective or off on the other side of the map in Narnia doing god-knows what.

The Nuance of Assault is straightforward: You work in tandem with Support and Marksman to clear the area, if Support is dealing with waves of bots, you cover him. If Marksman is being harassed by enemy bots, you cover him. If Medic is trying to revive someone or heal, you cover him. Your job is to protect your team by aggressively punishing the bots, you're the mama Goose and your team are your Goose babies.

In practicality, your whole team takes on the role of Assault to varying degrees, the difference is, Assault class is the best and most well equipped for it. Generally speaking, Assault is equipped for short range to mid-to-long range combat, you're not as squishy as Marksman or Medic but you're not the toughest either. While it is recommended to stay with your team most of the time, there will be moments where you'll see an opening to flank an enemy, your role is designed to take that opening. Be careful though as this is your most vulnerable time playing Assault and is the most common moment Assaults get downed. Play smart and be aware of your surroundings and you will be fine.


Recommended Assault Operators for Beginners:
Operator
Special Force
Ability
Description
VYMPEL
Iron Grip - Allows you to shoot accurately with less recoil for the duration of the ability
Volk is a fantastic starter Assault, while he's not quite on the Meta chart of Assault operators, he is still quite good and his ability will help you get an understanding of how accuracy and recoil works in the game.
Plut
22 SPN
Sabotage - Creates a decoy that will advance in the direction you're looking when he spawns
Plut's ability makes him an excellent operator for PvE, his decoy can be used to safely distract the enemy bots long enough to make a successful push, what's more, his decoy marks out all enemy bots when it is destroyed.
Mustang
ARYSTAN
Radar - Highlights all enemies on the map only for you for the duration of the ability, but will also mark you after
You may be happy to know Mustang's gun is the highest damage Assault weapon in the game, and his ability can help you understand where the enemy bots will spawn to learn the various spawn patterns for each mission.

Support Class

Support class is, unlike it's name, the main class for suppressing, tanking and mowing down enemy bots. While Support operators are generally the slowest and clunkiest class, their purpose is to be the center point formation dealer of death. Their abilities are, generally speaking, designed to aid their team over themselves. In fact, even while the majority of Support abilities only directly affect themselves they are designed to be used to 'Support' the team as a whole.

As the Support, you are almost always the toughest operator in your squad, you were meant to sponge bullets the most as well as shoot the most bullets back. That being said, you're not unkillable, and you also have to utilize cover as much as, if not more so than any other class. Mostly because most Support operators have a bipod on their weapon that boosts their weapon accuracy and recoil reduction substantially. This method of bipoded cover will likely be your most effective weapon at range since the recoil of Support weapons is pretty strong.

The Nuance of Support is very simple: Stand at the center of your team and shoot bad guys. Being Support means you are the enemy oppression line between the cover ahead of you and the cover behind you. Or, a better metaphor is this: If the goal is to conquer a region territory, and Assault is the advancing line to take territory, you are the measure of held or taken territory. You're king of the hill, your job is to keep the hill.

Operator
Special Force
Ability
Description
Almaz
VYMPEL
Aegis - Shields himself with a whopping 65hp shield at base level that can regenerate when not taking damage, but it slows him down to a walking speed, making him the ultimate Tank operator.
As far as Supports go, Almaz is the most traditional bullet-spongey Tank you'd expect out of the Support class. When upgraded, his shield makes him virtually impervious to most bots especially if you just never turn off your shield. When I play Almaz, I just turn on the shield and slow-walk the entire point sweep mission.
Kit
22 SPN
Banner - Creates a banner with an AoE effect that restores stamina for teammates but also automatically revives a downed teammate within the radius at the cost of the banner itself.
Kit is the only Support who's specc'd in Medic, his banner makes him extremely useful in dire situations because he can just revive with his ability and it never costs a revive kit. The only downside is that his banner costs quite a lot of stamina to place so make sure you bring extra stims or stamina-friendly personal skills to make up the difference.
Bourbon
SEAL
Crackdown - After landing a few shots (roughly 4-7 rounds) with the ability active, the target is Stunned for 0.7 seconds. This effect can only happen once per target per game round.
You may not think his ability is that great by the description, but think about what that stun effect precisely does. The target is locked in place, and they lose ADS (aim-down-sights) allowing you a free moment to fill the target with lead. This ability is extremely useful in both PvE and PvP, the hardest part is landing your shots.
Medic Class

Medic's role in a mission is very straightforward, you heal and revive your squad. As Medic, you're more support than Support class, because your immediate goal in life is to keep your buddies alive and in their best physical form. The trouble with Medic is that you're also equipped with almost exclusively tactical gear designed to sway the ebb and flow of combat in your team's favor. In Caliber, a bad Medic is one who doesn't heal his team or worse, heals himself and not his teammates.

First and foremost, Medic has the most revive kits of all teammates, everybody gets One(1) revive kit except for Medic so your team should want to keep you alive so you can revive them, making you the squad VIP. Again, your goal is to keep your team going, not get into the firefight first. Speaking from first-hand experience, Medic is like the catalyst for a team surviving or getting completely wiped in most any gamemode. In PvP if you manage to down and execute the opposing Medic, your chances of victory just went up astronomically purely because Medic is the only operator alive who can keep you going between engagements. I don't care how many medkits you have, you will more than likely lose without your Medic.

When advancing to a downed teammate be sure to clear the area around them as best you can before reviving, it puts your team in a very dangerous position if you get downed trying to revive a teammate. Your special gear is meant to help you in these situations, whether you're equipped with smokes or flashbangs, use them liberally to accomplish your immediate goal.

The Nuance of Medic is complex but easy when you understand it: You have to play into both your ability and your special gear. Out of all the classes, Medic requires you to think the most about what to do with your gear, generally speaking. Medic class also requires the most communication with your team, each Medic has a different ability and there are several Medics that require their teammates to understand how to utilize the heal effect properly to get the most out of the benefits. A great example of this is the Medic operator Velour, he drops a med bag with armor plates in it, healing and restoring armor to teammates. What a lot of new players don't know is first off, you have to interact with his bags to heal, and if you take the heal while at full HP and armor you gain additional armor, increasing your ability to stay alive throughout the mission until the armor is lost.

Operator
Special Force
Ability
Description
Schatz
KSK
First Aid - Toss a healing pastry on the ground, anyone that walks over the pastry eats it and gets healed over time.
Schatz is one of the most straightforward Medics there is, he's recommended here because his heal isn't the worst and he's quite effective in combat. His heal is helpful in teaching new players the general mechanics of Medics, that they have to interact with the heal to a degree to benefit from it. Also his personal skill is essential for most any shotgun operator.
Kaval
SSO RB
Suture - Point at a teammate and pop the ability to restore some hp and armor or hold it down to restore hp to yourself.
Kaval is effective as a healer because his ability restores both health and armor. But he's also effective in combat because he can heal himself, his grenades are extremely effective prior to a push and his gun is accurate and deals heavy headshot damage. His personal skill is also one of the most essential to any skill build, Composite Armor Plates allows you to restore up to 20hp when restoring your armor using Armor Plates. This allows you to carry stims in place of First Aid Kits.
Freyr
AMF
Touch of Idunn - The heal-and-forget ability, heals all teammates instantly from anywhere on the map. The downside is that the base ability's cooldown is 38 seconds.
Freyr has one of the best weapons for Medic class, paired with his healing ability, he is excellent for providing back-line fire support. His special gear, Biostims, increase his movement speed and revive speed dramatically making him a worthy Medic recommendation.
Marksman Class

So you want to play Marksman. You think getting headshots from a distance and stone cold assassination is pretty cool? Well it absolutely ♥♥♥♥♥♥♥ is, but playing Marksman in Caliber means that you're the only class equipped to deal with far-off high-threat targets, generally speaking. There are two distinct types of Marksmen operators; Auto-snipers who sacrifice a bit of range to drastically increase their effectiveness in mid-to-close quarters combat, opting to assist the team much closer to the front line. And then there are Semi-snipers who are your traditional long range high-zoom snipers equipped with either a semi-automatic or bolt-action rifle.

While Marksman is effective at picking off bots from afar and with ease, their singular task in a Point Sweep mission is to counter special bots. As Marksman, you're the counter-sniper, counter-rocketeer and counter-chemist. Generally speaking, those special bots that can team-wipe are your number one priority. (I mean really they should be your whole team's number one priority but as Marksman, you're the best equipped to deal with them before they become a problem) When there aren't any special bots left, your next priority is to pick off Gunner bots and rushing Shotgun or P90 bots because though they are kinda wimpy, they still pose the most threat to you and your team.

The Nuance of Marksman is about Priorities: In specific order, from highest to lowest priority, you wanna be the first to take down RPGs, Chemists, bot Marksmen, Gunner bots, Shotgun bots, P90 bots then Shooter bots. But aside from that you're the one providing Overwatch to your team, so while Assault and Support are dealing with the main stream of hostiles, you're going to be the one picking off the flankers and fun-ruining ♥♥♥♥♥♥♥♥ bots. As a result, it is in your best interest as Marksman, more than any other class, to learn the patterns and variations of spawn locations of bots throughout the point sweep missions.

Operator
Special Force
Ability
Description
Sztylet
GROM
Deep Wounds - Enemies hit by the primary weapon with the ability active receive the bleed effect, a Damage over Time effect that stacks with subsequent hits.
Sztylet is one of the most underappreciated Marksman operators because of his relatively low damage and simplistic abilities. But I'm here to tell you that he is extremely effective in PvE and isn't bad in PvP if used properly, his magazine capacity can be upgraded to hold 20 rounds per clip and paired with his Personal Skill makes him an extremely effective harassment operator.
Archer
TFB
Dumdum Bullets - While the ability is active, Archer's primary weapon bullets explode on impact creating a grenade-like effect where they land.
Archer has the single highest damage weapon in the game, any hit from Archer is a 1-shot-kill, even if you get shot in the foot or elbow. The trade-off is that his bullets are the slowest in the game, roughly the speed of a fast-pitched baseball and his bullets have significant drop over long distances. But his Personal Skill is among the best must-have skills among other operators.
Vagabond
RAID
Fragmented Bullets - Similar to Archer's Dumdum Bullets, Vagabond's primary weapon bullets create a shrapnel explosion over a base range of 10 meters wherever they hit while the ability is active. The shrapnel explosion can only affect up to 3 enemies.
Vagabond's ability compared to Archer's does much less damage overall but is extremely useful for harassment in PvP and crowd control in PvE. His primary weapon is probably the most traditional bolt-action experience of all operators, if your looking to improve your skills with Semi-snipers in general, Vagabond is a great choice to practice with.
Strategy In Play Pt1: Combat Engagements
Now lets talk about Applied Tactics as a general approach to each scenario. This is advanced stuff for folks who are like me and enjoy the theory of strategy in practice as an effective tool for pre-combat scenarios.

[This is Bonus content for the guide, the above sections should detail everything you realistically should know about Point Sweep so you can skip this section if it seems uninteresting.]


Much of the following section is based on IRL strategic theory outlined as guidelines for decision-making in a combat situation. The purpose is to help you make smarter and safer decisions overall when moving from cover to cover, firing from cover and playing your intended class-role from those points of cover.


So first off, take a look at this diagram. I'm sure it looks like a jumbled mess upon first viewing it, but we are going to go through and break down what is happening here and how to apply this in-game as a basic but effective approach to almost any situation. This can also be applied to PvP and is generally a useful strategy to employ in almost all engagement situations.
Disclaimer: This is a basic Theory strategy map and only applies to general environmental situations in the field such as being out in the open with basic cover. There are much more advanced strategy maps out there that detail much more specific situations.


Lets break this down starting with the Cyan arrows:


So this map details basic class-movements for tactical rotation in an environment for (ideally) your entire squad when dealing with an inbound hostile threat. To keep it simple, think of this as the pre-engagement step when your squad is preparing to engage the hostile force. This maps out a bit of how your engagement is going to go, so if Support is in the middle he will be the first target seen by the hostiles and thus the first target to be shot at.

For example, if the threat is coming from the left side Support and Marksman both rotate to the left with Assault for a 4-LoS (Line of Sight) direct approach. This means the oncoming hostiles have to come around a corner/cover first before engaging. However, if Support and Assault rotate left while Marksman rotates to right cover, Marksman has the opening shot and thus, the opening engagement. This approach is effective for taking down short range hostiles from afar, but puts Marksman in danger when taking on long range hostiles. To remedy this, Support can also rotate right for suppressing fire so that both Support and Marksman are taking on the oncoming threat while Assault and Medic have to wait for whatever hostiles survive to round the corner/cover. This can be effective when taking on a lot of enemies at once. Alternatively, if Assault rotates right with Marksman and Support stays in the centerpoint, Assault has the opening engagement but is supported by next-in-line fire from Support and obviously Marksman from the rear. In this scenario, both Marksman and Assault have the opening engagement but Assault is closer making him primary target for the hostile force.

Realistically, you're always performing a tactical movement, it just means your moving from cover to cover, but it's how you move in relation/coordination with your squadmates before, during and after combat that can determine whether or not you survive the encounter.

Now lets talk about what happens when engagement starts after you've performed your tactical movement:

In an ideal situation involving the entirety of your squad, you see here Assault moving to flank the main approach while Support and Marksman fire down lane. What you also see here is Marksman covering the flanks for the rest of his team, this is your offensive movement being supported and covered by your squadmates. Offensive movement is not exclusive to Assault obviously, and each class can take up either role, but the important thing here is that each class is designed for specific roles in this engagement. Assault is the most effective for offensive movement and Marksman is usually the least effective. Support is the most effective for head-on engagement from the front, while Marksman is usually most effective for counter-flank covering fire and long range pickings, and so on.

The idea here is to help you understand your class role in each engagement, the classes are more and less effective at different tasks/approaches in a combat situation so keep in mind how you're planning to approach a situation.

As a side note here, many players in Caliber have these concept in-grained in their subconscious, it just comes as a habit of playing the game. They've gone through combat experiences of what works and what doesn't work and employ the depictions in these diagrams without even realizing the planning and strategy behind it. These diagrams give face to such behavior, the effort of this section of the guide is to get players to understand that they are working with a team and not alone. If you can exhibit the behavior in combat while keeping the behavior of your team in mind, your squad as a whole can perform much more effectively.


Moving on to the Medic's role throughout these engagements:

In an ideal situation, whether this is pre-engagement, during or after, the Medic's primary behavior as a class is to heal and revive. This diagram attempts to show the Medic's line or path to support all of his squadmates. As Medic, you have to rotate forward and back as well as to either side to support your team. Apply this diagram to the previous one, in a combat engagement Support and Marksman is covering the main hostile engagement, creating openings for Medic to get to Assault for a revive or heal. Conversely, Medic should be close at hand to support his squadmates most at-risk of injury or death. This usually means staying close to Support and Marksman because the Assault class generally has the most survivability out of all the classes, mostly due to Assault being among the fastest operators, a good Assault can quickly get out of danger when need be. That doesn't mean Medic should ignore Assault by any means, just that generally, Marksman and Support especially will need the Medic more often.

This diagram also insinuates that Medic is shooting while moving, which is accurate, Medic is generally best equipped to clear the immediate area quickly so he can reach his teammates. When not healing, the Medic still plays a pivotal role in the combat engagement in any situation or environment, which is why Medic's guns are usually quite powerful at short-to-medium range.


Now lets get to the good stuff: Synchronous Squad Movement

This is where it can get complicated, because you're not only trying to be aware of your own location and movement, but your squadmate's also. Assault being generally the fastest operator has the opportunity over the other classes to push and retreat more easily, this makes Assault the most flexible and adaptable class when paired with a squadmate. Assault has the most versatility and can oftentimes control the ebb and flow of the enemy through his own movements and decisions in correlation with his teammates, this is especially true during PvP.

Imagine a string attached to each of your teammates, they also have strings attached to each other, no matter what formation you're in, the strings between each of you create triangles- Actually this is called Triangle Offense, let me make another section to go over this more in-depth.
Strategy In Play Pt2: Triangles
So first of all, Triangle Offense is a real thing, it's a strategy used in Basketball that ensures that the player with the ball has at least two other players to pass the ball to.

Here, watch this video real quick, it's 2 minutes it'll just take a sec:

Great show by the way, highly recommend Ted Lasso.

Anyway

This same strategy can be applied to Caliber, believe it or not, so long as your team understands the concept as well. We'll lay it out in detail here.

So conceptually, the ball here is the engagement target, (the guy on your team getting shot at) or rather, the ball is the spot the hostiles are shooting at and instead of passing the ball from one location to another, the players in turn become the ball.

The example in this diagram here shows Support up front, the one getting shot at.

Currently, he is the ball, he does not want to be the ball anymore because it hurts.
So he rotates to Medic to heal, but look at how the dynamic changes.


Suddenly, Marksman is the ball, but this also creates an opening to counter the offensive.


So do you see how this works? A simple rotation can be enough to counter an overwhelming force by means of simply changing the attention of the hostile force! Now I know this explanation has some holes, but conceptually this does work extremely well against bots and can be very effective in PvP as well. All that's needed is a coordinated team to apply the concept strategically and effectively, in fact my buddies and I often play Frontline with this tactic and we win almost every time against the bots/enemy players because it is so habitual for us. We understand the fluidity of combat on the larger scale and have it unconsciously ingrained into our playstyles, thus making an effective squad.
Graduating Point Sweep Into PvP
So to bring this all to conclusion, much of what you've learned here can be easily applied to PvP and PvPvE gamemodes, but there are just a few more tidbits you should be aware of that are PvP specific.

  • - When you shoot down an enemy player, you must get to him and execute him for in order to permanently take him out of the round. You can't just shoot a downed player and expect them to die.

  • - In Showdown after a few minutes of a round, a neutral position will spawn in, the first player to capture that neutral position wins the round. So if you're struggling against a team in Showdown, try waiting for the neutral position to spawn and then fight for that.

  • - In Annihilation if you manage to Execute an enemy after downing them, it will not only increase that enemy's respawn timer, but will award you with 2 points instead of 1. Only 1 point is awarded if the enemy respawns on their own.

  • - In Frontline there are usually 2-3 routes to the other side of the map, the two main capture routes and a third alternative route. Frontline is about getting the most points first, securing intel, capturing points and killing bots all award your team points. Try to prioritize what is most important when playing Frontline with your team.
Closing Statement
Thank you for taking the time to read my guide, it's actually my first substantially-written guide. My hope here is that players new to Caliber can gleam some useful information from this guide and be able to enjoy the game.

Leave a comment if you like my guide!
9 Kommentare
SAMPL 28. Jan. 2024 um 16:41 
guys repair ranking games becouse is shit totaly shit even Diament 1 play with Bronze 5 or what becouse i play all day and is not posible to win evewn 1 game ok so is my and my team i open twitch and is same problem only losses................
J. Wright 19. Juli 2023 um 10:52 
@CursedDaywalker tbh you hit the nail on the head, and sadly like many games the community is what will kill this game. The game is fun, but the community is absolutely terrible with probably a small 10 or so percent of players that arent toxic and trying to play the roles right to help the team.
CursedDaywalker 30. Juni 2023 um 2:34 
After playing caliber with mostly randos for a week non/stop since i was ill and bound to my home i feel you so hard XD
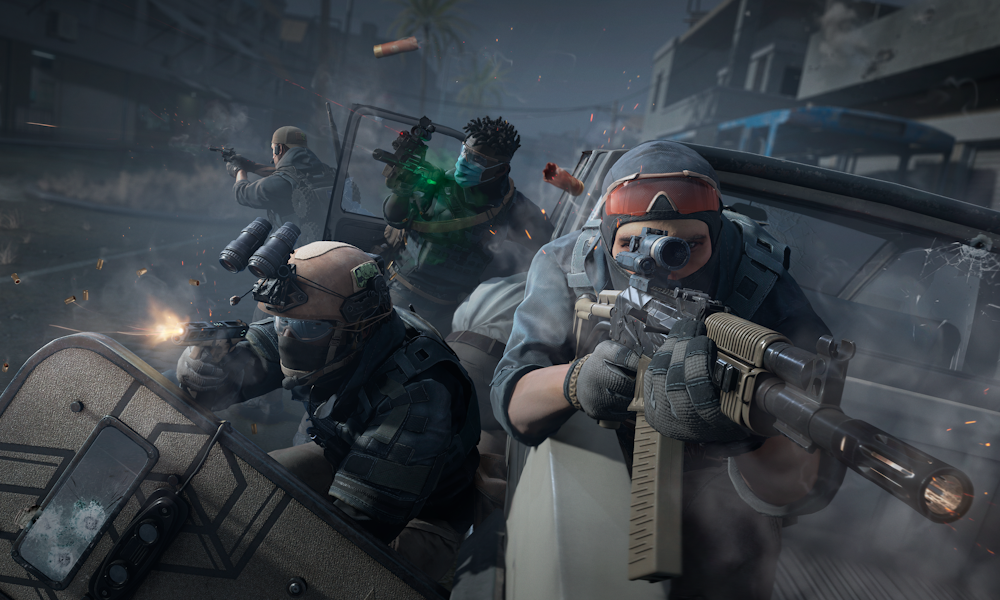
ppl rushing objectives
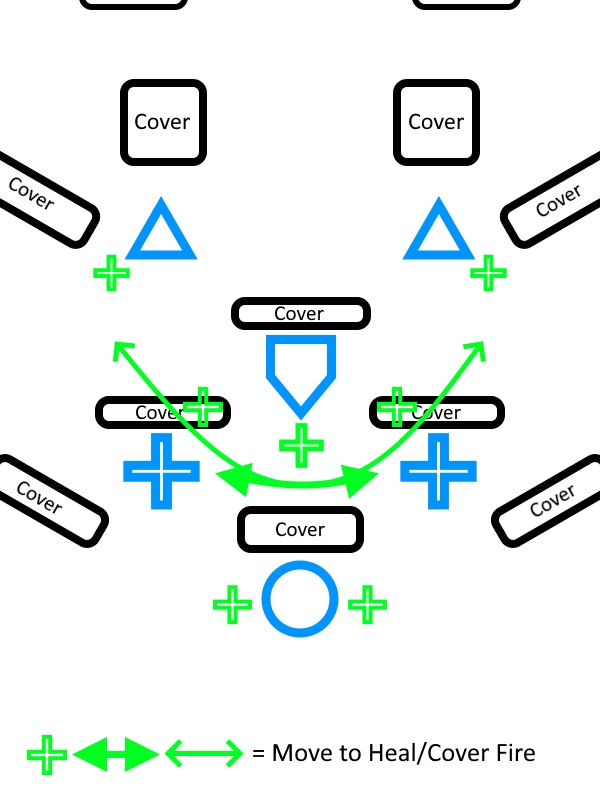
ppl not healing
ppl screaming at the medic not understanding how their skill works
ppl talking to u in russian even tho u told them soory i cant understand you
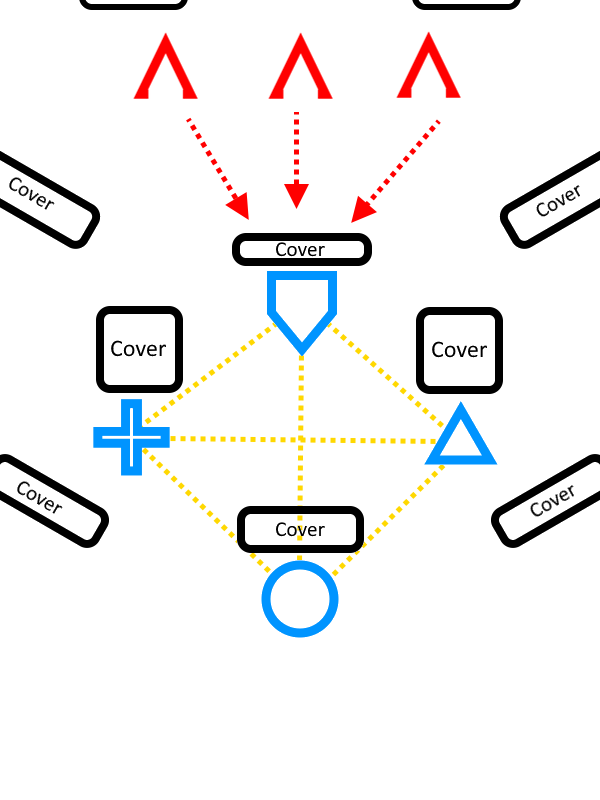
ppl rushing in alone then complaining about that they have died
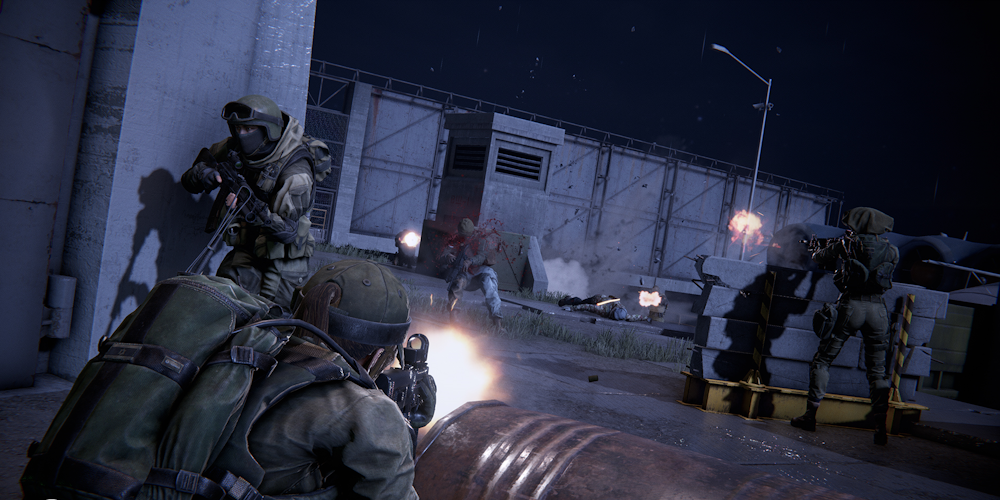
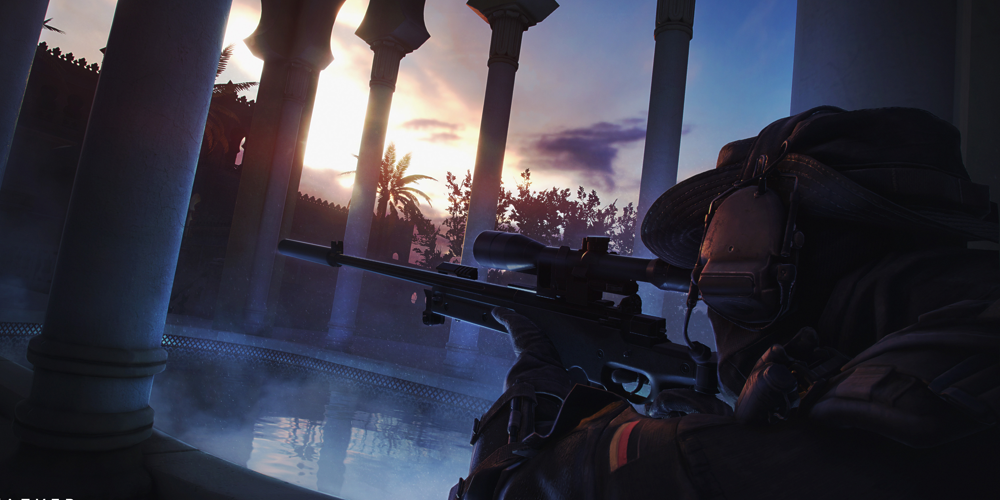
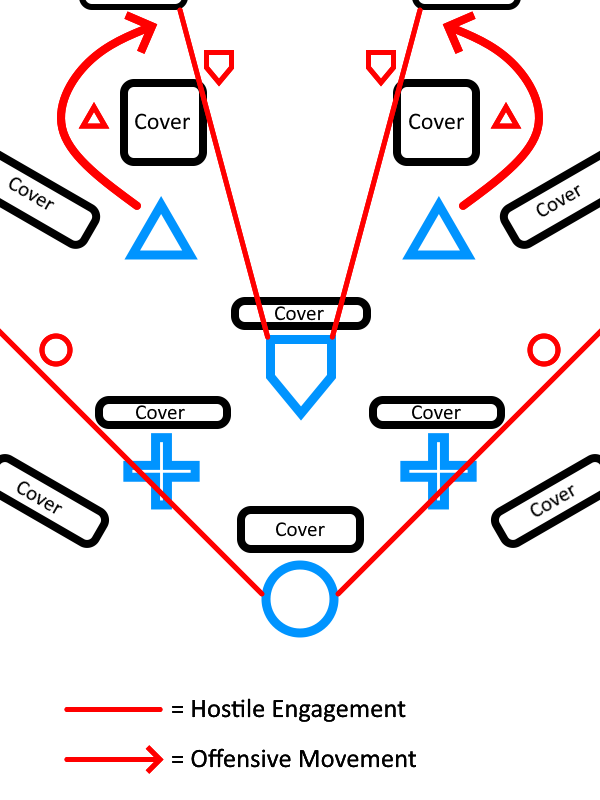
and yeah somehow ppl tend to be a bit on the toxic side in this game coz its actually not easy and can end quickly if one member doesnt pay attention
i really hop this game sticks around coz its actually something special and as you described very tactical, at least far more then other games!
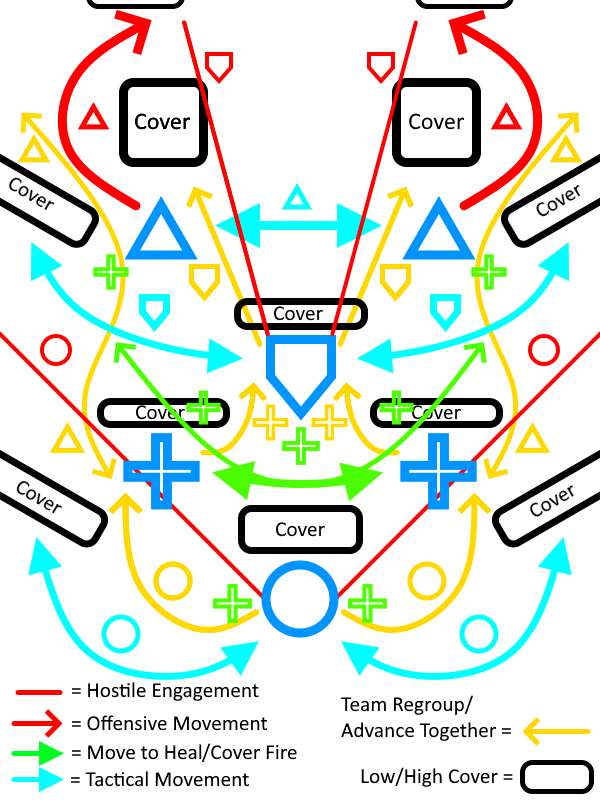
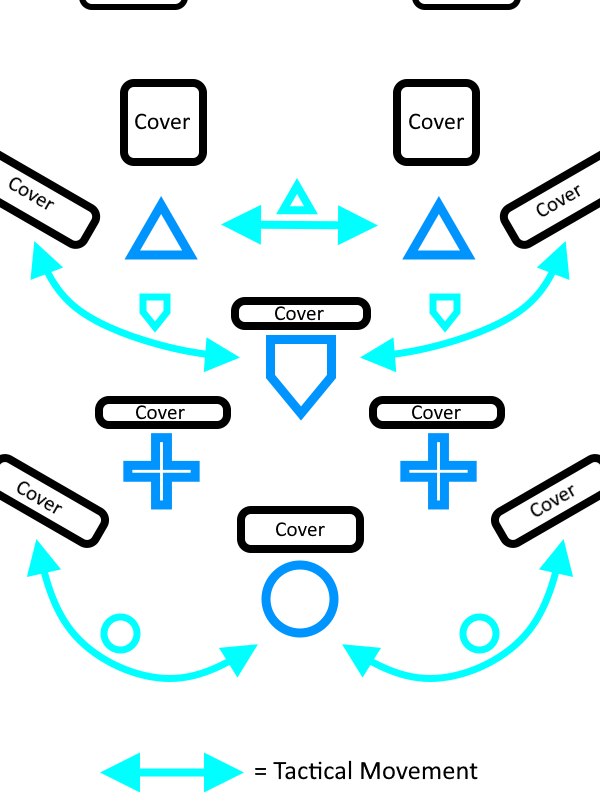
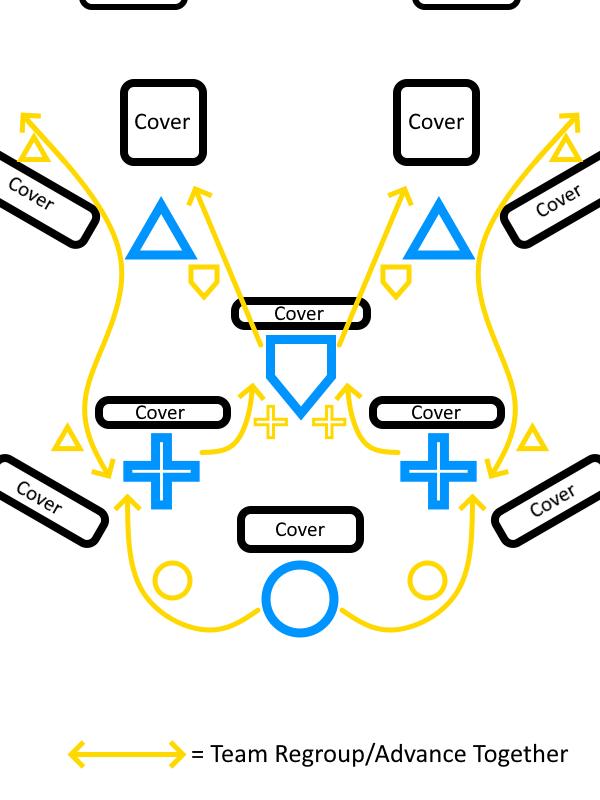
n its so easy to tell when a team in pvp is used to one another n runs tactics coz with randos... most of the time against a trained team, it kinda feel like you get penetrated through the backdoor (without warning) n no lube! XD how rude #nohono XP
THX for taking your time and writing the guide
maybe add me and we could play sometime
Pt.Jones 28. Juni 2023 um 2:47 
You might also want to add that new players can try out operatives via the "Practice" mode and find one that matches their play-style. Nice guide btw!
PoopooPeepeeFartyfart 12. Juni 2023 um 9:05 
"do i have suggestions" no bro i'm SCARED. I look forward to whatever guide you make next though.
BASTION  [Autor] 10. Juni 2023 um 8:22 
Thanks bro
Yunus 8. Juni 2023 um 11:33 
Great guide bro
BASTION  [Autor] 8. Juni 2023 um 8:02 
I've been toying with the idea of making guides for other gamemodes, but I'm not sure how I'd do a ranked guide as I haven't played it enough to really get a grip on other player's approaches and behaviors to combat compared to something like Showdown. Plus I've only been able to play ranked in a 2 or 3-stack and have struggled with it. But if you have any suggestions on how to go about it I'm open to ideas
PoopooPeepeeFartyfart 7. Juni 2023 um 17:01 
good man, a guide for beginners in ranked would be epic of you. its hard to find english guides for this community