Hogwarts Legacy

Hogwarts Legacy

322 avaliações
How to get the Best Gear to Maximize your Power in the fastest and most optimal way: Tips and Tricks
Por Akunamatata
Lots of useful tips on how to get the best possible gear at any stage of Hogwarts Legacy game, and also many tips on relevant general aspects of gameplay like leveling up, looting, beasts, money etc. based on in-debt game statistics and experience.
12
7
2
14
6
3
2
2
   
Premiar
Adic. a Favoritos
Nos Favoritos
Desfavoritar
Introduction

After my 3-rd play-through and watching a ton of YouTube videos, reading many guides, posts and discussions, I came to much better understanding of the game mechanics, of things that can really improve your experience and of the most optimal ways to develop your strength. I also made my own conclusions about the major mistakes you can do and what things are the most important to know before you make your decisions in the game.
I wrote this guide when I felt the need to share some of my thoughts, conclusions and things I learned for myself, all of which could potentially help others.

At the beginning I only wanted to share my own strategy and tips on getting the best possible gear, after I came to the conclusion this is the most important thing to improve your strength. (And I do cover this in detail in Sections 2, 2a and 2b.) But as I was writing this guide I realized this issue is tied to other aspects of gameplay such as leveling up, earning money and obtaining beast byproducts and traits; and that I want to share many useful tips on those aspects too. So at the end this guide has blown to a full-length gameplay guide.

Even if you think you know everything about the game, I still suggest to read this guide or at least scroll through the tips – I hope there's a good chance you find something useful you didn't know or didn't think of.

There are obviously spoilers of gameplay development and I reveal some minor details of some side quests, but there are no story spoilers and no solutions of any puzzles (there are couple, but I put them under the spoiler tags). All tips, pictures and tables are numbered for easy reference.

I took all the statistics of game mechanics from this legendary post on Reddit:
https://www.reddit.com/r/HarryPotterGame/comments/114vjnu/spreadsheet_and_game_mechanics_exact_stats_for/
You can follow the link and thank the author in any way you see fit.

General points and basic info

Getting the best possible gear is the most basic and important thing you can do to make your character stronger.

What is the main purpose and benefit of leveling up your character (aside from unlocking quests and talents and increasing your health bar)?
Obviously, it’s the access to gear with greater magical powers, since the powers of items that drop from looting or found at vendors depend on your character's level.

Some basics:
"Gear" refers to enchanted wearable items that have defensive and offensive magical powers (which are measured in points from 0 up to 114). You wear 3 defensive gear items (Facewear, Headwear and Outfit) and 3 offensive ones (Handwear, Neckwear and Cloak/Robe). Every item belongs to one of the five rarity categories, each with its distinct characteristics and features:

Table #1:


You get new gear items either by looting gear chests that are scattered around the world or by shopping at vendors. Each item you obtain belongs to a certain level, which usually matches your character's level at the moment of looting or buying this item (there's a 10-15% chance to get an item that's 1 level higher, but you can equip those items only after you level up).

You enter your GEAR screen by pressing 'I' or whatever you have on your controller:

Picture #1 (click to enlarge):


You can see combined defence and offence powers of your gear in the upper-right corner of the screen (438 in this example). For individual stats of any equipped item, point at the item and you will see its level (38 in the example above, which matches my character's level, but, of course, it can be lower) and its offence and defence powers (110 and 36). Note that unupgraded items have only one type of power, you add points to the defence power of the offence items and visa versa by applying upgrades after you learn to catch magical beasts.
If you didn't know, you can change the look of any item you wear by pressing 'F' to 'Change Appearance' of the item (look at the bottom of the picture above). You can read more details in Tip #12 in Section 2a.
Similar item's stats window opens when you point at any item while browsing gear shop's inventory (see Picture #11 in Section 2b).

When you loot or buy a new item, a notification appears on the right side of your screen, with a green or red arrow next to it, indicating whether the power of this item is higher or lower compared to the power of your currently equipped item of the same type:

Picture #2:


To see all items of the same type that you have in your bag, click on the item from your main GEAR screen. If we click on the gloves in the example above (Picture #1), the following screen will open:

Picture #3:


When you point at any item, you can see its stats and also check how your combined gear powers will change if you equip this item instead of the one you wear. If you didn't know, you can unequip (take off) any item you wear by simply clicking on it, you don't have to equip another item in its place.
* BTW, this is the only screen where you can see how many gear items you have in your inventory (12 in my example, when the max number I can carry is 40).
Note that the gloves in the middle are level 39 and currently locked – they can be equipped when I reach the next level. Even though I can't wear this item yet, I can apply to it upgrades and traits:

Picture #4:


Some important and eye-opening statistics:
Your offensive capabilities depend much more on your gear quality than on anything else:
Any kind of damage inflicted on an enemy has a numerical value (you can see it on your screen as a number of points substructed from enemy's health bar every time it takes damage). This value is initially calculated based on many factors – type of spell or damage; conditions like airborne/frozen/stunned/disoriented state of the enemy; used potions, talents, traits etc. But then the resulting number is multiplied by a damage multiplier, which is a function of your combined gear offence power.
Your combined gear defence power reduces a certain percentage of any damage inflicted on you, but your defensive capabilities are less tied to this particular factor – your health bar grows with your level, you can block, dodge and use health potions.

Below you can see two charts that show how exactly your overall defensive and offensive capabilities depend on your combined gear powers (defence on top and offence on the bottom):

Chart #1:

Chart #2:


As you can see on the top chart, you gain the biggest increase of damage reduction for each additional point between defence powers 1 and 16 (1% less damage taken for each additional point), then it drops to 0.112% per point and rises to 0.283% per point after 350.
But the biggest difference between lower and higher powers of your gear you see with the offence (bottom chart). The destructive power of your attacks doubles at offence gear power 32 (damage multiplier = 2), triples at 63 (damage multiplier = 3), quadruples at 94 and so on up to 250, then starts to grow exponentially and ends up with very steep linear growth between 390 and 450 (which is a max possible combined power of your gear). Your inflict 4.1 times more damage at gear power 390 compared to 250 (damage multiplier 36.8 vs. 8.97) and 2.33 times more at 450 compared to 390.
When you reach level 40 and obtain gear with max possible combined power 450 in both defence and offence, your inflict 86 times more damage and take 82% less damage than with gear that has no magical powers.

What does any item's power consist of?
  1. Basic power which depends on item's level (and chance, since each level has a small stat range (min and max) and the value is randomly selected from this range).

  2. Extraordinary or legendary bonus which also depends on item's level.

    (For example, level 10 item's power can be as low as 14 and as high as 27 (with legendary bonus), between 34 and 62 at level 20, 51-94 at level 30 and 60-112 at level 39.
    You can see the max possible power of an item for each level in Table #3 in Section 2 below, and more detailed gear stats here (including the chart with ranges for all levels).)

  3. Upgrade level. This is the most important component – fully upgraded legendary item adds 36 points (which is a massive 108 points bonus for 3 items of the same category).

Conclusion:
In order to get better gear you should pursue 3 following goals:
  1. Level up as fast as you can.

  2. Figure out a way to get gear items with highest possible stats for the level (either from looting or vendors).

  3. Acquire all resources needed for upgrades, which are beast byproducts (and money you will have to pay for some of them).

1. Leveling up

Here's the table showing how much XP you earn from every activity:

Table #2:


It is very important to remember that earning XP from everything in the game is tied to challenges. After you complete chain of challenges that's related to a certain activity, you no longer earn XP from this activity.
For example, after you defeat 35(5+10+20) Dugbogs, defeating another Dugbog won't give you any more XP.
After collecting 50(2+8+15+25) Field guide pages in Hogsmeade you won't get any more XP from collecting a page in Hogsmeade, and there are 55 Hogsmeade pages in total. And so on.

Here are several main points I suggest you to follow to level up quickly and efficiently:

1. Explore! As you can see from the table, exploration activities and Revelio pages give you more XP than defeating enemies (except infamous foes), so you can level up very quickly even without engaging in any combat, especially early in the game.
Tip #1:
Once you arrive to Hogwarts, you can jump many levels just by finding Field guide pages and doing side quests (see alternative strategy in the next section!). You can (and should in my opinion) explore the whole castle after you learn Accio and Levioso spells - along with Revelio and Lumos they will allow you to find all types of Field guide pages except one (for which you need fire). At the same time, before leaving for Hogsmeade, you can take all 4 available side quests ('Like a Moth to a Frame', 'Flying off the Shelves', 'Gobs of Gobstones' and 'Crossed Wands: Round 1'; below you can read how to find new side quests on the map). Once you get to Hogsmeade you can also explore the place and find almost all its pages, instead of rushing the story. You can easily find YouTube videos with all pages' locations (great example).
You can reach level 16 even before thetrollfight in Hogsmeade. For this you need to complete 4 side quests and find 128 pages (not counting 2 flying pages from Prof. Ronen's assignment). Or, if you choose to leave 'Crossed Wands: Round 1' for later, you'll have to find 130 pages (at this point you can find 82 Hogwarts pages, 52 Hogsmeade pages (of which 50 give you XP) and 1 Highlands page). (again, also read Section 1a)
Read Tip #13 in Section 2a on how to unlock Merlin trials as soon as possible - each trial will give you 80 XP.
Tip #2:
Later in the game you can infiltrate into the southern part of the world much earlier than you must according to the story. Using Disillusionment, you can sneak through the Coastal Cavern without fighting all the trolls and the goblins (only at the very end of the cave you'll be probably spotted despite your concealment, but there will be only 4 goblins to fight).
It will open a lot of exploration activities, side quests and chests to loot and you'll be able to fast travel there whenever you want.

2. Revelio is your best friend. Cast Revelio as frequently as you can, especially in the air, it will reveal a lot of objects of interest in a huge radius around you.
Tip #3:
Once you unlock talents, you should acquire 'Revelio Mastery' talent to increase the range of Revelio, IMO it's a must-to-have talent.

3. Don't postpone your assignments! It will unlock new spells and will also give you a lot of XP.
Tip #4:
Madam Kogawa’s assignments, which are unlocked after 'The Map Chamber' main quest are really easy to miss before you start Percival Rackham’s Trial, and they give you new spells that are really useful for the trial!
Sometimes you need to check your owl to receive new quest or assignment!

4. Do side quests! Most of them are really easy to complete, and they give you money, appearances, conjurations etc. in addition to 180 XP.

To see side quests in the Highlands and Hogsmeade, open the corresponding map and look for icons. To see the list of all available quests in Hogsmeade or Hogwarts Castle is also very easy – point to the location from the World map and you will see all the data on the side:

Picture # 5:

Picture # 6:


To see the exact location of a new side quest on the map of Hogwarts is a bit trickier. You have to select the right wing, only then you see the icon on the map (look for the wings with black flags, then switch between them to find the quest):

Picture # 7 (click to enlarge):

Picture # 8:


Some useful piece of info regarding 4 interconnected side quests later in the game:
Tip #5:
Small tip how to visit Henrietta's Hideaway (in Manor Cape) and Clagmar Castle only once to complete 4 side quests which are related to those locations:
1. Steal a map from a table inside a tent on the edge of the Poidsear Castle, it will initiate 'The Hippogriff Marks The Spot' quest.
2. Take 'Rescuing Rococo' quest from the vendor in Bainburgh hamlet in Manor Cape. (It's unlocked after 'The Elf, the Nab-Sack, and the Loom' and 'In the Shadow of the Estate' main quests (you also need min level 25).)
3. Go to Henrietta's Hideaway and do 3 things inside it (besides looting and fighting wizards and inferi): solve the Hippogriff statue puzzle; find and catch Rococo; find the Musical Map, which is a part of 'Solved by the Bell' quest.
4. Come back to Agnes Coffey in Bainburgh hamlet and bring her Rococo. Sell all excessive items to free space in your bag for a new loot.
5. Go to Clagmar Castle, defeat Sylvanus Selwyn and all his buddies in the camp, then solve the musical bells puzzle inside the castle (while you're there, don't forget to loot all chests in the castle).
6. Go to Cragcroft hamlet in Cragcroftshire, find Hyacinth Olivier and take 'Sacking Selwyn' quest from her. At the end of the conversation, tell her you already took Sylvanus Selwyn down, it will complete this quest.
I really wish I new all this during my 1st play-through, I had to return to Henrietta's Hideaway twice to complete all the quests, and it is not a very nice place to say the least... ;)

5. When you encounter an enemy, pay attention to the Duelling Feats that pop-up in the bottom-right corner of your screen. They can give you a good advice on how to fight different enemies, and completing a feat gives you 35 XP.

6. After you learn to catch magical beasts ('The Elf, the Nab-Sack, and the Loom' mission), you get 30 XP for every beast you catch (up to 60 beasts), and you need many beasts anyway to get byproducts for upgrades and earn money (each upgrade of your gear will also give you 25 XP).

7. Some people recommend Battle Arenas as a good way to level up quickly. First, it's only good before you completed most of your combat challenges. And personally I think you will encounter plenty of enemies while exploring, and this way you have almost total control on whom, when and how many at a time to fight in much less chaotic environment...

You can also read the Special Tip at the end of Section 2 to learn another unconventional way to get a lot of XP (and many excellent gear items).

1a. Alternative strategy for the early stage of the game:

Instead of leveling up as soon as possible (as I describe in Tip #1), you can choose entirely different strategy early in the game:

During the early stage of the game you can progress through the levels very quickly, but if you're actively collecting gear by looting chests and sacks along the way from the start, your chances of finding better gear on higher levels are much smaller, since then you draw from much smaller pool of chests you haven't opened yet (as I explain in Tip #6 in Section 2a).
So the most logical thing to maximize your chances of finding better gear on higher levels is to leave the chests unopened until your level is high enough.

But, the problem is, if you level up quickly without improving your gear by looting, you will be at a big disadvantage against your opponents in combat, since one of the key elements of the game mechanics is that it scales the enemies you encounter with your level – usually their level match yours, unless you’re in a region where the lowest enemy’s level is higher than your current level (or the enemy is of “super-strong” variety).
And the worst possible combination is being high level with low power gear (or no power at all if you postpone looting entirely). You may have more HP, but so will your opponents, and their attacks will be more devastating while yours will be weak, since their offensive power scales with their levels, unlike yours, which only depends on your gear. And you will also have little or no damage reduction from your defensive gear items.

So the possible solution is to level up by performing non-combat activities (as I show in the previous section). But to unlock enough of these activities (like main/side quests and Merlin Trials), you have to progress trough some of the main quests, which does involve some combat.

And the key is to attend all these mandatory early combat missions while your level is as low as possible, so that the enemies you’ll have to fight will be with lowest possible levels as well, since, as I said before, the game scales your enemies with your level.

So the alternative strategy I’m going to suggest in this section is based on the following key principals:

Phase I:
    Since you arrive at Hogwarts and until you reach a certain point of your initial progression along the story, hold off on looting and stay at lowest possible levels at every stage.
Phase II:
    Then rapidly level up to a highest possible level while engaging in no or minimal combat. At this stage still refrain from looting chests and sacks to which you can easily come back later.
Phase III:
    Finally, crucially improve your gear by extensive looting (and you will have all the chests and sacks still intact for that purpose).

Here’re the main points and steps of this strategy (some minor spoilers of early story development ahead):

Phase I:
  • On your path to Hogwarts you should obviously try to find and loot all the chests along your way to get as much cash as possible from the locations to which you will never return, but once you arrive at the Castle, stop looting until your level up significantly at the end of Phase II.

  • Avoid ANY side activity that gives you XP until you complete ‘Trials of Merlin’ main quest – no side quests, no Field Guide pages, no fighting random foes.

    If you accidentally revealed a page with Revelio, simply don't take it – XP from just a single page can put you (and your enemies) one level higher in critical moments! (The page will be hidden again when you move 300 yards away from it, fast travel or reload the game.) You can explore the Castle and Hogsmeade village and unlock Flue Flames, but refrain from taking or summoning pages!
    There will be students around the Castle asking for help – if you stopped and asked them what they want, this will initiate side quests. You can take these quests, but don't complete them until after the ‘Trials of Merlin’ quest! Simply come back to your current main quest by clicking on its line in your quests list, the side quests you took can wait and be finished later.

  • During this period attend every mandatory story quest or assignment which involves combat, when your level is as low as it can be:
  1. After completing ‘Welcome to Hogwarts’ quest, go to Defense Against the Dark Arts Class and after that straight to ‘Crossed Wands: Round 1’ (you will have to complete this quest anyway for a mandatory Prof. Hecat’s Assignment 1, so it’s better to do it as early as possible with lowest possible level). This way you and your rival duelists will be level 2, which makes defeating them quite easy even with zero power gear on hard difficulty.

  2. If you went through all the mandatory missions up till the critical moment near the end of ‘Welcome to Hogsmeade’ quest without collecting pages (there must be only 3 collected pages from ‘Welcome to Hogwarts’ quest and Prof. Ronen’s assignment), at this moment you will be only level 3.

  3. After you return from Hogsmeade and talk to Prof. Fig, go straight to Prof. Hecat and complete her 1st assignment. This way you will be level 4 during ‘Crossed Wands: Round 2’ and following ‘Secrets of the Restricted Section’ main quest (you can leave all the loot during this quest as well, since you can always return to the Athenaeum in the Restricted Section of the Library and enter the Antechamber, it will be empty after the quest).

  4. After completing ‘Secrets of the Restricted Section’ quest, come back to Prof. Fig, complete ‘Tomes and Tribulations’ quest and then attend Prof. Hecat’s Assignment 2 (avoid 10 attacks by dodge rolling and hit enemies with Incendio 5 times). This assignment will reward you with Expelliarmus spell, which will be very helpful for the following ‘Trials of Merlin’ quest in the next step 5.
    If up to this point you refrained from getting any XP from pages, fighting or side quests, you will be 195 XP short from level 6, and you want to stay at level 5 during the fight in the final quest of Phase I. You will receive 150 XP for the completion of the assignment, so you should avoid getting any additional XP in the process. The best way to do this is to find a dugbog * and do your 10 dodge rolls and 5 Incendio casts against it, but not kill it! On hard difficulty, if you don’t hit the dugbog with any other spells and too many basic casts, it will survive your five Incendio blasts. On any other difficulty it will survive only three, but when you see that it won’t live through your next Incendio, go away from the fight, make a manual save and reload it – when you return there will be another unharmed dugbog, so you could complete the assignment without killing it (or just temporarily set your difficulty to 'hard' before engaging the dugbog). To minimize the damage, you can also unequip any gear item which power is higher than zero, for example, the robe you've got from Augustus Hill (and don’t forget to put these items back on before the next quest ;).
    ___________
    * There's always a dugbog just north from 'Dogweed and Deathcap' shop past the northern edge of Hogsmeade.

  5. Finally go meet Natty in Lower Hogsfield (‘The Girl from Uagadou’ quest). The end of your talk with Natty will trigger the start of ‘Trials of Merlin’ quest nearby, during which you and your enemies will be level 5, if you followed all my recommendations above.

(The ending is in the next section due to the unreasonable Steam restriction of 8000 characters per section.)
1a+. Alternative strategy - ending:

Phase II:
After you complete ‘Trials of Merlin’ main quest, still hold off on looting*, but now switch the mode completely and gain as many XP as possible by doing non-combat activities (see Table #2) and completing quests that also don’t involve any combat.

* While exploring the Highlands, you can loot some occasional chests along your way, but leave clusters of loot to which you can easily come back later (like the Hogwarts Castle, Hogsmeade and hamlets).

If you wish to gain some XP by defeating enemies and completing dueling feats, better do it before you level up significantly and in the regions with lower enemies’ levels (which are South and North Hogwarts Regions and Hogsmeade Valley, you can see the enemy levels in each region on the in-game map if you zoom out and hover over the region, and they’re also shown on my map of the northern half of the Highlands below).
  1. First, I’d go to the Greenhouses and farm as many free plants as I can using the method described in Section 3 of my other guide (they will include Mallowsweet, needed to unlock Merlin trials).

  2. Then I’d explore the Highlands (while hiding from enemies in the most dangerous regions), find Field Guide pages and landing platforms and solve Merlin trials (and also unlock Flue Flames to be able to fast travel there later). If you explore the countryside first, your level (and matching levels of your enemies in less dangerous regions) will still be low enough so that meeting and fighting occasional foes won’t be too challenging (Disillusionment + Petrificus Totalus and Accio + Incendio from the higher ground are your best combat techniques at this stage). Look at the map on the right*, where I show accessible Highlands pages, Merlin trials which are solvable at this point and landing platforms you can reach without a broom (you can also use this interactive online map[mapgenie.io], from which I created mine, but be aware that its descriptions of the required spells to solve many Merlin trials are exaggerated).

    * To expand the map, you need to click on it and then click on the address line of the window that opens, then expand the 3rd window (or you can use this link to open the map in your browser and save the picture, if you want).

  3. Then you have a plenty of non-combat quests to complete – Herbology Class, Potions Class and 8 side quests in Hogwarts Castle:

    ‘Like a Moth to a Frame’
    ‘Flying off the Shelves’
    ‘Gobs of Gobstones’
    ‘Cache in the Castle’
    ‘Venomous Valour’
    ‘Spell Combination Practice 2’
    ‘Summoner’s Court: Match 1’
    (unlocks after Potions Class)
    ‘Dissending’ for Sweets’ (unlocks after Potions Class)

    At the same time as running around the Castle while carrying out the quests, you will be able to collect at least 100 Hogwarts pages to complete this chain of challenges and earn 8000 XP (here's the video showing all Hogwarts pages). And don’t forget to initiate ‘The Daedalian Keys’ quest – you won’t complete it at this stage, but in the process of running around the Castle you will also start to collect tokens.

    In addition to that, there are very easy ‘E-Vase-Ive Manoeuvre’ quest in Irondale and ‘The Lost Astrolabe’ in Lower Hogsfield, but I’d leave the latter for later, since during this quest you’ll gather several gear items with good chances to get some epic and legendary ones, which will be more useful after you level up.

    You can also complete your house quest leading to ‘Jackdaw’s Rest’ story mission, it doesn’t involve any combat too, unless you’re Slytherin (even in this case you can choose to avoid fighting by swimming around the dangerous zone).
    This quest will also unlock short and easy ‘Ghost of our Love’ side quest (though, figuring out the place from the sketch can be somewhat challenging, and you have to remember this quest can only be done after sunset). Even if you haven’t found the Map with Floating Candles during your house quest, side quest icon will appear at its location on the map (the roof of the Owlery for Ravenclaw, Hogsmeade cemetery for Gryffindor, Squid cave underneath Hogwarts for Slytherin or behind Claire Beaumont’s vendor stall in Upper Hogsfield for Hufflepuff).

  4. There’s also one of the Hogwarts secrets at the Viaduct Bridge you can solve at this stage of the game for 200 XP reward.

  5. And finally, you can collect at least 50 Hogsmeade pages for a nice sum of 4000 XP (here's the video that shows all 55 pages).
    While collecting pages in Hogwarts Castle and Hogsmeade, don't forget to loot eyeball chests (see more details in Tip #21), each will give you 500ʛ, so you can collect up to 13,000ʛ if you find all 26 of them (the remaining 4 eyeball chests are behind locked doors).
If you complete all the activities I listed above (3 main quests, 10 side quests, solve one Hogwarts secret and collect 100+50 Hogwarts and Hogsmeade pages), you will only need to complete 7 Merlin trials* and find 9 Highlands pages/landing platforms to reach level 21 (and this is without defeating a single enemy). And you can reach even higher levels if you explore and fight more.
* – 2+6 completed trials (including the one from 'Trials of Merlin' quest) will allow you to increase the number of gear items you can carry from 20 to 28.

Phase III:
Now is finally the time to improve your gear by looting chests and sacks, and you will have a huge pool to draw from, as you haven’t touched any of them ever since you arrived at Hogwarts.
I suggest to save all the big ornate gear chests (see Tips #8 and #8a) for the 1st Keepers' Trial ('Percival Rackham’s Trial'). As I explain in Tip #8, then you will get from them items matching your updated level, and they will have random traits already applied, which you cannot do by yourself at that stage. It would be a waste to open these chests earlier.
In addition, now you have unlocked many Floo Flames to move quickly around the map; and you also have more room in your bag to store more gear items after you've completed a number of Merlin trials. Use my tips in Section 2a, they will help you get the best gear from looting in the most efficient way.
Moreover, you will earn a lot of money by selling excessive gear items, and this will allow you to buy recipes and brew potions in the Potions classroom even before you get the Room of Requirement, and even buy the best gear at Gladrags (as I describe in Section 2b) once you have really excessive amount of cash, of course (you can read my money management tips in Section 4b).

All this will make you much stronger, so that you could take the remaining combat-extensive quests and truly explore the world, engaging different enemies along the way with much more confidence.

2. Getting items with the maximal possible stats for the level

First, how can you know what is the max possible power of an item at any given level? There is no conventional way to find this out, but fortunately we're lucky to have someone who dug it out of the game data files for anyone to see and use.
Here's the complete list of max item's powers for all levels:

Table #3:


(As you can see, from level 1 to 5 it grows every level by increments of 1 and 2, from level 6 to 23 by increments of 3 and 4 (darker grey), up to level 30 by increments of 3 and from there to level 40 by increments of 2.)

So how do you get gear items with max power for your level, when, as I mentioned before, the value of every item that drops from looting or found at vendors is randomly selected from a certain range?
– I will explain this in detail in the next two sub-sections (2a and 2b).
Why did I split this into two parts? – From my experience and cost/benefit analysis, the strategy should be different before and after you learn to catch magical beasts and upgrade your gear.

Earlier in the game you should get your gear from looting rather than buying it, because of four reasons:
  1. If you follow my advice in Section 2a, the gear you'll get from looting won't be much weaker than the very best you can buy.
  2. After you get the Room you can find and use items with some useful traits already applied, and you can't buy items like that at vendors and can't apply traits by yourself before you learn to catch beasts and get the Enchanted Loom.
  3. You get much less benefit from each power point added to your gear with lower powers at lower levels compared to higher ones (see Charts #1 and #2 above).
  4. The most important reason: It's not wise to spend your money before substantial and important expenses by the time when you learn to fly and get the Room of Requirement.
The only* two exceptions to this rule:
1. I recommend buying a new set of max powered legendary items (as I describe in Section 2b) before Jackdaw’s Rest main quest, if you can afford it. – To determine this, compare the contents of your wallet with the list of upcoming expenses I provided at the end of Section 4b (with added cost of 6 legendary items minus what you can get by selling your current gear). If you're tight on cash, pass on defensive items, since you gain only 1% additional damage reduction from every 10 points you add to your defence.
2. Also, buy max powered legendary items before embarking on Percival Rackham’s Trial (in addition to items with useful traits already applied, which you found in legendary chests by using my advice in Tip #8 below. Traits that are useful for the trial are 'Ancient Magic', 'Control', 'Herbology', 'Concentration', 'Laceration', 'Destruction', 'Scorching' and 'Disarming', all other traits are useless at this stage - you can check all traits' effects in this table[docs.google.com]). This is one of the most challenging quests where every additional bit of strength is important, and at this point most of your biggest expenses are behind you and you should be able to afford this investment.
——————————
* - If you're exploring and looting really extensively from the very beginning and hence have a lot of money for your disposal even early in the game, you can sure buy gear items more frequently. Just don't waste your cash on defensive items, since, as I already mentioned, the actual gain is minimal – adding 10 points to your defence power gives you only 1% more damage reduction from enemy strikes (when your initial power is between 16 and 340). You can always check how much of actual improvement you can get from additional power points with this table[docs.google.com].

After you learn catching beasts and upgrading your gear, the only logical thing is to buy your gear every time you level up. There is no sense in being content with anything but the very best if you don't have to spend much time and effort to acquire the very best. I describe my method of quickly obtaining the best possible items from vendor in Section 2b and give my advice on upgrading your gear in Section 3.

Special Tip:
There's another secret way to get a lot of extraordinary and legendary items, but it uses a glitch – one of the Infamous Foes, Belgruff the Bludgeoner in the Rookwood's Castle, resurrects every time you take him down, after three in-game days. In addition to 150 XP reward for defeating an Infamous Foe, he always drops extraordinary or legendary item. The game allows you to skip time, so you can literally farm excellent gear items (and XP, up until you defeat 21 Infamous Foes in total). Though, Belgruff the Bludgeoner disappears from the castle after you complete Charles Rookwood's Trial (or appears only one time if you never killed him before that).
See more details in my Reddit post.
2a. Getting best quality items from looting:

The rule is very simple:
The more you loot, the higher the chance of finding better quality gear.

Before you can upgrade your gear and have enough money to buy it, the way of constantly improving your gear is also very simple:
When you see that the item you've just looted is better than one you wear (there's a green arrow pointing up next to it's notification icon) - equip it instead of your current item and sell the old item as soon as you can, regardless of the rarity of both items. (See Tip #12 below about changing the appearance of any equipped item.)
The rarity doesn't matter until you can upgrade your gear, and if your old legendary item is less powerful than your new green/blue one, there's no point keeping it - when the time comes to buy best possible items to apply upgrades, you'll sell it anyway.
Tip #6:
If you see that you are just about to jump to the next level, consider postponing looting, especially if you near a cluster of lootable stuff to which you can easily return after you leveled up (like a village or a hamlet). If you loot the same chest when your level is higher, better quality item will drop.
For example, during my 2nd play-through I decided not to loot chests and sacks while I was leveling up by collecting Field guide pages and doing side quests between 'Welcome to Hogwarts' and 'Welcome to Hogsmeade' missions (as I describe in Tip #1). Only when I reached level 16, I started to loot chests and sacks in Hogsmeade. To show you the difference – at level 5 looted items have powers between 5 and 9, at level 10 – 14‑27, and at level 16 – 26‑48. (Or you can follow a different strategy from Section 1a and postpone looting even further.)
Now, when you open any chest, a random item will drop, so it's like rolling a dice. Is there any way to "re-roll the dice" to get better item from the same chest? Yes, there is a very simple way:
Tip #7:
Before opening the chest, make a manual save, and if you don't like the item that dropped, load this save and open this chest again and repeat the process till you get something you wanna keep.
But, although this is useful for conjurations and traits chests (as I describe in Section 5), save scumming until max power item drops is a waste of time. Even with legendary gear chests (see Tip #8 below), the chance of max power item dropping is so small, that the time which usually takes to finally get one is better to invest in earning money, you will earn much more than you save by save-scumming an item instead of buying it.
I'd only use this method if one of my items (say, gloves) is really weak and I just want to get better gloves, but not necessarily with max possible power. Or to just get more expensive items (at least purple from bigger chests and blue from the rest).

Here are several main points to remember (some are similar to ones regarding leveling up, but here I also give a lot of info specific to looting):

1. Explore – the more ground you cover, the more stuff you find.
Don't ignore treasure vault icons on the map – you may not yet have the spells needed to open the vault or reveal the chest inside (at your current stage of progression), but it's always worth checking.
Read Tip #2 in Section 1 about unlocking the southern part of the world early.

2. Again, use Revelio frequently!
As I wrote in Tip #3 in Section 1, get 'Revelio Mastery' talent to increase the range of Revelio.

3. Put your nose into every corner. When you're in some cave or dungeon during a quest, don't rush – there are always many dead-end tunnels/corridors on the right and left with many goods. If after casting Revelio you see something lootable to the right, left, bottom or top of you – don't ignore it, it's all reachable, even if it requires solving a small puzzle. This way you will also be sure not to miss any collection chests.
Tip #8:
Best items are found in the big ornate gear chests – each gives you a legendary gear item. My advice is to save these chests for the 1st Trial (which is the hardest quest in terms of combat) – you will get items matching your updated level, and they will have random level I traits already applied, which you cannot do by yourself at this stage. I you find these chests earlier than that, you can make screenshots of them and the map with their locations and move them to a dedicated folder called something like "Unopened chests", so you could easily find them later.
Tip #8a:
There are 5 big ornate gear chests hidden in 5 Hedge Mazes (these chests get refilled once in a while, so you can loot each more than once):
https://www.youtube.com/watch?v=e6j0uQBjwWs Important advice: sometimes a Hedge Maze doesn't spawn; if it happens, just save the game (make a manual save), exit to main menu and load back in.
Tip #9:
You should figure out how to solve the Door Puzzles in Hogwarts Castle, there are one gear chest and one conjuration chest behind each door. The only thing you should know is to start counting from zero, after that it's a piece of cake. If you still have trouble solving them, there are plenty of other guides to help you, just type "door puzzle" in the search bar.
Tip #10:
You should learn how to pick locks as soon as possible ('The Caretaker’s Lunar Lament' quest after Percival Rackham’s Trial). It is very easy to collect 8+13 Demiguise statues to be able to pick every lock in the game. Here are 3 great videos that show you the locations of all Demiguise statues in Hogwarts Castle, Hogsmeade and The Highlands.
I also highly recommend to install "Better and instant timeskip" mod (see Tip #14 in Section 2b). It will make setting the time of day much easier, which will help you collect the moons.
Tip #11:
After you learn to pick level III locks, you can get into the headmaster's office much earlier than during 'Polyjuice Plot' quest. You can fly to the Great Tower and land on the balcony, then enter both upper and lower studies where you can loot a lot of chests and also get the key to open the big door above the Trophy Room.

4. Make it your habit to sell all excessive loot at any opportunity to keep as much free space as possible for a new loot.
Tip #12:
You can change the look of any item you wear – in your main GEAR screen (see Picture #1), point to the equipped item and press 'F' to 'Change Appearance' to any appearance you have in your collection (watch this video for more detail). You keep appearances of every item you acquire, even ones that are level-locked, so you can sell them too if they have poorer stats than your equipped gear. Only items you shouldn't sell are unidentified ones, identify them first, then their looks will be forever stored in your collection.
Tip #13:
You should unlock Merlin trials as soon as possible so you could increase the number of gear items you can carry. When you complete 'Tomes and Tribulations' main quest, you receive a message from Natty to meet her in Lower Hogsfield ('The Girl From Uagadou' main quest). After you go there and talk to her, 'Trials of Merlin' mission will immediately start nearby, which will unlock all Merlin trials.

2b. Buying best quality items from a vendor:

Acquiring ability to catch beasts ('The Elf, the Nab-Sack, and the Loom' main quest) is a huge deal and the biggest turning point in the game because of two reasons:
  1. Now you can upgrade your gear which will drastically boost it's power;
  2. Now you have never-ending source of income – at any time you can get as much money as you need by catching and selling beasts.
From this point the fastest way by far to get the best gear is to buy it from vendor (and by "vendor" I only mean Augustus Hill from 'Gladrags Wizardwear' in Hogsmeade, there is no point going anywhere else). As I already said in previous section, even with big ornate gear chests (as in Tip #8) the chance of max power item dropping is so small, that it can easily take 30–40 minutes to get one desired item with save-reload method, and believe me, I tried... So trying to save money this way is absolutely pointless, since you can earn much more than 300ʛ in much less time.
From this point of the game all gear chests become just a source of money (unless by some chance max power item accidentally drops from one of them).

In comparison, with the method I'm going to describe below you get a full set of 6 max power legendary items in 5–10 minutes (on average, it can be less than 5 minutes if you're lucky). This is much faster compared to chests, because it's like rolling several dice at once (as the number of items in the store's inventory, and Augustus Hill may offer up to 20 legendary items at the same time).

The Method:
All vendors renew their stocks every 2,5 days, so you're supposed to wait 60 hrs to see the new set of items for sale. But fortunately there's an option to skip 12 hrs ('wait to advance time from day to night or night to day'). To apply this option you open the map with 'M', then press 'F' to "wait" and confirm with Space. So if you repeat this procedure 5 times in a row it will update all vendors' stocks.
So skipping time is exactly the way to find anything you need in any shop – in this case legendary items with max power for your current level (you can check the value in Table #3 in Section 2):

You skip 60 hrs, open the shop's inventory, see if one or more items you need are in stock, then skip another 60 hrs and repeat this until you find and buy all 6 items with max power for your level.

The problem is, skipping time the regular way is a tedious process where you have to wait through the animation each time you advance 12 hrs etc. Skipping 60 hrs this way takes about a minute and you will have to do it a lot of times until you get all 6 items.

But fortunately, there's a great little mod that makes skipping time seamless and instant (with this mod it takes literally 2 seconds to skip 3 days):
Tip #14:
  • Download and install 'Better and instant timeskip' mod from Nexus:
https://www.nexusmods.com/hogwartslegacy/mods/1158
It works with 3 buttons of your keyboard:
When you press 'PageUp', this question pops on your screen:
Then you press 'PageUp' again to add hours: , or 'PageDown' to subtract hours. If you press PageDown from the start, your time skip starts from 24 hrs:
To confirm the time skip press 'End' button, then the notification will appear:
No need to open different screens and wait for animations, and you can go back and forth as many hours as you want, you are not tied to 12 hour jumps (for example, if you want to set time of day 3 hrs earlier than your current time, you just press 'PageDown' 4 times (to skip 21 hrs) and confirm with 'End').
Very important!! Installation instructions in the Nexus page description of this mod are outdated! To install this mod correctly please read and follow my instructions in "Better and instant timeskip" mod proper installation instructions section of my other guide!

So how does it work when I just jumped to the next level and want to buy a brand new set of gear with 6 legendary items, each one with max power for the level?

0. On the picture below I just leveled up from 34 to 35, but still have 34 level gear (max power 102×3 for offence and defence, plus level 3 upgrades of all items, which add 36×3 for offence and defence, which all in summary gives 414 power points for offence and defence):

Picture #9 (click to enlarge):


1. Now I go to 'Gladrags Wizardwear' in Hogsmeade, open the inventory and see if there are any legendary items with max power for level 35 (which is 104 according to Table #3 in Section 2 above). If I was lucky to see one or more items like that from the start, I, of course, buy them and move to the next step.

2. I exit the inventory and skip 3 days by pressing PageDown⇨End 3 times:

Picture #10:


3. I open the inventory again to see if there is another item I need. If there is, I buy it:

Picture #11:


Read Tip #15 at the end of this section!

4. I repeat steps 2 and 3 until I have all 6 new items. On average it takes 5-10 minutes.

5. Before leaving the store I equip all 6 new items and sell the old ones.

6. Then I fast travel to the Room of Requirement, go to my Enchanted Loom and upgrade all new pieces of my gear:

Picture #12:


So you can see I added 6 power points to my offence and defence. Is that a lot?
According to the game statistics[docs.google.com], now my attacks are 9% more powerful and I take 6% less damage. (This is how I calculated it:
Offence: damage multipliers 61.4/56.48=1.087
Defence: damage reduction percentages (100%−73.7%)/(100%−72%)=0.94 )

The cost of replacing a full set of legendary items is 1,800ʛ (6×500−6×200).
Much more money goes to the full upgrade, since you need 3 Graphorn Horns and 3 Phoenix Feathers for 3rd level upgrades (see Table #4 in Section 3), and each of these byproducts costs 700ʛ (so it's 4,200 total for 6 items). You won't have to pay for them after you get the Phoenix and the Graphorn, but it happens very late in the game.
You can choose, for example, to update your offensive items every level and defensive items every 2 levels (saving 3,000ʛ every other level), but I think that earning extra 6,000ʛ every level is very easy (see my advice on earning money in Section 4a, particularly Tip #22).
Tip #15:
If during step 3 you see max powered items of the next level (in my example it would be 36 level items with 106 power points), buy them, it will save you several minutes of your time later. Also, although you can't use these items yet, you can upgrade them and apply traits (as you can see on Picture #4), that means they will be ready to be equipped the moment you level up, which can come in handy if it happens in the middle of a quest.
3. Upgrades

Upgrading your gear gives the most significant boost to its power – full upgrade of 3 legendary items of the same category adds a massive 108 points bonus.
So when you finally get this ability, in my opinion you should pause all your activities and get all the resources needed for the full upgrade of your gear.
At the same time you get access to an unlimited and easy way to earn money, so when you acquire all needed resources, the most logical thing is to buy gear with max stats for your level to apply the upgrades (as I describe in Section 2b).
You want nothing but legendary items from this point of the game, since, first, they have the highest power for the level, second, upgrading them gives the biggest power boost, and third, this is the only type of items that allows you to attach level III traits.

How much of improvement can you get?
For example, at this point I was level 30 and these were my stats:
Defence: I jumped from 268 to 390, which translates to 37% less damage taken;
Offence: I jumped from 271 to 390, which translates to 232% more destructive power.
Add to this 6 stacked Concentration level III traits, that add combined 68% damage to all red spells, which makes them deliver almost 6 times more damage than before the upgrade (3.32×1.68), and you will REALLY feel the difference. ;)

Here's the list of all beast byproducts required for the full upgrade of legendary gear set:

Table #4:


If you apply only level III traits to your items (see how to get the traits you want in Section 5), you won't need Puffskeins or Diricawls (you can catch them later if you'll want to breed them). You will need a lot of Jobberknoll Feathers and Mooncalf Fur, but they give you 5 byproducts at once instead of 3 (also read Tip #19 below).
Unfortunately, until you get the Phoenix and the Graphorn (which happens pretty late in the game) you will have to buy Phoenix Feathers and Graphorn Horns. There are only two vendors who sell both – Indira Wolff in Pitt-upon-Ford and Pádraic Haggarty in Irondale; in addition, you can buy Graphorn Horn from Brood and Peck in Hogsmeade. All these vendors only have 1 piece of those byproducts at a time and renew their stocks every 3 days, but you can buy as many as you need by repeatedly skipping time as I described in the previous section.

Here are the locations of some beasts that can be harder to find:

Pictures #13&14 (click to enlarge):


Unicorn den is on the eastern edge of the Forbidden Forest.
Thestral den is in the eastern part of North Ford Bog.
Diricawl den is NW of Keenbridge.
Fwooper dens are NW of Feldcroft and SW of Keenbridge.
Kneazle dens are near Brocburrow and in South Sea Bog south of Keenbridge.
Hippogriff dens are in the middle of the Forbidden Forest, NE of Feldcroft and SE of Keenbridge (near The Mine's Eye).

You can also use this interactive map[mapgenie.io], it's extremely useful when you want to find any object that exists in the game world.

Tip #16:
This is my set of spells for catching beasts:
Picture #15:

Disillusionment will let you sneak up on the beast so it doesn't run of fly away.
Glacius provides the longest immobilization effect, that will allow you to catch the most difficult beasts like Hippogriff or Unicorn, or bring flying birds to the ground. But be careful – it turns the beast into an ice statue that can easily roll down a slope or fall off a cliff. In situations like this I use Arresto Momentum (or Levioso, it works the same way).
Another thing you can do is to lower your difficulty level to "Story" for your hunting session, it will make the catching instant with all beasts.
Tip #17:
Don't forget to cast Revelio – it makes the beasts glow blue and let you see them through obstacles, which really helps to spot them.
Tip #18:
Naturally it takes about 12 game hrs for a beast den to reset, so it can take you a long time to catch a good number of Unicorns or Hippogriffs when only one or two of them spawn in their dens (or to get rare specimens, like golden Unicorns or black Hippogriffs).
But there's a simple way to refill a den:
  1. Fly away from the den to about 200-300 meters;
  2. Skip time (which is much quicker to do with 'Better and instant timeskip' mod[www.nexusmods.com] – see Tip #14 above – with this mod installed you only need to hit PageDown, then End to skip 24 hrs, just don't do it while moving – the game might crash).
    When you come back to the den, it will be full again.
  • Alternatively, instead of flying away you can hide nearby, then skip time and save the game (make a manual save), then immediately load this save.
For example, if you hide behind a tree near the Unicorn den, then skip time, save, reload and immediately cast Disillusionment, you can literally farm Unicorns in a very quick manner.
  • Fast travel has the same effect as [Save➤Reload], so if you fast travel to Brood and Peck to sell the beasts you've just caught, you only need to skip time to reset the den.
Tip #19:
You don't have to keep your beasts in the vivarium and wait 25 minutes every time you want their byproducts. All "freshly-caught" beasts give their byproducts instantly when you place them in the vivarium. For example, if you need some Toad Warts, go clear one of the Toad dens (you can get 5 Toads at once), go to the vivarium, move 5 beast from there to your Nab-Sack, move 5 new Toads to the vivarium and collect their Warts (5 Toads will give you 15 Warts). Then you can move the Toads out and sell them.
Just remember you need some free space in your Nab-Sack to move your beasts from the vivarium to place the new ones. If you have less than 4 species in the vivarium, you will need only one single free slot in your Nab-Sack to move the beasts (you can move one to the Nab-Sack, then one from the Nab-Sack to the vivarium and repeat this till all the beasts are moved). If you have 4 species in the vivarium, you will need as many free slots in your Nab-Sack as the number of your least numerous species in the vivarium, since you will have to move all the beasts of that species out to be able to move another species in.
At the beginning I kept only 6 Jobberknolls and 6 Mooncalfs in my vivarium, then raided the dens of all other beasts one by one, filling my Nab-Sack with them, then bringing them home, collecting their byproducts and selling them to Brood and Peck. This way I quickly gathered all byproducts needed for all future upgrades (for example, 18 Toads give you 54 Warts to cover 9 full upgrades) and earned a lot of cash and XP in the process. You calculate the quantities of all needed byproducts by multiplying the numbers in Table #4 by [41 minus your current level], that is if you attend to buy and fully upgrade a new set of 6 gear items every level.
Tip #20:
When you deal with Jobberknols or Thestrals and they fly away from their dens, you can just wait for them to return. Cast Disillusionment and move away from the center of the den – in a short time they will fly back and will usually land on the ground.
In my experience there's no point waiting for Hippogriffs and Fwoopers to return to their dens, it's faster to reset the den.
4. Money
4a. How to earn money:

Again, the game is divided into before and after the crucial turning point of learning how to catch beasts, when during the first half of the game your only two sources of income are looting and side quests.

1. To get as much money as possible from looting you should follow the same advice I gave you in Section 2a (exploring, casting Revelio, looking in every corner etc.).
Tip #21:
After you learn Disillusionment, you can loot the eyeball chests in Hogwarts and Hogsmeade. There are 30 of them (4 are behind locked doors) and each one contains 500ʛ, which gives you 15,000 in total (or 13,000 before you learn Alohomora). You can find 27 chests out of 30 in this video:
https://www.youtube.com/watch?v=vXG8VECKv70
(You can get to the 12th chest also from the Lower Grand Staircase Floo Flame – go downstairs and turn right. 3 chests that are missing in the video are in the Underground Harbor (you can swim to it from the Boathouse – see the screenshot), in one of the 4 secret rooms with moving grates in the Clock Tower (you need Alohomora to get into the tower, then solve the secret to keep the grates open) and at the back side of Flutes and Lutes building in SE Hogsmeade, upstairs behind level II lock – see the screenshot.)
You can get a lot of money from places mentioned in my Tips #8a, #9, #10 and #11 in Section 2a above.
You can use Save➤Reload method (colloquially called "save-scumming") to maximize you profit from the items you loot from chests and sacks (as described in Tip #7 in Section 2a). With bigger chests you should reload until a purple/gold gear item drops, with smaller chests and sacks the chance to get purple or even gold item ls much smaller, so don't waste time and stop reloading when you get a blue item instead of a green one or Wiggenweld potion.
Read the Special Tip at the end of Section 2 – you get 150-200ʛ every time you take that goblin down (+ all the cash that drops from his buddies).

2. Regarding side quests – aside from my previous advice not to ignore them, in some of them you can get 200ʛ more if you ask for extra fee. It may look not very nice (and may not be consistent with your character), but has no consequences on your character's relationships, future gameplay or ending.

3. From the point you learn to catch beasts you start earning good money even without purposefully catching beasts to be sold. You can accommodate a maximum of 12 beasts in your 1st vivarium, but you will catch much more to collect their byproducts (if you read my Tip #19) and sell all the surplus after that.
But if you want to catch beasts just to make profit, which species should you choose for that purpose? – One that's the fastest to catch and with the largest number of beasts in a single den, and this is obviously the Puffskein.
It's also useful to know how to reset the den so you won't have to wait 12 game hours (see Tip #18 in the previous section).

Allow me to suggest one of the fastest ways to earn money in the game:
Tip #22:
There is a Puffskein den southwest of Hogsmeade (the one where you caught your very first beast). You can get to it from the Floo Flame near the entrance of the Forbidden Forest, it's about 10 sec flight from there:
Picture #16 (click to enlarge):


There are 10 Puffskeins in this den (note that 4 of them are always hiding in the trees above the ground):
Picture #17 (click to enlarge):


You can catch all 10 Puffskeins, fast travel to Brood and Peck, sell them, skip time to reset the den and get back to it in 3-4 minutes. If you repeat this 5 times, it will take you 15-20 minutes to earn 6,000ʛ.

4b. How to save money:

It is very important to minimize your spending, particularly during the initial part of the game, when you anticipate substantial expenses (both necessary and desirable) once you learn to fly and get the Room of Requirement, and on the other hand don't yet have a steady source of income.

1. Don't be careless in your fights, especially early in the game.

You may think you have enough money to buy as many potions as you want, but these expenses will accumulate much quicker than you think.
Learn to block, dodge and retreat; after you acquire Disillusionment spell, learn how to use stealth tactics.
Don't engage in unnecessary fights when you know for sure you will use a lot of potions and you will have to buy them later to replenish your stock. You can knock yourself out once you have access to a potion station and plenty ingredients in your inventory so you can brew all your potions instead of buying them (you can use the cauldron in the Potions classroom after you complete your first Potions lesson).

2. Don't pay money for something you can pick, craft or grow.

Don't be lazy to collect ingredients and moonstones around you – it's really easy and you won't ever have to buy them.
Tip #23:
Naturally it takes 60 game hrs for a harvested resource to respawn, but you can force-respawn all the collectable resources in the game by skipping at least 2.5 days (exactly as you do with shops' inventories as described in Section 2b). This is much quicker to do with 'Better and instant timeskip' mod[www.nexusmods.com] – see Tip #14 above – with this mod installed you only need to hit PageDown⇨End 3 times to skip 3 days.
Always pick the loot that drops from defeated goblins and wizards – this way you will collect a lot of Wiggenweld potions (in addition to coins and occasional gear items).
Don't avoid fighting creatures that give you the most valuable ingredients – defeating Mongrels, Dugbogs, Spiders and even Inferi is relatively easy once you learn how to deal with them, just don't dive head first into the center of their lairs, there are plenty opportunities to engage 1-2 at a time. (Trolls are a different matter, but you don't really need their Bogeys since Invisibility potion is almost useless.)
You can brew your own potions instead of buying them even before you get the Room of Requirement. Once you complete your first Potions lesson you can always come back to the classroom and use its potions station to brew potions.
After your first Herbology lesson you can always come back to the Greenhouses to pick 5 Dittany leaves every 10 minutes. (Or better buy Mallowsweet seeds and grow Mallowsweet - you will need it in a short time for Merlin's trials – see Tip #13 in Section 2b. This way you make a one-time investment of 200ʛ instead of paying 100ʛ for each Mallowsweet Leave you need.)
And there's no point buying any plants after you get the Room – just buy seeds and grow your own plants - your investment into buying seeds will pay out in a very short time.
Tip #24:
You don't really have to grow Venomous Tentaculas and can save 1,050ʛ by not buying their seeds if you complete the 'Venomous Valour' side quest, which becomes available very early in the game. This quest unlocks one the greenhouses in the Herbology wing, where 6 Venomous Tentaculas grow. You can refresh all 6 Tentaculas by skipping 3 days as described in Tip #23 above, then fast traveling to the Greenhouses Floo Flame. So you can harvest as many Tentaculas as you want without waiting for them to grow.
(You can see more details about this location and several similar ones with other free plants in my other guide cited in the next tip.)
Tip #25:
There are several easily accessible places where you can farm all plants exept Shrivelfig. Some of these places are available very early (for example, you can get Mandrakes for free once you complete your first visit to Hogsmeade).
I created a separate guide where I describe all these places in detail:
https://steamcommunity.com/sharedfiles/filedetails/?id=3041248793

3. Sometimes you save the most money by buying the most expensive things right away.

When the time comes to spend your money, I suggest to buy spellcrafts for largest possible potting tables and potions station. You will want to buy them later anyway and they will also allow you to grow all needed plants and brew all the potions you want in the fastest possible way from the very beginning.
Take a pass on potting tables with 3 small pots, 1 medium pot, 2 medium pots and 1 large pot, and also don't buy medium potions station. This way you will save 4,650ʛ.

Here's the list of everything you will need and want to buy once you learn to fly and get the Room of Requirement:

600 – your 1st broom;
2,550 – All seeds except Venomous Tentacula (see Tip #24 above);
2,900 – All potion recipes except Invisibility (see Tip #26 below);
11,500 – Conjuration spellcrafts, which include:
  • Potting tables – with 5 small pots, 3 medium pots and 2 large pots
  • T-shaped potions station
  • Dung composter (it will double the yield of your battle plants and save you a lot of money in the long run)
Grand total – 17,550ʛ. (If on top of that you can afford the hopping pot spellcraft (3,000ʛ), buy it, it's very useful, unlike chopping station and material refiner which both are a waste of money if you have all the seeds to grow plants and not too lazy to pick a moonstone when you see one).

If you follow all my advice above, at the point when you get the Room of Requirement you will have much more than 17,550 (you get 13,000 just from eyeball chests – see Tip #21). For example, during my 2nd playthrough, just after I got the Room of Requirement and bought everything I listed above (including hopping pot spellcraft), I still had 9,500ʛ left in my wallet.

Tip #26:
How to complete the last Prof. Sharp's assignment to acquire and use an Invisibility Potion without buying the potion or the recipe?
– About the same time you should receive a new side quest from Parry Pippin to deliver 3 Invisibility Potions to Fatimah Lawang in Keenbridge ('Demanding Delivery'). Actually, Parry Pippin gives you 4 potions, but you will have to test one of them in front of Fatimah, otherwise she won't buy the other three. Drinking this potion completes Prof. Sharp's assignment.
Tip #27:
Small tip on using the hopping pot. If it gives you the potion you can't pick since its wheel slot is already full, you can't empty the hopping pot like you do with plants. – Simply vanish it with Evanesco and conjure a new one, it will brew a new random potion. Or just make the room in your wheel by drinking one of the 12 potions – this is even faster and will have exactly the same effect.
And be aware that your hopping pot won't brew potions for which you don't have recipes!

5. A note about Traits

Traits are special abilities that provide combat boosts. You apply them to items of your gear with the Enchanted Loom the same way you apply upgrades. Traits that reduce damage from a certain type of enemy are received as a reward to a challenge to defeat a number of those enemies. One trait you get after completion of a certain quest and another after applying a number of upgrades to your gear. The rest are obtained from collection chests at bandit camps throughout the Highlands.

You can "re-open" the same chest as many times as you need to get the trait you want, using save‑reload method I described in Tip #7 in Section 2a. This is a really useful method to get the desired trait or conjuration, although it can be somewhat time-consuming (the longest time it took me to get the wanted trait was 15 minutes, with conjurations it can be longer).
Tip #28:
To reduce the time needed for the desired trait to drop, don't use save‑reload method with the first camps you clear, just loot their chests. It will take a while until you can use the traits, and as long as some accessible chests remain intact, you can always force-spawn specific traits from them.
So just keep some of the camps (depending on how many specific traits you want) in the northern half of the world untouched for the moment when you finally learn to upgrade your gear. After obtaining part of the traits you will have a smaller pool to draw from, so the chance of a specific trait to drop is higher, and some of your desired traits may already be in your possession from the chests you already looted.
There are 29 bandit camps in the North (including 2 castles with 2 traits chests each). You can track them with this interactive map[mapgenie.io], it's extremely useful.

This is how conjurations and traits chests look:
Picture #18:


Tip #29:
If you want to use save‑reload method with conjurations chests pointed by butterflies, do the following:
Save at the point where the butterflies spawn (not near the chest!), then follow them to the chest (sometimes the chest doesn't appear - if this happens, simply cast Revelio where the butterflies stop). Open the chest, and if you want something else, load the last manual save. You will respawn near the spot where the butterflies start flying, make them move and go strait to the chest (you don't have to follow them if you already know the exact spot), then cast Revelio to reveal the chest and check it again.
Tip #30:
In most cases you don't have to clear the camp from enemies to loot its traits chest. Usually it's hidden in some tent and you can easily sneak past the guards (don't forget there can be 2 traits chests in camp castles, you can check this by opening the map and pointing to the camp).
Also, be aware that even if you cleared the camp before approaching the chest, when you reload your save the enemies in the camp can respawn. Usually they won't spot you right away (since the tent hides you from them), but be prepared to cast Disillusionment the moment you respawn, just in case.

So what traits should you seek? Obviously, whatever the trait is, you want nothing but level III, since it gives the biggest boost. On top of that, to get the most effect you need to stack traits, i.e. apply the same trait to all items of your gear. If you apply 6 different traits at once, you will hardly feel the effect from any one of them.
Here are the traits that many experienced players consider to be the best (and with my own experience I came to the same conclusions):
Concentration III increases damage of all Damage spells (red ones) by 9%.
It's a multiplicative trait, that means that 6 stacked Concentration III traits add 68% damage to all Damage spells (1.09⁶=1.68). This is the only truly universal trait and by far the best one for everyone who prefer conventional style of fighting. It adds a bit less damage to a single spell compared to traits like Destruction or Laceration (which add 131% to Confringo or Diffindo), but you can't rely on a single spell.
Unforgivable III increases damage dealt to cursed targets by 30% (from all types of attack except plants). It's an additive trait, that means that 6 stacked Unforgivable III traits add 180% damage to all cursed targets (30%×6). This is the best trait for all Dark Arts aficionados who extensively and consistently use curses. But if your use of curses is inconsistent, this trait greatly loses its effect, since all uncursed enemies and ones whose curses faded take only basic damage.
Ancient Magic III increases damage from Ancient Magic by 60%.
It's an additive trait, that translates to a whooping 360% damage boost to your Ancient Magic attacks from 6 stacked traits (60%×6). This means you can pretty much one-shot almost any enemy, and if you have 5 Ancient Magic bars and use all talents which replenish Ancient Magic Meter, this trait can really help you quickly win fights with several very strong foes.
* You don't find this trait in a chest, you get it as a reward once you complete a challenge to upgrade your gear 30 times (so you only need to apply full upgrade to a complete set of 6 items twice (2×6×3=36)).
Herbology III increases damage of all plants by 75%.
6 stacked Herbology III traits add an unbelievable 450%(!!!) damage to all plants. If you combine it with 3 plants talents (Headache, Noxious and Fertiliser), you can basically win any fight only using plants, without casting a single spell. This trait makes all other plant-related traits obsolete.
In comparison with these 4 traits all other spell-specific, plant-specific or enemy-specific traits fall very short.
The only other trait I had some hopes for was Ambush III (which increases spell damage by 30% while concealed by Disillusionment), because I really like playing stealth... But after I tried it I was disappointed – on easy difficulty even on lower levels it's enough to use Concentration for the same purpose (quietly killing enemies from a distance with a single spell). On harder difficulties, before I reached a certain level, applying Ambush wasn't enough to one-shot enemies from a distance, but after I passed some threshold, again, I could use Concentration for the same purpose without the disadvantage of the trait losing its effect the moment I'm detected...
Maybe I did something wrong, you can try this by yourselves.

Afterword
Thank you for listening, I will greatly appreciate your thoughts, questions, notes and suggestions.

If you liked my guide, please, don't forget to hit the thumbs up button to keep the guide on the first page, so it will be easier to find for others. Thanks!


Here you can see all my other guides:


34 comentários
palocundo 25 nov. 2024 às 23:15 
I try to figure out what is more important/fun for me. Not big fan of Unforgivable because I have to curse target first but have to wait and test it again with avada spell , Ancient magic is strong even without traits, so either concentration or herbology.
Akunamatata  [autor] 25 nov. 2024 às 6:46 
It all depends on your style. I like Concentration + stealth, with Herbology or Ancient magic you don't really fight... Someone who extensively use curses may prefer Unforgivable combined with all Dark Arts talents.
Akunamatata  [autor] 25 nov. 2024 às 6:40 
Herbology III I think is the most OP, especially if you also have the talents. Ancient magic is good only when you have very few extremely strong enemies, with max power gear you can one-shot with it almost all enemies even without the trait if you drink Maxima potion just before and have the potency talent (3X damage with Maxima).
Just make a manual save before some mission or the arena and try different traits and talents, you will know what you like more.
palocundo 25 nov. 2024 às 5:32 
between these three traits (concentration, herbology and ancient magic) which one do you think is stronger? I use everything when I play and I like play op characters, not sure what to pick XD
Akunamatata  [autor] 24 nov. 2024 às 12:42 
You're welcome, I'm glad you found it useful! I appreciate you writing the comment, thanks for the kind words! :lunar2019grinningpig:
palocundo 24 nov. 2024 às 10:38 
This is very useful, thank you for putting all this together:)
I'm playing this on ps5 and can't rate this without the game but great job :)
Akunamatata  [autor] 17 jul. 2024 às 20:50 
Thanks. And you don't have to have the loom to check what traits you've collected. You can always open your collections menu ((Esc -> Collections, or simply press 'Y') and navigate to your obtained traits list (Traits -> scroll down to 'EXPLORATION'):
https://steamuserimages-a.akamaihd.net/ugc/2474248649127103093/4F18B67331B29C6D27A6FC618ED2F997EF85546E/
Redleg 17 jul. 2024 às 20:21 
I stand corrected. I finally got the loom today and was able to verify that what I did in fact pull from the chest was the 'Ancient Magic Focus III' trait.
Akunamatata  [autor] 14 jul. 2024 às 23:07 
Hi, thank you for your kind words, I'm glad my guide helped! :lunar2019grinningpig:
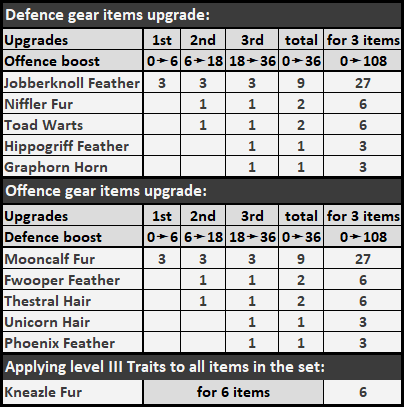
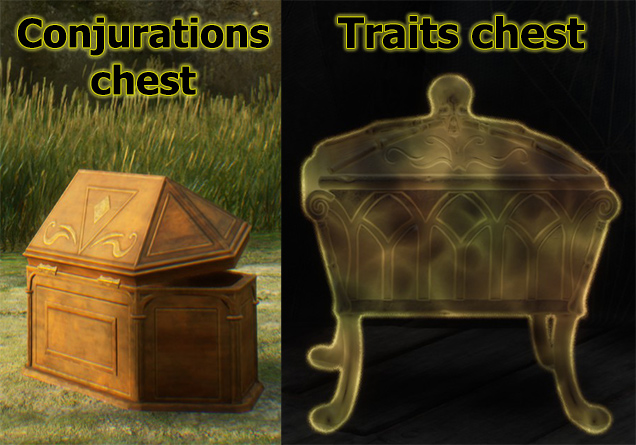
As for the 'Ancient Magic' trait, it's never found in chests (as any other trait you get from challenges). I'm sure what you found was 'Ancient Magic Focus ', they are very similar in appearance and can be easily confused between each other. See for yourself:
https://hogwarts-legacy.fandom.com/wiki/Ancient_Magic_(trait)
https://hogwarts-legacy.fandom.com/wiki/Ancient_Magic_Focus
Redleg 14 jul. 2024 às 14:59 
Awesome guide. I played through using your alternate strategy for early game development and not only does it align with my normal play style, it really helped with money management.

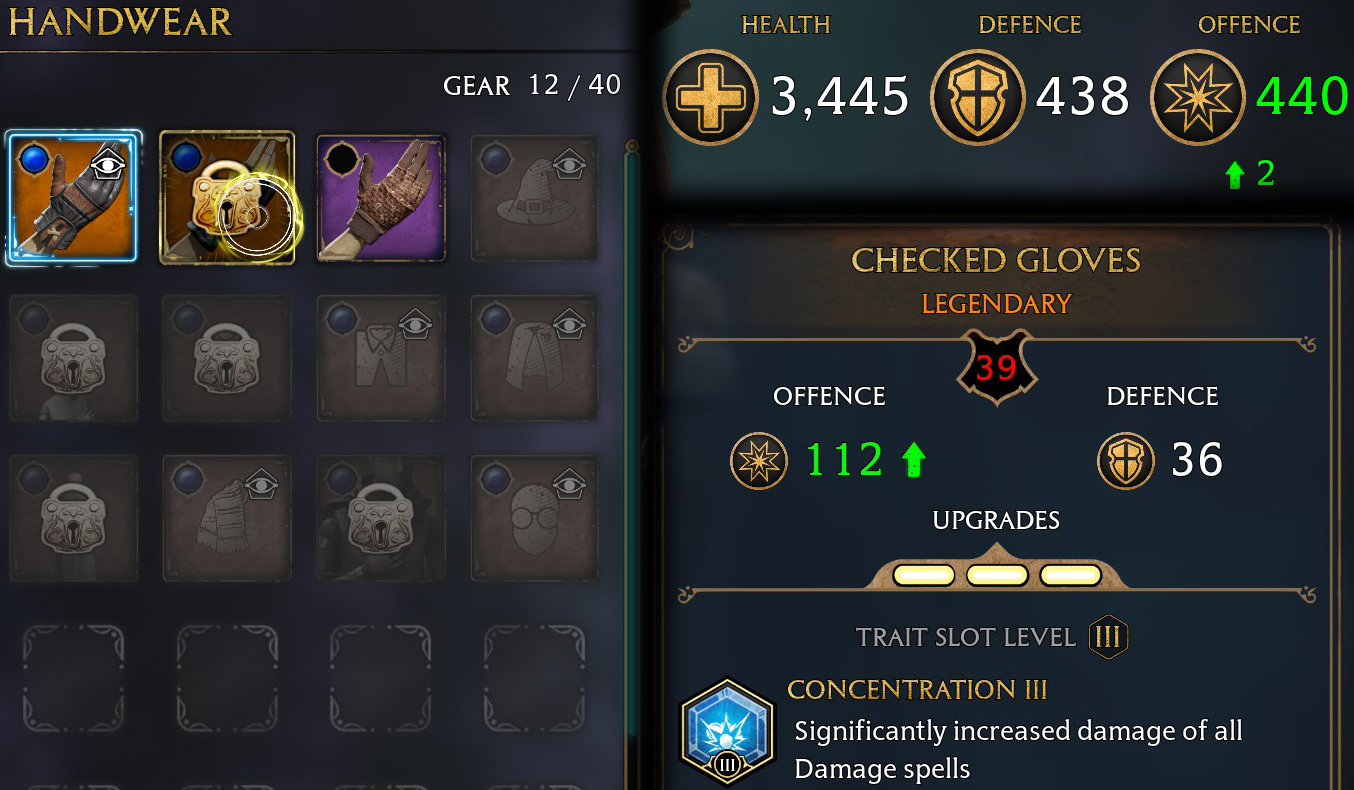
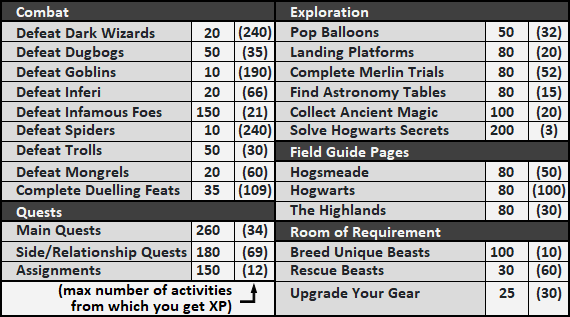
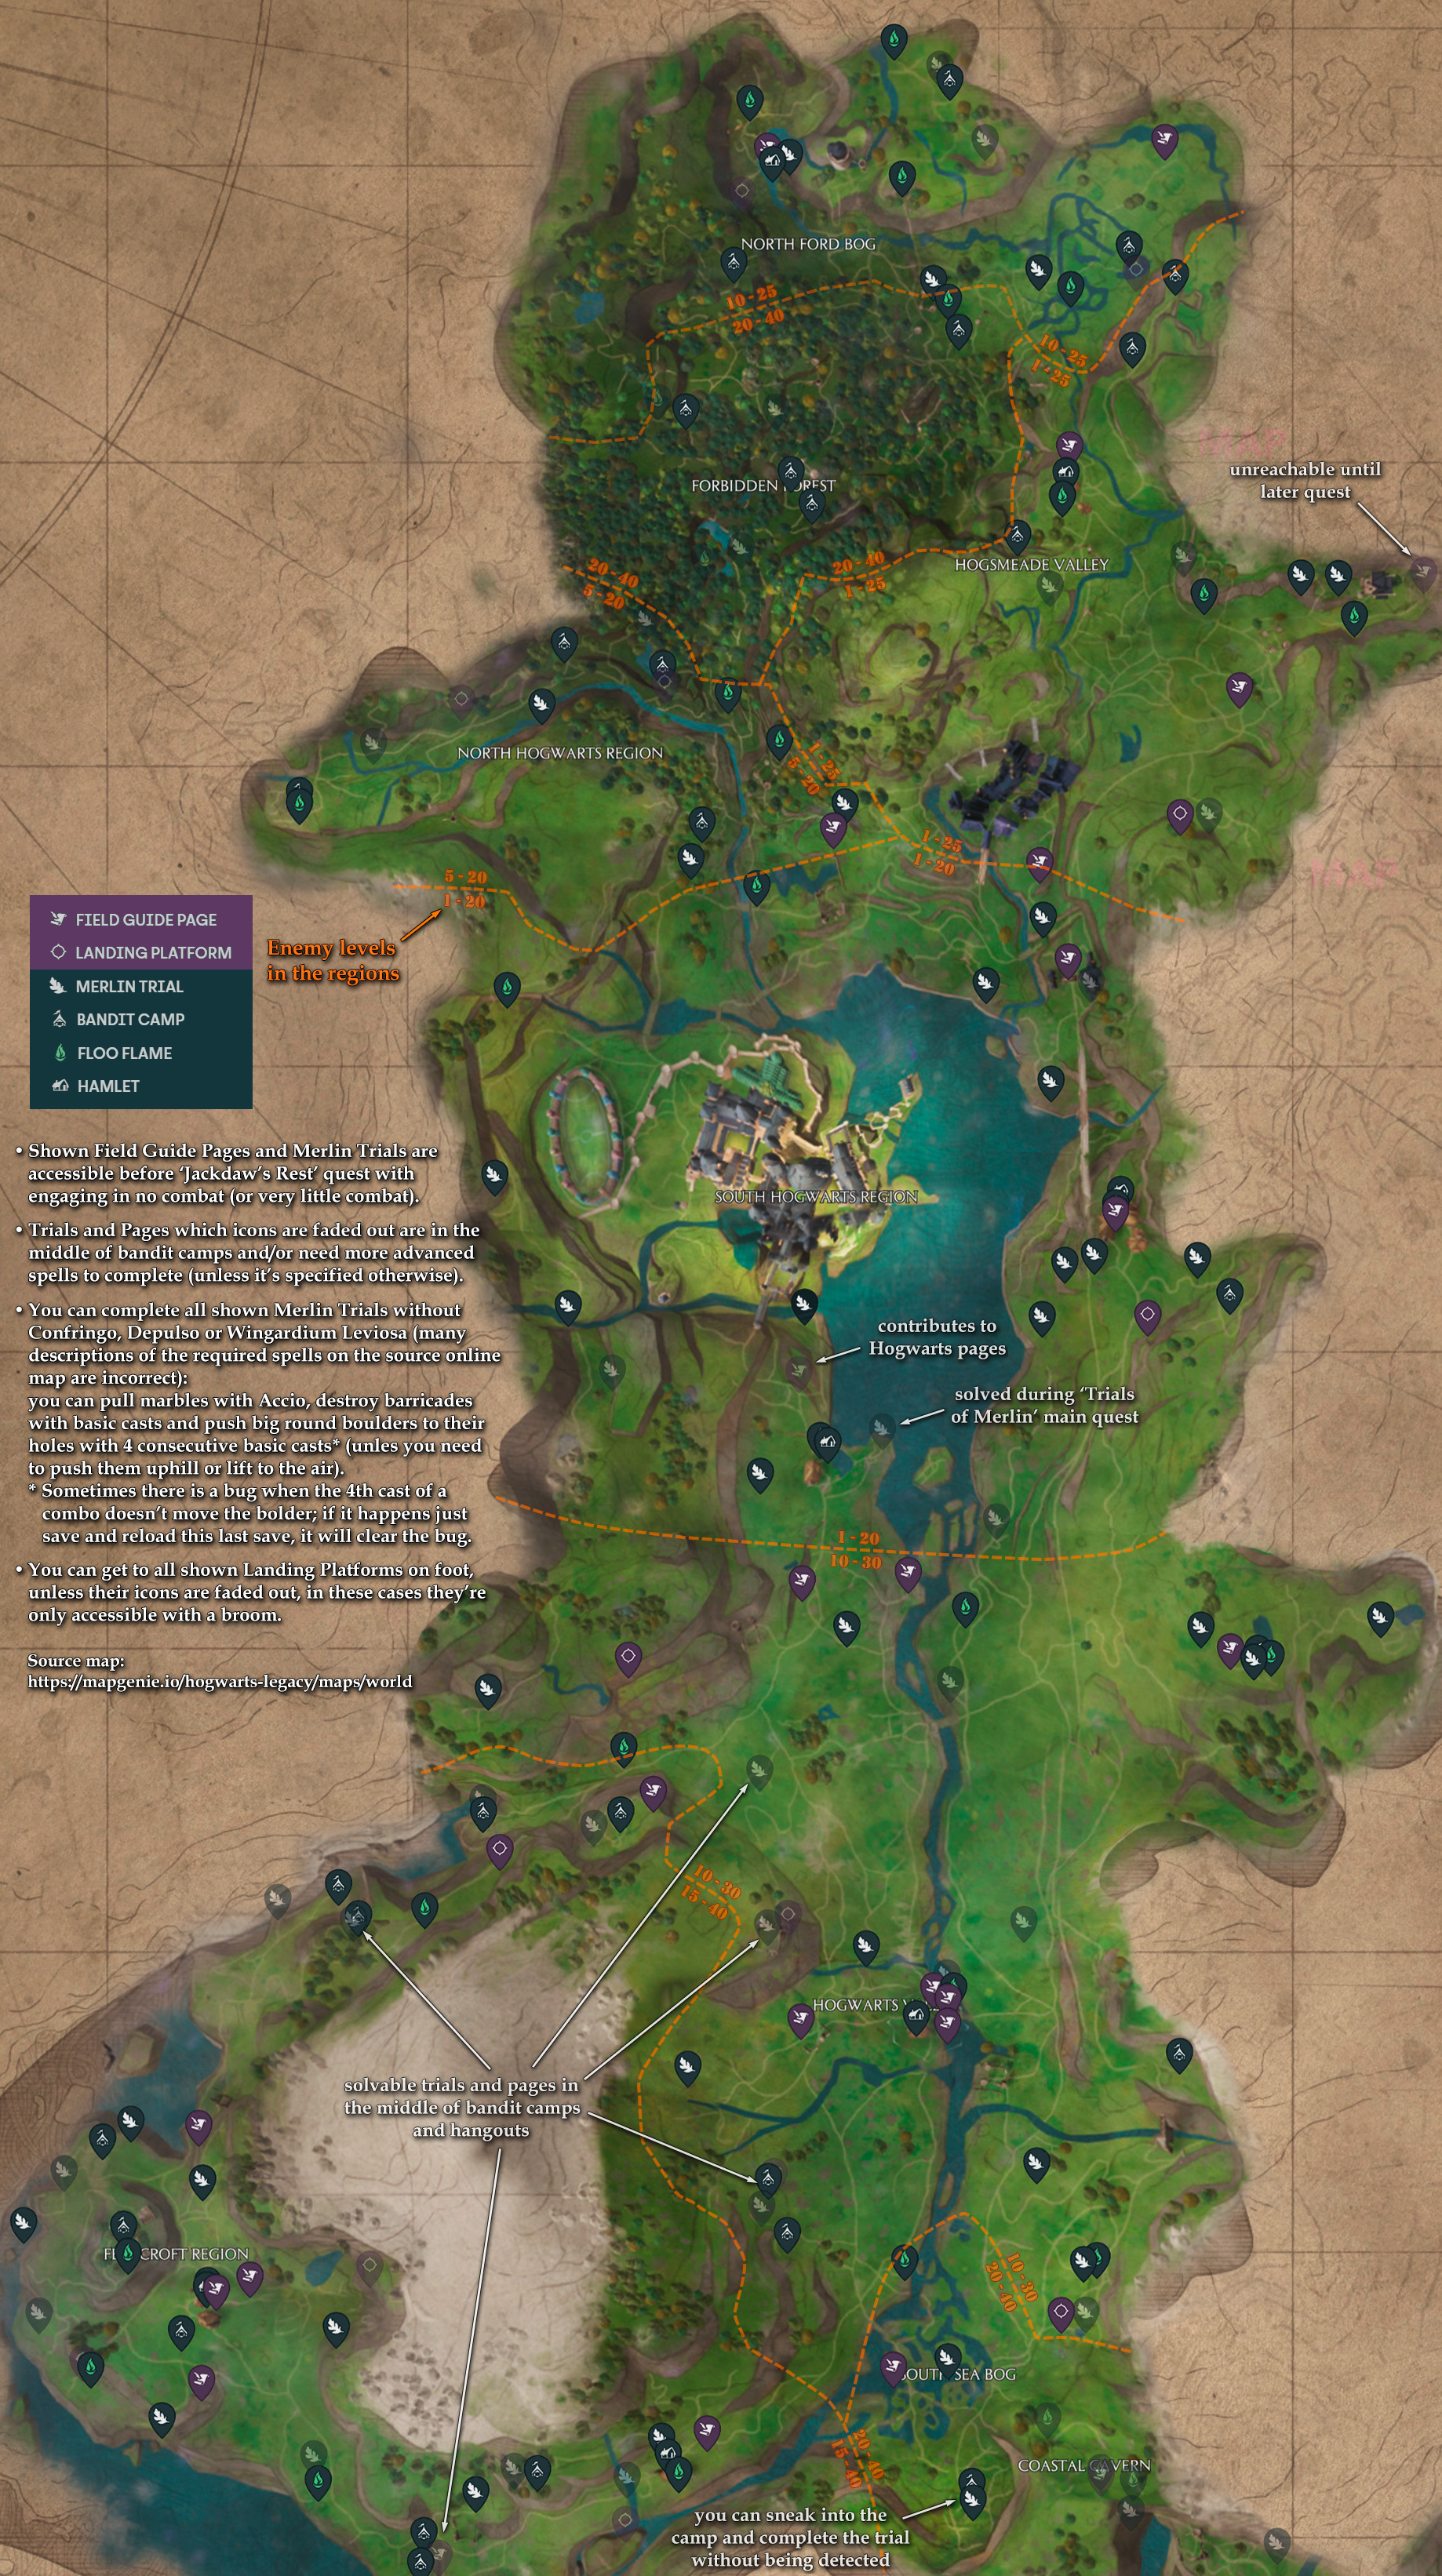
I did find one apparent error in your guide. You have a note on the trait "Ancient Magic III" in section 5 that says you can't get it from a chest, but I just pulled it from the trait chest in the bandit camp west of Irondale. This was on Build Version 1228792 dated July 12th 2024. I have not done any upgrades to my gear yet as I am not far enough along in the main quests. Maybe the note should read: "If you don't find this trait in a chest, you can also get it as a reward once you complete a challenge to upgrade your gear 30 times".