Pathfinder: Wrath of the Righteous - Enhanced Edition

Pathfinder: Wrath of the Righteous - Enhanced Edition

399 évaluations
Guide to all achievements and most puzzles in Pathfinder: Wrath of the Righteous (including DLCs)
De ALEC
Hello to every pathfinder seeking to suffer with this game's pantheon of achievements.

One rant before we begin, the information for every achievement is spread out across the multiverse of reddit, a bunch of random websites and no place to find a comprehensive guide with everything detailed in a single place, the wiki is incomplete, neoseeker guides are extremely detailed for the hardest parts of this journey, Praise Ranadiel and his legendary friends and determination, and most recently u/mirtexxan. the rest is just around the place, this is just a way to unify a lot of information in a single link.

I will try to detail the most about of what you need to know, what still works and what might help as for the patch 2.3.2c.

Disclaimer: If you are here, you accept that you will receive every possible spoiler on this god green earth.
Warning: Difficulty achievements require that you remain on the selected difficulty from start to finish unless stated otherwise, any change of difficulty may make the achievements unobtainable in the run, this affects the following: Spirit of Adventure, Equal to Aroden, Test of the Starstone, Sadistic Game Design, Your First Big Enemy, Prelate's Nemesis, Blight of Drezen, End of Eternal Guard, Playful Mood, Just Pathetic, Dreadful Dragon, Ashes to Ashes.
31
9
5
22
8
4
2
2
2
3
3
3
2
   
Récompenser
Ajouter aux favoris
Favoris
Retirer des favoris
Main campaign (8/110)
You cant miss these ones if you play the game until the end

Devoured By Darkness
Complete the tutorial area


Burning City
Complete the Chapter 1/Gray Garrison


Banner over the Citadel
Complete the Chapter 2/Siege of Drezen


Fifth Crusade
Complete Chapter 3/Attack on the Midnight Fane


Embrace of the Abyss
Complete Chapter 4/Colyphir Mines


Demonic and Divine
Make your choice when you meet Iomedae and Nocticula


Heart of the Fallen Land
Complete the attack on Iz and defeat Deskari


The Final Threshold
Finish the game
Mythic Paths (20/110)
During the siege of Drezen, when you deliver the Sword of Valor to its rightful place, you can choose your mythic path and unlock the respective achievement.

Angel
Unlocked when you take the Sword of Lariel/Light of Heaven


Demon
Unlocked in the end of the Shield Maze dungeon


Trickster
Unlocked by visiting the Blackwing Library in Act 1 before the attack on Defender Heart, when you arrive you have to pass a few Religion Checks until you arrive at the option that [Requires Trickster Mythic Path], doing so will unlock the path.


Aeon
Unlocked by picking up the crystal dagger in the middle of the Market Square, located near Hulrun. Accepting the power is the first step. After doing this, in the end of the act 1 when interacting with the Wardstone, choose the option [Requires Aeon Mythic Path], doing so will allow the power to rest within you and unlocking the path. If you dont destroy the wardstone using this choice, you will be locked out of the path! But not out of the All Paths Open Achievement.


Azata
You must sing the song of Elysium with the Desna Initiates, to do so you must rescue all three of them, this is connected to the quest Starward Gaze, when you find Hulrun trying to kill Ramien like the madman he is, you have to stop him, either by killing him (not advised) or by showing him the Light of Heaven to quell his anger. This allows you to intervene between him and Ramien and this problem must be completed before the attack on defender's heart or Hulrun will just kill Ramien without a chance of intervention.

After stopping Hulrun, go towards the church in the top left corner of the map, Ramien will be invisible really close to the entrance fence. Talk to him and rescue the initiates, the first being him, the second is aranka that can be found on Daeran's mansion as the bard, the third is Thall the Wallflower that can be found by the starting area of the market square in kenabres, close to where you found a running thiefling, he will be the only soldier around with a blue detail on his head.

Head back to the church, sing with them, do the story book and accept the gift of elysium, once again doing the [Require Azata Mythic Path] options


Lich
During the attack on Leper's Smile, when exploring the depths after defeating the Vescavor Queen, in the left side of the map you will find ghouls and a magic wand of evil, this wand belongs to Zacharius, choose to keep the wand in your bag. Don't release it or break it.

When the gargoyle attack happens in Lost Chapel, when you reach the church, right by iomedae's statue, one side will lead you to the area boss and the other to a wall, one that you can see that can lead somewhere, if you have the wand, it will open. Inside of the basement, you will find Zacharius, if you accept his help using the option [Requires Lich Mythic Path] and gain his favor, you will unlock the Lich path.


All paths open
Requires you to unlock all the mythic paths, this achievement should pop up when you accept the lich power.


Welcome to the late game Mythic options

Dragon
A simple path with simple requirements.

First: Have a Terendelev's Scale on your inventory back from the beginning of the game and show it to the Storyteller
Second: Leper's Smile, find Terendelev's Claw in one of the carts near Zacharius' Wand on the left side of the map, be sure to have high perception around because of loot.
Third: Show the Claw to Storyteller, find the origins of her story, following the quest.
Fourth: When you arrive at the place, help Hal, agree with what he says, dont kill Hal.
Fifth: When retaking Drezen, dont kill Hal.


Devil
Requires you to be first Aeon or Azata, Melies/Early Sunset respectively will show up at your door at the start of chapter 3, he will be your advisor, should you do everything that he requests of you which can be specially conflicting with the Azata path, you will arrive at the Trial of the Crossroads, it is advised to have high persuasion due to the several diplomathic checks that you have to pass, achieving to do so will allow you to sign a contract and turn into a devil.


Swarm that Walks
This takes some preparation.

First: Shoo the queen away in the beginning of chapter 2, she must no be around or she will lock you out of the path.
Second: Leper's Smile, when you kill the Vezcavor Queen, collect her goo to use on the siege of Drezen.
Third: Strategy council of the Siege of Drezen, say that you want the vezcavor goo to be used.
Fourth: After the siege ends, go to the house on the lower right in the city of Drezen, defeat the swarms inside until you find a newly born Vezcavor queen, let her live.
Fifth: Find Xanthir Vang, ask him how to become what he is and get his notes.
Sixth: Do the Xanthir's Experiments crusade decree before Midnight Fane.
Seventh: Anevia will ask why you are so interested in the swarm stuff, whatever you do, just DO NOT select the "i dont know what came over me" option. Convince and lie, get used to it.
Eigth: After returning from the abyss, go back to your queen, kill her and choose to "Devour the queen"
Ninth: Devour your friends, devour your people, devour hope, devour everything.


Legend
Unlocked by default at the request of Iomedae, pass the check and you are good to go after doing your mythic quest.


Transformation
Follow your mythic questline to the end, marked by the option to change your portrait.

Exclusive to the Tutorial Area (22/110)
Your First Big Enemy
REQUIRES CORE DIFFICULTY. Do this encounter before leaving the Shield Maze, you can do it after defeating Hosilla, the key to defeating him is exploring everything in the Shield Maze which will give you potions, scrolls, buffs, to give AC to tank, buffs to attack and protection from the cold damage that he does.


Radiance
Locked in the deepest part of the Shield Maze behind a completely random color puzzle which gives you no direction or warning of where the solution might be: Yellow, Blue, Red, Yellow.

In case you are wondering where the solution is, look to the wall by the left side when you enter in the room where you first find corrupted mongrels, 4 pictures with the colors side by side.
Exclusive to Chapter 1/Start on Chapter 1 part 1 (28/110)
Defender's Heart
The arsonists are the ones that you have to target, kill them quick and you should be safe. They spawn next to the spawning doors, you can always trip them.


Prelate's Nemesis
YOU MUST HAVE STARTED THE GAME ON CORE DIFFICULTY AND REACHED THIS POINT WITHOUT CHANGING IT.

First: You need to actually spawn the thing in which is another problem entirely. To do it, go to the market square before the defender's heart attack, go to the top right corner where you find the guards being attacked by the Nabasu, see the cutscene, go towards the top right corner where you face ghouls and shadow creatures, be careful with their ability damage, go towards the end until you find the gnome with a taste for necromancy, kill him and clear that section.

This gnome can be difficulty because 3 ghouls, 4 cultists and he casting haste and blindness can be complicated, this fight can be nerfed with a well positioned selective grease.

Second: do the defender's heart defense and go back to where the gnome was and you will find the nabasu once you get close. Buy death ward scrolls and freedom of movement scrolls from the cleric in defender's heart. A Nabasu has that level-stealing gaze and this one always starts the combat trying to mass hold person, counting with this game balance system, you have a 1% chance of overcoming it naturally with all characters so better to invest in some scrolls.

Other than that, buff yourself the best you can and debuff him too and you should be able to get the kill.


Truly Important Deed
divided in two parts, courtesans and booze.

Courtesans: Daeran's mansion, this will be a hectic moment but you can lower the difficulty if luck is not being on your side, kill the demons before the courtesans fear their way into the demon's AoO. There is no problem if the drunken nobles die, they dont matter. All 8 courtesans must survive.

Warning: The Courtesan section can bug out if they do not return to their intended position after the cutscene on Daeran's Mansion. Thanks to @SotiCoto in the comment section for the trial and error to figure out what the problem could be.


Booze: Just dont allow the Arsonists to burn the booze cart during the defender's heart defense. The only arsonists that can actually hit this cart are the ones that spawn with the minotaur boss, kill them and you should be safe, the cart can tank some hits but its best if you dont let those hits happen.


Death By Column
Tower of Estrod, when you prepare yourself to drop the pillars on the enemies, drop them on your allies. Simple as that.


Mythic Choices
Choose 5 dialogue choices that specify [ Require X Mythic Path] like showing the light of heaven to Hulrun, losing yourself to demon rage on Irabeth, Aeon your way in the Lost Chapel and other interactions.


Voice From your Dreams
Oh, arue, you sweet cinnamon roll.

You have to find her two times before reaching Drezen.

First time: Go to the Desna Church in Kenabres Market Square on the top left corner of the map, she is the green smoke hovering near the church.

Second time: Lost Chapel, after defeating the Nabasu area boss, go to the graveyard area, of the place and its time to explore the lower area surrounding the chapel, pass the athletic checks and prepare yourself for some random those-should-not-be-so-difficult fights.

There are 3 items that you need to find while doing this exploration:

Shrine of Desna: A random stone altar close to the lower middle side of the mountain
Small Sextant: Dropped by a Kabriri Cultist on edge of the area
Small Harp: Inside the cave in the end of the trip.

Go back to the shrine of desna and open the inventory and put the small sextant and small harp there. This is a sound puzzle. The solution is: Middle, Right, Left, Middle. Now you can talk with the cutest girl in the game and promise that you will save her.


(Source: https://www.pcinvasion.com/pathfinder-wrath-of-the-righteous-arueshalae-desna-shrine/)

Bonus by solving the puzzle: A +3 Throwing Axe in the altar among the things that you collected.
Bonus by doing this: You can recruit arueshalae early, during the siege of drezen


Exclusive to Chapter 1/Start on Chapter 1 part 2 (31/110)
Hey, I Know you!
The three important people cited in the achievement, divided by first encounter and second encounter.


-Cultist Scribe in Tower of Estrod, Kenabres: Go before the attack on Defender's Heart, you can find Greybor hanging around here, clear the area of enemies and go to the lower section, you will find the most dedicated scribe you could ever see, a great trickster material, save him from himself by making him cough out the paper.

You can find him again in one of the rooms during the attack in the Ivory Sanctum.

-Traveler Attacked by the Vescavors: Leper's Smile/chapter 2, you can save him right before the attack on the vescavor queen, make sure you have potions/healing spells on you or your team to make sure he is saved.

You can find him again in the Abyss/Chapter 4, Bad Luck tavern, he will reward you with Ashmaker.

Vrock of the Molten Scar: You can find him in the Molten Scar/chapter 3, let him go when you find him, preferably with him giving you the Elven Note that he has.

You can find him again in Ivory Sanctum, before the charge in Xhantir Vang lab where you meet the angels, the open area, go to the opposite direction, you should find a check to make you jump to the other side of the cliff where you can find the vrock again.


Next Door Play
Oh boy, this one is a long one. This group of artists can be found on every chapter but it doesnt take much to find them.

Chapter one: You can find them trapped under some rubble near the starting area after fixing the path between the two sides of the market square, relatively close to where curl is, do the check, save them, talk to them and talk to them again in defender's heart should they be there.

Chapter two: Talk to them in your camp, set up the prep work to their act.

Chapter three: They are in Drezen, keep talking to them and preparing stuff.

Chapter four: They are near Vellexia's house, "hiding" in some crates.

Chapter five: Get your act and your achievement.


A Story Worth Millenia
Now for an actual challenge and takes the whole game to complete.

For this one you have to find 20 Elven Notes.

1: Gray Garrison - Chapter 1
2: Conundrum Unsolved - Chapter 2 - Requires solving the puzzle
3: Inconspicuous Camp - Chapter 2
4: Artisan's Tower - Chapter 3 - Can be destroyed by Devarra
5: Molten Scar - Chapter 3 - Goes by the name of "Page Smeared With Blood and Soot"
Be careful when you deliver this page to the Storyteller, it requires deciphering
Choose the following dialogue options when you deliver this one to him:
"The center of the magic shape was a prisoner"
"It looked like a small rift was opened to the Abyss"
"They repeated the word "Ravukh"
Do this and it will count towards the achievement.
6: Temple of the Good Hunt - Chapter 3
7: Heart of Mistery - Chapter 3
8: Core of the Riddle - Chapter 3
9: Forgotten Secrets - Chapter 5 (Chapter confirmation by Xhal)
10: Sacred Lands - Chapter 3
11 and 12: Areelu's Laboratory - Chapter 3
13: Ivory Sanctum - Chapter 3
14: Nexus - Chapter 4
15: Mage Tower - Chapter 4
16: Legacy of the Ancients - Chapter 5
17: Final Veil - Chapter 5
18: The Enigma - Chapter 5
19: Iz - Chapter 5
20: Threshold - Chapter 6 (yes, you have to go back to him after picking this one)

Aaaaaaaaand that is not enough, after talking with the Storyteller and deciding what he should do (i made him accept his death and work as Pharasma's personal scribe) Confirmed by @palid1 that making Storyteller be Pharasma's scribe is a requirement.

You must also find his best buddy that is trapped in the Core of the Riddle area, (See Core of the Riddle Achievement) release the guy, tell what happened to him to the Storyteller and make them reunite in the afterlife. The achievement will pop when you complete the game, during the storybook section of the character's endings.

Exclusive to Chapter 2/Start on Chapter 2 (34/110)
Queen's Gratitude
Time to show the queen what you can do. (This achievement has been updated with more info thanks to @Rohen and @Necrodamus in the comment section of this guide)

Credits to:
1- Rqsb_ and Shikotei-kun (https://psnprofiles.com/trophy/18387-pathfinder-wrath-of-the-righteous/15-queens-gratitude)
2- Ranadiel (https://www.reddit.com/r/Pathfinder_Kingmaker/comments/ryr6a2/comment/hrror5x/?utm_source=share&utm_medium=web3x&utm_name=web3xcss&utm_term=1&utm_content=share_button) Why wouldn't he be here again? The guy is mythic.


The Hard requirements for this achievement are:
1- Reach Drezen in less than 60 days,
2- High morale (anything between 0-20)
3- Small percentage of crusader units lost (at max 2500xp, i have no clue how to measure this in crusade units).

You only need to complete 2 of those requirements: the 60 days and high morale being the most likely if you have Setsuna Shy on your crusade.

The best possible outcome is described below:
First: Bring the queen with you in the start of chapter 2
Second: Reach drezen in less than 60 days and with high morale.
Third: During Leper's Smile, ignore all loot, you can save the traveler but go straight for the vescavor queen.
Choose Sosiel and stand your ground when deciding who should bait the vescavors away for the minimal damage possible.
Fourth: Do the siege of drezen without relying on destroying doors, which requires you to go through the church, ruins, houses to open the doors through the levers.

By the start of chapter 3, the queen will personally gift you some juicy items


Blight of Drezen
YOU MUST HAVE STARTED THE GAME ON CORE DIFFICULTY AND REACHED THIS POINT WITHOUT CHANGING IT. Chorussina is a wild ride and probably the last chance of a balanced optional fight.

For this boss to spawn, when exploring the dungeons beneath the citadel in drezen, near Jorah Vane, you have to allow all the cultists to sacrifice themselves for the fight to start.

Hits like a truck, starts with mirror image but can still fall with a selective grease, get true sight scrolls before this mess, buff yourself to mythic and debuff him/dispel if you brought scrolls or spells.


Subtle Hints
You have to confront Nurah, the gnome advisor, another person that the queen brings that is utterly useless and you have to find 2 clues.

First clue: Leper's Smile, after the battle with the vescavor queen, pass a perception check to find a rag with queen goo on your pocket, go back to nurah's tent, pass another perception check to find a "perfume" with the same smell.

Second clue: in the beginning of the gargoyle attack on your camp, find nurah throwing alchemist fires the right side of the commander tent and then confront her again after the lost chapel and before the siege.

Bonus: If you have trickster mythic path unlocked, use the option on her, you get one ally and a help in chapter 5, for the ascension ending/achievement.


Exclusive to Chapter 3/Starts on Chapter 3 (42/110)
Great Upstart
More a test of patience than a challenge

Leadership increases as your generals gain xp
Military increases recruiting units and mercenaries
Diplomacy increases by acquiring resources
Logistics increases by constructing buildings


Divide and Rule
if you can manage to recruit a demon for some random reason/decree, make it attack another demon during crusade mode, significantly easier to do as a demon commander.


Capitulation is now Moot
When attacking the Ivory Sanctum, ally with jerribeth, defeat Xanthir Vang, when talking to him, provoke him by warning that he will be betrayed by jerribeth and he will attack again. The achievement pops during the conversation.


End of Eternal Guard
YOU MUST HAVE STARTED THE GAME ON CORE DIFFICULTY AND REACHED THIS POINT WITHOUT CHANGING IT. Oh boy, prepare yourself to hit above AC 40.

But there is a catch again, during your exploration of the south side of the map, you can find some altars of baphomet, interacting with them will spawn clones of the boss, you can outrun those bosses and avoiding combat while unlocking the final door.

Inside the final room, you have to fight some mimics and there is a symbol puzzle in this room, make your characters stand on the buttons and then press the combination: Circle, Pentagon, Hexagon, Triangle.

You open a secret door and if you try to loot, you spawn the guardian. Lure the guardian out of the tiny loot room because there is a trap constantly emitting negative energy and healing the boss, He is tough and is incredibly annoying that everytime he hits something everything in general proximity get a dazzling display + fear effect for a turn.

Buff yourself to infinity and explode the death out of him.


The Legacy
Find the Ancient Cloak in Areelu's Lab, bring it to the storyteller but you can only complete it when you find the new items on chapter 4.


Memories frozen in time
You have to find AND WATCH the "Experiment: The Suture", "Experiment: Transformation", "Secret of Great Sorcery" Crystals on Areelu's Lab. The last key is the Key Crystal on Iz, and when you enter the Key Crystal portal and you find the part where the paths divide, take the right path, you will be teleported back to the middle, dimension door your way beyond the point where the game teleports you back and then watch the last projection.

Warning: Watch the other crystals before inserting the key crystal because the key crystal will lock the equipment


Playful Mood
YOU MUST HAVE STARTED THE GAME ON CORE DIFFICULTY AND REACHED THIS POINT WITHOUT CHANGING IT. The most difficult optional fight in the entire game to the point of making him a recurrent challenge. (Playful Darkness, Inevitable Darkness, Nahyndrian Darkness, one fight more cancerous than the other, all can be solved with Kineticist Deadly Earth + Cloud + Wall)

Found in the Midnight Fane, after unlocking everything up to the final boss, there is an area at the right side of the map with those spider robots and a lot of hasted succubus archers, go for the portal and near a giant pile of bones, you can find him invisible.

Now is the time for cheese, any cheese is welcome. Creeping doom if you can make him go and attack the swarms which are immune to physical damage, crit fishing, dispel, Clemency of Shadows, anything and everything. Buffs and Debuffs, all cooldowns are valid.


Secret of Secrets
This is unfairly specific, while exploring midnight fane, there are 2 specific levers that bear the mark of Deskari, if you leave them on and all the others off you can open the middle area where inheribro and queen stand their ground for a special area with good loot, there are 2 extra problems with this.


(Source: https://re-actor.net/pathfinder-wrath-of-the-righteous-secret-of-secrets-achievement-guide/)

One you have to pass an extremely high trickery and perception check, Conman's Ring help to avoid taking an acid fog to the face and two, 4 high level swarms will spawn when you open the chest and do their usual of confusing, applying nauseated and debuffing with poison. Your best friend is bane of spirit that turns all your damage into force damage which allows to overcome immunity to physical attacks that swarms have.


Exclusive to Chapter 4/Start on Chapter 4 (47/110)
Midnight Aim
If your brain is set in "Crow Mode" or you are a Loot Goblin, you most likely have a midnight bolt on your inventory, you can get those all over the game even in Chapter 1, and if you are Save-for-when-i-need type, that same arrow is already covered in dust in your inventory.

Location of all bolts:

1- Market Square, Kenabres. Close to the Aeon Knife, stuck to a board.
2- Areelu's Lab, Chapter 3. In the room with the turns-to-dust soul crystal.
3- Ivory Sanctum, Chapter 3. Stuck to a straw target.
4- Nocticula's Palace, Chapter 4. In Areelu's bedroom.
5- Colyphyr Mines, Chapter 4. Second Level, North side.
6- Iz, Chapter 5. In one of the ruined houses.
7- DLC only, Nocticula herself gives you a Midnight Bolt to use on Nahyndri's Heart.
8- Ineluctable prison, Chapter 5. Near Inheribro's Heart.

The objective of this achievement: Shoot a demon lord with this arrow.

You have 5 opportunities during the course of the game.

1- Shoot Baphomet with a Midnight Bolt at the end of Chapter 4.
2- Shoot Deskari with a Midnight Bolt when fighting him in Iz.
3- Shoot Areshkgal with a Midnight Bolt when fighting in Enigma.
4/5- (x2) Shoot both Deskari and Baphomet again in Ascension rematch.
(Source: Neoseeker)

One extra opportunity if you play as Trickster or Demon, shoot Nocticula.


Abyssal Conspiracy
Are you in for a trip on the midnight isles for the most random conspiracy? Yes, okay. Good luck.

First: Have a party of friends with high perception/religion, you only get one shot to discover each place.
Second: Middle city, close to Ten Thousand Delights, you can find a group of demodands arguing around, kill them and loot the Demodand Leader, what you want is the Thanatonic Minor rune.
Third: Go back to the lower city, close to the elevator, go towards the bottom left corner of the map, its near the checks that allow you to go to middle city before intended, find the socket hidden behind the perception/religion, put the stone in, prepare yourself for a three wave battle, the enemies pack considerable power but a well buffed team should be able to send them back to the abyss( wait a minute...), open the socket, take the rune.
Fourth: Middle city, near the aasimar's house, go towards the top right corner of the map, by the side of the house you can find the second socket, another battle, more powerful tier of enemies, kill, take the rune back.
fifth: Upper city, go to the roof of Willodus' mansion, top center side of the map, get ready, Vavakia's will be present this time, clear the floor with their faces, make the blood rain and take the rune that is now totally empowered.
Sixth: Middle city, Harem of ardent dreams, there is a corridor near the Harem that almost looks like it will lead to nowhere, follow it until you are behind the building, last socket, prepare for the last battle.

This is tough, archers on the higher area, kineticists in the end of the room, Galaus (worst enemy ever, F*** that rain of blood that can be easily countered with a channel positive energy), during the fight, stringy demodands will spawn behind you, beware of attacking the kineticists as demodands can rob you of your weapons because of sticky skin (filthy bastards, go take a bath), kill everything that moves, dispel the leader to have a chance to hit, buff yourself with everything you got, you can always rest after.


Just Pathetic
YOU MUST HAVE STARTED THE GAME ON CORE DIFFICULTY AND REACHED THIS POINT WITHOUT CHANGING IT. Chapter 4 is full of optional difficult battles, huh. Time to make this guy actually look pathetic.

He can be found on top of the aasimar's house channeling his magic, initially neutral so you can stand uncomfortably close to him, it takes some talks to turn him hostile.

He is relatively easy but can be a daunting battle, this fight has 3 phases. Buff yourself to godhood, have some dispel magic in hand, dont forget true sight and death ward.

Phase 1: Fight starts, enemies spawn in the roof for some reason, kill them and the quasit, he dies.
Phase 2: He grows stronger, more magic is inserted into his being by the owlcat gods, more enemies spawn.
Phase 3: Same thing, but this time he is a dragon, you can get a funny interaction of killing him by dispelling his buffs because it decreases his maximum hp.


Dreadful Dragon
YOU MUST HAVE STARTED THE GAME ON CORE DIFFICULTY AND REACHED THIS POINT WITHOUT CHANGING IT. 70 AC, yep, things are a little out of hand. But his Touch AC is pathetic like the quasit you had to kill before getting here. He doesn't have that much of hp tho. The bad part about him is the breath attack that he starts with that can kill the casters on your team.

My cute little ember managed to kill him in the first round with a critted bolstered, empowered, maximized hellfire ray + 3 fire bloodlines.

Same thing a different target, buff, dispel, exploit his low Touch AC and manageable Spell Resistance and you should be good to go.


Truly Profane Gift
Wanna get dirty?

This is fairly straight, get to colyphyr mines, find her on the right side of the map, talk to her, do her quest.

Kill the dragon, talk to her, Kill Hepzamirah, dont leave the area, talk to her, kneel to her and accept her gift.


Exclusive to Chapter 5/Start on Chapter 5 part 1 (54/110)
Nearing the end, you are doing great.

Strategic Victory
You have done this before, you can do it again.

Be aware that some level ups, specially logistics, requires you to do the decree.
Military requires you to go and defeat stuff and so on.


Heroic Victory
Basically, reach the end of the military crusade campaign against Korramzadeh.

He will be the highest level fight but can be instantly deleted with a single cast of highest damaging spell Setsuna Shy along with a decent amount of marksmen.

Wanna go bonkers? Whenever your mythic reinforcements cooldown is available, separate the marksmen from a group, use the mythic reinforcement on him alone and get some extra 300 marksmen.


Mythic Reinforcements

Another crusade related achievement, by the time you get the other two, you will get some random meetings with your mythic representative that will bring some special units that can be earned through decree, unlock all and do them all.

Unfortunately, mythic power units sucks in comparison to a really good regular human with a bow


Masterful Dispel
Ineluctable prison, bottom-right area, after the two rolling boulders.

You wil find an interesting guy, the genocidal lich Alderpash, the intention of this achievement is to dispel every single buff when you face him in battle. But, just so happens, that you can dispel him on the spot while he is friendly and he has like, 3 buffs that the goggles of dispel can take out in a single use.

So much for legendary runelord.


Core of the Riddle
You know... I hate, totally hate these puzzles, all of them, maybe cause i have 5 int, probably, maybe because the ui is so horribly stupid, the buttons overlap, my eyes hurt just trying to decipher what the symbols are in the accursed tablets.

The inefficiency of those puzzles ui is astounding. Anyway...

There are 5 locations to solve:

Conundrum Unsolved - Tablet location: The same room of the puzzle, in the urns.

https://pathfinderwrathoftherighteous.wiki.fextralife.com/file/Pathfinder-Wrath-of-the-Righteous/conundrum-unsolved-solution-new.jpg
(Source: https://pathfinderwrathoftherighteous.wiki.fextralife.com/Conundrum+Unsolved )

Legacy of the Ancients - Tablet Location: Place of Execution (Chapter 5, west of Pulura's Fall)

https://pathfinderwrathoftherighteous.wiki.fextralife.com/file/Pathfinder-Wrath-of-the-Righteous/legacy_of_the_ancients_solution.jpg?v=1658746509955

Core of the Riddle - Tablet Location: Ravaged Long House (Chapter 3, North of Terendelev's Lair)

https://pathfinderwrathoftherighteous.wiki.fextralife.com/file/Pathfinder-Wrath-of-the-Righteous/coreoftheriddlesolution.jpg?v=1653715900645

Forgotten Secrets - Tablet Location: Shrine of Sacrilege (Chapter 3, South of Lost Chapel)

https://pathfinderwrathoftherighteous.wiki.fextralife.com/file/Pathfinder-Wrath-of-the-Righteous/forgotten_secrets_solution.jpg?v=1658746463927

Final Veil - Tablet Location: Bone Hills (Southwest of Valley of temples, only appears after completing iz)

https://pathfinderwrathoftherighteous.wiki.fextralife.com/file/Pathfinder-Wrath-of-the-Righteous/final_veil_puzzle-pathfinder-wrath-of-the-righteous.jpg?v=1631956470801

Heart of Mistery - "Tablet" location: Laughing Caves (East of Valley of Temples)

Align the picture with the correct portal for better/faster completion


The only good part of this hell, when you travel near the puzzle locations in the world map, you encounter ghosts, pass the checks and get some good wands.

(Source: https://pathfinderwrathoftherighteous.wiki.fextralife.com/The+Secrets+of+Creation )


Ashes to Ashes
YOU MUST HAVE STARTED THE GAME ON CORE DIFFICULTY AND REACHED THIS POINT WITHOUT CHANGING IT. We try to help and what do we get? A curse.

She doesn't even feel like an actual boss, she usually dies by unknown reasons on my runs. Don't even know what to say, do a selective sirocco on her because the true threat the gigantic shadow purple worm lurking in the middle of the room.

She is "protected" by a barrier of DC 40 trap, DC ~43 Arcana, DC ~43 Lock and to open the path towards the purple worm, just pass the perception check and the door will reveal itself to go forward and defeat the actual encounter that is the worm.

DON'T TRY TO CHEESE THE FIGHT BY KILLING THE WORM FIRST, YOU MAY BUG HER AND LOCK YOU OUT OF THE ACHIEVEMENT.


Get the Toad
This is a random encounter that happens when you go exploring the map, you will find Jubilost Narthropple, help him, entertain him and he will shove the toad on you.

Exclusive to Chapter 5/Start on Chapter 5 part 2 (55/110)
Grain of Sand
Enigma... Something that is worse than the core of the riddle but at least you can get 1.5 million selling stuff and get the nice mask that adds +20 to all saves. Oh yeah, you have to put up with Nenio, i guess that is equally bad. To unlock the place, you have to do her questline.

Mask locations:

Circle Mask - Ivory Sanctum, the central chamber puzzle - Solution: 3654
Darkness Mask - Heart of Mystery - Solution: Look at the Core of the Riddle Achievement
Question Mask - Ineluctable Prison, Area where you fight Baphomet's Chosen - Solution: 4365
Summit Mask - Pulura's Fall, Central chamber puzzle - Solution: Newlyweds, Daughter, Rider, Patriarch, Pack, Follower.

Statue Solutions:

Circle - I am the void and the emptiness
Darkness - I am the unknown
Question - I am the impetus to act
Summit - I am the end of the road

Now that i gave you a quick push of how to access this hellish place:
https://pathfinderwrathoftherighteous.wiki.fextralife.com/More+than+nothing
May Desna be with you!

Jokes aside, for you to get the achievement, you have to convince the demon lord of knowledge that he is also nothing, you have two ways to do this:

1 - Be a Legend, choose your respective option.

2 - Go through the dungeon, you will be faced with 4 moments where you have to go through Areshkagal's nonsense.

First, the interaction with the statue in the first part of the dungeon, be stubborn, do not accept yourself as a grain of sand, you will know that you did it right if you get a buff.

Second, the crossing the invisible bridge towards the green crystals, again, be stubborn, get the second buff.

Third, the oath to Areshkagal, just say that you won't give him the satisfaction.

Fourth, when you complete the central chamber puzzle, areshkagal appears one last time, you know what to do, confront him one last time.

When you finally arrive and confront the true demon lord, choose the dialogue options:

"Do you wish to deprive me of my free will? ..."
"My journey through enigma has taught me ..."
"But if this is so, what makes Areshkagal special?"
"I have learned something else during my time in the Enigma..."

Now you deliver the poetic karma back to him, both on his will and on his body. Dont forget to use a Midnight Bolt on him for the Midnight Aim achievement and for the Ascension ending.

Chapter 6/The end (57/110)
I cant say Exclusive/Start if this is the final chapter...

So much of me
You can do this as part of the achievement below but for this one, you must make areelu understand that you are her long lost child by showing her that you retraced 5/7 steps during the course of the game. To make her understand that, you must have passed a perception check during act IV about Areelu being worried about Suture, again, i recommend reading the guide linked in this achievement.

1- Shoot the crossbow at the beginning of the game
2- Rescue Yaniel and give her the neutral or evil answer when she later asks a question
3- Exhaust all questions when talking to Areelu in Chapter 4 till she says "You are seeking answers, trying to understand the crux of the matter. That is good."
4- Gone through Areelu's secret lab
5- In the first room of Areelu's secret lab, click on the crib, drawings, and textbooks in that order to create a container holding gloves. Take the gloves to get the flag.
6 - Grab the summoning solution from the first screen of Areelu's Lab and use it in the center of the summoning circle on the second screen.
7 - Reach level 8 (total mythic level of 10) in any of the following Mythic Paths: Aeon, Angel, Azata, Demon, Lich, or Trickster

No clue as to why some of these count towards being her child but whatever.

Source: https://www.neoseeker.com/pathfinder-wrath-of-the-righteous/guides/Secret_Ending


Ascension
For this one, all the credit of an organized guide to complete this goes to our friends on Neoseeker, blessed be their name.

https://www.neoseeker.com/pathfinder-wrath-of-the-righteous/guides/Secret_Ending

Reminder: Only you need to ascend, the rest of the party + Areelu is for flavor.
Random stuff (61/110)
Masterful Craftsmanship
Pretty straightforward, reach level 20 on a full caster class, follower and mercenaries counts, get the scribe scrolls feat, get the brew potions feat, get the mythic brew potions feat/ability, buy the high level crafting equipment, the materials and spend 2 nights creating the 9th level scroll and 6th level potion on the same character.


Masterful Charge
Get a character able to ride (or use bismuth), get the spirited charge that doubles the damage of charges, get a weapon with a good crit modifier (like the scythe), do a strength build with power attack to get the extra edge and explode something when you first crit.

To get the achievement, you have to kill the charge damage, if the enemy dies cause your mount bit or you did some extra separated damage, it won't count.


A Spark
Start a romance, its kinda of easy considering the amount of options. Even easier to start by accident.

Camellia - Male
Lann - Female
Wenduag - Any
Daeran - Any
Arueshalae - Any
Galfrey - Any
Sosiel - Male


A Flame
To complete a romance, you dont need to get the best ending so just go for it with who ever you got first. Romances only complete in chapter 5 and beyond, some early than others, just do all your follower quests and wait a while before changing chapters because some events only happen after a millenia or specific triggers.

Difficulty Related (65/110)
These achievements require you to go from start to finish in a specific difficulty, changing difficulties for any reason will lock you out of them

Spirit of Adventure
Finish the game on Core difficulty, no changes of difficulty during the run


Equal to Aroden
Finish the game on Core difficulty + Last Azlanti(Iron man mode/No control on saves/All of your party dies is game over)


Test of the Starstone
Finish the game on Unfair difficulty... Good luck, Neoseeker has guides for this.


Sadistic Game Design
So... This is somewhat stressful.

Requirements:
1) Core difficulty or above;
2) Party's speed depends on the weight you're carrying;
3) No auto level-up for PC or companions;
4) No retrain;
5) No more than 75 rests total;
6) Find and kill all optional bosses in the earliest chapter possible;
7) Defeat Khorramzadeh's army in Crusade mode;
8) Develop all four Crusade stats to their maximum potential;
9) Complete your mythic transformation.

Guide for each topic:
1- Select Core, dont change.
2- Be careful with your loot hoarding, get characters with pets to carry more stuff.
3- Just a pushover by this point, level them up yourself, its best anyway. Owlcat builds are a little disgusting.
4- And whatever you select you better be sure of it, you can't change afterwards.
5- This is less terrifying than it looks, what you can do to work around this is take a character that doesn't rely on cooldown abilities/spells that recharge on long rest and accept that you will have to travel quite a bit while exhausted but that doesn't mean that your companions will also be like that.

When you reach chapter 2 and beyond, i dont know if it works on kenabres but it should, you can leave the base alone, leaving all your companions there and they will rest, lose exhaustion/fatigue and restore spells but they won't recover health, be prepared to spend some time healing of money with healing items, if this doesn't happen immediately, wait outside the base or go for a quick walk around the place. Inheribro's heals dont count as resting so you can recover hp, resources, spells but not your exhaustion. Restoration spells only save you from exhaustion/fatigue for like a couple of minutes so remember that if you have to pull your own weight in a fight.

When in chapter 3/5, build outposts and teleportation circles to get around the map without applying exhaustion on your party.

DONT FORGET to reassign someone to the stealth whenever you leave using the camp menu, you dont have to rest. if you dont assign, you will not roll to avoid random encounters.

You will soon realize that your rested friends can carry you a long way.

6- This goes a lot far than just the the ones you are used to kill and must be done on the first possible chapter. Since you are going to kill a lot more than you thought, go for the known ones through the other achievements, just to be on the safe side and add the extra challenge.
Chapter 1:
Kervil The Sparkling Fist - Silken Thread Atelier
Mimics and Alchemist - Topaz Solutions
Succubus - Tirabade Residence (bring glitterdust or try the usual: Slumber Hex + Coup de Grace, Communal protection from evil to avoid being dominated)
Cairn Wight - Pitaxian Wine Cellar
Othirubo/Alchemist - Gray Garrison

Chapter 2:
The gnome - Nightingale Grove
Plagued Smilodons - Moondance Meadow
Shivial the Pain Conoisseur - Underground Hideout
Maugla - Lost Chapel (spawns after defeating the area boss, when exploring the lower area, you will find maugla near the cave at the end. To cheese some of those encounters, use the combination of terrain, mass inflict wounds, summon monsters and a ranged character. Stay on the high ground, mass inflict wounds to aggro and summon monsters to make the aggroed units get closer to you and just wait until your ranged archers kill everything. This can also be used to cheese the Stringy Demodand but that requires a dimension door usage to bring her closer to the higher terrain area and teleport the bait back to safety, i did that with a pet)
Ancient Sarkorian Ghost - Ashberry Hamlet ( The main cause of failed SDG runs, this spawns after the attack of lost chapel so you MUST NOT defeat the last demon outpost leading to Drezen, return a little and go towards the top right corner of the map. This boss is unfairly difficult, do your best to kill him before he has the chance to cast rift of ruin on your team, almost impossible to escape)

Chapter 3:
Ash Giant Thugs - Ashen Caves
Gormandizer - Shrine of Sacrilege
Bodaks - Ravaged Longhouse
Sinful Sinew - Crimson Dust
Playful Darkness - Midnight Fane - See Playful Mood Achievement

Chapter 4:
Deathsnatchers - Rooftop close the Bad luck Tavern
Demodands - See Demodand Conspiracy Achievement
Pitiful Quasit - See Just Pathetic Achievement
Conspirators - An encounter in front of Savamelekh's Lair
Melazmera - Colyphyr Mines - See Dreadful Dragon Achievement

Chapter 5:
Demon Commando - Place of Execution
Demon Assault Squad - Laughing Caves
Demon Saboteurs - Bone Hills

7- Get Setsuna Shy, he will do it for you
8- See Great Upstart Achievement and Strategic Victory Achievement.
9- Complete all your mythic quests until you get the option to change portraits

Unless it was patched in the 2.0.7k version, you DON'T need to actually finish the game to get the achievement, just completing the requirements will already make the achievement pop which made the last council meeting a lot satisfying when i saw that skull show up.

Source: https://www.reddit.com/r/Pathfinder_Kingmaker/comments/r1k7p1/sadistic_game_design_achievement_guide_to_boss/

Inevitable Excess (71/110)
All of these achievements can be done in Story mode

Glimpse of Truth
You get this halfway through the dlc after your conversation with your new chaotic friend. Cant miss it.


Inevitable Outcome
You get this when you complete the DLC. Can't miss it.


Detective at Work
When you explore Iz for the first time, before you enter Marhevok's hut, you have to find every single possible clue.

Reality failures, Marhevok ability to multiply, his talk with the exiled shaman, his history errors, the blind shaman, to sum up, explore the whole map, click on everything and you should get this one.


Silver Tongue

When solving the problem on the ziggurat for Zacharius, you will find the whole team of raised from the dead followers, prepare yourself with high ability checks for the ~65 persuasion/diplomacy/religion


Disillusioned

When solving Hilor's problem on the Spinner of Nightmares, try to attack every single of the 15 illusions for no particular reason, after all, you had to try.


Paradox

You have to finish the game with the help of mommy Areelu, for this you have to create a paradox, there are 16 events that can change the world on the dlc, 9 are with npcs and 7 on portals( 3 portals on Threshold, 3 portals on Iz, 1 Portal on the Other Side of Threshold), Paradox happens when you choose 8 lawful choices to fix the world and 8 chaotic to break the world, you will get a different interaction in the end, after defeating the snake and the robot.

The guys on Neoseeker can explain better.

https://www.neoseeker.com/pathfinder-wrath-of-the-righteous/walkthrough/Inevitable_Excess#Creating_a_Paradox

Through the Ashes Campaign (83/110)
All of the achievements in this DLC can be obtained in Story difficulty

Are you a cat?
You need to topple 12 different things, you dont need to hit someone for the thing to count.
DO NOT use a toolkit to leave the theater or you won't have enough to complete the graveyard as the Statue and the gravestones require one kit each. (thanks Sky)

1- The shelf - Theatre - On top of the dog that introduces the mechanic
2- Barrel - Catacombs - The one near the Tremendous Centipede
3- Rock - Catacombs - The one that harms/kills the monitor lizard
4- Slime Pillar - Graveyard - The first that changes the Gelatinous cube patrol path
5- Slime Pillar - Graveyard - The Second that changes the Gelatinous cube patrol path
6- Tombstones - Graveyard - The ones close to the gelatinous cube and fall on top of the group of undead
7- Log - Graveyard - Close to where the healer hides
8- Cart - Upper Graveyard - Rolls over skeleton champion crusher
9- Iomedae Statue - Upper Graveyard - Can only be toppled if the mage is still alive
10- Barrel - Rich Quarter - Near the stables
11- Barrel wall - Rich Quarter - The two barrels that drop from the wall
12- Cart - Rich Quarter - Near the end of the area

Source: https://www.reddit.com/r/Pathfinder_Kingmaker/comments/voumsl/are_you_a_cat_achievement/


Don't Eat This
You need to find all mushrooms AND fill 6 flasks with acid

Mushroom Locations:
1- SW corner, behind the centipede
2- Central Area, South of the bridge to Giant monitor Lizard
3- East of Millorn, after going down the elevator between a Giant Spider and a Spider Swarm
4- NE of Millorn, Just past the aforementioned Giant Spider
5- In the Death of Eight Legs area, close to where you do the mobility check to enter, North Edge
6- Protected by the Death on Eight Legs

Flask Locations:
1- SE area, in a room close to the exits of the theatre, Langrat's Exit.
2- Central area, near the mongrel with 2 flies
3- Central area, in a loot bag hidden by a perception check, close to the second mushroom
4- NW side, in the room with the ooze disguised as a door.
5- Close to Millorn's Hut, hidden by a perception check
6- North of Millorn, down a left passage as the group moves up the east side of the map towards the northern hall, just past a spider swarm.

Acid Locations:
1- Tremendous Centipede
2- Corpse of another, near Millorn's hut.
3- Within Death on Eight Legs Lair, along the east wall by the entrance through a mobility check

Source: https://www.reddit.com/r/Pathfinder_Kingmaker/comments/vm9nuj/dont_eat_this_achievement/


The Unbreakable Trio
Your only opportunity to change party is during the start of the catacombs section, you must refuse the offer of help and finish the game with only you, the rogue and the sorcerer.


This Side Toward the Enemy
Do you remember the Death By Column Achievement? Same thing, find a thing to topple, topple on yourself. Profit!


Piece it Together
this achievement comes naturally if you just explore everything

Puzzle 1: Theatre, the lever/plank system in the end of the corridor in the room after where you get the rogue into your team.
Puzzle 2: The rich quarter, basement of the house where the thieflings are looting, the game here is to push the levers so that no pressure machine explode and holding the steam back to loot, you can see the state of the machine by its color.


The Art of Provocation
The target here is the Gelatinous Cube in the graveyard, you must change his patrol path by knocking down the gravestones close to him and make the Gelatinous Cube fight the group of undead, you dont need to attack anything and you have to do this while in STEALTH, i used a pet with stealth on to topple the two pillars until the gelatinous cube patrol changes until he battles the undead group. When it dies, you get the achievement.

If the first undead group isn't enough to kill it, quick load or bait the other group of undead into the monument battle, you can't be detected by the Cube for it to count.


Ill-Gotten Gains
Turn on your Loot Goblin mode and wipe everything clean in the graveyard, the extra differences while completing the achievement is the one loot that you need rope to push, the tower that you can break into near the patrol area of the gelatinous cube and the two graves that you can dig. You have to talk with brodie to be sure that hey are unlocked

Grave 1: the grave is close to the beginning of the "rich" graveyard area, top right corner, between the first pile of boxes to clear and the cart to push
Grave 2: after clearing the boxes, hug the right wall, you will find it before the group of ghouls that lead to ambushing the necromancer

For a more comprehensive list of everything in the graveyard area: https://www.reddit.com/r/Pathfinder_Kingmaker/comments/vouo4z/illgotten_gains_achievement/


Careful Steps
The main catch about this achievement is that the fume in the catacomb area that protects one loot also counts as fume from the graveyard, dont touch that fume, fix the pipe if you want the extra loot, and be careful in the graveyard.


Who's There?
5 doors in the Rich quarter that you need to knock, its best that you talk with all the survivors before going for some extra loot

1- By the side of the town hall, where you meet the Magistrate
2- House near the fountain square on the bottom left side corner of the map
3- House where the city guards are protecting in the central area of the map next to a house on fire (Easy to miss)
4- House on the top central corner of the map, near the bridge with a boat
5- Close to house number 4, a little to the south, where the beastmaster is patrolling


The Manuscript Found in Kenabres
You need to find 6 itens and read them.

The Great Deeds of prelate Hulrun - Theatre - Stage portion of the map
Staunton Vhane, The Hero of Mendev - Theatre - Basement
"Shadows of Absalom" By Pax Groometra,"On the Basics of Sin Magic", "The Legend of Magic Bones: Religious Beliefs of the Giants of Old Sarkoris" - Graveyard - Mage's tomb
On the Art of siege - Rich Quarter - Eastern Guard Tower
Crusader's Letter - Defender's Heart

source: https://www.reddit.com/r/Pathfinder_Kingmaker/comments/vouqb1/the_manuscript_found_in_kenabres_achievement/


One for All
You allowed the sorcerer to sacrifice himself to let you escape. One of the endings.


All for One
You didn't allow the sorcerer to sacrifice himself, you went on to sacrifice yourself and your friends too. One of the endings.


Through the Ashes Follower Related (89/110)
This is section of achievements is hard to miss because if you do the side quests of every follower, you will have your achievement

Come Rain or Shine
Frada the Bureaucrat must deliver her report to the magistrate in the beginning of the Rich quarter section.


Bloody Bandages
Inai the healer must know what happened to her friends, find the church on fire in the middle of the rich quarter, interact with the door and deliver her the news


Deadweight
Brodie the gravedigger has to die due to ghoul sickness, this happens if in the end of the graveyard section you didn't give the scroll of remove disease to him, he turns to ghoul when you reach the rich quarter. Kill and get your achievement.


In Memoriam
Langrat the Musician was brought to the mausoleum on the top right corner of the map in the Graveyard Section.


No Escape From Justice
Bemir the Miller must be delivered to the inquisitors in the end of the Rich Quarter section.

No idea why this one image is smaller than the others


We Don't Trade Lives
Yeah... Either you deliver bemir for the achievement above or you hide him for this achievement. Or use quicksave.

For this, you must have everyone reach defender's heart, you can heal their state using scrolls of remove disease or potion of restoration made by inai, during the storybook sections, you take options that do not threat the health of the survivors. No one should be allowed to sacrifice to distract the demon.

For extra info: https://www.neoseeker.com/pathfinder-wrath-of-the-righteous/DLC/Survivor_Guide


The Treasure of the Midnight Isles (106/110)
This section was made with the help of u/mirtexxan and his guide: https://docs.google.com/document/d/16VquroHEKlM-U9vDycjeFjHV3i5998GLaSQamgGtBBI/edit

All achievements can be obtained on story mode with the exception of Hunting Darkness.

Achievements that can be obtained during campaign: Broken Trickster, Green Thumb, Devoted Servant, Fallen Angel, Don't Scream At me!, Who needs Ballistae?, The Past Never Dies.

All the other achievements require the standalone version.

The path is clear
Complete the first set of islands. Campaign Related and impossible to miss.
This being 1/3 of the way to Broken Trickster.


Broken Trickster
Complete the third set of islands. Defeat the Broken Trickster, campaign related and impossible to miss.


Green Thumb
During the battle with the Broken Trickster, DO NOT take any damage from the plants. Relatively easy to get.


Devoted Servant
Complete the sixth set of islands, this is boss is tricky but can be summed up in: Attack the one that has its head glowing until the end, the only boss that can't be steamrolled in story mode. Campaign Related and impossible to miss.


Fallen Angel
Defeat songbird. Campaign related and impossible to miss.


Don't Scream at Me!
A little complicated to get, i managed to do it with a swarm that walks, even its base form is enough to survive the battle against her indefinitely. During the battle with songbird, in her first phase, bait her towards the small containers of acid in her arena and let her scream at you until you fail the save and the resulting aoe damage explodes the container, do this three times and then kill her. Best done with deactivated AI and real time mode.

This is kinda buggy because of how the scream interacts with the container, might take a while until it explodes.


The Past Never Dies
You can only do this encounter ONCE per playthrough, and once defeated, you will not be able to fight it again unless you start all over again

This encounter is available as soon as you defeat songbird SAVE BEFORE DOING THIS ENCOUNTER because you might need it for "No Remorse" and "Brave and Foolhardy".

After defeating songbird, say to the chain that you want to review all his memories, when you see all three of them, say that he is weak and provoke his attack, it will spawn all the 3 previous bosses: Broken trickster, Devoted Servant and Songbird with Nahyndri, you only need to defeat nahyndri to win.

This is listed over here because you need to do this fight if you want to get the secret ending/Redemption Achievement.


Who needs Ballistae?
Slightly easy to do, in the Nahyndri boss fight, there are three basllistae close to the heart in broken boats by each side that you can use to stun for 1 round and do 250 damage to Nahyndri, dont use them.


Redemption
If you defeated the monster from the chain before, you will have a fourth option that is to redeem Nahyndri, choose it, save the poor guy, he is but a witness to your boredom.


No Ordinary Mortal
Fight and defeat Nahyndri without earning a single mythic level.


From the Jaws of Defeat
The closer the boss Nahyndri is to the heart, the stronger he gets, he earns buffs which are marked by the spawn of monsters in the boss arena, wait until he slowly walks to the heart and stands there, he will be in his most powerful version.

Switch to Real time mode and stand far away from the boss so you dont have to stall while battling him.


Secret of the Midnight isles
This requires 6 expeditions/runs, 2 forced wipes and 1 for each ending. Better to find a good podcast because i found this dlc to be extra boring. ALL OF THOSE MUST BE DONE IN THE SAME SAVE FILE. You can't save-scum this achievement. Yes, you have to defeat nahyndri 4 times... No other way around. You will know that you are getting progress when you reach him to decide the ending and the conversation choice is already grayed out.


No Remorse
Remember that I said to save after defeating songbird and before fighting the monster of the chain? Yep, for this one specific achievement, you must defeat him now, no other way around. The save is also useful for "Brave and Foolhardy" below.


Brave and Foolhardy
From the same save between songbird and monster of the chain, end the expedition, start a new one, go straight for the chain and bravely try to fight the monster with a single character level 1 and, unless you can do a miracle, die.


Ride the Wind
After defeating the Broken trickster for the first time and getting gifted with a forced wipe, you unlock the power of tailwinds. You collect one with the start of every expedition.


Windcatcher
Collect 15 Tailwinds, the quickest way is to create a pregenerated character, go for the helmsman, say deal, board the ship, talk to the helmsman, quit the expedition. Rinse and repeat.


Windmaster

Obtain all 25 tailwinds.

The complete list of tailwinds is:
1- Bouncing Tailwind
2- Crashing Tailwind
3- Elven Nimbleness
4- Impervious Tailwind
5- Sacred Tailwind
6- Shielding Tailwind
7- Slashing Tailwind
8- Tailwind of Bloodlines
9- Tailwind of Contradictions
10- Tailwind of Fists
11- Tailwind of Flocks
12- Tailwind of Foxes' Alacrity
13- Tailwind of Good Hunting
14- Tailwind of Ironclad Magic
15- Tailwind of Lenses
16- Tailwind of Spellswords
17- Tailwind of Arrows
18- Tailwind of the Bearded
19- Tailwind of Gnomish Fortune
20- Tailwind of Scorched Earth
21- Whimsical Tailwind
22- Barding songs with Stacking Effects
23- Tailwind of the Hardy
24- Tailwind of Elemental Rampage
25- Tailwind of the Pious

This achievement is possibly bugged. If you got all the listed tailwinds and it didn't pop:
Toybox => pick n' search => Flag_UniqueDungeonBoons => Set to 25

Treasure of the Midnight Isles part 2 (110/110)
Loot the Loot!
Do the side quest of tracking the pirates loot, find the pieces, the pirates gold/loot until you find the special island marked by the special pirate sign on your expeditions and loot the looters.


Synergy
Equip two items that belong to the same set, best example is guardian's axe and guardian's shield. if you find an item that mentions another, equip them both, wait a few seconds or go on a expedition, it should unlock.


Wealth is the Best Superpower
Just sell a Nahyndrian crystal, if you sell to any npc other than the greedy chest, you get 1-5g, greedy chest pays 80k for the item and items sold to greedy chest don't reset between expeditions, so you can sell nahyndrian crystals now so that one other expedition may pay for extra mythic levels.


Hunting Darkness

Now for the worst achievement in the game, rivalling Test of the Starstone, not in the matter of difficulty but in the matter of how rng based your life will be. The dlc is what will break your will to live, not the boss.

Neoseeker made a comprehensive guide about this: https://www.neoseeker.com/pathfinder-wrath-of-the-righteous/DLC/Nahydrian_Darkness

Mirtexxan made an extra observation about this:

u/mirtexxan a écrit :
First of all, the guide is incorrect in assuming that you can find the Golden Symbol of Lamashtu in the Drowned chest immediately after starting a new expedition. Our sadistic game designers made the symbol spawn in the chest after completing at least one island. Nice waste of time. Note that the symbol is still a chance drop, so if you don’t see it after the first voyage, you should immediately start a new expedition.
Second: as the Greedy Chest inventory persists between runs, be sure to sell any of the required items to it, as you don’t know when you’ll encounter one of the thrice-cursed islands required to unlock the secret boss fight. You should sell a Small Sextant, one Crystallized Wild Magic Fluids and a few scrolls of Flame Strike and several spells that deal lightning/acid damage to be sure. Don’t worry too much to lose one of the Runestones: they will become part of the Skeletal Merchant inventory if you get them at least once in your inventory. Note that ALL quest related progress will persist between expeditions.


To quickly check if an island is one the “rune” ones, check for the undertow: "Raging" only appears on rare islands even if it is not exclusive to the “rune” ones.

A reminder before you start to try: You can do ALL the prepwork on story mode.

Now my extra bits:
-Neoseeker assumes that you have to spend spell slots to summon the Deathsnatcher but you can do it just fine with spam of cantrips, do it away from the main party so that they dont get so random magic to their faces, to speed things up, equip the caster with magic nullification so everytime that he fails and turns into an elemental/dragon, you dont have to stop from spamming a cantrip like Resistance on yourself and he doesnt just die randomly from banshee screams on your head.

The deathsnatcher is not THAT powerful but its nice to prepare yourself with a Guarded Hearth. If you reach the end of the expedition, sell the item to the greedy chest and you are good to go for the next run.

- The island spawn issue: So everytime that you start your journey, make saves to check upon every single island in every set of islands, the first time that i tried this, i managed to get into all three of those necessary islands. (farmer Silver confirmed that they indeed spawn everytime)

- For the damage on the totems, dont know if i was doing something wrong but area attacks never worked properly on the pillar but i made a crossblooded sorcerer with earth elemental and air elemental bloodlines which gave me Acid scorching ray and Lightning scorching ray that could target the totems and progress the quest.

- The npcs dont sell Scrolls of flame strike so you must have a cleric/divine caster on your team when trying to find the Second Runestone.

- The fact that the greedy chest can hold items for the next expeditions is a blessing. Since i did a good amount of runs, i started selling the nahyndrian crystals, small sextants, runestones, and other prep material to the greedy chest, when i completed all the requirements, i made a kineticist lamashtu worshipper and started to buy nahyndrian crystals until i was able to become swarm that walks early, when i had 3 clones, i went to Nahyndrian darkness lair, upped the difficulty to core, spammed deadly earth, cloud and wall while he was friendly, talked to him, started the fight, saw him decay before the best cheese combination in the entire game, killed him but died right after because last stand ran out.

Got the achievement, its the only thing that matters

Last Sarkorians (121/121)
Huge shoutout to Ranadiel that helped pave the way for almost all the achievements of this DLC

Stay Undergound
Tied to the Ulbrig Quest 2 side quest "Whence Moves the Hunger?". Backtrack to the start of the area, there will be perception checks guiding you to the Hunger That Moves cave, you will see an area in a lower height, athletics check to jump to it, almost in the border of the map you will find an cave entrance barred, clear the rubble and go forward, clear the area of enemies and you will notice a wooden wall with a Fiendish Purple Worm on the other side, kill it.


Hanged Man's Notes
Hanged Man Notes (During Quest 2)

Page 117 - Knock down the corpse (athletics) near the Spirit Catcher

Page 11 - Perception check by three ghosts chatting (near 117) to the north

Page 23 - In front of Forest Rangers cabin (bottom right of mini-map) near devoured bear

Page 48 - Perception check right before you encounter three spirit wolves fighting demons, near an entrance to the abandoned cave
(Source: Ranadiel)


Sarkoris Will Be Green

In the Forest of Forgotten Spirits there are two caves (Swamp Cave and Abandoned Cave), inside the two are two unique enemies. Each carries a key.

Take the two keys to a door in the wall near the start of the Forest. You need to insert these keys, but only one half is usable at a time. One during the day and one during the night. Once you put both in, you can enter the Cave of Lamentations. Kill the enemies to get the trophy.(Source: Ranadiel). It may or may not count, if it doesnt, try to defeat them quicker and at the same round.


Beware Still Water
When you reach Currantglen, going straight forward and down, right after the fox spirit cutscene, you will find a corpse strapped to the tree, pass the athletics check and you get the achievement.


This Wall Won't Fall
Part of Ulbrig's third quest.
Defeat Muzahol The Swarm Carrier in the quest Call of Kin.


Not the Last Sarkorian
Complete Ulbrig's third quest.
It pops the moment you decide Kerenai's fate.


Wings of Stone
Reach the blackwing library in chapter 1 before the attack on defender's heart. (Source: Ranadiel)
You can also go after the Defender's Heart attack. (Confirmed by Rumix IV)
Inside the library, in the opposite direction of the pyre, you will see a giant griffon statue, approach it and you get the achievement.


The Lady of the Forest
Part of Call of Stone, Second quest.(Source: Ranadiel)
"Story related", you will find her at the end of the Call of Stone quest.


Sellout

Tied to the quest Quarantine, you have to expose Sigvorn's advisor of his treachery with:
1- there is a kid south to Arysen Krei that can give a clue
2- The dog owner south to Ysenna
3- Infirmary with the quaratined people south-east to the dog guy (the place only opens after you accept the quest so it might not show up on your map)
4- Killing the infected guy with the golems
5- Showing the document that the infected guy had

Or just brute force it with the Aeon option. If only every detective had an Aeon on call.

If my testing is correct, you need an incredible amount of 1 clue to expose the guy + the knowledge of the "pilgrim", the advisor really doesn't help himself. The achievement pops after the battle.


Elements of Success
Inside the first big house near the entrance to the cave, you have to pass a perception check DC26~30, you get an item called Blessed amulet, when you leave the other side of the cave you will find an obelisk that you can interact near a earth elemental, put the blessed amulet inside and get your achievement.


Endangered Species
I tried to get the achievement without being in a relationship with ulbrig and nothing happened, so it's either the list is incomplete (which i dont think it is because datamining) or the romance IS necessary

You need to find every trace of Griffon activity in the chapter 3, only possible when you have an active romance with Ulbrig:

Areelu's Lab - Preserved griffon head
Greengates - Nest
Ivory Sanctum - Bones
Wintersun - Nest - Right by the entrance to the cave where Morveg is
(Source:Ranadiel. https://www.reddit.com/r/Pathfinder_Kingmaker/comments/11m7f94/guide_updates_for_dlc4_spoilers/ )

Lord of Nothing (132/142)
All achievements except Unfair Challenge can be done on story mode.


A Shard In a Cave
Defeating the first portal area boss, the giant chief


A Shard In a Tower
Defeating the second portal area boss, the goblin in the top of the tower


A Shard In The Woods
Defeat the third portal area boss and get the shard from the dragon, this achievement is currently bugged.
You can get the achievement fighting the dragon in the middle of the city instead of collecting from the dragon's corpse after the treant fight.


A Shard In the Shadows
You collect it from the dying elf in the throne room in the Shadow World but you have to keep the shard instead of giving him to the edgy dude.


You Don't Need It Anymore
Would you look at that... The source is Ranadiel again, you are great!

So a quick achievement thing. In the hub area, head to end of the path before the area where Stahlmer is. At the end of the path, you should see a cave that you can't enter with what appears to be a person frozen inside. From there, head to the ledge and teleport down. You'll find a body with a note (and a scroll of dimension door for getting back up). Read the note by inspecting it and backtrack the path to find a rock with Sithhud's symbol on it (you could previously interact with it for a religion check). Now that you've read the note, you can dig up a chest with the Frostwail crossbow in it.

(Source: https://www.reddit.com/r/Pathfinder_Kingmaker/comments/181izah/dlc_5_miniguides_spoiler)


Prohibition
Second Shard Area, The Magical Tower, Lowest Floor.
Enter the tower, descend into the basement floor, fight off the slimes and check the beer barrels, a few skill checks later and a bunch of beating and the achievement is yours.


Certified Adventurers
Third Shard Area, The Treant cursed forest, the temple area.
Between the old guy root and the druid roots, you can get inside a temple ruins, which is also part of the druid's quest to burn and honor him, in the end of the area you can find a door with a really high trickery DC, i recommend getting a consumable lockpick's kit (that +5 should be enough to have a decent chance or any chance before quick load spamming but the more the better), you will have to talk to a npc before that but ignore his words and go "help yourself" to his treasure.
You have to lockpick to get the achievement, using the key shouldn't work but i didn't test that.


Pain And Pleasure, Indivisible
Shadow World, after the bellringer's room in which you enter the edgy guy's basement.
By the end of the shadow damage area, after the first aggressive patrol of enemies, you will find a shadow door protected by a shadow which "patrols" directly in front of it that will aggro if you turn on the shadow lamp, inside that room you will find a fecthling strapped to a table, talk to him and when deciding what to do, do the arcana check, Penta should be profficient with it enough to complete it and you get the achievement.


I Wonder What's Inside
Inside the shadow damage area, there are 6 iron maidens for you to open, Rekarth should be able to lockpick all.

1: Following Ulab's request, near the "tutorial" for the achievement, close to two golems.
2: Near the monument patrolled by a shadow, close to the shadow door.
3: Near the prison cells, close to the aggressive patrolling group of soul eaters/overseer.
4: Near the strapped fecthling.
5: Before you jump down to the corpses, following to the end of the path where you see a vision of Rekarth killing Sendri.
6: Near the Fecthling Reanimator, closer to the stairs to leave the shadow damage area, by the end of the room.


Stealthier Than a Shadow
There are multiple shadows in the game so this one can be deceptive but this one is related to the untouchable Greater Shadow Demons that patrol the prisoner area, you must survive that area without a single aggro from any of them, the aggro is only possible if you are using the lantern to protect yourself from the constant damage. This achievement will only pop up when you are leaving the Shadow World.
Thanks to u/glacial_syphon for confirming that you can kill the soul eaters without problems.
According to Sky, Aura of Greater Courage from paladins can nullify the constant damage to help your survivability.


Unfair Challenge
Ohhh boy, here we go again with this guy's plethora of delete buttons towards the party. Again, i thank Ranadiel for his guide.

So before transitioning to the lowest level of the Plane of Shadow, check to your left. You should see some platforms to the left of the door when looking at the door. Teleport to the first of these and then teleport to the second one from there. You'll find some mirror shards on a body. Then teleport back (yes this is teleport intensive if you are doing it properly).

On the next map, you'll find a circular room with a bunch of switches that can be used to lower cells. Lower the cells to the Southwest and follow the path to find a trophy room. Right next to a shield that likely belongs to the author of the Faded Notes, you'll find a puddle of darkness on the floor, which have the description of "The clouds of impenetrable darkness thicken as though something is playing with you." Cast True Seeing and you'll see a mirror. Put the shards in the mirror and then see what you saw and take the saw...I mean open a way forward.

Enter the mirror to find six switches pull the Misery, Suffering, and Pain switches (in that order?). This will bring forth the Chained Darkness. Beat him up to call it a day.

My addition to this:
Guarded Hearth, Touch of good, haste, bless, prayer and everything else that you can use to help you hit.
Have a dedicated tank (I used a pet) to hold him for as long as possible, protect the tank with death ward(negative levels), displacement (he doesn't have true sight).
Dispel magic to lower his AC and to dispel his Polar Midnight( he gets 808hp on core difficulty, his spell will destroy you if it lasts for more than one round), watch out for when he casts Blasphemy cause its garanteed that he will kill your tank if you are not prepared.
Sacrifice your other 2 units instead of the main characters, the MC deaths will result in the loading screen if it lasts for more than 2 rounds.
To counter his silver regeneration negative health immortality, do Coup de Graces until he rolls 1, keep someone attacking just to make sure he never gets up.

(Source: https://www.reddit.com/r/Pathfinder_Kingmaker/comments/181izah/dlc_5_miniguides_spoiler)

Lord of Nothing Part 2 (143/143)


Scattered Notes
You have to find the adventures of a Shelyn paladin scattered around in pages around the darkest dullest world he could possibly get into.

1: Before seeing the shadows spawn around the Cathedral, a little beyond the objective, there is a camp near the gate. The first page is in one crate.
2: Near the soul eaters in the shadow damage area, you can enter a boiling room protected by a shadow door, in one of the cells is a bag with another faded page. i recommend using protection from fire before entering.
3: Next to the open iron maiden in the end of the hallway of the Chessboard fecthling (DC 30 Perception on Normal Difficulty)
4: After the fecthling reanimator, there is a cell in the back, the page is in one of the corners (DC 32 Perception on Normal Difficulty)

My game was indeed bugged and never spawned the pages, had to restart the whole map again(again) to spawn them, maybe the hotfix made them appear. Thanks to AerinSwift and u/glacial_syphon for pointing out where the pages were.


A Waste Of Good Suffering
Another entry of Ranadiel

Choose "So, you knew the elf had a shard of a demon lord's soul?"

Then choose "Why do you want prisoners bearing Sithhud's soul shards?" and pass a perception check.

The choose later in the conversation "You don't care who has the shard, correct? You want to observe Sithhud's agony."

That will unlock "There has to be more to it. A single shard would be enough for you to see Sithhud's pain."

That will unlock later in the conversation "Since we can't get out of here, we won't resist, but let me ask something else," unless you have three shards and they overrule the idea.

Then choose "You want to feel this pain, and you only need one shard... Why wait? Take it now," and pass a Persuasion check and then choose someone to lose a shard level.

Or just explore all dialogue options and have high perception and persuasion.

(Source:https://www.reddit.com/r/Pathfinder_Kingmaker/comments/181izah/dlc_5_miniguides_spoiler)


Odious Treasure
I am not sure if this one is one that you can't miss or not, since you can give up one of the shards to the Edgy Shadow World guy, but if you keep all the shards to yourself by the end of the Shadow World, you should be safe.
This achievement can't be missed, thanks sky


The Last Adventure
This is an ending choice, sacrifice yourself to the ritual.


The Last Spell
This is an ending choice, when you are presented with the choice of sacrificing yourself to the ritual, let the three other characters try to sacrifice themselves and then you choose Sendri for this achievement.


The Last Shot
This is an ending choice, when you are presented with the choice of sacrificing yourself to the ritual, let the three other characters try to sacrifice themselves and then you choose Rekarth for this achievement.


The Last Song
This is an ending choice, when you are presented with the choice of sacrificing yourself to the ritual, let the three other characters try to sacrifice themselves and then you choose Penta for this achievement.


Frozen Pork Chops
At the end of the ritual, you get the chance to fight the Nalfshenee. You have two ways to do this, survive long enough in the angel's ritual until Sarenrae smites the Nalfshenee out of existence(this is totally possible with Protection from Cold, Resist Cold) or you can explode him yourself by sheer power. Beware that Nalfshenees are by default broken because his unholy Nimbus and Blasphemy are stupid OP in his hand.


Thaw
Credits: Ranadiel.
This is related to the end of your DLC, there are 3 possibilities that can happen. The objective is to get Sithud weakened before fighting him in the Main Campaign with the Knight Commander.

This save is imported during the Act 5. And your ending should be one of these below for you to get the weakened version of Sithud.
While playing, i found out that you can also import the save after defeating the Vescavor Queen in Leper's Smile in Act 2.

-Sendri's Ritual Complete-
Requirements:
Left Sendri in Abyss alone
Did feed one of Sendri's shards to Tag'Tkhaar

-"Hermit's" Ritual Complete-
Requirements:
Stayed with Sendri
Either:
Someone has 3 shards
You did not feed a shard to Tag'Tkhaar

-Everyone Survived-
Note: Technically just a best case variant of "Hermit's" Ritual Complete, but game has a unique variable for it
Requirements:
Stayed with Sendri
No one has 3 shards
Fed a shard to Tag'Tkhaar


Cold Snap
Credits: Ranadiel.
This is related to the end of your DLC, there are 3 possibilities that can happen. The objective is to get Sithud to full power before fighting him in the Main Campaign with the Knight Commander.

This save is imported during the Act 5.And your ending should be one of these below for you to get the powerful version of Sithud.
While playing, i found out that you can also import the save after defeating the Vescavor Queen in Leper's Smile in Act 2.

-Player Betrayed Party-
Requirements:
Kill Stahlmer

-Party was Defeated-
Requirements:
Lose during the final fight

-Survived without Ritual-
Requirements:
Left Sendri in Abyss alone
Did not feed one of Sendri's shards to Tag'Tkhaar


Glaciation

It seems that this achievement doesn't differentiate if it's full power or nerfed Sithhud so... if you managed to reach Act V on Unfair, you already know what to do and how to eliminate this target.

A dance of masks (153/153)


The Living Fraud
Story related, can't be missed.


Tailed!
For this, you need a character able to cast Dispel Magic. Goggles of Pure Sight recommended.
Before you are able to enter the event itself, you will be approached by an "old nice lady" who will offer a cat to you. Cast Dispel on the cat.


Dig in!
I believe that the most difficult part of this achievement is playing as Swarm because you have to get to Iz, kill Deskari and then be back at Kenabres which takes a lot of time because you gotta have your "team" back or you will be killed by Owlcat's great late game difficulty balance.

Objective: Get to the event, kill everything, follow the fight/guards and get abducted by Razmir, achievement pops on abduction.


Unofficial Visit
You have to survive two scripted events for this achievement to pop.

First: The queue to enter the event.

You will be approached by some npcs to talk and you can just ignore/deflect/avoid saying the wrong thing but there is a trap there. By the end of the line, where you see two women discussing and two men watching you, you MUST NOT interact with the TWO MEN or they will give away your disguise.

Second: The Commander competition

You will have to interact two times with the dance/ceremony area where you will face your copycat, you, again, MUST NOT use your mythic related options, you gotta stay hidden, blend in.

And when Razmir tries to taunt you, ignore it and play it cool, Rovus got your back.

The achievement pops when you get inside Razmir's palace.


Craving the Glory
I have to warn you, if you do the side quests of most characters in the event, they will be kidnapped by Razmir making it more difficult to complete the Arena if they kidnap an important character to you but you have to do at least 3 side quests before you can trigger the spawn of Drizmo to reach the Arena so "eliminate" your companions wisely.

The companions which are safe to the side quests are Seelah, Regil, Lann and Woljif, if i understood correctly, there is no trigger to make them disappear.

With that information, the achievement itself is pretty straightforward as is for the other two after it.

Survive the arena and kill them all.

Honorable mentions: Trickster/prankster commander as the last fight, he has trick fate, so he always crits and survives 10 hits with 1 hp, keep hitting until he is surely dead, the mages will give you a headache though...


Seeking the Glory

If you built your characters nicely, you shouldn't have problems up to this point, keep killing and keep earning.

Honorable mentions: A paladin during the Inevitable fight that has the Aura of Peace that will constantly make you stop attacking, either eliminate him or make him the last one.


Chasing the Glory

Here the things get the Owlcat trademark of balanced battles.

Lantern King/Fey King, all units will remain alive until you kill the main boss.
The death cosplayer, all units will get a buff of +4 to all stats for each kill made, kill as many as you can and don't allow the death guy to do the same
The shadow fight, keep killing but you will lose characters in the process, they keep multiplying and they hit you for your stats, prepare Death Ward to help you and any other stat protection magic. They teleport to whoever hit them last.
The others i don't recall anymore.


Triumphant Glory

Kill Drizmo, servant of Zuset Echox Zego (which is by far the most complicated name ever spoken by a VA and i praise him for it)

You have to face him and his mechanic is that he will kill whoever killed him so prepare some "Last Stands" and kill him again until death sticks to it.

After your victory, just select the first option when talking to Lord Zuset Echox Zego and the achievement should pop.


More Fun Together
Back to more fun and games, shall we?

For the companion side quests to be available, you must have completed their side quests up to this point in the story. (Source: DavidForums)
I recommend you use a Mythic Path that won't eliminate/remove any companions like Lich (removes Seelah), Demon (Removes Arue), .
Out of the whole team, only Trever and undead companions won't have an interaction/side quest inside the event.
Azata gets an extra companion for you to use for the achievement.
Ulbrig counts for this achievement but you must complete his side quests first.

So try to avoid killing your "Helpful" companion even if she thinks that she can kill your Legend KC with her +2 rapier on a +2 dex belt. Based on a true story.


True Love's Kiss
This is supposed to trigger after the events on Razmir's Palace and after the gathering, by the end of the night, when you are had enough of festivities, when you try to rest, your beloved will find you.

Go out there, be romantic, earn your kiss.

The DLC ends after this.
Some solutions to puzzles
Shield maze color puzzle: Yellow, Blue, Red, Yellow.

Defender's Heart lever puzzle: Lever under the torch is up, lever on the opposite wall of the shield is down, lever by the stairs is up.

Gray garrison music puzzle (succubus room, her position is the "top" direction): Top right, Middle left, Top left, Bottom left, middle right, bottom right

Nameless Ruins circle puzzle (adjust the camera to that the head if aligned with you): Outter circle, inner circle, both left bars

Desna altar music puzzle: Middle, Right, Left, Middle.

Drezen Sword of Valor puzzle: Adjust the compass to the north: bottom left, center, center, top left, top left.

Wintersun Location of all pillars and ghost locations:


Source: https://pathfinderwrathoftherighteous.wiki.fextralife.com

Ivory Sanctum puzzles:
Central Chamber: 3654
Double locked doors puzzle: 3540, 4306
Eternal Guard room: 0563

Sacred Lands puzzle: A little too complicated to summarize.

Blackwater puzzles:
Door: Triangle, Rhombus, Circle with a dot
Infected room: Hand, wind, Fire.

Gravestone Rock (Seelah's final follower quest location): Blue, Yellow, Green, Red and then Red, Green, Yellow, Blue.

Ineluctable Prison puzzles:
Blood pool puzzle: 0356
Near the entrance to the purple worm boss: 6054
Near Baphomet's Chosen: 4365

Abyss rotational platforms puzzle: rotate the platforms and position party members to lock the plaform from rotating, focus on the next until you get the loot.
Locations
Middle city - South of Harem of ardent dreams
Upper city - north side - Behind Palace of Incest and Degeneracy.


Conclusion
I lack the words to describe what i feel towards this game, i love it but with a lot of flaws that at some point start to make the bigger picture even better for some reason.

The mess of information going all around is now organized in a single place, i had enough of going to a lot of propaganda pages saying a lot stuff to get a single piece of information. It gives me peace of mind to see the final product and i hope that this guide might help future completionists.

To you all, may fate be tricked to be ever 20 and good luck fellow pathfinders.

If there are any mistakes, please let me know and i will fix it :D
199 commentaires
ALEC  [créateur] 20 avr. à 10h16 
@tru-,

"be stubborn" is the idea of what you have to be to get the achievement, why?

Areshkagal is trying very hard to teach you that you are nothing, less than a grain of sand, but you are NOT nothing, you are something, you have to stand your ground against his words and not play any of his games, not obey any of his requirements, not follow any of his commands, like a stubborn person.

If after those interactions you get a buff, you did the step correctly towards obtaining the achievement, you need 4 buffs for the conversation with the true Areshkagal to play out in the end and you get the achievement.
tru- 20 avr. à 4h00 
i understood nothing from the enigma part. What does it mean "be stubborn"? Is this a guide or another riddle?
Lentobombe 12 déc. 2024 à 11h30 
No troubles ! I planned a next playthrough in any case, so I'll have another try at it later, thanks for your amazing guide !
ALEC  [créateur] 12 déc. 2024 à 11h01 
@Lentobombe,

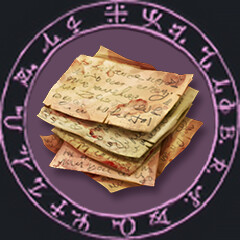
To be completely honest, i haven't done all the necessary stuff to get a grip on the workarounds and fixes for the implementation of the "Sithud" demon lord boss, on my case, i got it by getting an really old save, importing the stuff late Act V and fighting Sithud.
ALEC  [créateur] 12 déc. 2024 à 10h58 
@Rohen,

Some enemies are indeed not listed for the SGD achievement, which i think it is weird, for the sake of completionism, i advise to kill them all, it's more fun and more challenging this way
Rohen 12 déc. 2024 à 6h23 
Huh so I just finished my first one run and got the sadistic achievement, did all my respecs through toybox coze its faster, played on core etc and maybe I even was under 75 rests and tried to clear every enemy...but i only started reading this guide at the end of act2 so I didnt know about the prelates nemesis achievement, so obv I didnt return there to kill him after already clearing the map. So either the achievement is bugged or this optional boss is not needed for it.
Lentobombe 7 déc. 2024 à 2h08 
Oddly enough, I didn't get the "Thaw" achievement after defeating the lord demon. I achieved the "everyone survive" ending of the DLC (all 4 characters showed up in Act V) and was able to defeat the demon (and complete the quest to weaponize its remains), yet no cheevo.

Could it be related to the fact that I imported the DLC save outside of act 2 ? (I did those two DLC while I was in the middle of an act, and imported them then)
ALEC  [créateur] 29 nov. 2024 à 14h21 
@Rohen, let me start by showing @Necrodamus (13 oct) comment on his playthrough that also granted him the Queen's Gratitude.

The Achievement Queens Gratitude worked differently for me:
First: I didn't take the queen with me. (because of the swarm that walks achievement)
Second: yep
Third: you can collect anything that does NOT trigger the message that the crusades' morale is decreasing.
I chose Lann for the distraction.
forth:I lured the swarm. Then I went through the church. But in the end I still destroyed a few gates.
At the end I was very surprised when the achievement popped up.


I believe i should change my wording on that explanation but the hard requirements for the achievement are: 60 days or less to drezen, high morale, low percentage of crusader units lost, no idea about the percentage nowadays.

My guide highlights the best possible path for Leper's Smile, since that event that can cause huge loss of units and morale.
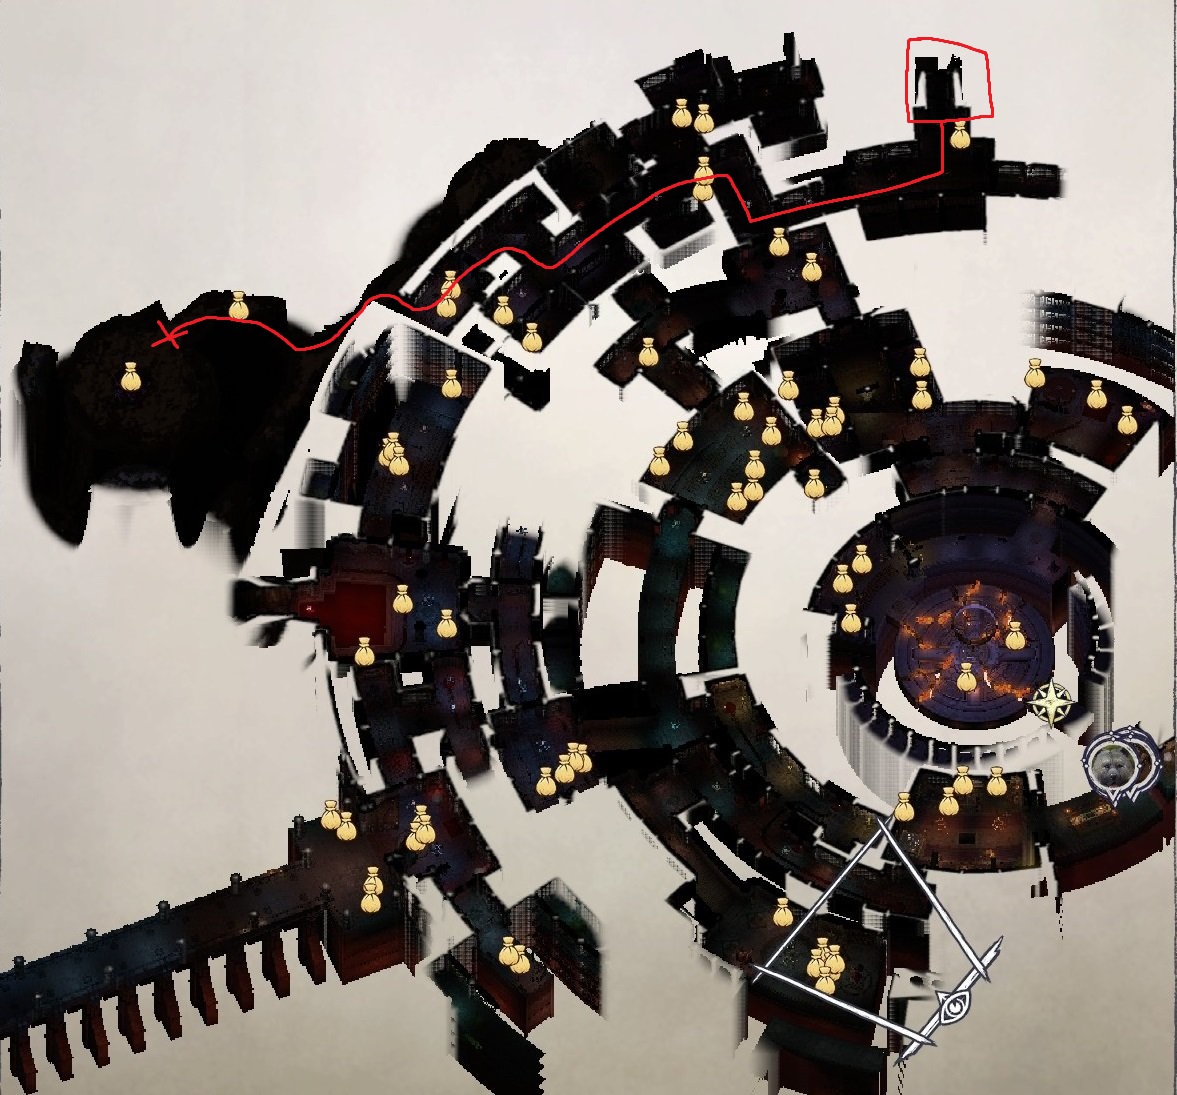
Rohen 29 nov. 2024 à 11h22 
@ALEC
Queen's Gratitude
Time to show the queen what you can do. Divided in four parts:


Third: During Leper's Smile, ignore all loot, you can save the traveler but go straight for the vescavor queen.
Choose Sosiel and stand your ground when deciding who should bait the vescavors away for the minimal damage possible.


By the start of chapter 3, the queen will personally gift you some juicy items

So just finished act 2 and got the achievement but i did the third thing completeley wrong, i did not choose sosiel but took the traitor nurah instead and choose run away instead of stand your ground and choose to loot some of the things in the in the rift...but i still got the achievement. So either the achievement got updated or the guide is listen a condition that isnt nessessary.
ALEC  [créateur] 29 nov. 2024 à 4h44 
@Kimagure,

While i know the imbalance caused by Angel/Oracle builds, I tend to not judge/advise a specific build for these types of things, i don't want the reader to feel "locked" into a specific road and i choose the "works for all" strat to talk about