Shank 2

Shank 2

41 ratings
Surviving the Survival mode
By Gea Force
Your partner is down, A bomber is about to blow your last supply station, a couple of fat guys with a flamethrowers doesn't let you deactivate the bomb, you're about to die but your 40 oz tequila still has 20 seconds of cooldown left... Why did everything go so wrong?
This guide explains how to prevent situations like this. Make efficient use of your weapons, money and abilities
   
Award
Favorite
Favorited
Unfavorite
Preparations
The first half of the battle is the preparation. Before anything, discuss your strategy with your partner: Assign roles, decide how to handle certain enemies and what to buy and when. The characters and weapons you and your partner chose at the begining will affect the way you will play the entire game.
Characters
Every character is good at something and bad at something else. The greater the bonus, the greater the penalty will be.
Choose your character acording to the roles you and your partner decided previously.Try to pick two character who complement each other: Tipically, a ranger/support and a melee character. Basically, just do what your character is good at...

Finally, try to avoid the characters with heavy health penalties as much as possible (Caesar, Evil, Sunshine,..). On later waves (20+) enemies start to do more damage and those characters tend to be knocked out in one or two hits (leaving your partner completely helpless).
Weapons
The most important part of the preparation. Like the characters, every weapon is good for something, and not-so-goot ad other things.

Machetes
Pros fast, good for combos.
Cons little knockback, not much damage compared to the shanks

Cainsaw
Pros Easy poins by grinding enemies. The combo run+heavy is pretty useful for crowd controlling
Cons Easy to interupt, not very good against strong enemies

Sledgehammer
Pros high knockback, high damage. Up+heavy and Jump+heavy attack can be abused to deal with groups of enemies or powerful enemies while knocked down
Cons Slow... way too much damage, not good for combos (less money)

Katana
Pros Balanced, useful in most situations
Cons Not too good at crowd controlling

Scyte
Pros Very good for combos when combined with uzis
Cons Easy to interupt, short range

Pistols
Pros fast, good for combos, good range to pick enemies from a safe distance.
Cons little to none knockback, not enough to stop bombers from setting bombs

Knifes
Pros Good damage combined with good range and acceptable knockback. Chargeable
Cons Low rate of fire, requires good aiming

Shotgun
Pros Knockback, and damage. Good for crowd controlling and taking down knocked down enemies
Cons Not considered a range weapon, it has no range at all

Revolver
Pros Good range, good damage, goes through enemies
Cons Low rate of fire, not enough knockback

Uzi
Pros Good for easy comboing,
Cons bad damage, bad range, usefull only for combos
Money
There are 2 ways to earn money:
  • Picking up yellow orbs from dead enemies
  • Attacking enemies

Orbs
The simplest way to earn money. Try to pick them as fast as you can since they disappear in 5 seconds. You can also let your partner pick them if he needs the money.
  • Bosses leave a huge ammount of orbs (1000-2000). You may want to share them with your partner
  • Bombers leave 4 orbs when killed normally, but none when thrown
  • If you kill an enemy by throwing him out the scenario (also meat grinder) you cannot get his orbs
  • Zombies do not leave orbs when killed

Combos
You can also get money by attacking enemies. Keep on eye on the special bonuses that appear over your enemies (switchup, domino, juggle,...). Try to keep your combo counter high specially on the firsts rounds.
  • Know your weapons. there are weapons better at comboing than others. Tipically, the fast weapons with low damage are the best suited for this task
  • You can still combo dead enemies. Keep their corpses jumping arround to earn extra points (Man that sounded terrible)
  • Don't abuse the scenario traps. Although they are very usefull, they doesn't give you too much combo points
Shop Items
Tequila (40 oz)
400
The uncensored version of the medikit. it restores a half of your health. Also dropped by random enemies and the bids flying arround the scenario. You can also buy it for your partner

Boar
500
A wild boar runs arround the current platform and knocks enemies away. Not that usefull against big and fat enemies. It may give you the time you need to revive your partner or deactivate a bomb. Will explode 20 seconds later regardless it's health

Decoy
1000
It gives enemies another target to attack. Specially useful when you need some extra time. If you keep him alive enogh time, he will start picking the grenades lying arround and throwing them to enemies.

Minigun
1500
Usefull to kill low health enemies like tribal midgets, amazons, and gunners. On later waves, it can also be used as a hold mechanism to keep the enemies from reaching a your position while your partner attacks them with something more solid (like the grenade launcher or the harpoon thrower)

Grenade Launcher
1800
High damage, low ammo. It can clear groups of strong enemies if used efficiently. Be aware of the small delay until the grenade actually get's fired, You can easily get rammed by a fat enemies

Turret
2000
It shoots the enemies on its front. More usefull when used on pairs (since turrets cannot turn arround). They can also act as a decoy, enemies will try to destroy them from it's blind side. Can be thrown

Fire Turret
2000
Same as the turret but with more damage and less ammo. Usefull against zombies. Not that useful against big groups of enemies.

Barrage
2500
Your partner is down, the last supply station is about to blow and you're about to die. What would you do? Use the barrage station. Basically if clears the screen and gives you some time to deactivate the bomb, heal youtself or whatever you need to do. Only one use, but unlike the other weapons, they do not disappear over time. It's always useful to have a couple of them lying arround the stage for desperate situations (specially on the last two zombie waves)
Enemies
Slim militia
Common enemy, it comes in diferent varieties. For the most part, they're just pushovers meant to bug you. They tend to drop pickup weapons which can be used to your advantage. Just don't let them surprise you, and combo them to earn some extra money.

Big boys
They can do some damage, but they are slow and easy to dodge or outrun. Be careful when knocking them down, since they tend to get up wildly knocking you away. That doesn't really do damage, but it you're not lucky, it can knock you into some trap like the meat grinder. Sometimes, they carry weapons arround like spears and shovels, which are more useful than normal pickups. As long as you stay out of their range you'll be safe

Bombers
Anoying... even more anoying as you progress through the waves. The game marks them for a reason, whenever you see one of theese go kill him. You can throw them into another enemies as a grenade, but it's better to kill them normally since they drop a good ammount of orbs. Arround wave 10, they gain the hability to throw grenades, be careful with those glowing red dots. Be specially careful with the zombie version of this enemy, since it can grab you and chop away half of your health

Gunners
Low health, high range. They come in two varieties: pistol and assault riffle. Do not stay still if one of theese guys is arround. They can be really anoying in big groups, so you may want to get rid of them as soon as you can. If they manage to corner you, you can easily get rid of them with a minigun. For some reason, this is the only enemy who doesn't have a zombie version

Amazons
They come in two diferent varieties: rod and sai. They may be hard to hit since they are fast and jump around like crazy. The key is to dodge her attacks and attack them after they miss. Or you can just shoot them down with your average ranged weapon. They are pretty easy to knock down and you can finith them with your heavy weapon while they are lying on the ground.

Tribal midgets
Pretty much like the amazons but more anoying. they can grab you and take a fair amount of your health, so you want to get rid of them with a ranged weapon before they come near (shotguns are specially efective). They have very little health

Fat militia
High health, high damage and high speed. Be careful when they charge at you since they do a lot of damage. Lead them into a wall, or just wait for them to get tired in order to get rid of them. When knocked down, they tend to get up wildly the same way as the big boys. You may want to kill them from a safe distance with knifes or other ranged weapon. Theese guys are specially dangerous on zombie waves, you may want to hold them with a decoy or a minigun to take them down more easily.

Fat gunner
A fat militia with a flamethrower. it's not easy to get near them, you may want to use a ranged weapon or a minigun to take them from a safer distance, or use a decoy to get them from behind,

The Boss
As the name says, the strongest enem. He appears at multiple 6 waves (6,12,18,24,30). He can eat most of your health in a single blow. You may want to use traps from the scenario to take him down. Be careful since he tends to appear with support characters like shield guys or gunners. He can throw away your turrets and other defenses. He gets more dangerous on his zombie form. you should use barrage station to kill him before it's too late.
Waves
The actual waves may change from onw map to another, but there are some things that never change.

Boss waves (6,12,18,24)
Wave 6: the boss comes alone, You can use this oportunity to earn some easy combo money or to unlock the "No Gimmick" achievement (Note only the player who deals the final blow will get the achievement).
Wave 12:The boss comes with some pushovers. It's not much of a challenge, you could still get the achievement easily enough, but if you want to play safe, just use the traps
Wave 18: The boss comes with a group of gunners. Keep an eye and don't let them corner you. If you can afford it (+10000) or if you are desperate, you way want to use a minigun to get rid or them.
Wave 24: The boss comes with some guys with shields. Be careful since this one comes after a zombie wave, you may be worn out.

Zombie waves (13,19,23,27,30)
Wave 13: Fairly easy. Just some slim zombies. As long as they don't surprise you you'll be okay. You can combo them to earn some extra money
Wave 19: Enters the big zombie. He is slightly faster than the average version, Use the traps and you'll be good enough. If you are having problems, you could buy a couple of boars or a grenade launcher.
Wave 23: This is getting hard. Now there are fat zombies and zombie bombers. If you cannot depend on the traps, You may want to use a couple of turrets (one in front of other on the opposite direction) or a minigun to hold them while the other player kills them with something more solid like the grenade launcher.
Wave 27 Now zombie amazons and a zombie boss. He is faster and more dangerous than the actual bosses, The traps won't hold him enough, It's strongly recomended to use a barrage against him. It will instantly kill him as well as the rest of the enemies. Then kill the zombie amazons with some kind of ranged weapon proceed the same way as wave 23.
Wave 30: The final wave, zombies are more agressive and there is another zombie boss. Use another barrage and use whatever money you may have on turrets, miniguns and grenade launchers. Use ranged attacks as much as possible. you don't like to get them close. If your partner dies you could use a decoy to win some time (our just another barrage if you have any left). Be sure to keep at least one supply station safe. Generally, the one from the top is the easiest to defend.
Maps and Traps
Every map has some kind of trap you can use (or abuse) to take enemies down or defend your posidion easily. However, in most cases, those traps can be turned to the player if he is no carefull

Farm
The farm has the meat grinder. There are two switches (one on the bottom right, the other on top left) you can use to activate the meat grinder on the center of the screen. It insta-kills whatever falls inside or it: enemies, bosses and... players. Be specially careful when activating this trap since you could alse kill your partner. Also, be careful with fast enemies (zombies, fat enemeis), they can outrun the meat grinder easily.
A safer strategy would be to open the meat grinder and shoot the enemies as they try to jump over it, making them fall into it. This is specially usefull on zombie waves.

Church
You can use the fire traps on this scenario. Enemies got stun while the fire trap drains away their health. You can shoot them down as they try to climb up the stairs and then activate the fire trap. This is specially usefun on zombie waves, you can buy yourself some precious time by trapping zombies on fire
Also there is an achievement for killing 30 enemies (per player) using that trap

Boat
You have a switch that activates a boat that falls and knocks down whatever is on the center of the screen (Not very usefull).
The actual trap would be the harpoon throwers, that can instakill most enemies. However, it takes some thime to get charged and leaves you vulnerable since you have to stay still at a particular place (gunners, bosses, small enemies). You may want to defend your position with mines or turrets.
Finally, Keep in mind the blind spots of this weapon (directly above and below) which prevent you to reach certain enemies.
In my opinion this is the easiest map to beat
Special Thanks
Rickyel: My partner. for it's patience and cold thinking on extreme situations

The Shank 2 comunity: after all, appart from my personal experience, most of this stuff is made from whatever useful information I could find scavenging arround the forums

12 Comments
jc777 Nov 25, 2018 @ 10:48am 
Great guide... you can use the shank button to throw midgets and bitting bombers of you. You can also use the sea to your advantage in the boat level, just through them in the drink! Insta kill!
jc777 Nov 25, 2018 @ 10:46am 
Yes it is ,bullfighter, on local , then organise yourself , then click begin.
recca Nov 16, 2018 @ 3:09am 
Great Guide bro...
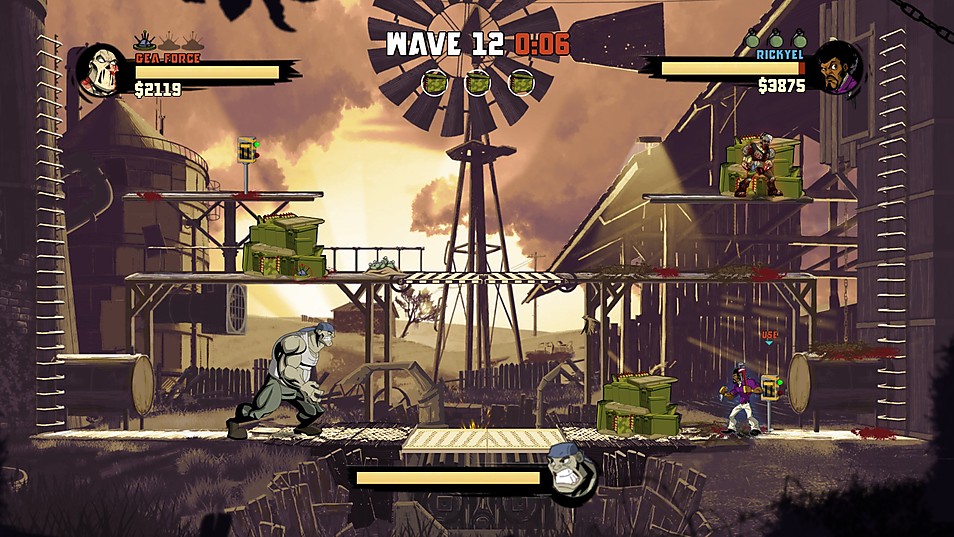
Harpoon turret trick to shoot straight down Jump and shoot.
大崔哥可猛了 Nov 30, 2017 @ 8:23pm 
哈哈哈
N.I.T Nov 18, 2017 @ 2:46am 
only if new player read your guide
Da Atte Apr 10, 2017 @ 3:26pm 
@bullfighter

No, not really. When you are playing alone it is close to impossible to disarm the bombs in later waves when there are dozens of ranged enemies shooting at you and canceling the disarming progress. I've gotten to wave 18 solo I think and after that it was almost impossible.
󠁳⁧⁧ ad4m Nov 17, 2015 @ 2:49am 
Btw your description saying about what happened,happened to me when I 2 fat guys with flamethower shooting at me while i have a flipping cooldown XD
yourboiGFK Jun 21, 2015 @ 2:06am 
nice one!
DarkGoona Dec 4, 2014 @ 9:37am 
Nice Tips Bro! usefull
foxtrot Dec 2, 2014 @ 3:27am 
why have one when you can play with two just go to the discussions and find people to friend who wanna play.. chances are someone will be on