Helicopter Gunship DEX

Helicopter Gunship DEX

33 evaluări
Gamepad and Controls Guide
De către Jimmy Arcade
This guide will take you through the gamepad's "Screen of Interest" & Modifier control system.
2
2
   
Premiază
Adaugă la preferate
Preferat
Elimină din preferate
Default Gamepad Controls


This is the default gamepad control layout. All of these controls can be re-bound in the Control Settings menu in game.

LEFT STICK X
This controls the amount of power the tail rotor of the helicopter produces. When in a hover this control will rotate (or yaw) the helicopter.

When in forward flight this control becomes less responsive due to air flow over the body of the helicopter.

LEFT STICK Y
This controls the amount of lift the main rotor blades produce. In a hover the collective makes the helicopter move vertically up or down.

LEFT STICK CLICK
Clicking the Left Stick will cycle through the autopilot modes...
  • Altitude Hold - In this mode the helicopter will try to maintain the target altitude. You can alter the target altitude using by increasing or decreasing the Collective.
  • Hover Hold - This mode will only engage when flying slower than 20kts. When engaged the autopilot will take control of both the Collective and Cyclic controls to maintain a stable hover at the target altitude. You can alter the target altitude using by increasing or decreasing the Collective.
  • Off - Full manual control.

RIGHT STICK X
This controls the roll of the helicopter causing it to bank to the left/right. At low speeds it will make the helicopter strafe to the left or right. At higher speeds it will cause the helicopter to turn left/right.

RIGHT STICK Y
This controls the pitch of the helicopter. Pitching forward will make the move forwards. Pitching backwards will make the helicopter move backwards.

RIGHT STICK CLICK
This will cycle through the various external and internal views.

LEFT TRIGGER
Controls the wheel brakes for helicopters that have landing gear.

LEFT SHOULDER
Hold this button to engage Modifier 1 which dynamically alters the functions of MFD buttons depending on the MFD screen. See MFD Control section.

RIGHT TRIGGER
Fires the currently selected weapon.

RIGHT SHOULDER
Hold this button to engage Modifier 2 which dynamically alters the functions of MFD buttons depending on the MFD screen. See MFD Control section.

VIEW / BACK
Cycles the left MFD screen through its various displays.
  • Threat Display - Displays a local map together with any enemy units detected by the RADAR and/or Co-pilot. Also controls various RADAR functions if available.
  • Stores - Displays the available weapons, flares, chaff and fuel levels.
  • Mission Support - Allows you to call in any Mission Support units available. e.g. Artillery

MENU / START
Cycles the right MFD screen through its various displays.
  • Targeting Pod - Allows you to control the targeting pod & designate targets
  • Mission Briefing - Displays a brief outline of your current mission objectives
  • Damage Monitor - Displays the current health of all the helicopter's systems.

D-PAD
Allows you to press MFD buttons 1 - 4. See MFD Control section.

X, A, Y, B
Allows you to press MFD buttons 5 - 8. See MFD Control section.
Flying the Helicopters
OVERVIEW

Helicopters are not easy to fly in real life and this is replicated in Helicopter Gunship D.E.X. However, when you 1st start the game you will be asked which flight model style you would like to use. Your can change this at any time in the Control Settings menu. For more information check out the Flight Model Adjustments section of this guide.

The flight model is a full physics based model which means the helicopters follow real world physics to fly.

It is a skill to fly helicopters smoothly without getting into trouble. So, if you've never flown a full simulation helicopter before, it may take you a little time to get comfortable with them in this game.

If you are having trouble then take a look at the "Making Flying Easy" section below.

BASIC FLIGHT CONTROLS
These are the basic flight controls for a helicopter...
  • Collective - This controls the amount of lift the main rotor generates. In basic terms this is what makes the helicopter move up and down.
  • Tail Rotor - This rotates or yaws the helicopter left or right. It is most effective when used while hovering. When moving forward the airflow over the helicopters body reduces the effectiveness of the tail rotor to yaw the helicopter.
  • Cyclic X - Banks the helicopter left or right. When hovering, or at low speeds, this will cause the helicopter to strafe left or right. At higher speeds banking the helicopter will cause it to turn.
  • Cyclic Y - Pitches the helicopter forward or backwards moving it in that direction

MAKING FLYING EASY
There are a couple of things that can make flying the helicopters much more easy.
1. Make use of the autopilot modes.

For novice flyers, the Hover Hold system will be your greatest tool as it will take over the complicated task of adjusting the Collective & Cyclic to maintain a stable hover at the target altitude. You can use this mode to both take-off and land with ease.

The Altitude Hold autopilot will allow you to hand off the Collective controls over to the autopilot while manoeuvring your helicopter.

For more information checkout the video here at around the 07:30 mark...
https://www.youtube.com/watch?v=fU8mrtZBgsQ&t=450s

2. Adjust the flight model options in the Controls Settings menu. For more information see the Flight Model Adjustment section is this guide.

3. Try enabling "Relative Collective" in the Game Settings menu. This will allow you to set a desired collective amount rather than having to continuously apply Collective with your stick.

This is can be really useful for Gamepad users due to stick re-centering springs.

4. Presssing "r" will reset your helicopter back to its original take off helipad. This is useful it you manage to flip the helicopter while learning to fly. Be aware that using this will be seen as "cheating" and you won't gain any points from the mission.


Flight Model Adjustments
Helicopter Gunship D.E.X now allows you to modify the flight model for the helicopters. There are 4 presets...

Beginner
Perfect for gamepad users or anyone who wants a very easy to fly helicopter. The helicopter will be extremely stable in flight and very easy to hover. Artificial effects are applied to make the helicopter easy to fly.

Intermediate
A good mix between stability and maneuverability. Less artificial effects are applied to make the helicopter easy to fly.

Advanced
The original flight model. Helicopters are fully aerobatic. HOTAS is recommended but you can still fly with a gamepad. No artificial effects at all!!

Custom
Create your own flight model by adjusting the various flight model sliders in the Control Settings menu as shown below...

Helicopter Rotational Stability - this effects how much force is required to rotate the helicopter in any direction. It helps damp down sensitive controls and also reduces lively flight models such as the Viper! Essentially the helicopter will try to resist any rotational forces.

Excessive values can make the primary controls sluggish and unresponsive. This can be corrected by increasing the relevant Cyclic X, Cyclic Y and Tail Rotor power settings.

Rotor Disc Brake Force Multiplier - this effects how much braking force (or drag) is generated by the rotor disc when at positive angles of attack (pitching up). Essentially it slows the helicopter down faster when pulling back on the cyclic.

High values can also effect the helicopter's ability to maintain speed in a high-g turns.

Extreme values may make the helicopter reluctant to lose altitude when hovering.

Rotor Disc Angle of Attack Lift - this adjusts the lift generated by the rotor disc when at positive angles of attack (pitching up). It can make the helicopters feel more nimble and responsive to desired altitude changes when flying at higher speeds much like fixed wing aircraft.

Forward Motion Lift Force Multiplier - this adjusts the lift generated by the rotor disc as well as any other flight surfaces such as wings. This makes the helicopters require less collective when flying forward at speed. Extreme values may cause unwanted effects such as constant climbing or requiring excessive downwards nose pitch.

Low Speed Drag Multiplier - this setting increases the overall drag of the aircraft as it reaches speeds lower than 20m/a (aprrox 38kts). Below this speed the drag will increase helping to slow the helicopter down, smoothing out response to collective input changes, reducing side way slip, smoothing ground effect forces and generally making the helicopter want move into a stable hover position.

High values will make the helicopter want to remain in a hover state so more aggressive nose down pitching will be required to transition into forward flight.

Excessive values may make it very difficult for some helicopters to gain forward speed resulting in unrealistic nose down pitching!!
MFD Control System
OVERVIEW
Helicopter Gunship D.E.X uses a context sensitive "Screen of Interest" control system to expand the number of buttons available to gamepad users.

This basically means that the function of the MFD buttons change depending on which MFD screen you are currently using.

CYCLING MFD SCREENS
MFD screens are cycled using the VIEW / BACK button to cycle the Left MFD screen and MENU / START button to cycle the Right MFD.

SCREEN OF INTEREST (SOI) / ACTIVE MFD SCREEN
Whichever MFD screen currently has the 8 buttons round the side is the current "Screen of Interest" (S.O.I.I) or active MFD.

INTERACTING WITH THE MFD SCREENS
The MFD buttons are pressed using the D-PAD directions & the X, A, Y & B face buttons on the gamepad as follows...

D-PAD UP: MFD Button 1
D-PAD DOWN: MFD Button 2
D-PAD LEFT: MFD Button 3
D-PAD RIGHT: MFD Button 4
X: MFD Button 5
A: MFD Button 6
Y: MFD Button 7
B: MFD Button 8

The actual function performed when clicking an MFD is displayed next to the corresponding button on the MFD screen and varies depending on the current MFD screen being displayed.

For example...
In this image the Screen of Interest is the Right MFD as it has the buttons around the side. As this is the targeting pod screen the MFD Buttons relate to the Targeting Pod functions as follows...
MFD 1: UP (Targeting Pod Up)
MFD 2: DOWN (Targeting Pod Down)
MFD 3: LEFT (Targeting Pod Left)
MFD 4: RIGHT (Targeting Pod Right)
MFD 5: MODE (View Mode)
MFD 6: ZOOM (Cycle Zoom Levels)
MFD 7: LOCK (Lock Target)
MFD 8: WPN (Cycle Weapon)

However, if the Screen of Interest is moved the Left MFDs Threat Display you can see the functions of the MFD buttons have now changed to the RADAR functions.
MFD 1: UP (RADAR Cursor Up)
MFD 2: DOWN (RADAR Cursor Down)
MFD 3: LEFT (RADAR Cursor Left)
MFD 4: RIGHT (RADAR Cursor Right)
MFD 5: RNG (Cycle Range)
MFD 6: TGT PRI (Cycle Target Priority Filtering)
MFD 7: LOCK (Lock Target)
MFD 8: WPN (Cycle Weapon)

While the function of the MFD's buttons has changed the actual controls on the Joypad to press the MFD buttons remain the same.

MODIFIER BUTTONS
The "Screen of Interest" system is further expanded by the use of two modifier buttons "Modifier 1" & "Modifier 2". With no modifier buttons pressed the MFD screens will display the default controls for that screen. However, holding "Modifier 1" or "Modifier 2" or "Modifier 1 & Modifier 2" will alter the function of the MFD buttons further.

For Example...
The targeting pod with no modifier button held.

The targeting pod with "Modifier 1" held only.

The targeting pod with "Modifier 2" held only.

The targeting pod with both "Modifier 1" & "Modifier 2" held. (Currently all buttons are empty awaiting future functions)

Using the modifier buttons together with the Screen of Interest system allows you to control far more systems than would be possible than just using the default buttons of the controller.
Extended Joypad Modifier Controls
OVERVIEW
These are additional controls that can be enabled by ticking the "Enable Extended Joypad Modifiers" check box in the "Game Settings" menu.

They cannot be rebound and do not appear in the Control Settings menu.

  • Modifier 2 + Change View
    This enables the "Collective Look" mode where your Collective/Tail Rotor control (usually left stick) will now control the view rotation allowing you to look around.
    Obviously this should only be done when using either Altitude Hold or Hover Hold modes!
HOTAS & Flight Sticks
OVERVIEW

For HOTAS and Flight Stick controls the game comes with just the basic flight controls setup by default e.g. Collective, Tail Rotor & Cyclic.

There's just too many different variations of buttons, hats etc between flight sticks that I could never get it right for every stick.

However, you should be able to setup your preferred control scheme via the Control Settings input binding system pretty quickly.

DIRECT ACCESS CONTROLS

Whereas Gamepad users have to rely on the "Screen of Interest" and modifier button system due to a lack of available buttons, Flight stick and HOTAS users don't have this issue.

To differentiate between the "Screen of Interest" system I shall be referring to these controls as "Direct Access Controls" but they are no different to the normal options you would get in any flight sim.

So, you'll will find all the controls from launching flares to switching the RADAR on/off to equipping your Night Vision Goggles in the Control Settings menu and these can be mapped directly to any button on your flight stick / HOTAS.

If you think I've missed a control then just let me know and I'll be sure to add it in!

If you've setup a profile on your controller that you think is really good then let me know and I'll see if I can add it as a default setup for fellow users of that stick/hotas.
Troubleshooting
OVERVIEW

If you can't get controls to work or your controller isn't seen in the Control Settings screen then 1st of all Let Me Know by posting in the forum.

I can usually find the issue and fix it or devise a work-a-round

I'm only one person and I don't have access to every controller out there so I rely on feedback from the community to improve and fix things and that's all part of the Early Access system.

DIAGNOSING ISSUES

1. See if your controller is shown at the top of the Control Settings menu. If it isn't then the game can't currently see it. Try unplugging its USB cable and then re-attaching it. Sometimes this will allow the game to see a new device.

2. Click the "Assign Controller" button towards the top of the Control Settings menu and follow on screen prompts to add your controller. If the button doesn't do anything then the game can't see your controller. Check to make sure it is working in Windows/Other Games. If it is then please post a message on the forum and I'll take a look to see why your controller isn't working.

CONTROLS TOO SENSITIVE

You can adjust sensitivity for your controller by clicking the "Calibrate" button in the Control Settings menu.

Alternatively you can adjust the stability of the helicopters by adjusting the Helicopter Stability option in the Game Settings menu.

If you need to reduce sensitivity even more you can also reduce the Cyclic X, Cyclic Y and Tail Rotor power to below 100% (minimum is 10%) in the Games Settings menu.

HELICOPTER CONSTANTLY PULLS ONE WAY OR ANOTHER

This is usually to do with some sticks not centering to exactly their 0 input position. You'll need to add some dead-zone to your controller via the "Calibrate" option in the Control Settings menu.

Keep adding dead zone until the helicopter receives no input from your controller when it is centered.
HOTAS Setup Guide
This is how I would set up my HOTAS.

1. Make sure all the primary flight controls are bound as required. For most joysticks this should already be setup. All the flight controls can be found in the Flight Controls section of the Control Bindings menu.

2. Setup "Cycle Left MFD Page" & "Cycle Right MFD Page" in the MFD Controls section. This will allow you to not only change the displayed page on the relevant MFD but also switch which MFD is the Screen of Interest. The SOI is denoted by the MFD having the extra buttons displayed around the edge.

3. Setup your weapons & targeting controls as these are what you'll be using the most. All of these controls are in the Weapons & Targeting section

- Make sure you have a button (or trigger) bound to "Fire Weapon" & "Cycle Weapon" - those are very important :steamhappy:

- Bind controls for Previous Target & Next Target. This will allow you to cycle through targets very quickly.

- Bind controls for "Move TPod or TSD Left/Right" & "Move TPod or TSD Up/Down" this will allow you to control both the Targeting Pod and the TSD cursor depending on which one is current the Screen of Interest (as mentioned above)

- Bind controls for "Toggle TPod or TSD Lock" this will allow you to have a single button to lock either the TSD or Targeting Pod depending on which one is the current Screen of Interest.

- Bind controls for "Cycle TPod Zoom" & "Cycle TPod Vision Mode" these will allow you to zoom in & out as well as switch between DTV and IR modes.

That's really the core buttons covered. Now try a mission flying any of the Apache helicopters and take some "LASER" guided Hellfires Fly around and practice locking on to things with the Targeting Pod and then launching Hellfires. You'll soon get used to how it works.

Once you're comfortable with that you can start to take a look at using the RADAR equipped helicopters like the Apache Longbow and Viper CRS.

- Bind controls for "Toggle Radar" & "Cycle Radar Layers"

Toggle Radar turns your Radar on/off. When it is on you will see it sweeping round on the TSD screen. The Radar will find and categorise most targets for you but it is not infalable - terrain and other objects will block it.

Use the "Cycle Radar Layers" control to filter what is shown on the TSD display. You can cycle between...
ALL - Shows everything
HIGH - Shows only AAA/SAM threats
MED - Shows APC/IFVs
LOW - Shows Tanks, trucks etc
BLDG - Shows only buildings
AIR - Shows only air targets.

This allows you to use the TSD cursor to lock onto targets more easily as is declutters the display.

To use Radar Guided Hellfires you mustlock the target via the TSD display - not the Targeting Pod.

That should get you going with the core controls. After that you'll want to look at binding Countermeasures, Navigation Controls & other Aircraft Controls as you see fit.
10 comentarii
Reaper 9 ian. la 17:11 
Last question (sorry about that) : Do you plan to add DualSense controller compatible with your game ?
Reaper 8 ian. la 3:57 
Thanks for answering ! I think it would be a good idea to allow a button for multiple bind at least. Because rignt now, what you did is great with MFD and modifier, but we are pretty limited with another mapping on the controller.
Jimmy Arcade  [autor] 7 ian. la 17:16 
You can rebind the MFD buttons to whatever joypad/joystick/keyboard buttons you want, but the actual function of the MFD button changes depending on which MFD screen is currently being used and which modifier buttons are pressed.

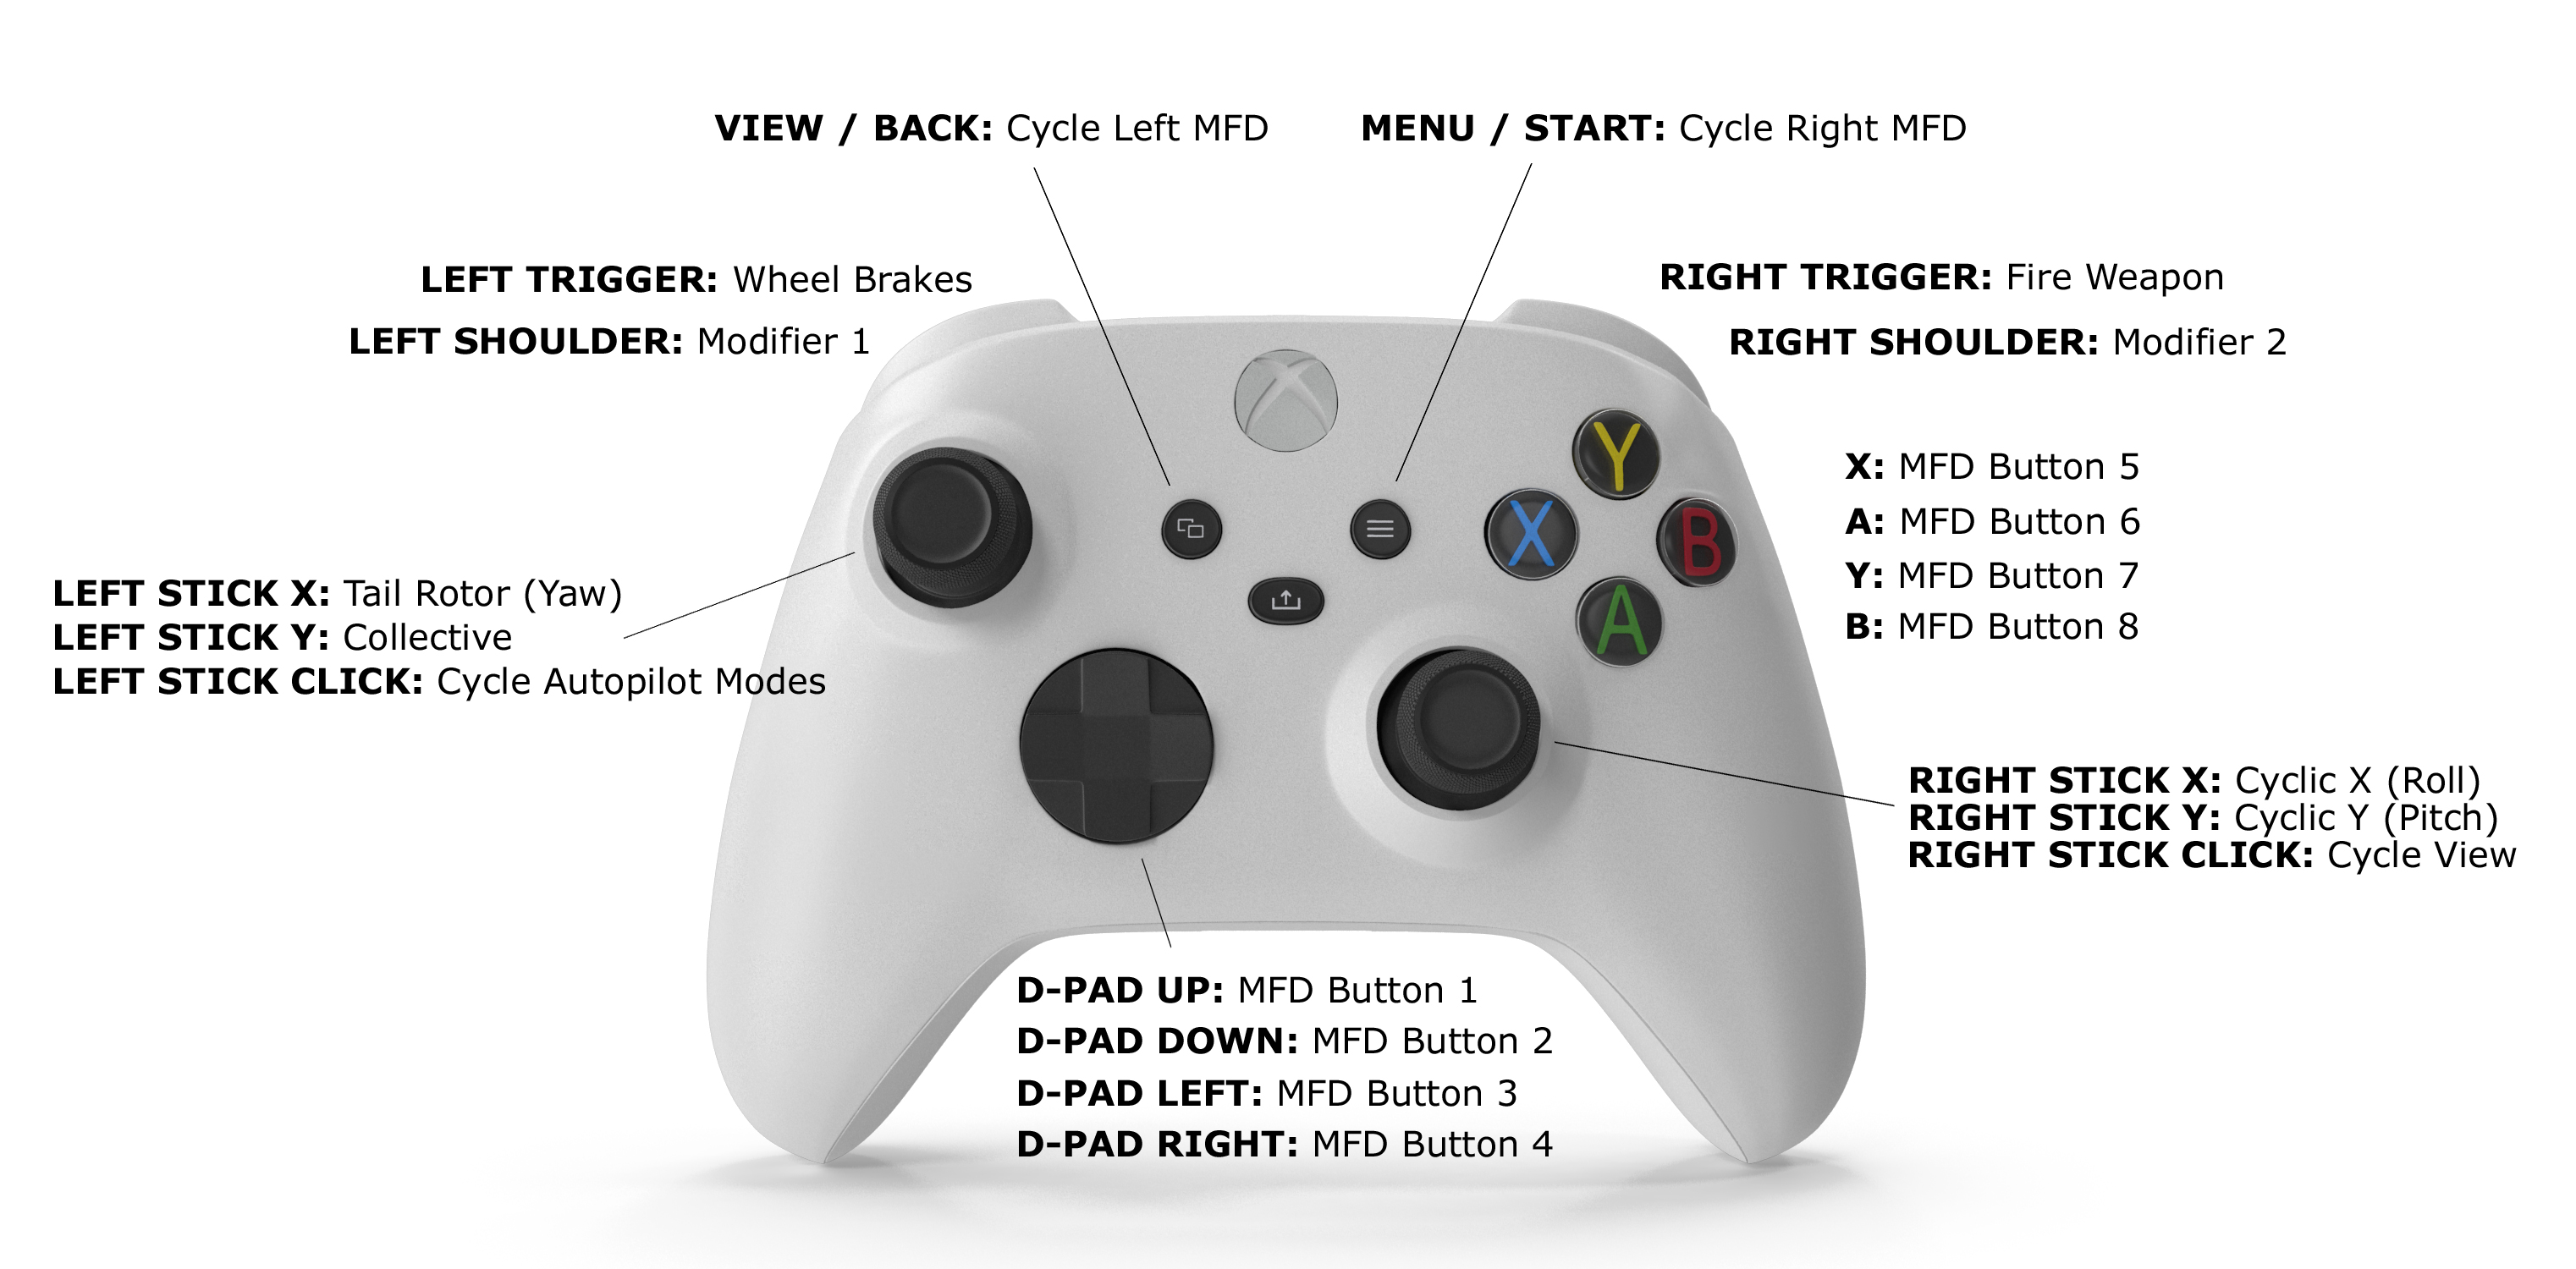
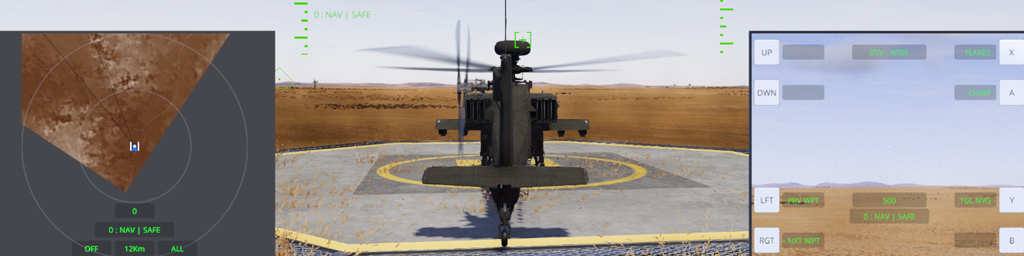
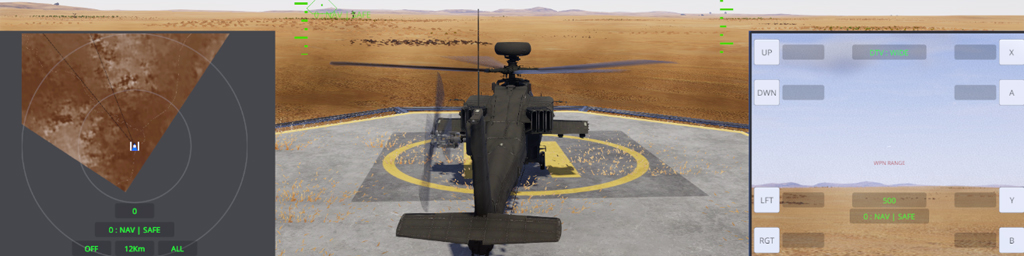
There is no "fire" MFD control as that is a separate control (usually right trigger for a game pad). However, you could remap that to any other control you like allowing you to use the triggers as collective control if that is your preferred method. :steamhappy:

The control system is pretty flexible and I'm happy to add in other controls if there is a need for them.
Reaper 7 ian. la 9:09 
Can we configure what MFD buttons are doing ? For example i would like to be able to fire since I use triggers for collector....
Shallymoo 11 mart. 2024 la 11:25 
I don't know what I'm doing wrong, but since today's flight model update (11 March 24) I cannot get the torque below 50%, which makes landing difficult.
Dr. Paul 6 mart. 2024 la 12:25 
I'm using a Thrustmaster HOTAS X. Is there a way to implement the "Screen of Interest" system on a HOTAS setup, rather than the "Direct Access Controls" system? like, is there a button to switch MFD bindable for HOTAS?
rodowing 14 ian. 2023 la 8:09 
Is it possible to print this Gamepad and Controls Guide please, or if possible allow access to allow me to print please.
casarabat21 5 ian. 2023 la 21:46 
I am using a logitech flight stick Extreme 3D pro, with twist grip (for rudder) and throttle lever for collective. Is not working,so will have to remap inputs. Works OK for MSFS2020 & XP-12
Jimmy Arcade  [autor] 1 ian. 2023 la 11:44 
For flight sticks I could only really set up the basic flight controls because the sticks vary so much in terms of buttons, hats etc.

So you'll need to assign your preferred control scheme using the Control Settings input mapper.
Tunney 1 ian. 2023 la 10:52 
Are there any default flight stick controls?