Mass Effect™ Legendary Edition

Mass Effect™ Legendary Edition

Nincs elegendő értékelés
Support Sentinel Guide - Mass Effect 3 - Legendary Edition Insanity Guide
Készítő: PhilosophusRex
This guide details character and squad optimization for a sentinel in Mass Effect 3, as included in Mass Effect Legendary Edition. This guide includes a build for the Sentinel, as well as recommended Squad Members. It also includes a recommended quest order, which would allow a player to progress through Insanity difficulty with as few difficulty spikes as possible.
   
Díjazás
Kedvenc
Kedvenc
Törlés
Shepard Build Order

Level 30: Throw 6 (Radius, Detonate, Double Throw), Tech Armor 4 (Durability), Offensive Mastery 5 (Force and Damage, Squad Bonus), Fitness 5 (Durability, Squad Bonus)
Level 32: Tech Armor 5 (Power Damage)
Level 33: Tech Armor 6 (Durability)
Level 34: Fortification 2
Level 35: Fortification 3
Level 36: Fortification 4 (Durability)
Level 37: Fortification 5 (Power Synergy)
Level 38: Fortification 6 (Durability)
Level 39: Overload 1
Level 40: Fitness 6 (Durability)
Level 41: Overload 3
Level 42: Overload 4 (Chain Overload)
Level 43: Warp 1
Level 44: Overload 5 (Neural Shock)
Level 45: Overload 6 (Chain Overload)
Level 46: Warp 2
Level 47: Offensive Mastery 6 (Force and Damage)
Level 48: Warp 3
Level 49: Warp 4 (Detonate)
Level 50: Warp (Expose)
Level 51: Lift Grenade 1
Level 52: Warp 6 (Pierce)
Level 53: Lift Grenade 3
Level 54: Lift Grenade 4 (Radius)
Level 55: Cryo Blast 1
Level 56: Lift Grenade 5 (Max Grenade)
Level 57: Lift Grande 6 (Slam)
Level 58: Cryo Blast 2
Level 59: Cryo Blast 3
Level 60: Cryo Blast 4 (Radius)

Intel
Armor Modkit: Shields +5%
Remains of Reaper Destroyer: Power Recharge Speed +5%
Advanced Biotic Implants: Power Recharge Speed +5%
Weapon Upgrade Kit: Weapon Damage +5%
Intel from Battle of Arcturus: Shields: +5%
Volus Intelligence Archives: Health +5%
Intact Reaper Weapon: Weapon Damage +5%
Gallae’s Electronic Signature: Power Damage +5%
Med Bay Surgery: Health +5%
Improved Geth Resistors: Shields +5%
Miniaturized Armor Capacitors: Power Recharge Speed +5%
Research Data From Pragia: Power Recharge Speed +5%

This build focuses on providing bonuses to the whole squad, executing power combos, and durability. The Sentinel is the only class that has a Squad Bonus which grants a 30% bonus to health and shields for the whole squad. Further, the class power "Offensive Mastery" has another bonus that grants a 10% bonus to squad weapon damage and a 15% bonus to the force and damage of squad powers. This build also focuses on executing power combos that are essential to doing high amounts of damage on higher difficulties. This build allows Shepard's Squadmates to prime power combos and uses the Throw ability to execute the combos. Evolving Throw to have Double Throw is one of the few ways to execute 2 combos with one ability in single player. Finally, this build is highly durable and uses Tech Armor and Fortification to increase Damage Reduction by 90%, granting Shepard extreme survivability. Taking the Power Synergy bonuses to each Talent increases the Force and Duration of our powers. The downside to this is that both Tech Armor and Fortification both reduce Cooldown reduction, but since our primary power use will be Throw which has a very low cooldown to begin with, this is not a great issue.

Because this build wants to limit weight so as not to induce further penalties to cooldown reduction, I recommend utilizing weapons with infinite ammo, eliminating the need for a sidearm. In the early game, we can pick up the Particle Rifle. This weapon does more damage after it's been "charged up" with continuous fire, so using the Magazine upgrade will make it so you can fire the "charged up' version for longer. In the 2nd Act of the game, we can play the Citadel DLC to secure access to the M-7 Lancer which has an even lower weight than the Particle Rifle. When customizing armor, focus on boosts to Shields first and then Health, to get the most value out of your Damage Resistance from Tech Armor and Fortification.
Recommended Squadmates
Liara

Outfit: Power Recharge Speed +25%
Level 31: Warp 6 (Detonate, Expose, Pierce), Pure Biotic 4 (Recharge Speed)
Level 34: Pure Biotic 5 (Duration and Force)
Level 38: Singularity 2, Pure Biotic 6 (Squad Bonus)
Level 39: Singularity 3
Level 40: Singularity 4 (Radius)
Level 41: Stasis 1
Level 43: Singularity 5 (Recharge Speed)
Level 55: Singularity 6 (Expand), Stasis 5 (Duration, Recharge Speed)
Level 57: Stasis 6 (Bubble)

Liara provides our primary method of crowd control and sets up powerful biotic power combos. She can use Singularity on unarmored enemies to disable them and set them up for biotic detonations and Warp can set up detonations on protected enemies. Equip her with the N7 Hurricane and mod the weapon so that it increases power damage. Power combos do extra damage on Insanity (x3.375 damage compared to normal) so it's essential o higher difficulties. Reduce Liara's power recharge time with her alternative outfit and passive abilities so it's comparable with Shepard's Throw ability, allowing the two characters to work together to create frequent biotic explosions.

Garrus
Outfit: Weapon Damage +25%
Level 36: Overload 2, Armor Piercing Ammo 6 (Squad Bonus, Headshots, Pierce), Turian Rebel 5 (Weapon Damage, Assault Rifles)
Level 37: Overload 3
Level 38: Overload 4 (Chain Overload)
Level 41: Overload 5 (Neural Shock)
Level 44: Overload 6 (Chain Overload)
Level 55: Proximity Mine 6 (Radius, Damage Taken, Recharge Speed)
Level 58: Turian Rebel 6 (Squad Bonus)
Level 59: Concussive Shot 2
Level 60: Concussive Shot 3

Garrus provides the primary source of weapon damage. The popular "Godhood" build utilizes the N7 Typhoon, Armor Piercing Ammo, and his passive Turian Rebe power to increase his weapon damage higher than any other squadmate. He can also set up Tech Bursts with Overload and use his Proximity Mine attack to apply a debuff on enemies, increasing the damage they receive for 8 seconds. The Squad bonus from Armor Piercing Ammo is particularly useful as squadmates tend to shoot directly at enemies in cover.

Tali:
Outfit: Power Recharge Speed +25%
Level 60: Energy Drain 6 (Radius, Recharge Speed, Damage), Sabotage 6 (Duration, Explosive Hack, Tech Vulnerability), Combat Drone 6 (Detonate, Shock, Chain Lightning), Defense Drone 3, Quarian Machinist 6 (Recharge Speed, Tech Upgrade, Squad Bonus)

Tali replaces Laira whenever you have to face the Geth because of her unique powers. Sabotage is incredibly useful against Geth Primes, as it will temporarily cause them to attack their teammates. Evolving Sabotage with the level 6 upgrade "Tech Vulnerability" increases the damage caused by Tech Bursts by 100%, allowing you to disable enemies while also increasing your DPS significantly. Energy Drain is also extremely useful as it can both prime and trigger Tech Bursts in conjunction with Shepard's Overload power. Equip her with the Crusader Shotgun and swap to her alternate outfit to lower her power recharge time for more frequent Tech Bursts.

Ashley:
Outfit: Weapon Damage +25%
Level 31: Disruptor Ammo 6 (Squad Bonus, Headshots, Stun), Marksman 4 (Firing Rate)
Level 32: Alliance Officer 1
Level 33: Alliance Officer 2
Level 34: Alliance Officer 3
Level 60: Inferno Grenade 6 (Radius, Max Grenades, Radius and Shrapnel) Concussive Shot 3, Marksman 6 (Duration, Accuracy and Firing Rate), Alliance Officer 6 (Weapon Damage, Power Damage, Assault Rifles)

Ashley replaces Garrus as our primary source of weapon damage when facing Geth because she has Disruptor Ammo. Applying Disruptor Ammo to the whole squad allows for gunfire to have a chance of stunning Geth and priming them for Tech Bursts. Increasing her fire rate via her unique Marksman talent allows for these secondary effects of gunfire to trigger more often. Even with her outfit bonus to Weapon damage and the use of Garrus's N7 Typhoon, her raw DPS falls short of Garrus, but the extra utility makes her well-suited as Tali's partner on Geth Missions.
Recommended Quest Order
Prologue: Earth

Mars

Citadel I

Exodus Cluster
- Intel: Remains of Reaper Destroyer
- Eden Prime
- Resistance Movement

Sigurd’s Cradle
- N7: Cerberus Lab
- Alien Medi-Gel Formula (part 1)

Apien Crest
- Banner of the First Regiment (part 1)
- Palavan

Citadel
- Alien Medi-Gel Formula (part 2)
- Aria: Blood Pack
- Aria: Blue Suns (part 1)
- Aria: Eclipse
- Banner of the First Regiment (part 2)
- Barla Von (part 1)
- Hanar Diplomat
- Leviathan I
- Prototype Components (part 1)

Ismar Frontier
- Prototype Components (part 2)

Petra Nebula
- Grissom Academy
- Biotic Amp Interface (part 1)

Kite’s Nest
- Aria’ Blue Suns (part 2)
- Pillars of Strength (part 1)
- Intel: Weapons Upgrades Kit

Shrike Abyssal
- Prothean Obelisk (part 1)

Caleston Rift
- Find Garneau

Citadel
- Aria: Blue Suns (part 3)
- Biotic Amp Interfaces (part 2)
- Leviathan II
- Pillars of Strength (part 2)
- Prototype Components (part 3)
- Prothean Obelisk (part 2)

Pylos Nebula
- Find Ann Bryson

Citadel
- Leviathan III

Sigurd’s Cradle
- Leviathan

Citadel
- Aria T’Loak

Omega
- The Invasion of Omega

Annos Basin
- Sur’Kesh

Ninmah Cluster
- Krogan Team
- Krogan Dying Message (part 1)

Arcturus Stream
- Intel: Intel from Battle of Arcturus
- Cerberus Abductions
- Evidence (part 1)

Krogan DMZ
- Turian Platoon
- Bomb
- Cerberus Automated Turret Schematics (part 1)
- Cerberus Attack
- Improved Power Grid (part 1)
- Barla Von (part 2)

Citadel
- Barla Von (part 3)
- Evidence (part 2)
- GX12 Thermal Pipe
- Improved Power Grid (part 2)
- Krogan Dying Message (part 2)

Krogan DMZ
- Tuchanka

Horsehead Nebula
- Cerberus Fighter Base
- Heating Unit Stabilizers (part 1)

Aethon Cluster
- Intel: Volus Intelligence Archives
- Book of Plenix (part 1)

Citadel II
- Batarian Codes
- Book of Plenix (part 2)
- Cerberus automated Turret Schematics (part 2)
- Cerberus Retribution
- Heating Unit Stabilizers (part 2)
- Inspirational Stories
- Medi-Gel Sabotage
- Wounded Batarian

Far Rim
- Perseus Veil

Valhalla Threshold
- Prothean Data Drives (part 1)

Minos Wasteland
- Ex-Cerberus Scientists
- Cerberus Turian Poison (part 1)

Athena Nebula
- Hesperia-Period Statue (part 1)

Nimbus Cluster
- Intel: Intact Reaper Weapon
- Library of Asha (part 1)
- Ardat-Yakshi Monastery
- Intel: Gallae's Electronic Signature
- Asari Widow (part 1)

Citadel
- Asari Widow (part 2)
- Cerberus Turian Poison (part 2)
- Hesperia-Period Statue (part 2)
- LIbrary of Asha (part 2)
- Medical Supplies
- Prothean Data Drives (part 2)
- Volus Ambassador
- Shore Leave
- Geth Challenge
- Spin Zone Challenge
- Reaper Solo Challenge
- Thermal Clip Challenge
- Charity Reaper Challenge
- Prothean Challenge
- Medi-Gel Challenge
- Cerberus Challenge
- Unusual Scores

Perseus Veil
- Geth Dreadnought
- Geth Fighter Squadron
- Reaper Code Fragment (part 1)
- Intel: Improved Geth Resistors
- Intel: Miniaturized Armor Capacitors
- Admiral Koris
- Target Jamming Technology (part 1)

Argos Rho
- Kakliosaur Fossil (part 1)

Citadel
- Kakliosaur Fossil (Part 2)
- Reaper Code Fragment (part 2)
- Target Jamming Technology (part 2)

Perseus Veil
- Rannoch

Hades Nexus
- Obelisks of Karza (part 1)
- Prothean Sphere (part 1)

Silean Nebula
-N7: Fuel Reactors
-Chemical Treatment (part 1)
- Code of the Ancients (part 1)
- Rings of Alune (part 1)

Citadel
- Citadel III
- Chemical Treatment (part 2)
- Code of the Ancients (part 2)
- Elcor Extraction (part 1)
- Obelisk of Karza (part 2)
- Prothean Sphere (part 2)
- Rings of Alune (part 2)

Silean Nebula
- Elcor Extraction (part 2)

Athena Nebula
- Thessia

Nubian Expanse
- Intel: Research Data from Pragia

Kepler Verge
- Communication Hub
- Cerberus Ciphers (part 1)

Citadel
- Cerberus Cipher (part 2)
- Elcor Extraction (part 3)
- Party

Cereberus Headquarters

Earth
Gameplay Showcase


7 megjegyzés
Durrandon 2024. nov. 28., 7:45 
I just finished ME3 Insanity using this build and it was amazing, so thanks for that.
Would you ever make another build for a different class and post it?
PhilosophusRex  [készítő] 2024. aug. 11., 8:46 
@amar.mehic77 I recommend taking everything that increases shields, you get a lot of value out of shields due to Tech Armour and Fortification
Amarius 2024. aug. 10., 9:02 
What armor do you reccomend with this build
PhilosophusRex  [készítő] 2024. ápr. 16., 4:30 
With Kaiden, there is a lot of crossover between him and your Sentinel Sheppard, so there isn't much point in choosing him over other squad members.
Medusa 2024. ápr. 15., 13:34 
@PhilosophusRex thanks for your reply. what about Kaiden? is he of any value within ME3 combat? so far I'm done with ME1 (thanks for your guide), now I'm at the very beginning of ME2.

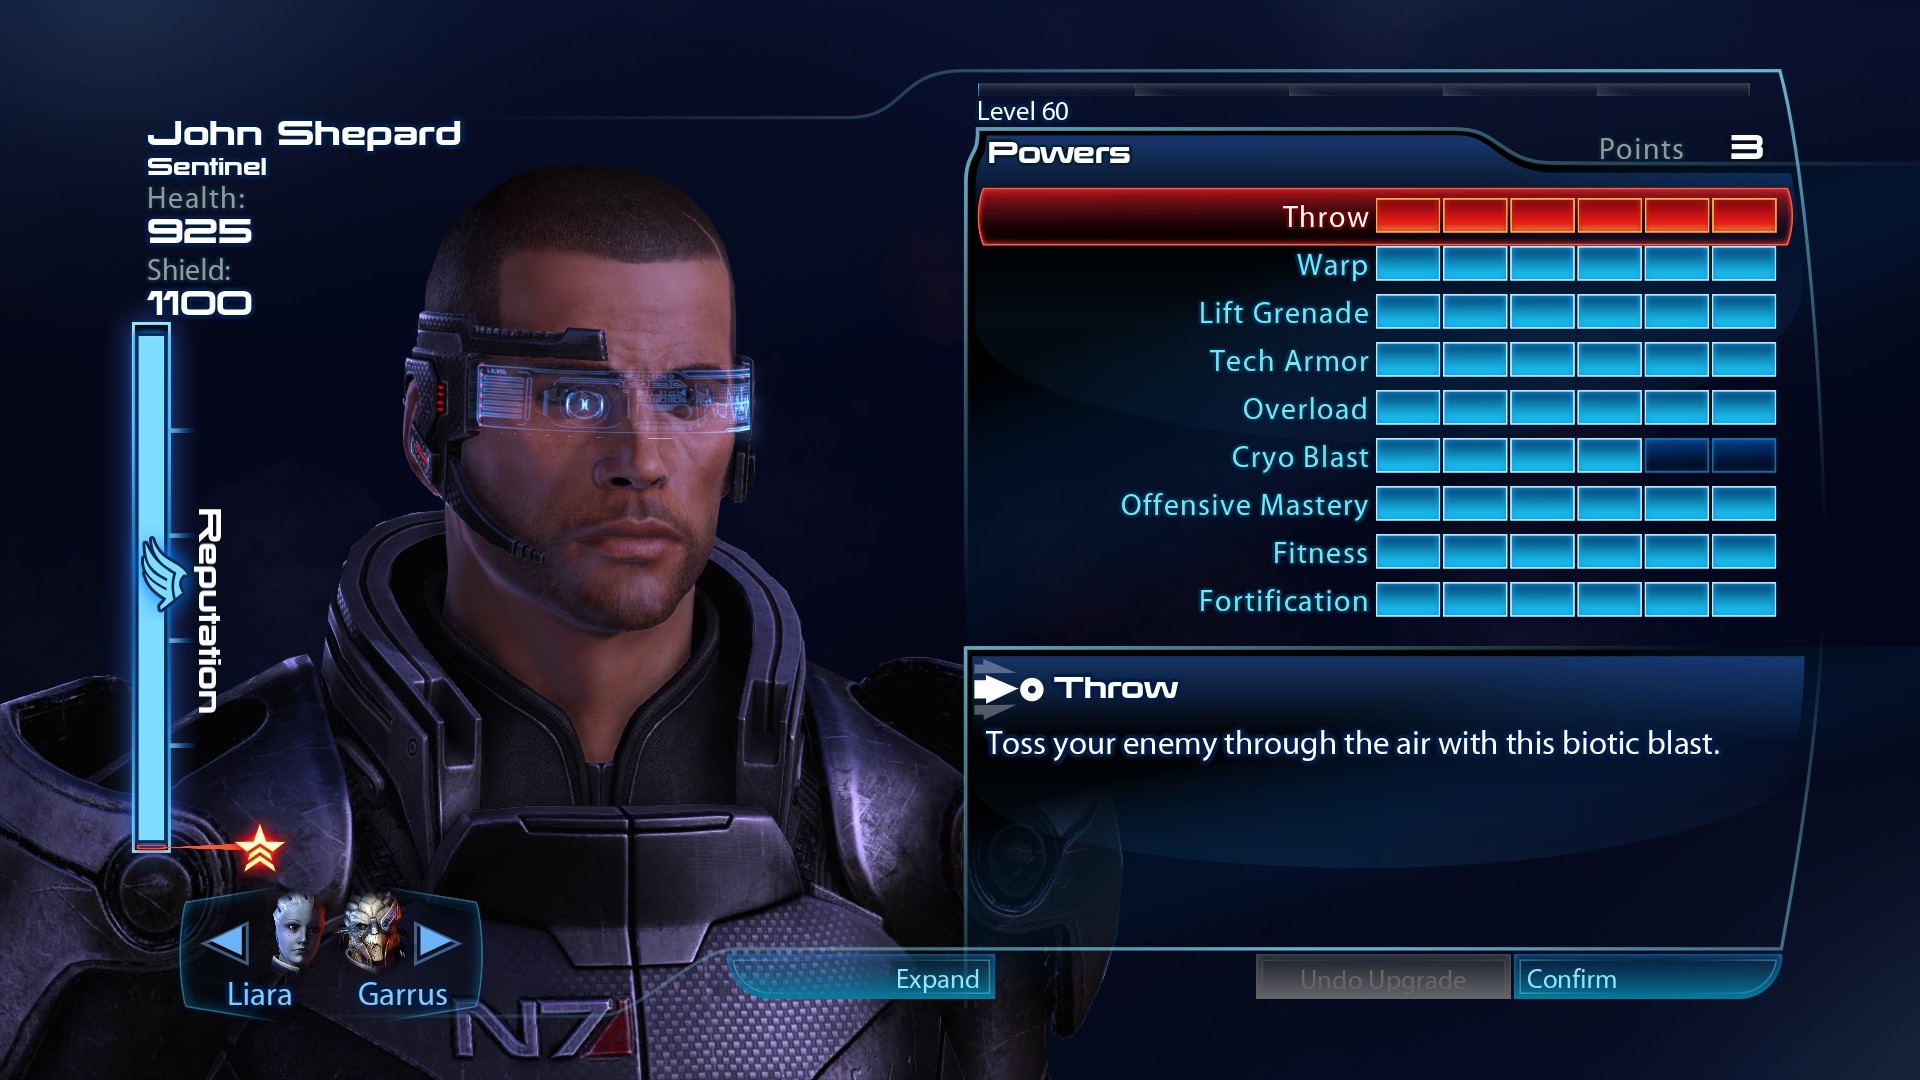
Like your guides a lot because this Shepard-build offers a very different perspective in terms of gunfights. I really enjoyed combat in Dragon Age: Origins, and although Insanity mode in ME doesn't give anything challenging compared to DAO, I still find it somewhat enjoyable and rewarding. I mean I almost after every encounter in ME1 on Insanity felt like "damn we really killed everyone, that was hard".
PhilosophusRex  [készítő] 2024. ápr. 14., 17:59 
@Medusa you can use Garrus in leui of Ashley at any time and you'll be fine. The Garrus build is a generalist that will work on any mission really and provide all the DPS you'll need. The Ashley build is specialized towards Geth to make those fights a little easier
Medusa 2024. ápr. 13., 16:36 
what if I let Ashley die in ME1?