Vagrus - The Riven Realms

Vagrus - The Riven Realms

57 értékelés
Vagrus Guide (work in progress)
Készítő: K-mille
Vagrus is a complex, difficult and very rich game but I haven't found many guides about it. So I tried to gather some information about Vagrus + DLCs here.
This is a work in progress so please comment if you have anything that can supplement this guide. As many achievements have not been unlocked by any player, it cannot be completed at this time.
4
4
2
   
Díjazás
Kedvenc
Kedvenc
Törlés
Introduction
  • Number of offline achievements: 99
  • Number of online achievements: 0
  • Estimated time for 100%: 300 hours and more
  • Minimum number of games required: 1
  • Bugged/impossible achievements: 0
  • Missable achievements: 7
Tips
As in any games doing the tutorial is highly recommended. But I found the tutorial storyline ‘Pilgrims of the Wasteland’ much harder than the rest of the game. So don’t get discouraged if you’re having significant difficulty finishing the prologue.

Vagrus is about exploration, so explore a lot. Go to the confines of the playable map ! Don’t hesitate to select every option when visiting a location. Even when you have visited a location many times, a new option may appear, because you have the requirements. Buy every rumor you can, because it may unlock quest, places or new interactions.

An important point is that you can’t explore the whole map. You can’t go beyond the fork north of Deven, The Twin Towers and Carravhon to the south, The Crimson gate to the east, Sadirar and Eitrar to the west.

Start small and then improve your comitatus little by little to transport more goods and generate more profits. Avoid travelling without transporting goods as much as possible, because you lose money this way.

Hire enough fighter so that your comitatus is sufficiently protected. It will be easier to maintain vigor, moral and obedience to high levels because you will not have a penalty of -1 vigor if you guard the camp when camping.

Outriders are stronger than fighters but they consume more supplies than the sum of fighters and mount. When you don’t have a fight, don’t forget to dismount them.

Recruit companions as soon as possible. You can recruit them as soon as you see Braxius. He will suggest that you recruit 2: Gor'goro or Garrik + a random one. Always choose Gor'goro because he is more powerful than Garrik. In this guide, you will find how to recruit each companion. Check regularly with them when you set camp. Sometimes they will ask you something and it will start a new quest and sometimes you can talk to them and gain insights or new codex entries.

Max your authority as soon as possible. And later in the game try to max your resourcefulness. Also, the leadership perk call ‘Command’ will help you a lot in Crew Combat even if you do not have enough combat strength. This perk unlock action that can make you win the fight.

Be careful to always get enough supplies when travelling. When you comitatus run out of supply, your crew members will wear themselves out and end up not being able to move forward. Save as often as possible, you don’t know what awaits you on the road.

Don’t spend your insight points too fast, rather wait to see what you need or you risk getting stuck.

How to make profit: Do tasks for factions. It will increase your reputation with them and you will get tasks with more interesting reward. Opposite of buying and reselling you don’t need to spend anything. Passenger transport isn’t the best way to make profit in most cases.

To win Vagrus, the simplest remains Renown, then Whealth and the hardest is the Knowledge ambition.
Pilgrims of the Wasteland (Part 1)
A Second Chance
Leave Scrapheap in ‘Pilgrims of the Wasteland’
First you need to travel to Scrapheap, two nodes away from where your comitatus is standing. But before you enter Javek will talk to you about your next mission.

Select: Time will tell, but I still have my doubts – It does yes – Our plan ought to give us another chance – If he is not willing, we must find a way to compel him – Taking a peek? – Apology accepted.

Select Track Down Narbo – Walk over to the bar – Wait until he is done with his paper – Walk over to Narbo’s table – Apologise to him – You breeze in – Tell him that you will be in his debt. Let him know that in exchange for his help, you can help him out with a problem he might have right now. He will ask you to deliver a package to Skornar in Avernum.

Buy everything for your journey to the market: 24 Scrap Metal, 800 Supplies, The Awnings equipment (you will be guided through this by the tutorial).

Don’t quit yet. In the story pane, click on: Stroll Scounger’s Lane. Find the merchant who is selling the cheap supply and buy the supplies. Then select: You recall a little shop hidden in an alley and buy the compass; it will be a great help to you. When you are read click on the exit arrow on the top right corner. You will have a conversation with Jarvek. You can choose what you want, but I advise you to spare the members of your comitatus: +3 Morale. The achievement should pop.

Press-ganged
Reach Avernum in ‘Pilgrims of the Wasteland’
Before moving don’t forget to equip the Compass. To travel you will have only one road so don’t bother about where Avernum is situated. It will take 10 days for you to arrive in Avernum. When camping you need to choose about defense, select: Post Guards.

At the end of day two after camping, you will see an event window and you will have to fight two Jhakra. The tutorial will guide you through your first fight. When it’s over choose to: Harvest the damned critters before going back to bed.” Reward: 2 Ivory, 90 Supplies, 5 Hides.

During the fifth day of travel (day 11 on your calendar), you will encounter The last Pilgrimage: Try to find a place where you can hide – Hunker down with the comitatus.

On the sixth day of travel, the game will remind you to pay your comitatus. You can’t yet, so continue to travel to Avernum.

When you reach the extremity of the voiceless lake, a window will appear. If you fail the test, you can still pass but you will lose : 1 Mount, 1 Fighter, 1 Slave and 2 Morale. If you fail, reload and try again. If you succeed you will gain +1 Morale.

But you are not at the end of your sorrows. After leaving the lake behind, you will hear battle sounds. Rush in and attack the undead and get +1 Morale. A fight will commence against two cinderborns and one congregated. You will have two allies at your side. Place Morwen on the front row and Jawek behind Sedarias. After the fight you loose 1 fighter. Tell him that you are a trading comitatus travelling south – Best not to make him wait – Exhaust all four options and ask him what he plans to do now.

Now you don’t have enough fighter so when camping play between : Post no guards and Post guard to keep Morale, Obedience and Vigor above 3.

On the seventh day of travel (Day 19 on your calendar), you encounter The last Pilgrimage again. Hide and gain +5 Insights

On the ninth day, you will arrive in the city of Avernum.

Before entering Avernus, Sedarias will want to have a chat with you. Ask him every question then agrees to help him (you can choose the reason). Enter the city, pay the tax gate and the achievement should pop.

The Package
Deliver Narbo’s package to Skornar in ‘Pilgrims of the Wasteland’
When you have reached Avernum on the story pane select: Meet Skornar – Talk to Skornar – Hand him the package. Reward: +2 Insights.
Pilgrims of the Wasteland (Part 2)
Pilgrimage’s End
Complete the main story in ‘Pilgrims of the Wasteland’
After you have delivered the package to Skornar enter the temple of Ahskul ask the priests about the walls and their gods and Visit the Great Ossuary to gain +2 Insight. You also gain +2 Insight each time you add 10 new codex entries. So, try to exhaust every option. As there are many, I won’t detail all of them.

Visit the Sorcerer – Tell me what you can about the last Pilgrimage and exhaust all options: +5 Insights

To dispose of the Sergorodites belongings: Seek out the foundries – Smelt down the arms and armors of the dead Sergorodites: +1 Iron, +1 Bronze

In Sedarias’ hideout, you can ask him to pay for the tax gate: +1 Lyrg. Then report to him, he will give you three targets. You need a day by target.
  • Assistant Magistrate Geludis Darro: Tell him you have heard rumors – Tell him the fake story - … and my scout returned with news of dead bodies – We took some weapons.
  • Centurion Vardis Pendius: Talk to the bartender – Convince the bartender to spice up Pendius’ drinks – Continue to buy him spiced-up drink (you can use resourcefulness to ease the test).
  • Smelter’s Collegium: Lavinus’ watering holes – Ask Skornar if he can help you the investigate the Smelter’s Collegium – Use Skornar’s help in dealing with the collegium.
Report your findings on the three suspects to Sedarias. You can tell him anything that you want in the list, it will not change a thing: +7 Insights.

When you are ready head to The Warehouse but be wary as there will be tough combat in there. So be sure that you companions get at least 6 hp. First fight: Three enemies and two allies (Sedarias included). Second fight: 4 enemies and Sedarias. Reward: +10 Insights

When you leave the city gate a Sergorodite will give you 350 supplies, so leave enough places to take it with you. To help Sedarias you will have to eliminate three abolitionist camps.
  • For the first one (see location below, on the left you can see Vitrar): Make plans for an attack – Send scouts – Send in several scout – Send in a lot of fighters. You will have to fight 3 enemies – Turn right and go down the dark corridor: 150 supplies, 8 grains, 11 obsidian blades, 3 wine, 3 Ivory. The second fight is again against 3 enemies. Try to persuade Serdarias to give the slaves to you. You can choose between two tests or use your former service to Sergorod as leverage.
  • For the second one: See the Embellished achievement (Skornar’s quest)
  • For the third one sees location below. Buy two mounts. Before reaching this place get four outriders with mounts and fighters. Take your fighting crew and approach the camp – But do you remember to check what happens behind you? – You can send outriders ahead. Reduced casualties: - 1 slave, -1 workers, -2 fighters. Fight against 5 enemies but with Sergorod followers instead of your companions. Reward: 400 Supplies, 12 Grains, 2 Scrap Metal, 16 Bogweed, 2 Dwarven Gadgets, 3 Medical supplies.

When you have found, all three of them Sedarias will send you to a fourth Abolitionists camp see location below. But before going there be sur to have 4 outriders and 3 scouts. Approach the camp in formation – Send your outriders to fight them (4 required) – Lead the counterattack yourself. You will have to fight 4 enemies. Choose to send Morwen with some scouts - Have your fighters enter the fray – Did you manage to turn the tide of the battle?

I tried different combinations but every time I lost 8 fighters just before the second fight against. Stay at Javek’s side. Reward: 380 supplies. The day after you will lose 2 companions and 3 workers.

Defy the black knight: +2 Morale and a fight against Sedarias and a wounded priest of Sergorod. Sedarias can’t be moved or stunned so just hit him. When Sedarias is on the ground take care of the priest. You gain 15 slaves. If you obey the black knight: -2 Morale and you will still have to fight against Sedarias and a wounded priest of Sergorod. So, it’s a better choice to defy him.
After the fight you will be able to follow only one route. And a fight against the last pilgrimage will happen. You can’t win this fight but you have to fight till the end to finish Pilgrim of the Wasteland.

After the tutorial you can create your own Vagrus or you can skip the tutorial and begin the main storyline. You will that the main game take place 10 years later, so the cities you have visited in Pilgrim of the Wasteland might have changed.

Embellished
Complete all side-stories in ‘Pilgrims of the Wasteland’

In Avernum – Explore the city. You may randomly encounter a group of merchants who want to go to Vitrar agree to take them at start the quest: The price of water. When you are in Vitrar select the water merchants disembark – Let’s hear it – I’ll see what I can do. Seek out the Shamans in Vitrar – Negociate trading rights – Try to bribe them or convince them. Return to The Water Merchants’ Camp – Inform the merchants of your negotiations. Reward : 280 supplies, 2 Bross, 3 Insights.

In Avernum – Visit the Slagfort – Go the bounty office and take all bounties.

The Abomination (see location below): Follow the man and them use him to flank your enemies. If you do so you will only have to fight the abomination. Reward: 3 Bross.
The Jhakra Alpha (See location below): Follow the tracks – Follow the trail on the rocky area – There is a movement up on the rocks. Fight : 2 Jhakra and 1 Jhakra Alpha. Take whatever you can and leave this place. Reward: 2 Hides, 1 Ivory, Amulet of Protection and you lose one scout. Report back to get 2 Bross.
Avernum – Meet Skornar (after delivering his package) – Ask how you can help him – Accept his request

To see where to find the outlaw chieftain see below. Send scouts to size up the camp – Approach ready for a fight – A battle commences : If you succeed you lose only two fighters. You will have a fight against 3 enemies (Korveas included). Try to convince Sedarias to spare Koveas. Reward : 375 supplies, 1 Scrap metal, 2 Obsidian, 9 Salt, 11 Bogweeds, 2 Medical supplies, 3 Slaves, 10 Insights. You need to bring Korveas alive to pursue this quest.
Storyline (Part 1)
Theory to Practice
Complete ‘the Golden’ Theory storyline.
On your first visit to Tor’Zag’s Shelter when you intend to leave, you will be stopped by an Imperial official who will ask you to deliver a letter to Levantius.

Accept it and deliver the letter to Arken. Follow the road to the north pass the Crossroad and when you arrived at a new cross go west to find Arken. Reward: 1 Lyrg and 5 Changers. Levantius will ask you to accompany him to Lumen.

Lumen is southwest from Arken you could go there directly from Arken or go back to Tor’Zag’s Shelter and go there by road if you want to do more trade or tasks on the road.
When you arrive in Lumen, you will meet another person: Kandake. Reward: 3 Lyrgs and +2 Insights.

She is a scholar who will ask you to bring her many and various goods. She will compensate for every request. Kandake will make random requests, here are the items she requests most often (with the places where you can buy these items at low prices and which are not too far from Lumen). In any case she will give you eight errands :
  • Brightkelp: Tor’Zag’s Shelter or Larnak but it's further on the map.
  • Coppers: Tor’Zag’s Shelter.
  • Dragonbone: You have two choices.
    Attain relationship (to increase relationship see the faction section of this guide) with the Ratharnak Alliance and buy it in Mine of Plenty – The Rathnarnak Emporium – Browse their special goods. It will cost you 27 Bross, 7 Lyrgs and 6 Changers.
    If you do not want to do business with the Scythichnis Covenant then go to Deven. It’s on the road south of crossroads. Choose to go to the Hintercaves, then select enter the Wraith slums. There you will have to buy it from the black market for 26 Bross, 6 Lyrgs and 3 Changers.
    Be careful because Dragonbone is considered as contraband in most of the cities you will pass by. So, I advise you to save before entering a city. If it’s too hard, you could buy Hidden Compartments to equip your cargo. If you hide contraband in secret compartments, you don’t need to do any test when entering a city.
  • Dyes: Tor’Zag’s Shelter or The Crimson Gate
  • Flavo crystals: Crystal
  • Ivory: Tor’Zag’s Shelter or Lumen
  • Jade: Tor’Zag’s Shelter.
  • Linen: Tor’Zag’s Shelter
  • Medical Supplies: Tor’Zag’s Shelter (Infirmary or Alchemist).
  • Obsidians: Drussian Quarry
  • Pottery: Tor’Zag’s Shelter.
  • Rare jewels: You need to have ‘The Jewellery shop’ rumor. The rumor can pop in any city during the game. Then go to Deven – The Shadow Bazaar. It’s on the road south of crossroads and go to the new place that this rumor unlocked: The famous jewellery shop. Buy 2 Rare jewels and bring it back to Kandake. If you can't find this rumor, go to Tor'Zag Shelter - Kal-rish Market - Browse wares - sometimes you will find Rare jewels.
  • Silver: mines of Plenty
  • Slimegrass: You can find Slimegrass in Tor’Zag’s Shelter – Civic Distric – Garden of Laviena – Take a walk – Try to find Slimegrass (Need Herb Lore 3): 2-3 pear harvest. You need to wait 6 days to do it again. You can buy 3 slimegrass in Deven - The Gardens - The Hanging Gardens - Buy something for 1 Bross, 3 Lyrgs and 6 Changers (available very 2 days).
  • Timber: Tor’Zag’s Shelter.
  • Tins: check above in this guide
If you have a Demon Horn you can give it to Kandake for 47 Bross and it will count as an errand. When you have brought her everything, she needed, she will ask you to escort her and her assistant to Leviathan’s Demise. Be careful as her cargo will take 10 slots. Reward: 4 Insights

Leviathan’s Demise is southwest from Ioscian Quarry. This quarry is on the southern slope of the mountain called Sergorod’s Blade. Be careful to bring enough supplies because you won’t find much on the road. Reward: 18 Bross. You can take a look at the Leviathan – ‘A little sorcerous perception’ (Magic Sense 4) and ‘Maybe your studies in the Arcane arts’ (Arcarne Lore 3). You can get +3 Insights for each options.

Continue to talk to Kandake to the point where she asks to come back in two weeks. Reward: 18 Bross, 6 Insights. But before coming back be sure to have at least 4 beasts of burden.

Kandake will ask you to find the first missing dragon head. It’s not far from where you are standing (see below). When have reached it: Follow the Flamespy -Try a more subtle approach. You can try an intimidation test or have at least 3 Outriders. Hooking the skull will make you lose 10 cargo slots.
Return to Kandake with the first head so she can ask you to get the second on. Reward: 6 Insights, 1 valuable treasure, 8 Bross, Dragonstone of Protection. It’s south on the map at the foot of Sepis’s Mountains. Before going be sur to have at least 5 beasts of burden. See location below.
You can’t kill him, so you need to convince him: Ask who the Dragon is – Ask what this unwhole is – Ask something else – Inquire why it guards the skull - Tell it you need the skull – Try to convince the dragon – Taking the skull would lead to know more about the past – You are powerful in your own rights – You work with a scholar.

Come back with the second head then Kandake will ask you to wait 3 days. You can talk to Kandake about your reservation but it will change nothings. Reward: 2 Dragonbone, 2 Valuable Treasure, 2 Rare Jewelry, 2 Rare Jewel and 2 Bross.

When you return to Kandake she will perform the ritual. Watch it till the end to end the quest line. Reward: 1 Renown and 10 Insights.

You could report in Salum about it but you will lose 15 points with the Scythichnis Covenant.
Storyline (Part 2)
Inquisitions of Discord
Complete “the Source of Discord” storyline.
At the beginning of the game when you talk with people in Kernak Waystation about the wind situation you will get a new rumor: A Change in the Wind.

You can start this quest at The Twin Towers – Ask for an audience at the tower – Inquire about the nature of the threat – Ask if you can be of help.

Glean the nature of the voice on the wind: A random event during camp on the road you will dream.

Find the source of the mutant invasion: Tectum Kelvar – Delve Deeper – Descend down the slope (Choose 6 companions max) - The descent is treacherous (Test: Mighty, Dexterous and Tough) – Step through the door – Enter the corridor – Descend down the stairs – Try to jump aside (Dexterous test – If failed -4 vitality on a companion) – Continue through the exit – Walk into the hall – Scale the stairs and examine the text (History test) – You read on – You have read the account. Reward: 1 Marble Statuette, 2 Ancient Tablet and 10 Insights. You may encounter more and more Ghouls during the exploration. If you don’t want to fight, reload and try again.

Have a sorcerer scry on the ruin of Carravhon: Carravhon, The Howling City (see below) – Ask you sorcerer to scry on the wind (Need Nedir or Finn). Don’t try to push your crew or that will be instant death. When living you might lose some crew members. Reward: 3 Insights.

When you have done everything that was requested, report back to Tor’Zag’s Shelter – The Temple District – Go to the authorities – Report you findings on the threats over at the Singing Winds. Reward: +90 Church of Sergorod, Talisman of Divine Rage, 1 Renown, 10 Insights, 20 Bross.

Insectoid Propagator
Complete the “Insectoid Propagation” storyline.
To begin you need to be trusted enough by the Yskorri Ambassy in Larnak. A value of 10 is required. To be able to enter Yskorri Ambassy you need to see Incanus a mage in Avernum – The Hill – Tower of Incanus. He will grant you access. Or you need to have the quest : Just a small formality (obtained after the quest Hunter of hunters if you took the right path).

To increase relationship bring him Dried Fruit. You need at least 35 units to give it to him (lowest prince in Mirage). Then asks to have Yrgs for yourself.

When you have 5 friendship, the Yskorri Ambassador will ask you to investigate the forlorn hive south east from Larnak.
Take Garrik with you or you will need prospecting 5 - Companion fight against a tainted Oghre. Bring back the heirloom to the forsaken colony (reward: Icareon's Circlet) and report back to the Yskorri.

When you meet the necessary requirement, it will start the quest: Yrg of Burden. To begin with you have to find a crystalmancer. Go to Lumen and talk to the Crystalmancer or Avernum - Ivanus' tower. She will tell you to go back to Larnak – Lucernum District to find a Crystalmancer named Murno. But before departing buy two stacks of Ceruleus crystals. In Larnak, Murno will ask you for the Ceruleus crystals. Then pay 100 Bross. You will have to wait one month for Murno to finish his work. When he is finished meet him at his shop then at the embassy. Reward: 3 Insights.

In the third and last quest, the Yskorri will ask you to establish Yrg hub in each great city: Tor’Zag’s Shelter, Avernum and Deven.
  • Tor’Zag’s Shelter – Yrg Propagation – Take a look at your options: You need either a tier 3 standing with The Church of Sergorod or a standing of 3 with The Loader’s Guild. If you have helped Tullus Caepasius with the problem at Fort Larius you can sk for his help.
  • Deven – Yrg Propagation – Take a look at your options: You need a tier 4 standing with The Church of Ahskul
  • Avernum – Yrg Propagation - Take a look at your options: You either need tier 4 standing with the Carpenter’s Guild or you can count on the prefectus if you have a friendship of at least two with him.
When reporting to the Yskorri ambassy you will be awarder with 1 renown and 2 insights.
For Avernum Prefectus: See The Last Voyage achievement for more info.
Storyline (Part 3)
Trouble at Fort Larius
Complete ‘the Trouble at Fort Larius’ storyline.
To start the quest line, go in Tor’Zag’s Shelter – Temple district and look for the Magistrate called Tullus Caepasius (you need to have a rumor for it to have been activated ‘The man called Caepasius’).

He will ask you to investigate fort Larius. Before hitting the road, buy some merchandise that will be needed for this quest line:
  • 500 supplies.
  • 8 salts
  • 10 grains
  • 12 linens
Fort Larius is situated east to Tor’Zag’s Shelter beyond the Hollow Crags. The place doesn’t sales supplies so be sure to bring enough to come back.

Enter fort Larius - Approach the gates - Persuade or frighten them and talk to Bashir. He will give you three tasks:
  • Raid a comitatus not too far from Crossroad on the path between Tor’Zag’s Shelter and Crimson Gate and bring him 10 Iron: Attack the rear – Fight against 1 Brigand, 1 Bruiser and 1 Mercenary with 3 companions. Then you will have a crew fight: Strenght 46 and Defense 12.
  • Pillage near Vigilus Tower and bring him 20 obsidians (see location below): Try to draw out the bulk of the guard – Bring 2 companions – Skulker, Savvy and Desxterous test. Fight 1 Brigand, 1 Legionnaire and 1 Slinger with you two companions. Then you will have a crew fight: Strengh 37 and Defense 11.
  • Bring him 500 supplies, 8 salts, 10 grains and 12 linens (if you follow this guide, you should already have that in your cargo)

Reward: 4 Insights, 24 Bross, 6 Lyrgs, 9 Changers. When you complete all three tasks, Bashir will present you to Dewcatcher. Talk with him about every subject. If you can have his name, you will be awarded latter with some insight points.

Dewcatcher will ask you to look for his vanished spies. Do has he says and go back to Tor’Zag’s Shelter – Market district and find Buzzard.

Follow the quest and when you will be prompted between ‘helping him’ or ‘pursue the wraith’, pursue the wraith: Mighty, Dexterous and Tough test. Choose Finndurath if you have her in your party, it will ease a test to follow the wraith.

When you catch him, you will have a combat with the companion you choose against a unique wraith.

Continue the quest line and when you have two options choose to stay hidden. You will hear a dialogue between two persons.

When you are prompted again chose to attack Shemukan. For the next fight, I advise concentrating your attacks against the leader and to take care of the rest after. Foes: Shemukan and 3 Bronze Dragonguards. When you have finished, you should find a letter on the corpses. Reward: 6 Insights.

Be careful because, if you pursue the quest when you report back to Tullus Caepasius you will only have one month to complete the quest.

It is time to report back to Magistrate Tullus Caepasius, if you have the letter and the real name of Dewcatcher give it to him and you will be awarded with two insight points. Reward: 8 Insights and 25 Bross.

Then go back to give your report to Dewcatcher, feel free to alert him or to stick to the plan of helping the Empire. Reward: 7 Bross. But if you alert him the Ruiner achievement will be locked.

You will have to wait for one day. If you help Tullus Caepasius then you should help the Empire during the assault. Assault the Gatehouse when prompted. Skulker and Dexterous test. Then you will have a crew fight: 80 Strenght and 19 Defense. Reward: +60 Church of Sergorod, 15 Bross, 3 Lyrgs, 10 Insights and 2 Renown.

Been There, Done That
Complete the “To the Four Corners” storyline.
To begin this quest, meet Iulas in Mirage – Visit the Strange Camp – Take a look around. But you need 4 in renown to see the option. Mirage is west from Crystal. The legendary Vagrus will ask you to visit four places:
  • Carravhon, the howling city: Look for a dome whith a winged creature. To valid this you need either a Scrying Orb (Avernum – The Hill – Invanus’ Tower/Lumen - Crystalmancer) or a Spying Glass. Reward: 1 Insight.
  • Border Range: 2 Insights
  • Hills of Talien
  • Voiceless lake: 1 Insight
These four places correspond to the four corners of the visitable map. You just need to go to these places (marked on your map). Then go back to Mirage to meet Iulas again. Reward: 3 Renown, 2 Insights.
Storyline (Part 4)
Bounty Hunter
Complete all bounty hunting storylines in a single playthrough.
Bounties quest are not far from where you unlock them. There are not very hard and you will be rewarded with coins and reputation with Sergorod’s/Ahskul’s Church.

Four in Tor’Zag’ Shelter
  • The Price of Freedom: Travel to Vigilus Tower to learn more about the outlaws. Eliminate the outlaws (marked on the map). Try to force them into a pincer – Marauder and Savvy test. Crew Combat: 110 Strength and 31 Defense. Reward: 4 Pottery, 6 Bones, 3 Obsidians Blades, 5 Mushrooms Beer, 220 Supplies, -30 Abolisionist, 6 Changers, 2 Slaves, Gor’Goro lost loyalty. Report back to the bounty office: +35 Church of Sergorod; 15 Bross, 2 Insights.
  • Death Incarnate: Kill the necromancer in his den (marked on the map): Perceptive and hunting test. Crew combat: 98-112 Strength, 38-42 Defense. Companions combat: Bone Walker, Forsaken and Necromancer. Try to recall the Necromancer’s words: Savvy and Perceptive test. Reward: 2 Bogweed, 3 Odd Bone Carving, 4 Spectral Residue. Reward: 1 Valuable Treasure, +25 Church of Sergorod, 8 Bross and 4 Insights.
  • Savage Business: Travel to Drussian Quarry to learn more about the rogue sadirar tribe. Go to the location marked on your map (precise node below). You can make them flee or kill them. If you want to make them flee: Gather a few companions – Persuade (increase Fin loyalty) or Threaten them. Reward: 2 Insights. If you want to beat them: Crew combat with a strength of 140 and a defense of 25. Reward: +25 Church of Sergorod, 13 Bross, 4 Lyrgs, 2 Insights.
  • Reptilian Instinct: Find and kill the rogue Krawag (marked on the map): You will need 60 supplies to lure the beast – Choose 4 companions – Wait 1 day – Skuler and Dexteroux test. Companions combat against a green Kragwag. Hunting between 3 and 4: Get a claw from the beast. Hunting at least 5: Beast lore, Savvy and Venatori test, then a hunting and beast lore test, and a new perceptive test. Reward: Ivory, Hides and if you succeed in every test, 3 Tribal Trinklet, 1 Bronze Statue, 1 Simple Jewely, 1 Insight and a new quality showing the involvement of The Ratharnak Alliance. Reward: +30 Church of Sergorod, 12 Bross, 2 Insights.

One to start in Lumen – The Blind Jhakra – Drink, chat, share news, talk to others travelers – This might be an opportunity in disguise – Perhaps you can contact this Grahvan. A new quest will be add to your journal: The Lost Grifter. Ask about the man in Tor’Zag’ Shelter – Market District. Then go to Tor’Zag’ Shelter – Civic Distric – The Garden of Laviena – Approach the gangs – Find Maviro’s pal. Then after you have talked to the gang members go to Tor’Zag’ Shelter – Undercity – Brothel – And pay for some time with Achada. She will tell you where Maviro’s hideout is. Now you need to know where he lives. Tor’Zag’ Shelter – Civic Distric – Dragon’s Nest inn. If you succed in on of the test you will learn where et lives. If you have at least 2 with The Church of Sergorod prefer to go in The Temple District – Authorities and as about Maviro. Go in the undercity and visit Maviro’s kip – Go out the window. You will have a fight against 3 undead (Forsaken). You will find Maviro’s body just after the fight. Reward: 1 Insight and 6 Changer. To receive a more substantial reward, visit the market district – Grahvan: 2 Bross, 1 Renown, 2 Insights.

Three in Avernum – The Hill – Visit the Slagfort – Go to the Bounty Office
  • The Haunting of the Warehouse: To begin with this quest you need the rumor: The Haunting of Scoria. Ask about it in Avernum – Hill District in the bounty office. Scoria - find the wharehouse - ask in the tavern and around - Go to the warehouse - Magical Scying (need Magic sense 5) - Search (perceptive 10 or Garrik) - Fight against a demon - Take the Demon's horn (need Outer Realm lore 4 or Nedir). Then report back to the bounty office. Reward: 8 Bross, 2 insights.
  • Abominable Congregation: Destroy the undead to the northwest (marked on the map, see below). If you have at least 4 scouts set a trap and get a crew fight: 122 strength, 44 defense. To pursue this bounty quest, go to the westernmost node. Pick 5 companions for a fight against 1 congregrated, 1 necromancer and 1 cinderborn. Reward: 1 Ivory, 2 bones, 1 scrap metal, 3 odd bone carving, 2 dwarven gadget, Smoldering Heart, 25 Bross and +50 Church of Ahskul.
  • Terror of the Spirit: Travel to Kotrar to find out where Zangos is hiding (see below). capture or kill Zangos.
Four in Deven – The Gardens – Office of the Legate – Bounty Office
  • Hunter of hunters: Destroy two Ifreanni nests (marked on your map):
    • North of Deven: Try to force beasts into a pincer (Hunting, Skulker, Beast lore and Criftaa test) - Crew combat! 140 Strength, 21 Defense - Take the time to skin the dead beasts (Hunting 4 and Chief Handler). Reward: 220 Supplies, 5 Hides, 4 Ivory.
    • South of Deven: Ask Criftaa - Put out a bait (50 supplies) - Crew fight: 131 strength, 20 Defense - Take time to gather ressources (need Hunting 4, Chief Handler). Reward: 220 supplies, 8 Hides, 3 Ivory.
    Reward: +5 Chruch of Sergorod, 32 Bross.
  • Bug Hunt: Eliminate three Yrgs nests (marked on the map):
    • East of Deven(see location below): If you have Vorax, 2 Bogweed, 10 Supplies, 1 Moondust and 6 Dampsmoke so reduce combat strenght or you can create a diversion but it will be less efficient. Crew Combat (with diversion): 131 Strength, 83 Defense. Assemble a strikeforce (do not use Ren against Yrgs) - Companion fight against an Yrg warrior - Light 3 dampsmoke or enter in force - Companion fight against an Yrg worker - Companion fight against an Yrg worker and an Yrg warrior
    • West of Deven: do not bring Ren - Use dampsmoke or enter directly - turn right - listen to Garrik.
    • Far west of Deven: Use 3 dampsmoke or enter directly (do not bring Ren) - fight against 2 yrgs worker - sneak in (need skulker 5 or Marauder prime) - fight an Yrg warrior.
    Return to Deven and metion you stranger finding (A confounding discrovery) to get your reward: +10 Church of Sergorod, 38 Bross and a new quest: Just a small formality.
  • Bragga the Braggart: Execute Bragga, an outlaw (see location below): Crew combat: Strenght 80 and Defense 16. Reward: 1 Simple Jewelry, 5 outlaw trophy, Standard armament, 7 Lyrgs. Take the deal or refuse
  • The Needs of Many (location below): you have two choices to resolve this quest:
    Attack them with some finesse (need 12 fighters) - Crew combat: Strength 170, Defense 34. Reward: 9 bones, 2 ivory, 4 hides, 3 chitin, 2 pottery, 5 tribal trinket, 2 odd bone carving, 1 simple jewelry, skewers.
    Or resolve these matter peacefull - Try to convince Shaabnin (persuasion and charismatic test) . Reward: 1 insight.
    Report back in Deven to get your reward: +10 Church of Sergorod, 15 Bross.
Crew combat encounter
Conciliator
Successfully appease the foe during a crew combat encounter.
When you get a crew combat encounter choose to flee from it. Then to the right side of the screen you can give them money to increase your chance to flee. Use the button automates to give them automatically the right amount to avoid combat. If the Move On button is available then you can’t flee. It’s because the group you met isn’t aggressive so you can fight them or just pass them without doing anything.

Fight Another Day
Successfully flee from a crew combat encounter.
Same as above except don’t give them any gold. Prefer to do it with a crew combat where you get a high chance of fleeing. If the Move On button is available then you can’t flee. It’s because the group you met isn’t aggressive so you can fight them or just pass them without doing anything.


A Real Battle
Defeat a foe with at least 1000 Combat Strength in a crew combat encounter.
It happens during the quest The Return of The Wyrm when you defend Tectum Carvos against the sand wyrms. The last wave got around 1200 combat strength. To know more about it, see the Ever After achievement.
Crew members and cargo capacity
Tactician
Start an in-game day with at least 250 Combat Strength and no more than 50 armed crew members.

Strategist
Start an in-game day with at least 500 Combat Strength and no more than 50 armed crew members.

General
Start an in-game day with at least 1000 Combat Strength and no more than 50 armed crew members.

For Tactician, Strategist and General, recruit 50 fighters fire your scouts and buy as many mounts as you can. Use both to get outriders as they have a superior combat strength. You have to start the day with enough combat strength, so mount camp after getting the right combat strength.

Some equipment will help:
  • Standard Armaments (+1 Fighter/Outrider/Scout Combat Strength),
  • Bronze Armaments (+1 Fighter/Outrider/Scout Combat Strength, +1 Fighter/Outrider/Scout Defense),
  • Iron Armaments (+2 Fighter/Outrider/Scout Combat Strength, +1 Fighter/Outrider/Scout Defense),
  • Dragonsteel Armaments (+3 Fighter/Outrider/Scout Combat Strength, +2 Fighter/Outrider/Scout Defense),
  • Lances (+1/2 Outrider Combat Strength), Blinders and Combat Saddles (+10 Chase, +1 Outrider Combat Strength),
  • Blinders and Combat Saddles

Quartermaster
Start an in-game day with at least 600 Cargo capacity, no more than 50 work crew members and no more than 5 Beasts of Burden.

Supercargo
Start an in-game day with at least 600 Cargo capacity, no more than 50 work crew members and no more than 4 Beasts of Burden.

For Quartermaster and Supercargo have no more than 4 beasts, buy as many mounts as you can and equip the Kal-Rish SaddleBag (+3 Mount Cargo, +3 Outrider Cargo). You can order it in Crystal – The workshop if you gave him good quality tools for 5 Hides and 2 Lyrgs. It will take 5 days to Dek-Rai-Kaan to finish it. Suppress every outrider as it decreases your cargo capacity. You have to start the day with enough cargo capacity. So mount camp after getting the necessary capacity.

For example, when I unlock this achievement, I had 4 Beast, 29 Mounts and a Kal-Rish SaddleBag equipped.

Hired Help
Extend an elite hireling’s contract twice.
You can hire elite in Drussian Quary (Oquo), Larnak (Venari) and Ash (Darius). To hire one you need at least a tier 3 standing and to spend 12 Bross.
When prompted extend the contract and to it two times.
Companions (Part 1)
Potential Unlocked
Reach Prowess 9 with any Companion.
To unlock prowess, you need to spend insight points. But companion progression is limited by your advancement in their storyline. So, you need to finish their quest, except for Skornar where you need to go near the end but not till the end. Storyline can't progress if you do not have enough friendship with your companion. The conditions vary depending on the companions but gifts as well as progress in their main quest always work. For more details, see companion storyline below.

Talent Nurtured
Reach Prowess 6 with at least 6 Companions in a single playthrough.
See Potential Unlocked

Company of Heroes
Reach Prowess 9 with at least 6 Companions in a single playthrough.
See Potential Unlocked

Adept
Unlock Tier 3 for all four Skills of a Companion during a single playthrough.
See Potential Unlocked

Forged in Battle
Complete Gor’Goro’s personal storyline.
Gor’Goro is very powerfull especially at the beginning of the game. He has a lot of health points and he can block/evade attack with a good chance. One of his attacks can reduce the target's armor. He can also force foes to attack him.
If you haven’t met him at beginning from Braxius a rumor appears. Buy it so you can take the quest where you have to help him and Gaius. If you don’t do it with Braxius then you will have to bring your own companions.

When you have enough relationship with Gor’Goro talk with him about his past and exhaust every option. He will ask you to win arena championship titles and discuss with it. To increase relationship with him, offer him gifts, visit Gaius’ compound each time you arrive at Tor’Zag’s Shelter, be honorable, protect the weakest and offer him gifts (exquisite weapon, oil).
You have to win 3 of the 4 arenas in the game:
  • Bestiary Arena in Tor’Zag’s Shelter: Fight beasts in the arena until you meet Maldarian. The beasts that you need to fight are randomly selected. You will need to wait 6 days between each fight. When you have fought enought a man will have a special combat for you. Companion fight against 2 splinters. If you win you will be the new champion. Reward: Amulet of Protection, 4 Bross, 5 Insights.
  • Sun Rock fighting’s pit: Fight there until you meet the champion. As in Tor’Zag’s Shelter you will need to wait a few days between each fight.
  • Arena of Echoes in Deven: Enlist in the tournaments. 3 days will pass. Between each fight you can rest. After the first fight against 4 orcs, chat with prince Laekor and you will get Major Advantage for the second fight, against a krawag, a dragonmage and a dragonguard. During this fight target preferably the mage and the beast. After the fight pay the medicos 6 Lyrgs to gain +5 Viltality on all companion. The final fight is against 2 Veles gladiator, a murmillo gladiator and Gracchus Vastator, the champion. Put your companion on 2 range far from the champion and concentrate first on the Veles then on the Murmillo. Reward: 2 insights, 24 bross, 1 renown
  • Ash: In this arena it's a one on one fight until you are judge able face the champion. This will give access to a new arena.
  • Avernum - Scoria - Pandemonium Arena : You will have to fight 3 combats in a row. Do that 3 times and you will meet the champion.
  • Invisible Arena (secret see Ash's arena): Drussian Quary then Avernum then Arken and Tor'Zag Shelter. These are always 1 against 1 fights. For the last arena, it will be a fight against a tainted oghre. Take Gor'Goro and use every advantage at your disposal (need charismatic 4, Savvy 4, Codex Oghres, 15 Bross). Use Inspire on Goro at the begining.
After getting all this championship titles Gor’Goro will trust you enough for the following. Talk to him during camp to unlock the next part: Kingslayer. Reward: 9 insights.

Rent the Arena Maximus in Tor’Zag’s Shelter – Civic Distric for his fight. It will cost you 100 Bross. Then you have to wait 1 month for the champion to arrive in Tor’Zag’s Shelter.

For the fight against Krag’Gorn you will only have Gor’Goro, so be sure that he is well prepared. It can’t hurt to us ‘Inspire’ on him at the beginning. Also, you can bet on Gor’Goro to gain more money. One day will pass before the fight – Place some bets – You can bet 30 Bross or 100 Bross or 300 Bross. Bet the maximum you can as there will be no other consequences for you. Reward: +4 Renown, +6 insights and 431 Bross if you bet 300 Bross.

After some time, you will unlock: Call of the Ancestor when Gor’Goro will talk to you during camp. Find the mysterious shamans in the hollow crags (see below)
The shaman will ask of you to destroy two Hollow Eyes lair (see below).
Need magic sense 8 or Arcane lore 5 or Nedir to search fo the lair. Crew fight 311-366 strength, Defense 117. Fight against 3 forsakens and 2 hollow eyes. Target hollow eyes first. They have a high chance of evasion. Reward: 3 simples jewelry, 1 rare jewelry, 1 crystal lamp, 1 exquisite weapon, 3 Bross, 4 Lyrg, 3 Changer.
Crew combat: Strength 324-347, defense 125 - Ask Goro for advice - Charge in - Crew combat: 235 Strength, 125 defense. Reward: 1 valuable treasure, 4 simple jewelry, 2 common jewel, 1 marble statuette, 2 bronze statues.
After removing both lairs go back to the shaman hut and bring him 12 spectral residues. You can find spectral residue on ghosts in the sleepers’ valley or you can buy some in cities during random events. Be sure to be blessed by Ahskul priests (Blessing of Unbinding) before performing the spirit dance as you will fight ghosts.
After you bring the shaman what he ask you will have a companion fight against 4 forsakens and 2 hollow eyes. As before take care of the hollow first. The a second one against 3 forsakens and 2 hollow eyes. A last one against 3 hollow eyes. Reward: 100 supplies, 4 herbs, 4 slimesgrass, 3 medical supplies, 1 acrane test, 6 insights.
Gor’Goro will have one last request: Help him forge a new armor.
Before depart be sure to have:
  • 3 units of Dragonsteel scraps (Mines of Plenty)
  • 2 Demon horn (Avernum – The Hill – Invernus)
  • Urd Urn (Avernum – The Hill – Invernus)
  • 6 Hides (any market)
  • Smoldering Heart (See Abominable Congregation)
It will be needed for the armor. Then wait a month before retrieve the new armor.
Companions (Part 2)
The Voice of Hereafter
Complete Finndurarth’s personal storyline.
Finn is very powerfull on the back line. She can inflict a lot of damage while lowering enemies' INI. And because she uses magic she is able to harm spectre.
To increase friendship with her try to negociate during event when this is possible, help the weakest and offer gifts (perfume, jewel, precious stone, dragon egg, ancient tablet, arcane text).

You can find her on the road between Deven and Tor’Zag’s. You will find an attacked comitatus on the road: Investigate the wreckage – Rush to the woman’s aid. Reward: 4 Spice, 3 Coffee Beans, 1 Dragonsteel Scrap, 250 supplies, 6 Lyrgs. Take Finndurarth to Kernak Waystation, you have no more than 22 days to do so. Let her go alone to the meeting. There will be a fight afterward against two wounded assassins. Then you will have a second fight against 3 assassins. Reward: 1 Moondust, 3 Simple Jelwelry, Torture Device, 3 Lyrg, 2 Changers and 5 Insights.

After the fight talk to Finn during camp and ask about her plans. To continue the quest, ask about the eight-legged lizard tattoo: In Deven, Tor’Zag’s Shelter, Larnak, Avernum. In Avernum if you let her do the search on her own Finn will lose 5 Hp, -10 Carpenter’s Guild. Reward: 3 Insight.

This investigation will lead you in Ash to talk to a man name Harn. You can intimidate him (Intimidation and Renown test) or fight him (companion fight against 4 foes). Finn will lost loyalty regradless of your choice. Reward: 1 Insight. This meeting will let you know the base of Corneus Serpentis is. It’s marked on your map southwest from Salum. See below for a more precise location. Go there to find who hired them.
Don’t let her try to negotiate with them, or she will die. You will have a crew fight with a force of 240 and a defense of 44. Reward: 194 supplies, 10 Obsidians blades, 3 Medical supplies, 1 Valuable Treasure, 5 Simple Jewelry, 1 Rare Jewelry, 2 Common Jewels, 2 Marble Statuettes, 6 Outlaw Trophies, 8 Moondust, Bronze Armaments, Slave Cages, Skewers, Trapping Nets, 3 Insights.

The second part of Finndurarth’s personal storyline is called: Conclave and Black and White.

Your first task is to find the incognito Cadmador agent in Fort Larius: Finndurath is eager to find the Cadmador agent - Choose 4 companions – Tell her that she did what she felt was right – Tell her that sha has grown – Perceptive test - Companion fight against 4 mercenaries. Reward: 2 Insights. The day after you can talk more with the quiet man in The Haggard Camp – Discuss the matter of the envoys and assassins. Reward: 2 Insight

Then go to Crystal to meet Nhaera, it will cost you 1 Bross. Reward: +1 Insight and if you will take the content of the stash Finn will lost loyalty but you will get: 2 Rare Jewelry, 3 Simple Jewelry, 1 Valuable Treasure, 2 Ancient Tablet, 1 Jade Figurine, 1 Marble Statuette, 8 Bross, 9 Lyrgs. Follow her to Flavo Calerus you need to equip your comitatus with Calerus Protection Gear (Lumen or Crystal Market) and Heat Shielding Crystal. To get the Heat Shielding Crystal you need to do another quest, see at the end of this achievement. Comb the area thoroughly – Navigation, Perceptive, Savvy test – Choose companions – A companion fight against 2 Krawag – Search the bounty hunters and Nhaera. Reward: 1 Dragonsteel Scraps, 1 Ivory, 1 Hide, 1 Exquisite Weapon, 2 Simple Jewelry, 1 Moondust, 2 Bross, 34 Changers and 2 Insights. Then search the living chamber (At lest 10 in perception is required): 1 Arcane Text, 1 Crystal Lamp, 4 Medical Supplies, 2 Pristine Trophy, Perimeter Alarm, 4 Bross and 2 Lyrgs. Search the storeroom: 21 Brightlekeep, 7 Marbles, 13 Dyes, 23 Wines, 14 Flavo Crystal, Fire Bombs. Open the Hidden Compartment: 1 Insight and a new objective.
If you opened the hidden compartment then you should have an additional objective. To complete it: Deven – Shadow Bazar – Look for a merchant call Geharis. Companion fight against 1 Sharduk Reaver, 1 Bruiser, 1 Slinger, 1 Brigand. After the fight you will have a tough, savvy and perceptive test to catch Geharis. Then you catch up with the merchant attack the guards. A second companion fight against 3 Dragonguards. Reward: 2 Insights.

The next step is to Convince Khaledisthar in Sun Rock to tell you where the Oghres envoy are. Try to convince Khaledistar – Ask him why he is hesitant – Tell him that you are famous (renown 9) – You even have associates among his kind (Trust of the Forsaken 5)/Tell him that you kwon his people (codex entries) – You know that Ratharnak are behind (if you have completed the second objective before meeting the ogre) – Because Finn think this is important. Khaledisthar will tell you the location. If you followed this guide, you should get a second objective again: Contact the Oghres at the Forsaken colony. Reward: 2 Insights.

To increase Trust of the Forsaken Insectoid Propagator and barter with them (see below)

You need to do this additional objective first if you have it. Go to the Forsaken Colony – Visit the Oghres colony – Talk to him about the Oghre envoy. Reward: 1 Insight. All you have to do is go to the indicated area (for the precise node, see below). Enter the valley – Try to reach the tectum in succeeding a navigation and skulker test - Head to the Tectum. At the end of the dialogue, take on the orc in battle. Crew fight: 358 - 470 strength and 172 defense. Use the Oghre envoy to increase your own strength in battle by selecting the passenger’s picture. After the fight you can pillage the orc camp for 547 supplies. Reward: 28 bones, 2 obsidians blades, 673 supplies, 13 tribal trinket, orcish terror totem and 5 insights.
Then you have to travel with the Oghres envoy to the south of the Last Oasis (see location below). First companion fight against 5 demons. Second companion fight against 3 demons. Third companion fight against 4 demons included a Moloch. A fourth companion combat against 4 major demons: 2 Quarens and a black moloch. Reward: 9 insights, 700 supplies, large energy crystal, Dragonsteel Armaments.

The White Crystal
You need to accomplish this quest in order to get the Heat Shielding Crystal. To unlock this quest, you need a rumor: Master Crystal Mage. After getting the rumor go to Lumen – General Inquiries – Talk to the merchants and exhaust all option. Then select, The Crystalmancer’s Vault. Shebenni will ask you to deliver a pure white crystal in Lumen. To get what Shebenni want you have several options:
  • You can find one south of the Loom but you will have to pass 3 fights to get to the white crystal.
    • You can avoid these fights with dampsmoke. You can buy dampsmoke or you can ask the alchemist in the undercity of the Shelter to prepare dampsmoke with some slimegrass. The slimegrass can be obtained in Deven. You will need 3 dampsmoke to pass each combat. Reward: 2 Insights.
  • You can buy a White Crystal in Deven - The Gardens - Visits the hanging gardens - Buy Something - Purchase a rare white cluster of crystals for 15 Bross

To equip the Heat Shielding Crystal you need a spellweaver who has the channelling skill: Finndurath or Nedir. If you do not have either one of them in your party see the achievements linked to those companions. The Amulet of Concentration can give channelling to Finn or Nedir.
Companions (Part 3)
Business As Usual
Complete Garrik’s personal storyline.
He can dealt a lot off damage but his attacks are unpredictable. He can miss them completely or inflict little damage. Which makes it difficult to trust Garrik in combat. On the other hand, even if he is a back line character, he is quite resistant.
To increase friendship with him be greedy, take advantage of the weakest and give him gift (6 Lyrgs, Dwarven Gadget).
You can unlock him at the beginning or you can find him in the Shelter - Undercity - Bathhouse- with the rumor : Dwarf in a Pickle you can liberate Garrik from the Loaders' Guild.
There is an encounter that will increase Loyalty for Garrik : Salum - Explore the rown (random event) - Go for a stroll.
When he has enough loyalty, talk to him - Ask him about his plans - Offer him your help and he will ask that you find some his stash (marked on the map). With 3 Evaluate and 3 perusasion you can negociate a better share:
  • South end of Terathion’s fall: you need a Deputy Venatori or 5 Hunting – Fight against 2 Black Krawag – You can harvest the cadavers with 3 Hunting and 2 Beast Lore (2 Ivory, 3 Hides, 1 Pristine Trophy). Reward : +1 Insight
  • South of Mirage: Look around the village (Perception 8 and Evaluate 4) or attack the village or talk to the villagers
  • Southeast Hargard Tuul
Talk to him during camp to retrieve a fair share.

The second begin in Avernum. When you explore the city (random event), you will have a chance to meet a man. He will ask you to assemble a crew for a heist:
  • Therulion: Larnak – The Fields – The Bumbling boatman: 1 insight
  • Fignit: Salum – Pawnshop - Companion fight against 4 ennemies.
  • Cairistonia: Deven – Shadow Bazar - Head over 3 Bross and 10 renown - Skulker, con, dexterous and Savvy test. +1 Insight.
Bring all of them in Lumen – Blind Jhakra. You need to have the three of them at the same time. You can’t leave them one by one. Then take the team to Mirage to proceed with the plan. Infiltrate the company. After the heist you will retrieve your share. But you will have to sell it. To find a buyer go to Tor’Zag’s Shelter and search for a potential buyer. You will need several try with few days between. You can speed things up with Loaders' Guild 4 or Renown 12. Don’t hesitate to trade between the surrounding places in waiting. When Garrik returns, be prepared for a fight against 3 Shades (You need magical damage or Unstoppable trait or Blessing of Unbinding by Ahskul priests). Then a second fight against 5 Shades. And a third fight against 5 shades.
During camp don't forget to ask him about his smuggling business.

Voracity Confronted
Complete Vorax’s personal storyline.
He is a real HP bag and he can heal on the back line. But he is very bad in attack. Another advantage is that he can force a foe in the back line to come in the front line and thus allow you to have more successful strategies in combat.
Anything related to food may increase friendship with him.
You can find him on the road between Kernak Waystation and The Twin Towers.
After a certain amount of time and when you attain a certain relationship with Vorax talk to him during camp - Vorax wants to talk and he will give you a new quest: The trial of trials. To make the make dishes you have to bring Vorax rare and specific ingredients.
  • A bottle of Empyreana gives you a quest The Grape of Grath (see below)
  • Jhakra stomach: In Eitrar help Burhek chase a Jhakra. Before going there be sure to bring 10 beast lure and 10 slimegrass. Pick 5 companions – 1 day pass – Use your spellweaver or your venatori to lure the beast – another day pass – First companion fight against 5 Jhakra – A day pass – A second companion fight against 2 Jahkra and 1 Jhakra alpha. Reward: 10 ivory, 10 hides, 254 supplies, 1 pristine trophy, 3 insights.
  • Ambershroom stain (Deven, Hanging Garden): Plant some in the garden for 66 Bross, then go back there after two months to harvest it.
  • 3 Spices: You can buy it in many markets.
  • Tarkian Mugworth: Buy it for 12 Bross in the Tarkian quarter of Tectum Carvos.
  • Wraithgrass: Deven - The Hintercaves – Wraith’s Slum. Cost: 9 Bross
  • Arran’s Bell (Tor’Zag’s Shelter – Civic District – Garden): Ask to the gardener for Arran’s bell he will be elusive. Take a walk in the garden – Appreciate the many types of plants (Need Herb Lore 1). Then ask him if he is alone to take care of the garden, he will tell you that a sorceress take care of it. This will unlock a new option in the garden of the Shelter. The sorceress will sell you some Arran’s Bell. Cost: 16 Bross, 5 Lyrgs.
When you have gathered everything in the list talk to him during camp. Then bring him in Sun Rock – Davris Marius Paulus’ villa.

For The Grape of Grath, Grath a barman in the Copper Pugio of Deven ask you to bring him six bottles of rare beverages in order to give you a bottle of Empyreana. Reward: 2 insights.
  • Goradian Absinthe (Tor’Zag’s Shelter – Civic Distric – Dragon’s Nest inn): Trade a dragonbone.
  • Luminalirium (Larnak – The Fields – Bumbling Boatman): Take on a quest where you have to help the local with a beast problem. Go hunting for the monster’s nest in the sewers – You know what these creatures are – Take a team – There is no guarantee. First fight (4 companions): 3 Gruftas. Track the beast. Second fight (6 companions): 5 Gruftas. Reward: 1 Bronze Statue, 2 Simple Jewelry, Urd Rune, 1 Bross, 1 Lyrg and 2 Changers. You can keep their belongings or give it back to them. Reward: +1 Insight, +2 Morale, +1 Renown.
  • Maekrathar’s Spirit: Purchase it in Salum of Mine of Plenty.
  • Aqua Infernis (Avernum – Scoria – Lavinus Watering hole): Trade 35 units of coffee beans.
  • Ulalud (Vitrar): Trade it for 6 Sadirar bone necklace.
  • Cerulean Essence (Lumen – Blind Jakhra): Win a card game. You need 10 Bross. It will require several tests to succeed. First test: Savvy, Charismatic, Peceptive. Second test: Savvy, Charismatic, Peceptive and Evaluate. Third test: Savvy, Dexterous, Charismatic, Con and Evaluate.
When you have gathered everything in the list talk to him during camp. Reward: 2 insights. Then bring him in Sun Rock – Visit the Paulus Villa – Enter the villa and pick 4 companions. Insist on taking part in the search – Savvy, perceptive and skulker test – Discuss what you can with Paulus. Reward: +2 Renown, 8 insights. If you choose to be rewarded with renown you will get +3 Renown.

The last part is called Cursebreaker: Travel to Larnak – Vernius Villa, but take a detour in Avernus to get a blessing of Unbinding by the priest of Ahskul. Explore the manor until you meet 5 ghosts and a Wight to fight.

A new objective will appear: Find a Sorcerer well versed in curses. Go to Avernum – The Hill – Incanus to ask him if he can help Vorax. Take the opportunity to buy 10 Ahskulite charms you will need later. Refresh your blessing of Unbinding (it lasts only 12 days). He will send you to The Last Oasis. Dhuzani will agree to meet you in Larnak. When you get there discuss her findings. Then give to her the 10 Ahskulite charms and 10 Spectral residues. The quest will end with the performing of the curse-breaking spell by Dhuzani. She will ask you to defend her against the spirit: fight 2 times against 5 five specters and a Wight. Reward: Vernius Matriach Skull, 6 insights, 4 silvers, 2 valuable treasures.
Companions (Part 4)
Legacy of a Mercenary
Complete Harvek’s personal storyline.
Harvek is quite good in combat at beginning but loses effectiveness over the game.
To increase loyalty refuse to help the weakest, offer gifts (moondust, bogweed)
You can have him through Braxius or recruit him in Lumen – The Blind Jhakra - Look for potential recruits - Talk to Harvek - This does not look good. You can help him (increase loyalty) or let him handle the situation by himself.
Aid Harvek in killing his targets. Harvek will tell you when you meet one. When you have found at least three people on the list, talk to Harvek during camp –- Ask Harvek how his campaign of payback is coming. Reward: 6 Insights.
  • In Kernak Waystation during Finndurath’s storyline you will kill someone on his target list (see The Voice of Hereafter)
  • In Mine of Plenty – Hungry Miner – Harvek wants to talk to you in private – Insist on going with Harvek – use whatever mean necessary to pass then you will have a test involving Engineering, Savvy, Perceptive and Navigation. Reward: 1 Insight.
  • Deven – Explore the City (Random Event): If you have Vorax in your group you can skip the test. Reward: 3 Bross, 7 Lyrgs and 4 Changers.
  • Avernum: A random event when exploring the city. Join him and go in Scoria – Find Harverk’s target at the old bathhouse. A fight with only Harvek against Juvail a Tarkian soldier will begin. Reward: +1 Rare Jewelry.
  • Fort Refugis: Harvek want to talk to you in private – Wait for tonight and do it (Choose 3 companions) – Skulker, Dexterous, Scout Master and Perceptive test.
  • Fort Larius: If you side with the Empire you will kill one person on his list (See Trouble at Fort Larius). Reward: 2 Insights.
  • Tectum Carvos: Harvek will want to kill a hunter. You can use a trap kit or lure in wyrms and I guess you will have to kill them after they killed the wyrm hunter. Tanks to cdcdcd172 for this info
  • Drussian Quarry - Insivible Arena (See Gor'Goro storyline)
When you have killed 5 people on his list, talk to him about it during camp. Go to the faction headquarters with whom you have the highest tier. Avernum for the Carpenter Guild. Tor’Zag’s Shelter for the Loader Guild’s. You can also go to Avernum Prefectus if you befriend the prefect.
Whomever you choose to go, it will send you to a villa in Blackblood Mountains, behind Tor’Zag’s Shelter. The villa is located in a passage that separates the mountain in two, just behind Tor’Zag’s Shelter.
Choose five companions – Then you have 2 options:
  • Try to climb up the wall – If you have Criftaa she can shoot an arrow. If you don’t have her in your team then you have to pass a dexterous, perceptive, mighty, skulker, veteran and savage test. I you fail you will an additional foe for the next combat.
  • Try to leap across one by one – Dexterous and mighty test. If you fail you gain weakened.
Companion fight against 4 foes - Companion fight against 5 Ifreannis. Reward: 6 Insights, 776 supplies, 20 Bogweed, 20 Luxury wine, 25 Mushroom beer, 15 Brightlekeep, 5 Oil, 6 Coal, 6 Crystal Lamp, 6 Exquisite Weapons, 3 Jade Figurine, 6 Marble Statuette, 4 Rare Jewelry, 4 Valuable Treasure, 3 Pristine Trophy, Blinders and combat saddles, Mount blankets, 11 Bross.

In the villa, Harvek will learn about his son. Ask about him to the Carpenter’s Guild - Deven. If you have a tier 3 Carpenter's Guild or 120 Bross. Reward: 2 Insights.
They will redirect you in Fort Viridium, where you have to make Harvek’s son escape. Pick 5 companions – Perceptive test – Companion fight against 3 Grufta – Skulker and perceptive test - Companion fight against 5 foes (guards and priests of Sergorod) – Distract them or bribe them - Try to calm them (need Harvek loyalty and 3 persuasion). Reward: 5 insights.

Huntress Unbound
Complete Criftaa’s personal storyline.
Criftaa is a really powerfull back line, who can cause a lot of damage.
To increase relationship with her: do bounty, punish slave, do not help the abolisionist and offer gifts.
If you haven’t unlock her at the beginning you can find her near Velarias. To be able to meet her there you need to buy a rumor: Bounty Hunter on the Prowl.
In Velarias ask about her, they will tell you to go north east (location below). Tell her you have come for a bounty hunter – Tell her you are here to collect the bounty of Krog’Vor – Listen to her proposition – Accept or give her a counter offer (need persuasion 8). Fight: Krog’Vor, and 2 Orc Marauder. Reward: 223 supplies, 5 Mushroom beer, 2 Bogweed, 2 Moondust, 3 Simple Jewelry, 4 Tribal Trinket, Orcish Terror Totem, 3 Changers, 6 Lyrgs, 5 Insights. Then collect the bounty in Tor’Zag’s Shelter – Temple District – Go to the authorities – Bounties office - Deliver Krog’Vor head. Reward: 10 Bross, +50 Church of Sergorod. Still in the bounty office select: There is a sensitive matter to be taken care.
Criftaa will ask you for help for four more bounties when she trusts you:
  • Vaiak’s Valor (see location’s node below): Scout the terrain (Scout Master, Scout, Perceptive and Navigation test) – Decide what to do now – Collapse the pillar or create a diversion (Con, Savvy and Skulker test) – Crew combat: 125-132 Strenght and 35 Defense. Choose to liberate the tribe or execute them. Reward: 51 supplies, 3 hides, 4 outlaw trophy, 4 simple jewelry, 20 Tribal trinket, 3 beasts lure, 3 insights.
  • Bonegrinders: Take a least 3 scouts with you before going to the node show below. Scout the area before fighting - Crew combat: 235-272 Strenght, 91 Defense. If you advise her to execute only the Sharduk your reward will be: 2 hides, 18 ivory, 27 bones, 4 outlaw trophy, 4 simple jewelry, 15 Tribal trinklet, 1 insights.
  • Hollowmen: Crew combat 308 strength, 72 Defense. Reward: 14 Bogweed, 7 herbs, 36 pottery, 5 common jewels, 3 marble statuette, 10 odd bone carving, 1 rare jewelry, 7 simple jewelry, 9 tribal trinket, 3 pristine trophy, 12 beasts lure, 3 bross, 22 lyrgs, 1 insight.
  • Terath’s Sunstriders: Crew combat with 464 strength and 109 defense. Reward: 127 supplies, 4 ivory, 2 dragonsteels scraps, 4 dragonbone
After eliminating the last tribe (reward: 5 insights), you can speak to Criftaa and say to her to hunt down her handler. That is what I did. I don’t know what happens if you don’t. If you make the choice to hunt down her handler, you will have to defeat the garrison of Limus Custodis (see location below). Be prepared for a hard crew fight. Hire fighters and mounts before it. Pick 5 companions. Have Finn or Ren or you can pass a Skulker, Dexterous and perceptive test. Companion fight against 5 enemies. Then you will have a crew fight: 689 Strength, 295 Defense.
After the combat you can spread the word about what you have done and it will increase your reputation with the Abolitionist Faction (+150) but it will decrease your relationship with Criftaa. Reward: 1099 supplies, 50 wines, 35 dried fruits, 1 exquisite weapon, 15 medical supplies, 4 marble statuette, 8 simple jewelry, Bone wand, Talisman of divine rage, Torture device, Iron Armaments, Legionnaires tents, 6 Insights, 33 Bross.
Companions (Part 5)
The Darkness Within
Complete Renkailon’s personal storyline.
Ren is versatile and can fight in front or behind. He can inflict heavy damage and despite a low number of HP he has a good chance of dodging.
To increase frienship do not confront him against Yrgs, give him dampsmoke.
If you haven’t unlocked him at the beginning, you can find him in Deven. To recruit him to need to befriend The Dark Elven Prince Laekor in the Hindercaves. To increase friendship to 6 with Leakor give him Obsidian/Hides/Iron/Tools or dedicate your victory to him in the Arena of Echoes.

The prince will also give you a quest: Heritage of Hatred
You have to defeat a garrison (see below).
Creep up on the tunnel:
  • Try to draw them into an ambush – Use Sorcery (spellweaver deputy and Savvy, Con test) – Crew combat against 169-149 Strength and 66-57 Defense. You get random rewards after the crew fight. If you do not have enough fighter, you can hire 7 of them in Deven and in Sun Rock. After the fight you can explore the tunnel with companion fight before collapsing it. Be careful during companion fight, dark elves as a high chance of evasion.
  • Try to sneak in – Sneak in (Dexterous, Skulker, Scout Master test) – Companion fight against 4 Dark elves – If your companions are not to wounded search the storage room or the captain’s quarter, if this not the case Collapse the tunnel with Garrik or 15 Work
After a while and when Ren trust you enough, Ren will ask for your help during camp. Quest: One Last Job.
Search the area - Perceptive and Scout test - Let Ren - Mount a rescue operation - Try some sorcery (need spellweaver and 5 Magic Sense) - Try to dispel the glyphs (need 6 Strong-Minded, 6 Arcane Lore) - Entre the tunnel - Free the slave (need Con 3) - Companion fight against a dark elfe and two Yrgs - Crew fight: Strength 109, Defense 72 - One day will pass. Reward: 1 Insight. After 2-3 days Ren will talk to you . Reward: 2 Insights.
Go to Deven - Hintercaves - Dark Elf colony - Prince Laekor - Report your findings on the Varukai gate. Reward: 20 Mushrooms, 1 Rare Jewelry, 1 Insight, +3 Prince's friendship.

During camp talk to Ren and tell him you have decided to aid him. Quest: Delving into Darkness. Then ask him about his studies and exhaust all options. You can give him Arcane text (every 30 days) and Ancient Table (every 20 days). These items can be bought in Sun Rock - Khaledisthar's shop. You can also show him the Varukai Gauntlet (a gift of Prince Laekor when reaching 12 in firendship) and Candle of Dead (Church of Ahskul in every large cities).
Continue to give him items until you unlock another option during dialogue. Note that the option will not appear immediately after you give him the items. He will ask you to explore ruins between Sun Rock and Stonehorn (see location below).
Gather a party (bring Garrik) - Take your time - Push deeper. Reward: 2 Marble Statuette, 1 Simple Jewelry, 2 Ancient Tablet, Good quality tools. Then, you will need to pass a Perceptive, Dexterous, Garrik test - Fortify yourself inside the room - Companion fight against 1 Demon and 4 undead. Reward: 1 Demon Horn, 3 Ancient Tablet, 5 Odd Bone Carving, 2 Insights.
Then continue to give him text and table until another option appear.
After you have bring hime enough item, Ren will ask to explore the ruined Fort Scolaris.
Try to calm him down - Have a look around (1 Arcane text, 2 Ancient tablet, 3 Antidote, 1 Bronze Statue, 1 Jade figurine, Achemical tools, Scrying Orb) - Follow Ren - Companion fight against 3 Yrgs. Reward: 3 Insights.
Continue to give/show him items until a new option appear. Ren will ask to explore fort Atris.
To help you find your way in the screenshot, the crevasses you see at the bottom are the Carravhon crevasses. Perceptive and dexterous test - Loss 5 VIT on a random companion - Strong-minded and Charismatic test - Companion fight against a tainted Oghre - Search the premises/or ask him. Reward: 3 insights.
Continue to give/show him items until a new option appear. Ren will ask to explore an abandoned colony north of Arken. Before depart be sure to have Blessed of Unbiding.
2 Companion fights against 4 specters - Temper him.
Wait until he talk to you during camp. Head to the prince's tomb.
Send scouts - Attack - Find a way - Ask Ren (Prowess required 6) - Crew combat: Strength 353-386, defense 111-120.
Descend into the tomb - You can try to convince hime that it's mistake or proceed - Companion fight against 5 shades. Reward: 8 Insights
Companions (Part 6)
Ever After
Complete Eylani’s personal storyline.
In order to recruit Eylani you need to help Tectum Carvos (See below, the quest: The Return of The Wyrm).

Talk to her in camp to finish this part. For the following you will need to have a good relationship with her. To do so give her gift and show her the animals you have in your comitatus.

When she is confident enough, she will ask you to search for her husband. Meet some of his old acquaintance:
  • Avernum - Scoria - Drug den
  • Salum - Lakeside Square: A Tough and Strong-minded test (1 insight) - A companion fight against a torturer with Eylani only. Reward: +3 Insights
  • Kernak Waystation
Wait a month then, go to Sun Rock there Eylani will talk to you and this will start a fight. You can tell her what you want about her husband. It doesn’t matter for the achievement. Reward: Dwarven Compass and 4 Insights.

The Return of The Wyrm
Deliver material to 400 Preparadness. It’s a long quest at it will take time for you to reach the necessary preparedness. For goods you need one complete stack per delivery.
  • Supplies, Obsidian, Ivory, Obsidian Blades: Per stack
  • Medical supplies (20 Maximum): Per pack of 10
  • Mining Equipment (maximum 5): 1 per 1
  • Task/slave master (maximum 2): You can recruit both in Drussian Quarry (House Oquo). You can’t recruit two tasks/slave master at once.
  • Overseers (maximum 3): In Ash (House Darius).
  • Fighter: Per group of five
You can see your advancement in the Qualities section: ‘Tectum Carvos : Preparadness’. Each time you enter in Tectum Carvo you have to fight to be sure to bring enough fighters in your comitatus (Wyrms' Strength 200-400). But it may happen that you have no fight when you return (the event is quite rare). Except the first time, you will have a Companion Fight. Be careful as Wyrms tend to take your slaves and workers.
After you have gathered everything, you can assist to a meeting with the leaders of Tectum Carvos. Reward: 4 insights. And you can already recruit Eylani.
The prince will ask you to rally allies for the battle to come. A high friendship/trust with your contact is needed:
  • Avernum Prefectus (Avernum – The Hill): See The Last voyage achievement in this guide for more info. You need a level of trust of 7 with the prefect.
  • Dark Elve Prince Leakor (Deven – The Hindercaves): See The Darkness Within achievement in this guide for more info. You need a level of trust of 10 with the dark prince.
  • Magistrate (Crystal): See below. You need a level of trust of 6 with the magistrate.
  • Yskorri Ambassy (Larnak): See Insectoid Propagator achievement in this guide for more info. You need a level of trust of 8 with the ambassador.
  • Sadirar: See the Seeker achievement in this guide for more info. After you have been granted access to the upper village, the shamans will ask you to ascend the mountain of Kor. You will have to pass a tougth, mighty, and strong-minded test – Then a savvy test – Try to save Ekra – A strong-minded test. Reward: 5 insights.
  • Dhuzani (The Last Oasis)
  • If you have finish the Xevarian Gambit storyline you can recruit the Dread Reavers in Tectum Carvos - Wyrm Hunters.
When you have gathered every help, you can, the battle can begin. Reward: +11 insight, +4 renown. Be sure to have enough combat strength to win every combat crew. If you have the Command leadership perk, a strength of 600 should be enough. If you don’t have the Command leadership perk, a strength of 800 should be enough.

When you select ‘begin the preparation for the battle against the Wyrm’ this will start a long series of combat crew. It will last 6 days. Requisition a platoon of Tarkian soldiers – Crew combat: 639 strength and 144 defense and don’t forget to deploy your passengers this will add 365 strength to your crew – Prepare for the night – Ask the Sadirar shaman to heal your companions – Talk to the prince – Requisition supplies – 1 day will pass – another day will pass without an incident – Ask the shaman to bless your crew – Requisition supplies from the warehouse – Ask the shamans to heal your companions – another day will pass – Pick the tarkian soldiers – Use the charm you received from Dhuzanni - Prepare for the night – Ask the shaman to bless your crew - Requisition supplies – Talk to the magistrate of the prefectus – 1 day will pass – A first companion fight with 2 allies against 5 wyrms - Another companion fight with 2 allies against 5 wyrms - Talk to the prefectus – Requisition supplies – Time to turn in for the night – 1 day will pass – take in all fog them – Do not interfere – Try to smooth this over – 1 day will pass – Ask the shamans to bless your crew - 1 day will pass - Ask Eylani to scout the terrain – Get reinforcement from the Avernus legion – Crew combat: 256 strength and 60 defense – A companions fight against 6 wyrms – Get reinforcements from the Legion – Crew fight 1784 strength and 416 defense – 1 day will pass and you will gain 8 insights.

At the end of this hard battle meet the leaders in the war room. Reward: +3 Renown, +1 insight and a Bejeweled silver chest. They will ask you to consult Denekar a shaman in the Writhing Oasis. Report back to the leader in the war room in Tectum Carvos.

If you choose to bring them be prepared to have many fighters as they need many for their protection during travel. You have to escort them to The Last City of Vraltuk. You will have many fights with a group of four of your companions and some imposed fighter (shaman, tarkian soldiers). You will have 4 fights against sandwyrms before meeting the boss. You will have a 2 companions fight against 5 Wyrms and the renegade. Reward: 10 Insights and the Wyrmslayer achievement should pop.

Quests to befriend the Magistrate of Crystal: The Magistrate’s Needs
  • Get 10 balls of bogweed to the magistrate (you can buy some in Deven – Hindercaves – Wraith slum district – Black market)
  • Bring him a special ingredient from an apothecary in Lumen.
  • Bring him stack of Ceruleus Cristal
Companions (Part 7)
A Terrible Will
Complete Nedir’s personal storyline.
To find Nedir head in Avernum - The hill - Icanus' tower and ask him about his apprentice. Then go to Larnak - The fields - The Bumbling boatman - Look around for the sorceress. You can pay for her tab to increase loyalty.
During camp Nedir will call you in the middle of the night. You will have to fight demons. Reward: 2 Insights. Then she will ask you to contact her former tutor in Avernum – The Hills. But before meeting with him, be sure to bring:
  • 1 Demon Horn (you can buy one to Incanus)
  • 12 Spectral residues: You can find spectral residue on ghosts in the Sleepers Valley or you can buy some in Crossroad (what you can buy here is random).
  • 3 units of Oils (In most markets)
  • 2 units of Jade (In most markets)
Then go in Tor’Zag’s Shelter – Market District find Pardar. This will lead you to a Wraith named Weid in the Undercity of Tor’Zag’s Shelter. Then follow Weid and his associates in the sewers - Companion fight againt 5 wraiths. This will lead you to Dai-Kor-Vass in Tor’Zag’s Shelter – Market District and then in Tectum Carvos. The third time you will have to look in Avernum. You will know that he is dead. So, look for his bones in the Ossuary in Avernum – The Hills. Need Religion 5 or Tier 4 Church of Ahskul or Con 6. The next fight is quite hard, because you have only 3 companions and Nedir is one of them. I never took Nedir in fight as I prefer Finn and so that was difficult for me. But if you upgrade her well, I think the fight isn’t too hard.

This meeting will lead you to Larnak in the Temple of Bal Ur Kaal. If you haven’t done the quest Faithful Conviction. You have to do this quest now. During this quest you have to travel to Vigilus Tower and convince a young officer to abandon his military career.

If you have done the quest, the Bal Ur Kaal priestess will indicate the Nosferatis Hideout (marked on your map).
Need Nedir prowess 4 or -3 VIT Nedir and Terrified on all companions - Companion fight against 5 tainted men - Companion fight against 1 bone walkers, 2 nosfertis sisters and a tainted man - Another fight against 5 demons. Reward: 3 Ivory, 1 accursed amulet, 4 acrane text, 1 demon horn, 25 odd bone carving, 1 rare jewelry, 8 ahskulite charms, 1 valuable treasure, Bloostone, enchanted perfume, ring of leeching, torture devices, 3 insights.
When you have recovered the relic bring it back to Invernus in Avernum – The Hills. After performing the ritual, you will have to fight. But before that, asks for a blessing of Unbinding to the priest of Ahskul.
You will have a first fight against 4 Quarens - And a last fight against Morgarthan, a Quarren and an archfiend. Reward: 2 Demon horns, +5 VIT on all companion, Morgarthan's Gaol, 6 Insights.

The Last Voyage
Complete Skornar’s personal storyline.
Skornar is a good fighter and his stun attack can make you win a combat encounter.
To recruit Skornar go to Avernum in the Arena and observe a fighter in the pit - Warn the prefect - watch a fight and ask about the man into the pit (1 bross). Then go talk to the prefect on the hill - Slagfort. He will liberate with friendship 4. If you hadn’t befriend him already see below for more info.

Skornar will ask you to help him with his vengeance. Travel to Deven - Shadow Bazaar - Hall of Trade to meet the Carpenter’s Guild. To do so you will need a tier 2 with the Carpenters or a tier 3 with House Venari or 10 Renown or 20 Bross. Reward: 1 Insight.
Return to Avernum in the Carpenter’s headquarters in Lavinus Watering Hole (Scoria District). Ask to be taken to Pernandius. Then ambush Flaco late at night – Pick 5 companions. After the confrontation you will have a companion fight against 5 enemies including Falco. Reward: 2 Insights. Then you will have to fight Falco in Avernum’s Arena. Skornar will be alone against Falco, so be sure that he is well prepared. It can’t hurt to us ‘Inspire’ on him at the beginning. Reward: 2 Insights.
After your victory, discusses with Skonar at the camp. This will unlock the last part: A Life Long Lost.
Travel to Crimson Gate to see if Syrtir is still there. Once there you will have to ask from the garrison and the resident of the Crimson Gate. They will give you information that will lead you to the Mines of Plenty – Hungry Miner. After talking to Ulak, you will have a combat with Skornar against 2 bodyguards. Reward: 2 insights.
To find Syrtir investigate the tomb of Kathovras (see below).
Use magic (magic sense 3) - Press on - Climb down - Turn left - Drink the dark liquid - Need Perceptive 15 or Garrik - Companion fight against 4 revenants and a bone walker - Companion fight against 4 revenants, Kathovras and a bone walker - leave the tomb. Do not break the slab or you will die the next day.
Try to find Kjarten in any village of the tribes in The Searing Plains. They will guide you to Sadirar. You need to be accepted by the tribes. See the Seeker achievement. They will let you see him if you have access to the upper village.

The next step will be far away from your actual position. In Auguros Work Camp see for Hafri. You can pay the overseer or help Hafri escape. Take him to Maar Gorad (marked on the map). But before going there be sure to gather:
  • 2 stacks of timber.
  • 4 stacks of Linen
  • 2 units of Iron
  • 1 stack of mushroom beer
  • 200 units of supplies.
Then ask him about building a boat. If you have followed this guide, you should have what he required. If you want to keep Skornar, save before. Let him go to unlock the achievement, then reload. When you bring Hafri what he required, you can fully upgrade Skornar.

To increase friendship with the prefect:
Brought him fresh news from large cities and secrets.
A quest will unlock when you reach 3 friendship: An Account of Corruption
Deliver a package toAuguros Work Camp and bring back a prisonner. If you don’t bring him back you will lost 1 point in friendship. If you talk to Harvek about the prefect it will also raise friendship.
Tasks
You can access tasks in cities when you click on the Faction button. Trade tasks have the axe logo and mercenary task have the bag one.

You can see how many cargo slots it will take to bring the merchandise near a box symbol. Be sure to have enough place to bring supplies for the journey.

For mercenary tasks, the colour of the logo indicates if you can win the battle with your actual strength. When you hover on the axe logo, you can see the actual strength you will be fighting against, if you need to let fighters, how many fights will be needed and also if you have to fight another faction, which one is it.

Breached
Fail a Faction Task.
Accept a task with a short time limit preferably and just wait until you run out of time.

Taskmaster
Complete 50 Tasks.
This can be trading tasks or mercenary tasks.

Merchant
Complete 100 Trade Tasks in a single playthrough.


Merchant Lord
Complete 250 Trade Tasks in a single playthrough.


Mercenary
Complete 100 Mercenary Tasks in a single playthrough.


Mercenary Lord
Complete 250 Mercenary Tasks in a single playthrough.
Codex entries
To unlock codex entries, talk to people and exhaust every option when you visit places. Visit as many places as you can inside the perimeter. When returning to places that you know, see if there aren’t new options available.

Try to do storyline and quests. You can also buy/order books in Larnak (The Fields – Noon Day Reader), sometimes you will find codex entries in them. Return regularly as his shop will get new books through the game. Books also give you one or two insight points.

You can see your progression at the bottom of your codex. There are a total of 224 entries.

Scribe
Unlock 85 codex entries in a single playthrough.


Scholar
Unlock 150 codex entries in a single playthrough.


Loremaster
Unlock 215 codex entries in a single playthrough.
Factions (Part 1)
Acquaintance
Reach a Tier 3 standing with any faction.
To increase your reputation with any factions you can take tasks (mercenary or trade), do errands for officials (you need a certain reputation level to unlock this option). For more information about errands see below achievements with each faction.

Despised
Reach the lowest standing with a faction.
The easiest way to do it is to take a mercenary task for their adversary. When you hover on the axe logo, you can see the actual strength you will be fighting against, if you need to let fighters, how many fights will be needed and also if you have to fight another faction, which one is it. Take tasks where you have to fight the faction you want the lowest standing with.
When you are selling slaves in market your relation with Abolisionists decrease.

Diplomat
Have Tier 4 standing simultaneously with 8 different factions.
For more information see Acquaintance. But be careful not to pass bellow tier 0 with any faction as it will be very hard to restore your standing, except for the abolitionist.

Factotum
Have Tier 5 standing simultaneously with 6 different factions.
For more information see Acquaintance. But be careful not to pass bellow tier 0 with any faction as it will be very hard to restore your standing, except for the abolitionist.

Manticore
Reach the highest standing with House Venari.
Quest for House Venari: See the Ruiner achievement.
Sell information to this house in Larnak.
Tier 2 House Venari: Larnak - Lucernum - Villa Acuela - Seek an audience to get a quest: Sorting out Omphalat. For more info see the Ruiner achievement.

Captain
Reach the highest standing with House Darius.
Do tasks for this house and transport passengers from the Darius house. You can also go to Ash and offer to transport slaves from the biggest slave market.

Quest : Always Greener on the Other Side. In Acherus Quarry - The forum you need 2 Renown or tier 2 with House Darius to talk to Iulius Claudius (+1 insight). He ask you to spy for him on the Drussian Quary. When you arrive at your destination select Spy for Acherus:
  • Start at workers' canteen - Join in (5 Changers, 5 Charismatic)
  • Or go straight to the Station (need 2 House Oquo, 6 Savvy, 2 Con).
Reward: 5 Lyrg, 35 House Darius, 1 Exquisite Weapon, 1 Insight. Return there after two months to receive 20 Obsidians and a new quest. Return to Drussian Quary then select Spy for Acherus again you can pursue your investigation with House Oquo 2 - Charismatic and Con test. Reward: +30 House Darius, 1 Insight, 3 Bross

Trailblazer
Reach the highest standing with House Oquo.
Drussian mines: Lord Valabentu of House Oquo(need 2 standing) - Offer you services
Quest: A Matter of Presence
  • Larnak – The Fields: Find Rasheed
  • Secure the warehouse for house Oquo: If you have a good relationship with the Loader’s Guild or a high enough renown it’s easy. If not, you have to raid the place.
  • Then report back to Lord Valabentu.
Offer Lord Valabentu a Jade Statue to get +30 with House Oquo. You can give him a statue every 15 days.

Despoiler
Reach the highest standing with the Ratharnak Alliance.
Official’s location: Mine of Plenty – Rathanak Compounds – General Angaroth (need a tier 2 relationship)
Quest: Agent of Destruction
Agree to take a wraith woman to Velarias then report back to Angaroth.

Quest: Cleanse the Rot
Deliver 10 Luxury Wine, 10 Bogweed and a pile of Corpses to Velarias. Once you have arrived in Velarias select: Call in the Dragons.

If you do not have a pile of corpses, go to Deven – The Hintercaves – Wraith Slums – Browse the black-market wares and purchase corpses.

You will get: +50 Ratharnak Alliance and Velarias will become a ruin. For your comitatus: -2 Morale and -1 Vigor

Arcanite
Reach the highest standing with the Scythichnis Covenant.
To get a lot of standing with the covenant see What Lies Below and The Voice of Hereafter. You can also sell them Dragonbone and Dragonsteel Scraps.
This house uses few trade routes. So it can be difficult to take your relationship high enough.
When you reach a tier 3 relationship go to Salum - Covenant House - Visit the inner sanctum - There is a matter ... You will begin the quest: Wayward Souls.
Be prepared with a Blessing of Unbinding as you will encounter undead.
When you arrive in the area you will have a companion fight against 5 Jhakras. When you can, explore the camp for more clues (Perceptive and Skulker test). Then go to the next node to the north and click on the torch icon. Select 'Seek out the Artakin Tomb' - Assemble a team - Dispell the barrier (need a spellweaver) - For the next test you will need Magic sense 4 - Companion fight against 3 specters - Explore the passage to the right - Examine the amulets (Need magic sense 6 or Arcane lore 2) - Need Magic sense 4 - Companion fight against 4 specters - Explore the inner chamber a bit more - Take a look at the amulets.
Then report your finding to the Covenants to receive your reward: 3 Rare jewels, +50 Scythichnis Covenant, Large Energy Crystal, Dragonstone of Clairvoyance, 3 Insights.

Handymen
Gain at least 5 Bross from a single Odd Jobs city rest action.
Easy to do it with a high standing with the Loader’s Guild or/and the Carpenter’s Guild as it will increase your chance a succeeding. You can do jobs when resting in Mansio. To increase your chances, have as many slaves and workers as you can. But save before doing so.
For example, I had 57 Slaves and 67 workers.


Carpenter
Reach the highest standing with the Carpenters’ Guild.
Phaeras the Jeweler will ask of you to go to Larnak – Lucernum - Herctum Antiqua - Sign up - Wait 1 Day - Go to Lucernum - Intimidation and mighty test - wait a second day - Mingle with other guests - A savvy, charismatic, persuasion and history test - Rush backstage - Rush at them - Companion fight against 5 thieves.
Reward: 100 bross
Retrieve the jewel and bring it back to Deven to get your reward: +100 Carpenters, 2 insights.

DLC Sunfire and Moonshadow - Kabur - Souk - Craftmen's Square (Need a tier 2 standing):

Executor
Reach the highest standing with the Church of Sergorod.
If you accomplish bounty as well as tasks, you will increase your standing with the Church of Sergorod. You can also sell them Outlaw Trophies.
Factions (Part 2)
Making Contact
Unlock access to the Abolitionist faction’s headquarters.
Reach a relationship level of 2 with the abolitionist and free all your slaves so you don't have a single one left. Shortly after (1-2 days) a worker will come and talk to you to give you the location of the headquarters: Deserted Cove in Maar Gorad.

To increase your relationship with the abolitionists you can buy slaves then free them or enslaved you enemies at the end of a crew combat and then free them. But don’t sell you slaves or your standing will decrease quickly.

For the Cause!
Unlock access to 10 different Abolitionist cells in a single playthrough and report your success to the faction.

When you know the location of the headquarter go to the deserted cove and new option will be there to contact the Abolitionist. After that you will gain access Var’Dak’s Landing. Learn about cypher Accius to contact Abolitionist cells. In each new cell you can learn about a new Cypher. But in order to learn new Cypher you need to increase your standing with the Abolitionist. For each tier you can get a limited number of Cypher and you need to wait before getting another one. Cypher disappears after 14 days.

If you have done the quest: Death Incarnate (bounty quest in Tor’Zag’s Shelter) then you can tell Accius about what were the Necromancer lasts words. Accius will give you a new quest: Fate of the Downtrodden. Go to Deven – The Gardens – Copper Pugio inn – Contact the abolitionist cell – Find your contact (need 1 with the abolitionist) – Report what you heard of Munda Tellain. Reward: +25 Abolitionist, 1 insight.

Tor’Zag’s Shelter: You need 2 standing with the faction. Select Contact the local cell. Pick 2 Companions. This will consume one abolitionists cypher. Located around the lake in the undercity.

Lumen: You need 2 standing with the faction. Select Contact the local cell. Pick 2 Companions. This will consume one abolitionists cypher. Located in Blind Jahkra inn.

Larnak: You need 2 standing with the faction. Select Contact the local cell. Pick 2 Companions. This will consume one abolitionists cypher. Located in the Bumbing Boatman.

Avernum: You need 2 standing with the faction. Select Contact the local cell. Pick 2 Companions. This will consume one abolitionists cypher. Located in Scoria.

Acherus Quarry: You need 2 standing with the faction. Select Contact the local cell. Pick 2 Companions. This will consume one abolitionists cypher.

When you have found at least 5 Abolisionists Cells and you have at least a tier 3 standing with the abolisionists, you can share what you have learn with Accius in the Deserted Cove. Whatever you choose you will gain +30 Abolitionists and +3 insights.

Liberator
Reach the highest standing with the Abolitionists.
See the Making Contact achievement.
Factions (part 3)
Loader
Reach the highest standing with the Loaders’ Guild.
When you get a standing of 2 with the Loader go to Tor’Zag’s Shelter – The undercity – Bath House - Visit Rhak'Tar and exhaust every options.
He will give you a quest: The Stand
In Salum ask about the Har-Tak-Gai Tribe. Find the meeting point near Vortex (see below).
Look around (need Survival 8) and follow the tracks.
Then go to the meeting point :
You arrive in the middle of a conflict between the Har-Tak-Gai Tribe and the Sharduk marauders. You can talk to both leader before taking a decision.
  • If you side with the Sharduk you can go by their leader choice and have a companion fight against 6 ennemies then a combat crew with the help of the Sharduk (+316 strength): strength 223, defense 62 OR you can fight them directy with a Crew Combat: 272 strength, 75 defense. Reward: 5 Ivory, 119 supplies, 2 Pristine trophy, 12 beast lures, 2 simple jewelry, 1 valuable treasure.
  • If you side with the Kal-Rish you will start with a companion fight against 3 Sharduk reaver and 2 Ifreannis. Then a Crew Combat (+230 strength): 290 strength, 38 defense.
    You can deliver the goods yourself with an intimidation, persuation, mighty, charismatic test.

Watcher
Reach the highest standing with the Church of Ahskul.
If you gave them some spectral residues, you will also increase your standing with them. Bounty quest related to undead will increase your relationship with the church.

Required a tier 1 standing. In Deven – The Temple Ward Necropolis of the Great King - talk to a high priest. He will ask you to kill an undead called Thatmas in Arken. Even if you do not take Thatmas life in Arken, you will not get a penalty with the church.
To let him live complete Thatmas Transmogrified:
  • Socketed golden amulet: Deven – The Shadow Bazar – Visit the jewelry shop - Ask him if he can craft you a golden amulet – Give him a golden amulet or buy a golden amulet
  • Large energy crystal: Lumen – Crystalmancer’s shop - buy a large energy crystal
  • Rare clay : Go to the location marked below – Sent out search parties (prospecting and perceptive test). You will need to use supplies (20) during travel to keep the clay moist.
After bringing him everything, rest in the Mansio an return to Thatmas’ Shop the day after. After entering the shop you will have a companion fight against 4 Bounty Hunters and their captain. Then Thatmas will join your comitatus. You have to bring him to Mirage – Thatmas’ arrival. Reward: 1 Valuable Treasure, 1 Bronze Statue, 1 Insight. You can visit him again in a few days.

In Ioscian Quarry - Visit the Morgue a Necromancer will ask you to look fo Scortaur bands. You can find them in the location below.
You will have a crew fight: Strength 54, Defense 24
After collecting your reward you will unlock a new mission with Necromancer Orpiter Lucius Herculius. Reward: +20 Church of Ahskul, +30 House Oquo, 5 Bross, 2 Insights

In Ioscian Quarry - The Bone Garden: After your first quest in Ioscian Quarry meet Necromancer Orpiter Lucius Herculius (Reward: 2 Insights). He will ask you to find the skeleton of a tainted manticore (see location below).
Reward: +30 Church of Ahskul, 2 Bross, 1 Valuable treasure, Blessing of Ahskul.

It is necessary to have already helped the Necromancer Orpiter Lucius Herculius. In Deven – The Great King's Temple Necropolis, the high priest will ask you to go to the Ioscian Quarry and collect the corpse of a great necromancer to bring it to Deven. Along the way, your comitatus will be drugged and the corpse will disappear. Investigate around camp (need 5 Savvy, 3 Religion). Then go to Sun Rock, but do not report to the High Priest of Deven. Try to be the mediator between the different parties so that they realize that they must first consult the deceased because he is the one in question. This time you can go to Deven and give the corpse to the church. Reward: 1 Valuable Treasure, 1 Rare Jewelry, 70 Church of Ahskul, 6 Bross, 5 Insights and Blessing of Ahskul.
Passengers
Delayed
Keep a Passenger for an in-game year.
Easy to do during the quest Trial of the Wind. Help the shamans and keep them for at least one year before returning to Kotrar.

Escort
Transport 100 Passenger groups to their destinations in a single playthrough.
Take passengers to their destination through the passenger panel in Mansios. I don’t know if passengers from quests count in this achievement.
News
Harbinger
Get paid for recent news from a ‘Far Away’ source of origin.
You need to visit distant cities and bring news between them. It will happen during your playthrough if you explore a lot, but you need to get news from non-visitable cities. Ask about fresh news in market and spend a few changers. You can also get news from far away cities during random events.
You can see the freshness of your news in your journal.

Courier
Exchange news 200 times in single playthrough.
Don’t forget to exchange news each time you arrive in a place. This achievement will unlock quickly.
Wining and conditions (Part 1)
Conqueror
Win the game.
The game ends once you have fulfilled all the victory conditions. You can reload your game after winning, if you have unfinished quests.

Entrepreneur
Win the game through the Wealth Ambition.
In order to win through the wealth ambition you need to build your own outpost: see the Settler achievement.
To succeed you will need a lot time, because there is a lot of waiting period. You will also need a large quantity of coins and a high level of relationship with the differents trading house.

Celebrity
Win the game through the Renown Ambition.
If you choose the renown ambition, seek a legendary Vagrus for advice. You can find him in Mirage, this city is situated on the west side of the map. North east from Larnak in the Arenas Vorax region. To see more about it see the Been There, Done That achievement.

After you have completed the first quest talk to him again when you have at least 40 in renown: Tell him that your name is being spoken all over the region

Renown +1: Reaching 7 with Adjunctis Prefectus of Avernum: The Prefectus Wishes to talk to you.

You will get +1 Renown when you reach a tier 3 and 5 standing with any faction.

Quests that give you renown: The Golden Theory (+1), The Beast of Arken (+1), Trouble at Fort Larius (+2), Source of Discord (+1), Insectoid Propagation (+1), The Lost Grifter (+1), Vorax storyline (+6), Gor’Goro: Kingslayer (+4), The Dead Reavers (+3), The Return of The Wyrms (+7).
Wining and conditions (Part 2)
Seeker
Win the game through the Knowledge Ambition.
For starter, you will need a rumor: A curious book shop, in order to have access to a bookshop in Larnak - The fields.
To unlock the quest for this ambition you need to have enough codex entries: Seekers of Knowledge (I had 180 codex entries when the new option appeared in the dialogue)
The merchant who runs the bookshop in Larnak – The field will give you this quest if you meet the requirement. He will tell you to seek out Tertia Sartra: Tor’Zag’s Shelter – Civic District – Public Library.
Tertia Sartra will give you a new quest. You have to go to the Upper Village of Sadirar. In order to go to this sacred place, you need the pass the trials of the tribes:
  • Trial of the Winds: The quest starts in Kotrar. Shamans are not always there, so if they are not here when you arrived do something else and return there 2 weeks later. You have to take the Kotrar Shamans at the centre of the Singing Winds (see below).Wait one day and assist them in their ritual. Crew Combat: 209 to 259 strength and 29 in defense. Then you will have a companion fight against 4 Ghouls. 2 Wind Shaman will help you. After the fight you will have to wait again one day. Reward 2 Insight and Blessing of the Wind (+1 MP during 14 days). When they are ready take them back to Kotrar.
  • Trial of Earth: In Eitrar Enter the Grotto of Reflexion – Enter the Grotto and choose 6 companions – Enter the Crystal Chamber. Fight against 2 Splinter. Then touch the yellow crystal. You will have a last fight against a Splinter. If you fail you can try again the next day. Reward: 3 Insights.
  • Trial of the Water: in the Writhing Oasis talk to Danekar and escort her into the Writhing Oasis. Do not try to go without her or you will die. Take Finn and/or Nedir with you. Leave the fruit and ask to Finn/Nedir to cast a spell. Reward: 5 Insights. Return to Vitrar to finish the quest.
  • The Trial of Flame: - The Trial of Flame: Kill sand wyrms pack when travelling into Arena Vorax. They attack often, so that shouldn’t be a problem for you to get 12 trophies of Sand Wyrms. Bring the trophies in Utvorar to be allowed to pass the trial. Travel to the place marked on the map. Begin the trial of flame – leave a tribal trinket – Everything begins to go to darkness (tough and strong-minded test) – Reach into the flame – Press on – Then he locks gaze with you. Reward: 1 Insight. Don’t forget to get back to Utvorar to complete the trial.

After succeeding in every trial, you need to return to every tribe to get their blessing. Travel quickly as benedictions don’t run indefinitely. When you arrive in Sadirar you should have the four blessings still active. If you do so, they will grant you access to the upper village.

Talk to the shaman and they will ask you to escort them to the Sunken Tower. They will set up a base camp there and leave your comitatus (+2 insights). The Sunken Tower is southeast from Tectum Carvos.
Enter the Tower - Head up to talk to the guardian (1 insight) - Exhaust all options - Leave him - Head down to explore - Enter the Study Halls -Pick a direction. The following events occur randomly.

The tests become increasingly difficult as you venture further. Consider taking ability Enhance, if you can, because this ability will significantly increase your chances of success.

If you fail certain tests, you will die immediately, so don't progress too far into the tower.

The events are random. When you leave the tower your comitatus may be attacked by enemies or have to face a storm.

You may encounter different enemies in the tower (they all have the trait: Impervious)
  • Study Halls : Custodia Genius (unaffected by electrical damage and resistant to magic damage), Specters, Custodia Superintendens, Shades
  • Dormitories, Lecture Halls and Library : Custodia Genius, Specters, Shades, Custodia Prime, specters
  • Crystal Archives : Crimson shard, Crimson Splinter, Splinters, Custodia Genius, Specters, Shades, Custodia Prime, specters
  • Star Garden : Shards
Meeting with Praeceptor Letitheassin : this will unlock new objectives for the quest : Seal Beyond.
Into the Study Halls (when exploring, random event): You meet a young scholar – Success in a test to receive a Spell of Opening and 1 insight: you can now break the seal on the Dormitories
When you return back from the tower, the quest For Posterity will be update too. Go see the librarian in Tor’Zag’Shelter – Civic District – Public Library – report to her about your first foray (4 insights). In order to reach The Crystal Archives you need to progress through the tower until you have the keys that can open it.
  • Into the Study Halls (when exploring, random event): You meet a young scholar – Success in a test to receive a Spell of Opening and 1 insight: you can now break the seal on the Dormitories (1 insight).
  • Into the Study Halls (when exploring, random event): You find a place with a map to study. Then you will have to fight against Custodia Superintendens and Custodia Genius: 1 insight, 1 Diary of Narma, 2 Ancient tablet, 2 arcane text, 1 insight: you can now break the seal on the Lecture Halls (1 insight).
  • Into the dormitories when you are prompt choose: Stay and observe the game – Savvy Perceptive and Navigation test. Then continue exploring the tower. When you come back, you can continue the game. If you win you will have: 1 Imbued key (This item will give you access to the Library - 1 Insight.)
  • Into the Lecture Halls you will meet a lone specter who will ask if you are the new professor – Tell that you are (Charistmatic and con test). On you next visit to the tower A specter will tell you to go inside the class – Apologize and head inside – Religion a least 6 – On another visit you will meet two High Praeceptors – Then during a later visit you will hear a woman's voice who will welcome you to the tower of Akarius. She will ask 3 questions:
    • First answer: Knowledge
    • Second answer: Morality
    • Third answer: Head librarian
    You will receive the Bibliothecaris Prefectus Scepter to access the Crystal Archives you will also need the Glyph of the Seeker from the Library.
  • Into the Library you will find the Mage’s Memory Crystal during you exploration (random event). Then you will need to go to a Crystalmancer to experience its content – Go to Larnak – Lucernum – Murno’s workshop or Lumen – Crystalmancer’s shop. To access the Crystal Archives you will also need the Bibliothecaris Prefectus Scepter from the Lecture Halls.
When you have the Bibliothecaris Prefectus Scepter and the Glyph of the Seeker break the seal on the Crystal Archives (1 Insight, 1 valuable treasure).
You can now return to see Tertia Sartra in Tor’Zag’s Shelter to inform her that you were able to unseal the Archives.
Then go to Shibenni’s shop in Lumen to record your memories. To obtain each memory you will need 9 Prsistine Memory Crystals and specific codex entries.
You can find Pristine Memory Crystals in The Sunken Tower – Enter the tower – Explore the lower levels - Crystal Archives.
If you miss just a few entries, buy perks points in: Alchemy, Arcane Lore, Beast Lore, Engineering, Herb Lore, History, Navigation, Outer Realms Lore and Religion. And go to Larnak – The Field – Noonday Reader see if he has new books.

When you have recorded all your memories you will receive 6 Insights and you will have to return to see Tertia Sartra in Tor’Zag’s Shelter – Civic District – Public library. Then say your farewell – Defend her – Companion fight against Legionnaires and Executor of Sergorod (6 foes). Reward: Ring of Keepers, 6 Insights.
Wining and conditions (Part 3)
Rage Repressed
Receive the Wrath of Sergorod during the first three in-game weeks and win the game without ever removing it.
To get the Wrath of Sergorod (+10% enemy combat strenght) in any temple defy Sergorod. It works in Tor’Zag’s Shelter or in Deven for example.

Death Denied
Receive the Disdain of Ahskul during the first three in-game weeks and win the game without ever removing it.
To get the Disdain of Ahskul (higher chances of undead ambushes) in any temple defy Ahskul. It works in Tor’Zag’s Shelter or in Deven for example.

Deceptions Disclosed
Receive the Treachery of Bal Ur Kaal during the first three in-game weeks and win the game without ever removing it.
To get the Treachery of Bal Ur Kaal (You can’t see the effect you gain the Treachery of Bal Ur Kaal) defy Bal Ur Kaal in the temple of Larnak – Lucernum – Sanctum of Bal Ur Kaal.

Defiant
Receive the Wrath of Sergorod, Disdain of Ahskul, and Treachery of Bal Ur Kaal during the first three in-game weeks and win the game without ever removing them.
See above for more information.

Vagrus Supreme
Receive the Wrath of Sergorod, Disdain of Ahskul, and Treachery of Bal Ur Kaal during the first three in-game weeks and then win the game without ever loading a manual save game in the playthrough.
See above for more information.

Beloved by Irafons
Win the game without ever loading a manual savegame in the playthrough.
Others (Part 1)
Conquered
Die for the first time.
Pretty explanatory

Randomized
Roll 100 on an Accuracy roll.
It should happen much faster than you think.

Unseen Patterns
Listen to the strangest sounds of the wasteland.
The picture is misleading because this achievement won’t unlock in if you only visit Ventulium.
In Ventulium, listen to the melody (need Savvy 6).Reward: 2 Insights.

In Deven – Explore the city (Random event, see below). You have to pass a Strong-Minded test to listen to what is inside the crystal-like formation. Reward: +1 Insight

In Drussian Quarry ask for a tour of the quarry and if you have five in perception and six in magic sense, you can select ‘Suddenly there is a strange sensation’ during the visit. If you don’t have the requirement, this option will not appear. Reward: 2 Insights.

Near Avernum: Voiceless lake (see Been there, done that achievement)

Life… Finds a Way
Gain the Spirit Idol.
Buy the wooden idol from Thatmas in Arken or in Mirage.

In Tor’Zag’s Shelter – Civic Distric – Garden of Laviena : Talk with the superintendant and ask him questions. If you have the wooden Idol with you, you will be prompted to show the statue to him.

Then in Deven – Hanging Garden : Talk with the botanist and show him the idol transformed by the superintendant.

And last take the idol to The Last Oasis and talk with Djuzanni she will transform it into the spirit idol and the achievement should pop.

Accomplished Explorer
Discover all accessible named locations and regions.
As I didn’t unlock this achievement, this list isn’t complete.
  • Acherus Quarry
  • Arken
  • Ash
  • Auguros Work Camp
  • Avernum
  • Carravhon, The Howling City
  • Crossroad
  • Crystal
  • Deserted Cove
  • Deven
  • Drussian Quarry
  • Eitrar
  • Fort Larius
  • Fort Refugis
  • Fort Viridium
  • Ioscian Quarry
  • Kernak Waystation
  • Kotrar
  • Larnak
  • Leviathan’s Demise
  • Lumen
  • Mines of Plenty
  • Mirage
  • Omphalat Outpost
  • Sadirar
  • Salum
  • Sun Rock
  • Tectum Carvos
  • Tectum Kelvar
  • Temple of the Sleepers
  • The Crimson Gate
  • The Forlorn Hive
  • The Forsaken Colony
  • The Last Oasis
  • The Lost City of Vratluk
  • The Sunken Tower
  • The Twin Towers
  • The Writhing Oasis
  • Tor’Zag’s Shelter
  • Utvorar
  • Velarias
  • Ventulium
  • Vigilus Tower
  • Vitrar

Metropolitan
Visit the four great cities within 14 in-game days or less.
The four great cities: Tor’Zag’s Shelter, Avernum, Deven, Larnak.
Others (Part 2)
Chromatic Collector
Own one of each Dragonstone.
In Salum you can buy Dragonstone of Celerity, Dragonstone of Clairvoyance, Dragonstone of Enchantment and Dragonstone of Teleportation.
In Mine of Plenty, you can buy Dragonstone of Protection.
Dragonstone of vitality is a reward for the quest The Dread Reavers when Daneram Xevaris, the young noble asks you to bring several things for a feast he is holding (See Xevarian Gambit achievement)

Glorious leader
Unlock all Leadership Perks as well as reach the maximum Resourcefulness and Authority in a single playthrough.
It will cost you a great number of insight points. If you are not interested in getting every leadership perks, you can wait to get enough insight point save, buy everything needed for the achievements then reload again. But max authority is very important and full resourcefulness may help you in combat.

Tail-wind
Start an in-game day with a total of MP plus MMP higher than 20.
See Moving At Odd Angles.

Moving At Odd Angles
Start an in-game day with a total of MP plus MMP higher than 28.
Mp depends on your beasts: Mammals, Reptiles and Yrgs.
Dwarven Compass: + 1 MMP
Reinforced Cartwheel (Mine of Plenty – Ratharnak Emporium) gives + 2 MMP
Reinforced Wheels and Axles (Avernum – Scoria – Anvil of Thardraz): You need to give the dwarves 3 Iron, 2 Timber and 6 Bross. After that you need to wait for 20 days: +20 Flee, +1 MP, +1 MMP.
Moral 8 or above: +5% MP, 10% MMP
Vigor 8 or above: +10% MP, 15% MMP
Irafons blessing (random encounter on the map): +2 MP.
Kalarruk’s favor (Deven – Random encounter when exploring the city, give money to the poor) + 1 MP
Blessing of the wind (Kotrar after finishing the quest Trials of the Wind): +1 MP.
An assigned Chief Handler: +1 MMP
An assigned Scout Master: +1 MP

Tax Evasion
Avoid the highest tier of road tax.
Road tax increase through the game but you can escape them with enough reputation with factions. In each tier the needed reputation increase. Loader’s guild and Carpenter’s Guild can’t help you in this matter. The highest tier of road tax cost 250 Bross.

Huntsmaster
Gain at least 950 Supplies from a single Hunting camp action.
Foraging is a camp action that can be accomplished with scouts. Prefer to camp in the wilderness. There is also equipment that can give you a bonus: Falcons (+10 Hunting Base Chance, +15 Scouting Base Chance), Hunting Animals (+10 Hunting Base Chance, +5 Chase, +8 Combat Strength).
To see where to find equipment see the Prepared For Anything achievement.


Forager
Gain at least 500 Supplies from a single Foraging camp action.
See the Huntsmaster] achievement.

Settler
Build your own outpost and develop it to its full potential.
To build an outpost you need to go to TorZag Shelter or any major city and spend 250 Bross at the authority office.
The following take place in Deven - The Gardens - Offices of the Legate. You need either a reputation of 14 or higher or a certain level of relationship with factions. To know how much this cost see the screenshot below.
To establish a permanent outpost, you will need:
  • 6 stacks of bone (Ioscian Quarry)
  • 2 stacks of hide (Tor'Zag's Shelter)
  • 1 stack of obsidian (Drussian Quarry or Acherus Quarry)
  • 1 stack of bronze (Mine of Plenty)
  • 12 stacks of supplies (Tor'Zag or Deven)
  • 40 Bross
  • 50 Workforce
  • 2 Mounts
You will also have to leave members of your comitatus:
  • 22 fighters,
  • 16 Workers/Slaves,
  • 8 scouts
  • 2 mounts
You will need 2 days to built a permanent camp. See below for the outpost location:
Then wait two months before coming back to your outpost.
In the meantime, to temporarily improve your salt extraction, you can bring:
  • 12 imbued masks,
  • 15 potteries,
  • 15 Linen,
  • 25 Hides
  • 100 Bones
When you return to your outpost after 60 days, your overseer will report to you (random events took place during your absence). The Outpost - Look for the best spot.
To mine the salts effectively you will need an expert. To find him: Salum - Lakeview Square – Visit the Ratharnak outpost – Accept an invitation – Hire Bergavuor to survey your salt mining trip (40 Bross). Or you can find two other miners at the Salt Shaker inn.

Then bring him to your outpost and come back in 20 days.
You can also upgrade your outpost if you have the necessary (tools, animals …).

When the miner has finished select ‘The results of the salt mining survey are ready.’
The expert needs a lot of goods to mine salt:
  • 5 mining equipment,
  • 40 stacks of bone,
  • 15 stacks of obsidian,
  • 15 stacks of iron.
You can also ask for help to you allies:
- Oquo: Lord Valabentu in Drussian Quary (Obsidian, bones, scouts, ivory, brightkelp, marble)
- Ratharnak: Angaroth in Mine of Plenty (Horses, Ifreanni, timber, Iron, bronze, marble)
- House Venari: Lord Psithyrus in Larnak (Fighters, Timber and Brightkelp, marbles).
- Covenant: Sardokhor in Salum (Iron, Workers, timber). You can also ask fo their protection.
- Ash: Darius (slaves)
As it will make you have everything at once you will not be able to carry everything. You will therefore have to call on your allies.
To see the result you will need to wait 3 months.
After those 3 months your journal will update and you will need to bring:
  • 500 Ivory
  • 100 Timber
  • 150 Brightkelp
  • 80 Bronze
As before ask help from your allies.
Then, again you will to wait 4 months.
Your journal will update with the necessary goods for the last update of your outpost:
  • 1000 Marbles
  • 120 Iron
  • 32 Silver
  • 20 Crystal Lamps
  • 3 Pristine Trophies
  • 3 Exquisite Weapons

Return to your outpost in 6 months: Outpost - Consider upgrading your outpost - Check on the progress - You walk accross camp to inspect it - Time to enjoy the fruit of your work.
This will also end the game with th Wealth Victory.

Over the Horizon
From the start of a campaign, reach the Last Oasis in 17 in-game days or less.
Others (Part 3)
All Geared Up
Own at least 40 unique Gear.
You can buy some off them or find some others during quests and encounters.
  • Alchemical Tools
  • Amulet of Concentration (Avernum - Ivanus, Lumen - Crystalmancer)
  • Amulet of Protection (Champion of bestiary Arena in Tor'Zag Shelter and see The Jhakra Alpha)
  • Bloodstone (see A Terrible Will)
  • Bone Wand ( see Huntress Unbound)
  • Bronze Owl Pendant (Deven - Jewelry)
  • Candle of the dead (Deven - Church of Ahskul - Candlemaker's shop)
  • Crystal idol (Arken - Thatmas' shop)
  • Demonbone Vambraces (Avernum - Icanus' tower)
  • Dragonstone of Celerity (Salum)
  • Dragonstone of Clairvoyance (Salum)
  • Dragonstone of Enchantment (Salum)
  • Dragonstone of Protection (Salum)
  • Dragonstone of Teleportation (Salum)
  • Dragonstone of Vitality (see Xevarian Gambit)
  • Enchanted perfume (TorZag Shelter – Braxius' store, Avernum - Bal Ur Kaal Sanctum)
  • Greater Luck Talisman (The last oasis)
  • Great King Blessed Ring (Reward Church Of Ahskul IV)
  • Gval Rune (Avernum - Icanus' tower)
  • Herbalist Tools (Tor'Zag or Deven infirmary)
  • Icareon’s Circlet ( see Insectoid Propagator)
  • Jah-Rai-Vek's Pipe (Tor'Zag's - Market District - Kal-rish market - Visit old Jah-Rai-Vek, Need rumor : The Old Kal-rish)
  • Large Energy Crystal (Lumen - Crystalmancer)
  • Luck Talisman
  • Manticore Broche (reward House Venari IV)
  • Medicos tools (Tor'Zag or Deven infirmary)
  • Morgarthan’s Gaol (see A Terrible Will achievement)
  • Murky eye Broche (The last oasis, Avernum, Deven - Jewelry)
  • Orcish Terror Totem
  • Potent Poison (Alchemist or herbalist hut in Laviena's Garden)
  • Rhaxian Incense (reward Handjari IV)
  • Ring of Keepers (see Seeker achievement)
  • Ring of Leeching (see A Terrible Will)
  • Scabbard of Valahuir
  • Shadow Talisman
  • Small Energy Crystal (Lumen - Crystalmancer)
  • Smoldering Heart (see Abominable Congregation quest)
  • Spirit Idol (see Life Find a way)
  • Survival Kit (Utvorar - Trade with the shamans)
  • Talisman of Divine Rage (The Temple of Avernum, Kotrar. Quest : The Source of Discord)
  • Talisman of Inubis (DLC Sunfire and Moonshadow - Kabur - Temple Quarter - Temple of Inubis - Priests of Inubis)
  • Thatmas Idol (Arken or Mirage)
  • Torture Devices
  • Trap kit (TorZag Shelter – Braxius store, Utvorar - Trade with the shamans)
  • Urd Rune (Avernum - Icanus' tower, Dwarf merchant rumor in Tor'Zag, Quest: The grape of grath)
  • Varukai Gauntlet (offered by the Prince Laekor if friendship=12)
  • Vernius Matriach Skull (see Voracity Confronted achievement)
  • Wand of Parhassus (see And the Sky Full of Stars achievement)
  • Windwalker Talisman (Kotrar)

Prepared For Anything
Own at least 45 unique Equipment.
You can buy them in cities.
  • Awnings (Market in every large city)
  • Blinders and combat saddles (Market in every large city)
  • Bronze Armements (Ash with 1 House Darius, Avernum - Scoria - Anvil of Thadraz)
  • Burhek's Traps (Eitrar)
  • Calerus Protection Gear (Lumen or Crystal)
  • Candle of the Living (Deven - Church of Ahskul - Candlemaker's shop, Avernum)
  • Cat (DLC Sunfire and Moonshadow - Kabur - Souk - Bespoke shop - Menagerie)
  • Dowsing rod (Vitrar - trade with the shaman)
  • Dragonsteel Armements (See The Voice of Hereafter achievement)
  • Dwarven Compass (Eylani’s quest end - See Ever After achievement)
  • Extra Storage (Market in every large city)
  • Exquisite banner (Larnak - House Venari or see Xevarian Gambit achievement)
  • Exquisite Tools
  • Falcons (Tectum Carvos, reward Handjari II)
  • Fire Bombs (Fort refugis)
  • Good quality tools (Market in large city and in mines)
  • Guard Animals (Market in every large city)
  • Hauling Litters (DLC Moonshadow)
  • Heat Shielding Crystal (Lumen – See The Voice of Hereafter achievement)
  • Hidden compartments (Reward Loaders' Guild II)
  • Hunting Animals (Market in every large city)
  • Iron Armements (Avernum - Scoria - Anvil of Thadraz)
  • Kal-rish Saddlebags (Crystal - Workshop, see Supercargo)
  • Lances (Avernum - Scoria - Anvil of Thadraz, reward Ratharnak Alliance III)
  • Legionnaire Tents (Fort Refugis and Ash)
  • Looking Glass (reward House Darius level IV)
  • Mount Blankets (Tectum Carvos)
  • Mining Equipment (Large cities and mines)
  • Perimeter Alarms (Market in every large city)
  • Protected Harnesses (Reward: Tier2 Loaders' Guild)
  • Reinforced Cartwheel (Mine of Plenty)
  • Reinforced Wheels and Axles (Avernum - Scoria)
  • Scrying Orbs (Lumen - Crystalmancer)
  • Sergorod Blessed Idol (Church of Sergorod III)
  • Shriekers (See Insectoid Propagation - Yskorri Friendship 7)
  • Skewers (Market in every large city)
  • Slave Cages (Ash - House Darius chapter)
  • Smuggler’s compartments (Reward Loaders'/Carpenters' Guild IV)
  • Spyglass (Tectum Carvos)
  • Steel armaments (Avernum - Scoria - Anvil of Thadraz)
  • Standards Armements
  • Tarkian Awnings (Tectum Carvos after the end to the quest: The Return of The Wyrms, see Wyrmslayer achievement)
  • Trader's backpack (Drussian mines - House Oquo)
  • Trained Jawui
  • Trap kit (Ash, Tor'Zag - Braxius' store)
  • Trapping Nets
  • Travelling saddles
  • Yrg Combat Apex Crystal (Larnak - Lucernum - Murno's shop, see Insectoid Propagator)
  • Yrg Drone Apex Crystal (Larnak - Lucernum - Murno's shop, see Insectoid Propagator)
  • Yskaari Larva (Larnak - See Insectoid Propagator achievement - Yskorri Friendship 9)
Masked Achievements (Part 1)
And the Sky Full of Stars
First, you need to reach The Crystal Archives in The Sunken Tower (see Seeker achievement).
In the Crystal Archives you may find Memory Crystal of Parhassus (Random event pretty rare). When you have found it Break the seal on the Star Garden.
You will then access the Star Garden – Continue to explore until you meet with Lalitheassin – Try to stop Laletheassin – combat against 5 anomalies – A second fight against 3 anomalies and an abomination – A strong-minded test – Exhaust every option (6 insights. Reward: 6 insights, the Wand of Parhassus and the achievement)

What Lies Below
Learn the truth about the Great Machine.
For this quest explore (torch icon) areas in front of Salum to mine some salt. Explore area with bigger circles. Those are controlled by the Scythichnis Covenant. To mine there you will need permits: Salum - Covenant House – Purchase permits. Purchase at least 10 tokens. When mining salt you will meet a wounded miner’s group and a new quality will be add to your journal: Brine Mere: Unfortunate Miners. Go back to Salum – Lakeview Square – Salt Shaker – Talk to the salt miners and then ask about wounded miners. They will indicate you where they came from and a new quality will be added: Brine Mere: Decimated Camp. To see where the camp is situated see screenshot below.
Look for the camp of the dead crew on the plateau
  • Bury the dead: + 5 Church of Ahskul
  • Load up the salt the miner has abandoned: +2 Salt
  • Scout the area: You need to take 3 companions with you (Bring Garrik if your are not a dwarf)
You can break open the pipe and then follow it, nothing bad will happen to your crew.
An easy test (Navigation, Savvy and a bonus if you are a dwarf or if you take Garrik with you).
Continue to follow the quest until you can take a look around an old miner’s camp :
  • Take the lamp crystal and valuables: +4 Crystal Lamp, +1Arcane Text, +2 Ancient Tablets, Good quality tools
  • Observe the edifice close up: If you can do everything below: +3 Insight
    • The runes appear to be Dwarven (Garrik or history test)
    • The technology and design of the structure is intriguing (need: 5 in Savvy and Engineering)
    • Perhaps there is magic at work here (Need: Magic sense 3, Arcanic lore 4)
  • Try to search the place thoroughly: new quality added “Brine Mere: What lies Below” and someone will approach but you will get no reward, so prefer to observe the edifice close up (see above)
You can’t avoid combat even if you are friend with the Scythichnis covenant: 2 Renegade Dragonguards
Try to run down into the tunnel you will have a fight against 2 Renegade Dragonguards again.
You will meet a tall dragonkin: You can tell him that you want assurance or ask him who they are but it will not change anything. Do not surrender or you will be dead instantly.
This will start a new quest: Secret below
Escape from the tunnel with the help of Garrik and gain +1 Insight and lose 6 movement.

Go back to Salum. You will have three choices of allies. You can choose only one of them
  • If you have at least 2 with Scythichnis Covenant: Covenant House – Visit the inner sanctum: Don’t ask them about a group of sickly miners of you will loose relation. Instead Report what you have found below the surface of Brine Mere. Confirm by choosing Inform the Dragon and the Archmage. Insist on helping them: + 80 Scythichnis Covenant + 5 Insight.
  • If you have more than 0 with the Ratharnak Outpost: Lakeview Square – Visit the Ratharnak outpost – Chief Agent Welgan – Inform Welgan about what you have found below the surface of Brine Mere – Inform the chief agent – Offer your help: + 40 Ratharnak Alliance, +2 Insight
  • If you have at least 2 in the Church of Ahskul/Church of Sergorod : Lakeview Square – Salt Shaker inn – Contact Xeshara - Report what you have found below the surface of Brine Mere – Inform the imperial spy – Agree to help : +20 Church of Ahskul and Church of Sergorod, +2 Insight
For the following I choose to take side with the Scythichnis Covenant (other path may diverge on some points) as the reward is much more interesting:

Go back to the camp of the dead crew on the plateau : visit the crevice that leads into the salt tunnels – Find your allies nearby and continue to follow the quest until have to fight against renegade dragonguards. You will be accompagnied by two allies. In the second fight you will be accompagnied by 3 allies againt 3 renegade dragonguard and 2 renegade dragonmage. After some times you will meet a third group of 3 renegade dragonguard and 1 renegade dragonmage. For the third combat you will have three allies with you. When prompted ask Garrik for help against the mage. You will gain +3 Insight after some times.

Reward at the end of the quest : 20 Salt Mining Tokens, 1 Rare Jewel, +70 Scythichnis Covenant, Dragonstone of Enchantment, +6 Insight, 6 Bross and the achievement should pop.

Wyrmslayer
For more information see the Ever After achievement in this guide.
Masked Achievements (Part 2)
Ruiner
Have Velarias, Fort Larius, and the Omphalat Outpost destroyed in a single playthrough.

For this achievement you need to bring three places to ruin through three separate quests.
  • For Velarias, you need to have tier 2 reputation with Ratharnak alliance and meet general Angaroth in Mines of plenty. Agree to help him and complete Agent Of Destruction quest. See Despoiler achievement for more info.
  • For Omphalat Outpost, You need a reputation of 2 with House Venari. Larnak – Lucernum – Villa Acuela – Stinger Lord Psithyrus. Offer your help and he will send you to the outpost. You also need a standing of 2 with the abolitionist to make the outpost a ruin. The Caverns – Take a stroll around the caverns – Asks some slaves – You memorize the information – Try to locate the abolitionists leader – Approach them in order to offer your help – If you don’t have a standing of at least 3 you need to convince them with a persuasion and charismatic test – accompagnied by the slaves you step inside – Your abolitionist guide move confidently in the dark – Kuath begin to talk – Aid Kuath and the abolitionists. Reward: 250 mushrooms, +50 abolitionist, +1 insights.
  • For Fort Larius see the Trouble at Fort Larius achievement for more info.

Xevarian Gambit
Listen to Daneram Xevaris announce his intentions at his feast.
You can start this quest when you have at least 2 Renown. In Tor’Zag’s Shelter – Civic Distric – Dragon Nest inn, a mercenary company called The Dread Reaver will ask you to transport them to Lumen – Blind Jhakra. Or you can find them without prerequisites when Exploring Tor’Zag’s Shelter (random event). Reward: 7 Bross.

When they quit your comitatus talk to their leader in the Blind Jhakra tavern. To traverse the Crystal Forest you need to equip: Calerus Protection Gear (Market in Lumen or Crystal) and Heat Shielding Crystal (See quest : The White Crystal in The Voice of Hereafter achievement). Reward: 2 insights.

Equip the 2 protections on your cargo then talk again with the Dead Reaver. Before leaving be sure to have enough supplies for 12 to 15 days as the quest might be long. Locate your guide and then transport them Calerus Valley. To find the guide you don’t need the Heat Shielding Crystal, so remove it, you will regain 2 MP. See the location of the guide below.
When you have found the guide equip the Heat Shielding Crystal and go find the lost tectum (see the location below). Ask the others what they think about the corpses – Pass through the doorway – Turn left - Fight against 3 ennemies – Check out the corridor on the left – Share your loot – Return to the great all – Enter the chamber – Rummage through the plaza for valuables (4 ancient tablets, 1 marble statuette, 1 bronze statue) – Use magic on the crystal (+1 insight) – Fight against 5 forsaken - Fight against the second wave (5 forsaken) - Try to free Lahgdanar - Fight against 4 Specter - Enter carefully – Exit the vault - Rush to the Reavers' aid - Fight against a Splinter. Harvest the Crystal if you can (6 workers, 2 prospecting). Reward: +5 Scraps Metal, 3 Insights, 12 Bross.
When you have finish you have to take them to Arken. Once in Arken the Dread Reaver will ask you to bring them in Salum - Lakeview Square – Salt Shaker inn, to contact a man. Reward: 5 Bross. Take all of them to the north next to Wyrm’s Teeth (the place is marked on your map).

Once there you will gain a new passenger. On the road Daneram Xavaris will talk with you a few times. Bring all of them to Deven.
During travel Daneram will ask what drives you (+1 insight). Your reward depends on your answer :
  • Knowledge: 3 Insight
  • Money: 1 Valuable Treasure
  • Fame: Exquisite Banner
  • Adventure: The Looking Glass, Trained Jawui
  • Personal reasons: Dragonstone of Enchantment
  • Serve The Empire: Church of Ahskul +50, Church of Sergorod +50
To obtain your reward, visit Daneram Xevaris in his villa in the Garden District: 35 Bross + a reward according to what you answer.

Daneram Xevaris wants you to bring rare goods for an upcoming feast:
  • A ceremonial armor: Avernum – Scoria – Anvil of Thadraz
  • Tarkian Spice Infusion: Tectum Carvos – Tarkian quarter: It will cost you 78 Bross.
  • Zewura’s Zenith: Ash. If you do not bring every member, he will be displeased but you can continue the quest.
  • Sweet Ygr nectar: Larnak – Yskorri Ambassy (you need a relationship level of 6)

When you have brought everything, he needs, talk with him about the feast. Before going to the feast, you will have to wait 1 day. Reward: 123 Bross, 1 Dragon Egg, 3 Rare Jewelry, 1 Valuable Treasure, Dragonstone of Protection, Dragonstone of Vitality, 6 insights, 1 Renown.

Before the feast you have to wait 1 day – If you accept the place, you will receive +2 insights but if you give it to another person, it will increase your standing with a faction - You receive +2 Renown during the feast – A fight with 4 companions against 1 Wraith, 1 dark elf mercenary, 2 elite assassins. These foes have a lot of Evade (almost 50 %) so this combat can be very hard if you are not lucky – If you have more than 10 in perception then you can escape – You will have a second fight against 3 assassins, 1 dark elf mercenary and 1 wraith. Reward: 1 Silver Laurel, 8 Insights.
Sunfire and Moonshadow (Part 1)
The DLC Sunfire and Moonshadow does not have any achievement but but I still added this section in order to have the most complete walkthough.

Main Storyline:
To trigger the new content you need 400 Bross, 3 Companions and 3 Renown: Lumen – Meet agos again – Inquire what brings him here – take him right now or later. Go to Crossroad – Accompany him – Do as Agos asks – Usher your crew through. Reward: +4 Insight. Don't worry, you'll come back soon enough, contrary to what the game says.
Select the highlighted zone to the left – Press on toward the village – Tell him everything – Agree to his conditions.
Then select The village – Check in on the locals – Exhaust all options – Talk to Icareon – Ask Icaron about something – Exhaust all options – Ask him about his plans – Discuss smithing – You can ask about some of your equipment.
Icareon can improve some of your gear:
  • Crystal Idol: Cannot be improved
  • Icareon's Circlet: 2 Silvers, 5 Arcane Text, 2 Rare Jewel.
Leave Kadaath and go back to the hill on the right – Icareon is here, waiting – Walk up to the realmgate – Open the realmgate. Reward : 5 Insights.

You can return in 60 days to the crossroad to go back to Kadaath.
Or you can ask Prince Laekor (Deven – Hindercaves – Dark elves colony) to partially recharge it for you with 9 friendship for 25 Bross or 5 Bross + 3 Slaves.
The Convenant House in Salum can also recharge your Astralabe (need tier 1 and 25 Bross)

Before returning to Kadath, remember to take 5 Hides and 5 Ivory but do not take any goods other than supplies (Except 2 Silvers if you want to upgrade Icareon's Circlet).
When you arrive in Kadath Icareon will ask you to come and talk to him in the Field of Stars once you are settled
But before that, go see the locals to collect your supplies and ask for their help to build some hauling litters with 5 Hides and 5 Ivory (new equipement). Withdraw it an equip it.

You can now go to a location south of your position. It's a large black disc with a crystal in its center. Enter the Field - Icareon is here to give you a tour (+2 Insights).
You can go back and leave some of your crew/beasts in Kaadath.

Tell him the truth - Accept the invitation - Ask him questions and exhaust all options. Reward: 3 Insights, +20 Handjari and 2 Renown.
If your introduce yourself: -10 Handjari, +10 Chimera Legion
If you cait for the prince to introduce you: no malus or bonus.
Tell him that you see a prosperous metropolis: +5 Handjari.
Ask them why you would want to do that - Go with them without a fuss.

You will to wait for the astralabe to recharge and then head to the Stone Gate. Don't forget to sell your beasts before.
When you are through Icareon will suggest that you find a mage and a rare crystal on this map. Travel to the red region on the upper right side - The Glade's Perimeter - Venture inside - A speelweaver and strong-minded test - Press on - Follow them - A Navigation, savvy and perceptive test - Companion fight against 2 crimson spliters - Move as fast as possible - Another speelweaver and strong-minded test - A companion fight against 2 splinters and 2 shards - A strong-minded test - Companion fight against 5 crimson shards (be careful as the shards may damage your backline a lot). Reward: 2 insights. Head back to Kaadath and report to Icareon. Instead of going to the field of Stars go to the Fang gate. Don't forget to recover you beasts and mound then go to Tectum Carvos and bring the letter to Prince Faisal. He will then give you the mission of providing his answer to Kabur.

Additionaly if you go to Larnak - The Hive you ask to propagate the Yrgs to the Bronze desert. Go to Larnak - Lucernum - Murno's shop and pay him 500 bross. You will be tasked find allies in Kabur (need tier 4 with Carpenters/Ahari/Handjari) and Phlegetos Bridge (need Loaders tier 4 or Chimera Legion tier 4).

When you are able to use the astralabe again, deliver the message in Kabur - Palace Quarter - Prince's Palace - Visit Senechal Akeer (need O Handjari). Reward: 2 Prized carpets, +20 Handjari, 20 Bross.
You can then begin the quest prince's commission (random):
Larnak - The Fields - Take a walk around the fields - Seek out Mara. Reward: 10 Bross, +10 Handjari.
Deliver a gift in Mine of Plenty
Arrange fo an exquisite piece of art: Larnak - The fields

You can also request an audience to ask fo the prince's support with the realmgate - wait a day - return to the prince - wait 12 days before visiting The Stone Gate - The Handjari Mage Camp. They will ask you to bring:
  • 36 Marbles + 24 Iron (If you pass through the gate with 17 workers, 8 slaves a Trader’s backpack and Hauling Litters equip, you will have 4 slots in cargo hold to take 3 stacks of iron or marble + 1 stack of supplies).
  • 30 Ceruleus Crystals + 10 Spectral Residue + 2 Silver (Ceruleus and Silver can be bought in Kabur)
Wait two weeks. Your mounts can now pass through the gate but not your beasts.
When you are in Kadaath, visit Icareon at his workshop - Discuss the enhancements of realmgates - Icareon will ask that you bring him :
  • 1 Dragonsteel Scraps (Mine of Plenty or Salum)
  • 16 Iron (Mine of Plenty)
  • 8 Tin (Mine of Plenty)
  • 8 Copper (Mine of Plenty)
This should not be a problem to bring all of this goods to Icarean as there is no limitation in your cargo capacity. And forget to bring 7 Inbued masks.
Go see Icareon - Discuss the enchancement of realmgates - You have all the metal.
Then exist the village - And clic on the green region (bottom right) - Elect to delve into Noxious Lakes - Take Finn and Garrik to ease you tests - Need 7 Inbued masks - Navigate the narrower path - Perceptive, engineering and dexterous test (3 Scrap Metal) - Navigation, perceptive test :
Reach the bow of the ship (Mighty, tough, engineering test) - A mighty test - Choose the test with test with the highest chance of success - Quickly salvage (4 Scrap metal, 1 tin, 1 silver) - A tough and strong-minded test (1 Insight, Weakened, Acid lungs).
Bring the Nexus to Icareon. Then, meet him in the field of stars - You agreed to meet Icareon (2 insights, Ithil coin). You can sell the coin in Kabur.
Icareon will ask to bring him:
  • 160 Iron (Mine of Plenty)
  • 80 Oil (Oil Field Venari/Rinaris)
  • 20 Silver (Mine of Plenty)
  • 50 Spectral residue (Fight specters in The Valley of Sleepers)
This section is currently being written.
Sunfire and Moonshadow (Part 2)
Bronze Desert Region Side Quests
Lurker in the Shadows
To get this mission: Kabur - Palace Quarter - Magistrate's court - Bounty Hunters' Guild
The quest begin in Kabur- The Souk - Spas - Kora's Spa - Begin the investigation - Exhaust all options (you can return on the next day) - Look around in the neighborhood - Tea house - Companion fight against 3 beasts.

The Unseen Prowler
To get this mission: Kabur - Palace Quarter - Magistrate's court - Bounty Hunters' Guild.
Shahsgabat - Village - Meet the locals - Buhak - You are ready - You bid your comes. Go to the location marked below.
Tie the great, dark horse - Linger here - Companion fight against the revealed prowler - Take the time. Return to Shahsgabat - Village - Meet the locals - Announce to the Bandul thta the beast is dead - Explain in detail.
Return to Kabur - Palace Quarter - Magistrate's court - Bounty Hunters' Guild - Bring forth the body.
Reward: 3 insight, 1 arcane text, +20 Ahari, 11 Tribal Trinket, 54 Bross, +15 Handjari

Scourge of the Desert
To get this mission: Kabur - Palace Quarter - Magistrate's court - Bounty Hunters' Guild).
Go to Oil Field Rinaris and ask around about the survivors. Meet Vahs near the oil field.
Spread out and find the carverns (need 3 scouts or Scout Master) - A Dexterous, perceptive, engineering test - Gather 55 supplies and 6 herbs.
To pursue this quest go to Phlegetos bridge - Seider's Hovel - Talk to the barman about any Bandul - Head to the gambling den - Approach the disheveled Bandul man - Have your companions engages the bruisers - A dexterous, tough and mighty test.
You will know where Vahs hideout is situated.
Crest the dune - You can attack her if you want to take the side of the Chimera Legion or you can approch the camp if you to side with the Ahari. Come back to Kabur with her bracelet to receive your bounty: 10 Bross, +5 Handjari, 1 Insight.

Deceptions of Glory
To get this mission: Kabur - Palace Quarter - Magistrate's court - Bounty Hunters' Guild (need Renown 20).
Charon Keep - Legionnaire camp - Drathis Karn - Exhaust every options. Go to the location marked below.
Share everything - Discuss tactics - Venture inside - Companion fight against 2 tainted oghres. Reward: 11 bones, 5 hides, 1 pristine trophy, 1 commemorative coin, 1 tarkian carpet, 3 simple jewelry, 1 rare jewelry, 1 exquisite weapon, 1 marble statuette, 1 insight.
Report back in Charon keep - Legionnaire camp - Drathis Kan (+20 Sergorod, 42 Bross, 1 Insight).
And don’t forget to report back to the bounter’s guild in Charon: +15 Handjari.

A Tale of Memory
To get this mission: Phlegetos Bridge - Seider's Hovel - Pleasure Loundge.
Talk to Brutus accept the quest and exhaust all options. Then find the proprietor - Ask about Brutus. When you have finish to talk with the proprietor return to the bar - Talk to the woman serving at the bar. Then head the Gambling den - Engage a group of gamblers - A persuasion, Charismatic Savvy/Con, Savvy, Charismatic test. They will give you the name of a working girl.
Visit the pleasure lounge - Find the proprietor - Arrange a meeting with Anastasia (Cost 3 Bross) - Choose one or the other option, it doesn't change anything. - Persuade her ( Persuasion, Charismatic, Savvy test) - Exhaust all options.
Ask around the pleasure loundge about Jarek - Return to the bar - Gambling Den - Talk to the 2 veterans - Intimidate or bribe them - Leave Seider's Hovel.
Wait Urkal and head to the Gambling Den in Seider's Hovel - Observe the high-stakes game - Approach Jarek - Converse with Jarek - You have questions - You are building a case - Return to the bar - Attempt to secure evidence - Debate with the barman (Savvy, Charismatic, Persuasion test) - Visit the pleasure house - Talk with the legionnaires - Drink and ingratiate yourself - Search fo Brutus.
To complete this quest you can: Tell Brutus the truth, lie to him or Blackmail him. If you tell him the truth you can convince him to repent.

The expansion of Wazirhai:
Wazirhai - Offer a business partnership with Thadirath (need tier 1 with Ratharnak): Provide the requested resources until reaching the requested value.

Mysteries of the Dead Forest
To get this mission: Onyx Outpost need 4 with the Covenant.
Go to Stygios Lumber Camp and buy some tokens to harvest Deadwood. You won't pick Deadwood every time unlike Timber. Also expect to encounter undead, spiders or mercenaries/outlaws from time to time.

Suboptimal efficiency
To get this mission: Oil Field Venari upon your arrival.
Kabur - The Slums - Asghar, then bring him back to Oil Field Venari (23 passengers). Wait 80 days then come back to receive your reward: +50 House Venari, 50 Bross. And report to the Magister to receive 1 Luxury wine and 1 Marble statuette.

A Sabotage most ruinous
To get this mission: Oil Field Rinaris - Sandstone Emcampement (need House Oquo tier 1).
You have to bring them 3 experts:
  • Kabur - Souk - Red Viper - Ask about Cato.
  • Phlegetos Bridge - The Bridge - Mason's Workshop - Pay the Chief Architect (cost 16 Bross)
  • Hakhtarast - Night Prince's Square - Handjari tier 0 - A nearby gaggle of Tarkians
You are ready tell that you will begin the interrogations - Intimidate or persuade the slaves - Agree to her plan OR call for the sentinels.Then report back to Lady Antonia (+5 Chimera Legion, +25 Oquo, 2 Insights)
If you call for the sentinels you will have to fetch the help of a necromancer in Fort Erebus.
Reward: 33 Bross, +36 Oquo.
If you agree to her plan go the cantina in Oil Field Rinaris (New quest Dawnfire). Then go to the Ahari Encampement.
Make your way - Companion fight against 4 Malkins (they can heal themselves and have a high chances of evasion). Return to the oil field to place the stones Shahid gave you: Oil Field Rinaris - Standstone Encampement - Choose a companion - Skulker test - Pay on last visit to Polaris (+50 Abolitionists, +80 Ahari, 1 Insight) - Stay and watch or Leave. Oil Field Rinaris will still stand.

Kabur's Arena
You also have an arena in Kabur - The Slums: Fight in the arena (random foes) until you are able to sign up for the championship tournament. For the tournament you will have to beat 4 undead and a necromancer. After a brief rest +3 VIT on all companions, you will have a fight against 4 ennemies (high chances of evasions). Reward: 1 Exquisite weapon, 160 Bross, 1 Renown, 1 insight.

Striking Black Gold
Hakhtarast - Night Prince's Square - Handjari tier 0 - Farud. Accept his proposition and bring him Ivory and Tin.

This section is currently being written.
Sunfire and Moonshadow (Part 3)
An Exquisite brew
Utun Ghrayi - Curious Encampement - Handjari Tent (Need Handjari tier 0). Talk to her and exhaust all options. You can return every ten days to talk about different subjects with her. This will increas Try to seduce her: +5
Tell him about the battle against the Wyrms (The Return of the Wyrms): +10
Recount your ventures and exploits (Renown 10): +3
Discuss botany (herb lore 3): +3
Regale Tamarra with the tale of Brutus (A Tale of Memory): +4
Tell Tamara the tale of Kandake (Golden Theory): +5
When you reach 24 in Tamarra’s Affection to pursue the mission – Agree to help Tamarra broker a good deal (1 insight). Set up a meeting with House Oquo/Ratharnak/Darius (need tier 0) – Speak with the person in charge – Visit Tamarra – You have set up a meeting – House of your choice. Return again to talk to her – The stage is set – Compliment her – Intervene (+25 House Oquo/Ratharnak/Darius, 1 insight).
Deliver ressources to Utun Ghrayi: Marble, Timber, Crystal lamps, Prized Carpets, Workers

Vanguish the Tyrants
Need Ahari tier 1. When you leave Hakhtarast a man will talk to you stay and search for Safiya. Take part in the clandestine operation (available every 12 days). You will to do that several times. When you aid Safiya the following events will happen (not sure if order is random):
  • A persuasion, charismatic mighty and dexterous test (+15 Ahari). You need to do this several times.
  • Ambush them – companion fight against 5 legionnaires. Reward: +15 Ahari, 5 Potteries, 1 Dried Fruit, 3 Mushroom Beer, 385 Supplies, 2 Simples jewelry, 3 Bross
  • Distract the guard yourself (Con and Charismatic test). Reward: 1 Luxury wine, 3 Simple jewelry, 1 Rare jewelry, 1 valuable treasure, 11 Bross, +15 Ahari.
  • Companion fight against 4 legionnaires and an executor of Sergorod (+15 Ahari)
  • Distract the guards yourself - Reward: 1 Luxury wine, 1 Simple jewelry, 1 Rare jewelry, 1 valuable treasure, 13 Bross, +15 Ahari.
  • Attempt to lead an ambush (Skulker, dexterous test) – Companion fight against 3 legionnaires and 3 peltas (+15 Ahari)
  • You only get one shot at this (Persuasion, charismatic, mighty and dexterous test). (+15 Ahari)
  • Head to House Venari/House Oquo/The Handjari depending on your relationship with them – Convince them (persuasion and charismatic test). (+20 Ahari)
  • Companion fight against 4 legionnaires (one is seriously injured) and a Peltas (+15 Ahari)
  • Silently make your way – Use Ahskulite charms (need arcane lore 6 and 3 Ahskulite charms) – As an Adherent of Ahskul (Need 3 with the church) - +20 Church of Ahskul, 4 Ahskulite charms, 1 simple jewelry, +15 Ahari.
  • Distract the guards yourself. Reward: 1 luxury wine, 3 simple jewelry, 1 rare jewelry, 1 valuable treasure, 12 Bross (15 Ahari).
  • Attempt to lead and ambush (Skulker, dexterous and Marauder prime test) - Companion fight against 3 legionaires and 3 peltas (15 Ahari)

Of Survival and Blood
Ahar Kadah - Accept Decimus' offer. Go to the location below. You can choose:
  • Your allegiance lies with Decimus: Fire on him - Combat Crew (419 Strength, 76 Defense)
  • Ally with Reg - Return to Ahar Kadath - Bring forth the body - Companion fight - Say that you want no parts of this. Reward: 1 Exquisite weapon, 1 Valuable treasure, 1 prized carpet, 1 tarkian carpet, +60 Ahari, 52 Bross, 3 Insights.

Caller of the sun
When you reach Ahari tier II, you will have a random encounter with an Ahari woman.
Then go to Shahsgabat – Temple of the Sun – Enter (1 insight). Then return to the temple to gift an Aharutun plant (can be found in Utun Ghrayi if you explore the oasis. It’s a random event): +3 Ahari per plant.
This quest will also unlock Factions missions in towns.
Then go to Mehdar Ahara (see below)
Make your way inside (need Ahari tier 2). Once the conversation is over: Sanctum of the Sun God – Visit the Prophet – Exhaust all options – Bid him farewell.

Legate's Fall
When you reach IV with the Ahari/Chimera Legion, a dialogue will open and your Vagrus will decide that it is time to go see your allies. This will also have the effect of dropping the relationship with the opposing faction to -999 (without the possibility of improving it).
For the Ahari, go to Mehdar Ahara – Visit the prophet – Now that you are respected among the Ahari – You are ready: the quest Legate's Fall will be in your journal.

Go to Vaelenesthil – Vaelenesthil Depths – Scour the ruins – Make your way : Opt for the steeply descending – Mighty and dexterous test – Explore the skittering tunnel – Find the source – Companion fight against 2 Yrgs worker and an Yrg warrior (1 insight) – Fight against 2 yrgs warrior - Take the corridor to the right – Strong-minded test - Take the tunnel on the left – Use dampsmoke (1) or move cautiously – Engineering, tough and mighty test (1 valuable treasure, 1 exquisite weapon, 2 arcane text, 4 ancient tablets, 3 crystal lamp) – Explore the chamber – Magic sense, perceptive and arcane lore test – Companion fight against 2 Yrgs worker and an Yrg warrior – A second fight against 2 yrgs warrior and Valahuir Aendar Vaelen (Impervious). Reward: 2 silve, 2 rare jewelry, 1 valuable treasure, 2 rare jewel, 1 vaelen’s relic, 1 elven gold coin, Scabbard of Valahuir, 4 insights.
Return the relic to Mehdar Ahara – Sanctum of the Sun God – Visit the Prophet – You have brough him the relic. He will ask you to bring :
  • 30 Spectral dust (Sunken Tower and Valley of Sleepers)
  • 6 Aharun plants (Utun Ghrayi – Blazing oasis)
  • 1 Large Energy Crystal (Lumen)
  • 3 Small Energy Crystal (Lumen)
This section is currently being written.
23 megjegyzés
Jackdaw Mask jan. 21., 13:13 
*bronze owl pendant(I was wondering where to find a second one)
Jackdaw Mask jan. 21., 13:11 
So something weird about Vorax's meal when you finally have all ingredients: I chose reputation first time, I was bit like "72? eeeh that seems bit lame for all the work, I wonder what the riches option is" and was flabbergasted it was 320 bross, valuable treasure and masterwork weapons, then I got bonus reward including bronze pendant from lady who tells Lar's story. I didn't read dialog too much, but I had on whim tested out what the "give mercy to the thief" option gives party attitude wise(I was expecting treasure reward wasn't too great that Iw ould reload anyway) and then reloaded the scene again but this time chose dialog my character on playthrough would have picked. And I didn't get the extra reward just like on first time, because its not part of the riches reward option it seems.

So I'm not sure but seems like telling to be merciful on that scene gives extra reward surprisingly
Jackdaw Mask jan. 18., 2:04 
This guide is overally really nice, but it also doesn't really delve into branching of quests. Like in renkailon's second mission, if you don't use con first time around, you get second chance to do it instead of fighting with comitus if you want to. So assuming its not nice guy playthrough, which one would be more effective opportunity to use it is kinda unclear.
Jackdaw Mask jan. 16., 16:15 
Also warning on Thatmas quest: if you take too long, he will leave comitea on his own
Jackdaw Mask jan. 14., 4:34 
Just to note, in pilgrims of wasteland, you can buy for cheap charm from Akshul temple that makes you fight abomination alone with it having lost hp
fedq.sumkin 2024. szept. 7., 10:50 
Celebrity ambition is 25 renown, not 40. Other than that - great guide! :steamhappy:
greegarak 2024. júl. 5., 21:55 
Nice guide.
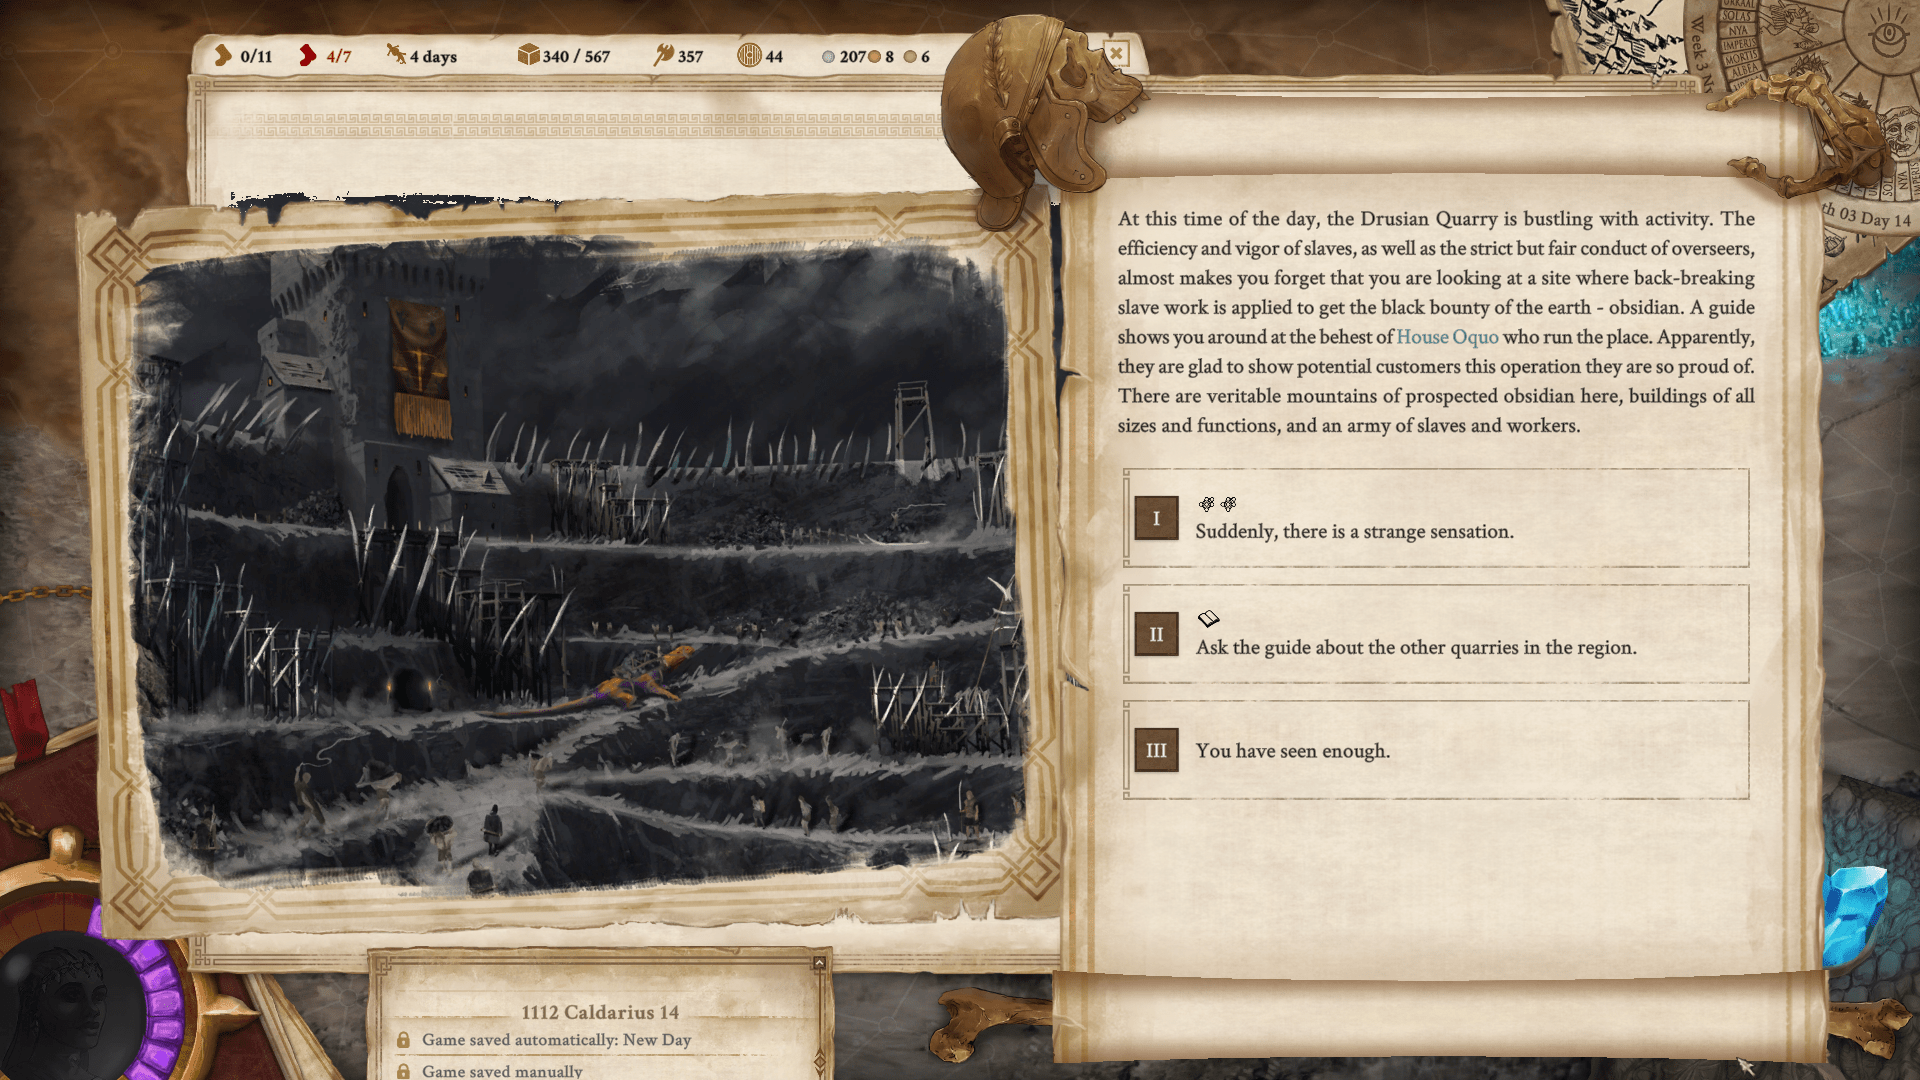
Need to mention another option for Yrg Propagation in Deven.
Elf Prince will help after reaching 16 loyalty with him. Which is easy 'cos he also like luxury wine and spices. Also there is one random event during exploring.
"Dwarven Compass (Eylani’s quest end - See Ever After achievement))"
- Compass you can buy in Torzag's Exploring city event. Trigger for this is amount of your bross. You need to have 100. Selling horses and beast of burden for a while is good option for having such amount

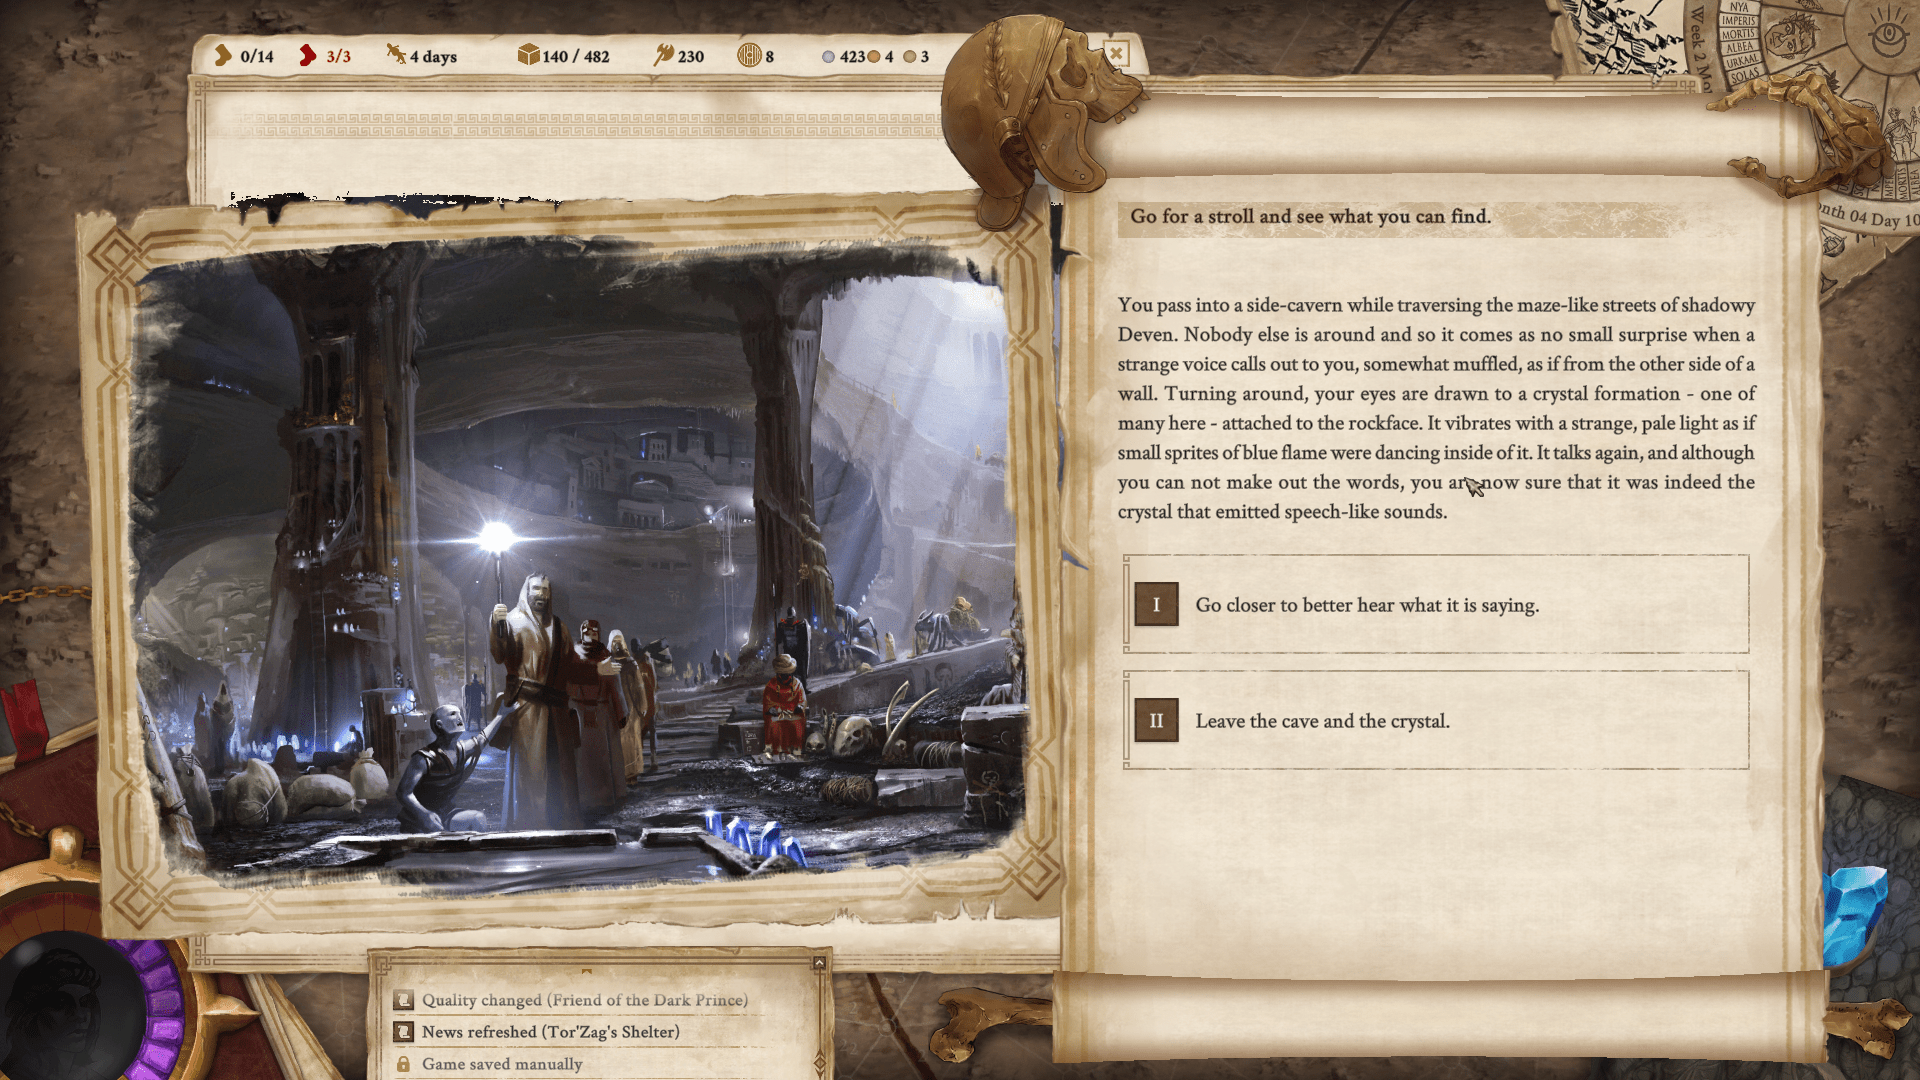
"The Voice of Hereafter
...... And because she uses magic she is able to harm spectre."
It's not magic what she use in fight, but electrical damage. And every attack which have specific type -fire (Nadir,Garrik,venari agent),electric(Finn), cold, poison, bleeding,magic -can harm (unless enemy is resistant at least in 100%points) enemies with Impervius perk.
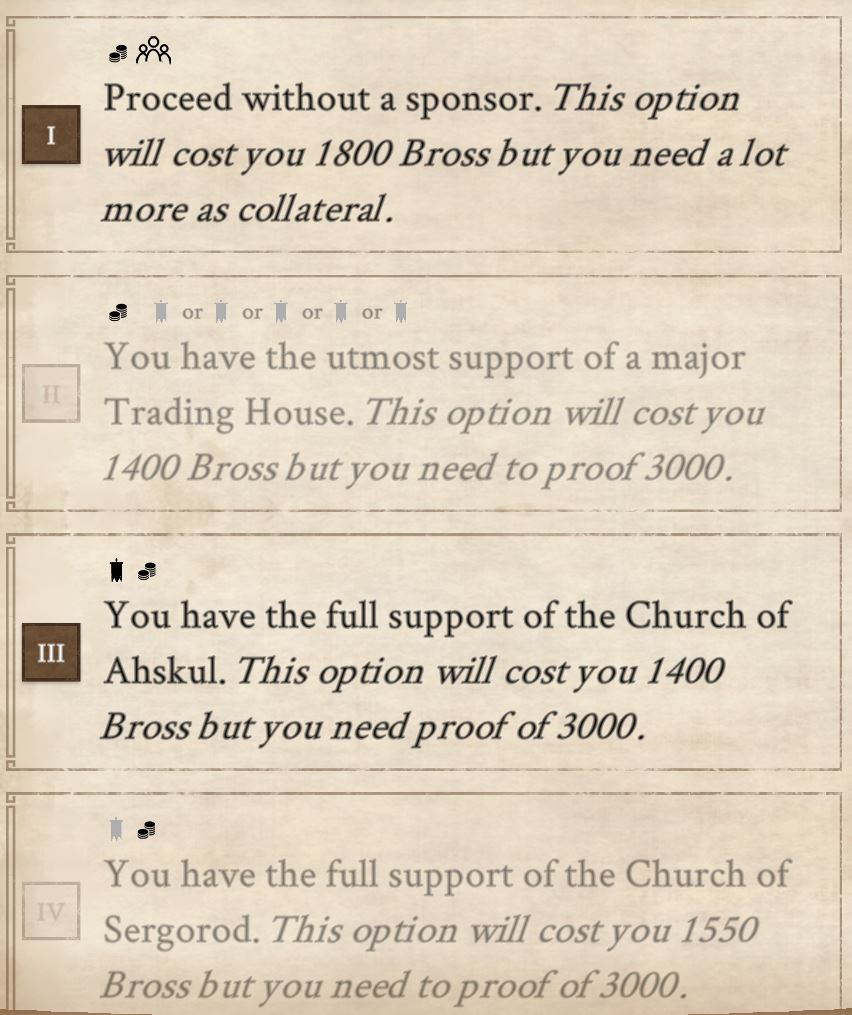
Xavarian gambit- ”.. Your reward depends on your answer :"
There is also
No Alternative: Bloodstone
ЭКОНОМИКА РОССИИ 2024. máj. 31., 9:00 
Win the game through the Knowledge Ambition.
I've done quest "For posterity", but nothing happend, what is wrong?
stunlord 2024. ápr. 25., 19:23 
Just a note, highest road tax is 500. Maybe it was 250 before, but it doesn't work with 250. I finally got it with avoiding a 500 bross road tax.
KocLobster 2024. ápr. 11., 21:15 
Not sure if you're still updating this guide... I hope so because it is extremely helpful! But RE: the white crystal quest that you obtain near Loom, it's just 1 dampsmoke per combat, for a total of 3 to avoid all combats. That might've been what you meant but when I read it originally I thought I needed to bring 9 dampsmoke if I wanted to avoid all of the combats there.