F1® Manager 2022

F1® Manager 2022

169 ratings
Design and Research Mechanics
By Mike Takumi
v1.8 Explanation of mechanics behind car design and research
7
12
2
9
4
2
2
2
2
2
   
Award
Favorite
Favorited
Unfavorite
Terminology
Updated for 1.8, If you read the guide before, literally the only change is that the additive bonus from focus was reduced significantly (it is 25-35% as powerful as before), the main problem of the multiplicative ratios is still there and you can still win championship with Williams in Season 1 and be able to lap the entire field every race from Season 2 onwards without breaking a sweat.

Please please please reference design and research correctly! I have seen much confusion from people using Research interchangeably with Design. They are VERY different in what they do and how they work, so please save people the headache and refer to the correct action if you are talking about one or the other.

Design: The process by which you send your engineers off to a room to figure out improvements for your CURRENT seasons parts, which will allow you to manufacture v2 and v3 of parts you put through design process.

Research: The process by which you send your engineers off to a room to figure out improvements for NEXT seasons parts. Gains in research do not apply in ANY way to the current season, only to the parts you start with next season. You gain these bonuses automatically at the start of the new season, you do not need to design or manufacture new parts.
What goes into stats and performance
Your cars overall performance is broken into the following listed stats:
  • Top Speed
  • Acceleration
  • Cornering (low/medium/high speed)
  • DRS (top speed/acceleration)
  • Dirty Air Cornering (low/medium/high speed)
  • Brake Cooling
  • Engine Cooling


We also have 6 different parts (plus engine, but I will not cover that as you can do nothing about that but change suppliers)
  • Chassis
  • Front Wing
  • Rear Wing
  • Sidepods
  • Underfloor
  • Suspension


Each part has 3-6 stats that determine the cars performance, some of these stats are used across multiple parts
  • Drag Reduction: Mainly raises Top Speed and Acceleration (normal+DRS), but also helps with Cornering (normal+dirty)
  • Downforce(low/medium/high speed): Mainly raises cornering (normal+dirty), with slight harm to top speed
  • Airflow Sensitivity: Mainly raises Dirty Air Cornering, slightly harms normal Cornering
  • Airflow Front: Mainly raises Dirty Air Cornering, but also helps normal Cornering, slightly harms top speed
  • Airflow Middle: Mainly raises Dirty Air cornering, but also helps normal Cornering
  • DRS Delta: Mainly helps DRS Top Speed and Acceleration, slightly harms everything else
  • Engine and Brake Cooling: Mainly helps the respective cooling, obviously


Breakdown of what parts have which stats
Stat
Chassis
Front Wing
Rear Wing
Sidepods
Underfloor
Suspension
Drag Reduction
x
x
x
x
x
Downforce
x
x
x
x
Airflow Sensitivity
x
x
x
Airflow Front
x
x
x
Airflow Middle
x
x
DRS Delta
x
Brake Cooling
x
x
Engine Cooling
x
x


There is one final layer to this cake. Every single stat in every single part has a rating that is unique to it. IE: Your drag reduction for Rear Wing is separate from your drag reduction in Sidepods. So if you are trying to improve stats in one part, they will not transfer in any way to another part. The way the stats within parts are determined is additive from several factors listed below:
  • Base Value: This only applies to the 3 Downforce stats, each has it's own starting value
  • Expertise: This is the primary value and will comprise the majority of your parts final stat rating
  • Head of Aerodynamics/Technical Chief: Both of these staff members will add .05*relevant skill rating to the final rating, for a maximum of +10 if both are maxed out
  • Wind Tunnel/CFD Simulator: If you use CFD or Wind Tunnel hours on a part Design, depending how upgraded your buildings are and how many you use, it will add an amount to the final rating. This does not appear in Research (more later)
  • Suspension Simulator/Car Part Test Center: Brake and Engine cooling get a boost from these buildings depending how upgraded they are
  • Design Focus: This is going to be the primary...well focus of this guide as it plays an enormous factor in a lot of mechanics. This value can be positive OR negative. This does not appear in Research (more later)
  • Research Benefit: This only appears in research, as the name would imply.
Parts are NOT equal
Different parts have very different degrees of influence over the final performance ratings of a car. This is reflected in the cost of designing/researching the different parts, and the costs line up approximately with which parts have the most impact. In order, Underfloor-Rear/Front Wing-Suspension-Sidepods-Chassis. Below is an example of the Performance gains from one design run of each part with roughly equal gains in each part stat
You can see Underfloor across the board gives the most increases in almost every single stat. Rear Wing and Front wing are about even, Rear Wing gives a lot of speed/acceleration gain, but Front Wing gives a bit more cornering gain. Suspension, sidepods, and Chassis give only slight gains across the board but they are much cheaper and faster to design or research.

This is important to know because % improvements per part are nearly equal between all parts in this example, and CFD/Wind Tunnel hours would provide a similar % gain in relevant stats regardless of which part you invested them in. Essentially, you should never be investing those precious hours into anything except Underfloor, Rear Wing, and Front Wing. If you're familiar with Formula 1, this is probably obvious because those are the primary components to a vehicle and where you really want to be putting the bulk of your attention.
Design Basic Process
You get a number of Engineers and Slots which can be used for either Design or Research as you upgrade your Design Center facility, as follows
  • Level 1: 2 Slots, 6 Engineers
  • Level 2: 2 Slots, 10 Engineers
  • Level 3: 3 Slots, 10 Engineers
  • Level 4: 3 Slots, 15 Engineers
  • Level 5: 5 Slots, 20 Engineers
Now we'll go the steps that we will be elaborating on the impact of in the remainder of this guide. I will not be explaining the full scope of the ramifications of choices here, so if you are familiar with the process you can skip over this.
  • Step 1: Go to Cars tab, select Car Parts Development, select New Project, then click Design

  • Step 2: Select the part you wish to create a new design for

  • Step 3: This page is the initial part overview where you can see what gains you're looking at to start off with. You can add and remove CFD and Wind Tunnel hours here as desired to give a blanket boost to how good the part will be. You can also press a button to see what rank on the grid the part is and will be at compared to current values. Once done here, you can continue to design focus

  • Step 4: Here you can adjust which stats on the part you wish to put more or less focus into. There is a dropdown menu for several preset focus settings or you can move the sliders yourself. There is no limit to the sliders, you can move them all left, or you can move them all right if you want.

    Moving a single slider to the right will increase the time and cost for design up to 10% if you move it all the way. This is is additive, so 1 to the right makes the time 10% more, 2 to right means 20% more, etc. Moving a single slider all the way left will increase the time/cost 5%.

    You can see in the side menu the increase and decreases to a stat by adjusting focus. The sum total of these increases and decreases is what creates the Design Focus boost. Every slider you move left will add a slight bonus to all other stats, every slider you move right will add a slight negative modifier to them.

    You should always be using these sliders and moving them as needed to ensure focus is put into the areas you need improvement in. If you need improvement in all areas, you absolutely can move them all to the right, you will get a boost in all stats for doing so, but if you keep one or more to the left, you will get even more benefit to the sliders you keep to the right. Once happy with focus sliders, you can continue to Development Settings

  • Step 5: Here you can assign more or less engineers to a project which will speed up the time it takes to finish a design at the cost of reduced overall expertise gain, 6 is the maximum, but remember you always need at least 1 engineer for any additional projects. You can also set the approach for your engineers to take. Normal will add no extra cost and take standard amount of time. Rushed will complete the design 33% faster by adding 50% cost and reducing the overall expertise gain. Intense will triple the cost, but will complete in the same amount of time as normal, while increasing expertise gain by 50%

  • Step 6: Once a design has completed, you will be able to start manufacture of it and fit it into your car. Also at completion, you will gain an amount of Car Parts Expertise in each stat which will help boost your next design of that same part.
Research Basic Process
I'll just cover the slight differences between Design and Research process here
  • Step 1: Go to Cars tab, select Car Parts Development, select New Project, then click Research

  • Step 2: Select the part you wish to research

  • Step 3: As before, this is the initial view of what gains research will give you. The primary difference here is when you use CFD or Wind Tunnel hours, the benefit from them will feed directly into the Research Benefit value for the stats, it is not an independent value added as with design. Now you can continue to Research Focus

  • Step 4: This screen functions much like the design focus screen did, except just like the CFD/Wind Tunnel, when you shift the sliders here, you will directly effect the Research Benefit. Just as before, if you move a slider right, it will increase the value added to the boost to that stat and reduce it in all other stats, and vice versa. Same effect on time and cost in research applies to the sliders here. When done, move on to Development Settings.

  • Step 5: Unlike Design, there is only one way to complete research and your only option is how many engineers to put onto the task. The more engineers you assign, the quicker it will complete, but the less research gain you receive on completion.

  • Step 6: Upon completion, you will gain the research bonus the project said you would gain. You can research the part again to raise that value even further if you wish. The boost itself will not apply until Jan 1 of the following year and will be added directly to your expertise on that date, your new car part for the next year will have this new expertise value added automatically, you do not need to design anything to get the benefit of it. You do not gain any expertise in the current year for completing research.
Car Parts Expertise
This gets a section dedicated just to explaining Expertise, as it is THE core value that the majority of your part quality and what most of the mechanics within the car development system hinge around

As stated before, Car Part Expertise is a value that every single stat on every single part will have, and each one is separate. Front Wing Low Speed Expertise is a different value from Front Wing High Speed Expertise is a different value from Rear Wing Low Speed Expertise. These are three separate values that you can improve at different rates as you require or see fit.

Your Car Part Expertise ratings can be raised in only two ways. By completing a relevant part design you will gain an amount of expertise per day which will all be added into the value once the design is complete. This means that if you used rushed design, or add in additional engineers to a task, your total expertise gain will be less as fewer days were used. The other method is if you completed research in the current year, the value of that research will be directly added to your expertise value at the beginning of the next year.

Car Part Expertise is the value impacted by yearly regulation changes. When you see the -10/20/30% numbers, that means at the end of the current year, you will lose that percentage of your expertise. If you have a -30% regulation change to Front Wing Drag Reduction and your expertise is 60%, you will lose 18% (30% of 60%) of your expertise when the new year rolls around. This is what research counteracts, so if you did enough research to gain 18% back in that stat, you won't lose anything.


It's good to keep this in mind as we start to dive deeper into how this all works, because you will have to figure out how to balance design for gaining expertise now with research to either offset losses from regulations or to boost expertise later.
Design/Research Expertise Gain Basics
I say basics, but from here on out, it's going to be a lot of numbers. I will try to keep the explanations as simple as I can up front before dumping a lot of numbers for your eyes to glaze over.

Every design, regardless of focus settings, number of engineers, or mode of design will gain at least some amount of Expertise. The base rate of Expertise gain is determined by your current Expertise in the given stat. The more Expertise you have, the lower the base gain will be. Similar applies to researching parts. The more Expertise you have, the less benefit research will gain you.

Because Downforce is measured in kN and not %, when referencing %s that apply to that, the scale that Low and Medium speed downforce use is 2kN, ie: 45% in downforce=.9kN bonus, High Speed downforce is a scale of 1, so 45% there=.45kN

Here are some examples with Expertise before and after and how much gain per day each one had with just normal mode and single engineer(I will add more examples over time as I gather more data, but this is just to show the initial gain differences between different start points)
Starting Expertise
Ending Expertise
Days
Average Gain/day
52.74%
54.50%
40
.0440
51.76%
53.57%
40
.0453
44.20%
46.37%
40
.0542
39.67%
42.04%
40
.0592
36.11%
37.99%
30
.0627
33.37%
35.33%
30
.0653

Research follows a similar curve of increase, but with a catch, your daily gains apply to expertise minus the reduction
Starting Expertise
Expertise Minus Regulation
Research Benefit
Days
Average Gain/day
33.76%
30.38%
3.36%
50
.0672
34.85%
31.37%
2.01%
30
.0670
36.57%
32.91%
1.97%
30
.0657
37.97%
34.17%
1.94%
30
.0647
39.35%
35.42%
3.15%
50
.0630

The general rule here is that you gain
(1-[Expertise])/1000
expertise per day, and is recalculated every day. For example if you have 35.42% expertise (or post regulation expertise) on something, and you do design/research on it, you will gain .06458% on day 1 and .06452% on day 2, then .06445% on day 3, and it will continue to decrease. There is also further diminishing returns at higher expertise levels.

For research, where you can perform it multiple times, note that if you already have done research, additional research will begin at
[Current Expertise]-[Regulation Reduction]+[Current Research Benefit]
So if we take that first example from the research table, and ran it through a second round of research, instead of starting from 30.38%, it would be starting from 33.74% (30.38+3.36)

What this also means is that your gains for research will have a higher base gain rate to work from depending on the regulation hit. So the larger the regulation hit, the larger the daily gain from research compared to design. But there are other factors to consider for daily rate gain, so don't go thinking research is always faster/better gains.

[TODO: more design/research values, there seems to be a curve that kicks in at 40%, 50%, and 60%, Also a table comparing different regulation hits and comparison of the gain difference between design/research]
Engineer Count and Design Modes
The next piece of the mechanics, to keep it "simple" still is the number of engineers and what mode you select before putting a part into the grinder to design or research

With Research, this is easy, the only thing we have is the number of engineers assigned. You don't even need to actually start a research in order see the difference this makes as you can set a number and go back a page to look at the stats to see what difference it made to how much gain you will get.
Starting Expertise
Research Gains
Engineers
Days
Average Gain/day
30.11%
3.37%
1
50
.0674
30.11%
3.10%
2
46
.0674
30.11%
2.84%
3
42
.0676
30.11%
2.64%
4
39
.0677
30.11%
2.44%
5
36
.0678
30.11%
2.31%
6
34
.0679

With Design, we have the same option of number of engineers, but we also have the additional option of doing a design normal, rushed, or intense.

As far as expertise growth, normal and rushed give equal amounts of expertise per day. But since rushed is quicker to complete it will spend less time in design and give less overall expertise, just like if the only difference was using more engineers.

Intense, on the other hand, directly impacts your daily expertise gain by multiplying it by 1.5x. We can see the impacts of various settings below and how much they differ in resulting gains and rate of gains
Starting Expertise
Ending Expertise
Engineers
Mode
Days
Average Gain/day
33.37%
35.33%
1
Normal
30
.0653
33.37%
34.68%
6
Normal
20
.0655
33.37%
34.68%
1
Rushed
20
.0655
33.37%
34.29%
6
Rushed
14
.0657
33.37%
36.29%
1
Intense
30
.0973
33.37%
35.33%
6
Intense
20
.1030

An important note I feel I need to point out, more engineers does not equal better gains. Remember there are diminishing returns the more expertise you get, so if a part is in design for a longer period of time, every day your expertise is higher and higher and so the actual daily gain will decrease. Whether you do 30 days of intense design with 1 engineer twice, or 20 days of intense design with 6 engineers 3 times, the total expertise gain would be the same. The only difference is how soon the part is out of the oven and ready for more money to be thrown into the pit.

So at the very basics, if you are trying to maximize your gains over the year, you have to check your expertise gains of post regulation vs your expertise gains of intense design. Keep in mind also that as design gains are immediate, that you will lose the regulation % of those gains! So if you're in a regulation reset year with 50% hits, research gains in the long term will always be better.

But if you want a cheat sheet for where the break points when research beats intense design factoring in all of that, here it is, if your expertise is below the breakeven point, Intense Design is better, if it's higher, Research is better.
Regulation Hit
Breakeven
-5%
90%
-10%
78%
-15%
65%
-20%
50%
-25%
34%
-30%
15%
-35%
0%

BUG NOTE: If you start a research with a single engineer, and then edit it later to add more engineers, you will still gain the total benefit of 1 engineer, but in much less time, greatly improving your daily gains. I'm not your dad, use this knowledge as you see fit to avoid exploiting, or to take advantage of it. Thank you to maceyp for bringing this to my attention!
CFD and Wind Tunnel
As said in other sections, you should be using these hours wisely and know how they effect your car development. There are valid applications of this within both design and research.

With design, what you're doing is applying a temporary bonus to a specific part. If you put the same amount of hours into different parts, you will get the same additive bonus to the parts stat rating. So you could get for example +.70% gain on your rear wing Drag Reduction, or you could get +.70% gain to chassis Drag Reduction. Refer back to "Parts are not equal", and you'll see that that .70% bonus is better applied to the rear wing in this example as it will give you more performance gain.

Also remember you are getting the bonus for this particular part. So if you design a 2nd part later in the year, you will not get that bonus applied to it unless you apply the hours again. If you have high stats already, it may be worthwhile to use the first 3 ATR periods to hours boost your Underfloor and both wings to get that bit extra of performance out of them for the year.

With research, the approach is entirely different. Remember that CFD and WT hours go directly to your research gains. This means you can use an ATR period to feed all your hours into your underfloor research. Then when it completes, use the next ATR period to feed even more CFD and WT hours in, as in this case they will stack on top of each other and accumulate. The bonus applied from using them in research is vastly higher than what gets applied to a design, but is subject to diminishing returns, you get a larger flat bonus gain for lower stat parts than higher stats, but facility upgrades do not give any extra bonus.

But enough talking, let's look at some numbers and part gains! We'll use the Drag Reduction of an Underfloor and look at how much that stat gains when you use CFD and WT on it. This is different teams/different upgrades to facilities, but pairs are together. 2nd and 3rd pair are the same team but with level 2 CFD and WT facility.
Type
Without CFD/WT
With 4.0 CFD
With 40 WT
With Both
Design Final Stat
Research Final Stat
57.80%
61.33%
58.75%(+.95%)
63.08%(+1.75%)
58.50%(+.70%)
63.08%(+1.75%
59.45%(+1.65%)
64.73%(+3.40%)
Design Final Stat
Research Final Stat
45.55%
45.55%
45.93%(+.38%)
47.97%(+2.42%)
45.90%(+.35%)
47.97%(+2.42%)
46.28%(+.73%)
50.30%(+4.75%)
Design Final Stat
Research Final Stat
44.36%
48.90%
45.31%(+.95%)
51.19%(+2.29%)
45.06%(+.70%)
51.19%(+2.29%)
46.01%(+.1.65%)
53.38%(+4.48%)
Focus I: Intro and Warning
This is where things start to get really complicated, and where if you are trying to keep the game challenging for yourself, where this rocket really takes off and things start to break into little pieces if you're not cautious about it.

If you are looking to keep as much challenge in the game as possible, you should not adjust these sliders very much (2-3 ticks only), if at all. If you are already too strong, then you can increase priority on "garbage" items like cooling (of which you only need so much), dirty air cornering (it's more dependent on your normal cornering stats), or DRS (even at minimum stats DRS is completely overpowered at the moment).

If you're ok with breaking the game, or want to understand what or why to avoid doing certain things with focus, then read on!

The intended purpose of Focus is to offer you the opportunity to adjust which stat values you wish to put more emphasis on and which ones you want to put less attention towards. The effect of adjusting focus sliders is twofold. We will address each one separately because understanding this properly is a trip down the rabbit hole.

Focus II: Addition and Subtraction, Design
The first effect of adjusting sliders applies to each slider viewed on it's own. When you adjust a slider to the right, as explained in previous section, you are doing a flat addition to the relevant stat value, and a flat subtraction from the other stat values. When you move a slider left, you are doing the opposite by adding stat value to everything else, and removing stat value from the current sliders stat value.
  • So if you move none of them, no change will happen of course.
  • If you move all sliders right, you will gain stats in every area as the negative values from other stats don't outweigh the positive gained from moving a stat right.
  • If you move all sliders left, you will gain stats in every area as, again, the negative values don't outweigh the positive.
  • If you adjust the sliders to for example, put all downforce stats to the right, and move drag reduction and cooling left, you will gain more the most additive value to downforce possible.
Let's look at an example.

Design-Sidepods, Final stat values
Stat
No sliders
All to Right
All to Left
Airflow Right,
Drag/Engine Left
Gain/Loss breakdown for previous
Drag Reduction
54.57%
56.36%
(+1.79%)
55.10%
(+0.53%)
51.82%
(-2.75%)
-2.48% from Drag Reduction
+1.41% from Engine Cooling
-0.79% from Airflow Front
-0.89% from Airflow Middle
Engine Cooling
52.72%
54.21%
(+1.49%)
53.88%
(+1.16%)
48.54%
(-4.18%)
+1.41% from Drag Reduction
-2.85% from Engine Cooling
-1.37% from Airflow Front
-1.37% from Airflow Middle
Airflow Front
57.16%
58.94%
(+1.78%)
57.58%
(+0.42%)
62.4%
(+5.24%)
+0.89% from Drag Reduction
+0.80% from Engine Cooling
+4.67% from Airflow Front
-1.12% from Airflow Middle
Airflow Middle
57.16%
58.85%
(+1.69%)
57.67%
(+0.51%)
62.31%
(+5.15%)
+0.89% from Drag Reduction
+0.80% from Engine Cooling
-1.21% from Airflow Front
+4.67% from Airflow Middle
If you observe the gains for each stat in the focus menu, you will see that if you put a slider in a certain position, the values they set for other stats remains the same, regardless of where you move the others. For example, with the Airflow Front slider all the way to the right, it gives an individual +4.67% increase to itself, and -0.79% bonus to Drag Reduction. If you moved Drag Reduction back to the right, Airflow Front is still giving itself a +4.67% bonus and a -0.79% bonus to Drag Reduction. This is all just simple addition and subtraction.

The difference between the values generally follows a trend of "moving left will provide half the overall bonus of moving right", which matches up with the cost and time increasing by half as much for each tick to the left from default than it does for each tick to the right from default.
Focus III: Multiplication and Division, Design
Oh dear sweet reader, you are not prepared this section. I am about to unveil eldritch horrors of imbalance more unfair than a battle between Hamilton in a 2020 DAS Mercedes vs Mazepin in that Haas from 2021. One of the most dangerous things in games for someone concerned with balance to hear is "we used a multiplier function".

As covered in the basics, Design has two primary functions. One is creating an improved part to install to your car for performance gains. The second is to build up your Expertise rating in the various stats once that design is complete, this is what we will be looking at here, so the increases we will be seeing will not apply to the part you are currently designing, but to the next part of the same type you design following that.

Previously I showed you how expertise gains were done per day, and that time in design has no effect except on the overall gain for a single project. We saw expertise rating has a scaling effect where the lower your value is, the larger gain per day you receive. And that if you used intense design, a multiplier was applied to that daily gain.

The same applies with focus sliders, but unlike the previous section, we need to consider all sliders in relation to each other to understand the terror of geometric progression.
  • If you leave all sliders in the middle, as before, nothing will happen and you will gain standard Expertise per day
  • If you move all sliders left or all sliders right, it will make no difference and you will gain standard Expertise per day (but more overall because time in design increases)
  • If you start moving some sliders left and some sliders right, multipliers will being getting applied
Lets go back to our sidepod friend and perform the same 4 slider settings, only this time, we will be looking at the starting and ending expertise stat. We will use 6 engineers to make this go faster since we're only interested in the gain per day.
Slider Setting
Starting Expertises
Ending Expertises
Days
Gain per day
All Sliders Middle
46.47%
39.12%
49.16%
49.16%
47.97%
40.75%
50.48%
50.48%
27
.0519
.0604
.0489
.0489
All Sliders Right
46.47%
39.12%
49.16%
49.16%
48.53%
41.39%
51.01%
51.01%
38
.0516
.0597
.0487
.0487
All Sliders Left
46.47%
39.12%
49.16%
49.16%
48.28%
41.04%
50.72%
50.72%
32
.0519
.0600
.0488
.0488
Airflow Right
Drag/Engine Left
46.47%
39.12%
49.16%
49.16%
46.98%
39.59%
52.15%
52.15%
35
.0117(22.59%)
.0134(22.24%)
.0854(174.74%)
.0854(174.74%)
Airflow Right
Drag/Engine Left
Intense Mode
46.47%
39.12%
49.16%
49.16%
47.18%
39.83%
53.55%
53.55%
35
.0174
.0203
.1254
.1254
Oh dear. Just by moving two sliders left, and two sliders right, we doubled the daily returns (A little less technically because they diminish as stat goes up). And we can see that by also making it intense, we then multiplied that doubling by a further 1.5x to get nearly 3 times the gain on our aerodynamics and cornering ability as we did without creating any difference between the sliders.

Of course, we did this at a cost of reducing our returns for the other stats. But just like parts, not all stats are created equal. Cooling will help keep your temps lower, so they aren't useless. But you're running a racecar, not a refrigerator, you don't need piles of cooling. Speed/acceleration are important, but the gap between the top and bottom teams there are very small to begin with. Then we have Dirty Air Cornering stats, which if you are aiming to be in the lead, why would you need to worry about Dirty Air?

Remember, Expertise carries over. So while sliding all your sliders right and getting the extra 2% is certainly useful, that extra 2% doesn't carry over year to year. But the extra 3% gained here will, minus a % from regulations getting applied. 3% is not all that impressive of a number, but remember, this is from just a quick part design that only took around a month, and it was by a team that is already around the average middle ground of 50%. Backmarker teams start out around 30%, which means the base gains for them are being multiplied by a catch-up factor, and then you can use intense to boost that 50%, and then focus to multiply them by even wilder factors.
Focus IV: The Impact of Stacking Multipliers
Disclaimer: I am showing this for the purposes of displaying just how powerful focus is when used to it's full potential. Under no circumstance should you use this to guide your own gameplay path as you will have the AI already bent to your will by season 2.

Lets try some things with Williams and see what we can do with a single part design. Downforce is adjusted to % based, so "40%" low/medium downforce equates to .80kN and "42%" high downforce equates to .42kN
Chassis
Start
End
Normal
Gain/day
Focus
End Focus+
Intense
Gain/day
% Change
Drag Reduction
Engine Cooling
Airflow Middle
33.37%
34.88%
36.11%
35.33%
36.80%
37.99%
.0653
.0640
.0627
Middle
Left
Right
37.00%
35.60%
41.61%
.1037
.0206
.1571
158.75%
32.14%
250.76%

Front Wing
Start
End
Normal
Gain/day
Focus
End Focus+
Intense
Gain/day
% Change
Low Downforce
Medium Downforce
High Downforce
Brake Cooling
Airflow Sensitivity
Airflow Front
36.00%
38.00%
42.00%
35.99%
33.47%
38.56%
39.00%
41.00%
45.00%
39.11%
36.7%
41.56%
.0600
.0600
.0600
.0624
.0646
.0600
Right
Right
Right
Left
Left
Right
45.50%
47.00%
50.00%
37.25%
34.77%
47.56%
.1267
.1200
.1067
.0168
.0173
.1200
211.11%
200.00%
177.78%
26.92%
26.83%
200.00%

Rear Wing
Start
End
Normal
Gain/day
Focus
End Focus+
Intense
Gain/day
% Change
Drag Reduction
Low Downforce
Medium Downforce
High Downforce
Airflow Sensitivity
DRS Delta
35.79%
36.50%
38.50%
42.00%
33.74%
36.32%
38.92%
39.50%
41.50%
45.00%
36.96%
39.43%
.0626
.0600
.0600
.0600
.0644
.0622
Mid
Right
Right
Right
Left
Left
42.00%
46.00%
48.00%
51.00%
35.06%
37.60%
.0887
.1357
.1357
.1286
.0189
.0183
141.72%
226.19%
226.19%
214.29%
29.28%
29.40%

Sidepods
Start
End
Normal
Gain/day
Focus
End Focus+
Intense
Gain/day
% Change
Drag Reduction
Engine Cooling
Airflow Front
Airflow Middle
35.60%
36.74%
37.28%
37.28%
38.12%
39.22%
39.74%
39.74%
.0630
.0620
.0615
.0615
Mid
Left
Right
Right
39.84%
37.60%
43.76%
43.76%
.0848
.0172
.1296
.1296
134.60%
27.74%
210.73%
210.73%

Underfloor
Start
End
Normal
Gain/day
Focus
End Focus+
Intense
Gain/day
% Change
Drag Reduction
Low Downforce
Medium Downforce
High Downforce
Airflow Sensitivity
38.20%
38.00%
40.00%
44.00%
36.17%
42.66%
42.50%
44.50%
48.00%
40.78%
.0595
.0600
.0600
.0533
.0615
Mid
Right
Right
Right
Left
45.59%
49.50%
51.00%
54.00%
37.77%
.0725
.1127
.1078
.0980
.0157
121.83%
187.91%
179.74%
183.82%
25.52%

Suspension
Start
End
Normal
Gain/day
Focus
End Focus+
Intense
Gain/day
% Change
Drag Reduction
Low Downforce
Medium Downforce
High Downforce
Brake Cooling
Airflow Front
40.49%
34.00%
36.00%
40.00%
34..00%
36.65%
41.96%
35.50%
37.50%
41.00%
35.62%
38.21%
.0588
.0600
.0600
.0400
.0648
.0624
Left
Right
Right
Right
Left
Left
41.22%
40.00%
42.00%
46.00%
34.80%
37.43%
.0197
.1622
.1622
.1622
.0216
.0211
33.55%
270.27%
270.27%
405.41%*
33.37%
33.78%
*This one is a fluke of rounding

So we can see that the gains from just one single cycle of intense design with proper focus can gain enough growth to jump you up to 3rd-7th in the important stats. Since speeds are so close, you could even slide Drag Reduction options also to the Left and go entirely all in on downforce and cornering. Recall that Underfloor and Wings are the large bulk of your part gains, so those would be the most important pieces to get upgraded.

So how do you win in Season 1?
  1. Day 1: Get the Underfloor and Front Wing into intense design with sliders set for max downforce. Start construction on a Design Center upgrade. 60 days later you will be able to upgrade again, so have a spare 12 mil laying around and several mil extra for the Front Wing to finish
  2. Day 60: You will be able to upgrade Design Center again if you want, so have a spare 12 mil laying around and several mil extra as the Front Wing will finish a week later to swap out for a Rear Wing intense design.
  3. Day 100: Underfloor is out, time to put it back in, this time using your CFD and WT hours with the same focus settings. This time we're doing it to get the additive bonus, so all we're aiming for here is to get the maximum temporary gains. So we need to toss 6 mechanics at this and set the approach to Rushed
  4. Day 140: Everything happening all at once. Design Center will finish if you started the next upgrade, Rear Wing and 2nd Undertray will also finish. We put the Front Wing back in with CFD/WT/Focus/Rushed and 5 mechanics, and we put the Rear Wing in with Focus/Rushed/5 mechs. You can start production of the Undertray
  5. Day 180: Both wings will finish their 2nd run and you can start producing them. You now have top of field parts for the most important bits and if you know how to make the most out of a race you can pull off some wins.
Focus V: Normal Research
Now we'll look into research and what impacts it has on your gains. As mentioned before, the Research Benefit value for each stat will be applied to its respective Expertise value at start of the year on Jan 1. You can grow it throughout the year and research parts multiple times. It has no effect on anything else. Expertise does not grow itself at the end of a research project.

The base value of research gains is related to your final stat value for next year's car, so between staff+facility bonuses, and regulation -bonuses, something with already a higher expertise will gain fewer benefits. Also just like Design with Expertise gain, the gain here is per day, so the longer something is in research, the more overall gain it will get.

With research, the focus sliders again act as a multiplier when they are different from each other. There is no addition factor involved here, if you slide something left or right you are simply changing the slider multiplier applied to all stats.

Here's some examples, I'm going to be shortening the stat names because tables keep breaking so DR=Drag Reduction, D:LS=Downforce:Low Speed, A:AS=Airflow:Airflow Sensitivity
Part
Stat
Start Value
Default Gain
Per Day
Focus Right
Per Day
Special Focus
Per Day
Chassis
DR
EC
A:AM
55.08%
41.30%
51.79%
1.55%
2.09%
1.66%
.0517
.0697
.0553
2.00%
2.71%
2.15%
.0513
.0695
.0551
1.93%
0.53%
3.27%
.0551(106.73%)
.0151(21.74%)
.0934(168.85%)
Front
Wing
D:LS
D:MS
D:HS
BC
A:AS
A:AF
59.50%
58.00%
56.00%
44.28%
49.46%
52.64%
2.50%
2.50%
3.00%
3.35%
2.86%
2.69%
.0500
.0500
.0600
.0670
.0572
.0538
3.50%
3.50%
4.00%
5.30%
4.50%
4.23%
.0438
.0438
.0500
.0663
.0563
.0529
4.50%
5.00%
5.00%
0.90%
0.77%
5.51%
.0600(120.00%)
.0667(133.33%)
.0667(111.11%)
.0120(17.91%)
.0103(17.95%)
.0735(136.56%)
Sidepods
DR
EC
A:AF
A:AM
54.57%
40.98%
52.24%
52.24%
2.07%
2.79%
2.17%
2.17%
.0518
.0698
.0543
.0543
2.87%
3.88%
3.01%
3.01%
.0513
.0693
.0538
.0538
0.95%
1.28%
1.00%
7.44%
.0190(36.71%)
.0256(36.70%)
.0200(36.87%)
.♥♥♥♥(274.29%)
Sidepods 2
DR
EC
A:AF
A:AM
54.57%
40.98%
52.24%
52.24%
2.07%
2.79%
2.17%
2.17%
.0518
.0698
.0543
.0543
2.87%
3.88%
3.01%
3.01%
.0513
.0693
.0538
.0538
2.34%
0.64%
3.88%
3.88%
.0468(90.43%)
.0128(18.35%)
.0776(143.04%)
.0776(143.04%)
So we can see clearly the same powerful multiplication factor exists, but there's an additional catch. Those examples were from the same car/team as the Focus III section. The start values here are getting an added bonus from Staff (and in some cases a nerf from regulations). But if we compare normal design daily expertise gain, with normal research daily bonus gain we notice a deviation
Design Daily
Research daily
.0519
.0604
.0489
.0489
.0518
.0698
.0543
.0543
So what is that about? For the sidepods in this example, there is no regulation impacting the first stat, the 2nd stat has a -30% drop, and the last two have a -10% drop for a loss of -11.74% and -4.92% respectively. How research works when it's calculating your daily research bonus gain, it is doing it as if you already have lost that expertise, so your gains in areas hit by regulation will be higher base than in design. However you can't do intense research, so intense design still ends up being the better place to put your attention until you hit around 60-70% and depending on what kind of regulation hit you will be receiving. (I will gather the numbers for this eventually)
Focus VI: Research and CFD/WT
Congratulations, you've made it to the final section explaining Focus! There is a lot to take in, but it's because the knock on effects from Focus are enormous and it's important to understand them

We already know that Focus will act as a multiplier, and that CFD/WT will act as additive, both with diminishing returns, so now let's see how they interact on the degree of gains you get. We will be using our friend the Sidepods again, it's very convenient with its 4 percentage based stats. Also I will be saving space on the table and only showing the daily gains, I think by this point you can mentally fill in the blanks. Again we will use 4.0 and 40 hours for CFD and WT and the same focus settings as Sidepods 2 above
Base Gain
CFD/WT
CFD/WT/
Focus Right
CFD/WT/
Special Focus
% and
Increases
from Base
2.07%
2.79%
2.17%
2.17%
5.92%(+3.85%)
8.11%(+5.32%)
6.23%(+4.06%)
6.23%(+4.06%)
6.64%(+4.57%)
9.13%(+6.34%)
6.99%(+4.82%)
6.99%(+4.82%)
5.83%(+3.76%)
1.66%(-1.13%)
9.42%(+7.25%)
9.42%(+7.25%)
Daily gains
.0518
.0698
.0543
.0543
.1480
.2028
.1558
.1558
.1186
.1630
.1248
.1248
.1166
.0332
.1884
.1884
What is happening here, if it isn't clear, is that the multiplicative factor is being applied to both the base gain and the CFD/WT gain. If you compare the above numbers with Sidepods 2 from the Focus V section, you'll see that setting special focus reduced the gain for the 2nd stat to ~20% from it's base gain. And that here, CFD/WT was giving it a 5% gain initially, and after we set the sliders, the gain difference was only 1% compared to without CFD/WT.
AI Development
[to be more fleshed out later, I have grabbed the data for this]

A few notes on how the AI does their development.
  • The AI does use all their slots
  • They do almost solely use intense mode for design work
  • They split about half/half between design and research
  • They put an equal amount of time into parts, as in they're likely to do chassis 3 times before hitting the underfloor
  • They do use the preset modes on the sliders
  • They will prioritize stats they see themselves behind on as best as the slider presets permit
  • They will vary it up between using single engineer and putting a couple on a job
  • They use CFD/WT hours, by dumping their entire allocation into a job, sometimes design, sometimes research
Final Thoughts
7000 words isn't enough for me, I have a few more things I would like to add, adjustments I hope will be made, and to reiterate what I see as major issues presently in the system. There will be no particular order or organization here, as this list will adjust as needed with future changes (Every bit of this remains the same, 1.8 addressed absolutely none of these issues).
  • I think Frontier has all the pieces they need here for the first entry, there is nothing glaringly lacking or missing with the core system. The values need a lot of adjusting, and some calculations should be shuffled around into other places, but there is nothing I can easily point at and declare "Why is this not there".
  • Intense design needs to be either removed, or reworked completely. As it stands, the majority of the time, intense design is always the best way to gain experience until the point where you already have a car that dominates the field, whether you need a new part or not. I can see a use case for it, if it were to increase the number of days required for a part, maybe 25-33%, and instead of being an expertise boost, would give say an extra 5-10% stat bonus for the part being designed. As in if your expertise is 50%, you gain an extra 2.5-5%. This could also use the low-high variance multiplier. As implemented, it should not exist period because it's only purpose at the moment is a 1.5 expertise gain multiplier, and speaking of that
  • Design should not give anywhere remotely near as much expertise/long term stat gain as it presently does. Research should be what you use for increasing your team's expertise as they study new concepts and try new ideas. Design is for applying that knowledge gained. There should be some increase of expertise I think. But I would say at maximum about 20-25% of what researching gives. This would clearly differentiate the purpose of the two so research is where you work on the long term, and design is where you work on the short term. And speaking of expertise gain
  • Overall expertise gain needs to be knocked backwards, by a lot. While taking Williams to the podium in 6 months is by really really abusing the system, as the system is presently designed, someone with just minor intuition and attention who is being realistic, but not full min-max, should be able to take Williams to a championship by season 3 with no trouble at all. People don't select the bottom rated team with expectations of rapid success, they're in for the long haul. The curve where lower expertise creates larger gains, and higher expertise leads to lower gains is fine, but the entire line needs to kick backwards at least to 35% of where it presently is, maybe even lower than that. There is enough difference between other factors such as staff, focus settings, and CFD/WT that just through that alone a high level of variance can be seen. Lets keep the string going and hit CFD/WT next
  • CFD and WT are weird, this is the one bit that feels like it wasn't finished. The gains you get for research are irrelevant to the development you've done to them, but if you've upgraded your buildings, it's about equal bonus to use them in either place. The amount of gain you get should be equal at any level, so the bonus if you use it for research with non-upgraded buildings is much smaller than presently. Also it shouldn't be multiplied by the focus factor at all in either process. You know exactly where I'm going next now ;)
  • Focus....where do I start. I guess the easiest spot is that the sliders should either be capped so you can't "max" everything, which would be better implemented as more of a pip/point allocation type system (ie: you start with 5 pips in each stat and you can add/remove them up to 10 and down to 0 and once you've allocated them all and in the way you want you can progress to the next screen). Or alternatively, keep the sliders, but sliding either direction changes the cost and days by 3-5%, if left, remove 3-5%(3% for 5/6 stat sliders, 4% for 4 stat, 5% for 3 stat), if right, add 5%. So you could still slide everything right, but it's going to be far more costly in terms of $ and days.
  • The relativity multiplier with ratios needs to go, it's way too strong even if there was a limit on how much you could do. It can still have a multiplicative effect, but relative to it's position compared to center. Every tick can create a 10% difference, so if you slide a stat to the right, then you get 150%, if you slide it left, then 50%. I haven't mathed this out entirely because I've done far too much math already, but my quick rough calculations and comparisons to current "optimal" sliders say this feels right. Alternatively, keep the relativity multiplier, but apply a clamp that takes anything over 150% and distributes it back to other stats. Either solution might need some slight tweaking, especially along with the previous thought, but I have enough numbers on my spreadsheet and time that I could work something out fairly easily, so a whole team should have no problem.
  • AI car development generally is ok and done in a reasonable manner. However it's still far too easy to break the AI. While parts and stats being unequal is in theory fine, even a casual player is going to realize floors and wings are important, and that downforce is the only stat that really gets significant gains. Meanwhile the AI treats all parts and stats as somewhat equal if they are "behind" other teams and puts investment into stats that really don't matter that much. What hurts them further is that there is no "general downforce" slider preset, so at best they have to alternate between high and low speed focus to get close to as much benefit/gain as the player gets.
45 Comments
Dab Jun 20, 2023 @ 10:11am 
Oh i think that's why i fell off heavily, i only focused on the Underfloor, Fwing and Rwing, so i probably couldn't do anything because of that, okay, that has to be it. And yeah, top speed was an issue, thanks for the reply mate, this should definitely help quite a lot
Mike Takumi  [author] Jun 20, 2023 @ 9:43am 
Or in more detail:
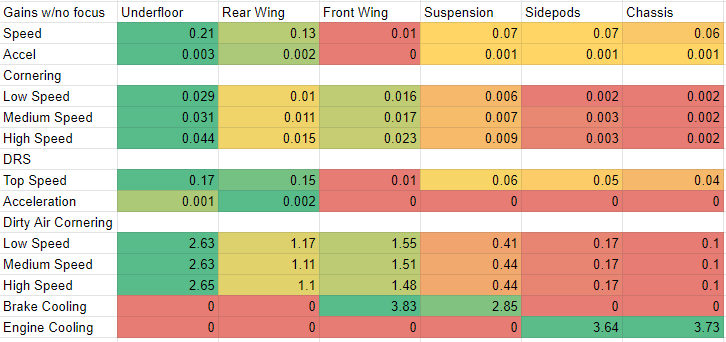
If you want to just clown on the field constantly and forever, get your R&D to 4 slots as fast as possible, then I found best to use 2 slots to rotate Floor>Fwing>Rwing through and rotate the other 3 parts through the other two slots. Get your downforce up to 1st, after than then just move the sliders to the right enough to maintain 1st place for downforce and pump your drag reduction for more top speed. Once you have those both in 1st for the wings and Floor, then doing the rotate thing while keeping downforce and drag reduction to the right for general stat increases seems to keep the AI away.
Mike Takumi  [author] Jun 20, 2023 @ 9:43am 
At high level:
Default action is intense design, it's the fastest way to keep pumping up stats
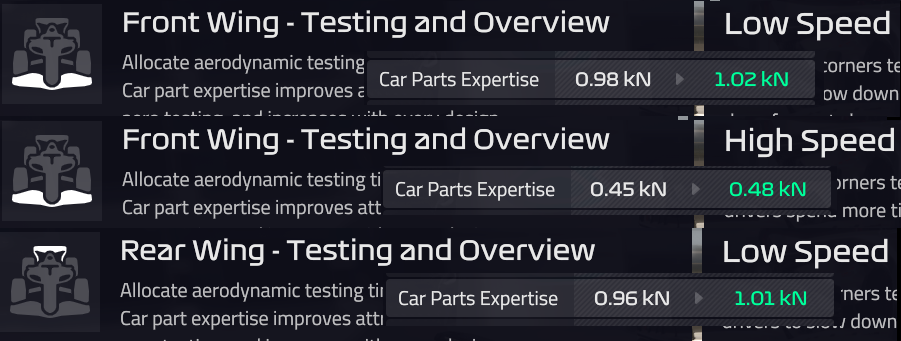
Once you have a few levels in CFD and WT upgrades, then you want to use your ATR hours in research (and only on Wings/Floor) since that's a flat bonus % addition to expertise
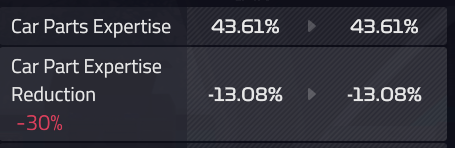
Otherwise, Research should only be used to offset regulation hits of 20% or greater on the effected stats and ignored on ones non impacted.

And don't let your other parts fall too much behind, Floor and Wings are about 65-70% of your pace potential, so keep them at/near top of field, but if you only focus those you'll start to fall off from the other parts getting bad.
Dab Jun 20, 2023 @ 8:55am 
Hey Mike, i hope you're still reading through the comments on this guide, but i must ask you something, i used this "min-max" strat and used the Focus 4 Chapter in AMR to try and progress through the field, of course, the results were absolutely there, first season i had around 50 points, then the next i had over 300! But here i am in 3rd season and i am back on P10 and lower, to my surprise, i only focused on Research, so i just want to confirm, is it better to keep pumping the same stats over and over on Intense Design, and maybe try Research at the end of Seasons or? I am trying to be consistently winning this but it seems i made a mistake and i don't know how to consistently stay at the top/improve further
grabi47 May 5, 2023 @ 12:58am 
Thank you very much.
Mike Takumi  [author] May 2, 2023 @ 10:53pm 
They will keep your engine and brakes cooler. But that part is obvious of course. Cooler engine means your engine/gearbox/ERS will degrade more slowly and let you use it for more races before needing replacing. Cooler brakes will reduce chances of lockups and run wides
grabi47 May 2, 2023 @ 2:11pm 
Tell me please what does engine and breaks cooldown actually do? Is it worth doing?
sanotourkos Apr 10, 2023 @ 4:00am 
You made an amazing job and left nothing untouched. But honestly too much math . My brain hurts and i still have basic questions for the game
gormy33 Apr 7, 2023 @ 2:54pm 
Incredible work here, thank you!

"someone with just minor intuition and attention who is being realistic, but not full min-max, should be able to take Williams to a championship by season 3 with no trouble at all"

This describes me - except I wasn't even partial min-max, just looking at the numbers briefly. I kind of enjoy role playing 90s era Patrick Head and Frank (rip) but was hoping for more of a challenge...
NRWDuke Apr 1, 2023 @ 1:41am 
Thanks for your explanations. I have no clue how you figured this all out ;) and honestly..... i am dumber than before. I better will go on with my inefficient way, because the game will still doesn't get better. But again thanks