Risen
254 ratings
Risen - 100% Achievement Walkthrough
By Brachragon
Some achievements are missable, if you attack / kill NPCs without reason or get caught trying to steal their stuff.

This guide was written before the achievements were officially added to steam on 24th Jan. 2023 and as such uses the ingame-images of the achievements.
5
2
10
3
2
3
   
Award
Favorite
Favorited
Unfavorite
The stuff you need to know about
This game has several mutually exclusive achievements, split into 2 groups:

1) The story is split into 4 chapters. In order to advance to chapter 2, you need to join 1 of the 2 factions of the game; either the Bandits or the Inquisition.
The Inquisition is further split into the paths of a staff-wielding warrior of the order, or a mage - a decision which you need to make right after joining them. And you can only become a mage, if you've joined them in a very specific way, which will be covered in the walkthrough below. If you just walk up to the monastery at the start of the game, you'll be forced to become a Warrior of the order, which is the only useless path (from an achievement point of view).
There's a Bandits-exclusive story achievement right at the start of chapter 3, and a Mage-exclusive achievement well into chapter 4.
Which means, that you should clear as much content as you possibly can, before joining either faction, in order to reduce your overall playtime in the long run. Getting as much level ups as possible while being factionless, is also important for:

2a) Skill point investment.
The combat system of Risen is heavily dependent on invested skillpoints, as your pool of executable actions is actually locked behind certain skill levels. There's 8 skill trees, with a total of 10 levels each.
There's 3 different skills trees for close combat (sword, axe, staff), 2 for ranged combat (bow, crossbow) and another 3 for magic (fire, frost, magic missiles).
You actually need to have maxed out all 8 skill trees at least once, in order to unlock 3 achievements related to them. This does NOT need to be done at the same time. You can just accumulate enough skill points to max out an entire tree at once, save, invest, then reload and immediately do the next.
BUT the Inquisition only teaches you certain skills after you've joined them, while one of the Bandits (Fincher) teaches you everything he knows, UNTIL you joined the Inquistion, at which point he stops doing so. Which means you should grind up on skill points, so you can max out the Bandit-exclusive skill (sword tree) during their part of the walkthrough below, which is a lot shorter.

2b) There's also 3 attributes in the game: strength, dexterity and wisdom.
You need to have leveled each of them to 200 at least once - and again: reloading works.
BUT you can only invest skill points, until you're at 100 points. For the remaining 100 points, you need to drink perma-boosting potions. Each such potion gives you +5 attribute points.
Which means you'll need 20 per attribute, 40 in total (for strength and dexterity; wisdom has another way*). The problem is, that both of these potions require a certain herb ("Hero's crown") to be brewed, out of which there's only 20 in total...
So you need both - all 20 plants AND enough unspend skill points to max out an attribute at once - before you should actually start increasing your stats by considerable amounts...
AND you also need the Alchemy skill to be level 3, and the correct recipes, in order to even be able to brew these potions - which you can only obtain in chapter 2+ (chosen faction doesn't matter).

Do NOT ever consume stat boosting plants!
Always brew them into potions!


*To increase Wisdom, you need to interact with every bookstand and use every "Stone Tablet" from your inventory, which you come across. There's potential for more than 200 points, but you do need to be pretty thorough.
Maps for both the herbs and stone tablets in the attributes chapter below.

Also, as has been pointed out to me in the comments by Teratus:
Yeah can also confirm rings and amulets do not contribute to the maxed stats achievements.

I also noticed that if you have them equipped when you hit the cap of 200 you will actually screw yourself over because the amulet and ring bonuses will not surpass that hard cap and will take priority over the permanent increases from the potions.

I had a +5 Ring of Strength and a +15 Amulet of strength equipped the first time I drank my potions and even though I had enough potions to get my strength to 195, because I had those items equipped I wasted 3 strength potions.
As soon as I unequipped the items my strength dropped to 180, not to 195 as it should have done.

So make sure to unequip your stat boosting items before you attempt to max that stat.

This is further made problematic, as there's a limited amount of experience in the game.
Enemies on the world map do NOT respawn. Each new chapter spawns a few new encounters all over the island, but there's a limited amount in total.
There's actually 1 repeatable quest in the game, which you can abuse to infinitely grind experience, but it's both really slow & boring. You'll want to rely on that method as little as possible.

By the end of the game, you'll end up somewhere between character levels 25 and 30.


With all of that out of the way, let's look at the actual achievements:

Cumulative Achievements
All of the achievements below share a common trait:

You can save, perform one iteration of the achievement's requirement, reload and repeat.

The progression gets tracked while the game is running, and neither of the achievements needs be performed in a single continuous playthrough!


Image
Achievement
Description
The brave little tailor
Seven grave moths killed
Ferocious wild boars
20 wild boars killed
Terror of the hens
20 chickens killed

All kinds of moths and boars count for the achievements.


Image
Achievement
Description
Beginner
Beast slayer
Big game hunter
First monster killed
500 monsters killed
2000 monsters killed

As mentioned at the top, you can save and reload in front of a large group of weak enemies to grind the 2000 kills, after you've completed all the other achievements. This can easily be done with a pulled together group of early game monsters, like the stuff in front of harbour town, and the AoE "Inferno" scroll - which you can buy in chapter 3+ from Cormac in the Bandit camp and from Master Illumar in Volcano Keep. Just save, scroll, reload, repeat. If you do it after you've finished the game, you should be able to grind this in less than an hour.
500 kills should easily happen during your normal playthrough.


Image
Achievement
Description
Well-to-do
Moneybags
King Midas
1,000 gold coins obtained
100,000 gold coins obtained
300,000 gold coins obtained

At the very end of the game, save in front of a merchant, sell your entire inventory, reload and repeat.
If you want to have that amount of money in your inventory at once, check the guide linked at the very bottom of this section. I wouldn't recommend it though, as it's sloooow.


Image
Achievement
Description
Idiot
Fell to death 3 times
Fervent swimmer
Caught by the tideworm 10 times

Well, kill yourself a few times by the means of gravity, and try to leave the island by approaching the ocean at any of the beaches.


Image
Achievement
Description
Map reader
Found first map in the game
Archer
Found first bow

All maps and bows count here, regardless of the method to obtain them.
You will have absolutely no problem here.


Image
Achievement
Description
The fourth triplet
10 treasures found

Grab a shovel and start digging. You can find a few of them as early as the bandit's swamp.
You'll have to dig up 7 treasures as part of a mandatory chapter 2 quest, which you'll have to do as both a Bandit and a Mage, so this achievement is unmissable.


Image
Achievement
Description
Jester
25 Jest spells used

Just use 25 Jest spells. Using the Rune works, too. You can even just use them on empty air.


Image
Achievement
Description
Master thief
50 pockets picked
Safecracker
100 locks picked

Invest some points into the two thievery skills and get going. When and where to learn them will be part of the walkthrough below - spoiler: early on in the Bandit Camp.
The lock picking scroll does NOT increase the counter for the Safecracker achievement.


Image
Achievement
Description
Weaponsmith
100 weapons forged
Hard worker
250 quests completed

Just clear all quests you can find, and you should unlock this without any issues.
If a given quest has multiple stages, it's actually multiple quests in the first place, so 250 quests is way less than it seems to be.
You can kinda cheat this anyway, should you want to do so: There's two quests related to re-forging 2 broken weapons: Stormwind and Souldrinker.
So by abusing the quicksave and reload method, you can just forge these 2 weapons a 100 times, and both of the achievements above are yours.
Note that you only need to repeat the final step - to sharpen the dull swords with the Whetstone - to increase the counter for this achievement.

All 4 parts require lockpicking. Here are the locations, as well as the level of lockpicking required:

But you can also grind the only infinitely repeatable quest of the game, which would also give you some exp, which in turn would help with the achievements of the next section:

Attributes and Skills
Much of the important stuff that needs to be said here, has already been mentioned in the first section of this guide. Most important of all:

You do NOT need to max all attributes or skill trees - even for a single achievement - at once. Just gather up on learning points, save, max one attribut / weapon type, reload and repeat.


Image
Achievement
Description
Expert
Master of the classes
100% achieved in an attribute
100% achieved in three attributes

This refers to Strength, Dexterity and Wisdom.
Strength and Dexterity require the potions illustrated on the right. Brewing the potions requires an Alchemy skill of 3, and the recipes, which can only be bought starting from chapter 2.
The recipe for the strength potion is sold by Cormac, who's in the bandit camp's temple.
The recipe for the dexterity potion is sold by Leonardo, who's in the merchant district of the harbour town. Alternatively, you can loot it in one of the locked chests in the Volcano Keep.

Again, there's only 20 hero crowns, which you need for BOTH potions, so save before you brew anything and invest too many learning points. For a map of all herb locations, check this guide:

Additionally obtainable potions in the early game:
  • Strength: Chest in Leonardo's house in harbour town and quest-reward for "Find Hemlar's murderer" in the monastery.
  • Dexterity: On a barrel in the forest north of the bandit camp and in 1 of the 5 treasures as part of Patty's questline in ch. 2.

You can also gain a handful of points in strength for every 10 eaten apples & eggs, and a handful of points in dexterity by eating "Hunter's Fry-up". The recipe can be looted in Patty's tavern and the Bag of Spices required for them can be bought from Konrad in the merchant district - a few per chapter. Make sure to consume these items after you've maxed out the 100 points that can be learned by teachers.

I haven't tested it myself, but I've been told in the comments, that using rings or an amulet to push your attributes to 200 temporarily does NOT register that attribute for the achievement.

For Wisdom, you need to interact with book stands, and you need to "consume" stone tablets, which can be found in all major caves and ruins:

  • (map copied from worldofrisen)


Image
Achievement
Description
Workaholic
Every profession learned

The skills required for this achievement & their teachers are:
  • Prospect Ore 1: Olf - Harbour Town (ch. 1) / Eastern Temple (ch. 2) / Bandit's swamp (ch. 3+)
  • Gut Animals 1: Sam & Luis - Bandit Camp, Jervis - Volcano Keep, Cole - Harbour Town, etc.
  • Alchemy 3: Cormac - Bandit Camp, Abrax - Volcano Keep
  • Smithing 3: Oscar - Bandit Camp, Karlsen - Volcano Keep, Walter - Harbour Town

Image
Achievement
Description
Gladiator
Sharpshooter
Mage
Every close combat talent learned
Every ranged combat talent learned
All crystals learned

Read part 2a) of the first section of this guide, for more information regarding these achievements.

The skills required here & their teachers are:
  • Sword Fighting 10: Fincher - Bandit Camp (ONLY ch.1 or as Bandit)
  • Axe Fighting 10: Karakos - Bandit Camp
  • Staff Fighting 10: Mendoza (ch.2) in Volcano Keep, Carlos (ch.4) in Harbour Town (both ONLY if you've joined the Inquisition)

  • Archery 10: Sam - Bandit Camp
  • Crossbow 10: Edgar - Harbour Town

  • Magic Bullet 10: Master Vitus - Volcano Keep
  • Fireball 10: Master Ignatius - Volcano Keep
  • Frost 10: Master Pallas - Volcano Keep
    -> If Pallas died: Loot "Power of Ice" and go to Ignatius, who'll take over.
    --> All 3 of the magic skills are for Inquisition Mages ONLY, and you need to obtain the magic crystals beforehand. Their locations are part of the walkthrough.

(The guide originally mentioned Karakos' Axe training to be locked to the bandits as well, which was incorrect. Thanks to both ERiser and Graved for telling me so in the comments.)

A full list of all existing teachers can be found at:
------------ Walkthrough ------------

Your chosen difficulty does NOT matter. Feel free to play on Easy for the sake of achievements.

As a general rule of thumb:
Be nice to everyone. Don't attack people, unless a quest tells you to do so.
You never know the longterm consequences of attacking the wrong person.

Do NOT get taken to the Monastery, before the walkthrough tells you to do so!
This would lock you out of becoming a Mage and therefor an achievement in chapter 4.

The game has a Quest Log, which you can open with the [L] Key. Clicking on an individual quest enables a "quest map", which often shows you where you need to go for that selected quest. Make good use of it.

You have an infinite inventory, so loot absolutely everything you can.

Merchants have a permanent inventory. If you sell them something in chapter 1, they'll still have it in chapter 4. So you might want to choose a merchant to which you sell exclusively, so that you always know where all the stuff is, should you need to buy something back.

This should be a given, but I'ma gonna mention it anyway: Save regularly!
Always quicksave before you try to steal from someone, and reload if you get spotted.
And create a number of manual, permanent saves, while you're at it.

The walkthrough below will mostly be limited to achievement related content.
If you want a thorough walkthrough, check this one:
On the same website, there's also a list of the majority of side quests:
As well as all available maps marked with almost all interesting landmarks:

Chapter 1 - Prologue & Bandit Camp
At the very beginning of the game, you'll see a few corpses in front of you, as well as Sara. Just accompany her up to the abandoned house.

Go further up the cliffs and you'll encounter a ruin. Just enter it, fall through the hidden pitfall in the middle of the room, kill the moth and pull the lever to unlock:

Image
Achievement
Description
Adventurer
Found way out of the first ruin


Follow the only available path and you'll soon come to a second house. Inside, you'll find Jan, who wants you to find a sword within the house. Get it, approach him again and tell him about Sara to unlock:

Image
Achievement
Description
Philanthropist
"Rescue Sara from the wilderness" completed


From there, ask Jan to show you the way to Harbour Town. He'll only walk a few steps until you see a farm and then return. Go to that farm, where you can collect 10 grains to unlock:

Image
Achievement
Description
Field hand
10 grain plants collected


After that's done, go back to Jan and ask him to show you the way to the bandit camp now.

Once you're at the camp, find an NPC named Sam. He's at the entrace, currently cutting some wood. He'll be the one to give you the "Power struggle" quest, which is about getting rid of the wannabe-leader Brogar.
Do NOT kill Brogar and do NOT let him see you steal from the chest inside his hut, or you'll be locked out of this achievement. Beyond that, the quest requires 2 things to be done:

1) - Talk to Craig, who will set up a few arena fights. After you've beaten all regular fights, you can provoke Brogar into fighting you. While you fight both Craig himself, as well as Brogar, make double sure to loot them, while they're down, in order to get 2 pieces of a broken golden sword.
  • You don't actually need to invest any points into strength or sword fighting, nor do you need a better weapon for these fights. There's a reliable, super easy method of defeating every humainoid enemy in the game:
    Equip a shield and block with the right mouse button. Go as close to the enemy as possible and just walk left or right. Since the camera will keep the enemy focused, you should be circling around them. Now just wait for the enemy to attack. Most attacks will easily be blocked by your shield, but sometimes the enemy will just hit the empty air, where you've been standing a second before. If he does so, you can safely place a hit or two. Rince and repeat.
2) - Brogar is collecting protection money. While sticking to the borders of the swamp, you'll encounter a drunken hunter by the name of Luis. While you're there, give him 3 beer to obtain his part of the golden sword. But for now, he's just a landmark, since there will be a cave really close to him, which has several moths and a corpse. Loot the corpse for the 4th piece of the golden sword and a list of people, which ought to pay for protection. Take the list to Rachel back in the camp, and then approach Brogar. Tell him you haven't talked to anybody about the list, and that you want to be the one to collect the money. Proceed to actually collect the money from all the people Brogar mentions to you, then approach him again, decide to keep the money, and bring it to Rachel instead.

Together with some more gossip, which you can gather from other characters in the swamp, you should now be able to approach Brogar and tell him to lay low, which will award this achievement:

Image
Achievement
Description
Sidelined
"Power struggle" completed


And while you're at it, check the islands in the middle of the swamp. Grab a shovel for later and loot all the chests. One of them will hold the final piece of the golden sword, which Oskar the smith can reforge for you. Just keep it, after he handed it to you to admire it. You'll now be able to go inside the temple, where you get access to the best sword & axe trainers in the game: Fincher & Karakos. You can also talk to the Don for some experience. Doing so will NOT let you join the Bandits yet, so don't worry.
Do NOT give the Golden Sword to the Don, as it's a very good weapon for now, requiring just the right amount of strength to not be too expensive.

Finally, while you're at the camp, invest 20 learning points into strength, so that you can actually wield that golden sword. Also search for the fighter Phil. Let him teach you 2 levels of lock picking and pick pocket each, for another 20 learning points. This will cost a total of 40 learning points and therefor 4 level ups, which you should have gotten up until now.
While Phil can also teach you Sneak, which is a super useful skill, you'll get a ring, which let's you sneak while wearing it, right after entering harbour town - as long as you bring that shovel mentioned above.

And that's actually all the skills I'd recommend you to get during all of chapter 1. Feel free to invest more points into a combat ability of your choice, if you feel the need to do so.
But remember that you want to have ~50+ learning points on your hands by the time you need to pick a faction, so that you can easily max out a given skill tree - and thus obtain all of the skill and attribute achievements by reloading a save.

With all of that done, and with all of the random quests in the camp completed to earn you some money and experience, we can leave the camp behind us.

Chapter 1 - Harbour Town & Island
Once you're done with the Bandit Camp make your way back to the farm, where you've collected the 10 grain.
Now talk to Tellur, and ask him to show you the way towards the safe entrance of Harbour Town.
I'd recommend you NOT to kill any monsters on the way. Keep them for later, so that you can pull them all together and repeatably kill them with the "Inferno" scroll AoE for the 2000 kill achievement at the end of the game.

Once you're in front of the city gate, bribe Leto with 100 gold and you're in.
Don't complete any Bandit / Order NPC quests just yet.
Just a few steps in, there's a man named Arno. Talk to him and he'll tell you about his sick wife, Martha. Pay him 25 gold for now.
Continue your way in and turn right at the fish shop to find a man named Belschwur. He'll give you a few potions and a list of people to deliver these potions to - one of which is Martha. Return to Belschwur after all 5 have been delivered to unlock:

Image
Achievement
Description
Samaritan
"Medicine for everyone" completed


If you talk to Flavio, who's right next to Belschwur, he'll ask you to gather 10 skins, which you need to trade to Baxter for a delivery of meat, which you're supposed to hand to Belschwur. Follow the questline until you can do so. Once that's taken care of, talk to Flavio again, and he'll offer a free bed for Martha to recover. Return to Arno, tell him the good news, then talk to Martha to unlock:

Image
Achievement
Description
The merciful one
"The farmer's sick wife" completed


Make your way down to the actual harbor and take a right turn. You should walk towards a woman in revealing, blue clothes in front of a somewhat fancy building. That's the brothel. Enter it and talk to the woman in the bathtub - Gwen. She'll tell you about some dude, who wronged her - Erikson, the idiot sitting on a bench closely by. Beat him up, punch him down and tell him to get out.
Talk to Gwen again to unlock:

Image
Achievement
Description
Ladies' man
"Woman beater" completed


Interact with the picture in that same room to open a tunnel which leads to one of the Bandits called Scordo. Use pick pocket or beat him down to obtain the sewer key, which you can then use a bit further down the tunnel to open a door, which let's you leave harbour town, without having to decide on one of the two factions:

Leave the brothel, take a left turn and climb the sets of stairs until you're standing in front of the "Guard House". To the right of the entrance, hidden behind a bush, will be a digging spot for a treasure chest, which contains a ring, that gives you the "Sneak" skill, while wearing it:

Alright, now go ahead and clear all available quests in harbour town, which do NOT involve any of the bandits or warriors of the order, as those quests need a bit more of information:
There's 7 sets of quests, which are mutually exclusive to each other, as you need to help either a member of the bandits or the order to get their hands on a specific item or person. Completing one of those quests will show an on-screen message like "1/4 for the Don" or "2/4 for the Order".
Completing 4 of those 7 quests for any side will then force you into joining that side. Which means that I want you to complete exactly 3 quests for each side for now.
You can choose whichever you want, but I personally recommend these for maximum experience and gold:
  • Side with the marked NPC:

    Bandit
    vs
    Order
    Delgado
    Toni
    Lukor

    Scordo
    Cid
    Weasel


    Cpt. Romanov
    vs
    vs
    vs

    vs
    vs
    vs

    vs*
    Sebastian
    Hernandez
    Carasco (Armour Plates)


    Carasco (Golden Bowls)
    Rodriguez
    Marcelo

    Sergio

  • *Do NOT pick a side between Cpt. Romanov and Sergio just yet.

Create a permanent save. Regardless of the faction you're going to join, everything up until now will be required for your second playthrough anyway. So you might as well start right here.
You'll have to make a decision now: You can either join any of the 2 factions now, or you can leave harbour town and clear most of the island's easy encounters for a few quick level ups, which you wouldn't have to do twice then.
Remember: You want to have ~50+ unused points, so you can max out the entire sword tree during your time as a bandit - whose achievements will be completed right at the start of chapter 3, whereas the path as a mage leads basically right to the end of the game.
Even once you've joined the bandits, you'll still get ~25k experience points just doing the chapter 2 story quests - maybe up to 30k, depending on how many monsters you kill along the way.

Also remember that you'll have to find all 20 "Hero's crown", as well as most of the "Ogreroots" and "Pixie Hats" all throughout the island for the achievement about maxing out strength and dexterity, as well.

---------------------------------------------------------------------------------------------

When you're walking out of harbour town, you should have 2 unsolved quests from independent NPCs:

The first one is Walter, the smith in the merchant district. He'll task you with obtaining 15 tool bags from gnome hordes. If you complete the quests before obtaining the 20 bags for the achievement below, you can still knock him out and loot them back (Thanks to Zentun for telling me!).

Image
Achievement
Description
King of the handymen
20 tool bags collected in inventory

And here's a map for all 23 locations:

The second quest is by Tilda, the woman with the broom nearby the smith above, who wants to know about the locations of her 3 sons - Beppo, who's in the Bandit Camp - William, who's in the monastery - and Leon, who's in a hut in the forest close to harbour town's north entrance.
After you've talked to all three of them, return to Tilda and the achievement will unlock.
Talking to Leon will then start another questline, for which you'll have to gather a number of "vassal rings" from pretty strong skeleton lords, that you'll have to kill in the island's ruins. With all of those rings, return to Leon for the second achievement related to this family:

Image
Achievement
Description
Family man
"The sons of Tilda" completed
Ghost hunter
"Find all the vassal rings" completed

Here's a map with both Leon's hut and all skeleton lord locations:


Path A - Joining the Bandits
Alright, it's time to finally join the Bandits.

Since the only weapon skill tree locked to this path is the sword tree, you might as well commit to it right now and invest all your skill points, as it makes the content below somewhat easier.

Return to harbour town and complete the 4th required quest for the Don. If you followed my recommendation, that should be Romanov's quest. So hand him his basket, obtained in the upper floor of the warehouse, and you'll be set.
Make your way to the hidden tunnel system behind the brothel and talk to Scordo to start the quest "A package for the Don". Just take it back to the camp and you'll unlock:

Image
Achievement
Description
Fence
"A package for the Don" completed


The Don will now proclaim you a "Hunter" and offer you a new set of armor. Buy it, as you'll need it.
The Don will then send you to the monastery to talk to the Inquisitor. So follow that questline until you meet the Inquisitor, and follow him to the massive gate behind the monastery, which will lead you into entering chapter 2.

Chapter 2 is all about obtaining 5 Crystal Disks. Mendoza will tell you about two dudes named Eldric and Cyrus as part of a questline for the first disk. Once he let's you go, return to the Don. He'll tell you, that he already possesses one disk and that you're to return to him, once you've got the other 4.
Fincher will both give you another teleport stone and progress the storyline about the Eastern Temple. And there's also a new NPC in the Don's hub, who'll tell you to go to Patty and complete her questline.
The final disk has to be looted from the "Gyrger", who's name you probably heard a few times by now, and who resides in the ruin all the way in the northeast of the island.

Here's a map:

Let's start with Patty's questline, the one for which I've marked the entire path, as well as the 5 red dots, where you'll have to dig up some treasure chests.
If you've already completed the harbour town part of her questline in chapter 1, she'll be waiting at the beach outside town, otherwise you'll have to start her quest in the tavern. While you're there, meet Scordo for another teleport stone.
Follow Patty's quest until she sends you to dig those treasures. 4 of them are rather easy. For the one closest to the Monastery, you'll have to jump down from a spot close to that pond of water.
Once that is done, follow the questline until you meet with Romanov. The Crystal Disk is in the cave behind him. Only open "Dilinger's chest", as all other chests will instantly kill you.
Complete Romanov's request or straight up kill him to obtain a key to Patty's prison, which is in the ruin marked with the 4th green dot. Keep hugging the cliff side of the ruin and you'll find it. Romanov will become unavailable later in the game, at which point this achievement becomes unobtainable, should you wait too long:

Image
Achievement
Description
Little hero
"Where is Patty?" completed


Alright, next is the Gyrger. This one is simple - just go the marked ruin in the northeast of the island, past the long bridge. Talk to the hunter at the campfire just in front of the bridge, if you want an NPC companion for the quest. Go to one of the two cellars of that ruin and find the Gyrger. Kill him however you fancy and you'll unlock:

Image
Achievement
Description
Death of a Legend
"The Legend of the Gyrger" completed


Next is the eastern temple, the one southest of the Monastery.
Should you not have completed the harbour town quest to get the 3 treasure seekers out of town, do that now. Go to the temple, to which the entrance is hidden in the small forest marked above. It's a dead end for now. Find the 3 brothers at the beach where you also picked up Patty's quest and send them to the temple. Once the entrance has been cleared, just complete the temple as it has been intended by the game to unlock:

Image
Achievement
Description
Archaeologist
"The mystery of the eastern temple" completed


Go to Eldric's hut, the one marked above, next to the Gyrger's ruin, where you'll meet Cyrus. Follow the quest (and thus the wolf) until you find the ruin blocked off by a red magic barrier. Cyrus will give you a scroll to break it. Make sure to take him with you, as you'll probably need his help inside.
Just kill all the lizardman you can find, until you face a heavily armored one called the "Watchman". Kill him to loot a key, which you can use to open the cell of Drok, the ogre.
He'll tell you where to find Eldric and therefor the fourth Crystal Disk.
This will unlock:

Image
Achievement
Description
Ogre friend
Rescued the ogre, Drok


With all 4 Crystal Disks in your inventory, return to the Don, who'll once again send you to the Inquisitor. Let him open the gate and kill all the lizardman. The game will advance to chapter 3 and Mendoza will now command you to follow him inside the Volcano. Just ignore the man. Teleport back to the Don, bring him up to date and receive the quest to take over the city.
Teleport to Harbour Town and approach Commander Carlos in his Guard House. Just exhaust his dialogue and you'll unlock:

Image
Achievement
Description
Freedom fighter
"Esteban's return to Harbour Town" completed

And that's it for the 2 Bandit-exclusive achievements about joining their side and reclaiming the city. Time to join the Inquisition and play the path of the Mage.

Path B - Becoming a Mage
Reload your latest save before you've joined the bandits. Approach Sergio and hand him Romanov's basket, or complete whichever other quest for the order you hadn't completed earlier. Once you have those 4/4 quests for the Order, go meet with Commandant Carlos and help him to root out Scordo, to obtain both his recommendation and:

Image
Achievement
Description
Peacekeeper
"Peace and order" completed


With the recommendation in hand, make your way to the Volcano Keep. Right behind the gate you'll be forced into a conversation with Master Pallas. Tell him that you volunteered, have a recommendation and want to become a mage. This is NOT optional.

You'll be told to talk to Taylor to receive your novice robe. Accept his offer to show you to your rooms and he'll lead you right to it - where you're greeted with Hemlar's corpse and Inquisitor Mendoza, who's putting you in charge of finding the murderer. This is easy enough. Go to Master Vitus, the one overseeing the training area, and he'll task Caspar with helping you. Caspar will lead you through the quest step by step, up until Hemlar's murderer will also try to kill you. Surviving it and informing Master Vitus about the culprit will unlock:

Image
Achievement
Description
Master detective
"Find Hemlar's murderer" completed


To proceed the main story, you'll have to complete a test for each master. Master Vitus wants you to find "Wisdom in Combat", which is a book in Berengir's Chest in the Cemetary. In the upper area of the Monastery, you'll find Master Ignatius. He'll tell you to read every book in the library, to which he'll show you the way. The library seems to only have 3 books. If you take a right turn and go to the end of the library though, you'll see 2 stone rings sticking from the wall. Pull on them to unlock a hidden section.
Go inside, take another right turn and walk straight until you find a door, which get's commentated as "that's impossible". Now read all bookstands you can find, including those for levitation, nautilus transformation, telekinesis and open locks. You don't need to enter the part blocked off by the red barrier.
At the end of the hidden library, you'll find another set of stone rings. One of them opens another hidden room with a skeleton and a chest, which contains the Crystal for Magic Bullets.
Grab another use of open locks and return to the "impossible" door to open it. Transform into a nautilus and roll through the gap in the wall to find a book on creating illusion scrolls and Master Abrax. Return to Master Ignatius, tell him that you've read all books and you'll unlock:

Image
Achievement
Description
Wise man
"The test of Master Ignatius" completed


Ignatius will also tell you about the novice Nathan, who you're supposed to find. He's in the ruin beyond the pond just outside the Monastery. Loot him to obtain the Crystal for Fire Magic.
Complete the remaining master's tests and let Master Ignatius walk you into the temple of the holy flame, where you're officially promoted to a Mage. The Inquisitor will accompany you to the gate and advance the game to chapter 2.

After that, approach Master Pallas to buy the Crystal for Frost Magic.
I hope you kept those unspend learning points, so that you're able to max out both the staff tree, as well as all 3 crystals now - including the reloads after each skilltree, obviously. If not, it's not that bad, since this should be the save you complete the game with, putting you somewhere between level 25 and 30 by the end of it, giving you enough options to accumulate a big enough stack of unspend points.
Once you're done with them, keep 20 learning points to learn all 4 levels of the "Seal" skill from Master Ignatius. Each level requires 50 points of wisdom, so a full 200 for the last level. This requires a lot of stoneplates, for which you'll need to loot several ruins, which will only become available later on in chapter 4. Just mentioning it here, so you don't waste all your learning points beforehand. Obtaining the fourth level will unlock:

Image
Achievement
Description
Rune master
"The fourth seal of rune magic" completed


Complete chapter 2 again. It's basically identical to the bandit's chapter 2. You might want to grab lockpicking level 3 from Patty during her quest, while you're at it.
After you've completed the eastern temple, you'll encounter lizardman all over the island. Kill them to loot their teleport stones. Here's a full overview for all 14:
  • (click to zoom in)
Obtaining all 14 will unlock:

Image
Achievement
Description
The Traveler
"Find all the teleport stones" completed


Once the Inquisitor has opened the gate and advanced the game to chapter 3, he'll order you to accompany him inside the volcano to progress the story. Just ignore the man, yet again.
Return to the Monastery and you'll find it being overrun with Lizardman. Clear all of them, including the cemetary for Vitus's quest and the hidden part of the library mentioned above for Abrax's quest. Report your progress to Master Ignatius to unlock:

Image
Achievement
Description
Defender
"Secure the volcano keep" completed


Now go into the volcano and progress the main story questline inside there to unlock:

Image
Achievement
Description
Pandora's box
"The Titan trap" completed


At the end of the volcano cave, you'll advance the game to the final chapter 4, in which you'll have to loot 5 ruins, which are sealed off by blue magic barriers this time.
The ingame questlog shows the locations of those 5 ruins:
This is all regular main story stuff, so no more help from me.

After you've obtained the 5 parts, you're basically finished with the game.
So it's time to go for the achievements to obtain 300k gold and 2k killed monsters.
As has been pointed out a few times now, just approach a vendor, save, sell your entire inventory, reload and repeat until the gold achievement pops.
Same for 2k kills: Grab an Inferno scroll, for example by buying it from Master Illumar, pull a few mobs together, like the ones close to harbour town, which I've told you to spare, save, Inferno, reload, repeat.

Once those two have been unlocked, go back into the volcano and finish the story for the final 2 achievements:

Image
Achievement
Description
Showdown
"The Inquisitor is dead!" completed
Titan Lord
"Defeat the Titan!" completed

--------- Bugfix: 300k Gold ---------
Image
Achievement
Description
Moneybags
King Midas
100,000 gold coins obtained
300,000 gold coins obtained

As of right now, the method to unlock the 300,000 gold steam achievement by simply selling and reloading does not work.
The game requires you to have 300,000 gold in your inventory at once.
It is literally impossible to achieve this legitimately, even by completing all quests and selling every single item in the game.

There's 3 ways of obtaining the achievement anyway.
(At least on PC. Console players will have to use method 1)

1) You abuse the infinite loop of selling 10 weed to Rhobart and stealing it back from him afterwards:

2) You switch the game to publicbeta mode.
Library -> right click Risen -> Properties -> Betas -> pick "publicbeta" in the dropdown list.
The selling - reloading loop should now unlock the achievements.
Thanks to jaaaszczomb for telling me about this fix in the comments.

3) You cheat via the ingame console.
I'll remove this part from the guide once the problem is fixed, but for now you can do this:
  • launch the game in either normal or "Force Keyboard" mode.
  • load a save or create a new character.
  • type in "minsky" real fast; within ~1 second.
  • this message will appear on the left side of you screen ->
  • steam achievements will now be disabled, for as long as test mode is activated.
  • press the key that is directly beneath the [Esc] button on your keyboard, which should usually be [^] or [~]. This will open the console.
  • Type in the commands:
    give It_Gold 299999
    give It_GoldBag_Small 1
    Your inventory should now look like this:


  • type "minsky" again to disable test mode.

    Steam achievements will now be enabled again.
  • open the inventory and click on the small bag of gold to unlock the achievement.

98 Comments
Weed-Lei Jul 17 @ 10:14pm 
Thank you a lot ! For the 2000 kills, it took 2 games, or you can farm the rats (easy to kill) at the island.
Charlotte Snake Jun 9 @ 7:20pm 
Funny enough, you can still get the idiot achievement by pushing mobs off the cliff to their deaths (forcing them to the edge and the mobs try to back away to instead fall to their deaths) though it's still easier to do it yourself 3 times then getting the mobs to do it but I found it out accidentally.
Big Goldberg Jun 9 @ 5:15pm 
Thanks a lot for a great guide. I just passed the game and hit 100%
I, Dementia! May 5 @ 9:08am 
@scorpion3333king, try using tab when typing command
scorpion3333king Apr 21 @ 11:51am 
in method 3 it says 0 item added to pc hero inventory any1 know why?
Shindragan Mar 27 @ 4:59pm 
Oops, sorry. :), ty again for the guide, I just need the 2000 kills and Im done :steamhappy:
Brachragon  [author] Mar 27 @ 11:31am 
@Shindragan - There's actually a note pointing this out on the left side of the infographic ;)
Shindragan Mar 26 @ 6:06pm 
Hi man, Just a note, the last teleportation stone is behind a blue magic barrier which cant be accessed until chapter 4, I kinda spent 30 minutes looking for it on the west end of the darn caves, haha, just letting you know since you mention the achievement during chapter 2. So I think a note saying the Western Volcano Grotto teleport stone cant be gotten until then. Cheers!
Brachragon  [author] Mar 21 @ 3:44am 
@Shindragon - Thanks, I've changed that part a bit.
Shindragan Mar 20 @ 10:49pm 
Hello, great guide. I was following it and got confused by the following:
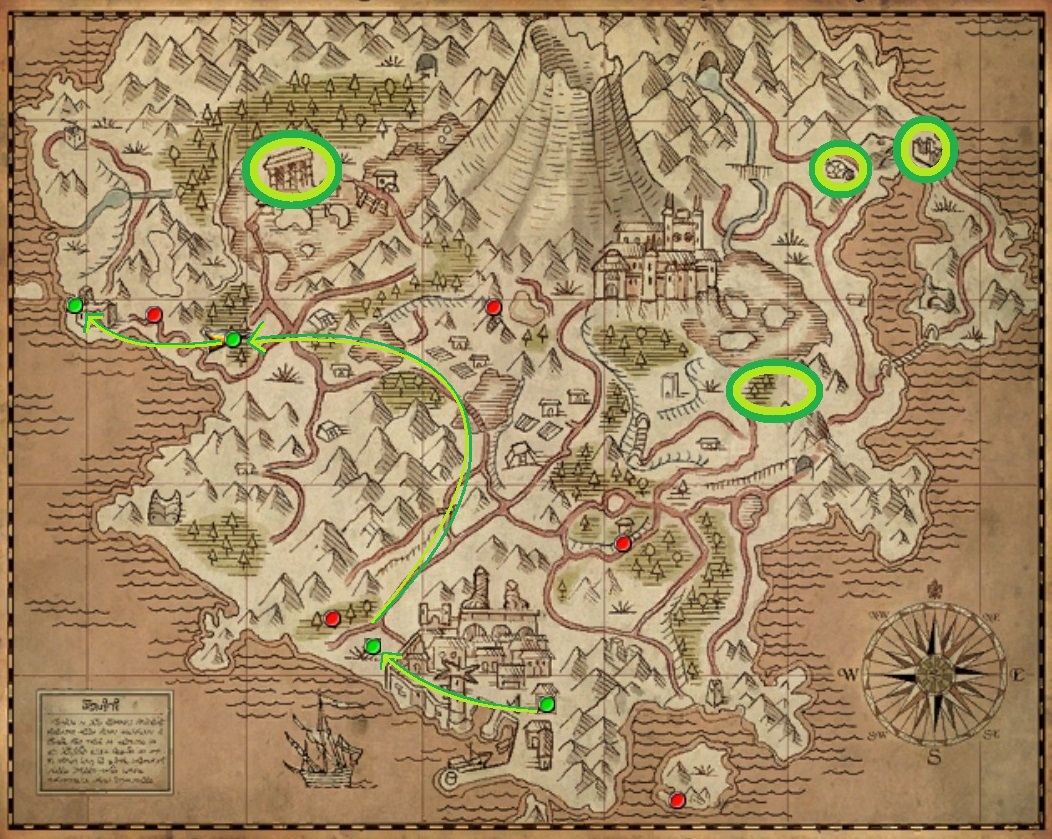
"Tell him you haven't talked to anybody about the list, and that you want to be the one to collect the money. Collect money from all people Brogar tells you, then bring the money to Rachel."
I did all the collecting but Rachel didnt have an option for taking the money. I thought I did it wrong or I was missing collecting for someone, so I triple checked, took me like half an hour or unning around.
It was AFTER talking to Brogar about completing the collection and then choosing to keeping the money when I was finally able to talk to Rachel about it. Hope anyone else that gets confused about this figures it out. Cheers!