People Playground

People Playground

168 ratings
How to make your own basic mod!
By doot
This guide will cover the basics of creating a simple mod. In this, I will show you how to create a custom mod. This is intended for beginners. Feedback is appreciated.

In order, this guide will show you how to create a
- Custom Knife
- Custom Gun with slide animations
- Custom Category
- Custom Human
8
7
2
12
2
2
3
5
2
2
2
3
3
2
   
Award
Favorite
Favorited
Unfavorite
✦ Information. ✦
While it is not essential, having Visual Studio Code installed will be a great help when it comes to modifying the files in your mod. You can download it here.[code.visualstudio.com]

If you need help with parts of the guide, or just want to get in contact, my discord is dootw


I highly recommend going through the guide in order, as if you start at the custom human section, you may not have the relevant files or information.
⠈⠂⠄⠄⠂⠁⠁⠂⠄⠄⠂⠁⠁⠂⠄⠄⠂⠁⠁⠂⠄
✦ Making your files. ✦
First off, we need to make a folder.
Make a folder. It can be anywhere on your computer and it can be named anything you like.

Next, we need files inside the folder.
Create the following files inside the folder:
  • script.cs
  • mod.json

Your folder should look like this now.
✦ Editing 'mod.json'. ✦
To begin with, go to this[www.studiominus.nl] link. This will help with generating easy code to put in your mod.json file.

You will only need to edit the name, author and description for the time being. Change 1.11 to the current PPG version, with a + after it.

Once you are done with that, you can copy the script and place it into your mod.json file.

Your mod.json file should be similar to this inside of Visual Studio Code.


✦ Editing 'script.cs'. ✦
To begin with, go to this[pastebin.com] link. This is a basic code snippet to add a new knife.

Copy that code snippet and place it inside your script.cs file.

Your script.cs file should be similar to this inside of Visual Studio Code.

✦ Making Sprites. ✦
This is, more often than not, the most laborious part of making a simple mod.

To begin with, go to this link[www.pixilart.com]. This is a website good for making sprites for your first basic item. Create a new canvas. It should be 4 pixels wide and 17 pixels high.

To make the knife dimensions as accurate as possible, use this as a template.


Once you've created your knife pixel-art, go to File > Export/Download. There, make sure this bar is set to x1 size.


Afterwards, you can save it into your knife mod folder and name it 'dagger'. Make sure the filetype is a PNG file. Do not worry about the image being small, as it will show up fine in-game.

Your folder should look like this now.

✦ Finalizing your mod. ✦
Lastly, we will need a custom thumbnail for your mod. You can either design a custom one or just use any random image you have saved. Name this image 'thumb.png' and put it in your knife mod files.

Your folder should now look like this now.

✦ Moving your mod. ✦
For your mod to actually work inside of PPG, we need to move it into the appropriate folder.

Place your knife mod folder in this directory. 'New Volume (E:)' will likely be different, depending on what drive you have PPG stored on.

✦ Finished! ✦
Congratulations! You have completed your People Playground Mod! You should be able to find the mod amongst the rest.


And the knife should function correctly!


⠈⠂⠄⠄⠂⠁⠁⠂⠄⠄⠂⠁⠁⠂⠄⠄⠂⠁⠁⠂⠄
✦ Making a gun. ✦
Now that you've completed the basics, let's try something just a little harder.

We're going to be adding a basic gun to our mod with an actual animated slide.
✦ Editing 'script.cs'. ✦
Editing mod.json is not really necessary at this point, as it will function as it is, so we're going to move right onto script.cs. Find in between the two final sets of brackets in your mod (see image below).


Copy the code from this[pastebin.com] link and put it there.

Your script.cs file should look similar to this now. (IT WILL NOT BE EXACT, I have changed the pastebin contents a few times)

✦ Changing values. ✦
Staying in the script.cs file, we can now change some properties of the guns. What all the values do are explained in the comments next to them. You can obviously change the description and name if you wish.

I personally would not change any of the actual firearm properties for the sake of keeping it like a regular pistol currently, though if you want to, for example, increase the damage it deals or minimise the gun recoil, you can.
✦ Making Sprites. ✦
Woo, we're back to this again! This time around, we will want to make two different sprites. One for the main gun, and one for the slide. You can obviously remove the gun slide line and just create a static gun if you wish to, but I feel that takes the fun out of it.

Yet again, go to this[www.pixilart.com] link and create a 14x7 canvas for the gun's body.

To get dimensions correctly, you can use the gun body sprite I made for this tutorial.


It looks a little odd right now, but that's because it doesn't have a slide attached. It will look normal in game, don't worry. Save your file as 'gun.png'.

Now, go to File > New and create a 13x3 canvas for the gun's slide.

To get dimensions correctly, you can use the gun slide sprite I made for this tutorial.


It also looks a little odd right now, but I assure you they'll both fit together well in-game.
✦ Fixing Positioning. ✦
Because the game is weird when it comes to custom slides, it may not look EXACTLY like the pistol in-game in terms of positioning, but here's how you can get it closer:

Before you save, resize your canvas to 26x6 and make sure that 'Resize Contents' is checked.

Next, change the canvas size to 26x7 and make sure that 'Resize Contents' is unchecked.

Use the move tool to move the slide to the top right of the canvas and make sure none of it is cut off.

Then, save it as 'gun-slide.png'.

Make sure your sprites are named correctly in accordance with the names listed in your script.cs, otherwise the slide may not show up.
✦ Finished! ✦
Now you've completed your basic gun! The slide is 0.75 pixels off, but that's an unfixable issue unless we're using super high-quality sprites with a black border to make that invisible.

Regardless, your gun should work now and your slide should move when fired!


⠈⠂⠄⠄⠂⠁⠁⠂⠄⠄⠂⠁⠁⠂⠄⠄⠂⠁⠁⠂⠄
✦ Making a Category ✦
Now you've got a few things in your mod (and may want to add more), it's a good idea to make a custom category.

First off, create a file in your mod named 'CategoryBuilder.cs'. Open the file and paste the contents from this[pastebin.com] link into the file. DO NOT change anything inside of the CategoryBuilder.cs file.
✦ Editing 'mod.json' ✦
For our category script to actually function, we need to edit mod.json. Open the file and under the "Scripts" section, add "CategoryBuilder.cs". Make sure that there is a comma after "script.cs", like this.

✦ Editing 'script.cs' ✦
We now need to edit a few things in our script.cs file. First of all, add this line:

CategoryBuilder.Create("NAME", "DESC", ModAPI.LoadSprite("icon.png"));

in the place shown here.


Obviously, change 'NAME' to the name of your category, and 'DESC' to the description of it. You can have whatever you like for the category thumbnail.

Next, you will want to change the 'CategoryOverride' for all the items that you have added so far. Simply change, for example, 'Melee' to 'MyMod' if you have a knife and have named your category 'MyMod'.
✦ Finished! ✦
Now the items in your mod should be in their own separate category! This is good for finding things more easily. Just make sure that if you're making another item, the category override is set to the one you've just made.

⠈⠂⠄⠄⠂⠁⠁⠂⠄⠄⠂⠁⠁⠂⠄⠄⠂⠁⠁⠂⠄
✦ Making a Custom Human ✦
This section will show you how to make your own custom human!
✦ Editing 'script.cs' ✦
Go to this[pastebin.com] link and copy the code from here into your script.cs file, just like you would with a knife or gun.

Change the name and description override to whatever you like.

Make sure you have a file in your folder called 'human.png' that will act as the thumbnail for your human. You can always change it once you have made your sprite.

If you have made a custom category (see last section), make sure the category override is set to the name of your custom category.
✦ Making Sprites. ✦
Next, download the three sprites from this[github.com] link. You can edit any one of them to your liking, but make sure their names stay the same as listed in your script.cs file.

For the purpose of efficiency, I'm only going to be editing the skin layer for this tutorial (mainly since it's the simplest), but if you want to make a more complex custom human, feel free to edit all 3 layers.

Once edited, simply save the files and the custom human should work!
✦ Finished! ✦
Congratulations! You now have a custom human in your mod!

⠈⠂⠄⠄⠂⠁⠁⠂⠄⠄⠂⠁⠁⠂⠄⠄⠂⠁⠁⠂⠄
✦ Extra Resources + Thanks! ✦
https://www.studiominus.nl/ppg-modding/ - A great website that contains tutorials and documentation of the game code.

https://github.com/mestiez/ppg-snippets - Snippets for creating basic PPG mods. It has the code for a new gun, human. It has the name of every spawnable object so you can change which object your item derives from, and more.

Thank you for reading up to this point. If this guide was useful to you at all, make sure to like and favourite it so that more people can learn how to make their own mod. If you end up making a mod with this, credit would be appreciated lol.
89 Comments
Local Man Eats Sandvich Sep 27 @ 2:28am 
top-level statements
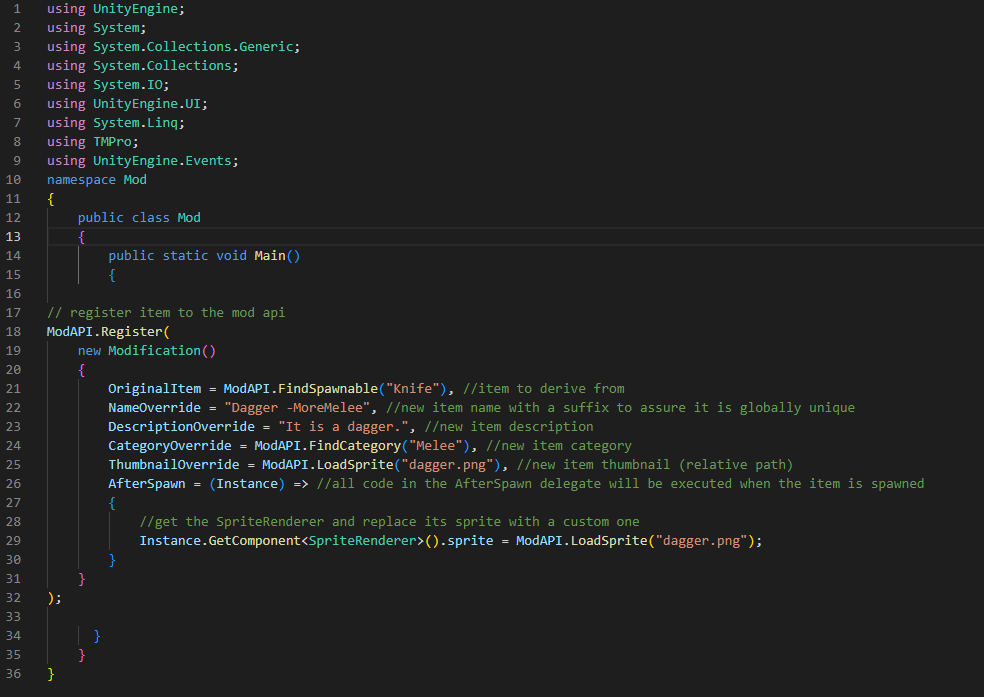
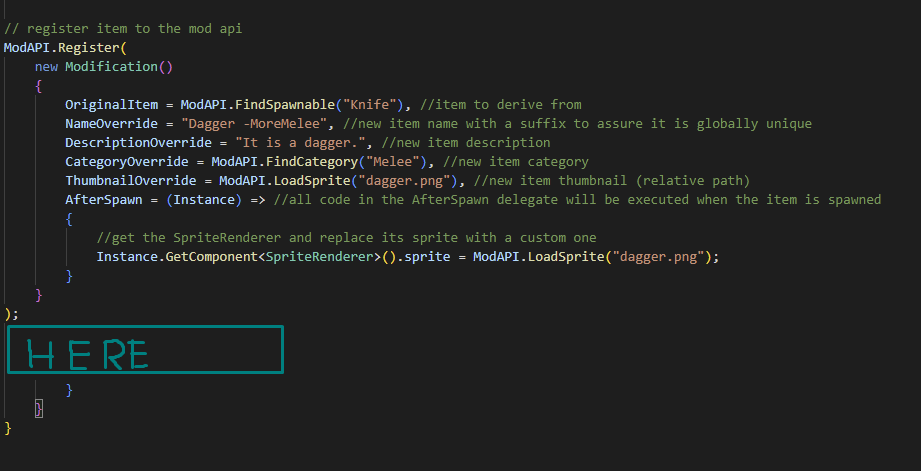
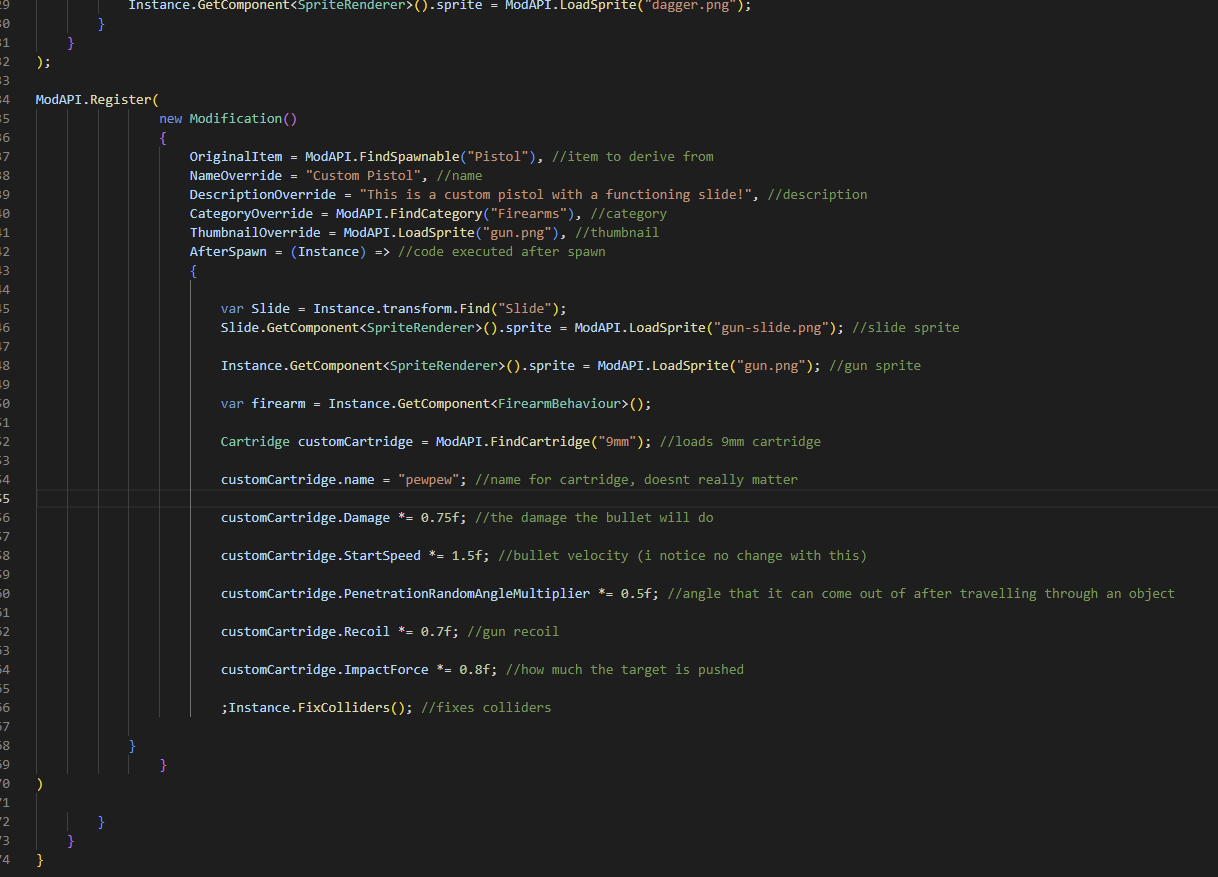
pretty sure they are like things that run first in a program, they dont have the wonky main stuff.
ClashEricCo Aug 22 @ 9:23pm 
how do I accurately adjust the hitboxes
Dreadnoughtix Feb 9 @ 9:53am 
i think the guide outdated. i got error message: Feature 'top-level statements' is not available in C# 7.3. Please use language version 9.0 or greater. at 0,0"
"inUNKNOWN FILE, Program using top-level statements must be an executable. at 0,0
RevanBoy413 Feb 9 @ 1:31am 
I followed all the steps, but it just says ERROR!
"Feature 'top-level statements' is not available in C# 7.3. Please use language version 9.0 or greater. at 0,0"
"inUNKNOWN FILE, Program using top-level statements must be an executable. at 0,0"
DuckDuckGun Jan 29 @ 1:14pm 
@gimmiejimmie9000
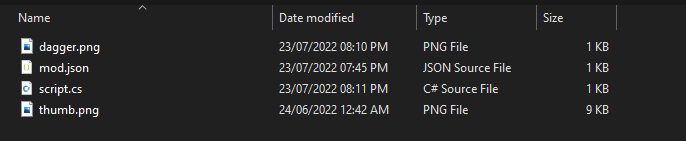
in visual studio, select your folder. click the "add file" button. rename the file to be "mod.JSON", and create a second one named "script.cs".
GlowGuy III Jan 3 @ 9:21am 
aaaaaaaaaaaaaaaaaaaaaaaaaaaaaaaaaaaaaaaaaaaaaaaaaaaaaaaaaaaaaaaaaaaaaaaaaaaaaaaaaaaaaaaa- AAAAAAAAAAAAAAAAAAAAAAAAAAAAAAAAAAAAAAAAAAAAAAAAAAAAAAAAAAAAAAAAAAAAAAAAAAAAAAAAAAAAAAAAAAAAAAAAAAAAAAAAAAAAAAAAAAAAAAAAAAAAAAAAAAAAAAAAAAAAAAAAAAAAAAAAAAAAAAAAAAAAAAAAAAAAAAAAAAAAAAAAAAAAAAAAAAAAAAAAAAAAAAAAAAAAAAAAAAAAAAAAAAAAAAAAAAAAAAAAAAAAAAAAAAAAAAAAAA
don quixote Nov 24, 2024 @ 12:41pm 
i have done every step but it just wont load ingame
gimmiejimmie9000 Nov 18, 2024 @ 6:05pm 
how the hell to i make a cs and json file???
GoofyGoober *x* Oct 18, 2024 @ 8:49pm 
its hard i cant code bc it says notebook
press_rouch_rouch Oct 7, 2024 @ 8:51am 
slide still wont render though