World of Warships

World of Warships

104 értékelés
Your Carrier and You. A New Owners Manual.
Készítő: DeviousDave
The complete new Captains guide to owning and operating your Aircraft Carrier and how to get the most out of your strike squadrons.

(OUTDATED regarding the latest Carriers at this time)

ON HOLD - WarGaming is in the process of making major changes to Carrier game play that will probably make several sections of this guide obsolete)
4
2
4
2
   
Díjazás
Kedvenc
Kedvenc
Törlés
Forward
This guide aims to assist new Carrier Captains to get the most out of their Carriers as well as provide insight into the various tech tree lines as well as the Premium Carriers, noting the pros and cons of each.

Please do note that this is from my own perspective and others may disagree or have their own opinions on this. If you see something you think is wrong or somewhere where you would like there to be more detail added then do shout up in the comments section so I can check it and correct it/expand it if needed.

If you find the guide useful then do please consider liking it to help others find it more easily.


This guide is accurate as of the time of writing and will be updated when/if WarGaming gets around to actually trying to balance Carriers.


(the official seal of WarGaming's balance department*)


*Not really, but it should be :P.
Updates:
  • 27/08/2022 Corrected a few spelling errors, tweaked the text in a few places and added/expanded on some tips based on feedback received.
  • 28/08/2022 Added a new section on aiming and renamed the other sections to part 2 and 3. Made some minor changes to the Forward section.
  • 05/09/2022 Changed the ending section - moved the closing bit to its own section named Closing Comments to make way for the upcoming Operations guidance expansion part one (Killer Whale) hopefully coming soon.
  • 30/09/2022 Minor update to Graf Zeppelin based on Operations experience.
  • 05/11/2022 - Updated Operations section a bit based on experiences.
  • 09/12/2022 - Killer Whale guide is up \o/
Abbreviations Used
  • DD - Destroyer
  • BB - Battleship
  • CV - Aircraft Carrier
  • AA - Anti Aircraft
  • AAA - Anti Aircraft Artillery
  • SS - Submarine
  • Torp - Torpedo
  • AP - Armour Piercing
  • HE - High Explosive
  • LMB - Left Mouse Button
  • RMB - Right Mouse Button
  • RATO - Rocket Assisted Take Off
  • DOT - Damage Over Time
  • RNG - Random Number Generator (usually used when describing randomness such as dispersion)
  • GZ - Graf Zeppelin
  • RTS - Real Time Strategy (How CVs used to play before the 2019 rework)
  • OP or OPS - Operations
Your Carrier and You!
Congratulations Captain on being promoted to the proud owner of your very own Aircraft Carrier!

Pull up a seat, grab a cup of your favourite {Insert beverage here} and take a complimentary cookie.

Do be aware this guide is going to take a while to get through so I hope you are sitting comfortably.

Now before we dive into the murky world of World of Warships Aircraft Carriers I do need to raise something.

To quote a certain over used Marvel meme.


Aircraft Carriers (or CV as they get commonly shortened to) are arguably the single most influential class in the game.

A good Carrier player can shore up a flagging allied flank, blunt an enemy push, punish another player's miss play and reveal ships trying to sneak through the front line allowing your team to give them a right paddling.

But it gets better because it can do all this while still dealing damage to enemy ships, forcing them into manoeuvring where they don't want to be in their efforts to avoid the CV's attack for example into an island or into giving a nice juicy broadside to your teams Battleships.

A good CV can make up for a weaker team while also breaking the enemy team over their knee by strategically removing key ships or denying them capture zones thus providing your team an advantage.

A bad CV player on the other hand, one who for example spends ninety percent of the match farming back line camping battleships, will drag their team down and force them to face an uphill struggle.

The result of this is that CV can be very rewarding to play, with the ability to pull your teams collective buttocks out of the fire while snatching victory from the iron jaws of defeat. However CV is also one of the more stressful ship classes to play if you actually care about winning and/or what others type in chat because when things go wrong, boy will you know about it (and according to chat it will be all your fault).

Now if this hasn't turned you off from playing the class, then read on as we delve into salt soaked hangers of CV game play starting with... Nations.
Nations (USN and IJN)
The first thing you are going to need to decide when starting out as a Carrier main (or even if you're just dipping your toe in to see what it's about) is which nation you want to pick up first.

Now a couple of pieces of advice here:

1) Try all the lines. Each nation has a different play style and one of them may feel better to you than the others.
2) Do not take the tier four game play experience as an indicator of the nation's ability. Most tier four Carriers are purposely dumbed down to act as an introductory for new new players and thus don't exactly make for exciting game play.

I will cover them in release date order so first up:

USN (America)


Aaaammmmeerrriiicaaa, Ammmmmeeeerrriiccaaa... (Que World Police theme song)

America, the Jack of all trades CV line.

USN CVs are the measure to which all other CV trees are held to. Am excellent blend of speed, firepower, survivability and sustainability that produces a Carrier line that can respond to any threat from any ship class.

That said the full weight of the old adage of "Jack of all trades, master of none" springs to mind here too because USN CVs don't particularly specialise in any one area means other nations CVs can do specific things better than they can.

IJN for example have faster planes, better torpedoes and use Armour Piercing (AP) bombs and are thus somewhat better at killing Battleships and Cruisers while operating at longer ranges from the CV hull and also at reacting quicker to hot spots developing on the opposite flank during a match.

The hulls of American Carriers at the lower end of the tech tree can be somewhat squishy with only moderate deck plating to protect from plunging long range gun fire and bombs along with a decent belt armour to protect the citadel however they have good speed tier for tier and decent handling.

Higher tier Carriers, namely the Midway class, finally get good deck armour in the form of an armoured flight deck and improved citadel protection making them considerably more survivable if caught in the open.

American Carrier hulls do however take the medal for the most number of AA guns strapped to the ship of any Carrier line. Every square inch of deck space not used for plane management has some form of duel purpose or 40mm Bofor emplacement on it and every meter of side railing has a 50cal or 20mm cannon bolted there.

They literally bristle with guns.

The lower tier USN CV aircraft can be somewhat unwieldy due to not quiet having enough ordinance per drop to score truly spectacular damage per pass coupled with mediocre aiming speeds, dispersion and sluggish turning that can lead to some frustration when making an attack run, especially starting out for newer players.

It is at tier eight with the Lexington where Americas CVs begin to really shine and at tier ten with the Midway where the full weight of USN air power comes to bare.

At both these tiers USN CVs squadrons come to fruition as the number of planes per attack run and amount of ordinance dropped greatly increases (The Midway drops a whopping six torpedoes per attack run!).

USN also gain access to an alternative attack plane load out at these tiers in the form of Tiny Tim rockets. These rockets compared to the standard HVAR load out sacrifice numbers of rockets launched for much greater damage per rocket and considerable armour penetration values allowing you to threaten Battleships and heavier Cruisers with them.

The tech tree USN line up consists of.

Langley


Ranger


Lexington


Midway


America also gets three Premium Aircraft Carriers in the form of:

+ Enterprise (No longer available outside Super containers and Christmas Santa containers)
+ Saipan
+ Hornet

These CVs will be covered under the Premium CV section.

IJN (Japan)


Tora, Tora, Tora!

Japan's Carriers were the second of the old Carrier lines from the pre Carrier game play rework days.

IJN Carrier's squadrons sacrifice armour and survivability for speed and restoration. Your planes get in quick, hit hard and get out or they die fast.

The line's premiere squadron is the torpedo bomber squadron. Japanese air dropped torpedoes are scary, you might not get as many per drop as some other nations but these torpedoes hit very hard and are very fast, to the point a single torpedo in the drop is a significant threat to lighter vessels (a single Ryujo torpedo can shave nearly half of the HP points of some tier six destroyers)

Unlike the USN line the IJN line uses AP bombs on their dive bombers. This allows for the bombs to score Citadel strikes against Cruisers and Battleships for major, unhealable damage.

All this speed and power does come at a price however. The planes are squishy and do not react well to being shot at and while the torpedo bombers are incredibly useful and versatile due to how good those IJN torps are (you can two shot Destroyers with those things rather easily once you get good enough at aiming them) the rest of the squadron's planes are more fixed in what they can deal with.

The dive bomber's AP bombs while good against Cruisers and Battleships don't really work against Destroyers as they will simply over penetrate causing minimal damage while the rocket planes don't launch enough rockets per attack to be of much threat to heavier vessels even if the IJN rockets deal more damage per rocket and have better AP values than the USN standard rockets.

The rocket planes are also fragile even by the usual IJN standard, like seriously, you would think these things are made out of canvas soaked in gasoline with how easy they go up in flames. While the squadron size does mean you will in all likely hood get a drop off against a hostile ship do be aware that you will likely take heavy losses to do so against anything with remotely decent AA values or blobs of ships sticking together.

The IJN Tech tree line consists of:

Hosho


Ryujo


Shokaku


Whoops, wrong pic.. I mean...


Hakuryu


IJN also have the premium CV Kaga.
Nations Part 2 (RN)
RN (Britain)


Ark Royal contemplating the difficult choice of making tea or launching Swordfish to defend Newport

The third Carrier line to be released and the first new line after the CV rework.

British Carriers are... well... a mixed bag to say the least. In theory they play like the USN Carriers being a jack of all trades carrier line where all squadron types can deal with pretty much anything. The reality however is that British CV's can struggle in the damage race that is Randoms due to putting weaker ordinance downrange dropped from smaller squadrons. This becomes especially noticeable at tier eight and ten where the flaws in the design are magnified by the sheer power of the competition, namely Lexington and Midway.

That said, British CVs are very forgiving to new players and are very easy to pick up. The lines style is built around toughness, reliability from both the aircraft and Carrier hull itself.
Their aircraft, that while somewhat slower, can take a beating from AA on the way in and still get the drop off which when coupled with Britain easy aiming mechanics and short delays on drops allow for easier dealing with of blobs of enemy ships or high power AA ships along with being able to pull off trick shots other nations can only dream of doing.

British CV hulls are remarkable tough, even at lower tiers they gain access to an armoured flight deck to help protect against enemy airstrikes or plunging long range gunfire.

British torpedo bombers are very easy to aim with, having fast aiming speeds that are resistant to the effects of turning hard along with a converging torpedo spread and relatively short arming times. The downside to this however is that each individual torpedo dropped does not do spectacular damage like the IJN torpedoes and you don't get the weight of plane numbers/ordinance dropped that the USN get to have so you are left with mediocre per drop damage.

Even at tier six the USN Ranger gets a flight of eight torpedo bombers while the British Furious only gets six.

The most unique squadron British CVs get is their level bombing squadron. These planes rather than diving onto a target like most nations bombers instead fly level over the target and release their bombs in a line, saturating the target with multiple bomb strikes.

These bombers drop a LOT of bombs per drop and thus are pretty good at starting fires and are fairly easy to aim due to the cluster release nature coupled with the gentle change in altitude during the attack run up.
Sadly this is where the praise ends. the individual bombs are really, REALLY bad, with poor armour penetration and damage per bomb along with a poor fire chance which really hurts the line.

Now you might think,"Oh well, just go for more lightly armoured targets such as Destroyers" however remember where I said further up about how they saturate an area with bombs?

Well that area is huge in comparison to the size of a Destroyer and the number of bombs released is not 'that many' when considered against the area they can potentially land in.


Yep, that pic sums up the issue. That tier six level bombing area is almost as big as a Yamato, a tier ten battleship...

The biggest Battleship ever built (in real life)...

Now you can, and will, score bomb strikes against Destroyers using the level bombers and occasionally you will get hilarious moments where you set all of an enemy ship on fire in one pass but note these moments are HEAVILY RNG based. One bombing run might net your seven penetrations and three fires, the next two penetrations and no fires.

And considering that individual bomb strikes are not that impressive damage wise only scoring one or two hits will do little to impede an enemy combatant.

British attack planes on the other hand are a solid contributor to the CVs damage output, slow but sturdy by attack plane standards these planes put a lot of rockets downrange per attack. The rockets have lower damage and pen per rocket when compared to the USN rockets per tier but they are quite accurate and British attack planes have a short machine gun spray delay before firing which makes them fairly versatile.

Overall British CVs require DOT via fire and flooding to keep up with other nations CVs and you will be looking to stack these on enemy ships as often as you can via accurate torpedo blows to the bow or stern of enemy ships or via the hammering of their decks with bombs and rockets.

If the idea of watching everything burn appeals to you then British CVs might be the line for you.

British tech tree CVs consist of:

Hermes


Furious


Implacable


Audacious


With Ark Royal and Indomitable featuring as the line's Premium carriers.

The weird bit

But wait there is more! So possibly due to the British CVs being released first after the CV rework and the massive backlash it created, they seem to have had something of a development hell situation while being created and it shows in their weirder stats.

For example each Carrier's upgraded tier of torpedo planes uses a new Mk of torpedo (eg. the base planes drop a Mk III torpedo but the upgraded planes drop a Mk IV torpedo) but don't get the equivalent damage increase. However they do get a slightly longer arming time (no other nation has this feature) over the stock plane's torpedoes.

The level bombers when upgraded drop significantly more bombs however those bombs are identical to the stock ones AND they drop them over a much greater area.

For example the stock tier six bombers, the Skuas, bombing zone for eight bombs looks like:


While the upgraded Barracudas twelve bombs bombing zone looks like:


So in reality the upgraded bombers have far more RNG to their strikes due to the bombs having more room to wander off course due to someone forgetting to tweak the bomb release timers to account for the faster plane speed and more bombs being dropped.

That said the RNG can work the other way and twelve bombs slapping into the top of a ship will cause considerably more damage than eight bombs. Generally speaking the stock planes are more consistent in my experimentation but the upgraded planes have more potential damage if RNG favours you.

This weirdness also extends to the planes themselves by which the upgraded planes per CV are faster and tougher however also incur a much longer restore time for each plane lost compared to the stock aircraft.

Now considering the above the argument can be made for British CVs that the stock aircraft , namely level bombers, are actually BETTER than the upgraded ones.


Nations Part 3 (Kriegsmarine)
Kriegsmarine (Germany)


(Insert Hollywood plane diving noise here)

The second line introduced after the rework and the first line to mostly consist of paper ships, that's ships that were never actually built (or finished if they were started) and mostly consisted of design blueprints.

German CVs play similar to the IJN CVs in that you have very fast plane's, that tend to be good against only one or two ship types and do not react well to being shot at. The Germans however turn this idea up to 11.

German Carrier hulls get excellent secondary batteries with the built in German improved secondaries HE penetration values and accuracy/range. This, when combined with their good armour schemes and high ship speeds, can make them a considerable threat to any lighter surface vessels who manage to close with the CV hull.
They are also deadly to any ships that have already taken a beating and stray within the secondaries firing range as what little health they have left will be quickly eaten away by the barrage of shots.

That said you are still a Carrier so be careful charging down hostile ships as it likely still won't end well if you get into a heavy gun fight and torpedoes can, and will, still sink you in short order.

German aircraft excel at killing specific ship types per squadron but each squadron type will struggle against anything else.

The German attack plane's rockets use AP warheads rather than the standard HE ones used by other nations. This makes them d.e.v.a.s.t.a.t.i.n.g against lighter Cruisers where the AP warheads combined with the decent number of rockets launched per attack run allow for multiple citadel strikes per volley if aimed well. It's not uncommon to chunk a third of a Cruiser's HP pool in one pass if you can catch them flat broadside.

The German dive bomber's high powered AP bombs when combined with the steep dive angle their plane's dive at allow for truly spectacular damage against heavily armoured targets such as Battleships and heavy Cruisers.

Meanwhile German torpedo bomber's, despite having a tendency for lower damage per torpedo, excel at DD hunting due to the very high speeds of the torpedoes, fast aiming speed and long running distance on the torpedoes that when used correctly can allow from cross dropping the target.

That said, German rockets will over pen Destroyers and bounce off the heavy belt armour of Battleships, the AP bombs will plough straight through most light Cruisers without arming (and don't even bother dropping on a DD ) and those torpedoes will only mildly irritate most Battleships and heavier Cruisers.

This is combined with some very different flight mechanics for two of the three squadron types which can throw you off a bit at first and have a few draw backs. While the torpedo bomber's are pretty much the same as everyone else, the rocket attack plane's have a very shallow, low altitude, dive on the target during the attack run which is heavily influenced by what you are flying over.

For example:


Is the normal distance the Weser's BF-109-E's aim at on an attack run, while:


Is the same squadron when flying over a small island when on an attack run.

The reticle gets thrown way out further when flying over an island which can really mess with your attack if you don't expect it.

The German dive bombers also have a unique flight mechanic in that they cruise at a massively greater altitude than other nation's dive bombers and rather than do what I call the bunny hop ( a steep climb followed by an arcing curve into the dive) that all other nation's dive bombers do, German dive bombers simply nose down into the dive the second you hit left mouse button.

This can be jarring at first as the white aiming area is directly below the squadron rather than in front like most nation's dive bombers which makes it a bit harder to keep track off when you are trying to dodge flak on the approach.

They also can't bunny hop over enemy flak walls when very close to the target like other nation's dive bombers can but they do get a heal ability like torpedo bombers.

This reliance on super specialised aircraft that only really do well against one or two target types can make the German line tricky to play but if you can master them and learn to use the correct plane against the correct target you can pull truly staggering damage numbers.

The German CV line up consists of:

Rhein


Weser


August Von Parseval


Manfred Von Richthofen


With the premium Carriers being.

Erich Loewenhardt (Not purchasable anymore - Super container/Santa crate only)
Graf Zeppelin
Max Immelmann


Nations Part 4 (Russian)
Voyenno-morskoy flot (Russian)


Here to help you 'skip' straight to zero karma.

The latest Carrier line and the first one made up of 100% fantasy paper designs as none of these vessels actually existed or were even laid down.

That said for paper ships they are surprisingly decent with a small detection range, fast hull speed, decent secondary battery and decent AA firepower. This does come at the cost of having paper thin armour on the earlier ships and thick cardboard armour on the later ones along with a citadel that can be hot from pretty much any angle.

The basic idea here is that you use the speed and concealment of the Carrier hull to get close to the target while remaining un-spotted, ideally behind an island.

"Why do you get close?", I hear you ask.

Because Russian aircraft are some of the slowest aircraft in the game and unless you want exceedingly long turn around times (the time it takes for planes to get to a target, hit it, get back to the Carrier and get added back into the pool of available aircraft) you NEED to be up close and personal.(but not too close, paper armour and all that)

The Russian CV line gets two unique features for it's aircraft that define the entire lines play style.

Firstly unlike every other nations CV lines, Russian CVs do not have multiple strikes per squadron so when a Russian squadron attacks the entire squadron attacks as one. This allows you to front load your damage and deliver a huge blow to the enemy in one fell swoop however it also means that any mistakes on your behalf become twice as costly as you do not have a second chance to make up for it.

The second feature of the line is that from tier eight onward Russian aircraft utilise a RATO system for take off, that's Rocket Assisted Take Off for those who don't know random military abbreviations. This system involves a couple of solid fuel rockets strapped to the plane that fire during takeoff to provide a massive speed boost to assist overloaded planes to get off the ground before running out of fuel and detaching. In game these rockets provide about 4 - 5 seconds of super boost after a squadron takes off allowing the planes to cover considerable distance rather quickly before slowing to the standard Russian plane speed.

Looking at the squadron types, Russia uses the standard HE equipped attack planes set up used by most other nations but due to the all or nothing approach to squadron attacks, Russia puts a huge number of rockets downrange and from tier eight upward those rockets are similar to Americas Tiny Tim's with good AP values and decent damage per rocket. The downside to this squadron is the fragility of the planes, slow speed and the massive wind up on the attack run with the machine gun volley and pause before the rockets actually launch taking somewhere between five to seven seconds roughly to complete.

Russian torpedo bombers function similar to how other nations do, however they don't get the plane heal consumable at tier eight and ten. The torpedoes dropped deal middling individual damage with a mediocre speed and long arming distance however the weight of numbers dropped makes up for this as the damage from five or more torpedoes hitting you will make any ship sit up and notice.

The most unique squadron type available to the Russian CVs is their skip bomber squadrons. These planes act in a similar manner to torpedo bombers, but rather than dropping a torpedo they instead release an HE bomb that skims across the water like a skipping stone, bouncing three times before sinking if it hasn't hit anything.


As shown above the bombs become more accurate the further they skip, gaining a tighter dispersion however taking longer to reach the location. Also of note is that because the bombs bounce they can actually skip clean over a target if the target is not on or very close to one of the three bounce spots indicated by the three lines.

These planes are very good at starting fires due to the decent fire chance per bomb and the large number dropped at once. They are also, in my opinion, somewhat broken as the sheer range they can be dropped from, especially at higher tiers, combined with the speed of the bounces and lack of warning provided to the target allow you to drop from the edge of a ships AA zone, or even outside it and still land multiple hits causing considerable damage.

Final words on the Russian CV line. They hit hard but not often, their squadrons are slow making it difficult to react to changing conditions in the match but they are deadly up close to your Carrier hull where the turn around time decreases and they will punish enemy players who are not paying attention or are newer to the game so don't know how to deal with them. But against players who know how to manoeuvrer and are paying attention they can struggle to land major blows due to the long wind up times on their attacks.

They also don't do spotting and vision control very well.

The Russian Carrier tech tree consists of:

Komsomolets


Serov


Pobeda


Admiral Nakhimov


With one premium Carrier in the form of Chkalov.
Upgrades and Captain Skills
Once you decide what nation you plan to try first the next task will be to start planning out what Captain skills you want to equip on your Carrier Captain and the upgrades you will be putting into each slot on the equipment screen.

So borrowing from the Captain Skills WarGaming wiki page we have:


Now that is a lot of skills... unfortunately a lot of them a very situational and only really work on a few unique CVs.

Let's break it down in game:

(pretty colours!)

So all the skills in the red zone are going to be useful no matter what CV you play and are the skills you will generally take unless you are going for a meme build.

The blue box skills will be an either-or pick depending on whether your CV uses HE or AP more.

Now the purple box skills are only really effective with German CVs and even then only if you plan a close combat meme build or want an effective anti DD defence if one sneaks up on you.

The yellow box skills will most likely be side picks for a higher tier CV, as those are the ones that can get the most out of them however do note the downside to the tier four skill hidden menace which makes your squadrons return to the carrier at a 50% slower speed which can cause delays in refreshing your deck parked planes depending on how far the returning squadron have to travel to get back.

Lastly the green box skills will only be used if you plan on making a fighter spam meme build on something like Béarn or Enterprise.

The two unboxed skills are... of debatable use... The tier one skill grants an extra patrol fighter consumable on your CV hull (these fighters launch when your CV is detected by the enemy and circle around above you to protect you from enemy strike craft) which will be of minor use 99% of the time.
The tier four skill reduces flak damage by 25% which seems great at first and can be useful on some CV's who have large un-wieldy squadrons but as explained later in this guide you can, with practice, make flak an almost non issue in most CVs by learning to predict where it will spawn and moving around it.

Below is a typical IJN Captain load out that I use:


Let me walk you through it:

At tier one we have Last Gasp, Improved Engine Boost and Air Supremacy - This gives you a free boost gauge refill for the last part of a strike squadron, whether they are the last because AA has reduced the squadron down or because you have gotten multiple drops off on a target, boosts the effectiveness of your boost gauge by making your planes a bit faster and lastly cuts down the restoration speed of the planes to allow for faster recovery of losses.

At tier two we have Torpedo Bomber and Enhanced Engines - These two skills allow your plane's to fly faster and your Torpedo bombers to drop a little closer to the target. One thing to note here is that Torpedo Bomber states that it reduces arming distance by 10% but what it actually does is reduce arming time by 10% which means if you take skills that increase the torpedo's speed eg. Swift Fish then these cause the Torpedo arming distance to increase again (because the torpedo covers more distance in the time it takes to arm)

At tier three we have Aircraft Armour and Survivability Expert both of which improve your plane's ability to tank incoming damage and last longer under AA fire.
I also have Sight Stabilisation selected as I personally find the aiming speed of IJN CVs to be a tad sluggish, especially torpedo bombers, and this skill improves that allowing me to start an attack run later but still get maximum accuracy on the drop or make manoeuvers during the run without the aiming area blooming dramatically.

And at tier four we have Proximity Fuse which bypasses 10% of a ships anti torpedo protection if the torpedo hits the ships torpedo bulge (an area amid ship on most larger vessels designed to absorb the impact of torpedoes limiting the damage they do)

Now you will make changes to this based around your own preferences and the Carrier line you are playing but most of these skills will be the ones you are sticking to no matter what CV you play as the red box skills, especially as a newer CV player, will likely get you the best results point for point as these skills improve your strike squadrons allowing you to hit harder, more easily and get out with more planes alive.

Upgrades

With the upgrades you can equip on your ship at the equipment screen you generally will be looking at anything that improves your planes over things that improve your Carrier hull. The possible exception being secondary battery skills for German CVs.

On my Midway for example I have.


With this I aim to maximise plane speed, recovery and hit points (with a small boost to torpedo speed) to keep my squadrons hitting the targets as often as possible with as many planes making it back home again as possible.

That said, play around with them and find what works best for you.

Link to the Upgrades page on the WarGaming wiki where you can see what each upgrade does.
https://wiki.wargaming.net/en/Ship:Upgrades#Managing_upgrades
Munition Types
Aircraft Carrier squadrons utilise one of three types of munitions to deal blows to enemy vessels.

These consist of bombs, rockets and torpedoes.

Not all Carriers get all three types of munitions to work with, some only get two types or even one although in those cases the way that munitions are deployed will likely vary.

The munition type themselves are also further sub divided into AP or HE for both bombs are rockets which will effect how they function.

Let's take a quick look at each.

Rockets

Rockets are the weapon type employed by attack aircraft squadrons and consist of two types of warhead, HE and AP, along with two main types of rocket, those being the smaller, more common, multiple launch rockets such as the HVAR rockets used by the USN and the larger Tiny Tim style rockets which have less rockets per salvo but more punch per rocket.

Both types of rocket work the same way with the rocket being fired from the aircraft and then flying in a straight line until it impacts a target. Upon impact the rocket will then detonate immediately if it has a HE warhead or will penetrate the target and explode after roughly half a second if it has an AP warhead.

HE equipped rockets are best used against lighter targets such as Destroyers although the Tiny Tim style heavy rockets can function well against larger vessels as well. They also have a small chance per rocket of starting a fire upon impact so it can be beneficial to rake the superstructure of heavy vessels with rockets in an attempt to cause this.

AP rockets are best used against Cruisers as the rocket is most effective when it detonates within a ship's citadel area. Against lighter vessels such as Destroyers these rockets will tend to over penetrate the vessel causing minor damage. Against heavier ships such as battleships these rockets will either shatter on impact due to hitting armour that is too thick to penetrate or will cause standard penetration damage which deals significantly less damage.

These rockets can also ricochet if they impact a target at an angle, deploy them against a flat broadside where possible.

Bombs

Deployed from dive bombers, level bombers and skip bombers - these weapons are dropped onto a target where the armour on most ships is thinnest with the exception of skip bombers which skim the bomb into the side of a target.

Bombs act similar to rockets in that they come in various sizes and with either an HE or AP warhead depending on the Carrier dropping them.

The warheads on these weapons act very similar to how the rocket versions act but tend to be far more powerful yet deployed in fewer numbers.

HE bombs are effective against all target types.

AP bombs are effective against Battleships and Cruisers when dropped from low altitude.

Torpedoes

Utilised by torpedo bombers, torpedoes are dropped away from the target ship and then propel themselves towards it at high speed before impacting below the water line to cause maximum damage and cause flooding.

All air dropped torpedoes in the game function in the same manner however how many are dropped per attack, the damage they do on impact, the chance of causing a flood, the speed of the torpedo and how long they take to arm all varies from torpedo to torpedo.

Do note the arming distance/time of the torpedo you are dropping, below this arming threshold the torpedo will not explode upon impact and will deal no damage.

Torpedoes function well against all ship types although smaller vessels such as Destroyers can be difficult to hit with them.
The Basics. (Along With Controls and The Game Screen)
This section will cover the basics of how to actually control your CV along with aiming, AA (and how it works), the minimap (very important) and some theory crafting such as target selection, positioning and how to respond to certain threats.

Controls will be covered in this section while the rest will have their own individual sections.


Aircraft Carrier Controls


The controls... in all their glory.

A and D keys control the direction of aircraft (i.e. left or right) , note that the mouse also does this but to a lesser degree unless you hold down RMB (right mouse button) for free look.

LMB starts your attack run and launches the attack when on an attack run.

The W key is used for boost, this drains the boost meter which recharges once you let go. (supposedly the engine is overheating)
The S Key allows you to slow your aircraft down, this will also drain the boost meter.... for reasons...

R key - Refills the boost gauge using one of the engine cooling consumables.
T Key - Calls fighters to the area using one of the fighter patrol consumables.
Y Key - Restores plane health using a plane repair consumable that is present on some squadrons.
F Key: - Returns the squadron home.
1,2 and 3 keys - Double click to launch your squadrons. (first click selects the squadron, second click confirms the launch)

M Key - Opens the map so you can set way points for your ship's hull to follow.

This link takes you to WarGaming's official news post about Aircraft Carrier controls (along with some other tips)
https://worldofwarships.eu/zh-tw/news/game-updates/cv8-how-to-play/

The Game Screen.

So once you are in game you will see a screen looking something like this.


The only real difference from other ship's here is the middle bottom of the screen which shows you what squadrons you have available along with how many planes are ready for take off. You also have the auto repair consumable icon here and the combat air patrol consumable icon here both of which are completely automatic.

After selecting a squadron and taking off the screen changes to the plane management screen as so:

Let me break down what you are looking at:

At the bottom of the screen in the red box are your plane consumables, a number indicating how many charges are left of them along with a handy reminder of the key that uses them. You also have the recall button reminder here as well as the symbol of what squadron you are using.

Above this in the yellow box are the plane health indicators showing the status of each plane. Green being good, yellow not so good with the planes themselves usually tailing a grey wispy smoke and red being very bad with the plane in question normally on fire along with trailing black smoke.

Blacked out sections indicate planes shot down or that have reached safe altitude and returned to the Carrier.

You also have the plane type named here, aka. Blackburn Skua in this particular picture, as well as a numerical indicator of the overall squadron HP pool that decreases as planes take damage.

The green box indicates where your squadron reserves counter is. This shows how many planes are in a squadron along with how many planes of that type are ready for take off. Pressing the 'Alt' key will display how many planes you can have ready on deck at any one time along with how many planes are actually on deck and ready and how many seconds are left until the next plane is made ready allowing you to keep track of how the restoration of a shot up squadron is going.

The pink/purple box is the minimap (more of this later)

The aqua/turquoise box in the middle of the screen is your boost bar, when boosting using the 'W' key or braking with the 'S' key this bar will drain and once it runs out you can't boost or brake anymore. it slowly recharges over time when not in use for most squadron types. You also have a speed indicator located here.

Next to it in the blue box is your attack timer indicator that gives a rough estimate of how long it will take for an attack to hit the target.

Lastly in the bottom left corner of the screen you have your Carrier hull indicator that shows your ships HP both in number form and by the picture state (yellow being not good and red being very not good) along with the autopilot indicator that tells you if the autopilot for your ships hull is on or not. The big circle with planes in the middle is the camera orientation indicator that shows where your camera is pointing in relation to the planes heading.


Spotting

I spy with my little eye something beginning with.... D

Something you will end up doing without even realising it.

As a Carrier your planes act not only as your weapon but as your teams eyes as well. The simple act of flying around the map on your way to a target will reveal enemy ships that you pass close to.

This allows your team to gain an information advantage over the enemy... assuming your team actually uses this information... that will allow them to better position themselves to counter the enemy teams moves.

In my opinion spotting is divided into two types:

Passive - The spotting that occurs while you are busy doing something else but just so happen to pass by an enemy ship, revealing it to your team.

Active - When you are purposefully hunting down an enemy ship or scouting a flank to reveal where the enemy ships are for your team to fire upon.

At the start of a match you will need to do a combination of both passive and active spotting for your team. Namely find where the enemy Destroyers are (if any) and do a pass over the enemy front line but at the same time making sure to drop ordinance on targets of opportunity (such as the enemy Destroyers or any Cruisers that have raced ahead of the fleet)

As the match progresses you will tend to mostly do passive spotting but occasionally will need to perform active spotting if the situation calls for it, for example hunting down an enemy Destroyer who is threatening a flank or revealing an island hugging HE spamming Cruiser who is firing on your Battleships.

Knowledge is power, so the more information your team has the better your chance of winning.
Aiming
This section covers the basics of aiming. Namely where to attack from with each squadron type.

The different squadron types have different attack patterns that you need to take into account when setting up your attack run. Getting it wrong will result in you missing or only landing part of your attack.

Que helpful image:


As my lovely assistant shows, you should be aiming for the broadside of the target when using either attack planes, torpedo bombers or skip bombers. This is because each of these squadron types attacks over a wide, broad area so attacking from the bow or stern (front or back) of a ship which presents the thinnest, smallest profile will result in most of what you fire missing.


For dive and level bombers you want to be attacking from the bow or stern as these planes have a long, thin(ish) and narrow target area so attacking from a broadside direction will result in your bombs having an awful lot of water to hit rather than ship.

Remember when it comes to aiming reticles:

Broad and wide, attack from the side but thin and narrow is a fore or aft fellow.

(yes I know my rhyming sucks)
Aiming Part 2
This part was copied from a WoWS forum post I made way back in 2020. The information in it however is still accurate (hence me using it again).

I have tidied it up a bit but there may be still one or two weird bits lurking around.

Aiming CV bombers and torpedo planes generally changes on a CV by CV basis depending on whether or not they a silver line CV or Premium CV alongside what nation they belong to and what ordinance they are dropping.

A few base rules are as follows.

+Thou shall lead thy target. Super important this one, the amount of new CV players I see aiming where the target is, rather than where it is going is painful. Remember that ALL munitions have a travel time so aim where they are going to be based around what they are doing and adjust accordingly.

For example if a ship starts turning into your torpedo attack remember to drop earlier and give less lead time as the act of turning bleeds speed and course change will give less arming time, if they turn away wait to drop your torpedoes and again give less lead as the act of turning bleeds speed.

+Thou shall learn to recognise thy enemy ship. Comes with time and practice (Ops are great for this) but all ships have different handling characteristics and speeds that need to be accounted for. Observe the ship and what the captain does when you attack them to be better able to predict how they will react on your second/third attack (how the smoke is coming out of the stacks can help determine if the ship is speeding up or slamming the brakes on)

+Thou shall aim for or ahead of the nose if at full speed. NEVER drop amidship on a moving target, you WILL miss.

+Thou shall give enough time for arming. On torpedoes, the yellow area (see below pics) is where the torpedo hasn't armed yet. In this zone the torpedo will, upon impacting the enemy ship, make an interesting clang sound as it bounces harmlessly off the side doing sweet nothing in terms of damage. Don't be one of those CV players who complain in chat that the enemy ship is cheating because the torpedoes hit and did no damage and it's all hacks and everyone should feel bad. Instead leave a bit of green area between the yellow segment and your torpedoes aquatic victim so that if they try to turn into the torpedo attack or you have lag or the server stutters etc. etc. and so forth, your torpedoes will still arm in time.


So in the picture below you can see the lead time for a Japanese tier six CV (Ryujo) with Torpedo Acceleration and Aerial Torpedo Mod 1 (at which point for admitting this I'm probably going to get slapped by some unicum CV player -_- ) again both aforementioned modifications will change how much lead time you need to give so keep that in mind.


See how I'm aiming ahead of the ship? Notice how the smoke is coming out of the funnels and going straight back indicating they are going ahead at full or close to full speed? Notice the green band between the yellow section and ship?


If you main CV this is the point where all the receptors in your brain light up and you get that giddy dopamine rush because you know you have him, he's screwed, nothing he can do at this point will allow him to dodge those torps, he's as good as dead. (well... mildly irritated due to CV torpedo damage output but still...)

And against a Cruiser


Notice how more lead time was given? How I allowed more leeway for arming time in case they tried to dodge into the attack (not that it mattered as the AI ploughed into the iceberg [face palm] )


Practice, practice and more practice. If you can, go into a training room with your CV of choice, set AI to hard with no weapons and just drop on them repeatedly. Go play Ops such as Killer Whale and Newport and try to nuke DD's with your torpedo bombers. Get a bucket and soap to scrub yourself clean afterwards and go play... tier four... (shudders) along side the rest of the CV hoard at that tier to learn how to drop against player ships (possibly skip tier four and go straight to tier six if you don't like seal clubbing helpless surface ships)


As for dive bombing a ship all the general rules (except arming distance) apply here too (hence general rules) so.. LEAD THY TARGET as bombs take time to fall. Start the bombing run a bit early as it takes time for the planes to be able to drop during the set up phase so don't leave it until the reticle is over the ship. Start it when the reticle is where the ship will be during the dive aka. where the ship is going (lead the target)


Example A: This is a bad drop, at the height I am at and where the aiming circle is by the time the bombs reach the ship they will either miss or hit the ships stern and over penetrate.


If I follow through on the dive though.


Now when the bombs release the ship will sail straight into the bombing area, maximising the chance of a hit amidship where the citadel is, as the Japanese drop AP bombs so you want to get that tasty Citadel strike. With HE bombs, such as what the USN drop, it doesn't really matter where you hit as long as it's not the top of a main battery turret (too much Armour for the bomb to penetrate)


Now an example of a British bombing run (gave a little bit too much lead on this one) Ideally you want the bottom of the aiming sight to be about amidship when you drop if bombing from behind although this varies per tier you're at as some of the higher tier ships have more 'floaty bombs' that take longer to descend and thus need more lead time.


And the German premium with it's remarkably fun Stukas of Dooooooooom (tm), note how with this bomb drop, which would have been fine for the Japanese CVs, the slow fall speed of German bombs resulted in both bombs striking the BB's aft quarter where one hit the deck (Yaaay!) while one bounced off the roof of turret D (Boooooo! Op turret armor please nerf!)


This time with more lead the bombs hit amidship and both detonated properly setting two fires


...
..


MWUHAHAHAHA! (ahem *cough's* )


Anyway as stated before PRACTICE! Seriously despite what some might claim getting used to CVs aiming systems and quirks and actually hitting things reliably is hard when you're starting out. You will screw up, you will miss targets and slap yourself for it, you will "accidentally" torpedo your allies complete with


reaction.


But sooner or later with enough practice you will join the ranks of the infamous CV lords who single handedly give WarGaming a migraine and start a hundred thousand new anti-CV threads a day with their shenanigans.


(OP CV captain staring mercilessly at their next victim)

(Added after the original post)

One final thing to note here, to improve your chances of hitting something you need to be flying or diving in a mostly straight line.
This is because the aiming reticle that governs how much dispersion you have when you release your ordinance will shrink in size when on an attack run and travelling in a straight(ish) line, thus reducing how much RNG is involved.
Aiming Part 3
(Forum post over - back to regularly scheduled guidance)


Now if this ship was moving those rockets would never have hit

Not covered in the previous section were the aiming mechanics for attack aircraft and skip bombers which we will cover now.

(mainly because back in 2020 one squadron type was a point and click adventure with almost no aiming required and the other didn't exist)

Attack aircraft differ from other squadron types due to the forced delay between locking in an attack and the munitions actually launching but the key principle remains.

Lead the Target


Now originally, after the CV rework of 2019, attack aircraft attack runs rather simply consisted of:
  • Press lmb to start attack run.
  • Wait until reticle turns green.
  • Place reticle over enemy ship's bow area.
  • Press lmb again.
  • Watch enemy ship get shredded by rockets roughly one second later.
After much complaining by the community this was eventually changed so that now when an attack aircraft locks in on a target it goes:
  • Press 'lmb' to start attack run.
  • Wait until reticle turns green.
  • Place reticle over enemy ship's bow area.
  • Press 'lmb' again.
  • Watch as your planes start firing their machine guns in a strafing manner leading up to the target point over roughly a five second period.
  • Watch as there is about a second delay after the machine guns stop firing before your rockets actually launch.
  • Watch the rockets splash harmlessly into the ocean because the enemy ship sailed out of the target area back when you were firing the machine guns BECAUSE YOU DIDN'T LEAD THE TARGET and just put the aiming area on the ships bow.
The days of simply pointing the aiming circle at an offending ship and pressing 'lmb' are mostly long gone now thanks to the introduction of the 'machine gun run' firing delay on all nations attack aircraft so now you need to actually aim ahead of the target vessel and account for it's speed and course.


Shows a British attack aircraft squadron engaging a Cruiser who is travelling at full speed. Note the gap between the Cruiser and where I am aiming, the goal here is that by the time the Cruiser crosses that gap the machine gun fire will have ended and the Cruiser will be right in my aiming sight as the rockets fire.


Similar situation with a Russian attack squadron, note the slightly larger gap left because Russian attack planes have a much longer machine gun run than the British planes do but the ship was going slower. (The AI refused to cooperate on this one)


And a German squadron of BF109-T's with very little lead, and a lower aiming point to try and get that citadel strike.

You can tell the delay between the attack starting and the rockets launching via this symbol located next to your boost gauge.

Here's the Russian one for comparison.

Remember to take the ships speed into account, you need to give less lead if the vessel is not going at full speed.

Practice, practice and more practice. It takes time to get the 'lead distance required' feeling right to the point where you can just eye ball it without a second thought.

Last point before we jump over to skip bombers, for heavier targets such as Battleships you will want to aim high to avoid your rockets shattering on the belt armour. To do this let the reticle pass over the ship's path until the ship will sail through the lower half of the reticle. eg.

Skip bombers.


Skip bombers are the latest addition to aircraft types by WarGaming and are mainly encountered on the Russian line of Aircraft Carriers.

They work by releasing their bombs from a low, fast flight so that the bomb skims across the waters surface and bounces, bit like a skipping stone.

Like this, only more explosive.

Thanks to this attack pattern, these bombers can attack enemy ships from a long distance, using the skip of the bombs to get the ordinance to the target quickly at considerable ranges. In fact the further you are from the target at release time the better as the bombs converge after the first bounce with each subsequent bounce having a tighter dispersion up to the final bounce where they are at maximum accuracy.

So against smaller targets you really want to be aiming to hit them on that last bounce.

This picture shows the aiming reticle for skip bombers.


Notice the horizontal lines that were mentioned in the Russian CV line section? Those are the locations the bombs will bounce at so to hit a target, especially a smaller one, you want the ship to be on or near those lines when the bombs get there otherwise they may just skip clean over the vessels deck.

Do note that if you try to drop from too high a height the bombs will not skip, the reticle will tell you the bombs won't skip by changing to look like this:


As per normal, and you're probably sick of reading it by now, lead the target. Those bombs are quick but they are not instantaneous in reaching the enemy ship, especially if they are at the max bounce range.

Last trick with these I will cover is that you can just drop the bombs on an enemy ship directly by releasing when the ship is under the first bounce marker. It's not efficient as the bombs are initially released over a pretty wide area but can be used to pound Battleships decks or catch players behind islands and Destroyers at point blank range with some damage.
AA (Anti Air)


The second biggest issue most newer CV players run into. What to do when that big mean Warship wants to tear your squadrons a structurally superfluous new behind via the liberal application of more gun(s).

The first thing to understand about AA is that it is divided into two components.

1) A continuous damage aura that wears down the HP of the last plane in the squadron, similar to a damage over time mechanic from a role playing game, while within AA range of a hostile ship.
2) Flak explosions that are spawned roughly two seconds ahead of the squadron on the estimated path the planes are taking (with some RNG thrown in) and cause heavy damage to any aircraft that pass through them while they are detonating.

These two components are then further divided into short, medium and long range anti aircraft areas.


and this can be reinforced by the use of sector priority (strengthens one side of the ships AA at the expense of the other) and the use of the Defensive fire AA consumable (a flat buff to the ships AA damage )

Now short of leaving the area there isn't much you as a CV player can do to mitigate the continuous damage once you're in a ship's AA zone and under fire. That said you can try to avoid the damage or limit it fully by using terrain to your advantage.

For example, AA will not fire through islands so by using this you can approach a ship from the opposite side of an island to avoid it's AA fire until you are almost right on top of it.


(American Saipan attack planes using an island to avoid a Minotaur's AA until the last second)

This does come with the drawback of giving yourself very limited time to aim and depending on the squadron type you are using you may find that there is not enough time for your ordinance to arm or that the aiming point of your strike planes is too far out to actually hit the ship.

At higher tiers the use of the aircraft heal ability can be used to temporarily counter AA damage although you only have limited charges of this so use sparingly.

Flak on the other hand is almost completely under your control as the CV player due to how it is coded to work.

Where flak spawns is calculated by two things:

1) The direction you are currently heading when the flak guns fire.
2) The distance you will cover in roughly two - three seconds after the flak spawns.

So by varying these two variables you can manipulate where the flak blasts spawn and thus can throw off the aim of the AA gunners.


Here is a basic diagram of what happens when you approach a ship and enter it's AA range.

Now flying at a constant speed in the same direction, as shown above, allows the flak to spawn and intercept the aircraft causing heavy damage. But by utilising the information we have about how the flak spawn system works we can change that to our advantage.

For example because the distance from your squadron that flak will spawn is not set at a fixed distance but instead based around the time it takes to reach a certain distance, by increasing or decreasing this time you can make the flak spawn further or closer to your squadrons flight path... and would you know it... CV planes can accelerate at will...

... and brake too...

... but what makes this extra effective is that AAA flak barrages only last for roughly two seconds or so after spawning, so by boosting to increase your plane speed (and thus the distance covered by your planes in the two to three seconds calculation) then braking you can cause the flak to de-spawn by the time you get to where it was fired...


(el problem AAA gunners)

it's almost unfair...

So when you combine this variance of speed with changes to your heading the flak component of a ships air defence can be removed almost completely for example:


Shows a basic diagram of how varying speed and direction can throw off the flak spawn algorithm.

In general you will find yourself approaching your target from an angle, boosting, then curving once the Flak starts spawning, releasing boost to slow your speed (use a bit of brake if needed but don't over do it or you will become an easy target) and then using boost again once past the flak to throw the next set away from your planes creating gaps to fly through and then repeating the process.

You will find you tend to fly in a 'S' shaped pattern when doing it right, although it will vary as Flak has some RNG to it.


This can be further combined with using your squadrons attack animation to bypass the flak in a couple of ways (more on this in the advanced tactics section)

As with aiming, practice makes perfect and CooP, Training rooms and of course Operations all make excellent practice areas to try this for yourself in a low stress environment.


For more information on how AA works here is a link to the WarGaming wiki article regarding AA:
https://wiki.wargaming.net/en/Ship:Anti-Aircraft_Fire?_gl=1*vmjzzl*_gcl_aw*R0NMLjE2NTM3ODQzMDUuRUFJYUlRb2JDaE1JeklxTXpMcUQtQUlWeGJUdENoMm02d045RUFBWUFTQUFFZ0pIQnZEX0J3RQ..
Fighters

Tally Ho!

Utilised by yourself, the Carrier, and catapult equipped surface ships, fighters are one of the biggest threats to your squadrons if you are not paying attention.

If you are paying attention then there are multiple ways of dealing with them.

Fighters come divided into two groups, Catapult Fighters and Patrol Fighters, both of which act the same way. Upon entering the patrol radius of the fighters, designated by a red circle on the map for Patrol Fighters and a roughly 3 - 4km radius from a ship for Catapult Fighters, the fighter squadron will turn and begin to chase you after a few seconds delay (if you turn and leave the area immediately they won't chase you).

You can tell when either you have entered a fighters area of patrol or when it has tagged you and is now chasing by the plane symbol that appears on your screen. This symbol will be yellow if you have entered the patrol area and red once the fighters are coming for you, you also get an indicator of which direction they are coming from too.


Once the fighter planes get close to you, about 500 meters or so, they will open fire with their machine guns. At this point a number of planes in your squadron equal to the number of fighters chasing you will begin to take damage and will be rapidly shot down.

This is because fighter squadrons trade on a one to one basis with your strike squadron so for every fighter in the attacking fighter patrol(s) one of your planes will be lost.

Once the equivalent number of planes have been shot down or there are no enemy aircraft left in whatever squadron they are attacking the fighter squadron will de-spawn or return to land on the ship that launched it.

Hence why Carrier Patrol Fighter consumables are far more dangerous than most catapult fighters, they are just simply bigger so hurt more.

Trying to run away is pointless once the fighters have tagged you even in the faster planes some Nations get as fighters will always catch up to you eventually.

That said as they are AI controlled they are perfectly exploitable.

Take this picture for example.


Here I have entered the very edge of the enemy fighter's patrol radius and have then called in my own fighters before turning and leaving the area. Once my fighters arrive they will trigger the enemy planes and the two squadrons will shoot each other down letting me fly through freely.

Another trick is to get tagged by the enemy fighters on purpose and then lure them into allied AA gun fire as fighters do not have much HP and as such will be shot down pretty quickly. This only really works however if an allied ship is very close by and you are in a fast squadron.

Lastly you can use a technique known as Squadron Shortening to reduce the losses taken from a fighter squadron when you don't have time to deal with it any other way and have to hit the ship they are protecting. Squadron Shortening is described in more detail further down the guide.

If you have the time, you can also use squadron shortening to remove an enemy fighter patrol from the map by:

-Reducing your squadron to one attack wave.
-Starting an attack run and then entering the radius of the patrol you wish to despawn.
-When the patrol tags you and starts chasing you, wait until they start firing and the second your planes take damage drop the squadrons ordinance to call them back to the carrier.

The patrol will will chase the fleeing planes but will not actually attack anymore and if done right will then despawn freeing the way for follow up strikes.

Be very wary of enemy CV Fighter Patrol consumable fighter squadrons until you know how they work and how buffed they have been. The CV Captain skill tree has four skills that vastly improve fighters making them patrol over a bigger area, move in to attack instantly once you enter the area they are guarding and makes them ignore and be immune to enemy fighters meaning they are harder to get rid of (but also can't be used to remove your fighters either).
The Minimap
So by this point you know how to fly your aircraft, hopefully hit things when you attack them and how to avoid losing all your planes on the way in.

But now comes one of the single most powerful tools a CV can utilise, one that can provide you with a wealth of information at merely a glance.

The minimap.


The minimap is incredibly useful to a CV captain as it provides a quick overview of how the battle is progressing, what allied ships are doing, where enemy ships that have been detected are or last were if they have stopped being spotted.

Keeping an eye on the minimap WILL save you (probably).

For example, in the below image (created using wottactic, a rather handy web page that lets you make minimap presentations for plotting clan activities) I have moved my hull in close to the front line and hid behind an island to reduce my plane turn around times (travel to and from the targets) and a situation has developed now the enemy team has started to crumble. namely several large gaps have appeared in the friendly line as allied players have pushed in to start and chase down fleeing enemy ships.


Now you might be thinking "Neat, we're winning! Problem solved, pat on the back, beers all around!" however if you look carefully you will notice an enemy Destroyer (marked in yellow for convenience) that was spotted earlier in the match lurking at the back and not doing much other than the occasional 'Hail Mary' torpedo salvo into the front line (thus not a real threat compared to the Destroyer that was trying to charge down our Battleship and flank our pushing forces)

That Destroyer hasn't been spotted again by our pushing forces and isn't engaging them with torps anymore which means:

A) He has fled that flank for the other flank (so not a problem... yet).
B) He is hiding around an island awaiting one of our ships to get close so he can torp them point blank range (So needs to be found before this happens).
C) He's coming for you by sneaking through the gaps in our line, using the islands for cover.

(drum roll)


It's C, he's seen the gaps in your line and was trying to be clever and go for you, the Carrier.

Now if you ignored the minimap you would never have noticed this situation occurring and thus the evil little loliboat would have possibly gotten away with it.

But because you did pay attention to the minimap, noticed the hole in your teams line, noticed the DD had been dark for some time AND decided correctly to go see what it was up to you thwarted his plans and left him in the awkward situation of being spotted in gun range of a Cruiser moving across from the other flank and a Battleship who was heading north to use the island as cover as they kept long range firing on the enemy team (using the chat wheel call out of Destroyer spotted to make sure everyone is aware of him is highly recommended).

Keep one eye glued to the minimap at all times. Go into the settings and increase its size so it's easier to read and watch as matches play out for how situations unfold. At first you will struggle with this but with time and practice you will start to notice tell tale signs and get a feeling for when things are happening such as a flank collapsing that might need you to start running for the other flank and the safety of allied vessels or the above situation of someone trying to be a sneaky git and break through the lines to come after you.
Target Selection
What to kill first?

Easy, Destroyers, the bane of all existence, the lolli boats of doom, the it must die immediately class.. nuff said...

I mean just look at it... It's eeevvviiiillllll, evil I say!


With its beady little eye, plotting all our destruction (shudders)

Wait... you want more...

...

...Like an actual target list...

...That isn't just "Murder Destroyers because they are evil"...

*sighs* fiiiiinnnnnneee...

*Ahem* Poorly done jokes aside, your target list for a match will vary greatly depending on where you have spawned and who is close by and this will change over time based on how the match is going (Are you winning or losing? Who needs help? Etc. )

Generally speaking you want to target the most influential ship classes along with the easiest to get to ships (aka. the ones closest to you)

So for the most part your target priority list at the start of a match will go:

A) Destroyers - Very influential + tend to be right upfront scouting. (See, it's not just because they are evil!)
B) Cruisers - A bit less influential on the match + tend to be further back supporting the Destroyers.
C) Battleships - Not particularly influential on the match outcome + like to sit back far away (mostly)
D) Carrier - Hugely influential on the match + sits very, very far back.
E) Submarines - (will probably dive the second you get close so don't bother unless it's threatening you)

So Destroyers come out top of the "Kill it with fire!" list as they are both highly influential on the matches outcome thanks to their concealment, spotting capability, speed and sheer making people panic if they are still alive and unspotted at the ten minute mark power. They also tend to be right upfront at the start of the match so you don't have far to travel to find them.

The enemy Carrier on the other hand may seem like a tempting target (and can be if they sail close to you later on) thanks to the sheer influence they have on the match (unrivalled spotting power and ability to reach and hurt allies anywhere on the map) but the starting position right at the back along with heavy AA and fighters makes them simply take too long to kill (unless you can coordinate with your teams Battleships to nuke them with long range AP cannon fire while you spot them) thus wasting time and allowing the rest of the enemy fleet to start making moves against your team unhindered by your airstrikes.

DO NOTE however that this list changes based around what is happening in the match {as said previously).
For example if an enemy Battleship is moving up to get into a flanking position to cross fire into your teams broadsides then that Battleship becomes number #1 on your most wanted list of it must die. Same applies the opposite way in that a Destroyer who is lounging around at the back with the sniping battleship players and not really contributing to the fight drops off your "must die" list as it's not really doing much (but still keep half an eye on it in case it suddenly decides to charge in)

Use your minimap, read the situation, figure out who is a threat to your nearby team mates and then remove that threat.

And for the love of [INSERT DEITY FIGURE HERE] DO NOT just fly over and farm damage on A or J line camping Battleships... this does not help you win.

AA Cruisers (or just good AA ships in general)
You will get used to spotting these over time and with more matches in a CV under your belt will get better at dealing with them.

At first as a newer CV captain avoid them if you can until later in the match where they become more vulnerable due to damage taken and knocked out AA guns.

If you do have to however fight one as it's too big a threat to ignore then cycle the squadron type you throw at it to avoid de-plane... err... ing yourself of a single squadron via excessive losses and try to get allied help to kill it.

The very next section down (Advanced Tactics) also provides more advice on this once you feel more confident and think you want to go up against an AA Cruiser and fight it one on one.

At the end of the day, your planes regenerate, your allies HP pools do not, a sacrificed squadron that saves an allied ship or kills an enemy ship is a decent trade off (just try not to lose ALL your planes doing it)
Advanced Tactics
Now that you are (hopefully) more familiar with the basics of CV game play we can now move to the more in depth stuff.

This section covers the more advanced tricks available to CV players to help minimise incoming damage or to help throw off an opponent.

Some of it will expand on areas touched on before and other bits will be brand new subjects.
Dealing With High Power AA Vessels


American attack aircraft about to make life very unpleasant for a Battleships AA guns

So you're flying around, happily blasting ships left and right having a right ole good time but then suddenly a wild Cleveland appears to ruin your fun... so wat do?

As the previous section stated, if possible avoid it until later in the battle, but if that isn't possible for whatever reason then besides the tactics already covered in the basics section on avoiding Flak one thing that plays very, very much in your favour is that ships AA mounts have an HP pool and once that pool is gone... well...


Pictured above, the burnt and blackened remains of a once proud AA gun suit.

Now a ship's AA rating and the damage it can throw at you is based around the state of its AA systems. At the start of a match, when the ship is at full health and has received little to no incoming damage, these systems are at full strength but as a match progresses and a ship takes damage, notably HE damage, these AA mounts will begin to be knocked offline one by one reducing the overall capability of the ship to fight you.

But how do you actually go about knocking out a ship's AA guns?

Well to put it simply you have two real choices:

Option 1 - Do it yourself.
Option 2 - Get allies to do it for you.

We will start by covering the easiest option, getting allies to do it for you.

In this situation an allied or several allied ships are nearby within gun range of the offending AA Cruiser. So first things first, make sure to keep the Cruiser spotted by lurking at the edge of its AA range (or outside it if its air spotting distance allows). Follow this up with using the chat wheel ('B' by default) to call out the Cruiser as a target (the top option).

Hopefully some allied vessels have turned their guns on the offending ship and have started pelting it with AP and HE rounds but if not then use the teams chat channel and politely request fire on the offending ship.

The incoming fire should hopefully cause the AA Cruiser to either A) Sink (yay) B) Turn around and run or C) Be distracted by the volume of shells raining on him that he doesn't have time to think about what your planes are up to.

In any case the gunfire from your allies is likely to knock out some of his AA guns, especially if an allied Battleship hits him with HE rounds... it's amazing how quickly AA guns vanish under the sheer power of 14 inch high explosive.

The second option, do it yourself, is a bit more tricky.
To start with, utilising the following techniques in the Advanced Tactics section of this guide will serve you well in minimising your losses taken but understand you will take losses here.

The basic idea here is to use less valuable aircraft at your disposal to soften up the target before finishing it off with your more valuable aircraft. For most nations, the 'sacrificial' squadron will probably be attack aircraft as outside the early parts of the match when hunting Destroyers these planes tend to see less action and thus have more planes ready on deck and if the squadron gets shot to bits it's not a major loss.

Remember the goal here is to knock out the ship's AA guns, as such aim high by letting the reticle pass over the enemy ship until the ship is in the lower half as due to the angle rockets are launched at this should result in the deck and superstructure where most of the AA guns are located being the spot that gets peppered with rocket explosions.

For German CVs you're probably going to want to use torpedo bombers for this task and hope the explosion from the torpedo impact catches some of the ships deck mounted AA.

Once you knock out some of the AA guns, you can either follow up with the squadron type you intend to kill the vessel with if you think it has been weakened enough or if you want to hammer its deck some more send in HE equipped dive bombers/level bombers/skip bombers to weaken it some more.

In all honesty though it's pretty rare you need to do this as most of the time you can just use island cover to get close and then bomb whatever ship is causing issues off the face of the planet.


Squadron Shortening
Short and sweet section but one that can give you a huge late game advantage.

Squadron shortening is an incredibly easy trick but also stupidly useful. To do it you simply:
  • Launch a squadron.
  • Start an attack run.
  • Fire off some ordinance into the ocean or an island (make sure not to hit your team mates)
  • Watch as the part of the squadron that just dropped their ordinance flies off back to the Carrier safe and sound.
  • Profit!
What this does is allow you to reduce the amount of planes that will be going into the meat grinder if you are expecting to take a lot of AA fire on the next attack. By doing this you are preserving your forces early on and thus helping to reduce the chance you will end up de-planed and launching the last tattered scraps of your squadrons late match.

Use it early in the match when the enemy team is clumped together or when facing a high power AA vessel that you are unlikely to get more than one drop off against without taking a lot of losses.

Just remember not to shorten the squadron too far as you will need some planes to absorb incoming hits long enough to get that one drop off.


Slingshotting
An old... ...tactic... or exploit depending on who you ask.

Slingshotting used be a very, very powerful tactic using inbuilt game mechanics for squadrons that have just dropped ordinance to almost completely negate a ships AA zones. Thus allowing squadrons such as dive bombers to get right on top of the enemy without taking damage.

WarGaming eventually got around to patching this so it is no longer as useful but it still can be used in a variety of ways as a tool to improve your squadrons mobility.

The basic principle behind this move is to use the massive speed boost and invincibility time gained after an attack wave drops its ordinance to slingshot the rest of the squadron through an enemy ship's AA zone, timing it so that the invincibility phase wears off and you regain control of the squadron right as you approach your target allowing you to start another attack run right on top of them.

These days there is a delay after attacking that extends beyond the end of the invincibility/speed boost period making it much harder to pull this move off.

However you can still utilise this mechanic to speed up travel to a target, especially if you plan on squadron shortening as the slingshot effect is like having a free mini boost gauge.
Accelerated Withdrawal (aka. How to imitate a Saturn 5 rocket)
Basically this, in propeller form.

So if you take the previous section on slingshotting and combine it with hitting 'F' to recall the squadron you get the trick known as Accelerated Withdrawal.

The idea is to combine the huge speed boost and invincibility time with the recall climb of the returning squadron to allow that squadron to reach safe altitude (the altitude where they become immune to AA or fighters) faster.

To perform it simply hit 'F' right after your attacking planes drop their ordinance. When timed right the remaining planes will rocket skyward to safety limiting the damage they receive from enemy AA and hopefully out running any enemy fighter planes, although this does depend on how far away the enemy fighters were if they catch them or not.

From my experiences doing this there is a timing factor involved. Hit the recall too early and the planes tend to not get the speed boost properly, hit it too late and it wears off only a fraction of the way up.

The only real way to learn it is to practice.

Attack Animation (and how to use it)


Another nice easy trick for the discerning Carrier player to use. By initialising an attack run you can change the altitude of your aircraft and thus throw off the Flak spawning algorithm. Can be used as a last resort to try and save some aircraft who are about to fly through a lot of Flak or to bypass the final line of Flak if you are close to the target ship.

To do it, just wait for the next Flak wall to spawn, hit 'S' to slow your planes down slightly and 'LMB' to start the attack run and release 'S'. When done right your planes should climb/dive over/under the Flak wall and take no damage.

Now if you are still in the Flak spawn radius of the ship (usually happens if you are using this to try and evade a sudden flak wall rather than just dodge the last set spawning at about 3km from the ship) then once you start the attack animation and evade that first Flak wall immediately hit 'A' or 'D' to start turning hard because the next Flak wall will be likely placed right where you are climbing or diving towards.

I would then suggest heading towards the nearest island for cover (if there is one close by), closing on the ship (if you can) to get out of the Flak spawn radius and once safer recalling the squadron using the accelerated Withdrawal Trick (potentially trying to get a drop off on the enemy in the process if you charged the ship).

The bonus to this is that your attacking flight also gain a 50% damage resilience bonus against AA fire when on the attack run making them just that bit more difficult to shoot down. This becomes more apparent when you have no reserves left or are playing a Russian CV where all planes go on the attack as one.

Do note however that not all nations have squadrons can make use of this trick as not all of them change altitude on the attack run to a degree that allows it to be used to dodge Flak.
Cross Dropping

Ouch time.

Cross dropping is the art of utilising two attack runs to force your opponent into heading in a set direction dictated by yourself and then nailing them with the second attack when they can't manoeuvre out of the way.

Done properly it is very difficult for the enemy ship to avoid taking some damage, in a best case scenario they panic and end up being hit by both attacks.

The below diagrams show the basic principle of how it works.


So the initial attack is aimed in such a way as to force the enemy ship to move in a set direction for an extended period of time to avoid damage, usually by dropping from behind so the torpedoes chase the enemy ship.


This is then followed by a sweeping curve of the aircraft flight path to set you up for the crossing drop. You ideally want to release on the enemy ship when the first set of torpedoes is just reaching them so if they try to turn to dodge the second attack then the first will collide with them.

You may need to make a very hard turn depending on the Nation you are using to do this and their plane manoeuvrability. It is advised to always keep some of your boost gauge in reserve for breaking purposes when doing this trick.

As with all things CV related, practice makes perfect and the training room is a great place to practice this drop until you feel comfortable pulling it off.

Premium Carriers (and Freemiums!)
This section will cover the various premium and freemium (available for coal, steel etc.) Carriers available in game.

Do note I don't actually have all of these Carriers and so will mark which ones I do not own to let you know which ones I would love gifting err.. I mean... I have second hand information on. (alas, poor Enterprise, taken before i could buy her *sob* )

Again, this is all my own opinion. Others will have different ones. (For example a Clan mate of mine loves Graf Zeppelin so would argue it's an excellent CV and to be fair he somehow makes the darn thing work miracles damage wise... not sure how... )

Saipan (and Variants)


The actual Saipan

The... other Saipan

Saipan is a Premium tier eight USN Carrier and packs a punch well above her weight but is cursed with some sizeable drawbacks. Her aircraft squadrons consist of the same tier ten aircraft dropping the same tier ten ordinance used by Midway but with overall reduced numbers, namely two planes per attack run rather than the three on Midway.

Saipan is a very squishy Carrier with no dual purpose artillery and a fairly fragile hull so getting up close to the front line can be difficult but her biggest drawback is that she has very little deck parking and long plane restore times making it easy to run out of aircraft if you are not careful.

That said, you can and will wind up fighting tier 6 vessels and against these the Saipan's tier ten aircraft dominate, they hold up fairly well against tier 8 ships too.

Just be careful around tier ten ships and play more cautiously less you end up de-planed by the five minute mark.

Saipan is a very hard Carrier to play well but rewarding when you do. DO NOT pick this as your first premium CV or until you actually know how to play CV or you will hate playing her.

Hornet


One of the latest Carriers added and comes with the same gimmick the super Carriers use in the form of a Tactical Squadron representing her participation in the famous Doolittle Raid of WW2.

Hornet is a fairly easy Carrier to play, her squadrons consist of two attack groups made up of tier six aircraft which are the same as the Rangers aircraft but you have more of them per attack with four or five planes striking at once and her bombers drop AP bombs in a shallow dive rather than a full nose down dive like other USN Carriers.

The main star of the show however is your Tactical Squadron consisting of a flight of six B-25 Mitchell medium bombers with each plane dropping four bombs for a total of twenty four per attack. These planes attack in a manner similar to the British level bombers by carpeting a section of ocean with a large number of bombs, the difference being that each HE bomb from the Mitchell's hits pretty hard at 7,300 damage with a decent fire chance and they drop in a circular area meaning you can attack from any direction with equal chance of success.

Use the B-25 bombers every chance you get when they are off cool down because those things are great to use and don't have reserves to worry about as they fully restock at the end of the cool down timer.

Overall, Hornet is a decent Carrier and fun to play but there are better tier eight premium Carriers.

Enterprise

Don't own.

Enterprise, the Carrier so nice they pulled her from sale twice. Easy E is regarded by many to be the best Carrier in the game and in the hands of a pro she can dominate a match. Sadly she is not for sale anymore.

Enterprise uses AP bombs on her dive bombers and due to the large number dropped and the accuracy of them she can very quickly shred Cruisers. Her attack planes are also very good with a large number of planes in the squadron.

Enterprise regenerates her aircraft rather quickly for a tier eight Carrier so is difficult to de-plane which makes taking risks with her squadrons less painful as losses are incurred.

Lastly Enterprise gets a beefed up Patrol Fighter consumable with a whopping ten planes to the flight and an extended patrol radius making these actually a threat to other CV squadrons.

If you manage to get a hold of this Carrier and learn her game play style you will be feared.

Franklin D. Roosevelt


Don't own.

FDR is a freemium tier ten American Carrier (if the name didn't give it away)

She costs 33,000 steel and is best described as a flying explosive brick that takes whatever you throw at her and still manages to smack you in the face.

Using the same hull as Midway but more modernised and with a reduced secondary gun battery the real star of the show is FDR's huge squadron sizes with a whopping SEVEN attacking flights per squadron.

These attack flights themselves are fairly impressive too, with a large amount of ordinance dropped per attack run and very tanky planes that can take a beating and keep on flying.

Her torpedo bombers are particularly of note with a spread of eight torpedoes per attack.

This said she does have drawbacks, her squadrons are painfully slow for tier ten which makes engaging targets far away a drawn out process as well as making her planes far more vulnerable to enemy fighter aircraft. They also tend to be unwieldy due to the sheer size of the squadrons that makes dodging flak very hard.

Lastly she has a huge cool down period after every attack that reduces the number of follow up attacks she can pull off and makes exploiting fire and flooding by forcing an enemy to use Damage Control much harder.

FDR looks to be a fun CV to mess around in and if you can get the Steel for it I would probably say it's worth a look at, I know it's on my to get list at some point.
Premium Carriers Part 2
Kaga


The only IJN premium Carrier and arguably the best tier eight premium Carrier available at the moment (next to Enterprise)

Kaga has a slow squadron restore speed but it barely matters as her gimmick is that she has a huge deck reserve for each plane type which means you're not running out of planes any time soon unless you like to play 'catch the flak cloud' all the time.

Her planes themselves are not too impressive, being the stock Shokaku aircraft so roughly a tier seven plane meaning they are a bit slow and fragile for tier eight and don't like being up tiered against tier ten.

The planes ordinance is either:
A) Similar in damage per hit to her tech tree cousin but have lower volumes dropped per attack.
or
B) Does the equivalent damage per hit as a tier six Carrier weapon but you get to drop more of them per attack, such as her torpedo bombers which drop four torpedoes per run.

Unique for an IJN Carrier her dive bombers drop HE bombs rather than AP bombs and you get to drop four of them per attack run so they can be used to effectively hunt DD's and start fires pretty easily.

Kaga is a fun, effective and very easy to play premium Carrier which is very forgiving on mistakes made but packs enough punch to remain relevant when up tiered.

If you must buy a tier eight premium, this is probably the one.

Graf Zeppelin


This is a Carrier you will either love or hate.

She has meme worthy secondary batteries that are the equivalent of having a tier eight Cruiser strapped to each side of you which, when combined with German boosted secondary dispersion and pen values, can prove to be a very nasty surprise for anyone who tries to run you down for an easy kill.

This battery gets even better if you equip secondary specked upgrades and Captain skills turning it into a lethal hazard to even Cruisers when combined with your planes at surprisingly far ranges (up to 9.5km with all secondary upgrades, flag and Captain skills).

GZ's planes are decent, with a good top speed but poor health pool while the ordinance they carry is mediocre at best with decent damage numbers per hit along with acceptable amounts dropped per attack.

The dive bombers however are a bit awkward to use. You get the standard German immediate dive from the tech tree CVs but combined with a weird shallow dive from a not great height and a circular, relatively small aiming area which makes predicting the bombs hit locations harder, but does allow you to attack from any direction with equal chance of success.

After further testing in Operations I have discovered you can somewhat control the angle the AP bombs impact at with Graf Zeppelin by accelerating or braking before and during the attack dive. Braking gives a steeper dive and more vertical bomb impact for hitting deeper citadels while accelerating does the opposite. The bombs still, however, land in random locations across the ship which is not good considering they are AP munitions and you really want consistency with them to allow for hunting citadels.

Now if they were HE bombs with that drop circle... (ominous foreshadowing)

She gets HE rockets which is unique for the German Carrier line allowing for easier DD hunting and you will tend to use these and her torpedo bombers, which drop three torpedoes per attack run, the most out of the squadrons available.

Graf is a decent ship but there are better premium Carriers for you to spend money on. Get her if you want something to mess around in and go on a meme build secondary rampage but don't expect her to hold up in a serious competitive environment without heavy work by the player.

She is good fun in Operations though.


Max Immelmann


Don't own.

Another freemium tier ten Carrier this time costing coal to the tune of 264,000.

Max Immelmann was the test bed ship for the skip bomber style aircraft back before the Russian CVs came out and these style planes comprise one of the two squadrons she gets, the other being torpedo bombers.

The torpedoes dropped by her torpedo bombers are fairly low on the damage per hit but you do get to drop four of them per attack run.

The skip bombers hit significantly harder, dealing 11,000 damage per bomb with four being dropped per attack.

The planes themselves are the typical German affair of very fast but rather fragile.

I... don't really have much else to add here to be honest... She kinda just... well... exists... and for being a tier ten premium that can be got for coal, a resource you can farm in game, she is a decent Carrier but certainly not a 'OMG I must have it!' Carrier.

If you like German CVs and want a tier ten premium one then go for it.


Premium Carriers Part 3
Erich Loewenhardt


The Carrier with a bleeding hard name to type properly.

So remember Graf Zeppelin? Imagine that but with good planes...

...

... finished screaming in terror yet?

Good.

E.L (because I'm not typing that name out again if I can help it) is the premium tier six German Carrier and is based off the early draft design for Garf Zeppelin, hence the two ships looking very similar.

Hull wise, you get the same beastly secondary battery GZ does however it's very slightly lighter, missing one of the forward deck mounter 105mm turrets and has a weaker fire control system which brings the range down to 7.6km with all buffs applied.

I have also heard that it doesn't get the German secondaries dispersion buff applied but outside this forum post can not confirm or deny it.
https://forum.worldofwarships.com/topic/223859-weser-vs-e-loewenhardt-the-secondary-showdown/

Now for the planes, you get the usual complement of attack aircraft, torpedo bombers and dive bombers that standard German CVs use and each handles pretty much the same, being very fast but fragile however these planes are the equivalent of tier seven aircraft being comparable to stock August Von Parseval aircraft.

So at tier six they wreck pretty much anything that gets in their crosshair despite the squadron being only six aircraft strong.

Did I mention she gets Stuka dive bombers and they get the famous dive siren? Probably should mention that.

Those dive bombers drop a pair of HE bombs that deal stupendous amounts of damage with a fire chance most tier ten CVs could only dream of.

It's not uncommon for these bombs to land next to a Destroyer and still wreck their torpedo tubes/engine/rudder etc.

And with the same drop circle as Graf Zeppelin it's fairly easy to hit your target... from any angle.

One one major drawback is her torpedoes are truly atrocious, dealing similar damage to Weser's torpedoes with a fairly long arming time on them but also being the slowest torpedoes dropped by any Carrier.

That and her restore times per plane are abysmal.

Sadly E.L is no longer available for purchase but may still drop from a Super Container or a Christmas Crate.

Ark Royal


Oh beloved Ark Royal how I love to play thee.

I have to admit I'm somewhat bias here as I love this ship. She is just so fun to play.

Ark Royal is the British tier six Aircraft Carrier and she has a lot going for her. Her torpedo and level bomber planes are Swordfish bi-planes for a start (the famous ones from the hunt for the Bismark amongst other things) which does mean they are very slow by tier six standards with sluggish handling but once they reach the target, that target will know about it.

Ark Royal deploys more planes per squadron when compared to the tech tree British CV Furious but maintains the smaller number of attacks, with only three waves of planes. The difference is that you gain an extra plane per wave and it makes a noticeable improvement in capability.

The star of the show is naturally the torpedo bomber squadron where you drop the same 5200 damage torpedo that Furious drops but now you drop three of them rather than two. This provides a huge damage boost if you land all three and with the British shorter arming times and converging drop pattern it's pretty likely you will.

Her level bombers differ from the tech tree plane's by dropping tiny 40lb bombs rather than the usual 250lb bombs. This may seem bad considering the 250lb ones already have a pretty poor performance however Ark Royal's bombers drop eight bombs per plane with an attack flight of three planes for a whopping twenty four bombs per attack dropped over a rather small area. This makes them very, very good against lighter vessels like Destroyers and light Cruisers and the sheer number of bombs released means you have a pretty good chance of starting a fire.

Her Attack planes are decent and provide a back up while waiting for the other squadrons to restore losses, which doesn't take long due to the low plane restore time.

Ark Royal is a very good tier six Carrier and well worth the money if you enjoy Carrier game play.

Indomitable


Indomitable is an... interesting Carrier...

An Illustrious class Carrier her hull is pretty comparable to Implacable's with a similar layout, armour scheme and secondary battery although with a weaker AA gun suite but where she really differs is in her aircraft squadrons.

Indomitable gets two squadrons, an attack aircraft squadron and a level bomber squadron. These are made up of the very good de Haviland Sea Hornet's which are both a rather tough aircraft and a blisteringly fast aircraft.

They are very fun to use.

Sadly this is where the praise stops. The Sea Hornets have a stupidly high restoration time on them and this is coupled with a tiny squadron size of six attack planes per squadron along with only four level bombers with an attack flight of two planes per squadron type and small deck capacity to top it all off means any losses will hurt, a lot.

The ordinance deployed isn't spectacular either using the same rockets and bombs as Implacable but just having less of them per attack.

This CV lacks punch to all her attacks and requires you to farm fires to actually get good results.

Indomitable does however get one nice trick up her sleeve. She is still very much capable of performing slingshot drops with her dive bombers thanks to the very short cool down after the attack ends.

This lets you pretty much ignore flak entirely and get drops off on even the most heavily AA specked vessels with ease.

This is not a good Carrier and unless you want something to just mess around in there are far better choices at tier eight for premium Carriers.
Premium Carriers Part 4
Aquila


Don't own

The latest Carrier released by WarGaming and the first Italian carrier in the game.

As a tier eight Carrier her stats look interesting given that she comes with two squadron types, AP equipped attack aircraft and torpedo bombers with decent restore rates and deck parking.

The planes themselves look to be styled after German aircraft with high top speeds but very small HP pools.

The AP rocket planes have a large squadron of ten planes divided into two attack waves of five planes each with a large number of rockets thrown downrange per attack with decent damage per attack and a fast arming speed which means they can be used against a wide variety of targets.

The torpedo bombers have six planes to a squadron with two planes per attack wave. The torpedoes hit decently hard at 7133 damage per torpedo which is nearly Shokaku levels of damage although you don't get the same number of planes to make multiple runs like Shokaku does. The torpedoes are a bit on the slower side with a max speed of 30knots and a 403 meter arming distance.

Another CV I'm keeping my eye on as it may be a good investment. (If anyone who own's one reads this let me know how you find her in the comments section)

Bearn


Oh man this thing is a one trick pony...

Bearn is not a good strike CV but that isn't what she is really built as. Bearn is a support CV but be warned this isn't exactly a super profitable way to play (although if done right you will p*** off the opponent CV)

Let's talk about Bearn's two good points first.

Her skip bombers are decent and fun to use, they hit pretty hard at 6100 damage and as HE bombs that can start fires they have a decent 31% chance built in before buffs are applied. The planes are mediocre speed wise being comparable to the British Furious's squadrons but with less HP.

Secondly, and most importantly, her Fighter Patrol consumables are meme worthy and define the entire ships play style.

You get eight Fighter Patrol charges per squadron and each charge lasts one hundred seconds. The patrol itself consists of eight aircraft which are tier six is an insane number of fighters to deploy and when combined with all the fighter boosting Captain skills allows Bearn to literally 'nope' the opponent CV out of the match by denying them the ability to get strikes off or even take off at all if you place the squadron over the bow area of the enemy Carrier to catch them as they leave the deck.

When used right these planes will let you de-plane the enemy Carrier, even if it is a tier eight one.

You can now act as 'fun police' to the 'fun police'.

Oh and in port she has a working plane elevator animation which is pretty cool.

But what does it cost you for this power?

Answer:

Everything else on this Carrier is bad.
Her hull moves like an old pre-Dreadnought paddle ship.

Her AP bombers are mediocre at best with an appalling drop pattern by which I mean two bombs are dropped first on an attack and then a second later the last two bombs are dropped making hunting citadels a chore and more random luck than skill.

Her deck parking allows for enough planes to have one full spare squadron available if you lose the entirety of the first which can easily happen with those AP bombers due to the sluggish speed and middling HP pools.

Her secondary battery consists of eight casemate mounted 155mm guns with no dual purpose guns for AA defence and she can only bring four of those 155mm guns to bare at any time.

She also has the lowest AA rating of all tier six Carriers.

Her armour layout also results in her being very, very vulnerable which when combined with her poor speed makes running away almost impossible if you get caught out in the open.

if you want to mess around and irritate the other CV player then Bearn is... well not really worth it still... but could be fun. Shooting down the entirety of the enemy CVs planes leaving them with nothing is always a good laugh and will usually get you praise from your surface ship comrades.

I am probably being a bit harsh here as I had high hopes when I first read about her in the dev blog which she did not meet.

If you want a good tier six premium CV just do yourself a favour and get Ark Royal.


Chkalov


Don't own

When this came out there was a huge amount of complaining about it. Since then it has been nerfed and brought a bit more in line with other Carriers at tier eight.

Chkalov is the only premium Russian CV in the game and functions very similarly to the other tech tree Russian CVs in that you get one flight of rather slow and squishy planes that unload all their ordinance at once to provide a strong alpha strike punch to the target but with no sustain.

Her biggest difference to the other Russian CVs is that rather than having attack aircraft she instead gets a dive bomber squadron which I have heard can be difficult to use as the planes get shot down easily on approach and due to being dive bombers you have to get right on top of the target.

That said I have also heard they absolutely wreck Destroyers and cause heavy damage to other ship types if you can get close without being shot to pieces.

Her torpedo and skip bombers function similar to Pobeda's but both squadrons get six planes and her torpedo bombers do slightly more damage per torpedo but her skip bombers do slightly less per bomb.

A decent tier eight Carrier overall and definitely one to keep an eye on if you enjoy the Russian CV game play style.
Super Carriers (T11 CVs)

Fllllyyyyiiiinnnngggg through the danger zone, gonna take a rrrriiiiiidddeeee into the danger zzzoooooooooonnnnneeeee!

Ah yes... Those CVs...

The super ship Carriers are... well... not liked much by most of the community, partially because they are Carriers and partially because they are super ships or tier eleven as that's pretty much what the super ships are at this point.

Both of these vessels function very differently from other Carriers (with the exception of Hornet) as you gain two different squadron 'pools'.

The first is your standard strike craft pool consisting of two squadrons of tier ten aircraft utilising the same RATO system that Russian CVs use.

The second is your Tactical squadron pool which consists of three squadrons of... wait for it... JET AIRCRAFT yep, you read that right, these things get jets... well jet and twin prop turbo jet hybrid aircraft for the Americans but still. These planes are infinite in number as after an attack they do not return to the Carrier and instead the squadron goes on a cool down timer.

Do note that these things are very expensive to run with a huge post battle cost so don't expect to make much in the way with credits with them although they do grant a bonus to FXP earned.

The two current Carriers available are:

Eagle


The British tier eleven Carrier is in many's opinion a straight upgrade to Audacious, sacrificing a standard attack squadron but gaining the three jet powered Tactical Squadrons in return.

Despite being a post war Carrier Eagle is very much built to late war standards with good armour and a healthy secondary battery of dual purpose guns to ward off would be attackers.


United States


Don't own

United States is very much a post war Carrier design and feels more like a modern Super Carrier than anything World War Two vintage.

She has a lot of dual purpose batteries but they are aimed more in the anti air role than anti ship role and her armour is practically non existent.

This is a Carrier that does not react well to incoming fire.

United States loses a torpedo bomber squadron in comparison to Midway but gains the three Tactical Squadrons in return one of which is jet powered and the other two being twin prop and a turbojet hybrid aircraft.

In both ships cases use the Tactical Squadrons when they come off cool down and the standard squadrons when waiting for the next cool down period to end.
Operations (a how to guide)

Currently under construction. mainly due to the upcoming changes to how Operations work:
https://blog.worldofwarships.com/blog/354

However while you wait for the in depth guide let me throw out some basics.

1) Practice - do not expect to come top of the score board the first time you run a new Operation... it's unlikely to happen.

2). Ryujo is love, Ryujo is life - if you don't know what you're going to go up against then this Carrier will probably pull you through it (just spam torpedoes at the problem until it goes away).Tier VI CV's don't work too well anymore due to the tier range you can encounter. You can still play them but if you want to really contribute then your better off in a tier VIII CV.

3). Ark Royal is a great premium Carrier for Operations... she just takes a while to get anywhere...
(Still holds true, just see previous note)

4). DO NOT USE BEARN (unless you are really, REALLY, good at CV game play.

5). Kill DD's on sight (they are worth more Xp per damage dealt)

6). Keep on the objective - if the objective is to kill something then kill it, if it's to protect something (*cough* Raptor *cough* ) then for %$£&! sake keep with it, protect it and kill anything threatening it.

Of special note here is Killer Whale... guys, girls and anything in between, please, please head for the exit at the end of the Operation...

You are an Aircraft Carrier, you do not need to charge the enemy fleet, you have planes for that.

7). Work as a team - If an ally is under attack and getting hammered then try to help them. Also spotting is greatly appreciated by most surface ship players so consider it if any other players ask.

On the topic of Tier VIII CVs for the new operations.

Lexington, Kaga and Shokakau are all good picks as they hit hard enough to deal with most targets but are flexible enough to deal with any of the Operations the random generator throws at them.

Hornet, Implacable and Indomitable are excellent Cherry Blossom CVs... they just suck everywhere else. Each of these Carriers can D.E.C.I.M.A.T.E the Aerodromes with their level bomber's in a very short period of time (+ The B-25's of Hornet look pretty damn sweet flying over the mountains to reach the Aerodromes in the early light of dawn)

Saipan is... well... hard mode... I don't recommend to be honest.

The Russian CVs are decent all rounders though the time it takes to reach the target at long range can hamper them in dealing with enemy ships before your team just shoot it to death.

Graf Zeppelin


The dark horse of the TVIII CV line up.
This one surprised me and has become my go to CV for Ops. Graf on paper doesn't sound too exciting, her:
* Planes have poor HP pools.
* Deck space reserve is average.
* Restore times on regenerating planes is average.
* Munitions range from weak to average
* Hull is pretty venerable to being shot up due to a lack of an armoured flight deck.

However she has a couple of things going for her that make her surprisingly OP in Operations. (and flat out hilarious to play!)

First off her Planes are very, very quick, even without taking Captain skills into account. This means she spends less time travelling to a target and less time within a targets AA zone which in turn means less damage taken.

Graf Zeppelin is also quick hull wise, capable of keeping up with allies or outrunning enemies (always helpful)

She gets a nice mixture of weapon types, with AP bombs for killing Cruisers and annoying BBs. Decent, if somewhat slow, torpedoes for dealing with anything that doesn't dodge in time and HE rockets for starting fires or killing those damn Aerodromes in Cherry Blossom (You can hit them from miles away by abusing the Mountains nearby)

But her party trick, and the thing that makes her insanely good in Operations, is her Cruiser grade secondary battery.

These guns, when fully secondary build specked, are stupidly powerful. You get eight 150mm cannons per side in case mate twin mountings and twelve 105mm cannons in turreted dual purpose twin mountings. When flat broadside this gives you more secondaries firepower than a Bismark.

And it gets better.

You see as stated in Graf's entry in Premium section of the guide she has a unique secondary batter modifier giving her massively improved secondary battery dispersion along with the improved German HE pen values on secondaries.

All of which can be further enhanced with equipment, flags and Captain skills.

The result is a secondary battery that can hit targets with Destroyer like accuracy at 9.5km's with a rate of fire that would make an Atlanta blush.

This allows Graf Zeppelin to pull off what no other Carrier can do in an Operation, be in two place at once. Her secondary battery firepower turns your hull into impromptu light Cruiser that can actually win gun duels with enemy ships when positioned properly.

This firepower allows you to be more daring with your hull, running down objectives and battering them to death with cannon fire at medium range or sending your planes off to kill a VIP target while you are being chased by a DD and not having to worry about it as your secondary battery will pummel it to death in short order.

It really opens up the door for so many cheeky plays that other Carriers can only dream of.

I've literally watched my Graf Zeppelins secondary battery kill off the Destroyer flotilla that tries to overrun the repair base on Ultimate Frontier before on it's own.

(Ok, there was a BB nearby drawing fire from the DD's but my GZ's secondaries did all the damage)
Killer Whale - Part 1
Objectives.
Primary:
⦁ Kill designated ships inside the bay (six fighting vessels)
⦁ Retreat to designated exit.
Secondary:
⦁ Destroy Forts and land installations (eighteen in total)
⦁ Destroy enemy support vessels (five in total)
⦁ Destroy Battleships Furi and Dono in the reinforcement waves.
⦁ Destroy the enemy's first and second reinforcement waves (kill the marked vessels)
⦁ Do not let enemy reinforcements enter the haven (keep them out of the harbour perimeter)

Because Killer Whale is an offensive focused operation that requires you to cover large amounts of territory, repeatedly, I would suggest using a faster CV on this Op or one that hits hard enough to not require follow up strikes.

(Not that you can choose where you go when queuing anymore)

When you load into this operation you will find yourself and your allies located outside the harbour you need to destroy. Let's take a quick look at the situation before moving:

So the green marker at C3 is roughly where you are outside the bay. Inside the bay we have multiple land based targets that need a good killing as part of the secondary objective. The bay itself is guarded by two forts at each entrance. To the north and west we have the exit zones, marked by green circles with a flag on this map, which will not be visible when you first start the operation but will become visible when you complete the first set of main objectives and lastly we have three sets of yellow markers which show where the secondary objective reinforcement ships that need sinking will spawn.

let's get moving.


The path I usually take is shown in the above map via the green route. By passing through the southern channel you can position your CV hull like shown below to cut down on turn around times for attacks against the ships in the harbour as well as setting yourself up for an easy escape run to either of the two exit points.

Just make sure to watch out for these on the way in.
From Wargamings Wiki

Forts have nasty AA fire and can throw it up at considerable range. Now it's not enough to stop you attacking them or flying past but it will take its toll if you linger for too long in the forts radius (so don't do that).
They also come with a large calibre gun battery that fires HE shells for anti ship purposes and have quite the thick hide making HE somewhat less effective against them, so if you do need to kill one then hit it with AP if available.

Generally speaking though, leave the forts alone unless you reeeeeaaallllyyy need to kill it. the height of the hills the forts are built on tends to mess with the CV aiming system somewhat making it a pain to actually hit them (aim higher than you would normally if using rockets).

This is why for the first attack flight I suggest sending torpedo bombers into the harbour via the yellow route shown on the map. This bypasses the forts completely and lines you up nicely to attack the Destroyer and Battleship that spawn at the southern docks.

Go for the Destroyer first as it's the biggest threat to you and your allies. If left alone then by the time you enter the harbour area with your hull it will likely have charged north and be within torpedoing distance, as shown by its red dotted path.
On that note, remember that because your planes are higher up due to having come over a mountain the torpedoes dropped will take longer to actually hit the water and start moving, as such give more lead time than normal.

If you find it a struggle to hit the DD with torpedoes then I would suggest using dive bombers as the next best option, assuming your CV nation has HE bombs. If this is not the case then go for the BB instead on your first attack and with your second squadron launch send in attack planes to harass and spot the DD while calling for allied fire support as player ships should be pushing into the harbour at around this point.

After the DD is dead start pounding the BB with whatever remains of the first flight and then send in your next squadron. Hopefully the forts are destroyed by this point which makes your life a bit easier but in any case use your second flight to put pressure on that southern BB and to hit the Cruiser that spawns slightly to the north of it.

Once those are dead or on the way to being dead due to fire/flooding/allied ship gun fire etc. the situation should look something like this:

The next big issue facing the team is a pair of hostile BB's parked up as shown above. When spotted one of these two ships will start to get under way and move out to engage your allied ships (or you. if you get very unlucky) by moving along one of the three routes shown in red.

The other one is having engine problems and as such is immobile... her main guns and AA battery however are very much active so watch out for that as she throws up a lot of flak.

You will also find a series of port buildings that need blowing up and five transport ships slightly to the north of the Battleships that will immediately power up and start (slowly) making a run for it in two groups, one heading north and the other north west as depicted by the white dotted line on the map.

The next targets are up to you and as you can imagine it's a target rich environment, go cause havoc.

That said I would suggest not bothering with the buildings around the place as those tend to get shot up by your allies rather quick but if you do go after them then remember that HE is far more effective against them than AP (although that still works too) so use it if you have it.

(map)My route, as shown above in yellow, is to launch an attack against the stationary BB with torpedoes then swoop away north east to hit the transports as they try to flee. The transports provide lots of XP for minimal effort (no AA guns) so make for great targets. After that I then circle around to hit the transports again and then either:

A) Recall the squadron if it is too shot up to be worth a further attack.
B) Hit the mobile BB with the last of the planes.


Rinse and repeat until everything is dead or dying but keep an eye on the clock, you have an important date at D1 sometime roughly around the twelve minute mark and you don't want to be late.

Now before we get to that I need to quickly explain two things.
1) The exit, very important this one. YOU MUST GO HERE! Fifty percent of surviving player ships need to be in the exit zone to win the mission, if they are not then you lose no matter how many enemy ships you sink.

The exit point will appear on the map once all primary tasks have been completed.

As shown above it can appear in ONE of two locations. Check your minimap and plot a way point path to head to the one that spawns.
I suggest using 3/4 or 1/2 speed for your hull at first to allow your allies to get ahead of you so they can kill any ships that get close to your hull, especially if it's the northern exit point as the first and second reinforcement wave spawn there to cut you off (and your squadron will be busy elsewhere)

2) The area shown below:
Is the zone in which if an enemy ship enters it you lose a star, try not to let this happen.
Keep an eye on the minimap and if no one is going for the norther reinforcement waves then send your planes up there to kill them. Keep half an eye out for DDs trying to slip in here, they like to steal that star from you (evil little *****).
Killer Whale - part 2
On that note.

(map)
Let's assume the exit has spawned to the north. Now remember our important date at D1? An insufferable AI DD spawns here that likes to steal the "Don't let the enemy into the Haven" star from you.
As such, you really want to have a torpedo bomber (or other type of squadron) here when it spawns to greet it and politely tell it that it is not welcome in your match and to (puts on old man voice) "Get off my ocean!"

Seriously though, kill this ship before it causes problems as it will cause problems if you leave it alive.

After that, use the remains of the squadron, or launch a new squadron, and go after the BB that spawns to the north. It's one of the secondary objective ships that needs to be sunk (thus marked with a yellow ring on my map) to get all the stars so it takes priority on the kill list.

You can also find another DD to kill up here although this one is not 'quite' as bad as the other one for star stealing (kill it anyway).

At about the nine minute mark the second reinforcement wave spawns.


You get an objective Battleship to the north at A8 blocking the exit but our allies should deal with that. Another objective Battleship with a Cruiser escort spawns to the north west where the first Battleship spawned and lastly you get a final objective Cruiser spawning at D1 (roughly)

Kill the Cruiser at D1 pronto before it can charge into the harbour, then burn down the Battleship at the north west with bombs and torpedoes. If your allies killed off the Battleship to the north then congratulations, you have completed all secondary objectives and now need only reach the exit to win.

If they haven't then kill it yourself (then get to the exit).

From this point on more waves on standard ships will spawn roughly every couple of minutes or so.


Feel free to kill anything that spawns but don't leave the exit circle. I would also recommend checking the minimap for your allies positions and pinging the exit if they seem to insist on being tardy getting there.

Worst case scenario remind them, via chat, that if you don't get enough ships in the exit circle then you all lose.

This operation is a race against time. Not just in getting to the exit with all tasks complete, but also in getting to targets before the rest of your allies can blow them off the face of the server or they enter the harbour(costing you a star). Aim carefully and make every strike count.

The alternate start.
Suggested by NobleSauvage.
"One tactic I quite like on Killer Whale by the way is putting the carrier down at G or H1, it's a little cheap admittedly but makes it pretty easy (especially if the exit is at the South, although easy enough to slip off North inside the harbour if one is paying enough attention or else just relying on the rest of the team to get half into the exit if they're reasonably with it)
Lets you focus on just flying the planes rather than worrying about (hull) manoeuvre overmuch"


So doing this means instead of sending your CV hull through the southern channel into the harbour you instead remain outside the harbour and attack over the mountains from square G1, like so:


Downside to this is a longer turn around time for your planes against ships in the harbour itself, especially the two Battleships.
Upside is very fast access to the Destroyer at D1 and enemy waves coming from A1.
If the exit is to the south/west then simply move up slightly to reach it.
If the exit is to the north then you have two options as shown below:


Entering the harbour and running the standard route is slightly slower but far safer, running the outside of the harbour tends to be a bit faster but you put your CV hull at risk of long range Battleship gun fire.
Either route works and as a overall tactic it can work very well, just make sure to kill that Destroyer at D1 because it WILL be coming for you the second it spawns.
Closing Comments
Hopefully this guide has helped you understand CV game play a little better and granted a better view of the tricks that can help preserve your squadrons and smite your foes.

Many thanks to all those who took the time to read this guide to the end, and an extra thank you to those who rated it or added it to their favourites, it is appreciated.

Last but by no means least, remember, the most important thing when playing an Aircraft Carrier is to:

Good hunting Captains!
Special Thanks
For those who have contributed to the guide in some form or another.

  • HanlonHouse91
    For helping to proof read this text blob of a guide and not throttling me for some of the stupid grammatical mistakes I made.
  • The nubinator
    For pointing out some tricks I has missed.
  • NobleSauvage
    For assisting with the Killer Whale section of the guide and other feedback.
  • Legoman
    For feedback on the use of the minimap and ship hull statistics (update coming soon)
14 megjegyzés
DeviousDave  [készítő] ápr. 1., 2:33 
Apologies to anyone following this guide, it's on hold for the moment pending the release of WarGaming's update to CV mechanics.

Once the change goes live (or it becomes apparent it's going to be several months before it happens) I'll update it based on what has been said in the comments. (And the new game play system if CV rework, rework is implemented )
I Darkstar X febr. 9., 4:49 
I meant the Japanese T11 mb
I Darkstar X febr. 8., 13:50 
Oh excellent! Also I mistakenly said that Aquilla wasn't included when it is so that's on me.
DeviousDave  [készítő] febr. 8., 8:34 
Thanks for the comment.

I plan on updating it again soon and will include those Carriers along with the new USN support CV line.
I Darkstar X febr. 7., 14:30 
Will this be updated? I'm curious about the Malta and Aquilla, and the Japanese T11 carrier.
whoizz 2023. jan. 20., 14:31 
As Destroyer, I act 100% to support my team with smokes and detection and I free my CV, which is far more important to do his task which is enemy CV & BBs. When a Destroyer actually do his job, there is really no point for a CV to "spot" - and the elimination of enemy CV will save you team and your BBs an extreme amount of hit points.
DeviousDave  [készítő] 2022. szept. 25., 6:00 
Thank you!
OH 2022. szept. 25., 5:31 
What a fantastic guide. Wow. This was very educational!
DeviousDave  [készítő] 2022. szept. 17., 6:19 
Thanks for the comment!

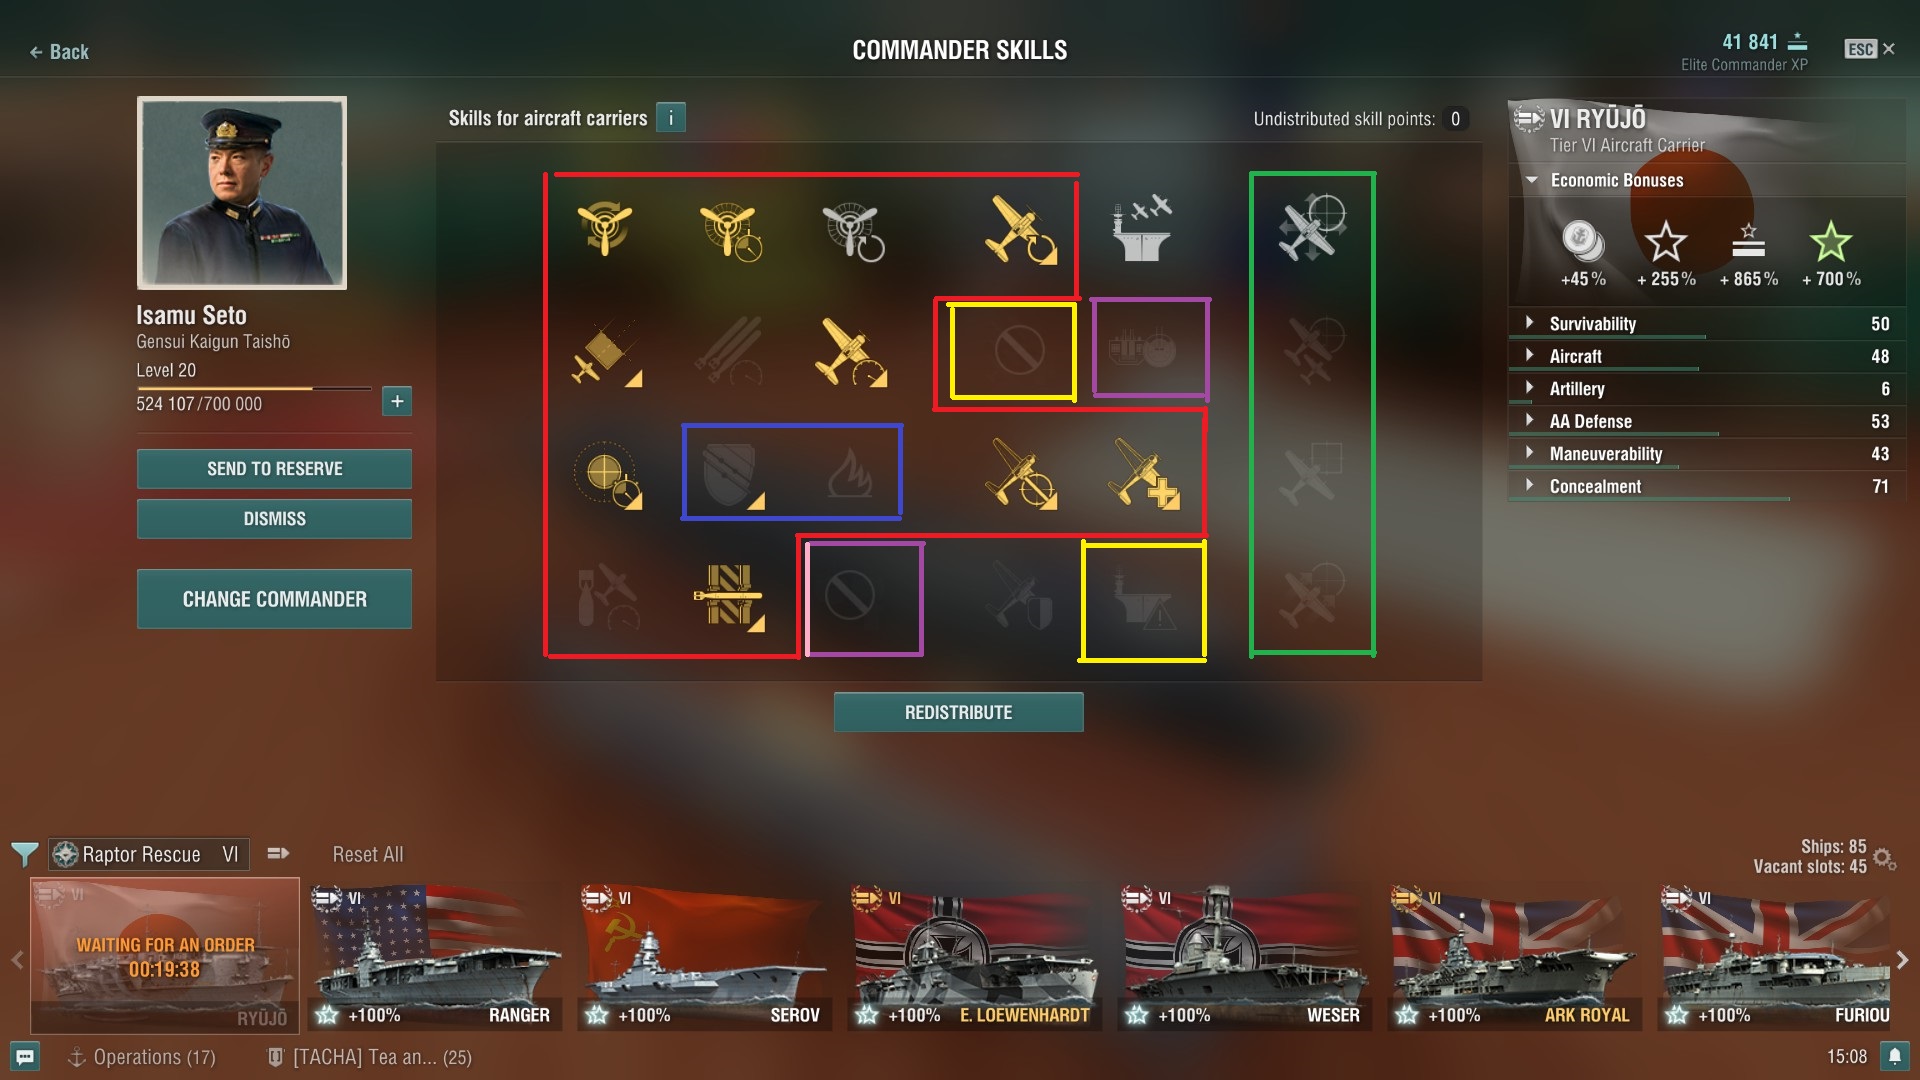
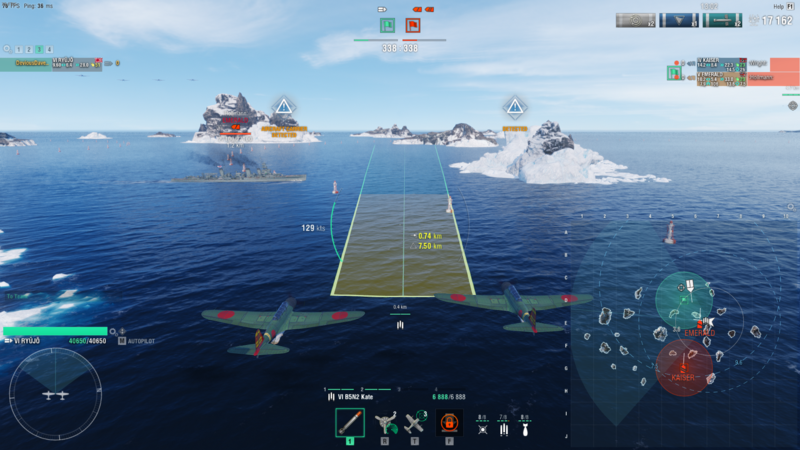
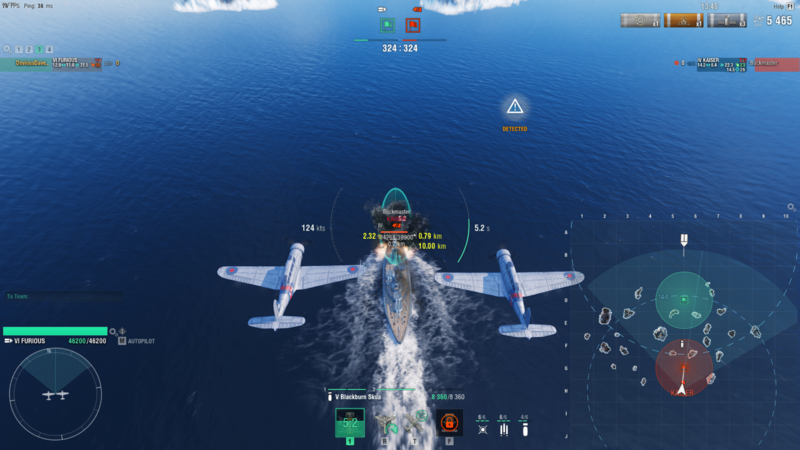
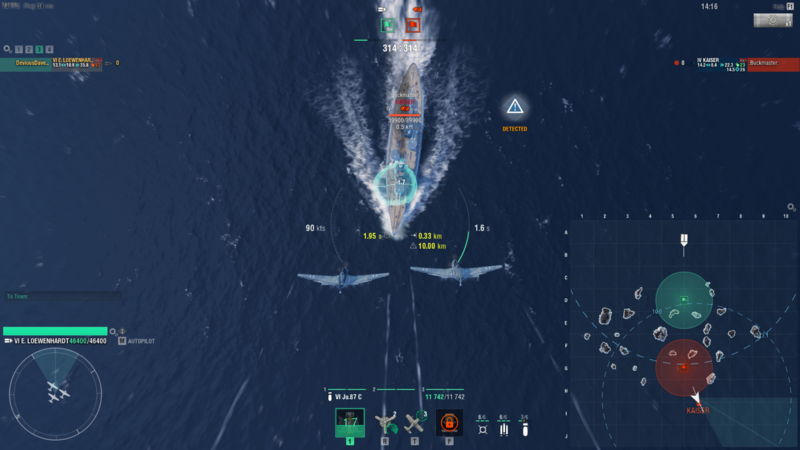
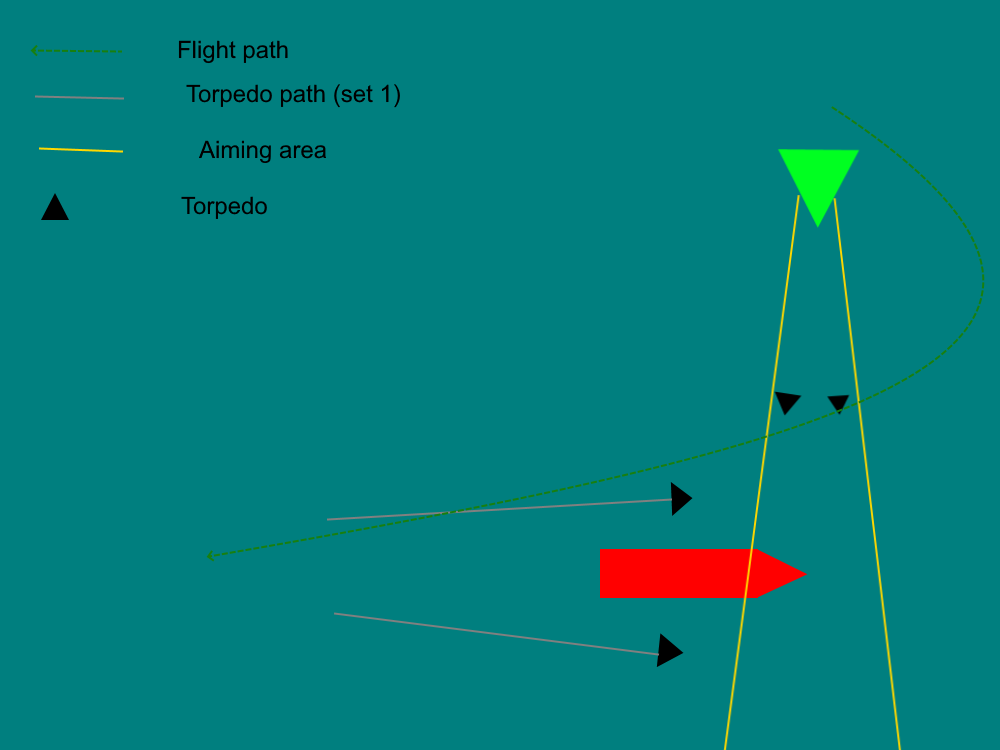
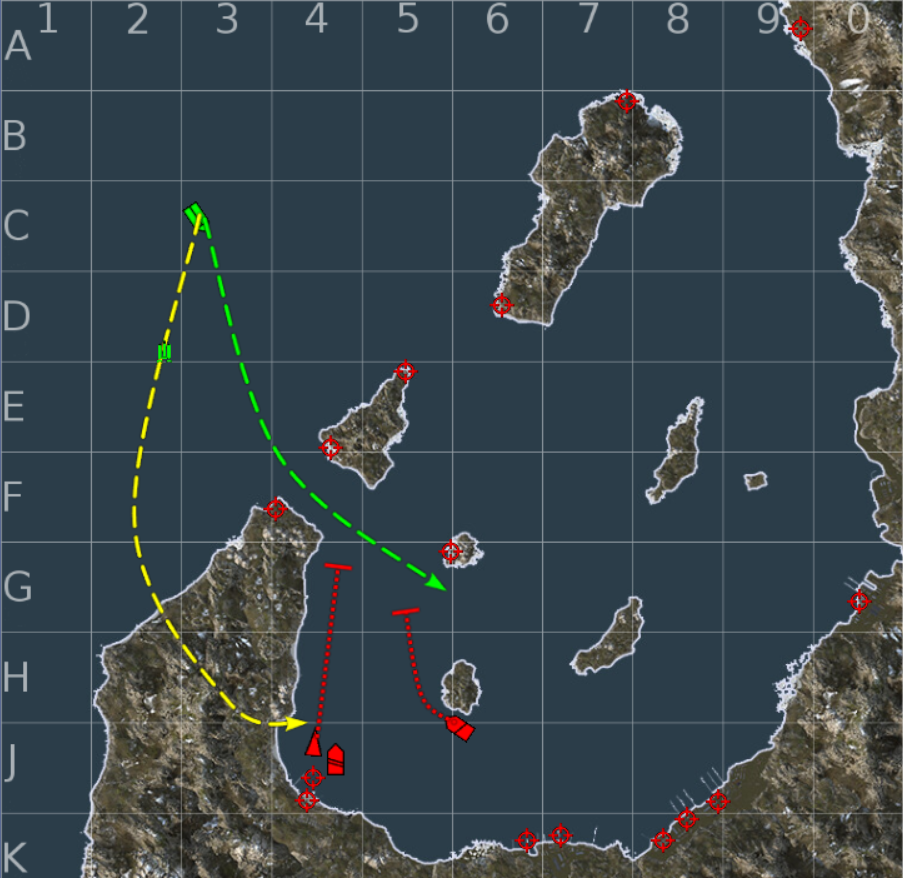
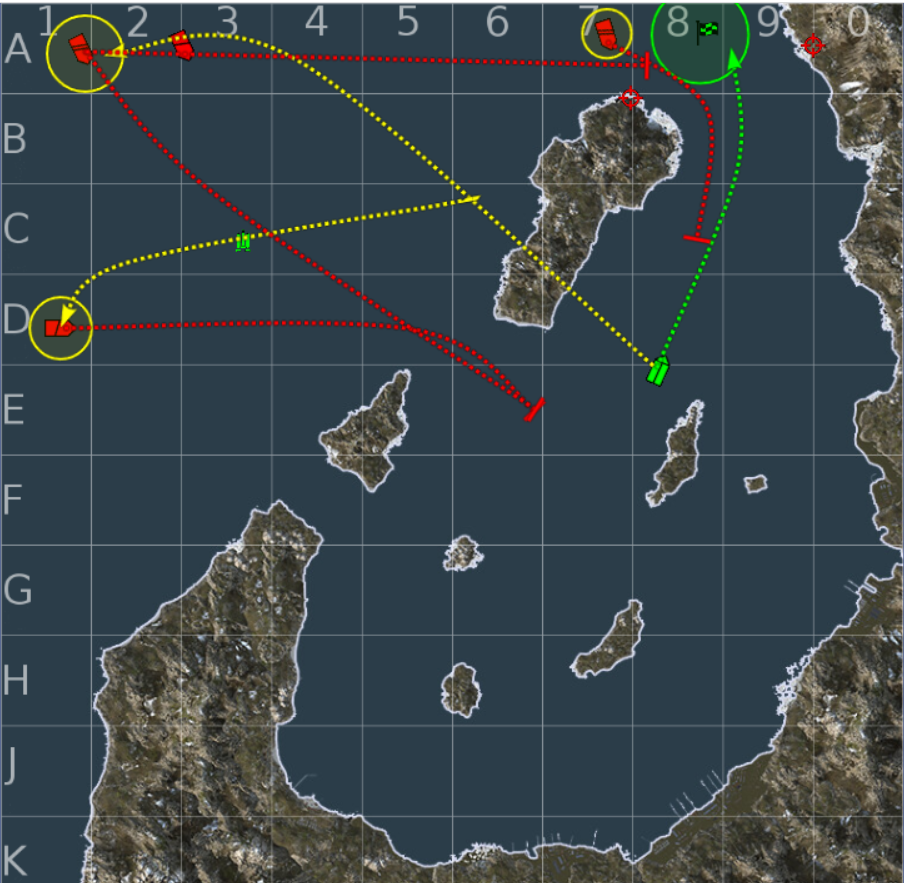
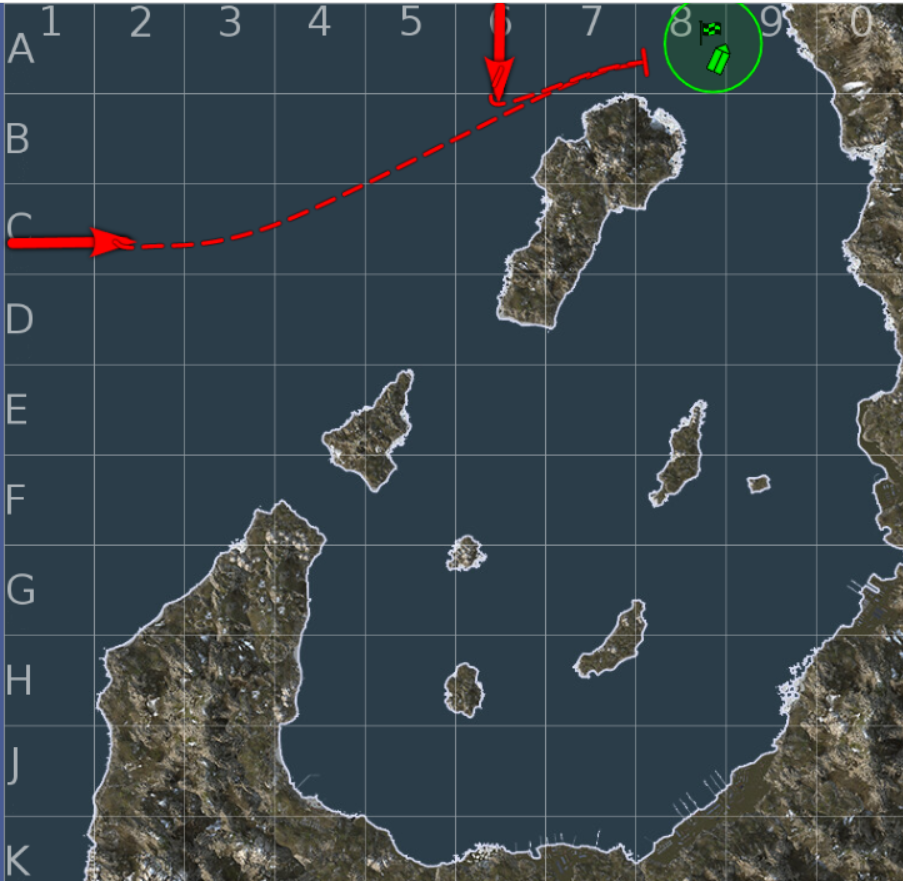
I never thought on expanding on how the 'M' way point system works but after you pointed it out I figured it could actually do with an explanation as it does have some drawbacks that are not obvious.

I also really need to expand on the Nations section, initially I didn't realise that STEAM guides have a character cap per section, hence the American and IJN being one section as my original intention was to write the whole Nations part as one thing.

I plan on going back to improve it once the first part of the Operations guide is done.

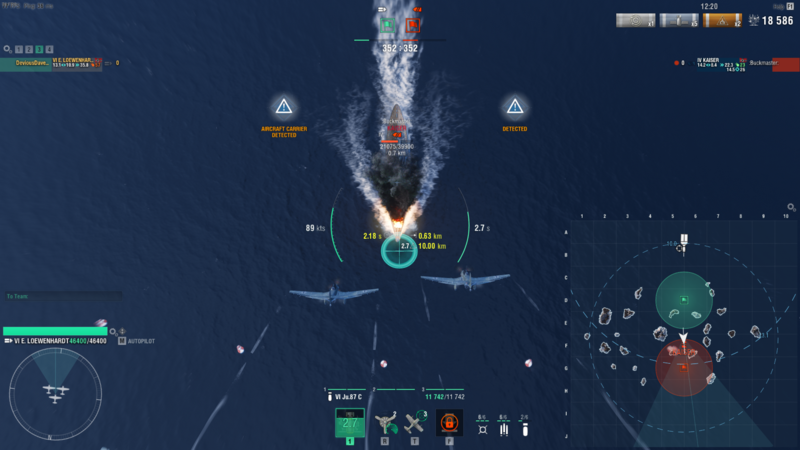
Glad to hear it has inspired you to try the German CV line again, I hope the tricks help!
Legoman 2022. szept. 12., 4:39 
Very nice guide, it says near the top about using M to set waypoints to follow, is there much in the way of limitations for its use? Also I noticed that you cover the USNs CV characteristics a bit, have you considered info on the other nations characteristics? IJN CVs being comparatively stealthy and manoeuvrable for easier repositioning, German CVs having stronger armor and secondaries allowing greater self defence tactics etc.

That being said, i started up the game purely to use some of the info you gave, changing from British DDs to my Rhein.