Terraria

Terraria

1,541 ratings
The Summoner's Guide to the Galaxy
By Kascin and 1 collaborators
Is your body ready for the epicness that is the Summoner?
14
12
45
4
6
8
4
2
7
3
4
3
2
2
   
Award
Favorite
Favorited
Unfavorite
Introduction
I've played through Terraria time and time again. Many runs on PC, a few on Xbox. I made a number of endgame characters use specific armor, weapon and accessory sets, each pertaining to melee, ranged, or magic bonuses. With a late-game Warrior, it's almost impossible to die due to some insanely high defense, or insanely high damage depending on which Beetle chestplate you wear. Pair that with Vampire Knives and a Flask of Ichor and you're set. A Ranger keeps its distance from the enemy, firing away with a bullet, arrow or explosive weapon, depending on the Shroomite hat, for high DPS and devastating critical hits. Finally, Sorcerers have a wide variety of unique attacks and two different kinds of Spectre headgears, either for additional damage or for healing themselves and teammates.

But what about the Summoner?

One day I decided to start fresh with a new character and world; only this time, I was going to focus on summoning items, armor and accessories. I wanted to see how using these overlooked items would affect the line of gameplay. In many of my first playthroughs, it was second nature to gain a Gold Broadsword, a Light's Bane/Blood Butcherer, and work my way up to Night's Edge. I couldn't go anywhere without Meteor Armor with the Space Gun, I couldn't enter Hardmode without a full set of Molten Armor. How much gameplay would be changed if I concentrated on being a Summoner?
I would soon find out.
And soon, so shall you.
This is what the Summoner is capable of. If you seek to attain this power, read on. The knowledge of the Summoner beckons.
A Brief History Lesson
The summoning "class", if you want to call it that, was introduced with the plethora of other items added in version 1.2. However, it was only introduced with three summoning weapons; the Slime Staff, the Pygmy Staff, and the Staff of the Frost Hydra. It also only came with one armor set, Tiki Armor, which couldn't even be obtained until after defeating Plantera, basically about 77% through the game. The Raven Staff was implemented in 1.2.1, with the Halloween update, as well as a new kind of summoning armor; Spooky Armor. But even those weren't obtainable until the Pumpkin Moon, even later in the game than the Pygmy Staff.

A good number of people in the Terraria community saw a lot of potential in the summoning mechanics, myself included. I just didn't pay a lot of attention to it because there wasn't a lot to it at the time. Then in 1.2.4, the Summoner class expanded dynamically, adding in far more summoning items and armors, some of which were even accessible before Hardmode (Despite the Slime Staff being obtainable before Hardmode, it's so rare that most people don't even bother looking for it).
At last in 1.3, the Summoner was made an official class with the introduction of the Summoner Emblem, its own Celestial Tower, and of course, more minions.
In 1.3.3, the Forbidden Armor and Basilisk mount were made available, giving Summoners more options in early Hardmode. In 1.3.4, many new sentry minions and 8 new Summoner-style armor sets were introduced to commemorate the Dungeon Defenders 2 crossover.
And in 1.4, the Summoner went through some substantial changes, including the ability for minions to update their damage dynamically instead of upon summoning, leading to the removal of the damage loadout strategy many used to use. To supplement this, whips were added as a way for Summoners to deal direct damage as well as synergize more with their minions. Several new minions were added at various points of progression, several older ones got buffed, and Hallowed Armor was given a Summoner helmet.
In 1.4.1, a few new Pre-Hardmode Summoner items were introduced, including more varieties of armor as well as the craftable Flinx Staff.
How does a Summoner work?
The Summoner is a character whose strength lies within the minions they summon to fight by their side, instead of in the overrated endgame weapons that everyone else uses. So step aside, solar-clad, cat-throwing players; there's a new sheriff in town.

Anyway, the Summoner works highly different from the rest of the Terrarians. For instance, their main damage output does not come necessarily from themselves, but from the minions they summon. This allows for more flexible fighting, especially from a distance, while safely barricaded, or more infamously, for AFK farming. A skilled Summoner utilizes their minions as a way to let them focus on dodging attacks while the minions fight for you, and as such, this class is a good way to help one recognize boss patterns and improve their survival skills.
You are also able to use any weapon you desire without being locked behind a certain class that requires a certain weapon to be used for full effect (save for some armor sets). This way, you can add onto your minions' DPS with your own, or assist them with various debuffs or whips.

As well, dying is a little more punishing than most characters. When a Summoner dies, all of his/her summons disappear, and have to be re-summoned when respawning. This doesn't bode well for the Summoner, especially if in the middle of an invasion like a Solar Eclipse or Pirate Invasion, where enemies can just spawn-camp you. With other characters, you can just keep fighting, maybe pop a potion or two and you're set.

On top of this, the Summoner has generally the lowest defense compared to the rest of the classes. This usually makes the Summoner quite squishy and you'll want to avoid as much damage as you can. However, this is made up for by the fact that you'll have the best area control in the game; with the right terrain, a large amount of minions and several sentries, you can cover an entire screen and more with sheer firepower.

Plus, most minions cannot deal critical hits, even with modifiers that affect critical strike chance. Meaning, you'd have to reforge accessories to Warding or Menacing, for more defense or plain attack power, respectively.
Also keep in mind that you can summon multiple minions with just one summoning weapon, assuming you have minion cap bonuses. There's no real point in making more than one of the same summoning weapon for yourself.

When you summon a minion, a buff icon featuring the minion you summoned appears in the top-left along with any other buffs. A summoned minion lasts forever and cannot die, unless the buff is cancelled; either by right-clicking the buff, summoning another minion that breaks the minion cap and causes a previous one to vanish, removing cap bonuses, leaving the world, or by dying. Some minions can also despawn if they stray too far off the edges of the map; keep this in mind when in the space layer. In the lategame, having too many (over 44) buffs at once can cause others to disappear, meaning a minion can just straight-up vanish in the heat of battle. Back when the limit was only 22, Frost Moons went very wrong due to this...

Without any summoning armor, buffs or accessories, you can only have one minion following you at a time. If you have spare minion bonuses from summoning armor and the like, it is possible to have different kinds of minions out at once. I encourage you to form a party with variety, and see which combinations of minions work well for you in specific parts of the game. Though, as you progress, you'll want to fill all your minion slots with one kind of minion for especially difficult/endgame situations (exempli gratia, Stardust Dragon).

If you are too far from a minion and they have trouble catching up to you, whether they're stuck behind a wall or similar, they will fly towards you at a fast rate, bypassing any obstacles. Activating any form of Rocket Boots (but not wings) will also cause any stuck minion to fly back to you. Some minions have their own ways of movement; some just run around on the ground, others fly, and the Spider minion in particular can climb background walls. A handful can move through blocks on their own, but only a select few can detect enemies through walls.

And if you haven't figured it out already, the minions automatically target and attack any enemy in their sight. This includes enemies off your screen, making minions an awesome way to protect you from harm. Oftentimes they can travel far from you to kill whatever enemy they've spotted, sometimes even going offscreen. Furthermore, they can serve as a method of protection when in a dark cave or at night, where it would be difficult for other Terrarians to notice the approaching enemy.
As of 1.3.4, you can right-click near an enemy while holding a summon staff, and your minions and sentries will target it, if it's within reach.

Also, just because your minions are fighting for you doesn't mean it wouldn't be wise to assist them. Back in the day, I had personally used a combination of melee and magic weapons when attacking enemies beside my minions. Once I had obtained the Crimson Key, the Vampire Knives were very beneficial to me; in Hardmode, even Tiki Armor doesn't have as much defense as Shroomite, Turtle, Beetle and even Spectre Armor with the Mask. Heck, out of all the endgame armors, Stardust Armor has the absolute lowest defense.

But why try to put a bandaid on my defense when I can just bring down the enemy's defense to my level? Thanks to the ability to apply a Flask of Ichor to whips, enemies can go down quickly before they can deal too much damage to you. As the Ichor debuff lowers enemy defense by 15, this allows even low-damage minions to stay in the game longer. So if you're making a Summoner, consider a Crimson world.

Alternatively, a Corruption world will be valuable because of the availability of Ebonkoi, a vital ingredient in the Wrath Potion which your minions will greatly appreciate.
Do note that one can grow the alternate evil biome by buying seeds from the Dryad in a Hardmode Graveyard.

Just remember: defense isn't everything. Playing the Summoner will be sure to sharpen your dodging and preparation skills.
Meet the Minions (Pre-Hardmode)
Here I will give a semi-brief list of the items that summon minions for you, by order of game progression. Each one is different from the rest, though obviously some are more powerful than others. Most summoning weapons use 10 Mana, with a few exceptions; the sentry rods and the Flinx which use 5, the sentry staves which use 15, and the Houndius Shootius and Frost Hydra which use 20.

The iconic Slime Staff is among the weakest of the summoning weapons, and ironically the rarest. It's the rarest dropped weapon in the entire game, actually, having a 0.01%, or 1 in 10,000 chance of being dropped by most Slimes or Slimed Zombies (0.014% chance in Expert Mode). However, as of 1.3, Pinkies have an increased chance of dropping the Slime Staff, at 1% (1.4% in Expert Mode). Sand Slimes in particular have a 0.013% or 1 in 8,000 (0.018% or 1 in 5,600 in Expert) chance of dropping it. As said earlier, it's so rare that a lot of people don't go farming for it. Plus, its summon damage of 8 just doesn't seem worth the effort. Although, if you are blessed with one early on in the game, that's pure fate right there. The Baby Slime it summons attacks by jumping into the enemy's hitbox, dealing rapid damage. Although, it becomes next to useless in Hardmode when it's doing a rapid 1 damage. If you had it early enough, though, it would be a huge load off your back. Since starting characters have to fight enemies up close, the Baby Slime will take care of any enemy nearby with little trouble. Once I had even seen my Baby Slime take out a flying Harpy. And yes, it can jump very, very high.
If you don't feel like farming for it or just wanna have some fun, the Slime Staff can be purchased from the Princess NPC for 10 gold, but only if playing on the "celebrationmk10" joke seed. Note that the Princess is actually a starting NPC in that world. Who would've thought.

The Finch Staff is a new face in the minion family, added with the Journey's End update. It has a 33% chance to be found inside Living Wood Chests under Living Trees, which may or may not spawn in the world depending on your worldgen RNG. Alternatively, a Finch Staff always spawns as a starting weapon on a fresh Journey Mode character. It can also be transmuted from a Living Wood Wand thrown in a Shimmer pool. When used, a little bird's nest will spawn on your head, along with the Finch minion itself. It will remain nesting on your head until it's shaken off (such as going up on a minecart rail) or if it detects nearby enemies, in which case it will fly at them somewhat clumsily, even through walls if it has to, dealing 7 summon damage. This makes it among the weakest of the summons, but most definitely one of the easiest to reasonably obtain.
This little bird will be the start of many gestating Summoners for years to come, before they're ready to leave the nest.

Abigail's Flower is a summon weapon added in 1.4.3. It summons Abigail the ghost to follow you, occasionally making idle ghostly sounds. It's a rare plant that can grow on grass blocks near placed tombstones. Abigail deals 6 summon damage at base, but she possesses the ability to grow stronger with each subsequent summon, adding about 55% of the weapon's listed damage to each minion slot used on her; the flower on her head will change form and color to indicate how many stages she's at. She attacks by floating towards enemies and performing a small AoE attack, on top of being able to deal contact damage even when not attacking. The AoE attack can hit up to 3 enemies, with 1 additional enemy for every two additional summon slots used. Interestingly enough, her movement and attack speed gradually increase with each slot spent on her, making her viable enough to take you to Hardmode. As if that wasn't enough, each subsequent summon adds about 130% of her listed damage in Hardmode, instead of 55%.

The Flinx Staff is crafted at a Work Bench using 10 Gold or Platinum Bars and 6 Flinx Fur, which is often dropped by Snow Flinxes. It summons a light purple Snow Flinx that deals 8 summon damage by running and jumping into nearby enemies. Unlike other minions, the Flinx is capable of bouncing on top of enemies repeatedly instead of just jumping through them, making them viable against airborne targets such as the Eye of Cthulhu. If minion-obtaining RNG hasn't favored you at the start of your run, you always have a reliable crafting option right here.

On the contrary, the Vampire Frog Staff is rather shy around many people, as one must go through a lot of effort to obtain it earlygame. It is dropped by Wandering Eye Fish or Zombie Mermen, at a 1 in 8 chance. The aforementioned monsters can only be found while fishing during a Blood Moon, where they may jump out and ambush whoever brought them out of the bloody depths. Due to the toughness of these monsters (especially at higher difficulties), as well as how much the stars need to align, coming across this staff is seldom an easy task. The Vampire Frog itself deals 11 summon damage, via hopping towards an enemy and performing a short-range piercing attack with its tongue, licking everything in its path. Its body is also a hitbox, making this froggy surprisingly good at crowd control. Being amphibious, it's also capable of swimming through water or even launching itself sky high in pursuit of its prey. It has a higher knockback value than other minions in Pre-Hardmode, so it may be helpful in knocking enemies away from you (or towards you, depending on how it's feeling). An adorable companion, and well worth the patience to obtain.

The Hornet Staff is crafted with 14 Bee Wax at an Anvil, and is often a player's first step into the world of summoning. The Bee Wax needed is dropped by the Queen Bee, meaning you would likely have mid-tier Pre-Hardmode equipment by the time you obtain it. Its summon damage is 12, and the Hornet it summons fires projectiles just like the enemy Hornet would. As well, the stingers can inflict the Poisoned debuff to enemies, making this flying critter a very nifty partner to have by your side. Ironically, just like many other of the Queen's drops, the Hornets are also good for farming the Queen Bee, as they chase her down and even go right next to her when she's above you.
While wearing the Hive Pack, the Hornet's fire rate increases by about 22.2%.

The Imp Staff is obtained by taking 17 Heckstone Bars to an Anvil (Yes, I just said that). It is technically obtainable as soon as you have a Nightmare or Deathbringer Pickaxe or better, but the Underworld's enemies will be sure to give you a hard time until you have sufficient gear to survive its dangers. This staff summons a Fire Imp to shoot a straight line of fireballs at mobs. Yes, a Fire Imp. Those annoying little dutchnuggets can finally be on your side for once. The main differences being, the summoned Imp cannot fire through walls, but it can fly. Their projectiles fly faster than the Hornet's stingers, and can set enemies on fire, which can help light up dark areas while beating the snot out of your enemies. The Imps are also a beast at farming bosses like the Eater of Worlds or the Brain of Cthulhu, as their multiple parts can easily be set ablaze by the Imps' fireballs. Plus, its summon damage of 17 makes it much more powerful as the Hornet Staff.
Meet the Minions (Hardmode)
The Spider Staff is likely the first summoning weapon a player will obtain in Hardmode. It can be crafted from 16 Spider Fangs, which are a common drop from Black Recluses. Its summon damage is 26, and the Spider's attacks can inflict the Venom debuff on enemies, a much stronger poison. The Spider can climb background walls as mentioned earlier; if there are no background walls, the Spider will trail behind the player on the floor. Its attacks are melee compared to the Hornet's ranged stingers, but overall the Spider is better (the increase in damage should be obvious enough) as it chases its enemies much faster. It jumps incredibly high and latches onto foes when it attacks, even when they're airborne. The Spider works wonders when in the Underground Jungle, as its abundance of walls allow it to take down Moss Hornets, Jungle Creepers and Angry Trappers with ease. It has several different visual appearances upon summoning, which, funnily enough, have their own immunity frame timers when they all pile on top of enemies.

The Pirate Staff is a rare drop from any pirate enemy during the Pirate Invasion. Its drop rate is somewhat low, being 1 in 1,000, or 0.1%. Luckily, however, the Flying Dutchman, a boss that appears during the Pirate Invasion, has a 1 in 15 chance of dropping this staff, and the Pirate Captain has a 0.4% chance. As well, it can be bought from the Princess on the "celebrationmk10" seed, after defeating a Pirate Invasion, during the Full Moon and Waning Gibbous. The staff summons a miniature Pirate similar to the ones from Pixel Piracy to fight enemies by swinging a tiny sword at them. It deals 40 summon damage and the Pirate is a grounded summon, making it essentially an upgraded version of the Slime Staff. The summoned Pirate will often drop a tiny pile of poop behind it, also similar to Pixel Piracy, but this is purely visual. It also has different visual appearances upon summoning.

The Blade Staff is dropped by Queen Slime at a 25% chance (33% in Expert/Master). It summons a small Enchanted Dagger to float above your head, which deals 6 summon damage. Yes, only 6, but don't let the small stature fool you. When a Dagger has at least partial line of sight with an enemy in range, it will zoom towards it and cut it up repeatedly, ignoring 25 enemy defense in the process. The Dagger's attacks are so rapid, and yet having multiple of them won't interrupt each other's attacks. Combine this with Ichor, a Shark Tooth Necklace, Stinger Necklace, and/or a whip that deals tag damage, and watch your DPS spike as the Daggers shred everything in sight. One of my favorite features of this minion is that it locks on just as quickly as it can catch up to you, meaning there's much less downtime of waiting for the minions to continue attacking. This makes it incredibly reliable if you know how to use it.
Be aware that it only gains 75% of the tag damage applied by whips.

And then there's the Sanguine Staff. Where do I begin?
This staff has a 50% chance to be dropped by Dreadnautilus (100% on Expert/Master), a miniboss that can be fished up during a Blood Moon at any point in Hardmode. While obtaining this staff is quite difficult, I guarantee it has the potential to carry. It deals 35 summon damage and conjures red Sanguine Bats that never leave your side; unless they charge forth to attack your foes. When the Bats successfully kill their prey, they immediately teleport back to your side, only to lunge out again to assault another target. Their attacks are scarily on-point even against fast targets, and their damage adds up fast in numbers, rendering them one of the most reliable minions in the entire game. It's a perfect damage dealer without all the shortcomings of inaccuracy or having to catch up to you half the time. Remilia fans rejoice.
Meet the Minions (Hardmode part 2)
Darn Steam guide sections' character limits.

The Optic Staff is crafted at a Mythril/Orichalcum Anvil with 2 Lenses, 1 Black Lens, 12 Hallowed Bars and 20 Souls of Sight, meaning you must defeat the Twins in order to access this weapon. This is a personal favorite of mine, as it summons the freakin' Twins to fight for you. Of course, they're not as big as their boss counterparts. These Twinions are essentially two minions in one; Retinazer shoots lasers at the enemy from afar, while Spazmatism launches back and forth, tearing up anything in his path, much like the actual Twins bosses. In particular, Retinazer deals 27 summon damage while Spazmatism deals 24. With the amount of DPS a group of Twinions can reach, this item is definitely worth the expensive materials.

The Pygmy Staff drops from Plantera at a 25% chance (and is obtained from her Treasure Bag at a 50% chance). It summons a little tiki dude to throw spears at your enemies. It deals 40 summon damage; when stacked, a cluster of Pygmies will become a very devastating force, throwing their spears rapidly like a machine gun. This, combined with their excellent accuracy, is enough to keep most enemies at bay, as well as help bring down bosses easily. Because the spears don't pierce, they can't interrupt each other either. With this in mind, the Pygmy Staff shines at single-target DPS. Plus, their spears can afflict enemies with the Venom debuff. Sometimes they will fire at an enemy just barely out of their field of vision due to blocks being in the way, and their spears will literally cut corners, flying through some blocks to hit the intended target. The Pygmy minions also have variant skins.

The Desert Tiger Staff is a special treasure that can only be found in the locked Desert Chest located within the Dungeon. Enemies in the Hardmode Desert have a very low chance of dropping the required Desert Key to open the chest, but you cannot use it until you defeat Plantera.
The Tiger summoned by this staff only has 41 summon damage, but each use of the staff increases the damage of the Tiger (by 40% of the base damage) instead of summoning multiple. Each use also takes up a minion slot, similarly to the Stardust Dragon; except the Tiger can only take up 9 slots maximum. The first three stages of the Tiger will appear as a baby, while stages 4-6 are an adult, with stages 7-9 being an adult with cool golden armor.
The Tiger attacks by performing a super fast and homing attack towards enemies which deals 1.5x its base damage and can land generic critical hits. This pounce attack bypasses walls if it needs to, and is followed by rapid damage as the Tiger attempts to stay on the opponent's hitbox. Then it will either return to your side or zoom to the next target at a breakneck pace, with a short cooldown between homing attacks; this cooldown is reduced with each growth stage. However, if your minion cap is maxed out, multiple further uses of the staff cause the Tiger to home in on any enemies in range immediately. Good kitty.
Meet the Minions (Hardmode part 3)
We're only just getting into the monsters.

The Deadly Sphere Staff is an extremely powerful weapon that drops from Deadly Spheres at a 3.33% chance (6.56% on Expert), which spawn during a Solar Eclipse after Plantera has been defeated. These are large metal Spheres which float around the player, and rapidly charge through enemies doing an insane amount of damage. Despite its summon damage of 40, each Sphere has its own local i-frames on hit, meaning a large number of Spheres will be able to deal damage at once with no interruptions. This makes the Spheres great at mobbing and bossing alike, making this weapon a great pick for challenging the Pumpkin Moon. The Spheres can't phase through blocks unless they need to catch up with the player, however; this only makes them truly effective in wide-open areas, due to their large tendency to get stuck around corners and walls. They also require further distance from you than normal before they go into catch-up mode, but this can be used to have the Sphere target an enemy while you fly further away to dodge. The Spheres periodically change form when attacking, but these are purely visual changes.

The Raven Staff is an uncommon drop from Pumpking, the most powerful enemy in the Pumpkin Moon event. The drop rate increases as you approach Wave 20, and the highest drop percentage the Raven Staff can get is 12.5%. This staff summons Ravens that fly around you, and chase enemies by flying into their hitbox and dealing 55 summon damage. When summoning multiple Ravens, it looks as if a spooky flock is roaming over you, and when they swarm enemies, the results are murderous.

The Tempest Staff is one of the most efficient killing machines in the world of summoning, clocking in at 50 summon damage. It drops from the dreaded Duke Fishron at a 1/5 chance. The Tempest Staff summons a freaking Sharknado to follow you around, which can phase through walls. When it spots an enemy, it fires purple and blue Sharkrons from its watery tornado, which splatter upon hitting a target. The tornado itself also causes damage when touching an enemy, and it even damages critters, so be wary of this when you're searching for critters or Truffle Worms with your Bug Net. Six or more Sharknadoes can easily tear up almost any boss all on their own, although you would have to dodge the boss's attacks or heal accordingly to make sure you don't die. It has high DPS when used in great numbers and is greatly useful when taking on the Pumpkin and Frost Moons.

The Xeno Staff is a 16.66% drop from a Martian Saucer, the strongest enemy in the Martian Madness event. It summons a small UFO to fly around you in a similar manner to the Hornet, only it flies faster and can teleport to enemies when attacking with its lasers. Its summon damage of 36 makes it appear weaker than the Tempest Staff, but its rate of fire is nearly twice as fast as the Sharknadoes, and its attack is extremely accurate. A decent few blocks of headroom must be above the enemy for the UFO to properly attack, since it always strikes from above. A fleet of these can absolutely melt many enemies within seconds.

The Stardust Cell Staff is crafted with 18 Stardust Fragments at the Ancient Manipulator, which is only dropped by the Lunatic Cultist. It summons a little blue and yellow Star Cell to follow you around. It deals 60 summon damage, making it stronger than the Tempest Staff. The Cells can teleport to faraway enemies, and their primary form of attack is by launching smaller versions of themselves that latch onto enemies, dealing the same amount of damage as the staff itself at the moment of impact. However, the smaller Cells cause the Celled debuff, which damages enemies over time for 10 damage per tick. Up to 10 smaller Cells can be attached to a single enemy, effectively draining their health away to nothing. Additionally, when you are attacking an enemy, the Cells can fire their own shots at the enemy you're striking without interrupting their regular attack pattern, essentially helping both of you take down strong foes and encouraging teamwork, if you want to see it that way.

Lastly, the Stardust Dragon Staff is a true behemoth of a summoning weapon that's crafted at the Ancient Manipulator with 18 Stardust Fragments, just like the Stardust Cell Staff. As a matter of fact, it's so unique and wondrous that it can hardly be considered your state-of-the-art minion. When initially summoned, a medium-sized serpentine Dragon will begin to circle around you, occasionally hovering over you. But using the Staff again does not summon another Dragon; instead, each use increases the length of the Dragon's body, making it larger and able to hit a larger group of enemies, which it attacks by charging and circling into their hitbox like a super fast worm. Thus, a larger Dragon deals far more DPS than a smaller one, especially since its damage increases as it lengthens. Each segment is able to deal its own damage, allowing the Dragon to either hit multiple enemies, or totally shred larger enemies with more health. However, summoning a max-size Dragon would allow you to summon no more minions, leaving the Dragon as your only buddy. It targets enemies through tiles as well, as it passes through all walls effortlessly.
Having lower damage than the Stardust Cell Staff, 40, one would wonder which of the two would be better. I have found that the Dragon can only focus on one enemy at a time, making it especially useful on bosses. On the other hand, the Cells can only attach up to 10 smaller replicas of themselves to one enemy, and therefore are better against crowds since multiple enemies can be taken on at once. The DPS of the Cells increases nicely when you're all focused on one target. With the right buffs, however, a Dragon with 9 or 10 stages can easily dish out 400 to 1,000 damage per hit, and at a very fast rate. Also, the Dragon looks somewhat like a souped-up version of the Frost Hydra, so that's always cool.

...When suddenly, the Terraprisma. This beautiful thing summons rainbow swords that fan out behind you; they attack by swinging and stabbing into enemies at a headlong speed. While they can't detect enemies through walls by default, they will if there's a visible enemy that sets them into attack mode, proceeding to clear everything off the screen. It deals 90 summon damage, the highest base damage of any standard minion. Its reliability is far above the Stardust Dragon, which gives him quite a run for his money.
This weapon can only be obtained if you fight and kill the Empress of Light during the day; all damage dealt must be during daytime. The Empress is enraged during the day, meaning all of her attacks WILL oneshot you. This makes her one of the biggest challenges a Summoner can face.
Are you up for it?
Sentry Minions
There's a large handful of summoning weapons that summon "sentry" minions. These types of minions stay placed at the mouse's pointer location upon summoning, and fire at any enemies that come within range. They remain there for ten minutes before disappearing, and do not count towards your current minion capacity, while still inflicting summon damage.
As of 1.3.4, sentry minions have a cap of 1, so you cannot have multiple sentries in play by default. There are accessories and armor sets to supplement this and increase the cap, however. If you have a bonus to the sentry cap, you can summon more than one of the same kind or different kinds at once.
Ground sentries will be summoned at the ground or platforms below your pointer; when the blocks below them are broken, they will fall down until they land on another surface.
Since turrets, like other minions, are summoned at the mouse's pointer, you can summon them on the other side of walls and they can clear out rooms in places such as caves, while you hide in safety. They can also be used for area control, such as during invasions. These minions will stay stationary and will not follow you, regardless of how far you stray from them.

The Houndius Shootius is a Pre-Hardmode sentry that has a 25% chance to be obtained from the Deerclops boss. It's a very basic sentry that fires basic projectiles at nearby enemies; these projectiles fire in a straight line and deal 24 summon damage. It is the only turret in Pre-Hardmode that isn't bought from the Tavernkeep; additionally, its eyeball always seems to be staring at its Summoner.

The Queen Spider Staff can be crafted with 24 Spider Fangs at an Anvil. It has 26 summon damage, and it spits lobbed eggs at enemies that crack open into two to four baby spiders that dive into enemies, each dealing their own instance of damage. It can also inflict Venom and has higher knockback than the normal Spider Staff, making this minion an overall good bodyguard for quite a long while into Hardmode.

The Staff of the Frost Hydra deals a powerful 100 summon damage at base, twice that of the Tempest Staff's. This weapon summons a Frost Hydra that spits piercing icy bolts at enemies for very high damage and decent knockback, while inflicting the Frostbite debuff. It is definitely a huge help when dealing with the Pumpkin and Frost Moons, or Solar Eclipses. With good modifiers, accessories, and summoning armor with high damage, the Frost Hydra can easily deal 200 damage per hit. This staff is very difficult to obtain if you're not lucky, as it is found in the locked Ice Chest within the Dungeon. You will need a Frozen Key, which drops from enemies in the Hardmode Tundra biome at a 1/2,500 chance. Additionally, the chest cannot be opened until Plantera is defeated.

The Lunar Portal Staff has an 22.22% chance of being dropped by the final boss of the game, the Moon Lord. This weapon summons a void of sorts that fires a very long sweeping laser at any enemy within its 60-tile range, similar to the Moon Lord's deathray attack and the skill the Vortex Pillar uses to defend itself; only this one is far faster and more rapid. It deals 100 summon damage and its laser pierces infinitely. It can be summoned in the air, making it excellent against just about every kind of enemy, including bosses. Only problem is, it doesn't detect enemies through blocks, and its laser doesn't fire through blocks either. Regardless, this is one of the best minion staves you can get.

Finally, the Rainbow Crystal Staff is also dropped by the Moon Lord at the same percentage as the Lunar Portal Staff. When used, it summons a floating Rainbow Crystal that looks somewhat similar to the Last Prism which glows in different colors slightly. When an enemy comes within its range, it will begin shimmering extremely radiant, fabulous beams of light in many colors. The beams themselves don't attack enemies, but rather the star-shaped points at the end. They will spin and glow before bursting, which deals 130 summon damage to enemies in the blast, knocking them back strongly. The Crystal can easily hit large targets and it shreds through crowds, and sometimes the lights can go through walls.

Sentry Minions (Tower Defense)
Many of the sentry-style minions are earned through playing the Old One's Army event. These sentries, however, work differently from the others. When bought, they cannot be used normally until the Old One's Army has been defeated. But while fighting the Old One's Army, the tower defense sentries ignore the sentry capacity and can be placed as many times as desired. However, they cost 10 Etherian Mana to place down (Etherian Mana is dropped by enemies during the invasion).

Perhaps the most peculiar thing about the tower defense sentries is that they come in three tiers according to the currently-unlocked tier of the Old One's Army. These tiers are: Rod, Cane, and Staff, in that order. When you're first able to fight the invasion, at Tier 1, only the Rods will be available. Subsequently, the Canes and Staves will unlock at Tier 2 and Tier 3 respectively. Tiers will become unlocked according to game progression in the current world; Tier 1 is always available, Tier 2 is unlocked after defeating a mechanical boss, and Tier 3 is unlocked after defeating the Golem.
Obviously, Rods are the weakest of the lot, Canes are stronger than Rods, and Staves are stronger than Canes. Rods can be bought from the Tavernkeep for 5 Defender Medals; Canes are worth 15, and Staves are worth 60. Rods use 5 Mana, Canes use 10, and Staves use 15.
If for some reason you want to try a new Tavernkeep sentry without having to buy more, you can toss the staff in question into a Shimmer pool and it will transmute into another sentry of the same tier.

Below I will list all of these weapons alongside their base summon damage values.

Ballista:
Rod: 30
Cane: 74
Staff: 156


Ballistae are massive, powerful crossbows that fire large harpoons which pierce through enemies, dealing high damage. These bolts are affected by gravity after a certain distance and are slow to reload. The Ballistae can aim in almost any direction to fire at enemies, similar to the Frost Hydra. The projectiles' piercing ignores enemy invincibility frames as well. These are great crowd-control weapons that will prove valuable during invasions, especially Old One's Army.

Flameburst:
Rod: 17
Cane: 42
Staff: 88


The Flameburst staves summon a turret that shoots fireballs which fly at a decently high velocity. They launch slightly faster than Ballistae, and explode upon impact with an enemy, dealing damage in an area and setting enemies ablaze. This tower works well alongside a player with the Huntress set effect with Explosive Traps. However, Flameburst turrets mostly fire in a straight line, and have trouble shooting at enemies directly above them.

Explosive Trap:
Rod: 24
Cane: 59
Staff: 126


Not to be confused with the Explosives item that can be uncommonly found underground. When summoned, Explosive Traps appear as an orange landmine on the ground. When enemies draw close, the mine explodes, dealing high damage in an area. The cool part is that the mine stays there and continues to detonate for the duration of its lifetime. Its recharge time is similar to the Flameburst, but can be shortened with full Huntress-type Armor. This sentry works best with ground enemies, though its explosion can reach high enough to hit a flying foe if it's low enough.

Lightning Aura:
Rod: 4
Cane: 11
Staff: 34


Lightning Aura staves summon a device with two components; one sitting on the ground and one in the air, producing an electrical field in a circle shape. This creates a field of electricity that damages enemies as they walk through, making it a bit of a support/defensive weapon that isn't for direct combat. Summoning it over key areas or around yourself can prove to be useful. The damage is generally low, but it's one of the fastest-hitting turrets in the game. It also has the capability to ignore enemy defense, by adding half of an enemy's defense to its damage. The electrical field stops when the rim hits a block, making it a better idea to set it on an open surface (Or better yet, on a small platform in the air so it generates a full circle). The floating orb will need to have sight of the enemy in order to deal damage to it. When summoned in a tight space that's below the field's maximum height of 10 blocks, the floating component will be limited to the ceiling, creating a much smaller field that's nearly useless. The Lightning Aura also only gains 50% of applied tag damage.
Summoner's Whips (Pre-Hardmode)
The Summoner class allows for great versatility in weapon choice, as your minions will be doing a lot of the work. It is wise to carry some sort of sidearm or backup weapon, in case something gets too close or if you need extra damage. As of 1.4, Summoners get their own weapon type, the whip, which will scale off summon damage.

Whips are a type of weapon subclass, added in the Journey's End update. This is a special type of weapon that acts like a melee weapon, lashing out a large whip that deals damage to enemies in its line of sight. Whips can pierce multiple enemies per swing, with the damage output lessening with each additional enemy hit. These weapons inherit specific melee-weapon effects such as attack speed and, as of 1.4.1, flask bonuses. Also, the Feral Claws and its upgrades are capable of making whips autoswing, like other melee weapons.
Attacking an enemy with a whip will mark that enemy as if you right-clicked with a summon staff, causing your minions to focus their attacks on it. Perhaps the most interesting feature about whips is the tooltip that lists "summon tag damage". This means that, for 4 seconds after being struck, an enemy will take additional damage from the minions and sentries attacking it. Additionally, using multiple different whip tags actually lets them stack with each other, increasing minion damage further. This allows for some epic damage combos when you and your minions are working together.

Whips are capable of receiving the same reforges as swords, meaning they can receive the Legendary modifier. As of 1.4.1, faster whips are no longer bugged to have shorter range, so Legendary is the best modifier.

Leather Whip:

  • 14 Summon damage
  • 4 Summon tag damage

The first of the whip family, the Leather Whip is sold by the Zoologist NPC for 10 gold, requiring you to complete 10% of the Bestiary. This is a basic whip with not many special effects other than the targeting ability and tag damage addon that many whips share. Regardless, a weapon of this range, especially if earned early enough, can prove especially helpful.

Snapthorn:

  • 18 Summon damage
  • 6 Summon tag damage
  • +12% whip speed on hit

The Snapthorn is crafted at an Anvil using 15 Stingers, 3 Vines, and 12 Jungle Spores, and it definitely pulls its weight when used correctly. On top of the other features of a whip, the Snapthorn also inflicts Poisoned onto its targets at a 20% chance; in addition, each strike briefly increases your whip attack speed by 12%, allowing subsequent uses of this weapon to hit faster. This whip is particularly good at focusing down a single target with high HP, despite the AoE capability.

Spinal Tap:

  • 27 Summon damage
  • 7 Summon tag damage
  • Less affected by piercing damage dropoffs

The Spinal Tap is crafted at a Work Bench with 90 Bones and 55 Cobwebs, placing this whip at Skeletron-tier. The final whip in Pre-Hardmode, this weapon can prove useful against crowds, as it has slightly less damage reduction from hitting multiple enemies compared to other whips, at 15% damage falloff per enemy struck in a single swing. This is your answer to the Wall of Flesh.
Summoner's Whips (Hardmode)
Firecracker:

  • 37 Summon damage
  • Marks enemies with blazing energy

The Firecracker has a 25% chance to drop from the Wall of Flesh. This whip is able to set enemies on fire; it doesn't feature a summon tag damage value, but instead marks struck enemies with "blazing energy". When blazing enemies are attacked by minions (even those from another player), the energy will explode, dealing additional damage equal to 2.75x the damage dealt by the minion, as well as dealing 1.75x the damage to enemies in the immediate vicinity. This is a great way to dish out additional DPS throughout Hardmode, which you'll definitely want to take advantage of while you try to climb the power ladder.

Cool Whip:

  • 45 Summon damage
  • 6 Summon tag damage
  • Summons a snowflake minion on hit

This delicious whip is crafted with 8 of each Souls of Night and Light, and a Frost Core (dropped by Ice Golems) at a Mythril Anvil. When striking enemies with it, a snowflake minion will spawn at the location of the enemy and attack with its small amount of DPS (usually about 15 damage per hit) which ignores 30 enemy defense. It only lasts 2 seconds, but subsequent hits with the whip will refresh the snowflake's lifetime. The snowflake is also capable of flying through walls to pursue enemies, sometimes flying back and forth between them. Also, the whip inflicts Frostbite on hit.

Durendal:

  • 55 Summon damage
  • 9 Summon tag damage
  • +25% whip speed on hit

For the Summoner who likes banking into melee build shenanigans, the Durendal is quite a reasonable choice. It is crafted with 12 Hallowed Bars at a Mythril Anvil. It's a more basic whip that features a whip speed buff of 25% when attacking enemies, better than the Snapthorn, on top of a decent summon tag damage value. Though, if you prefer having additional area control and flexibility, the Cool Whip might be more up your ally.

Morning Star:
  • 165 Summon damage
  • 8 Summon tag damage
  • 12% Summon tag critical strike chance

"Hey, you know what we should add as a Summoner weapon?"
"What?"
"A freaking Morning Star."
The Morning Star is dropped by the various Armored Bones in the post-Plantera Dungeon, at a 0.5% chance (1% on Expert Mode). This is quite the jump in power from earlier whips; while it is the slowest whip of the bunch, it has incredible damage and very high knockback, which most whips have very little of. Despite the low tag damage value, the Morning Star is capable of allowing minions to critically strike focused enemies. At long last. And along with all that, this whip is a solid enough weapon on its own, allowing you to dispose of anything foolish enough to get too close.

Dark Harvest:

  • 100 Summon damage
  • +35% whip speed on hit
  • Marks enemies with dark energy

This rad looking scythe-whip is dropped by Pumpking, the toughest enemy in the Pumpkin Moon event, at the same rate as the Raven Staff. Attacking enemies with it grants you a 35% whip speed boost, surpassing the Durendal and Snapthorn. Additionally, enemies will be marked with "dark energy"; minions who attack afflicted enemies will cause that energy to jump towards nearby enemies, zapping them for about 10 damage, ignoring 50 enemy defense. It can be viewed as 10 tag damage in this case. This damage is unaffacted by your own attack power, making this whip consistently useful for crowds. It synergizes best with fast minions like the UFOs as a result.

Kaleidoscope:

  • 180 Summon damage
  • 20 Summon tag damage
  • 10% Summon tag critical strike chance

The ultimate whip in the game. The Kaleidoscope has a 1 in 4 chance to be obtained from the Empress of Light boss. The added summon tag damage and crit chance will hand a lot of power to your minions. Do you want a Stardust Dragon that can crit? Do you like rainbows? If yes, make this whip your goal. It's very straightforward but it gets the job done.
Summoner's Mounts
A select few mounts are actually summon weapons in disguise. The damage values on these mounts actually increase as you wear equipment that grants additional summon damage. As such, these mounts may prove beneficial to your means of protecting yourself in combat.

The Slimy Saddle has a 25% chance to be dropped from King Slime (and has a 50% chance of being obtained from his Expert Mode Treasure Bag). This is a mount item that lets you ride on a large Blue Slime. It's able to jump much higher and faster than you, allowing it to scale cliffs with ease. It falls at a very fast speed, can lessen fall damage, and float on the surface of water. When you jump on an enemy with the Slime mount, they take 40 damage by default, though this damage is usually a bit less depending on the enemy's defense. This is much easier to obtain than the Slime Staff, making it usually the first minion a player will encounter. Since this mount's jump speed is so fast, its falling speed is faster than normal, making this mount a surprisingly good tool for falling downward quickly to avoid certain boss attacks, even in the lategame.

At 30% Bestiary completion, the Zoologist sells a variety of horse mounts. Respectively, the Dusty Rawhide Saddle summons a Painted Horse, the Royal Gilded Saddle summons a Majestic Horse, and the Black Studded Saddle summons a Dark Horse. These cost 25 gold each and are all functionally identical. They can be seen as Pre-Hardmode versions of the Unicorn mount, though their top speed is 40 MPH. They deal 30 summon damage to enemies they ram into.

Meanwhile, the Zoologist's brother, the Golfer, sells the Golf Cart Keys for 50 gold post-Skeletron, but only after the player achieves a total of 2000 golf score, which is generally measured by how far a golf ball has traveled before reaching the Golf Cups. It reaches a top speed of 41 MPH, jumps higher than normal, reduces fall damage by 80%, deals 40 summon damage when running over enemies, and most importantly, comes with nifty headlights so you can see better in front of you. Unlike other mounts which grant you 0.1 seconds of invincibility when ramming into an enemy, the Golf Cart specifically grants 0.2, a fifth of a second.

The Goat Skull has a 25% chance of being dropped from the Wall of Flesh, on Master Mode only. This makes it one of the few Master-exclusive Summoner items. It summons a rideable Goat mount that leaves a fire trail behind it as it runs. The Goat is functionally identical to the Unicorn mount however, including the 60 summon damage that it deals, with the exception being that the Unicorn gives off light when mounting and dismounting. Though, getting basically a free Unicorn at the start of Hardmode can prove very convenient for Master Mode players.

The Blessed Apple has a 2.5% chance (3.33% in Expert) of dropping from a Unicorn, a Hallow enemy. It summons a rideable Unicorn that can double jump, and it runs faster than most running boots. The Unicorn takes a couple seconds to build up speed without any interruptions; after a certain point, it will create a cloud of sparkles and begin sprinting, allowing it to impale any enemies it touches for 60 base damage. While dashing, the Unicorn reaches a top speed of 61 MPH, and gains a 1/10-second invulnerability when touching enemies, allowing you to ram through many enemies unscathed, but usually if the enemy dies in the process. You only take 20% fall damage when mounted as well. This mount is ideal for those who use a long skybridge for travel or for charging through weak enemies; although Asphalt Blocks don't affect the Unicorn's speed.

The Ancient Horn is a 2% drop from Basilisks, which are dangerous Hardmode enemies in the Underground Desert. It allows you to ride a Basilisk that can double jump and deals 90 base damage, making it stronger than the Unicorn. Despite that the Basilisk can only run at 41 MPH, it needs to be traveling at least 10 MPH in order to deal damage, a much lesser windup time than the Unicorn. The Basilisk mount is much better suited for battle than the Unicorn because of how easy it is to hit enemies during the ride. The Unicorn takes too much time charging in order to be effective.
Just like the Unicorn, when the Basilisk lands a hit on an enemy, you gain 1/10th of a second of invulnerability. This allows you to knock down weak enemies without being touched, or, if you like having fun, bully worm enemies.
Additionally, when at least 27 feet underground, the Basilisk gives off a faint red glow.

The Black Spot has a 25% chance to be dropped by the Flying Dutchman, the boss of the Pirate Invasion, on Master Mode. It allows you to ride a pirate ship mount that can fly infinitely; the ship has low acceleration, and it can reach a max speed of 36 MPH. When enough speed (20 MPH) has been built up, golden particles will appear, indicating the ship has reached ramming speed. Ramming into enemies deals 100 summon damage, leaving lots of room for its damage to scale nicely with game progression.

The Gelatinous Pillion can be considered a Hardmode upgrade to the Slimy Saddle. It is dropped by the Queen Slime boss; just like its Pre-Hardmode predecessor, this mount has a 25% chance to be dropped on Classic Mode, and a 50% chance on Expert Mode. It also deals 40 damage, just like the Slimy Saddle. However, the Gelatinous Pillion has more versatility; it can run faster, and acts like a pair of wings in the way that it has a short flight time and gliding ability. Holding Down while in the air also allows it to hover briefly. In addition, it doesn't interrupt your current flight time when hopping on and off.
On top of all this, you will look extremely fabulous riding on this mount.

The Hexxed Branch is dropped by the Pumpkin Moon enemy Mourning Wood at a 25% chance, on Master Mode. But for good reason; the Tree Mount is the fastest land mount in the game, reaching a top horizontal speed of 81 MPH. Unlike the Unicorn and Basilisk, it cannot double jump, but ramming into enemies at a high-enough speed deals an incredible 120 summon damage at base, making it the hardest-hitting mount a Summoner can acquire. It only excels in flat terrains however, as any bump in the road will definitely slow it down.
Summoner's Armor (Pre-Hardmode)
At a few points in the game, you'll have access to armor that benefits the Summoner, increasing your max number of minions and your summon damage. Summoning armor generally doesn't have a whole lot of defense, but the fact that you can safely take out enemies from a distance with your minions' DPS makes up for that.
Along the course of the game, most of the main Summoner armors are few and far between, so you would have to play large portions of the game without upgrading your armor. Man I love 1.4.


Flinx Fur Coat:
  • 1 Defense
  • +1 Minion capacity
  • +5% Summon damage
Unlike the other sets on this list, this armor comes in only one single piece, for the chestpiece slot. The Flinx Fur Coat is crafted at a Loom using 10 Silk, 8 Flinx Fur, and 8 Gold or Platinum Bars. While its stats are very minimal, its ease of access will provide a lot of support for beginner Summoners. 5% minion damage will probably not make a difference, but an additional minion certainly will.


Obsidian Armor:
  • 15 Defense
  • +1 Minion capacity
  • +31% Summon damage
  • +15% Whip speed
  • +30% Whip range
1.4.1 gave the previously-bland Obsidian Armor a use; and now it belongs to us. It can be crafted at a Heckforge with a total of 30 Silk, 60 Obsidian, and 20 Shadow Scales or Tissue Samples; 10/20/5 for the hat, 10/20/10 for the longcoat, and 10/20/5 for the pants. This set focuses on raw power rather than minion numbers, given the large percentage of summon damage it provides (15 of which is from the set bonus itself). It also allows you to hit faster and further with your whips, if you prefer to use them as your most active weapon (other than minions of course). This set is a fantastic alternative to Bee Armor, although you'll need to have fought the Brain of Cthulhu or Eater of Worlds first.


Bee Armor:
  • 13 Defense
  • +2 Minion capacity
  • +23% Summon damage
Bee Armor is the final summoning armor set obtainable before Hardmode. It requires a total of 30 Bee Wax to be crafted at an Anvil (8 for the headgear, 12 for the chestplate, and 10 for the greaves). Because this is the first summoning armor, you would be playing the game for a good while until finally reaching the Queen Bee, who drops the aforementioned Bee Wax. As well, you would be playing another good while until obtaining the next armor set up on the list.


Wizard Hat:
  • 4 Defense
  • +5% Magic damage
  • +1 Minion capacity... if playing on the Celebrationmk10 world
The Wizard Hat is dropped by Tim, a rare enemy in the Cavern layer. It's a Mage headpiece that has interesting set bonuses with various other magic armor pieces.
...But for some ungodly reason, if you're playing on a world with the "celebrationmk10" seed, the Wizard Hat in particular gets an extra minion slot. I haven't the foggiest idea why this random detail was added, but it's a Summoner item now, so into the guide it goes.
I'm so confused.
Summoner's Armor (Hardmode)


Spider Armor:
  • 20 Defense
  • +3 Minion capacity
  • +28% Summon damage
The Spider Armor can be obtained immediately after activating Hardmode. The full set requires 36 Spider Fangs (8 for the mask, 16 for the chestplate and 12 for the greaves), crafted at an Anvil. As it gives a bonus to both the minion cap and damage, it can go a long way in Hardmode. There are four appendages extending from behind the chestplate. If you're wearing wings, the extra legs will likely cover it until you start flying, at which point the wings replace the appendages and show its flying animation.


Forbidden Armor:
  • 26 Defense
  • +2 Minion capacity
  • +25% Summon damage
  • +25% Magic damage
  • +80 Mana
  • Grants the ability to summon sand tornadoes by double-tapping Down
Perhaps one of the most peculiar Hardmode armors, the Forbidden Armor acts as a hybrid armor for both Mages and Summoners. The set is fully crafted with 3 Forbidden Fragments and 46 Adamantite or Titanium Bars (1/16 for the mask, 1/20 for the robes, 1/10 for the treads). Forbidden Fragments are dropped by Sand Elementals, rare Hardmode enemies that only spawn during a sandstorm. This essentially makes the Forbidden Armor a counterpart to the Frost Armor, which is a hybrid melee/ranged armor exclusive to the Hardmode blizzard. Forbidden Armor is an excellent choice if you don't rely on your minions too much and prefer to use a wide arsenal of magic weapons.
When the full set is worn, a gold relic called the Forbidden Sign will float behind you, similar to the Stardust Guardian. When you double-tap your Down key, an Ancient Storm will be conjured on the ground below your cursor if it's within your line of sight, at the cost of 20 Mana. The sandnado deals a rapid base damage of 20 to any enemies that pass through it, and lasts for around 15 seconds. Summoning another tornado or hitting enemies enough times with it will also cause it to despawn more quickly.
The sandnado's damage is affected by both magic and summon damage boosts, and is interestingly one of the only sources of summon damage capable of achieving critical hits; this is because the sandnado is affected by your magic critical strike chance.


Hallowed Armor:
  • 27 Defense
  • +3 Minion capacity
  • +17% Summon damage (7% of which is total damage)
  • +7% Critical strike chance
  • +8% Movement speed
  • Holy Protection
That's right, baby. The Hallowed set has joined the Summoner's ranks. The full set is crafted with 54 Hallowed Bars at a Mythril Anvil. At first glance, the Hallowed Hood, which is the Summoner helmet variant, might not look very good with its measly 1 defense, +1 minion and 10% summon damage. But when the full set is worn, a set effect is given to provide an additional 2 minions. It may still be lower than Bee Armor in terms of damage, but the Holy Protection set bonus more than makes up for it. When you or your minions attack an enemy, you'll gain a buff for up to 30 seconds which will allow you to completely negate the next attack that hits you. This has an internal cooldown of 30 seconds, so don't rely too heavily on it. This set is perfect for survivability, even in Master Mode, and synergizes with the Blade Staff which can always hit reliably, and isn't too affected by the lowered summon damage.


Tiki Armor:
  • 35 Defense
  • +4 Minion capacity
  • +30% Summon damage
  • +30% Whip range
Each piece of the Tiki Armor can be bought from the Witch Doctor, but only after Plantera is defeated. Each piece is worth 50 gold coins, totaling a hefty 1 platinum and 50 gold. It is very much worth it though, as the boost in defense and damage, as well as the extra minion are definitely helpful in the long run, as it keeps you alive much longer.


Spooky Armor:
  • 30 Defense
  • +4 Minion capacity
  • +58% Summon damage
  • +20% Movement speed
Spooky Armor is currently the strongest wood-based armor in the game, and can only be obtained from the Spooky Wood in the Pumpkin Moon event. Crafted at a Work Bench, the helmet requires 200 Spooky Wood, the chestplate requires 300 and the leggings require 250. In total, a whopping 750 Spooky Wood is needed, but that's honestly not a whole lot, as Pumpkin Moon enemies drop it in large quantities. A successful run can net you well over a thousand.


Stardust Armor:
  • 38 Defense
  • +5 Minion capacity
  • +1 Sentry capacity
  • +66% Summon damage
  • +30% Whip range
  • Summons a Stardust Guardian to fight alongside you
The legendary Stardust Armor is the ultimate summoning armor, being only obtainable after you have defeated the Moon Lord several times. Basically you have to beat the game. The full set requires an expensive 36 Luminite Bars and 45 Stardust Fragments (8/10 for the helmet, 16/20 for the plate, and 12/15 for the leggings) using the Ancient Manipulator. Upon wearing the full set with no vanity items covering the armor, you will shimmer brightly with an effect that's much nicer than the Spooky Armor's pulsing effect. This effect remains even when the armor is dyed, allowing for many epic looking combinations. Regardless of whether or not you're wearing vanity items, this armor also glows white, almost like an infinite Shine Potion. The leggings and plate increase your minion cap by 2, while the helmet increases the cap by 1.
This armor's set effect calls forth the Stardust Guardian, which doesn't count towards your minion cap, to have your back at all times. When an enemy comes within 30 blocks of you, the Guardian will fly towards it, bypassing any obstacles, and beat the crud out of it Jojo-style for daring to threaten your safety. Most enemies will get squashed by his punches rather quickly, but if you're close enough to a boss, the Guardian won't cease punching until either you move far away or until the boss is dead. The Guardian is also affected by pet dyes, so you might have some fun with that.
Summoner's Armor (Sentry-based)
With the 1.3.4 update, Summoners now have a massive arsenal at their disposal. With the Dungeon Defenders 2 crossover event, many new items have become available. To access most of this content, you must buy them from the Tavernkeep, an NPC who specializes in trading through a specific currency called Defender Medals.
There are a total of eight Dungeon Defenders-themed armor sets... and they're all for Summoners. The catch is that they mostly specialize in sentry minions, which aren't the traditional minions that follow you.
Additionally, the armors are not specifically built only around minions, unlike the Spider and Tiki armors for example. They also include a vast array of other stats that players may find useful. These sets could be helpful for those who seek a balance between different classes of damage, or are curious about the world of summoning but aren't quite ready to give up all of their other power. This also encourages players to fight alongside their minions just like the Forbidden Armor, though these are most useful during the Old One's Army invasion.

The following four armor sets cost 45 Defender Medals each, so 15 per piece. Medals are earned from fighting the Old One's Army. The armor sets in this section must be bought from the Tavernkeep who sells everything you need to get the invasion started. He will start selling the armors after one mechanical boss has been defeated.


Squire Armor:
  • 58 Defense
  • +2 Sentry capacity
  • +2 HP per second of life regeneration
  • +30% Summon damage
  • +15% Melee damage
  • +15% Melee critical strike chance
  • +15% Movement speed
  • Increased Ballista velocity
  • Ballistae pierce more enemies and shoot faster when you take damage
A summoning armor with a lot of melee benefits. This set encourages you to use the Ballista weapons during invasions; the set bonus increases the velocity and pierce count of each Ballista harpoon. Additionally when you take damage, you gain the Ballista Panic buff for 5 seconds; your currently-placed Ballistae will fire every second, as opposed to the default 3 seconds.


Apprentice Armor:
  • 32 Defense
  • +2 Sentry capacity
  • +30% Summon damage
  • +20% Magic damage
  • -10% Mana usage
  • +20% Magic critical strike chance
  • +20% Movement speed
  • Additional Flameburst field of view
  • +50% Flameburst range and +40% Flameburst velocity
Apprentice Armor is similar to Forbidden Armor in that they are magic/summoning armor sets. However, they key differences are that: Apprentice Armor provides more defense, more summon damage, and reduced Mana costs, compared to Forbidden's additional Mana and evenly-split magic and summon damage. The set specializes in Flameburst-type weapons which ought to be handy for enemy clusters.


Huntress Armor:
  • 36 Defense
  • +2 Sentry capacity
  • +30% Summon damage
  • +20% Ranged damage
  • +10% Ranged critical strike chance
  • +20% Movement Speed
  • +10% Chance to not consume ammo
  • Explosive Traps recharge faster and oil enemies
This set is a blend of Summoner and Ranger armor, and it's viable for Rangers who control areas with sentries, and it decreases the Traps' recharge time from 1.5 seconds to 1 second. Huntress Armor can work well in situations where you need reliable crowd control while you go for a bigger enemy like a boss during an event. Since Explosive Trap sentries aren't effective unless an enemy walks near them, the set effect makes them much more valuable and makes up for their slow recharge. When oiled, enemies will take more damage over time from fire-based debuffs such as On Fire, Frostburn, and Shadowflame.


Monk Armor:
  • 46 Defense
  • +2 Sentry capacity
  • +30% Summon damage
  • +20% Melee damage
  • +20% Melee speed
  • +15% Melee critical strike chance
  • +20% Movement speed
  • Lightning Auras can now deal criticals (16.7% chance) and attack 20% faster
Monk Armor is a nifty set that works as a fast, hard-hitting attacker. It's a melee set that relies on swift strikes, which works well with whips, or the melee weapons obtained from the Old One's Army. The Monk specializes in Lightning Auras; since each Lightning Aura can cover a wide area with a fast hitting, critically-damaging field, the Monk can become a formidable force on the battlefield.
Summoner's Armor (Sentry-based part 2)
The next four armors are unlocked after defeating the Golem, and can be bought for 150 Defender Medals per set; 50 per piece. A bit expensive, but they can prove highly useful since they're optimized to tackle invasions.


Valhalla Knight Armor:
  • 68 Defense
  • +3 Sentry capacity
  • +60% Summon damage
  • +10% Melee damage
  • +4 HP per second of life regeneration
  • +20% Melee critical strike chance
  • +20% Movement speed
  • Increased Ballista velocity
  • Ballista fire rate increased to 1.67 seconds
  • Ballistae pierce more enemies and shoot even faster when you take damage
Valhalla Knight Armor is an upgrade to Squire Armor, with the exception of a slightly lower melee damage bonus. This is currently the highest summoning armor in terms of defense and it also makes a great armor for tanks. Simply wearing this set allows Ballistae to fire almost twice as fast. Upon taking damage, you'll gain a stronger Ballista Panic buff compared to the Squire Armor, allowing your increased number of Ballistae to fire every half-second.


Dark Artist Armor:
  • 42 Defense
  • +3 Sentry Capacity
  • +60% Summon damage
  • +25% Magic damage
  • +25% Magic critical strike chance
  • +20% Movement Speed
  • -15% Mana usage
  • Additional Flameburst field of view
  • +50% Flameburst range and +40% Flameburst velocity
  • Larger explosions from Flamebursts and Phantom Phoenix
The Dark Artist set specializes in high magic damage and critical hits, along with powerful Flamebursts. A player as a Dark Artist can keep safe with a group of Flamebursts that fire at enemies with fast shots from long distances, while the player utilizes their own enhanced magic abilities to blow everything down. The set provides no additional Mana however, so you'll probably have to make up for that with accessories, Mana potions, Mana regeneration, or weapon reforges that further reduce Mana costs.
Unlike the Apprentice set, the Dark Artist set more than doubles the size of Flameburst explosions... but this also applies to the Phantom Phoenix, a ranged weapon, for some reason.


Red Riding Armor:
  • 48 Defense
  • +3 Sentry capacity
  • +60% Summon damage
  • +25% Ranged damage
  • +20% Ranged critical strike chance
  • +20% Movement speed
  • +20% Chance to not consume ammo
  • Explosive Traps recharge faster and oil enemies
A direct upgrade to Huntress Armor, Red Riding Armor is an excellent choice for defensive Rangers. Since Rangers are supposed to hit fast and hard, the increased damage and crit chance are much appreciated. As usual, the respective sentry, the Explosive Trap, is enhanced to be more viable; its recharge time is further reduced to every half-second. Explosive Traps work well with this setup too; most Rangers will find themselves in the air, shooting at bosses, while the Explosive Traps take care of lesser enemies on the ground.


Shinobi Infiltrator Armor:
  • 54 Defense
  • +3 Sentry capacity
  • +60% Summon damage
  • +20% Melee damage
  • +20% Melee speed
  • +25% Melee critical strike chance
  • +30% Movement speed
  • Lightning Auras can now deal criticals (25% chance), attack 20% faster, and have increased size
Shinobi Infiltrator Armor doesn't have too many differences from the Monk set, except for more summon damage, sentry capacity, critical strike chance, and defense. They're all relatively even, allowing for fairly high stats across the board. This armor set is meant for swift, up-front attackers, and is good enough to rival both Hallowed and Spooky Armor at the same time (despite the set applying to sentries instead of traditional minions). Like the Monk, Shinobi Infiltrator specializes in Lightning Auras, allowing them to potentially create an arena out of Lightning Auras that they can fight inside or use as a defense, leaving no enemy safe.
Summoning Buffs
Well let's be honest, every summoning item is useful in its own right. So I'll just be throwing in all the items that benefit a Summoner that don't belong in the weapons, armor, or accessories category.

The Summoning Potion allows you to summon an extra minion for 6 minutes, which can be very useful for boss fight preparations. To brew one, you need a Bottled Water, one Moonglow and one Variegated Lardfish at an alchemy station, meaning you would have to take up fishing to make a steady supply of these. The fish can be caught in the Underground Jungle's lakes.

The Bewitching Table is an essential item released with the 1.3 update. It's one of the special class furnitures, so it functions much like the Crystal Ball and Ammo Box. When placed, you may right-click it to receive a buff that increases your minion cap by one; this buff lasts indefinitely until death, exiting the world, or canceling the buff. The Table is found in the Dungeon and functions as a table for valid housing. It's also sold by the Witch Doctor for 10 gold when the Wizard is present, and can be transmuted by throwing an Alchemy Table into a Shimmer pool. I recommend always having a Bewitching Table active if you're a Summoner. It's good for non-Summoners too, as having a little extra DPS is good for just about everyone; unless it's a quick piercing minion that may interrupt your attacks. The Bewitching Table is like a free Summoning Potion, and the two stack as well.

The War Table is a class furniture dropped by Dark Mages of the Old One's Army, at a 50% chance (guaranteed on Expert) on Tier 1, and 12.5% (25% on Expert) on Tier 3. Right-clicking it will grant you an indefinite buff called Strategist, which increases your sentry limit by one. It may take a few tries to obtain, but you'll generally be redoing the event several times anyway if you aim to amass a bunch of Defender Medals.

Any item with the Well Fed buff slightly increases all your stats, on top of providing additional health regeneration in Expert Mode. Among these stats are a 5% overall damage increase, which affects minions as well, and an additional 0.5 minion knockback. As of 1.4, a large amount of food items were added, which either provide Well Fed or its two higher stages, Plenty Satisfied and Exquisitely Stuffed. These apply 7.5% and 10% damage, and 0.75 and 1 minion knockback, respectively, among other stats. Items with this buff include Pumpkin Pie, Cooked Fish, Bowl of Soup, Bacon and many other consumables.
I recommend the Well Fed buffs for any and/or all boss encounters.

The Wrath Potion is brewed with one Bottled Water, Ebonkoi, and Deathweed. Because the Ebonkoi is a fish exclusive to the Corruption biome, it normally cannot be caught in Crimson worlds unless you were to build your own Corruption using materials brought in from a Corruption world (or if you buy Corrupt Seeds from the Dryad during a Hardmode Blood Moon). The Wrath Potion increases all damage by 10% for 4 minutes; because this also applies to minions, it is recommended to use this just before the start of a major battle, with all your minions ready.

Also, a special shoutout to the Sharpening Station! This is a buff station that you can find in cabins within the Underground Jungle, or it can be bought from the Merchant in Hardmode for 10 gold, if you somehow never found one by then. It increases armor penetration by 12, similar to the Shark Tooth Necklace, but only for melee weapons.
...Or does it?
In actuality, it increases armor penetration by 12 only while you're holding a melee weapon. Are you picking up what I'm putting down? This means that minions can benefit from this buff; but since you have to hold a melee weapon (whips don't count, sadly), this is a very niche strategy. But still, a strategy nonetheless.
Accessories
A wide number of accessories in Terraria can provide a good help to Summoners, some of which are made purely for them. It's always been difficult for me to choose a correct loadout of accessories, which is why I always keep some in my inventory in case I need to switch them out.
I usually find myself always having my Wings equipped at all times, since I often have to travel across my world for whatever reason. On one of my characters, I used to have Frostspark Boots equipped, but eventually I replaced them with another accessory that benefits summoning.

First and foremost, the Pygmy Necklace is an accessory that increases your max number of minions by one. It is bought from the Witch Doctor at night, for 20 gold. As it can be obtained in Pre-Hardmode as of 1.4.1, this is an exceptional boost in early power.

The Summoner Emblem is one of the most important accessories for the Summoner. Introduced in 1.3, this Emblem is dropped by the Wall of Flesh at a 25% chance. Alternatively, it can be produced by throwing another Emblem into a pool of Shimmer. Similar to the other Emblems, this increases your summon damage by 15%, which is a substantial boost for just about any stage in the game.

These items are dropped uncommonly by Ogres during the Old One's Army event. They are the Squire's Shield, Apprentice's Scarf, Huntress's Buckler, and Monk's Belt respectively. The Shield and Scarf are dropped by Dark Mages at a 50% chance (100% on Expert/Master), while the Buckler and Belt are dropped by Ogres. Each item increases your max number of sentry minions by 1, and your summon damage by 10%. These accessories' effects don't stack with one another, however.
The Squire Shield (and any other shield for that matter) can be used with the Brand of the Inferno (also dropped by Ogres) to parry attacks and grant you the Striking Moment buff for a couple of seconds, which quintuples the power of your next melee attack.

The Hercules Beetle is obtained by buying it from the Witch Doctor post-Plantera, while he is living in a Jungle biome, for 40 gold. It increases the damage of your minions by 15% and increases their knockback. It can be combined with a Necromantic Scroll at a Tinkerer's Workshop to create the Papyrus Scarab.

The Necromantic Scroll can be dropped from the Mourning Wood during the Pumpkin Moon. Its drop rate increases as you advance in the Pumpkin Moon, the highest being 20%. It increases your max number of minions by one and increases minion damage by 10%. It can be combined with the Hercules Beetle at the Tinkerer's Workshop to create the Papyrus Scarab.

After being crafted, the Papyrus Scarab gives a bonus of one extra minion, 15% more minion damage and increases minion knockback. Essentially, this is a Hercules Beetle with an added space to the minion cap. It is possible to have a Hercules Beetle, Necromantic Scroll and Papyrus Scarab equipped all at once, increasing your max minions by 2, damage by 40% and knockback by, well, a lot. This item is a must-have for any dedicated Summoner.
Accessories (Part 2)
And now, I shall mention a few accessories that can also help Summoners, but are not necessarily exclusive to minion bonuses.

The Shark Tooth Necklace is an accessory that increases your armor penetration by 5, which can also apply to summoned minions. It's dropped by Blood Zombies and Dripplers during a Blood Moon, at a 0.67% chance (1.33% on Expert/Master). You can combine it with the Honey Comb (a 33% drop from Queen Bee) at a Tinkerer's Workshop to create the Stinger Necklace, which retains the armor penetration. Additionally, upon taking damage, the Necklace will release friendly bees to attack nearby foes, and grant the Honey regen buff for 5 seconds after taking damage. These bees can be further upgraded by the Hive Pack, the Queen's Expert drop. The Necklace is a well-rounded offensive and defensive accessory and I personally see no reason not to use it.

So, funny story. The Brain of Confusion is the Brain of Cthulhu's Expert-exclusive item. This accessory causes nearby enemies to become confused at about a 60% chance when you take damage. However, there's also a 1 in 6 chance that you'll avoid damage altogether and gain the Cerebral Mindtrick 'debuff' for 4 seconds; which grants you 10% critical strike chance as well as an unlisted 10% increased summon damage. That's such an odd detail; was it intentional? An oversight? Either way, a welcome sight it is.

The Hive Pack is an Expert-exclusive accessory obtained from the Queen Bee. It serves a number of uses, such as making friendly bees bigger and stronger, essentially synergizing with other Queen Bee weapons. Notably however, wearing it increases the fire rate of the Hornet minion by 33%.

The Avenger Emblem increases your total damage by 12%. It can be made by taking any Emblem and combining it with 5 Souls of Sight, Might and Fright. The Avenger Emblem gives a pure damage boost overall, meaning minions can also benefit from this. While the Destroyer Emblem is considered better with its 10% damage increase and +8% critical strike chance, it would mostly affect your own attacks. Minions cannot deal critical hits.


As of 1.4, the Feral Claws and any of its upgrades provide autoswing and 12% attack speed to all melee weapons and whips. The Berserker's Glove, made by combining a Power Glove and Flesh Knuckles, provides these bonuses as well. It also provides 100% more melee knockback and 10% increased size for melee weapons, but these do not affect whips. It also gives 8 defense which can help your squishiness. You'll draw more enemy aggro when wearing it, however.

The Sun Stone and Moon Stone are essentially equal to the Celestial Stone in terms of stat increases; however, they only function during the day or night, respectfully. The Celestial Stone keeps those stat increases regardless of the time of day. The Moon Stone is an uncommon drop from Vampires during a Solar Eclipse, with a 2.86% drop rate, while the Sun Stone drops from the Golem at a 14.29% chance.

The Celestial Stone is created by combining a Sun Stone and a Moon Stone at the Tinkerer's Workshop. It increases most of your stats; including 10% melee speed, 2% critical strike chance, 1 HP per second of life regeneration, 4 defense, 15% mining speed, 0.5 minion knockback and 10% damage. As this is a pure damage increase, this also applies to minions. Many late-game characters prefer to use this item, as its overall stat increase helps in almost every situation. It can also be combined with the Moon Shell to create the Celestial Shell.

The Celestial Shell is an item that is made by combining the Celestial Stone and Moon Shell at the Tinkerer's Workshop, and it retains the abilities of both items. This requires you to have obtained the Sun Stone, Moon Stone, Neptune's Shell, and Moon Charm. The Neptune's Shell is dropped from the Creature from the Deep, an enemy from the Solar Eclipse, at a 2% chance (3.96% on Expert). Moon Charms are dropped from Werewolves, which only spawn at night during a full moon in Hardmode, at a 1.67% chance. The Celestial Shell is a highly helpful item when fighting in the Ocean, since you'll be able to transform into a merfolk when entering water, and swim rather quickly.

I also give a special shoutout to the Demon Heart. While not an accessory on its own, consuming it allows you to gain a sixth accessory slot. This allows for a lot of powerful accessory combinations, and is a huge help to all characters, not just Summoners. This item can only be obtained from the Wall of Flesh's Treasure Bag on Expert Mode. You won't gain any more Demon Hearts after you've used it, and you can't use more than one. You also can't use your sixth accessory slot on Classic Mode worlds. The Demon Heart also stacks with Master Mode's natural sixth accessory, meaning you can have a maximum of seven by Hardmode.

Not all loadouts are going to work for everyone, so feel free to switch these around as you progress through the game.

A very important tip when it comes to Summoner items: the Witch Doctor is your best friend! (And the Goblin Tinkerer if you wanna perfect your setup)
(Has anyone else noticed he appears to be holding a Pygmy Staff?)
Prefixes
One of the most important things about endgame items is their prefixes or modifiers; the stats added as an additional bonus. This applies to both weapons and accessories.

What kind of prefixes should a Summoner go for? Well, almost all summoning weapons can obtain the Mythical prefix, the best modifier for most magic weapons. Sounds good, right? Well, kind of. Mythical has the widest array of stats, but most of these affect the initial summon rather than the resulting minion. The Speed and Mana Cost portions, for example, only affect when you're just summoning the minion. The Speed part does not increase your minion's attack speed; only how long it takes to summon said minion. The Critical Strike Chance portion is useless, as said before, because minions cannot critically hit. Only the Damage and Knockback outputs are what matter.
Surprisingly, Mythical does not have the largest damage increase; the Ruthless prefix does. However, while Ruthless has the highest damage output, it lowers knockback. This leaves players at a decision; to keep well-rounded damage and knockback, or sacrifice some knockback for more damage.
Personally, I used to have a mix of Mythical and Ruthless summoning weapons (as I have all of them in my Summoner's inventory). My Xeno Staff, for example, is Ruthless because I use it to tear through bosses and invasions, which aren't even affected by knockback in the first place. My Optic Staff was Mythical, as I used the Twins when exploring or farming enemies. Sometimes I go semi-AFK here when loot-farming and in a semi-safe area, so knockback would've been good to keep me safe. However, the difference in knockback is negligible, as most non-sentry minions have quite low knockback in the first place. I eventually reforged my Optic Staff from Mythical to Ruthless.

Also, the Slime Staff, Abigail's Flower, Finch Staff, Flinx Staff and Vampire Frog Staff's best modifier is Mythical, as their damage is so low that the Ruthless modifier rounds it down to the same number. The Blade Staff's best modifier is either Demonic, Deadly, Mystic, or Hurtful, due to having no knockback.
Also-also, the knockback bonuses from summoning accessories can easily make up for the lost knockback in the Ruthless prefix.

As most of you know, no accessories can have negative modifiers. And each accessory prefix can have one of six stat increases; to melee speed, movement speed, critical strike chance, max Mana, damage or defense. Each category has four stages to how much that particular stat is increased, ranging from 1 to 4 percent (with the exception of critical strike modifiers, which can only have 2 or 4 percent; and the single Mana modifier, Arcane, which grants a flat 20 max Mana).

Each "class" is better suited to some stats than others. Melee characters go well with Warding, Menacing or Violent prefixes, which increase defense, damage or attack speed respectively. Ranged characters are awesome with Lucky prefixes, which increase their critical strike chance. This allows them to dish out a lot of pain in a short amount of time. My Mage, which used the Spectre armor with the Hood, used all Menacing accessories to make up for the 40% decrease in magic damage by wearing the Hood (Seriously Red, fix that) (Okay, Nebula Armor fixes that. Thanks).
But what would the Summoner use?

Prefixes for movement speed are not recommended, because it's nearly useless when using boots or wings, which can do the job just fine on their own. On top of that, movement speed bonuses don't even enhance your boots' sprinting speed or your wings' flying speed, but rather your normal walking speed and acceleration. Melee speed benefits whips, however, so if you prefer a whip-oriented playstyle (or if you're having too much fun with Obsidian Armor), try putting Violent on your accessories.
I should also note that critical strike values on any equipment do not stack with the "summon tag critical strike chance" on the Morning Star or Kaleidoscope whips. So this means you can't further build into crits past the listed value on the whip itself. They also don't add to the set critical chances of the Lightning Auras when wearing the Monk or Shinobi Infiltrator sets.

Personally, I believe Menacing works best on the Summoner. In the past, I liked using Warding modifiers, sacrificing my power for safety. But Ben Franklin wouldn't approve of that. Summoner is already the generally squishiest class in the game, but has incredible damage potential. I've come to realize; defense doesn't matter if you never get hit. If you know what you're doing, you can play a "kill everything before it kills you" sort of playstyle. In Expert Mode and above, defense matters very little (unless you opt for a 'tank' build) and you will have to learn how to dodge your way to victory. More Menacing accessories means more powerful minions, which can shorten the time taken on a boss battle.
And besides, knowing boss patterns and destroying them while grazing all their attacks makes one feel very accomplished.

The paragraph below is outdated and does not apply to 1.4:

I've learned that it's possible to have damage-boosting accessories, summon the minions with that damage increase, and then equip your normal accessories. This will keep your minions' damage boosts. If you have a large amount of money to spare, try getting two of the same accessory.
For example, my current loadout, with Stardust Armor, is the Monk's Belt, Pygmy Necklace, Stardust Wings, Necromantic Scroll and Papyrus Scarab, all with the Warding prefixes. However, I also have a second Necromantic Scroll and Papyrus Scarab, as well as an Avenger Emblem, Summoner Emblem, and a Hercules Beetle, all reforged to Menacing. I equip all of these Menacing Accessories, drink a Wrath and Summoning Potion and an item with the Well Fed buff, activate the Bewitching Table, and then summon my minions. The Stardust Cells get a massive boost to over 150 damage, while the Frost Hydra absolutely skyrockets to nearly 300. Then I change into my full Warding set, and I'm ready to wreck.
With this advanced but worthwhile loadout, I'm able to completely shred through anything and everything in my path with little risk. More elaboration in the Ultimate Summoner Loadout section.


Also, do note that reforging accessories with the Goblin Tinkerer will eat up a lot of platinum, and probably cost you a rage or two. Prepare some mob farms.
Understanding Immunity Frames
This section will detail a rather advanced mechanic that isn't explained in-game, so a good deal of experimenting was required in order to fully convey this information. It isn't entirely necessary to understand, but getting a good grasp on it can help you sharpen and optimize your strategies and minion loadouts.

So what exactly are immunity frames? Well, let's start simple.
Think of a simple piercing weapon, such as the Vilethorn or Rainbow Gun, which have a lingering projectile. When fired through an enemy, these weapons will damage the enemy up to 6 times per second, or every 10 frames, or every 0.17 seconds. Whichever number is easiest to remember for you. The reason why the enemy isn't hit every single frame is because the game has immunity frames in place to prevent the enemy from being vaporized instantly. These are also known as invincibility frames, or i-frames for short.
The game attaches a category of i-frame to just about every piercing projectile. These are known as global i-frames, static i-frames, and local i-frames. I will break these three down in a way that's hopefully easily digestible.

Global I-Frames
Throughout most of Terraria's history, just about every piercing projectile inflicted global i-frames. This means that when a piercing attack hits an enemy, no other global piercing attack can hit said enemy between those 10 frames of invincibility. In this case, even many melee weapons like swords and spears count as piercing 'projectiles' and can't hurt enemies that are already being pierced by something else.

For the first few years after Summoner's conception, almost every piercing minion inflicted global i-frames. This made it nigh-impossible to combo with your minions using a piercing weapon, as minions such as the Baby Slime and Spider would simply hog all the i-frames for themselves. A sword would harmlessly swing right through the enemy being attacked in many cases. This would force a player to use a direct-hit weapon such as a gun with non-piercing bullets, which inflict no i-frames whatsoever.
Many weapons in Terraria still inflict global i-frames, but no minions do anymore, as far as I'm aware. They either inflict static or local i-frames, which still play nice with global weapons, so all is well. I won't get into the finer details of global weapons here; you are here to become a Summoner, aren't you?

Static I-Frames
At some point, Re-Logic gradually strayed from global i-frames and created static i-frames for a number of projectiles, minions included. This is good, as with the introduction of whips, you can freely use any piercing weapon alongside your minions with no downsides.
A weapon with static i-frames will not conflict with other sources of damage, as long as that source isn't another instance of itself. This means that only weapons or minions that share the same internal 'projectile ID' will interrupt each other, but different weapons can still hit the enemy freely.

To illustrate what I mean, here's a gif of a Mimic being jumped by eight Baby Slimes:


...But that doesn't really feel like eight, does it?
In actuality, one could achieve the same DPS with merely one or two Baby Slimes; all others become redundant when it comes to single-target DPS. But since they're static, one could easily add to that DPS with different weapon types.
Including... Other minions...?


Ah-ha!
So a varied team is viable after all.
When it comes to focusing down a single target, consider using a variety of static minions as opposed to multiple of the same type, if no local i-frame minions are available. This is less of an issue, however, when faced with a horde of entities such as the Wall of Flesh, making a group of Frogs most ideal in such a setting.

Static minions include:

Baby Slime
Flinx
Abigail*
Vampire Frog
Imp**
Spider***
Twins****
Frost Hydra
Sharknado*****

*Abigail appears to have more i-frames than other minions, meaning she hits less frequently than others.
**Imps only inflict 6 i-frames per hit compared to the usual 10. Their projectiles hit more often than others, assuming they don't all connect at once.
***Spiders are an odd case; they hit less frequently (2.86 hits per second, or once every 21 frames), but each visual variant has its own i-frame timer, meaning they can hit up to three times at once. While an additional three can allow the group to hit more often to make up for their slower bites, two of the same Spider variant maxes out at 4 hits per second, or one hit every 15 frames; a diminishing return compared to the first three, but they still add an overall DPS increase. As such, six would be the maximum useful number of Spiders.
****Spazmamini possesses 12 i-frames, which is slightly worse than average. However, Retinamini's lasers don't pierce, making it beneficial to summon as many Twinions as desired.
*****Technically, Sharknado projectiles are direct-hit, but the tornadoes themselves do inflict static piercing contact damage.

Local I-Frames
Local i-frames function much like static ones, except multiple projectiles of the same ID do not interrupt each other. This means that multiple identical 'local' minions can swarm an enemy as much as they please. The only restriction is that each individual projectile has its own timer and can't attack every frame, which is true for all piercing in general.

As an example, watch this flock of Finches charge into the Mimic all at once:


A bit of a difference there compared to the Slime Squad, eh?
They'd be hitting even more often if they didn't have the turning skills of a drunk snail.

Minions with local immunity (or direct-hit capabilities) are generally the best choice for a "strength in numbers" build, as you lose nothing for adding more to your party.
Alternatively, a target being hit by a local projectile will get all of its i-frames reset to 0, meaning that even static minions would gain a DPS increase from a local minion's support.

Local minions include:

Finch
Ballista
Flameburst
Explosive Trap
Lightning Aura
Dagger
Pirate
Sanguine Bat
Desert Tiger*
Deadly Sphere
Raven
Stardust Dragon*
Terraprisma
Lunar Portal
Rainbow Crystal

*The Tiger and Dragon technically use local i-frames, but as they are only a single entity, this doesn't make much a difference.

If that was a lot of information to swallow at once, or was too complex... that's okay. It took me a long time to get a grasp on these mechanics. Since these i-frames play a part in how summons operate, I deem it important enough to relay this information to you.
And if words aren't your thing, perhaps this picture can help illustrate how it works.


You've acquired a lot of knowledge from the past few sections. If you think you're ready, perhaps it's time we put that knowledge into practice, and move on to an actual playthrough now. Shall we?
A Summoner's Journey
I'm not gonna lie, the path of a Summoner is a long and arduous one. While Summoners have a slow start, they can often have many advantages over other characters. There will be lots of deaths and many nooby mistakes, but I am here to help minimize those mistakes, and guide you on your path to awesomeness. That's the point of this guide.

Let's begin at the start of a new character and world, and list off the first summoning weapons available: that would be the Slime Staff, Finch Staff, Abigail's Flower, Flinx Staff, Vampire Frog Staff, and Slimy Saddle.
Due to its rarity, the Slime Staff is often overlooked. If you like, you could always make a Slime farm using an existing world, utilizing Slime Statues to produce Slimes that infinitely die and respawn until a Slime Staff is acquired.

The Slime Rain event makes it slightly easier for one to obtain the Slime Staff without statue grinding. With the incredible amount of Slimes spawning, it's likely for you to spawn a Pinky or two, even King Slime if you kill enough Slimes. This increases your chance of a Slime Staff heavily. The Lifeform Analyzer, sold randomly by the Traveling Merchant, can detect and notify you of any nearby Pinkies. If you want to search for Pinkies, it may also be a good idea to run constantly across the world during the Slime Rain so that Slimes keep spawning without you having to kill any, until it ends after about 9 to 15 Terraria hours. Or, you could always skip the Slime Staff and begin at one of the others, or to one of the armor tiers.
Or, if you're lucky enough, a Slime Staff may just come to you at some point along your journey.

There is always still a slim chance of obtaining the Slime Staff from a Slime or a Slime Statue, if you can set it up at an underground trap with lava nearby. But King Slime is fairly easy to beat, and since all it takes is a little mining and preparation, you'll likely obtain the Slimy Saddle long before the Slime Staff.

With 1.4, you now have access to a few new minions; such as the Finch, the Flinx, and the Vampire Frog. Try exploring the surface of your world to see if there are any Living Trees; it's likely that you'll find your Finch if your tree has a hollow trunk going down, where you'll find a Living Wood Chest. If you happened to find one, great! Take good care of the baby bird, and it will take care of you. If not, we'll move on to another minion on the list.

Before we get into that, I wanna make a quick note here; start setting up your NPC housing when you can. With the Journey's End update, it's beneficial to set up little outposts in different biomes so that you can purchase Pylons from happy NPCs, which allow you to travel back and forth between said outposts instantaneously.
When you've filled out about 10% of the Bestiary, the Zoologist NPC will move in to an available home. For reference, the Bestiary records information about entities you meet in the world, such as NPCs, critters, or defeated monsters. She will also sell you the Leather Whip, a good choice for a starting Summoner weapon if you already have a minion with you. Though, if you're feeling brave, you can dive into the Underground Jungle and gather the materials for a Snapthorn, a much better whip by comparison.
Additionally, at 30% Bestiary completion, the Zoologist will sell you Critter Shampoo, which allows you to apply dye to your minions! Who doesn't want that?

If you wish to aim for Abigail's Flower, you'll want to place some spaced-out tombstones; dropped when your character dies, or, if you're on Hardcore for some reason, when an NPC dies. For maximum efficiency, you'll want to build several layers of grass blocks all around the tombstones so that the flower has more places to potentially spawn; this may create a Graveyard biome in the process. You will need grass to grow on the dirt blocks used however, so you'll want to plant Grass Seeds, sold by the Dryad, or use the Staff of Regrowth, found in Shrines in the Underground Jungle. Be aware that the flower can grow on just about any type of biome grass, as long as it's at or above the surface layer. Then, you can speed up the growing process by sleeping in a bed, which quintuples the speed of time. You'll know you've found your target when you see a little red flower protruding from the ground, which also appears as a red pixel on the world map. Take good care of your new sister.

Let's aim for the Flinx Staff and Flinx Fur Coat now. Once you have adequate exploration gear, such as ropes and torches, it would be beneficial to dive into the Underground Tundra to kill a few Snow Flinxes. If you're on a higher difficulty, this is easier said than done. While Flinxes are very easy enemies, as they have negative knockback resistance on Classic Mode, every other enemy in the frozen caves will prove to be a deadly nuisance. On Expert Mode, Spiked Ice Slimes can spray a wide volley of icicles around them, and the waters of the Tundra will slow you down. Snow Flinxes drop 1 to 2 Flinx Fur (1-3 on Expert/Master); you will need a total of 14 to craft everything you need for the first step in Summoner progression.
You're also going to need 18 Gold/Platinum Bars and 10 Silk, which can be crafted with Cobwebs at a Loom. As Looms are best obtained by crafting them at a Sawmill, you're also going to need some Iron or Lead as well. Essentially you're going to need to go mining and get your basic set of crafting stations. Once you have everything you need, you'll have crafted your first summoning set. Enjoy watching your new Flinxes bounce everything to death as they assist you through the earlygame.


...Most importantly, you'll look stylish while doing it.
A Summoner's Journey (part 2)
Anyway, let's talk about our elusive friend, the Vampire Frog.
A lot of things have to be done in order to get a chance to obtain him. First, a Blood Moon must occur, which has an 11.11% chance of happening each night, if you have at least 120 HP and if the night is not a New Moon. Then, during a Blood Moon, one must go fishing in the bloody waters, where you may end up reeling in a dangerous enemy like the Zombie Merman or the Wandering Eye Fish. These creatures are extraordinarily strong for this point in the game; the Merman for example has 400 HP, 1,200 on Master Mode, and its damage is enough to turn you into sushi with a mere couple hits. Both enemies are extremely fast and are immune to knockback, so fighting them head-on is a fatal mistake.
But Summoners think outside the box (or in this case, inside), so let's solve this problem.

Blood Moon fishing enemies will spawn at or just above the point where your bobber was when you reeled them in. With this in mind, it is possible to trap them by boxing in the lake with solid blocks. Then, to keep you safe from other freaks in the night, you can build a barricade around yourself and open one block to squeeze your fishing line through, if you hug the wall and throw it at just the right angle.


I should note that it will take a while to gain a decent fishing rod and a surplus amount of bait to fish up this many monsters in one night. Do a bunch of quests for the Angler while you wait for Blood Moons in the meantime! You can also "grind" for Blood Moons by sleeping in a bed as well.
Alternatively, Blood Moon-exclusive enemies have a 1% chance to drop the Bloody Tear, a consumable item that summons the Blood Moon if it is nighttime. It also has a 1 in 5 chance of dropping from The Bride and The Groom, a 4% chance from the nightmarish fishing catches, and a 50% (100% on Expert/Master) chance from Dreadnautilus (more info about that guy in the future).

When the night is over, it's time to butcher your catches. Obviously, opening your fish chamber would be suicide; dispose of them with a weapon like the Vilethorn, or summon a minion inside the kill zone to take out the monsters, while you go make some macaroni because those guys take a while to kill.
Other than the Vampire Frog Staff, you can also obtain the Chum Caster or Blood Rain Bow from these monsters; the former is a nifty fishing rod that reels in Blood Moon enemies with an increased chance, while the other is a bow that rains blood from the sky. They also commonly drop Chum Buckets, which increase your fishing power temporarily when thrown in water. Rather helpful items for helping you deal with the arduous Vampire Frog grind. Each Blood Moon is such a small window of time, so you must make the most of it and prepare accordingly. The Frog will only reveal himself to those who are patient. If you get him early enough, you should feel quite proud of your accomplishment. I hope he serves you well.

Vampire Frog or not; when you feel prepared enough, you should eventually take on King Slime. The Slimy Saddle is very much worth your time, especially if you want that nice boost in mobility, which is just what a Summoner needs.
Boss: King Slime
You can summon King Slime with a Slime Crown, which is crafted with one Gold/Platinum Crown and 20 Gel at a Demon Altar. The Crown is made with 5 Gold/Platinum Bars and 1 Ruby at an Anvil. Alternatively, you can wait for a Slime Rain event, which has an approximate 12% chance of occuring on a Pre-Hardmode morning (about 8% in Hardmode) as long as you have more than 140 HP and 8 defense. On an Expert world, these criteria are not needed and Slime Rain may occur at any time, with a significantly lesser chance until the prerequisites are met. If King Slime has already been defeated in the current world, the chances are halved.

Recommended Minions:
  • Flinx
  • Baby Slime
  • Finch
  • Vampire Frog
Recommended Accessories:
  • Bottles or Balloons
  • Hermes Boots or higher
  • Band of Regeneration
Recommended Buffs:
  • Regeneration
  • Ironskin
  • Cozy Fire
  • Swiftness
Recommended Armor:
  • Flinx Fur Coat

King Slime will spawn when 150 Slimes have been killed during the Slime Rain event, or 75 if King Slime has already been defeated previously. The battle can be surprisingly challenging as King Slime deals about 40 damage on Classic mode, the same damage as the Slimy Saddle. He has the ability to teleport onto you if he's stuck behind a wall or too far from you. One method of fighting him can be steadily backing up and attacking with a boomerang or other ranged items while he's jumping towards you. You can also use a whip at the right distance and watch your minions' damage add up against him.
King Slime has a movement pattern of doing a large jump for every three normal jumps. If you're backed into a corner, time your moves to run under him while he's jumping; a grapple hook would come in great handy here. Also, as of 1.4, King Slime's teleport has been altered to reach you if you're on a rope. Good luck!

After King Slime is defeated, the Slime Rain event ends. Once you get the Slimy Saddle, you'll have a much easier time traversing the terrain with your increased jump height and ability to bonk the enemies you jump on. And since the Slime mount deals summon damage, it's possible for it to scale with your power throughout the game. Unfortunately, other mounts become much better, even if they don't deal any damage. The cool thing is, because of the Slime's jump height and damage being nearly equivalent to King Slime, this mount is most likely the King himself, since he becomes smaller due to releasing Blue Slimes (and Spiked Slimes in Expert Mode) as he takes damage.

On Expert Mode and up, King Slime drops the Royal Gel, an epic accessory that causes almost every Slime to become passive and not target or damage you; with the exception of the King, his Spiked Slimes, and a certain regal gelatin you'll encounter later on.
Fun fact: The Royal Gel even makes you immune to Gastropods. Most people don't know those count as Slimes.

The Baby Slime is a huge help early-game, as it easily outclasses you in DPS and jump height. It will tear through Zombies, Bats, even Hornets and other Slimes with ease. This little tyke even helped me take down the Eye of Cthulhu, getting rid of his servants while I focused on the boss himself. The Slime mount, likewise, is good at helping you avoid bosses who can attack from below, such as the Eater of Worlds or the Eye of Cthulhu (which has a habit of diving under your feet). All you have to do is jump and you'll bounce off of them as long as they're below you. Just make sure not to jump too many times or else you may be taken into the air much higher than you anticipated.

Boss: Eater of Worlds/Brain of Cthulhu
For the longest time, I never really covered the bosses of the evil biomes. Back in my day, all you had to your name was a Slime Staff and a dream. Which isn't exactly the most fun weapon to use against a boss without a backup weapon.
But it's 1.4 now. New minions have joined the team. Whips are a thing. Earlygame armor is a thing. Finally.
Since the class is now fleshed out to tackle the earlygame, let's talk about the evil bosses.

As you probably know, your world will always generate with either the Corrupion or the Crimson biomes; never both (unless you generate a drunk world). This dictates a lot of things, such as the loot you get from said biomes, the enemies you encounter, the special Dungeon chest that spawns, but most notably, the boss you will fight in Pre-Hardmode.
Luckily, neither of them directly drop any Summoner items, so you're not missing out on anything super important from the evil biome you ended up without. They do, however, drop an ingredient for the very solid Obsidian Armor. Do you want to feel like an absolute powerhouse this early in the game? Then this is the route for you.

Deep within the Corruption and Crimson caves, are Shadow Orbs and Crimson Hearts respectively. They each can drop one out of five cool items, but use caution; every three Orbs/Hearts broken will cause that biome's boss to spawn. Make sure you're prepared and have a potential arena/escape route nearby. Alternatively, the Eater of Worlds can be spawned using Worm Food, crafted with 15 Rotten Chunks and 30 Vile Powder; while the Brain of Cthulhu can be spawned with a Bloody Spine, using 15 Vertebrae and 30 Vicious Powder; both crafted at a Demon/Crimson Altar. They must be spawned in their respective evil biome, and leaving the biome causes them to despawn.


(He's much larger than this I promise)

Recommended Minions:
  • Vampire Frog
  • Flinx
  • Baby Slime
Recommended Accessories:
  • Bottles or Balloons
  • Hermes Boots or higher
  • Band of Regeneration
  • Feral Claws
Recommended Buffs:
  • Regeneration
  • Ironskin
  • Cozy Fire
  • Swiftness
  • Summoning
  • Inferno
  • Hunter
Recommended Armor:
  • Flinx Fur Coat

The first time you fight Eater of Worlds in your run, it'll probably be by breaking the third Shadow Orb and then running for your life to the nearest open area. As the Eater is a worm enemy, he has a good advantage of the terrain which makes it harder to land hits on him. This is where a Hunter Potion comes in handy, so you can keep track of where he is.
Unlike other worm enemies however, the Eater's segments each have an individual health bar. When one is depleted, the worm splits, causing the remaining segments to take on a new form as another, smaller Eater of Worlds. If you keep attacking the center of its body, you may end up getting overwhelmed by a whole army of short Eaters. The best way to deal with this is by attacking the head or the tail, which do not cause a split when destroyed.
Generally, the Snapthorn whip performs nicely here since it can inflict Poisoned on multiple segments. Piercing minions such as the Baby Slime and Vampire Frog are the best choices here in my opinion. Heck, you might even get the Vilethorn or Ball O' Hurt from one of the Shadow Orbs, which counter the Eater pretty hard.

It's a pretty straightforward fight, but Expert Mode makes things a little more spicy. In this mode, the Eater of Worlds becomes highly resistant to most explosive weapons at this stage of the game (and bees, apparently). He also moves faster, has higher health and damage, and can shoot Vile Spit projectiles from all of its body segments. These projectiles have a 5% chance of inflicting the Weak debuff for ten whole minutes. On top of all that, when fought above ground, the Eater moves even faster and shoots projectiles more rapidly. So uh... be prepared.
Despite this however, I still feel more comfortable taking the Eater to the surface, especially if I have a platform arena waiting above the ground. This makes it much easier to avoid the Eater and his attacks, compared to being at the mercy of the underground's nooks and crannies. If you care enough to bomb out some of the cave to make it more suitable for combat though, be my guest.
Let it be known that the Vile Spits are destroyable projectiles, so they can be almost entirely negated by a few whip swings, which is why I recommend the Feral Claws here to boost that effect. On top of that, the Inferno Potion deletes any Vile Spits that pass through the ring of fire. It might be hard to obtain one this early in the game, but it's entirely worth it.
And if that wasn't enough, literally just hold down the Ball O' Hurt. This causes it to swing around you, deleting every Vile Spit it touches. It shuts down this fight entirely in Expert Mode.
Literally just hold it down. That's it. You win.

Anyway. Brain of Cthulhu.

Any experienced player will know that worm-type enemies are easy to manipulate, which can make the Eater of Worlds a cakewalk. The Brain of Cthulhu, however, is not a worm-type enemy, and will definitely be the one doing the manipulating. He's tricky for newcomers, but I like his fight much more. He's got minions of his own; it's mastermind versus mastermind in this battle.
On the bright side, the Crimson caves are big enough for you to safely fight this boss, regardless of difficulty. Good thing too, as it takes longer to escape the Crimson caves than the Corruption chasms. Set up one/two layers of platforms in the center of the cave, and, if you're destroying Crimson Hearts, be ready to grapple to your arena immediately. While the Brain's movements are generally slow, he can and will teleport around. And if he decides to teleport into your personal space while you're trying to get to your arena, you are in big, big trouble.

The Brain is surrounded by 20 tiny eyeball enemies called Creepers, which float towards him every time he teleports, occasionally flying in your direction to deal contact damage. Since they tend to travel in a group, this makes them susceptible to piercing attacks; Vampire Frogs in particular shred them like butter. They're also weak to most debuffs, so the Snapthorn and Inferno potion are still helpful as always.
The Brain himself is immune to all damage until all Creepers are killed off. This will make him mad and open up his brain to reveal a heart and an eye. Because that's totally how anatomy works. In this phase, he becomes more aggressive and starts trying to charge into you, before teleporting nearby and charging again. Unlike other bosses, you can actually keep him at bay with knockback, so you can afford to play defensively and keep attacking him instead of having to dodge so much; your minions will have your back too.
And then that's it. He dies.

In Expert Mode, the Brain and his minions can inflict one of a random assortment of debuffs upon hit. This means that, if RNG isn't in your favor, a single hit can cause a downward spiral into death, especially if you become confused or cursed.
How to avoid that? Well, don't get hit.
In the second phase, the Brain starts to create holographic clones of himself that mirror his position and movements. They don't do damage, but they can potentially confuse you as to which one is the real one; especially since the clones become more opaque as the Brain loses health. You can keep track of the real Brain by seeing which one has debuffs or whip-targeting visuals, or by having your minions go after him.
And that's about it.

Use the Shadow Scales or Tissue Samples you obtained during those fights, and make yourself a fancy new armor set. Or pickaxe.

Summoner's Detour
This is an entirely optional section, as it covers the objectives of the Old One's Army which is a rich source of many Summoner weapons and armors. They aren't entirely necessary for progression, however, but can make the game more fun and easy if you put your effort into it.

With the 1.3.4 update, the world of Etheria became linked to Terraria, and many characters from Dungeon Defenders spilled over. Among these is a new NPC, the Tavernkeep.
If you have defeated the Eater of Worlds or the Brain of Cthulhu in the current world, the Tavernkeep can be found laying unconscious on the ground, anywhere in the world. Speaking to him will wake him up, and he will explain that he had fallen through a portal into another land. When you select the "Eternia Crystal" option for the first time, he will hand you 10 Defender Medals for free; this is enough to buy two summon rods from his shop, so you can get started and have a weapon to spend Etherian Mana on during your first invasion. Selecting Eternia Crystal again some more times will cause him to tell you the situation, and how you can use the Eternia Crystals to draw out the Old One's Army.
The Tavernkeep also sells a couple of items for normal coins; Ale, an Eternia Crystal, and an Eternia Crystal Stand.

Now that the Tavernkeep has been found, he will join you at a vacant house, and he'll come back eventually if he dies. If he does die though, he has a 12.5% chance of dropping the Ale Tosser, which is a ranged-type glove that uses Ale as ammo.
You have your first sentry minions, but you cannot use them until you have cleared the Old One's Army. Let's get down to business.

If you intend to fight the Old One's Army this early in the game, despite it being only Tier 1 at this point, you'll want to gear up and set up an arena. This is tougher than the Goblin Army, so decent armor and weapons are recommended. For Tier 1, you may want the best armor you could find at that time, especially Bee Armor if you'd rather be safe than sorry. Meteor Armor and the Space Gun are also very reliable.

To begin the invasion, find a long, relatively flat area in the world to place your Crystal Stand in, with no obstructions too close to the Crystal Stand. It definitely has to be over a screen wide; make sure there are no high blocks too close to the Crystal Stand, including blocks that float above it. Platforms will not work either; the arena must be made entirely of solid blocks. Consider bringing various potions with you if you're not too confident in your ability to take on the invasion. When ready, right-click the Stand with an Eternia Crystal in your inventory to start the siege.

On the far ends of the arena, two Mysterious Portals will open up, and the first wave commences. Monsters will come out of the portals and attack from either direction; it's your job to defend the Eternia Crystal and make sure it doesn't get destroyed by the enemies. Keep them away at all costs. Additionally, throughout the invasion, you're afflicted with the Creative Shock debuff. You cannot break blocks or place objects until the fight is over. Make sure to use your buff stations before the battle.

The main issue is that enemies will come at you from both directions, so it's not always easy to defend your Eternia Crystal. The Vilethorn can help keep enemies at bay, the Crimson Rod can provide more area coverage, and the Minishark can mow enemies down depending on the bullet type you use. Above all, consider whips for crowd control.
Even then, enemies can still approach from the other side if you leave it unguarded. That's where your sentries come into play. At the start of the invasion, the Eternia Crystal will produce 10 Etherian Mana. You can use this to place down your first sentry right away; make sure to place it in a good spot. Enemies in the invasion will drop Etherian Mana, which will allow you to place more sentries. Collect the Mana and build your turrets during the 30 seconds between waves.
Of course, if you already have minions of your own, they will become an invaluable help to your defenses. Playing with a friend also makes the invasion significantly easier.

There are five waves in Tier 1; during the final wave, the Dark Mage will spawn. He is the boss of Tier 1, and has a hefty 800 HP on Classic Mode. But nothing you and your defenses can't handle.
Using the minion mechanic added in 1.3.4, right-click on the Dark Mage with a summon staff in hand, and your minions will target him until you right-click again or until he's dead. He can cast heals on his allies, and summon skeletons that rush you and the Crystal. A whip like the Spinal Tap will be sure to whittle him and his hordes down. After all that, the wave will end and the battle will be won. Congrats, you can now use your defense turrets outside of the battle.
You will have noticed that, from Wave 3 onward, the Eternia Crystal will drop a couple of Defender Medals. You get a total of 5 for completing a Tier 1 invasion, enough to buy another sentry rod. You essentially want to repeat this battle until you have them all, if you plan to obtain all the summoning weapons.
Dark Mages drop two of the accessories that increase your sentry cap and summon damage. These should make the next few invasions somewhat easier. They also drop various vanity and decorative items, such as the very useful War Table.

Tier 2 of Old One's Army is unlocked upon defeating any mechanical boss. The sentry canes and the first sets of sentry-based armor will become available, but for a higher price. If you intend to upgrade your rods, you'll have to head into battle again.
This time around, the enemies are tougher, the wave count is increased, and the boss of Tier 2 is the Ogre. The Ogre has a massive amount of health and multiple attacks to combat you with; including jumping on the ground to cause an earthquake, throwing an ooze ball at you that severely hinders your movement, or hitting you with his giant club. He is a force to be reckoned with because, if you don't pay attention to him before he comes too close, your Crystal is toast. By this point you should have Spider or Forbidden Armor, with Spider, Bat or Twin minions. You can also use the Queen Spider without any Etherian Mana cost because she isn't a tower defense minion.
Ogres can drop a variety of weapons for other classes, as well as the other two sentry-enhancing accessories.

Tier 3 is unlocked after defeating the Golem, so you can expect the enemies to be brutally strong and hard to kill. Minibosses appear at lower waves, with the final boss being Betsy, a swift, huge, flying dragon with 50,000 HP and an AI similar to Duke Fishron. She's hard to catch while she's dashing, so quick minions like Deadly Spheres, Sharknadoes and UFOs are recommended. Or you could wait until you obtain the Stardust crew or Terraprisma.
Betsy doesn't drop any summoning weapons or accessories, but completing the invasion on Tier 3 will be sure to give you a huge amount of Medals. Additionally, on Expert Mode, Betsy drops a Treasure Bag that contains a nice sum of Medals as well. The sentry staves and final sentry armors are now unlocked post-Golem too, so you can now obtain the sentries' strongest variations. These will be sure to help control areas during later invasions such as Martian Madness and the Celestial Towers.
Now you should be well-acquainted with what you can expect from the Old One's Army.

That's enough explaining for now; onto the rest of the journey!
Boss: Queen Bee
Now, let's take a look at the Queen Bee. The first step for many old Summoners in training began here. The Queen Bee can be summoned by breaking the larva located inside a Bee Hive (a minibiome within the Underground Jungle), or by crafting an Abeemination with 5 Honey Blocks, 5 Hive Blocks, 1 Stinger and 1 Bottled Honey. The Abeemination is fairly easy to craft since Jungles spawn with small clusters of Honey Blocks periodically.

Recommended Minions:
  • Flinx
  • Vampire Frog
  • Imp, if you get him early enough
Recommended Accessories:
  • Bottles or Balloons
  • Rocket Boots or higher
  • Frog Leg or higher
  • Band of Regeneration
  • Bezoar
  • Shield of Cthulhu
Recommended Buffs:
  • Regeneration
  • Ironskin
  • Honey, duh
  • Cozy Fire
  • Swiftness
Recommended Armor:
  • Obsidian
  • Flinx Fur Coat

While you can technically get a Summoning Potion before any boss, the only reason it's not needed here is because you can usually do this fight with just one minion if you're skilled enough. If you need one regardless, feel free to use it.
If you fight Queen Bee inside a hive, it may be a good idea to place platforms on the surface of the honey so you don't fall in (and to occasionally dip in to gain that sweet regen buff). Personally I like to conserve on platforms, so I place platforms every other block, which is easy due to the backwall of the hive.
Queen Bee will always start by dashing at you three times when she's horizontally at-level with you. Then she will either hover around above you and shoot poisonous stingers, or remain stationary and send out bees to attack you. If you're using a piercing weapon, the bees should be no problem to deal with. They can even drop Mana Stars if your Mana is less than full. I like to keep the Bezoar in my inventory, so if I do get poisoned, I can quickly swap in and out with right-click. The Snapthorn's summon tag damage makes it an effective weapon here.
On Expert Mode, the Queen's attacks become gradually faster as her health gets lower. Her stingers start firing more rapidly, and her charges become so fast that it's incredibly tricky to hit her when she's close to death. Some of her summoned bees are also bigger and stronger.

Mobility is very important in this fight, especially on Expert. Some fights can be tanked properly if you're prepared, but Queen Bee is good at whittling players down. If you're a budding Summoner, it's important to note that you won't be able to tank most fights. The less you get hit, the better.
There's a particular trick you can perform if you're fighting Queen Bee out in the open, if you cleared out a large portion of the Underground Jungle (as of 1.4, the Queen will enrage and attack incredibly faster if taken to the surface). After her initial charges, try making a habit of jumping or rocketing in wide circles around her. When you're a certain distance away from the Queen, she'll try to catch up to you and get in position before she initiates her next attack. If you can get the distance just right, and keep making large circle movements with your extra jumps and whatnot, you'll get her locked into circling on the opposite side of you as well, ensuring that she'll almost never be a threat. Once you get the pattern down, you can use ranged weapons or minions to bring her down little by little, even if it takes longer than fighting her normally. This was how I was able to beat the Queen as my first boss on one of my older Expert runs.
Let me make this very clear because I can't stress this enough: I love the Frog Leg. I can't get enough of it. It's a good item for every single boss. How often do you jump during a boss fight? A lot. The Frog Leg makes those jumps (and flying) 32% faster. Unless you're able to take on fights while standing still, there's no reason not to use it.

Queen Bee drops between 16 and 26 Bee Wax (17-29 on Expert), a vital ingredient in your first summoning set. You'll need to defeat her about two or three times in order to have enough Bee Wax for the full Bee Armor as well as the Hornet Staff. Now that you can summon more minions and have a boost in defense (I was still wearing Cactus Armor at the time), you're set as far as armor goes. Personally though, I liked to keep my old minions around too, so I often had my Baby Slime out along with my two Hornets. You can also use said Hornets to farm Queen Bee further, and she's one of the best ways to make money in Expert Mode.

When the Queen is defeated, your best friend the Witch Doctor can move in to an empty house. I recommend giving him a place to stay in the Jungle, so that he can sell the Hercules Beetle when you eventually beat Plantera. On top of that, the Jungle is his favorite biome, so pair him with the Dryad or Guide and he will happily sell you the Jungle Pylon, which you will definitely want to use numerous times throughout your adventure.
Anyway, the Witch Doctor will already be selling the Pygmy Necklace at night, so grab it when you can. This, plus your Bee or Obsidian Armor, will increase the size of your squad far more than when you first took root in this world. Enjoy.
Consider also taking the Imbuing Station so you can power up your whips later as well.

Boss: Skeletron
In older versions of this guide, I never touched up on Skeletron at all for two reasons: One, he used to not offer any direct Summoner upgrades. And two, he was always pretty easy for me.
When suddenly, Expert Mode.
Expert Skeletron's damage is more than doubled, he's way tankier, and he gains the ability to shoot projectiles. In Expert, Skeletron turns from a pushover to an absolute noob killer. For a young Summoner, this is no mean feat to accomplish alone. Let's get right into this.
Interact with the Old Man in front of the Dungeon at night, and select the Curse option when you're ready to begin the battle.

Recommended Minions:
  • Vampire Frogs
  • Imps
  • Hornets
Recommended Accessories:
  • Pygmy Necklace
  • Bottles or Balloons
  • Spectre Boots or higher
  • Frog Leg or higher
  • Band of Regeneration
  • Shield of Cthulhu
  • Hive Pack (if using bee weapons)
Recommended Buffs:
  • Well Fed
  • Regeneration
  • Ironskin
  • Cozy Fire
  • Swiftness
  • Endurance
Recommended Armor:
  • Bee
  • Obsidian

One can sometimes get away with defeating Classic Mode Skeletron without much of an arena, but with Expert, you're going to need more space to move around. I recommend constructing a long platform starting at the upper lip of the Dungeon's entrance, and then building another platform layer above that. Feel free to add more layers or make them longer if you find it necessary.

Skeletron is able to inflict Bleeding on hit, which eliminates your natural health regeneration. However, regen-boosting such as buffs or the Band of Regeneration can counteract this, which is why I recommend them in this fight. Additionally, Skeletron's hands in Expert Mode inflict Slow on hit, making avoiding them and targeting them a higher priority.

Each of Skeletron's hands adds an additional 25 defense to the head as long as they are alive. When one hand is defeated (or when the head reaches 75% health), the head will occasionally shoot a cursed skull that somewhat homes in on the player. Without much prior practice, these become painful to deal with as the fight goes on; when both hands are down, the head will fire these skulls at a faster rate. Sometimes running in a single direction won't help much to avoid the skulls as they take relatively sharp turns, especially as the head flies closer to catch up with you. The skulls will continue to fire throughout the fight, except during the head's spinning phase.
I've learned that a simple way of dodging the skulls is to jump over and circle Skeletron's head, using mobility accessories. The skulls can only home in so much before they stop caring and keep flying away in a single direction. Use this to your advantage and keep performing sharp dodges around the head (or if you're clever, use solid blocks to stop the oncoming skulls) to bait out their movements. This fight teaches you precise movements with the Shield of Cthulhu that will be much-needed for later fights in Expert Mode.
Have I mentioned I love the Frog Leg yet?

Just be careful when getting close to or jumping over Skeletron's head. He will perform the spinning phase about every 13 seconds or so after the previous spin ends. The worst situation to find yourself in is getting caught by the spinning head, stunlocking you with knockback until you die. Even with the Shield of Cthulhu, it's hard to escape that death roll, so to speak, as the Shield's dash will bump you right into his hitbox and pull you back in again. With this in mind, try not to stay close to Skeletron when he's about to spin. Have a grapple ready to save you from death.

As this is a very mobile fight, it'll be hard for your minions to land a decent amount of hits; Hornet stingers travel too slowly to be reliable at times, and Imps and Ballistae in particular fire rather infrequently.
Enter: The Hive Pack.
Queen Bee provides a beautiful weaponry upgrade for all classes. The Bee's Knees, Bee Gun, and Beenades are the most notable subweapons you can use against Skeletron. For Summoner, the Hive Pack powers up the fire rate of the Hornets' stingers, allowing them to fill the air with projectiles that Skeletron can run into. Pair this with a Stinger Necklace and Snapthorn for much better damage output. Minions take out some of the need for aiming at Skeletron, allowing you to focus more on dodging and jumping around like a frog holding a balloon on steroids.
Speaking of frogs, if the bee setup isn't up your alley, donning Obsidian Armor with a couple of Vampire Frogs has potentially higher DPS except with a more aggressive playstyle.

The fight will be pretty intense even with both hands down, as you will need to keep circling and avoiding skulls in order to survive. The spinning phase is your best chance for you and your swarm to deal as much burst damage as possible, as Skeletron's defense drops to 0 during the spin. With enough practice, you can definitely get this fight down with confidence. Just don't let the sun rise while fighting him, or else he becomes a Dungeon Guardian that oneshots you.

When Skeletron is down, good job. You managed to defeat him, hopefully without getting too rattled. He doesn't drop any immediate rewards for the Summoner (unless you count the incredibly fun Bone Glove), but now you're free to go into the Dungeon and plunder to your heart's content.

Boss: Deerclops
With the addition of the Don't Starve Together crossover update, Terraria now has a new boss, the Deerclops. It possesses a number of interesting items, including one weapon for each class, making it a possible target for Pre-Hardmode players.
Deerclops can be summoned using a Deer Thing, crafted at a Demon/Crimson Altar with 3 Flinx Fur, 1 Lens, and 5 Demonite/Crimtane Ore. This item can only be used in the Tundra biome. Alternatively, Deerclops can spawn naturally during a blizzard, at midnight, if you have either 9 defense or 200 HP (if you've already beaten it previously, this only occurs at a 25% chance).
Like most Pre-Hardmode bosses, Deerclops doesn't require any bosses to be defeated beforehand, but due to its large health pool and challenging fight, I'll place it at around the same tier as Skeletron.

Recommended Minions:
  • Vampire Frogs
  • Imps
  • Hornets
  • Abigail
Recommended Accessories:
  • Pygmy Necklace
  • Bottles or Balloons
  • Spectre Boots or higher
  • Frog Leg or higher
  • Ice Skates
  • Feral Claws
  • Hive Pack (if using bee weapons)
Recommended Buffs:
  • Bewitched
  • Regeneration
  • Ironskin
  • Cozy Fire
  • Swiftness
  • Endurance
  • Summoning
  • Warmth
Recommended Armor:
  • Obsidian
  • Bee

The Tundra biomes can be small and hilly, so it might be recommended to flatten out some space for an arena, maybe with a platform a few blocks over the Deerclops' height, as it tends to not stay on platforms very easily. If you lucked out and found the Ice Skates, you can use them for easy maneuverability on an arena made of ice blocks.
Deerclops possesses a number of abilities, most of which are used depending on your distance and positioning. For one, when you're far away enough (about 30 blocks), the Deerclops will turn a dark purple and become invulnerable, forcing you to stay in close proximity. When you're a medium distance away, it will stand in place and roar, dealing no damage, but inflicting the Slow debuff on every player in range. As well, it can also grab the ground and throw large chunks of debris high into the air, before it all falls down, requiring careful dodging. When you're within its melee range, Deerclops will perform an ice spike attack that comes out of the ground, freezing you for a split second on hit. If this attack is done three times in a row, the third attack will be slightly delayed, before taller ice spikes are shot out from both sides, albeit at a shorter distance. If the Deerclops can't reach you, such as when you're too high above it, it will summon a swarm of five shadow hands to surround you and try to grab you to deal damage.
On Expert and higher, a shadow hand will occasionally spawn every few seconds throughout the fight, often dangerously close to you. This hand will either slowly float towards you, spin around in a small circle, or perform a wide swipe across the screen. These attacks will happen slightly more frequently as the boss takes more damage.

Since it's possible to stack summon tag damage by using multiple different whips, minions that hit in quick succession such as Frogs and Abigail will perform well; even moreso since Deerclops isn't a very mobile boss. As you might know, the tried and true strategy of Obsidian Armor, Spinal Tap and Vampire Frogs is an absolute pubstomp in Pre-Hardmode, and against the Deerclops, this is no exception. Caution must be taken however, as getting frozen can make it very easy for the Deerclops to combo you with another attack. The overlooked Warmth Potion can lessen the damage Deerclops deals to you, so consider this option if you're struggling.
You must always pay attention to your surroundings as well, as those shadow hands can appear anywhere around you on higher difficulties. Deerclops' ice debris attack doesn't happen if it's standing on a platform, but this strategy is a bit unreliable since it likes falling off platforms. Alternatively, one can just stay at close range and it will only perform the ice spike attack most of the time; simple movements like jumping make it easy to avoid the first two spikes, while walking backwards (or jumping higher) will allow you to avoid the third.
Also, important to note: the Deerclops' legs do not do damage to you. You can just run under the boss to avoid many of its attacks. Be careful if you use the Shield of Cthulhu though, because dashing into its legs will cause you bonk off of them, allowing Deerclops to punish you.
Use caution when fighting Deerclops on a platform above it; not only does this make you susceptible to the hand swarm attack if you're directly above, its ice spike can actually spawn on the platform above it for some reason. On the bright side, this does give you slightly more reaction time to deal with the debris attack.

The boss itself is easy to understand and manipulate after a bit of practice; there's not much risk in doing so either, because if you die during the fight, Deerclops will still wander around for an in-game day, allowing you to come back and continue the fight if you're close enough. The only real issue though is the randomness of the Expert shadow hands which can throw a wrench into any strategy, but at least it keeps you on your toes.

Deerclops can drop the Houndius Shootius, one of your earliest sentries. If you haven't done the Old One's Army yet, you can use this as a free defense during the invasion, making it slightly more manageable. Deerclops' Expert drop is an accessory called the Bone Helm, a defensive item that frequently spawns your own shadow hands to attack nearby foes for an average of 15 classless damage, capable of piercing up to 3 enemies per hand. I'll also give a shoutout to the Eye Bone, which summons Chester, a pet who acts as a mobile piggy bank, good for players who haven't gotten the Money Trough yet.

Hope you enjoyed that doozy of a fight.

Don't try this at home.
A Summoner's Journey (part 3)
Once you've defeated Skeletron and looted the Dungeon in its entirety (don't forget the Bewitching Table and Spinal Tap!), it's time to head to the Underworld to search for Heckstone and Shadow Chests. With your updated weaponry and your minions at your back, looting the Underworld should be (almost) a breeze. However, I didn't search far for Shadow Chests until I had the Imp Staff. The first thing you could do is start mining for Heckstone, whether it be beside the obsidian towers, under the ash, or in the lava using an Obsidian Skin Potion. At minimum, you'll need a Heckforge, 17 Obsidian and 51 Heckstone Ore. Once you have enough bars, the Imp Staff will now be in your hands. This Imp will be one of your powerhouses in Pre-Hardmode summoning, as its high damage and fire aspect are nearly unmatched at that point. Even though Underworld enemies are immune to being set on fire, the Imp's damage, along with the Hornets' poison substituting for fire burns, brought everything down within seconds. Slime, Hornets and Imp... what a team!

The cool thing is, if you're using Bee Armor, you don't have to waste a huge amount of time and Obsidian (unless you're going with Obsidian Armor lol) trying to craft all the Molten Armor, or much else from Heckstone for that matter; although a Lavaproof Bug Net makes one's life better.

When you're certain that all the Shadow Chests have been looted, start building your anti-Wall of Flesh bridge. That's one thing that almost never changes about my characters; setting up a proper arena for certain bosses. Generally, the larger the world, the easier it is to build the bridge on which you'll be fighting the Wall of Flesh. This is because you have more space to work with before you run into the obsidian towers closer to the center of the Underworld, which greatly hamper the building process and can even ruin the fight if you're not careful.

Building the bridge is a long and often annoying process. Enemies will always be at your back, but on the other hand, so will your minions. If you've got a sentry in your party, place one periodically to help take care of monsters while you slave away building over the magma.
Another thing to note is that one must choose carefully what elevation to build the bridge at. Generally, you'll want to choose a spot above most of the lava lakes, without being too close to the ceiling of the Underworld. More often than not you'll probably also have to cut (or bomb) through hills of ash and Heckstone along the way to ensure you have a clear path down the bridge.

If you've played through Expert Mode, you probably hate how Lava Slimes now drop literal lava when they die, turning them from a minor annoyance into a very real hazard. They will spawn quite often during your bridge-building mission and as such will constantly flood your bridge with lava. This is extremely irritating. To avoid this, break one-block holes in your bridge at regular intervals so that any Lava Slime debris will harmlessly flow out of the bridge and into the magma below, saving you a major headache. Alternatively, one might prefer to build with platforms made of obsidian or stone, or even Planter Boxes, which are all immune to lava.

To be on the safe side, you'll probably want a bridge that is around 800 blocks long if you're on Classic Mode, but definitely longer if you're on Expert or Master. The last thing you want is to run out of footing towards the end of the fight only to get your face scraped against the floor of the Underworld with the Wall's tongue.
In the time it takes you to build the bridge, you're likely to encounter some Voodoo Demons, which drop the Guide Voodoo Doll required to summon the Wall of Flesh. These Demons are easy to spot because they hold the Voodoo Doll in their talons. Just make sure not to kill them above lava. That would be most regrettable.
Before you're ready to face the Wall, I recommend taking care of unfinished business in your world, such as building any farms or houses, optimizing your gear, or separating the evil biomes from the rest of the world via long tunnels.
Boss: Wall of Flesh
I'm not gonna lie, the battle with the Wall of Flesh on my first Summoner was easier than expected, especially with the use of Beenades. The minions showed excellent "teamwork", if you want to call it that. The Baby Slime knocked away the flying Hungry that decided to latch onto the center of my hitbox, the Hornets rapid-fired and poisoned their targets, whittling down their health at a good rate, and the Imp helped me with the bulk of the Wall of Flesh, igniting the Hungry.
Think about this for a second... a boss that I died numerously on with Molten Armor, I beat on my first try using a low-defense summoning armor with little damage to me. Does that not say something to you?
This was back in 1.2 of course. But here's the thing. On Classic Mode, the Wall of Flesh can be torn apart rather quickly, especially by a Summoner. On Expert, this can be a whole different story. The Wall's higher damage and HP, and scary increase in speed when low on health, can easily turn the tide on even a confident player. So for that reason, on top of being arguably the most important boss in the game, the Wall deserves his own little boss guide. So here we are.
When you're prepared to fight the Wall of Flesh, stand at the edge of your bridge and toss the Guide Voodoo Doll into lava. Make sure the Guide is alive when doing this, of course, as the Wall only awakens at his sacrifice.
Again, don't forget the Bewitching Table. That thing is a part of you now.

Recommended Minions:
  • Imps
  • Vampire Frogs
  • Hornets
Recommended Accessories:
  • Pygmy Necklace
  • Spectre Boots or higher
  • Obsidian Shield
  • Shield of Cthulhu
  • Frog Leg or higher
  • Band of Regeneration
  • Lava Waders (if using little to no bridge)
  • Hive Pack (if using bee weapons)
Recommended Buffs:
  • Bewitched
  • Summoning
  • Regeneration
  • Ironskin
  • Heartreach
  • Cozy Fire
  • Swiftness
  • Endurance
  • Thorns
  • Water Walking and Obsidian Skin (if using little to no bridge)
Recommended Armor:
  • Obsidian
  • Bee

If you're one of those pro players who not only doesn't need a bridge, but was also lucky enough to obtain a hard-earned pair of Lava Waders or Terraspark Boots, you can optionally just use the lava as your platform for fighting the Wall. You'll just have to deal with more frequent bumps in the road in the form of ash hills. If you don't have Lava Waders, you can also use Water Walking and Obsidian Skin Potions to do the job just fine. I also recommended the Thorns Potion just for its ability to knock away any Hungries that try to take a bite out of you.
The Wall will also spawn on the closer side of the world that you're currently at. Keep this in mind when deciding the placement of your bridge and where you'll dump the Voodoo Doll.

I should note that the Wall of Flesh's AI is programmed to try avoiding Ash Blocks. This is to make sure it doesn't sink into the ash hills which would render it unable to be attacked. You can use this to your advantage and build your bridge out of ash to ensure the Wall will always stay above the bridge (or even build a roof of ash just over the bridge to prevent yourself from ever getting shot by his lasers, but this is harder to pull off).

On Expert Mode, the Wall of Flesh's Leeches that he burps out now only have a 20% chance to drop a heart, instead of a guaranteed drop. However, the Hungry still have a 75% chance to drop a heart; If you get your hands on a Heartreach Potion, you're almost guaranteed to heal instantly every time a heart drops from the Wall's minions, since the hearts get drawn to you from much further away.
On top of that, the Expert Wall regenerates the Hungry gradually over the course of the fight, making them a constant threat throughout the battle. What makes this more dangerous is that the Hungry do more damage the less HP the Wall has remaining. In addition, this would make non-piercing weapons less viable since the Hungry can potentially block shots aimed at the Wall.

Earlier I mentioned that I used the Slime, Hornets and Imp to take out the Wall of Flesh. This was on Classic Mode; the Expert Wall would laugh at me if I tried to legitimately use the Baby Slime in this setting. Hornets are a fine choice, but you'll probably have the best time using a full squad of Imps, with or without some Vampire Frogs for good crowd DPS. Not only do the Imps cause fire to the Hungry, they also pierce, which is very crucial on Expert. Whips are nice against the Hungry, but on Expert and higher, you really don't want to be too close to the Wall, especially since the Hungry can regrow and bite you for massive damage.
...That is, unless you're rocking Obsidian Armor and the Spinal Tap, which will give you a massive edge, rendering the clusters of the Hungry helpless against your calcium whip. Pair this with Vampire Frogs and a Flask of Poison for even more carnage.

Otherwise, weapons like the Space Gun, Heckwing Bow and Phoenix Blaster can be a good secondary source of damage. You can also use Bone Javelins to stack up damage over time on the Wall's face, assuming you have a clear shot.
But if you want one of the easiest and quickest possible experiences, equip that Hive Pack and spam your best Queen Bee weapon, most notably Beenades. The huge swarm of powered-up bees will cover all of the Wall's parts with constant damage, easily cutting the fight down to a very short time. Your Hornets would appreciate it too.

When the Wall is almost dead, it will start catching up to you with alarming speed; fast enough to potentially outrun you and your homing bees, which might just end with your corpse being dragged across the Underworld. Use your most reliable or fast weapon at this point and keep attacking the Wall's eyes, which have less defense than its mouth. Keep clear of the rapidfire lasers that the Wall will spew from its eyes as well. You can also prepare for this phase by distancing yourself from the boss when it's about to speed up tremendously, giving you more time and room to strike.

When the Wall crumbles, congratulations. Your world is permanently in Hardmode now.
The Wall of Flesh will drop its items in a box of Demonite or Crimtane Bricks when it dies. Among these is the Pwnhammer, the first hammer that can destroy Demon/Crimson Altars. The Wall is guaranteed to drop one Emblem and one of its other weapons, and its Expert Treasure Bag contains the exclusive Demon Heart. Eat it right away, so that you can equip one of your other accessories that were on standby.
As there's only a 25% chance to get the Firecracker, it may take more than one try to get it. You'd have to fight the Wall again once your Guide respawns. The Summoner Emblem has the same drop chance, but regardless of which Emblem you get, you can simply toss it into a Shimmer pool and transmute it into the Emblem you want.

But once you get your hands on that Emblem, rejoice. You now carry the mark of an official Summoner.
Now go forth. A changed world awaits you.

A Summoner's Journey (part 4)
Anyway, once Hardmode was activated, I did what anyone else would do; explore the surface once more, checking the map for its Hallow or new Crimson/Corruption.
Now, your first call to action in Hardmode (before or after getting beaten up a few times) is to head to the nearest Spider Cave. The Wall Creepers that spawn there will have been mostly replaced with Black Recluses, an important source of your next summoning items. Each Black Recluse has a 50% chance (90% on Expert) to drop one to three Spider Fangs, which is an item you'll be grinding for, for the next short while or so. It will take a total of 76 Fangs to craft everything you need; the Spider Staff, Queen Spider Staff, and the Spider Armor, which you may be using for a decent chunk of Hardmode.
Be careful though, as Black Recluses can hit you hard with 90 to 100 damage, as well as inflict Venom upon you for even more hurt. On Expert, their damage can easily reach 200, and they're capable of spitting web shots to stun you in place. It is not uncommon to be killed by Black Recluses early on in Hardmode. Also, their dark coloring causes them to blend in easily with the black background wall of the Spider Caves. Place torches often and watch your minions to see where they're aiming their attacks. A full squad of Imps is ideal here; I recommend summoning them inside the Spider Cave to let them safely deal damage to the Black Recluses.
Alternatively, Abigail becomes stronger in Hardmode; spending around five slots on her will easily make her the strongest summon in your stock, allowing her to carry you through the agony of early Hardmode. The Firecracker shines here.
If you haven't found a Spider Cave yet, spamming the Firecracker can give off enough light to help you see into dark, unexplored caves.

When Hardmode is enabled, try to fish up as many crates as you can, as you'll gain a number of Hardmode ores and bars without having to touch a single Demon Altar. As of 1.4, you can no longer save crates from Pre-Hardmode and then open them all in Hardmode to instantly skip all the early Hardmode mining. As of 1.4.4 however, destroying Altars no longer converts random blocks in the world into infectious biomes, allowing you to forego the fishing grind if you so wish. Keep in mind though, that destroying Demon Altars can allow the mechanical bosses and Pirate Invasions to spawn naturally.
Now that I think about it, one need only use the Hardmode ores in one or two crafting recipes each; Cobalt for the Cobalt Pickaxe, Mythril for the Mythril Anvil and Pickaxe, and Adamantite for the Adamantite Forge. Though if you have enough crates, you can probably skip right to the third ore tier with a bit of time; but generally, Hardmode crates will seldom give you enough of the correct ores unless you've amassed lots of them. Don't be afraid to do some smashing if need be.
Either way, you'll need to do much less early Hardmode mining than other characters, as you won't need ore armor sets at all. The joys of being a Summoner.

You would likely be spending a lot of your time searching for new Hardmode equipment (I recommend hunting various Mimics) to prepare for your next course of action; defeating a boss such as Queen Slime or the Twins. With the Twins defeated and their souls collected, you could get your hands on the Optic Staff. You could also get an upgrade to your Slimy Saddle and even obtain the Blade Staff if you prove successful against the Queen.
But the Pirate Invasion would likely happen before then. Hopefully you'll be lucky enough to get a Pirate Staff. It's not difficult whatsoever to farm Pirate Invasions, as every enemy in the Hardmode Ocean has a 1% chance of dropping the Pirate Map, which will cause an Invasion to happen. You could stand on a platform just above the water's surface (or below if you want the enemies to target you) with many Jungle blocks nearby to turn the biome partially into a Jungle and increase the spawn rate. After setting up, you can let your minions do the grinding for you. Of course, the Imp's fireball is nigh-useless in the water, so you may want to switch him out with another Spider, Hornet or Frog; or perhaps convert your whole team into a strong Abigail.
Keep in mind that if you have NPCs near the Ocean, you can effectively farm Pirate Maps from the Pirates themselves, since they only spawn near NPCs. At that point, the Invasion pays for itself and you can potentially just farm them indefinitely.
If you have a Pirate Staff obtained, consider using the Pirate to replace the Baby Slime and Flinx, who will pretty much do 1 damage to all Hardmode enemies.

If your world is Crimson, I recommend you head there at the earliest opportunity and search for Ichor Stickers. These enemies are deadly, but the Ichor they drop can be imbued into your whips via the Flask of Ichor. This allows your whip attacks to lower enemy defense by 15, which indirectly raises your minions' attack power towards that enemy. This and other Ichor weapons are among my favorite Hardmode weapons, as the Ichor debuff applies to almost all bosses, making the battles with them slightly easier.
A Summoner's Journey (part 5)
The secrets of the sands are asking to be discovered. As of 1.3.3, the Hardmode Desert is full of unique treasures; among these are a couple of Summoner items. You know what that means.

On the downside, the Desert enemies at this stage are painfully strong; you may have some difficulty fighting them, especially on Expert. Your main focus should be Basilisks, which drop the very handy Ancient Horn. Basilisks are the Hardmode equivalent of Antlion Chargers; they have similar AI, run incredibly fast, and are highly resistant to knockback. Sometimes, when a Basilisk runs into a corner of a chamber in the Underground Desert, it somehow manages to launch in the other direction at a terrifying speed, making them near impossible to dodge if you're in the way. The constant piling from your Spiders or the brute force of your Pirates are going to be very helpful in holding them off.
And if you could somehow tame one of these beasts, I guarantee it will be worth your while.

Other enemies inhabit the Underground Desert as well, such as Lamias and Ghouls. The Dune Splicers in particular are arguably the most dangerous underground worms in the game; they're both massive and fast, meaning that they can take sharp turns to strike you again, just like the Crawltipedes. The generally small chambers of the Underground Desert do not make the encounters any easier, either. Luckily, they are not immune to the Venom debuff; with enough Spider attacks at the right areas, you can inflict Venom on many of the Dune Splicer's segments at once, corroding its health away. Shadowflame weapons, dropped by the Goblin Warlock during the Hardmode Goblin Army, can be just as effective because the Shadowflame debuff deals 5 damage per tick, adding onto the 15 of the Spiders' Venom.

The type of infectious biome also affects the enemies that spawn in the Desert. This is usually hard to control, since these biomes spread erratically through the Desert due to the abundance of corruptible sand. Defeating Plantera slows down the spread to one-third of the original speed, but you have a long way to go until that point. Consider dividing the Desert into fractions to keep the spread controlled, or you could defeat a mechanical boss first so you can buy the Clentaminator from the Steampunker.
In particular, the Hallow, Corruption and Crimson transform Ghouls into their alternate forms depending on which biome they spawn in. Vile and Tainted Ghouls drop Cursed Flames and Ichor respectively, as well as Dark Shards. Dark Lamias drop Moon Masks while normal Lamias drop Sun Masks. And more importantly, Desert Spirits spawn in Corrupt/Crimson Deserts, and they drop some pretty useful items if you intend to hunt for those.

If you decide to go for the Forbidden Armor, you'll want to have done a lot of mining or a lot of fishing for the Adamantite or Titanium required. You also want to hang out around the Desert's surface, check back every once in a while, or keep a Weather Radio on you which notifies you of a sandstorm. Sandstorms do not need to occur at the same time as rain in the world. The Desert itself can start sandstorming at random if the wind speed is above 30 MPH, and the event lasts for about 8 to 24 minutes of real time. You'll know a sandstorm has started when the music changes to a unique track, and the background and foreground become filled with flying sand particles. As long as you're out in the open, you'll be indefinitely afflicted with the Mighty Wind debuff, which slowly pushes you along in the strong winds until you find cover, leave the Desert, or if the sandstorm ends.

Unique enemies spawn during the sandstorm, like Angry Tumblers and Sand Sharks. The spawn rate in the Desert becomes much higher, and the resident worms will spawn more at the surface. Sand Sharks have their own special variations depending on the infectious biome they spawn in; Hallow, Crimson, or Corruption. When you suddenly become surrounded by cyclones of sand, pay attention to where your minions are heading, because a Sand Elemental is nearby. These are rare enemies in the sandstorm and they have 5,000 HP by default. Think of it as a counterpart to the Ice Golem. Sand Elementals summon three sandnadoes that spawn randomly around you; the tornadoes are tall, meaning you would have to fly high over them to avoid taking damage.

Sand Elementals are guaranteed to drop one Forbidden Fragment. At the minimum, you would want to defeat three of them. You'll want a total of five if you wish to make the Spirit Flame as well, a magic weapon that requires 2 Forbidden Fragments, 12 Souls of Night, and a Desert Spirit Lamp (dropped rarely by Desert Spirits). It creates a multitude of purple flames that home in on enemies to explode and deal damage. If you're wearing the Forbidden Armor, the Spirit Flame helps make up for the lack of minions by surrounding yourself with purple flames. As this weapon uses 14 Mana, it's rather expensive to use long-term unless you have a lot of Mana; which the Forbidden Armor supplies.
Another useful magic weapon that pairs well with Forbidden Armor is the Sky Fracture; crafted with 2 Light Shards (dropped by Light Mummies and Dreamer Ghouls), 16 Souls of Light, and the Magic Missile found in the Dungeon. It casts a cluster of magic swords that fly towards the cursor, dealing nice DPS with a higher critical strike chance.
I believe these weapons were meant to be used in conjunction with the Forbidden Armor, which encourages players to fight alongside their minions. While the Forbidden Armor may seem lackluster, its power is surprisingly high when you use it alongside your minions and these powerful magic weapons.

You have no obligation to switch out of your Spider Armor if you feel comfortable with your current defenses and your minion power. Forbidden Armor is entirely optional but provides a neat little gimmick, just like the Frost Armor. The choice is yours.

Also, make a note to return to the Underground Desert when you're better equipped. Should you decide to farm the monsters, you will eventually be greatly rewarded with the Desert Key. Hold onto it until Plantera's defeated, so you can unlock the Desert Chest in the Dungeon later.
Boss: Queen Slime
With 1.4 comes the fabulous Queen of Slimes. She is intended to be a boss that you can optionally fight before tackling any mechanical boss. As she holds the Gelatinous Pillion, a very good mount, you might benefit from making her your next target.
Queen Slime is summoned by using the Gelatin Crystal anywhere in the Hallow. The Gelatin Crystal grows in the Underground Hallow on Pearlstone, Pink Ice, or Pearlsand, much like the much more common Crystal Shards. They might be hard to spot for an untrained eye, but if you find an arrowhead-shaped crystal that shifts colors from blue to pink, you've found the right one.
If your world just became Hardmode, it may take a while for the Crystals to grow. Make a clean scan of the Hallowed caves once in a while, or build a crystal farm of your own. Gelatin Crystals can also grow even in pre-1.4 worlds, and can show up on the Metal Detector.

Recommended Minions:
  • Spiders
  • Abigail
Recommended Accessories:
  • Lightning Boots or higher
  • Wings
  • Bottles or Balloons
  • Shield of Cthulhu
  • Frog Leg or higher
  • Pygmy Necklace
  • Feral Claws or higher
  • Charm of Myths
  • Summoner Emblem
Recommended Buffs:
  • Bewitched
  • Summoning
  • Regeneration
  • Ironskin
  • Heartreach
  • Cozy Fire
  • Swiftness
  • Endurance
Recommended Armor:
  • Spider
  • Forbidden
  • Obsidian

Note that you can use the Gelatin Crystal to begin the fight in the Hallow, and then lead Queen Slime out of the Hallow with no drawbacks, continuing the fight as normal.
Queen Slime will, at first, appear to have a similar yet faster movement pattern to King Slime, as well as the ability to teleport. After a jump cycle or two, she will stay in place momentarily while gathering a bunch of pink particles. Then, she will either lunge toward you and perform a stomp with an area of effect; or, shoot out a group of bouncy projectiles in several directions. Sometimes she will do this attack twice in a row or combo it with another leap forward.
As the fight goes on, the Queen will summon her subjects to attack you. This includes the Crystal Slime, which is a souped up Spiked Slime that has a huge firing distance; the Heavenly Slime, which flies toward you like a Slimer; and the Bouncy Slime, which can and will snipe you with a fast bouncing projectile.

When the Queen reaches 50% HP, the second phase of the fight will begin. She will grow huge pretty wings and start soaring in your direction. Then she will start to fire projectiles in 10 directions, which will all start obeying gravity shortly after being fired. Occasionally she will try to fly over you and drop down to perform another ground pound. All the while, Slime minions will still be airdropped out of her as she takes damage. This process will repeat until the battle is over, one way or the other.

The Queen herself isn't terribly difficult to deal with, even on higher difficulties. However, just like you, the real danger comes from her minions. If they start filling the screen with projectiles, you could quickly get swarmed and meet a slimy demise. Destroying the minions should be high priority for you, which is something your Spiders can easily take care of.
The problem arises when the second phase starts, and it's time to fly. While it's possible to predict where her projectiles will fall at an angle and fly up between them, it's much safer to stay clear of the whole radius and attack her from a distance, using the Rod of Discord if need be. The main issue here is that Spiders may have trouble dealing reliable damage in this phase, due to all the running and flying.

In earlier versions of Terraria, the Blade Staff was the answer to this solution. But as of 1.4.1, the Blade Staff is now dropped from the Queen herself, rather than Enchanted Swords. This puts you at a huge disadvantage in the second phase.
No matter. They're holding your next minions hostage. Give 'em heck.

1.4.1 also brought along the blessing of the Obsidian Armor, which mitigates the worry of being up-close to use whips. A long-range Firecracker will be sure to spike your DPS when your Spiders are biting away and inflicting Venom on the Queen, and the Cool Whip can be used to send in some backup if you need more crowd control. Personally, I get a few Cool Whip lashes in whenever I see a Bouncy Slime, which is the worst offender in this fight, then swing the Firecracker a few times when it's safe to deal damage. Placing a sentry once in a while doesn't hurt either.
As of 1.4.3, Abigail is also a viable contender in this fight. Building into minion slots via Spider Armor makes her delightfully fast and aggressive, and will be able to hit the flying Queen more reliably than most. Obsidian Armor will place more of the fight in your hands in the second phase due to Abigail not being as fast, but the range of your whips will make for safer DPS at a distance. If you took on the Twins first, the rather quick Optic Staff minions should be able to keep up with her flight speed.
Treat this fight as a tactical war between her army and yours. Keep a fair distance and don't rush in blindly, except when you have an opening to use a whip.
And again, don't think her minions will listen to your Royal Gel. You murdered her husband.

For the second phase, keep the Queen on-screen (as if that will be any difficult) and stay alive, and use those whips as much as you can. With multiple mobility accessories, you can easily fly above her so that all her projectiles will simply fall down harmlessly. You will have to land eventually between attacks, so keep an eye on your landing zone to make sure you don't get swarmed by the ground troops, which are more than capable of acting as anti-air. Alternatively, you can rely on horizontal movement in the form of the Unicorn mount or a fast Minecart track, given your arena is wide enough.
Spiders will seldom attack her when you're both sky-high, putting the weight of the fight on your shoulders. Make sure to set up a combo attack with the Firecracker for when the Queen starts to slam downwards; your Spiders or Abigail will be waiting. As this is a very small window of time for minions to attack, I propose using a Flask of Ichor or some other debuff to imbue your whips with, to make the fight go by slightly faster. Theoretically, having many layers of platforms going into the sky can make this battle more manageable, especially since that spreads out the Queen's troops to make them less of a condensed issue.
It's an uphill battle, but you got this.

If you still struggle, you can always go out of your way to attempt getting the Sanguine Staff from Blood Moon fishing. It's a challenge of its own, but succeeding will ensure that you stomp through the Queen... and the next six bosses after her.

Once you've gotten the hang of this fight, victory should be well-assured. If you're lucky enough, you'll finally be rewarded with the Blade Staff and the Gelatinous Pillion. On Expert Mode, the Queen drops the Volatile Gelatin, an accessory that fires a bouncing, piercing projectile at nearby enemies for 65 base damage. It's not affected by any boosts, but it's a very good defensive item if you just wanna go fishing or mining in peace.

The Mechanical Bosses
The mechanical bosses are next on your list. I should mention that early to mid-Hardmode is one of the points where the Summoner struggles the most. Sure, Spider gear is an incredible boost once you grab it, but even Spiders aren't the best at tackling the next bosses ahead of you; that title belongs to the Optic Staff's Twin minions (or your Daggers). But because the Optic Staff is gated behind the Twins, that means you must struggle through at least one mechanical boss to gain that necessary power. You, your Spiders and/or your Daggers will have to prepare to fight another uphill battle.
Mechanical bosses can be spawned by using their respective summon items; the Mechanical Eye, Mechanical Worm, and Mechanical Skull, which are either crafted at a Mythril Anvil or dropped by enemies in Hardmode if said boss hasn't been defeated. If you've ended up smashing a Demon/Crimson Altar in the world, a mechanical boss has a 10% chance of spawning each night until it's defeated. They'll keep testing you until you prove yourself successful.

Recommended Minions:
  • Spiders
  • Daggers
  • Twins (for Destroyer and Prime)
Recommended Accessories:
  • Frostspark Boots or higher
  • Wings
  • Bottles or Balloons
  • Shield of Cthulhu
  • Frog Leg or higher
  • Pygmy Necklace
  • Power Glove or higher
  • Charm of Myths
  • Summoner Emblem
Recommended Buffs:
  • Bewitched
  • Summoning
  • Regeneration
  • Ironskin
  • Heartreach (for Destroyer)
  • Cozy Fire
  • Heart Lamp
  • Swiftness
  • Endurance
Recommended Armor:
  • Spider
  • Forbidden

Defeating the Twins is by no means easy, especially if this is your first time as a Summoner. I'll break down the fight since I somehow didn't do that in previous versions of this guide.

When summoned, Retinazer and Spazmatism will approach and begin their coordinated assault. Spazmatism will stay horizontal to you and fire out volleys of cursed fireballs, which will hurt quite a lot if it inflicts Cursed Inferno. Retinazer will try to stay above you while occasionally firing lasers if in range, which are fired rather inaccurately. After a few seconds of these attacks, they will start attempting to ram into you, charging a few times before returning to their signature attacks. Rinse and repeat.
When one Twin's health reaches 40%, it will transform into its respective second phase; Retinazer will no longer charge, but his lasers become far more accurate. He will cycle between a few shots while above you, before initiating a rapid-fire attack from the flank. These lasers become increasingly more rapid as Retty loses health. Spazmatism's second phase will pursue you more slowly while continuously releasing a flamethrower of cursed fire, and after a few seconds, he will charge forward several times at a startling speed in an effort to maul you to death.
Both Twins must be defeated in order to win the battle. It may be wise to pick them off one at a time, directing your minions accordingly.

It may be difficult getting close enough to use your whips, unless you're bent on sticking to Obsidian Armor. Damage-over-time debuffs also help during the Twins' second phase, since their defense rises. It is recommended that you build a spacious skybridge to stay on the run. This will help avoid many of the Twins' attacks. Also, make sure there are Campfires and/or Heart Lanterns set up at this arena, as you will need all the regeneration you can get. Stash some potions, get your buff stations ready.

If you're good at staying in a small area and dodging, then your minions will have an easy time landing hits. Spider minions can latch onto airborne foes and bite them continuously, and their venom completely destroys the Twins' health. I recommend using at least one of them for this battle. If your Spiders get shaken off, you can also re-summon them onto the Twins' faces (eyeballs?) to make your Spiders' job of doing damage easier. If you prefer reliable damage, build around the Blade Staff with a Shark Tooth/Stinger Necklace. The armor penetration of the Necklace/Ichor and Daggers is enough to completely ignore the Twins' defense, even in their second phase, with the Daggers' damage reaching the 0-defense limit. Alternatively, you can try a Flask of Cursed Flames; in fact, try that, inflict Frostbite with the Cool Whip, and then throw in a Spider's Venom for good measure. Profit.

Mobility accessories will win you this battle. If you're on Expert, the Shield of Cthulhu works even better, as you will need to move in sharp patterns to avoid Spazmatism's deadly dashes. As he deals the most damage, I recommend taking out Spazzy first.
Retinazer's second form is a lethal annoyance, as his lasers are scarily accurate unless you're moving fast enough. If you don't feel like putting in the extra effort to evade him, you can simply stand in a house or box, rendering Retty completely unable to damage you, since he doesn't dash in this form. Use your minions or a weapon like the Daedalus Stormbow to finish him off.

Once the Twins are defeated, congrats! You've got yourself a shiny new Optic Staff. Try summoning six at a time, it's like you have twelve minions. And if you have Hallowed Bars to spare, consider crafting the Durendal, your next whip.
The Twins become your key to victory when facing the Destroyer, which will be covered in the next section due to character limits.
The Mechanical Bosses (part 2)
Now let's talk about the Destroyer real quick.
The Destroyer spawns bundled up with most of its segments in one place, before it begins to charge in your direction like an oversized worm enemy. After a few seconds, it will spray out a barrage of lasers from its body in an attempt to suppress any attempts to get close to it. When the Destroyer takes damage, there's a chance it will release a Probe to attack you, which can be destroyed. Landing a lot of hits in quick succession can end up getting you swarmed with Probes.

As stated earlier, the Twin minions are excellent here since Spazmatism's attacks are piercing, which worm enemies are allergic to. This piercing effect will slice up the Destroyer as well as the Probes it releases. I can't fully recommend the Daggers here, as their low damage can hardly compare to the Destroyer's big fat bag of health; on top of that, having to deal with the Destroyer and its Probes all at once will leave your fighting force scattered. Daggers perform best when converging onto one target, so use the Twins to cover your weakness of being outnumbered.
Keep in mind that the Twinions stop attacking when they need to catch up to you. They'll only resume their assault once they reach you. I've found that flying past the Destroyer, opposite to the direction it's headed, is a good way to avoid its lasers and also gives you a tad more breathing room when the Probes start to swarm you. Around this point your Twinions would need to catch up to you, and the Destroyer would already be turning around and headed back your way. That's when you start flying past him once more while meeting up with your Twinions so they can continue dealing damage. This process is far easier in 1.4.4. Repeat this process of flying side to side in wide intervals, while dealing with any troublesome Probes however you can, and eventually the Destroyer will be turned to scrap. The Destroyer hates piercing weapons, so the Magical Harp, Flying Knife or Ballista Cane will do you many favors here. If you feel like deleting the Destroyer with less effort, try the Daedalus Stormbow and Holy Arrow combo. Also, the Cool Whip's snowflake tends to follow and fly through all of the Destroyer's segments, which can help in adding up damage.

Destroying the Destroyer will advance you one step further towards Plantera, as well as grant you Souls of Might, which are an ingredient to the Drax and the Avenger Emblem. Maybe you'd appreciate a Megashark. Once you have enough Hallowed Bars, you may also consider making Hallowed Armor with the Summoner headpiece, if you find yourself lacking in survivability. This is a healthy boost for you if you're playing Master Mode.

Now then, with the Twins at your disposal, killing Skeletron Prime should be very possible. If you're familiar with the Skeletron fight, this is relatively the same thing... except he brought the Swiss army with him this time. More arms to chop you up with; two melee weapons, Prime Saw and Prime Vice; and two ranged weapons, Prime Laser and Prime Cannon. Needless to say, the melee arms will try to ram you like Skeletron's hands, while the Laser and Cannon fire lasers and artillery bombs, respectively.
Unlike normal Skeletron, Prime's head gains double defense when spinning, on top of double damage. During the spinning phase, all of his arms become more aggressive as well.

After popping some buff potions, focus on Prime Saw and Prime Vice, his two main weapons. They cause the most damage and, if taken out first, will make the fight much easier. If you're playing on Expert, however, disregard the previous advice and direct your minions to Prime Laser, which deals a lot more damage and is a much heavier presence in this fight simply because Prime doesn't need to be close to you to snap you in half.
Ichor is still recommended here, along with Frostbite-inducing weapons like the Cool Whip, so even when you're running, the arms still take damage. Flying in circles around him is a good way to avoid most of his attacks. Note that Prime Cannon's bombs can explode on platforms, so consider making your arena multi-layered so you can duck for cover. If you're using Daggers, aim your whips or staff right-clicks carefully if you plan to dispose of the arms one by one; Daggers excel in single-target damage far more than crowd control like the Twins.
Take the arms out in a greatest-to-least order, then aim for the head, and Prime should eventually be down.

A good long-ranged weapon is ideal for all the mech bosses, unless you've learned how to utilize whips correctly. Other good pre-mech weapons include the Clockwork Assault Rifle, Crystal Serpent, Sky Fracture, Toxicarp, Cursed Flames, and any Dart gun dropped by the Corrupt or Crimson Mimic. The Dart Rifle in particular can be potentially good enough to aid you through the rest of the game, if you know how to use it.

You probably know by now, but mobility is key as boss progression increases. You'll want to avoid as much damage as possible since you're the most frail class in the game. But if you need survivability, try using the Star Veil so you can gain those extra invincibility frames, which can potentially save your life. The Ankh Shield is also attainable before any mech boss. Shoutout to the Charm of Myths. If you find yourself dying when you've almost won, maybe you can try using the Frozen Turtle Shell for low-health tankiness, or set up some Heart Statues wired to a timer. Survivability accessories aren't any good if you never get hit, however, so only put them on if you feel like you need a crutch.


That should just about cover the mechanical bosses in terms of strategies and recommended items. Moving on in life.
A Summoner's Journey (part 6)
Remember the painful Blood Moon fishing grind earlier in the journey? Did you enjoy it? Too bad, there's more to be done now.
At the start of Hardmode, new enemies can be fished up during a Blood Moon. While you could go for this at any point, I recommend getting some adequate Hardmode gear before attempting such a dangerous expedition. In fact, the Hallowed Summoner Armor will do you several favors here. At the very least, make sure you have decent early-Hardmode weapons and that you're decked out in Spider gear.
Grab your Chum Caster. Wherever you fish, I hope you have a wide, well-lit area. You're going to need it. Consider bringing Hunter and Night Owl Potions too.

Let's start with the Hemogoblin Shark. Unless you want a cool magic weapon, he's mostly a tanky annoyance that can leap high up to reach you. You can also fish up the Blood Eel, a fast flying worm-type enemy with boatloads of health. You'll want to aim your whip carefully or use some other piercing weapon, along with your minions, to take him down before he becomes too much of a problem. He drops a cool flail, but that's not entirely what you're looking for.
If you have any Sonar Potions, consider using those to skip the annoyances; this way you'll know what's biting your hook so you can reel in with more confidence. In particular, we're fishing for Dreadnautilus.

Does this look like the face of mercy to you?
Along with Expert Skeletron and Plantera, Dreadnautilus can be quite a vicious killer if you're not entirely familiar with his patterns. When first reeled in, he will begin the assault by firing three shotgun-like blasts of projectiles that are affected by gravity. Then, he will turn his back to you, reflecting most projectiles for a short time, before suddenly charging forward at a ludicrous speed. If you're not prepared, you may just have to tank the hit and stand still, where Dready will continue spinning harmlessly around you. You can avoid this hit by using the Hallowed Armor set bonus, granting you immunity to one hit every 30 seconds, as long as you're doing damage. Alternatively, if you have insane mobility, you can rocket upwards with wings, Frog Leg and a Balloon, followed by dropping straight down on a Slime mount as a very over-the-top way of avoiding Dready's charge. You can also dash just above or below him and then stand still while he loops around you, allowing you to avoid him entirely and get a few whips in. If you're precise, you can use the Shield of Cthulhu to bonk into him and score just enough immunity frames to avoid his charge.
After that, Dready will fire another volley of blasts, before summoning three Blood Squid minions. These minions will try to avoid contact damage with you in favor of shooting bloody projectiles from a distance.
As if that wasn't enough to worry about, you still only have a mere few minutes on the clock. While being swarmed by other lesser enemies.

You may want to block off your fishing area so that you don't have other things annoying you while you try to fish. If you're at the Ocean or other large body of water, you can simply stand on the water's surface with the Terraspark Boots, or perhaps build a partially-open box to contain the Hemogoblin Sharks if you're not using a Sonar Potion. Another possible strategy which can be done with Hallowed Armor is to barricade yourself in blocks; Dreadnautilus's projectiles can pass through blocks, but Blood Squids' cannot. In fact, no Blood Squids will be spawned if Dready doesn't have direct line of sight with you. The only other danger would be Dready's super spinny charge; if you have enough sustain and Holy Protection, they should allow you to outlast him if you have minions and weapons that pass through blocks.
If you're daring, you can do this strategy without Hallowed Armor; but this may not end well on higher difficulties, unless you can shield-bonk to evade an attack or two.
Should you decide to fight him the "normal" way, consider using Enchanted Daggers as your main minions. Consider using Ichor and whips to assist your Daggers, as always. Spiders and Firecracker pair well together as well.

The chance of the Sanguine Staff dropping from this nightmarish monster is 50% (100% on Expert/Master), but if you fail, hopefully you'll have Bloody Tears saved up. Dready himself also has a 50% (100% on Expert/Master) chance to drop a Bloody Tear as well, which might prove useful.
Once you get your hands on the Sanguine Bats, fill up your minion slots with them instantly. It will take only mere seconds for you to realize the substantial boost in power you just gained. While I do believe the Sanguine Staff is almost too good for the stage in the game where you obtain it, the amount of hoops you have to jump through balances it out a bit. Treat Dreadnautilus like Duke Fishron, who can also be fought at any point in Hardmode and is quite challenging, but provides wonderfully powerful gear to make up for it. Except in this case, it's only a summon staff. An extremely good one at that.

Can you believe this thing has a banner?

Boss: Plantera
The Jungle grows restless. Now it is time to gear up for the Jungle. Craft a Drax or a Pickaxe Axe, the Durendal and maybe some Hallowed Armor, and start searching for Chlorophyte, Life Fruits and Plantera's Bulbs. Although, to be completely honest, you can skip the Drax and Chlorophyte entirely. But I always preferred to stick with my Drax because it's so darn handy. It's just that there is nothing for a Summoner that Chlorophyte can offer.
It's a good idea to clear out a decent section of the Underground Jungle to have as an arena for Plantera. Luckily for my Summoner, there was already a wide open space naturally above the Jungle Temple and I hardly had to change a single block. There should also be more Life Fruits in the vicinity, so make sure your max health is increased when preparing to fight Plantera. In my opinion, she's not exactly the toughest boss to deal with (except on Expert lol); just don't take her to the surface, that's just stupid.
Plantera will awaken when you destroy one of the pink glowing bulbs that occasionally grow in the Underground Jungle. Be ready for a fight.

Recommended Minions:
  • Twins
  • Sanguine Bats
  • Daggers
Recommended Accessories:
  • Lightning Boots or higher
  • Wings
  • Bottles or Balloons
  • Shield of Cthulhu
  • Frog Leg or higher
  • Charm of Myths
  • Summoner Emblem
Recommended Buffs:
  • Bewitched
  • Summoning
  • Regeneration
  • Ironskin
  • Heartreach
  • Cozy Fire
  • Heart Lamp
  • Swiftness
  • Endurance
Recommended Armor:
  • Spider
  • Forbidden
  • Hallowed

When Plantera starts to give chase, lead her back to your arena very steadily. Go too far, and you risk making her despawn.
Many of your minions can play a part in this battle. The Imp can set her on fire while the Spider stays in her hitbox, biting away. As well, Retinazer can shoot from afar while Spazmatism continually charges through her and her tentacle minions. This effect is greatly enhanced with the Ichor debuff. The Slime and Hornet are just about no help here, sad to say, so don't use them. With a few good platforms, even a Pirate Staff would do well here. Set up a Queen Spider on a platform in the center of the arena so that she can aim well in all directions, against both Plantera and any monsters that wander by. A Lightning Aura is also a good choice.

Some of Plantera's attacks are capable of poisoning you; it wouldn't be unwise to keep a Bezoar or Ankh Shield on-hand to swap to whenever you wish to negate the poison.
During Plantera's second phase, some of her tentacle minions might be overwhelming, so don't be afraid to shoo them away with the Durendal, which will cause your minions to come to your aid immediately to clear them out.

If you're playing on Expert though, Plantera is definitely one of the most infamous bosses in my book. You could have a full army of Twinions and chug all the potions you need, and still get your butt handed to you. In my experience, this is because Expert Plantera's second phase sprouts extra tentacles on each of her hooks in addition to her main body. This, in essence, causes her to take up almost the entire arena, rendering you unable to properly avoid her, leading to you getting bodied. What really changed this fight for me, was knocking down every backwall in the arena. It may take a while, but if all the backwalls are torn down, Plantera will mostly only be able to latch her hooks onto solid blocks, which means her arms will be outstretched enough for you to dash through and escape when you're cornered. By default, she's capable of grappling onto backwalls, so disabling that ability can give you quite the advantage.
Important: Prepare a deep ditch beneath the floor of the arena, so that Plantera's thorn ball projectiles can be disposed of rather quickly, instead of bouncing across your arena making your life difficult.

Once Plantera is defeated, hope for a Pygmy Staff. If she didn't drop one, take your biome keys, which you probably found along the course of Hardmode, and unlock the final chests in the Dungeon, to help you defeat her more easily; the Vampire Knives and Scourge of the Corruptor do the job nicely. Alternatively, there's lots of helpful drops in the post-Plantera Dungeon that may aid you, such as the Morning Star. This whip is highly recommended as it's a huge spike in damage compared to the Durendal, on top of the potential to make minions land criticals. If you've been blessed with a Frozen Key and Desert Key along your quest, you know exactly where to go; that beautiful blue and white chest containing the Staff of the Frost Hydra; and the pretty orange chest containing the Desert Tiger Staff.

Weather or not you have the Pygmy Staff in hand, it's time to return to the Witch Doctor. Let's hope you had moved him to a house in the Jungle, or even made an artificial one beside your village for him, because you're going to need it. In his shop you'll see your well-deserved Tiki Armor and the Hercules Beetle. Get it, get it, get it. These should make subsequent Plantera fights less of a pain.
With your fabulous new Tiki Armor, you can now have one extra minion and your defenses are much higher than before. With the Hercules Beetle, your minions are now stronger and you can potentially replace your Summoner Emblem. Doesn't it feel so nice having all these friends?

Boss: Golem
There is little time for celebrating though. Now you must venture deep into the Lihzahrd Temple and slap the Golem around a bit with a large trout.
Try invading the Temple using an entire army of Pygmies and watch the chaos that unfolds. The Pygmies can easily tear any Lihzahrd or Flying Snake to shreds with how quickly they all throw their spears in a row. Once you get all the Lihzahrd Power Cells from the chests and possibly loot some from the enemies, head down to the Altar at the bottom of the Temple and disable all the traps. A Dangersense Potion works wonders here; just be aware that wiring in the Temple cannot be seen, placed, or cut until the boss is defeated. When you are ready, right-click the Altar and summon the Golem.

Recommended Minions:
  • Pygmies
  • Desert Tiger
  • Deadly Spheres
  • Ravens
Recommended Accessories:
  • Wings
  • Hercules Beetle or higher
  • Lightning Boots or higher
  • Frog Leg or higher
  • Feral Claws or higher
  • Tabi or higher
Recommended Buffs:
  • Regeneration
  • Ironskin
  • Heart Lamp
  • Cozy Fire
  • Swiftness
Recommended Armor:
  • Tiki
  • Hallowed
  • Spooky

I kind of feel bad for the Golem sometimes. Despite that all his stats have been buffed in the past, he's still rather weak. Help.
As of 1.4.4, the Golem is far tankier, forcing you to endure a DPS race; which luckily, Summoner excels at.

Golem consists of multiple parts: the head, body, and two fists. While you're to the left or right of the Golem, that respective fist will charge up for half a second before launching itself at you. While directly above or below him, both fists will attempt to punch you. As of 1.4.4, the fists can no longer be deflected by attacks and must be avoided properly. The head will periodically fire bouncing fireballs throughout the fight. As the head's health diminishes, the punches will become more frequent.
If you've cleared out one fist, stay on that side of him while you and your minions pick off the other one, which is completely unable to do anything. His head will start firing lasers when at half HP, so be wary. Make sure not to destroy the head before taking out the fists, lest you want to be punched to death.
When the head's HP reaches zero, it will detach from the body and fly above you, unable to be damaged further, yet still able to attack you as usual. At this point, the body becomes vulnerable, and must be taken out in order to win the battle.
Be aware that on Expert, Golem becomes increasingly aggressive the more players there are.

The tight spaces of the Temple make half the difficulty here, especially if the boss room spawned in an awful shape. Generally you don't want this fight to drag on too long; the more Golem fills the room with projectiles, the harder it will be to survive.
Regardless, this big idol is no match for your army of inexhaustible idols; even the Golem is not safe from Hanipaganda.

In my experience, flying above and over the Golem, from side to side, helps avoid most of the dangers. Don't move too fast or too slow. By the time Golem stomps his way over to your side of the room, fly over him to the other side to keep some distance. Of course, bring your best whips; the Dark Harvest easily exploits Golem's multiple parts, but generally most players will beat Golem before Pumpkin Moon. The Morning Star will make a solid choice then. With the right setup, especially with the Flask of Ichor, you and your Pygmies can destroy the Golem in a little under a minute.
You're not trapped in here with him; he's trapped in here with you.

When the Golem crumbles, you're free to use your wiring powers in the Temple. Perhaps you can uproot the Altar with Actuators, or pick it up directly if Golem dropped you a Picksaw. He can also provide the Sun Stone, a component of the Celestial Stone.


The enemies within the Jungle Temple have a 14.29% chance of dropping one to two Solar Tablet Fragments. Collecting eight and bringing them to a Mythril Anvil will get you a Solar Tablet. Use this to cause a Solar Eclipse to happen when it's daytime. Make sure your Pygmies or Bats are out and have a Water Candle and/or Battle Potion ready. It's time to start the grind for the Deadly Sphere Staff.
The enemies in the Solar Eclipse are brutally tough, so make sure to use Ichor-imbued whips (or Vampire Knives) often. Watch out for Mothrons; they may be dangerous, but they hold the Broken Hero Sword which is a crucial ingredient in- you guessed it- the Terra Toilet.
Deadly Sphere enemies have 80 defense, which makes many attacks useless unless you utilize Ichor or whip tagging, or hit them with a stronger weapon like the Morning Star. Keep your wits about you, as Deadly Spheres give off no light and can fly through blocks to reach you, resulting in a very sudden assassination. I was lucky enough to obtain the Deadly Sphere Staff on my first Solar Eclipse in 1.3, and it would be an understatement to say that it serves me well.
If you're looking for the Moon Stone, aim for Vampires too. The Celestial Stone is a very good accessory. Make sure to confiscate the Neptune's Shell from Creatures from the Deep, as they're a further ingredient to the Celestial Shell.
Boss: Empress of Light
This is where the fun begins.

Post-Plantera, a new critter can spawn on the surface Hallow during the night; the Prismatic Lacewing. It is a beautiful rainbow butterfly-like creature that floats in the air, shifting in color on occasion as it innocently wanders the Hallow.
And your job is to kill it.

The Lacewing is a rare creature that can only spawn from dusk to midnight; that is, 7:30 PM to 12:00 AM in-game. A very tight timeframe, but with a Water Candle and/or Battle Potion, you should get them to spawn more often. Also, only one Lacewing can be spawned at a time, so if you see one, act fast.
At first, it would be wise to simply catch these critters with a Bug Net and store them until you're ready to use them. If you haven't bought a Guide to Critter Companionship from the Zoologist, now would be a good time. This will prevent you from accidentally killing a Lacewing when you're not ready. Also, enemies can't kill Lacewings, unlike other critters. Also-also, Lacewings will despawn shortly after being outside the Hallow, unless in your inventory.

When you're completely ready, release one of your caught Lacewings and kill it. This will bring forth the wrath of its guardian. Behold the Empress of Light.

Recommended Minions:
  • Sanguine Bats
  • UFOs
  • Ravens
  • Deadly Spheres
Recommended Accessories:
  • Lightning Boots or higher
  • Weather in Balloons
  • Wings
  • Master Ninja Gear
  • Frog Leg or higher
  • Charm of Myths
  • Papyrus Scarab
  • Any other Summoner accessory
Recommended Buffs:
  • Bewitched
  • Summoning
  • Regeneration
  • Ironskin
  • Cozy Fire
  • Heart Lamp
  • Swiftness
  • Endurance
  • Wrath
Recommended Armor:
  • Spooky
  • Tiki

This battle will seem very chaotic and difficult at first, but enough practice and observation should make it very possible.
The Empress of Light's attack pattern is as follows:
First, she will cast Prismatic Bolts that gradually accelerate towards you with a slight homing ability. This can be avoided by changing your trajectory such as flying upwards. Then, the Empress will make a horizontal dash toward you.
Then she will perform a Sun Dance; where she floats over you and several large beams of light will circle around her. Followed by another dash.
Next she will cast Everlasting Rainbow, which sends out a circular pattern of stars that leave damaging trails behind them. While this pattern is still going, she will send out more Prismatic Bolts, before doing another dash attack.
After this, she will cast Ethereal Lance; many colorful lines will appear around you, indicating where these lances will travel after a short time. When the lances are done, she will dash once more, and perform another Everlasting Rainbow. Repeat.

When at 50% health, the Empress will enter a new attack phase with a different pattern:
A different version of Ethereal Lance will be performed; only instead of being aimed at you, they are evenly spaced across the screen. There are four waves of lances; each will come the left, the right, the top-left and the top-right respectively.
Then the rest of the pattern is: Prismatic Bolts, dash, Everlasting Rainbow, Prismatic Bolts, Sun Dance, Ethereal Lance, dash, and finally another Prismatic Bolt attack that comes out in several directions around the Empress, before homing in. Repeat.

It's a lot to keep track of, but enough attempts will help you get this ingrained into your memory.
You can use a flying mount for this fight as well, since all attacks are non-random and predictable. But I personally recommend mobility accessories for players still learning the fight. Actually I recommend mobility accessories in general, what am I saying.
As this is a very mobile fight, this means you most likely have to find openings in the fight where your minions can dish out lots of damage instead of catching up with you. If you prefer reliability over damage, then use the Sanguine Bats. They will generally perform better than almost any other minion in this battle.

I tend to run in a horizontal direction before flying up during the Prismatic Bolt attack. While the Sun Dance is the easiest attack to avoid, it's usually worth getting close and risking a hit since it's a good opportunity for you and your minions to deal damage. I usually try to avoid the Everlasting Rainbow altogether by just running off in another direction, since the Rainbows tend to loop back towards their origin location which can limit your space. Ethereal Lances are intimidating at first, but become much easier when you understand how they work; flying or dashing in a circle is a surefire way to lead them out of your way.

The Empress drops very useful items such as the Kaleidoscope, the final whip in your roster. If you're satisfied with this, then let's move right along.
However.
As you might know, the Empress enrages during the day. Her attacks will glow golden instead of rainbow, and will do around, let's see... fifty thousand damage.
It seems pretty standard for a boss, since bosses like Skeletron also oneshot the player during the day.
But what if I told you that one of your minions is gated behind the enraged Empress?
The Terraprisma outclasses even the Stardust Dragon in many different ways, but in order to obtain it, you have to practically do a no-hit run against the Empress and succeed. You must deal all your damage during the day in order to get the prize. Only the worthy may wield her blades.

Additionally:
During the start of the second phase, the enraged Empress will have a new spell card up her sleeve; Ethereal Lances will come in six waves instead of four. They won't be perfectly aligned across the screen, but instead will be fanned out according to your position. They'll come from the left, the right, the bottom-right, the bottom-left, the top-right, and top-left, in relatively quick succession. After her dash, she will summon a more narrow line of Ethereal Lances directly on you. These can be avoided by dashing from side to side repeatedly.
The rest of her pattern continues as normal until repeating, but note that some spells will overlap each other, making the Rod of Discord more valuable here.
On Expert and Master, the Empress' attack patterns will be the same as if she was enraged, but without the oneshotting.

Tragically, as of 1.4.4, dodging items such as the Hallowed Armor and Master Ninja Gear will not allow you to dodge her enraged attacks. If you truly desire the Terraprisma, your resolve will be tested.
Just remember, focus purely on damage and mobility for the enraged fight. Reforge all equipment as necessary, since defense doesn't matter here.
Also, perhaps you can take on the easier fight first, just to give yourself a bigger edge with the Kaleidoscope or the Soaring Insignia.

If you can somehow get your hands on an early Terraprisma, I congratulate you. The rest of the game will be a breeze.

I genuinely like how the enraged Empress can serve as a "final boss" specifically for Summoners. I deem her a greater, albeit more fair, challenge than the Moon Lord himself.

A Summoner's Journey (part 7)
You've managed thus far, and at this point you come to a crossroad: with your fancy new minions, you can take on either the Pumpkin Moon, Duke Fishron, Martian Madness, or Empress of Light. Post-Plantera and post-Golem are a lawless wasteland in which you have the freedom to do as you please.
In order, I challenged the Pumpkin Moon for the Necromantic Scrolls (and the Raven Staff just to have it), then Duke Fishron until I got the Tempest Staff. It so happened to be that as soon as I got it, a Martian Probe spotted me and began the invasion. I didn't use my Sharknadoes for long until I got the Xeno Staff.

First, before even thinking about challenging any of these, it is strongly recommended that you open the special Dungeon Chests; at the very least, the Desert and/or Ice Chests. As well, start fighting the monsters in the Hardmode Dungeon for important items like the Morning Star, the Tabi and the Black Belt, if you haven't already done so. It is highly probable that you will die a few times here, what with all the Paladins and Casters.
Luckily, your minions have got your back. They can continuously land hits on Casters, causing them to teleport madly. This can also be done with the Piranha Gun. Your minions, as well as the Piranha Gun paired with Ichor are also excellent at taking down Paladins. When the Paladin is under constant damage, he will not throw his hammer, meaning you could potentially stunlock him until he's dead. You would have to repeat this many times though until he drops his hammer.
Also note that most monsters in the Hardmode Dungeon have so much defense that Vampire Knives won't heal you as efficiently. Keep this in mind and try dodging every attack that comes your way, or put up some banners.
On top of this, Deadly Spheres and Twins have trouble navigating the Dungeon due to their tendency to get stuck. Consider using Pygmies, or, if Plantera hasn't given you a Pygmy Staff yet, Bats or Spiders. The Tiger also performs excellently here, with his ability to jump through walls and attack everything in sight.

Warning: you will see Cultists at the Dungeon after the Golem is defeated. Do not attack them yet. I recommend cancelling your minions as you approach the entrance, and re-summoning them once you're inside. You just might regret killing them.

Martian Madness can be triggered as soon as the Golem is defeated. However, it may take some time, and you might not actually be ready for the event. The enemies are very tough, and will definitely give you a hard time if you're not prepared.
Rarely on the surface, you will see a small, slow-floating Probe scanning the ground with a green light. If it spots you or if you hit it, the light will turn red, and the Probe will fly away. If it does, the invasion begins. If you destroy the Probe, the event will not trigger. Probes are certainly hard to find, although they can spawn slightly more commonly up in space. They also only spawn away from the center third of the map.
If you're having trouble getting one to spawn, place a Water Candle at a table on a Floating Island that's far from the center of the map and wait, killing any Harpies or Wyverns that spawn. The Lifeform Analyzer can help you indicate when one is nearby. It's recommended to dispel your minions so that they don't accidentally destroy the Probe when it nears you. Probes only spawn at the outer two thirds of the world.

Once you return to your spawn point, it's time to fight some aliens. They will be swarming you pretty quickly; if you already have the Sharknadoes, tearing through them will be a cinch. The Deadly Spheres will work just fine though, but since you're at spawn, it's likely for them to get caught around buildings and have trouble catching up to you. You'll want to be wary of Martian Engineers, who can build Tesla Turrets as a form of area control against you and your NPCs. Try to take those out immediately. The Scutlix can run incredibly fast and charge into you for a painful amount of damage. But most of all, you want to keep a sharp eye out for the boss of the event; the Martian Saucer.

This boss can show up more than once during Martian Madness, and it is bloody dangerous. However, it has the next summoning weapon you need, the Xeno Staff. While your minions at this point can tear it up rather quickly, it can tear you up faster. It has four parts, the two cannons and the two turrets, which are located near the corners of the ship. Each must be destroyed before you can damage the boss itself. Before any parts are removed, the Saucer can scatter a multitude of laser beams, as well as rockets with a sharp homing ability, which hurt a lot. The Saucer itself, whether or not the parts have been destroyed, can also fire a deathray as it hovers across the area around you. This deathray can phase through walls as of 1.4, leaving you completely exposed to its insane damage. When all parts are destroyed, the Saucer will only spam the deathray attack, at a much faster pace.
So what do you do? Fly and dodge. Flying above the Saucer while your minions hack away at it is a decent strategy to temporarily render yourself safe. But it will eventually get above you, so make sure you glide to the side to avoid the deathray; then, when it turns sharply around to perform another deathray in front of you, dash to the other side and keep gliding. Repeat as necessary, making sure to avoid the pieces of scrap the Saucer spews out during its attacks. Deploy a Hydra to take care of enemies on the ground so you have less to worry about.
This event is quite intense and may take some practice. Especially since, unfortunately, you can no longer throw cheese at the aliens.

Luckily, my first Martian Saucer kill got me the Xeno Staff. In the same invasion, I also got the Cosmic Car Key, which is a very handy mount; it allows you to infinitely fly around on a UFO, at a decent speed, while still being able to use weapons and tools. If you didn't get the Xeno Staff, you can always hunt for the Probe again. It will take some time, of course, but it'll be worth it. The UFO minions have some of the highest DPS among any other minions in the game, as they relentlessly lock on to enemies and melt them down with a swarm of unavoidable lasers that fire as fast as a Chain Gun. If you want, you could potentially keep them for the entirety of the game; they're just that powerful. But I like to have all the minion staves, and a variety of minions friends around me so I can be more well-rounded, since each one has its own distinct attack pattern.
A Summoner's Journey (part 8)
Once you have the best weapons and the best modifiers you can get for your minion staves, as well as your best modifiers on all your active accessories, it's time to challenge the Pumpkin Moon. You're gonna need the Dark Harvest, those Necromantic Scrolls and Spooky Wood for later on in the game. And the Raven Staff, if you're caring enough to collect all the staves.
There are many ways to set up a Pumpkin Moon arena. Many years ago, Demize constructed an arena that relied heavily on Jungle Temple traps. This helped me quite a lot in my younger days, but over time I've been optimizing how to efficiently progress the invasion waves as quickly as possible.
You can create a simple but effective arena that doesn't take much energy to construct, and does the job extremely well. See below:

This eyesore of an arena is made with two long strips of lava surrounding a small island of dirt, with a platform a decent distance up; I recommend about 38 blocks above the central island. When the player stands up there, all ground enemies will spawn on the dirt surface below, because it's the only available place for them to spawn. As such, you and your minions can focus your firepower down in one area, demolishing every enemy at once. It looks atrocious but it's effective.
If desired, you could change up the platform to be a bit safer; add a small spawn house to the side and move the Nurse in for quick heals. I also like to build a wider platform above the central platform, to give me a landing zone when dealing with Pumpkings. You could also place some actuated Temple traps down below, as they could help take out lesser enemies on the ground while you and your minions focus on Pumpking and Mourning Wood, which have the next summoning items you need. Either way, use whatever arena strategy you think is best.
When you are sure you're ready, craft a Pumpkin Moon Medallion, wait until the first moment of night, and summon the Pumpkin Moon.


The first few waves should go by quickly from your traps and minions. Summon your strongest sentries to provide further area control. I usually don't need to buff at all until the Mourning Woods start approaching, around Wave 6. I'm not gonna lie; the Mourning Woods and Pumpkings hurt, and it's very likely you'll die before Wave 20 or before getting your most needed items from this event; the Raven Staff, the Dark Harvest and the Necromantic Scroll, as well as at least 750 Spooky Wood. Your victory is marked when you find the items you require (unless hunting for trophies is your kind of thing).

Try to dodge Mourning Wood's flaming attacks. I know it's difficult, but these projectiles can hurt you a lot, so it would be best to try and dodge them, while flailing your Ichor-imbued whips to outlive your opponents. That, combined with your minions and/or traps, should deplete the boss's health like nothing else.

When the Pumpkings start to arrive, make them your priority, as defeating them will advance you further and faster in the Pumpkin Moon waves, thus increasing your drop chance for the items you're looking for. Be careful when fighting Pumpkings, as their Flaming Scythe attack will snap you in half just as easily as one of those Black Recluses back in early Hardmode... See how far you've come?
When dealing with Pumpkings, chances are there will also be Mourning Woods on the ground that will be firing anti-air splinters at the same time. Standing still is a death sentence. Take to the sky and fly in wide circles or figure-eights to avoid Pumpkin's attacks and lead away Mourning Wood's projectiles. Pumpking should often be close enough to fall into whipping range. Chip away.

To put it bluntly, unless you have some impressive luck or skill, this may take more than one try. Learn from trial and error and use whatever tactic works best for you. I used Deadly Spheres for this battle, as I needed pure firepower to push my way up through the waves; their piercing makes short work of crowds too. Of course, if you managed to get the Tempest or Xeno Staff before this point, you can use those instead. The Sanguine Staff is also a reliable pick, if nothing else.

It took me about five tries before I finally got both the Raven Staff and Necromantic Scrolls on my first Summoner run. If prepared though, one can collect everything in only two runs at most. Combine a Scroll with your Hercules Beetle to upgrade it into a fabulous Papyrus Scarab. Once you free the Ravens trapped within the staff, well... pat yourself on the back. Ravens will make a fine addition to your team, should you decide to use them. They synergize nicely with the Dark Harvest's special effect as well. The Necromantic Scroll is also very much worth your time. I recommend getting two, actually; one for the Papyrus Scarab, and one to equip on its own. For more minions and summon damage, of course.

Once you have a full set of Spooky Armor, you'll gain another noticeable boost in power. It's a proper step in progression that will make you feel glad for pursuing it. And yet still, there is much left to be done. Onward.
Boss: Duke Fishron
I hope you had caught some Truffle Worms along this amazing journey, because if you haven't, now's the time. Truffle Worms are rare creatures that reside in underground Mushroom biomes, and are the most difficult critters to catch, as they burrow away from you when you get too close. Try running or falling towards them with your Bug Net swinging and hope you don't miss. An Invisibility Potion can also net you a bit more time to catch them. If you need more room to hunt, expand the biome or make a giant one of your own using the Clentaminator, loaded with Dark Blue Solution (sold by the Truffle) around the Underground Jungle.
Do note that while a Battle Potion or Water Candle can still increase their spawn rates, they also increase the spawn rates of enemies as well. On that note, you could accidentally kill Truffle Worms too (shoutout to my naughty Frost Hydra who knocked a Mimic into a pit where a Worm was), so if you'd rather be on the safe side, maybe you'll want to hold onto the Guide to Critter Companionship.

Afterwards, if you haven't already done so throughout the whole game, try getting a decent fishing rod like the Mechanic's Rod, or Sitting Duck's Fishing Pole; the Truffle Worm must be used as fishing bait at the Ocean in order for Duke Fishron to awaken. If you've already been doing quests for the Angler, excellent. You should already be pretty good at fishing by now.

When you have set up an arena at the Ocean, fill your minion capacity and grab your best potions. Adjust your equipment accordingly. Just remember, you're a Summoner. Your strength lies in your trusty minions.
When you're a thousand percent ready, toss in that Truffle Worm and summon the beast.

Recommended Minions:
  • Deadly Spheres
  • UFOs
  • Ravens
  • Sanguine Bats
Recommended Accessories:
  • Lightning Boots or higher
  • Weather in Balloons
  • Master Ninja Gear
  • Frog Leg or higher
  • Papyrus Scarab
  • Charm of Myths
Recommended Buffs:
  • Bewitched
  • Summoning
  • Regeneration
  • Ironskin
  • Cozy Fire
  • Heart Lamp
  • Swiftness
  • Endurance
  • Water Walking (if you're lazy)
  • Inferno
Recommended Armor:
  • Spooky
  • Tiki
  • Hallowed

    The mighty Duke Fishron is one of the most difficult bosses in the game. Use everything you've got on this battle and don't hold back.
    Combine the Flask of Ichor with your best whips. Just don't get too close to the Duke as he chases you, for his damage is through the roof. He will charge at you five times, then spew bubbles to home in on you and block your attacks. An Inferno Potion can help pop these bubbles if they get too close to you, as they only have 1 HP. After another five charges, he will summon the very Sharknadoes that you must acquire. These throw out Sharkrons in your direction, and the Sharknado usually won't disappear until the Duke's next Sharknado attack. When the Duke is stationary, slow down or stop for a brief second to let your buddies pick away at him. Then be prepared to fly straight up, drop straight down or dash straight sideways to sidestep his next five charging attacks.
    Keep an eye on the Duke's health. When it drops down to half, situate your position to prepare for his second phase; the Duke is invincible during this short period. In his second form, the Duke becomes faster and stronger. He can easily dish out over 100 damage to you, but in this form, his defense is reduced by 10. Don't risk going through the second-phase Sharknadoes, as those will hurt you just as much.

    In phase 2, Duke Fishron only has three charges in a row, but they are much faster than his first phase, so don't try to outrun them. After three charges, he will spin in a circle, spreading more bubbles that will chase you. After another three charges, the Duke will cast one Sharknado whirl that will chase you, transforming into a huge Cthulhunado at the ground below. If you're too high up, the Cthulhunado will spawn a short distance below you. The Sharkrons thrown out by the Cthulhunado are also harder-hitting than the ones from the first phase. This attack cycle will repeat until the Duke is defeated.

    Duke Fishron becomes enraged when you take him away from the Ocean. This will cause him to charge at you, and never, ever stop. He can kill you almost instantly this way.

    If you so wish, try latching a Piranha Gun onto him and keeping your distance while the Piranhas and minions whittle his health down. Homing weapons and minions allow you to focus more on dodging, which is the key to victory in this fight. Try a Possessed Hatchet or a Martian Madness/Pumpkin Moon weapon.
    One wrong step, though, and it could all be over just like that.

    However, in Expert Mode, Duke Fishron will enter an exclusive third phase when he falls below 15% HP. The sky will become shrouded in blue fog, reducing your visibility. Now you've really ticked him off. Couldn't let him eat that worm in peace, huh?
    The Duke will turn invisible and dash at you once. Then, he will teleport behind you and dash two times. Followed by another teleport and three dashes. Teleport and repeat back to one dash. He will remain doing this until you finally take him down.
    Trying to run away like you did with his earlier phase will not work due to his fixed teleportation a short distance from you. You'll at least be able to see where he is when he does teleport, thanks to the minimap and his glowing eyes. He will be temporarily visible during his dashes as well.
    The secret to this phase is vertical movement, which is why I strongly recommend the Frog Leg for this. Because the Duke always teleports and dashes from the sides, moving quickly up or down is a reliable way to avoid him. Make sure to keep moving if he still has more than one dash left before the next teleport. Moving to the side too much may change his trajectory in his favor, landing a hard hit on you. If he's at a diagonal angle, dashing in the correct direction will help you avoid him too, similar to how you dealt with Spazmatism's charges.
    It may be hard to hit him since he teleports so often, meaning minions will have to keep up with him as well. For this phase, I recommend a quick weapon like the Magnet Sphere, which attacks quickly and immediately. UFOs are also the best choice here since they too can teleport and attack. Hold your breath and let your adrenaline play this part if you wish.

    Personal rant here: Duke Fishron, despite being the dreadful monster he is, is honestly one of my favorite bosses in the game, because he is almost entirely skill-based. There's a bit of luck and skill involved with every part of the game, sure, but the Duke really stands out to me in particular. To an inexperienced player, he puts on a huge impression as a terrifyingly fast and strong boss that has no problem decimating you in seconds, which may send you into a panic. I was in that boat once. But when you really take the time to practice and learn his patterns, you start to know exactly what you need to do to defeat him. It's very possible to beat him without even getting hit. I dare admit those mechanics and traits alone make him a better boss than the actual final boss.

    If you can defeat him, it'll feel like a huge load off your back.
    But what if he didn't drop the Tempest Staff? Well, then I would legitimately feel sorry for you. I'm certain that the weapon he dropped can help you in killing him again, like the Flairon, and I wish you the best of luck.
    And if he did drop the Tempest Staff?
    It's one of the most relieving feelings in all of Terraria.

A Summoner's Journey (part 9)
You have done it. You have defeated the dreadful Duke Fishron. As a Summoner. And now his minions have become yours. I give my platinum coins out to you.
But is that all? Normally, this would have been the end of the Summoner's journey; the Sharknadoes were once the best minions in the game. But with the many additions to the art of summoning in 1.3 and 1.4, there is still more to be done. If Duke Fishron was the first thing you took care of after acquiring the Deadly Spheres, the Pumpkin Moon, Martian Madness and Empress of Light will be all the more easy for you.
Once those three tasks are completed, you do not need to do the Frost Moon. There is nothing there for a Summoner, although the weapons might suit your fancy. But I didn't need any Frost Moon weapons for my playthroughs. If you so wish, go ahead and take care of that. But the weapons that you'll be getting very soon make the Frost Moon's items look like children's toys (except for the Razorpine holy crud that thing is good).

With that being said, the only things left on your agenda are the Lunar Events and the final boss. The final test begins.

Once your best minions (UFOs/Terraprisma recommended) are reforged, preferably to Ruthless, and your accessories are in check, prepare yourself thoroughly and head on over to the Dungeon. It's time to stop the Cultists' ritual.

Kill them. The fight should take no more than a few seconds, even after the archers start to fight back. Once they're taken out, the Lunatic Cultist will appear beside the Mysterious Tablet and begin drawing power from it. A few seconds later, the boss battle begins and he will start attacking you.

The Lunatic Cultist is the smallest boss in the game, but he is no pushover. He has 32,000 HP, casts a multitude of powerful spells, and teleports above you before each one. His spells include but are not limited to shooting an ice chunk that fires shards in six directions, casting orbs that shoot lightning at you, and firing rays of light in large numbers. He also has several others, including making clones of himself and summoning a Phantasm Dragon. It should also be noted that the Cultist has a 25% damage resistance against most homing projectiles, minions included. Utilize those whip tags.
The fight is not particularly long with the right setup. Just be sure to attack the correct Cultist when he makes clones; you can tell the fakes apart due to their square eyes and that they're always lit up.

Once the Lunatic Cultist is down, the Lunar Event begins. Celestial creatures will invade your world, and four large pillars will appear across the surface; you might already be next to one as soon as the Cultist is defeated. Before doing anything, pick up his loot. He will have dropped an Ancient Manipulator, the final crafting station in the game. Keep it in your inventory, as you're going to need to use it at a moment's notice.

There's a likely chance that, as soon as the Cultist is defeated, the celestial creatures could start swarming you instantly. Luckily, your minions will be ready for it. If you're not being attacked yet, look at your map. Across the surface, you will see the four Celestial Pillars. If you see a blue one, I recommend you head there immediately. Hopefully it's the closest one to you like it was for me. Flying through the areas of the other towers is bloody dangerous, so you may want to teleport home for a shortcut if the Pillar you're aiming for is far away.

When you're near the correct Pillar, the whole environment will turn blue, the moon will become dangerously close to the earth, and the music will change to the Lunar Boss track. Little blue sparkles will be glittering in the background. Welcome to the Stardust Pillar.

You will likely encounter hordes of strange new creatures before you see the Pillar. All of them are strong, but luckily you and your minions are stronger. The Stardust enemies attack in a manner similar to you; they have smaller entities that fight with them, minions of their own. But you're gonna show them who's boss.
In particular, you want to watch out for the Flow Invader, a squid-like monster that flies around with smaller minions orbiting it and throwing themselves at you. When you kill it, its remaining minions will avenge it by flying into you at a fast speed. If they hit you, you'll likely take over 80 damage, so try to remain wary of the enemies around you. You must eliminate 100 invaders in order for the shield around the Pillar to disappear. When it does, it shouldn't take long for you and your minions to take it down. Just beware that the Pillar summons creatures to fight you when you get near. It has 20,000 HP, but that shouldn't be much of a problem for you at this point. You can gain a decent amount of health by using your Vampire Knives on it, if you possess that weapon. The Pillar itself doesn't have touch damage, so you don't need to avoid bumping into it throughout the fight.

When it runs out of health, the Pillar will start to break down until it finally disintegrates. Enemies will stop spawning. Your mind goes numb. But look; the Stardust Pillar has left many Stardust Fragments in its place. Collect them all, and if it dropped at least 18, immediately slap down your Ancient Manipulator. Take a good look at what you can make.

Now look at your crafting options. Do you see those?
Yes, those.
The Stardust Cell Staff and the Stardust Dragon Staff are already available for you to craft. If you have enough Fragments, take both of them. If not, you'll have to come to a decision. The Cells are excellent for hordes of enemies, which you will be taking on many many times for the next while. The Dragon's damage is beyond almost anything I've ever seen, but it can only be in one place at once. It completely melts larger enemies like bosses when you increase its length, but keep in mind that the final boss has several parts that you must take down. Either way, the choice is yours.

Once you have your new minions in hand, summon a whole swarm of them. They're going to help you with the rest of the Pillars, which for the most part are significantly more difficult. The next one you could/should focus on is the green Vortex Pillar. This one is based on Rangers, and has many enemies that fire projectiles at you from quite a distance. They're not so much a hassle though; just try not to headbutt every projectile that comes your way. The Pillar area will occasionally open small Lunar Portals that strike you with lightning. Sometimes the portals spawn Alien Hornets though, so watch out for that. Getting hit by a Vortex enemy can cause the Distorted debuff, which causes you to float up and down uncontrollably. Grappling yourself to a block allows you to ignore this, though. Once enough enemies are cleared out, you know what to do; take down the Pillar.

You are overwhelmed with pain. The Pillar will leave behind Vortex Fragments, which can be used to craft the Vortex Beater and the Phantasm, which are a gun and a bow, respectively. The Beater rapidly fires bullets and occasionally a homing explosive, while the Phantasm fires a stream of multiple arrows, which are beautiful against bosses. If you plan to use either one, make sure to have an Endless Musket Pouch or an Endless Quiver, crafted at a Crystal Ball with 3,996 Wooden Arrows/Musket Balls, respectively. Those allow for an endless supply of basic ammo. If you've been using ranged weapons before, then you probably already have some special ammo stocked up. Use those instead.
A Summoner's Journey (part 10)
The purple Nebula Pillar is the next one up on the difficulty scale (except on Expert it's the freaking worst like holy crud be careful). The enemies attack in strange patterns and possess many spells, just like Mages. Be wary of Brain Sucklers, which float through blocks and bite you on the head, turning everything in your vision except yourself black, making it impossible to see; like the Blackout debuff, but even more severe. Beware of Evolution Beasts, which fire pink orbs that can follow you through walls, dealing high damage if you don't avoid them enough. The Nebula Floater teleports around you at erratic rates, spawning small eyes and shooting lasers at you. These can be especially dangerous and are the worst in my opinion. You basically don't want to stand still during this portion of the invasion. When enough enemies are taken care of, repeat the process and take down the Pillar.

Otherworldly voices echo around you. With the Nebula Fragments, you could make two magic weapons; the Nebula Arcanum and the Nebula Blaze. The Arcanum fires a slow-moving orb that is orbited by projectiles that damage enemies. When hitting an enemy or surface three times, or after 11 seconds, the orb explodes, which also deals damage. The Blaze fires a cosmic fist that homes in on enemies and explodes for high damage. Sometimes a much stronger, faster blue fist will fire instead. Both of these weapons are rather Mana-costly.

There's only one last Pillar to take care of. The most difficult of these for newcomers, in my opinion, is the Solar Pillar. And let me tell you, a younger me would've gladly taken on all the other Pillars at once rather than the Solar Pillar (except on Expert lol). Its enemies are super fast, super deadly, and often super hard to kill before they hit you.


Do you see this son of a fish? This is a Crawltipede. It crawled right out of the seventh circle of Heck, and its only purpose in life is to take your good day and throw it right out the window. Then it takes your bad day and pours salt all over it and treats the wound with lemon acid. It's a worm-type enemy that flies endlessly through the air at mach speed, faster than most wings and the UFO mount. It's nearly impossible to dodge, and even if you do, it'll just turn sharply around and impale you from behind with 120 damage, 240 on Expert.
That is, unless you stay on the ground.
The Crawltipede is the Solar Pillar's version of an anti-aircraft missile. It will actually not aim for you if you're on the ground. So when dealing with these guys, you can't fly more than a couple blocks off the ground. In addition, the Crawltipede's only weak spot is the back of its tail. The tail has 10,000 HP, but all attacks hit for ten times more damage than normal. One dagger thrown from the Vampire Knives can heal you for an astounding 20 HP if you can land it. Spectre Mages would have a fun time with this enemy.

The Solar Pillar's ground troops are a pain however. Selenians can reflect some projectiles while spinning, Srollers somersault into you for an incredible amount of damage, and Corites are like super fast Meteor Heads that are tough to kill before they hit you, since they tend to swoop in from below. For this portion of the invasion, it's recommended that you set up your best sentry nearby for all the protection you can get, but be aware that Selenians can also reflect the Frost Hydra's bolts if they time their spin correctly. It's very easy to get killed in just a few hits from the Solar Pillar's creatures. Being a Ranger at this point is true suffering.
Keep in mind that the Pillar itself can spout fireballs which deal damage on contact. Since the yellow background features a rain of solar flares, it may be difficult to distinguish the projectile from the background elements. Either way, it's easy to tell that this Pillar is best suited for Warriors, who are more likely to survive with their high defense and powerful attacks.
One of the most efficient ways to deal with the Solar Pillar's enemies in my experience is to build platforms in the air. Crawltipedes will not target you and the enemies on the ground will pose less of a threat, leaving Corites as the only annoyances. Battling atop a hill will also work, and it'll look quite cinematic as well. It's truly over for the Solar Pillar if you have the high ground.

When you somehow manage to destroy the Solar Pillar, pick up the Solar Fragments and take a look at the weapons you can make, if you can. You can make the Solar Eruption or the Daybreak. The Solar Eruption is like a cross between a sword, spear and flail, that extends a far distance and hits enemies multiple times, causing small explosions of 110 damage with each hit. It can also hit through walls. The Daybreak is like a throwable javelin that auto-throws like the Vampire Knives, launching a large spear of light at a fast speed which arcs downwards after flying a certain distance. It doesn't go through walls, but when it hits an enemy, it deals 150 damage and remains stuck there for a while, dealing 100 damage per second (25 per quarter-second). This can stack up to eight times, allowing for an insane amount of DPS, especially with the Stardust Cells' debuff. With all this destructive power, nothing can stand in your way.
Except for...

Oh my. All Celestial Towers have fallen. Impending doom approaches...
Boss: Moon Lord
You have one minute, my dear friend. One precious minute to prepare for the impending doom. Head home, craft whatever Fragment weapons you can. If you have a Bewitching Table or other class furnitures, now would be the time to use them. Your screen starts to shake and the background is beginning to darken. The music is fading away. Time is running out.

If you so wish, prepare your buffs. You can also craft Super Healing Potions by bringing 4 Greater Healing Potions and one of each Fragment to an Alchemy Station. These can restore 200 HP and are the best healing item in the game. To be honest though, you have a pretty large chance of dying on your first encounter, since you won't know what to expect. Any potions used are likely to be a bit of a waste, unless you know exactly what to do and how to handle the battle. This may take a few practice runs.

Don't forget, you're not alone. You have the friendships you forged throughout this odyssey. And they have you. Together, you can overcome this final obstacle, and protect the world you love so dearly and worked so hard on.

Brace yourselves. The Moon Lord has awoken.

Recommended Minions:
  • Terraprisma
  • Stardust Dragon
  • Stardust Cells
  • UFOs
Recommended Accessories:
  • Frostspark Boots or higher
  • MASTER NINJA GEAR
  • Frog Leg or higher
  • Weather in Balloons
  • Wings
  • Papyrus Scarab
  • Any other Summoner accessory
Recommended Buffs:
  • Bewitched
  • Summoning
  • Regeneration
  • Ironskin
  • Cozy Fire
  • Heart Lamp
  • Swiftness
  • Endurance
  • Wrath
Recommended Armor:
  • Spooky
  • Tiki
  • Valhalla Knight

You will see a bright light, and before you know it, the final boss appears before you. There's hardly any time to think. Immediately take to the sky and stay flying in one direction to avoid the many, many projectiles he spams at you. He's quite fast, and will catch up with you swiftly. Luckily, he doesn't actually deal any touch damage, since he's more in the background than anything. Teleporting back home will cause him to teleport with you. He cannot despawn unless you die or exit the world.

Or of course, unless you defeat him.

Vampire Knives will be of no use for this battle. The Moon Lord will extend a tentacle from his mouth that is very difficult to avoid. When it latches onto you, you will be afflicted by the Moon Bite debuff. This cancels all forms of lifesteal, meaning that Vampire Knives and the Spectre Hood will not heal you at all. You'll have to use a different weapon and try to dodge the best you can. This attack causes a few entities to spawn and slowly fly towards the Moon Lord; if not defeated in time, they will heal the Moon Lord by 1,000 HP.

Go for the eyes. The Moon Lord has three eyes; one on each hand, and one on his forehead, that you must take out in order to initiate the next sequence of the fight. They periodically close to protect themselves from damage. The hands have 25,000 HP each while the head has 45,000, on Classic Mode. When you see an opening, start swinging your Kaleidoscope or your strongest weapon at it and watch the damage add up. Since your new minions can fly fast, it'll be easier for them to start attacking the eyes. The Dragon tears up one eye at a time with its raw damage, while the Cells can also add damage over time to each part, completely destroying the eyes.

Watch out, however. When the head's eye is open, it will soon begin firing a large sweeping laser that's hard to dodge unless you know where it's coming from and how to dodge it. The beam can be evaded by flying diagonally up and over the Moon Lord's head, assuming the deathray was aiming down at you. You can also avoid it by teleporting with the Rod of Discord. As of 1.4, the deathray can phase through any blocks to reach you, so good luck if you turtle a lot.

When one of the eyes is defeated, it will fly out of its socket and continue fighting by the Moon Lord's side. In this state, the eye is invincible, and the empty socket will be able to damage you. This eye, as you will soon see, is called the True Eye of Cthulhu. It follows an attack pattern of Phantasmal Bolts, Phantasmal Spheres, Phantasmal Eyes, Phantasmal Deathray, and Phantasmal Spheres again. Many large Phantasmal Eyes will be thrown at you throughout the fight, flying through walls, and can deal around 60 to 100 damage.

There are many ways you can create an arena for this boss. Personally, I find it most reliable to horizontally distance myself from the Moon Lord using the Master Ninja Gear's dashes, to the point where he's practically offscreen. This makes it so that his projectiles always come from one direction instead of from all angles, making dodging infinitely easier and giving you more reaction time. Then when his head eye opens, fly up and over the deathray using the Frog Leg.
I used to use the UFO mount for this fight, but its lack of good speed and acceleration leaves much to be desired. Do not underestimate mobility.

When you're at low health and your potion is still on cooldown... run to the Nurse. As long as you have money, she can make the battle so much easier, especially if Autopause is enabled (though I personally don't enable it). She's able to heal you instantly with the only limit being your wallet. I understand fully that this tactic is hardly worthy of being called a tactic, but this fight isn't always easy, especially on Expert. But, if you dodge correctly, the battle can be won without the Nurse.

When the head and the hands have been taken out, the Moon Lord's chest will open up, revealing his core. It has 50,000 HP and is the final phase of the battle. The True Eyes will continue their assault, and all the attacks will become more frequent, minus the deathray (when the head's eye is out, the deathray will no longer fire). Remember to right-click or whip the core to ensure your summons aim for that spot.

You're almost there. All of your and your minions' attacks are converging to one spot now. Your Dragon and/or Cells (and possibly some UFOs) combined with your whips are draining its health as fast as the Moon Lord drains yours. It has all come down to this.
But before you realize it, it's over. The Moon Lord has fallen to the power of the Summoner.

The Moon Lord can drop not one, but two summoning weapons; the Lunar Portal Staff and the Rainbow Crystal Staff, along with seven other weapons. So technically, you have a 44.44% chance of getting one, as he drops two weapons per kill. Either way, whatever he drops can be a huge help in defeating him again. Personally, I find the Terrarian to be a good weapon against him, especially with its homing particles.

You will notice that he dropped Luminite. That can be turned into Luminite Bars at the Ancient Manipulator. Luminite Bars are the crucial ingredient, besides Stardust Fragments, in crafting the beautiful Stardust Armor. It will take more than one Moon Lord kill, however, so have patience and don't give up. And once you have that armor, you'll become even stronger, have additional minions by you, and even gain control over the Stardust Guardian to help keep you safe.

Once you can manage to best the Moon Lord enough times, you will eventually get the staves you need. And each new weapon you get will make the boss and the invasion just a bit easier. Note that you can craft a Celestial Sigil with 12 of each Fragment, which summons the final boss without having to go through the Lunar Events. It will be an arduous grinding mission if you're unlucky, but I know you can do it. You've come this far; you must use your knowledge of combat to the best of your ability. I believe in you.

And once you have that final staff, you'll feel lighter than air.

The Summoner Triumphs
You have won. After many tries, after many failures, and after many victories, you have saved your world from countless invasions and took down the Moon Lord himself. All the while, you were playing the most rewarding playstyle of them all; the Summoner. You've had friends at your side who were there for you every step of the way.
There are many other things to do in Terraria, especially with 1.3 released. Expert Mode, for example, has unique loot dropped by bosses that cannot be obtained anywhere else. With 1.4, there is also Master Mode, a very tough journey for the people who are truly willing to embrace pain. If you think you can stomach it, especially as the Summoner, then I wish you the best of luck.
And if you decline...
Rest easy, hero.

You've earned it.
The Ultimate Summoner Loadout (OUTDATED)
So 1.4 completely negates these next few sections due to minions now adjusting their damage dynamically instead of on summon. I guess I'll keep this section here though for legacy reasons (and for anyone running an older version).

If you've beaten the game as a Summoner, you may have found out that summon damage works quite differently from all other kinds; in the way that damage is only applied upon the initial summoning of minions and doesn't change if you decrease/increase your damage while they are summoned. This works because a summoned minion is a constant form of attack, a living projectile, if you will. Similarly, if you were to fire a Rainbow Gun or Nimbus Rod, which lingers for a short while, changing your damage or accessories would not affect the attack because it's currently in play. Minions act the same way, but because they are an attack that lasts forever, this allows for an incredible amount of flexibility with your accessories.

So just what is the absolute strongest damage loadout as a Summoner?

If you wish to attain that level of strength, you will have to undergo a very complex and time-consuming process of timing and getting everything just right.
First off, you will need an Expert Mode world for this to work. Next, you will need a crudload of accessories:
  • Papyrus Scarab
  • Avenger Emblem
  • Pygmy Necklace
  • Hercules Beetle
  • Necromantic Scroll
  • Summoner Emblem
  • Celestial Shell/Stone
All reforged to Menacing.
In the vanity accessory slots, place the Pygmy Necklace beside the Avenger Emblem as shown. You may also have other accessories you commonly use beside the Hercules Beetle, Summoner Emblem and Celestial Shell, as you will freely be able to switch them out after the loadout is complete.
Then, you will need to set up a small station to prepare your loadout:
This area contains a closed space for Mimics to spawn from the Chest Statue, a passable water volume surrounded by Bubble Blocks (sold by the Party Girl in Hardmode), a Bewitching Table, and a Bat Statue which is also hooked up to its own switch.
So what's with the statues?

Well for this part, we're gonna need a little help from our good friend, the Mage. That's right, you're going to need the Nebula Armor set for this loadout. Meaning that you need a whole lot of Nebula Fragments and additional Luminite Bars; 45 and 36 respectively.
The Nebula Armor's set effect allows buff boosters to fly out of enemies occasionally when you strike them. They randomly appear in one of three categories depending on the color of the booster: pink for damage, orange for life regeneration, and blue for Mana regeneration. Boosters float in the air and are easily picked up at a further distance than picking up normal items. Each buff type stacks up to three times, intensifying the effect of the booster type you've picked up. One stage of the damage buff gives you an additional 15% damage, meaning that its third stage gives you +45%. This is a universal damage type, meaning that minions will benefit from it. This is also the reason why the endgame Mage is the best support character you will ever need. The best part is that the boosters spawn even if you hit enemies with a non-magic weapon, unlike the Spectre Armor. Unfortunately, since each stage of the buffs last for eight seconds, you will need to be quick and/or have a lot of boosters nearby.

This is where the Chest Statue comes in. By flicking the switch a few times, you can spawn up to three Mimics. In Expert Mode, they have 1,000 health, and will take a lot of hits before dying. You can use any weapon that goes through walls to hit them repeatedly and get as many buff boosters as you can, but I recommend using a weak weapon like the Vilethorn. In my case though, I found that my Baby Slime was actually very helpful at this stage.

This is the part where the water serves its purpose. You're going to need the Shrimpy Truffle, which is only found in Duke Fishron's Treasure Bag in Expert Mode. This summons a Cute Fishron mount that can fly freely through the air, albeit slower than the UFO. However, when in a body of water, its speed increases dramatically, and you gain a +15% damage bonus. This buff remains for six seconds after you leave the water, but remains indefinitely if the mount is either submerged, or you are below half your health.

Bats in Expert Mode have a 10% chance to inflict the Feral Bite debuff for 30 to 90 seconds when they attack you. Throughout the duration of this debuff, your regeneration is decreased and you have a chance to be randomly afflicted by any number of these other debuffs for a short time: Darkness, Cursed, Confused, Slow, Weak, and Silenced. However, Feral Bite also increases your damage by 20%, making it very viable for this loadout and the reason a Bat Statue is required here.

In this image, I'm sitting in my puddle of water with the Cute Fishron mount, allowing my Baby Slime to collect buff boosters from the Mimics, which instantly go to me. While standing away from the cage, the spawning boosters float up in a straight line, which is why there's a small opening at the top. This way, I can simply walk closer if I need to refresh the buffs for whatever reason. I also have a second Baby Slime taking care of enemies down below in case I need additional boosters. Remember that the pink boosters are the important ones.
There are much better ways to collect these boosters, such as using a 1-Second Timer or even a completely different mob-spawning statue. This is just how I did it.

With all of these damage buffs, consume an item with the Well Fed buff as well as a Wrath Potion, for even more damage. Drink a Summoning Potion for the extra minion. Finally, spawn a few Bats to give yourself the Feral Bite debuff. Don't forget the Bewitched buff.
When the third stage of the damage booster resets to 8 seconds, immediately swap out into your Stardust Armor by right-clicking it. Now you have finally attained the highest summon damage possible. It's up to you which minion you want to summon, but since we're going for the absolute best, we're going to summon the Stardust Dragon. You only have 8 seconds to swap into your Stardust Armor, summon 10 stages of the Stardust Dragon, then quickly swap your Avenger Emblem with the Pygmy Necklace by right-clicking the Necklace, and then using the Stardust Dragon Staff one last time to complete all 11 stages of the Dragon. Though, if you are playing with a friend, they can continuously supply you with boosters so that there's no immediate time limit.

At maximum power, you hold a grand total of +262% summon damage. With this much strength in your minions, just about anything you summon will surely serve you well. The Baby Slime is even capable of toppling Golems!

And there you have it! The absolute best Summoner loadout in Terraria.
Well, for the most part. There is a loudout with slightly more damage, but it's not really worth using. More on that in the next section.
The Ultimate Summoner Loadout (Sentry-based) (ALSO OUTDATED)
In the previous section, we talked about the best possible Summoner loadout. However, as of 1.3.4, it's not the highest damage in terms of percentages and raw numbers.

If you want to attain the highest possible damage loadout, you would need the same loadout of accessories as mentioned earlier, but your armor would be different. You would need to wear the Stardust Helmet, your choice of the Valhalla Knight or Dark Artist chestpiece, and the Red Riding Leggings. This would total up your summon damage increase to 77%, a whole ten percent stronger than full Stardust Armor. Combined with all the ultimate accessories, potions and Nebula/Feral Bite/Cute Fishron buffs, the final increase in summon damage is +272%, which is an incredible amount. With full Stardust armor instead, the total is +262%.

However, there is a significant flaw with this loadout; it's highly impractical, for both following and sentry minions. It only provides one additional minion and no additional sentries, accessories aside. Your best bet, in the case of sentries, is to wear one of the full Tier 3 sentry armor sets. Which one you choose is up to you. Keep in mind that each set compliments a certain type of tower defense summon; pick an armor set based off your favorite sentry, if you have one.

Your Menacing setup should look something like this. Since we're going for a sentry loadout, normal minion cap bonuses are not necessary, so we can take away the Pygmy Necklace, and replace the Necromantic Scroll with any sentry cap accessory dropped by the Ogres (Go for the Squire's Shield if you plan to use the Brand of the Inferno). The lower three accessories also provide more knockback, which many sentries already have a lot of.

The fundamental problem with this setup is that it revolves around sentries, which only last for two minutes at a time. So when they disappear, you'll need to re-equip the damage accessories and summon your sentries again. This applies less-so during the Old One's Army since tower defense sentries last the whole battle; normal sentries will still have their normal lifespan. Though, without your mobility and survivability accessories, you're incredibly fragile unless you're skilled with a mount. You will be able to summon up to five of any combination of sentries though, so you will be well-defended for the most part. Five Lunar Portals will serve you wonderfully, as the high amount of sweeping lasers can work miracles on a battlefield. Five Rainbow Crystals will become a beautiful light show that can deal tons of damage, assuming they can actually hit something.

You can summon as many tower defense sentries as possible when you fight the Old One's Army, with your only limit being Etherian Mana. Five Ballistas in other events sounds like a dream come true.

That just about does it as far as a sentry loadout goes. In many cases it may not be as useful as a cluster of Cells or a giant Dragon, but it's definitely fun to play around with if you have the resources to spare.
Summoner's Maximum Power (STILL OUTDATED)
I wanted a little bit more room to add some details to this and the other sections, so I moved this reference sheet here.
These are the numbers you will get on your summon staves when you successfully achieve the first ultimate loadout, at +262% summon damage. You obviously won't get a lot of time to review these numbers in-game, since your damage buffs can only last for so long. So I've decided to write these down for the sake of convenience... and because I really like writing Summoner-related statistics.

The final results in damage values for all summon staves are as follows:
  • Mythical Slime Staff: 32
  • Ruthless Hornet Staff: 39
  • Ruthless Imp Staff: 90
  • Ruthless Spider Staff: 112
  • Ruthless Queen Spider Staff: 112
  • Ruthless Pirate Staff: 170
  • Ruthless Optic Staff: 126
  • Ruthless Pygmy Staff: 144
  • Ruthless Staff of the Frost Hydra: 427
  • Deadly Deadly Sphere Staff: 199 (It was the same base damage as the Tempest Staff so I tried something different, hehe)
  • Ruthless Raven Staff: 159
  • Ruthless Tempest Staff: 213
  • Ruthless Xeno Staff: 152
  • Ruthless Stardust Cell Staff: 257
  • Ruthless Stardust Dragon Staff: 170
  • Ruthless Lunar Portal Staff: 213
  • Ruthless Rainbow Crystal Staff: 640
  • Ruthless Ballista Staff: 597
  • Ruthless Flameburst Staff: 376
  • Demonic Explosive Trap Staff: 503
  • Demonic Lightning Aura Staff: 423 (I still find this hard to believe since the numbers on this one are strange)
Wow. That's a lot of damage. While the Frost Hydra, Ballista, Stardust Cell, and Rainbow Crystal appear the most impressive, it is actually the Stardust Dragon who truly shines with this much power. Remember that the Dragon's damage increases more and more as you summon more segments of his body. With 11 segments, he shows no mercy as he dishes out over 1,000 damage to just about everything he touches.
At this point, I find it funny that the official Wiki once claimed the Dragon's highest possible damage to be 1050. We've broken the theoretical damage cap, ladies and gentlemen.
Also yes, that was a Flow Invader on Expert Mode.

After all that, the Stardust Dragon alone can even rival Rangers and Mages in terms of multi-target DPS. But, as you've seen in the previous sections, it takes a lot of effort to get to that point; only then does it become constant, automatic damage around you at all times. And they call Summoners lazy.
Conclusion
I dedicate this guide to you, the one who came this far. I give it to you with all my love.

Thank you for having the patience to read this insanely long guide. I hope you decide to take up the Summoner at some point, because it is truly a unique playstyle and one of the most rewarding experiences in Terraria.

Please do take the ten seconds required to post a comment, for I have worked on this guide for an incredible amount of hours, and I would appreciate feedback... and sleep.

I wish you all luck on your adventures, Summoner or not. I hope this guide has helped you in some way, as I feel that the Summoner is a sacred class and needs to be given a chance by more people.

Until next time, guys,
This is Sci, signing off!


Also, special thanks to Didu for making the guide icon.[imgur.com]
743 Comments
Kascin  [author] May 2 @ 7:23pm 
I just came back from a cruddy closing shift at work.
Reading something as simple as that makes it all worth it. Thank you.
Vix. May 2 @ 5:16pm 
this guide is a beauty
Kascin  [author] Apr 2 @ 1:21pm 
Thank you! This monster will grow exponentially next update.
Moonn_Mann Apr 1 @ 4:01pm 
Absolute monster of a guide that sheds light on my beloved summoner class. Take ALL of my points
Kascin  [author] Jan 26 @ 12:49pm 
Makes sense. Another possible point I could use is a minion's movement type; grounded and aerial, for example.
Camera Man Jan 24 @ 9:47pm 
I haven't read the guide in a long time so I might've forgotten some things. Awhile I rather point out niches like how maybe certain summons might be more consistent than others although having lesser damage against Empress running around, bullet points could help as a simplified form of an explanation.

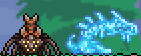
Use Time is almost questionable since you're usually have your summons ready for fights, unless maybe summon reposition(?)
Kascin  [author] Jan 18 @ 7:06pm 
Happy new year.
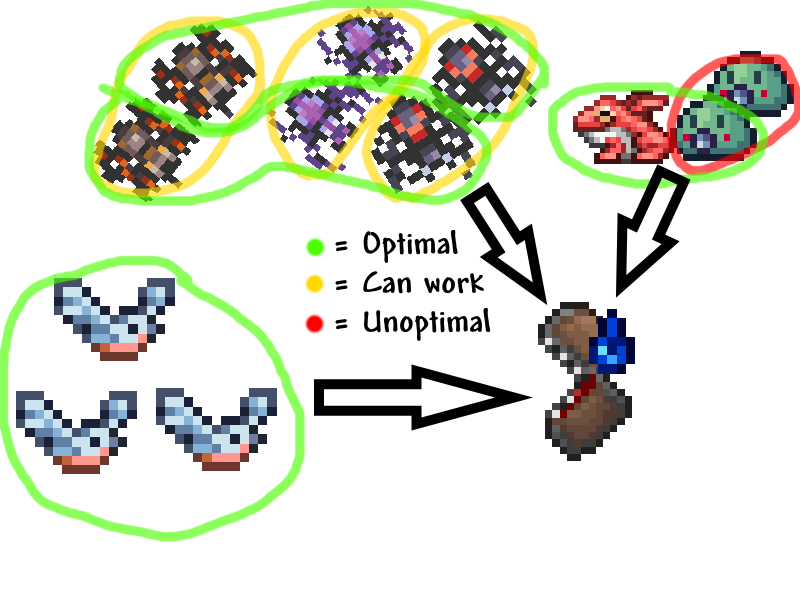
I'm considering the prospect of adding bullet points for stats on the Meet the Minions sections, to be more consistent with other informational sections.
Not sure if there's a point though, I could add easily readable damage stats, maybe the debuffs they inflict... What else? Do people care about listing the knockback and use time of summon weapons? Is that too much information?
ninja axolotl Dec 2, 2023 @ 10:33pm 
thanks
Kascin  [author] Nov 30, 2023 @ 6:22pm 
Hope you're having fun.
ninja axolotl Nov 30, 2023 @ 5:40pm 
im up too pre hm meet the minions in this guide.
tomorrow i will read more