Idle Monster TD: Evolved

Idle Monster TD: Evolved

29 ratings
Beginner's Guide
By Grimagin
Everything you need to know to get started. Plus, how to get an early advantage by preparing for the end game from the start.
I am currently in the process of adding content for this guide. Please be patient with me as I continue to work on it.
4
   
Award
Favorite
Favorited
Unfavorite
Before Reading
If you haven't already, I suggest you take a look at the FAQ provided in game. I understand the tutorial isn't the greatest in the world, and it doesn't go into great depths of detail, but that's a good place to start gathering information and learning about the game. It's found in the Settings menu under FAQ/Help.

At the top it will point you to their Wiki.[idle-monster-td-evolved.fandom.com] There you can find even more help and resources about the game. I find a lot of it to be very good and well written, but some of their suggestions I find to be a little misleading. Plus, a lot of topics aren't gone into detail. So, I've comprised this guide to provide you with my own thoughts of analysis and recommendations on what I believe you should be doing instead.
Warning, Do Not Attempt!
First, I would like to take a moment to warn you of the game's anti-cheat system. If you attempt to modify the game in any way either by editing the data or process time faster using a tool such as Cheat Engine, you will be given a warning about your attempt to cheat. Your second attempt will remove your name from the online leaderboards and will no longer be able to participate in Tournaments by flagging your account with a DataEdit error message. You will still be able to play the game and unlock the rest of the achievements, so make sure you at least participate in 12 before attempting to modify your game information. You have been warned!

As I'm sure you're already aware, the game tries to exploit the player's wallet by tempting them with lots of in game purchases that aren't worth the asking price. I can list countless other TD games for less than $2 that provide a much more engaging form of entertainment that aren't riddled with "micro-transactions." The Law of Diminishing Returns runs rampant with these sorts of games.

However, this guide is about Idle Monster TD: Evolved, so that's what the focus of the content will be about.

In my own experiences playing this game legitimately for roughly 2 weeks (enough to play in 5 tournaments), I noticed several flaws in the mathematical algorithms making this game considerably frustrating given the soldiers and bosses power creep paired with the very slow starting game speed as an up-gradable mechanic alongside special towers having skills to boost it as well. What a mess!
Types of Time
There are 3 aspects of time to consider: Offline play time, Active play time, and Game Speed time.

Offline Time
The game uses a mathematical equation to award you an amount of gold during the time you are away that only amounts to a fraction of the gold you would have earned if you had left the game idling in the background while doing other tasks like sleeping. The gold earned while offline is a fixed amount that's multiplied by the time you are away. It doesn't take into account the bonus gold dropped from the monsters you have on the board nor the multipliers given from 2x and 10x or bosses and resource haulers. It might not seem to matter in the early game, but will make a great deal difference in the late game.

Active Time
Active play time is the amount of time you spend inside of the game in real time. I think it is worth nothing here that key increments of time will be spend here to call the mob, activate the tank swordsman, and prestige back to wave 1. I calculate that it should take the average person to accumulate 100 days worth of hours playing 24/7 to unlock all of the Steam achievements. The active play bonus and mini-game timers stick to this clock.

I may also refer to this as Real Time.

Game Time
Game speed time is an increased adjusted speed based on percent(%) increases of real time starting at a 1:1 ratio or 100%. Boosting the speed by 100%, or doubling(2x), will adjust to 2:1 meaning for every 1 second to pass in real life, 2 seconds will pass in game. This might not seem like much as first, but as you unlock all of the game speed boosts it will make quite a bit of difference as you're spending a large chunk of active play time trying to grind valuable resources. Timers such as skills and spells will be affected by this value.

The best time upgrade you can purchase to speed up the game time right away, which you should save your first 500 gems for, is the Game Speed Doubler in the Premium Shop. It's also possible to further increase the game speed with other upgrades and towers, but this purchase at the start is the best up front game time increase the game offers.

As a side note, the 10 second defeat timer pauses all timers. If you're actively playing the game, you can reduce it to 1 with a single click.
Resource Order of Importance
First and foremost is Energy. Why? Because it is the most widely spent resource in the game. Most others are only meant for one purpose, but energy is now meant for 5. That's how you know which resources are most important by the difficulty and scarcity of them of the amount and ways you can acquire them. The limitations on upgrade tiers, how much they cost, and how much they award are also telling.

Energy
Energy will quickly be used to acquire the full arsenal of spells to use at your disposal. Then you'll find yourself wanting to evolve your towers, and they cost an increasing amount of energy as well. When you've got some lying around to spare, some useful upgrades can be bought. When you finally reach wave 400 (I believe), you find yourself spending even more to summon the Necromancer. Once you've accomplished all of that, Pets are another aspect of the game that will require energy to upgrade. Pets start coming around once you've earned enough Energy and Experience to have a monster at it's 5th Evolution.

Keep in mind that repeated waves don't award energy or experience, but still award gold.

icon Experience
The second most important resource is obtaining enough experience need for your towers to evolve. It is very slow going to grind, and are the most expensive cost to upgrade in any of the given upgrade tabs. Contributions to evolving is probably the most effective way to increase the damage output of your monster towers.

Setting the game aside and playing in Offline mode is a great way to distribute Experience among your monster towers. The amount awarded when coming back online is evenly distributed between the 10 active towers currently on the field.

icon Prestige Points
While you'll often find yourself spending a lot of time to prestige over and over again in the Enchanted Forest maximizing your efforts to quickly farm Prestige Points, with the right towers involved can also help with the grind for the previously mentioned resources. This is where you'll learn to maximize your efforts of resource grinding in the Enchanted Forest as it's the best map to quickly climb back up the waves.

icon Tech Points
When you finally hit wave 400 you'll notice a new resource at your disposal. The Tech Points upgrades are harder to come by, but net a significant boost to all aspects of the game. With Tech Point upgrades installed, you'll be able to snag 41 with every kill.

icon Gold
The Fifth resource to hunt is Gold. Gold is the only resource that doesn't punish you for resetting the waves, and can even continue to farm after you've been defeated. Getting enough gold to level up towers in sets of 50 can add a significant boost to your damage output. This will come naturally as you spend energy to evolve your monsters. I'll go into detail later about maximizing the efficacy of your gold to focus on a single tower instead of all 10.

icon Gems
Next on the list are Gems. There are a number of ways they can be obtained for free and are relatively slow going. However, they are faster and easier to acquire than tourney points. The best way to farm these puppies is to log in every day for the daily missions. On top of the 102, every rotation of 7 active play bonuses over 70 minutes will earn 5, every 4 hours (lowering it down to 2) spawning the tank swordsman can earn up to 25, and the log in bonus awards 5x based on your multiplier.

icon Tournament Points
The last resource is tournament points. A new tournament starts every 3 days where you compete on a leaderboard for highest achieved wave over 24 hours. You'll have to prestige to participate and probably won't even earn enough for the cheapest upgrade after your first participation. This is the most stressful resource in the game to be able to afford to upgrade anything.

icon  Kills
With the most recent update to the game (April 10, 2022), kills now become a resource for pets. It works a lot like experience except a set number is required by it's parent monster. Other than that it's pretty self explanatory.
Spending Gems
Before you do anything else in the game... OK, maybe just before you spend any gems in the game, you should consider making these purchases after enough have been put in the bank.
  1. In the Premium Shop you'll find a single (the only) offer that can be purchased with 500 gems. It's the 2x Game Speed, and you'll want to make sure you snag this first. It will make doing everything else in the game now take half the time it used to.
  2. Acquire the Autocast feature on just the 4 Resource Spells. Purchasing Autocast for any of the other spells would be a waste.
  3. Unlock the remaining two tiers of upgrades in both the Research and Tourney tabs for a total of 500 each.
  4. Start making purchases towards resource increases in the Gem Shop.
  5. Reroll Artifacts after reaching wave 2500.
  6. After most Gem Shop Upgrades have been maxed, saving for resource boosts from Resource Pack III.
What to Upgrade First
Basically any upgrade in every tab that increases Energy drop by any means should be the primary focus. As mentioned above, this is the most widely used resource in the game making it the most important. Evolving monsters is where you are going to see the most lucrative increases to every aspect of values while also being the best bargain. It will also take Experience for your monsters to have the strength to evolve to the next level, so it naturally comes second.

Especially the order to upgrades in every tab is:
  1. Energy
  2. Prestige Points
  3. Tech Points
  4. Game Speed
  5. Monster Skills
  6. Spells
  7. Experience
  8. Range
  9. Damage
  10. Gold
  11. Other Upgrade Types
A more in depth analysis of upgrades and their suggestive order can be found in the following guide:
https://steamcommunity.com/sharedfiles/filedetails/?id=2795132219
An Introduction to Towers
Monsters come in all shapes and sizes. They even come in difference classes with their own set of skills. Following a structure of becoming more powerful with each tier of monsters you unlock, they also come with more and better skills at their disposal.

Damage Type
These monsters provide you with your best line of defense against the enemy soldiers. A single tower of this type is who you will be dumping all of your earned gold into as you're making your push towards higher achieved waves.

Damage type monsters are single minded and have skills that do lots of damage in a single attack. Because Res Haulers and Bosses have higher HP than the rest of the soldiers, it's usually best to set these skills to only hit Bosses. Damage monsters that have a splash damage effect will hit all surrounding monsters if the target is a Boss or not. Having their skills trigger when they are available to anyone is the better option. Drain skills are best used at the beginning of the path because its effect is based on the enemies current remaining HP. It's still best used for Bosses even if it is only half effective on them.

The best damage monsters are those who have increased damage output from always active skills. Those are Initiative, Splash. Nuke can be pretty effective too, but it's shortcoming it having a long cooldown. Kingslayer is just a lesser version of Initiative that only applies to bosses. Hit-or-Miss is a wish-wash of results and isn't consistent enough to know if you're actually outputting less damage than you should.

Bird (Common *)

Skeleton Mage (Rare ***)

Cactus Boss (Legendary *****)

Werewolf (Mythic ******)

Darkness Dragon (Divine ********)


Support Type
These monsters provide the best aid to your damage type monsters. It's best to have these guys accompanying them than only having Damage type monsters on the board. They can help a single damage type monster output more damage overall than any other setup.

Support Type monsters commonly have skills that are always active. Their effects apply to all towers within their range (even though they have the shortest), and can combo off surrounding Support monsters. This is why it's best to include the most and as many supports clumped together as possible on the board. Their skills add bonuses to Damage, Critical Hit Damage, Critical Hit Chance, and Attack Speed to every actively placed monster. Just pay attention to their individual global combo skills. With the right placements, you'll have a vastly more powerful team.

The best support monsters are... well, all of them to be exact. It doesn't matter what their own DPS looks like. only their supporting skill power is what matters here. Sadly, there are 10 support monsters and only 10 spots on the board. With the need for at least one splash damage tower you'll have to let one go. I suggest the Rabbit in the common tier.

Debuff Type
The most worthless monsters in the game. I'm not joking. Don't even bother with these guys. Not only do the skills they provide for your team kind of suck, they actually make it harder on you to make progress than help. I've tested this theory, and having equal time to slay soldiers is better for your monsters than trying to clump them all together using Slow. Splash damage works differently in this game and isn't affected by enemies clustered together, so that's one less thing you'll have to worry about.

Debuff Type monsters do come with a weaken skill, but unlike splash, does have a cooldown timer. That's also why a helping hand from support tower skills always being active is more beneficial as well. Poison is also much like the damage monster's Drain skill, except it's it's not as powerful. Even the Assassinate skill has a very small chance of happening and doesn't put a dent in Boss's HP. And, guess what? Special monsters have a similar skill called Execute that's better and more effective too.

However, some Debuff monsters do come equipped with Confuse, Stun, and Teleport. They aren't really good for common use or Bosses only, but can help you out in a pinch if an enemy does happen to slip through the cracks. Just make sure to manually slide the monster's range to the minimum and place him on the end slot on the path if you do choose to use one (and only one). That will prevent you from Teleporting a soldier from the begging of the path only 1 step backwards.

Mole Rat King (Rare ***)

Tanker Bot (Mythic ******)

Ice Mage (Immortal *******)


Special Type
The best all-round monsters in the game. You will be using these monsters frequently in every team setup from farming resources to pushing waves. Their purpose is to help supply the income of resources more quickly, so when you're operating your push team, you'll be able to climb higher.

Special Type monsters come in handy for everything. They increase the speed of progress with every one of their skills. They help with gaining extra Energy with Energy Source and Energy Aura. Because these skills can stack on top of each other, it's also wise to have Special monsters with Restore on your team to double their gain by resetting cooldowns. They also help increase the game speed with Timer Mastery and Time Combo, which can help take the stress off of farming said Energy.

Monsters in the Special class can also grant bonuses to Gold and Experience Drop from both on-hit and aura skills. However, these skills don't stack on top of one another like the former mentioned skills will. Only targeting bosses for these skills will yield better income. You'll still want to keep a team of many Specialists around even if their skills don't directly increase the resource gain because of combos.

The best Special monsters are all of them. But, this time I do mean all of them. Because most of your time is spent farming one resource or another, having all of them down at the same time will be better than any mix for this purpose. That is unless you're saving one slot open for a tower you want to evolve to nab all of the Experience instead.
New Tower Cards
Towers
New Tower Cards
Card Pack
# of Cards
Energy Cost
Card Chance
Starter Deck
5
10
50% Common, 50% Uncommon
Beginner Deck
8
20
20% Common, 65% Uncommon, 15% Rare
Regular Deck
10
50
20% Uncommon, 65% Rare, 15% Epic
Advanced Deck
12
125
20% Rare, 65% Epic, 15% Legendary
Expert Deck
15
300
20% Epic, 65% Legendary, 15% Mythic
Professional Deck
18
750
20% Legendary, 65% Mythic, 15% Immortal
Champion Deck
20
2000
20% Mythic, 65% Immortal, 15% Divine
Master Deck
25
5000
35% Immortal, 65% Divine
Grand Master Deck
50
10000
0% Immortal, 100% Divine
High Roller Deck
155
200 Gems
Card Chance
Moneybags Deck
468
500 Gems
Card Chance
Monster Evolution
Just keep in mind that for monster's that provide no benefits from increased range or skill powers because of the non stacking rule, the following can skip their turn on the evolution table:

Most Damage Monsters

Rabbit (Common *)


Virtually All Debuff Monsters

Sunflora Pixie (Common *)


Tentacles Bot (Rare ***)


Dog Bowwow (Epic ****)


All other towers should be upgraded as usual to the minimum of evolution 12.
Tower Ranges (Showcase)
While range may not seem like a game changer at first, applying all the upgrades to it will have great use for most support skills and skills that combo. Monsters on higher tiers have a longer base range.

Range Minimums
Tower Type
Common
Uncommon
Rare
Epic
Legendary
Mythic
Immortal
Divine
Debuff
5.5
5.83
6.05
6.38
6.60
6.82
7.04
7.15
Damage
5
5.3
5.5
5.80
6
6.2
6.4
6.5
Special
4.5
4.77
4.95
5.22
5.4
5.58
5.76
5.85
Support
4
4.24
4.4
4.64
4.8
4.96
5.12
5.2

Range Maximums
Maximum ranges before pets get involved on the Eerie Cemetery is just double the minimum due to the additional 10% increase. It's slightly less than that on any other map.

What The Difference Looks Like
Debuff


Damage


Special


Support


Active Play Bonuses
The active play bonuses award you for actively spending time inside the game. There are 7 of them that rotate around in the same order given to you every 10 active game time minutes.
Waves come in sets of 10. After the 10 wave in a set is beaten, it creates a save point for when you are defeated. Losing a wave on the 10th wave in the set will bump you back down to wave 1.

Active Bonus
Notes
Damage x2
Save for wave 8 in a set
Gold x2
Start on beginning of wave 5
Experience x2
Start at beginning of wave 5
Game Speed x2
Use right away / doesn't matter
Gold+
Use right away / doesn't matter. if progressing highest achieved wave, wait if possible
Energy+
Use right away / doesn't matter. if progressing highest achieved wave, wait if possible
Gems +5
Use right away / doesn't matter

The Energy and Gold awarded from the Active Play Bonuses are based on the maximum achieved wave. The Resource Packs you can snag in the Gem Shop for a minimum of 100 Gems are also increased relative to the maximum achieved wave. Bosses and res haulers award more experience and gold when killed. Every 5 active bonuses claimed will award +10% damage. As far as I can tell, there is no maximum to the limit of active bonuses damage you can amass.
When to Use Spells
Resource Spells
These four spells should always be active on your loadout with Always Autocast enabled. This will greatly increase the amount of the most important resources you earn while idling the game and not having to worry to continuously simultaneously use them. Unless you're using another loadout to push hard to defeat waves of enemies, there is no reason why you should never see these without their cooldown timers running.

Combat and Buff Spells
I've clumped these together because they are intermixed with each other providing one task of increasing DPS for a short period of time when needed. This is usually towards the end of your push while you're struggling to make a set. There is no need to Autocast any of these spells because of your watchful eye in timing these perfectly with your push. The reason is that you'll want to make sure these spells strike at the moment all enemies for the wave have spawned and not somewhere in the middle like when the boss spawns.

Initially you'll want to make a loadout comprised of Rain of Fire, Strength Boost, Battle Roar, and Freeze. Later on down the road when things get really difficult, and you've got the levels on these skills to actually make a difference, a second loadout containing of Strength Boost, Battle Roar, Heavy Weapons, and Eagle Eye unless you've got the reflexes of a fox. The reason Death Awaits is not included in any of the loadouts is because of how little impact it has in damage (especially towards bosses).

Keep an eye out for when you start to repeat waves. Take note on the highest wave in the set you can make it to without the need for spells. The right time to activate all the spells simultaneously for the best effect is after all enemies for the wave have spawned. Because some of the spells have an active time of 30 seconds instead of instantaneously, you might be able to progress even more waves if you wait to cast those towards the end of the active spells timers.

If you're patient, you can also wait for the Active Play Bonus Damage 2x to roll around. With that activated for 2 minutes, you'll be able to make it even further when you activate the spells.
Targeting is Important
Why, When, and How to use Skill Support
Final Thoughts
If you are struggling or would like my perspective to some wondering question you may have, I will do my best to answer them to the best of my ability. Just leave a comment below and I'll see what I can do for you.
7 Comments
Dr.Zoidberg Jul 29, 2022 @ 12:00am 
Great guide! Thank you :cozybethesda:
Calenar Jun 24, 2022 @ 6:25pm 
You should really change your approach to in-app purchases and the way you see them. Not all mobile games are run by studios and use the same tactics, so seeing them exist in a game shouldn't automatically bias you to shit on them.

Yes, 2$ TD's can be better, but you might have to pay 2$ for 50 shitty games before you find a good one.

Sure you can read reviews, but how long is that gonna take and some people don't want the game spoiled for them before-hand.
So a free game that gets constant updates with an active Dev that talks to the community with in-app purchases that might be expensive, but not predatory is honestly a better alternative to me, and many others in the Discord.


Great guide tho, really amazing.
Calenar Jun 24, 2022 @ 6:25pm 
"As I'm sure you're already aware, the game tries to exploit the player's wallet by tempting them with lots of in game purchases that aren't worth the asking price."

Please note 1 example of this ever happening?
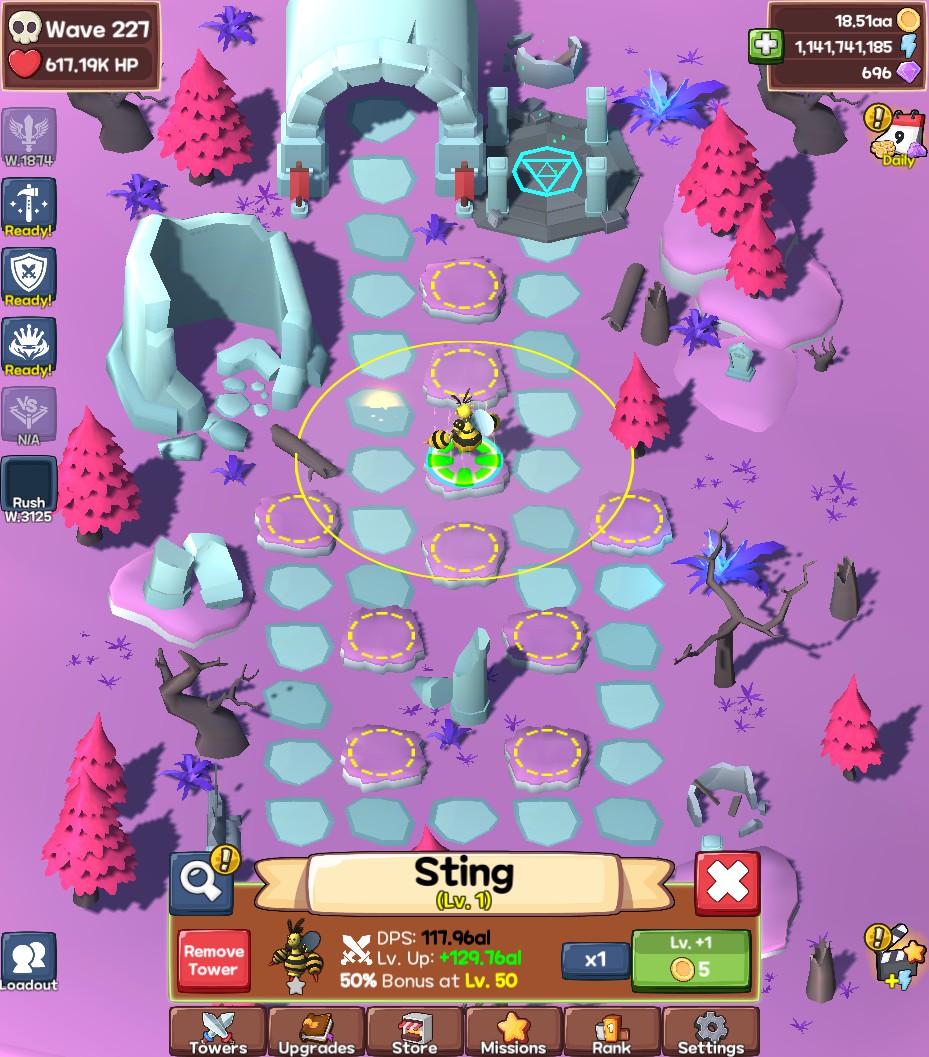
There are options to buy, but not once will the game give you a pop, forcing you to close an offer screen.
The price might be steep, but developers need to make a living and since he's not using predatory tactics, this is the alternative.
jaguarrl Apr 28, 2022 @ 7:12am 
Thanks Grimagin for the effort in the guide! We have an active community on Discord, but I admit to not being as active on the Steam Community. Appreciate your efforts.
Grimagin  [author] Apr 20, 2022 @ 4:21am 
Finished explanation of towers, and added a section on range.
Grimagin  [author] Apr 20, 2022 @ 1:37am 
Thank you for your continued support.
jadedlogik Apr 19, 2022 @ 12:57pm 
thanks for all the work you've put in on these guides here grimagin :) *thumbs up*