Firestone: Online Idle RPG

Firestone: Online Idle RPG

144 ratings
Firestone: Online Idle RPG: Complete Guide (Beginners & Advanced Players)
By Aurora
Comprehensive guide to everything about Firestone Idle RPG.
Guide is up to date! (last updated on: April 2025)
Describes every aspect/structure of the game and covers as much as possible at all stages of progression, with constant updates and revisions to ensure the most accurate information is provided at all times.

This guide is based on the old/outdated guide from Verkade.

10
5
4
5
2
   
Award
Favorite
Favorited
Unfavorite
Welcome!
Comprehensive guide to everything about Firestone Idle RPG.
This is a guide for beginners and also for advanced players.
I hope this guide will make it easier for you to start playing Firestone and help you avoid the most common mistakes.
Quick Hints / Quick Tips for Beginners 1
⠀⠀
📢 IMPORTANT!: The first thing you have to do in game: Activation of the purchase confirmation for gems! (Settings)

Researches
  • Unlock the second Firestone research slot (library, with meteorites) as soon as possible so that you can always do two researches at the same time
  • Whole research (Firesorne, Exotic, Alchemist, Meteorite, pers. Tree, Talent)
    Focus first on: Research time reduction (Map, Alchemy, Firestone, Guard training) or any bonuses like more beer, more meteorites etc., pickaxes, battle cry, prestigious, and raining gold... raining gold and raining gold! It’s all about the gold!
    The order is up to you but... don't forget the gold
  • Save inventory items and scrolls until you are level 30. Then sell them at the Exotic Merchant.
Heroes
  • Your Heroes: Unlock all 3 Tier as early as possible (with meteorites)
    They benefit all heroes, making them much better than tier 1 equipment. Also you gain effect from tier 2 and tier 3 equipment even when you don’t have that hero in your party. It’s a permanent and best investment for your void crystals.
    Unlocking tier 2 and 3 of the gear requires gear power specifically.
    Tier 2 = 480 meteorites
    Tier 3 = 720 meteorites
  • From level 300 and 5 billion gear power you unlock an additional mission (mystic chest, with titan seal) to reach this 5 billion gear power as soon as possible for new players it's necessary also to level up the weapon at Tier 1.
  • Level if possible first Trier 1 (Weapon) then Tier 2 (Wrist) and then Tier 3 (Ring + Relic).
  • Don’t bother with HP or Amor in this game unless you need to progress further in trees or unlock tier 2 and tier 3 equipment.
  • Enchant rings 1-3 levels higher than wrists and relics. Enchant wrists and relics 2-4 levels higher than tier 1 equipment.
  • You don’t actually enchant the equipment itself, you enchant the slot. Meaning when you get a higher rarity later on in the game, the enchantment level will carry over to the upgraded equipment.
  • Ignore seals unless they are for a weapon or they are for wrists, relics or rings.

    Strategy 1
    • For beginners or also for those who can only manage a few mapmissions/day or who want to reach 5 billion gear power fast without wasting too many empty crystals on T1, it's best, in my opinion, to upgrade Tier 1 Weapons and Tier 2 Wrists as soon as possible and complete them with all mythical sigils. And then Tier 3 (Ring/Relic).
    However, if you realise that upgrading tier 3 is too expensive and progress is too slow, you can bring Tier 1 of all heroes you have in game/party to max (weapon/armour/health) + seal. If you still don't reach the required power at level 415, then you should focus only on Tier 1 for all heroes and bring everything (weapon/armour/health) to maximum + seal until you have the necessary power.

    Strategy 2
    • Players who are able to complete all 4 map cycles per day should continue with the original strategy of upgrading only Tier 3 (Ring/Relic) and Tier 2 equipment (Wrist), and then upgrade Weapon and the remaining Tier 2 equipment. (example under: Hero Equipment / Jewel Equipment)
    A mythic lvl 11 ring/relic provides 124,416,000 gear power. 21 heros with both lvl 11 ring and relic will have at least 5,225,472,000 gear power

    Also here: However, if you still don't reach the required power at level 415, then you should focus only on Tier 1 for all heroes and bring everything (weapon/armour/health) to maximum + seal until you have the necessary power.

    Strategy 3
    • A little calculation shows that at level 300 you have about ~14 heroes. If you maxed all their Tier 1 items (which is relatively cheap) then you already have 4.2 billion gear power.
    Now, you need the mythic seals to do that and given the distribution, you'll have T2 and T3 seals before all the T1, which give even more power.
    So it's true that 5b power seems like a lot, but you can definitely reach it if you decide to.

📢 Your goal should be to find a good balance between wasting/using empty crystals for the "less effective" equipment and wasting/using empty crystals for the most effective equipment (for the required gear power), and finding a balance between upgrading only the effective equipment to unlock the Titan mission (Mystic Chest) as soon as possible.

Rituals
Not really for beginners, but also important. At level 200 the oracle will be unlocked in the town.
Do as many rituals as possible. First of all, you should aim to reach oracle level 6 to unlock the 4th ritual. You need the chests that you get as rewards for the blessing upgrades, and the blessing upgrades also increase the oracle level, which then brings higher rewards for the rituals. The same goes for the soul stones, which you need to equip your heroes and which you also get from the chests from the rituals. The next goal should be Oracle level 11 to unlock tier 2 of the soul stones. Like tier 2 and 3 of the hero equipment, tier 2 of the soul stones affects all heroes.
Tier 2 Soulstones:
  • Gold bonus
  • Increases the number of Firestones after Prestige
  • Increases the main attributes (damage/armour/health)
Soulstones
  • Besides the hero equipment (equipment + jewels), at level 200 there are also the soul stones

    Level 2 = required soulstone power: 10.800 + oracle level 11: 1000 dust

  • Each rarity approximately triples the effect of the soulstone and allows you to enchant the soulstone two more times.

Hero Rarities
  • There are eight hero rarities. Each rarity increase costs contracts and requires all of the hero's gear, jewels and soulstones to be of at least a certain rarity. A higher hero rarity multiplicatively increases the hero's main attributes, the main attributes of all heroes and the raining gold bonus.
  • Therefore, it's worth upgrading the hero rarities, just like with the WMs.
  • As the contracts are needed for both new mercenaries and hero rarities, you need to decide which is more beneficial. My recommendation: As soon as you have filled your main WM's with heroes/mercenaries, you can use the contracts for at least for the first couple of rarity levels, as two of the rarity bonuses are valid for all heroes, regardless of whether you have them in the game or not.
More detailed under the point: Equipment / Gear

Gold Items
Best time to use your gold items is when the sum of all your heroes' damage is higher than the wave's HP.
Quick Hints / Quick Tips for Beginners 2
Prestige
  • As a rule of thumb do not prestige unless you gain at least +100% firestones. Other than that prestige when it is convenient for you and you have the time to get back to your farming stage.
  • When exactly you prestige depends on a lot of factors - a general rule of thumb is to sit at the farm stage as long as your multiplier is climbing significantly, or the gold you would earn in the next ~2 hours (the time taken to climb back up to your farm stage after prestige) is larger than the total gold earned so far. When that's no longer true, it's a reasonable time to prestige.
  • It makes sense to make prestige more often at the beginning of the game, later it makes sense to go by these criteria:
    • If the gold counter / XP counter or % prestige counter no longer increases.
    • If you can't pass a stage any more (wall)
    • To unlock the next hero
  • Do NOT use Prestige Tokens / Epic Prestige when you have a very high multiplier. It’s better to use them when it takes a full day to get a low multiplier then double that multiplier. The reason for this is the token works essentially as another x2 multiplier regardless of how big your prestige is. Therefore, using this on a x500 multiplier is wasted.
  • If there’s any information that you wish to view in terms of formulas, or in depth mechanics of the game you can find the wiki at this link: https://firestone-idle-rpg.fandom.com/wiki/
  • Farm at a stage where most of your heroes can kill enemies with a single hit
Fellowship & Guild
  • Fellowship
    At level 7 you can join a fellowship. For better progress, make sure you join a full (5 members) and active fellowship.
    The higher the Battle Cry/Fate of the individual members, the higher the Fellowship Aura. (attribute damage, armour and health, leadership and team bonus, firestone effect and golden rain).

  • Guild
    At level 10 you can join a guild. Like with the fellowship, you should make sure to join a full and active guild. The higher the guild, the higher the guild benefits. (Benefits via the things that have been levelled in the guild tree and through the guild level).
  • Do as many map missions as you possibly can. Time them wisely. Short on time? Do short missions first, and just before you leave, start the longer missions.
  • Always try to do all daily quests because the bouns are not to be despised
  • The cost of the first guardian evolution is 300 Strange Dust. So save up 300 Strange Dust before your guardian hits level 10. At level 100 the guardians can fight against the dark gods in the Chaos Rift, which means it makes sense to unlock and evolve all 4 guardians + increase their rarity levels.

    There are 3 ways to do this:
    • Game progress optimised = focus on the: Dragon and Phoenix for the better guardian auras
    • Chaos rift optimised = level all guardians more equally
    • Game progress + chaos rift mixed: Level the dragon and phoenix for the better guardian auras always some evolutions level higher than the fairy and the djinn, but don't neglect the other two guardians for the better chaos rift strategy and level them evenly, even if it's some evolution levels below the dragon/phoenix.
  • Chaos Rift
    • The Chaos Rift is a server-wide event in which all players on the same game server fight against the dark gods. Each god has his own toems of power and his own research tree.
    • The dark gods can also be recruited as heroes, for this you need to bring their corresponding research tree to 2x5 (10) and another 50 tomes of power for the recruitment. As f2p or only with the event pass you won't be able to recruit the god in the first run, but that shouldn't worry you as the gods rotate in a monthly cycle, so if the recruitment didn't succeed in the first cycle, you just have to wait until it's that god's next turn. The recruited gods are then ‘’only‘’ normal heroes, so no drama if you only recruit them on the second or even third turn.
    • The progress you made on the god research tree won't be reset, meaning that you can then continue to levelling in the next turn.

    Strange dust
    Since strange dust is needed for several things, the question is where to use it in the most useful/effective way.

    My recommendation:
    • 1. For the Guardians + Alchemy experiments (split up)
      First, you should try to unlock all 4 guardians, use the dust to bring the dragon, the fairy and the phoenix to evolution level 5, to enable them to fight together against the dark gods and to do more damage to the gods in the Chaos rift (from level 100). But it is also important to use the dust for the alchemy experiments.
    • 2. At level 200 the Oracle and the soulstones will be unlocked. After you have unlocked all 3 guardians with dust, you should start using the dust to unlock tier 2 soulstones for all heroes.
    • 3. Then split the dust between the guardians and alchemy

    Golden Battle Pass

    The battle pass is a series of daily and weekly challenges that give glory when completed. Once you have collected enough glory you can claim chests, currencies or temporary buffs as rewards.
    Items are permanent. Bonuses/Buffs are for the duration for one month.
      Rewards can be fixed or variable. Variable rewards depend on your stats at the beginning of the month. Any rewards not claimed by the end of the month will be sent to you via game mail.
    • Free rewards
      Free rewards are various types of chests or currencies and can always be claimed.
    • Golden pass rewards
      Golden pass rewards can only be claimed once you have purchased the golden pass.
      The golden Battle Pass costs 1500 gems/month or price depends on your platform
      The golden pass in only valid for the current month and can be activated up to one day before the end of the month.
      Golden pass rewards can be chests, currencies or temporary buffs. Temporary buffs are only active in the current month

    • For 1500 gems you get:
    • 1. The equivalent of 4 Amulets. (Amulet of Conquest, War, Knowledge and Luck)
      Alone the value of the amulets corresponds to 6000 gems + 20 golden keys.
    • 2. Besides this, you have currencies like: chests/beer/golden keys/guild coins/expedition emblems/blueprints/pickaxes etc..
    It is impossible to get this amount of rewards outside the battel pass for 1500 gems in this game.
    Neither via the tavern nor via the other exchange possibilities gems = stuffs.

    As f2p you get at least 2600 gems/month in the game, and with the pirate prices, the minimum amount of 2600 gems/month will be even higher.

Quick Hints / Quick Tips for Beginners 3
Gems / Amulet / Golden Keys

In case you decide not to spend the 1500 gems per month for the golden battle pass but to continue with the amulets, this would be...
  • Gems: Use the first collected gems for the most important Amulet: (2000 gems)
    • Amulet of Exploration: Increase the chance to get 100% more rewards on guild expeditions 5%
      • Active online play + not so active/online
    • Amulet of Cartography: Increase the expedition tokens you receive from guild expeditions 5%
      • Active online play + not so active/online
    • Amulet of Liberation: Increase the chance to get 100% more rewards on the daily missions with the war machines 5%
      • Active online play + not so active/online
    • Amulet of Knowledge (Reduces the research time of all firestone researches +10%
      • ONLY if you play actively and online, for players who only log in 1-2 times/day is it less worthwhile.
    • Amulet of insight: Increase the chance to get 100% more rewards from the oracle's rituals
      • Active online play
    • Amulet of the Seven: Increase the chance to get 100% more rewards on the weekly quests 5%
      • Active online play + not so active/online
    • Amulet of Conquest (Increases the number of squads on the world map
      • The he Amulet of Conquest, which increases the number of squads on the world map by 1 squad and the Amulet of War, which reduces the duration of all missions on the world map by +10 brings you many advantages. If your rank is low or you have limited time to play, these amulets are very helpful as they can help you to complete all map missions, especially at the beginning of the game but also later as completing the map missions is easier and faster with it. But this two are not must-have amulets.

  • Save up 1000 gems for level 120, that’s when you unlock Dragon Blood and you can buy them in the store. Make sure you always have enough dragon blood to always do the alchemy research.

  • Golden Keys: Use the first collected 20 keys for:
    • Amulet of Luck (Increases the chance to get 100% more beers from the Dragon.)
Talent Tree
  • Do not level everything from top to bottom up to the maximum.
    First unlock everything as far as possible.
    There are always hurdles where you have to have a certain level to unlock the next one.
    Use these hurdles to level up what is important to you.

    • Librarian
    • Alchemy
    • Twin dragons
    • Battle Cry
    • Fate
    • Expeditioner
    • Trainer Skills
    • Coworkers
    • Meteorite Hunter
    • Raining Gold
    • All main attributes
    • Party - Auto Abilities
    • Leader - Auto Abilities

    Which of these you level up first is up to you, but the Research Time Reductions, Double Beer, Battle Cry, Fate and also Gold should always be levelled up fast. If you feel unsure, you can always use the order above as a reference.

War Machines = WM
  • At level 50, the Warfront will be unlocked with the War Machines, the Campaign and the Engineer in the town. Then you will get your first WM from the engineer, where you can put your heroes in and then do your first campaign missions (campaign star) in the Town -> Battles -> Campaign.
  • Your first goal should be to reach 190 (319) campaign stars to unlock all daily missions (liberation/dungeon).
  • The most efficient way to do this is to focus on 1 WM and then slowly level up the other WMs to progressively increase their rarity. For the solo or a two-WM strategy, you should use the blueprints for all 3 points. (War machine damage, health and armour).
  • I recommend for Solo Damage WM: Cloudfist / Multi-damage WM: Thunderclap and Tank: Goliath. But that doesn't mean that the other WM's like Talos or Fortress or other WM's are therefore bad WM's. If for example you've drawn Talos instead of Cloudfist or Fortress instead of Goliath, then they are still good WM's. So don't panic about them.
  • Each rarity increases the attributes of this and other war machines by 5% / Overdrive by 3%. The amount of tools you need for the rarity levels increases significantly after the first rarity level, but the fact that two of the will affect to all WMs makes it worthwhile despite the costs. Once you've upgraded all your favourite WMs to uncommon, it's definitely worth bringing all your other WMs to level 10 before upgrading them to uncommon.
  • The quantity for the 3rd rarity level could theoretically be used to upgrade 3.5 of the non-favoured WMs to the 2nd rarity level. This approach has in addition to the negative "high cost effect" the positive "side effect" that by levelling the non-favoured WM's, you will also increase your engineer level, which results in an increase in "every 6 hours" tool quantity as well as the engineer bonus increases.
  • There will always be walls/hurdles in the campaign where you can use the expedition tokens for level up your personal guild tree or for rarity levels.
    I would recommend to use these hurdles for upgrading the rarity levels, at least until campaign star 190 (319).
  • Later in the game you can always decide to level up more war machines as a second/third main WM.
More information can be found under: Warfront/Warmachine Expansion

You can also ask questions about the game on the Firestone Discord.

Firestone Idle RPG Discord: https://discord.gg/StzRZmv

We are looking forward to your visit!
Heroes
  • There are a total of 24 heroes and 9 Mercenary an 3 dark gods in the game. Every hero has their own equipment and abilities. Base attributes vary a little bit between every hero but they are neglectable. If you notice a big difference between heroes, it’s most likely because they have better tier 1 equipment, or the leader is boosted more than the team or the other way around. Also there are upgrades and researches that boosts certain heroes but not others.
    Unlocking tier 2 and 3 of the gear requires gear power specifically.

    Tier 1 = required hero power: 0 = 0 meteorites
    Tier 2 = required hero power: 1400 = 480 meteorites
    Tier 3 = required hero power: 6700 = 720 meteorites

    Heros/Mercenarys
    • 7 (+4) x Rage-Heroes
    • 8 (+3) x Energy-Heroes
    • 9 (+2 + 1) x Mana-Heroes
    • 9x Mercenary
    • 3x Dark gods

    Mercenaries can be unlocked in the pirate ship with contracts, please check chapter: Pirate ship/Mercenaries

  • Besides the hero equipment (equipment + jewels), at level 200 there are also the soul stones

    Level 1 = required soulstone power: 0 + oracle level 0 = 0 dust
    Level 2 = required soulstone power: 10.800 + oracle level 11: 1000 dust

  • Soulstones are a type of hero equipment and individual to each hero. You get soulstones from celestial chests which are obtained by performing rituals in the Oracle. Soulstones unlock at character level 200.
    The first priority should be to reach oracle level 6 as soon as possible to unlock the 4th ritual followed by oracle level 11 to unlock tier 2 of the soul stones. Like tier 2 and 3 of the hero equipment, tier 2 of the soulstones affects all heroes. Oracle level 36 should be the next goal to achieve.

    Soulstones give the following bonuses:
    T1:
    • Focus: Increase the damage of this hero
    • Stamina: Increase the health of this hero
    • Courage: Increase the armour of this hero
    T2:
    • Wisdom: Increase your gold earnings
    • Faith: Increase your firestone gain
    • ]Charisma: Increase all main attributes on all heroes

  • There are also 8 rarities. Each rarity approximately triples the effect of the soulstone and allows you to enchant the soulstone two more times.
    As with the other equipment ( gear + jewels), you don't enchant the equipment but the slot, so whenever you get a better item, the enchantment level will carry over to the newly improved item.
  • The effect of a soulstone roughly triples with its rarity and roughly doubles with its enchanting level.
    With these multipliers, the effect of a soulstone is:

    effect = (rarity multiplier * level multiplier - 1) * 100%

  • There are 8 hero rarities. Each rarity increase costs contracts and requires all of the hero's gear, jewels and soulstones to be of at least a certain rarity. A higher hero rarity multiplicatively increases the hero's main attributes, the main attributes of all heroes and the raining gold bonus.
    Therefore, it's worth upgrading the hero rarities, just like with the WMs.
  • As the contracts are needed for both new mercenaries and hero and guardian rarities, you need to decide which is more beneficial. My recommendation: As soon as you have filled your main WM's with heroes/mercenaries, you can use the contracts for at least for the first two of rarity levels, as two of the rarity bonuses are valid for all heroes, regardless of whether you have them in the game or not.
    Requirements for rarities:

    • Rarity level 1: Common:
    • Rarity level 2 Uncommon: 30 contracts + gear to at least uncommon
    • Rarity level 3 Rare: 70 contracts + gear to at least rare
    • Rarity level 4 Epic: 150 contracts + gear + jewels + soulstones to at least epic
    • Rarity level 5 Legendary: 200 contracts + gear + jewels + soulstones to at least legendary
    • Rarity level 6 Mythic: 250 contracts + gear + jewels + soulstones to at least mystical
    • Rarity level 7 Titan: 300 contracts + gear + jewels + soulstones to at least titanic
    • Rarity level 8 Angel: 350 contracts + gear + jewels + soulstones to at least angel
  • There are 3 hero “specializations” in this game. Damage, Tank and Healer. They sort of tell what kind of hero it is, and what their abilities are. Healer has an added bonus, they heal and do damage.

  • There are 3 hero resources in this game. Rage, Energy and Mana.
    • Rage goes up only by being attacked or when you attack yourself. The pool is small at 100 points.
    • Energy goes up by 9 points per second. The pool is also small at 100 points, so very quickly you are fully charged. Energy heroes also work with a combo point system. So you have to charge up by using the first ability. And the second and third ability perform better with more combo points.
    • Mana goes up slowly. Only 3 points per second. The pool is very big at 600 points. Allowing you to use a lot more abilities before you have spent all your mana.
  • There are 3 hero attack styles. Melee, Ranged and Spellcaster. They don’t mean much at all, but there are researches and upgrades that only boost either melee heroes, ranged heroes or spellcaster heroes.

  • You have 2 sets of positions : Front (melee) and Back (ranged & spellcaster).
    You can re-arrange heroes only within one position. So you can swap melee heroes together on the front line, and you can swap ranged/spellcaster heroes together in the backlind.
    You'll never be able to put a melee hero with the ranged hero in the backline, or a ranged hero with the melee heroes in the front line.

  • To see a full list of the heroes, their stats, attribute, archetype and how to unlock each one, you can check this link: https://firestone-idle-rpg.fandom.com/wiki/Heroes
Pirate ship / Mercenaries
The pirate ship is a building in town that unlocks at character level 10. Here you can hire mercenaries and claim the pirate's prize.

Mercenaries
There are currently 9 mercenaries in the game. Once you unlock the Mercenaries they are exactly the same as your heroes, with the same attributes, skills and equipment, awakening auras etc. exactly the same as the normal heroes. The only difference is the way you unlock them. Instead of a stage milestone, mercenaries will be unlocked with contracts. To unlock the first mercenary, you need 400 contracts. Each following mercenary will cost you 1000 contracts.
The mercenaries can be unlocked in the Town => Pirate ship => Mercenaries.

Which mercenaries should be the fist choice?
If you choose a mercenary you should rather go by raining gold, prestigious and if the hero has an aoe than by hero specialisation, hero specialisation might be important at the beginning when you have only a few artefacts, but the more artefacts you have the less it will matter, awakening bonuses like raining gold or prestigious are much more effective.
At the moment Cirilo would be the best choice.

Contracts
Contracts are obtained from the Tavern, the Battle Pass and from Mini-Events. They are required to hire mercenaries in the Pirate Ship. You can obtain 295 contracts per month via the active battle pass (milestone 31), the rest through the Tavern and the Mini Events.

Since you need the contracts for mercenaries and the hero and guardian rarities, beginner should only get the first mercenary for 400 contracts and then use the contracts for the hero rarities
The best choice here is to get Cirilo as the first mercenary. His good stats, gold bonus and abilities make him to one of the best mercenaries.

Pirate's prize
The pirate's prize comes in two forms: the full pirate's prize and the free pirate's prize. The free pirate's prize can be claimed once you reach the corresponding character level milestone. The full pirate's prize additionally requires unlocking the corresponding prize tier with platform currency.

Every 10 character levels (your level, not the level from the mercenary) you will unlock a pirate prize. There are currently the following 5 prize tiers:
  • Jewels
  • Game token
  • Dragons blood
  • Mystery boxes
  • Chests
There are currently the following 5 prize tiers:
  • Tier I = Character level 1-200
  • Tier II = Character level 201-400
  • Tier III = Character level 401-600
  • Tier IV = Character level 601-800
  • Tier V = Character level 801-1000
The prices depend on the respective platform

A list of the pirate prices can be found here:
https://firestone-idle-rpg.fandom.com/wiki/Pirate_Ship#Mercenaries
Attributes
There are 3 attributes in this game. Attack, Health and Armor.
  • Attack: This attribute is always good. You can’t do without it. The faster you kill, the more gold you earn, means more firestones. Also bosses have a timer, so you need to have a high enough attack to kill a boss within 60 seconds.
  • Health: Good for a balanced build. However after testing, I suggest ignoring health. [See “Builds” section]
  • Armor: Armor can block up to to 100% of the incoming damage.
There are several reasons to raise HP. Equipment, enchanting chestplate and boots to get the power requirement for unlocking tier 2 and tier 3 equipment. Or inside research, to push further in the research tree or unlock new trees.
Party
Your party can only contain 5 heroes at a time. So eventually you have to choose which heroes you want to use, and which ones you don’t. There are researches and upgrades that only boost a certain type of heroes. You want to limit the amount of research and upgrades you need to level up, yet boost the most heroes while doing it. Currently the best strategy is focusing on a mana spellcaster hero party. Out of the first 8 heroes, 4 of them use mana and they are also spell casters. So eventually you get a party that contains Solaine, Benedictus, Blaze and Luana. Also considering that Solaine and Blaze are the most favorable leaders in the game, I don’t see this setup change anytime soon.

Slots
Party slots are numbered from 1 to 5. The lower the number of the slot, the more likely the hero in that slot is going to be targeted by an enemy:
  • Slot 1 = 50% Chance
  • Slot 2 = 20% Chance
  • Slot 3 = 15% Chance
  • Slot 4 = 10% Chance
  • Slot 5 = 5% Chance

Positioning
There are two areas of hero positions. The area in front is reserved for melee heroes, while the area in the back is reserved for ranged and spellcaster heroes. Within each area, heroes can positioned in any order.

Roles
  • Leader
    You have to assign one of your party members as leader. The leader is able to use abilities on the battlefield and is boosted by the Leadership research.

    The leader of the party gets a 50% bonus to all attributes, but there are also "Leadership" and "Team Bonus" researches (in Firestone Trees, Exotic Upgrades, Talent Tree, Tavern Cards, Artifacts and Guild Tree) which affect the attributes of your party members. If the team bonus is large enough, the leader will have lower stats than the other party members.

  • Non-leader
    The other party members are called non-leader characters. They profit from the Team Bonus research instead.
    Basically you have 2 sets of positions : Front (melee) and Back (ranged & spellcaster).
    You can re-arrange heroes only within one position. So you can swap melee heroes together on the front line, and you can swap ranged/spellcaster heroes together in the backlind.
    You'll never be able to put a melee hero with the ranged hero in the backline, or a ranged hero with the melee heroes in the front line.

An easy way to choose your heroes for the game is to compare the stats in the party "Order by: power, speed, health, armor" and choose them there depending on your strategy.
Builds
There are 3 builds in this game.
  • Balanced build: You make sure to have enough HP on your heroes so they can survive a few hits from enemies, while at the same time your heroes kill them with a single blow. Doing this requires you to level up anything attack and health related. With this build you can farm up at a normal pace after a prestige. Kill speed with 4 balanced heroes is about 65-70 kills per minute.
  • Guardian build: You let the guardian do all the work for you. This requires a clicker (which is allowed). You only have to level up anything attack related. This means wrists, relics and all main attributes too, as they benefit guardians too. Guardian build only works temporarily as heroes can and will be more buffed throughout the game. Out of the 3 builds, guardian build is the quickest way to farm up after a prestige. Even more so when using the dragon. When the guardian is much stronger than the heroes, to the point where heroes don’t do any damage at all. You basically get no to very little gold using gold items.
  • Glass cannon build: You only focus on attack. Your heroes don’t have any health or armor. Your heroes die when they get hit, but they kill the enemies too. As you only have to focus on attack and not on HP, attack is higher compared to a balanced build, allowing you to farm higher stages. After a prestige, when you farm up, the first 85-90% of the stages will go at a normal pace. The last 10-15% of stages will be painfully slow, that’s when the heroes starts dying. Kill speed with 4 glass cannon heroes is about 30-35 kills per minute. You also get a ton of gold using gold items, as HP or heroes alive does not affect the rewards of gold items. It only uses DPS to calculate the reward.
  • Going full ♥♥♥♥♥♥ build: You only focus on armor, and ignore the rest. [joke]

I’ve tested the kill speed in 2 situations, both stages my 4 (mana spellcaster) heroes kill the enemies with a single blow, but one stage my heroes survive (aka balanced build) and the other stage my heroes keep on dying (aka glass cannon build). I found that the balanced build does about 65-70 kills per minute, and the glass cannon build does about 30-35 kills per minute. This means you only need to collect 2.3 times as much gold per kill on a glass cannon build to make it worth it. Which means you only need to farm 4 stages higher.

I play glass cannons as it is the most effective.
Now that this has been tested, it's actually advantageous to to do a glass cannon build early on the game. All you have to do is farm 4 stages higher. This means you need to have 81 times more attack than HP. Can easily be achieved. Since you will be saving void crystals by not having to level up shoulders, with those saved crystals, you can increase the level of your wrists by 1. With 5 heroes, that result in 32 times more attack already. Do this the same for weapon vs chestplate, and that’s another 2 times more attack. All you need is 1.5 times more attack somewhere else. Exotic Merchant or Research. Too easy.
Stages & Farming
Every stage that you go up will grant you 25% more gold while the enemies get at least 50% stronger. The last number goes up gradually and caps out at 200% at stage 200. After stage 200, enemies get 200% stronger, so you see their HP and damage triple every stage you go up.

Since enemies' health increases by a lot while their worth only increases by a small amount, it’s better to farm at a stage where you quickly kill your enemies. Try finding a stage where most of your heroes kill enemies with one single blow. If you use a balanced build, you don’t need a full team that can kill all enemies with a single blow, because with 5 heroes, that attack every 2 seconds, it’s very likely that 2 heroes attack the same enemy. Resulting in wasted attacks. So having 3 capable heroes is more than enough, as it reduces the overall chance of 2 heroes attacking the same enemy. With a glass cannon build, try to aim for at least 4 heroes capable of killing enemies with a single blow. Since the heroes spend most of the time dead, the attack interval is like 10 seconds, which means it’s less likely 2 heroes will attack at the same time and so less likely wasted attacks occur.

When you are going offline, you may be able to farm a few stages higher than your heroes can handle online. This is due to your overall party DPS. If your party DPS is higher than the waves total HP, you can farm this stage offline. This is due to your parties HP stat not being taken into effect while you are offline.


The exact formula for gaining xp
  • xp = (mantissa/10 + exponent) * 3000
    where
    firestones = mantissa * 10^exponent

The exact formula for offline gold gains
  • avg hero speed = (hero 1 speed + … + hero 5 speed) / 5
    avg attacks per sec = 5 / avg hero speed

  • avg hero dmg = (hero 1 dmg + … + hero 5 dmg) / 5
    avg attacks per kill = 1 + floor(enemy health / avg hero dmg)

  • avg kills per sec = avg attacks per sec / avg attacks per kill
    avg gold per sec = avg kills per sec * gold per kill

  • offline gold = avg gold per sec * offline time (sec)
Equipment / Gear 1
You get equipment out of chests, most of which you get from doing map missions. You either get new equipment, an upgrade or you get a duplicate. Whenever you get a duplicate, you receive void crystals which you can use on enchanting. The amount of void crystals you get is determined by the tier and rarity of the equipment.

There are multiple tiers of equipment. It is very important that you unlock tier 2 and tier 3 equipment as soon as possible. They are much more powerful than tier 1 equipment. As tier 2 and tier 3 equipment provide attribute bonuses to ALL heroes, even when you don’t use the hero in your party.

List of items:
  • Weapon - Increase attack on equipped hero
  • Chestplate - Increase health on equipped hero
  • Boots - Increase armor on equipped hero
  • Wrist - Increase attack on ALL heroes
  • Shoulder - Increase health on ALL heroes
  • Belt - Increase armor on ALL heroes
  • Ring - Increase gold bonus
  • Relic - Increase ALL attributes on ALL heroes
The tiers are unlocked with meteorites:
Tier 1 = 0 meteorites
Tier 2 = 480 meteorites
Tier 3 = 720 meteorites

There are also various rarities. Common, Uncommon, Rare, Epic, Legendary, Mythic, Titan and Angel. Gear can be upgraded to Angel seals up to level 16. In most games, we often wait till we get good quality equipment before we enchant it. But in this game it doesn’t matter because we don’t enchant the equipment, but we enchant the slot. Meaning if we get a common equipment, we enchant it twice, then we get the same equipment but rare, it will be level 2 still.

The rarity of the equipment will do 2 things. Every rarity gives the equipment 3 times as much bonus. Also it allows you to enchant it 2 levels higher. A common equipment can only be enchanted 2 times. Uncommon 4 times. Etc.

Every level of enchantment provides the equipment with 2 times as much bonus and the cost goes up by 100% for the next level, only 50% after level 8. It's better to level up equipment equally. Level up 1 tier 2+ equipment, 2 times, you pay 60 + 120 void crystals. You get a 4x bonus. If you level up 2 tier 2+ equipment, 1 time, you pay 60 + 60 void crystals for the same 4x bonus.

It is advised to have your rings 1-3 levels higher than your relics and wrists. And keep tier 1 equipment 2-4 levels lower than your relics.

Also every equipment has a power rating, and you have a total power rating. But this means absolutely nothing. You can have a level 12 Mythic weapon on 1 hero. This will give something like 96.000.000 power, but all you did is make 1 hero strong. He has gained 2^12 = x4096 attack from enchantments and since it’s 2 rarities higher than epic, that means 3^2 = x9. So 9 x 4096 = 36,864x attack on this hero alone. But you could also enchant 4 epic wrists to level 4. You will get 2^16 = 65,536x attack on ALL heroes. The power of these 4 wrists? Only 260.000‬.

From level 300 and 5 billion gear power you unlock an additional mission (mystic chest, with titan seal). The 5 billion equipment power is more something for the late game, but since the upgrading of the slots becomes more and more expensive, you should start early to reach the goal: 5 billion.
Basically, you don't have to change your strategy, only tier 3 (ring/relic) at first and then tier 2 (wrist).
A mythic lvl 11 ring/relic provides 124,416,000 gear power. 21 heros with both lvl 11 ring and relic will have at least 5,225,472,000 gear power

The efficiency of upgrading power (power/crystal) for Tier 1/2/3 is 8:6:5.
Consequently, upgrading level 1 equipment is an advantage in terms of equipment power.

1. Power/Crystal Table
created by xixifrank


2. A sample of using Power/Crystal Table to decide strategy
Assume gain x crystal per day before unlocking mythic chest. let P = 5bil, a = 1828, b = 1142
  • Strategy 1: Use x crystal on Tier 1 gears, up to level 12. Increase ax power per day. Unlock mythic chest at P / (ax) days.
  • Strategy 2: Use x crystal on Tier 3 gears, up to level 12. Increase bx power per day. Unlock mythic chest at P / (bx) days.
    2 Mythic Chests/day = Gain 7535 crystals/day

Strategy 1 gain (2 Mythic Chests per day): (P / (bx) - P / (ax)) * 7535
Strategy 1 lost: x * P / (ax)

Use strategy 1 when P / a < (P / (bx) - P / (ax)) * 7535
Solution: x < 4526
Result: If gain less than 4526 crystal per day, then Strategy 1 (upgrade Tier 1 gear to level 12) is preferred, otherwise Strategy 2 (Upgrade Toer 3 gear to level 12) is preferred.
Note that you can get over 10000 crystal per day at Rank 20.
The sample is based on long-run (typically, play >3 years from now on), seals have been converted to crystals. One can try different settings (different level, the value of a and b, number of mythic chests/day, different value of seal, etc). Here are some points, which may affect player's dicision:
1. The value of titan seals, especially in short-run.
2. mythic seals are randomly given.

I understand that 5 billion gear power seems a lot, but that's because players are (rightfully, imo) holding back on a lot of upgrades and focusing on rings, wrists and relics.

But... there is always a "but"...
The leveling of tier 3 is expensive and will take time, especially to bring tier 3 to mystic.
Later, in the end game, at level 600 and an gear power of 60 billion, you will unlock the last mission on the map, the Shadow Mission. However, if you've already reached this point and can fulfil the requirements for this mission (lv. 600 + 60 billion equipment power), you've been playing the game so long that you don't need any guides/tips for it, apart from the same recommendations as for the titan missions.

Strategy 1
A little calculation shows that at level 300 you have about ~14 heroes. If you maxed all their Tier 1 items (which is relatively cheap) then you already have 4.2 billion gear power.
Now, you need the mythic seals to do that and given the distribution, you'll have T2 and T3 seals before all the T1, which give even more power.
So it's true that 5b power seems like a lot, but you can definitely reach it if you decide to
(Of course it won't be instantly, we are on an idle game)

The goal in the example (optimised to 4 cycles/day) is to maximise the total "useful" crystals in a long-term game. But please note that the number of cycles also affects the gain from mythical chests.

Continue on Hero Equipment / Jewel Equipment 2
Equipment / Gear 2
  • Also the number of map mission cycles/day will affect the decision. Several other indicators (level, luck level, guild level, artifacts, etc.) affect the exact crystal gain. 10k is more likely a lower limit of a 4 rounds rank 20 player, they can be up to 12k-13k.⠀
  • So the game is not only about the gain, but also the lost, and how you define them. Like in the sample, all crystals on Tier 1 gears are considered as "lost", one may have different opinions though.
  • At the moment, the Tier 1 upgrades can be considered as wasted empty crystals, but once there is a PvP, the situation may change completely, in the sense that even if they are not optimised items NOW, they will probably play a role later. But that role will depend on the rewards of PvP.
    At this point, it's just a guess and a faith.

    Conclusion:
    Your goal should be to find a good balance between wasting/using empty crystals for the "less effective" equipment and wasting/using empty crystals for the most effective equipment (for the required gear power), and finding a balance between upgrading only the effective equipment to unlock the Titan mission (Mystic Chest) as soon as possible.

  • Strategy 1
    For beginners or also for those who can only manage a few mapmissions/day or who want to reach 5 billion gear power fast without wasting too many empty crystals on T1, it's best, in my opinion, to upgrade Tier 1 Weapons and Tier 2 Wrists as soon as possible and complete them with all mythical sigils. And then Tier 3 (Ring/Relic).
    However, if you realise that upgrading tier 3 is too expensive and progress is too slow, you can bring Tier 1 of all heroes you have in game/party to max (weapon/armour/health) + seal. If you still don't reach the required power at level 415, then you should focus only on Tier 1 for all heroes and bring everything (weapon/armour/health) to maximum + seal until you have the necessary power.

  • Strategy 2
    Players who are able to complete all 4 map cycles per day should continue with the original strategy of upgrading only Tier 3 (Ring/Relic) and Tier 2 equipment (Wrist), and then upgrade Weapon and the remaining Tier 2 equipment. (example under: Hero Equipment / Jewel Equipment)
    A mythic lvl 11 ring/relic provides 124,416,000 gear power. 21 heros with both lvl 11 ring and relic will have at least 5,225,472,000 gear power
    Also here: However, if you still don't reach the required power at level 415, then you should focus only on Tier 1 for all heroes and bring everything (weapon/armour/health) to maximum + seal until you have the necessary power.

  • Strategy 3
    A little calculation shows that at level 300 you have about ~14 heroes. If you maxed all their Tier 1 items (which is relatively cheap) then you already have 4.2 billion gear power.
    Now, you need the mythic seals to do that and given the distribution, you'll have T2 and T3 seals before all the T1, which give even more power.
    So it's true that 5b power seems like a lot, but you can definitely reach it if you decide to

  • The same goes for the jewels that were launched with WarFront.
    Jewels are unlocked at character level 50. Jewels are individual to each hero and are used to increase the attributes of a war machine when the hero is in its crew. You get jewels from jewel chests. Jewel chests are obtained in campaign missions and via the daily and weekly quests.
    Jewel can be upgraded to Titan seals up to level 14.

  • Jewels come in 2 tiers and give the following bonuses:
    1. Ankh: Increases the damage of the war machine, when this hero is in its crew
    1. Rune: Increases the health of the war machine, when this hero is in its crew
    1. Idol: Increases the armor of the war machine, when this hero is in its crew
    2. Talisman: Increases the damage and health of the war machine, when this hero is in its crew
    2. Necklace: Increases the damage and armor of the war machine, when this hero is in its crew
    2. Trinket: Increases the health and armor of the war machine, when this hero is in its crew

  • Besides the hero equipment (equipment + jewels), at level 200 there are also the soul stones

    Level 1 = required soulstone power: 0 + oracle level 0 = 0 dust
    Level 2 = required soulstone power: 10.800 + oracle level 11: 1000 dust

  • Soulstones are a type of hero equipment and individual to each hero. You get soulstones from celestial chests which are obtained by performing rituals in the Oracle. Soulstones unlock at character level 200.

    Soulstones give the following bonuses:
    • Focus: Increase the damage of this hero
    • Stamina: Increase the health of this hero
    • Courage: Increase the armour of this hero
    • Wisdom: Increase your gold earnings
    • Faith: Increase your firestone gain
    • Charisma: Increase all main attributes on all heroes

  • There are also 8 rarities. Each rarity approximately triples the effect of the soulstone and allows you to enchant the soulstone two more times.
  • As with the other equipment ( gear + jewels), you don't enchant the equipment but the slot, so whenever you get a better item, the enchantment level will carry over to the newly improved item.

  • The effect of a soulstone roughly triples with its rarity and roughly doubles with its enchanting level.
    With these multipliers, the effect of a soulstone is:

    effect = (rarity multiplier * level multiplier - 1) * 100%

  • There are 8 hero rarities. Each rarity increase costs contracts and requires all of the hero's gear, jewels and soulstones to be of at least a certain rarity. A higher hero rarity multiplicatively increases the hero's main attributes, the main attributes of all heroes and the raining gold bonus.
  • Therefore, it's worth upgrading the hero rarities, just like with the WMs.
  • As the contracts are needed for both new mercenaries and hero rarities, you need to decide which is more beneficial. My recommendation: As soon as you have filled your main WM's with heroes/mercenaries, you can use the contracts for at least for the first couple of rarity levels, as two of the rarity bonuses are valid for all heroes, regardless of whether you have them in the game or not.
  • Requirements for rarities:

    • Rarity level 1: Common:
    • Rarity level 2 Uncommon: 30 contracts + gear to at least uncommon
    • Rarity level 3 Rare: 70 contracts + gear + jewel to at least rare
    • Rarity level 4 Epic: 150 contracts + gear + jewels + soulstones to at least epic
    • Rarity level 5 Legendary: 200 contracts + gear + jewels + soulstones to at least legendary
    • Rarity level 6 Mythic: 250 contracts + gear + jewels + soulstones to at least mystical
    • Rarity level 7 Titan: 300 contracts + gear + jewels + soulstones to at least titanic
      Rarity level 8 Angel: 350 contracts + gear + jewels + soulstones to at least angel
Prestige
You will earn firestones through Prestige. Firestones give you a gold bonus. First time you should prestige at around 100 firestones. After that you get automatically a popup to prestige whenever you have a 2x multiplier. This means that the amount of firestones that you have doubles when you prestige. The newly ‘collected’ firestones will be added on top of the old firestones. But you don’t have to prestige at 2x multiplier. You can wait longer and get a higher multiplier. Do remember that you have to collect 6 times as much gold to double the amount of newly collected firestones. So it’s better to do shorter runs than longer runs. But stay at least an hour at your farm stage.

You will also run into prestige walls when you don’t get any gold bonus through other features in the game, eventually the time it takes to do a 2x prestige will take longer and longer. Can be 8 hours or longer before you start seeing a 2x multiplier. This will greatly slow down stage and character level progression of course. To fix this you have to find ways to increase your gold bonus. This can be achieved by making your heroes stronger, allowing you to farm higher stages (x1.25 gold per stage). Obtaining new rings will help greatly. Enchanting rings. Level up or evolve the dragon. Research or upgrade Gold Bonus or Prestigious.

It’s best to use Prestige Tokens when you have reached one of these walls. That is when you get the most out of the prestige tokens. It may sound weird, you might think they are better used when you have a very high multiplier, but that’s wrong as they only work as an effective x2 multiplier (your bonus is x2 larger than the previous).

The formula for calculating the total firestone effect is:
Total firestone effect = (1% + all meteorite trees (add) + all firestone trees (add) + all exotic upgrades (add) + all experiments (add) + guild tree) * tavern card * all artifacts (mult)
Fellowship
Fellowships are a way for players to band together to add their powers. It's similar a guild with separate chat. A fellowship consists of up to 5 players which share a common fellowship aura. The fellowship auras give bonuses to hero attributes, team and leaderbonus, gold gain and firestone gain.
  • At level 7 you can join a fellowship. For better progress, make sure you join a full (5 members) and active fellowship.
  • The higher the Battle Cry/Fate of the individual members, the higher the Fellowship Aura. (Attribute damage, armour and health, leadership and team bonus, Firestone effect and gold rain).
Make sure you are always in a full and active fellowship.
Just 1 member in sleep mode (72+ hrs off) will remove the entire gold bonus.
There are two fellowship ranks with the following privileges:
  • 1. Leader (1)
    • Kick a fellowship member
    • Transfer leadership to another fellowship member
    • Set join requirements (battle cry and fate attributes) and set join password
    • Rename the Fellowship
  • 2. Member (4)

Offline/Inactive
A fellowship member who is offline for more than 72 hours will go into offline mode and will be marked by OfflineMode. A fellowship member who is offline for more than 1 week will be automatically kicked from the fellowship. If the fellowship leader is kicked due to inactivity, a random fellowship member becomes the new leader.

There are two kinds of fellowship auras:
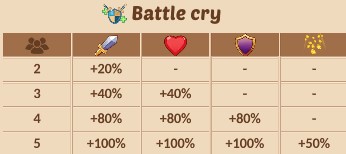
  • Aura: Battlecry
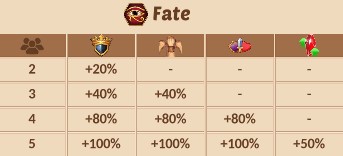
  • Aura: Fate
Battlecry
The battle cry aura is determined from two factors: the base aura and the aura effect.

battle cry aura = base aura × aura effect

The base aura only depends on the number of online players in the fellowship and consists of up to four bonuses


The aura effect is determined by multiplying the battle cry attributes of each online player in the fellowship:

aura effect = (1 + player 1 battle cry %) × (1 + player 2 battle cry %) × ...

The battle cry attribute of a player in offline mode stops contributing to the fellowship effect until the player returns to the game.

Formula for Battlecry:

battle cry% = (1+talent%) * (1+guildperk%) * (1+campaignperk%) - 1

Where the battle cry can be boosted:
  • 1. Guild: Personal Tree (level 10)
  • 2. WF/Campaign (level 50)
  • 3. Talent Tree (1. at level 101 and 2. at level 401 and 3. at level 950)
Example:
  • 1.if you have levelled the battlecry 1x 1-15% in the talent tree yet.

    Personal Guild Tree: 108%
    Campaign: 80%
    Talent tree: 15%

    108 % + 80 % + 15 % = 330 %.

    (1 + 1,08) * (1 + 0,8) * (1 + 0,15) = 4,3056

    2,08 * 1,8 * 1.15 = 4.3056
    (4.3056 - 1) * 100 % = 330.56 %

  • 2. if you have levelled the battlecry 1x15% and 1x 1-15% in the talent tree.

    Personal Guild Tree: 799 %
    Campaign: 210 %
    Talent tree: 15% + 15%

    799 % + 210 % + 15 % + 15 % = 3.584 %

    (1 + 7,99) * (1 + 2.10) * (1 + 0,15) * (1 + 0,15) = 36.8567525

    8.99 * 3.1 * 1,15 * 1,15 = 36.8567525
    (36.8567525 - 1) * 100 % = 3585 %

Fate
The fate aura unlocks at character level 200. With the Oracle, there are two types of blessings: the twelve outer blessings and one inner blessing (Fate). All blessings require glyphs, which are obtained by opening celestial chests. Blessings will give you a permanent attribute or gold bonus as well as virtue. You need to level all outer blessings five times before you can level the inner blessing, the Fate once. The Fate aura gives you benefits in your fellowship and is determined by two factors:

fate aura = base aura × aura effect

The base aura again depends on the number of online players in the fellowship and consists of up to four bonuses in the following way:


The aura effect is determined by multiplying the fate attributes of each online player in the fellowship:

aura effect = (1 + player 1 fate %) × (1 + player 2 fate %) × ...

Where the Fate can be boostedy:
  • 1. Oracle: Blessing
  • 2. Talent Tree (1. at level 531 and 2. at level 801 and 3. at level 1130)
  • 3. During the event: Decorated heroes*
During the event: Decorated heroes*
Depending on how many stars of recognition you obtained during the event, you will rewarded with a medal of courage after the end of the event. You will only get the highest medal you reached. The medal permanently increases your fate attribute multiplicatively.
Guilds
At level 10 you can join a guild. Like with the fellowship, you should make sure to join a full and active guild. The higher the guild, the higher the guild benefits. (Benefits via the things that have been levelled in the guild tree and through the guild level).

Available as soon as you enter a guild are Expeditions, these are missions separate from your regular map missions that reward you with Guild Coins and Expedition Tokens. The coins are automatically donated into the guild bank (with exception of ones purchased through the shop, from the Battle Pass or the rewards from the arena) the tokens are used to upgrade your personal tree, your wm's or to purchase pickaxes, jewel chets, elixir of life, tools or emblem of valor.

Guilds play a major role in terms of your progression in the game too. Guilds have perks for the whole guild, and your own personal perk tree. This will help boost you to pushing further into the game.

There are two Trees of Life, the guild tree and the personal tree. Each tree offers upgrades which can be bought with guild coins or expedition tokens.
Each tree also has a tree level which is increased by buying upgrades which also yields tree xp. The tree level determines the maximum upgrade level you can obtain for each upgrade.

The tree xp gain per upgrade starts at 100 for upgrade level 1 and increases by 10 per level. The tree xp requirement to level-up the tree starts at 1140 xp for level 2 and increases by 15 xp per level until level 10. Level 11 then costs 23 xp more. From level 12 on the increase is 45 xp per level. At certain milestones in the tree level, boss avatars are unlocked.

Pickaxes are unlocked at level 50, and are used in the Arcane Crystal. This is a guild based event, and rewards you with Arcane Crystals based on the damage you dealt with your pickaxes. Each guild has their own crystal and etiquette based on who should be in 1st, 2nd and 3rd place. These crystals are used in Awakening to strengthen your heroes and upgrade their passive abilities.
  • Officers can promote, demote and kick any member below officer.
  • Guild leaders and officers are now able to see the previous month's guild donations.
  • Guild leaders and officers can invite and decline recruits.
  • Guild leaders and officers can set guild description and join requirements.
  • Guild leaders and officers can invest guild coins in the guild Tree of Life and upgrade the Arcane Crystal
  • Guild leaders can choose one of the guild banners that have already been unlocked.
  • Guild leaders can promote, demote and kick any member.
  • Guild members who have been inactive for 3 days will be marked with an inactivity symbol (as in Fellowship).
Active guild expeditions are now canceled when leaving the Guild. Also in this case the guild coins from completed but unclaimed guild expeditions will be automatically donated to the Guild.

The last 50 guild actions are logged in the guild log. The following actions are logged:
  • Promotions and demotions of guild members
  • Joining, leaving and kicking of guild members
  • Guild tree upgrades and level-ups
  • Guild level-ups
  • Arcane crystal breakings and upgrades
  • Rank changes due to inactivity (leader and officer)
  • Guild leader leaving the guild
  • In the Guild Bank, you can donate the guild coins that you have purchased in or received from the Arena of Kings or the Battle Pass to your guild. Guild coins earned from expeditions will be automatically donated. The monthly donations from the guild members for the current month can also be seen there. Guild leaders and officers can see members' donations for the previous month.
  • The manual guild donations from the guild members are documented in the guild bank log.
  • In the treasury, the guild's treasurers can distribute the treasures the guild has obtained in the Chaos Rift competition to the guild members.
  • The damage that a player does in the chaos rift is tied to that player, if he leaves the guild (or he gets kicked) he will take the damage with him.

Inactive Guild Leader
  • If the guild leader is inactive for longer than a week and if there are no active officers in the guild, an active member gets promoted to officer.
  • If the guild leader is inactive for longer than a month, an active officer gets promoted to guild leader.
  • On a new game server while there is an ongoing competition event, when the guild leader is inactive an active member is promoted to officer in 2 days instead of 7 days and an active officer is promoted to guild leader in 5 days instead of 30 days.
Tree of Life
Tree of Life is your “Guild Tree”, which has two different types. A guild boosting one, and a personal boosting one. The “Guild” boosting tree affects everyone who is part of the guild, and the “personal” boosting tree affects just you. If you switch guilds, the guild tree changes depending on what upgrades that guild has done, but your personal tree stays the same and carries over all progress previously.

For each upgrade, you can only level them up to 5 to start, and as your tree level progresses by 10 levels, you can then level up each upgrade a further 5 times. Each upgrade you do grants you “XP” towards your tree level, so they work together.

There are two Trees of Life, the guild tree and the personal tree. Each tree offers upgrades which can be bought with guild coins or expedition tokens.
Each tree also has a tree level which is increased by buying upgrades which also yields tree xp. The tree level determines the maximum upgrade level you can obtain for each upgrade.

Guild Tree
The guild tree has 23 upgrades and affects all guild members. Only the guild leader and guild officers can buy upgrades. The cost for each upgrade starts at 5000 guild coins for level 1 and increases by 1000 coins per level.

Recommendation:
  • 1. Gold rain (left side of tree below)
  • 2. Librarian (left side of tree below)
  • 3. Alchemy (right side of the tree at the bottom)
  • 4. Attribute damage (tree trunk at the top)
  • 5. Damage specialisation (right side of tree in the middle)
  • 6. Main attributes (right side of tree at the bottom)
  • 7. Team bonus (left side of tree at top)
  • 8. Leadership (left side of tree at top)
  • 9-11. Energy/Mana/Rage
  • 12-14. Fist fight/Preciseness/Magic spells
  • ....
Personal guild tree
The personal tree has 20 upgrades and affects only you. You will keep these upgrades even if you leave your current guild. The cost for each upgrade starts at 600 expedition tokens for level 1 and increases by 100 tokens per level.

Recommendation:
  • 1/2. Gold rain (tree trunk/centre)
  • 1/2. Battlecry (tree trunk/centre)
  • 3. Prestigios (tree trunk/centre)
  • 4. Attribute damage (left side)
  • 5. Main attributes (tree trunk/centre)
  • 6. Miner (tree trunk/centre)
  • 7. Firestone effect (tree trunk/centre - as it is additive, it's only worth it at the beginning, the higher you level it the less effective it is and should then be leveled after 11-13)
  • 8-10. Energy/Mana/Rage (left side)
  • 11-13. Fist fight/Preciseness/Magic spells (right side)
  • ....

Personal Tree vs WM : Math & Formulas
Originally posted by Cryozene:
A lot of formulas here will be rough estimates and rounded at various points to keep the numbers somewhat nice. If you use the formulas provided here, keep in mind that they serve to show the order of magnitude for each category, never an exact breakpoint.
The effectiveness of upgrading your personal tree of life in favor of Warmachines depends very much on what you want to achieve. So first of all, we need to map out the actual gains of each choice.

To make things easier, I’ll calculate a single number as gold/token. Increased Firestone gain will impact this directly. Gold gain impacts firestone gain and vice versa, so effective gold gain will be multiplied by the amount of firestones generated by getting more gold (goldgainlog(2)/log(6)). Damage is a 25% gold multiplier for every increase of 3 (the gold per increase in stage and the increase in enemy strength per stage for the main game).

Campaign level progress
I’ll gracefully ignore the increased research speeds, more beer, explorer bonus etc here and focus on damage only. The personal tree will give you a higher miner level (and more arcane crystals), battles will give you faster library progress. In general, the bonus through faster research is better, but only very long term.
The main bonuses are the x2 for gold and stats for 5 campaign stars each. So, in other words, it is directly linked to the increase in actual fighting power. Each level increases enemy power by 20% and another 200% every two levels. That's an average of 103*1.21.4 .
For a progress of 5 levels, we need about 1.45=4.3times the actual power.

WMs increase power by 5% for every level and by another 5% for every BP level on relevant stats. Thats 1.052=1.1025times the actual power for each WM level.
1.1025x=4.3 x 15: Upgrading our tanks by 15(!) levels provides us with a mere progress of 5 normal missions on average. Of course, progress will be accelerated by hero jewels, your setup
Arcane Crystal
As stated earlier, once you are in a guild, you can access the Arcane Crystal once you are character level 50. Obtaining pickaxes, like a lot of other resources is a passive income where you can claim 1 free pickaxe every 96 minutes, meaning 15 per day and will cap at being able to claim 30, but you can hold onto as many as you want.

Your reward is based on your performance and “damage dealt” to the crystal with your pickaxes, and as mentioned earlier, each guild works on this differently as to ensure everyone is getting their own fair share of crystals.

To see the full formula of how your reward is calculated you can view the wiki page at this link: https://firestone-idle-rpg.fandom.com/wiki/Arcane_Crystal

Personal Tree vs Arcane Crystal
Originally posted by UnNaMeD:
The ratio between crystal health and crystal rewards is a logarithmic function.
This means that early upgrades will be giving significantly more crystal for each hit. It also means that later upgrades will continue giving more upgrades per health, but the difference wlil get smaller and smaller, while still always giving more.
This means that upgrading the crystal is always profitable, but the profit diminishes with every upgrade - yet still always remains profitable.

However, something else to consider, is the cost to upgrade the crystal. Crystal costs guild coins, as well as the guild tree - BUT the crystal will not grant guild exp and make your guild grow. The crystal profits to the guild members, not the guild itself.

With that in mind, you need to find the balance that satisfies you between gaining guild levels and getting more rewards from the crystal.

My personal opinion: given the crystal rewards growth of early levels, would be to upgrade the crystal every time it reaches 5/5 breaks until the rewards get significantly lower than previous level, which is around crystal level 50.

I know that some guilds prefer to ignore the crystal to get more guild levels, because these will unlock new spots in your guild for more members. It's also a good strategy, more members will have your guild snowballing.

Either way, upgrading the crystal or the tree is slow, we are of course on an idle game.

As for the limit, it hasn't been reached yet, with a crystal lvl 308 or 309 at the highest as I write the message.

See: https://firestone-idle-rpg.fandom.com/wiki/Arcane_Crystal
The formula for reward/heatlh => Y = (3000 + (X + 1) * 3000) / (22500 + (X + 1) * 675)
Hero Awakening
Linking into Arcane Crystals, Hero Awakening unlocks at level 50, and is where you use your obtained Arcane Crystals. Similar to how Alchemist Experiments work, Hero Awakening will apply to Random Heroes rather than you specifically choosing which hero to focus on. Each upgrade costs 500 Arcane Crystals and gives varying experience when used. Every hero gives a different effect of either Raining Gold, Prestigious or All Attributes where the effect increases with each hero level gained.

To view the full list of how much experience is needed to level a hero, and the strength of their relevant effect you can go to this link: https://firestone-idle-rpg.fandom.com/wiki/Awakening
Chaos Rift
The Chaos Rift is a server-wide event in which all players on the same game server fight against the dark gods. The Chaos Rift is located in the guild and will be unlocked at level 100.
  • Dark trial
    There are 3 dark gods that can be attacked with help from your guardians.
    • Lendra
    • Kramatak
    • Yanamoth
    The dark gods are special bosses, if you defeat them you will gain their individual power books, which can be used for research in Forbidden Knowledge.

  • All the dark gods can also be recruited as heroes, for this you need to bring their corresponding research tree to 2x5 (10) and another 50 tomes of power for the recruitment. As f2p or only with the event pass you won't be able to recruit the god in the first run, but that shouldn't worry you.
    • The gods rotate in a monthly cycle, so if the recruitment didn't succeed in the first cycle, you just have to wait until it's that god's next turn.
    • The progress you made on the god research tree won't be reset, meaning that you can then continue to levelling in the next turn.
    • The recruited gods are then ‘’only‘’ normal heroes, so no drama if you only recruit them on the second or even third turn.

  • All guardians that you have unlocked are attacking at the same time. Each attack requires 1 Moonstone or 1 Eclipse Stone.
    • Moonstone: The maximum amount of Moonstones you can have is 10, at the end of each day the Moonstones are restocked to 10. (similar mechanism as the Arena Tokens)
    • Eclipse Stones: The eclipse stones can also be used to attack the dark gods, there is no limit to the amount of eclipse stones you can accumulate/collect.
  • When fighting the Dark Gods, each guardian's damage is calculated from its advanced chaos rift attributes. A guardian's basic damage is determined by its holy damage attribute. Critical hits can occur according to its precision hit chance attribute and the guardian's damage is then increased by its precision hit damage attribute. Double hits can occur with a chance according to the guardian's double strike attribute. Critical and double hits can also stack, so there are the following four possible cases:

  • Basic hit = Holy damage

    critical hit = (1 + precision hit damage) × holy damage double hit = 2 × holy damage double critical hit = 2 × (1 + precision hit damage) × holy damage The health of a dark god starts at 5 million hit points and increases multiplicatively by 5% per level: health = 5,000,000 × (1 + 5%)god level-1

  • For the Chaos Rift it is better to unlock all 4 Guardians as early as possible and level all guardians equally.
  • Game progress + chaos rift mixed: Level the dragon and phoenix for the better guardian auras always some evolutions level higher than the fairy and the djinn, but don't neglect the other two guardians for the better chaos rift strategy and level them evenly, even if it's some evolution levels below the dragon/phoenix.
To increase the damage of the guardians you have to upgrade the holy damage in the magic quarter with the light orbs, evolve the guardians and increase their rarity levels. All the guardian upgrades outside of the magic quarter, like the talent points, from the various research trees, artefacts or the tree of life etc., don't have any effect on the damage of the guardians in the chaos rift.

When a dark god is killed, its level will automatically increase by one.

  • Rewards
    When a dark god is killed, all players who have hit the dark god at least once will receive rewards. There are two types of rewards: the damage rewards and the rank reward.

  • Damage rewards
    The damage rewards are proportional to the damage the player dealt on the dark god:
    - Dark runes: 30% of the damage = can be exchanged for the Tomes of Power.
    - Light Orbs 25% of the damage = are used to upgrade the guardian attributes for the Chaos Rift (in the magic quarter).

  • Rank reward
    After each killing of one of the dark gods, the top 5 players with the highest proportional damage on the god will get an additional reward:
    • Rank 1: 10 tomes of power
    • Rank 2: 7 tomes of power
    • Rank 3: 5 tomes of power
    • Rank 4: 3 tomes of power
    • Rank 5: 2 tomes of power
  • Server bonus
    When a dark god is killed, the whole server will get a 100% all attributes bonus ("Twilight of the gods") for 60 minutes.

  • Competitions
    There are two monthly competitions: the personal competition and the guild competition.
    • Personal competition
      Players will receive rewards at the end of the month in proportion to the total amount of damage they have done, depending on their league and rank within their league.
      The rewards will be distributed via in-game mail at the end of the month.
    • Guild competition
      Guilds who are in the top 10 of the total guild damage leaderboard at the end of the month will receive rewards.
      The rewards will be deposited in the Guild Treasury at the end of the month where the guild's treasurers can distribute them to the guild members.
      The damage that a player does in the chaos rift is tied to that player, if he leaves the guild (or he gets kicked) he will take the damage with him.

    The list of the rewards can be viewed here in the wiki: https://firestone-idle-rpg.fandom.com/wiki/Chaos_Rift
Forbidden Knowledge
  • In Forbidden Knowledge, you can research in the domains of the three dark gods. As with the Oracle or the Tree of Life, all research has to be completed to level 5 before you can continue to research there. All upgrades are multiplicative.

  • There are 3 dark gods that can be defeated with the help of your guardians.
  • The Dark Gods are special bosses, defeating them will give you their individual Books of Power, which can be used for Forbidden Knowledge research. [Dark Gods can also be unlocked and become part of your heroes, for this you have to bring all their Forbidden Knowledge research to level 10 and then recruit them with 50 of their Books of Power.
  • Each of the three gods has their own Book of Power which can be used in the Forbidden Knowledge mechanic.

  • Secrets of the Oceans
    To explore the secrets of the ocean, you need Ledra's power books .
    - Lendra = Used to explore the secrets of the oceans
  • Thunder Chronicles
    To research the thunder chronicles you need Kramatak's tomes of power.
    - Kramatak = Used to research thunder chronicles
  • Chaos Lore
    To research the chaos teachings you need Yamamoth's tomes of power.
    - Yanamoth = Used to research the Chaos Lore
Magic Quarter & Guardian 1
Guardians help your heroes battling enemies, but need to be actively clicked, alternatively hold down the space bar or right mouse button or use an autoclicker. All guardians have the same main and advanced attributes, but they attack differently and also have different auras. Guardians are upgraded by gaining experience and can be evolved when they reach upgrade level 10. Currently there are four guardians in the game.
  • Fairy (Grace)*
    Unlocking: Activated automatically as the first Guardian.
    Guardian Aura: Main attributes (damage/health/armour)
    Attack Type: Single damage, attacks up to 10 times per second.
  • Dragon (Vermilion)*
    Unlocking: Unlocked at Grace Evolution 2
    Guardian Aura: Golden Rain
    Attack Type: Single damage, attacks up to 10 times per second.
  • Phoenix (Ankaa)
    Unlocking: Unlocked at Vermilion Evolution 5
    Guardian Aura: Prestigious
    Attack Type: Multi damage, attacks a bit faster than once per second. The attack hits all enemies, with the main target taking 100% of the damage and surrounding enemies taking 50% of the damage.
  • Djinn (Azhar)
    Unlock: Unlocked from personal tree of life 50.
    Guardian Aura: Main attributes (damage/health/armour)
    Attack Type: Single damage, attacks up to 10 times per second.
* Some players have the Dragon as their first Guardian, final order will be updated later

The fairy* is the one you start with, you have to bring the fairy to level 10 in order to evolve her. The first evolution costs 300 dust. After you have evolved the fairy once (to the second evolutionlevel), you unlock the dragon* and the phoenix will be unlocked as soon as Grace and Vermilion have both reached their fifth evolution. However, the djinni can only be unlocked at personal tree of life level 50. All 4 auras are active at the same time. In a way, you have to level up the fairy, dragon, phoenix and djinni as well. At level 100 the guardians can fight against the dark gods in the Chaos Rift, which means it makes sense to unlock and evolve all 4 guardians + increase their rarity levels.

There are 2 (3) ways to do this:
  • Game progress optimised = focus on the: Dragon and Phoenix for the better guardian auras
  • Chaos rift optimised = level all guardians more equally
  • Game progress + chaos rift mixed: Level the dragon and phoenix for the better guardian auras always some evolutions level higher than the fairy and the djinn, but don't neglect the other two guardians for the better chaos rift strategy and level them evenly, even if it's some evolution levels below the dragon/phoenix.
* Some players have the Dragon as their first Guardian, final order will be updated later

Strange dust
Since strange dust is needed for several things, the question is where to use it in the most useful/effective way.

My recommendation:
  • 1. For the Guardians + Alchemy experiments (split up)
    First, you should try to unlock all 4 guardians, use the dust to bring the dragon, the fairy and the phoenix to evolution level 5, to enable them to fight together against the dark gods and to be able do more damage to the gods in the Chaos rift (from level 100). But it is also important to use the dust for the alchemy experiments.
  • 2. Starting at level 200 with the Oracle and the soulstones being unlocked, the dust is also needed for another thing.
    After you have unlocked all 3 guardians with dust, you should start using the dust to unlock tier 2 soulstones for all heroes.
  • 3. Then split the dust between the guardians and alchemy

Guardian Info
In the Guardian Info tab you can train your guardian every 8 hours. You can also enlighten the guardian at the cost of 20 dust without a cooldown. This is also the place where you can switch between the guardians. By clicking on the guardian you want, and click the "Set Active" button.

Therefore it makes sense to shorten the time for guard training (through talent trees or other research trees). With all the possible guardian training time reductions in the game, you can go from every 8 hours to every 4 hours. Which halves the time or doubles the gain

Evolution
The evolution tab is unlocked once you make your guardian level 10. Once your guardian is level 10 you need 300 Strange Dust to evolve your guardian. The evolution a guardian significantly increases his main attributes, his advanced attributes and his guardian aura.

Evolution costs can be found here: https://firestone-idle-rpg.fandom.com/wiki/Guardians#Evolution

Continues with Magic Quarter & Guardian 2 next chapter
Magic Quarter & Guardian 2
Rarity
There are eight guardian rarities. Each rarity increase costs contracts and requires a certain number of guardian evolutions. A higher guardian rarity multiplicatively increases the guardian's damage and the guardian's aura effect.
  • Rarity level 1: Common:
  • Rarity level 2 Uncommon:30 contracts + 5 evolutions
    Guardian damage: x61
    Guardian aura: x51
  • Rarity level 3 Rare: 70 contracts + 10 evolutions
    Guardian damage: x85
    Guardian aura: x71
  • Rarity level 4 Epic: 150 contracts + 20 evolutions
    Guardian damage: x121
    Guardian aura: x101
  • Rarity level 5 Legendary: 200 contracts + 30 evolutions
    Guardian damage: x181
    Guardian aura: x151
  • Rarity level 6 Mythic: 250 contracts + 40 evolutions
    Guardian damage: x241
    Guardian aura: x201
  • Rarity level 7 Titan: 300 contracts + 55 evolutions
    Guardian damage: x361
    Guardian aura: x301
  • Rarity level 8 Angel: 350 contracts + 70 evolutions
    Guardian damage: x481
    Guardian aura: x401

As guardians do not take damage, they have no health or armor. So the only main attribute displayed is Attack and the passive guardian aura.

Attributes
  • Main attributes
    The base damage of a guardian starts at 20 and increases by 35% per level and by an additional 700% per evolution. It also increases with the rarity of your guardian.
    base damage = 20 × 1.35 (level-1) × (8 * 1.3510) (evolution-1) × rarity effect - 1
  • The adventure damage is obtained from the base damage by multiplication with the Guardian Power, Attribute Damage and All Attributes researches, the guardian gold upgrades, the effect from wrists and relics and the honor effect:
    adventure damage = base damage × research multiplier × gear multiplier × gold upgrade multiplier × honor multiplier
  • Advanced attributes
    The critical chance of a guardian starts at 1% and increases by 1% per evolution up to a cap of 50%. The critical damage of a guardian starts at 300% and increases by 10% per evolution up to a cap of 800%.

Chaos rift attributes
In the Chaos Rift, guardians have the following special attributes:

  • Holy damage: Basic damage against a god
    - Base value: 1000
    - Increase: +0.5% per total guardian evolutions
    5% per holy damage upgrade
  • Double strike Chance to do double damage against a god
    - Base value: 5%
    - Increase: +3% per rarity
  • Precision hit chance Chance to do a critical strike against a god
    - Base value: 5%
    - Increase: +3% per rarity
  • Precision hit damage Extra damage of a critical strike against a god
    - Base value: 100%
    - Increase: +50% per rarity
  • Redemption Increases the holy damage of all guardians
    - Base value: 0%
    - Increase: +0.5% per evolution
The holy damage can be upgraded until the end of the current month with orbs of lights. Each upgrade level multiplicatively increases the holy damage by 5%. The upgrade cost starts at 2,000 orbs of light and multiplicatively increases by 13% per upgrade level. The improvements will be reset after each month and you start afresh with the next dark event god.

For the Chaos Rift it is better to unlock all 4 Guardians as early as possible. To increase the damage of the guardians you have to upgrade the holy damage in the magic quarter with the light orbs, evolve the guardians and increase their rarity levels. (see table above) All the guardian upgrades outside of the magic quarter, like the talent points, from the various research trees, artefacts or the tree of life etc., don't have any effect on the damage of the guardians in the chaos rift.

Aura
The aura of a guardian can be one of Heroes All Attributes, Raining Gold and Prestigious. The aura of a guardian is always active even when it is not your active guardian. The strength of an aura starts at 10% and increases by 30% per level and by an additional 700% per evolution. It also increases with the rarity of your guardian
aura effect = 0.1 + 1.3 (level-1) × (8 * 1.310) (evolution-1) × rarity effect - 1
Character Level & Talents
You will earn experience when you earn firestones (means gold too). Everytime the total earned firestones goes up by 10x, you have earned about 3000 EXP. Your character level will unlock certain features in this game. Tavern at level 15. Exotic Merchant at level 30. Campaign, Battles, Crystal, Engineer and Awakening at level 50. Emblems and 3rd tab inside Exotic Merchant at level 65. Monster Missions at level 70. Arena at level 80. Alchemist, Dragon Missions and Dragon Blood at level 120. Transmuting at level 130. Naval Missions at level 140. Oracle at level 200.

Talenttree
Everytime you level up you gain 1 talent point. With it you can level up some basic and special things. Don't level up your talent tree from top to bottom up to the maximum. Unlock everything as much as possible first. There are always hurdles, where you have to have a certain level to unlock the next one. Use these hurdles to level up what is important to you.
There are currently 2037 talent points in the game.
  • Librarian
  • Alchemy
  • Twin dragons
  • Battle Cry
  • Fate
  • Expeditioner
  • Trainer Skills
  • Coworkers
  • Meteorite Hunter
  • Raining Gold
  • All main attributes
  • Party - Auto Abilities
  • Leader - Auto Abilities
Which of these you level up first is up to you, but the Research Time Reductions, Double Beer, Battle Cry, Fate and also Gold should always be levelled up fast. If you feel unsure, you can always use the order above as a reference.

Level these at the end (only level these if it' necessary to unlock the next one in the talent tree).
  • Team Bonus
  • Leadership
  • Attack speed
  • Damage Specialization
  • Mana/Energie/Rage Heroes
  • Tank/Healer Specialization
  • Critical chance
  • Critical damage
  • Weaklings
  • Powerless enemy
  • Dodge
  • Expose weakness
  • Powerless boss
  • Guardian Power
Team Bonus should be one of the first things you level up. Enemy should always be before Boss (HP/DMG) and HP always before DMG. If you feel unsure, you can always use the order above as a reference.

All talent upgrades (except the auto abilities) are additive per level. All upgrades (except dodge, critical chance and critical damage) are multiplicative with the other upgrades of the same type, also within the talent tree.
A list of talents you find here: Firestone Idle RPG Wiki: Talents[firestone-idle-rpg.fandom.com]

Avatar/Skins
    The game has several different types of avatars and skins.
  • Basic Avatars: These basic avatars are available from the beginning regardless of level or progress.
  • Heroes/Mercenary: As soon as a Heroes/Mercenary is unlocked, the appropriate Heroes/Mercenary avatar is also available.
  • Bosses/Milestones: Boss avatars will be unlocked through your personal guild tree when you reach certain milestones/levels.
  • Event Avatars: Event Avatars are special avatars that you can only get during the event.
  • Skins: Skins are new looks/new designs for your heroes they can be unlocked via the anniversary event or through certain in-game quests.
    • Valentine's Event: 4 Special Avatars (+3 new Avatars will be added every year)
    • Anniversary Event: 4 Special Avatars and 2 Skins
    • Spring Event: 4 Special Avatars (+3 new Avatars will be added every year)
    • Tropicana Event: 4 Special Avatars (+3 new Avatars will be added every year)
    • Astral Alignment Event: 4 Special Avatars (+3 new Avatars will be added every year)
    • Halloween Event: 4 Special Avatars (+3 new Avatars will be added every year)
    • Winter Festival: 4 Special Avatars (+3 new Avatars will be added every year)

Background
The background colour of the avatar depends on the level of the character as follows:
  • Level 1-29 = Brown
  • Level 30-64 = Green
  • Level 65-119 = Blue
  • Level 120-249 = Purple
  • Level 250-399 = Bronze
  • Level 400-549 = Turquoise
  • Level 550-699 = Gold
  • Level 700-849 = Red
  • Level 850-999 = Celestial
  • Level 1000-1149 = Immortal
  • Level 1150- = Primordial
It is possible to choose one of the background colours that have already been unlocked
Map Missions
This feature of the game is very important. Here you can collect a lot of resources which you need in the game. Strange Dust for your guardians. Scrolls, which can be used or sold at the exotic merchant. Chests for equipment, items and void crystals. Later additional missions are unlocked, giving you Epic Chests (level 70), Dragon Blood (level 120) and Legendary Chests (level 140). Later in the middle and end-game you will unlock 2 new missions. Every mission will reward you with some honor, and after level 65 you start earning emblems too. Honor raises your attributes, but more importantly it allows you to rank up. Giving you more squads and more missions to do. It is very important to do as many missions as you can possibly do.
Some hints: When you are short on time, try to do the shorter missions first, and just before you leave, start the longer missions. Also for Monster Missions (level 70) and Naval Missions (level 140), they take 5-7 hours on average. Don’t do them right when you see them. Do normal missions first, complete most or all of them, then you probably have a few hours left. That’s when you start a Monster Mission. While the mission is in progress, it will carry over to the next map.

Monster, Naval, Titan and the Shadow missions appear on a specific chance, Monster missions will show up 1 in every 3 cycles, meaning the longest you can go without one would be 4 cycles. Naval, Titan and Shadowmissions will show up 1 in every 4 cycles, this time meaning you could go a maximum of 6 cycles.
Your map mission cycles do not “skip” while you are offline. Therefore if you close the game with 30 minutes until your missions refresh - those will be the missions that will appear. Meaning if you time things correctly, you will never “skip” a cycle with a Monster or Naval mission.

Monstermission = 70 level
Dragonmission = 120 level
Navalmission = 140 level
Titanmission = 300 level + 5 billion gear power
Shadowmission = 600 level + 60 billion gear power

Silver Missions
Silver missions appear randomly on the map once you reach rank 10. They are upgraded regular missions (including Monster, Dragon, Naval and Titan missions) and indicated by silver stars over the mission icon. Silver missions give double rewards, but also require twice the number of squads. Each rank above 9 increases the number of silver missions on the map by one until map rank 30. The next silver mission is available at map rank 35 and then at rank 40.
List of Missions
  • Scout Missions
    These missions reward you with 1 honor, 5 emblems and 10 Strange Dust. The duration is 30 minutes on average and takes up 1 squad.

  • Adventure Missions
    These missions reward you with 2 honor, 10 emblems and 2 random scrolls. The duration is 1 hour on average and takes up 1 squad.

  • War Missions
    These missions reward you with 4 honor, 20 emblems and a random chest. 70% common, 20% uncommon and 10% rare chest. The duration is 2 hours on average and takes up 1 squad.

  • Monster Missions (unlocks at level 70)
    These missions reward you with 28 honor, 140 emblems and an epic chest. The duration is 7 hours on average and takes up 2 squads. Has a 33% chance of spawning on the map.

  • Dragon Missions (unlocks at level 120)
    These missions reward you with 16 honor, 80 emblems and 50 dragon blood. The duration is 4 hours on average and take up 2 squads.

  • Naval Missions (unlocks at level 140)
    These missions reward you with 28 honor, 140 emblems and a legendary chest. The duration is 7 hours on average and takes up 2 squads. Has a 25% chance of spawning on the map.

  • Titan Missions (unlocks at level 300 and 5 billion gear power)
    A titan mission has a guaranteed 1 in 4 chance of appearing. It takes on average 7 hours to complete this mission. It requires 2 squads. It will reward you with a mythic chest, 28 honor and 140 emblems.

  • Shadow Missions (unlocks at level 600 and 60 billion gear power)
    A shadow mission has a guaranteed 1 in 4 chance of appearing. It takes on average 7 hours to complete this mission. It requires 2 squads. It will reward you with a mythic chest, 28 honor and 140 emblems.

  • Mystery missions
    Mystery missions only appear during the World Domination mini-event. They take on average 3 minutes to complete and require 1 squad. They will reward you with 1 mystery box (3 mystery boxes if you purchased one of the event packs), 1 honor and 5 emblems.

  • Silver Missions
    Silver missions appear randomly on the map once you reach rank 10. They are upgraded regular missions (including Monster, Dragon, Naval and Titan missions) and indicated by silver stars over the mission icon. Silver missions give double rewards, but also require twice the number of squads. Each rank above 9 increases the number of silver missions on the map by one.
List of Chests
Gear chests
  • Common Chest
    These chests give 1 piece of equipment ranging from common to rare. Also gives 1 item.

  • Uncommon Chest
    These chests give 2 pieces of equipment. At least one is uncommon. The other can be anything from common to epic. Also gives 2 items

  • Rare Chest
    These chests give 3 pieces of equipment. At least one is rare. The other 2 can be anything from common to epic. Also gives 3 items.

  • Epic Chest (Level 65/70)
    These chests give 4 pieces of equipment. At least one is epic, and another one is rare. The other 2 can be anything from common to epic. It also has a 10% chance of giving a Legendary Seal for a specific equipment. It also gives 4 items.

  • Legendary Chest (Level 130/140)
    These chests give 5 pieces of equipment. At least 3 is epic. Another one is rare. The last one can be anything from common to epic. It has a 1 in 10 chance to give a Legendary Seal, and another 1 in 15 chance to give Mythic Seal. It also gives 5 items.

  • Mythic Chest (Level 300 + 5 billion gear power)
    A mythic chest will give you 1 legendary gear item, 3 epic gear items and 2 random gear items. You also have a guaranteed 1 in 15 chance to get a mythic seal and guaranteed 1 in 15 chance to get a titan seal from this chest. Mythic Chest can get at lvl 300 but can't be open until lv 300 + 5 billion gear power.

  • Titan Chest (Level 600 + 60 billion gear power)
    A titan chest will give you 1 mythic gear item, 3 legendary gear items and 3 random gear items. You will also get 7 random inventory items. You also have a guaranteed 1 in 15 chance to get a angel seal and guaranteed 1 in 15 chance to get a mythic seal from this chest. Titan Chest can get at lvl 600 but can't be open until lv 600 + 60 billion gear power.

Jewel chests
  • Wooden Chest
    A wooden chest will give you 1 random jewel of common, uncommon or rare rarity. You will also get 11 components and up to 1 arcane conduit.

  • Iron Chest
    An iron chest will give you 1 guaranteed uncommon jewel and 1 random jewel of common, uncommon, rare or epic rarity. You will also get 22 components and up to 2 arcane conduits.

  • Golden Chest
    A golden chest will give you 1 guaranteed rare jewel and 2 random jewels of common, uncommon, rare or epic rarity. You will also get 33 components and up to 3 arcane conduits.

  • Diamond Chest (Campaign Stars 100/110)
    A diamond chest will give you 1 guaranteed epic jewel, 2 guaranteed rare jewels and 1 random jewel of common, uncommon, rare or epic rarity. You will also get 44 components and up to 4 arcane conduits. You can also get a legendary seal from this chest at a guaranteed 1 in 10 chance.

  • Opal Chest (Campaign Stars 145/155)
    An opal chest will give you 3 guaranteed epic jewels, 1 guaranteed rare jewel and 1 random jewel of common, uncommon, rare or epic rarity. You will also get 55 components. You will also get 55 components and up to 5 arcane conduits. You also have a guaranteed 1 in 10 chance to get a legendary seal and a guaranteed 1 in 15 chance to get a mythic seal from this chest.

  • Emerald Chest (Campaign Stars 190)
    An emerald chest will give you 1 legendary jewel and 3 epic jewels. You will also get 132 components. You will also get 132 components and up to 11 arcane conduits. You also have a guaranteed 1 in 15 chance to get a mythic seal and a guaranteed 1 in 15 chance to get a titan seal from this chest.

  • Platinum Chest (Campaign Stars 319)
    A platinum chest will give you 1 mythic jewel, 3 legendary jewels and 3 random jewels. You will also get 264 components and up to 22 arcane conduits. You also have a guaranteed 1 in 15 chance to get an angel seal and a guaranteed 1 in 15 chance to get a mythic seal from this chest.

Celestial chests
  • Comet chest
    A comet chest give 50 glyphs and 1 soulstone

  • Lunar chest
    A Lunar Chest give 100 glyphs, 1 uncommon soulstone and 1 random soulstone.

  • Solar Chests
    A Solar Chest give 150 glyphs, 1 rare soulstone and 2 random soulstones.

  • Nebula Chest (Oracle level 98/101)
    A nebula chest will give you 1 epic soulstone, 2 rare soulstones and 1 random soulstone of common, uncommon, rare or epic rarity. You will also get 300 glyphs. You can also get a legendary seal from this chest at a guaranteed 1 in 10 chance.

  • Cosmic Chest (Oracle level 149/153)
    A cosmic chest will give you 3 epic soulstones, 1 rare soulstone and 1 random soulstone of common, uncommon, rare or epic rarity. You will also get 600 glyphs. You also have a guaranteed 1 in 10 chance to get a legendary seal and a guaranteed 1 in 15 chance to get a mythic seal from this chest.

  • Galaxy Chest (Oracle level 201)
    A galaxy chest will give you 1 legendary soulstone, 3 epic soulstones and 3 random soulstones. You will also get 1200 glyphs. You also have a guaranteed 1 in 15 chance to get a mythic seal and a guaranteed 1 in 15 chance to get a titan seal from this chest.

  • Stellar Chest (Oracle level 279)
    A stellar chest will give you 1 mythic soulstone, 3 legendary soulstones and 3 random soulstones. You will also get 2400 glyphs. You also have a guaranteed 1 in 15 chance to get an angel seal and a guaranteed 1 in 15 chance to get a mythic seal from this chest.
Seals
You get Seals from epic, legendary, mythical or titan chests at a 1 in 10 chance for a legendary, and a 1 in 15 chance for mythical, titan and engel. There are 34 types of seals. Legendary seals, mythical seals, titan seals and engel seals. These seals allow you to upgrade equipment to legendary, mythical, titanium or engel rarity. To upgrade to Legendary rarity, you will need a level 6 epic equipment + Legendary Seal for that specific equipment. For Mythic, you need a level 9 legendary equipment + Mythic Seal for that specific equipment. For Titan, you need level 11+ mystic gear + a mystic seal. For Engel, you need level 13+ titanium gear + a titanium seal.

Just because you get a seal, doesn’t mean you have to actually use it. Most of the time you get a seal for a tier 1 equipment. You can ignore them. Not only is there a good chance that the hero will be replaced one day, so you waste void crystals by making the equipment level 6. But also tier 2+ equipment is so much more important, you will have to raise all of them to level 6 before it’s more cost efficient to make a tier 1 equipment legendary.
Items & Scrolls
You get items through chests and scrolls through missions. I classify them in 2 types, buff and speed up (aka gold) items. Buff items are those that will power up your heroes or guardian for just a few minutes. Speed up items are those gold items, like gold pouches, buckets, crates and piles.

Buff items are only good when you come across a 3-star boss. With these items it will become easier to defeat the boss. However if defeating the boss is pointless, like you don’t unlock a new hero with it, then I suggest not using any buff item on that particular boss. Just gather enough strength naturally to beat him. Any excess buff items should be sold at the Exotic Merchant. After all, permanent upgrades are better than temporarily buffs.

Speed up items can be good, often used for meteorites. They are also used to complete the daily quest, using 4 pouches or buckets (40-140 coins) to obtain 3 scrolls (240 coins). Resulting in a profit. They can also be used to obtain firestones more quickly, but it’s like a drug. Once you start using them, you have to keep using them to feel like you’re progressing further. Once you hit a prestige wall, like it takes 12 hours of normal gameplay to get a 2x multiplier on your firestones, you can start using gold items to lower it down. But this does nothing to push that wall further. Which means next run you have to use these items again, or else it’s going to take 16 hours to get a 2x multiplier. Overall I think it’s best not to rely on gold items, and just sell them at the Exotic Merchant. This gives you permanent upgrades, which will push that ‘wall’ further, allowing you to get a 2x multiplier in a shorter amount of time.

Speed up items are not affected by Midas Touch. However speed up items are affected by anything that increases your DPS. This is also why speed up items work very well on glass cannon builds. DPS counter does not take into account the survivability of the heroes, or even the state of heroes (dead or alive). All it means is their attack, and how fast they attack per second. So when you increase speed through a scroll, DPS goes up. Increase attack/damage, and DPS goes up.
Daily/Weekly Quests
Early in the game, daily quests are more important since you don’t get many missions and so the resources you get daily from missions is limited, the daily quests rewards are a nice addition to that. Some of them are difficult to complete and require you to play for a long period of time or come back later in the day and do some stuff. Some planning goes a long way.

To make the “open 3 chests” quest easier, you have to save the chest you get from this quest for the next day. So you start the day with 1 chest, then early in the day you can start a chest mission, and later in the day you can start another chest mission. You have 3 total. Open them. Accept the reward and hold onto that chest for the next day.

To make the “Train the guardian twice” quest easier, level up the “Trainer Skills” talent, and later in Firestone Research Tree 1, you can reduce the time for training even further. Lowering it down to 4 hours for each training.

The “complete 6 map missions” quest will mostly go to waste when your rank is low. But this, as well as every other quest, gets easier when rank goes up.

Daily Quests
  • Trainer: Train guardians 2 times • Reward: strange dust (20 + 2 × rank)
  • Conqueror: Complete 6 map missions • Reward: honor (3 + rank)
  • Collector: Open 4 chests • Reward: 1 random gear chest
  • Gamer: Play 10 times in the tavern • Reward: 300 beers (unlock: level 15)
  • Expeditioner Complete 5 guild expeditions • Reward: 300 expedition tokens (unlock: level 18)
  • Merchant: Sell 10 items at the exotic merchant • Reward: exotic coins (100 + 10 × rank) (unlock: level 30)
  • Liberator: Complete 2 liberation missions • Reward: blueprints (100 + 2 × campaign level) (unlock: level 50)
  • Miner: Hit the arcane crystal 5 times • Reward: 2 pickaxes (unlock: level 50)
  • Prohpet: Complete 2 rituals at the Oracle • Reward: virtue (20 + 5 × oracle milestone) (unlock: level 200)

Weekly quests reset every 7 days at your weekly reset time. Some quests have a character level requirement and appear only when the corresponding game feature is unlocked. For some quests, the reward scales with your character level, map rank or campaign stars. You receive the weekly rewards if you have completed 5/5 of the respective daily tasks within 7 days.

Weekly Quests
  • Loyalty-Weekly: Claim 5 daily rewards • Reward: 210 gems
  • Trainer-Weekly: Complete 5 times the quest "Trainer" • Reward: 3 gear chests, which type of chest depends on character level
  • Conqueror-Weekly: Complete 5 times the quest "Conqueror" • Reward: 2 gear chests, which type of chest depends on character level
  • Collector-Weekly: Complete 5 times the quest "Collector"" • Reward: 1 gerad chest, which type of chest depends on character level
  • Gamer-Weekly: Complete 5 times the quest "Gamer" • Reward: 700 meteorites (unlock: level 15)
  • Expeditioner-Weekly: Complete 5 times the quest "Expeditioner" • Reward: 1500 expedition tokens (unlock: level 18)
  • Merchant-Weekly: Complete 5 times the quest "Merchant" • Reward: (500 + 50 × rank) exotic coins (unlock: level 30)
  • Liberator-Weekly: Complete 5 times the quest "Liberator" • Reward: 1 jewel chest, which type of chest depends on your Campagne Stars
  • Miner-Weekly: Complete 5 times the quest "Miner" • Reward: 2 jewel chest, which type of chest depends on your Campagne Stars
  • Prohpet - Weekly: Complete 5 times the quest "Prohpet" • Reward: 1 celestial chest, the type of chest depends on the oracle level.
Meteorites
Meteorites
Once you have unlocked the Library at Stages 45, you will also see the miner coming into the battlefield, the meteorites are collected automatically just like the gold or beer. By leveling Coworkers in the talent tree, the increase on offline limit of meteorites is now granted by default to all players. There are various ways to get more meteorites. You can use gold items and there are certain upgrades which increases the chance for 2 meteorites to drop instead of 1.
The maximum amount of offline meteorites is 720, which is the equivalent of 12 hours.
But with all the extra benefits like Amulet of Heaven, Meteorite Hunter, Coworkers, you can reach the maximum of 720 meteorites faster than in 12 hours.

When using / spending your meteorites, your first priority should be to unlock the second research slot in the library (1500 meteorites), and then unlocking tier 2 and tier 3 equipment (tier 2 = 480 meteorites and tier 3 = 720 meteorites) on your heroes. The remaining meteorites can be spent inside the library on meteorite research. Always save enough Meteorites for your next hero unlock!

Meteorite Research
The library will be unlocked at stage 45.
Here you can spend your meteorites on research. Unlike Firestone Research, they don’t take time to complete. Just get the right amount of meteorites and you can upgrade them. Also what makes meteorite research different is that every research bonus goes up linear. What this means is that the more levels you put in a research, the less benefit the next one gives you.
Each with different bonuses however they are pretty similar.

In each tree, you should prioritize what is going to increase your gold gain, such as Raining Gold fire, then Firestone Effect and Prestigious for example.
The Meteorite Research Tree is additive, i.e. the more you level it up, the less effect it has
Firestone Research
The library will be unlocked at stage 45, the most important thing here is to buy the second research spot for 1500 meteorites as soon as possible and as well as level up the ‘Librarian’ talent. Most researches here are multiplicative. So it doesn’t matter how many levels there are in a certain research, it remains good to level it up.

Again focusing on gold boosting upgrades is best here, although Critical Loot Bonus/Chance are not as great in tree 1 due to calculations. Raining Gold and Firestone Effect will still be your priority, afterwards focusing on specifics depending on your team comp will help you more. So if you run more mana heroes, focus the mana talents etc...

Firestone-Research-Trees

Multiplikative
  • Attribute Damage
  • Attribute Health
  • Attribute Armor
  • Guardian Power
  • Fist Fight
  • Projectiles
  • Raining Gold
  • Rage Heroes
  • Mana Heroes
  • Energy Heroes
  • Magic Spells
  • Tank Specialization
  • Healer Specialization
  • Damage Specialization
  • All Main Attributes
  • Leadership
  • Team Bonus

Additive
  • Critical Loot Bonus
  • Critical Loot Chance
  • Weaklings
  • Expose Weakness
  • Medal of Honor
  • Prestigious
  • Trainer Skills
  • Skip Wave
  • Skip Stage
  • Expeditioner
  • Prestigious
  • Powerless Enemy
  • Powerless Boss
  • Meteorite Hunter
  • Firestone Effect
List of Researches / Upgrades
  • Raining Gold
    The best research or upgrade. Improves the amount of gold you earn, which in turn allows you to get more upgrades or hero levels. With that you can farm higher stages, once again earning more gold. And in the end, earn more firestones.

  • Prestigious
    In Exotic Merchant and Meteorite Research Tree 3, this upgrade is the best. In Exotic Merchant, it gives a decent bonus and it’s multiplicative. In Meteorite Research Tree 3, it gives a big bonus, but it’s linear like every meteorite research. Prestigious inside Firestone Research doesn’t do much.

  • Firestone Effect
    Nice in the beginning, but all researches and upgrades are linear. Means the first level is the best, every level after that loses effectiveness.

  • Attribute Damage
    Often cheaper to level up than All Main Attributes upgrade, and/or giving more bonus per level. Making it better than All Main Attributes, as attack is all that matters. Unless you go with a balanced build, then All Main Attributes might be better for you.

  • Attribute Health
    Good for balanced build. Still wouldn’t advise it. Level it up at the very end, together with Attribute Armor.

  • Attribute Armor
    Good for a balanced defence. Block up to to 100% of the incoming damage. However, level it with the Attribute Health at the very end.

  • All Main Attributes
    It’s a good upgrade. Boosts your attack, but is often more expensive to level up, or doesn’t give as much of a bonus per level.

  • Guardian Power
    Good for guardian build. It can help with farming back up to your farming stage after a prestige.

  • Critical Loot Bonus
    Bad. Currently only available in Firestone Research Tree 1. Maxed out it can give 20% crit chance and 300% bonus. Resulting in 60%

  • Critical Loot Chance
    more gold on average. 50 firetokens are required for just 60% more gold? No.

  • Weak Boss/ Weak Enemy
    Bad. You have to put many resources in it, and it only does so little. 2x 15 firetokens in Firestone Research Tree 1, just to reduce enemy HP by 15%. 1 level in Attribute Damage gives you the same result. That’s how bad it is.

  • Powerless Boss/Powerless Enemy
    Bad. Same as above. It’s even worse when using a glass cannon build, as you get killed anyway. Even with a 15% reduction.

  • Honor Effect/Medal of Honor
    Every research gives a linear boost and the amount is too small to make a big enough difference. You will get most honor effect from ranking up. I suppose only when you play very little and for that reason have a low rank, can honor effect research be good for you.

  • Intense Training/Trainer Skills
    This upgrade/talent is okay. In the current version, you can reduce training time by 50%. This allows you to train the guardian once every 4 hours. Making it easier to complete the daily quest for those that do not play a lot.

  • Mission Planning/Expeditioner
    A must have when you reach level 70. This allows you to do more missions in a shorter amount of time. At level 70, you get Monster Missions. Taking 7 hours on average and using 2 squads. Reducing that time by 30% means you can complete other missions.

  • Wave Skip/Stage Skip
    It's a decent research. Takes less time to farm up. It gets better when you unlock Alchemist. You can get 84% wave skip in total, and 54% stage skip. You can go from 1 to 500 in less than 15 minutes.

  • Scroll of Speed/Scroll of Attack/Scroll of Health/Ancient Knowledge
    Bad. Scrolls will be sold to the Exotic Merchant.

  • Reduced Hero Level Up Cost
    Does very little.

  • Meteorite Hunter
    It’s an average upgrade. Increases the chance of to get 100% meteorites from the miner, but all meteorite research gives a bonus that goes up linear. It takes months before you actually notice a big difference between someone who does not have this. Still it’s prefered as sometimes you get new heroes, and you want to get meteorites quickly to unlock tier 2 and tier 3 equipment.

  • Coworkers
    Increases the chance for 2 miners to appear with meteorites.

  • Twin dragons
    Increases the chance for 2 dragons to appear with beers.
    Next to Gold Rain, Research Time Reductions and Battle Cry, one of the most important researches in talents.

  • Battlecry
    Increases your contribution to the fellowship effect.
    Through the upgrading the battle cry you increase the fellowship aura [see point fellowship] which makes this talent next to the gold rain to one of the most important.

  • Mana Heroes/Rage Heroes/Energy Heroes
    These upgrades are decent. They increase all attributes of heroes using mana, rage or energy. Ideally you will want a team composition in the future composed of one attribute.

  • Tank Specialization/Damage Specialization/Healer Specialization
    Same as above. Focus on what you have more of in your team composition first.

  • Fist Fight/Projectiles/Precision/Magic Spells/Attribute Armor
    Same as above.

  • Leadership
    Good to equal differences in attributes between heroes. Also some people use Blaze as the main source of damage. Level up Leadership to boost him. Fully rely on him for damage, melting through 3-star bosses with the first ability and killing a mass amount of enemies using third ability. It’s a more active build, or clicker is needed.

  • Team Bonus
    Good to equal differences in attributes between heroes. This will give the best result for full idle.
Tavern
When you unlock Tavern at level 15, you will start earning beer. The beers are dropped by a dragon in battlefield, you have various ways to increase the amount of the beers.
  • Amulet of Luck (Increases the chance to get 2 beers from an enemy instead of 1 +5% (20 keys) It may not sound like much but it is definitely worth it....
  • Talent: Twin Dragons (Increases the chance for 2 dragons to appear with beers)
  • By campaign level (Campaign perks)
  • By guild level (Guild perks)
The offline generated beer will be dropped by the first dragon crossing the battlefield after the login
When you have collected 1500 beers, you can convert it into 5 Game Tokens and you can use them to play a game of cards. 6 cards will be presented in front of you and you can select 1 of them. It doesn't really matter which one you select as rewards are pre-generated, but it gives the player the sensation there is something behind every card and that you might get lucky when you choose the right card. Anyway, when you have selected a card, there are various rewards you can get. The amount of items you get depends on character level, rank and/or luck level. You can see the amount of items you can get when clicking the "Info"-button at the upper left corner at the Luck Level UI.

From tavern you can obtain Golden Keys, these will be used to upgrade your Artifacts, and will almost never be used for purchasing Amulets except a select few. In the amulets section I will say which amulets are worth purchasing, but overall your golden keys are going to be used to upgrade your artifacts mainly.

The auto function will be unlocked with luck level 3.

There are 3 main parts inside this feature of the game. Elements and artifacts, Sacred Cards and Luck Level.

To view the full reward list here is the wiki link: https://firestone-idle-rpg.fandom.com/wiki/Tavern
Artifacts and Elements
Currently there are 63 artifacts in game
Earning an Artefact or Element isn't a matter of luck.
The game guarantees:
  • 5 Elements within 400 game tokens = which means a whole Artefact.
    The 5 Elements drop within 400 Game Tokens [1 - 400]
  • 1 Full Artefact within 2000 game tokens
    The Artefact drops within 2000 Game Tokens [1 - 2000]

Artifacts greatly improve your game. They have 6 various improvements.
  • Raining Gold, Firestone Effect (multiplicative) or All Attributes
  • Basic attributes such as damage, health or armor.
  • Group of heroes based on what resource (rage, energy, mana) they use
  • Generation rate of the same resource or Librarian, Explorer, Alchemy, War Machine: Damage/Health/Armor.
  • Certain specialization (tank, damage, healer)
  • Guardian damage, leadership, team bonus or hero-damage.
Ancient Artifacts have 8 rarities (Epic, Legendary, Mythic, Titan, Angel, Celestial, Immortal and Primordial) and can be upgraded with golden keys. The enchantment cost starts at 20 keys and increases by 5 keys per rarity till Immortal, the last rarity level costs 40 keys, which is then the cap. Each rarity doubles the effect of all artifact attributes except for health and armor attributes which increase by ×4 instead. Resource regenerations, the alchemy perk and the librarian perk increase by 0.5% per rarity and the explorer perk increases by 0.2% per rarity. War machine attributes increase by 5% per rarity.
  • Epic
  • Legendary: Upgrade Cost: 20 golden keys.
  • Mythic: Upgrade Cost: 25 golden keys.
  • Titan: Upgrade Cost: 30 golden keys.
  • Angel: Upgrade Cost: 30 golden keys.
  • Celestial: Upgrade Cost: 30 golden keys.
  • Immortal: Upgrade Cost: 30 golden keys.
  • Primordial: Upgrade Cost: 40 golden keys.
Which artefacts to upgrade depends on various factors.
Basically, you can say that there isn't a purely bad artefact, as they all help you in one way or another, but you should definitely refrain from trying to upgrade them all. Golden keys are rare in the game, so every "wasted" key hurts.

So, how to decide?
Gold rain? Yes, definitely! Better than all main attributes
Damage before armour and health (also clear)
Which heroes? It depends on your group combination, if you have rage and energy heroes in play, obviously you shouldn't upgrade mana artefacts. In other words, your first (few) Artifacts can determine the direction of which Heroes you play in the group.
However, here is worth a look at the point: Builds
However, you should consider that the more artefacts you have, the less the hero specialisation makes a difference, this should only be considered as a ‘bonus’ in the choice of artefacts to upgrade.
These 6 aspects should be the main deciding aspects: Library, Explorer and Alchemy, Warmachine Attributes: Damage/Health and Armor.
Explorer increases the chance of double card rewards. Alchemy and library reduce the research time and the 3 Warmachine Attributes: Damage/Health and Armor, which increases the 3 WM attributes by 30+%.

This is a general order that you can follow:
  • Top row
    - Gold rain before firestone/main attributes and firestone before main attributes
    - Damage before health/armour and health before armour
    (Although the difference between health and armour isn't really big.).

  • Middle row:
    - Energy before Mana/Rage and ...
    However, this is a question of "personal preference" for me energy is before mana/rage because i play glass canon with 5 energy heroes, so depending on your game style the order can be quite different.
    - Librarian/Explorer before Alchemist and Librarian/Explorer/Alchemist before Mana/Rage/Energy Regeneration.
    - Warmachine: Damage before Armor + Health

    The first priority is for me War Machine Attribute: Damage.
    The 3 Artifacts (War Machine: Damage + Health + Armor) at the base 30% equals about 2.7 WM levels with full blueprint upgrades
    Plus you get about 1 more War Machine level per artifact rarity upgrade, though not quite the same since it's additive 5% vs. multiplicative 5%
    1,3 = 1,05^5,377
    Then follows Librarian. Librarian is before Explorer because the shortened Firestone research times are more important to me than the +0.5-1% Explorer.
    But players who for example only log into the game 1-2-3 times a day, for them it is less interesting if the research time is 1-2% shorter or longer, as it will in any case have ended after logging into the game the same goes for the alchemist. For these players, increasing the chance of a double reward in the map missions is more effective.

  • Bottom row:
    - Damage before tank/healer and tank before healer.
    - Hero damage/team bonus before leader/guardian and leader before guardian
And of course, the more of these 6 improvements are appropriate for you, the better it is.

This is my preference in short:
  • 1. WM damage, preferably with gold bonus or one of the other better bonuses, see above.
  • 2. Librarian, as the shorter firestone research times are important to me (active/online player or AC).
  • 3. Explorer or WM health
  • 4. WM armor
  • 5. Alchemy

Personally, i recommend to not level the first artifact you draw right away, instead collect the keys until you are sure how to play and which heroes you want to have in game.
Good: Gold Rain + Damage + Library/Explorer or Alchemy + Hero Damage/Team or Leadership Bonus Plus the Hero specification unless you pick one of the "good" war machine artefacts that has a damage bonus, but that's up to you.


Full list of artifacts can be found here:
https://firestone-idle-rpg.fandom.com/wiki/Ancient_Artifacts
Sacred Cards
Most of the cards you select will reward you with sacred cards. The amount of sacred cards you will get depends on your luck level. Your luck level will slightly increase the amount of sacred cards you will get.

There are sacred cards for every hero, every guardian, for each war machines and pretty much every attribute in the game. You first have to collect the cards, they will start out as level 1. At level 1 you get a bonus already, and all the bonuses, including that of Firestone Effect, is multiplicative. When the bar fills up, the card levels up, and the bonus increases multiplicatively. So if level 1 gives +30% (x1.3), the next level gives +69% (1.3x1.3 => x1.69).
Luck Levels
Every card that you choose gives you a reward, and based on the reward and the amount, you will earn luck. Something like Meteorites, Exotic Coins or Emblems give a very low amount of luck, usually less than 100. But things like Honor or Scrolls, you can earn many hundreds, even thousands of luck.

When you earn enough luck, you will level up. When you level up, you gain some bonuses. Faster Meteorites and more Sacred Cards is what you always get when you level up. As for All Attributes and Raining Gold, they increase in turn. First Attributes, then Gold, then Attributes again. As you level up, it's possible that other rewards, such as chests, scrolls, and currencies will increase in number too. But as those rewards are based off character level or rank too, it's possible you don't see a change when your luck level increases. At Luck Level 2 you will also be able to get Prestige Tokens. With this you can do a 2X prestige for free.
Exotic Merchant
You will unlock Exotic Merchant at level 30. Here you can sell items and scrolls and receive Exotic Coins in return. With these coins you can buy permanent upgrades. Also at level 65, you will unlock Emblems. From this point on, you receive emblems through missions and you can buy emblems with gems. With these emblems you can buy Epic Chests at the exotic merchant. Using your gems here is not worthwhile though, just use the passive emblems you receive through your map missions.

Back to exotic coins. You want to sell pretty much everything with the exception of (certain) gold items. Either you use all gold items for quicker prestiges and meteorites. Back to exotic coins. You want to sell pretty much everything with the exception of (certain) gold items. Either you use all gold items for quicker prestiges and meteorites.

As for exotic upgrades. Your first priority is Prestigious. Yes, whereas Prestigious in Firestone Research is not that good because it’s low percentage and linear. Inside Exotic Merchant, Prestigious is higher percentage and multiplicative. But it has a level requirement. You need to be at least level 50 to buy the first level, and that level requirement goes up by 2 for every purchase you do. Second priority is Raining Gold. After those 2 are maxed, you go raise attributes. Depending on the build, you can go many ways. With a glass cannon build, go for Hero DMG. Then you must decide, All Attributes to support all kinds of heroes, or ready yourself for a mana spellcaster party and level up Magic Spells. All up to you.

Emblem Market
The emblem market unlocks at character level 65. In the market you can buy gear chests with emblems of courage and jewel chests with emblems of valor and celestial chests with emblems of brotherhood.
  • 4 Common chests = 2000 emblems of courage
  • 4 Uncommon chests = 3000 emblems of courage
  • 5 Rare chests = 5000 emblems of courage
  • 3 Epic chests = 5000 emblems of courage

  • 4 Wooden chests = 2000 emblems of valor
  • 4 Iron chests = 3000 emblems of valor
  • 5 Golden chests = 5000 emblems of valor
  • 3 Diamond chests = 5000 emblems of valor (Requires 100 campaign stars)

  • 4 Comet Chests = 2000 emblems of brotherhood
  • 4 Lunar Chests = 3000 emblems of brotherhood
  • 5 Solar Chests = 5000 emblems of brotherhood
  • 3 Nebula Chests = 5000 emblems of brotherhood (Requires oracle level 98)

I recommend

Gear Chests:
  • 3 Epic Chests = 5000 emblems of courage for the heroes.
Soulstone
  • 3 Nebula Chest: 5000 emblems of brotherhood (Requires oracle level 98)
Jewel Chests:
  • 3 Diamond Chests = 5000 Emblems of Valour (Requires 100 campaign stars).
    • 3 Diamond Chests = 132 (3x 44) components
  • 5 Golden Chests = 5000 Emblems of Valour
    • 5 Golden Chests = 165 (5x 33) components
If you have all the epic seals for your heroes (or even before), the 5 golden chests are a good alternative, they contain more equipment for the war machines than the 3 diamond chests.
Alchemist
You will unlock Alchemist when you reach level 120. Alchemist is a lot like Exotic Merchant with their upgrades but they are called Experiments in Alchemist and the bonus you get is randomly decided for you. You can run 3 experiments at once, each with their own resources. Dragon Blood, Strange Dust and Exotic Coins. The time to complete an experiment varies on the tree you are currently on. Since the bonus you get is random, it’s pretty difficult to say when to use each resource. It is suggested to Dragon Blood right from the start. I suggest using Strange Dust whenever you have enough saved for your next evolution of your guardian. Exotic Coins is tricky as there are multiple pages of upgrades inside Exotic Merchant now.

At level 130, you will unlock Transmuting inside Alchemist. Transmuting allows you to convert chests to higher rarity chests. There are 3 tabs on the left side at the Alchemist -> Transmute: one for the transmutation of the hero chests, another one for the jewel chests and third tab for the soulstones, unlocked at Oracle level 149.
  • Transmutation of Hero Chests
    The only good thing here is Legendary Chest to Mythic Chest. But it’s very pricey. It costs 650 dragon blood + 25 Dust and 1 legendary chest to get 1 mythic chest. With 650 dragon blood you can do 13 experiments. So you have to choose if it’s worth it. Remember that at 140, you get Naval Missions. They’ll give you a Legendary Chest each day and with level 300 you will get 1 mythic chest as well.

    I would say the best way to spend dragon blood is to use them in experiments. When you have collected another 1.000 gems, you can spend all remaining dragon blood on transmuting legendary chests, and then you use those 1.000 gems on restocking on Dragon Blood. And repeat this over and over. So collect another 1.000 gems, you might have 1.000 dragon blood left, that’s 2 transmutations, then buy dragon blood again. These values may differ depending on how much you play, so basically how many experiments you do per day.

  • Transmutation of Jewel Chests
    The second tab for the transmutation of jewel chests is located directly below the tab for the normal chests. This tab will be unlocked when you reach 70 campaign stars in the WarFront campaign. Jewel chests are transformed with elixirs of life, which you get from the dungeon, and strange dust. Also here the costs are quite high, so only the last transmutation is worthwhile.
    I recommend that you collect the elixir of life until at least 145 campaign stars or even better/worthwhile up to 190 campaign stars and only use it to transmute for 650 elixirs of life and 25 dust from an opal chest into 1 emerald chest, before that the transmutation doesn't worth it.

  • Transmutation of Celestial Chests
    The third tab is at the bottom and will be unlocked at Oracle level 149. Celestial chests are transformed with star essence, which you get from via the Concentration Ritual, and strange dust.
    Like with the Gear and Jewel transmutation, the costs are very high, therefore only the last (two) transmutations are worthwhile.
Warfront/Warmachine Expansion 1
Warfront Expansion

At level 50, the Warfront will be unlocked with the War Machines, the Campaign and the Engineer in the town. Then you will get your first WM from the engineer, where you can put your heroes in and then do your first campaign missions (campaign star) in the Town -> Battles -> Campaign.
The Warfront expansion has two buildings in the city
  • 1. Battles: with the subcategories:
    - Campaign
    - Arena of Kings
    - Tower of Domination (locked)

  • 2. Engineer with the subcategories:
    - Engineer (A)
    - Garage (B)
    - Training Base (C)
Engineer (A)
  • The first tab with the identical name "Engineer" has the function: Tool production, every 6 hours you can collect a certain amount of tools there, the amount depends on the engineer level, i.e. increases when you level up your war machines and thus also the engineer level.
    The amount of tools you can claim increases with the engineer level as follows:

    Tools = 225 + 25 × Engineer Level

    The Amulet of Tinkering, which increase the chance to get 100% more tools from the Engineer to 5%. However, from a purely mathematical point of view, it is only helpful in the first year.
  • The second tab "Active Squad" allows you to 1. place your heroes in the war machines and 2. create alternative squads.
    Example: 1st squad for the campaign, where you can select the campaign power and 1 other squad for the arena, where you can switch from "Battle Attributes" to "Arena Attributes" under "Select Crew".
    From Engineer level 60, a sixth spot in the WM will be unlocked for the heroes, but this is more for a late game feature.
  • The third tab is for selecting your 5 favourite war machines.
    By selecting favoured war machines, you can better control the way components from jewel chests are distributed. 80% of the drawn components will go to your five favoured war machines while the remaining 20% of drawn components will be distributed among all your war machines.
  • The fourth tab: War Machines can be unlocked via the Arcane conduits, for this you need 3 different items
    • Chaos turbine
    • Energy core
    • Mana reactor
    These 3 items can be found in the Jewel(WM) chests, once you obtain the required amount you will automatically unlock the next war machine. The number of arcane conduits you obtain is also pooled random with a 3 in 22 chance per 11 components in the chest.
The first 3-6 WM's can be unlocked quite early in the game, from the 7th WM the required components are higher but don't have a visible "pattern"

A list of the required items for the war machines can be found in the wiki,
https://firestone-idle-rpg.fandom.com/wiki/Engineer[/list]

There's 4 classes of machines:
  • 1. Single damage
    In my opinion, any single damage is better than any multi damage.
    In single damages, there is a clear ranking:
    Cloudfist > Talos > Aegis > Firecracker
    Although Cloudsfist is on the same level as Thunderclap.
  • 2. Multi damage
    Thunderclap > before Judgement and > Harvester
  • 3. Tank
    Goliath is considered as the best tank, not only due his stats as a tank but also due to his ability of 10% self-healing, which can be increased by upgrading the rarity levels. Already at rarity level 2, the chance of triggering the self-healing ability is 28%. The abilities of the other two tanks, Fortress and Earthshatterer, is damage dealing, which is rather marginal, although both are good as tanks and could be used as great second tanks. Therefore the order is:
    Goliath > Fortress/Earthshatterer
  • 4. Healer
    Hunter is rated as the best healer. Sentinel before Curator, whereby Curator always heals the machine with the lowest health by 300% but only 1 WM and Sentinel's ability is somewhat broader based and heals all WM's by 150%. Therefore the order is:
    Hunter > Sentinel > Curator
In this order you will receive your first 5 war machines:
  • 1. Damage (single)
  • 2. Damage (single)
  • 3. Tank
  • 4. Damage (multi)
  • 5. Healer
Which damage or which tank/healer you exactly get is random, the order isn't.
From the 6th tank it's completely random

Garage (B)
  • The first tab in the garage is the Info page, where the main and advanced attributes as well as the abilities of the individual war machines are described.
  • Second tab, you can level up the war machines with the components you get from the Jewel(WM) chests.
  • The third tab allows you to upgrade your war machines with blueprints (every 5 levels)
  • The fourth tab is where you can increase the rarity level of your war machines using the tools you receive from the Engineer.
    There are 4 different effects that can be increased, 3 of which are multiplicative
    • War machine effect: Increases the attributes of this war machine (multiplicative)
    • All main attributes of war machines: Increases the damage, health and armour of all war machines. (multiplicative)
    • Mechanical Fury: Increases the Arena attributes of all war machines (multiplicative).
    • Overdrive: Increases the chance to trigger the war machines' ability.
    Each rarity increases the attributes of this and other war machines by 5% / Overdrive by 3%. Increasing the rarity of a WM requires a certain WM level, the higher the rarity level, the higher the WM-Level has to be. The amount of tools you need for the rarity levels increases significantly after the first rarity level, but the fact that two of the will affect to all WMs makes it worthwhile despite the costs. Once you've upgraded all your favourite WMs to uncommon, it's definitely worth bringing all your other WMs to level 10 before upgrading them to uncommon. The next higher rarity level is then "rare" (at WM level 50), once you upgrade your favoured WM's at this level, you should decide whether you also upgrade the non-favoured WM's to "rare" as before or only upgrade the 5 favoured WM's.
    • WM-Level 10 - 1nd rarity level Uncommon = 10.000 Tools
    • WM-Level 50 - 2rd rarity level Rare = 51.000 Tools
    • WM-Level 100 - 3nd rarity level Epic = 180.000 Tools
    • WM-Level 160 - 4rd rarity level Legendary = 220.000 Tools
    • WM-Level 230 - 5nd rarity level Mythic = 280.000 Tools
    • WM-Level 310 - 6rd rarity level Titan = 300.000 Tools
    • WM-Level 400 - 7nd rarity level Angel = 310.000 Tools
    • WM-Level 500 - 8nd rarity level Celestial = 320.000 Tools
    The quantity for the 3rd rarity level could theoretically be used to upgrade 3.5 of the non-favoured WMs to the 2nd rarity level. This approach has in addition to the negative "high cost effect" the positive "side effect" that by levelling the non-favoured WM's, you will also increase your engineer level, which results in an increase in "every 6 hours" tool quantity as well as the engineer bonus increases.
Warfront/Warmachine Expansion 2
War Machine component distribution from jewel chests
  • 80% of components from the jewel chests goes to the 5 favourite WM's, the remaining 20% to all others.
  • With 5 favoured WMs, with balanced components (amount) and a new WM or a WM without components, the new (non-favourite) WM receives 20% of the components, while each favoured WM receives 16% of the components. This allows the new WM to slowly catch up with the old WMs.
  • However, this is only possible with 6 Wm's. 5 WMs (old or favoured) and 1 WM (new and non-favourite)
  • Starting with the seventh (7) WM, the two new, not favoured, WMs will only receive 10% of the components, which makes it impossible to catch up with the old WMs.
  • If the new WM will be added to the non-favourites, they will get 20% and the 5 favourites will still get 80% of the components (i.e. 16%/per WM).
  • But it is also possible to "play" with this system
    • Add the new WM to the favourites so that they can catch up faster, as they receive 100% (80+20)
    • Or take it as a non-favourite with the 20%, so that your old WM's continue to get the 80%
    • Or alternating, first as a favourite for a while, so that the new WM can catch up fast but in order that your old WM's also get some components in between, take them out of the favourites and then "alternately" in and out of the favourites, depending on the situation.
▶ The shortest when you have only one new WM is to include it as favourite or not have favourites at all. This means that the new WM receives the 80% of the favourites and, as it has to catch up, also the 20% of the non-favourites, i.e. 100% of the components.
▶ The shortest when you have more than one new WM and you only want one to catch up is to add it to your favourites

Training Base (C)
Just to be mentioned here ...


📢 Your first goal should be to reach 190 campaign stars to unlock all daily missions (liberation/dungeon).
Later in the endgame, from campaign star 319 there will be an additional liberation mission.
  • The most efficient way to do this is to focus on 1 WM and then slowly level up the other WMs to progressively increase their rarity. For the solo strategy, you should use the blueprints for all 3 points. (War machine damage, health and armour).
  • There will always be walls/hurdles in the campaign where you can use the expedition tokens for level up your personal guild tree or for rarity levels.
  • I would recommend to use these hurdles for upgrading the rarity levels, at least until campaign star 190.
  • Later in the game you can always decide to level up more war machines as a second/third main WM.
More information can be found under:

Globally, stats are multiplicative in the Campaign and additive in Arena (PvP). A single machine that is fully boosted in the Campaign is much cheaper to level/upgrade and more efficient than a full tank team. Given the additivity of stats, the first upgrades will be more effective than the next. Going from 5 to 10 effectively doubles your stats, while going from 100 to 105 only adds 5%.
The Arena (PvP) gives small daily rewards, which in higher ranks are quite good, but not in comparison to the bonuses/benefits you get through the Campaign (Reduction of Research time, Battlecry, Gold Bonus, Explorer, etc.).

The power rating of a single war machine is determined from its attributes in the following way:

power = (10 * damage)0.7 + (1 * health)0.7 + (10 * armor)0.7

The rating is called battle power, when battle attributes are used, and arena power, when arena attributes are used. The power rating of a squad is the sum of the power ratings of all war machines in the squad.

Each crew member increases each attribute of the war machine according to the hero's specialization and the hero's jewels:

crew member bonus = (1 + specialization bonus) * jewel bonus

The specialization bonus is 40% if the hero's specialization matches the attribute (damage specialization matches damage, healer specialization matches health and tank specialization matches armor) and 0% else. The jewel bonus is the sum of all the hero's jewel effects for the attribute. If the hero doesn't own any jewels for the attribute, the jewel bonus is 40%. The crew bonus of each attribute is then the sum of the crew member bonuses for the attribute:

crew bonus = crew member 1 bonus + crew member 2 bonus + ...

There are 3 types of power:
  • Base Power
    Basic attribute = base attribute * (1 + level bonus) * (1 + engineer bonus) * (1 + blueprint bonus) * (1 + rarity bonus) * (1 + sacred card bonus) * (1 + artifact bonus)
    - Used in the war machines power leaderboard

  • Battle Power
    - Battle attribute = basic attribute * (1 + crew bonus)
    - Used in the warfront campaign.

  • Arena Power
    - Arena attribute = base attribute × (1 + log10(battle attribute / base attribute))2 × ( 1 + mechanical fury bonus) × ( 1 + battle card bonus)
    - Used in the arena of kings and the player inspect.
Both, battle power and arena power include the crew

Detailed info can be found here:
Arena of Kings
https://firestone-idle-rpg.fandom.com/wiki/Arena_of_Kings

The relevant guide can be found here:
Oracle
The Orakle is a building in town that unlocks at character level 200. This is where you can do four rituals every 6 hours which give celestial chests, oracle's gifts, emblems of brotherhood and star essence. You can also buy blessings which give permanent attribute or gold bonuses as well as virtue. Virtue in turn is needed to increase your oracle level.

The Orakle is organised into 3 (4) categories:
  • 1. Oracles
  • 2. Rituals
  • 3. Blessings
  • (4.) Shop

1. Oracle
Your oracle's level is determined by your total virtue. By levelling up the individual blessings, you gain virtue, a kind of "xp" for the oracle, which is required for the oracle level. By levelling the Oracle, you will also unlock milestones that improve the rewards for the rituals and also increase the "virtue effect". You obtain virtue by buying blessings and by opening oracle's gifts.
Oracle level 2 costs 1200 virtue. Each subsequent level then costs 60 virtue more than the previous one. At certain oracle level milestones, your virtue effect increases and one of your rituals gives more rewards. First of all, you should aim to reach oracle level 6 to unlock the 4th ritual. The next goal should be Oracle level 11 to unlock tier 2 of the soul stones. Like tier 2 and 3 of the hero equipment, tier 2 of the soul stones affects all heroes.
Tier 2 Soulstones:
Oracle's gifts can be received via the daily reward in the oracle shop and via the Concentration Ritual, , with various rewards:
  • Gear and jewel and chests
  • Virtue
  • Tools
  • Beer
  • Elixir of Life (from campaign star 70)
  • Golden keys
  • Meteorites
  • Dragon's blood
  • [Inventory scrolls (random)
  • Inventory items (random)
A list of all rewards can be found here (oracle level): https://firestone-idle-rpg.fandom.com/wiki/Oracle

Your total virtue together with the virtue effect determine the oracle's prestigious bonus:
prestigious bonus = virtue × virtue effect

2. Rituals
Every 6 hours you can perform 4 rituals, each lasting 40 minutes, and can be done in succession. The first 3 rituals are unlocked from level 200, the fourth from oracle level 6. The Ritual rewards are Celestial Chests and Emblems of Brotherhood as well as an Oracle's Gift. The rewards (type and quantity) will increase with the oracle level/milestones.
Do as many rituals as possible. You need the chests that you get as rewards for the blessing upgrades, and the blessing upgrades also increase the oracle level, which then brings higher rewards for the rituals. The same goes for the soul stones, which you need to equip your heroes and which you also get from the chests from the rituals.
  • Harmony = Reward: Comet chests
    • At oracle level 101: 1 additionally Nebula Chest: with a guaranteed chance of 1 in 3 (33%)

  • Serenity = Reward: Lunar chests
    • At oracle level 153: 1 additionally Cosmic Chests: with a guaranteed chance of 1 in 4 (25%)

  • Obedience = Reward: At oracle level 6 Solar chests
    • At oracle level 201: 1 additionally Galaxy Chests: with a guaranteed chance of 1 in 4 (25%)

  • Concentration = Reward: Emblems of Brotherhood + Oracle's Gift
    • At oracle level 149: 1 additionally: Star Essence

3. Blessings
There are two types of blessings: the twelve outer blessings and one inner blessing (Fate). All blessings require glyphs, which are obtained by opening celestial chests. Blessings will give you a permanent attribute or gold bonus as well as virtue. You need to level all outer blessings five times before you can level the inner blessing once.
The Blessing Wheel works similar to the personal Tree of Life. With the glyphs and soulstones from the celestial chests (from the rituals), you can upgrade various blessings. In addition to the respective upgrade, each blessing upgrade you also gain virtues which increase your Oracle level, starting up to level 5. At level 5, you can level up your fate. The fate aura gives you benefits in your fellowship.
- Leadership
- Team bonus
- All main attributes
- Firestone effect

All upgrades are multiplicative per level and with the other upgrades of the same type.
Amulets
There are 25 unique Amulets each giving a different permanent bonus.
Amulet can be obtained from the stop, and there are 2 different types. Ones that can be purchased with Golden Keys, and ones that can be purchased using Gems or Real Money. Some of the Amulets can be essentially "useless" based on your playstyle and priority, as they just don't give you the advantage for your playstyle. Before you buy the amulets, you should consider what your priorities are and whether they give you enough advantage for your game style

The effectiveness of some of the amulets also depends on how actively you play or how often you log in / are online during the day.
As an Example; Amulet of Knowledge (10% shorter Firestone research) is one of the good amulets, but for a player who only logs in once or twice a day, it is less useful, as the Firestone research will be done anyway, whether with 10% shorter research times or not.
Same for Amulet of Alchemy.

The Amulet of War, which reduces the duration of all missions on the world map by +10 and the Amulet of Conquest, which increases the number of squads on the world map by 1 squad brings you many advantages. If your rank is low or you have limited time to play, these amulets are very helpful as they can help you to complete all map missions, especially at the beginning of the game but also later as completing the map missions is easier and faster with it.

Amulets for 2000 GEMS
  • Amulet of Exploration: Increase the chance to get 100% more rewards on guild expeditions 5% = Active online play + not so active/online
  • Amulet of Cartography: Increase the expedition tokens you receive from guild expeditions 5% = Active online play + not so active/online
  • Amulet of Liberation: Increase the chance to get 100% more rewards on the daily missions with the war machines 5% = Active online play + not so active/online
  • Amulet of Knowledge (Reduces the research time of all firestone researches +10% = ONLY Active/online play
  • Amulet of Alchemy: Reduces the duration of all experiments of the alchemist 10% = ONLY Active/online play
  • Amulet of insight: Increase the chance to get 100% more rewards from the oracle's rituals = Active online play + not so active/online
  • Amulet of the Seven: Increase the chance to get 100% more rewards on the weekly quests 5% = Active online play + not so active/online
  • Amulet of Astrology: Increase the chance to get 100% more rewards on the daily quests 5% = Active online play + not so active/online
  • Amulet of tinkering: Increase the chance to get 100% more tools from the engineer 5% = Active online play + not so active/online
  • Amulet of the Quartermaster: Increase the loot you receive from the campaign with the war machines 5% (every 6h "Next Loot" in Campaign) = Active online play + not so active/online
  • Amulet of Production: Increase the chance to get 100% more free pickaxes 5% = Active online play + not so active/online
  • Amulet of the Pioneers: Increase the chance to get 100% more loot on the campaign with the war machines 5% (every 6h "Next Loot" in Campaign) = Active online play + not so active/online
  • Amulet of Conquest (Increases the number of squads on the world map = Active online play + not so active/online
  • Amulet of War: Reduces the duration of all world map missions 10% = Active online play + not so active/online
  • Amulet of Greed: Increase the guild coins you receive from guild expeditions 5% = Active online play + not so active/online
  • Amulet of the Sky: Increases the chance of 2 meteorites hitting the ground instead of 10% = Active online play + not so active/online
  • Amulet of Clarity: Increase the chance to get 100% more rewards when an arcane crystal breaks 5% = Active online play + not so active/online
  • Amulet of Midas: Increases all gold earnings 300% = not worthwhile
  • Amulet of Power: Increases all main attributes of all heroes and guardians 300% = not worthwhile
Which one you choose first is up to you, but you should always consider that if you play less actively, some of the amulets will be less useful. If you're not sure, you can use the order above as a guide.

Amulets for 20 golden keys:
The first amulet, that people tend to purchase with golden keys is Amulet of Luck. This amulet gives you a 5% chance to get 2 beers instead of one, effectively giving you 5% more beers per day.
  • Amulet of Luck (Increases the chance to get 100% more beers from the Dragon
These Amulets fall under the category: poor to poor
  • Amulet of the King: Increases the chance to skip a wave that doesn't have a boss 5% = ONLY if you prestige frequently
  • Amulet of the King: Increases the chance to skip a stage 5% = ONLY if you prestige frequently
  • All other amulets that you can buy for 20 gold keys you should just ignore

Other Amulets bought with gems can be categorised in three levels:
Highest priority: Amulets with "Effect: 10%".
Medium priority: Amulets with "Effect: 5%".
Lowest priority: Amulets with "Effect: 300%".
In the second tier, the priority of the amulets varies depending on the player's goals and playing style.

A list of the amulets can be found here: https://firestone-idle-rpg.fandom.com/wiki/Shop?so=search
Achievements
There are various achievements in the game, they all have multiple levels with their own bonus. All these bonuses are additive, not multiplicative. So only early game do you benefit from them. After you got a few thousand percent in All Attributes, then 100% extra isn’t going to do much for you anymore.
Gems
Gems are the premium currency in the game. They can be bought with platform currency in the shop, in Extreme Value Bundles and in Special Offers. Free gems can also be obtained from daily rewards, from a weekly quest and from card draws. Gems can be used to buy gear chests in the Gear Chest Shop or inventory items and other currencies in the Item Shop.
Each week you receive 210 gems via the weekly tasks

After buying the 5-6 most important amulets each for 2000 gems, it’s best to keep hold onto your gems until you are level 120, this is when you will unlock the Alchemist.

At level 120, Dragon Blood will unlock in the store. From this point on it’s best to spend your gems on Dragon Blood. You can only get 200 Dragon Blood per day through missions. With 1000 gems you receive 3600 Dragon Blood. That’s 18 days worth of Dragon Blood. Keep buying it until you have maxed all experiments.

If you are F2P, focusing on Dragon Blood is going to be more beneficial as with your limited supply of gems and legendary chests, this is going to help you progress your gear optimally. If you spend money at times (value packs etc…), and have left over gems, you can choose to spend excess gems either in the Tavern or by Transmuting by your own choice, as distinguishing what’s best right now is difficult.

As of version 4.0.5 there are Alchemy Trees. Always use your dragon blood on experiments when you can, strange dust can be used, as long as you have kept enough saved for your next guardian evolution. I wouldn’t use exotic emblems until you have completed your full exotic upgrade trees.

So, for what should i spend my gems?
As f2p you get at least 2600 gems/month,
The best investment for your gems at this moment is the Battle Pass, as it gives you the most benefits (more details under the point: Battle Pass), otherwise for Dragon Blood and also the most important amulets.
1. Battle Pass
2. Dragon Blood (at level 120, if necessary, so that you always have enough dragon blood for the alchemy experiments)
3. The 5-6 most important Amulet
    Gems: Use the first collected gems for the most important Amulet: (2000 gems)
  • Amulet of Exploration: Increase the chance to get 100% more rewards on guild expeditions 5%
    - Active online play + not so active/online
  • Amulet of Cartography: Increase the expedition tokens you receive from guild expeditions 5%
    - Active online play + not so active/online
  • Amulet of Liberation: Increase the chance to get 100% more rewards on the daily missions with the war machines 5%
    - Active online play + not so active/online
  • Amulet of Knowledge (Reduces the research time of all firestone researches +10%
    - ONLY if you play actively and online, for players who only log in 1-2 times/day is it less worthwhile.
  • Amulet of Conquest (Increases the number of squads on the world map
    - The he Amulet of Conquest, which increases the number of squads on the world map by 1 squad and the Amulet of War, which reduces the duration of all missions on the world map by +10 brings you many advantages. If your rank is low or you have limited time to play, these amulets are very helpful as they can help you to complete all map missions, especially at the beginning of the game but also later as completing the map missions is easier and faster with it. But this two are not must-have amulets.
  • Amulet of the Seven: Increase the chance to get 100% more rewards on the weekly quests 5%
    - Active online play + not so active/online
  • Amulet of Astrology: Increase the chance to get 100% more rewards on the daily quests 5%
    - Active online play + not so active/online[[/i]
4. Tavern
Firestone: Battle Pass
1. What is Firestone: Battle Pass?
2. Advantages?
3. Disadvantages?
4. How to spend the gems?
5. Questions about the Battle Pass

• 1.0 What is Firestone: Battle Pass?
The Battle Pass has been added with Version 6.3.0
The battle pass is a series of daily and weekly challenges that give glory when completed. Once you have collected enough glory you can claim chests, currencies or temporary buffs as rewards.
Items are permanent. Bonuses/Buffs are for the duration for one month.

1.1 How does the Battle Pass work?
There are daily and weekly challenges to complete. Daily challenges reset each day. There are four sets of weekly challenges. Week 1 challenges start on the first day of the month. After 7 days, week 2 challenges are added while the week 1 challenges remain active. Week 3 and week 4 challenges are added similarly. All weekly challenges reset at the end of the month.
The daily and weekly challenges have different types of tasks, similar to the daily quests, but they are all designed to be completed easily and fairly fast within the time limit.
Any challenges involving research auto-complete when you have finished all corresponding research trees already.

1.2 What kind of rewards are available?
Rewards can be fixed or variable. Variable rewards depend on your stats at the beginning of the month. Any rewards not claimed by the end of the month will be sent to you via game mail.
  • Free rewards
    Free rewards are various types of chests or currencies and can always be claimed.

  • Golden pass rewards
    Golden pass rewards can only be claimed once you have purchased the golden pass (1500 gems or ~ 5$). The golden pass in only valid for the current month and can be activated up to one day before the end of the month.
    Golden pass rewards can be chests, currencies or temporary buffs. Temporary buffs are only active in the current month. Two golden pass buffs of the same type are additive with each other (except for raining gold and all attributes which are multiplicative) and multiplicative with other buffs of the same type.

2. Advantages?

• For 1500 gems you get:
  • 1. The equivalent of 4 Amulets.
    Alone the value of the amulets corresponds to 6000 gems / 20 golden keys.
  • 2. Besides this, you have currencies like: chests/beer/golden keys/guild coins/expedition emblems/blueprints/pickaxes etc..

    The detailed list of rewards can be found here:
    https://firestone-idle-rpg.fandom.com/wiki/Battle_Pass
It is impossible to get this amount of rewards outside the battel pass for 1500 gems in this game.
Neither via the tavern nor via the other exchange possibilities gems = stuffs.
From a cost-benefit point the Battle Pass is worth its weight in gold!

• Is this a good investment for beginners who have not yet picked up the most important amulets or should they first collect the gems for the 3 most important amulets?

As f2p you get at least 2500 gems/month in the game, which is the equivalent of one (1) amulet, that means you have to collect gems for at least 3 months for the 3 most important amulets.
  • Amulet of Knowledge (Reduces the research time of all firestone researches +10%)
  • Amulet of Conquest (Increases the number of squads on the world map)
  • Amulet of War (Reduces the duration of all world map missions +10%)
Although you can only get 1 amulet after the first month, the second after 2 months and so on.
But this also implies that you don't receive the huge rewards/buffs of the golden battel pass in the first 4 months.

For 1500 gems you already get the 10% firstone research on the first day which is one of the amulets you should buy first. Just like you unlock the 1 additional squad for the map missions on the first/second day, which is also one of the first amulets you should buy besides the firestone research for 2000 gems and also the equivalent of the amulet meteorite hunter is also unlocked almost immediately. Furthermore, the 5% Explorer alone, which you also unlock very early on, is not to be missed, just like the expeditioner and the second 10% firestone research. Additionally, there are also chests/golden keys/guild coins/expedition tokens/scrolls etc. as extra rewards.

In addition to the battle pass, it is possible to collect at least 1000 gems per month. This seems low at first glance, but it isn't a comparison to the advantages of a battle pass. Collecting the gems for the most important permanent amulets, next to the ones for dragonblood, will takes longer. But with the same advantages as the amulets you have in the battle pass you don't have any disadvantage if you have to wait 3+ months the amulets instead of only 1 month to buy them.
Gem gains from the tavern depends on a number of factors, such as number of rewards in the tavern and monthly beer gain, which in turn depends on the cheers and twin dragon perks and the luck amulet.
The formula is:
monthly gem gain = monthly beer gain * 5 / 1500 * 100 * 2 / number of rewards

Number of rewards is at most 110 and monthly beer gain is at least 90000 (3000*32), so you get at least 545 monthly gems from the tavern. In practice the number is higher due to perks, for example i get almost 120000 beers per month, so 727 monthly gems from the tavern, even 1-2% more than that if you include the extra beer gains from the tavern as well.

3. Disadvantages?
Due to the costs of 1500 gems per month you can only save 1000+ per month for dragon blood or other amulets, so saving takes some time.

4. How to spend the gems?
There are several possibilities to spend gems in game.
  • 1. Amulets (2000 gems = 1 Amulet)
  • 2. Exchange for currencies (scrolls/chests/dragon's blood/dust etc..)
  • 3. Golden Battle Pass.

As already described in point 3. Advantages, there is nothing in games which has the same value as the rewards you get for 1500 gems via the golden battle pass.
Apart from Dragonblood. Here you should start saving the 1000 gems early.

At the end everyone decides for themselves whether they want to activate the golden battle pass or not. But even without activating it, the Battle Pass brings enough rewards for the f2p that they can benefit from the new Battle Pass too.

5. Questions about the Battle Pass
  • How much costs the Golden Battle Pass?

  • Do you have to purchase golden pass every month?

  • Are the rewards permanent ?

  • How long are weekly challenges active?

  • What happens if I finished every research and my quest needs a research?

  • Which hero can be picked for the quest Kill enemies with X hero?

  • Will my rewards upgrade if I level up?

  • Do Daily Quests carry over when unfinished?

  • Can I complete a quest offline ?

  • Are multiple bonuses multiplicative or additive?

  • How is the value of the rewards in relation to the cost of the Battle Pass?

  • What are "special upgrades"
Answers for these questions can be found here: Firestone: Battle Pass: FAQ

https://steamcommunity.com/app/1013320/discussions/0/3712685279012127184/
Events (Mini-Events | Seasonal Events | Decorated Heroes)
List of the 10 Mini-Events

  • Stardust - players will gain 20%/150% more meteorites from the miners
    - Challenge Rewards Day 1/2/3: Meteorites 500/600/700 | Contracts 16/20/24

  • Primordial elements - players will gain 20%/120% more beer from the dragons
    - Challenge Rewards Day 1/2/3: Beer 1000/1200/1400 | Contracts 16/20/24

  • Ethereal miners - players will gain 20%/150% more pickaxes from the guild
    - Challenge Rewards Day 1/2/3: Pickaxes 5/6/7 | Contracts 16/20/24

  • Team effort - Players will gain 20%/100% more rewards from expeditions
    - Challenge Rewards Day 1/2/3: Guild Coins 2800/3400/3900 | Expedition Tokens 1650/2000/2300 | Contracts 16/20/24

  • Mechanical superiority - Players will gain 20%/150% more rewards from "Next Loot"
    - Challenge Rewards Day 1/2/3: Emblem of Valour 420/500/580 | Blueprints 160/190/220 | Contracts 16/20/24

  • World domination - Players will have 1/4 mystery missions every time the map refreshes
    - Challenge Rewards Day 1/2/3: Honor 10/15/20 | Mystery Boxes 3/4/4 | Contracts 16/20/24

  • Guardians of destiny - Guardian can be trained 20%/150% faster and training xp is increased by 20%/100%
    - Challenge Rewards Day 1/2/3: Strange dust 60/75/85 | Contracts 16/20/24

  • Blessing of the eternals - Enemies will drop 200%/400% more gold and player will receive 150%/300% more firestones from a prestige
    - Challenge Rewards Day 1/2/3: Gems 50/75/100 | Contracts 16/20/24

  • Champions of Alandria - Heroes and guardians have +300%/+1000% main attributes and player has +5%/+15% skip stage
    - Challenge Rewards Day 1/2/3: Chests (Type of chests depends like always on the character level) | Contracts 16/20/24

  • Mass Production - Players will gain 20%/120% more rewards from "Tools production"
    - Challenge Rewards Day 1/2/3: Tools 3500/4000/4500 | Contracts 16/20/24

The events go for 3 days and after these 3 days there is a 2 day interval (cooldown) before the next event start.

List of 6 seasonal Events
  • Winter Festival Event = December, for 14 days
  • Valentine's Event = February, for 14 days
  • Spring Event = April, for 14 days
  • Tropicana Event = June, for 14 days
  • Astral Event = August, for 14 days
  • Halloween Event = October, for 14 days
Decorated Heroes
  • Decorated Heroes Event = January, for 14 days
  • Decorated Heroes Event = March, for 14 days
  • Decorated Heroes Event = May, for 14 days
  • Decorated Heroes Event = July, for 14 days
  • Decorated Heroes Event = September, for 14 days
  • Decorated Heroes Event = November, for 14 days
A detailed list of all events can also be found here: https://firestone-idle-rpg.fandom.com/wiki/Events
Unlocks (Level/Campaign Stars)
Unlocks (level)
  • Level: 3 = Chat
  • Level: 5 = Talents
  • Level: 7 = Fellowship
  • Stages: 45 = Firestone Research
  • Stages: 45 = Meteorite Research
  • Level: 10 = Leaderboard
  • Level: 10 = Guild
  • Level: 15 = Tavern
  • Level: 30 = Exotic Merchant
  • Level: 50 = Engineer
  • Level: 50 = Battles
  • Level: 50 = Awakening (also requires Guild level 5+)
  • Level: 50 Arcane Crystal (also requires Guild level 5+)
  • Level: 60 = Jewels Tier2
  • Level: 65 = Emblem of Courage
  • Level: 65 = Emblem of Valor
  • Level: 65 = Seals of Power
  • Level: 70 = Monstermission
  • Level: 80 = Arena
  • Level: 100 = Chaos Rift
  • Level: 100 = Forbidden Knwoledge
  • Level: 120 = Alchemist
  • Level: 120 = Dragonmission
  • Level: 130 = Alchemist Transmute
  • Level: 140 = Navalmission
  • Level: 200 = Oracle
  • Level: 200 = Hero equipment: Soulstones
  • Level: 200 = Emblems of Brotherhood
  • Level: 300 = Titanmission (also requires 5 billion gear power)
  • Level: 600 Shadow mission (also requires 60 billion gear power)
Tavern
The Auto play button in the tavern now becomes available after having 800 luck.

Oracle
  • Oracle level: 98/101 = Nebula Chest
  • Oracle level: 149 = Star Essence
  • Oracle level:149 = Alchemist Transmute: Soulstones
  • Oracle level: 149/153 = Cosmic Chest
  • Oracle level 201 = Galaxy Chest
  • Oracle level: 279 = Stellar Chest

WarFront (Campaign Stars)
  • Campaign Stars: Unlocked Feature
  • Campaign Stars: 5: liberation missions
  • Campaign Stars: 31: ×2 battle speed button (Activation only required once per game platform)
  • Campaign Stars: 70: dungeon missions
  • Campaign Stars: 100: diamond chests
  • Campaign Stars: 145: opal chests
  • Campaign Stars: 190: emerald chests
  • Campaign Stars: 319: platinum chests

Daily Liberation missions
  • Campaign Stars: 5 (Storm Rock) Reward: 1 wooden chest + 1 iron chest
  • Campaign Stars: 10 (Mythshore) Reward: 2 wooden chests + 1 iron chest
  • Campaign Stars: 20 (Moonglen) Reward: 2 wooden chests + 2 iron chests
  • Campaign Stars: 40 (Maplemere) Reward: 2 iron chests + 1 golden chest
  • Campaign Stars: 60 (Goldfell) Reward: 2 iron chests + 1 golden chest
  • Campaign Stars: 80 (Xandor) Reward: 2 iron chests + 1 golden chest
  • Campaign Stars: 110 (Talamer) Reward: 1 golden chest + 1 diamond chest
  • Campaign Stars: 155 (Hombor) Reward: 1 golden chest + 1 opal chest
  • Campaign Stars: 190 (Stormspire) Reward: 1 golden chest + 1 emerald chests
  • Campaign Stars: 319 (Stormspire) Reward: 1 emerald chest + 1 platinum chests

Dungeon missions
  • Campaign Stars: 70 (Ethereal Cavern) Reward: 50 elixirs of life
  • Campaign Stars: 120 (Dragon's Lair) Reward: 50 elixirs of life

In this order you will receive your first 5 war machines:
  1. Damage (single)
  2. Damage (single)
  3. Tank
  4. Damage (multi)
  5. Healer
Which damage or which tank/healer you exactly get is random, the order isn't.
From the 6th tank it's completely random
Steam Achievements
There are 75 Steam achievements, including 6 hidden ones and one (1) achievement which can't be achieved via the normal gameplay.
Play the game for a long enough time and the player will earn the remaining 68 achievements automatically through the normal gameplay.
These (Steam) achievements do not provide any benefit to the game or affect the game in any way. Not to be mixed up with the in-game achievements!


Hidden Achievements:

1. Background Story


2. What lies behind the bush?


3. Hero inspection


4. Inspection


5. Dragon Clicker


6. Miner Clicker


7. Training makes a Pro player
Town => Engineer =>Training Base


Addition
The guide has been completely reworked and also updated again. (April 2025)

WM-Guide can be found here:

The German Guide can be found here: https://steamcommunity.com/sharedfiles/filedetails/?id=2805334122
This guide is based on the unedited and completely outdated guide from Verkade.

Good luck and enjoy the game!

53 Comments
Aurora  [author] Apr 22 @ 7:41am 
Hi Heramon
Yes, I agree, the guide is already very long and partly complex, but I could add a changelog after the ‘Quick Hints / Quick Tips for Beginners’ chapter, with reference to the updates/patch notes and the changes made to the different chapters
But a lot of the changes are only marginal, however, I could mention that in the log, not that one is looking for some big changes while only a number has been changed or a rarity level has been extended etc
Heramon Apr 22 @ 5:00am 
Aurora, could you please do me/us a favor and post a little changelog when you do changes? I really appreciate your work and I follow this guide pretty closely for quite some time now but it's hard to track which section has been updated whenever you do changes. Doesn't have to be very detailed, just the section/headline would already be very helpful.

Thank you! Keep up the good work, for me it's THE guide to Firestone Idle!
Gurthfin Mar 15 @ 7:27am 
What is better - offline or online farming and if I use offline farming, isnt according to avg formula, better farm with only with 1, strongest and faster character?
BurningFalcon Nov 14, 2024 @ 10:43am 
I got two energy-based Artifacts early on, one with raining gold + attribute damage + damage specialisation.
The other like the above but with armor and tank.
By now I have 3 energy based, three rage and two mana.

So I figured I'll try and make an energy-based team. Only haven't seen a energy-based tank or healer so far, and I also try to make an all-female team.

Thanks to the artifacts, and the loot I got from chests, my 3 top DPS are Ina, Muriel, and Astrid. Now there would technically be Burt as the next best DPS, but I skipped him for Zelea.
Currently I use Danysa as a tank, although Talia would technically have better HP and Armor atm, so I'm not sure if I should rather go with her instead (she got 8m Power, Danysa only got 2.5)
Aurora  [author] Nov 14, 2024 @ 1:31am 
It was referring to the first 8 heroes you unlock, 4 of which are mana
But basically you can say that terms like healer/tank etc are just "labels" a spell or healer can be the best tank or a healer the strongest hero, depending on equipment, seals, artefacts etc
This can change after every new equipment/seal/level/artefact etc.
The easiest way is to choose your heroes for the game is to compare the stats in the party "Order by: power, speed, health, armor" and choose them there depending on your strategy
Focusing on one type of hero is (besides the fact that energy heroes can use their abilities almost infinitely often) is that you don't have to level the other hero specifications like rage/mana in the ptree or in the talents, at least not right away
LordJax Nov 13, 2024 @ 10:29am 
Aurora, great guide, I refer to it every now and then whenever I can't figure something out.

Quick question: What should the 5 party member be?
In the Party portion, you mention having a 4 mana spellcaster party once or twice, and say this is currently ideal. But the 5th member is never discussed... Should it be a tank? or just another mana spellcaster? Or something else?
Thanks!
Petrucius Oct 6, 2024 @ 11:54pm 
Got it. Thank you for taking the time to explain! :steamthumbsup:
Aurora  [author] Oct 6, 2024 @ 11:14pm 
Hi Petrucius
1. For the Guardians + Alchemy experiments (split up)
First, you should try to unlock all 4 guardians, use the dust to bring the dragon, the fairy and the phoenix to evolution level 5, to enable them to fight together against the dark gods and to be able do more damage to the gods in the Chaos rift (from level 100). But it is also important to use the dust for the alchemy experiments.
2. After you have unlocked all 3 guardians with dust, you should start using the dust to unlock tier 2 soulstones for all heroes. (from level 200)
3. Then split the dust between the guardians and alchemy

Thanks for the hint, i've added it into the guide now
Petrucius Oct 6, 2024 @ 7:12am 
Hello Aurora! Thank you for all the work you've put in such insanely comprehensive guide! It helps a lot!
Considering the newly added Chaos rift, what would you suggest to spend Strange Dust on - Alchemy Experiments or Guardians Enlightenment? Or maybe both equaly?
Thanks for all the help you provde to us newbs! :steamhappy:
Aurora  [author] Sep 4, 2024 @ 7:55am 
Yeah, that's kind of stupid... but fortunately it has already been changed once, before it was even more badly organised.
For more information about: War Machine component distribution from jewel chests + catch up system see => Warfront/Warmachine Expansion