Tiny Combat Arena

Tiny Combat Arena

133 ratings
Weapons and their Employment
By Perfect Info
A breakdown of the weapons currently available for the Harrier in Tiny Combat Arena and how to use them, hopefully effectively!
8
6
8
2
2
2
   
Award
Favorite
Favorited
Unfavorite
Overview
A breakdown of the weapons currently available for the Harrier in Tiny Combat Arena and how to use them, hopefully effectively!

This guide was last updated on 2022-10-27 and pertains to version 0.9.2.2 of Tiny Combat Arena.
Keybinds
The control bindings for weapons are, helpfully, gathered together in the control tab for "Weapons."
From the top "Action" down:
  • Fire Gun—Fires the gunpod, if sufficient ammo is available.
  • Most US aircraft follow the paradigm of having separate triggers for guns/cannons and other weapons. This is not a universal practice.
  • Release Weapon—Releases the selected, non-gun pod weapon, if sufficient ammo is available. Applies to anything from missiles to free-fall bombs.
  • Select Next Weapon—Cycles to the next equipped, non-gun pod weapon. This is also used to rearm the aircraft, when stationary on the ground at the airport.
  • Lock Target—Locks the target (look for the light green boxes and hexagons) closest to the centre of your screen.
  • When locked, the green box or hexagon becomes larger and brighter.
  • Information on the currently locked target is also presented on the cockpit UFC. (screenshots to follow later, in the weapon sections)
  • Unlock Target—Unlocks the currently locked target.
  • Drop Chaff—Not usually considered a weapon, but releases countermeasures intended to defeat radar-tracking missiles.
  • Drop Flares—Not usually considered a weapon, but releases countermeasures intended to defeat infrared-tracking missiles.
  • Drop Chaff/Flare—If you aren't ready to make an educated guess whether that missile is infrared or radar tracking, you may want to liberally apply both chaff & flares in the few seconds you have available.
Not a weapon keybind, but you may wish to also consider the Camera controls an important part of weapons employment. Being able to look around and lock targets without pointing your aircraft directly at them can be valuable. Remember the weapon lock is based on the centrepoint of the screen, so aiming can help pick out the target you actually intend to fire on from the others getting in the way.
Loadouts
In Quick Battle, your loadout is predetermined by the mission settings and cannot be changed. In Arena Mode, you may change your aircraft's weapons loadout while stationary on the ground at an airport, by pressing the "Select Next Weapon" key. This brings up the overview of your current load out, similar to what you see below:

Along the left side, you have buttons to:
  • Continue—Close the loadout menu and continue your flight.
  • Rearm/Refuel—If your loadout is partially depleted, selecting this option replenishes the aircraft to the current loadout's normal composition.
  • Select Loadout—Choose from the various loadouts available.
  • End Sortie—End the current mission/sortie, returning the spawn screen or to the main menu.
  • You could do this any time from the game menu instead, but I think we all know the real heroes are the simulator pilots that land their virtual planes on the virtual runway for a virtual debriefing with their virtual commanding officer.
Along the right side, you have an overview of the current state of the aircraft. If you just rearmed or selected a new loadout, it should reflect the "default" state of the loadout. But if you've landed after expending some of stores/fuel, this display will reflect what remains present. From top to bottom:
  • Loadout—The name of the currently selected loadout.
  • Gun—The number of cannon rounds available in the gunpod.
  • Stores—The non-cannon weapons carried on the aircraft.
  • Fuel—The current fuel remaining.
  • It is entirely normal for even a fresh loadout to have less than 100% fuel.
  • Fuel is heavy, and carrying less of it makes it easier to take off with limited runway space.
  • Weights—A summary of the mass of the aircraft.
  • "Empty" weight is the minimum weight of the aircraft. You will never be lighter than this.
  • "Fuel" weight is the weight of the fuel you are carrying. If you burn all your fuel, you will be much lighter!
  • "Stores" weight is the weight of the weapons currently equipped. If you drop all your weapons, you will be much lighter! This is the recommended way to lower your aircraft weight.
  • Thrust/Weight—Your aircraft's thrust-to-weight ratio. Literally just available thrust divided by weight, as it says on the label.
  • There are whole other guides covering this. But you need to be greater than 1.00 to take off vertically. Very few of the default loadouts meet that criteria.
I won't cover the individual loadout presets, as they are subject to change in future versions of the game. Try them for yourself!
Cannon
Most loadouts for the Harrier in Tiny Combat Arena include the Harrier's belly-mounted gun pod containing a 25mm cannon.
The gun pod is actually an attachment to the Harrier, not an internally mounted cannon. It has an unusual, horseshoe shape to improve the aerodynamics of the aircraft while hovering and landing. The shape helps to trap hot exhaust to both increase lift and to reduce the exhaust re-entering the engine intakes. One half of the horseshoe is the cannon itself. The other is the ammunition belt. Spent cannon shells are not ejected in flight, but stored in the pod until landing. Spent cannon shells are ejected for aesthetic reasons in Tiny Combat Arena, as of 0.9.2.2. I agree, it looks cool.

Notice that the cannon is not mounted directly on the centre of the aircraft. Firing the gun will "pull" the Harrier to the left due to the force of the cannon, as first confirmed by Simicro in the comments section below. You may need to compensate for that extra force if you are firing long bursts of cannon fire.

The gun is aimed using the "Gun Pipper" shown below. The remaining cannon ammo is shown on a counter in the bottom right of the display.
The gun pipper has two distinct modes:
  • With no target selected, or a ground target selected, the pipper is in CCIP mode
  • With an air target selected, the pipper is in air combat mode
The "TLDR" is "put the gun pipper onto the target and fire," but it's worth understanding both modes.

CCIP Mode
CCIP mode attempts to compute where the cannon shells will impact the ground when fired. However, there is a maximum range, after which it computes the point the bullets will be in the air at the maximum range. Tiny Combat Arena's developer has confirmed that the maximum range is the "self-destruct" point at which the cannon rounds despawn. Their future plan is to add a range indication of some kind to the pipper. So if you are aiming at the ground, the bullets will probably land where the pipper is marking (if it's close enough). If you're pointing in the air or too close to the horizon line, it's marking where the bullets will reach their maximum range.

Air Combat Mode
Air Combat Mode attempts to compute where you need to aim in order to hit the target you have locked. It's taking the locked target's velocity and acceleration as well as your aircraft's velocity and acceleration and doing a lot of calculus to answer the question, "Where should you aim so that the path of the cannon shells intersects the path of the target at the moment of impact?" It's actually quite fascinating, since these used mechanical computers and gyroscopes during World War 2 and—Oh, is that my manager holding up a cue card saying "stay on topic?"

The simple version is "put the pipper on the target and pull the trigger." But it's worth noting that the gun pipper is actually trying to predict an event a second or more in the future: the point when the cannon shell hits the target. But if any of the target's parameters should change before the cannon shell arrives, it may miss! If your target is behaving unpredictably for the gunsight, you should use your more advanced, human judgement to compensate and adjust your aim. The pipper is only a suggestion.
CCIP Bombsight
The CCIP bombsight in the Harrier is a visual cue used for the free-fall weapons released by the Harrier in Tiny Combat Arena. These include the Mk 82, Mk 83, and Mk 20 bombs, covered separately below.

Because the HUD gets a little crowded during CCIP bombing, instead of labelling the elements directly, I've copied and offset them in red, so you can compare to the originals in green:

The Total Velocity Vector is a flight instrument visible in all flight modes. It's not directly related to bombing, but actually shows where your aircraft is going to end up if you keep flying straight in the direction you are currently going. I consider it part of the bombsight, however, because it shows where your bombs are right now. They are still attached to the aircraft! So wherever your aircraft is going, that's the starting point for the exciting journey your bombs are going on. The moment you pull the trigger, the bombs will start flying with the same velocity you have at that moment, because of inertia. The only difference between your bombs and your aircraft is that your aircraft has a lot more lift, which fights against gravity, while your bombs have very little lift and thus will start falling under gravity.

The Bomb Fall Line is the path the bombs will trace after release, as they start being pulled by gravity towards the ground. It looks like a line straight down (well, this photo is angled because I wanted to get the best view of the CCIP sights) because gravity pulls straight towards the ground. But it's not as if your bombs are falling straight down. An object under the pull of gravity traces a (roughly) parabolic path.

The Impact Point is the dot, surrounded by a circle to make it easier to see. That dot is where the Harrier's bombing computer expects the bomb to hit the ground, based on the trajectory of the bomb and what the computer thinks is the elevation of the ground (let's assume in Tiny Combat Arena that value is perfectly accurate, but in other simulators there may be reasons it's not accurate, like an incorrectly set altimeter).

To make it easier to see how the indications on the HUD relate to the actual trajectory of the bomb, take a look at this comparison below:
What you see on the HUD is what the weapons computer estimates what the trajectory of bomb will be from your perspective at that moment. If you were to release the bomb with your aircraft's current velocity, but somehow were able to magically freeze the aircraft in place, you watch the bomb travel forwards in front of you and then move down the bomb fall line, to eventually explode under the impact point. But someone watching from outside the aircraft, from the side, would watch the bomb follow the parabolic trajectory.

To drop bombs accurately, put the Impact Point on where you want the bomb to go then pull the trigger. However, one technique that's useful to know is an "aim off point". When pilots are trying to put bombs on the target, it's very dangerous to try to "chase" the target with the bomb sight. The only way to force the sight lower is to dive more steeply, putting you at risk of racing with your own bomb to see who hits the ground first (you have a jet engine—you will win). Rather than try to steer the aircraft to put the Impact Point on the target, they steer the aircraft to hold the Bomb Fall Line on the target and wait. As you get closer to the target, the distance the bomb has to fall decreases, causing the Impact Point to "walk" up the Bomb Fall line. If you just wait, you know the Impact Point will eventually cross the target. An "aim off point" is a standard distance that one tries to aim ahead of the target and hold the aircraft's Total Velocity Vector as they wait for the Impact Point to climb. There are tables of recommendations for various types of bomb and dive parameters.

One last thing! The CCIP bombsight can only calculate impact points within certain conditions. If the impact point is too far away, or the aircraft pitch is too high, the CCIP bombsight will have an 'X', indicating there is no valid solution. Even if you were to see the Impact Point, the invalid solution warning means it should be ignored.
Mk82, Mk83, Mk84
The Mk82, Mk83, and Mk84 ('Mk' is short for 'Mark', the marking used to label something) are a family of unguided, free fall bombs common in NATO air forces. They differ in weight, mostly due to the quantity of explosives inside. These bombs are sometimes modified using add-ons to create other types of bombs. For example, the Mk82 Snakeye (covered later) is a regular Mk82 modified to add the high-drag tail kit.

Mk82
500 lbs, of which about 200lbs are high explosives, making for a small boom. Small enough that they can be carried on Triple Ejector Racks (TER's) for three times the fun. Can't argue with math.

Most bombs are classified by their total weight, not the explosive weight, because the total weight is what matters when trying to figure out how many you can safely carry on an aircraft.

Mk83
1000lbs, of which about 450lbs are high explosives, making for a large boom.
A pair of Mk83's impacting a base. Note the kill feed showing 4 barracks destroyed by the splash damage from two bombs.

Mk84
No picture available, since none of the default loadouts for the Harrier include Mk84's. Just look it up in the database. I decided I'd only take pictures of the weapons directly on the Harrier, rather than use the database where anyone could look for themselves.

2000lbs, of which about 950lbs are high explosives, making for a rather big boom.
Mk82 Snakeye
In the early days of aerial bombardment, there was a common problem. Bombs create very big explosions, so you want to drop them from high up where you won't be hit by the explosion. But bombs are very inaccurate, so you want to drop them from very low where you can aim more accurately. Striking the right balance between the two was a very dangerous game and resulted in many damaged and destroyed aircraft.

The earliest solution to this was, "What if we made bombs that didn't explode right away?" The aircraft could drop the bomb and then safely take a few seconds to fly away. That did work, but it had some unwanted consequences too: bombs sometimes didn't go off because fuses are delicate, bombs slammed into the ground hard and buried themselves before exploding, throwing a lot of dirt rather than deadly metal fragments, and the targets of the bomb would sometimes see it land right next to them and then run for their lives.

To find a better solution, they then tried, "What if we made bombs that fall slower, so they don't hit the target right away?" The aircraft could drop the bomb and have more time to get away before it actually hits and explodes on impact. Enter the Mk 82 Snakeye:
Notice how the tail of the Mk82 Snakeye is thicker and doesn't have the same fins as the normal Mk82

The Mk82 Snakeye, sometimes called the Mk82 HD ("high-drag") is a "high-drag" bomb, as contrasted to the default "low-drag" bombs treated as the default. A high-drag bomb has higher drag than a low-drag bomb, and thus it:
  • Decelerates faster when released (falling more steeply)
  • Resists acceleration by gravity better (falling more gradually, taking longer to speed up)
  • Has a lower terminal velocity (falling more slowly, taking longer to reach the target/ground)

The Mk82 Snakeye accomplishes this by deploying metal fins (or "petals", if you like the analogy to flowers), which present a very large surface air to catch the air and slow its fall.

A Snakeye in flight, with the fins deployed

How do you use the Mk82 Snakeye in combat? Well, you can certainly drop them just like any other bomb. Put the CCIP pipper on the target and pull the trigger. But remember that the Snakeye will take longer to go from release to impact, so you may need to use much longer lead times on moving targets.

But where the Snakeye excels is very fast, very low-level attacks. Very low-level, because you want to drop the bomb very accurately and play to its strength (not blowing-you-up because you dropped it from 200 feet off the ground). Because you are flying low, you either can't dive or you can only make a very shallow dive. Therefore, you need to be going very fast, because a high-drag bomb will fall more steeply than a low-drag bomb. By going faster, you elongate the trajectory to compensate for this. If you were going slowly, the CCIP indicator on a level-bombing run or shallow dive would be angled very far down, causing it to be covered up by the cockpit. It's extremely hard to line up the CCIP pipper and the target when both are hidden by the nose of the aircraft!

Snakeye, Snakeeye, Snake Eye, or Snake-Eye?
This isn't a wikipedia article, call it whatever you want.
Mk20 "Rockeye"
The Mk20 "Rockeye" is a free-fall, unguided, cluster munition which delivers 247 35 in Tiny Combat Arena Mk118 unguided, anti-tank bomblets. It sometimes operates under the alias "CBU-100", with it's fire-resistant cousin the CBU-99. It weighs approximately 500lbs, like a Mk82, and can be carried on a Triple Ejector Rack, like a Mk82.

But unlike a Mk82, which sets off one 200lb explosion, the Mk20 releases 247 35 in Tiny Combat Arena smaller bombs each with a 1/2 lb of explosives in a shaped charge. This results in a cloud of tiny bomblets spreading out over a larger area.
It's rather difficult to see, but the small white dots are all individual bomblets.

As noted, the real Mk20 releases 247 bomblets. That's a lot of tiny explosives for a game to simulate—whether the math for the flight path or the visual effect of them exploding. Tiny Combat Arena reduces the computational complexity by using 35 bomblets (according to the database) instead. TCA presumably applies splash damage from the bomblets to compensate for the fact that each is standing in for 7-8 Mk118's.

If the bomblet impacts a vehicle directly, it detonates a shaped charge. Most vehicles have thinner armour on the roof and engine grills, so even the tiny 1/2 lb explosion can pierce most vehicles depicted in Tiny Combat Arena. It isn't until the 70's and 80's that vehicles start being designed with heavy enough top-side protection to shrug off weaker cluster bombs.
The explosions of individual bomblets on impacting the ground.

Fun fact, Soviet manufacturers reacted to heavier tanks by using bomblets with 4x the explosive content of the Mk20's.

The trick to using Mk20's effectively is anticipating the area covered. Take a look at the example of two different trajectories below:
At the point the Mk20's fuse triggers, the Mk188 bomblets are thrown outward from the body of the Mk20 at varying speeds. They start to spread out in a vaguely cone-shaped pattern, influenced by the original trajectory of the Mk20. The ground forms a slice through that cone-shaped dispersal pattern, and depending on where you slice it you can get a more circular or elliptical slice, and a larger or smaller pattern. Just like if you sliced a baguette at an angle instead of straight across, you'd get elliptical slices instead of circles.

Generally, higher release is a bigger spread, lower is a smaller spread. Deeper dives are more circular patterns, while shallower dives or level releases at high speeds are more elliptical patterns. With practice, you may even be able to take out 4-vehicle rows with a single Mk20.
AGM65C and D "Maverick"
Edits are pending to add the AGM65C.

The AGM65D "Maverick" is an approximately 500lb, infrared-tracking missile. It's not "heat seeking" the way a sidewinder picks out a bright heat signature and chases it. It contains an infrared camera and tries to stay centred on the "image" of the target, using fancy matrix algebra.
The Maverick is employed in combat situations to either pick off heavy tanks, which require an accurate application of a 126lb shaped charge directly to the vehicle, or to pick off threatening targets at range, which benefit from the Maverick's ability to reach out and touch someone as far as 9-12 nautical miles away.
An AGM65D giving a BTR70 a friendly boop on the snout.

The AGM65D requires that a ground target is locked. Be sure you have controls bound to manage target locks.

The AGM65D is also a fire-and-forget weapon. After you've released the missile, you may unlock the target and find a different one to shoot. That makes it very easy to fire off several missiles in the span of a few seconds. Enjoy taking 5 minutes to take-off and land for 10 seconds of shoot-shoot-shoot-shoot!

The one advisory I have around the AGM65D is that it's not agile like Air-to-Air missiles. While it tracks moving ground targets and can manoeuvre to hit them, it's not capable of high-G turns. Where this can lead to disappointment is when you are trying to ripple-fire all your Mavericks into 4 tanks, but you keep getting closer to the targets leaving the 4th missile less time and space to react and aim itself. Remember to start your Maverick attack runs at a healthy distance away, fire the missiles cleanly, and don't be afraid to break off and try again. Remember, it takes a few minutes to land and rearm the missile you missed, but only 30-60 seconds to do a wide circle and come back for a clean shot.

Also, the radio call-out you are supposed to give when you fire an AGM65D is "Rifle!" You are henceforth strongly encouraged to practice and get into the spirit of things.
AIM7E "Sparrow"
The AIM7E "Sparrow" is an air-to-air, semi-active radar homing missile. This means the missile follows the target you have locked with your air-to-air radar and tries to hit them.
As you can see on this image, the AIM7E is one of the larger air-to-air missiles you can carry. It's ideal for long-to-medium range engagements ("long" being relative to the missiles of Tiny Combat Arena's time period). It won't be as nimble in a dogfight as an AIM9L or AIM82B, but it can still be fired at short ranges under favourable conditions.

The AIM7E has its own HUD indicators, to help you use the missile.
The Target Lead Indicator is "where the missile wants to go." As the name implies, it leads the target rather sits right on the target. The missile will need to fly for several seconds before impact, so rather than "chase" the target and waste energy, the missile uses "proportional guidance" to try to stay ahead of the target even as it moves.

The Allowable Steering Error Circle represents the missile's ability to manoeuvre. If you fire the missile without it perfectly aligned with the Target Lead Indicator, then it will need to turn to get itself onto the correct target lead after launch. If that turn is "too big", the missile wastes precious energy turning as hard as possible and is much more likely to miss the target. Only fire when the Target Lead Indicator is inside the Allowable Steering Error Circle, and preferably directly in the middle of the circle.
Above is an example of an AIM7E firing solution. The target aircraft is locked by the radar. The weapon computer calculates the correct lead angle, then places the Target Lead Indicator over the planned missile impact point. If the target continued flying straight at constant speed, that point is where the Sparrow would hit the target. Because the Target Lead Indicator is within the Allowable Steering Error Circle, the pilot could fire the missile and expect to hit the target.

"Semi-Active Radar Homing" means that the missile is homing on the radar waves fired by your aircraft's radar and reflected off the target. You must keep the target locked for the entire flight of the missile until impact. Imagine you are holding a flashlight in the dark and pointing it at the what you want the missile to hit—if you unlock the target, it's like you "turned out the light" and the missile can no longer see.

The radio callout for a Semi-Active Radar Homing missile (whether a Sparrow or otherwise) is "Fox 1!" If we ever see multiplayer, a fun mini-game is scaring your friends by shouting "Fox 1" and watching them check their radar-warning-indicator to see whether you're accidentally locking their aircraft instead of the enemy. If they respond with the correct callback "Buddy Spike!" then, by the rules of etiquette, you are obliged to unlock their aircraft and let the missile go dead.
AIM9L "Sidewinder" & AIM82B
The AIM9L "Sidewinder" and the AIM82B "This Missile Was Never Even Designed Let Alone Manufactured In Real Life" are infrared-seeking air-to-air missiles.

The AIM9L "Sidewinder" is a short-ranged and highly manoeuvrable missile. The 'L' or 'Lima' version is exciting, since it is the first Sidewinder variant intended for use as an "all-aspect" missile. Infrared-seeking missiles look for the bright heat of an aircraft against the otherwise "cold" looking sky. Early Sidewinders could only pick out the hot exhaust of the target's engines, meaning you had to fire the missile from behind the target (the "rear-aspect"). The AIM9L has a much more sensitive seeker, making it possible to detect and track an aircraft simply from the heat of the aircraft body & wings warmed by friction with the air. Because you can see the aircraft body from any angle, the AIM9L is called an "all-aspect" missile because it can be fired at any angle to the target.

The AIM82B is a fictional missile, inspired by a cancelled USAF weapon. That being said, don't let my tongue-in-cheek complaining about that deter you from having fun. The creator of Tiny Combat Arena made it to provider a smaller and lighter short-range, air-to-air missile option than the Sidewinder. Replacing an AIM9L with an AIM82B allows for a lighter take-off weight. And the smaller size allows TCA's Harrier to carry it on some form of triple-rail pylon, for three times the number of missiles.

As infrared-seeking missiles, both use the same HUD indicators. The Seeker Aimpoint Indicator shows you what the select missile is looking at that moment. Tiny Combat Arena "slaves" the missile seeker to either the aircraft boresight or the currently locked target. In other games, you may be accustomed to see the Seeker Aimpoint Indicator "wandering around" as it searches for something to aim at. The Seeker Field-of-View Indicator shows the size and location of the missile's field-of-view. The missile can only "see" whats inside its (quite small!) field of view. Also, right now you would be hearing "patient Sidewinder noises" as an audio cue that the missile is still looking around for a target.

However, Tiny Combat Arena simplifies air-to-air missile combat by slaving the seeker to a locked target. This is indeed possible with some, modern Sidewinder variants! In that situation, the missile can't actually "see" the target when it's launched. The launching aircraft gives it instructions to point itself in a specific direction and then try to spot the target. If all goes as planned, the missile very quickly turns itself, spots the target where it was told it would be, and then locks itself in flight. The implementation in Tiny Combat Arena is a bit of a game play conceit, to make it easier for players to use these infrared missiles in combat.

Above, you see an AIM9L with a valid firing solution while slaved to the locked target. Notice that the Seeker Aimpoint Indicator is directly over the locked target. You would also hear "happy Sidewinder noises" as an audio cue that the missile is locked on a target.

The missile was fired and went on to impact the target. Godspeed, small friend.

Both these infrared-seeking missiles are fire-and-forget. This means you can unlock the target after firing and go do more important things than babysit your strong, independent missiles. That being said, I do have an advisory for you about these missiles: The seeker can sometimes "see" farther than the missile can realistically fly. You can hear "happy Sidewinder noises," pull the trigger, and watch that small friend slowly drop out of the sky like a dog who couldn't actually run as fast as the car it was barking at.

The radio callout when firing an infrared-seeking missile is "Fox 2!" This is important, because there is usually no indication to the target that they have a Sidewinder heading for them; the only way to know you're being shot at is to look around for the missile smoke trail. "Fox 2!" is a friendly reminder to friendly aircraft to look around and make sure they're out of the way. Not saying you deliberately fired a missile at friendly aircraft—they just get in the way sometimes, don't they?
Other Resources
Tiny Combat Arena has a Database containing all the important facts and figures for the aircraft, ground forces, and munitions within the game. You are very strongly encouraged to read the database! In fact, I deliberately chose not to include images from the database, as this guide is meant to complement the information in the database, rather than replace it.

Future Revisions
I didn't want to put this in it's own section, so I'm sneaking it in here. Thanks for reading this far! I'm really tired after spending a week planning this guide and taking screenshots, then two days of editing images and writing content. I want to publish this early, despite having more planned. This isn't a promise I'll add everything, but as of right now I'd like to:
  • Add metric equivalents to the weights in pounds (e.g. "500lbs [220kg]")
  • Done! Create images and write content explaining free-fall bomb trajectories and the CCIP cues
  • Done! Add Mk82 Snakeye explanation Consider also adding a trajectory comparison of between high-drag and low-drag Mk82, either graphic or a table of sight depression angles
23 Comments
ShadowX Jan 7 @ 10:47am 
Happy sidewinder noises is not something I was expecting today.
Dann Willis Oct 26, 2024 @ 9:04am 
This is extremely well written, thank you for making this guide.
MichaelArcher Jun 17, 2024 @ 5:02am 
Also Eject is a keybind in the beyboard controls. You have to hit it three times (In real life you yell "Eject Eject Eject", so I think that's a throwback)
MichaelArcher Jun 17, 2024 @ 5:00am 
For the ZSU question, fairly high altitude bombing works, but the stupid things respawn faster than you can hit a resupply, lol. I ended up just Mk83'ing the base from 3000ft on a few runs, then once it was disabled I went back and cleaned up the survivors that didn't surrender
Panch0 Jan 23, 2023 @ 8:54pm 
@greenjoyce3001 sadly its not possible, however, you can kill friendly aircraft with an unguided AIM-7E or ground units with a bomb (they take more damage so it's seems like you can't kill them)
Panch0 Jan 23, 2023 @ 8:52pm 
in my 180 hours of playing this game i've never knew of to use the weapons, thank you for this man!

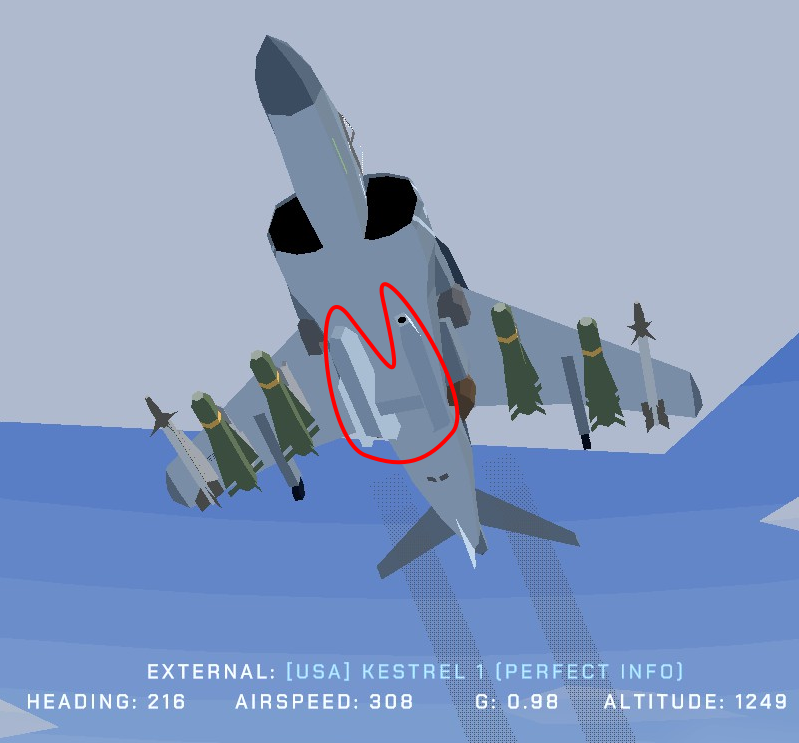
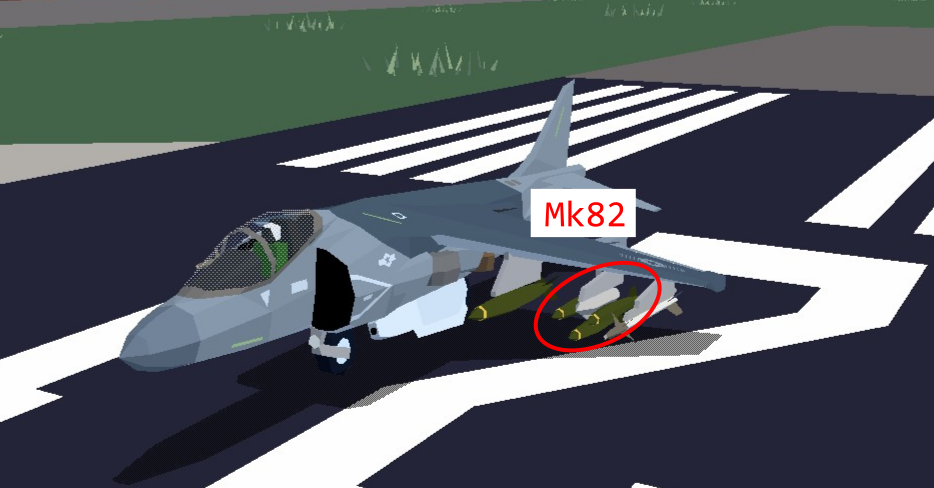
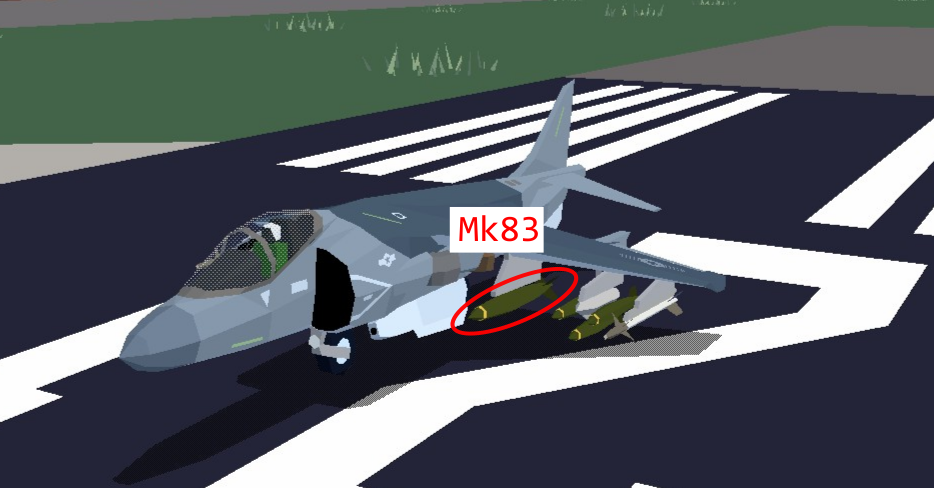
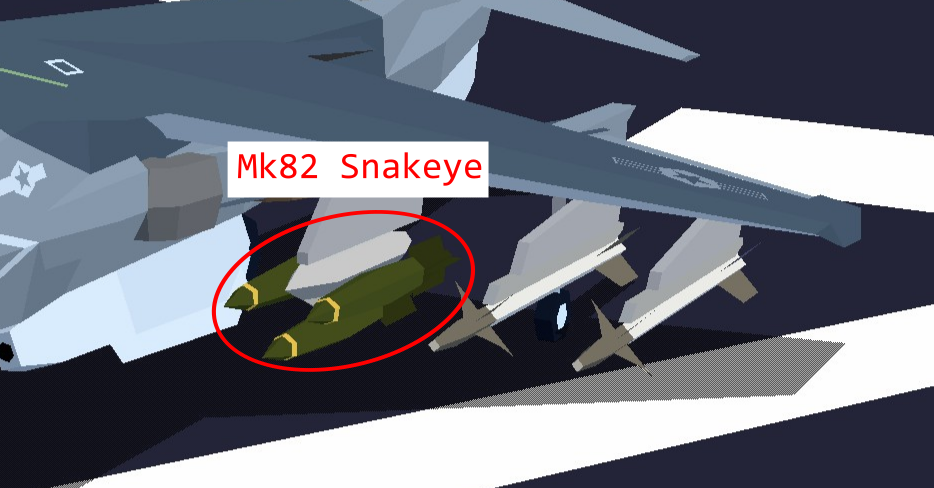
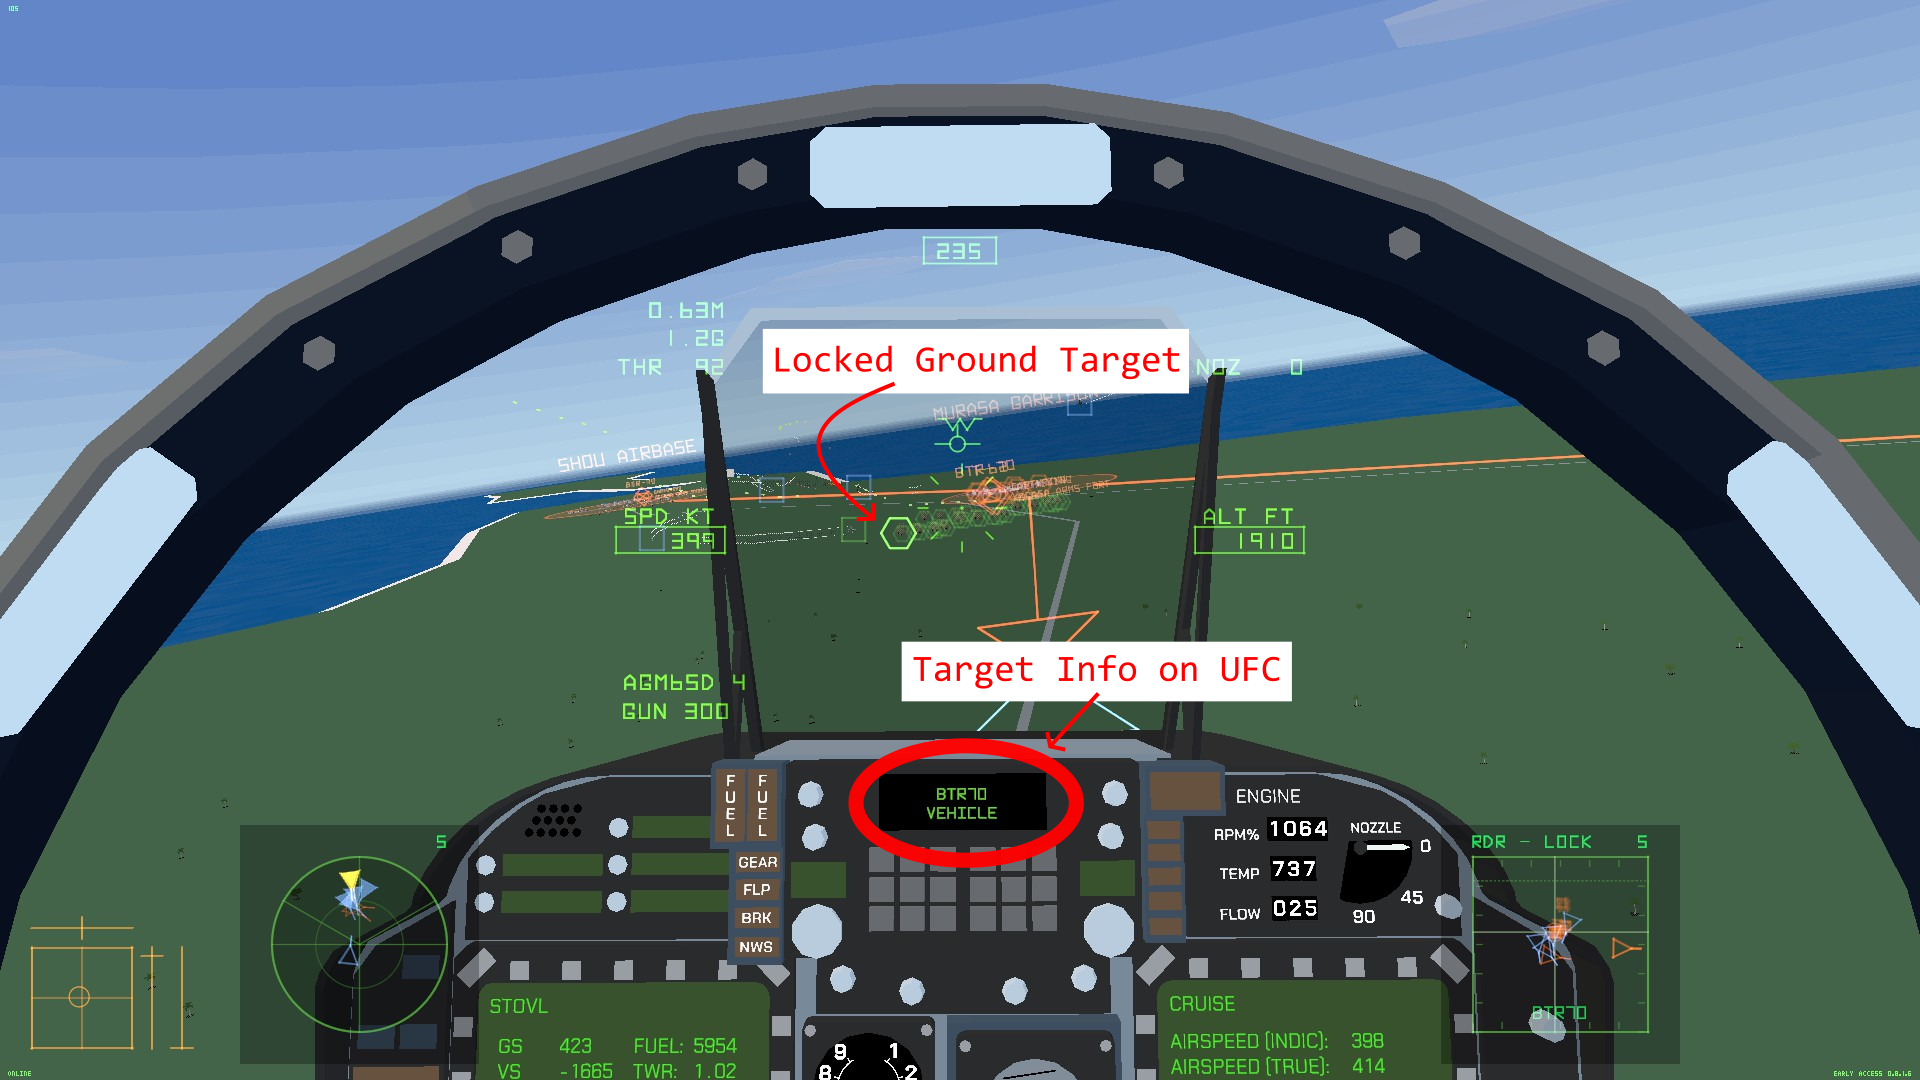
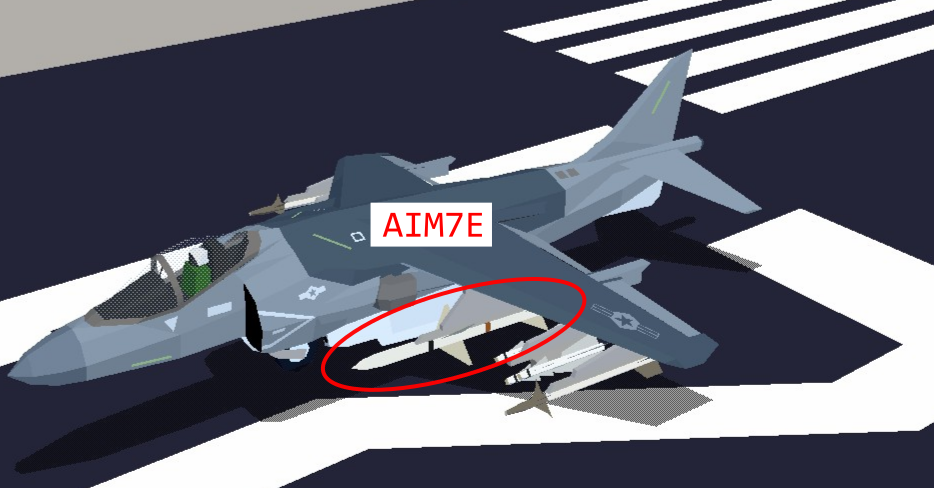
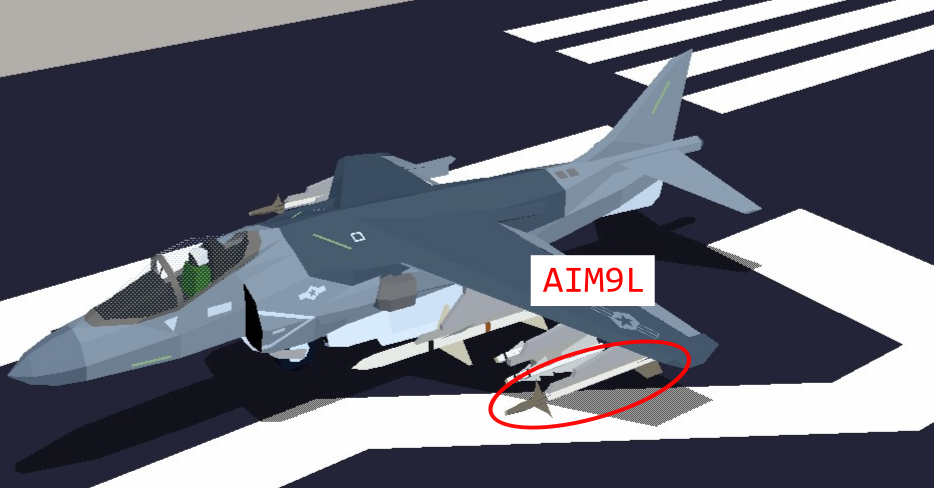
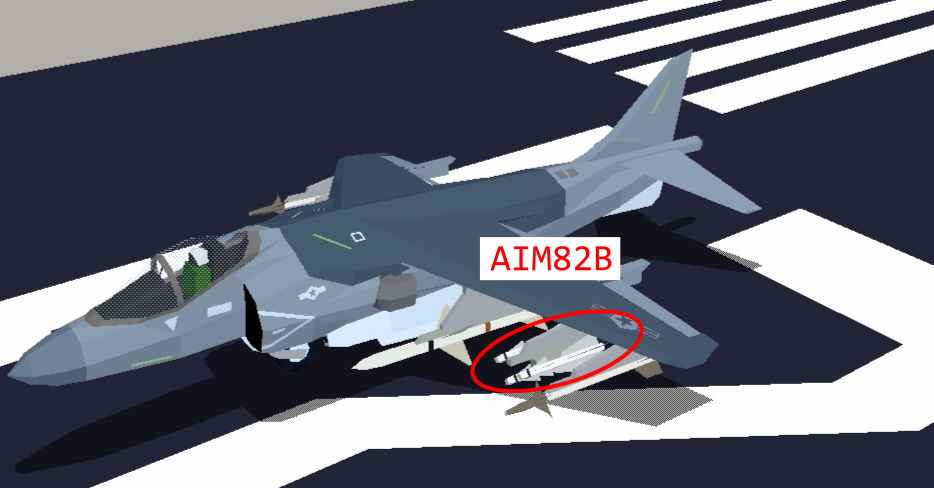
fun fact: the AGM-65D can be carrired in triplets just like the Mk82, also you can carry 2 AIM-9L's per rail under the wings (not wingtips that only works in AIM82B)
greenjoy Jan 22, 2023 @ 2:32am 
Am new to this game. Thanks for writing this great guide. I'm wondering if it's possible to accidentally lock on a friendly aircraft or ground target?
Perfect Info  [author] Oct 23, 2022 @ 7:03pm 
As the guide explains:
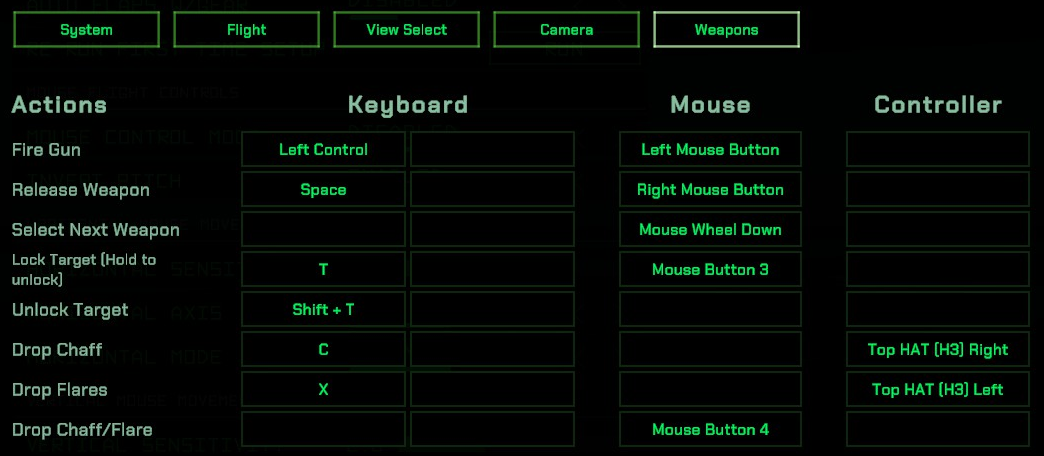
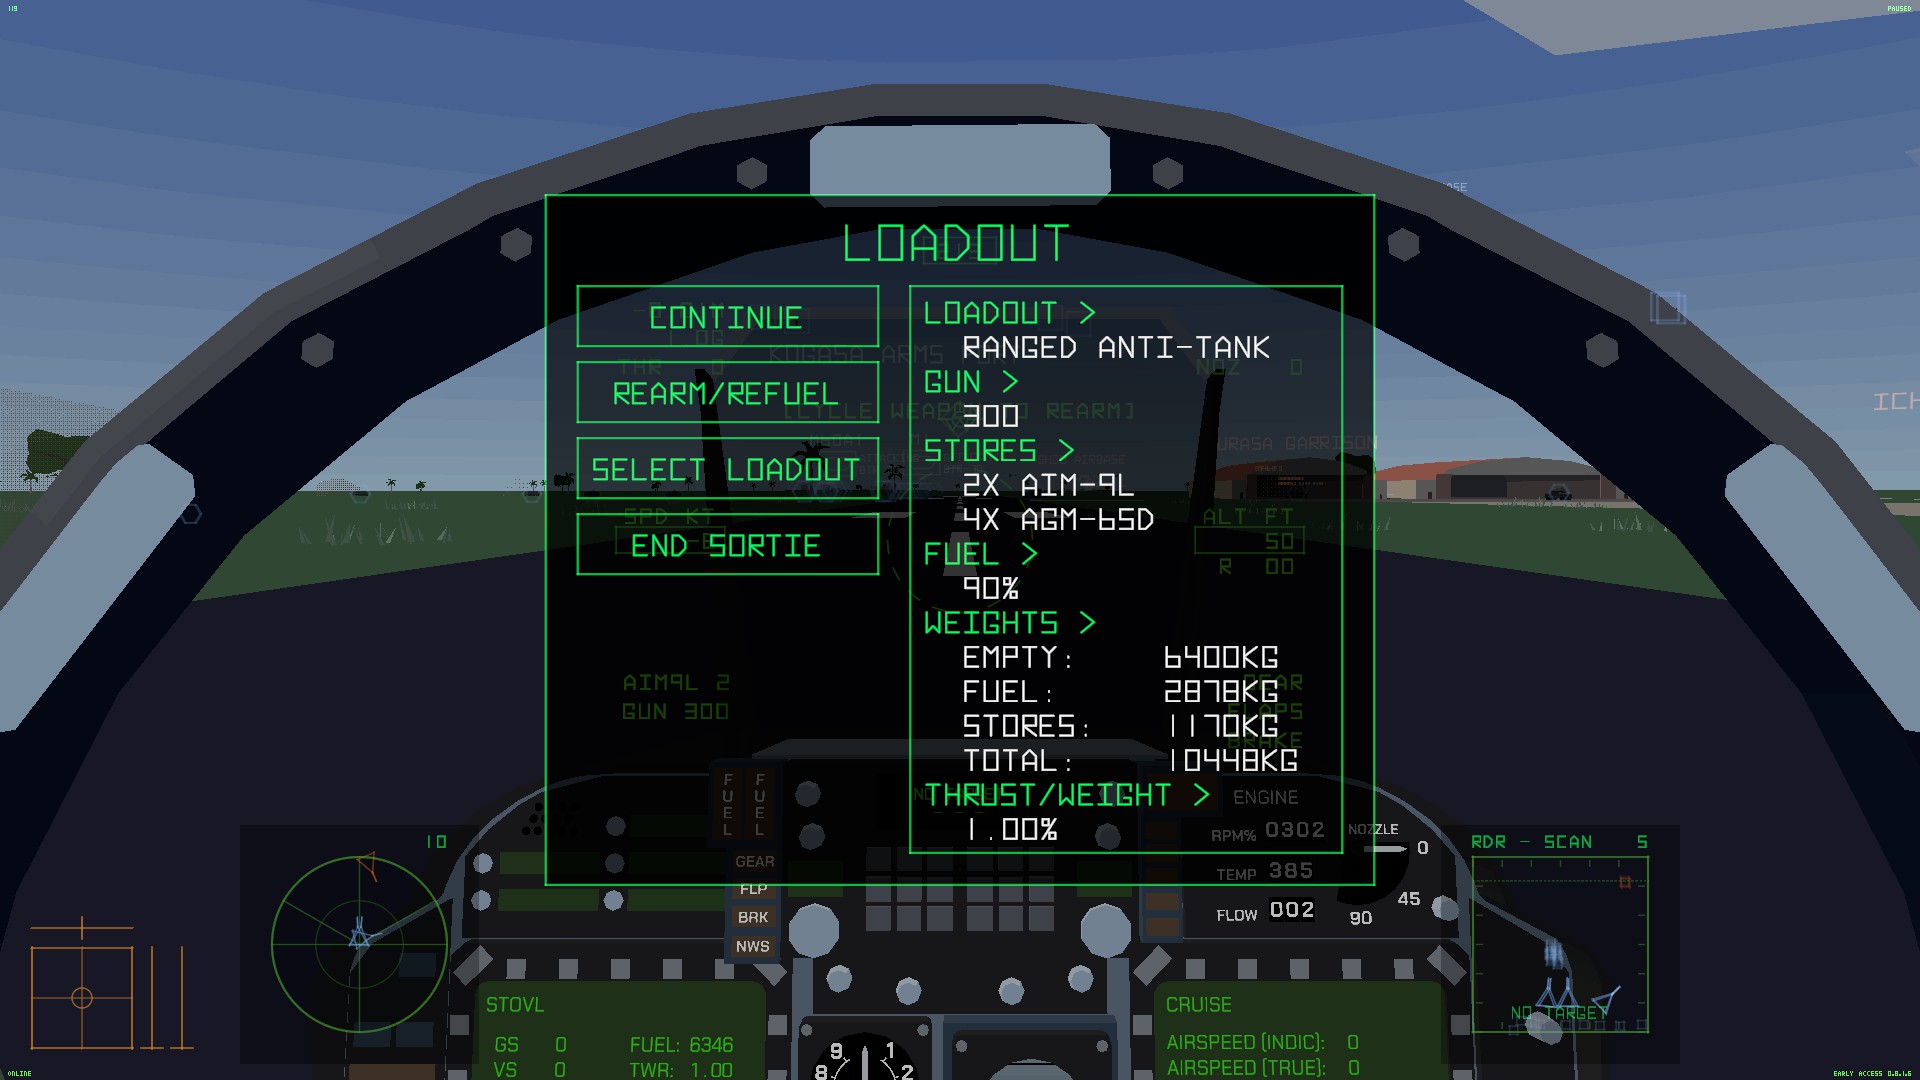
"In Quick Battle, your loadout is predetermined by the mission settings and cannot be changed. In Arena Mode, you may change your aircraft's weapons loadout while stationary on the ground at an airport, by pressing the "Select Next Weapon" key."
And there is a screenshot of the default key binds in that category...
C4eck4It Oct 23, 2022 @ 1:25am 
waht keybind i need press to open loadout section?
javo4143 Sep 3, 2022 @ 11:03am 
I like to think they put in the AIM82s to act like SRAAMS, present on Harriers, not AV8s