Warhammer: Vermintide 2

Warhammer: Vermintide 2

84 ratings
From Umgak to Dawri: In-Depth guide to Legend
By Danieleicho
Are you tired of dying like a little baby? Do you want your rat-slaying endeavors to be worthy of Bardin's songbook? Do you want to be a big boy and up the challenge? It's certainly no easy task to switch up from Champion to Legend, and I am here to drill you lads for what's coming. This guide is going to cover all you need. Sigmar provides!
5
10
   
Award
Favorite
Favorited
Unfavorite
1. Introduction
Today (11/02/2022) I met a player excusing himself for being bad. His build was a mess, he didn't really know what he was doing and he was taking hits left and right. I started giving him some advice and I realized that I actually had something to say. Something clicked and I decided to start writing this guide, which is a rare occurrence since I mostly keep to myself and don't care much about producing something that can be enjoyed by others. And this is indeed my first guide. I don't remember your nickname but I appreciate you for not being an ungrateful a***ole like most people have been when I was a kid and I offered them knowledge or help. Thanks bud, this one is for you.

Experiencing Legend is something I urge to do to anyone that picks up this game to see what it's really like. For my first dozens of hours I have played this game with my friends up to Champion difficulty without having to block, push or dodge a single time. Just mindless left clicking and sniping a special every now and then. They eventually lost interest because of this, but I kept playing until I hit level 30 and felt confident to try Legend. The first games were a mess and Ironbreaker was the only class I could play with, but eventually I got the hang of it and even managed to switch to Cataclysm.

Considering how little of an understanding of core game mechanics the lower difficulties require, this guide will be very unassuming and will go over a lot of basic stuff, so it will be suitable to player of all skill levels (except the veterans of course). If you are just starting out, read through, start implementing these basic concepts in your gameplay and jump into Legend as soon as you hit that level 35 on your character of choice.

To give some background, at the moment I am sitting at around 350 hours. I main Kruber, and I know my way around some Bardin and Saltzpyre. I have coached a couple of my friends up to Legend, and with one we even cleared the Bogenhafen missions on Cataclysm.

Special thanks to my friend squeezy for being my first trainee and the reason why I put the last 250 hours in this game.

Literally me right now:
2. Glossary
Just to make sure that we are on the same page, I will list a number of words that I will be using and that are needed to understand the contents of these guide.

Horde: a dense pack of low tier enemies.

Skaven: rats.

Chaos: they resemble barbarians.

Beastmen: bipedal goats. They count as chaos in damage calculations (e.g. power vs chaos).

Elites: strong melee enemies. They include: chaos warriors, maulers, stormvermin, plague monks, savages and bestigors.

Chaos warrior: the biggest baddest mofo. Armorclad and armed with a two handed axe.

Mauler: Wears a chain mail helm and no armor on its torso. Armed with a two handed axe.

Stormvermin: armored rat armed with an halberd or a sword and shield.

Berserkers: plague monks and savages.

Plague monks: they wear green rags and make a lot of noise. They unleash a flurry of strikes.

Savages: humanoid freaks that shout a lot and wield an axe in each hand.

Bestigor: big armored goat that makes a beeline for players to headbutt them.

Specials: enemies that have ranged attacks or that can disable the player. They include: gas rats, ratling gunners, fire rats, blightstormers, leeches, assassins, hook rats, standard bearers.

Gas rat: he lobs green vials that produce green sizzling stink.

Ratling gunner: shoots a machinegun.

Fire rat: fires a flamethrower.

Blightstormer: fat f**k that creates green tornados.

Leech: hooded fat f**k that grabs people and drains their health.

Assassin: always sneaking and stabbing.

Hook rat: grabs the player with his hook to drag them god knows where.

Standard bearer: big armored goat that plants into the ground standards that make all enemies inside its area tougher.

Disablers: specials that make the disabled player incapable of taking action unless freed by a teammate. They include: leeches, hook rats and assassins.

Monsters: big enemies that have a dedicated health bar that shows up on the UI. They are: rat ogre, chaos spawn, bile troll, stormfiend, minotaur.

Wound: happens if you go down and get revived. Your screen goes grey, and if you go down again while in this state you die and respawn at a later location.

Draught: healing potion.

Potion: potions that are stored in inventory slot number 4. Can be either of focus (purple, ability bar fill up rate), strength (yellow, damage boost) or speed (movement and attack speed boost).
3. General tips, Performance and UI Settings
Legend difficulty is a big step up from Champion because at Champion you can get away without knowing a lot of core game mechanics because it's too easy, plain and simple. Hordes and elites are very manageable and the damage they deal can be shrugged off most of the time, allowing the player to be careless.
All of this changes at Legend, because there are much more enemies, especially elites, and they are more lethal. There is a lot of stuff that can two shot or even one shot the most frail careers, and taking damage from random stragglers is no longer affordable.

If you never played Legend before I advise you to fully level up a character (at least lvl 30, but 35 is recommended), with at least all orange items as close as possible to 300 power each. This ensures to unlock the (almost) maximum potential of your character, either in terms of raw damage and in what he/she can do (talents and item traits). The maximum raw power that a character can have is 650 and is derived from the following formula: level x 10 + [sum of the power of your items]/5. Power determines the damage you do, both ranged and melee, and your cleave (how many enemies your weapon can hit before stopping) and stagger (how likely is for your weapon to interrupt what the enemies are doing by putting them in a brief stunned animation).
Red quality items are nice to have but not needed, as they are rare to get even in Legend reward chests and because orange items do their job perfectly fine. I am going to cover what to equip and what traits and properties to have on your items later.

Do not worry about the meta or what tier your career is according to reddit or some youtuber. Legend is very forgiving in terms of what is viable and the skill floor is not that high, so play what you like and focus on learning the game first.

A lot of stuff is viable yes, but it doesn't mean that everything goes. One thing is to be off meta, another to have an incoherent jumble of a build. Your build, disregarding its meta status, should be well put together, with weapons and talents complementing each other. This has to be so for two reasons: one is to ensure that you are doing the best to reach your intended goals (e.g. don't pick a specialized single target weapon if you want to clear hordes or if your talents don't complement that weapon choice), and the other is to do your best to not jeopardise the chances of the fellow players you meet and respect their time.

A very important habit to get into is to tag everything. It happens when you press T (default key) while looking at an important enemy or a relevant item like potions or books, and they get outlined in blue. It's important not just to communicate that something which should be taken care of has been spotted, but also to make dangerous enemies clearly visible in the distance, in hordes and through walls and terrain. A stormvermin can easily overhead you by surprise while blurred into a dozen other rats, so make sure to spot even the stuff right in front of you.

In the graphics options, turn on AMD FSR on ultra quality if you have a weak GPU (you will need to put antialiasing on TAA to be able to use it). It will give you a lot more performance for an almost imperceptible hit to image fidelity. You dont need an AMD GPU to use it and it can be used even on integrated graphics. If you have a weak cpu, the best thing you can do is disabling debris physics, ragdolls, put ambient light to low and turn off sun shadows and local light shadows. If your cpu is decent, sun shadows on low are the best balance between performance and visual quality.
I personally advise disabling motion blur and color and lens distortion for increased image clarity.
This game is peripheral vision heavy, so a wide field of view is recommended. I use 90, which I feel strikes a nice balance between width and not distorting the image too much. Keep in mind that this game uses vertical field of view, so a value of 90 vertical is about 120 horizontal.
In the launcher, select DX12 if you have a compatible video card. DX12 can produce random stutters for the first couple games due to caching stuff on the fly when it gets used for the first time, but when those are done it will run smoother, making better use of multi threaded CPUs.

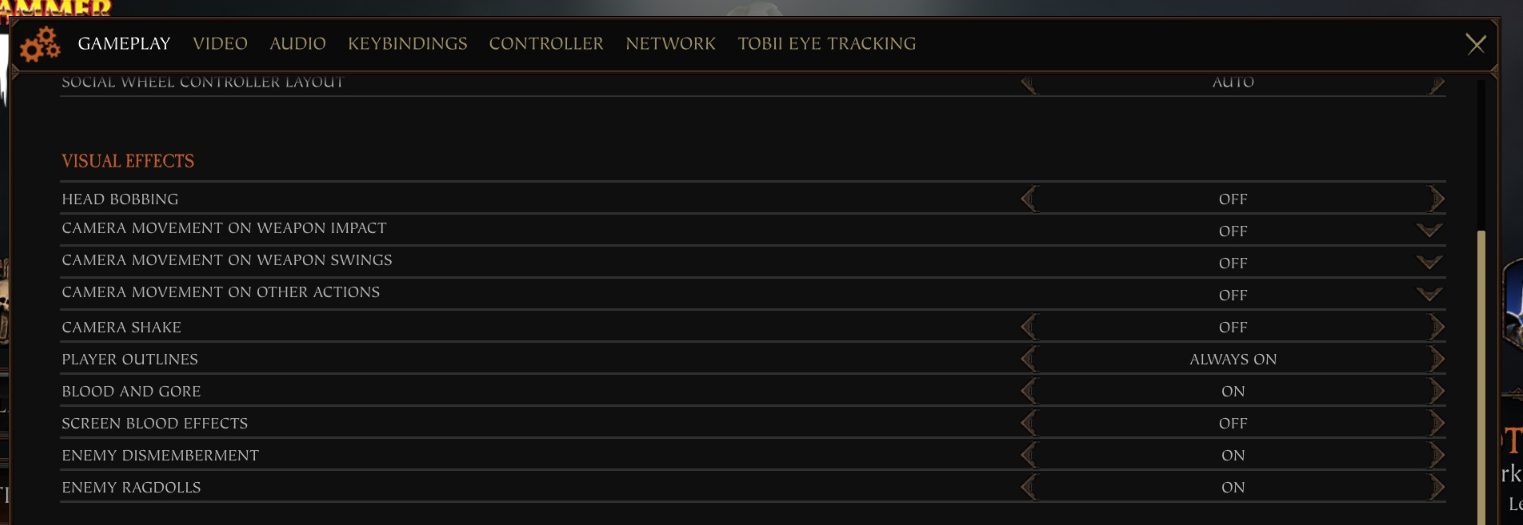
In the gameplay tab in the options menu, activate the following:
- Player outlines on always enabled will help you to be more aware of your fellows' position and to be less confused during hectic moments.
- Disable view bobbing and all camera movement related effects. It's easier to understand what's going on and to aim when the camera is not moving around like you are in a stormy sea. Plus they are motion sickness inducing.
- Disabling blood screen effects will remove the blood stains on your screen when you kill something at close range.
- Detailed UI, gives you all manners of crucial info about yourself and teammates, like the numeric value of your and their hp, if they are wounded, how many ammunitions they are carrying, and so on. Absolutely essential.
- Kill confirm crosshair tells you, rather intuitively, when you kill something.
- Friendly fire settings tell you when you hit an ally with a green hitmarker and when you are hit by an ally with the green semicircle thingy.
- Persistent ammo counter tells you how many ammunitions you have in the magazine and/or in reserve even when you are non using your ranged weapon.

Now that we got the technical stuff out of the way, we shall dive in.
4. Defense
The first thing that has to be in order for a smooth gameplay is staying alive.

First and foremost, positioning. Staying completely in the open is a bad idea, and the same goes for overly constrained spaces. The former will maximise the angle for attack for your enemies, while the latter shrinks your opportunities to escape and move around. In practically no occasion you will have to be not pressing a movement key.
Your best bet in most occasions will be to stay close to a wall, which is going to reduce the angle of attack to 180 degrees. Defending corners, doorways and choke points is even better, but it's not going to always happen and is not required to succeed. Defending ledges is a good strategy too, since enemies will be stuck in the climb up animation for several seconds.

In almost any occasion, you will have to be mindful of your surroundings even more than what you have in front of you. Stragglers are a significant threat at this difficulty, and a bunch of enemies sneaking up on you can end your life quickly.
About stragglers, you have to get into the habit of not diving deep into the horde before you have cleaned up all the enemies that have ended on your sides in one way or another. An enemy on the ground doesn't equal a dead enemy, and you should make sure it won't get up and stab you in the back while you are racking kills on that juicy thick horde.
Regarding backstabbers, it's a good habit to check your back every now and then to make sure that nobody is coming when you have that half second of spare time while fighting. The most important thing though, is to be mindful of that rising woosh sound that you hear when enemies are about to attack you from outside your field of view, and to react appropriately. Blocking is going to be enough, since it protects you at 360 degrees (you just take more stamina damage from attack outside your frontal block angle). Even better is to reposition quickly in a way that allows you to have all the enemies in front of you. Dodging does the trick too, but you'll have to get a feeling for how to dodge attacks coming from behind without turning.

Back to positioning. It's important to not get split up from your mates. It's better for everyone if you happen to die and you are reachable in a matter of seconds without having to go through 100 trash mobs and a bunch of elites. There will be times when it's inevitable, for example because of a gas bomb or a tornado, or when the action gets too hectic. Deal with the situation minding your own position following the aforementioned guidelines and reunite as soon as possible. It's also very important to stay on the same floor as your companions. If you happen to die on a ledge after everyone has jumped down, you are toast. Staying close is beneficial also because of some area of effect buffs that some careers have.

When traversing, don't speed ahead and try to keep up. Clear the various roaming enemies in an ordinate fashion to avoid leaving stragglers. You don't have to kill everything though, only enemies in your path or at risk of being aggroed. So don't make a beeline for that chaos warrior 100m away that you wouldn't have had to fight otherwise.

Blocking is extremely effective at protecting you from a lot of stuff, especially when coupled with some block cost reduction (that you should totally roll on your necklace, and most of the time on your primary too) and when you know how to avoid the most stamina-consuming attacks, like overheads from stormvermin and chaos warriors. It is your panic button if you don't know how else to avoid the incoming attacks or if you are unsure whether you are about to be hit. You don't need to have a shield to be able to block effectively, so use it and do it often. The most important situation in which to block is when a pack of Plague Monks or Bererkers shows up and you see them making a beeline for you. They can close up very fast and unleash a deadly flurry of attacks that is very difficult to interrupt by staggering, and can kill even the tankiest of characters in a matter of moments if not properly dealt with. Kill them with ranged weapons before they close up, and block when they do until some teammate kills them or kill them when they finish their combo.
All monsters have some attacks that deal so much stamina damage that they result in being unblockable, and some of them are very quick (e.g. rat ogre and chaos spawn). Overhead attacks from elite enemies often result in full stamina depletion, and you generally don't want. It puts you in a very vulnerable position because you risk being hit while in the broken block animation and because you can't push, which is an awesome defensive and offensive tool.
Two other circumstances in which you have to press block and never let go of it until you are sure that you are safe is when getting revived or when disabled.

For these very powerful attacks, and not only, dodging is advised. The most useful benefit of dodging is the extra mobility it provides, especially for some weapons that really slow you down while being swung or while blocking. The fact that it makes you more difficult to hit is cherry on top, and it does so for two reasons. One is that it creates space between you and enemies. The second is that enemies lose tracking if you dodge at the right time in their animation. For running attacks, enemies lose tracking if you dodge in the last 25% of their attack animation; for every other attack it's the last 75%. Being the overheads very telegraphed moves, you should use this at your advantage, while also keeping your guard up in case something goes wrong (for example a piece of terrain or an enemy blocks your dodge path).
So, while fighting a horde, you should be constantly moving and dodging in every direction depending on your positioning needs. It is very important to learn to fight and defend yourself while constantly dodging backwards when leaving while enemies chase you.
Dodging works for disablers too, but as long as you stick close to your mates and they are sufficiently aware, you are not required to be able to dodge them.
Keep in mind that each weapon has a dodge distance and a dodge count, meaning the number of consecutive dodges you can perform covering full distance. After this number has been exceeded, dodges are going to cover less and less distance for each subsequent one. Dodge efficiency recharges very fast though, and it shouldn't ever be a problem if you space your dodges like 1 or 2 seconds apart. Jumping resets the counter to full. Totally spam dodge if you need to get out of a bad situation, though.
As a side note, I suggest having a dedicated key for dodge. I think shift works really well and it's what I use personally.

Pushing is another essential tool that can stay largely unused at lower difficulties. It pushes (duh) enemies back in an arc in front of you, or can even throw them to the ground (if you push them two times in a row, for example). A push is performed by pressing left click while blocking, and a push attack is performed by holding left click while blocking. Pushing is very useful to crowd control, and it's the best tool to get out of bad situation quickly, like to create some space to get out of a sticking spot or an opportunity to quickly snipe a special.
Push attacks enable some attack patterns or combos that wouldn't be possible otherwise. For a lot of weapons, the pushing frequency will be determined by the push attack itself (if it is a good horde clearing tool) and the related combo. For other weapons (whose push attack has an elite killing function), pushing will have to be used at discretion and with the extra added care of not making it a push attack to not mess your combo up.
5. Offense
Pushing closes the defensive part and brings us nicely to the offensive, because just staying alive is not enough. Those rat bastards ain't gonna kill themselves, y'know. You need to actively help your team. And hopefully one day you aren't going to be that average guy that barely floats in the Vermintide, but one that surfs it, smashing their skulls while his teammates look in awe.

When talking about offense, the first thing that comes to mind is melee combat. Not every class is created equal, and each one of them fits a specific role that might not include being a specialised melee character. In any way, taking out the trash is everyone's job and you are required to be proficient at it, since everyone has a melee weapon and circumstances will necessarily call upon its use.
Melee weapons have two main functions: horde clearing and elite killing, both of which depend on the type of attacks that the weapon produces. Talking in general, horizontal slashes are good for hordes, while thrusts and vertical attacks are good for single targets. Charged attacks are generally better at dealing with armored enemies, meaning elites. Two other attack properties you need to be aware of are cleave and armor damage. Just being an horizontal move isn't good enough to make an attack good for horde clearing though, because it could have low cleave and stop after hitting the second target or so. The same might be true for an overhead: it could have no armor damage. If you like to dive deep into game mechanics, you can download the armoury mod, which tells you everything about a weapon. For most people though, just using a certain weapon and getting a feel for it is good enough.

Two things that are necessary to use most weapons to full effect are block cancel and push attacks (especially keeping it all connected and flowing). Block cancel consists in rapidly tapping the right mouse button once to reset your weapon's combo and make it start again from the beginning. Let's take the 1h sword for example. Its basic left click combo consists of two horizontal slashes and an overhead. While clearing a horde, that overhead will do you more harm than good, so you block cancel and start over your combo with the two horizontal moves. Even better: the 1h sword's push attack is a quick horizontal attack that flows right into the first two normal attacks. So we are now talking about a combo that starts with a push giving you extra crowd control capabilities and follows with three quick horizontal slashes. Cool.
Every weapon has its specific combos like this. Following the previous rules of thumb you should be able to work out combos on your own, but for extra safety you can find all of them neatly explained with video examples in this wonderful guide by royale w/ cheese:
https://steamcommunity.com/sharedfiles/filedetails/?id=1821186836

While fighting elites, another property becomes relevant: stagger. It is the capability of an attack to interrupt whatever the hit enemy is doing and putting them in this brief stunned state. Every different weapon and attack has different stagger capabilities. Generally, beefier weapons/slower attacks have higher stagger, while nimble weapons and fast attacks have less. With time, you will get a feeling for what staggers what. If in doubt, please dodge and/or block instead of mindlessly attacking a chaos warrior doing an overhead hoping to stagger him.

One useful skill to acquire is to learn how to aim headshots. Thrusts and overheads are generally easier to hit heads with. Your crosshair doesn't need to be spot on on the head because it's more about how the hitbox of your weapon interacts with the enemies'. When clearing hordes, it is useful to aim strikes at about head level. You will have to get a feeling for each weapon, but it is good practice to be mindful and actively trying.

For a melee focused character, your melee weapon will be your primary way of dealing with enemies, while your ranged weapon will fill in a support role; for a ranged oriented character it will be the opposite. The most typical for a melee career is to have a melee weapon that can deal with both hordes and elites, and a ranged sidearm that can snipe specials and kill some elites too. For a range focused character (I don't know a lot about those, sorry) it's vice versa: your ranged weapon is going to be your primary mode of engaging enemies, and your melee is going to complement and support your ranged weapon choice.
To put it into perspective, a strong recommendation that goes to Bardin players is to leave drakefire weapons aside for the moment. For melee based characters, it's better to have a secondary that can snipe since they are already very capable of clearing hordes with their primary. Picking a flamethrower would double down on that and make you incapable of dealing with pesky specials. You need the versatility to avoid depending on random players that might not have read this guide. The best time to experiment would be when planning a cool team comp with friends.

Every mission has some spots in which a monster or a patrol can spawn (so memorize them and be ready), and those will be a common encounter at Legend.
When dealing with a monster, it's usually best to not go full tunnel vision on him while a horde wipes your team. Monsters can be kited and staggered in various ways, and everyone should keep an eye out on them while giving priority to the horde (if present) and putting damage into it whenever the opportunity arises and finish it off when the situation is under control. Another option is to burst him down very quickly, but the whole team has to be confident and focus on the task for it to work other than having the sufficient amount of damage. It's extremely important to pick the best place available to fight monsters. At all costs avoid constrained spaces or places where you could easily get stuck. Those things are big and can close in very fast.
Patrols will make a very distinct sound and consist of a very big group of elites marching in formation. If you are sure that they are not going to show up later while the team is already dealing with a horde, you should sneak past them: their aggro range is short. If unsure, it's best to engage them when there are no other enemies around and the terrain is not too constrained. Monsters and patrols are both good times to drink potions, chuck some bombs and use career skills (F key). Patrols are easy to deal with if done correctly, but should not be underestimated because they can easily kill someone or straight out wipe a team if the necessary care is not taken.

Something to keep in mind is that most ranged weapons can't block, leaving you very vulnerable to enemies that are close by. So extra positioning care and awareness is needed for ranged players, also for the eventual couple enemies that will eventually slip past the frontliners.
This opens the talk about roles, which will be developed in the upcoming section.
Experienced players can make anything work, but generally it is advised to have at least two frontliners and one boss killer to deal appropriately with any situation. It won't be hard to cover all bases since every character fullfills different roles. For example, Grail Knight is excellent at clearing hordes, killing elites and monsters, but he can't snipe because he doesn't have a ranged weapon. Waystalker instead can, besides sniping, dish out tremendous amount of damage to any target but will have some trouble when hard pressed by a bunch of elites in close quarters combat, something that a Grail Knight can deal with with minimal problems. From this follows that, when possible, you should fill in the role that your party is missing.
6. Character selection and Building Fundamentals
When considering what career to pick and how to build, your first consideration should be what your playstyle is and what you like. Legend (and even Cataclysm, really) allow a lot of elbow room, and success is more about how well you can play the game rather than what numbers your character can put out.

Taking off where we left in the last chapter, there are two main character archetypes: melee frontliners and ranged damage dealers. The former are more about controlling and clearing the horde, and being a living wall for their squishier companions. They can usually also deal with elites and do some special sniping. The latter instead are more focused on staying behind while dishing out damage from a distance, taking care of priority targets like elites and specials. They are usually better at fighting monsters and bosses too.
While this is generally the rule, there are careers that are a mix between the two and allow for more nuance. For example, Grail Knight is a frontliner with boss killing capabilities; while some Sienna career/build (sorry for the vagueness here) can be a ranged horde clearer.
If you are an average melee enjoyer, Kruber, Bardin and Saltzpyre all have solid career choices. Kerillian and Sienna are instead more suited for ranged fans.

Choose your path wisely:

To get a good idea of what builds are the most effective for each career, you can once again check the following guides by Royale w/ Cheese:

https://steamcommunity.com/sharedfiles/filedetails/?id=1831243904

https://steamcommunity.com/sharedfiles/filedetails/?id=1832306381

https://steamcommunity.com/sharedfiles/filedetails/?id=1833338040

https://steamcommunity.com/sharedfiles/filedetails/?id=1833337461

https://steamcommunity.com/sharedfiles/filedetails/?id=1833925976

Once again, I want to stress that your concern should be trying out what you like and learning. I especially like these builds because he explains why he chose some weapon or talent, teaching you how to use your own brain to make your own decision.

In his builds, everything is optimized for Cataclysm to reach certain "breakpoints". A breakpoint is some threshold that you have to cross in order to accomplish some action more efficiently. To make it clear, let's say that your ranged weapon can kill some special in two hits. Now, adding an extra 10% power vs skaven will allow you to "hit the breakpoint" to kill that special with one hit instead of two. Legend is more lenient in terms of breakpoints because enemies have less health, so you can get away with much less optimized items and builds and still have the same effectiveness of the fully optimized build.

As a general rule of thumb, the best trait to have on your melee weapon will be swift slaying by a long shot, with some specific builds making use of niche traits like opportunist. The best properties are instead block cost reduction (a must most of the time), followed by crit chance or attack speed depending on the build. Some builds use power vs something to reach some breakpoints, but it's most likely not needed for Legend. I think swift slaying + block cost reduction and crit chance is the overall best way to go on pretty much any build.

For a ranged weapon, power vs infantry and skaven will usually do the trick for melee careers. Check specific builds if you want to be sure as a ranged career.
The best traits are:
- conservative shooter for high damage single shot weapons, like handgun, crossbow, etc.;
- scrounger for high ammo capacity weapons like brace of pistols, repeater handgun, kerillian's swift bow, etc.;
- barrage for ranged weapons that inflict consecutive damage like moonfire bow or some Sienna staffs;
- overcharge related traits for drakefire weapons or other Sienna staffs (check builds).

The best properties to have on a necklace are health and block cost reduction. Some builds swap one of the two for stamina to enable some combos.
Talking about traits, I generally advise to stay away from Natural Nond if you don't exactly know what you are doing. Depending on taste, Barkskin and Boon of Shallya (not to be confused with Hand of Shallya) are the best and most versatile ones. Lately I have come to appreciate the versatility of Boon of Shallya, since the bonus healing applies to your temporary health generation too. To be good, Barkskin requires to be hit in quick succession (including when in a downed state or incapacitated by disablers) or by some attacks that deal damage over time like stormfiend flames or blightstormer tornados, and those are generally things you want to avoid.

Regarding charms, its properties are going to complement your weapon choices to enable some breakpoints. Usually, power vs infantry and attack speed (recommended for melee careers) or power vs skaven and chaos are your safest bets. Ranged careers are advised to check specific builds to be sure.
For traits, proxy is generally the best one since it gives the best bang out of a single potion (basically doubling its efficiency). Decanter is good too, but should be avoided unless needed for a specific build or unless you are sure that a +50% on you is better than to duplicate the potion on an ally. Concoction is a niche trait for specific builds.

As for the necklace, the properties on your trinket are going to be the same 99% of the time: crit chance and curse resistance. Royale's builds never list curse resistance because on Cataclysm people on don't usually take books since it gives the same rewards as Legend. But doing full book runs is the norm at Legend and so curse resistance is highly recommended, unless you feel very confident.
The best trait to have here is shrapnel. Bombs should be used on monsters or patrols to set up a quick burst down with the whole team's focus.

Jumping to talents, I will restrict my talk to those that most builds have in common: THP talents (first row) and stagger talents (third row). In the first row, you want to always avoid the talent on the right.
It's of utmost importance to have your THP talent matching your melee weapon. THP on cleave (hitting multiple enemies) is usually the safest and most consistent provided your weapon is capable of cleaving. THP on stagger can lead to some insane THP generation especially when coupled with boon of shallya on the necklace, but it needs the right weapon to work (e.g. shield weapons or 2h hammers). THP on kill is a bit lackluster in my experience, and leads to interesting THP gains almost only when killing elites (chaos warriors especially). THP on headshots needs a good aim (and a good weapon to aim headshots).
Regarding lvl15 talents, Smiter and Assassin are the best. Mainstay is usually picked when none of the former are available. Bulwark is a niche talent that is best avoided. Enhanced Power can be an alternative to Mainstay for more single target damage or to reach some breakpoints or flat out increase damage on range oriented careers. Remember that power influences both melee and ranged damage, cleave and stagger.
7. Etiquette
As I have already said, doing book runs is the norm on Legend. It adds a little bit of extra challenge and gives better rewards. Assume this is the norm, and communicate if you are not intrested in doing books to see if your teammates are okay with it. You might not be interested in books because you just want to clear a particularly hard mission to get a challenge done, like for example to unlock an outfit. It's not essential that you know all the book locations, but be on the lookout for any teammate telling you to pick up a book they just tagged for you.
Grimoires should be carried by the hardiest characters, or by those who need a potion in slot 4 the least. Tomes can be carried by anyone. Always remember to pick them back up if you drop one to heal. Always pick up tomes dropped by dead teammates if you can.

Regarding healing items, clearing wounds is the absolute priority. If you are carrying a draught, you should give it to a wounded player with a free inventory slot 3. If you are carrying supplies, you should heal them. If you and another teammate are both wounded and you are carrying healing supplies, you should heal them: this will clear the wound on you too even if it does not heal you. If there is excess of healing supplies, the player with the least health should heal unless all the healing items on the ground are finished. When given a choice, carry supplies instead of draughts: they can clear two wounds, they heal more and they can be used on anyone. If you are low health without being wounded while carrying a healing item, refrain from using it. It's generally better to wait and use it when you are wounded, unless you know that you will most likely have no time to use it later. If you are the last player alive, anything goes.

Potions should be carried by who can make the most out of them. If you are Foot Knight for example, it's better to leave that purple potion for the Bounty Hunter. Purple potions (cooldown) are usually the best ones, closely followed by strength (damage) potions. Speed potions are the least useful, and are better if used by characters running Concoction on their charm. Don't waste potions, but don't sit on them too long either. As already said, use them for patrols or large number of elites, monsters or bosses. Pro tip: use them before s**t hits the fan.

Provived you have "Numeric UI", you can see how much ammunition every player has. Ammo pouches should almost always go to the player with the lowest ammunition count, and range dominant careers should get priority. Melee characters can still hold their own without ammo, while ranged careers could struggle.

When in the keep, if possible, pick a career that contributes to a balanced team composition; if not, ask someone to pick a different career.

It's not necessary to say sorry after every friendly fire incident (depending on the damage dealt), but it's nice to be careful to not do it, especially if your weapon does high damage. Also be careful not to get into other players' line of fire.

If you notice a player getting left behind and the others are speeding ahead, consider waiting for that player. If he gets pounced on by an assassin while everyone else has jumped down the ledge to progress, he is going to die and it's going to get worse for everyone.
8. TL;DR and Closing Remarks
To close up I shall make a list to summarize neatly what I went over in the whole guide.

1. have your character fully leveled up and as close as possible to 650 power with orange or better items;
2. set up your game to not be hindered by performance, visual clutter, or lack of information;
3. don't worry about career tiers, meta and breakpoints;
4. tag everything;
5. how to stay alive: staying together, positioning, blocking, dodging and pushing;
6. melee combat: attack properties and functions, push attacks, combos;
7. dealing with monsters and patrols;
8. character roles;
9. principles of character building: weapon and talent choices, item properties and traits;
10. guidelines for polite and cooperative behaviour: books and resource distribution.

Let's say you have been implementing all of this in your Legend gameplay for some dozen hours. You are a confident player always putting out the best performance and you almost never go down. You are considering making the jump to Cata to get that cool Helmgart frame for bragging rights. But this guide reportedly covers only until Legend. What now?

Qualitatively, Cata gameplay doesn't differ much from Legend, meaning it doesn't introduce as much new stuff as Legend does compared to Champion. This guide offers you all the basic tools you need to be successful at Cataclysm too, with the caveat that for Cata you need to master all of them. Other than this, the main difference is that at Cata you need to be aware of damage and/or stagger breakpoints (optimized builds and red items recommended). For some more specifics, I will link yet another useful guide by (you guessed it) Royale w/ Cheese:
https://steamcommunity.com/sharedfiles/filedetails/?id=1845062917
With this, our journey really comes to an end. You are now battle-ready and well educated in the art of rat slaying. Now go, and kill for old Kruber!
12 Comments
Danieleicho  [author] Jun 10, 2023 @ 2:20pm 
@Helios Hyx many thanks
Helios Hyx Jun 10, 2023 @ 2:25am 
When it's done right, you have to say it.
Great Guide, great work. You definitively didn't waste your time.
Well built, well written. Vague enough to not spoil, enough precise to understand what is being said and addressed here.

I hesitated to consult a guide (to not be spoiled), as I searched only the limit of the character's level to begin to open my collection of rewards I put aside for and to ameliorate my stuff a little. Saltzpyre is now on level 35(+1) and I wanted to know what is this +1.
I continued to read by curiosity just after reaching the information because you put this :
"Do not worry about the meta or what tier your career is [...], play what you like and focus on learning the game first."
In others terms "Think by yourself, learn, and don't forget to take fun".
That began well. I like the concept of this guide.

So, simply, thank you very much for your time and your good advices.

As they say : fight together... or die alone :)
No-one too far away, no-one behind.
Danieleicho  [author] Mar 24, 2022 @ 4:16am 
@Pungent corrected
Pungent Mar 7, 2022 @ 6:25pm 
Another small correction: the human berzerkers are called Savages. Berzerker is the enemy/armor type of both savages & monks, and Enchanter's Lair Nurgloth.
MeatRack84 Feb 19, 2022 @ 3:24am 
An awesome and thorough guide. Well done!
Followers of Fattigkussen Feb 18, 2022 @ 7:58pm 
好啊
Danieleicho  [author] Feb 16, 2022 @ 3:53pm 
@Parzival thank you.
Danieleicho  [author] Feb 16, 2022 @ 3:53pm 
@God Splitter [PL] tfw blessed by janfon1
Danieleicho  [author] Feb 16, 2022 @ 3:51pm 
@Kaiosama TLJ corrected, thank you.
Kaiosama TLJ Feb 15, 2022 @ 4:53am 
Just a little nitpick here: Standard Bearers are not elites, they are specials. They are unique, however, in the sense that they spawn alongside a few regular beastmen (after all, his role is to buff them), unlike other specials that spawn each on their own. Another tip since I'm speaking about them: They also have the same type of armor that Chaos Warriors have, which means that most armor piercing weapons will not bodyshot him.