TEKKEN 7

TEKKEN 7

Not enough ratings
Anti-Yoshimitsu Guide
By fam2
Learn to beat stances, oki, flash, and unblockables.
   
Award
Favorite
Favorited
Unfavorite
Never get freed up by bong huffing squids again
Yoshimitsu is a defense specialist character that shines when countering the opponent's reckless offense. It's because this character operates in a much different way than the rest of the cast, by breaking the conventional rules of Tekken, that make it appear like a more daunting fight than it actually is. When you don't have a foundation of knowledge to work off of, it's incredibly easy to get freed up by fake pressure, mixups, and the player mashing flash whenever given the chance. He's armed with an i6 launcher, healing capability, versatile unblockables, and evasive spins that allow him to escape pressure even the best sidesteps can't avoid. In this guide we'll begin unearthing the many layers of boof and bull this character has, and offering my opinion on how to best deal with each scenario. Since Yoshimitsu is very style based, every player will use different moves and setups, and some won't use certain techniques listed in this guide at all.
GENERAL DEFENSE
Yoshimitsu's weak side is to his right, and it's incredibly weak. By stepping to
to the left
, you're avoiding almost every single one of Yoshimitsu's pokes and longer range attacks. The ONLY attacks you're vulnerable to are either lacking in damage, slow, or heavily punishable. Sidestep left block drives this weakness even further, beating more moves, while only opening yourself up to the weak or launchable lows.

When fighting Yoshi, playing patiently and going on the defense forces the opponent to leave their comfort zone and work especially hard to obtain the life lead. Yoshimitsu doesn't do well with shutting down keepout paired with a good backdash cancel. He struggles with applying plus frame pressure, and lacks good lows and tracking tools to force the opponent to do anything but stand guard or step to the left.
WALL OKI
At the wall, the full might of Yoshimitsu's okizeme flourishes. After being flipped over with cd+1, you enter the vortex.

The mixup itself is pretty brain dead, but is high risk/high reward. cd+1 will continue to flip you over, and over, and will only be beaten with a techroll. When you tech, Unblockable Sword Sweep or Windmill will be used to catch you. If you manage to techroll cd+1 you can immediately while-standing launch punish if the axis and range allows. If you sleep on a sword sweep, you have plenty of time to get up and launch. You should be trying to launch this oki everytime you escape to discourage them from trying it again at a later time.
KEY MOVES AND STRINGS
Flash (1+4)
In the default stance, Flash is an i6 mid launcher that excels at shutting down plus frame pressure. It’s also used to steal back turns with a chunky combo, or, due its speed, can be used to launch punish otherwise safe moves.

Flash lacks range, and is launch punishable on whiff if you're looking out for it. The best way to deal with flash in the open is to use less immediate timing during plus frame scenarios. Though you lose out on lots of pressure, it's much better than being launched for mashing, and this way you can bait out and whiff punish any hasty attempts. Understanding your opponent’s tendencies is important here when deciding to utilize immediate timing while plus, or opting to bait out the move.

In No Sword Stance, Flash's properties change, and it becomes much more versatile. Though slower at i8, it receives extended range, and the ability to be used from full crouch. The new range enables it to combo from a CH 2-jab, and block punish MANY more moves that leave the opponent close on block, such as generic hopkicks. The full crouch version is able to heavily punish fast recovering highs such as jabs and Electrics[i.imgur.com]. However, the counter is still the same, understand the opponent's tendencies, avoid immediate timing, and try to bait, but be more careful with how you approach this version.
Manji Spin Kicks (d/b+3,3)
The first two kicks in this string are a natural combo. After the second, and each successive kick, Yoshi can end the string with a safe mid that looks like a while-standing 4, but actually knocks down on hit. As soon as you block a single low kick, you'll be jailed into blocking the rest until the player stops. From here, you'll be able to safely mash your i13 ws punish.
Df1 string (d/f+1,2~d/b+2)
A lot of Yoshimitsu throw this move with abandon, hoping the d/b+2 will save them from
a beefy punish. Some characters have interesting ways to launch this move, whether it be with a high evading hopkick, or quick CH launching low. Explore your options and see what your character can do, otherwise, a quick high crush works.
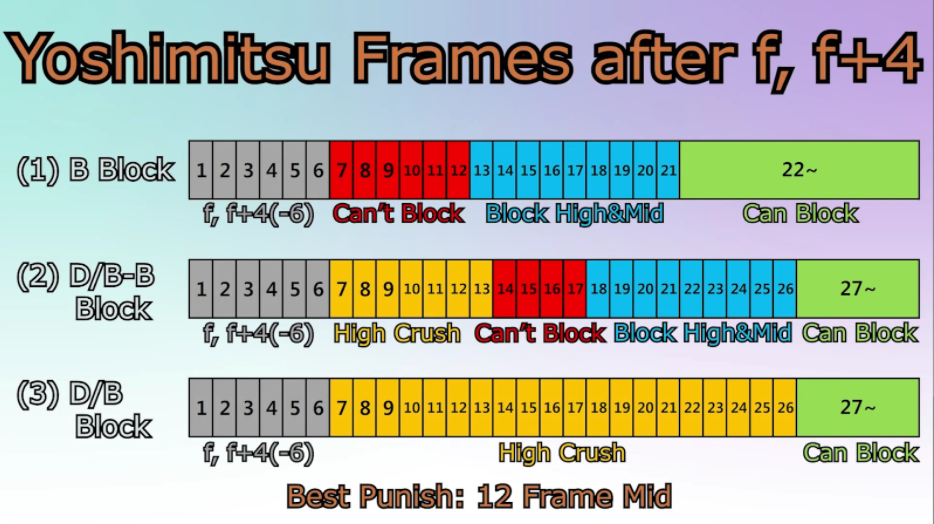
Fubuki Knee (fF+4)
(This move shares an on block situation with KIN 1+2, all info applies.)

On paper, these moves are safe on block, but since they leave Yoshi at -6 and back turned, it creates an interesting on block situation. From here, Yoshi's escape options are:

- Turning around with back.
- Turning around with down/back.
- Using backspins, at the cost of life.
- Challenging the frames with attacks.

If they hold back, all attacks up to i12 will hit. If they hold down/back, all mids and lows up to i17 will hit. To refrain from mixing yourself up, a quick i12 mid would be your optimal punish, catching both options. The Yoshi player can try to escape these punishes with a backspin, at the cost of life, further building on the situation. From here, you can dash up and launch, use a quick homing move, or grab their back. Keep in mind, opting for these punishes open you up for when they choose to challenge the frames.

If at any moment during the match Yoshi ends up backturned without you blocking one of these moves, you can backdash~crouch guard to option select every immediate option.

Knee Cap (FC d/f+4)
FC d/f+4 is a good keepout move that boasts excellent range, all while being unseeable. Because of its ease of use and ability to snag quick damage, it's an easy bad habit to form for players that are unconfident in their neutral. Pay attention to when this move is used, and tie the timing to something, as it can be an easy way to seal a large punish from predictable players.
M! Sword Windmill (u/b+1+2~1)
In the open, it acts almost as an unblockable homing move, losing only to being contested or backdashed. As okizeme, it beats every getup option besides a backroll, unless there's a wall immediately behind you. Windmill is potentially punishable if you can backroll to safety, and time an attack just right, or Rage Art. Bear in mind this move can be canceled early or extended. Whether cancelled or not, the length is very linear, and you can feel out when it'll end with more experience. A cancelled Windmill lasts only six spins, while a full length one lasts twelve.
L! Sword Sweep (FC d/f+1)
In the open, it is seeable, making your best punish either a hopkick on reaction, or backdashing to set up a strong whiff punish, since the recovery of the move is so slow. As an oki tool, this move absolutely devastates as a tech roll catch, but loses to a backroll or sleeping. It's important to punish this move whenever whiffed. Even if you chose to stay grounded, you still have enough time to stand and launch.

During a tech catch, this move does realign due to its required down-forward input, and has light tracking, however there is a subtle blind spot to Yoshi's left side, which will cause the move to whiff occasionally if executed too early. This makes tech rolling to the right almost always the better option.
Gehosen (cd+1)
An i17 launcher that also hits grounded, pancake flipping the opponent for further oki. This move is -17, making it risky to use on grounded opponents without a read, but can become safe in the open due to the distance. Some characters, like Bears, can launch this move at any range. Test your launchers, and see what ranges you're capable of clipping this move with.

It IS possible to cancel cd+1 into Kincho, making it safer, but since you can't block in KIN, the player can only try evading with b+1+2. You can option select this cancel at close range with a fast recovering launcher, stepping the unblockable, and attempting to launch again.
Sword String (d+2,2 series)
d+2 is -9 on block, which entices you to try and take your frames, but the followup 2 is a CH launcher that will catch even jabs. This followup is -12, which warrants a block
punish, but this move can also be followed up with either a high that will stuff any punish attempt, or a -10 CH mid that will launch you for trying to duck and punish the high. Pay attention to how your opponent utilizes this string, if at all, and punish accordingly while assessing the risk/reward.
STANCES
Kincho (KIN)
Once Kincho is executed, a parry window begins from 2, to 9 frames after the input. Any high or mid punches or kicks that connect during this window will activate the parry. This can act as a special punish for certain strings or be used to take back the player’s turn. This parry IS sidewalkable, and some players use this way too often for their own good. Common moves tied with KIN parry when blocked are 3~4, d/b+1,1, and d/f+2. Finding out their tendency, jabbing to activate the parry, and sidewalking is an excellent way to blow them up for being too predictable.

KIN boasts a large selection of hard hitting, relatively safe mids that decimate the opponent trying to step, contest, or crouch. All of the lows from KIN are seeable and are much less of an immediate threat than the mids. The best way to combat this stance is to just stand guard, and react to any incoming low. Do not try to duck any highs, or launch them for being unable to block, without confident hard read.

KIN b+2,1 is one of Yoshi's strongest launchers, and is only -12. It is important to block punish this, and every other move from KIN as hard as you can.

KIN 1+2 shares an on block situations with fF+4. See above.

KIN 3 is a seeable low that is -16, but has a pretty toxic mixup with KIN u1+2, which fakes the slide into a Dragonfly stance transition. This can be option selected with practice, otherwise you'll be forced to deal with the DGF mixup.

The new move, KIN f1, is reactable, but can be canceled in your face. Just try to react to and block the low.

Kin 4 is zero on block, but can transition to re-enter KIN, making it +3. This forces you to block KIN b+2,1 or KIN 1+2. They can attempt the kick again to try and frustrate you, but unless you're confident in your read, it's not worth ducking.
Dragonfly (DGF)
Dragonfly is a stance with just a small handful of moves, but contains an excellent mixup with tons of option coverage in just two moves.

The Dragonfly mixup is Dragonfly 3+4, a high unblockable. And Dragonfly 4, a counter-hit launching mid that tracks strongly both ways. It is possible to sidewalk Dragonfly 4 to the right, however, it's finicky and unrealistic in a real match. This mixup is very versatile, and can be used against opponents waking up, or even just during a raw transition out in the open. It's Important to try and read the transition and float it, because if you're not giving your opponent a reason to not use the stance, you're going to be seeing it again and again.
Flea (FLE)
Flea is easily Yoshimitsu's most iconic, and goofiest stance, but is limited with the amount of viable moves within it.

The most used attack from Flea is the unblockable jump, which can be avoided with movement and then floated.

FLE d crushes Yoshimitsu's hurtbox into the floor, and is thus capable of evading certain mids. There is also a mixup in this stance, pairing FLE 2 with FLE d~3+4; the FLE d being used to emulate the startup of the headbutt slide. At first, the mixup may seem extremely dangerous, but is discernible with light practice. FLE 2 cannot be float punished like most slides, so you'll have to find something that will quickly hit the grounded squid from the crouch state that is forced when blocking low.

BT Fle has a notoriously huge hitbox and you should test moves that will reliably float it. Moves that extend a hurtbox from your hitbox like weapons or projectiles work perfectly.
Mediation (MED)
Meditation is Yoshimitsu's "come-and-get-me" stance. It passively heals in short bursts with the goal of trying to frighten the opponent into regaining aggression. In this stance, the player has a few moves to dissuade the aggressor from closing the gap, and a weird looking back sway that is used to create whiff opportunities and more distance for the opponent to clear. Each player uses the attacks from the stance very differently, but the most common attack is MED BT d+1, a long range, counter hitting knockdown low that tracks both ways.

The best way to beat this stance is to dash guard right out of range of the frequented attacks. This way, you're challenging the opponent without actually putting yourself at risk. They won't be able to heal if they're constantly cancelling and back swaying, and on a normal stage they're only getting closer and closer to the wall. If they happen to whiff an attack just before your dash guard, you can easily close the remaining distance to begin your offense.
Indian Mediation (IND)
The transition is slow, and getting out of the stance is slow. Every attack within the stance requires the Vacuum Dance animation to play before executing, overall making it an incredibly easy stance to float with a long range mid.

IND f_b executes a raw Vacuum Dance. At a distance, this move does nothing, but when close to the opponent, it teleports the player behind them. This can be used to get a BT launch on over aggressive opponents that were too slow to in floating the stance.

However, after the teleport, there is still a small window where the player can be floated[imgur.com]. If your character has access to a backturned jab, then it's easy to land a float combo, otherwise you'll have to find other methods. When trying to bait this teleport float, you ONLY risk getting hit with IND 4, the only low in the stance, and maybe IND 1 if you don't step in time.
No Sword Stance (NSS)
No sword stance is a unique state where many properties of Yoshimitsu’s move change. Some new moves are added, and others are taken out. All attacks that utilize Yoshi’s main sword suffer a decrease in range and damage, or have been removed. Yoshi loses almost all of
his unblockables, and cannot transition into Dragonfly or Flea as long as this stance is activated. Instead, Yoshimitsu receives a more versatile flash, an i10 wallsplatting natural combo, an unseeable hellsweep from full crouch, and a fast recovering hop used to force a reaction from the opponent.

Though limited, this stance shines in certain matchups, primarily because of the extended flash range and ability to be used from full crouch. Characters that want to play close in your face will have to be weary of an i8 launcher ready to stuff their pressure, or for a non-committal counter-hit jab that will combo them for almost a third of their life. Characters with fast recovering highs like Mishimas or Steve will risk a lot more throwing out their key moves against this stance, hindering their gameplan.
Author's Note
If you have any questions regarding the matchup that wasn’t addressed in this guide, feel free to join the Yoshimitsu Discord[discord.gg] and ask us there. If you’ve enjoyed this style of guide, consider compilng a matchup guide of your own character to make learning just a little bit easier in an already bloated and character rich game. :)

♥♥♥♥ them squids bro
3 Comments
Yuuzou May 17, 2024 @ 5:00am 
We need a T8 version :steamthis:
Arqan Dec 18, 2023 @ 12:44pm 
Calling KIN f1 a seeable low (especially online) is very optimistic.
23 frames with an animation that looks more like a mid than a low would be insanely hard to block on reaction.
However, Yoshi's KIN lows have so much reach they will usually use them at 2-3 range and that could be a tell.
Fubuki Knee Feb 23, 2023 @ 6:56pm 
this is awesome even for me as a Yoshi player to better understand the risks im taking when playing these mind games. which is essentially all he is, just mind games. thanks dude!