Sands of Salzaar

Sands of Salzaar

Not enough ratings
[Modding] How to Replace NPC Character's Portrait
By Xaliber
This guide will help you replacing portraits of NPCs in game to your liking.
   
Award
Favorite
Favorited
Unfavorite
Introduction
So you've been seeing those character portrait replacer mods and want to do it yourself? This guide will help you do that step-by-step. You don't need to have prior experience in modding, though that will help a lot.

Basically what we're doing here is very simple: replace the texture of the characters to something else of our liking. You don't need to code. Your only requirements are:
  • Microsoft Excel (because the data is stored in *.xlsx)
  • Notepad or basic text editor to open and edit XML files
Let's get started.

Setting up a new mod
Creating a new mod
  1. You need to run the game Sands of Salzaar. You will be welcomed to the main title.
  2. Click Game Mods to open the modding page.
  3. Click Develop Mods and you should be taken to the mod development page.
  4. Click New Project. In the option, choose Simple Mod Project for Project Type, because we don't need additional 3D model or what else here. Input your project name and directory, and click Confirm.
    • You can choose any directory and name it anything, but for the sake of best modding practice, you should have a dedicated directory for your mod creation and name your projects with some kind of signifier as the prefix.
    • For example, I use the shorthand of my username, and in this tutorial we will be replacing Yousef's portrait, so it would be xal_portraityousef.


Configuring the mod
  1. We need to setup basic configuration here.
  2. Click Project Configuration
  3. Input the name of your mod, description, and set the tag accordingly. Don't abuse them to make it easier for others to find relevant mods. For this purpose we use Appearance.
    • This information will show up mainly in the mod browser within the game. So make sure to be informative yet also brief, because of the limited space. You can expand information about it on the Steam Workshop page, but we want to be brief here.
  4. Click Save.
  5. Click Build to build to make sure the initial steps go smoothly.


.
Structuring the files
Modifying and deleting unnecessary files
  1. Still on your mod development screen, click Open Project Directory to open the root directory of your mod. Leave this window open as it will be needed throughout the rest of the guide.
  2. Open \Interface\overrides.txt.
  3. In the file, copy-paste this line. This is to make sure the mod replaces the portrait.
    RES\Character\* > :\BuildSource\Character\*
  4. Now go back to the root directory of your mod. Since we only want to replace portrait, we need to delete a bunch of files. So delete these:
    • Excel\C传承.xlsx
    • Excel\J剧情内文字翻译.xlsx
    • Excel\Localization\english\J剧情内文字翻译_hotfix.xlsx
    • Excel\Localization\tchinese\J剧情内文字翻译_hotfix.xlsx
    • valuebundle\INDEX_Source.xml
    • valuebundle\TranslateTask.xlsx
    • valuebundle\TranslateTaskTemplate.xlsx
    Never delete the \Excel\ directory even if there's nothing there. The game needs it.
  5. Open these files, and delete the lines between <root...> and </root>. The result should look something like in the screenshot.
    • valuebundle\default.xml
    • valuebundle\default_english.xml
    • valuebundle\default_tchinese.xml
    • valuebundle\Index.xml
  6. Go back to your mod development screen, click Build.


.
Knowing what to replace
Getting to know the character ID
  1. Minimize your game screen but leave it open.
  2. Go to the directory of your Sands of Salzaar installation.
  3. Navigate to this path ModSamples\Example_ExcelReference\excel\Main\Localization\english
  4. You will see a bunch of Excel files. Find and open this file R人物列表_Roles_Heros_hotfix.xlsx
    • As the name of the file suggests, it's a file that lists configuration of the characters (in the game they're called "roles").
    • You have different files for different type of NPCs. Companions/lords are called "Heros", wrestlers are called "Fighters", etc.
  5. You will find a table with bunch of Chinese and English characters. In the top row of the table you can see what the columns are for. Pay attention to the left-most column. It's the ID of the character, written in Chinese. The column should say 人物ID_CharacterID.
  6. Find the character you're looking for and take note of their ID. For example, Husnu should be 霍驹. Yousef should be 齐肃之.
    • For some reasons, some characters such as Zeynep, Threnody, Omar, and a few others are located in different directory and file. So if you can't find your character:
      • Navigate to \ModSamples\Example_ExcelReference\excel\沙盒\Localization\English
      • Find the file R人物列表_Roles_Quest_hotfix.xlsx


Finding what to replace
  1. Now we need to know what exactly we need to replace. So go upward twice in the directory. Or just go to \ModSamples\Example_ExcelReference\excel\Main
  2. Find this file R人物列表_Roles_Heros.xlsx.
    • You might have noticed that the previous file has "_hotfix" in the name, while this one does not. It's because the "_hotfix" is meant to indicate its English translation. This is the original file.
    • If you're modifying characters such as Zeynep, Threnody, Omar, etc, then it should be in R人物列表_Roles_Quest.xlsx within \ModSamples\Example_ExcelReference\excel\沙盒\ directory
  3. Again, you will find bunch of stuff in this table, but now only written in Chinese. The table also contains more columns, more data. Because it's the original file so it includes many data relevant to the characters.
  4. Now find the character ID you've taken note before. Let's say we want to find Yousef, so we should look for 齐肃之 in the left-most column. Remember, it has to be in the left-most column because the name might be mentioned elsewhere.
  5. In the row where you find 齐肃之 (Yousef), scroll to the right until you find character:qisuzhi. That's the file name for Yousef's portrait.
  6. What you want to do now is to create a file with the name qisuzhi.png to replace Yousef's existing portrait. To do that, let's go to the next section.


.
Face generator portrait [OPTIONAL]
You might have noticed some characters in the Excel files don't have something like character:qisuzhi in their appearance column like Yousef does. Instead, they have a line of codes that might look something like this:
D#1.00,0.57,0.45,0.50,0.45,0.50,0.63,1.00,0.50,0.28,0.50,0.26,0.50,0.50#57,6,12,14,12,20,24,1,8,0#24
That means the character does not use hand-drawn portraits. Instead, they utilize the game's face generator tool (which you can also access in the mod development screen). Saqie (独孤霜) is one such character.

If you want to change the appearance of such character, let's go through this section.
Otherwise, you can skip this section and go straight to the next.

Add the Excel files: Part 1
  1. Go back to your game directory and go to \ModSamples\Example_ExcelReference\excel\Main. Let's keep this window separate because we need to return to this soon.
  2. Find again the file R人物列表_Roles_Heros.xlsx (where we found the ID for Yousef)
  3. Copy the file, go to your mod directory, and paste it to \Excel\Localization\english\.
  4. Append _hotfix to the filename.
    • The name now should be R人物列表_Roles_Heros_hotfix.xlsx
  5. Open the Excel file.
    • Let's say we want to replace Saqie, so find her character ID. In this case, it's 独孤霜.
    • Delete all rows and columns, except:
      • The first row of the table and the row Saqie belongs to.
      • The first column of the table and the column 人物形象_Illustration.
    • Your table now should look something like this:
      人物ID_CharacterID
      人物形象_Illustration
      独孤霜
      D#1.00,0.57,0.45,0.50,0.45,0.50,0.63,...
    • Duplicate the 人物形象_Illustration column, so you have two same columns side by side.
    • In the left 人物形象_Illustration column, append (Origin) to the name, so it should be renamed as 人物形象_Illustration(Origin)
    • In the right most column, replace the face generator code with something like character:xal_saqie.
      • Again, you can name it anything, but for the sake of best practices, better to always prefixes them with your name or mod code.
    • Your table should look something like in the screenshot.
  6. After all is done, copy the R人物列表_Roles_Heros_hotfix.xlsx file from \Excel\Localization\english\ and paste it to \Excel\Localization\tchinese\. So you have the files for both Localization directory.


Add the Excel files: Part 2
  1. Now we're back to \ModSamples\Example_ExcelReference\excel\Main again.
  2. Find a file called R人物立绘信息_CharacterDrawing.xlsx.
  3. Copy the file, go to your mod directory, and paste it inside \Excel\.
  4. Open the Excel file.
    • You will find a few columns and a bunch of rows.
    • Delete everything except the first and second row.
    • Rename unknown_man to xal_saqie.
    • Rename Mini/unknown_man_mini to Mini/xal_saqie_mini.


Register files to your mod
  1. Now go back to the root directory of your mod.
  2. Navigate to and open \valuebundle\ directory. We need to modify these files:
    • default_english.xml
      Between <root...> and </root>, add this line:
      <include file="Localization/english/R人物列表_Roles_Heros_hotfix.xlsx"/>
    • default_chinese.xml
      Between <root...> and </root>, add this line (notice it says tchinese, not english):
      <include file="Localization/tchinese/R人物列表_Roles_Heros_hotfix.xlsx"/>
    • default.xml
      Between <root...> and </root>, add this line:
      <include file="R人物立绘信息_CharacterDrawing.xlsx" />
    • index.xml
      Between <root...> and </root>, add these lines:
      <convert reg="character_new.xml" from="R人物立绘信息_CharacterDrawing.xlsx" /> <convert reg="role_template_pojo_new.xml" from="Localization/english/R人物列表_Roles_Heros_hotfix.xlsx" /> <convert reg="role_template_pojo_new.xml" from="Localization/tchinese/R人物列表_Roles_Heros_hotfix.xlsx" />
  3. Return to your mod development screen and click Build.
  4. Those edits should make the game recognize that you're adding new Excel files.

.
Adding the portrait files
Replacing the character portrait
  1. Let's go back to the root folder of your mod directory.
  2. Navigate to \RES\. Create a new directory called \Character\.
  3. Now save your new Yousef portrait there as qisuzhi.png. Make sure the background is transparent. For the dimension I use 930x1054px.
  4. Create a new directory there called \Mini\
  5. Inside \Mini\ you need a file called qisuzhi_mini.png for Yousef's mini portrait.
  6. So crop your new Yousef portrait to fit his mini portrait. For the dimension I use 450x450px.
  7. OPTIONAL (1) If you took the steps to modify characters with face generator portraits, you should repeat these steps for that character (Saqie).
    • Save your new Saqie portrait in the directory \Character\ with the name xal_saqie.png.
    • Do the same with her mini-portrait in the \Character\Mini directory with the name xal_saqie_mini.png.
  8. OPTIONAL (2) If you want your mod users to be able to change the portrait to something else (by replacing the file with their own file), do this:
    • Go to your RES\Character\ directory
    • Right click, choose New, choose Text Document
    • Name it as _HS_NEW_AB.txt
    • Your user should be able to replace the portrait with their own when they navigate to steamapps\workshop\content\1094520\<your mod ID>\RES\Character
  9. For reference, you could use my example: https://drive.google.com/file/d/1Pp477htzLo83SyNxxTiKomCa9mHX_Foh/view?usp=sharing
  10. Return to your mod development screen and click Build

.
Wrapping up
Testing and going through trial and error
  1. Don't forget to enable your mod:
    • Navigate back to Salzaar title screen, go to Game Mods
    • Click Manage Mods
    • Find your mod there and check the button.
  2. Test the mod in game. Adjust the placement accordingly through trial and error. Make sure you click Build each time you change the image.
  3. Don't forget to change the thumbnail for your mod. To do that:
    • In the mod development screen, click Upload to Workshop. Click Yes when easked to build.
    • Click the image in the Preview row. Upload a more fitting image.
    • You don't have to upload your mod to workshop after updating the thumbnail. You can close the screen afterwards.


.
Afterword
Liked my guide?
Feel free to donate me a snack through:
Ko-Fi[ko-fi.com] | Buymeacofee[www.buymeacoffee.com] | Trakteer[trakteer.id] | Saweria[saweria.co]

Check out my mods in Workshop:

.
11 Comments
Sukomi Feb 12, 2024 @ 6:27am 
I was attempting to follow along with this guide and it seemed to be going well, in the mod menu my changed portraits were showing up in the portrait viewer like they should. However, in the game all character portraits I replaced showed up as white boxes, Any ideas what might cause that?
ReMeDy Aug 25, 2022 @ 12:29am 
Thanks, nailed it on my first try.

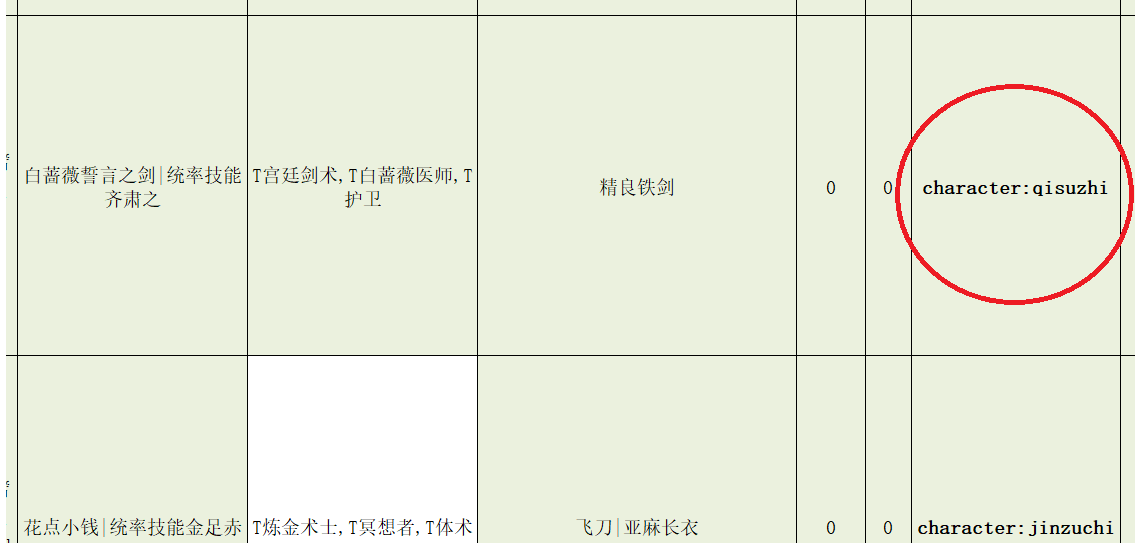
One question I have: I noticed "The Nameless" has no portrait. The cell is literally blank in the spreadsheet in ModSamples\Example_ExcelReference\excel\MainJ剧本设定_StoryMode

This is despite the fact in the character creation screen, there is very clearly a black silhouette. Can I get away with just typing my own name field into the empty cell and match my newly created name with my custom image?
Oni K. Ino Jan 22, 2022 @ 9:58am 
Yeah figured it out by trial and error earlier lol. Thanks for the reply ^^ :steamthumbsup:
Xaliber  [author] Jan 22, 2022 @ 9:00am 
@Oni K. Ino:
Whoops. Completely missed that. Yes, you're correct. Thank you for asking! I've fixed that typo.
Oni K. Ino Jan 22, 2022 @ 2:18am 
In step 6 of the Excel part which is: After all is done, copy the R人物列表_Roles_Heros.xlsx file from \Excel\Localization\english\ and paste it to \Excel\Localization\tchinese\. So you have the files for both Localization directory.

By R人物列表_Roles_Heros.xlsx , do you mean the R人物列表_Roles_Heros_hotfix.xlsx that we renamed/created?
Xaliber  [author] Jan 12, 2022 @ 12:14am 
@Bookf of Dead Giants:
It's not too difficult actually; just trying to be as detailed as possible. Let me know if you encountered any issues or how the guide can be improved!
Book of Dead Giants Jan 6, 2022 @ 8:25am 
Wow, very complex. Great guide Xaliber :goldpile::goldpile::paperheart::paperheart:
Xaliber  [author] Jan 3, 2022 @ 2:12am 
Have fun!
Remis Jan 3, 2022 @ 12:33am 
Yes, that worked. Thank you for your help and the nice guide
Xaliber  [author] Jan 2, 2022 @ 9:47pm 
@Remis:
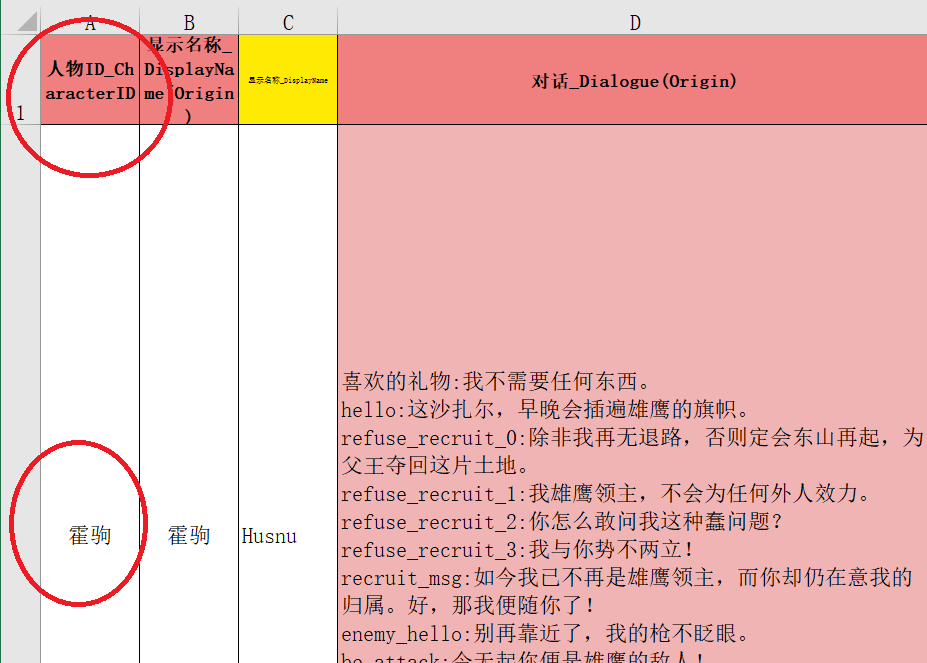
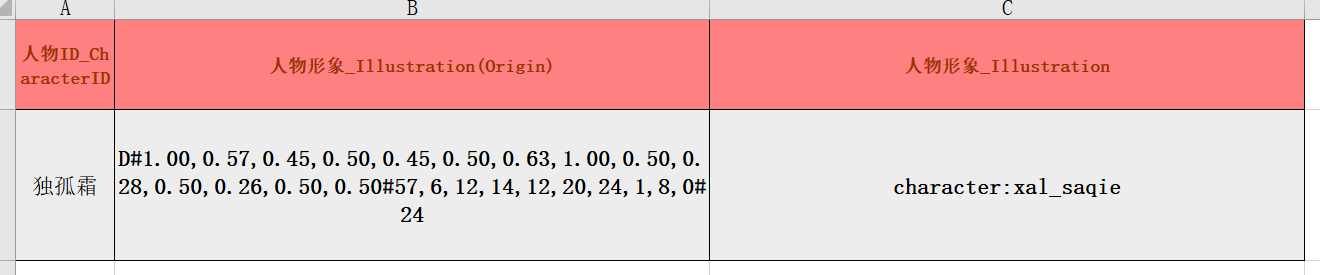
Good catch. For some reasons, Zeynep is located in R人物列表_Roles_Quest_hotfix.xlsx. They are within this directory: \Steam\steamapps\common\DesertLegend\ModSamples\Example_ExcelReference\excel\沙盒\

You can also find Nassant, Leena, Halcyon, Dahlia, Threnody, Omar, Tasha, Badis, Laik, Rabia, Ishtar, Yaksha, and the Ifrist guys there.

Zeynep's ID is 阿绫.