ΔV: Rings of Saturn

ΔV: Rings of Saturn

355 ratings
How to do things and make money! (As of 04/04/2024)
By Hexxitfan11
A guide consisting of my experiences in the game and some tips and things I've learned from those experiences that aren't covered in the other guides. This guide assumes you already know how to fly around, upgrade your ship, and shoot ringroids.

I've just returned to playing the game after quite some time, and oh boy, there's some new stuff! Stand by for updates as I learn more!
10
5
3
20
3
5
3
4
   
Award
Favorite
Favorited
Unfavorite
Introduction
Howdy fellow miners!


I quite enjoy playing this game, it's excellent for a relaxing night in. There is also a lot to it that doesn't seem to have much explanation. While I certainly don't claim to know everything about ΔV: Rings of Saturn, I've picked up a few things on my way so far.

I noticed that there don't really seem to be many guides posted for anything other than basics (what are minerals, how do I fly, etc.) so I decided to sit down and try to put one together. This guide is focused primarily on getting out of the early game and making some real money!

This guide will:
  • Share my thought processes, builds, and opinions for/on ship upgrades and efficient mining/selling
  • Teach you about how to use the market and how to make bank
  • Cure cancer
  • Share all useful information I have that I don't consider "basics" pertaining to the game

This guide will not:
  • Teach you how to fly
  • Teach you how to hire crew
  • Teach you what the resources are
  • Make you space coffee

    There are some minor gameplay/exploration spoilers (what kinds of things you can find in the ring, mainly), so if you want to go in fully blind then obviously don't read this.

    Happy diving!
    -Hexxitfan11
Upgrade Choice for Your Starting Ship
In order to start realizing your full potential, there's a few things you're going to need to know. I have found a system that works pretty well for me and makes collecting large amounts of resources relatively easy.

K37-TNTRL and You: What to do with your starting craft
ΔV has a lot of different upgrades in it. But which ones are actually useful? which are most useful?

Before you can ditch your K37-TNTRL, you'll have to make a fair amount of money. Here are the upgrades I would recommend:

Cargo Bay
  • Cargo Bay Baffles
    This upgrade installs a set of one-way doors in your cargo bay that only bend inward, meaning once something is in your bay it cannot go back out. The baffles will reduce your bay's holding capacity by about 5-7 resource chunks, as they take up physical space within it. If you find yourself commonly decelerating with the bay doors open, spinning at high speeds, crashing, or engaging in other activities which eject your harvest, you might like this upgrade. It is, however, optional. You will eventually need your bay space for a mineral processing unit anyways, so don't get too used to it.

  • Rustom-Antonoff MPU
    This will sadly replace the baffles, but trust me, it's worth it. This allows you to begin smelting your minerals into a refined form, and also turns the water into free fuel! This opens the door to the best way I've discovered to make money.

  • Nakamura MPU
    Just a faster and more efficient version of the cheaper MPU. Note that it does use more power so upgrade accordingly.

High-Stress Hardpoint
  • AR-1500 Manipulator
    "Why would I want a big robotic arm?" you may ask. Well, this allows you to raise money much more quickly than anything else available to you this early in the game. While the manipulator will grab resource chunks and throw them directly into your cargo bay, it can also be used to salvage derelict ships.

    The arm can only hold one resource piece at a time, but it's much better than nothing. When you press the enter or middle mouse button to open your cargo bay, the arm will automatically move the mineral piece inside.

Left/Right Low-Stress Hardpoint
These are interchangeable so what goes on which is up to your preference.
  • 1 Mining Laser (ML) / Microwave Generator (MWG) of any kind (not the point defence one though).
    These tend to do a better job of splitting asteroids without sending them flying away. If you really want to keep the ore bits from going flying away, make sure you adjust the pulse frequency/water resonance all the way right in the Tuning menu. They are pricey so it may take a while to unlock one, but it is worth it. Lasers and MWGs also have the advantage of not requiring ammunition, just make sure your power generation/storage can handle at least 30s of sustained fire.

  • NT Mining Companion
    This is a little autonomous drone that you can launch from your ship. It will fly around, mine a few resources, and then take them back to Enceladus Station to sell. It doesn't have much storage, but it is autonomous and can be filtered for resource type and minimum cost in the Geologist tab (accessed by pressing J by default during a ring dive). Good if you have the money and nothing else to put in your second hardpoint.

  • THI Cargo Container / THI Monocargo Container
    Don't bother buying these until you have an MPU to refine minerals. Without the MPU it is useless.
    The K37-TNTRL has the lowest processed material cargo space of any of the ships at only 7000 kg per resource. The cargo container adds an additional 15000 kg space for each resource, or 90000 kg of a single resource in the case of the monocargo container. This will let you stay in the field much longer before you fill up. Do note that the container will offset your ship's center of mass (more disruption the more it fills up), so it may make maneuvering more difficult and less fuel efficient. Additionally, the cradle arm can be used to carry back a lifepod or other recoverable once the container has been dispatched.

  • MPI Tug Drones
    These handy little fellows are an expensive upgrade, but very helpful. The tug drones will fly at resource chunks and bring them to a stop (relative to space, not your ship). This makes it much easier to collect resource chunks, especially with the manipulator arm. Make sure you also purchase a nanodrone storage if you buy drones, otherwise you won't be able to use them.

  • MLF Haul Drones
    This is the optimal mining assistance upgrade. These drones are like the tugs, but better. Instead of bringing chunks to a halt, they move them to the front of your ship and shove them in a straight line towards the cargo bay. This is the absolute least effort you will ever be able to put into mining.

Recon Drone
  • Microseismic Drone
    This essentially lets you see what resources are inside a rock and in what proportions before you break it open. You can do this by holding the mouse over the rock and looking in the bottom left of your HUD next to the cargo bay. A rock will generally make chunks of the element with the highest concentration, though it seems to be somewhat random.

These are all of the upgrades that can be of use to you in your K37-TNTRL. The endpoint of your time in the starting ship should look something like this loadout*:
  • High-Stress Hardpoint: AR-1500 Manipulator Arm
  • Left Low-Stress Hardpoint: THI Cargo Container/THI Monocargo Container OR MLF Haul Drones
  • Right Low-Stress Hardpoint: CL-150 Mining Laser
  • Kinetic Ammunition: Seal for Projectile Magazine
  • Disposable Nanodrones: (if using the MLF Haul Drones) Basic Nanodrone Storage
  • Cargo Bay: Nakamura MPU
  • Recon Drone: Microseismic Drone

*anything not listed here, use whatever you like. Just make sure you have enough power generation to fire your mining laser AND refine 2-3 chunks at the same time, or you will become annoyed very quickly.
Making Money with Your Starting Ship
More than likely, you've been making money so far by mining resources, bringing the chunks back to Enceladus Station, and then clicking the "Sell All" button. If you've got an MPU, you may have refined materials to increase your storage and then sold them.

This is all well and good, but what if I told you there are better ways?

Stonks
It's time to talk about the Mineral Market!

An annotated screenshot of the market

Key Points:
In the market, there are a few things of note:
  • Minerals
  • Sell Bars
  • High and Low Points
  • Current Price

The market will show you the price fluctuations of each resource over a 2 year period, with Jan 1st of year 1 on the far left, and Dec 31st of year 2 on the far right. The current price of each material is the farthest right dot on each graph (they should form a straight line going down). Each material may also have a high point and a low point if one has been reached in this time frame, as well as a short projected value to the right of the current price.

You can use this information to help you in two ways:
  • Instead of pressing the "sell all" button, press the "To Storage" button. This will store your resources and allow you to access them via the market tab. Only sell resources that have a high relative value, and hold on to low value ones while you wait for their relative values to increase.

  • You can also note which resources are the most valuable, and prioritize those over the less valuable ones in the field. As a general rule, beryllium is always the most expensive and water is always the least expensive followed by iron. The other four resources will fluctuate based on their market values.


Ok, that helps, but it's still slow. Surely you can make money faster?
Yes, it is slow, and yes, you can through two different methods, though they both rely on some RNG.
Let me introduce you to the real money!

Supplying habitats

This guy!
This is an Obonto habitat. You may have come across them before. If you approached them, you probably got a message requesting a specific resource, like you can see in the picture. Let's take a look at two different Obonto trade prices, both for Palladium and both in the same run:

This one is offering a premium price

This one is not

Holy ####! That Obonto is offering a whopping $12,000 per ton of Palladium! That's about 5.5 times what the Enceladus Mineral Market is paying, by the way. Even the non-premium price is still close to double that of the market!

So, to make money quick with this method, you'll want to find as many Obontos as you can and hop between them until one offers premium on a resource you have mined a lot of. Then you can make bank! The best way to locate them seems to be asking other miners about trade opportunities.

If you want some calculations, see below. If you don't want to see math, scroll past to the next header.

As an astute ring miner, you may have noticed that the mineral processing units are not 100% efficient. You may also be inquiring whether it is really worth it to sell 40% efficiency processed palladium (if you have the cheapest MPU) for the premium price. In short, YES, IT IS! It may not, however, be worth selling at the normal Obonto price.

Calculations:
Premium Obonto Price
2000kg Pd chunk x 40% efficiency = 800kg of processed Pd
~$12,000 per 1000 kg of Pd = 12,000 x 0.8 = $9600

Mineral Market Price
Unrefined:
2000kg Pd chunk + ~1000kg of H2O = (2 x ~2500) + (1 x $100) = $5100
Refined:
2000kg Pd chunk at 40% efficiency = 800kg of processed Pd
~$2500 per 1000 kg of Pd = 2500 x 0.8 = $2000

Normal Obonto Price
2000kg Pd chunk x 40% efficiency = 800kg of processed Pd
~$4900 per 1000 kg of Pd = 4900 x 0.8 = $3920

In short, if (and only if) you have the 40% or 50% efficient MPU, it is ALWAYS worth selling at a premium price, and if you've already refined the chunk, always worth selling at the normal Obonto price. However, if you have not refined the chunk, you will make more money selling to Enceladus.

If you have the 70% or 90% efficiency MPU however, it is always worth selling to the Obontos, period.

Great, I'm gonna go get rich!
Not so fast, buckaroo. What if I told you there's an even better way? One that can net you in excess of $700,000 in a single run if you're lucky?
Well...


Let's zoom in on the right side of the Obonto:

Well, well, well... what have we here?
The rocks next to this Obonto contain Palladium? The same resource the Obonto is paying $12K per ton for? Well, I think you can see where this is going.

If you get a lucky RNG roll, Obonto habitats can ask a premium price for a resource that is right next to them. This means you can spend all of your fuel collecting, refining, and selling those resources to one station, and make a #### ton of money doing so!

Here is a simplified flowchart representation of the process for this entire page:


Salvaging
On the other hand, you can also earn a lot of money (upwards of $1,000,000 or more if you are lucky) without mining anything! As long as you have an AR-1500 Manipulator Arm, you can grab onto a derelict ship and fly it back to Enceladus, where it becomes yours forever. You can then sell this ship like any other in the dealer tab, generally netting at least $400,000 in one fell swoop!

To help out with this, always investigate Big Lidar Contact and Radar Anomaly Points-of-Interest when they pop up, as they have a chance of being derelict ships. I would also get in the habit of checking the Pilot tab of the inventory, as derelict ships will show up from pretty far away. You'll be able to tell they are derelict due to the hail button reading "Hail Error". Getting one or two good salvages in the first few hours can really catapult you into the midgame, and it's always worth carrying the AR-1500 Manipulator Arm on your K37-TNTRL just in case you come across one.

If you fly close to a derelict, you may be offered a prompt to send a crew member over to attempt to fly the ship back to Enceladus. This is unreliable as derelict ships are usually derelict for a reason. Generally you will be better off bringing the AR-1500 Manipulator Arm and towing it, but if you do not have one then it's always worth a try.

In Summary
So, these are currently the best strategies I have to make money with your starting ship. Mining can be improved upon with some of the later ships, but maximizing mining performance often sacrifices the ability to reliably salvage.
Expanding Your Mineral Mining Horizons
Now that you're on the way to wealth, it's time to talk about upsizing. While the K37-TNTRL may have some sentimental value by now, ΔV has several other ships that will increase your mining and refining efficiency!

Mainly, we're talking about the Eagle Prospector:


And the Cothon-212:


BEFORE YOU UPGRADE, MAKE SURE YOU HAVE ENOUGH MONEY TO BUY THE SHIP AND A MPU, OR YOU WILL BE LESS EFFICIENT THAN YOU WERE IN THE OLD SHIP
This happened to me, it was annoying.

Now, one of the first things you'll notice about both of these ships is that they have 4 hardpoints, not three. This makes a big difference!

Something you might not notice is the innate cargo capacity of each ship, both significantly higher than the K37-TNTRL.
Eagle Prospector: 14,000 kg/resource
Cothon-212: 27,000 kg/resource

Having this extra storage lets you ditch the cargo container and replace it with a second MLF Haul Drone dispenser, and the extra mount point allows for a third. Three MLF Haul Drones allow your ship to easily corral large groups of resource chunks and funnel them into your hungry MPU!

You will also want to pick up the Military Nanodrone storage so you can run for as long as possible, as well as the Mitsudaya-Starbus MSU for that sweet, sweet 90% refining efficiency.

Okay, so which ship is better then?
That's a hard question to answer, they both have upsides and downsides.

Eagle Prospector:
Pros:
  • Rectangular Cargo Bay - It is way easier to put things in this cargo bay compared to the K37-TNTRL and Cothon-212. Trust me, it's so much nicer.
  • Asteroid Grinder - Grinds up the smallest size of ringroid, can be used to ram the small ones without damage.
  • 5 Crew Seats - Bring lots of friends
  • Good maneuverability
Con:
  • 14,000 kg/resource cargo space - Good, but only about half of the Cothon-212's.
  • Relatively fragile

Cothon-212:
Pros:
  • Big chungus (27,000 kg/resource cargo space)
  • Really ###### durable for some reason (I have rammed many rocks at relatively high speed with no damage)
  • Very large cargo hold (can fit ~30 chunks)
  • EMP Resistance
Cons:
  • Big chungus (Heavy and slow)
  • Poor Maneuverability
  • Weird-shaped cargo hold (same style as K37-TNTRL, just larger)
  • Only 3 crew capacity

I've played extensively with both ships, and I've learned I'm more partial to the Cothon-212. Either will do, though.

As of the 0.494.3 Digital Facelift update there are now some variations of each of the base ship types. So far, I have only seen variants of K37-TNTRL and Cothon-212. The variants appear to differ in things like engine mounts (the Cothon-213 has three), but not the main utility hardpoints. I have yet to see all of the variants so I may be mistaken or unaware about some of their features. This section will be updated in a few days once I have some more information. If you know more details about the variants please share them in the comments! This doesn't affect this guide majorly, just a side note.

Once you have your 90% efficient MPU, 3 MLF Haul Drones, and extra cargo space, you're set! Pretty much, you can just keep doing the Premium Obonto Price strategy but with more efficiency since you can hold much more cargo and refine much faster.

Eventually, if this is your preferred strategy, you can upgrade to one of the Antonoff-Titan K225 variants and push the gains to the max!
Alternative Income Sources
Salvaging

Salvaging is the process of finding a derelict (abandoned) ship and returning it to Enceladus station. It is a lucrative though unreliable way to make money. There are two ways to salvage derelict ships: Send a pilot crew member over to fly the ship back, or grab the ship with the AR-1500 Manipulator Arm and fly back to Enceladus with it. If using the first option, note that some ships will have inoperable reactors which means you cannot fly them back with a crew member. You will know this is the case if you get a dialog along the lines of "The reactor's cold" or "The reactor's cracked" upon approaching a derelict. Reactor-dead ships can only be salvaged with the AR-1500.

Always investigate Big Lidar Contact or Radar Anomaly locations as these can occasionally be derelict ships. Additionally, derelict ships will show a "Hail Error" on their contact in the Pilot tab of the in-flight ship menu. If you have the ability to salvage, make sure you check this from time to time.

Pros:
  • You get the ship. It is added to your owned ships on Enceladus
  • Salvaged ships usually sell for at least $400,000, often more

Cons:
  • Requires a pilot/AR-1500 Manipulator Arm. For guaranteed salvaging, you would have to use the Elon Model E or the K37-TNTRL as these can mount the AR-1500.
  • Derelicts are sparse. It took me about 4 hours of flying to find one derelict while writing this guide.

My recommendation: Salvage if you get the opportunity, but don't try to use it as your main source of income unless there is a better way to find derelict ships that I don't know about. (That is, better than randomly finding them or asking one of the tug ships for a location, as both rely on infrequent random chance.) I tend to generate money more efficiently using the strategy outlined in the earlier pages.

-Thanks to Jon, Veraghin, and sG | Anarchy for the tips and info about salvaging!

Uranium Mining

In addition to the seven common minerals you will mine most of the time, there is another you can pick up for a fair sum of cash: uranium, in the form of torbernite. In order to harvest this resource, you will need to discover the Uranium Caves location. The caves are located inside a large moonlet with a distinct purple glimmer in the middle.

The Uranium Caves moonlet.

The faint purple glimmer at the center.

Occasionally, you will get a tip from other mining craft or one of your crewmembers about "surveying a massive rock" and then a location you can travel to. This has a chance of being the Uranium Caves and is the easiest way to find it. You can also stumble across the location randomly.

To actually get to the uranium, you'll need to fly around the outside of the rock until your ship's lights illuminate a passage. Inside that passage you will find the uranium.

The actual uranium cave!

Approximately 6 - 14 crystals spawn in the cave per dive. You are looking for the tiny pinkish purple slivers, like the image below but less magnified. Each crystal is worth $10,000. They cannot be refined in a MPU.


Use extreme caution inside the caves, as the crystals are very volatile. If you shoot them or collide with them too violently, the crystals will detonate and damage your ship. I recommend using the AR-1500 Manipulator Arm to mine uranium, as the crystals are very difficult to see and often spawn against one of the walls.

Overall recommendation: If you don't feel like mining resources normally, outfit a ship with the AR-1500 Manipulator Arm and hit the caves repeatedly, or swing by for some extra cash at the end of a dive. You can make a decent amount of money this way with lucky crystal spawns.

Bounty Hunting
This is probably the least effective way to make money out of everything in this guide, but it is also one of the most fun. You've probably seen pirates (hostile ships with no transponders) out and about in the rings, maybe even exchanged volleys with them. If you successfully kill a pirate ship, however, you can actually return its lifepod to Enceladus for a neat $100,000 bounty.

I have not tried this myself yet, but according to CyberShadow in the comments you can salvage pirate ships if you have disabled them (which honestly makes perfect sense when you think about it). This would likely yield much more than $100,000 if you can manage it, though you would need to carry an AR-1500 Manipulator Arm into combat. You would also need to avoid blowing the ship up.

Overall, bounty hunting has the least efficient return for the following reasons:
  • Pirates are somewhat uncommon (in my experience at least)
  • Pirates tend to shoot at you and damage your ship
  • High-speed pursuits result in a higher likelihood of ringroid collisions

My recommendation: Bounty hunting is high risk for comparatively little reward. You're probably better off choosing any other method if you want to make money. Get in one bad fight and you likely won't break even on the repair costs.

Should you choose to pursue this route anyhow, you'll want to make sure you're packing a MWG Microwave Generator to disable your targets. This often prevents them from firing back or taking evasive action, and will greatly reduce the inherent danger. Similarly, keeping your target disabled makes it very likely they will eventually crash into a ringroid, helping to stack up damage on them.
K37-TNTRL and Variants
There are a lot more ships in the game now then when this guide was originally made, and they all have different variants too! In these next few sections, I will list each of them and my opinions as to their usefulness!

K37-TNTRL and Variants:
Variant:
K37-TNTRL
KX37-TNTRL
KR37-TNTRL
K44-TNTRL
KTA24-TNTRL
High-Stress:
1
1
1
0
1
Low-Stress:
2
2
2
4
2
Crew:
4
4
6
4
4
Cargo Storage:
7,000 kg
10,000 kg
4,000 kg
14,000 kg
3,000 kg
Bay Size:
96 m^3
110 m^3
78 m^3
122 m^3
58 m^3
Other:
N/A
N/A
EMP Shielding
N/A
Angled Thrust Layout
The starting ship and variants, the K37-TNTRL remains a great option for all-around use.

The KX37 or K40 variants are good early-game sidegrades for mining while you're gathering up money still, as their extended cargo bays and capacities allow you to pull in more ore each run. It should be noted that the K44 does not have the ability to mount an AR-1500 Manipulator Arm, but gains an extra low-stress hardpoint. This makes it function as a sort of miniature Cothon-212.

It also seems that the Prototype K44 can only be acquired through a salvage event, as I have yet to see one available for purchase.

The KR37 variant is useful as a combat ship due to its EMP shielding, as many foes employ microwave weapons.
Eagle Prospector and Variants
Now, let's take a look at the Eagle Prospector:
Variant:
Eagle
Vulture
Peacock
Pelican
High-Stress:
0
1
0
0
Low-Stress:
2
2
2
2
Drone:
2
0
2
2
Crew:
6
6
4
6
Cargo Storage:
14,000 kg
14,000 kg
14,000 kg
14,000 kg
Bay Size:
125 m^3
90 m^3
125 m^3
240 m^3
Honestly, I'm not much a fan of this line of ships. They have their uses as a more durable mining ship, but they simply don't offer enough benefit over the K37 line to warrant their price tag, unless you're looking to build a racing ship out of a Vulture variant.
Cothon-212 and Variants:
Variant:
Cothon-212
Cothon-211
Cothon-213
Cothon-217
High-Stress:
0
0
0
0
Low-Stress:
4
4
4
4
Crew:
3
3
3
3
Cargo Storage:
27,000 kg
27,000 kg
27,000 kg
108,000 kg (combined)
Bay Size:
260 m^3
260 m^3
270 m^3
260 m^3
Other:
EMP Shielding
3 Engines, No EMP Shielding
EMP Shielding
EMP Shielding
The standard Cothon-212 and the 217 and 211 variants are excellent midgame ships. They have a sizable processed cargo storage, sizable cargo bay, good durability, and 4 low-stress hardpoints. This supports a setup along the lines of:
1 Mining Laser (Any)
2 MLF Haul Drones
1 THI Cargo / Monocargo Container
This is a great autonomous mining setup, with the added bonus of the cargo container cradle providing a small arm for carrying a lifepod or other retrievable once the container is dispatched.

The 213 has potential as a racing ship due to the sheer number of engines you can stick on it, but otherwise is difficult to recommend as a variant over the benefits of the 217 and 211.
Antonoff-Titan K225 and Variants
Variant:
K225
K225-BB
Low-Stress:
2
2
Docking Bays:
6
2
Crew:
12
12
Cargo Storage:
7,000 kg
7,000 kg
Bay Size:
280 m^3
710 m^3
Other:
N/A
N/A
The ultimate endgame mining hauler. I love this ship! It's durable, and has effectively 8 hardpoints for mining purposes! The BB variant sacrifices 4 of those in exchange for approximately triple the internal cargo bay size, making a no-MPU build quite viable.

The base model K225 has the potential to mount 2 low-stress weapons and 6 point defenses of your choice, giving it a rather ridiculous amount of potential firepower. I have yet to use one in this role, but given the K225's general durability I expect it will perform quite well!
Other Ships
Here I will list the other few ships that do not have multiple variants as of the time of writing:

OCP-209:
Variant:
OCP-209
High-Stress:
2
Low-Stress:
2
Crew:
8
Cargo Storage:
50,000 kg (combined)
Bay Size:
610 m^3
Other:
Can Fit Large Objects
The OCP-209 is a strange one. It has a cylindrical cargo bay that the rest of the ship rotates around, and will change it's forward axis 90° when the cargo bay is open. This is the only ship to possess 2 High-Stress Hardpoints, which allows for some interesting builds. Potentially, you could mount 2 AR-1500 Manipulator Arms and salvage two ships in a run, though this would require you to find a derelict, grab it, and find a second one while dragging the first one around still.

More relevant I feel are the combat options: Two high-stress hardpoints means you could mount, say, two of the Tetsuo HMX-2000I Mass Drivers, which spit out a frankly ridiculous amount of iron per second. You could also mount two NANIs, which would be rather comical! I don't think I would recommend this as a general mining ship, but as a combat or salvage ship it works quite well.


Elon Interstellar Model-E:
Variant:
Model-E
High-Stress:
1
Low-Stress:
2
Crew:
5
Cargo Storage:
11,000 kg (combined)
Bay Size:
140 m^3
Other:
Can Fit Large Objects

The Model-E is for all intents and purposes a more fuel-efficient K37-TNTRL that is ludicrously more expensive. This is a good flex ship for when you have nothing else to spend your money on, but doesn't offer any real practical benefit over any of the other ships in the game.

ND-LIS Kitsune:
Variant:
ND-LIS
Low-Stress:
1
Crew:
3
Cargo Storage:
18,000 kg (combined)
Bay Size:
40-75 m^3 (variable)
Other:
N/A
I do not understand what purpose the ND-LIS Kitsune is intended to serve. With a single hardpoint and the smallest cargo bay and processed material storage on the list, this ship does not seem capable of an efficient time-to-profit ratio. Perhaps there are things I do not know about, but this ship seems rather superfluous.
Other Miscellaneous Tips and Tricks
Well, the body of my economic knowledge now lives in the previous sections. In here I'm going to just include a consolidated list of tips and tricks that I've found. I will try to remember to update this guide as I discover more about the game!

Tips, Info, and Tricks
  • It is worth it to hire crew! You for sure want at least an Astrogator and a Geologist, but all of the roles are useful. Additionally, some crew members can have unique interactions with certain points of interest or ships (i.e. My pilot sometimes gets a 90% discount on reaction mass from the Phage-class stations).

  • When passing time on Enceladus through the options in the Services menu, your crew will use that time to educate themselves and increase their effectiveness. Be careful not to spend so long fastforwarding that you lose all of your discovered locations though!
    -credit to Paulseoul for the tip!

  • If you run out of propellant and become stranded, Search and Rescue lets you keep your haul.

  • Your thruster exhaust will damage ringroids, so if there's an unavoidable impact, slamming the throttle in the direction of the ringroid just might save you. Additionally, you can use this to mine if you don't want to mount a weapon on one of your hardpoints, or you run out of ammunition.

  • If the relative velocity is high enough, ore nuggets can actually damage your ship! Granted you have to be moving very quick (close to the 200 m/s cap) for this to occur, but be warned!

    [EDIT] 4/4/2024 It seems that this now occurs much more frequently than when this guide was originally written. Beware of taking ore nuggets at speed, and try to angle so they don't hit your thrusters/mounts if a high-speed impact is unavoidable.

  • Under the tuning section on Enceladus, you can configure MLF Haul & Tug Drones to have a minimum and maximum range. Additionally, you can adjust parameters of many other systems to your taste as well!

  • When using the THI Cargo Container, you can use the small manipulator arm after releasing the cargo container. The arm can hold small objects like a lifepod or resource chunk.
    -Thanks to Glaziola for the tip!

  • If you have a bunch of minerals to refine, you can dock with an Obonto and hijack its rotational velocity for yourself. Being spun around the Obonto will cause centrifugal force to push all of your minerals to the back of your ship, into the MPU. This way you can refine without wasting as much fuel. Depending on your cargo bay shape and MPU shape, you may need to spin occasionally with Q and E to help shake loose any jams.

  • If you are full on a resource and don't want to waste any more of it in your cargo hold by processing it, you can shut off your MPU in the maintenance tab.

  • While on a dive, if you press J and go to the geologist tab (assuming you have a geologist), you can set each MLF Haul Drone dispenser as well as the AR-1500 Manipulator Arm to a specific combination of minerals and minimum value. This is helpful for if you only want to mine a single type of resource or a specific set.

  • The Cothon-212 can faceplant into rocks at low-to-moderate speeds and sustain no damage.

  • If you manage to align your ship correctly so it flies into the docking arm of an Obonto habitat as you are initiating fast travel, the current selling mineral of that Obonto habitat will "stick", allowing you to remotely sell that mineral from anywhere for whatever price the habitat was offering. This is definitely a bug, and it is hard to trigger intentionally, but I have managed it accidentally several times.

    [EDIT] 12/24/2021 I haven't had this occur in a while while playing, so I'm not sure if this bug is still present in the game.


    [EDIT] 05/16/2022 I have received confirmation that this was in fact a bug and has been removed from the game.

  • The Phage-class stations sell fuel (called reaction mass or remass in-game), so if you are having a particularly good run and need to refuel you can dock with them. Some crew members can also get a 90% employee discount some of the time at said Phage-class station, so look around for one of those.

  • The mining lasers suck at actually causing damage to an enemy combatant, but they are still enough to scare off pirates if you blast them for a minute or so.

    [EDIT] 12/24/2021 As it turns out, the mining laser is pretty good at actually killing enemies. If you can maintain sustained fire on their engine cone, it will overheat the enemy's reactor and blow up the ship. Much more efficient than shelling them to death with a railgun, provided you can stay behind them.

  • If a part on your ship is severely damaged, it will save you more money to repair a few times and then replace instead of just replacing outright. Watch the replace cost as you fix a severely damaged component and you'll see what I mean.

  • The THI Cargo Container will offset your ship's center of mass, causing you to burn additional propellant to keep the ship facing in a straight line while thrusting. Only use the container if you truly need the capacity.

  • Since the Habitats will destroy asteroids that spawn next to them when you fast travel, you can play as a "scavenger" with no mining weapon and only MLF Haul Drones and THI Cargo Containers. To do this you just fast-travel to an Habitat, slurp up all the delicious ore it has harvested (not like they were going to use it anyways), and then fast travel to another Habitat and repeat. The rocks will respawn each time you fast-travel.

  • Why does the Elon Interstellar Model E cost so much :(.
    I finally bought one, and it does have some improvements. Crew capacity of 5 is helpful for an extra crewmember, and the cargo bay can fit entire small ringroids in it (though they only give you H2O on Enceladus)

Things I need to conclusively determine still:

  • There seem to be several types of ship that you cannot buy in the Enceladus dealer, such as the chunky tug ships you can see doing salvage ops out in the ring. As of current, I have found no way to acquire these ships.

  • You can buy fuel while out and about from Phage-class stations, but can you buy nanodrones from anywhere while in the field? I do not know, but it would be very helpful if you could. To clarify, I know the Voyager SLRS MPU can fabricate the drones, I would just like to be able to use the higher efficiency MPUs and buy them instead.

  • Beryllium and Tungsten are the two most valuable minerals in the game, and Obonto habitats will not ask for either of them. The only place to sell Be and W that I have found is on Enceladus.

  • Is there a better way to find locations other than rely on the RNG of getting a random traveler to give you a "Radar Anomaly" or stumbling on them yourself? The map is really, really big and your relative FOV is very, very small so it is a bit frustrating to try to locate more habitats/stations/other stuff I probably don't even know exists.

    [EDIT] 12/24/2021 As a more recent addendum, I have noticed that locations move around the map sometimes. For example, I will encounter Habitat 4 somewhere, mark the location, and then encounter Habitat 4 again on a later run somewhere else. I still don't have a better way to discover locations, but the odds of finding them randomly are a bit better due to this system.

    [EDIT] 4/4/2024 It seems that random encounters with other miners are more common, but otherwise I still do not have a better way to locate points-of-interest.

Thanks for reading, if you have more info to add about anything here, or any of those last four questions in particular please do share in the comments! Happy diving!
-Hexxitfan11
100 Comments
Hexxitfan11  [author] Nov 30, 2024 @ 8:29am 
@Glodenteoo fair enough! I'll have to give this method a try and update the guide.

@lily40k hopefully one day I will be able to!

@Dies Irawe I can certainly do that once I actually figure out the crew mechanics a bit more definitively.

For anyone who wants to know if they can link or incorporate this guide, feel free to do so! Credit would be appreciated but honestly I don't care that much.
Glodenteoo Nov 23, 2024 @ 7:54am 
I disagree with your take on the OCP-209, it is a wonderful mining ship as you don't need to shoot apart ringroids AT ALL! The "jaw" of the hold can grab and break roids easily, and doesn't take (much/any I'm not sure) damage from collisions. Then the still rather large chunks can be force fed in with the arms, a little wishy-washy spinning to break them down to small bits and bam, a whole asteroid processed with 100% efficiency and ZERO mining required lol

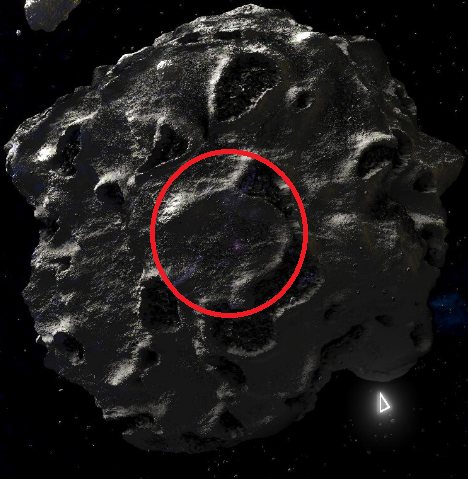
Obviously INSANELY helpful with high beryllium content, but it's also a blast to fly for me personally (I recommend manual, or turning off the auto-rotate feature when opening the jaws! You can find the setting in "tuning," I forget what it's called though.)

Also the Vulture Prospector when set up with two Gungnirs and with ND-NTTR rockets... That is a dangerous setup, for everybody around... pilot most definitely included! Have fun!
[RM] Thunderhunt Oct 7, 2024 @ 6:38am 
I have the Axial Harvester, i cant figure out where to buy or attach the AR-1500 Manipulator Arm
GrungiestTrack8 Sep 8, 2024 @ 2:31am 
FANTASTIC
lily40k Aug 12, 2024 @ 6:37am 
can you make similar guide for real life please :D
megatrondeathray Aug 9, 2024 @ 6:09pm 
This is ace dude, thank you
晴天披笠 ver. 暖春露营 Jul 26, 2024 @ 5:35am 
that's a great guide you got here,
may I include your guide link in my review so I can share with my friends?
Dies Irae Jul 10, 2024 @ 4:57pm 
Can you add a section covering crew choice and mechanics? I'm just kind of shooting in the dark with my picks and that's been working okay but I'm sure I could do better.

All in all though this is an amazing guide, thanks for taking the time to document and update this bud! :praisesun::reheart:
gorgofdoom Jun 30, 2024 @ 3:35am 
As for the model-E: it has the second largest door aperture in the game. These cargo bay doors can be used to crush medium asteroids by getting any part of it between the doors while closing-- then do the same for smaller ones. Thus it can mine (rather easily, i might say) without any special equipment.

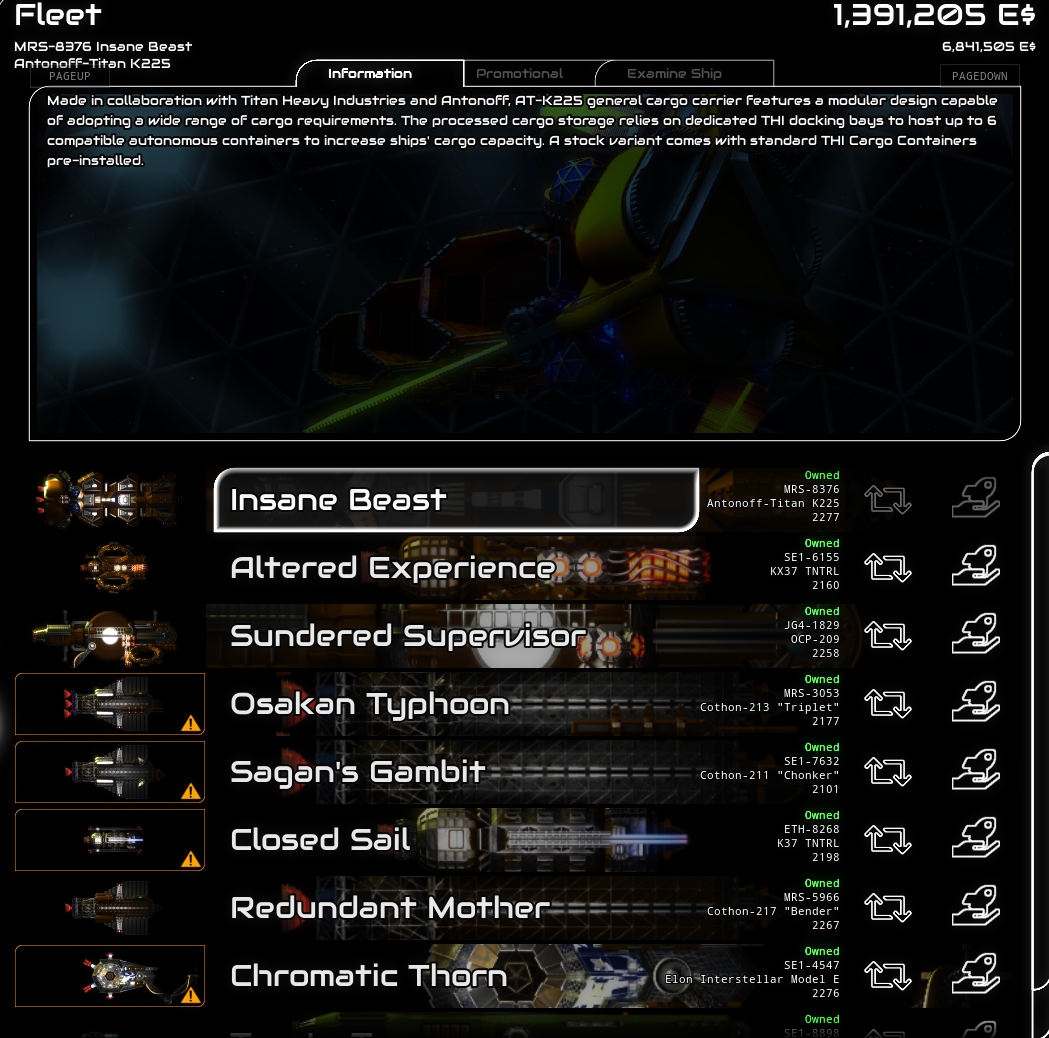
I got extremely lucky and stumbled upon one, wrecked, on my third drop. it came with a couple million worth of equipment which i was able to redistribute to make a self sufficient scout. On my very first trip into the belt I then found 1.2 million worth of anomalies. (and, yes, they all fit into it's bay)
gorgofdoom Jun 30, 2024 @ 3:22am 
Look closely at the map when picking your drop location. you'll see drive flares, just as the appear in the same view while piloting. This is a good indication that there will at least be ships of some faction in the area; investigate at risk with a cheap, fast ship... Or make friends with the pirates like I did. This is an alternative way to find quiet places to mine.