Warframe
1,275 avaliações
Welcome Tenno! A Beginners Guide to Warframe
Por CoffeeChippy e 2 colaborador(es)
Is Warframe downloading? Check out this guide to know what to expect!
4
7
   
Premiar
Adic. a Favoritos
Nos Favoritos
Desfavoritar
Welcome, Tenno.
Welcome to my guide! Here I will be doing my best to help starters off.

First things first, let me tell you what you're getting into. Warframe is a Player vs Environment action game, where you undertake various missions, build new weapons and equipment, and fend off the massive NPC factions. The setting is in space, as you, the Tenno, explore the solar system and beyond. Games can be played alone, or as public or private online multiplayer co-op (unfortunately, no splitscreen/local capabilities). Player vs Player action is available, but is terrible minimal at the current time.

You may be wondering, "Why do you keep calling me Tenno?" Well, Tenno, the Tennos are the faction controlled by you, the player. But, back on track! The first thing you'll do is choose your starter warframe.

**6/8/2020: Touched up Starters, Quests, Modding (Endo!), and Open World (finally mentioned Fortuna!).
**6/10/2020: New section: Exclusive Cosmetics and You
Choosing Your Starter
After a short cutscene about the Grineer and Vor, you'll choose your starter!


Just kidding, instead of choosing a pokemon, you choose a kickass space ninja. Eh, I rather have one of these.

The Starter Warframes

This section is dedicated to Loki Master Race Starter. 2012-2014

Excalibur
This guy, named after King Arthur's sword, is named fair enough. This guy's Warframe abilities are based on sword fighting. He is an all around character, who is the best for starters. His abilities are:
    Passive: So passives are a thing now. Excalibur gains 10% attack speed and melee damage when using Longswords, Dual swords, and Nikanas. This includes his own ultimate, Exalted Blade. Kind of awesome. I think so anyway.
  1. Slash Dash: Buffed up pretty good. This is a straight forward dash that applies your melee damage to the abilities small base damage. Pile the damage on by using a strong Longsword, Dual swords, or Nikana weapon. You can also use Slash Dash to get around the map or knock down enemies in a line. It is considered a melee attack and will contribute to your melee combo counter (more on that later)
  2. Radial Blind: This move can be Excalibur's bread and butter for cheap crowd control. This can help for taking out enemies buried behind cover. If you are melee based, this is a under rated ability, as your first melee hit will do increased damage due to being a "surprise/stealth attack." When used correctly you can stun a large group of enemies, allowing a getaway. Just a warning, they can still HEAR. shooting will cause them to run away.
  3. Radial Javelin: This used to be Excalibur's big move, but after an update making the Warframe more viable, it became his third move. Which is great. Radial Javelin is a powerful but somewhat limited damage move. It deals a nice chunk of damage, but to a limited number of targets. Activating the move summons up to 12 javelins that stun/damage/kill/tickle up to 12 enemies.
  4. Exalted Blade: BY THE POWER OF GREYSKULL, I HAVE THE POWER! Excalibur summons up a lightsword to replace your melee weapon that's pretty much a straight upgrade to whatever lame melee weapon you brought in with you. Oh, you brought a Dragon Nikana? Pretty sweet. But can it shoot energy waves? No? Exalted Blade can! Slam attacks emit large radius damage, slide attacks can blind enemies, regular attacks and Slash Dash emit energy waves... It's a lot of fun. The trade off is burning your energy up as you use it, though, so make it count. Did I mention Exalted Blade gets stronger with the mods you put on your melee weapon as well? Sweet stuff.
    Super Jump: RIP in pepperonis, Super Jump. You were good son, real good. Maybe even the best.
Excalibur is an all around Warframe that is best for starters and melee focused combatants. Highly suggested.


Mag
Mag is a pretty awesome CC warframe, and is an expert when it comes to melee. She sacrifices health for shield, which is a pretty good tradeoff. Her abilities are absolutely amazing, except for one. Let's check them out! Oh yeah, and her face is the universe. It IS the universe.
    Passive: Mag's passive, Magnetic Attraction, causes her to pull pickups towards her when she Bullet Jumps. This is a great ability to have, as it makes picking stuff up super easy. Basically a passive Vacuum.
  1. Pull: Pull is one of the most destructive CC abilities I know. You pull enemies in a short cone-range towards you, knock them off their feet, and ragdoll them. It is not very costly, and can take down a lot of enemies quickly. I use it more then her ultimate.
  2. Magnetize: Shield Polarize? What's that? This ability got buffed with an energy cost reduction, short range crowd control, and higher damage potential. Cast it to lock a target in a magnetized bubble that absorbs incoming projectiles and flings them around the bubble like crazy. When the locked enemy dies, the bubble explodes for potentially massive damage.
  3. Polarize: Bullet Attractor? What's that? IT'S BETA EVERYONE, IT'S FIIIIINE! Polarize was changed to be more effective against all enemy types. It casts out a radial wave that strips enemies of armor and shields, turning armor into shards that can be weaponized by Magnetize. Shielded enemies take damage, while armored enemies become vulnerable to Finisher damage. Finally, it'll restore the shields of allies that it touches. Mag's bread and butter support.
  4. Crush: Alright, they improved this one a bit too. Mag magnetizes the enemies themselves and CRUSHES THEIR FREAKEN BONES. This does a decent chunk of damage, which is doubled on Magnetized enemies. Every enemy caught up in Crush causes Mag to restore a portion of shields to all her teammates. That's her thing. Shields. Shields for everyone.


Volt
I'm not explaining why he's called Volt. But he's another interesting choice. Instead of being high mobility and in your face like Excalibur or hanging back and spamming abilities like Mag, Volt takes a solid middle ground. His stats are comparable to Mag's, and you'll find it easy to take advantage of his various abilities.
    Passive: Volts passive is Static Discharge, and it's pretty shocking. For every meter you travel on the ground between attacks, by walking, running, or sliding, you stack 5 electricity damage to your next attack. This stacks up to 1000 damage, though that may take a while.
  1. Shock: A straight forward lightning bolt with a high chance to stun and chain to other enemies. It's a great way to initiate crowds and does okay damage, but I find it rarely killing things by itself. The main benefit is that it doesn't interrupt what you're doing, so if you got a gun with a slow reload and 200 Grineer trying to give you a hug, give them a zap and you'll be fine. Probably. Use it on your Electric Shield to CHARGE IT FOR POWER
  2. Speed: Volt's bread and butter, at least in my opinion. He can greatly increase his team's movement speed and melee attack speed with this ability. Modded out, you can sling swords at mind blowing speeds, giving you another potent combat option.
  3. Electric Shield: If there's any reason why I don't like Volt as a replacement starter for Loki, it's this ability. It's intended purpose is to deploy cover and enhance the damage of projectiles you shoot through it, but take some caution when shooting non-traditional weapons, as the shield can cause some weapons to backfire. It reliably works with bullet weaponry though. It's seen some improvements, including the ability to carry the shield.
  4. Discharge: Sends out a radial lightning pulse. Everything caught in it gets paralyzed and spreads the shock damage. After a while, the paralyzed enemies will take damage too. Finally, you can use your first ability on a paralyzed enemy to make them explode. More lightning, more problems.
Volt is a very solid middle ground between Excalibur and Mag, so if you're having a hard time making the choice, this might be the one for you.


The Choice?
MY WARRIOR/ROGUE/MAGE ANALOGY DOESN'T WORK ANYMORE! THANKS U14!

Here's the new deal - Excalibur is made for slashing his way in and out of trouble, Volt is made for flexible combative options, close, mid, or long range, and Mag is still a crowd controlling caster.
Attributes
Now that you have chosen your starter pokemon warframe, it's time I teach you some of the most important things of each warframe: Affinity, Health, Shields, Armor, Energy, and Stamina.
  • Affinity: Affinity is arguably one of the most important resources in the game. Affinity is basically XP. You shoot someone? Congrats! You earned Affinity! Each mission also has a challenge (Example: Kill 30 people, kill 3 people in 10 seconds, use your Warframe ability 5 times) that'll give you more affinity mattering on the difficulty of it. So you may get 1000 affinity for one thing, and 20,000 for another.
  • Health: Health is, well, your health. It doesn't regenerate, but is usually covered by shields. When you reach 0 health, so sorry, but you just died. Your health is the red bar at the top right of the screen. You can replenish your health by picking up small red balls found after killing enemies.
  • Shields: Your shields are your first defense against the bullets speeding towards you. They are the blue bar in the top right, to the left of your health. Unlike health, however, they do regenerate after a slight delay.
  • Armor: Now this is a bit of a more advanced attribute, as it doesn't have a bar showing you exactly how much you have. Armor makes it so you are dealt less damage to your health, but not your shields. Health-based frames should worry about their armor a lot more than shield-based frames.
  • Energy: Energy is what fuels your Warframe abilities, as well as channeled melee combat. Think of it as mana, if you will. If you don't have any Energy, you cant use your Warframe abilities. You can find more Energy in small blue balls found after killing enemies.
  • Stamina: I'm sorry, what? What is this "stamina" you speak of? Are you sure you're reading the right guide? No, but seriously, before a certain update, your Warframes had stamina to maintain for maneuvers and melee combat... Not anymore! Feel free to ignore this paragraph!
A Walkthrough of Your Ship's Layout
So you've picked your starter, you've probably gotten to play with its abilities, and you've gotten through the very first mission, collecting the freebie equipment along the way. You'll now be aboard your very own ship, from which you'll be able to do... well, everything. The ship is basically the new "Solar Map" interface - you can either use Escape and click what you want to do or you can navigate your Warframe to the parts of your ship that allow you to do things.

The front, central console in front of your ship's window is the star map, allowing you to pick through the missions, alerts, invasions, and active quests with relative ease. You have a visual representation of all missions you haven't done (presented as "static" or "foggy" missions around each planet/moon). Other than the planets themselves, you can also see Enter the Void if you have Void Keys, the Derelicts if you have Derelict Keys, and your Dojo if you have a clan.

To the left of this console (if your character is positioned like they are looking out the window) is the syndicate interface. Syndicates are explained later on in the guide.

To the far left of the central console in the front of your ship, there is the Codex. This is one of the two most valuable places to obtain information about the game from. The other place is the Warframe Wikipedia page. The Codex gives you information about what items you have mastered, what quests are available (and how to start them), information about enemies IF you have scanned them into your Codex (this is a process done by purchasing scanners in the market and using them in-mission on enemies, or having your Helios sentry use purchased scanners), and so much more. If you're stuck on something and you don't want to open up the Wikipedia page, go to your Codex.

To the far right of the central console in the front of your ship is the Market. This is where you go to spend most of your credits and platinum. There is more about platinum later on in the guide but remember, nearly every item in the game that changes gameplay, such as Warframes, weapons, etc. can be obtained through gameplay. Be cautious when deciding to buy or spend platinum. The primary use of the market for new players is to purchase new weapon blueprints that you can make in your Foundry to upgrade your gear.

Near the Market console is the Conclave Console. Visit it if you're interested in the Conclave (PVP) aspect of the game. This guide will NOT talk much about PVP... partially because the writer has PTSD from the initial phases of Warframe PVP, and partially because it's constantly changing.

Finally, there is a small console between the Conclave console and the star map, which is simply a 4th wall breaking list of game hot patches and updates. I doubt I need to explain what this is.

When going towards the back of your ship from the front, you'll pass a radio where Grineer constantly complain about energy residue, order designations, and Ruk's promotion to General. Prepare to hate it almost as much as you hate Ordis.

Looking at the back of your ship, you'll see more consoles. On the far left, you have a screen with mods that will allow you to... modify your mods. Buffy speak, I know. I apologize. But that's what it's there for. More on mods in the Modding section of this guide.

Further into the room on your left is your incubator, where you will raise your Kubrow or Kavat. Interacting with the incubator allows you to hatch, modify, and switch out your Kubrows or Kavats. Self-explanatory, for the most part. Remember to pet your pets. Pet them vigorously.

In the back-center of the room is the equipment section. You can modify your Warframe and weapons here. Use the equipment, colors, mods, cosmetic attachments, etc. you've acquired and save various loadouts using this interface. Remember to set up Archwing and Conclave loadouts if you plan to partake in these aspects of the game.

The far right side of the room has the Foundry workbench. This utility allows you to take blueprints and components to create a plethora of useful items. More on the Foundry in the Crafting section of this guide.

...There's also a place where your sentinel sits. You can't pet it or anything. It just kinda floats there. So enjoy that, I guess.

Around the corner is the Void Relic console. Beat the Mars Junciton to unlock it. It allows you to quickly view all your Void Relics and use Void Traces to improve their drop rates. This is important for Prime farming. Don't expect to get Vauban Prime pieces in a reasonable amount of time without Radiant Relics.

In the far back left of your ship is the Infested Helminth room. It removes pink boils from your neck. If your Nidus, it does something different. But that's somewhat spoiler-y so we won't talk about it.

The last two rooms require you to complete the Second Dream and the War Within to access their purposes. No spoilers. Just do those quests.
Quests
Starting out, you'll need to go through the "Vor's Prize" quest to build and learn about the parts of your ship. Pay attention - everything you do in this quest teaches you about the various game modes work and how to get things done in the game. In the previous section, I attempted to explain all this, but this quest does it far better than this guide.

Currently, there are 26 (27 if you count the mulitple parts of New War) quests in the game
  • Vor's Prize
    The tutorial quest. You'll pick your Warframe, test its abilities, collect your weapons, and start up your ship. You'll do a few missions, kill your first boss, and be on your way to Warframe fame.

  • Once Awake
    A follow up to Vor's Prize that introduces you into the Infested. There's a free sword involved! Go for it, champ!

  • Howl of the Kubrow
    A quest to obtain a canine companion. After the quest is completed, you can go to the market to buy more blueprints for incubator power cores and Earth missions with Kubrows you can kill to take more Kubrow eggs to make more Kubrows. Highly recommended since Kubrow are pleasant little mastery fodder.

  • Hidden Messages
    A quest to obtain the Mirage Warframe. The first of many in a line of Warframe discovering quests.

  • Patient Zero
    A quest to track the now mutated Alad V, who has created new Infested and launched an invasion. Finishing this quest gives you access to hunting Mutalist Alad V, who drops components of the Mesa Warframe.

  • The Archwing
    A quest to obtain a support harness that lets you fly and battle in space, free of your spaceship. More mastery fodder. I don't much care for Archwings... but if you like 3D air space battles, go for it. Youll pretty much need this now that Uranus has a submergeable aspect.

  • The Limbo Theorm
    A quest to obtain the Limbo Warframe. You must first acquire an Archwing, either through the Archwing quest or the Market. You'll start this quest in the market by purchasing the Limbo Theorem quest item. This one was kind of long, in my opinion.

  • Stolen Dreams
    A quest that introduces players to the new Spy 2.0. There's an Orokin Catalyst for your trouble. Do it. Just do it. MAKE. YOUR DREAMS. COME TRUE!

  • The New Strange
    A quest to obtain the Chroma Warframe. This quest can be started at any relay by talking to Cephalon Simaris, on the second floor of the relay (the elevator is an energy tube, and yes, I'm saying this because it took me forever to figure this out)

  • A Man of Few Words
    A quest you can obtain from Darvo on the second floor at any relay. You get to meet Clem. And do stuff with Clem. Who is Clem? Yes. I don't know. It's kind of funny? Clem... Grakatas! Also, serves to introduce the Grustrag Three.

  • Natah
    A follow-up to the New Strange that rewards you with the ability to buy Exilus Adaptor blueprints from Cephalon Simaris. Very lore heavy, very spoiler heavy. You can start it by exploring Uranus submergeable levels and looking for an oddity to scan. You'll know when it's near because your screen will flash blue and an audio cue will play. Once the oddity is scanned and the mission is completed, Natah starts.

  • The Second Dream
    The quest to end all quests. This is the big one. Start it in your Codex after Natah is finished. The rewards for this are huge, including new areas to explore, new powers to obtain, new items, and all the lore the game's been building up towards for two years. I DO NOT ADVISE YOU LOOK UP WALKTHROUGHS FOR THIS QUEST BECAUSE THE SPOILERS ARE MASSIVE.

  • The War Within
    Well, this is the other quest to end all quests. Start in the Codex after The Second Dream. New area, new gameplay mechanics, new mods, new things to complain the DE about. MASSIVE SPOILERS ONCE AGAIN. YOU ARE WARNED. VERY WARNED.

  • Octavia's Anthem
    The quest to obtain the Octavia Warframe and one of several syndicate focused quests. Speak to Cephalon Suda after The Second Dream

  • The Silver Grove
    The quest to obtain the Titania Warframe and one of several syndicate focused quests. Speak to Amaryn of New Loka after The Second Dream.

  • Chains of Harrow
    The quest to obtain the Harrow Warframe and one of several syndicate focused quests. Check your Codex after The War Within

  • The Glast Gambit
    The quest to obtain the Nidus Warframe and one of several syndicate focused quests. Speak to Ergo Glast of the Perrin Sequence after the War Within

  • Saya's Vigil
    The quest to obtain the Gara Warframe. Speak to Konzu in Cetus after completing a bounty for him.

  • Sands of Inaros
    The quest to obtain the Inaros Warframe. You can buy this quest from Baro Ki'Teer when he shows up. Yes. You buy this quest. You're welcome.

  • The Jordas Preceipt
    The quest to obtain the Atlas Warframe. Get good at Archwings before trying this - the boss is rough.

  • The New War
    A three part major cinematic series, which takes place after The War Within. Only two parts have been released so far.

  • Vox Solaris
    Similar to Saya's Vigil, a quest in Fortuna that introduces you to the Orb Vallis and K-Drives

  • Mask of the Revenant
    A very brief quest in Cetus that unlocks the Revenant Warframe.

  • Apostasy Prologue
    A short, creepy cinematic quest that sets up the upcoming post Second Dream saga.

  • The Sacrifice
    Thought you knew everything about Warframes? Think again! Meet Excalibur Umbra, and an onslaught of new information about the suits you've been using.

  • The Silver Grove
    New Loka wants you to smash Grineer. Also, the unlock for the Titania Warframe

  • Octavia's Anthem
    This one was actually kind of a fun puzzle-platformer. It unlocks the Octavia Warframe.
Platinum and You
All F2P games that wish to sustain longevity through continued support need some sort of paid content. Warframe has Platinum. Platinum is the premium currency that allows you to bypass time restrictions when crafting, obtain various materials and assets more easily, and purchase exclusive cosmetic items. It is not required to make progress in the game, and everything except boosters, slots, and cosmetic items can be obtained through game play.

Starting out, you have 50 platinum to spend on whatever your heart desires. Your heart should desire an extra Warframe slot and four extra weapon slots. Normally, I don't try to tell people EXACTLY how to play the game, but this is important, because you will not be obtaining more platinum until at least Mastery Rank 2, unless you pay real money for it. You'll find the game a lot easier to get through if you have 3 Warframe slots and 12 weapon slots that you can cycle items through for Mastery's sake, instead of the default 2 WF and 8 weps.

Platinum can be purchased at any point by accessing the Warframe website and signing in with your Warframe account information, or by using the in-game Market's "Get Platinum" tab (note - do NOT use your Warframe account information anywhere but the in-game sign in and the official Warframe.com website!) Here you can purchase various platinum packages (please note that all mods offered in these packages CAN be obtained through game play). Experienced players recommend waiting until the Daily Login reward system awards you a discount. The 75% discount is the highest discount currently available.

A secondary way to purchase platinum, once per promotion, is through the Prime Access program. These packages are notably more expensive and cannot be used with discounts, but grant more platinum and the latest Prime gear, along with some exclusives (at this time, the Naviga Prime Sugatra, the Kavasa Kubrow Prime Gene Masking Kit and Armor, and the Trinity Prime icons are exclusive to the Prime Access packs).

Finally, after Mastery Rank 2, you can access the trade system, and can start acquiring platinum without paying for it by obtaining in game items that players want to buy. The Trading chat section in-game will help you with that. Rare mods and Prime components found in the Void are the hottest selling items, but you can also sell Fusion Cores and Orokin Void Keys for some quick platinum. Be sure to look up pricing guides or ask questions, as to not get yourself ripped off!
Exclusive Cosmetics and You
It's another new and exciting section that I've decided to add based on my own personal experience! I often found myself guzzling down cosmetic content and then later finding myself disappointed, as I would discover items I "missed out on" or could still obtain, but for more platinum than I would have normally paid.

This section will briefly discuss the premium market content so you can feel like you get the most bang for your buck.

Tennogen
Some of the content in the game is created by the game developers. Other content is created by talented players and community contributors who submit their creations through a rigorous voting process and get added to the game if it's a new Graxx skin if the community votes it through. There are two ways to identify Tennogen content in the market - simply use the Tennogen filter, or identify the item price. Any item that is sold for a cash value, rather than platinum, is a Tennogen item.

Tennogen cosmetics are vastly more expensive than the traditional cosmetic components, due to both the game developer, the content creator, and possible Steam itself (unsure, correct me if I'm wrong) getting a cut of the purchase. Due to the ever changing nature of the game, I strongly caution new users to put a good amount of though into purchasing Tennogen content. I have personally purchased a few pieces that I still use and adore, while other pieces simply sit in my collection, as a newer item takes it's place in my outfit.

If you have a dispensable income and want to support the content creators and the game, feel free to ignore this section.

Deluxe Skins vs Deluxe Bundles
Another fun bit of content the developers released are the deluxe skins and bundles. These items do more than add a different coat of paint to your Warframe or weapons, giving their bodies a complete physical makeover. It's still the Warframe you know and love, but with a fresh interpretation.

The biggest thing to note here is that most items available in a Deluxe Bundle CANNOT be bought separately. The Deluxe Skins CAN be bought outside of the Bundle, but any armor pieces, ship decorations, pet equipment, or weapon reskins included cannot. As a result, when considering if you want to purchase a Deluxe Skin, check the corresponding Deluxe Bundle, and make sure you are satisfied with missing out on the additional pieces. You can always buy the Deluxe Bundle at a later time, but you will essentially have paid for the skin twice - there is NO discount.

TL:DR? Always check Deluxe Bundles before buying Deluxe Skins. Buy informed.

Prime Access and Prime Accessories
Among the largest single purchase cash investments you can make are the Prime Access purchases. These bundles are released whenever new Prime equipment hits the game, instantly making it available along with large chunks of platinum and other cosmetics and perks, such as boosters and glyphs. Be warned though - all Prime Equipment made available in Prime Access can be obtained through regular game play.

The exception to that rule are the Prime Accessories. There are only two ways to obtain them - purchase the final rank of the Prime Access package ($140 USD, and you get every other item in the promo) or by purchasing the individual Prime Accessory pack ($50 USD, you get two boosters and the two exclusive cosmetics). This is another place to carefully consider your purchases. It can be difficult to obtain Prime Accessories after they leave Prime Access rotation (I think they come back with Prime Vaults, unsure, need source), but they can be costly.
Leveling and Mastery
At this point, you've seen your starters and are starting to learn the absolute basics, but what's the point? Where is this all going?

The game is all about experiencing everything it offers. The more you experience, the more you unlock. This begins by gaining Affinity, which is essentially the same as experience points. You can level your Warframe, weapons, and (when you get them) Sentinels simply by using them. Killing with a weapon will split the kill's Affinity between the weapon and your Warframe, while killing or even just casting with a Warframe's abilities will award all of the kill's Affinity to the Warframe. This applies the same way for Sentinel kills - half goes to the Sentinel and half to it's weapon if it kills with it, or all goes to the Sentinel if the Sentinel kill with an ability.

With enough Affinity, your equipment will level up. Warframes will get an immediate attribute boost with each level, but nothing immediately changes with weapons. You have to use mods you find in game to change your weapon's strength and attributes. What leveling does is that it grants you a larger mod capacity, allowing you to use stronger mods on your weapons or Warframes.

The big picture, however, is Mastery. Mastery is basically experience for your account, a level that prevents you from getting the top-end gear until you increase it. You increase your Mastery by leveling everything you can get your hands on. A general recommendation is to level everything you own to level 30 before you sell it, even if it's a bad weapon/Warframe/Sentinel. Everything that levels awards Mastery. There's also a small Mastery bonus for each mission you complete in the Solar System for the first time.

The Mastery bar is located under your Warframe screen name when you press Escape, in the top left corner. When you see this bar full and flashing, it means you're ready to take a Mastery Test. This test will be the final step to increase your Mastery Level each time. The test will depend on what Mastery Rank you're about to obtain. They're the same everytime.

Completing the test awards you the next Rank and allows you to use equipment that was locked by that Rank. Failing, however, forces you to wait 24 hours before doing it again, so don't be afraid to do a little research before trying a test! Cephalon Simaris lets you try them in practice mode for free!

TL:DR? Doing things > Affinity > Mastery > Rank Up
Crafting
After selecting your starter and doing Vor's Prize to familiarize yourself with your ship and the things you can do, you can begin on your way to exploring the solar system, obtaining new weaponry, and mastering your Warframe. As you may have noticed from starting, you had multiple weapon options and several Warframe options, and you may decide that you wanted both weapons, but could only pick one, or all the Warframes, or something completely different. Fear not. Nearly everything equipable item and many non-equipable items in the game can be obtained through the crafting system - the hundreds of weapons, dozens of Warframes, and several companions and Archwing items.

To craft an item, you must bring several items to your Foundry - a blueprint, an amount of credits, and whatever additional materials the blueprint asks for. You must also have an appropriate slot available in order to claim the item. The majority of blueprints can either be found in the market which you can buy with credits, or found through Clan Research, also purchasable with credits. You'll then select the blueprint in your Foundry, click Build, and the item will begin to build, finishing after a set amount of time. Keys, quests, and mission items generally take between one minute and one hour, basic weapons and Warframe pieces take 12 hours, Warframes take 3 days, and so on and so forth. At the end of the waiting period, you can return to the Foundry, look for the built item and claim it! But before you build anything, you need to know about the materials that go into crafting.

There are two primary categories of crafting materials - resources, which are easily found throughout the solar system, and components, more advanced parts that you have to build. Resources are identified as small, dark colored disks with either orange or blue bulges on it. Orange disks indicate common resources, while blue bulges indicate rare resources. You can identify where to collect resources by heading to the Navigation map and clicking one of the nodes (Mercury, Void, Europa, etc). On the side, resources that drop in that node are listed - do missions on that node. Kill enemies and open containers to collect. There are several exceptions to the node rule. A few of them include Oxium, which is dropped exclusively on Corpus enemy maps by Oxium Ospreys (that must be killed - don't let them suicide bomb into you!) and Cryotic, which is gained from Excavation missions.

Components are a little more complicated, as you must obtain the blueprints to create components, build them, and then use them as materials for whatever crafting project you're working on. This revolves mostly around Clan Research weapons, which mostly require 1 Forma and 1 or more additional Clan Research components (Fieldron, Detonite Injectors, and Mutagen Mass). Forma can be found built or in blueprint form as a reward for completing Void objectives, while the Research materials are in their respective labs, or can be awarded for fighting Infested Invasions and Corpus/Grineer Sieges, which randomly happen. There are also the Orokin Catalysts and Reactors, the rarest components of all, usually only awarded from events and alerts.

There are miscellaneous other materials in the game that are used in crafting, such as Void Cyphers (found by opening the Orokin Derelict Vault using a corresponding Dragon Key), Navigational Coordinates (found everywhere, used to craft 'keys' to Orokin Derelict missions), and other various materials that crop up for quests. A handful of weapon blueprints and the pieces to build those weapons are exclusive to boss fights - for example, the Seer Pistol and Cronus Sword from Captain Vor on Mercury, and the Miter Saw Launcher from... Captain Vor on Phobos. Damn it, Vor, leave some drops for the other bosses. Finally, Warframes and certain weapons are divided into pieces. Locations for the pieces for each Warframe are listed in the DW (Different Warframes) section near the end of this guide. And remember, not just weapons and Warframes go through the crafting system - many keys, quests, and gear go through it as well. Be sure to look around the market!
Modding
Mods are evil forum dwellers that ban you for saying "butts" trading cards you can equip to weapons and Warframes to change their attributes. They are the key to success in the game, as you will eventually find yourself struggling to progress without them. You can equip them by going to the weapon you want to power up in your Arsenal and clicking 'Upgrade."

Here's a mod, and it's components
  • Red: The name of the mod. I guess that much was obvious...
  • Orange: The amount of mod energy the mod drains or grants.
  • Yellow: The polarity of the mod - these can be important to maximizing your weapon's potential. Placing a mod in a slot with the same polarity will cause the mod to consume half as much energy, while placing a mod in a slot with a different polarity will cost 25% more energy.
  • Green: This icon indicates that the mod will grant energy, instead of draining it. So far, this is exclusive to Melee Stances and Warframe Auras.
  • Blue: Tells you what the mod equips to and affects.
  • Pink: The rank of the mod, represented both on the side as tick marks and as a number by the rarity. This tells you how strong your mod is and how much stronger it can become. More on that later.
  • Brown: Normally, you'd see a C and a number here - this would be the Conclave rating the mod contributes. Conclave is mostly just used to make PvP 'fair.'
Additionally, the overall "shade" of the mod tells you it's rarity. Bronze for common, silver for uncommon, gold for rare, and white-platinum for special.

Much like real trading cards, you can get more of these by using your real money to buy overpriced booster packs, you can trade with others who play the game (this is locked by Mastery Rank though. Minimum of Rank 2 to trade), or you can beat up everyone you meet and hopefully some will be carrying cards for you to take. Once you have the ones you want, it's time to power them up.

When you go into your Arsenal and click Mods, you'll be shown all of your mods. It's on this screen where you can modify the mods (Inception horn plays here). There are three potential options on this screen - Transmute, Fusion, and Sell. I doubt I need to tell you what selling a mod does (here's a hint if you need it - credits). The other two options are a bit trickier

Transmutation is an interesting process you can use to obtain new mods. You give up an amount of credits (minimum of 12,000, increases depending on the rarity of the mods you use up to 36,000) and four of your hard earned mods for the chance of winning one glorious mod... that is usually worse than the mods you gave up to transmute in the first place. In fact, there's nothing preventing you from getting one of the mods you used in transmutation back AS the transmutation's result! It's generally not recommended to do this unless you have the credits and mods to throw around - there ARE Transmutation exclusive mods, but this is more like mid to late game content. So take that into consideration before you try it.

The most important thing you can do with a mod is upgrade it through Fusion. To upgrade a mod, click it, then click on the -> arrow to upgrade it. Fusion Cores are (mostly) gone now, and the new system called Endo has replaced it. Collect Endo from enemies and Ayatan sculptures.The only thing left from the old Fusion Core system is the Legendary Core, which instantly upgrades a mod from 0 to max with no Endo or additional credit cost. These are mostly given out when the game has major changes that remove things from players inventories, as a form of compensation. They can also be traded for, for a quite a bit of platinum.
Mission Types
At this point, chances are you've played a bit. You may have also noticed that in mission one, you had to kill everyone on the map, while in the next mission you have to shoot tubes off of a sphere. This is because the game has different game types. Each of them have a different objective, and they each require different strategies.

  • Exterminate: This is the first gametype you play. The goal of this is simple: Kill everyone you see. I, uh, don't think it really needs any more explaining than that... So yeah! Onto the next gametype!

  • Sabatoge: In Sabotage, you have an objective you must find and destroy. This objective varies from mission to mission, but is usually a reactor core, a toxin injector, or a series of Infested Hives if you're facing the Infestation.

  • Capture: Capture is the third mission type you play. In this mission, you need to find your target, kill "incapacitate" them with your guns, then beam them up to Scotty. It looks pretty painful. Once you do this, you just need to make it out, and mission complete!

    Ouch.

  • Mobile Defense: Mobile Defense requires you to pick up a datamass, and go place to a computer console, having to hold the fort for a few minutes each. There can be 2-7 places you need to go to each.

  • Defense: Defense comes in two forms, first, let us focus on Endless. In this mode, you defend a Cryopod/Power Core, wave after wave. Every 5 waves, you have a chance to leave. In Wave Defense, you defend just like in Endless, but instead of going as long as you can, you stay for x amount of wave. Wave Defense is only found in special occasions.

  • Rescue 2.0:In this game type, you need to rescue a hostage from a prison area, and bring them to extraction. There are Wardens in the area, and if they see you, and you haven't reached the Hostage yet, A countdown will start. If you don't reach the Hostage in time, so sorry, He, to paraphrase, "Get Deaded."

  • Survival: In this, you fight a never ending stream of enemies. Seems simple enough, right? But oh no! Life Support is gone! :O What ever will you do! Kill enemies and take their life support, duh! You can also get Capsules that regenerate a lot more than the drops my enemies. You can leave every 5 minutes, and the rewards you can get stack.

  • Deception: The love child of Mobile Defense and Sabotage. Take the datamass to a central location, drop it off, run to extraction. No problem.

  • Assassinaton: Find the unique boss. Kill the unique boss. Steal his loot. Dance on his corpse. This is a common way that new Warframes can be obtained.

  • Hijack: You're going after a "big prize" here. You must activate a console and guide an item through a preset path, protecting it and surviving as you go. Once you successfully steal the "big prize" you extract.

  • Interception: Here's a fun one. You're playing King of the Hill on four "hills." Maintain the control points to intercept radio signals for the Lotus. When the Tenno have secured the transmission, you'll slaughter the enemies and then be presented with the option of securing another signal at a higher difficulty or leaving with your loot.

  • Spy 2.0: Gone are the days of lugging around a datamass for Spy. You now simply find the three terminals and hack the consoles. The security has increased and data will be deleted if you are detected and cannot get the data fast enough, so stealth is recommended. Each data console hacked guarantees you a small reward. Or a big one if you're lucky. The Ivara Warframe is obtained from these missions.

  • Crossfire: Also known as Invasions, at the current time this is simply an Exterminate mission where you have aligned yourself with an enemy faction to fight one of the other enemy factions.
Damage Explained and Table
Here's a quick explanation of Damage and how it affects your gameplay. All damage types have a special "Status," which can occur based on the weapons Status %

There are 3 types of physical damage:

  • Impact - common on blunt weaponry, this damage type can stagger enemies. A good basic type against Shields
  • Puncture - common on stabbing weaponry, this damage type can weaken enemy attacks. Excels against all types of Armor.
  • Slash - common on larger sharp weaponry, this damage type can cause enemies to bleed for direct health DoT (and yes, robots can bleed. Somehow). Strong against all types of Flesh.

4 types of basic elemental damage:

  • Cold - This damage type can cause enemies to slow down, in movement and in attack speed.
  • Heat - This damage type can ignite enemies, causing basic DoT (has to burn through shields before health) and causing enemies to panic
  • Electric - This damage type can stun enemies, with a chance of chaining to multiple targets
  • Toxin - This damage type can poison enemies, causing direct health DoT

And 6 types of combination elemental damage (you can create these by applying two elemental mods to a weapon. If you apply more than two, read like a book - top row left to right, bottom row left to right. The order will determine which mods combine):

  • Blast (Cold + Heat) - This damage type can cause knockdown... accuracy loss.
  • Magnetic (Cold + Electric) - This damage type can reduce maximum shields and drain Warframe energy
  • Viral (Cold + Toxin) - This damage type can reduce maximum health
  • Radiation (Heat + Electric) - This damage type can reduce accuracy and cause mooks to fire on each other
  • Gas (Heat + Toxin) - This damage type can cause an AoE Toxin direct health DoT - an enemy that is affected by Gas will have a cloud on them that spreads the Toxin DoT on those that get near it
  • Corrosive (Electric + Toxin) - This damage type can reduce armor on armored targets


And now, the table. You can use this with the faction guide to figure out how to maximize your damage. Green is good, red is bad, the larger the number, the greater the weakness/resistance:

Companions - Introduction and Sentinels
The game offers many different companion types to help you curve the battle in your favor. Besides what certain Warframes can summon with their powers, there are 2 divisions of "equipable" companions: Sentinels and Kubrows. There's also the powerful Tenno Specter that you can deploy in addition to your equipable companion, making for a possible total of 12 Tenno-allied units in a 4 player mission!

Sentinels

The oldest and easiest to understand are the Sentinels. They're a lot like Warframes or weapons in their mechanics. You have to buy a blueprint, gather the materials, build it, wait for it to get done building, and then finally you can equip it and give it a go! Each Sentinel comes with two Precepts mods and a default weapon - the weapons can be switched out between Sentinels (with the exception of Helios' unique Deconstructor weapon), but the two initial Precepts are exclusive to that Sentinel.

You mod them out like Warframes and weapons (note that your weapons and Sentinel weapons use the same mod types, and you can't equip a mod that's already in use [i.e. the same copy of Serration can't be put on Braton AND Deth Machine Rifle]). An important thing to remember while modding Sentinels is that Precept priority is determined by mod positioning - a Precept in the top-left most mod slot will activate before a Precept in the bottom-right most mod slot. Read like a book - top-left to right, then bottom-left to right. You almost always want to put your Sentinel's default attacking ability in the bottom-right Precept slot, while placing its unique ability in the top-left Precept slot.

Dethcube
Weapon Type: Rifle
Weapon Name: Deth Machine Rifle
Ability: Vaporize - deals high damage to a single target that moves within range
Obtain: Blueprint in the market.
Review: One of the most aggressive Sentinels, Dethcube has a fast shooting weapon and a high raw damage special ability. A good starter sentinel. He's raw combat - won't offer as much defensive utility as others.

Wyrm
Weapon Type: Rifle
Weapon Name: Laser Rifle
Ability: Crowd Disruption - when 2 or more enemies are within range, sends out a pulse that knocks nearby enemies to the ground
Obtain: Blueprint in the market. Prime variant in the Void.
Review: A bit more balanced between offense and defense, but with the weakest of all the Sentinel weapons. Often ignored due to excelling at nothing. The Prime variant comes with a notably better weapon, though.

Shade
Weapon Type: Pistol
Weapon Name: Burst Laser
Ability: Ghost - temporarily cloaks the Tenno and Sentinel when it detects an enemy
Obtain: Blueprint in the market. Prisma version from Baro Ki'Teer
Review: The weapon is somewhat weak, but being a pistol makes it fairly unique, not conflicting with your own primary. Ghost is a good ability for all situations though, granting added survivability. Also, the stealth choice, as it only retaliates - it will not attack enemies that haven't attacked you. The Void Trader offers an upgraded version if you can ever find him.

Carrier
Weapon Type: Shotgun
Weapon Name: Sweeper
Ability: Vacuum - pulls items in the surrounding area to the Tenno.
Obtain: Blueprint in the market. Prime variant in the Void.
Review: A change to Vacuum being usable by all Sentinels has seen a drop in Carrier's "required" status. Instead, Carrier functions as an ammo-carrying, ammo convering, ammo loving ammo bot. Sweeper is the strongest burst damage Sentinel weapon. You have to be fairly close to enemies though. When in doubt, the first choice. There is a Prime variant that is a straight upgrade.

Djinn
Weapon Type: Rifle
Weapon Name: Stinger
Ability: Fatal Attraction - increases it's own threat level to cause enemies to come at you, while dealing small radial damage and stun
Obtain: Biology Lab Research
Review: More potent than it seems. The weapon is initially toxic rather than physical damage, which is a plus, and it's ability allows you to set up short-range assaults by bringing enemies closer. A fair choice. Has synergy with the Gazal Machete

Helios
Weapon Type: Melee (a Glaive-type projectile)
Weapon Name: Deconstructor
Abilities (2): Investigator - uses Codex charges to scan the environment. Detect Vulnerability - if an enemy is fully researched through Codex scans, Helios can identify weaknesses for bonus damage
Obtain: Energy Lab Research
Review: Another utility oriented frame. Can be used to fill your Codex without slowing yourself down. Added benefits of it scanning enemies you might not necessarily see, revealing them to you ahead of time. It has an added mod you can obtain through Cephalon Simaris (NOT Suda) for an additional precept ability. Potent weapon, but very short ranged. Average overall. Comes with a Prime upgrade.

Diriga
Weapon Type: Rifle (specifically sniper rifle)
Weapon Name: Vulklok
Abilities (2): Electro Pulse - stuns a single enemy continually. Arc Coil - zaps a group of enemies with electricity
Obtain: Blueprint in market
Review: First Sentinel added in a while. Grineer inspired in design, seems to be based on their Arc Traps. The weapon is a sniper rifle, but it still uses rifle mods, which can cause it to clash, but it has great abilities. The stun can get you through a lot of tough situations. The recommendation is to use this Sentinel with a different weapon: Vulklok might be better off slapped on Shade instead.
Companions - Kubrows and Specters
Kubrows
The second type of equipable companion is the fierce Kubrows. Instead of the AI robots that float around your shoulder, these are living, canine-like creatures that long ago served the Orokin. As a result, the acquisition process is notably different. No, you can't just build a Kubrow. As living pets, you must take care of them - maintain their health and happiness, and you can't over exert them, taking them to every job like you would with a Sentinel. So far they sound like a downgrade, but Kubrows have more potential than Sentinels - their abilities are far more unique, and with the incubator bonuses and their unique mod mechanics (instead of boosting their stats, their stats are "linked" to your Warframes), they can shell out more damage and take more hits.

To obtain a Kubrow, you must complete the Howl of the Kubrow quest, detailed further in the Quest section. After you've done so, you'll have your Incubator that you can interact with to start on a new Kubrow, check on the health and happiness of your existing Kubrow, take genetic imprints of your existing Kubrow so you can breed the Kubrow of your dreams, or send your active Kubrow into Stasis (storage), allowing you to start it all over again (note: You don't have to do the quest again to get another Kubrow. You just have to reobtain the Power Cell and a new Egg). After a Kubrow matures, you'll be able to equip it and mod it out with it's own unique mods (also obtainable by killing Kubrows on Earth). The first Kubrow you make (and every Kubrow you make that doesn't use imprinting) will be randomly male or female, and will be one of the following types:

Huras Kubrow
Specialization: Hunting
Abilities: Hunt, it's lunging attack, and Stalk, a cloaking ability
Quick Review: It's cloaking ability seems to happen more often/last longer than Shades, so if you're good about maintaining Kubrows and are willing to put the time into it, the Huras is a good, durable alternative.

Raksa Kubrow
Specialization: Protection
Abilities: Howl, used to frighten enemies, and Protect, a shield restoring ability
Quick Review: I didn't notice much of a difference between this and a Sentinel. Raksa might activate it's shield restore ability more often. Still, it wasn't real outstanding to me.

Sahasa Kubrow
Specialization: Reconnaissance
Abilities: Dig, which allows it to gather hidden items, and Ferocity, a finisher for downed enemies
Quick Review: Dig is really useful. It can find energy orbs, which can really make the difference in a pinch. It's fighting capabilities are average. It's a solid choice for long jobs.

Sunika Kubrow
Specialization: Combat
Abilities: Savagery, a finisher attack, and Unleashed, a move to knockdown VIPs.

Chesa Kubrow
Specialization: Support
Abilities: Neutralize, which disarms armed enemies, and Retrieve, which allows the Kubrow to retrieve dropped loot.

____________________________________________________________________________

Specters

This final companion type is separate from the equipable ones. These are apparitions of the various units that you can carry in your backpack and deploy as your need. For the rest of the mission, you'll have the added assistance of whatever unit you deployed. Deploying a Specter consumes it, so either be wise about when to use them, or build so many that you can spam them.

There are two ways to obtain Specters - you either make them or purchase them from Syndicates. Specters you create will be Tenno, specifically a copy of whatever loadout you use to create it, while Specters you purchase will be of enemy units. The Red Veil, for example, can sell you Infested Charger Specters.

To create Specters, you need to obtain Specter blueprints, which are awarded from the new style Rescue missions (the ones with the Wardens). The harder the job and the better you do, the better the Specter blueprint you're awarded. You will then create a loadout for your Specter by equipping yourself with items that reach the required Conclave rating for the blueprint. Upon building, you'll either be allowed to use a previous loadout (if you've made one before) or your existing loadout (if you're making a new one or want to modify it's loadout), which will be saved and used whenever you deploy a Specter. Specters can use some Warframe abilities and will use whatever weapons you equip them with, so try to keep it simple. The AI isn't always sharp enough to know to charge Ogris or Lanka shots, for example.

Purchasing Specters is simpler, but perhaps not wiser. Once you obtain the first new title in a Syndicate, you will be allowed to use your standing to purchase Specters of enemy units that you can deploy to fight along side you. The reason this is discouraged is due to the far more interesting and unique items you can obtain through Syndicates.
Different Warframes
Yes! You're not just limited to the knight, rogueElectromancer, and magemagnetic caster! You can also get the assassin, the paladin, the necromancer, the ninja, the pyromancer and cryomancer, the tank, the cleric, and so on and so forth. There's even a pirate! Because why not?


This guide used to contain brief reviews of all Warframes. It will again! Please be patient, as the game has undergone many updates since this guide's inception, and we will have reviews again soon.
Factions
By now, we've given you a good idea that there are enemies in the game, but we haven't really gone into what kind of enemies they are. We also haven't told you much about yourself! As we said earlier, we are the Tenno. But what does that mean, and what are we doing? As a quick guide to how the faction guide works, here's a brief explanation:
  • 1st Paragraph - Introduction and Lore
  • 2nd Paragraph - Explanation of Faction Mechanics and Units
  • 3rd Paragraph - Special Faction Events
  • 4th Paragraph - Summary of Faction Weaponry (note that unless otherwise stated, all weaponry listed is obtainable, usually through Clan Research)
  • 5th Paragraph - Summary of Faction Defenses (use with the Damage Table to find out how to maximize your damage!)
If you take nothing else from this, take this: when the lights flicker, you get together and start acting like a team immediately.

For Syndicates, check out the section after the Orokin faction.
Tenno - The Space Ninjas in Space
The Tenno are a race primarily controlled by the players. They pilot powerful suits known as Warframes. More about the Tenno's exact nature can be learned through the Second Dream quest. The Tenno were sent by the Orokin to fight off the Sentients in war, long, long ago, and the Tenno eventually betrayed the Orokin. It is known that in recent times, the Tenno slept in cryopods, coming to wake in the events of the game. Called to duty under a mysterious entity known as the Lotus, the Tenno now fight to maintain the balance, and to secure and protect their comrades, many who still sleep in their cryopods.

Since we are the Tenno, whatever we do is whatever they do. Tenno fight with Warframe armor, each of which have 4 unique powers that consume Energy when used. Tenno can also channel their Energy into their melee weapons to enhance their attacks, but only while wielding their melee weapon exclusively. Other than their melee weapon, each Tenno can carry two other weapons - a primary and a side arm. They can get around by running, wall running, jumping, sliding, air sliding, and, my personal favorite, meleeing-while-sliding-in-mid-air-to-perform-sick-air-spins-slide-attacks. Although the Tenno are primarily player controlled, they are able to create Specters, which are basically artificial Tenno that fight like the real deal. These can be made by players who build them (Blueprints awarded from special Rescue missions) and deployed either as a sort of bodyguard in missions or given to a clan alliance as guards for their Solar Rails.

There's also the solitary Tenno who is neither a Specter or a player, but an agent of vengeance. The Stalker is a Tenno warrior who holds a grudge against the other Tenno. When you assassinate bosses, you occasionally get a love note from him. When you do, you are considered marked, and the Stalker has a chance to show up on any mission you do. When he comes the lights will flicker, and if the Stalker is coming for you specifically, he will send you messages taunting you before he shows. The Stalker has his own set of abilities, many which come from existing Warframes (Excalibur's Slash Dash, Nyx's Absorb) and his own unique ability, known as Dispel. It will cancel any buffs or supports that Warframe abilities grant. No more Valkyr invincibility. No more Rhino Iron Skin. No more Loki invisibility. It's important to use teamwork to bring the Stalker down as quickly as possible, as being killed by him is an instant death (no bleedout), and he has notably good loot. Recent events have revealed that the Stalker is not alone, and that there may be more entities out there, like him.

Tenno-made weapons are pretty common throughout the game, and with notably varieties. Most of their weaponry is derived from Orokin technology, but are much plainer and more simplistic. Some notable Tenno weapons include the Castanas (throwing knives that can be detonated to shock targets), the Soma (a low damage, high critical chance/damage assault rifle), and the Nikanas (based on katanas, sword and sheath weapon).

A Tenno's physical defenses are comprised of their Shield, their Warframe's Alloy Armor, and their Flesh. Specters are a little different - they wield Ferrite Armor. Ferrite Armor is also the armor Rhino gains from his Iron Skin ability. The Stalker boasts a Proto Shield instead of a regular shield. (You can refer to the Damage Table in the guide to see strengths and weaknesses)
Grineer - Cyborg Clone Spam
The Grineer are arguably the most brutal of the four major surviving factions. They are a race of people mass produced through cloning, thus their numbers are vast. The genetically invasive process of cloning has left many Grineer with notable deformities, and all Grineer use robotic augmentations and armor to keep their bodies moving. The saying goes that the Grineer are better at fixing what's broken than making something that works to begin with. The Grineer answer to their own leaders, known as the Twin Queens or the Sisters, united under the goal of universal domination. Interestingly enough, they are the most unified faction, as their deep hatred for everything not-Grineer rallies them under the banner of exterminating all other life.

The Grineer primarily employ mobs of humanoid enemies as their primary method of combating the Tenno. They usually move in crowds and will attempt to flank using covers, with their melee units charging into the front lines, almost like distractions. They are commonly divided up by their armor categories. First, there are the lightly armored units, which comprise their entire melee force and the shield-bearing Grineer. Next, there are the medium armored units, which comprise most of their ranged weapon users. Although these generally aren't dangerous on their own, their large numbers and varied weaponry can allow them to overwhelm you. Finally, there are the heavy armored units, which include the Drahk Masters, Bombarders, Napalms, Heavy Gunners, and Commanders. These units can be a threat even by themselves, due to their large pools of health, high quality armor, and high damage (but somewhat predictable) weapons. The Grineer also employ some robotics - mostly in the form of Rollers (large metal orbs that do exactly what you'd think) and Latchers (basically small Rollers that latch on to Tenno and other things and explode after a short period). A special additional note about Drahk Masters - in addition to summoning special Feral Kubrows called Drahks, the Drahk Masters can temporarily steal your weapons. You will not lose them permanently, but you need to pick them up off the ground or kill the Drahk Master using them to resume using that weapon during the mission.

One of the few things the Grineer hate more than the Tenno are the Corpus. It is not uncommon for one faction to invade a node owned by the other, and when this happens, you have the option to help the Corpus and fight off the Grineer. If you do so several times, the Grineer will take note of your actions and assign an elite task force known as the Grustrag Three to take you down. After being marked, the Grustrag Three have a small chance of showing up during any mission. When they come the lights will flicker, and if the Grustrag Three are coming for you specifically, the Lotus will begin sending you messages, advising you to retreat. Unlike the Stalker and Harvester, who will teleport after you, the Grustrag Three will simply walk after you, allowing you to escape them if you so choose. The Grustrag Three are composed of Leekter, a melee focused Manticore hammer user, Shik Tal, a Marelok pistol and shield wielder, and Vem Tabook, a Hek shotgun wielder. The best course of action is to divide and conquer. Failure to retreat from them or defeat them will result in them deploying their Carabus Sentinel to place an energy barrier over you (which prevents teammates from reviving you) as it attaches a Grustrag Bolt to you. The Grustrag Bolt will half all damage done to Grineer units until you remove it, which requires you to build a special blueprint (given by the Lotus upon failure). Bringing the three down is quite rewarding, however, so it's recommended if you're capable of doing so.

Grineer weaponry is fairly easy to identify - they are commonly bulky, brutal looking weapons, with rough edges or 'bulges.' They are often very basic in their function, but notably powerful, as seen on the Marelok (a semi-automatic pistol that packs a punch) and the Ogris (a rocket launcher, among the highest damage single shot weapons available). It should be noted that the most common Grineer NPC weapon is the Grakata (a fast firing hit-scan assault rifle with a decent crit rate) which means no bullet dodging. The Heavy Gunners also use the Gorgon (a spooling hit-scan minigun) which gets rather painful rather fast. Other notable Grineer weaponry include the Miter (built like a sniper rifle that shoots sawblades - NPCs will spam this one), the Ignis (a flamethrower), and the Amphis (a fast attacking staff with an eletrical slam attack).

Grineer are the armored units of the game. All Grineer units share their special Cloned Flesh, which is different from the Flesh of the Corpus and the Tenno. The light and most medium units, along with Heavy Gunners, Drahk Masters, and Commanders wear a layer of Ferrite Armor, although the light units usually have a negligable amount. The remaining heavy units, along with the Eviscerators and elites, protect themselves with a thick Alloy Armor. Grineer robotics are different from Corpus robotics, and as a result, they have different quality of armor, named Machinery on the Damage Table.
Corpus - Like Politicians. But With Robots
The Corpus are notable for their humanoid characters being actually human, but that's where the humanity ends. They are a greedy trade and industrial corporation of like-minded individuals that don't answer to a higher calling, like the Tenno or Grineer. They answer only to money and the pursuit of it. It is not uncommon for various members of the Corpus faction to go against each other, because at the end of the day, if they can make a good profit, that's what matters. The primary reason the Tenno are set against the Corpus is because the Corpus praise and seek Orokin and Warframe technology, and have been known to take Tenno in Warframes as they sleep in cryopods and dissect them, selling off the parts. Their high technology puts them at a tactical advantage over the other races - the Grineer are actually somewhat dependant on technology that the Corpus sell them.

Corpus tactics involve sustained fire and tactical robotic employment, a stark contrast to the Grineer's shock and awe mob tactics. The Corpus are divided into three primary unit types, although these are much more visually distinctive than the Grineer's divisions. The most basic of these are the Crewmen - humans in spacesuits with high-tech weaponry and shields. The rest of the Corpus army is comprised of various robotics. The first major sub category of these are the Drones and Ospreys, which are flying robots which, although not notably powerful, offer strategical advantages to the Corpus, whether they restore shields or lay mines on the ground, or even drain shields! There are even suicidal bomber Osprey, known as the Oxium Osprey, known particularly for dropping a semi-rare resource, but only if you kill it before it suicide bombs (you can dodge the suicide bombing though). The second sub category of Corpus robotics are the MOAs. These walkers are armed with a variety of weaponry and can be seen as the workhorses of Corpus combat, with decent damage weaponry and some mobbing tactics. Be warned - triggering an alarm on a Corpus tileset occupied by Corpus often results in several MOAs being spawned from the Corpus cabinets, often resulting in a cluster!

The Corpus are more than happy to throw a little money at their problems, if those problems are the Grineer. It is not uncommon for one faction to invade a node owned by the other, and when this happens, you have the option to help the Grineer and exterminate the Corpus. If you do so several times, a certain Corpus scientist will be intrigued by your Warframe's proficency and deploys a Corpus proxy known as the Harvester. After being marked, the Harvester has a small chance of showing up during any mission. When it comes, the lights will flicker, and if the Harvester is coming for you specifically, the Harvester will begin... beeping at you. It kinda roars as well, I guess. Evading it when it shows up can be difficult, since it teleports, but it can be killed, for good rewards. It is immune to some CC moves, particularly those that ragdoll, but can be slowed, blinded, and managed fairly easily with most Warframe abilities. A defeat at the hands of Zanuka the Harvester will result in you being captured by the Corpus! You will be removed from the mission and placed in an Escape mission, which forces you to find your primary, secondary, melee, and powers before fleeing from your prison.

As stated before, the Corpus rely on sustained fire and high technology for their weaponry. A lot of Corpus weaponry have Electric, Magnetic, or Radiation damage instead of physical damage, which can be painful do deal with, and wonderful to use. Common Crewmen use the Dera (basic laser assault rifle), which although not hitscan, travels relatively fast. More powerful Crewmen will employ the Lanka (a high electric damage sniper rifle), the Flux Rifle (a pinpoint accurate laser rifle), and Corpus Techs, the strongest of the weaklings Crewmen uses a Supra (spooling laser minigun) fairly effectively. You also have the powerful tactical wise Prod Crewmen that will run at you with a Prova (electric damage machete weapon). The Ospreys and MOAs use their own varieties of weaponry that cannot be obtained by players.

All Corpus, without exception, use Shields. The Corpus Tech employs a Proto Shield instead of a regular shield, but otherwise, without fail, all Corpus use Shields. It's their thing. After their Shields, the human Corpus have only their Flesh for defense, while the robot Corpus rely on their distinctive metallic armor for protection, referred to on the Damage Table as Robotic.
Infested - The OMGWTFISTHAT Faction
The Infested are the result of the Technocyte virus infecting an entity and taking over it. This is apparent when one looks at the physical appearance of the Infested - Chargers were Grineer before becoming infected, the Ancients were plantlife before corruption, and most other units were Corpus Crewmen or robotics before the virus overtook them. They share a mysterious connection with the Tenno. It is extremely rare to see an infested Warframe, but they can be created. Not much is certain. What is certain is that these monstrosities are at least somewhat organized, as swarms of Infested commonly attack and invade various establishments across the Solar System, settling in on Eris. They seem to be at home in the Orokin Derelicts, however, where they are the prevalent lifeform. The Derelicts sit on the edge of the Solar System and can be accessed by utilizing Navigational Coordinates to create Derelict Keys (blueprints in the market).

The Infestation has afflicted a large variety of units. They will move in groups and attempt to surround whatever they're attacking, making escape difficult. Chargers and Runners will get within melee range and start swinging, while Leapers will attempt to lunge at you while dodging your attacks. Volitale Runners will explode within range for massive damage (NOTE: This is no longer a joke - damage now scales). Crawlers are carried by Mutalist Ospreys. The Ospreys will drop the Crawlers, which will crawl at you, with some elemental variants lobbing attacks projectiles. They can be difficult to hit, as they are low to the ground. After dropping their crawler, the Mutalist Ospreys will charge at you, deploying toxic clouds in the air. Mutalist MOAs can perform ground slams like their uninfested counterparts, and can also fire either vision and damage reducing spores or speed reducing, damage dealing tar pits. The final category, the Ancients, are divided into two sub-categories - the spawners and the aura casters. The tall, aura casters will swing their long-reaching arms at you, capable of knocking you down or dragging you close. There are three variations of these aura casters that boost other Infested capabilities (Toxics grant added poison damage to nearby allies, Healer reduces ally damage and heals self when nearby allies are attacked, Disruptors grant energy draining attacks to nearby allies and reduce damage dealt by Tenno powers). The stout spawners come in two flavors - the maggot spawning Brood Mother that creates health draining and slowing maggots, and the spawn pod creating Boiler, the new highest priority Infested, which creates pods that spawn smaller Infested over time.

As previously stated, the Infested are known for attacking and invading Corpus and Grineer controlled territories. Both the Corpus and Grineer can tell what the virus has done to their comrades and can do to them, so they are willing to pay the Tenno to help exterminate the Infested, reclaim lost assets, and... raid their own ships as the Infested cut off life support? Sure. Let's go with that. During an Infested Invasion, all nodes being invaded are turned into missions you must complete 3 times for a predetermined battle pay - this can be an easy way to earn money and components for Clan Research weapon building. If the Infested invade an Assassination mission, the boss becomes Phorid, a large Charger with some added powers.

The Infested themselves do not use weapons, as they are too horribly deformed to even consider it. There are weapons that have been corrupted by the Technocye virus, and weapons that can be engineered through the Mutagens commonly found in Infested stomping grounds, though. These weapons are commonly elemental and often look like they're alive, having strong ties to their infected origins. Outstanding examples include the Phage (shotgun that fires wiggling tentacle-like viral-based laser beams), the Torid (a grenade launcher that deploys 'spores' that spray a toxic cloud), the Embolist (a sidearm that sprays toxic fumes), the Synapse (highly critical assault rifle that fires an electric beam), and the Dual Ichor (pure toxic dual daggers with high critical rates).

Their defenses can be difficult to remember due to their naming conventions. There are two types of Infested skin, referred to simply as Infested and Infested Flesh. The melee only units (Chargers, Runners, and Leapers) have nothing but their Infested health to protect them, while Volitale Runners, Mutalist Ospreys, and Crawler variants possess what is called Infested Flesh. These properties defend differently, as shown on the Damage Table. The Mutalist MOAs and Ancient units have had their skin become Fossilized with age. Finally, Phorid possess it's own armor class, a tough layer of Sinew.
Orokin - Just a Little Bit of Everything
The Orokin were a people of a long time ago. They created highly advanced technology that rivals modern technology, in their towers of ivory and gold. Sometime ago, the Orokin were engaged in war with entities known as the Sentients, which were also believed to be Orokin creations. To combat the Sentients, the Orokin turned to the Void. It is said that those of the Orokin who were sent to the Void and returned, twisted but alive, became the Tenno, or at least the ancestors of the Tenno, wearing the Orokin created Warframes and engaging the Sentients. The exact outcome of this war isn't known, however, from the Stalker's codex, it can be assumed that the Sentients were quelled, and when the Tenno returned from war, they slew the Orokin. As a result, no actual Orokin exist, and their towers are instead filled advanced technology proxies, with machines that impliment mind-controlling devices upon any non-Tenno organism that enters the Void.

The Orokin Void is currently the only place where the Orokin's Corrupted units appear. They're fairly easy to identify, as you've been seeing them throughout the solar system. The Heavy Gunner, Lancer, Bombard, and Butcher are borrowed from the Grineer, the Crewman, Nullifiers, and Fusion MOAs are borrowed from the Corpus, and the Ancient Healers are borrowed from the Infested. The only real tactic the Corrupted seem to display is that they'll herd underneath Orokin Drones to obtain shields. The traps in the void are a huge threat - the laser traps can kill you in less than a second, if not careful. The Gunners can be extremely dangerous, however, since they have much more health than their unCorrupted counterpart, and the Bombards can one-shot weaker frames on higher difficulties, while the Nullifiers protect themselves and nearby units from all Warframe abilities. They can be difficult to sneak attack due to all the branching paths in the Void - it's not uncommon for their patrol paths to have them facing each other.

The Void received an update in the form of T4 keys. During a T4 mission, a Corrupted version of the Mecury Boss, Captain Vor, can appear. He is far more dangerous then before and has a new weakpoint in the form of his glowing, bisected gut. Taking him down becomes high priority when he appears, as he can and will bring your team down, and drops exclusive mods that were once only available through events.

Orokin weaponry is the same as Tenno weaponry, except more powerful - generally they are direct upgrades. They're denoted by gold and white color schemes and the word "Prime" in their name. Examples include Boltor Prime (a fast firing assault rifle that shoots bolts with a small travel time) and Glaive Prime (a three-bladed disc that can be thrown). The Corrupted do NOT actually use Orokin weaponry - the Heavy Gunner continues using the Gorgon, the Lancers will use a Dera rifle, and the Crewmen will, for some reason, use the Strun (the starter shotgun. Pretty slow, but can be painful at close range.)

Be warned, they are NOT exactly the same as their unCorrupted counterparts when it comes to their defenses (differences are underlined). The Grineer-based Orokin have special Cloned Flesh, with the Gunner and Butcher (although negligable) wearing Ferrite Armor and the Bombard and Lancer wearing Alloy Armor. The Crewmen and Nullifiers use Shields, but are only protected by their Flesh after that. The Drones and MOAs also use Shields, and are protected by the Robotic frames. Finally, the Healers have a layer of Fossilized skin protecting them.
(Spoilers) - A Faction Note You Should Not Read Before "The Second Dream"
Seriously, skip past this section if you haven't completed "The Second Dream." I will not be held responsible for dumb baby men who spoiled it for themselves.

Still reading? I'm blacking this out!

Snape killed Dumbledore.

The Sentients have returned. Again. This race of mechanical super-beings once threatened to wipe out the Orokin Empire. It took the Orokin, with their weaponry, technology, use of the Infestation, Grineer slaves, AND Tenno soldiers (which turned the war in the Orokin's favor) to stop the Sentients last time. Now, Hunhow the Sentient has returned, intending to finish what he started - wipe out the origin system and exterminate the Tenno. Crap just got real, kids.

The Sentients are currently only found on the Orokin Moon tileset, on Earth. There are only three units, and only two of them actually fight. Easy, right? NOPENOPENOPENOPENOPE. The Oculyst will scan parts of the map, looking for Tenno. If you are scanned, or you attack them or try to scan them, they'll take off and be replaced by a Conculyst and a Battalyst. These flying units are fast and powerful, so prioritize them. Or run. Running is good too. Sweet mods for killing them though.

Other than the way they spawn, there are no real events based on the Sentient at this time, other than the fact that the Stalker becomes the Shadow Stalker after the Second Dream. His powers have changed, and his defensive mechanisms function like the Sentinets, adapting to damage and requiring you to change damage. He also uses the War sword. In ways, he is less dangerous, because you don't have to worry about Absorb, but in other ways, he's more dangerous, still using Dispel and having higher melee damage output.

Currently, War and it's broken counterpart are the only Sentient weapons available to players. The Sentients themselves use weaponized arms that they can trade between one another, with the Battalysts using laser beam arms and the Conculysts using baton arms to fly in and beat your booty in.

All Sentient units have Ferrite Armor and a unique health type that is unaffected by damage. This is due to their unique defensive measure - adapting to the primary damage type being inflicted on them. They can do this up to 4 times in one life, doing so after losing a percentage of health. The best way to fight them is to use weapons with balanced physical damage and using multiple elemental types, so you have a way to fight them no matter what they've adapted to.
Syndicates
There exists a smaller scale conflict in the mix. Syndicates have banned together under distinct ideas in an attempt to assert peace by supporting the Tenno. The various syndicates are at conflict with each other, however, as they build alliances, rivals, and enemies. So how does all this affect you?

You can join one or more syndicates by interacting with the syndicate node in the front of your ship. Each syndicate has it's own beliefs, as well as benefits, and you cannot effectively level all syndicates at the same time. Take the time to look over the syndicates reward options before making your decision as to which ones you will level first, as the enemies of syndicates you level become harder to level, and many of the items are exclusive to this aspect of the game.

In order to benefit from most syndicates, you must wear their sigil on your Warframe and gain affinity through any means. A fraction of affinity you gain while wearing a syndicate's sigil will increase your reputation in that syndicate. Reputation is used to rank up, and is also the currency used to make purchases from your syndicate. After ranking up, syndicate specific missions crop up daily to allow you to gain more reputation. There is a daily reputation limit for all syndicates, however, which depends on your Mastery Rank. The higher, the better. The Conclave, it's own syndicate, requires you to participate in their games. Which I still refuse to do.

Below are the different syndicates, their ideas, and what they can offer you. Note that weapons and mods obtained through factions ARE tradable, but will probably cost a pretty platinum, due to the time it takes to obtain them. Also note that supported weapon mods do NOT work for any variant of a weapon except the version listed (the Bolto mod does NOT work with Akbolto, for example)

Legend:
A = Allied factions. Wearing the sigil of one will increase your reputation of the other by 50%
O = Opposed factions. Wearing the sigil of one will decrease your reputation of the other by 50%
E = Enemy factions. Wearing the sigil of one will decrease your reputation of the other by 100%
Supported weapons = weapons that this faction offer exclusive mods for.
Supported Warframes = Warframes that this factions offer augmentation mods for.
Unique weapon = an exclusive supped up version of an existing weapon with innate, syndicate exclusive power ups, offered at the highest rank
Supported utility = a deployable that restores the corresponding attribute. Syndicates offer a larger variant than regularly available.
Preferred mission type = syndicates sell Tier 4 Void missions of this type.
In-mission NPC = represents both the NPC type that the syndicate sells as a specter deployable and the NPC type that will invade your missions in large groups if you achieve a large negative reputation with that syndicate.

Steel Meridian
A: The Red Veil
O: New Loka
E: The Perrin Sequence
Supported weapons: Hek, Dual Cleavers, Sobek
Supported Warframes: Ember, Excalibur, Frost, Nova, Oberon, Rhino, Saryn, Mesa
Unique weapons: Vaykor Hek, Vaykor Marelok
Supported utility: Large Team Health Restore
Preferred mission type: Defense
In-mission NPC: Eximus Grineer Rollers
Grineer defectors who want to protect the weak and innocent and deliver their own version of justice.

Arbiters of Hexis
A: Cephalon Suda
O: The Perrin Sequence
E: The Red Veil
Supported weapons: Burston Prime, Jaw Sword, Viper
Supported Warframes: Ash, Excalibur, Limbo, Loki, Mirage, Nyx, Volt
Unique weapons: Telos Boltor, Telos Akbolto
Supported utility: Large Team Energy Restore
Preferred mission type: Survival
In-mission NPC: Eximus Orokin Corrupted Lancer
What appears to be Tenno or Orokin observers who wish to see the Tenno surpass the Orokin though their discipline.

Cephalon Suda
A: Arbiters of Hexis
O: The Red Veil
E: New Loka
Supported weapons: Bolto, Kestrel, Supra
Supported Warframes: Banshee, Frost, Hydroid, Limbo, Mirage, Nova, Vauban, Chroma
Unique weapons: Synoid Simulor, Synoid Gammacor
Supported utility: Large Team Shield Restore
Preferred mission type: Mobile Defense
In-mission NPC: Eximus Corpus Shield Osprey (Eximus Corpus Scavenger Drones comprise the Death Squads instead)
An AI consciousness thirsty for knowledge and full of curiousity, irregardless of the destruction the pursuit may bring.

The Perrin Sequence
A: New Loka
O: Arbiters of Hexis
E: Steel Meridian
Supported weapons: Acrid, Grinlok, Spectra
Supported Warframes: Banshee, Mag, Nekros, Rhino, Trinity, Valkyr, Vauban, Chroma
Unique weapons: Secura Penta, Secura Dual Cestra
Supported utility: Large Team Energy Restore
Preferred mission type: Capture
In-mission NPC: Eximus Corpus MOAs
A Corpus subfaction that rejects the idea of conflict as profit and wishes to monetize on a shared peace instead.

The Red Veil
A: Steel Meridian
O: Cephalon Suda
E: Arbiters of Hexis
Supported weapons: Dark Dagger, Embolist, Mire
Supported Warframes: Ash, Ember, Loki, Nekros, Saryn, Volt, Zephyr, Mesa
Unique weapons: Rakta Cerno, Rakta Ballistica
Supported utility: Large Team Ammo Restore
Preferred mission type: Exterminate
In-mission NPC: Eximus Infested Charger
Possibly a Tenno-based faction of extremists who see corruption everywhere and believe the only solution is a purging fire.

New Loka
A: The Perrin Sequence
O: Steel Meridian
E: Cephalon Suda
Supported weapons: Furis, Skana, Vulkar
Supported Warframes: Hydroid, Mag, Nyx, Oberon, Trinity, Valkyr, Zephyr
Unique weapons: Sancti Tigris, Sancti Castanas
Supported utility: Large Team Health Restore
Preferred mission type: Interception
In-mission NPC: Eximus Infested Ancient Healer
Sponsored by a human/Lotus like entity, they worship the human form and repopulation of Earth, to reobtain it's former beauty.
Open World
What? A new section? In this guide? UNFATHOMABLE!

Yes, but there's a new game mode that deserves it's own section - the Free Roam missions. At the current point in time, we have three free roam areas: The Plains of Eidolon on Earth, the Orb Vallis on Venus, and the Heart of Deimos, on.... Deimos. I guess that makes sense. To start a mission in the Plains of Eidolon for the first time, enter Cetus and pass through the massive gate across the map. Afterwards, you'll be able to access the Plains directly from your star chart. To start a mission on the Orb Vallis for the first time, enter Fortuna and pass through the elevator. For the Heart, access the corresponding quest and complete it.

What makes open world areas so different? The map never changes, and is massive, spanning across several kilometers. The Plains, Vallis, and Heart themselves do not have an objective to complete and you can leave at any time through the designated exit, which takes you back to corresponding city hub. You must extract this way in order for your session to be "complete," otherwise you'll lose your progress like you failed a mission.

Open world maps have unique resources used to make and buy items provided by the people of their corresponding city hub. Each city hub acts like a Syndicate, with players being able to do missions or provide resources for the city in order to obtain standing that can then be traded for goods and services.

So what do you do actually do in open world missions? Speaking to Konzu in Cetus, Eudico in Fortuna, or Mother in the Necrolisk allows you to select one of several difficulty based Bounties. Bounties are 4 to 5 step mini-missions that emulate regular Warframe objectives - such as exterminating enemies, guarding a payload, assassinating a "boss," and so on. The Plains are Grineer controlled, so remember - puncture, corrosive, radiation. The Corpus run the Orb Vallis, so I advise impact, toxin, and magnetic damage. The Heart is horribly infested, so slash, fire, corrosive.

Here's a brief rundown on the characters and services offered by each open world hub:
  • Fishing (Fisher Hai-Luk on Cetus, The Business on Fortuna, Daughter in the Necrolisk)
    Exchange standing for fishing spears or shock prods, bait, and cosmetic trophies. Fish can be caught in various bodies of water, with different varieties being available depending on factors like day or night, water temperature, type of body of water, and bait used. You can also exchange caught fish for standing, or dissect the fish for resources usable in crafting.

  • Mining (Old Man Suumbaat on Cetus, Smokefinger on Fortuna, Otak in the Necrolisk)
    Purchase mining guns, gem and ore refinement recipes, and other cosmetics. You can mine for gems and ores by wielding the mining gun and looking for rocks with deposits available to harvest. It's recommended to buy the Sunpoint Drill in Fortuna, as it starts more powerful than the strongest mining gun available on Cetus. You can exchange gems for standing. Otherwise, the gems and ores are used for crafting items.

  • Weapons (Hok for melee Zaws on Cetus, Rude Zuud for secondary weapon Kitguns on Fortuna, Father for Infested weapons (non custom))
    Exchange standing for weapon parts, then combine them into your ultimate custom weapon. One of my favorite features of the open world. Once you level a custom weapon to level 30, take it to the corresponding vendor to reset it, just like using Forma on it. You can rename it and recolor it like any other weapon.

  • Hunting (Master Teasonai on Cetus, The Business on Fortuna, Brother in the Necrolisk)
    You can collect animal parts in exchange for displayable animal items. Cetus doesn't have "true" hunting, but you can kill the birds, rabbits, etc and trade their parts for the corresponding animals to display, as well as skins for your Kubrow/Kavat. The Business has a special farming resource allowing you to "tag" critters on the Orb Vallis and relocate them to preserve them. Brother goes a step further - instead of offering customizable weapons, Brother offers materials to make customizable followers. Creepy infested pets. Why not?

  • Other
    Cetus additionally has a mask vendor named Nakak that can trade resources for masks usable after a certain quest.
    Fortuna has a few other notable services. Ticker will trade secondhand cosmetics for your ship, and also offers the Tenno the "debts" of the indentured Solaris United workers. A Tenno that purchases those debts is rewarded with "bonds," used to level up Solaris United standing.
    In addition to Ticker, Fortuna has a custom Moa vendor named Legs. Want a Corpus Moa follower that wears a top hat? Done deal. Legs is your guy.
    Finally, Fortuna has the Ventkids, aero-skateboarding little rascals. You get your own K-Drive (read: hovering skateboard) that you can customize with them.
    The Heart of Deimos has Grandmother as well, who can take tokens you collect from other family members and exchange them for favor or other special services.

On a closing note, check back after The War Within. All open world hubs have additional factions that become unlockable afterwards.
Sorties
This section is at the end of the guide for a reason. It's basically the game's answer to challenging, end-game content. And it somewhat is. Mostly for the wrong reasons.

You can complete a Sortie once a day. To do so, you must have Mastery Rank 4 and a level 30 Warframe. That doesn't seem that "end-game," right? Well, go take your level 30 no-reactor no-Forma Volt and MK-1 Paris into one of these things and let me know how it goes for you.

These missions are a series of 3 missions against a single faction with three plot twists - the enemies start at level 50 and go over level 100 (read as: weaker Warframes will be killed in one shot), the mission has an additional condition, like a Nightmare Mode mission would, and the mission itself is modified to be made more difficult (A non-endless Survival usually last 10 minutes. A Sortie Survival lasts for 15 minutes, Exterminate missions have enemies permanently alerted, Spy missions require all 3 data vaults, etc). The Nightmare Mode like conditions vary vastly, between equipping only one weapon type, to enhanced enemy defenses or offenses, or weakened Warframe defenses, to having Radiation effects added to everything (FRIENDLY FIRE FOR EVERYONE FOREVER!) In some missions, it's not even worth kiling the enemies, and you might not even be capable of killing them.

So why put up with this?

Who knows? Credits, I guess.

I'm in the camp of people that enjoyed sorties prior to reward changes. Now I'm wondering where I'm going to put my seventh Ayatan statue and if I want to spend all the Kuva rerolling that cancer Ogris mod I got. But Orokin Catalysts and Reactors are always good. There's some value to them.

Don't be afraid to use "cheap" strategies in Sorties, like Link/Vampire Trinity, Blind Prism spamming Mirage, Chaos Nyx, Unkillable Valkyr/Wukong, or Exalted Blade Excalibur. This is the best place for those strategies, because these enemies deserve the worst you can throw at them.
114 comentários
CoffeeChippy  [autor] 1 jun. 2024 às 19:02 
Thank you! It's admittedly rather outdated at this point, but the inclusion of Duviri start would require an almost complete rewrite, which isn't super feasible at the time.
Wrenwings 1 jun. 2024 às 17:53 
Hi hi! Like 800 hours in Warframe, I can nuke Steel Path in seconds, suuuper nice guide btw. Figured I'd look at it cuz I was curious, and it's actually super detailed and nice. Congrats!
SkyTrainWand 16 ago. 2020 às 12:50 
this guide is honestly incredible. Thank you. As a new player, this was much needed
CoffeeChippy  [autor] 5 abr. 2020 às 14:23 
Hi! Hopefully sometime soon, but no promises.
Sesame0 4 abr. 2020 às 22:40 
is this ever going to be updated? just curious since it is very in-depth and extensive
Ricky Pee Pee 2 jun. 2019 às 15:57 
You left Atlas out of quest warframes
CarlozHolz 3 jul. 2018 às 11:52 
Uhm... hello!
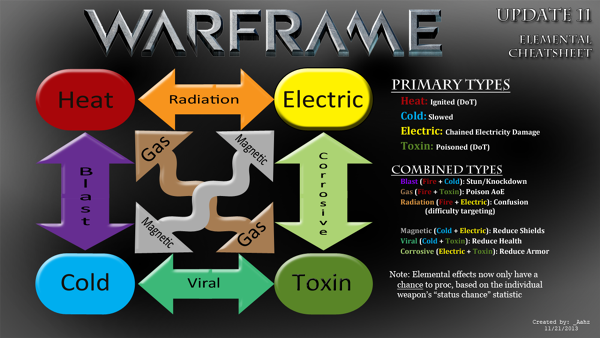
I have just finished reading this guide and I think it is just simple and gorgeous.
Well, I am here to ask if I can use this guide to translate it into Spanish. I mean, that'd be awesome for me to do. I've written many guides myself and that's how you know I wont mess up.
Thank you in advance!
Rando 1 jun. 2018 às 0:25 
Is this guide up to date for 2018?
76561198166937015 27 dez. 2017 às 8:44 
Should Honestlly put Dio shouting Z A W A R U D O at the Limbo Part
EndEz 30 ago. 2017 às 11:05 
Update this please