Stellaris

Stellaris

169 ratings
Enabling Achievements in Stellaris With Mods (All game versions) [SRE]
By class101 [deck]
In this new educational guide, I show you the basics of software reverse engineering (SRE). I show you how, starting from what we know, we arrive at what we are looking for.

Note: It is generally frowned upon to do SRE on a game, game developers generally don't like it, what is normal. In this case I explain how this can be legitimely useful to do in the "What we know" section.

Disclaimer: Even if you like this guide, remember that you should not upload the modified Stellaris executable to download sites, as well as you are not allowed to share it with any other person. Sharing this file is totally illegal and could get you in troubles, please don't try. Just share a link to this guide will be enough, and thus you will perhaps contribute to arouse new vocations, Knowledge is the key :s

Note to Paradox Interactive: Please don't waste your efforts banning this method, this will be really difficult for you to counter and easy for us to workaround (we could teach each others on how to unpack binaries it is not that hard :s) Ideally to fix this you need to allocate more people on translating this title, it's unacceptable to have to play in Frenglish, Italenglish, Spanenglish, seriously a project of this mature shouldn't even need a mod for translations, and in this case, if you had done all this properly translated, yes it would be logical to disable the mods if the checksum does not match but only on important and untranstable files.

13
6
2
3
5
2
2
2
3
2
2
   
Award
Favorite
Favorited
Unfavorite
Installing Ghidra


Ghidra is a software reverse engineering (SRE) framework created and maintained by the National Security Agency[1] Research Directorate. This framework includes a suite of full-featured, high-end software analysis tools that enable users to analyze compiled code on a variety of platforms including Windows, macOS, and Linux. Capabilities include disassembly, assembly, decompilation, graphing, and scripting, along with hundreds of other features. Ghidra supports a wide variety of processor instruction sets and executable formats and can be run in both user-interactive and automated modes. Users may also develop their own Ghidra extension components and/or scripts using Java or Python.

In support of NSA's Cybersecurity mission, Ghidra was built to solve scaling and teaming problems on complex SRE efforts, and to provide a customizable and extensible SRE research platform. NSA has applied Ghidra SRE capabilities to a variety of problems that involve analyzing malicious code and generating deep insights for SRE analysts who seek a better understanding of potential vulnerabilities in networks and systems.

Follow the installation instructions at https://ghidra-sre.org/ (requires Java 11+)

Arch Linux advice

Little advice for my brothers under Arch Linux :)

The following 3 versions are available
  • community/ghidra[4] (official package, debugger is not enabled)
  • aur/ghidra-git[5] (fork of official package, debugger is not enabled)
  • aur/ghidra-dev[6] (debugger enabled)

If you just need Ghidra for the guide, community/ghidra[4] will suffice and will do all what you need.

aur/ghidra-git[5] is a fork of community/ghidra[4], with it you will build Ghidra completely from the sources on the master branch at every new commit made on Github. It has no debugger because it is currently in development on another branch.

I'm personally using and maintaining the aur/ghidra-dev[6] package, it is defined to use the debugger branch, it is faster to build with parallel mode enabled, and I enabled the debugger by pointing the package to the debugger branch on Github. I initially forked it from aur/ghidra-git[5], but it is now a rework from scratch to better follow the recommendations of Ghidra's developers with a cleaner PKGBUILD master file.

With aur/ghidra-dev[6] you can now have a disassembler and a debugger side by side in early preview (because it is not released yet), but it's fully functionnal and really amazing to use.

Installing Ghidra script : savePatch


With Ghidra, it's very easy to understand and modify an executable, whether it is compiled for Windows, Linux or MacOS.

But currently a very interesting feature is missing which should see the light of day soon. Currently with Ghidra, you are able to patch an executable in the own ram memory of Ghidra, it is called "Patch Instruction" but in order to be able to commit the patch in the executable on the disk, you will need to install a Ghidra script called savePatch[2].

In order to install it, please follow these instructions :
  • Start Ghidra
  • If you see NO ACTIVE PROJECT as the picture below create a new one File > New project

  • Give the project the options of your choice

  • Run the CodeBrowser tool

  • Hit the Display Script Manager button
  • Hit the Create New Script button

  • Select Python and name the script as SavePatch.py
If it is your first time loading Ghidra, you will probably need to create the directory ~/ghidra_scripts on your system and in the Script Manager window, you click the Manage Script Directories button and verify that the folder is checked (thanks /u/torin23)

  • Copy the content of SavePatch.py here[raw.githubusercontent.com] and paste it into the Ghidra script window

  • And finally, hit the Save button


Congratulations, your Ghidra installation is all set and we can start right now with the real deal :)

What we know


  • The localization of Stellaris is partial, even if the game is translated into different languages, all translations still contains English to a point rarely matched in a game of this stature.

  • Installing a translation mod, like this excellent one[3], disables the unlocking of Steam achievements.
    It's a bad choice of architecture that has never been fixed by the PDX developers, surprising for a grand strategy game that has been in development for years, you will imagine that they push perfection to excess, but no, far from it, sadly...
    Hopefully they will not work to ban my method because they would be really stupid and would prove to the whole world that they would rather waste their time instead of working to improve their product.
    Technically if you want to ban my method, no problems, but allow the installation of translation mods without breaking the Steam Achivements too !


  • The game checks the integrity of certain files, and if it does not match, Steam achievements are disabled.

  • A file named checksum_manifest.txt located in the root of Stellaris directory is apparently used in the integrity checking system.

Regardless of the file content, the name of the checksum_manifest.txt file seems like a good entry point to understand the integrity checking system, you will understand very soon.

Analyzing Stellaris


The first step is to analyze with Ghidra the structure of the executable file of the game (stellaris on Linux, stellaris.exe on Windows, etc ...)

This step is better known as disassembling the Stellaris binary executable.

In order to start the analysis, please follow these instructions :

  • Start Ghidra
  • Drag and drop the Stellaris executable onto the Ghidra project (stellaris.exe on Windows or stellaris on Linux) and validate

  • Wait for the initial import to complete

  • Right-click on the binary > Open With > CodeBrowser

  • Answer 'Yes' to the question and leave the default options checked

  • Take a coffee, have a break, this process can be very long (~1h on core i7). Wait until you see no more activity on the status bar. (the larger the size of the executable, the longer this step will be, 40MB is already big)

    In reality most of the executables are much smaller in size, good developers often take the time to split their code into * .dll and * .so libraries.
    It is a fairly typical bad practice in the video game industry to put all the code in a single executable to end up with a gigantic executable. Some studios are not even ashamed to publish sizes even beyond 100MB. It's pretty ridiculous and often indicates that the development team is building very poorly structured code...

  • In the CodeBrowser, hit File > Save All (this will save the analysis in the ghidra project and this eliminates having to analyze the executable each time you restart Ghidra until the next update)

Well done, the analysis is over, it's only a matter of minutes now to find what we're looking for :)

Discovering the point of interest


Now that the analysis of the executable is finished and saved, we can therefore search for our first point of interest, the point which will bring us closer to what is to patch to activate the achievements permanently.

Do you remember the name we found in step "What we know", checksum_manifest, now is the time to use it.

We are therefore going to find out which part of the executable's assembly code calls on the checksum_manifest.txt file, please follow these instructions :
  • In the CodeBrowser, go in Window > Defined Strings and wait for the strings to load

  • In the Defined Strings window, search for checksum_manifest and click the entry found

  • Did you notice ? When you clicked the line in the previous step, the Listing window has automatically been synchronized and now it highlights the position of the string "checksum_manifest" in the .rodata section

  • The interesting part is the one annotated below, it means that the filename checksum_manifest is used in only 2 places which are both in the same method called CalculateGameFilesChecksum(), peanuts!
    Now double left-click the red annotated area below to directly go to the referencing code

  • This puts us directly inside the CalculateGameFilesChecksum() method

  • Now we will activate the decompiler to understand a little better where we are. Now left-click the Decompiler tab as below

  • Did you notice ? In the window named "Decompile" the cursor is automatically placed on the same line as the one selected in the "Listing" window, you can even select the entire line for better readability

  • It would be interesting to stop here to analyze what this method does or to replace the return variable of the method, but in reality we want to make it much simpler.
    Because this method is quite huge to handle, the further we are from her, the better. Instead we will find out the referencing code from where this CalculateGameFilesChecksum() method is called.

    To do this scroll up a few lines until you find the first line of the method as below
Windows users: It has been brought to my attention (thanks ShadyDemoness) that the start of the function is not exactly the same on Windows, indeed, but anyway, don't worry about that, once you find the reference of checksum_manifest, just be sure to scroll up a few lines until you see the first occurrence of XREF:[NUMBER], double click XREF:[NUMBER] should open a newer window with all references to this method, you have to select the row marked with a RefType called UNCONDITIONNAL_CALL.
You can also try to click the references on the right of XREF:[NUMBER] as I do below in the screenshot, but since you don't have the method names under WIndows, it might be more complicated, under Linux, there are 8 references, and only one of them is marked as RefType UNCONDITIONNAL_CALL in the references window. As far I checked on ShadyDemoness's screenshot, you should only have 1 reference on Windows


Windows

  • The interesting part is the one annotated below, it means CalculateGameFilesChecksum() is called from the InitGame() method.
    Now double left-click the red annotated area below to directly go to the referencing code

Windows

  • We are now 4 lines away of the solution, well done :)

Windows

Congratulations ! you just found the code responsible for checking whether the integrity of files is valid or not. Now you have to understand it and patch it in the simplest and cleanest way possible.

Understanding the code to patch


One of the best options that Ghidra brings is its decompiler, it is able to translate assembly code into C code so that the program is easier to read. And in my opinion, it does that even better than IDA Pro, another paid disassembler that was the only one to offer this option for several years.

There are several very useful informations that we can take from decompiled C code.


strcmp() is a C method which does string comparison, a return value of 0 means strings are equal
  • The official md5 hash for Stellaris v3.0.1 (c04b) is 43cd71b239a1a03991f563e6206ac04b
  • The calculated md5 hash of your local files is in the ppcVar16 variable
  • A string comparison is performed with strcmp() between the official md5 hash and the calculated md5 hash
  • If they are equal, 0 is set in the variable iVar9
  • And if iVar9 is equal to 0, also means CAchievementsManager::SetValidated(TRUE)
  • And if iVar9 is equal to 0, also means FillCrashReporterChecksumInfo(FALSE)

There are several ways to correct this code, the shortest (2 bytes to modify) and fastest one is most definitely; If we manage to patch iVar9 so that it always contains 0 (regardless of the previous call to CalculateGameFilesChecksum), the integrity check will always be successful and we will be able to unlock achievements even with the mods enabled.

Note: It won't even trigger the alert Paradox Interactive seems to have maliciously concealed to be alerted to integrity test failures with the FillCrashReporterChecksumInfo(iVar9 != 0) instruction :s

Patching Stellaris


Now let's take a look at how this strcmp() method works with a side by side view.


In assembly language, a conditionnal check is often represented by the CMP with the JNZ/JMP instructions or TEST and CALL instructions.

Without going into details, here what we can see is that iVar9 is actually the EBX register, and if we manage to force EBX to be 0 all the time, the file integrity check will still run with success regardless of the call to strcmp :)

The magic is in the XOR instruction.

XORing an operand with itself changes the operand to 0. This is used to clear a register[7]

In this case, we will use XOR to clear the EBX register to 0, we will replace
TEST EBX, EBX
by
XOR EBX, EBX
in order to force EBX to always contain 0

  • In the CodeBrowser, right-click on the line containing the TEST EBX, EBX instruction and select Patch Instruction

  • Edit the TEST instruction, change it to XOR and press Enter

  • Notice the Listing window has been updated

  • The Decompile window as well


As you can see, the change we just made is visible directly in the decompiler. Thanks to Ghidra ! That confirms that this is exactly what we were looking to do !

Now keep in mind that these changes are currently residing in Ghidra's ram memory. We need to send them to the executable on the hard disk.


This is where the previously installed SavePatch script comes in.
  • In the Listing window, don't just click but select all the line XOR EBX, EBX
I insist on the fact that if you want SavePatch.py ​​to work correctly you have to select the whole modified row and not just click through

  • In the toolbar, click the Display Script Manager button

  • Scroll the list down, select the SavePatch row and click the Run Script button

  • In the new window, navigate to the root of the Stellaris folder, select the stellaris executable and click Save Changes to overwrite the original executable
If you don't see this screen but another instead, it means that you have wrongly selected the row in the Listing window, git gud at selecting ;s

  • And finally in the Console window, you will see something similar to this


Stellaris is now patched. So you can, provided you have activated the IronMan mode, unlock the Steam achievements while having mods enabled.

Changelog


04/20/21 - [Discovering the point of interest] added screenshots and instructions for Windows
04/17/21 - Initial guide creation

81 Comments
Trendy Ideology Apr 17 @ 5:40am 
https://i.imgur.com/yGlMuiE.png
https://i.imgur.com/wnfLjGX.png
https://i.imgur.com/Mu68DHW.png
https://i.imgur.com/84ni8J2.png

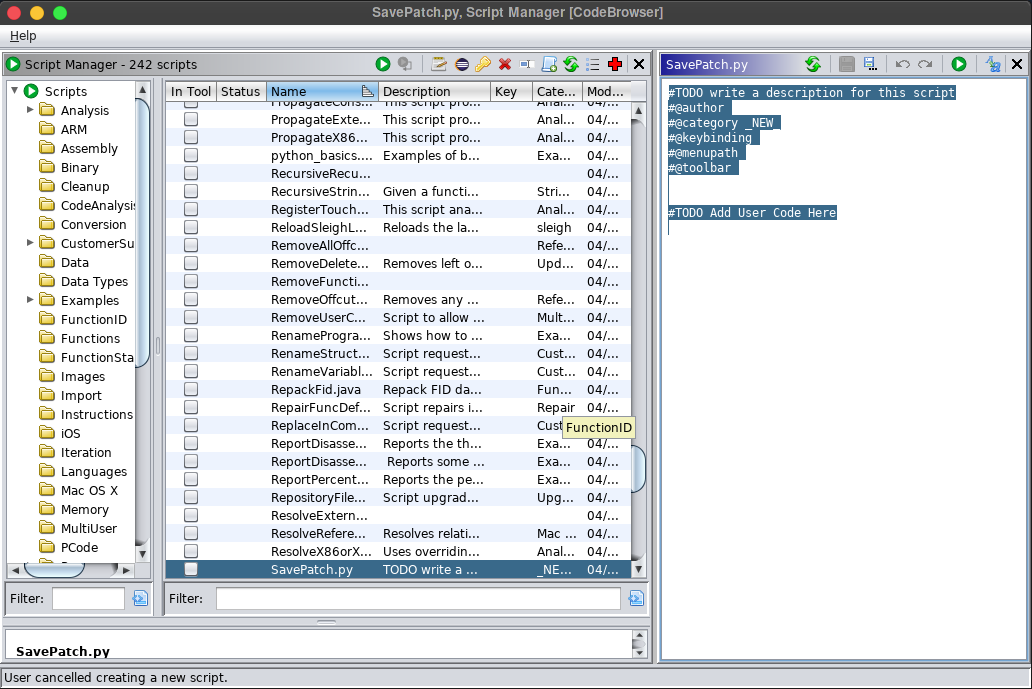
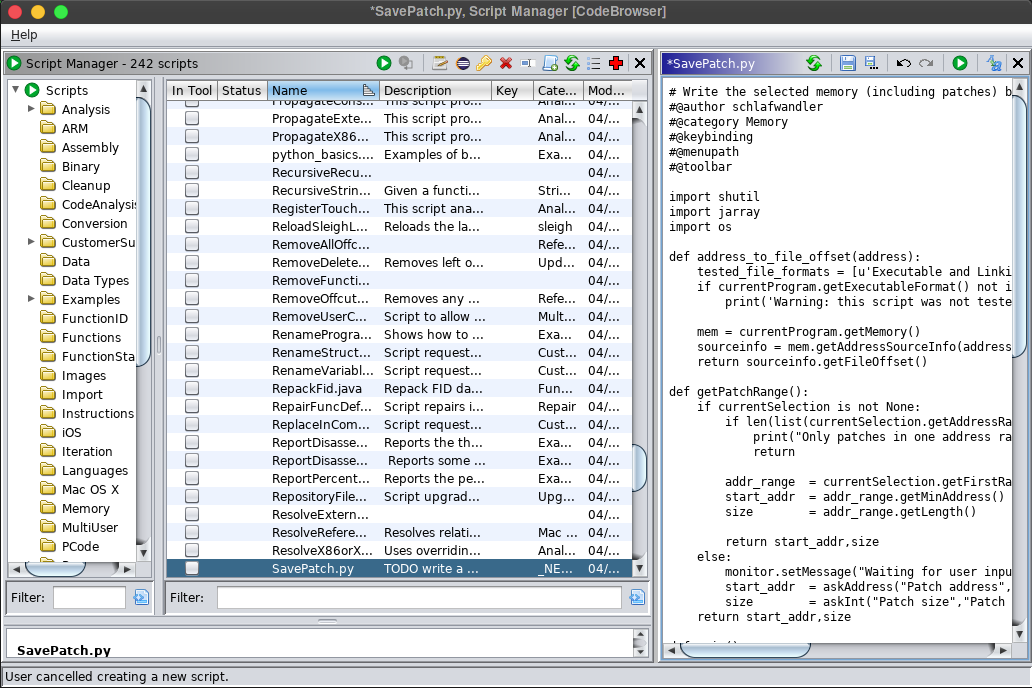
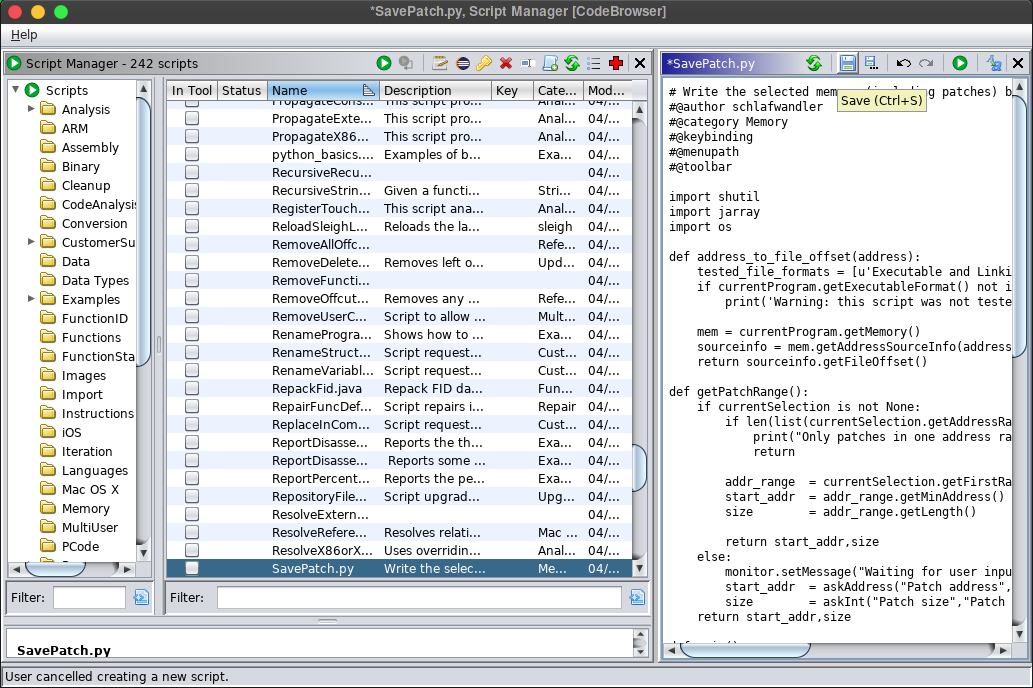
I think this is working for me. A lot changed and was divergent from the guide.
•¦NANA•¦CHI°• Oct 31, 2023 @ 8:15am 
and instead gcc, just windows.
•¦NANA•¦CHI°• Oct 31, 2023 @ 8:13am 
I have problem, i don't have the Executable and linking format(Elf), but instead Portable Executable(PE), (MZ) and Raw Binary.
TinyGrox Oct 22, 2023 @ 6:43am 
I just figured it out, won't bother you anymore :steamhappy:
TinyGrox Oct 22, 2023 @ 3:59am 
Could you plz show me how to patch in HOI4(Heart of Iron 4)? I have been trying all weekend and I have no clue at all now.:csgo_despair:
Princerazor Jun 3, 2023 @ 1:51am 
I just did followed this guide for MacOS, and was successfully able Enable Ironmade with Achievements for a New Game.

I would need further testing on the playthrough to trigger an achievement and confirm a steam achievement is recorded.

System is MacOS x64. Ghidra and JDK are both available for x64 version of MacOS

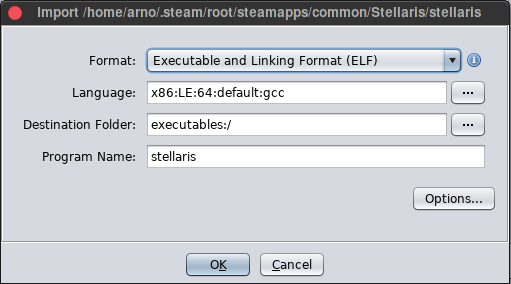
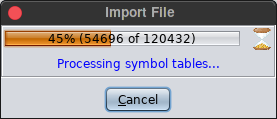
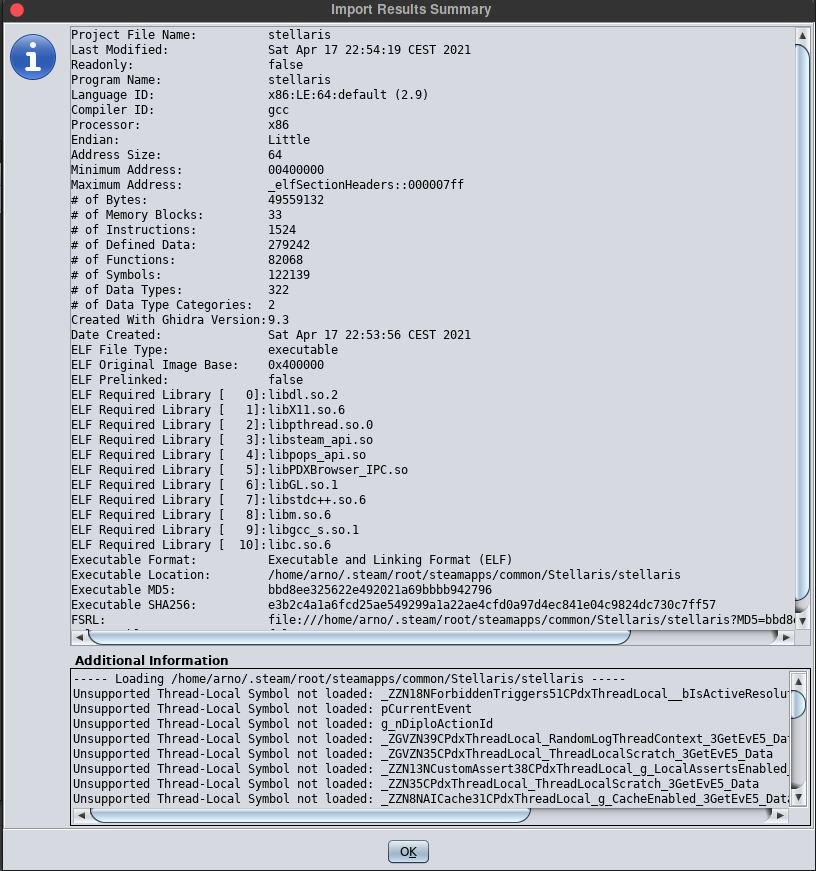
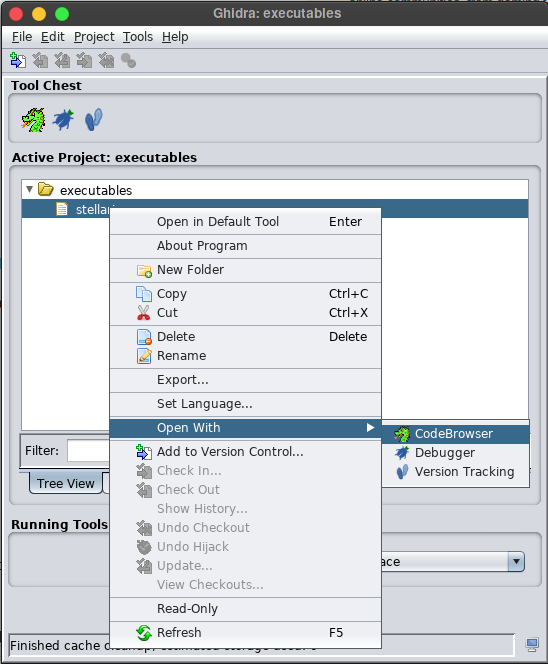
Following the instructions for Linux should work.
Duxatious May 2, 2023 @ 3:14pm 
There seem to have been modifications to the game since the release of this guide.
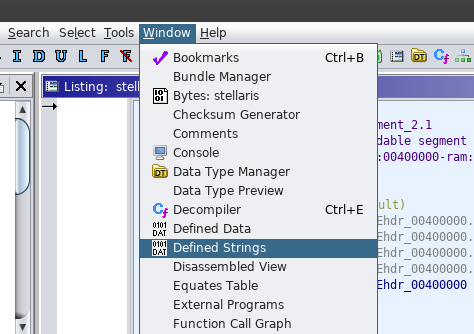
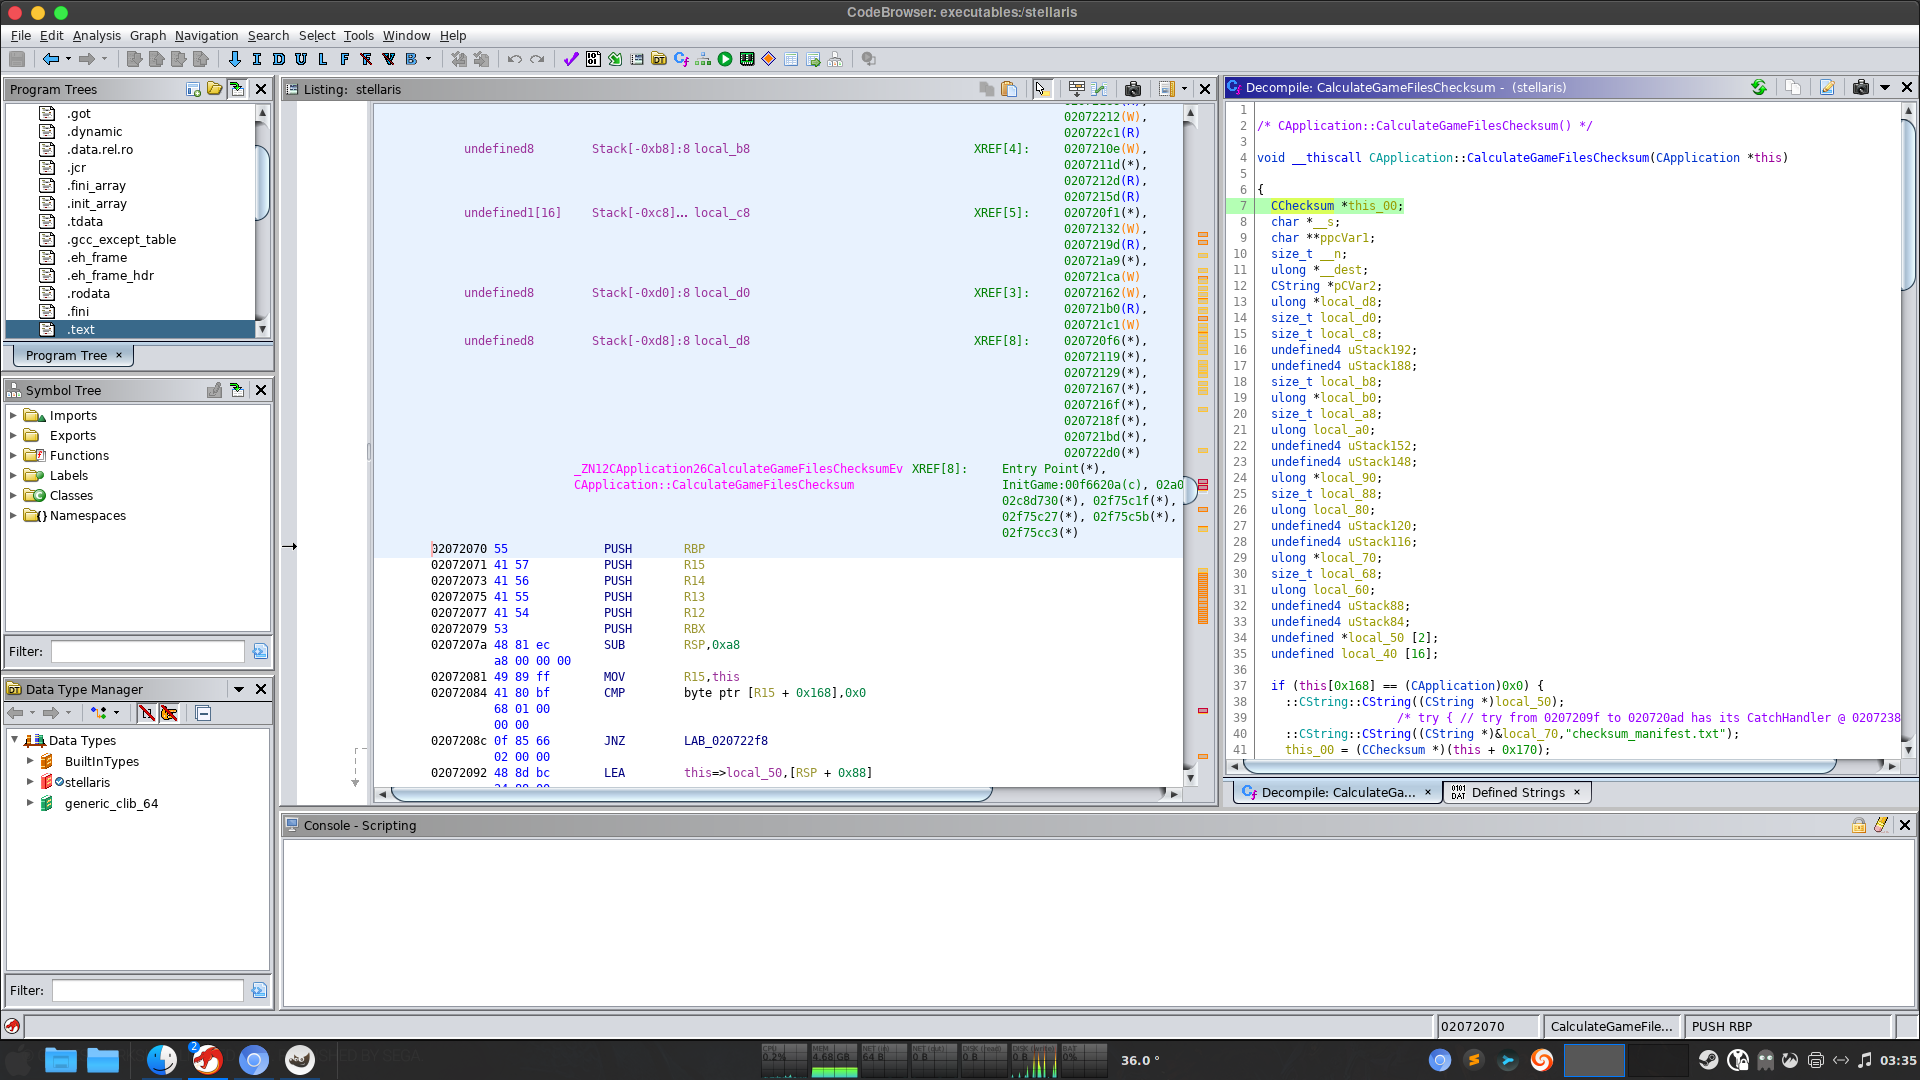
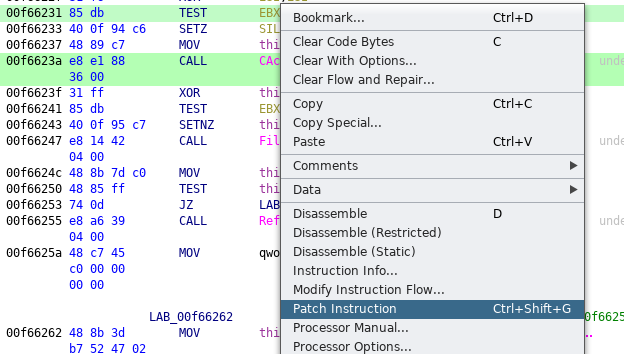
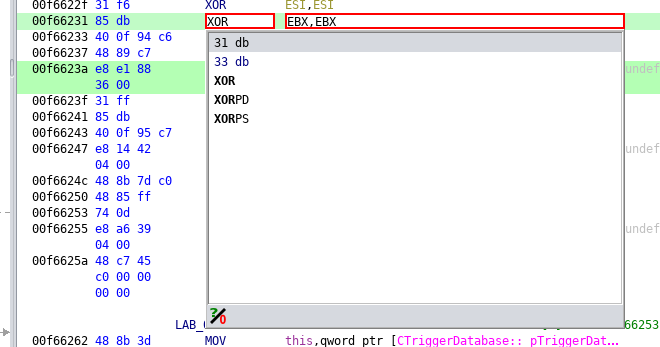
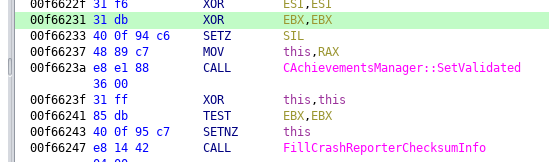
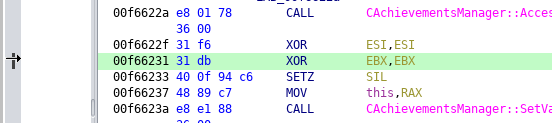
Ghidra now only lists Portable Executable (PE), Old Style DOS Executable (MZ), and Raw Binary as format options for importing the .exe file. Executable and Linking Format (ELF) doesn't show despite it being listed in the info button's supported formats.

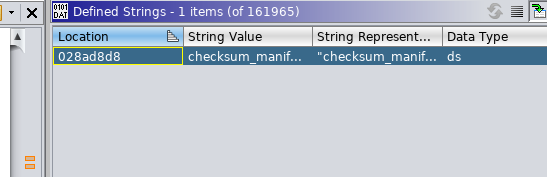
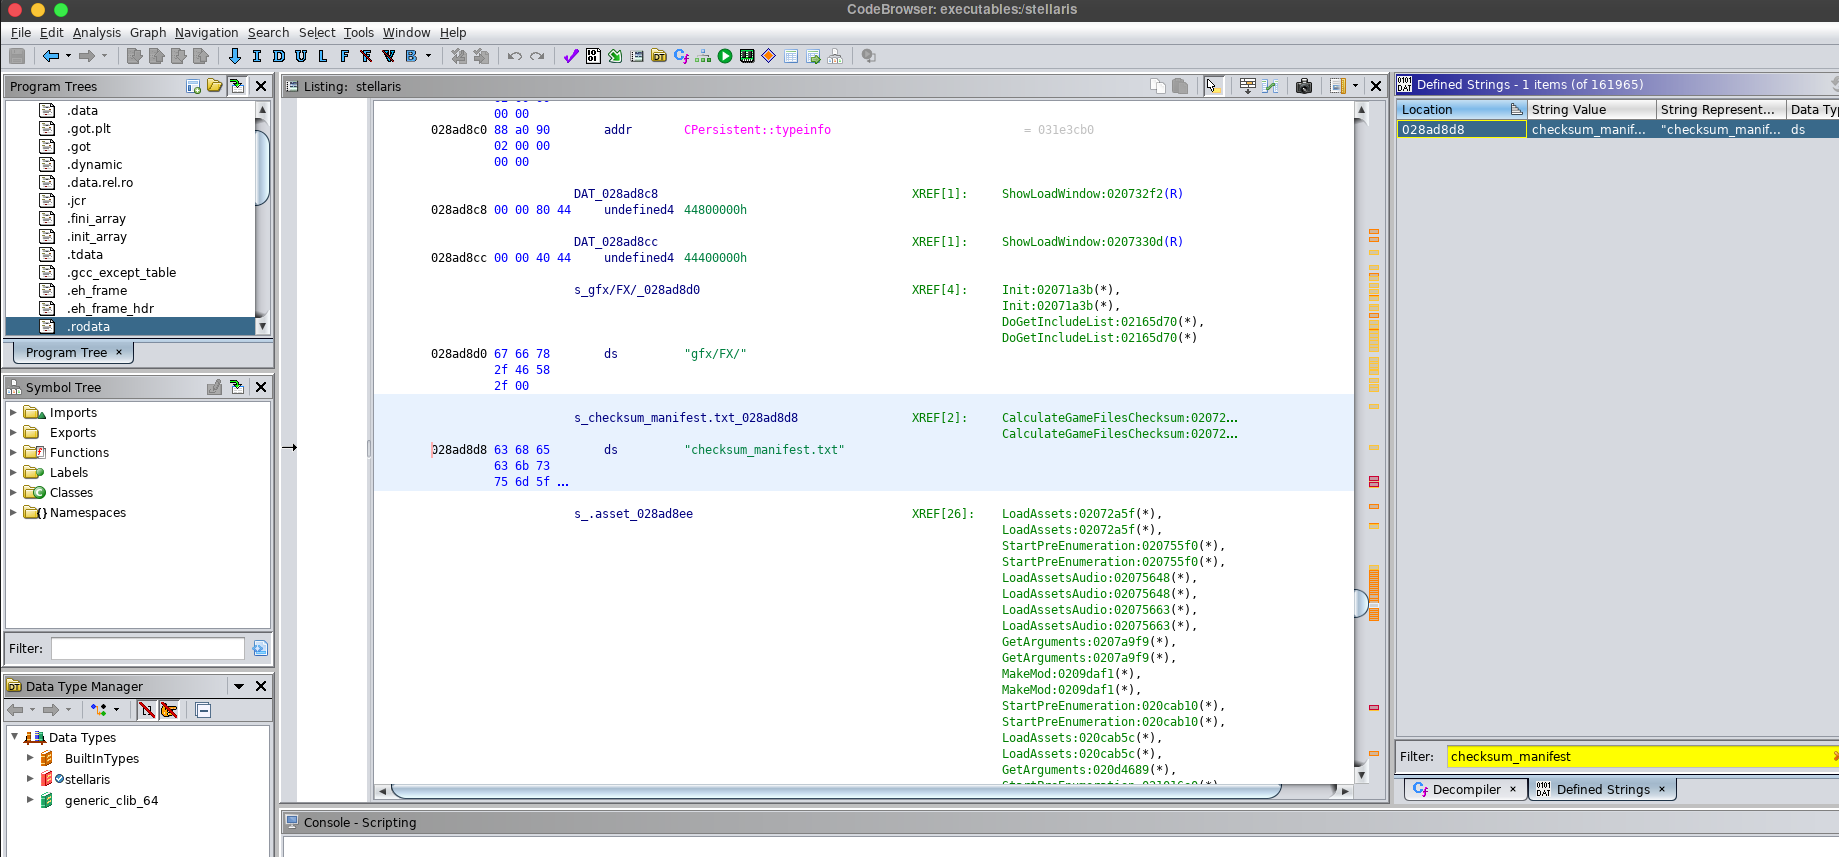
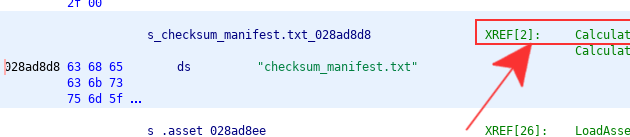
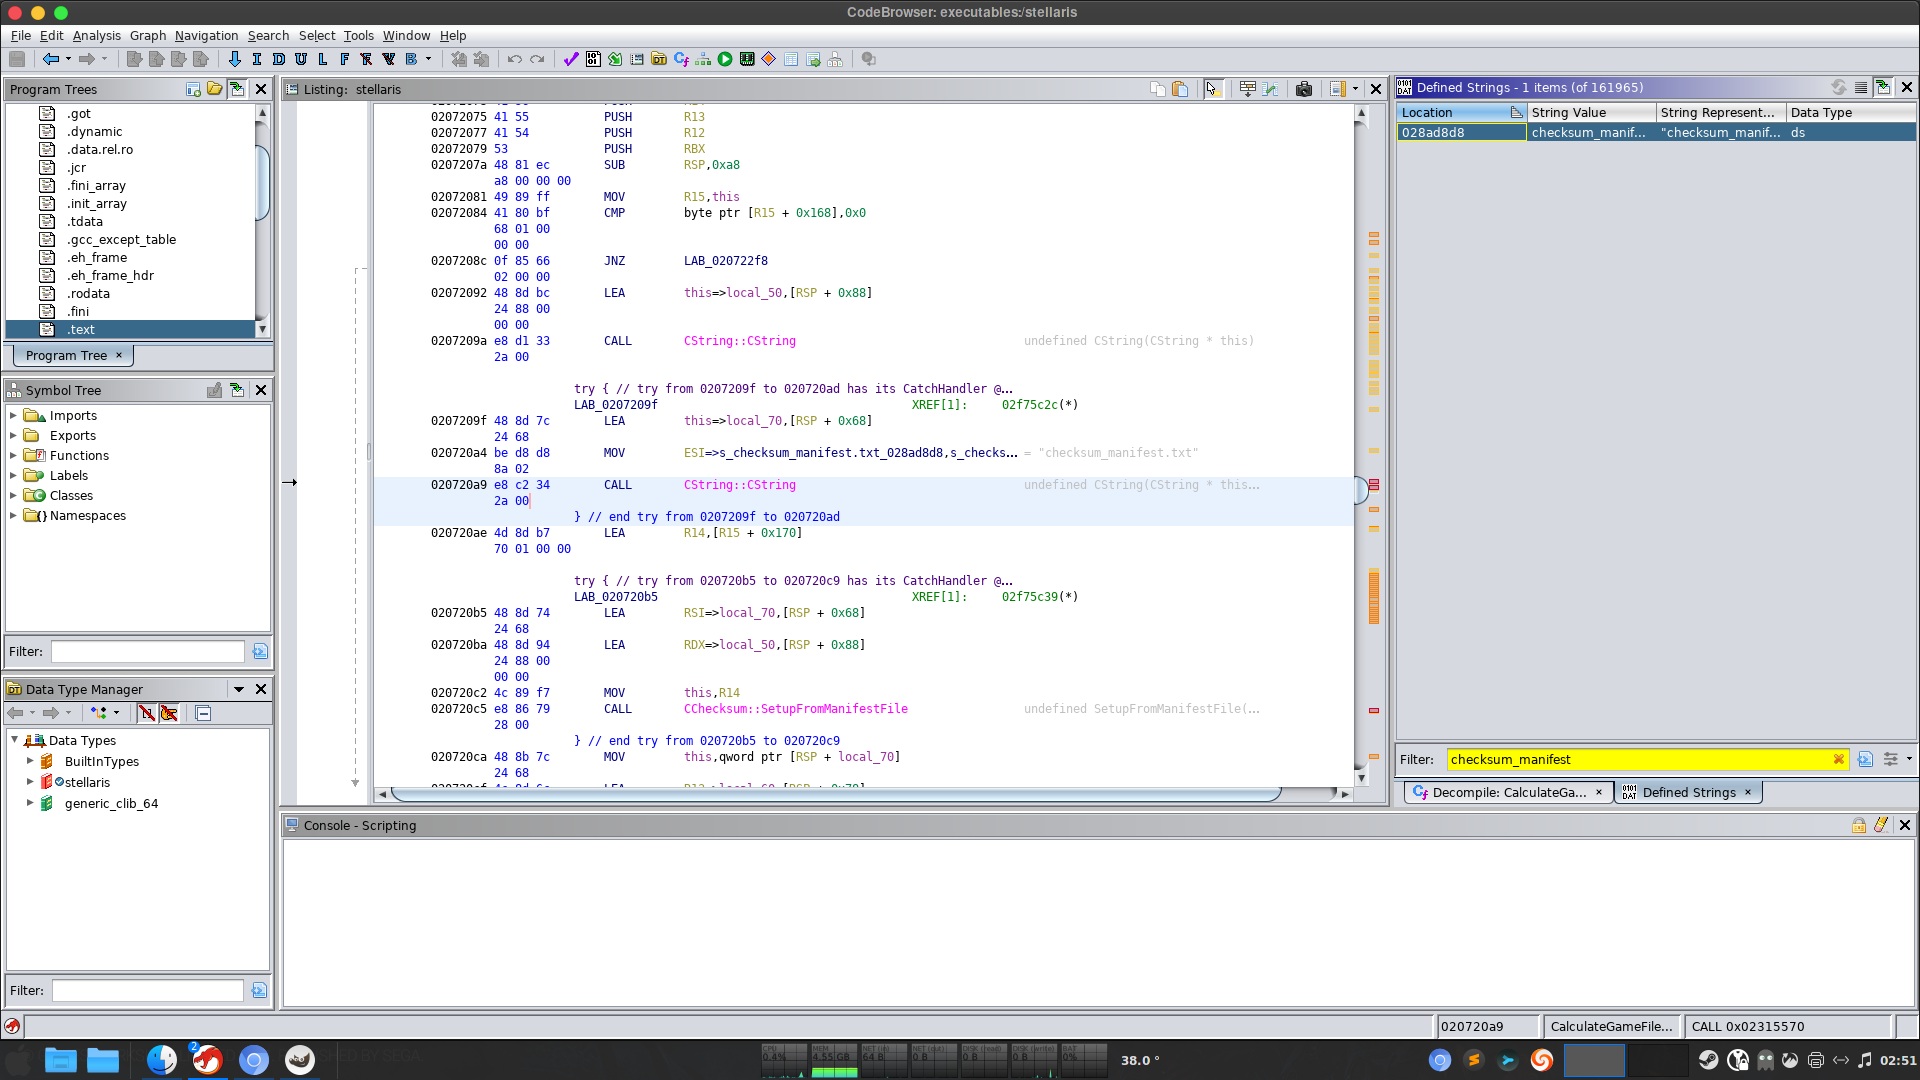
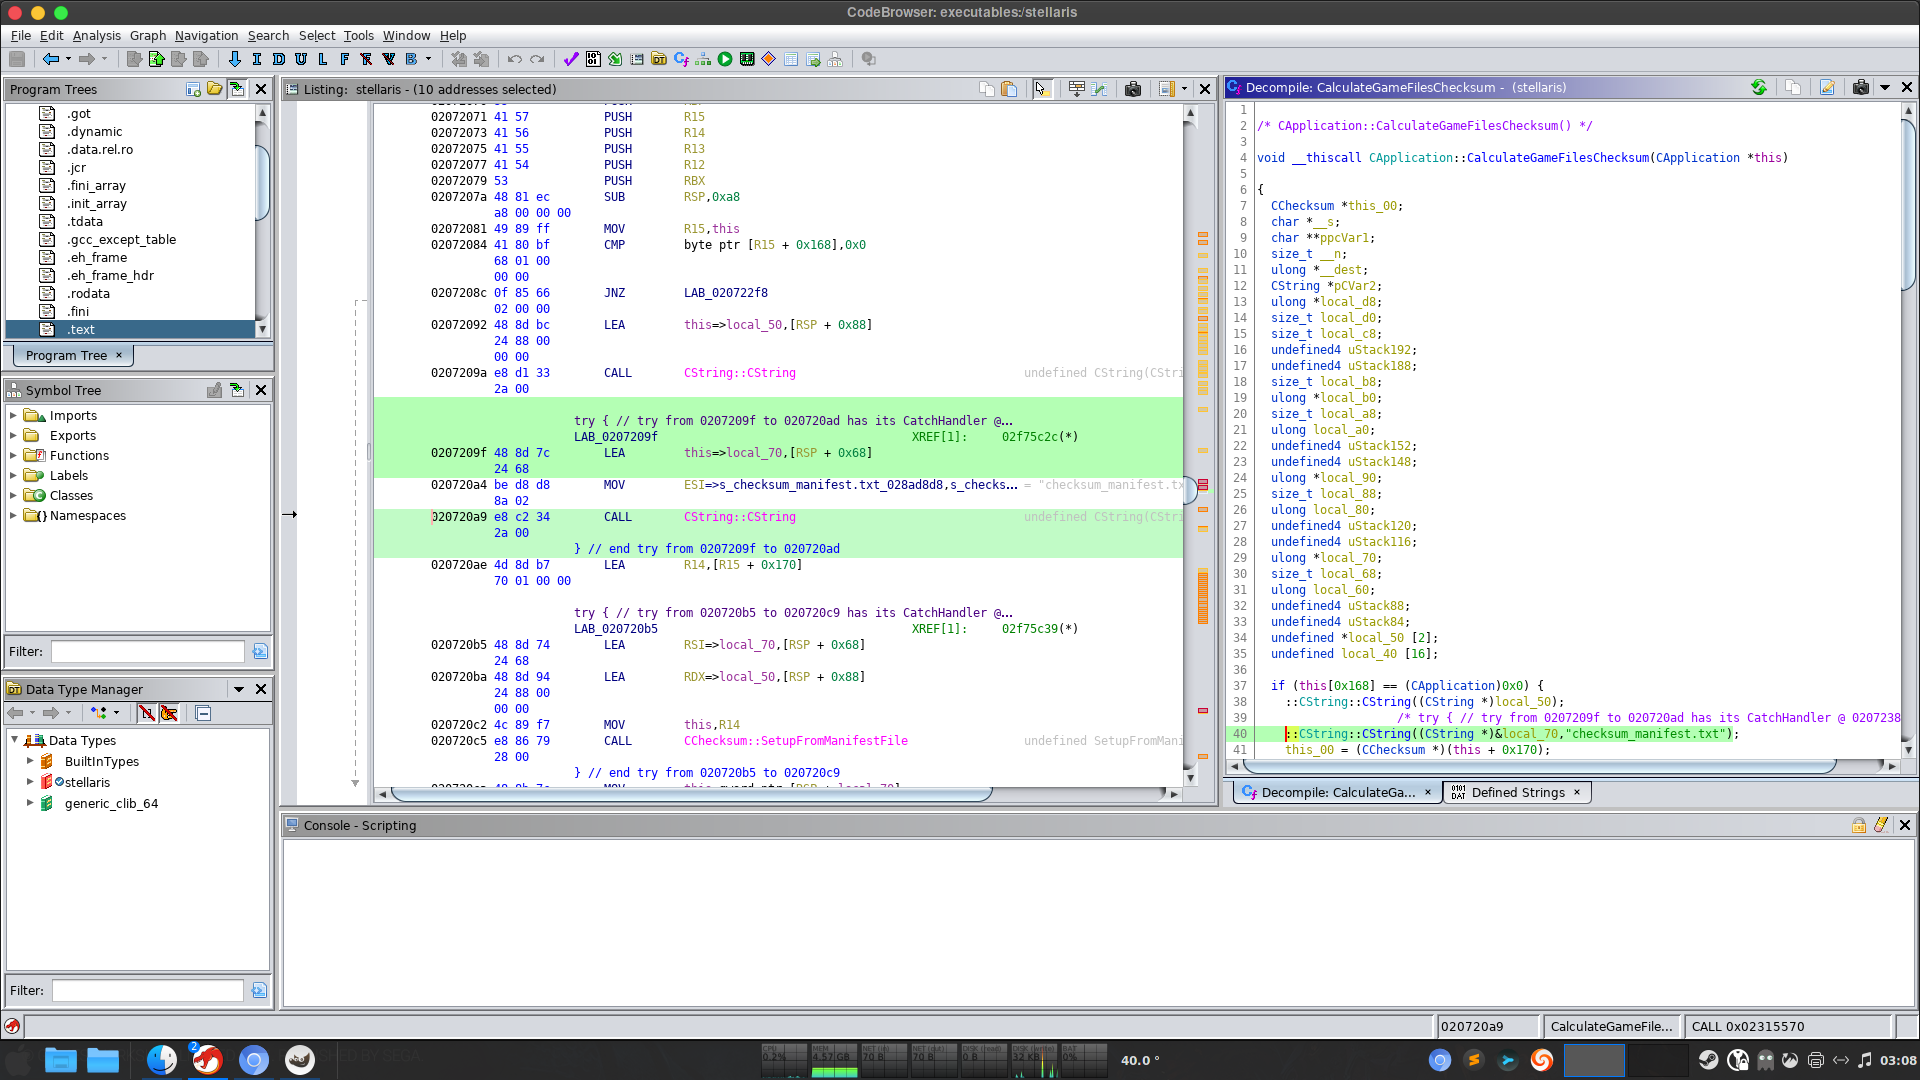
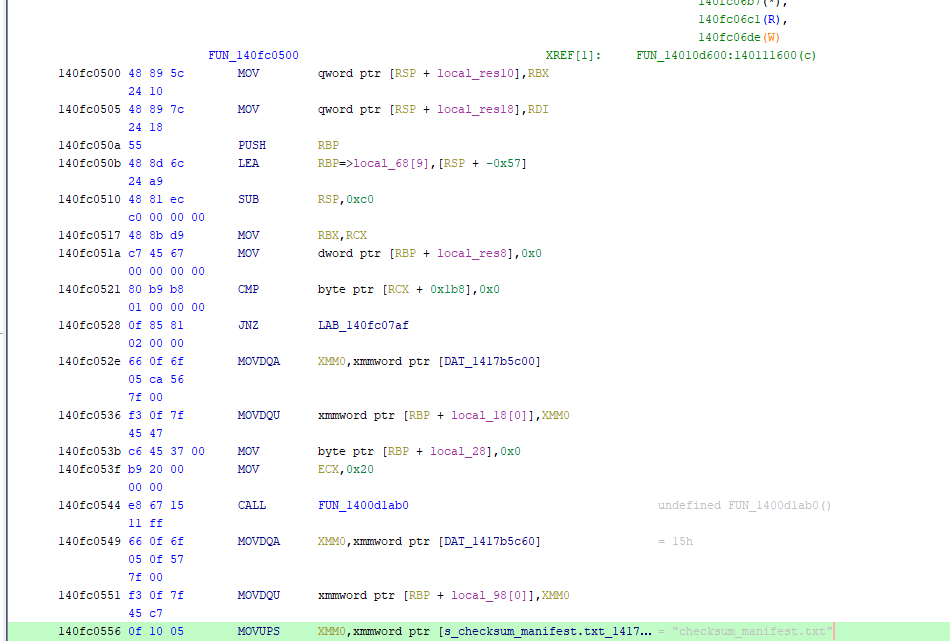
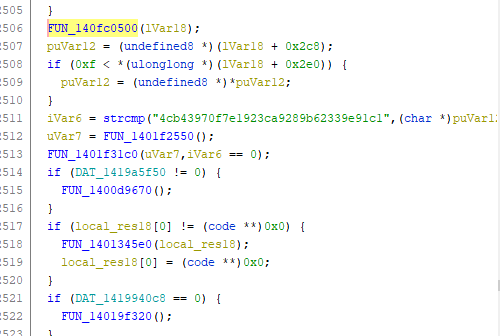
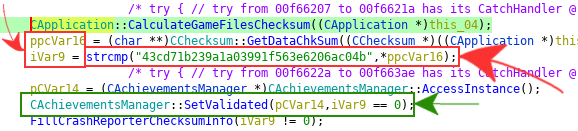
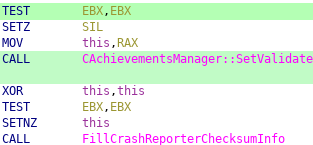
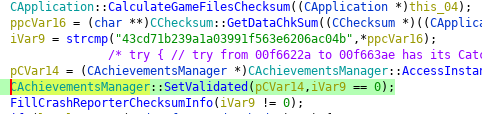
If you import it as a Portable Executable you will then get stuck in checksum_manifest step. "rodata" isn't a listed section, it's "rdata" now, and there are far fewer sections than appear in the screenshots.
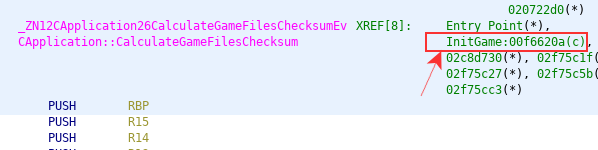
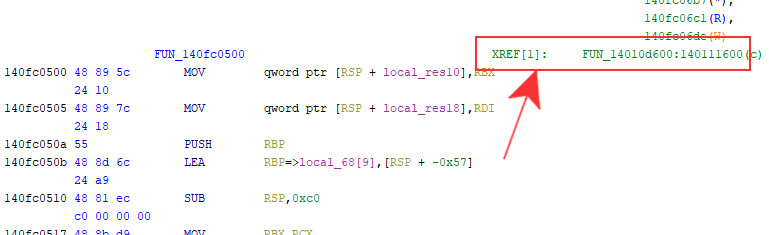
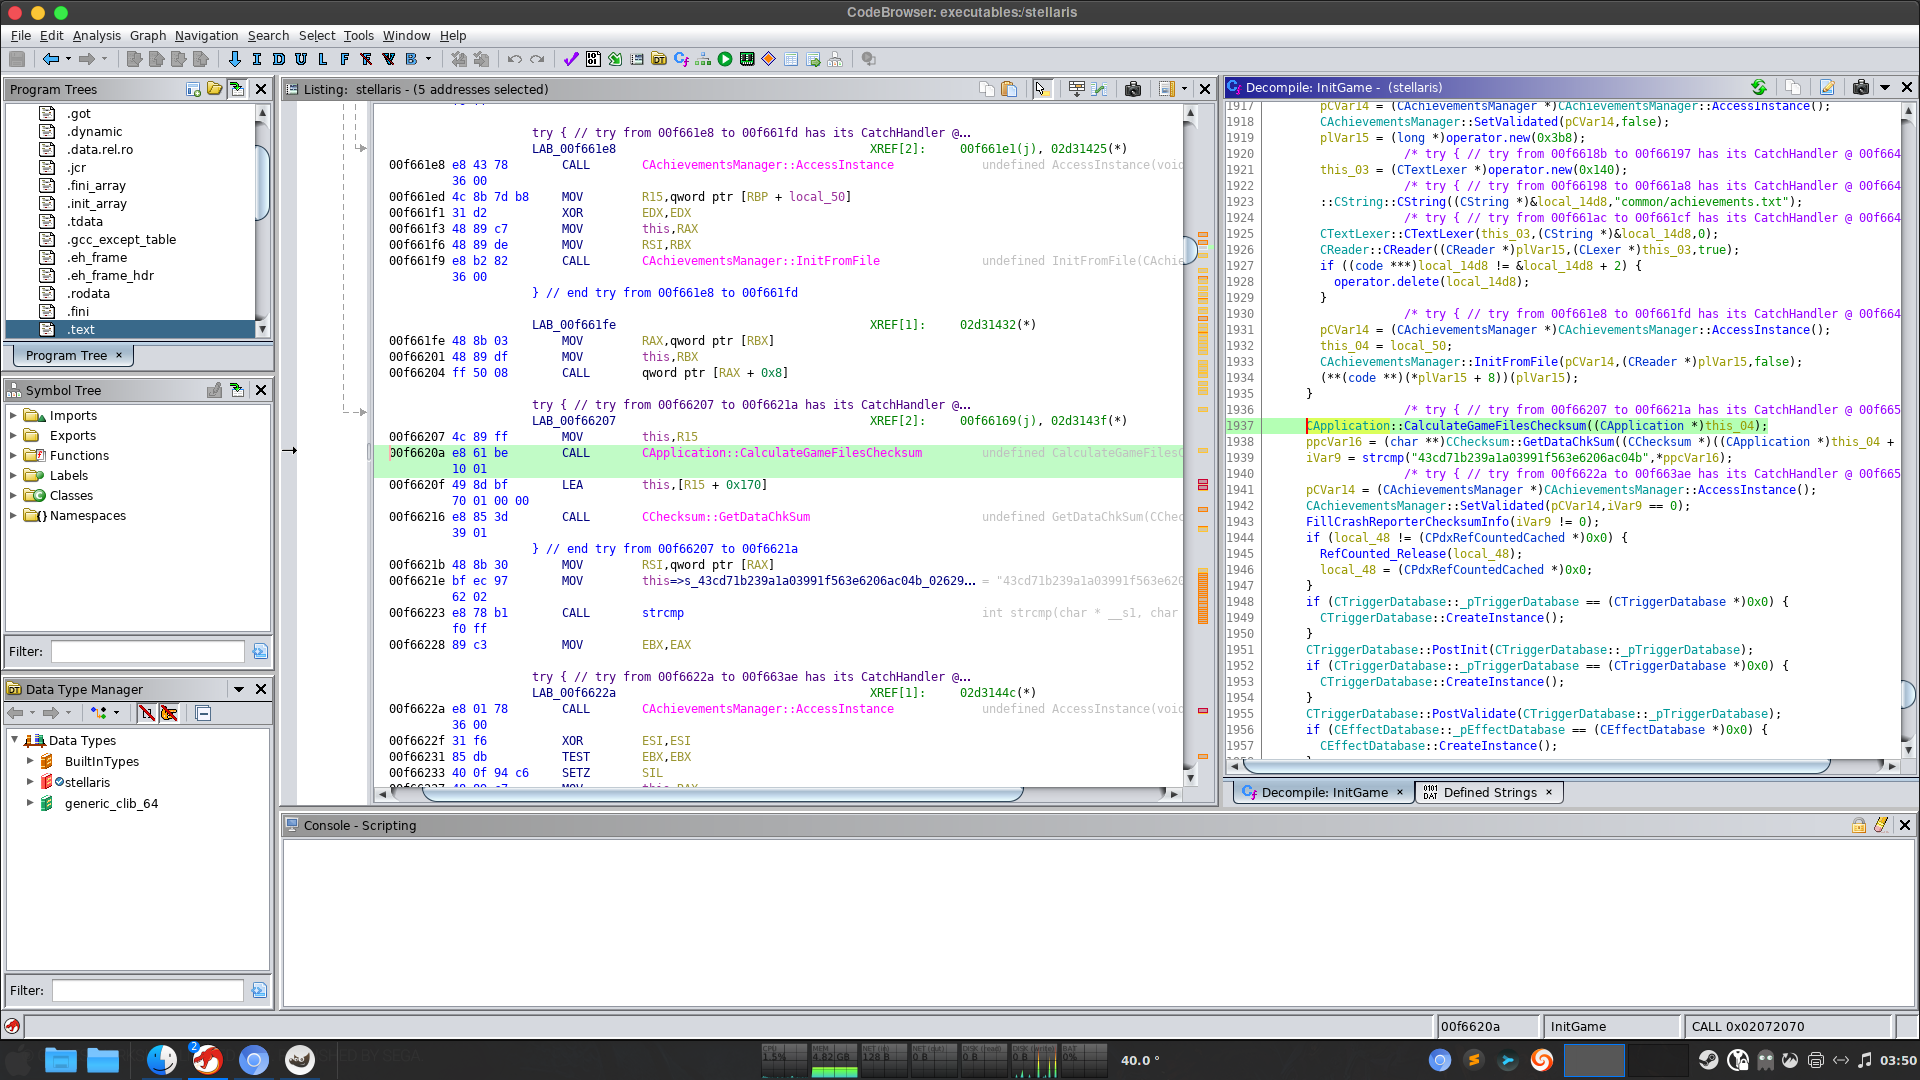
The checksum_manifest's XREF now shows [1,4], with five options available though none lead to CalculateGameFilesChecksum(), and none have RefType Unconditional_Call.

It doesn't appear that this method works on Windows at this point in time.
D3ATHCOM5 Apr 15, 2023 @ 7:18am 
Ghidra crashes during the analysis phase
Win 11
Ryzen 7 5800X
Dmformom Mar 28, 2023 @ 6:08pm 
I'm unable to find the ghidraRun batch file, anyone else have this issue?
yukito26 Mar 28, 2023 @ 5:35pm 
@Dmformom yes it does work