Divided Reigns
Недостаточно оценок
Divided Reigns - Walkthrough
От Firefly130984 и соавторов
Full Guide on Hard Mode
2
2
3
   
Наградить
В избранное
В избранном
Удалить
Starting the Game
Choose your difficulty.
Prologue
Captain Ailfred's Camp
Items: Tent (crate), 3x First Aid Kit (open crate) x2, Dispel Herb & Stimulant (command tent), Simple Helm (command tent)

Reprimand the soldier in civil.
The other soldiers will give you tipps:
Tundra Orcs are weak to Thrusting Attacks but resist Piercing Attacks.
Use different types of attacks on the monsters to unlock their weaknesses.
All attack types earn their own EXP (see save screen) and unlock skills.

You can rest for 5 x (nights rested) Talents in the villages.

Knocked out party members can revive at inns or with stimulants and only get a small portion of the EXP.

Ferocious Monster Stat Changes: HP: 200%, AGI: 150%, all other Stats: 120%, +50 EXP after the battle for all monsters!

Thalden
Items: First Aid Kit, Stimulant, Simple Sling, First Aid Kit & Stimulant & Dispel Herb (crate, School of Combat), 85 Talents (jar, inn), Simple Speed Boots, First Aid Kit (jar), Dispel Herb

Talk to the Abeyan at the tent and you will "buy" a Dispel Herb.
Buy the Schism "Worldmap" for 50 Talents.
At the School of Combat you can learn the "Sling" and "Greataxe" for 100 Talents each.
You can rest for 10 Talents in the inn.

Enter the item shop to proceed and you obtain 5 First Aid Kits, 2 Stimulants, 2 Dispel Herbs and a Tent.
In items shops you can sell all your spoils.
You will only need to keep a certain spoil for a side quest later.
You unlock "Ailfred's Journal".

Thalden Cave
Items (level 1): Stimulant, Simple Spear, Simple Crossbow, Stimulant, Dispel Herb x2, Simple Circlet, 3x First Aid Kit x2, Simple Crampons, Simple Cap, Chemist's Gloves
Items (level 2): Simple Buckler, 3x First Aid Kit x2, 3x Stimulant, Dispel Herb, Tent, Simple Breastplate

Listen to the soldier. High attacks are not effective!
Reach level 2.
During your first Boss Challenge, you can only lose.
The 2nd soldier suggest to try Side attacks.
You can use a tent at the magic circle.

I recommend to let Biggs (Wedge can use "Side") tend the wounded. Instead you will get Orson as a 4th party member.

Boss Sodiodon: try to exploit the weakness of Sodiodon. We already know that "High" is not effective but "Side" Attacks might work. The Boss attacks twice per turn. It will also resist "Ranged".

You unlock the Achievement "The Cockroach" and Wedge will follow Orson.

Don't forget to enter the Secret Cave Room to gather Simple Great Axe, Simple Crossbow (offhand) and Simple Tower Shield.
You can either skip to the entrance or walk back.

Captain Ailfred's Camp
Biggs and Wedge are back to report...
The camp will vanish after you finish your quest.

Thalden
Enter the item shop. Head north.

Vooresh
Items (city): First Aid Kit (barrel), Ether (jar), Dispel Herb (jar), 94 Talents (jar, pub), First Aid Kit (closet, inn), 130 Talents (jar, School of Combat), 152 Talents (barrel), Stimulant (jar, weapon shop)
Items (castle): First Aid Kit (jar, Throughway right), Stimulant x2, Simple Pauldrons, Ether (barrel, east building), Healing Potion (Training area), First Aid Kit, Simple Brigandine, Simple Armored Boots, Simple Sword (crate, Dungeon), Rage Potion (crate, dungeon), 4x First Aid Kit (barrel, dungeon), Simple Sword, Simple Helm

Ailfred "buys" a magical "Simple Strength Belt".
Play the piano in the pub (and later castle).
The item shop has a discount to military personell.
The School of Combat will teach you "Whip" and "Staves" for 100 Talents each.
Currently only Shakar can learn "Whip".
But the First Aid Kits are still cheaper at the Abeyan shop.
Buy Simple Mage Cowls and Simple Speed Boots as preparation for the next dungeon.
An Abeyan family is missing the father who went fishing.

You can now accept bounties, but don't bite more than you can chew as the cancellation fee will be 300 Talents. On Regular Mode you can compare the average party level to the recommeded levels.
As your party currently only has 2 members, only the first 2 bounties are recommended.
Your target will be marked with glitters or visible.

Currently not available locations: Locked house (western city), West Tower.

Talk to the soldier guarding the throne room once you are prepared.

Vooresh Castle Escape
Items (West Tower): Stimulant, Dispel Herb (barrel), Simple Whip, Simple Platemail

This is your only chance to pilfer the West Tower.
Head to the dungeon.
In the dungeon Habar and Niomi will join the party.
Get out and find the north gate.
Bounty Hunter Guild
To cancel a bounty costs 300 Talents.
You will either have to follow glitters and then catch them or you can see them on the Worldmap.
Even those targets can be ferocious.

Vooresh
  • Rec. Level 4 - Orc War Band: South of Thalden. Follow the glitters and the catch them. Get rid of the healer first. Reward 10 Tents.
  • Rec. Level - Juvenile Roc: SE of Vooresh. Use Ranged Weapons or Reach. Reward: Fine Crossbow and Major Elixir.
  • Rec. Level 32 - Undying Shoggoth: last sign east of Zeben near Cecil's Workshop. Reward: 2 Potions of Life
  • Rec. Level 45 - Frost Giant: on an island south of Rus (ship needed). Protect against Ice damage. He can cast Death and Absorbs Ice! Use Wind when you have a mage in party. Reward: Frost Battleaxe.
  • Rec. Level 60 - Desecrator: Airship needed to reach the island (formed like a "?") west of Zeben. It can cause "Neurotoxin", which renders a character useless as there is neither cure or protection. Reward: 5000 Talents and its drop Desecrator's Eye.
  • Rec. Level 80 - Grich Morgot: South of Vooresh. Weak to Ranged and Martial Arts. Has a high MDEF but Viriolic Cascade ignores that. Reflecting his attacks are effective, too. Reward: Mega Elixir and its drop Destruction Orb.
  • You unlock the Achievement "Vooresh Monster Hunter"

Kairon
  • Rec. Level 18 - Overgrown Devourer: Near Wilton Woods. Reward: Lesser Poison Gem. The first clue is at the western end of the Abel Wall! The battle is on the first map when you enter the Wilton Woods. Weak to Low and Fire! Don't underestimate it!
  • Rec. Level 20 - Greater Devil: Somewhere in Kairon (Combat School, Item Shop, Inn). Reward Lesser Lightning Gem.
  • Rec. Level 25 - Giga Wump: in a lake west of Abel. Reward: Claymore. It is too strone for a similar levelled party on Hard Mode as it has a Quadra-Attack and strong AoE and those twice per turn. With a bit luck, a high level of Side and Reach attacks, Haste on Habar, so he can heal/revive twice per turn, and Water II, Psych II, Poison, Sonic II, it is possible. Instant Death (Side Attack Level 6) works and will earn you an easier victory.
  • Rec. Level 40 - Goblin Murder Team: You need a ship to reach the Peninsula NE of Aldair. Get rid of the Murder Goblin first. Rewards: 5x Healing Breeze Potion and 1 Healing Gust Potion.
  • Rec. Level 50 - Rhyme & Reason: You need the ship to reach to the east side of the eastern Kairon Mountain range. You will start fighting Rhyme. Key to win this battle is Strenght! So have 3 damage dealers with Habar (don't use spells) in party. After its HP drops below 25% it will turn to Reason and will deal physical damage. Drops Rhyme and Reason (offhand). Be at least 10 levels stronger on hard mode. Rewards: 5000 Talents + drops.
  • Rec. Level 85 - Nidhoggr: on the peninsula SW of Kairon. Likes to shake the earth. Wealk to Thrust, Reach, Water, Psychic, Poison and Sonic. Likes to cast Vitriolic Cascade, Nuke Area and Caustic Breath (corrosion). Be at least level 99 and cast Defensive Formation. Reward: Mega Elixir and its drop Obsidian Orb.
  • You unlock the Achievement "Kairon Monster Hunter".

Kaifec
  • Rec. Level 25 - Giant: Sighted at the farms near the castle (just travel east to beginn). Reward: Mace.
  • Rec. Level 30 - Changeling: Last seen in the Winding Tunnels of the Pit. Reward: Spectrum Bangle & Healing Gust Potion
  • Rec. Level 42 - Gassy Giant: North of the Barrens. Blessed Ribbons or the Bio Breastplate or Luck Pendant and high luck are recommended. The Boss will act trice per turn so hope for a favorably RNG. If you manage to cast Time Flux in the first turn, let Niomi cast Fire III twice for massive damage. Reward: Mythril Mace.
  • Rec. Level 55 - Force / Cardinal Changelings: Ship needed as they were sighted on the island to the far east of Hess-Erabi (north of the Dark Cave). Try to figure out their weaknesses, because they will change often. The Carnal Changeling will be weak against Fire, Wind, Ice and the other against Thunder and Physic anytime. Reward: Mythril Claymore.
  • Rec. Level 65 - King Phoenix: Airship needed to fly to Phonix Island. On the highest spot of the dungeon there. Fire Protection is recommended. Tranquility will dispel all buffs on the party for the next turn. Drops Phoenix Feather, a really useful accessory. Reward: 5000 Talents and its 2 (?) drops.
  • Rec. Level 90 - Ancient One. Came out of the volcano and is found west of Kaifec. Protect against "Instant Faint" (You should have 3 Death Seals and the Deathbane Robe for Habar!), and other status effects like stone. Weak to high attacks and absorbs all elements. Cast Dispel or Spirit Slam (or similar) when it gets invisible. Also the Obsidian Orb let you summon Nidhoggr. He will cast and AoE Earth and Barrier. The Ancient One will now only act once per turn. Reward: Mega Elixir and its drop Muramasa.
  • You unlock the Achievement "Hess-Erabi Monster Hunter".

Kairon
After you have defeat all regular hunts and unlocked the 3 Achievements.
The final bounty target flies over Schism. Find and follow her to solid ground and then you can challenge her.

Landing places: next to Hess-Erabi Castle (reward bugged), Phoenix Island (reward works), small snowy island... if you can't find Tiamat, enter the Portal to Unity once and return to the worldmap.

Ancient Dragon Tiamat: Careful if she is ferocious (reload and fight another mob first)! Weak to Trip and attacks twice per round. Equip your best Trip weapons like the Apocalypse Flail (or Synchronous Caco Flail) or Whips. Reflect will cause massive damage but she absorbs fire. Dispel her own Reflect!
Another option are Orson Traps (not really, but he does much more damage than Ailfred) and bleed (like the Buckler of Wounding from the Red Gem Shop).
You only have one battle to defeat her - after that she won't land again (no, find her again)!

On hard mode and higher difficulty, even level 99 won't be enough (it is possible with Orson, Celeste, Habar and Niomi).
Best to first unlock the higher level caps in the post game dungeons.

Reward (from King Kairon in the bounty guild): Excalibur and the Achievement "Dragonslayer".
Summons
Depending on your hunts, you will obtain accessories that will allow you to summon Nidhoggr and Phoenix.

As both summons have an automatic 2nd action (barrier or revival), they are very useful.

Other Weapons, gear and Accessories will grant the wearer a skill or spell (mages only).
Prologue Part 2
Mount Elban
Items: Simple Bow, Simple Buckler, 3x First Aid Kit x4, Ether x3, Minor Elixir, Simple Dagger (offhand), Simple Cape, Dispel Herb & Simple Speed Boots (secret passage), Simple Shirt, Simple Kama
Items (tunnel 2): 3x First Aid Kit x3, Simple Boots of Health, Ether x4, Dispel Herb & Tent (crack), Rage Potion, Simple Focus Crystal, Wind Bangle (equip it on your healer!), 287 Talents, Dispel Herb

Right below the Simple Cape chest you can glimps a secret passage.
In a really visible crack of tunnel 2 you can use a tent at the magic circle.
I recommend an average level of 10 for the next boss on hard mode.
With level 8 Habar learns a AoE Heal.
On the next map (after tunnel 2) get the items before you head further west.

Listen to the conversation and note the weakness are fire, ground, ranged and reach. Habar will heal the party. Take the Simple Nullmagic Mantle before you engage

Boss Roc: Other weaknesses are water and lightning. Don't try to use the Crossbow - Bola, the Roc is immune to Trip attacks. The boss attacks twice and you have bad luck when it cast his triple wind attack twice.
ACT 1 "Exiled"
Mount Elban - Part 2
Items: Major Elixir
Items (Tunnel 3): Ether, Fine Cap, Dispel Herb, Simple Crampons, 3x First Aid Kit, Stimulant
Items (Tunnel 4): Dispel Herb, Simple Greaves, 3x First Aid Kit, Ether, Cryophoenix Feather
Items (final cave): Fine Buckler

On your way down you obtain "Habar's Circle of Elements".
With this you can also check on negative status effects.

Additional Status Effects not mentioned in this guide:
  • Instant Faint: Some skills or spells have this effect and will kill when effect hits. You will find some protection against it in ACT 5.
  • Neurotoxin: Worse than death as your character can't act and can't be healed/cured until death. Sign is a purple "Deathskull". You will first encounter such monsters in ACT 5 and some bounty hunts.
  • There are some positive buffs like Regen, Haste (or Time Flux), stat up/down and counter that aren't explained but not as deadly as those other two.
  • Screenshot of the Neurotoxin skill and Time Flux active

Cecil's Forge
Items: Fine Spear, Major Elixir (clock)

Just talk to Cecil and remember to return once you find a rare weapon/material.

Zeben
Time to stealth.
Take the Simple Circlet, 238 Talents (barrel), First Aid Kit (jar) and talk to your party before you begin stalking.
Keep to the north. After the pub is an Ether in a jar and another one in the jar behind the Soldier next to the armor shop.
Enter the armor shop.

Try to enter a shop and then head to the graveyard.
Before you talk to the grieving NPC there, check the other locations.

A night in the inn costs 20 Talents.
Train in Swords and Rods for 100 Talents each and buy new weapons.
Play the piano in the pub and find the Fine Sling (jar) and Ether.
The east house is still locked.

Enter the graveyard.
Now talk again to the NPCs in town.
The kid will tell you about the ice cave west of the ice lake.
Other tipps: no water, only ice (pub), Ornate Ice Spear and free rest once after the battle (inn).

Find the Ice Cave by following the western shore of the ice lake.

Lake Zeben
Items (outer): Ice Bangle (give it to Habar!), Simple Tunic, Healing Potion, Simple Greaves, Ether, Fine Rod, Psychic Bangle, Simple Evasion Cloak, Simple Strength Belt
Items (inner): Stimulant, Ether, Simple Monk Bracers, Simple Boots of Health, Simple Focus Crystal, Fine Breastplate

Remember that ice based monsters are weak to wind (and ground) and water based monsters weak to lightning. For the latter try Physic or Poison.
Right when you reach the inner cave, use a tent.

Find and equip the Ice Spear!

Boss Ice Angler: Weak to wind, water, ground lightning, thrust and high. Resists ice and is totally beatable with party level 11-12 on hard mode.

You can skip to the entrance. The cave will collapse!!!

Zeben
Before you rest in the inn:
Restock on First Aid Kits, Stimulants and Tents and sell your loot for cash as you won't be able to sell (most of) your loot at the next shopping opportunity.
The Armor and Weapon Shop will give you 10% discount.

Also enter the formerly locked house to find the Simple Cape.
You will only rest for free if you have talked to the innkeeper before your quest!
ACT 1 "Exiled" Part 2
Vooresh Controlled Shipyard
You unlock the Achievement "So Green".

Northern Fort
Just witness the event.
check the map for your location.

Aldair Cave
NW of the Shipyard.
Items: Ether, Simple Tunic, Fine Bow, Aggro Bracelet

Abeyan Camp
Right before the great wall.
Items: Fine Robe, Tent, Fire Bangle,

Talk to the Abeyan at the eastern tent.
You can restock on items now but no selling.

Enter the Great Wall.
Now you have the only chance to save the Abeyans!
If you don't want to help them, skip to the Kairon Checkpoint.

Abeyan Camp
Tell the female Abeyan in the Camp what you will do now.

Vooresh Controlled Shipyard
Items: 37 Talents (crate on deck), Simple Mage Cowl, Ground Bangle, Simple Fencer's Bracers

Those Vooresh Sailors might drop Fine Rapier (but noone can equip it currently).
Take the Key under deck and enter the captain's room.

Boss Ship Captain: resists thrust and Martial Arts but is weak to Side until he changes form.
This form is at least weak to Martial Arts (Niomi defeated him with Suplex, the others where dead).

Items (docks): Ether (barrel), Simple Bracers, Simple Pauldrons, Rage Potion, 319 Talents, Simple Evasion Boots, Fine Sword

Northern Fort
Items (outside): Fine Shirt, Fine Hat, Fine Shield, Ether (well)
Items (barracks): Tent, 648 Talents, Fine Sling (offhand), Simple Attacking Boots, Enchanted Kama
Items (prison): Potion of Life

After the first battle, loot the fort.
Enter the bigger barracks and survive 2 waves of Vooresh Soldiers, Sailors and Veterans.
Find the Northern Base Prison Key.

Enter the Prison and you unlock the Achievement "The Honorable Thing".

Abeyan Camp
Talk to the reunited family and obtain the Ground Bangle and Simple Evasion Cloak.

Now enter the great wall again.


Kairon Checkpoint (great wall)
If you have not helped the Abeyans, you will enter without problems.
If you have helped the Abeyans, you will have 3 options: Fight them (consequences), Run for it (consequences) or give them your remaining Talents (remember that you can't sleep in the villages then).
The consequences are bounty hunters on the worldmap in the Karion area. Those are faster than your party and on Hard mode not recommended.

Aldair Cave 2
Items: Rage Potion, 257 Talents, Fine Tower Shield, Healing Potion

Aldair
Items: Healing Potion, Ferocious Lure, Potent Rage Potion (barrel, slum hut), Ether (bucket, combat school), Simple Throwing Axe, Minor Elixir (clock, inn), 2x Ether (barrel, inn), 250 Talents (balcony of the inn),

Notice the wanted posters.
Rumour: Temple in Wilton Woods.

Talk to the old woman at the food stall (where did she hide that money???).
Sell your spoils at the item shop, so that you can go shopping (the items keep for last).
Buy the Poison Bangle for 500 Talents from the Abeyan.
In the Abeyan Combat School you can learn Throwing Axes and Bows for 100 Talents each.
Another Abeyan sells accessories.

A night in the inn costs 50 Talents.
Play the Piano in the inn and talk to the nun to obtain the Aldair Church Key (side quest).
Talk to the Constable in the Guardhouse to start the "Investigation of the Lester Mansion".

Rat Infestment
Enter the Aldair Church (the piano has no event).
Rest in the inn for healing.
  1. Start with the SW stairs, defeat the rats and step on the button.
  2. Take the SE stairs and step on the button.
  3. Take the N stairs, defeat the rats and step on the button.
  4. Take the SW stairs, defeat the rats, take the Simple Evasion Boots and step on the button.
  5. Take the SE stairs and step on the button.
  6. Take the SW stairs, take the Minor Elixir, pull the lever and step on the button.
  7. Take the SE stairs, defeat the rats and step on the button.
  8. Take the SW stairs, defeat the rats, step on the button and take the Fine Shirt.
  9. Take the SE stairs, step on the button and ignore the lever.
  10. Take the N stairs and step on the button.
  11. Take the SW stairs, defeat the last rats and take the Fine Strength Belt.
  12. Report to the nun and obtain Fine Boots of Health and Major Elixir.
Now you can learn more about the religion in the church.
You cannot enter the crypt anymore.

Lester Mansion
4500 (3000 corrected by the daugther) Talents were stolen from the bedroom.
No visible break in clues.

Please (don't) steal the Minor Elixir (clock), play the piano and go upstairs.
Check the left window by the stairs and the treasures.
Enter the east bedroom and (don't) steal another Minor Elixir (clock) and open all closets.
Enter the west bedroom and find the hidden compartment.
Report to the Constable and obtain 100 Talents.
Now Xen's wanted reward is doubled.
Talk to the Constable once you are prepared.

Boss Mercenaries: Both are weak to Trip and She also to Martial Arts. He might drop a Fine Sword.

Boss War Hounds and Mercenary: You beginn fully healed and can switch the formation before the battle so have Niomi as reserve (no elemental weakness). Celeste should look up the weaknesses and then you should act accordingly.
ACT 2 "The Road to Peace"
Wilton Woods
Items: Fine Staff, Minor Elixir, Whump Stone, Simple Attacking Boots, Fine Brigandine, Healing Potion, 422 Talents, Ferocious Lure, Fine Breastplate, Disengage Bracelet, Simple Monk Bracers
New added at the first Dead End: Auto First Aid

Listen to the tactic against Shriekers: weak to poison, wind, fire and ice.
Currently the best party setup is Aifred/Shakar + Celeste + Habar + Niomi. So you will have 2 damage dealers, 2 weakness scanners, 2 mages and 1 healer.
I recommend to have Celeste and Habar in the active party as often as possible.

Reach the roadsign and head to the dead end first.
Reach the 2nd roadsign and head to the dead end again.

Earth Temple
Items (spring): Sonic Bangle, Simple Nullmagic Mantle
Items (map 2): Minor Elixir, 5x First Aid Kit, Fine Hat, Healing Potion x2, Fine Whip (offhand), Stimulant
Items (NE room): Fine Great Axe, Ether, Fine Sling, Fine Scale Mail, Fine Greaves
Items (SE room): Fine Focus Crystal, Stimulant, Ether, Fine Throwing Axe, Fine Robes
Items (SW room): Healing Potion, Fine Crampons, Potent Rage Potion, Dispel Herb, Fine Speed Boots, Tent, Ether
Items (NW room): Simple Augment Sigil, 3x Stimulant, 5x First Aid Kit
Items (2nd floor): Stimulant, Fine Strength Belt, Simple Regen Ring

The spring will heal the MP of the party - this dungeon is a good grinding spot.
Make certain that the FPS Sync in ON!!!

Take the Red Sphere and use it at the door.
Find the Green Sphere in the NE room.
Put the Sphere into the one of the other 3 pedestals, best clockwise and find the other green spheres.
You can use a Tent at the NW room.
Put all 5 green spheres on the pedestals infront of the red door.
Now insert the Blue Sphere into the door.

Equip the Ground Staff and check the formation!

Boss Shrieker Baron: Investigate its weaknesses and act accordingly. But Poison will most likely not work. Guard when told! The weaknesses won't change (a little glitch).

Escape in time or GAME OVER. You cannot flee out of battle, so use a Rage Potion to get enough rage for Cleave!

Wilton Woods
Items: Fine Crossbow (offhand)

Progress further east.

Abel
Items: 3x Healing Potion (jar), Fine Throwing Axe (offhand), Potent Ether (well), Potent Rage Potion (jar), Water Bangle, 265 Talents (jar), Tent (crate), 2x First Aid Kit (barrel), Ether (jar, combat school), 300 Talents (jar, combat school), Minor Elixr (clock, combat school) x2, Simple Augment Sigil, 744 Talents, 97 Talents (barrel, storage), Fine Circlet, Simple Fencer's Bracers, Tent (barrel)

An Abeyan will sell a Rage Belt for 1500 Talents.

Talk to the NPC on the pier and collect 3 Freshwater Crododile Teeth.
They will attack in the Rust Cave (?) to the west or when you sail a small boat on the rivers.

In the Combat School you can learn the Greatsword and Spear for 100 Talents each.
Play the Piano.

Talk to the old woman beneath the storage until she tells you about the lonely island somewhere between Kairon and Hess-erabi. The Wiggle-Wiggle man will train your Side-Attack for Elixirs.

Enter the inn to proceed.
You can enter the pub and talk to the other guests, but you have to rest for 60 Talents.
Now you have to get along without your main healer.
Talk to the Abeyans.

Abeyan Prison
Items (start area): 5x First Aid Kit x3, 3x Stimulant x2, 3x Dispel Herb, Poison Bangle, Fine Kama, Fine Bracers
Items (3rd area): Potent Ether, Fine Greatsword, Healing Potion x2, Fine Dagger, Fine Platemail, Fine Evasion Boots
Items (4th area): Fine Attacking Boots, Healing Potion, Masterwork Shield, Stimulant, Fine Tunic, Tent

You will need another Key to open the remaining cells in the starting area.
Defeat the guard and obtain the Abeyan Prison Key.

Free the Prisoners and obtain Fine Cap, the Fine Strength Belt and you can open the last chests with the 3x Ethers and Aegis Ring.
Use a Tent and proceed.

Free the next Abeyan and hurry further.
Free all other Abeyans and obtain a Fine Mage Cowl.

Near the exit are 2 doors: left is a Tent location and right is the boss.

Boss Orson, Vooresh Lieutenant and Vooresh Soldier: Let Celeste explore the weaknesses and depending on who has the Chemist Gloves equiped heal. Orson will escape again.

Take the Fine Pauldrons and use another tent. Don't forget to change your formation.
Proceed to the south and Prefect Trellic will "join" the party.
Magic is temporarily disabled.

The next day you can still enter the Abeyan Prison if you forgot something.
ACT 2 "The Road to Peace" Part 2
Fort Abel
Follow the escort.

Abel
Prepare and then enter the pub and investigate the bookshelf.
Talk to Trellic to proceed.
Outside the town you will receive a small boat.
Remember to hunt Freshwater Crocodiles for their teeth! But they are strong and can one-hit-kill a level 20 party member on hard mode.

Rust Cave
Items (entrance): Crocodile Tooth, Fine Greaves, Seeker Pelt, Fine Rapier
Items (map 2): Sahuagin Fin, Ferocious Lure, Sahuagin Scales, Major Elixir, Potent Rage Potion
Items (map 3): Potent Ether, Rust Beast Claw

Use the tent area on map 3.

Rust Temple
Items (map 1): Fine Armored Boots, Potent Ether, Masterwork Kama (offhand), Minor Elixir, Fine Sai, Potent Rage Potion, Healing Potion, Potent Healing Potion
Items (map 2): Masterwork Robes, Masterwork Sword, Stimulant, Ether x2, Dispel Herb, Potion of Life, 3x First Aid Kit, Minor Elixir
Items (map 3): Ether, Masterwork Throwing Axe, Healing Potion, Minor Elixir, Tent, Rage Potion, Potent Rage Potion, Perfect Rage Potion, Stimulant, Battlemage Robes, Ninja Garb, Karate Gi

Watch out for traps and disable then from the tile infront with Shakar. Only spike traps can't be disabled.

Disabled Traps (map 1): 4
Disabled Traps (map 2): 5
Disabled Traps (map 3): 1

At map 2 ignore the big stairs and go further north to gather Potent Ether, Masterwork Rod and Masterwork Hat.
Use a tent after the mural and put Niomi into the reserve.

Boss Rust Beast Queen: Probe its weaknesses and attack accordingly.

Use a tent and then you can either skip back to the temple entrance or cave entrance.
Exit the cave to the west.
Return to your boat.

Abel
Get your reward from the NPC at the pier (Crocodile Teeth), a Lesser Sonic Gem.
Restock and then rest in the inn.
Talk to Prefect Trellic and obtain a Masterwork Mage Cowl.

Kairon
Items (town): Major Elixir (clock, combat school, 2nd floor), Masterwork Breastplate, Masterwork Crossbow (cupboard, combat school, basement), Potent Ether (barrel), Pointy Hat (church), Healing Potion (jar), Major Elixir, 238 Talents (barrel), Stimulant (jar, hunter guild), Tent (cupboard, musican's)

In the Combat School you can learn the Kama, Flails and Rapiers for 250 Talents each.
Talk to the NPC next to the jewellery shop to obtain a Simple Mage Ring.
At the Abeyan Camp you can purchase a Ring of Aggression for 1500 Talents.
Another one has a secret Magic shop.


Enter the church to start a side quest. Do this as the last thing before you enter the pub.

The Stolen Book Investigation
Start in the church.
The Cleaning Girl Dana: lives above the combat school. Check the floor first and then ask Dana all question from top to bottom.
The Musican Matt: SW corner of the city. First check the house, especially the beds. You can ask all questions to the girl and her mother. Don't ask the father about the book - or he won't cooperate anymore (leave if for last). After you have given your report and get him fined, you won't be able to enter the house anymore.
The Abeyan Margaret: a nun has witnessed her at night near the church. Lives in the camp (ist the mother). Ask her the last question last!

Note: Disable the AutoSave option!!! (this won't be saved and is active each time you start the game)

Now you have two real options. Both will earn you an achievement, but you only can make one choice.

  • It was Matt, the violonist = Fine Monk Bracers, Achievement "Moral over Truth"
  • It was Dana the Cleaner = There is no evidence and prior suspections were all cleared.
  • It was Margaret the Abeyan = Choose this for the Achievement "Truth over Moral"
  • It was Matt and Dana = Fine Monk Bracers
  • It was Matt and Margaret = Fine Monk Bracers, Masterwork Greatsword, 1000 Talents, Achievement "Truth over Moral" and later a mini side quest.
  • It was Dana and Margaret = Fine Monk Bracers

To get your reward it is best to travel back to Abel and return or progess the story.
For returning the Holy Book to the Priest you obtain 10 Ethers.

Mini Side Quest: Talk to the little, orphaned Abeyan and give him 10, 100 or 1000 Talents (best is the last option).
ACT 2 "The Road to Peace" Part 3
Kairon
Enter the pub and find your contact.
Last chance to stock up items before the party is split.
The battles will be a bit more difficult.

Kairon Dashi Camp - Ailfred's party
Travel per boat the to the end of the east river.
The camp is a bit further north.

The Daishi Riders are weak to Trip!

Kairon Dashi Camp - Shakar's party
Walk through the former checkpoint west of Kairon, visit Pada and then go further NW.

Pada
Items: 98 Talents (crate), 3x Healing Potion (well), Tent (jar, 2nd floor)

A night in the shop/inn will cost 40 Talents (after the next events the costs will be halved).

Kairon Dashi Camp
Without a healer that will be tough. One of them should wear the Chemist Gloves for better healing effects of First Aid Kits.

Start going back.

Kairon
Meet up in the inn.
Check your formation and report in the pub.

Last chance to finish a started bounty!

Abel
Unequip Niomi.
Report to Prefect Trellic...
ACT 3 "The Encounter Within"
You unlock the Achievement "Not so green".
Travel north.

Eras-Bashi Mountain
Items (map 1): 3x Healing Potion, 3x Stimulant, Tent
Items (map 2): Fine Null Magic Mantle, 3x Heat Skimmer Wing, Fine Tunic, Potent Ether, Masterwork Dagger (offhand), Ether, Masterwork Bow, Major Elixir
Items (map 3): Fine Evasion Cloak, Orange Pendant, Minor Elixir, Fine Evasion Boots
Items (map 4): Masterwork Scale Mail, Tent
Items (map 5): Ferocious Lure, Masterwork Rapier, Potent Ether, Ether
Items (map 4 north): Mirage Essence, Healing Potion
Items (map 6): Fine Attacking Boots, Masterwork Cap
Items (map 7): Ether, Potent Rage Potion, Healing Potion x2, Dispel Herb, Fine Pauldrons

The Mirage mobs are hard to hit physically and you should defeat the Cockatrice asap.
Note that "Stone" won't be cured when dead.
On map 3 first head to the west.
On map 4 north you can use a tent.

The path to the east will be blocked by a sandstorm, so you can only travel further west.

Sadak-Reel
Items (at night): Ether (jar), Rage Potion (jar), Perfect Rage Potion, Masterwork Flail, Fine Augment Sigil
Items (day): Fine Pauldrons (barrel, inn), Minor Elixir (barrel, house), Fine Javelin, Fine Brigandine, Healing Potion (jar, house)

One of the Abeyans has a shop.
Another sells you Monk Shoes for 2500 Talents.
You can walk in the shallow waters.
Enter the inn. Any further rest will cost 200 Talents.

Restock and upgrade your gear.
Talk the the NPC in the armor shop. The tells you to talk to the Monk you already have met in the Eras-Bashi Mountains map 4 north for 100 Talents.
The northern house keeps looked.
At the Combat School you can learn the Dagger and Javeling for 250 Talents each.
Another villiger will recognize Ailfred.

Eras-Bashi Mountain
Reach map 4 north and use a tent.
Gall will join your party.

Sadak-Reel
Before you enter the inn, learn some combat weapons and restock.
Enter the pub.

Head to the Sandstorm.

Sandstorm Temple
Items (outside): Fine Crampons, Minor Elixir, Masterwork Claw, Healing Potion x2, Fine Regen Ring, Masterwork Staff, Fine Fencer's Bracers, Masterwork Great Axe, Masterwork Hat, Masterwork Whip (offhand), Fine Boots of Health, Fine Circlet, Masterwork Kama, Wind Bangle, Minor Elixir,
Items (cave 1): Masterwork Glove (offhand), Masterwork Pointy Hat
Items (cave 2): Potent Ether

Use the terrain to move forward.
Make certain that the FPS Sync in ON!!!
Don't linger too long as you will be constantly attacked by Sand Kites.
In the little caves you can use a tent.

Using the Fine Regen Ring (chest surrounded by broken pillars) as direction, you cannot go further NE (wind too strong), NW is the 1st cave, to the SE proceed.
To the SE is a bit hidden passage further east with more chests (if you have found the Masterwork Hat, you have missed it).

Reach the eye of the storm and prepare!

Boss Sand Wyvern: Take out the Sand Kite first.
Now the Sandstorm will subside and only the normal random mobs will attack.

Strange enough you will end up at the chest that has contained the Fine Regen Ring.
No you can leave to the NE.

Tent / Wandering Bazaar
Currently you can only enter and move without Ailfred and Shakar.
Also some shops (e. g. the weapon shop) are not available.

Talk to a certain guard.
Restock!
A night in the inn will cost 125 Talents.
The Abeyan will sell her Time Flux Shoes for 2000 Talents. Gall will buy them from his funds.

Note: Time Flux Shoes are the perfect footgear for Habar and later Niomi, as their effect will stack with Haste and Time Flux (learned by Niomi).

Reunite and travel to the north.

Rebellion Camp
Items: Pearl x4, Blade Staff, Masterwork Javelin, Potent Healing Potion, Tent, Potent Rage Potion, Potent Ether, Masterwork Buckler, Fine Speed Boots, Potion of Life, Fine Monk Bracers, Masterwork Glove, Luck Pendant

Collect all treasures on your way to the camp in the NW.
Check really everything (cactus, barriers,...).
The last thing you should check is a certain cactus.
Items: Ferocious Lure, Minor Elixir

For the most part choosing one character will lead to a certain dialogue with the others.
ACT 3 "The Encounter Within" Part 2
Tent / Wandering Bazaar
Restock and buy plenty of water and food (10 rations of each is the max).
Use one ration and canteen on each party at once (and rebuy them) to set hunger/thirst to 0.
The water costs 100 Talents each and the food 150 Talents each.

The Barrens
You need to quell the hunger/thirst when the parameter reaches 55 at the latest.
  • Thirsty (30): -20% AGI, Max MP, MATK and MDEF, 25% fire attack weakness, -5% Evasion
  • Severe Dehydration (55): -50% AGI, Max MP, MATK and MDEF, 50% fire attack weakness, -100% Evasion. The Character is delerious and won't listen to your commands.
  • Hungry (30): -10% Max HP, -20% ATK and DEF, -5 RP each turn.
  • Starving (55): -33% Max HP, -50% ATK and DEF, -20 RP each turn.

Items: Ball Chain Whip, Masterwork Flail & Fine Attacking Boots (bones), Masterwork Cap & Fine Mage Cowl (bones), Major Elixir & Masterwork Robes (bones), Masterwork Sling (offhand), Potent Ether & Masterwork Whip (bones), Masterwork Scale Mail & Fine Focus Crystal (bones), Potion of Life (bones), Blessed Ribbon
Items (cave): Potent Healing Potion, Masterwork Crossbow

Beware the purple worm, as it can act twice.
Explore the weaknesses to act faster.

Reach the cave.
Don't linger too long as the water will just be enough to cross the barrens.

Orphanage
You can currently only talk the the children and their caretaker.

Cross the bridge.

Kaifek
Items: Masterwork Whip (jar, house), 384 Talents (crate, combat school)

Talk to the Abeyan child to obtain Key Item Shakar's Note 2.
Another Abeyan will sell a Lesser Water Gem for 3000 Talents.
At the Accessory shop you can buy really good rings.
At the Combat School you can learn the Staff, Whips and Bows for 250 Talents each.

Rest in the inn (50 Talents for the 1st night). Later it will cost 180 Talents.
Talk to Ailfred.

Kaifek Pit
Items (on random Maps like found when following this guide): Spiked Shield, Major Elixir, Major Elixir, Perfect Rage Potion, Masterwork Greatsword, Masterwork Crossbow (offhand)
When the direction says right or left then you have really turn to the right or left like in a EGO-type game. Straight is the opposite exit and back is (you know what).
If I give cardinal directions with OSWN, then follow them.
  1. You already have one set of directions: follow Shakar's Note 2 to find the Fine Monk Bracers, Guisarme and Genji Gloves.
  2. Next go right (or west) and you will meet the Wiggle Wiggle Man.
    He gives you the Fungus Quest, to deliver a Fungus to the ill child in the Orphanage in 3 Minutes after you find it.
  3. Go directly south to find the Changelings (other directions are W, N, W, N, N from the hub).
    Save before you fight them (dash around the north to shorten the distance).
    Best is to defeat them with strong Side or Low attacks and Habar should focus on healing. The Sonic AoE (Lesser Sonic Gem) might confuse them.
  4. Return to the Hub and follow the directions with Shakar's Note 1 (fungus) to find 752 Talents and the Exploding Fungus.
    Now hurry to the Orphanage (best run from all battles if possible, no healing and change maps to reach the Hubv faster). You obtain the Memento Necklace.
  5. Return to Kaifek, talk to Ailfred again and Celeste will keep him company.
  6. Find the Wiggle Wiggle Man (see paragraphs 1 & 2) to obtain Shakar's Note 3 (through).
  7. Follow Shakar's Note 3 (through) and find Potent Rage Potion, Key Item Red Disenchantment Sphere, Fine Nullmagic Mantle, Key Item Blue Disentchantment Sphere, Potent Healing Potion, Masterwork Tunic & Potent Healing Potion (behind ice trap).
    Enter the next map (Camp) to the north and collect Key Item Yellow Disentchantment Sphere, Potent Healing Potion, Masterwork Sling, Fine Augment Sigil, Fine Fencer's Bracers and Key Item Green Disentchantment Sphere.
    Disable the traps and proceed until Masret will join the party.
    Return to Kaifek (the Wiggle Wiggle Man has moved now).
You will find other clues later in game.

Kaifek
Return to the inn.
Check your formation.
I still recommend to have Celeste and Habar in the active party. Another Damage Dealer and Mage are best for the other slots.

Travel east to the orphanage and follow Masret's directions.
Enter the Ship.
ACT 4 "The Sea Connects All" - Free exploration
Before you travel to Abel, explore.
You unlock the Achievement "Blue Freedom".

As long as you are not strong enough, try to avoid deeper waters.

Tent / Wandering Bazaar
Now even Ailfred and Shakar can enter, but the shops won't sell anything to you (only the shoe shop will sell).

The Darkest Cave
Right north of the Orphanage.
Items: Masterwork Parrying Blade, Fine Mage Ring, Potent Ether, Masterwork Bracers, 784 Talents, Thief Shoes

The monsters are already known.

Crystal Lake (from the river)
Currently a game breaker.

Zeben
Talk to the innkeeper and she will gift you all rests there.
The Armor and Weapon Shop will give you 10% discount.

NOTE: The Combat Schools will now cost 500 Talents each everywhere.

Northernmost Point
North of Vooresh.
Items: 661 Talents, Knight Shoes, Major Elixir, Spiked Shield, Potent Healing Potion, Minor Elixir, Perfect Rage Potion, Auto Potion (new)

One of the 3 monsters was once the first boss. Be prepared to die even with level 40+ on hard mode as the Banshee even can cast Death.
But a great place to grind.

Thalden
Check for combat school.

Vooresh
The Abeyan has some "new" stock.
And you have lost the Military Discount.
You cannot enter the Castle yet.
But you can try the next bounty.

Cecil's Workshop
His demands have got more congrete: Shism Ore.
If you find a rock that blinks in and out of reality, bring it to him (Ice Spear, Ground Staff, Wind Dagger and all other elemental weapons like the one from Niomi).

For the Undying Shoggot bounty, collect full RP and then do max. damage (Bum Rush). Buffs and Debuffs and Ailfred's Focused Rage are necessary as is Luck. Lunge Injury will lessen the regeneration.

You cannot visit Rus or the Whirlpool.

Wiggle Wiggle Island
Check on the Worldmap when to go south from the Kairon-Continent and unlock this Achievement.
Items: Major Elixir, Minor Elixir

Talk to Wiggle Wiggle to obtain 1 Talent.
For Elixirs he will train you in attack skills (not possible anymore when you already have mastered them).

The Dead Circle
In the centre of Shism.
Only enter once for now.

Kairon Lookout
On the island west of the Sacred Falls (worldmap), a litte mountain pass.
Items: Masterwork Crampons, Potent Healing Potion, Major Elixir, Bludgeoning Rod, Mage Shoes, Potent Rage Potion, Masterwork Circlet, Auto Ether (new)

The monsters are of the same caliber as at the Northernmost Point.

You will unlock the Achievement "The High Seas" when you have found the Dark Cave, Northernmost Point and Kairon Lookout.

Fort Abel
You shouldn't be able to reach that!
ACT 4 "The Sea Connects All" Main Story
Abel
Enter the pub and then the former headquarters of the TFU.
Rest in the inn to proceed.
Wedge is hiding in the attic of the house next of the combat school.
He will join as a guest with Level 33.

The island of Rus has the same monsters as the Northernmost Point.
I recommend to grind until Masrek learns Group Barrier with level 42, then you are prepared for the following dungeons.

Rus
Items: Masterwork Greaves (behind combat school)

A night in the inn costs 200 Talents.
The Abeyan will sell a Major Elixir for 1000 Talents.
Another Abeyan will sell a Blink Axe for 5000 Talents.
This is the first time you can buy Masterwork weapons.

Enter the Combat School and Wedge will leave the party.
The Combat School will teach in Gloves, Crossbows and Claws for 500 Talents.

Travel to the whirlpool south of the tower.

Water Temple
Reach everyone in time but Celeste will be teleported away.
Check the Formation and enter the Temple.

Status Effect "Under Water": AGI =1 so Speed Boots and skill depending on AGI are not effective down there. (Time Flux is still effective)
Ranged Attacks won't work but skills doing Ranged Damage.

Ailfred's Ice Spear is not effective!

Items (whirlpool): Lightning Bangle
Items (entrance): Minor Elixir, 5x Ether, Potent Healing Potion
Items (NE Hall): Minor Elixir, Masterwork Mage Ring, Potent Healing Potion, Thief Shoes, Perfect Rage Potion
Items (SW Hall): Masterwork Brigandine, Time Flux Shoes, Potent Ether
Items (NW Hall): Masterwork Cape, Knight Shoes, Masterwork Sai, Stimulant, Potion of Life

Read the stone tablet at the front hall. You have to lower the water level.
Now the 4 gates are open.
In all those side halls are plates you have to push.

To the SE is a strong current and a tent area.
  • 1st current, left: Major Elixir
  • 1st current & right or 2nd current & left: Masterwork Mage Cowl
  • 2nd current & right or 3rd current left: Potent Ether, left to the plate or right to Mage Shoes.
  • 3rd current: Potent Healing Potion, then right to the tent area
  • southern current: not possible yet (remember that place!!!)

To the SW is another Tent area.

Items (inner hall): Crystal Rod, Tent
Use a tent.

Let Celeste equip the Hydro Rapier and reform the party.
For the boss battle you have no restrictions.

Boss Trench Walker: Weak to high!

Back on the surface, restock!

Magic Tower
Habar learns Dispel Ally and Dispel Enemy.
Touch the Orb.

Items (Floor 21): Potent Ether, Potent Healing Potion, Masterwork Robes

Defeat the Abeyan. Defeat the Expert Mage asap as he deals massive (one hit kill) damage.
He is weak against Thrust and Side.
Save often as you will encounter the same formation as mobs again.

Pull the lever.
The spikes will make 50 HP damager per step but won't kill.

Items (Floor 22): Potent Ether, Shattered Mirror (behind spikes), Potent Healing Potion,

Pull both levers and then go further.

Items (Floor 24): Potent Ether, Masterwork Focus Crystal, Flesh Effigy

Check the holes for their location on Floor 23 or 22.
This is the shortest solution:
  1. hole to floor 23: Major Elixir, Lever (pull), Potent Healing Potion (ignore the hole surrounded by spikes)
  2. hole to floor 23: Hydro Breastplate, Lever, Potion of Life, 2 holes to floor 22.
    • left hole: Flame Breastplate, then pull the lever and get the Potent Healing Potion
    • right hole: Bio Breastplate
  3. hole to floor 23: Bolt Breastplate, hole to floor 22 with Sonic Breastplate.
  4. hole to floor 23: Ground Breastplate, hole to floor 22 with Wind Breastplate.
  5. hole to floor 23: Masterwork Strength Belt
  6. hole to floor 23: Lever, Potent Ether, Perfect Rage Potion (the shortest distance above the spikes are 3 steps.
  7. hole to floor 23: Masterwork Pointy Hat
With this nearly only the east side of floor 24 is left.
Proceed further.

Items (Floor 25): Rage Belt, Minor Elixir

Take the east stairs back to floor 24 and pull the lever.
Return and pull the lever.
Proceed to the next floor.

Items Floor 26: Masterwork Evasion Cloak, Masterwork Nullmagic Mantle, Blessed Ribbon

Check the holes to reach the other chests and levers on floor 25 and pull the lever!
You will find Frost Breastplate (hole 1) and the lever (hole 2) for the gate at floor 24 with the Guided Knife.

You have to save before the last chest of this floor.

Boss Abomination: check the weaknesses (the elements are currently in the wrong order) and Masrek should cast Group Barrier in the first round. Ailfred's Ice Spear and Celeste's Hydro Rapier are very effective against him. The boss will regenerate 1000 HP per round.

Go upstairs and Niomi will return to the party with the same level as Ailfred and has the Physic Rod already equiped.
Return to your ship.
ACT 4 "The Sea Connects All" Main Story Part 2
Your party is fixed for the next events.
Revisit the towns with Niomi and learn new weapons (staves, whips, slings and crossbows) and restock on First Aid Kit and Healing Potions.
Another advice is to equip Regen Rings.

Aldair
Talk to all TFU members.
Rest in the inn to proceed.
Hurry back to the inn and find the cleaning lady.

Wilton Woods
Go to the next map and then investigate the log.

Herald's Hideout
Items (map 1): Potent Rage Potion, Stimulant, Masterwork Brigandine, Masterwork Monk Bracers
Items (map 2): Masterwork Pauldrons, Masterwork Fencer's Bracers, Stimulant
Items (map 3): Net Gun
Items (map 4): 3x Healing Potion, Masterwork Bracers, 3x Healing Potion (jar)
Items (map 5): Potent Ether, Masterwork Strength Belt, Potent Healing Potion, Masterwork Crampons
Items (interrogate): Minor Elixir, Wrist Crossbow, Potent Rage Potion

Defeat the Heralds.
Read the notes (C47, H13, D29), find the bed of J19, and try to sneak at map 3.
Don't touch anything when sneaking. When you mess up you have to defeat all 4 Heralds (not recommended on hard mode).

Prepare once you reach map 6.

Boss Heralds Investigator: Defeat the other Heralds asap and then focus Trip on the boss.
On Hard Mode you might need some tries. Time Flux might help.

Equip Ralts as he joins with level 40.
His Skills will change with his Paradigm Shift.
Leave the Hideout and return to the ship.
But the ship is not where you have parked it but in a lake to the SW of Aldair.
Don't forget to teach Ralts more weapons in Aldair first.

You will unlock the Achievement "Lineage" and obtain Elmyra's Notes (Volcano).
ACT 5 "The Battle for Schism"
Kaifek Pit
Follow Elmyra's Note (Volcano) and gather Major Elixir, 682 Talents, Potent Healing Potion and a Fire Bangle on the way.

Gouleg Volcano
Items (A): Dispel Herb, Phoenix Down, Major Elixir, Masterwork Circlet, Fire Bangle, Masterwork Regen Ring
Items (B): Minor Elixir, Potent Ether x2, Jaguar Pelt, Masterwork Monk Bracers, Potent Rage Potion, Ferocious Lure, Perfect Rage Potion, Tent, Potent Healing Potion, Ruby, Magic Evasion Pendant
Items (Tent Room): Potent Healing Potion, Masterwork Tunic

You can jump over the lava a certain spots (step stones).
You might want to let Niomi wear the Memento Necklace, as her spells deal massive damage down here but cost many MP.

It might be a bit strange to navigate blindly through the lava tunnels, but the first one (area A to B) is just up and then left and down.

Once you find the Tent and go north, you will find a lava tunnel with a tent area.

Make the party formations in front of the temple.
Remember you have two healers (Habar and Masrec) and two revivers (Habar and Ralts).
Gall, Masret and Ralts are the weakest (levelwise).
But you shouldn't put Niomi and Ralts in one party as Ralts can change to water or ice attribute.
Also you should have a Lesser Water Gem already. Give it to Masret.
Depending on how you will heal, trade the Memento Necklace.
My recommendation is:
Celeste's Party: Gall, Masret and Ralts. (Ice, water, Fire Absorbtion, scanner healer and reviver)
Aifred's Party: Habar and Niomi. (Strong ice, strong water, scanner healer and reviver)

Save on a different slot in case you have chosen wrong and save after each battle/chest!!!

Fire Temple
  1. You start with Celeste's Party and can find a Masterwork Buckler, Masterwork Sling (offhand) and Masterwork Javelin.
    Avoid the tiles with holes (100 HP damage and will kill) and step on the switch.
  2. With Ailfred's Party take the 3x Stimulant, Masterwork Hat, Masterwork Cap and Masterwork Helm before you challenge the traps.
    Gather 10x Ether, Perfect Rage Potion, Masterwork Boots of Health and Coal to the south and Potent Ether near the next switch.
  3. Navigate with Celeste around the traps to gather Masterwork Scale Mail, Minor Elixir, Masterwork Augment Sigil (ouch), Masterwork Focus Crystal (ouch) and Masterwork Robes.
    Below the next switch is a tent area.
  4. Proceed with Ailfred and cross another hot trap area to find Masterwork Rapier, Masterwork Mage Cowl, Major Elixir and Masterwork Glove.
    Look at the Mural and use the tent area before you step on the switch.
  5. Proceed with Celeste over the next hot trap.
    Get the Masterwork Shield (ouch), Salamander Scales and Major Elixir before you step on the next switch.
  6. Gather the Masterwork Cape, Potent Ether and Power Ring with Ailfred before you step on the next switch.
  7. Let Celeste take the 3x Stimulant and then cross the next 2 hot traps to find Arcane Ring, Minor Elixir and Potion of Life.
    Next head north and defeat the Flame Spirit!!!
    Let Ralts either buff ice weapons or fire absorbtion.
    With Ki Burst and Water II as well as the other attacks you should be able to defeat it.
    It drops a Fire Bangle.
    Step on the switch.
  8. Now Ailfred can proceed to the north and defeat the Animated Statue.
    This time you have to figure out the weapon weaknesses. Reach is a certain weakness.
    With Time Flux and Water III no problem.
    Drops a Ground Bangle.
    Save as saving will be disabled now!
  9. Push the pillars to the side with both parties!
  10. Check your party formation (Ailfred, Celeste, Habar and Niomi) before you step on the last switch!
  11. Go north the the final pillar.
  12. Boss Lava Golem: Get his weaknesses and defeat it.
  13. You obtain the Flame Claw and unlock the Achievement "Never Split the Party!".

Gouleg Volcano
You can skip to the other side of the volcano.

Kaifek
Try to leave (have still 100 Talents in your pockets).
You will obtain the Copy of a Herald Sigil Ring.
ACT 5 "The Battle for Schism" Part 2
Prepare thoroughly and do some bounty hunts.

Vooresh
Break into the western house and use the Heralds Sigil Ring at the fireplace.

Vooresh Sewers
Items: Chitin Claw, Death Seal (best for Habar or Ralts), Major Elixir, Ferocious Lure, Potent Rage Potion

Castle Moat
Items: Hartedge Greatsword

Finally you can reach that chest.

Major Herald Base
Items (map 1): Potent Healing Potion, Perfect Healing Potion
Items (map 2): Potent Ether, Poison Barbs & Minor Elixir (secret passage), Ring of Aggression
Items (map 3): Perfect Ether, Potent Rage Potion
Items (map 4): Stun Bangle
Items (map 5): Mega Elixir (secret passage)

Defeat the Heralds.
On maps 2 is a secret passage (the arrows should only demonstrate that the destination is to the north).
Read the books at map 3 and 4 and look into each passage.
On map 5 Ailfred will guard the hallway so check the formation.
Before you enter the southern room and take the Wind Dagger, find this secret passage:

Boss General Syleen: A duel with Niomi. Just throw her strongest spells at her mother until the battle ends.

You will obtain access to the Key Item Grandel's Journal. Read it whole.

Restock and travel to the western tip of Kairon.

Cave
Items: Masterwork Speed Boots, Potent Ether, Major Elixir

From now on you might encounter Golden Figments. Try to defeat one. The highest chance has Celeste with an Ring of Aggression and her Rapier - Pinpoint Thrusts or Duelist Dance as they can't miss.
Another option is to cast Counterspell and equip the Genji Gloves for multi hits.
Reward: 2000 EXP and Gold Nugget.

Sonic Temple
This temple has another swarming mob like the Earth Temple.
Remember that Poison and Wind are strong against Sonic.
Don't forget to equip the Death Seals and Sonic Breastplate/Bangle!!!

Read the book in the hall and then touch the bowls from the largest to the smallest.
Lowest = L = largest bowl Mid-low = ML = 2nd largest bowl Mid-high = MH = 2nd smallest bowl High = H = smallest bowl

Enter the SW room.
The riddles use sound (so amplify your loudspeakers).
For those who have trouble with hearing, please select "Audio Help" (can be changed at the book in the hall).

Take the Death Seal and Smiting Buckler.
Cross the pillars and listen to the sounds.
Solution 1: MH > ML > MH > H > L (forward)
Solution 2: L > H > MH > ML > MH (backward)

Enter the SE room and collect Rage Potion, Perfect Healing Potion, Potent Healing Potion, Perfect Ether, Potent Ether, 5x Ether, Tent, Enhance Sword (secret passage).

Pull all levers!
Solution: H > L > MH > ML > MH > L

Enter the NW room (backward solution):
Pull the boulder to the most right up 2x.
Go 2 steps left and push the boulder down.
2x left (one push), 2x down (one push), push left, and then push the last and lowest boulder left twice.
Reward: Genji Gloves.

Enter the NE room and collect the Repeater Glove (offhand), Major Elixir, Potent Ether, Perfect Rage Potion and Resonance Orb x6.
Use the Resonance Orbs at the organ.
Leave the room once and return to listen to the next sequence.
Final solution: MH > MH > ML > MH > H > ML

Take the Caco Flail.

Boss General Gabriel and 6 kinds of Heralds: Just try some AoE in the only turn you can act but you cannot win.
You will loose all elemental weapons.

Try the door once and check the room.
Shakar saves you.
ACT 5 "The Battle for Schism" Part 3
Abel Wall
Items: 10x First Aid Kit x2, 5x Ether, 3x Stimulant, Major Elixir, Potent Ether, Perfect Healing Potion, Perfect Ether
Items (tower 1): Major Elixir, Potent Ether
Items (tower 2): Masterwork Attacking Boots, Potion of Life
Items (tower 3): 3x Healing Potion, Spectrum Bangle
Items (tower 4): Tent, Perfect Healing Potion, Wakizashi (offhand)

Check your equipment and formation.
Climb the stairs when prepared.
Collect the items when you are not fighting.
In the small towers 1 and 4 are a tent areas.
Don't get hit by the catapults (massive damage until game over).

Reunite with Ailfred who is now 2 levels stronger than Niomi.
Re-equip him and put him into the party.
ow some of the Vooresh soldiers will flee.

Boss Gabriel: Defeat the Vooresh Soldiers asap and check out his weaknesses. With the catapult fire it will be difficult to beat him.

Boss Virion Gabriel: You will be completely healed. Even with the catapult damage, this will be easier as he is not completely immune to negative states. Time Flux each turn is recommended.

You will obtain the elemental weapons back.
Ailfred will keep the Ice Spear as he has other things to do now.

You unlock the Achievement "Unbound by Gravity" and obtain the Airship.
First restock and rest in Zeben.

Fort Abel
Cross the Abel Wall and enter from the back (you cannot enter the building further east).
Items: Potion of Life, Perfect Ether x2, Masterwork Attacking Boots, Perfect Healing Potion, Masterwork Regen Ring
Items (Kairon Treasury, hidden): Potent Rage Potion, Potion of Life, Perfect Ether x2, Mega Elixir, Minor Elixir x3, Major Elixir x2, Perfect Healing Potion x2, Perfect Rage Potion, Death Seal, Mythril Crossbow, Mythril Sword, Mythril Breastplate, Ground Gem

You might be able to enter it during the Ship Exploration, but story wise it should not be possible then.

Castle Kairon
Items (West Tower): Minor Elixir,
Items (Library): Major Elixir (clock)
Items (west hallway): Potent Ether, Stimulant, Healing Potion x3

You can rest for free in the guest room (east tower).
Meet the King in the throne room.
That opens a secret passage in the library.

Kairon
Talk to the owner of the jewellery and don't buy anything so he will show you his good stock.

Tent / Wandering Bazaar
The shoe shop has now Masterwork boots in stock.
The others still refuse to sell to you.

Tomb of the Choicemaker
Not implemented yet End-Game-Dungeon.

Phoenix Island
Items: Devil's Bane (offhand), Major Elixir, Minor Elixir, Potion of Life

NW Continent
This is the sole landing point, but you can't proceed there yet.

Vooresh
Once you can't do anything else, enter the throneroom.
Now you still have the chance to finish the Poe Chest Quest.

Once you are prepared fly high into the sky.
Poe Chest Quest
Act 5 - Airship available
Fly to the little island near Kairon.

  1. Clue: "Low Point":
    • Kairon, lower Abeyan tent - Ticket #1
    • Abel, next to the fisherman - Ticket #2
    • Kaifek Pit Hub - Ticket #3
    • Magic Tower, Ground Floor - Ticket #4
    • Mount Elban, east entry - Ticket #5
    Reward: Perfect Healing Potion, Perfect Ether, Genji Gloves and Achievement "Poe Boy".
  2. Clue: "Meetings":
    • Vooresh, next to item shop - Ticket #1
    • Aldair, behind church - Ticket #2
    • Eras-Bashi Mountain, map 4 north, campsite - Ticket #3
    • Kaifek Pit - Through, Rebellion Camp (you can enter the cave from the opposite end) - Ticket #4
    • Vooresh Castle, Throne Room - Ticket #5 (after your lunch with King Ailfred)
    Reward: Major Elixir, Perfect Rage Potion, Sonic Gem and Achievement "Not Poe any Moe".
  3. Clue: "Off the Beaten Path":
    • Kairon Lookout - Ticket #1
    • Wiggle Wiggle island - Ticket #2
    • Northern Fort - Ticket #3
    • Aldair Cave 2 - Ticket #4
    • Tomb of the Choicemaker - Ticket #5
    Reward: Mega Elixir, Infinity Sword and Achievement "Poe's got some Dough".

It is possible to finish this quest before you fly to the Lightning Temple.
ACT 5 "The Battle for Schism" Part 4
Over the Clouds
Items: Healing Breeze Potion, Potion of Life (collapsed temple), Major Elixir

When you are searching for the temple, you can find items on floating islands and monsters in the sky.
Beware the Volatile Drifters as they will explode.

You are on the right track once the clouds get darker and the storm starts.

Lightning Temple
Shakar will stay on board and will be unequiped.
Protection against thunder is recommended.

Items (outside): Potent Ether, Potion of Life
Items (cave): 5x Ether

  1. Pull the yellow lever in the cave and a yellow crystal (1) will appear to the north.
  2. Touch it to teleport to the next island.
  3. Find the next yellow crystal (2) and pull the blue lever.
  4. Return to the now blue crystal and teleport with it to the next island.
    Those colored crystals will turn to yellow again when used!
  5. Reach the yellow crystal (3), take the Potent Ether and touch yellow crystal (4).
  6. Enter the cave to collect Potent Ether, Perfect Rage Potion and Tent.
    You can use a tent and don't pull the red lever yet.
  7. Touch the yellow crystal (5) to gather Potent Ether, Potent Healing Potion, Perfect Ether, Major Elixir and pull the purple lever.
  8. Touch the yellow crystal (5) and (4) again to reach the purple crystal with the Spririt Regen Ring.
  9. Now pull the red lever in the cave and touch first the yellow crystal (5) and then the red crystal to reach the next island.
  10. Take the Perfect Healing Potion and touch the yellow crystal (6).
  11. Take the Minor Elixir and Potion of Life, then touch the yellow crystal (7).
  12. Take the Ferocious Lure and Potent Ether and pull the cyan lever.
  13. Return 2 islands back to touch the cyan crystal.
  14. Take the Mythril Cap and pull the grey lever.
  15. Touch the cyan crystal and then the yellow crystal again.
  16. To the south is the grey crystal with another cyan lever to pull.
  17. Return to the former island and then touch the cyan crystal (save!). Prepare (protect against thunder) and take the Bolt Sword.
Boss Quetzalcoatl: Check the weaknesses and then Habar should focus on healing, Niomi on casting Time Flux each turn and then make use of those weaknesses.

First rest and restock in Zeben.

Vooresh
Enter the castle.
Talk to Ailfred in the throne room to proceed.
Form a party with ranged, reach and magic (Celeste and Habar are a must, Niomi and Ralts or Masret are for the other 2 places).

You won't get any exp or loot for the air fights.
Weak attacks and counter are worthless, better use guard to claim RP.

Boss Green Dragon: Explore the weakness and defeat it.

For the first time the party is complete (you still miss the final party member) and Ailfred will lead the party again with a level of 2 more than Niomi.

Rest in Kairon Castle (currently no chances for the Abeyans, only for some soldiers on the Vooresh Continent).

Prepare and then land on the spot (screenshot above) at the NW continent and travel to the abandoned fort (equip the Death Seals!).
On Hard Mode you should have already beaten the Dark Phoenix, or what will happen next will be to difficult.
The Mage Hags might drop Masterwork Mage Rings!

Fort Nynnyaw
Items (outside): Tent, Potent Rage Potion,
Items (west): Masterwork Nullmagic Mantel, Tent, Protect Bangle, Perfect Healing Potion
Items (east): Potent Ether, Minor Elixir, Mythril Shirt, Auto Potent Potion (new)

Point of no return:
Find the crates in the east building and leave the fort.
Follow Syleen.

The Dead Circle
Boss General Syleen: Duel with Masret, but you have no chance.

Portal Clearance
Check your formation and then defeat the Unity Glaivesman. He will drop the White Gem, Green Gem and Mythril Spear.
ACT 6 "A Fissure in Reality"
You unlock the Achievement "Definitely not Kansas".
The party will escape the next battle so heal asap.
Run (you will only run from the Unity Soldiers) around the mountain range until the next event starts.
Time Flux is a must have spell here and there is a chance for Gem drops, the currency of Unity.
White Gem < Green Gem < Red Gem < Blue Gem

Heal!

Portal Clearance
Notice that your current magic weapons won't fit.

Travel north until you see the first town.
To the far east and then south you can earn some money.

Small Cave
Items: 2x White Gem, 3x White Gem x2, Green Gem, Red Gem, Ferocious Lure, Major Elixir, Mythril Smiting Buckler

Here you will encounter enemies that are immune to physical attacks (only defense ignoring skills will work) and have no weaknesses. So cast your spells.

Pon
Items: 5x White Gem & 1 Green Gem (jar, combat school), Healing Breeze Potion, Mythril Mage Ring, 5x Ferocious Lure (Accessory Shop, upper left table), Red Gem (inn, upper floor closet), 5x Tent (sleeping bags, item shop)

The Combat School will teach you Throwing Axes and Javelins for 3 White Gems each.
In the item shop you can currently buy 5 Healing Potions or Ethers for 1 White Gem.
They even have Mega Elixirs to sell.

At the well behind the inn you can exchange 1 Red Gem for 2 Green Gems and 20 White Gems.

In the Accessory Shop you need Red Gems to buy Elemental Gems or the other gems to buy Mythril Accessories.
Similar for the Armor Shop.

One of the guards will tell you that the Awakened (Tree monster, weak to burning) might drop all kinds of Gems, perhaps even the rare blue ones (normally only Virion has them).

You can leave the town to the north for more exploring or enter the inn to proceed.
To the north is some swamp you won't enter yet and when you reach the mountain range to the NW you won't proceed further until you have entered the inn.

Gall will stay by Masret in the inn.
A rest in the inn will currently cost 1 White Gem or free later on.
Start asking the Abeyan in town and you will be noticed when you can return to the inn.

Re-equip Gall then head to the previously mentioned mountain range to the NW.

Orson will join your party with his Bio Whip and you can change your formation for the battle.

Boss Manticore: Defeat it and return to Pon inn.

Travel back the where you fought with the Manticore.

Resistance Base
Items: Green Gem, Red Gem

You can rest for free here when you touch a bed.
Enter the NW room.
Later check on Gall and he learns Spirit Chakra.

Pon
Heal Masret and don't give up in the process.
This time you really have a full party with all 9 members.

Resistance Base
Talk to Pastrel to obtain 2 Poison Bangles.
Later you will obtain Magic Shard of Strenght and Magic Shard of Magic (now watch out for a small sparkle, all locations will be put into an own chapter).

Another Rebell will give you 8x White and 2x Green Gem.
The one-eyed NPC will teach you 5 new skills (Fury Strike, Battlefield Tactican, Swift Attack, Rapid Attack and Desperation Attack) for Green Gems.
Sage Virotess will teach you 9 new spells (Slow, Slow Area, Nuke, Nuke Area, Mind Control, Wound, Wound Area and Upheaval) for Red Gems.
Magic Shard Locations of Unity
Unity
  1. Resistance Base, left of the ladder to the sage.
  2. Worldmap, crater south of Pon
  3. Worldmap, little group of trees north of Pon
  4. Swamp
  5. Swamp
  6. Swamp
  7. Swamp
  8. Swamp
  9. Worldmap, after swamp
  10. Worldmap, after swamp, lonely tree
  11. Worldmap, after swamp, big crater near the tower
  12. Worldmap, after swamp, lonely tree near the tower
  13. Fortress Caves Area
  14. 1st Unity Tower, Floor 1
  15. 1st Unity Tower, Floor 2
  16. 1st Unity Tower, Floor 4 West
  17. 1st Unity Tower, Floor 4 East
  18. 1st Unity Tower, after Lift 1
  19. Worldmap, Mountain south of Moloke
  20. Worldmap, southern tip of the forest SW of Moloke
  21. Worldmap, Mountain at the southern cap west of Moloke or south of the Crystal Mines
  22. Worldmap, North of the Crystal Mines, next to the Hidden Cave
  23. Worldmap, NW of Moloke, lonely tree (east of Hidden Cave)
  24. Worldmap, behind the Fortress north of Moloke
  25. Worldmap, North of Moloke, west of the Fortress
  26. Moloke, library
  27. Molole, next to the Red Gem Shop
  28. Moloke, jar next to Magic Shop
  29. Crystal Mines, entrance
  30. Crystal Mines, entrance
  31. Crystal Mines, entrance
  32. Crystal Mines, entrance, tent area
  33. Crystal Mine, Riddle Room
  34. Crystal Mine, Riddle Room
  35. Crystal Mine, Riddle Room
  36. Crystal Mine, Riddle Room
  37. Crystal Mine, Riddle Room
  38. Crystal Mine, worldmap after Riddle Room
  39. Crystal Mine, part 2
  40. Crystal Mine, part 2, tent area
  41. Crystal Mine, part 2
  42. 2nd Unity Tower, floor 2 west (blue barrier/lever)
  43. 2nd Unity Tower, floor 2 east (green barrier/lever)
  44. 2nd Unity Tower, floor 4 east (green barrier/lever)
  45. 2nd Unity Tower, floor 5 east (green barrier/lever)
  46. 2nd Unity Tower, floor 1 via dropdown from floor 3 (purple barrier/lever)
  47. 2nd Unity Tower, floor 5 (purple barrier/lever)
  48. 2nd Unity Tower, after Lift 1
  49. Viron's Castle Bridge, during attack
  50. Viron's Castle Bridge, during attack
  51. Viron's Castle Bridge, during attack
  52. Worldmap at Choicemaker's Tomb (not reachable yet).

Magic Shards and on whom to use as each character can only use 5 shards per stat and 15 shards in total (in order of priority):
  • Body (Max HP):
  • Spirit (Max MP): Niomi, Habar, Masret, Ralts, Gall
  • Strength (Physical Attack): Celeste, Gall, Ailfred
  • Magic (MAT): Niomi, Habar, Masret, Gall
  • Defense: Ailfred, Ralts, Orson
  • Will (MDEF): Niomi, Habar, Masret
  • Speed (Agility): Shadar, Celeste, Habar
ACT 6 "A Fissure in Reality" Part 2
Swamp
Items: Auto Healing Breeze (new), Potent Ether x2, Green Gem x3, 3x White Gem x3, 2x Dispel Herb x2, Stimulant, Ferocious Lure, Magic Shards x5 (see screenshots in the former chapter), Mythril Hat, Tent, Stimulant, Red Gem, Potent Rage Potion, Healing Breeze Potion, Potent Healing Potion x2, Mythril Strength Belt

Equip your Blessed Ribbons, Green Pendants or Poison Bangles to protect against Poison!
You have to defeat the Deathcap in one turn as they will heal for 3000 HP each turn.
Your destination is the spooky cave to the north and head that warning there.

Boss Bioloom Squid and 2 Squidlings: You need to cast Fire or Lightning Spells or Flashbombs to see and hit your targets. Sometimes to boss will cast Bioluminescense. Get rid of the Minions first best with AoE attacks/spells of Physic or Lightning element as those will hit for 100%. Beware of Death Gaze (low hit chance).

You obtain the Gem of Severing. Let your fasted party member use it as the 1st turn.
Now you can skip the swamp for healing or new skills/spells in the base.

Fortress Caves
Items (Area): Healing Breeze Potion, Mythril Evasion Cloak, 2x White Gem, Tent, Ferocious Lure, Green Gem, Magic Shard
Items (map 2): 2x White Gem

The Void Hound is similar to the hawks and can hide from your attacks.
You will the Anti-Poison gear again.
Orson will be caught once you reach the end of the caves.

1st Unity Tower
Items (Floor 1): 5x Ether, 2x Tent, Red Gem (Secret Passage 1), Magic Shard, 3x White Gem, Stimulant, Rage Potion, Healing Breeze Potion, Green Gem
Items (Floor 2): Dispel Herb, Magic Shard, Stimulant, Perfect Ether & Perfect Healing Potion (behind trap)
Items (Floor 3 West): 5x Ether, Potent Ether, 3x White Gem, Perfect Rage Potion & Pharmacology Gloves (Secret Passage 2)
Items (Floor 4 West): Minor Elixir, 3x White Gems, Mythirl Blade Staff (Secret Passage 3), Magic Shard, Green Gem, Healing Gust Potion, Red Gem
Items (Floor 3 East): Minor Elixir, Mythril Sai & Healing Breeze Potion (Secret Passage 4), 3x White Gem, Ferocious Lure
Items (Floor 4 East): Ferocious Lure, 3x White Gem, Green Gem, Magic Shard
Items (Floor 5 East): Green Gem, Red Gem, Masamune & Major Elixir (Secret Passage 5), Potent Ether, Minor Elixir, Potent Healing Potion
Items (after lift): Magic Shard

All "Void" monsters can hide and the Void Walker can reflect.
Find the coffins at floor 1 before you go to the next floor.
Floor 1 Secret Passage:

To pass the fire trap at floor 2 you have to pull the ropes of floor 4 West and 5 east.

Floor 3 West Secret Passage:

Floor 4 West Secret Passage:

Floor 3 East Secret Passage:

Floor 5 East Secret Passage:

Defeat the Unity Assassin (weak to Side) and Alchemist (weak to High and Martial Arts) in an 1vs1 Combat. I recommend letting Celeste go first and use the Gem of Severing followed by Weakness Probe. You will only change the party member when she/he dies (depending on the level even Shakar can defeat both with Poison Darts). They drop a Healing Gust Potion and you obtain a Blue Gem.

Orson will re-join the party with additional 5 levels.
Return to floor 2, get the remaining items and enter the 1st lift.
Don't forget the Magic Shard before you enter the next two lifts.
You have to press enter on the lifts to return downstairs.

You obtain the Unity Bolt Sword, Unity Ground Staff, Unity Caco Flail and Unity Hydro Rapier.
Instead of an attack after use those weapons will absorb their element.

Resistance Base
Talk to Pastrel and then to Sage Virotess.
Ralts will learn the teleport spells for Pon, Portal to Shism and Moloke.

Right next to Pon is a teleport platform where you have to use the Key Item Blue Teleport Gem.
Your destination is Moloke.
ACT 6 "A Fissure in Reality" Part 3
Worldmap
To the west of Moloke are the Crystal Mines you cannot enter yet and the Hidden Cave.
To the north is a heavenly guarded fortress you cannot enter yet, but on the ring around it you can encounter the Void Horrors, very hard mobs that drop the Void Orb.

Hidden Cave
Items: Mythril Karate Gi, Mythril Battlemage Robes, Mythril Focus Crystal, Mythril Ninja Garb

Moloke
Items: Green Gem (barrel), Major Elixir (clock, inn) x2, Green Gem & Red Gem (jar, inn), 2x Green Gem (big crate, passage, 2nd floor), 2x Tent (crate, Human camp), Magic Shard (library), 5x Ferocious Lure (jewellery, cupboard), 2x Green Gem (barrel) & Potent Ether & Ferocious Lure & Mythril Throwing Axe (offhand) & Green Gem (secret passage of jewellery), Mythril Javelin (barrel, residential tower), 15x White Gem (jar, residential tower), Magic Shard x2, 2x Red Gem (ornate chest, red gem shop top floor), Major Elixir (clock, red gem shop top floor)

Talk to all Abeyans (and humans).
Give the Human woman a White Gem for information about the Assassin Sphere. Only traps are working on those deadly enemies (Perhaps you have to use Orson now...).

A night in the inn will cost 1 White Gem.
Oxlyetrope mobs might drop Red Gems.
Don't underestimate the Primitives, they can build up rage and then will attack (Bum Rush).

In the Knowledge Respository (library) find the mother of the child you met above the passage (possibly the blond NPC you have to talk to for the end-game content after the Choicemaker's Tombs).
And read the books to learn the "Inquest" Spell once (an AoE combination of Celeste's and Habar's scanning skills).

In the weapon shop you can buy all kind of Mythril weapons (the other shops have the other Mythril gear) for Green Gems (not recommended, use them better for skills).
Join Gilgamesh's dojo (combat school) with a Red Gem in the basement.
The NPCs teach all weapon types (for Orson only, as the others should have learned all types already).
One NPC will teach you the same skills as the instructor of the resistance base for the same price.

Secret passage in the jewellery:
Note: DON'T TALK TO THAT NPC YETY AS ONLY YOUR FIRST PURCHASE WILL BE FOR HALF THE ORIGINAL PRICE!!!
Down there is a Human Shop you can pay with Talents. The Magic Shards cost 8000 Talents each, a Green Gem 1000 Talents and a Red Gem 5000 Talents.
Don't forget to unlock the door further west as a shortcut.
You should be able to return here once you can travel freely between Unity and Shism with tons of Talents.

The item shop has the same account as the one in Pon as well as for Stimulants and Dispel Herbs.
The Red Gem Shop sells special gear - only when you have learned all spells and have a huge amount of red gems.

Once you have talked to all necessary Abeyans, you can enter the magic shop.
You need 10 Red Gems to remove the hex.

Defeat the 3 Unity Soldiers!

When you return to Moloke, you can buy the same spells as the sage from Abra's Magic Shop (remember that you need 10 for Niomi!).

Crystal Mines
Items (entrance): Magic Shard x3, Rage Potion, Tent, Perfect Ether, Resist Ring, Swiftwind Ring
Items (tent area): 3x White Gem, Magic Shard, 2x Green Gem

You have to ride the carts to proceed.
From here on you will encounter Primitives (they drops Red Gems, too).
First go deeper into the mine (north) to the tent area.
Then leave to the south.

Crystal Mines Riddle Room
No saving allowed but a tent area is near.

  1. Collect the Magic Shard and Potent Ether before you take the cart to lever 1.
  2. Pull the lever 1 and take the Magic Shard before you take the cart again.
  3. Collect the Magic Shard and then save in the northern room with the Potent Rage Potion and Mythril Kama.
  4. Use the eastern cart, take the Potent Healing Potion and pull lever 2.
  5. Return and use the western cart to collect the Magic Shard and pull lever 3.
  6. Return, save and use the eastern cart to collect the Rage Potion, Crystal Ball, Magic Shard and Perfect Healing Potion and pull lever 4.
  7. Use the cart, collect the Red Gem, Spirit Ring and Ferocious Lure and pull lever 5.
  8. Use the cart and pull lever 4 again so you can reach the exit.

Outside find the Magic Shard.

Crystal Mines
Items (part 2): Major Elixir (cart), Magic Shard x2, Stimulant, Body Ring, 3x White Gem, Mythril Mage Ring, Rage Potion
Items (tent area): 3x White Gem, 2x Green Gem, Red Gem, Magic Shard

You will rest at the exit.
ACT 6 "A Fissure in Reality" Part 4
2nd Unity Tower
Colorful barriers block your path.
Orson should be in the party because of the Assassin Sphere.

  1. Enter the left stairway to floor 2 and gather Potent Healing Potion, Healing Breeze Potion, Major Elixir and Magic Shard.
  2. Go further up to floor 3, pull the blue lever and proceed to floor 5 to find the Whip Glove.
  3. Return to floor 1 and take the right stairway to floor 2.
  4. Collect 5x White Gem, Magic Shard, Potent Ether and Potent Rage Potion and proceed (there was the blue barrier) to Floor 3.
  5. Take the Green Gem and proceed to floor 4.
  6. Find the Magic Shard, Green Gem and Healing Breeze Potion and proceed to floor 5.
  7. Gather Green Gem, Tent, Magic Shard and Perfect Ether and pull the green lever.
  8. Find the Secret Passage, jump down and get the 2x Red Gem.
  9. Return to floor 1 and proceed (former green barrier) to the north until the purple barrier and go upstairs to floor 2.
  10. Watch out for the secret passage and first look down before you jump to floor 1.
    Take the 2x Green Gem and 5x White Gem and jump back to the purple barrier.
  11. Return to floor 2, collect Potent Ether, Red Gem and Perfect Ether and proceed to floor 3.
  12. Gather 10x Ether, Healing Gust Potion, Red Gem and first look into the hole before you jump down to get the Ferocious Lure from floor 2 and Mythril Wakizahi (offhand) and Magic Shard from floor 1. Jump back and return to floor 3.
  13. Proceed to floor 4, take the Potion of Life and go upstairs to floor 5.
  14. Collect the Healing Gust Potion, Minor Elixir, Magic Shard, Stimulant and Perfect Rage Potion and pull the purple lever.
  15. Return to floor 1 (you can take the shortcut from floor 3) and proceed (former purple barrier) but don't use the lift yet but enter the other stairway to floor 2.
  16. Take the Green Gem and proceed to floor 3.
  17. Gather the Healing Breeze Potion and jump down to floor 2 to find a Ferocious Lure as well as the Holy Lance and the orange lever on floor 1.
  18. Take the lift and find the Magic Shard (nearly invisible) before you take the next lift.

You obtain the Unity Wind Dagger, Unity Psychic Rod, Unity Flame Claw and Unity Bio Whip.
Last chance to change your formation for the boss.

Boss White Dragon: Only Trip or Ranged Attacks will work (or you will fall down the tower). You will start without TP. It drops a Mega Elixir and Red Gem.

On your way back you only have rides the carts to cross the Crystal Mine Riddle Room or just skip the Crystal Mines fully (only this time).

Moloke
Return to the Mage Shop - and surprise, you won't need the 10 Red Gems!
Worse, he refuses to help now.

Enter the inn and talk to Pastrel to proceed.
Talk to everyone and when you are prepared, start the attack. If you need more time, talk to Pastrel again when you are prepared.

Attack on Virion's Castle
Defeat all the Virion's Soldiers. New are the Assassins.
Careful, you current formation may the Ailfred, Shakar, Habar and Niomi.
After the first fight you can change your formation.

Virion Castle Bridge
Find the Magic Shard before you engage the next battle.
Find the Mega Elixir before you engage the 2nd battle.
Find another Magic Shard and a Mythril Pointy Had before you engage the 3rd battle.
Find the Mythril Fencer's Bracers before you engage the 4th battle.
The Chimera can cast "Instant Faint", so protect your main Healer/Reviver!
Find the Platemail of the Paladin and another Magic Shard before you engage the 5th battle.
You only have to battle the Behemoth (lol) but it is really strong. Dispel its Rage! Also replace the Death Seal with the Blessed Ribbons again.

Last chance to find those items!

Virion's Castle
You obtain the Unity Ice Spear and proceed to the north.
You can only step forward.
Prepare to fight against your Abeyan Companions (Unity weapons, Chemist and Pharmacologist Gloves)... Best equip gear that will strengthen the MDEF.
You have no real chance against them so defend/heal until they break free from Virion's control.

Prepare and change your formation! (You can't save!)

Boss Virion, Life Orb and Heal Orb: Try to defeat the Orbs first as long as they don't vanish in the void. Virion himself is weak to High and Trip. But dispel his buffs asap (he himself can dispel the whole party). The Orbs are weak to physical attacks only: Thrust/Reach (Heal Orb), Ranged (Life Orb)
You can hit Virion's head but that won't stop him from casting spells.
If you fail to defeat the Life Orb soon, it will revive Virion.
Drops Mega Elixir, Potion of Life, Red Gem and Mythril Focus Crystal.

Save and equip a Death Seal for Habar or your main healer/reviver!!!

Boss Apotheosis Virion: Weak to High, Reach and Martial Arts. He will shift between elements and attacks more physically. Time Flux helps alot but can be dispelled.
This is the easiest battle of all 3.
Drops the Soulblighter.

Leave the castle and Niomi learns Viriolic Cascade.
You unlock the Achievement "Unlimited Power" and automatically teleport to the Shism Portal.
Now you can still return to Moloke to restock.

Shism Portal
You return to Shism.
Choose who will kill Elmyra... Ailfred won't do it. Best choice is Ralts.
ACT 7 "Extermination"
You can still return to Unity versus the Death Circle.

Now you can liberate the occupied cities before you prepare for the final showdown in Hess-Erabi Castle.
You can also finish all those remaining bounties and an additional bounty.
Once you are prepared, talk to King Ferrin in Kairon Castle.

Thalden
Boss Lamia: Beware for Petrify and water. Drops Magic Shard of Will and Mirror Shield.

You obtain the Putrid Schism Ore.

Vooresh
Boss Unity Commander, 2x Unity Glaivesman and Unity Assassin: You don't need to use the Gem anymore. Get rid of the minions with Vitriolic Casade or the commander will heal all with Group Heal III or Group Life II.
On Hard Mode a battle of attrition. Best have Ailfred cast Focused Rage and then 2 turns Jump and Strong Reach on the boss, Celeste Rally/Strafing Blows and later 2x Opportunistic Strike (with a whip), Habar when not healing, uses Rage Potion on Celeste and Potent Ether on Niomi (each turn) and for a third action Wound (if learned, give him a head wound), and finally Niomi with Time Flux, Vitriolic Cascade and for a third actrion Reality Collapse. You need the Time Flux Shoes for both mages. (this is my tactic, you can try others).
If you manage to give him a Head Wound, he will attack hard twice or call for help or Battle Formations (dispel that).
Drops Magic Shard of Defense, White Gem and Dragon Scale Mail.

You obtain the Static Schism Ore.

Zeben
Boss Elite Sorcerer, Unity Assassin and Unity Glaivesman: Dispel the buffs and use the same tactic as versus the Commander but the Elite Sorcerer is weak to Thrust and Side. Careful, this boss is stronger and casts Nuke Area. High MDEF is recommended.
That is the strongest of the city battles and your luck depends on the RNG.
Drops Magic Shard of Magic, White Gem and Deathbane Robes.

You obtain the Frigid Schism Ore

Rus
Boss Spirit Harvester: Weak to Thrust, Reach, Fire, Wind, Ice and Sonic. Beware of Physic Attacks and Mind Control and, as there is no protection against it. Also it will drain all your MP.
Drops Magic Shard of Spirit and Ring of Illusions.

You obtain the Telepatic Schism Ore.

Aldair
Boss Unity Duelist, Herald Firestarter and Unity Soldier: The boss is weak to Martial Arts and the Herald to High and Side. Same tactic as versus all Unity bosses. When your damage dealer can't use Martial Arts, let him use Side.
Drops Magic Shard of Speed, White Gem and Duelist Rapier.

You obtain the Wet Schism Ore.

Abel
Boss Hydra: weak to Side, Martial Arts, Water, Psychic, Poison and Sonic. It will restore 4000 HP each round (hard mode).
Drops Magic Shard of Strength and Cursed Ring.

You obtain the Rocky Schism Ore.

Kairon
Boss Destruction Totem: No offense - so attack it without worry. The battle is lost once the countdown is over.
My party: Ailfred, Celeste, Gall and Niomi (for Time Flux). Buff your attack (Offensive Formation) and RP (Rally, Critical Focus), then use stronge Multi Hit Skills (like ranged). Niomi should cast her strongest spell and Gall his Ki Burst III.
Drops Mega Elixir, Potion of Life and Piston Javelin.

You obtain the Lightweight Schism Ore.

Note: Pada, the Bazzar and the Orphanage are too small to be occupied!

Sadak-Reel
Boss Battle Master and Unity Alchemist: Weak to High. He will change his weakness to Low later and is immune to all other attacks and has high Magic Evasion.
Drops White Gem, Red Gem, Gold Nugget and Apocalypse Flail.

You obtain the Warm Schism Ore.

The formerly occupied building is available since the Choicemaker Tomb Update.
In there you will randomly fight with Rajah, weak to Low, Reach and full of differenct statuses you cannot protect against even with Blessed Ribbon. Don't hit her with spells, as those will be most likely reflected.
Habar should cast Group Purify and Group Heal III each turn, Niomi Time Flux and Dispel Ally (charmed).
In one of the crates you will find 1 Potent Healing Potion.
Pull the burning torch to open the gate.
If you leave via the gate you will find a Blessed Ribbon.

Wandering Bazzar / Tent
The Footgear shop has new stock, like Mythril Boots for 1 Talent (I don't trust me to report that as a bug).

Kaifec
Boss Life Harvester: weak to Thrust and Reach. Likes to drain your HP so Regen gear and Death Seals are recommended.
Drops Magic Shard of Body and Diamond Rod.

You obtain the Echoing Schism Ore.

For winning in all 9 occupied cities you will unlock the "Liberation" Achievement.

Cecil's Forge
Time to fuse the Schism Ore and your Elemental Weapons.
  • Putrid Schism Ore & Bio Whip & Unity Bio Whip: Synchronous Bio Whip & Putrid Ore Fragment
  • Static Schism Ore & Bolt Sword & Unity Bolt Sword: Synchronous Bolt Sword & Static Ore Fragment
  • Telepathic Schism Ore & Physic Rod & Unity Physic Rod: Synchronous Physic Rod & Telephatic Ore Fragment.
  • Wet Schism Ore & Hydro Rapier & Unity Hydro Rapier: Synchronous Hydro Rapier & Wet Ore Fragment
  • Rocky Schism Ore & Ground Staff & Unity Ground Staff: Synchronous Ground Staff & Rocky Ore Fragment
  • Lightweight Schism Ore & Wind Dagger & Unity Wind Dagger: Synchronous Dagger & Lightweight Ore Fragment
  • Warm Schism Ore & Flame Claw & Unity Flame Claw: Synchronous Flame Claw & Warm Ore Fragment
  • Echoing Schism Ore & Caco Flail & Unity Caco Flail: Synchronous Caco Flail & Echoing Ore Fragment
  • Frigid Schism Ore & Ice Spear & Unity Ice Spear: Synchronous Ice Spear & Frigid Ore Fragment

Hess-Erabi-Castle
Boss Syleen: weak to High and Trip. She attacks twice with strong AoE spells.

Boss Virion Syleen: second phase of the battle. No healing between battles. Same weaknesses. This time she will attack again at the end of turn and sometimes only Mind Blast or Mass Spirit Syphon, Enfeeble Potion or Instant Faint. Dispel Reflect! But cast Nidhoggr nonetheless. Survive until Syleen breaks free of Virion.

You obtain Sophia's Necklace. Now you have another accessory that halves MP consumption. Give the Memorial Necklace (33%) to your main healer.
There is still the Spirit Orb (75%) from the Red Gem Shop in Moloke, but it has some debuffs.
ACT 7 "Extermination" - Final Dungeon
Floating Citadel
Once you are ready, fly up into the sky.
You can return to Schism anytime.

Some of the mobs are known from Unity. Protection against Instant Faint is recommended.
The Devil will block your Attack Skills and Magic for 3 turns. Only Weak Attacks and normal skills will will work (opposite of Terror).

Take the Perfect Rage Potion, 3x Green Gem, 3x Magic Shard, Major Elixir. There are now 2 Cave entrances as you can't proceed further east (boulder).

Left Cave (Floor 1): Beware of Trap Doors. They will turn to Shapeshifters, which will change their weakness regularly. It has a similar Magic Evasion as the Golden Figments, so scan all weaknesses for each form. They might drop Magic Shards.
Behind the first Trap Door you will find the Mythril Speed Boots.

Left Cave (Floor 2): Take the Perfect Healing Potion, Magic Shard x2, a lever, Red Gem, Tent Area and Merlin's Hat. Pull the lever!

Right Cave (Floor 1): Take Death Seal, Healing Gust Potion, Healing Breeze Potion.
Trap Doors and stairs from left to right:
  • Trap Door A: Hyper Sling (offhand)
  • Trap Door B: 3x White Gem, Magic Shard, Swiftwind Shirt
  • Trap Door C: Tent and lever to reach the chest from door B
  • Stairs A: Mega Elixir
  • D: Tent Area, Potent Rage Potion, Healing Gust Potion.
  • E: Major Elixir
  • Stairs B: lever for stairs C
  • F: 2x Magic Shard, Potent Rage Potion
  • Stairs C: Perfect Ether, lever for one of the bands of floor 1, Mega Elixir (lever Stairs B pulled)
Now take the band from floor 1.

Right Cave (Floor 2): You can only cross the band if you have pulled the lever in the left cave.
Take the Mythril Monk Bracers, Potion of Life, Magic Shard and 30x Ether.

Right Cave (Floor 3): Take the Tent, 5x Ether, 1813 Talents, Perfect Rage Potion, Potion of Life and Magic Shard (west exit).
Before you proceed via the east exit, open the trap doors.
  • Trap Door A: Tent Area and Magic Shard.
  • Trap Door B: Mythril Spiked Shield
Go outside and take the Magic Shard before you talk to Syleen/Sophia.
Take the Mythril Attacking Boots and follow her.

In the building is a Tent Area, Red Gem and a blue lever.
Pull it to use the elevator to floor 1.
Push the boulder out of the way to create a short cut to the airship.
Take the Mythril Armored Boots, Red Gem, Magic Shard and Enfeebling Kama.
Return to floor 3 and exit to the east..

First go downstairs to find the Mythril Boots of Health and then up.

Floor 4 Boss Automaton: Use Inquest to figure out all weaknesses. Even (parts of) bosses can be ferocious, so watch out. Time Flux is to be cast each turn. The others should prepare. The orbs are weak to ranged attacks and the boss vs. High and Trip. Focus on the orbs first but notice their high evasion. As a second skill Niomi should use her Vitriolic Cascade, your healer Nidhoggr.
The boss has a high defense and will mostly be damaged by critical hits and magic.

From now on this boss will randomly appear as a mob.

Take the Healing Gust Potion and talk to Syleen/Sophia outside.
Follow her and find a Magic Shard and Magic Evasion Pendant.
Now you can choose between two caves again.

Middle Cave (Floor 5): Find the Ferocious Lure, Potion of Life and Profiteer Necklace.
The band will bring you back to floor 1 (a one-way-shortcut).

Right Cave (Floor 5): Find the Magic Shard and the Mythril Evasion Boots via the eastern exit.
The inner cave has a tent area and the western exit leads to a showdown.

Virion's Citadel
Floor 1: Take the Protect Bangle and Mirror Breastplate.

Rygor's Wing (Left Door): Prepare a physical only party (no mages, so equip your apothecary gear or Auto Potion accessories). He will attack multiple times so counter is very effective as well as Ranged and Reach depending on his form. During his counter stance focus on reviving/healing or use skills with dispel effect (like the Flail's Spirit Slam). If you have trouble, try out Orson's Traps.
Drops a Magic Shard and a Red Gem.

Take the Magic Shard.

Chessere's Wing (Right Door): Prepare a magic only party (only mages, no Gall) with Mirror Gear.
Ralt's should cast Delta Burst with all Paradigm Shifts, also Time Flux and Nidhoggr are recommended each turn apart from healing. If possible, let Masret cast Inoculate on each party member. Dispel her reflect!

Drops a Magic Shard and a Red Gem.

Take the Magic Shard.

Point of No Return.

Once you are prepared, go up the stairs.

Boss Virion Alpha Omega: Careful if he is ferocious (reload at hard or very hard mode). Weak to Reach, Martial Arts, Ice, Water, Earth and Thunder. He will drain the party's MP and cause Terror. Again cast Nidhoggr and Time Flux each round. Depending on the boss actions he can wipe out the party as he attacks another time at the end of turn.
Bring him down to 25% HP.

Boss Virion Absoulte: He will heal himself to app. 75% HP but keeps the debuffs. The party keeps their buffs/debuffs, too. Now Virion can dispel positive buffs of the party with Null Field and deals many injuries. He is only weak to Martial Arts now. Keep summoning Nidhoggr and Time Flux.

You will unlock the Game Clear Achievement of your chosen difficulty and all lower ones.
Magic Shard Locations of Schism
Floating Citadel
  1. Floor 1, outside
  2. Floor 1, outside
  3. Floor 1, outside
  4. right cave, floor 1 behind Trap Door B
  5. right cave, floor 1 behind Trap Door F
  6. right cave, floor 1 behind Trap Door F
  7. left cave, floor 2
  8. left cave, floor 2 outside
  9. right cave, floor 2, west exit
  10. right cave, floor 3, west exit
  11. right cave, floor 3, Trap Door A
  12. right cave, floor 3, outside east near Sophia
  13. right cave, floor 1 via blue elevator / shortcut
  14. Floor 4, after your meeting with Sophia
  15. Floor 5, right cave
  16. Virion's Citadel, Rygor's Wing
  17. Virion's Citadel, Chessere's Wing

Choicemaker's Tomb
  1. Descend, east side
  2. Descend, near next floor
  3. Bridge, SW
  4. Bridge, NW
  5. Bridge, NE: East, West
  6. Bridge, NE: East, West, East
  7. Bridge, NE: East, East, West, West
  8. Deepest Cave, 4 stairs, most east one
  9. Deepest Cave, coffin at deepest part
How to grind for Rare Gems, Talents or Levels (Endgame)
Green Gems (possibly a bug)
Try to teach a skill to the same character again and you will get back the original cost x2 in Green Gems!

If this bug is fixed in the future you can still buy them at the Human Shop in Moloke.

Red Gems
For the Red Gems you either have to grind mobs that drop them or buy them for many Talents at the Human Shop in Moloke.

Talents
For Talents I recommend the Cave to the Echo Temple and hope for the rare mob encounter "Golden Figment" - they will drop Gold Nuggets.
Remember to use attacks that won't miss the target.

At the Floating Citadel you can find the Profiteer Necklace, which will double the item drop chance and talents in battle.

Levels
On the Floating Citadel until level 99, then the Choicemaker's Tomb and Bastion.

I recommend first grinding for money and then buy Red Gems from the Human Shop.
With those teach your 4 Mages all spells and then buy at least one of each unique weapon of the Red Gem Shop.
Choicemaker's Tomb
Moloke (Unity)
Enter the Library and talk to the woman to the north.
Follow her to her home (green roof, west side of town).
You have to enter from the city wall.
Gaby will tell you about the Choicemaker's Tombs and gift you the Dwarven Translater (Key Item).

Choicemaker Tomb (Schism)
Use the Dwarven Translator to decrypt the hieroglyphes.

Descent

Items: Green Gem, Potent Healing Potion, Healing Gust Potion, Magic Shard x2, Ratt's Bow, Potent Rage Potion, Minor Elixir, Mimic's Tongue (Mimic)

At the Spirit of Knowledge (west side) you can forgot unwanted Spells.
  • Chrysalis: starts dormant, start to develop, will hatch soon and hatch as an Tarchon. Weak to High and Reach. Drops 4.000 EXP and Diamond.
  • Neuro Tick: weak to Low and Martial Arts. Can use Neurotoxin so defeat them ASAP. Drops 724 EXP, Bug Legs and Potent/Perfect Rage Potion.
  • Tarchon: hatches from a Chrysalis. Weak to High, Reach
  • Ice Tarchon: hatches from a Chrysalis. Weak to Side, Reach, Wind, Water, Earth, Lightning. Drops Green Dragon Heart, Red Gem.
  • Lightnint Tarchon: hatches from a Chrysalis. Weak to Low, Reach, Earth, Psych, Poison, Sound. Drops Minor Elixir, Potion of Life, Salamander Scales.
  • Sonic Tarchon: hatches from a Chrysalis. Weak to Reach, Martial Arts, Fire, Wind, Ice, Poison. Drops Quetzalcoatl Mane.
  • Entropinaux: weak to Lightning, Psych, Poison and Sound.
  • Undead Berserker: weak to trip, reach. Drops Aggro Hormones.
  • Automaton v1.2: weak to High and Trip, drops 9.011 EXP, Healing Breeze Potion, Green Gem.
  • Vampire: weak to Thrust and Fire, drops 5.537 EXP, Red Gem, Ghoul Brain Matter.
  • Mimic: mimics a red treasure chest. Can cast Death and is weak to Low and Reach. Taunt won't help. Drops 9.999 EXP and Diamond.
  • Death Gazer: Weak to Thrust, Ranged, Fire, Wind, Ice and Sound. Drops 8.346 EXP and Magic Shard of Spirit.

Bridge
Items (SW): Diamond, Potent Ether x2, Tent, Magic Shard, Potent Healing Potion, Mimic's Tongue (Mimic), 3x Stimulant, Reaper's Scythe, Mythril Mage Cowl, Borm's Gi

Pull the lever to move a part of the bridge.

Items (NW): Potent Ether, Magic Shard, Mimic's Tongue (Mimic), Salome's Rod, Viking Helm, Healing Gust Potion, Potent Healing Potion, Potent Rage Potion

Pull the lever to move a part of the bridge.

Bridge NE
The traps will reset when you start to backtrack.
  • West A1: Dispel Herb
    • West B1: Potent Healing Potion, 2x Minor Elixir, 10x Ether, 2x Tent
    • East B1:
      • West C1: Potent Healing Potion
        • West D1: Minor Elixir
          • West E1: Victor's Breastplate
          • East E1: Tent Area, Ferocious Lure, Red Gem, Healing Gust Potion
        • East D1: Tent Area, Lever (pull it), caved in door
      • East C1: Mythril Regen Ring, caved in door
  • East A1:
    • West A2: 791 Talents, Magic Shard
      • West B2: Tent Area
        • West C2: Angel Ring
        • East C2:
          • West D2: Mega Elixir, Perfect Rage Potion
          • East D2: Tent Area, Galadin's Platemail
      • East B2: Magic Shard, Red Gem, Mimic's Tongue (Mimic)
    • East A2:
      • West E2: Potent Healing Potion
        • West F2: Magic Shard, Mimic's Tongue (Mimic), Potion of Life
        • East F2: Ferocious Lure
          • West G2: Red Gem, Potion of Life
          • East G2 (Reliquary Pit): Tent Area, Potent Healing Potion x2, Gambler's Coat, Mimic's Tongue (Mimic)
      • East E2:
        • West H2: Magic Shard, Green Gem
        • East H2: Probing Kama

Items (SE): ?
You drop down...

Deepest Cave
Revive and heal your party.

Items: Tent, Stimulant, Berserker's Axe, Mega Elixir, Mimic's Tongue (Mimic), Magic Shard x2, 10x White Gem, Probing Great Axe, Potent Healing Potion x3, Finn's Kama (offhand), Healing Gust Potion, Healing Breeze Potion,

Sometimes it is better to head downstairs than upstairs.
Find the lever and pull it.
Now you can jump over the hole and obtain Lucille's Robes.

Bridge
The bridge should be complete now.

Boss Grand Mimic: That is a duel and each one has to be prepared. Distribute your Regen and Auto Potions accessories. Let Celeste (Duel Bonus) or your Inquest spell user begin to figure out the weakness (High/Reach). Masret can cast his Inoculate skill and will mostly survive the most. It is immune to poison and other status effects.
It is possible to win on Hard Mode. Drops 29.999 EXP, Mimic's Tongue, Red Gem and Diamond.

Head the warning and save on a different slot.
Choicemaker's Tomb Part 2
Choicemaker's Tomb
Inner Catacombs
Divide the party to 3 teams around Ailfred (Team 1), Celeste (Team 2) and Ralts (Team 3).

Quoting [NAG]Oreo (+ some remarks from me):
Tips on the 3x3 party setup?
I try to fill each role for each team.
Tank, Damage dealer, and Healer.
You can build most anyone a healer with the Pharmacology/Chemist Gloves, Auto Healing Breeze Accessory, and Alchemist Robes (only for Habar, Niomi, Gall, Masret and Ralts).
You just gotta buy a bunch of healing breezes.

I would rate each character in each of those roles as follows (A>F):
Ailfred: Tank: A, Damage: C, Healer: F (Decent damage because of huge weapons)
Shakar: Tank: C, Damage: B, Healer: C (can be fairly tanky because of evasion, and decent healer because she can use items at the start of the round)
Niomi: Tank: F, Damage: A, Healer: F
Habar: Tank: D, Damage: C, Healer: A
Celeste: Tank: D, Damage: A, Healer: D
Gall: Tank: B, Damage: B, Healer: C (You can build Gall quite tanky. Endure Pain is a fantastic skill for defense)
Masret: Tank: D, Damage, B, Healer: B
Ralts: Tank: A, Damage C, Healer: D
Orson: Tank: D, Damage: B, Healer: D

If I had to build my ideal team, I would do as follows (though almost anything is viable):
Team 1: Ailfred (Tank), Orson (Damage), Habar (Healer)
Team 2: Celeste (Damage), Gall (Tank), Masret (Healer)
Team 3: Ralts (Tank), Niomi (Damage), Shakar (Item Healer)


In your Key Items find the Team Swap and prepare your teams.
Talk with the Wiggle-Wiggle Man (Team 1) and shop for items.
A hit from the other traps will cost you 300 HP on Hard Mode!
Clear the 1st trap and press the stone switch.
Before you enter the trap passage, switch to Team 2.

Items (Team 2): Mythril Evasion Boots, Mythril Armored Boots, Mythril Speed Boots, Mythril Attacking Boots, Mythril Boots of Health, Mythril Buckler, Mythril Shield, Mythril Tower Shield, Mythril Strength Belt, Mythril Focus Crystal

Clear the 1st trap and get

Items (Team 3): Mythril Hat, Mythril Cap, Mythril Helm, Mythril Shirt, Mythril Robes, Mythril Breastplates, Mythril Scale Mail, Mythril Plate Mail


Monsters, Physical Skills, Character Skills
Currently in progress.
Links will be added later.

Monsters
The Monster list will contain all Monsters, where no or only one of the "scanners" is in party.
After Celeste has joined the party, only Monsters where one of the "scanner" is missing, are added.

Physical Skills
Will contain the levels of the weapon based skills (not combat school).
Level
Thrust
High
Side
Low
Trip
Ranged
Reach
Martial Arts
1
Thust Attack
High Attack
Side Attack
Low Attack
Trip Attack
Ranged Attack
Reach Attack
Martial Arts Attack
2
Strong Thrust Attack
Strong High Attack
Strong Side Attack
Strong Low Attack
Strong Trip Attack
Strong Ranged Attack
Strong Reach Attack
Strong Martial Arts Attack
3
Lunge
Cranial Attack
Cleave
Thumble
Strafing Blows
Aimed Shot
Phalanx
Eye Gouge
4
Focus
Overhead Strike
Aim for Vitals
Low Sweep
Opportunistic Strike
Spray & Pray
Bring Down
Suplex
5
Dual Thrust
High Stance
Improved Cleave
Double Swing
Rolling Tripwire
Blanket the Sky
Jump
Head Blow
6
World-Splitter
Heaven Strike
Decapitating Swing
Reckless Abandon
Vertigo Blast
Spray and Pray II
Whirling Fury
Bum Rush
7
Master Thrust Attack
Master High Attack
Master Side Attack
Master Low Attack
Master Trip Attack
Master Ranged Attack
Master Reach Attack
Master Martial Arts Attack
The Master Attacks (learned after you have used the skill 175 times) will substitute the normal Attacks for more damage and RP.

Character Skills
Will contain the skills and magic learned by levelling up.
This should help to figure out a level you need to beat some bosses.
New Game +
How to unlock
During the Credits Celeste gives you this clue:
That refers to the soldier in civil in Ailfred's Camp.

So start directly a new game and talk to him 5x (best enter the captain's tent between your talks).

Answers (clues):
  1. Niomi
  2. Orange
  3. Pup in Sadak-Reel
  4. Abel Wall
  5. Masret


Tweaks you can choose:

Note: You won't get all gear, but enough to cope.
But that is currently the only change to obtain the Void Orb.
With that cheat you will have an additional pair of Time Flux Shoes.
And I don't recommend the Ultra Hard Mode.
Комментариев: 13
zimxero 17 окт. 2024 г. в 4:35 
Great and walkthru and game. Wile playing max difficulty in new game plus, I found myself wanting to know what specific side-effects conditions produce, so would add condition effects. Also... why not put something in the bonus area so the game does not feel unfinished?
Kenshiro 14 янв. 2024 г. в 2:02 
Just a note...
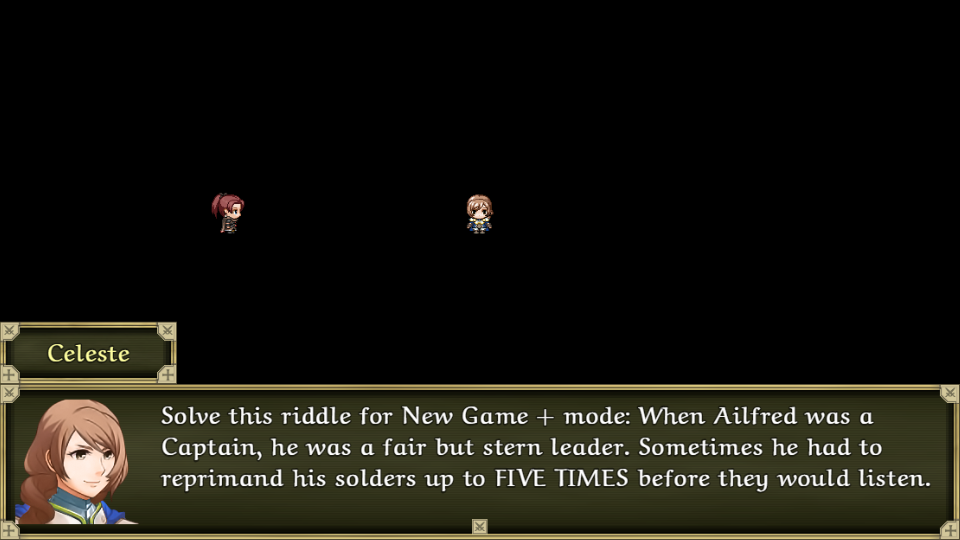
All skills level up when used the following amount of times:
Skill 1: 5
Skill 2: 20
Skill 3: 55
Skill 4: 90
Skill 5 125
Max: 175

Do with that what you will...
>.>
<.<
Firefly130984  [создатель] 24 ноя. 2023 г. в 8:31 
There was an update removing some chest after my walkthrough. See in the discussions for more information.
Mr. Bovine Joni 24 ноя. 2023 г. в 8:29 
Thyrestha - I'm finding the same thing to be true. For the Abeyan Prison I couldn't find the Masterwork Shield. Now in the Rust Temple and can't find the Masterwork Robe or Hat.
cat_lilly 21 ноя. 2023 г. в 15:19 
Many many thanks for your efforts on this especially for the flow chart of the northeast bridge of the choicemaker's tomb!!!!

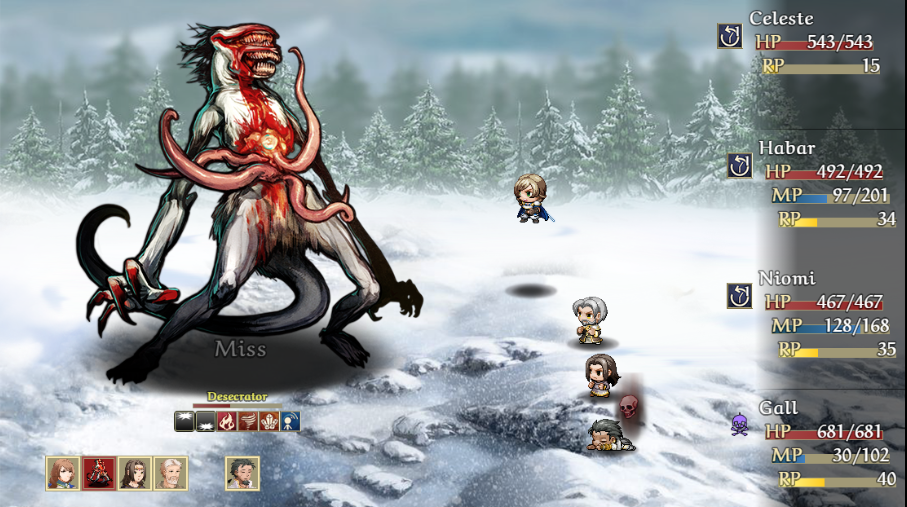
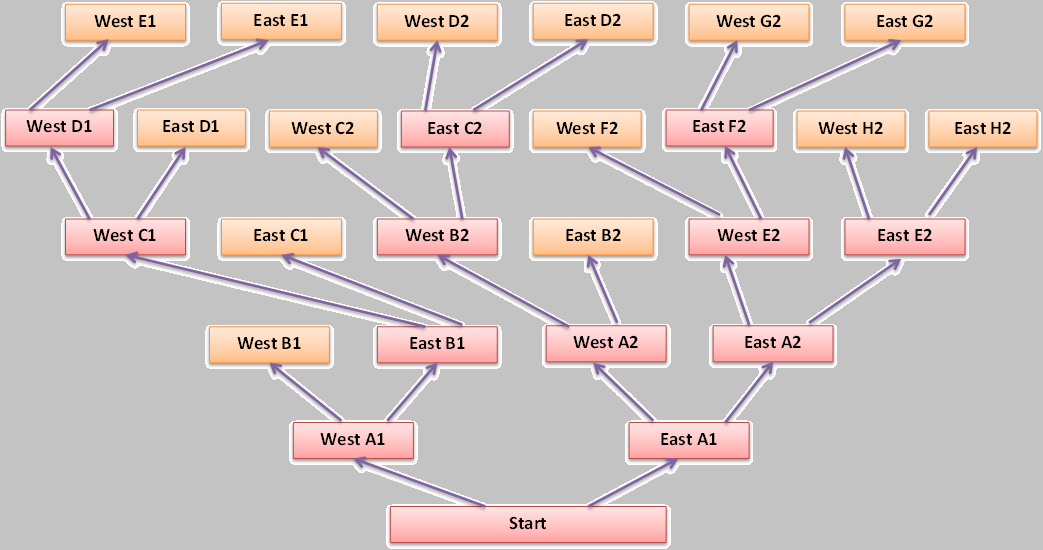
I'm on very difficult mode. Used your suggested 3 person teams in choicemaker's tomb part 2 but couldn't make any progress without an adjustment. In case this helps anyone else:

Team Ailfred: Orson(power ring) and Masret (built mostly for speed and evasion w/ spirit orb or other mp cost cutting item for repeated barrier use)
Team Celeste: Habar and Gall (body ring and spirit regen)
Team Ralts: Niomi(sometimes auto-potion) and Shakar (evasion decked out)
Thyrestha 3 фев. 2022 г. в 3:47 
Hey firefly! I have been following your guides, but sometimes i notice there are items on the items list that I could not find on the map! Is this due to the difference in difficulty or is it just a new game+ thingy? Say for example, the Fine Kama or Fine Bracer at the Abeyan Prison, they aren't on the map at all!

Hopefully you can enlighten me on this! And thank you so much for writing a guide for us!
Firefly130984  [создатель] 28 июл. 2021 г. в 4:10 
For #2 I checked my screenshots for the Magic Shards. For #5 I have to look.
JayJay02 27 июл. 2021 г. в 14:07 
Nicely done Firefly! The new game+ questions, while not overly challenging, two of them #2 & #5 gave me issues. For #2, never really paid attention to that characteristic and for #5 while not a typo, the name is close but not exact in the question.

Thanks for the guide!!
Firefly130984  [создатель] 17 мая. 2021 г. в 9:29 
You have a worldmap. Search there for the waterfall of Kairon and then the peninsula a bit further west. Sail/Fly there and you will notice a small mountain pass.
joaoteamsleep 17 мая. 2021 г. в 7:56 
Hi
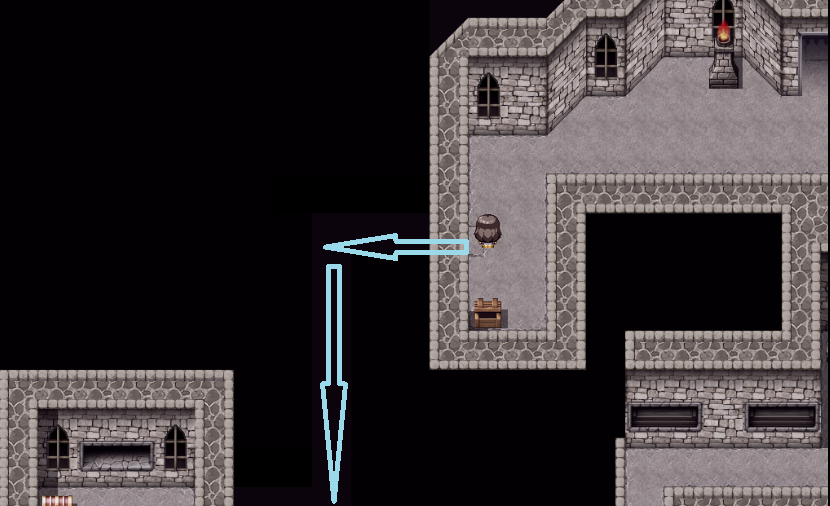
On Poe Chest Quest i cant find Kairon lookout
Can you please tell me the exactly place where the ticket is?