HAWKEN

HAWKEN

68 ratings
How to have FUN and complete CO-OP mode!
By TAW| V:ExorcisT
This guide will provide information on how to complete the CO-OP mode in HAWKEN game.
It includes the MECH BUILD aimed to pass through all 25 waves easily, removing any frustration to leave only fun for you to enjoy!
   
Award
Favorite
Favorited
Unfavorite
Introduction to CO-OP
The 0.9.6 HAWKEN game update with code name "Invasion" introduced a co-op mode called Bot Destruction. Pilots can band together to take down 25 waves of bot mechs (with one boss wave every 5 waves) controlled by an out-of-control AI bent on the destruction of a human colony. Players can gather resources from smashed AIs to upgrade their own mech between waves. You can earn XP and Hawken Credits in this mode, giving players another way to unlock mechs in new leveling system the free-to-play game first introduced in "Ascension" update.

This guide will provide a walkthrough of the CO-OP mode, and give an example of a god-like mech you can create with the upgrades availble.

Here are essential facts you need to know about CO-OP:
ENEMIES
  • There are 25 waves total
  • You must work with your team to destroy all drones and bots through each wave.
  • First wave starts right after the opening intro
  • Waves will include AI drones (weak flying bots) and AI mechs / bots (same mechs players use, but with lower stats, plus they don't use special abilities or items)
  • The further you get, the harder will waves become (not only amount of enemies will be higher, but more advanced drone models and mechs will be released on the field)
  • Most dangerous drones are EMP (act as EMP charge upon detonation) and BOMBER (deal large damage upon detonation) drones, which act as suicide attackers - must be eliminated ASAP
  • Waves number 5, 10, 15, 20 and 25 are BOSS waves (this include 1-3 BOSS mechs (3 BOSS mechs on the last wave only) with enemy drones and mechs assisting them)
  • BOSS mech is a powerful bot with enormous ammount of hitpoints (BOSS mechs use special abilities and items)
  • Because BOSS mech has an outstanding armour value and is very hard to destroy, it is advised to eliminate all assisting enemy mechs and drones (especially EMP and BOMBER drones) before attempting to eliminate the BOSS mech
  • Each destroyed AI bot will drop mech parts (glowing yellow spheres) - stand close to them to repair your mech
  • Each destroyed AI bot will drop EU (energy units) - collect them to use units for personal upgrades
  • The tougher was the enemy you destroyed, the more EU and mech parts will it drop.
  • Enemies AI makes them target and pursue allies with the least amount of armour left (meaning in the start when everyone is healthy they will try to focus on A-class mechs with small initial amount of armour, when you stand close to the the wounded friendly mech, enemy bot can ignore you, and it is also applicable to the turrets you place, they have tiny amount of hitpoints, meaning bots will try to eliminate them asap. This rule goes double for BOSS mechs, which hunt down your allies untill they are destroyed, and if friendly mech is healed BOSS acquires another target with least ammount of armour present or continues to hit same mech if his armour is still the lowest from all rest).
ALLIES
  • Your team consists of 4 mechs total
  • The minimal ammount of players to start the game is 2
  • If there is less than 4 players or if a player leaves the battlefield, friendly AI mech is placed on the free slot.
  • When friendly mech collects EU, you automatically get the same ammount of EU, and vice versa. This way everyone gets same ammount of EU, so no need to fight over the EU bits lying around. The only benefit you get when personally collecting EU is that it is recorded in your statistics.
  • When friendly mech is destroyed you can revive him by going to the exact place where he died. When there, press "E" (by default) button once to revie him. There is no need to hold the button, but you need to stay in that small beacon area so the revive could be completed (it takes few seconds). When mech is revived he has 1/2 (half) of his full armour, so be cautious! The ammount of revived mechs is shown in your stats and is counting towards the applicable achievements!
  • Considering the above mentioned fact, it is advised to stay in group or atleast in pairs to easily revive each other.
  • If your mech is destroyed you are out until your ally revives or until new wave starts (exception is when you use bonus items called CONSUMABLES, explained later).
  • If everyone is destroyed mission is failed (game over).
YOU
You can use EU for the following upgrades:
  • Offence - DAMAGE (+2% with each upgrade)
  • Defence - AMOUR (+25 armour with each upgrade)
  • Cooling Systems - DECREASED HEAT RATE (+5% with each upgrade)

EU price will rise with each upgrade for an individual branch:
  • 1st purchase - 10 EU
  • 2nd purchase - 20 EU
  • 3rd purchase - 30 EU
  • 4th purchase - 40 EU
  • 5th purchase - 50 EU
  • 6th purchase - 60 EU
  • 7th purchase - 70 EU
  • 8th purchase - 80 EU
  • 9th purchase - 90 EU
  • 10th purchase - 100 EU
  • 11th purchase - 100 EU (after 10th purchase price will remain 100 EU)

Low starting prices allow to put some points even in those upgrade lines (branches) you may find not absolutely nescessary.
Any upgrade after the 9th upgrade will cost 100 EU. Lets say you were upgrading just 1 branch of 3. On the 10th upgrade you can either add a bit to that branch, OR:
For 100 EU you can get (applies only to absolutely empty branches):
  • 8% damage
  • +100 armour
  • +20% decreased heat rate
So don't keep any of the upgrade branches empty!
Consumables (BASICS)
Consumables are used to aid pilots in CO-OP Bot Destruction.
All mechs share from the same pool of CONSUMABLE CHARGES (CC).

These CC are awarded through level progression, and can also be purchased:

For 1024 HAWKEN Credits / 115 METEOR Credits you will get 10 charges
For 1922 HAWKEN Credits / 216 METEOR Credits you will get 25 charges
For 3044 HAWKEN Credits / 342 METEOR Credits you will get 50 charges
For 4486 HAWKEN Credits / 504 METEOR Credits you will get 100 charges <<< BEST OPTION

Consumables (by default) are activated by F1, F2 and F3 buttons.
Each consumable spends CC, and yet their price is high they are very effective if used properly:

  • F1 - CHARGED BEACON - 5 CC cost
  • F2 - JUMP STARTER - 3 CC cost
  • F3 - STASIS FIELD (200 armour value SELF SHIELD) - 2 CC cost

CHARGED BEACON can be activated only if you were destroyed, acting as SELF REVIVE. It is the most expensive and powerful bonus, use it only if you are sure there is noone to revive you and that you ARE NEEDED to finish the wave. Don't waste 5 CC for nothing! To SELF REVIVE press "F1" when you are dead. You cant use CHARGED BEACON if you were the last alive member of your team.

JUMP STARTER works almost the same way as normal revive, but instead of pressing "E" button when you approach the beacon you press "F2". This way is much more effective:
  • No need to wait near the beacon, ally revives instantly
  • Ally has all hitpoints, not 1/2 like with normal revive.

STASIS FIELD acts by adding extra armour value on top of what you had for 30 seconds. Use it only if you know that those extra 200 armour will help, because it's not much, it will disappear after 30 seconds and there is a cooldown after each use of the STASIS FIELD (30 seconds).

NOTE: This is DEFAULT consumable set! You can rearrange them, or even switch to DIFFERENT consumables! Yet this set is my favourite set and I use it on all my mechs, to bring diversity in your gameplay there are some options provided.
Consumables (FULL LIST)
You can switch consumables for your mech right before you press LAUNCH in CO-OP mode (but you have only 30 seconds to do it, use this time to check consumables equipped), or you can do it in GARAGE where you have no time limit!
To do so, go into GARAGE -> (SELECT THE MECH) -> EQUIPMENT -> CONSUMABLES.

Here is the FULL LIST OF CONSUMABLES.
NOTE: I listed CONSUMABLES by importance based on my experience, that includes the CC cost/effect ratio and most importantly frequency of use (ammount of situations in the game when particular consumable is useful, lowest mark goes for consumables you would use very rarely AND/OR without great benefit).


IMPORTANCE: 10/10
Cost: 5 CC


IMPORTANCE: 9/10
Cost: 3 CC


IMPORTANCE: 8/10
Cost: 2 CC


IMPORTANCE: 8/10
Cost: 1 CC


IMPORTANCE: 7/10
Cost: 2 CC


IMPORTANCE: 7/10
Cost: 2 CC


IMPORTANCE: 6/10
Cost: 5 CC


IMPORTANCE: 5/10
Cost: 2 CC


IMPORTANCE: 4/10
Cost: 1 CC
Mech Class designed to RULE CO-OP
Of course, you can use any mech you like, but there is particular class of mechs that use AI disadvatage to their advantage more than any other -
C - Class.

This is due to TURRET MODE, which reduces the damage from the front attacks.
Even though the biggest flaw of the turret mode is the fact that damage from behind and top directions is incresed, enemy AI doesn't try to get behind you (atleast with purpose to overcome your TURRET MODE).

And for particualr reason my personal favourite is VANGUARD.


From all other C-Class mechs with turret mode, VANGUARD has the least amount of initial armour value, but it can be easily increased with DEFENCE upgrades for EU. For having the least armour VANGUARD was awarded with best TURRET MODE defence (-55% damage taken from front), which is also the fastest high mobility TURRET MODE, plus VANGUARD has GRENADE LAUNCHER as a secondary weapon, which is absolutely amazing when fighting several enemies at the same time (which you will always do in CO-OP), because of the AOE (area of effect) of this weapon. For the primary weapon I suggest to use very first weapon you get - SUBMACHINE CANNON, because it combines both accuracy, range and great DPS (damage per second).


INTERNALS Explained
My choice of internals for this mech is:
  • Basic Extractor
  • Advanced Armor Fuser (unlocked on level 21)
  • Failsafe (unlocked on level 11)

Basic extractor is simply a one great thing to have. MUST HAVE I should say. It uses only 1 slot, and helps to get repairs faster from dropped mech parts (glowing yellow spheres), which is it's primary function. It also helps to get EU faster, which is used more in a game mode called SIEGE.
This will help you to achieve the status of a vampire mobile turret, when you will feed on the souls of destroyed enemies with increased effectiveness. It also makes a perfect set with the item described in the next section!

Advanced Armour Fuser is an internal great for any C-Class mech. The more armour you have the more effective it will become! Just think about it - by destroying enemy mech or EVEN by getting an assist, your mech will start to regenerate it's health! And the more armour you have in total, the more it will repair per second! It is absolutely essential in CO-OP mode, when you are constantly destroying or getting assist, meaning you are always regenerating armour. And the further you get, the more armour you upgrate with EU, the more unstoppable you become!

Failsafe saved me many times in situations I had to fight in tight corridors or simply in any closed area. Here are some facts:
  • Your turret mode decreases damage from front attacks by 55%
  • Failsafe gives 60% damage reduction from self damage
You see where it is going? Yes, exactly, with filesafe you can use your GRENADE LAUNCHER in any situation and can even do a point blank shots, which will leave only a scratch on your armour in the worst scenario!

NOTE: You CAN'T USE different versions of SAME internal!
ITEMS Explained
This is my set for particular mech:

  • Repair Charge MK-III (unlocked on level 24)
  • MG Turret MK-I (unlocked on level 6)

Repair Charge is a IMO the MUST HAVE item for any C-Class with turret mode, it is also a great item overall, being one of the most popular items people buy for themselves. It acts like a repair parts destroyed enemies drop, you simpy press the button and after 3 seconds you can already use the sphere to replenish your armour. Plus you can use it to help an ally in need! It is even more effective with BASIC EXTRACTOR internal, which was described in the previous section, because time is essential in any battle, and with BASIC EXTRACTOR you repair faster using the souls. We pick MK-III (best one, with 3 uses per deployment / wave in CO-OP) because it saves lifes!

MG Turret was my choice for the 2 slots left (any item uses atleast 2 slots except for ITEM REGENERATOR, which uses 1 slot). It is an MK-I item (one use per deployment / wave in CO-OP), but it doesn't matter, and you will understand why when I explain how to use it.
  • The main problem with picking an item for 2 slots is that you understand you can use it only once, so it must be something really nice.
  • The main problem with our mech is that it has vulnerable back.
Something like a SHIELD or a BLOCKADE have finite time of use, and will disappear even if noone hits it. A PORTABLE SCANNER to alarm when an enemy appears behind you in advance? But it also has duration time (even though it's quite big) and it can only warn. Here comes the MG Turret.
Machinegun Turret has an outstanding range and can hit, hit, hit!
Place it behind the corner so it doesn't shoot enemies in front, enemies you see, enemies you fight. Place it so it can only shoot enemies behind, use some obstacle or a corner. If you hear MG Turret fire (it has a unique sound you can easily separate from all others) - someone is coming...

NOTE: You CAN'T USE different versions of SAME item!
STRATEGY Explained
UPGRADES:

1) +50 ARMOUR
2) +25% DECREASED HEAT RATE
3) +10% DAMAGE
4) everything else put in ARMOUR (By the end (wave 25) you should have around +900 ARMOUR)

TACTICS:

  • REVIVE YOUR ALLIES! If you can...
  • In the end of the wave and after each wave collect EU.
  • Before each wave get to the center of the map, when enemy spawn locations will be set, you will be able to easily get in ANY desired strategic position before the enemy start spawning.
  • Don't sit in one place after wave ends, enemy spawns will change, and you will have to adapt accordingly.
  • Chose position wisely, best if you have 2 spawns in front and one distant spawn (NO spawns behind!!!). With this class you can easily destroy enemies from both spawns, remember to stay in TURRET MODE!
  • Don't take any chances, place MG Turret behind to warn if any enemy will get close to you from that direction. Forewarned is forearmed!
  • If enemy manages to get behind you, either kill him fast, or if you see that it is not possible, face the group of enemies that is larger (and thus particualr side would deal more damage to your mech) and start moving backwards so enemy who was behind would get in front!
  • Try to destroy weaker enemies first. Use GRENADE LAUNCHER to destroy several flying drones at the same time (to detonate greande mid-air, press attack button again).
  • During the BOSS wave every mech excluding the BOSS mech(s) is considered as "weaker enemy" - destroy them first and leave BOSS for the end. The faster you destroy all weaker mechs - the higher are chances for success!
  • GRENADE LAUNCHER is a versatile weapon, you can shoot behind corners, grenade has large AOE so even if you miss you can still get the enemy - detonate grenade at any desired time (if grenade hits any surface it will detonate faster so be aware of that)
  • GRENADE LAUNCHER is most effective when fighting several enemies at once, use this knowledge to your advantage! Easiest example of how you can use it in particular way is to shoot between two close standing enemies and detonate grenade when it is between them - both will receive damage! In case you hit enemy with grenade and there are enemies very close to him - everyone of them will receive damage!
  • Remember that your items are replenished after each wave! Don't waste them, but also don't keep them unused.
  • If you retreat (shame on you!) get out of the TURRET MODE!
  • Use REPAIR CHARGES and defeated enemy mech parts to replenish your armour. Don't repair! NEVER IN CO-OP! You will have enough enemy souls to feast on...

Here is the video presentation, a clear explanation of how to be a TANK in CO-OP, fearless, unstoppable death dealer:


And on this one you can see how ridiculously powerful you become on the last waves:


If everything else fails - YOU DON'T!


Final Thoughts - VS MATCHES
Clearly VANGUARD has an edge in CO-OP mode, yet would it be effective against real players?
Oh yes, oh yes it would! Same internals, same items, same reasons to use them.
In 1 vs 1 fights you will almost always dominate, the more skill you get the more effective you will become! 1 vs 2 wins should also be an easily achievable everyday experience...
With medic in your team and clever use of turret mode this is a DIE HARD mech of HAWKEN universe. Practice, and you will become an unsoppable versatile machine of death!

On this video you can see me using VANGUARD at 1:50-2:26 :


If you are interested in
  • Participating in large scale warfare with other Clans.
  • Training and skill enhancement (In depth Game knowledge and experience).
  • Advanced strategic and tactical planning with your platoons and squads.
  • Competitiveness
  • Most Importantly Fun events!
Join TAW[www.taw.net] today!
More information here:
https://community.playhawken.com/topic/10353-the-art-of-warfare/
BONUS - "Chicken Nest"
As a "Thank You" to everyone who read this guide, here is something special for you:


This emoticon is the combination of 2 things and can be done by any C-Class mech with TURRET MODE.
First you must have a right HOLO EMOTE equipped. To do this go into GARAGE, select your MECH, go into the COSMETICS section, in the upper right corner click on HOLO EMOTE and select "BETTER CLUCK NEXT TIME".
Now everytime you end the round (or during the battle if you want) press "F" button to activate TURRET MODE and "H" button to drop a HOLO EMOTE - result will be an upgraded epic version of your chicken HOLO EMOTE with a metal nest!

Overall, I hope this guide will help you find better ways of dealing with everyday "problems" in HAWKEN, develop your unique play style, and get more fun from the game! See you on the battlefields of Illal, pilots! ^_^

40 Comments
Finras Sep 27, 2024 @ 1:21pm 
i miss this game. it was a just like phantom crash v.v
KoffeeLord Jul 20, 2024 @ 6:34am 
Once again i mourn the loss of this game :(
härjaren Aug 21, 2023 @ 7:36am 
rip pc hawken
MILOWYORHI Aug 18, 2023 @ 2:57pm 
i miss hawken
TAW| V:ExorcisT  [author] Aug 14, 2023 @ 12:00pm 
Alive and kicking :) Glad you found your way here.
MILOWYORHI Jul 10, 2023 @ 6:54pm 
7 years later
TAW| V:ExorcisT  [author] Apr 7, 2016 @ 11:48am 
I've never heard about that issue before, mrmonkey06, try posting on official forum: https://community.playhawken.com/
a9e10n Apr 5, 2016 @ 6:53am 
for me when it starts no bots or eney thing come out plz help
TAW| V:ExorcisT  [author] Mar 9, 2016 @ 4:38pm 
Thank you for your kind words, mech4warden. This guide is indeed probably a bit outdated at this point, but, as you mentioned, some tactics will never be obsolete. I would love to extend it, but at this point I am just too busy. Have fun destroying mechs and enjoy the game! ;)
MechWarden Mar 2, 2016 @ 7:03pm 
It needs a bit of minor updating here and there, but it is a great guide that helps explains things people would otherwise miss, since it isn't too well explained in-game.

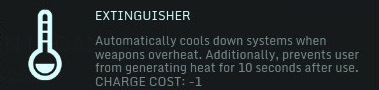
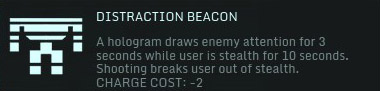
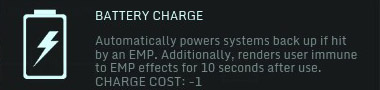
Should also have a short thing about when to, and when NOT to, use those revive consumables, since it is easy for someone to get stuck on wanting to push just a bit more while everyone else is down, making others feel the need to use their charges as well sometimes; when a defeat and a restart would be less painful and more practical.

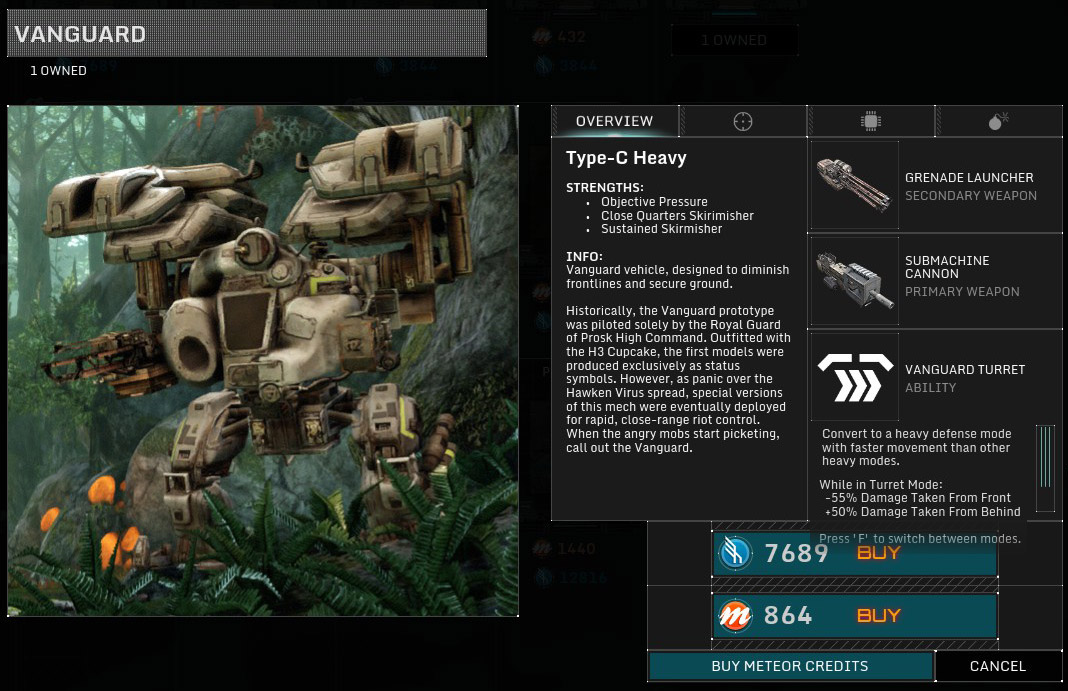
Also tactics with other mechs would be great. Right now AI mechs and drones (not suicide drones) totally ignore cloaked players, making for some humours and sometimes OP manoeuvers. Had AI mechs look right at me, bump into me, me push into them, and then walk away. Likely will be patched sometime soon, but those suicide bots seem to do well messing up predictor mech's cloaking.

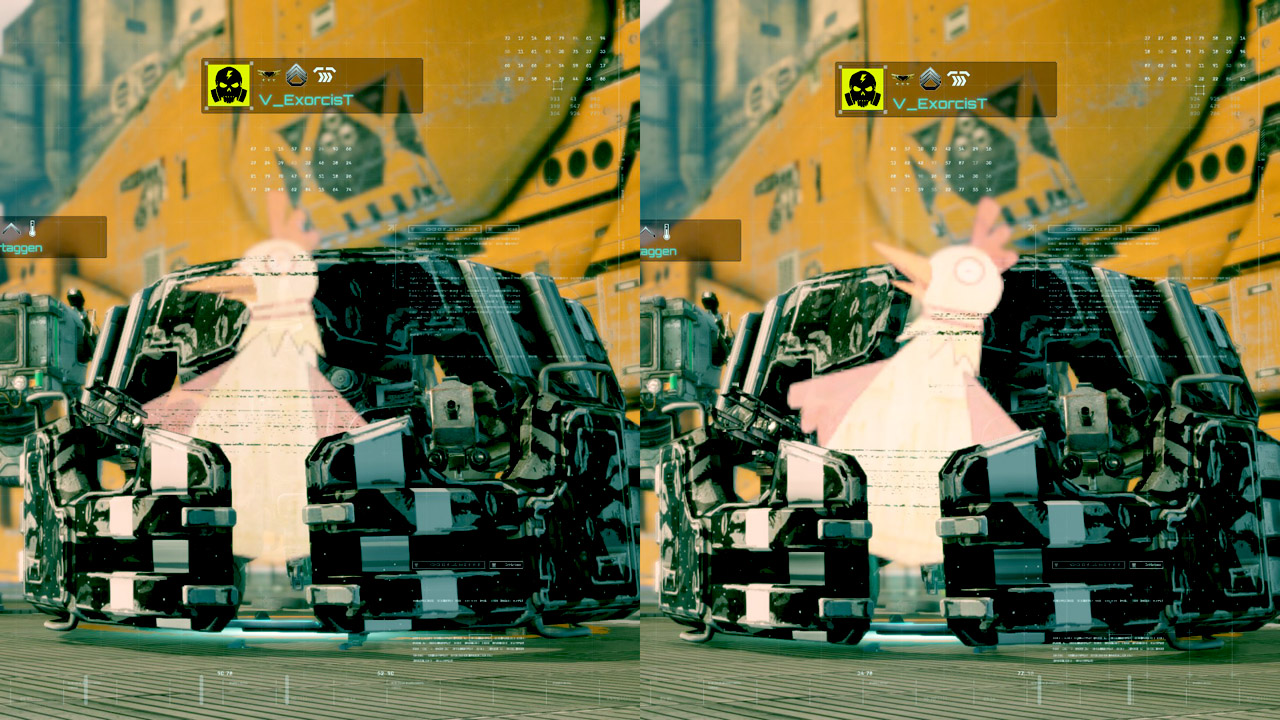
Btw, love the chicken nest emote.