Haydee 2

Haydee 2

119 ratings
Easy 1-Hour Walkthrough
By Enthusiast
Straight forward walkthrough with maps and videos. Step-by-step including 15 save points. This route can be done in 60 minutes.
2
3
3
   
Award
Favorite
Favorited
Unfavorite
Pistol
WHY: this is a shooter, we need a gun (to save time we don't get the pliers, we shoot mines)
There are three ways to get the pistol. The fastest is to let the slasher out, sneak by, and grab the gun and ammo. Next you press TAB and drag the ammo over the pistol to charge it. Press TAB again, then 1 (hotkey for the first slot). Finally, aim at the slasher and shoot. Tip: Make sure your mouse is over the second square before.
SAVE: where you started (1 Diagnostics)
Screwdriver
WHY: needed for Damage Upgrade - we want that as soon as possible
(also required for White, Teal, Blue, and finale)
SAVE: Hub
- store all ammo, you gonna get more
(you should now have your pistol and screwdriver in your pouch, and keep them to the end)
Damage Upgrade + Wrench
WHY: the upgrade nearly doubles your fire power. We need it to save ammo. The Wrench is required to continue to the next level (also Forceps + Teal key)
SAVE: Start (don't go all the way back to Hub, takes 25 seconds.)
- store all ammo, you gonna get more
+ take (or rather keep) Wrench with you, we need it next

Orange Key
WHY: to open door to white button cap (which opens a path to a lever that we need up in Security later, as well as a remote control.)

SAVE: middle of Engineering, 9 Repairs
- store all ammo, you gonna get more
- Wrench
+ Orange
Remote Control
WHY: the Wifi remote control (aka Clicker) is required to open the door to the bolt-cutter (needed later in Security)
SAVE: in Medical, 16 Storage
+ keep Orange
+ keep the Remote
> after saving go for the Pouch and the Remote
> while still in 4-Utility press Remote once to open the other door
Lever + Boltcutter
WHY: both are required in Security later, lever for a forklift, bolt-cutter to open gate to Jammer.
> round-trip to get lever
> remember to press Remote once in 6 Motorics
> take Boltcutter
> remember to take the blue Receiver button
SAVE: Medical 16, Storage
/drop Orange key once you have the pouch (right-click to let it fall on the floor, we need a free slot next. What's on the floor will stay there for the entire game. We may pick it up on our way back if we need it. Of course you are free to store it in your inventory, it just takes longer.)
- store ammo (we still get more)
- Wifi Remote
- Wifi Receiver
- Boltcutter
+ Wrench for forceps
Crowbar, Forceps, White Key
WHY: we need both Forceps (look like siccors) and White Key to get the Teal keycard (which opens doors in Medical later). You can't miss the Crowbar on your way (need it for White key next and up to Security)
(optionally save in 15 before 16+14)
SAVE: Hub
/drop saw immediately after use
/drop hand immediately after use
+ Crowbar (to get into Security)
+ Wrench (to get into 3 Stripbar)
+ White (to get Knife)
+ Forceps (to grab Teal key)
Teal Key
WHY: it's on our way up to Security, so we grab it now (opens doors in Medical later)
(> use Forceps in pool drain)
/drop White key immediately after use
/drop Wrench after use
/drop Pink Keycard immediately after use
/drop Forceps immediately after use
SAVE: Security, 5 Utility
/drop Crowbar once you're IN Security
- Knife (we need it again later, towards the end)
+ Boltcutter for Jammer
+ Lever for forklift
Blue Key
WHY: we need the Blue keycard to access another pouch upgrade (and the hangar at the end)
SAVE: as before in 5 Utility
+ Blue

Jammer + NVG
WHY: We need the Jammer to get the night-vision goggles (NVG)
|
from Jammer to NVG:

SAVE: again in 5 Utility, before and/or after you get the NVG
/drop Boltcutter once you're OUT of Security
/drop or leave Jammer
- Blue
Hammer
WHY: the Hammer breaks a wall to get the Gas Mask (which we need for the Yellow key)
> all the way down, two stairs to Medical
(You might want to save BEFORE going into Depot! It's pitch black, there are 6 enemies, and the Hammer is hard to find.)
(in a browser: right-click and 'View Image' for a larger version)
SAVE: down the stairs near Power gate, 5 Storage
+ 60 ammo
Power to Ventilation
WHY: We can go up to Medical from the other side, and we need to do that twice
SAVE: near Ventilation, 3 Workshop
+ Hammer
+ Teal keycard
Gas Mask + Agent
WHY: grab all 3 flasks (red, blue, green) to create a white Agent that clears Medical L2 (required to get to the Yellow key)
|
Back the same way:
/drop Hammer after use
(save before and after Ventilation)
SAVE: same, near Ventilation, 3 Workshop
Yellow Key
WHY: required to restore power (then activate the elevator to bring us to the finale)
> same way up and back
SAVE: same, Ventilation, 3 Workshop
/drop Teal once you have Yellow
+ Wifi remote
+ Wifi receiver button
+ Knife
Repair Valve and Fuse
WHY: Valve to get the Fuse, and Fuse to open the double-doors (to finally restore power)
|
SAVE: near Power, 5 Storage
+ Yellow
+ 60 ammo

Restore Power
WHY: Finally we have the lights back on! Once the Elevator is running we can get to the finale.
|
> prepare for surprising slasher attacks
|
SAVE: one flight up the red stairs, in Medical, 16 Storage
/drop Yellow after use
/drop Knife after use
+ Wifi Remote
+ Wifi Receiver button
+ Blue
+ 60 ammo
Finale
> call the elevator and go to level (3)
> grab the blowtorch (highlights in the dark in case you dropped the NVGs)
> enter the elevator again and go to level (2)
> use the Blowtorch to get into 3 Checkpoint and press all buttons (once)
SAVE: in the room behind the mine
+ all remaining ammo

Black keycard
WHY: to start the escape ship
SAVE: if you have more than 3 minutes left on the timer you can save again, same place.
> use the elevator to go to level (0)

Hangar
> use Blue to access 2 Checkpoint
> put the Wifi Receiver on the button (don't press it yet)
> enter other side of Checkpoint
> press Wifi Remote to enter the Hangar
> go up the stairs and board the ship at the back side
> use Black key to pilot the ship
> check Flight Log and select Previous Destination
> select Auto Flight and Operational Base 5
> Start Flight

Congrats! You fought well!
Summary + FAQ
Here is an overview of the steps we took from one save station to the next:
(in a browser: right-click and select View Picture for a larger version, zoom with ctrl+mousewheel)

And here's another view with just the main items in the order we collected them:
(in a browser: right-click and select View Picture for a larger version, zoom with ctrl+mousewheel)

You probably know how to aim (right-click) and reload (R) and run (shift). You may not know that you can right-click on an item to move it to storage or drop it. When you hover your mouse over an item in your pouch (tab) and press 1, 2, 3, 4 this assigns a shortcut key. To use an item, e.g. a keycard on a colored button, you can also highlight the button, open the pouch (tab), and double-click (or middle-click!) the item to use.

Headshots double the amount of damage you deal. So, yeah, that's very important. You should be fine (with pistol-only and shooting mines) if you have no more than one miss on average and collect every ammo pack there is.

To save ~100 rounds you could get the pliers and use mines against enemies, it takes ~5 minutes longer. As to how to take mines: point your mouse at the edge of the mine until it's highlighted and press the hotkey for the pliers (yes, have a hotkey for that).

Q: I saw a video where they went a different path...?
A: Yes, you can collect some items in a different order. I don't think it matters because the game is so well balanced. It only comes down to preference.

You may have other questions I didn't think of. Just ask them in the comments!

https://www.youtube.com/watch?v=ihTD-8QXCfA
https://steamcommunity.com/sharedfiles/filedetails/?id=2315048067
https://steamcommunity.com/sharedfiles/filedetails/?id=2327634458
12 Comments
Enthusiast  [author] Dec 20, 2022 @ 12:44am 
Great to hear it worked for you! Don't know why Steam keeps loosing some of the images/maps, no matter how often I upload them...
Geoff Dec 19, 2022 @ 11:50am 
This guide is excellent. The 1 hour run was my last achievement. Using the guide I took my best time from 90min down to 56min on my first attempt. Only 10 saves too. I ended the run with exactly ZERO bullets left! Very glad this guide was made!
MidiaN Oct 27, 2022 @ 6:08am 
Call me stupid... but i still don't know how to 'get the Jammer', i got the boltcutters to reset the gate that shuts when you walk/run through the red lasers.
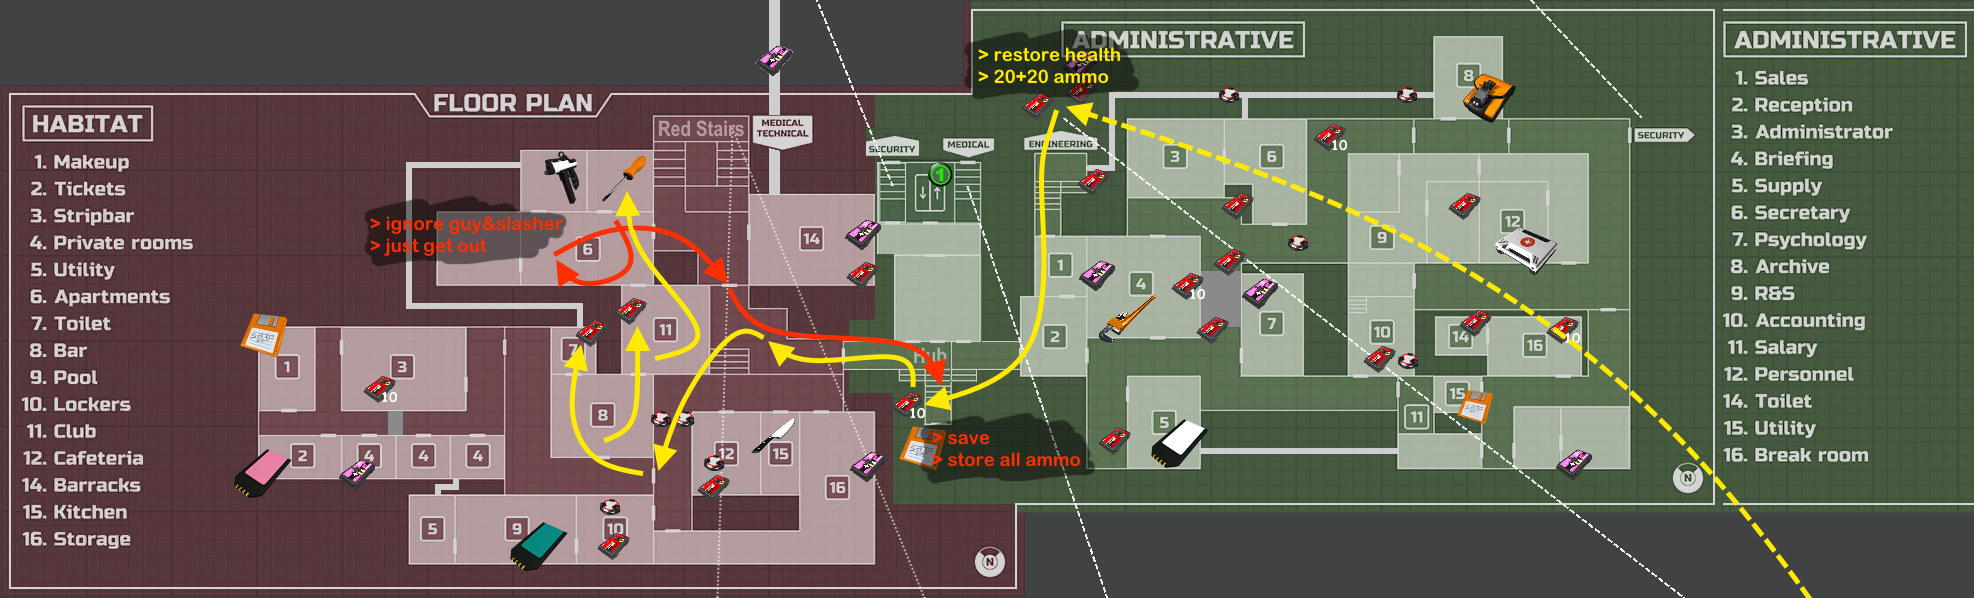
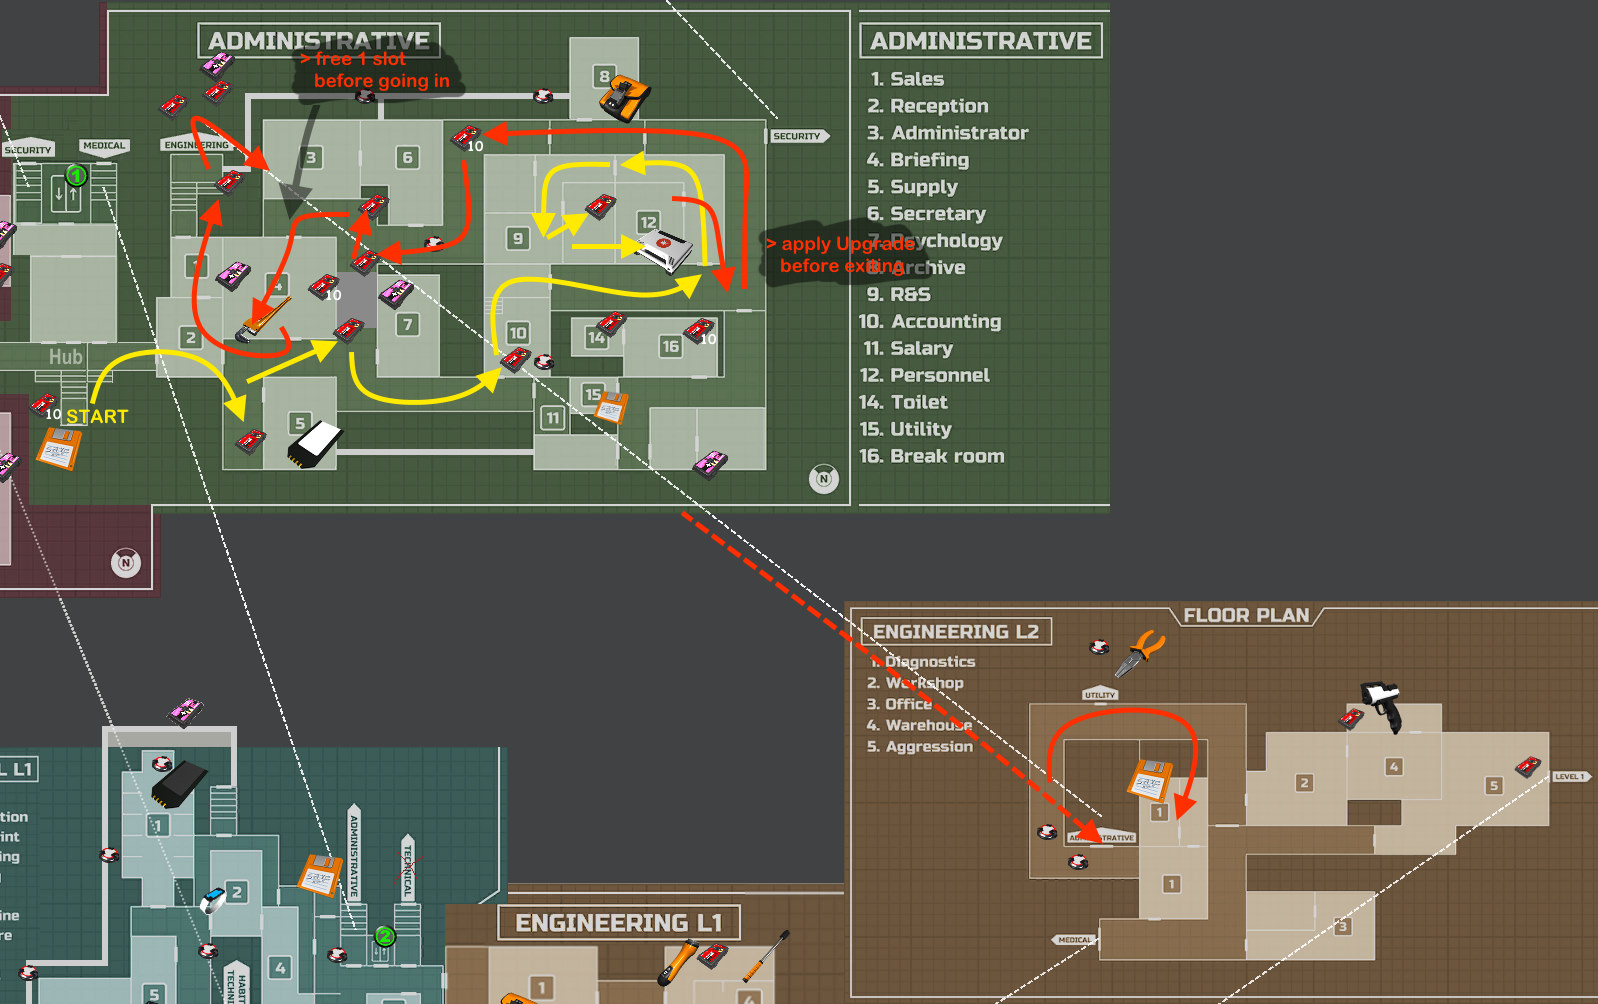
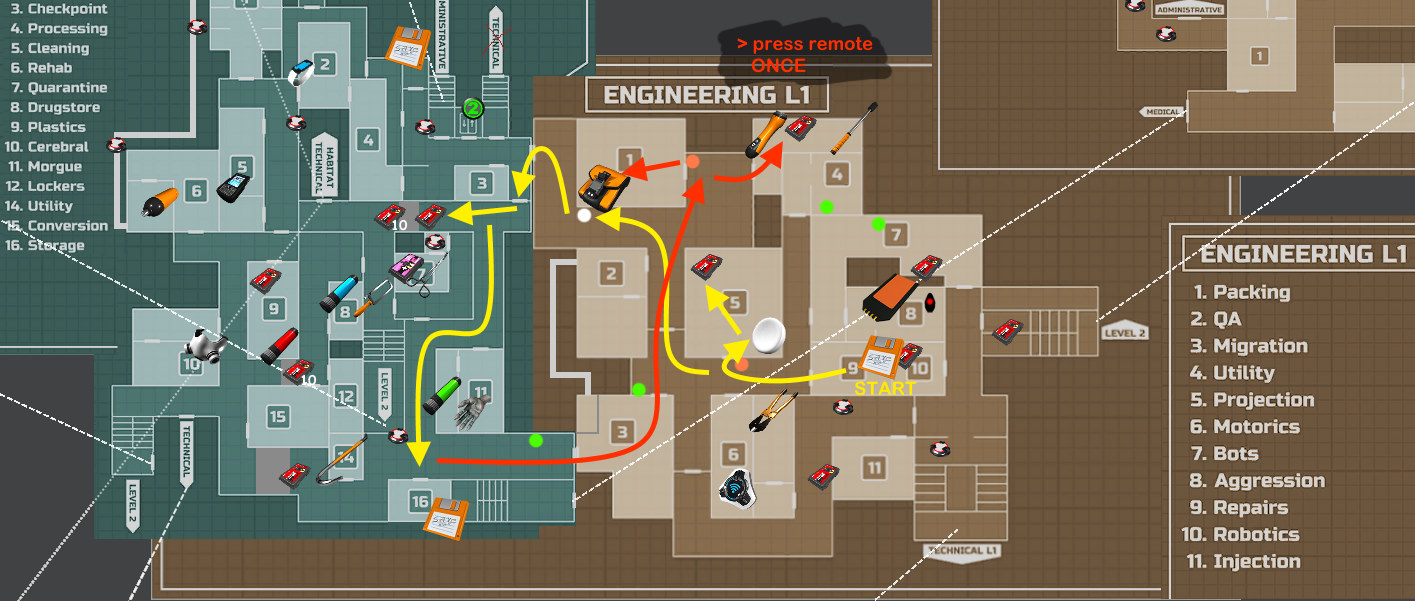
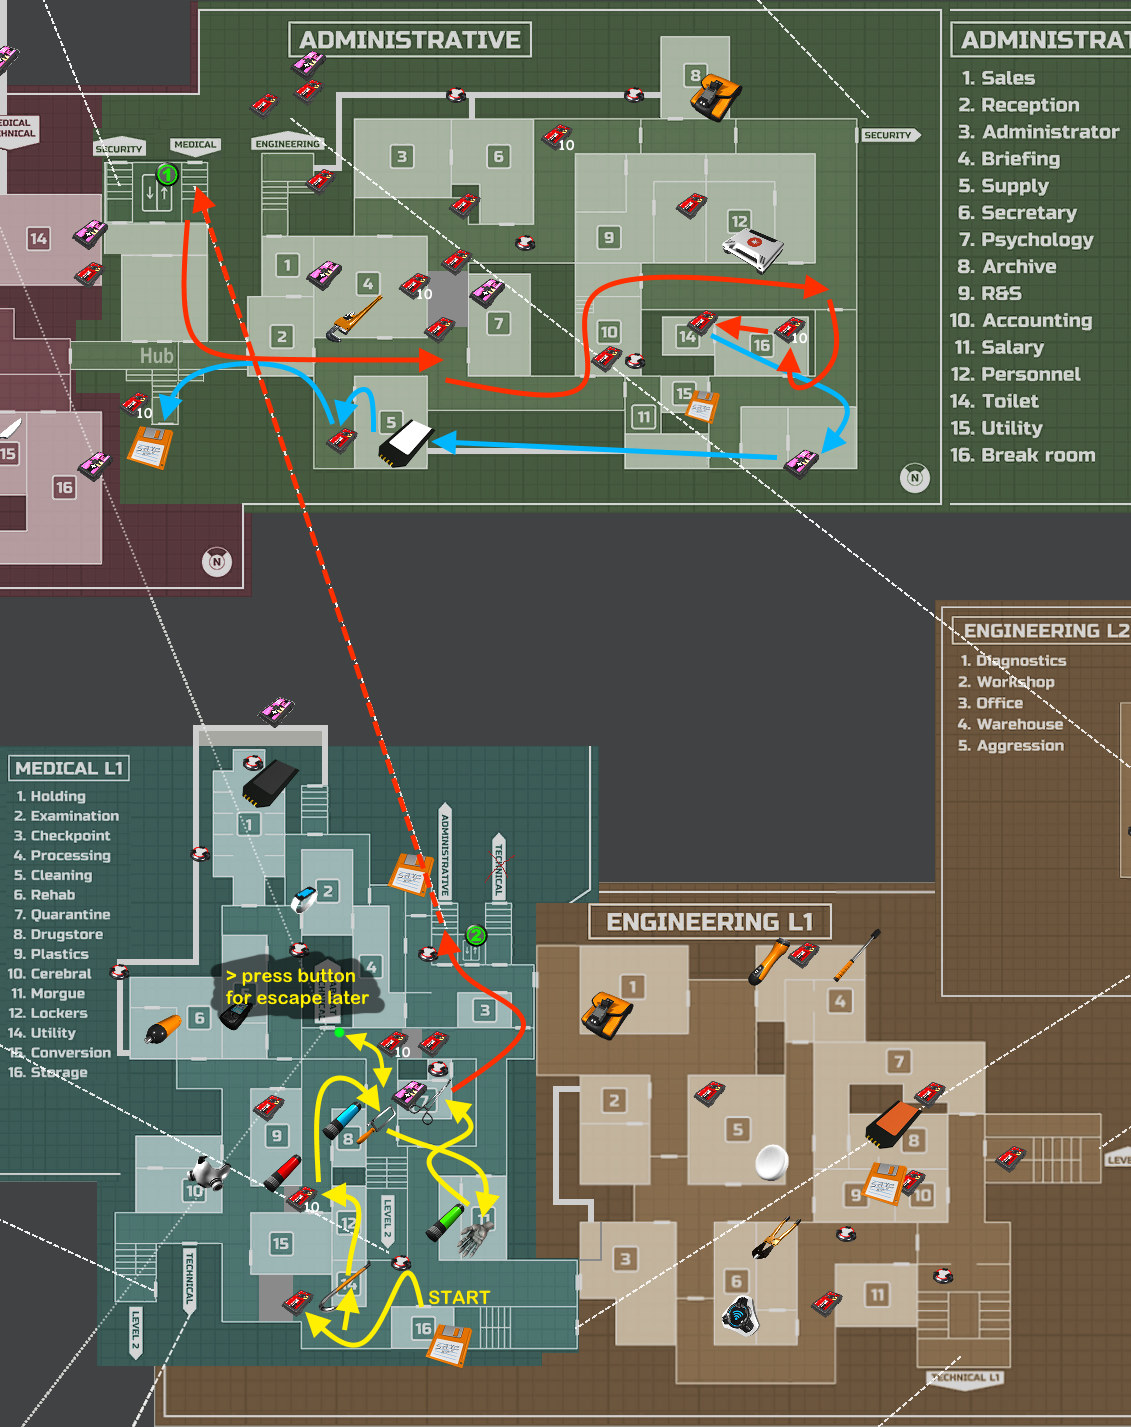
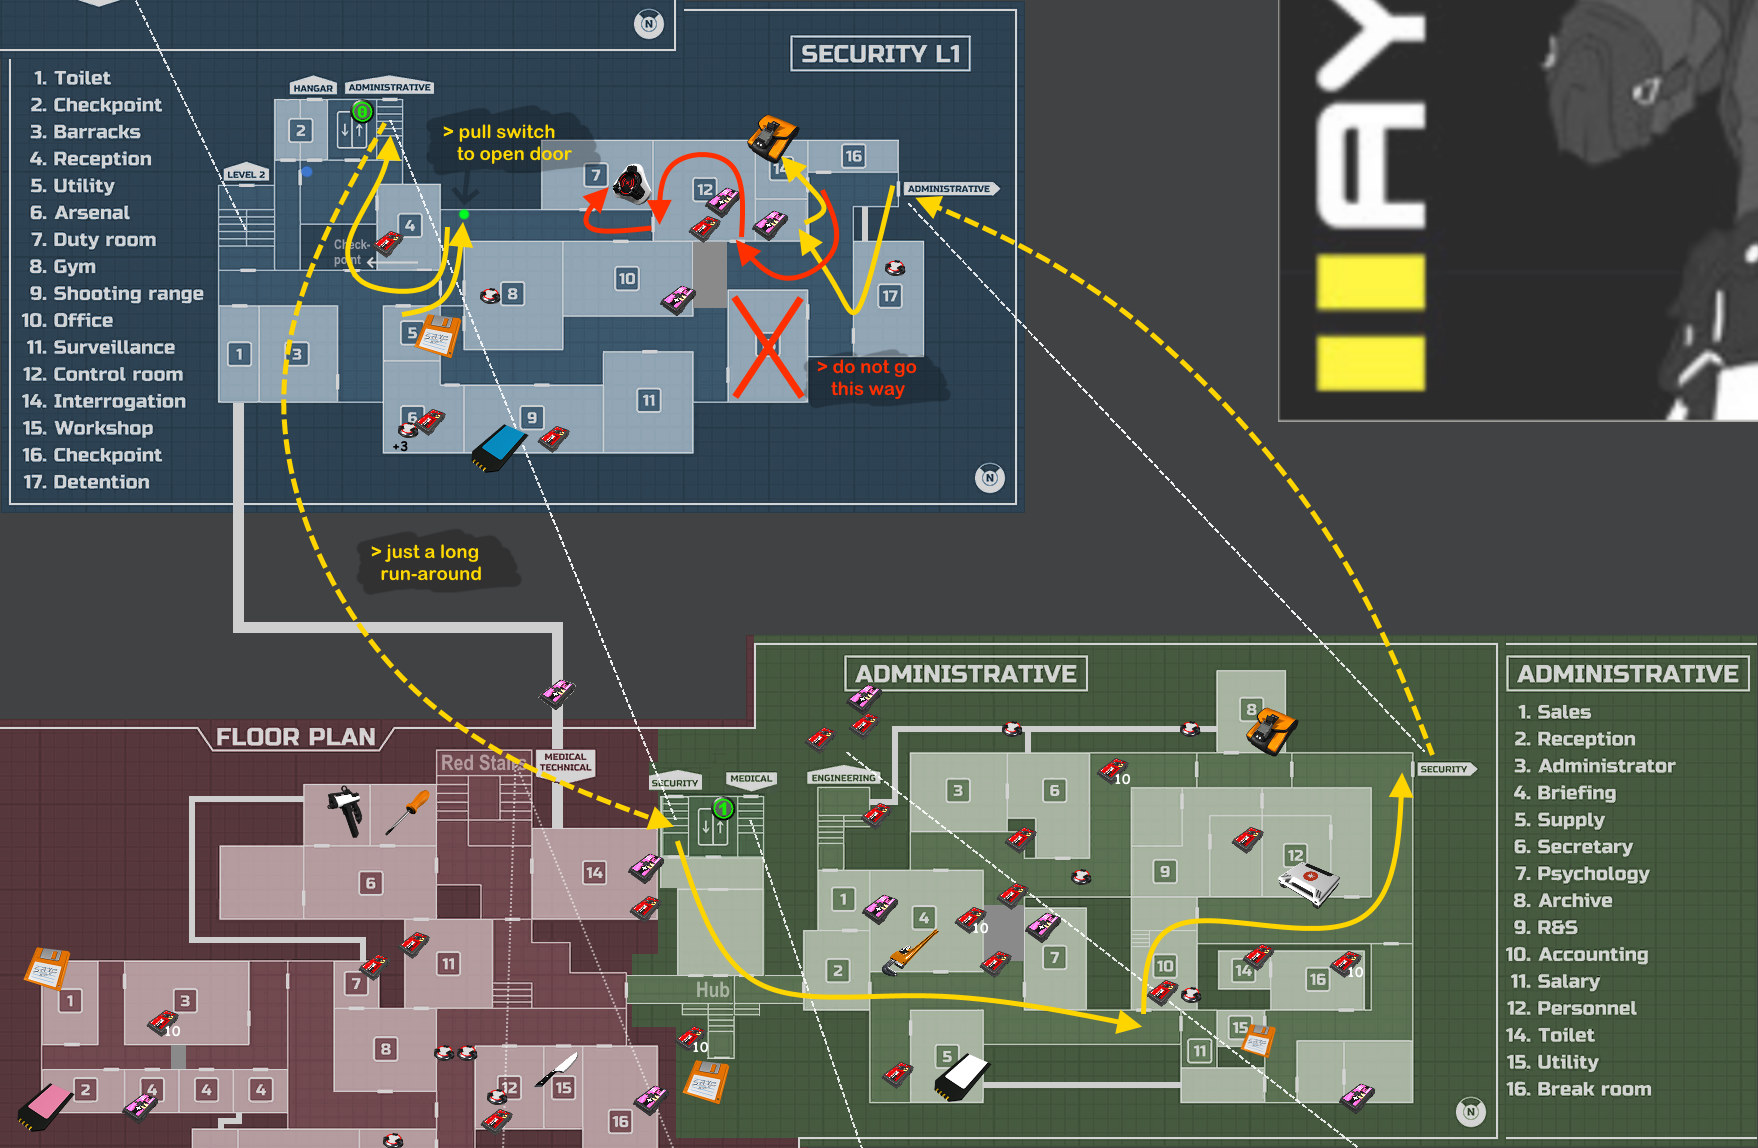
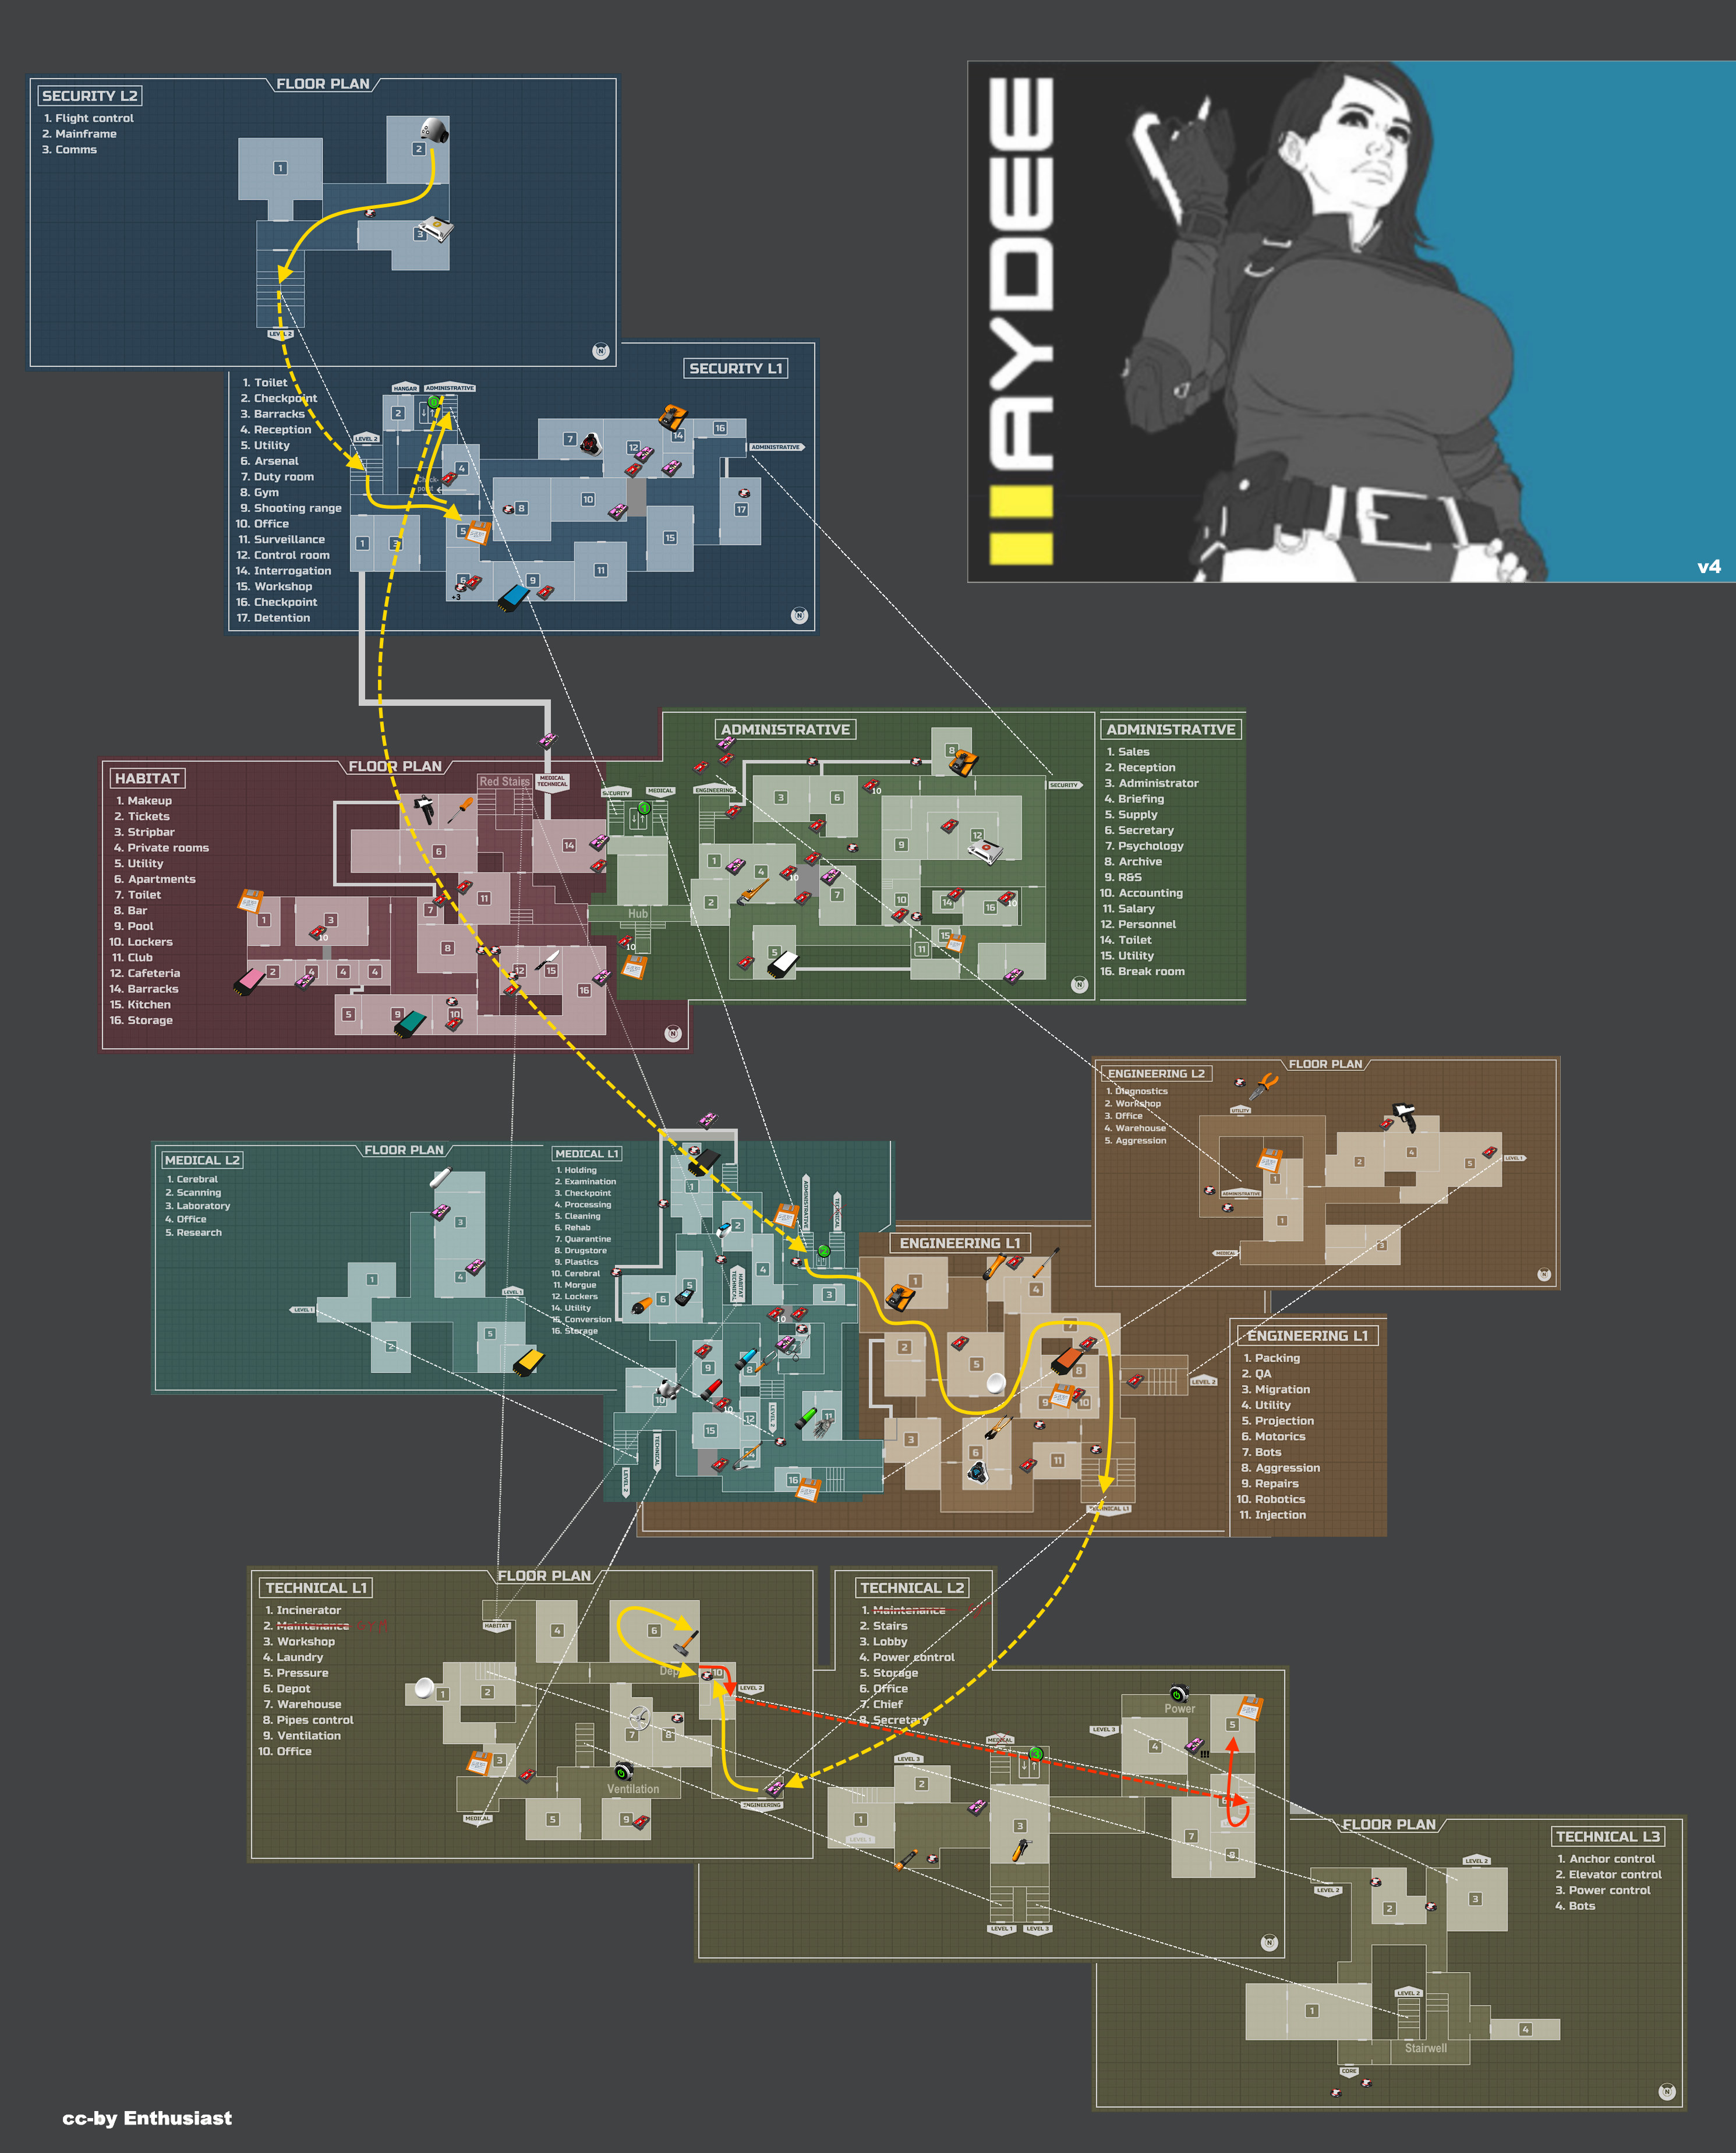
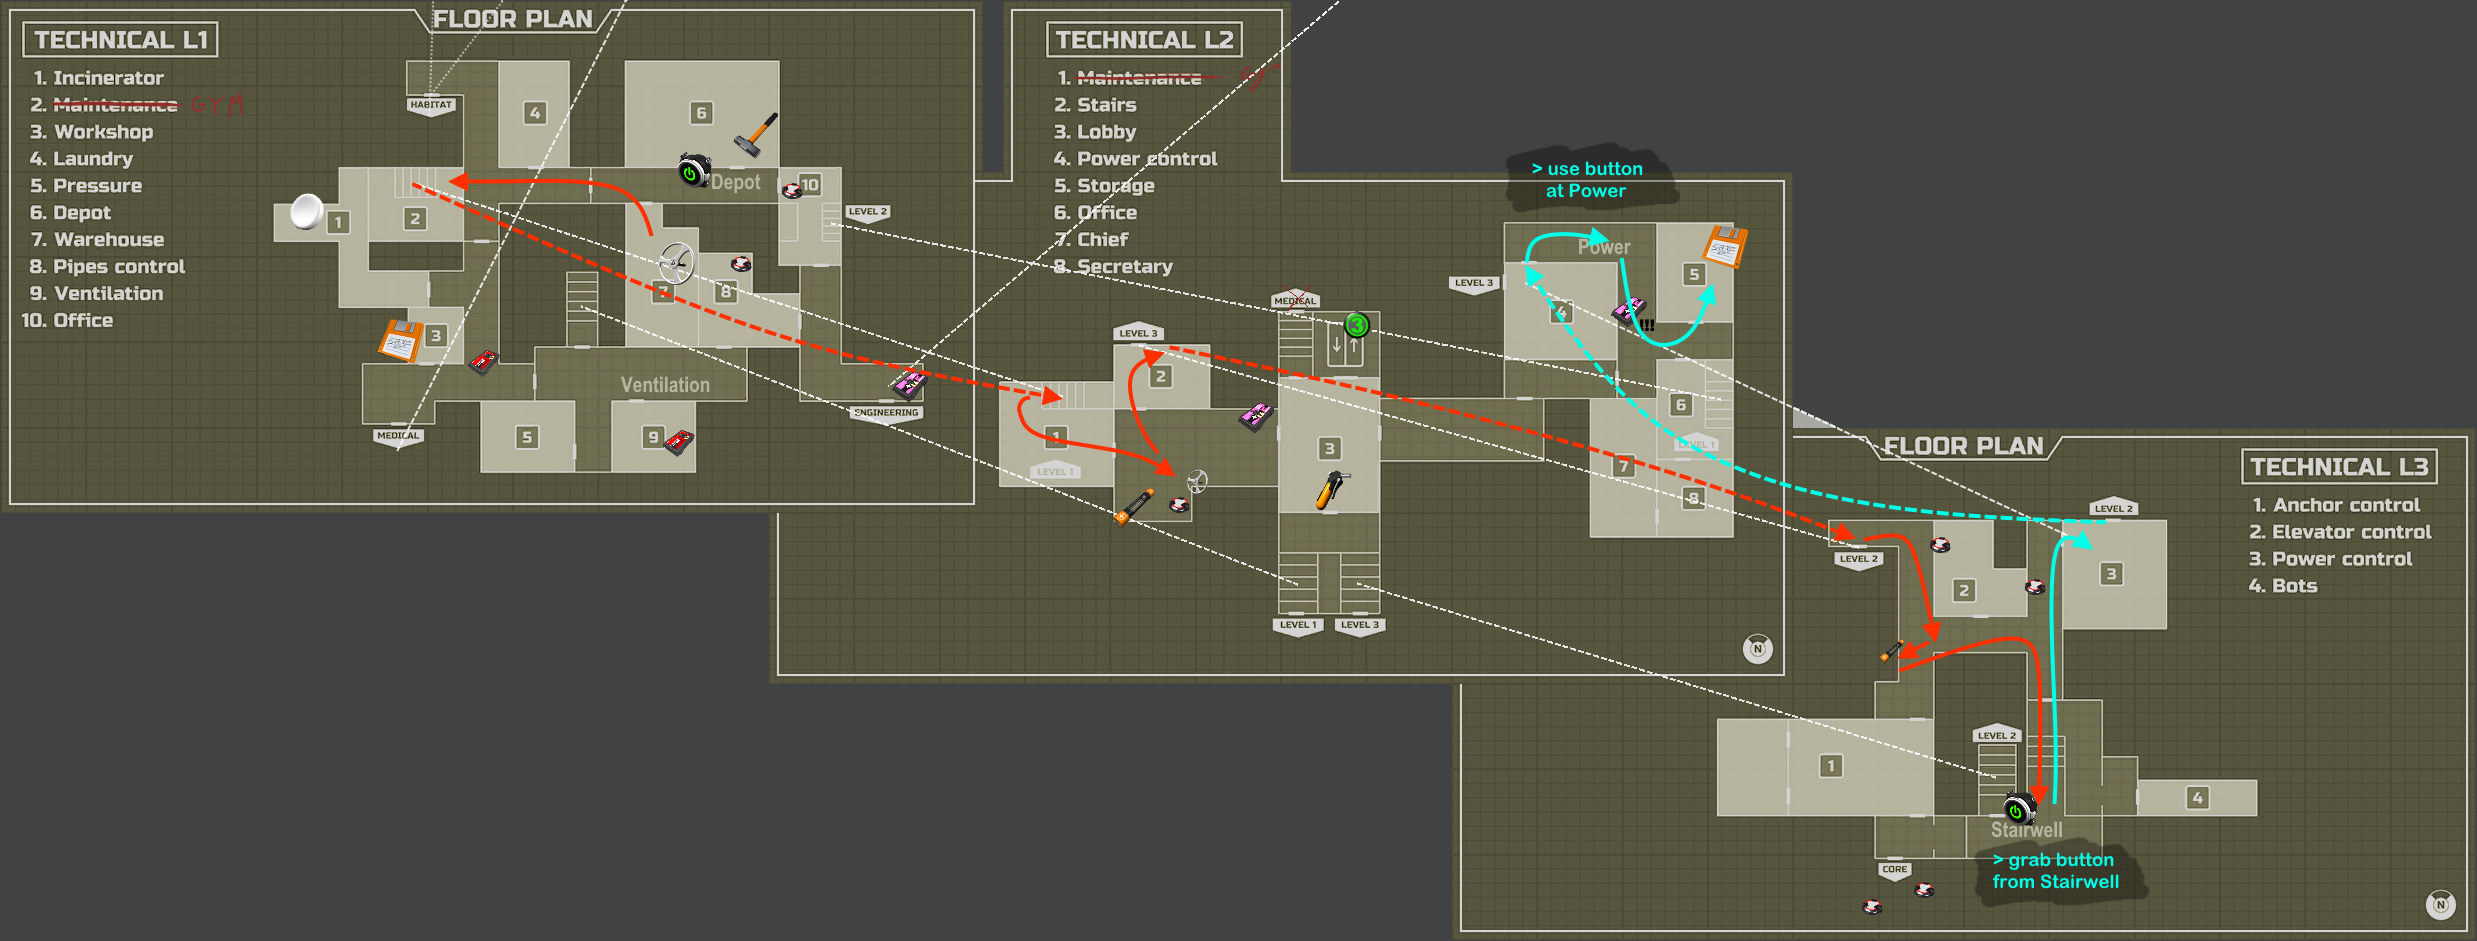
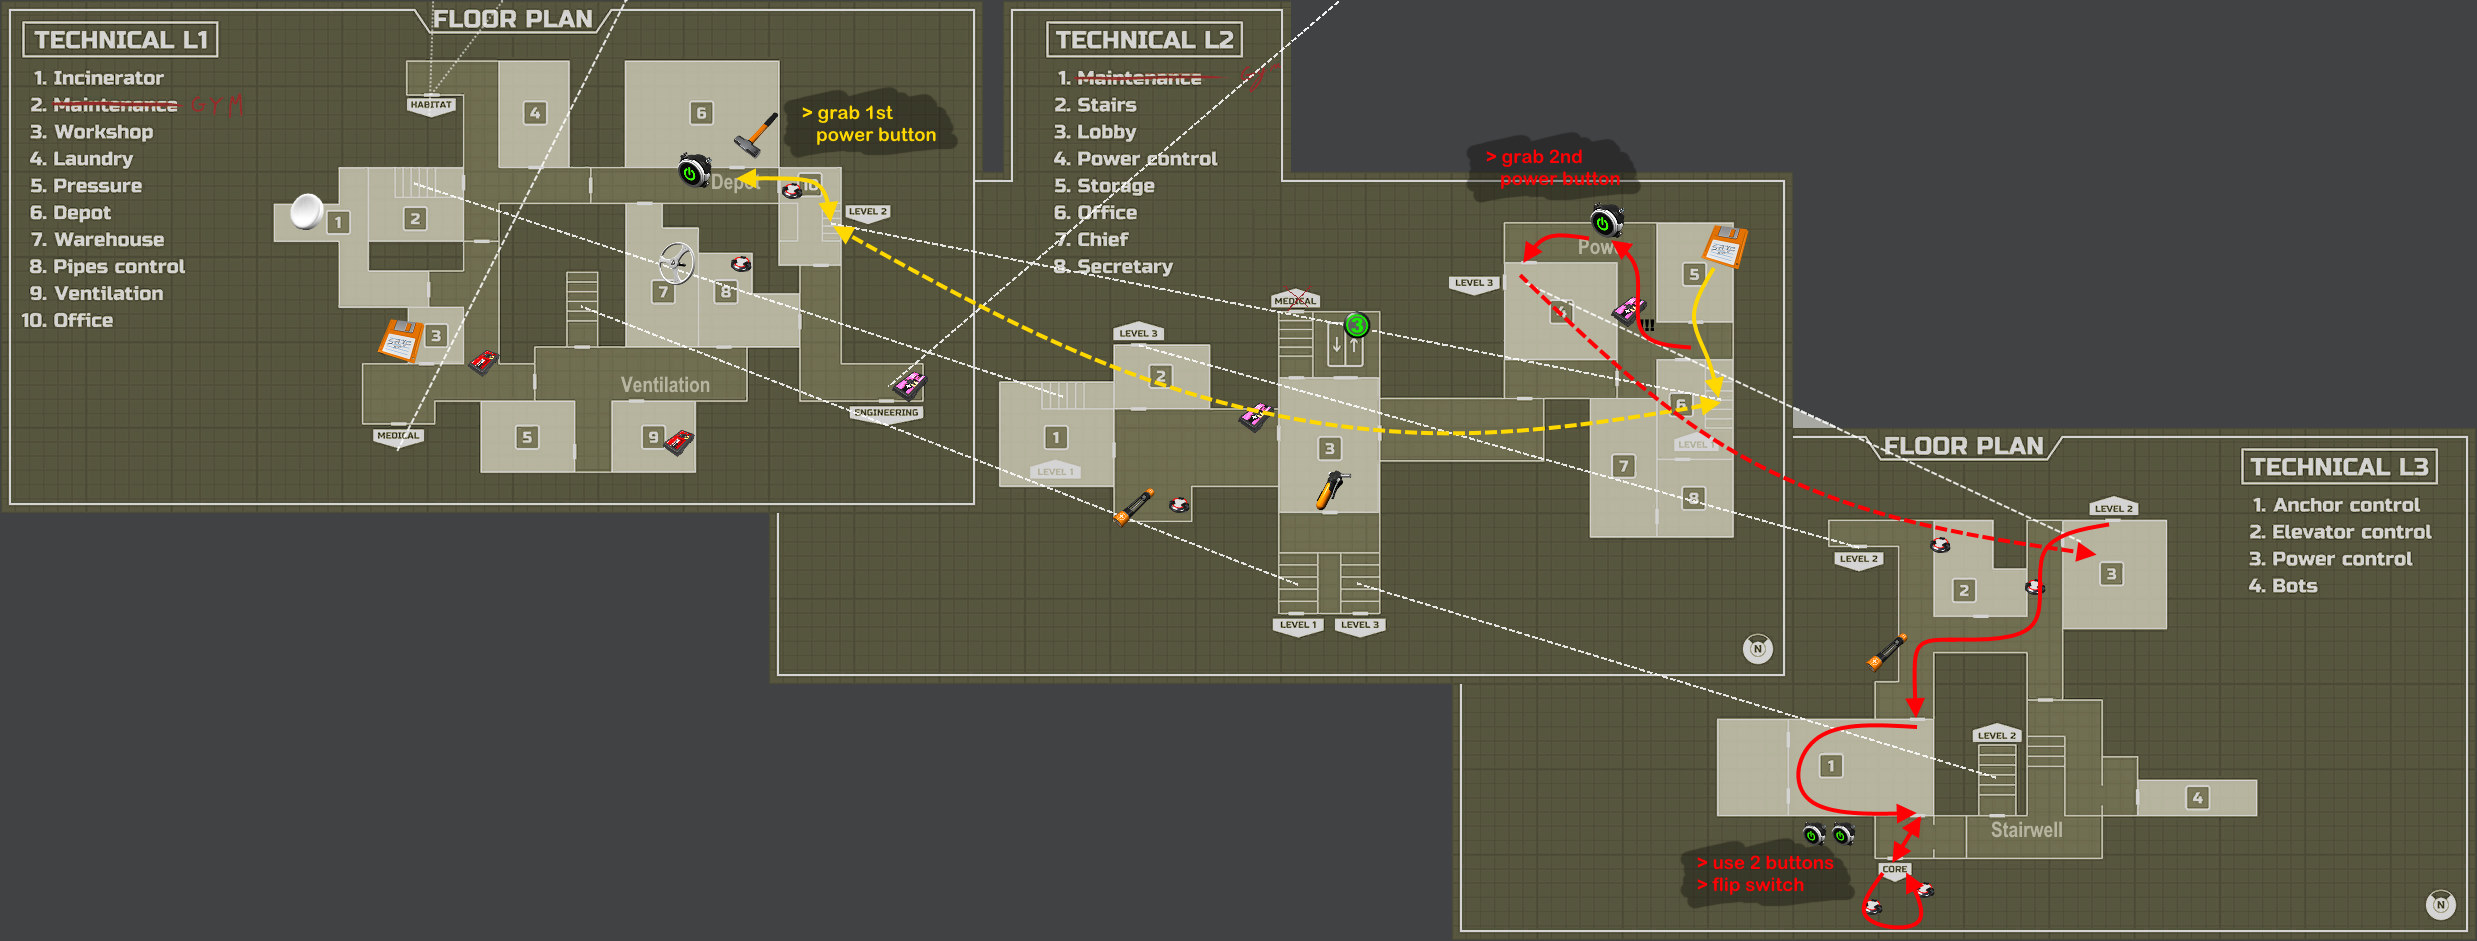
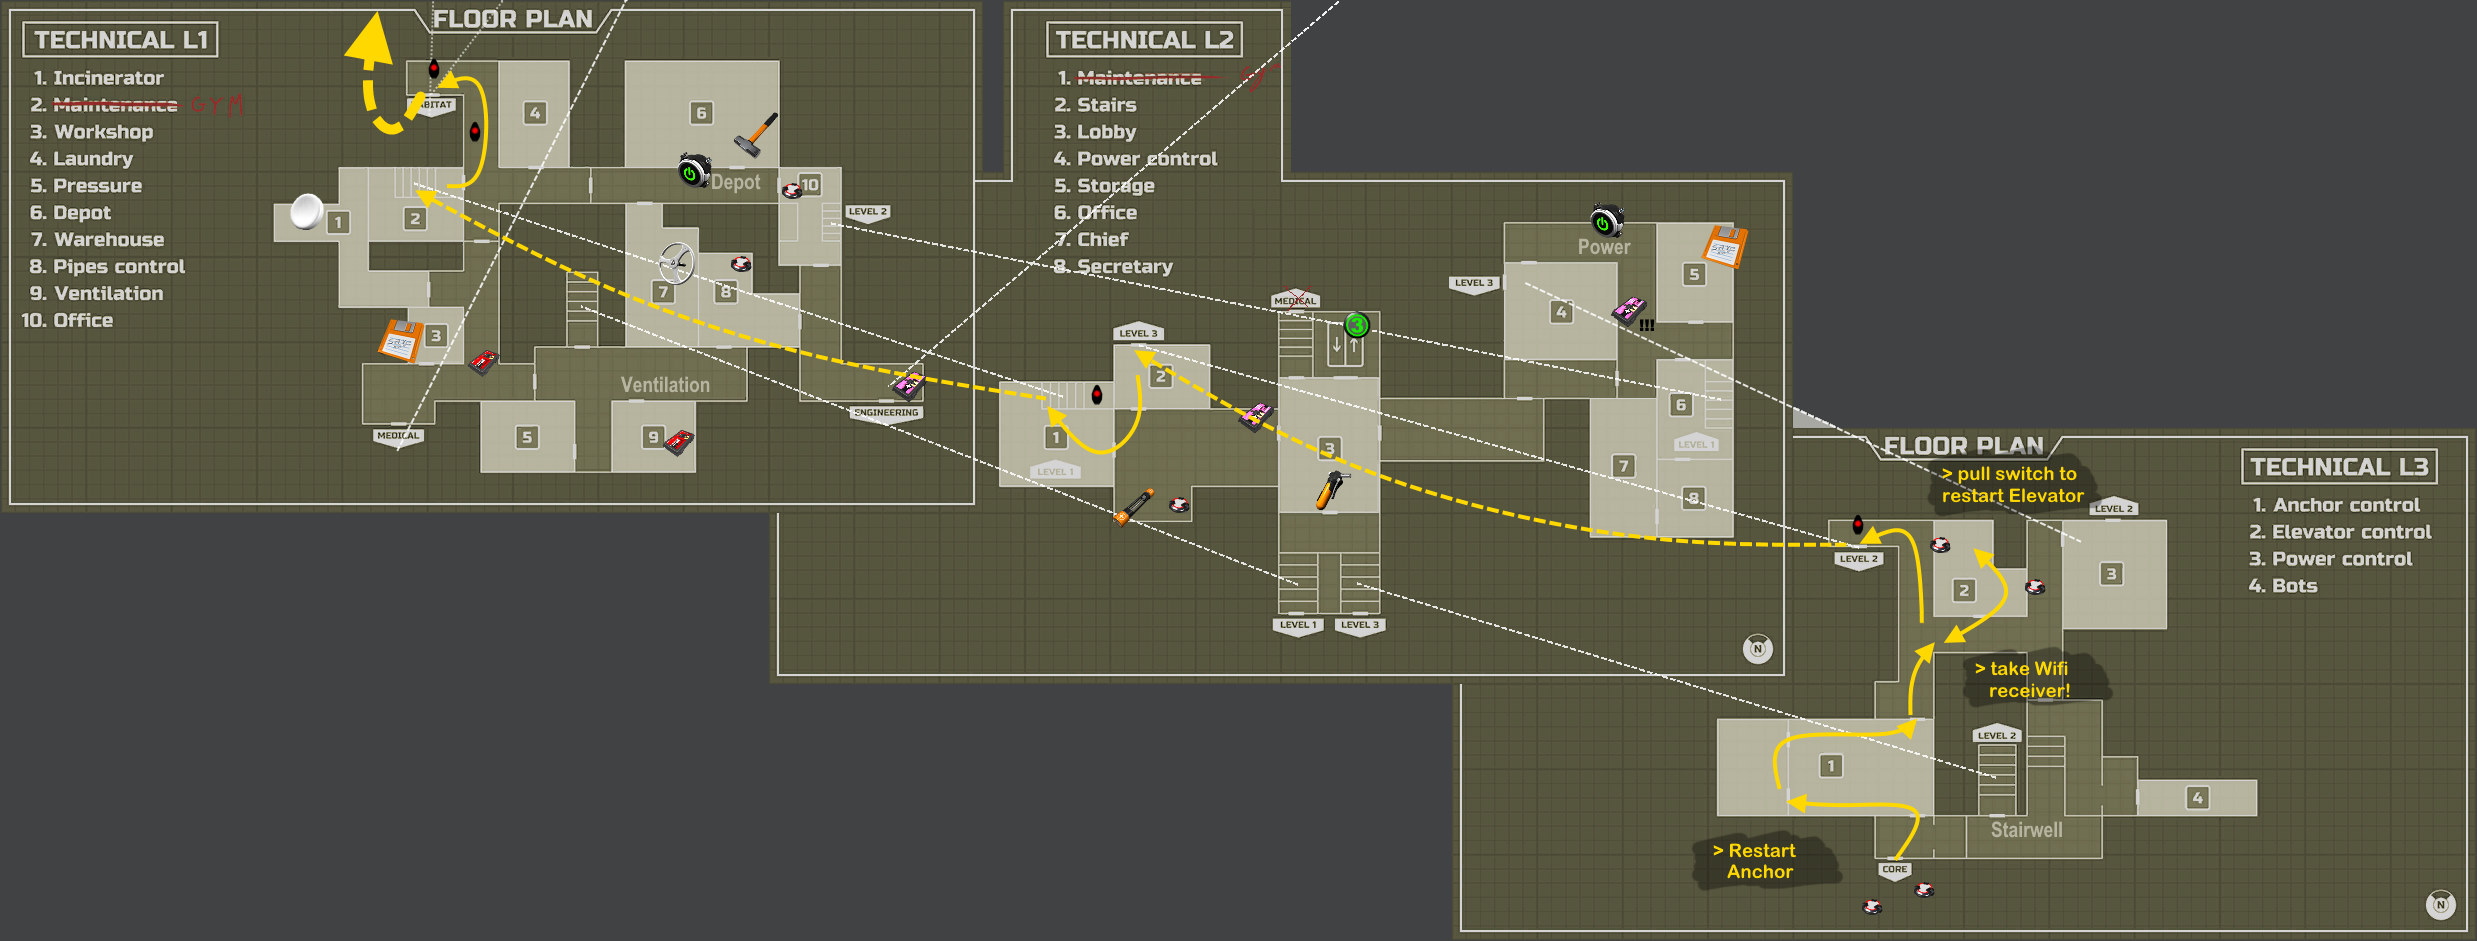
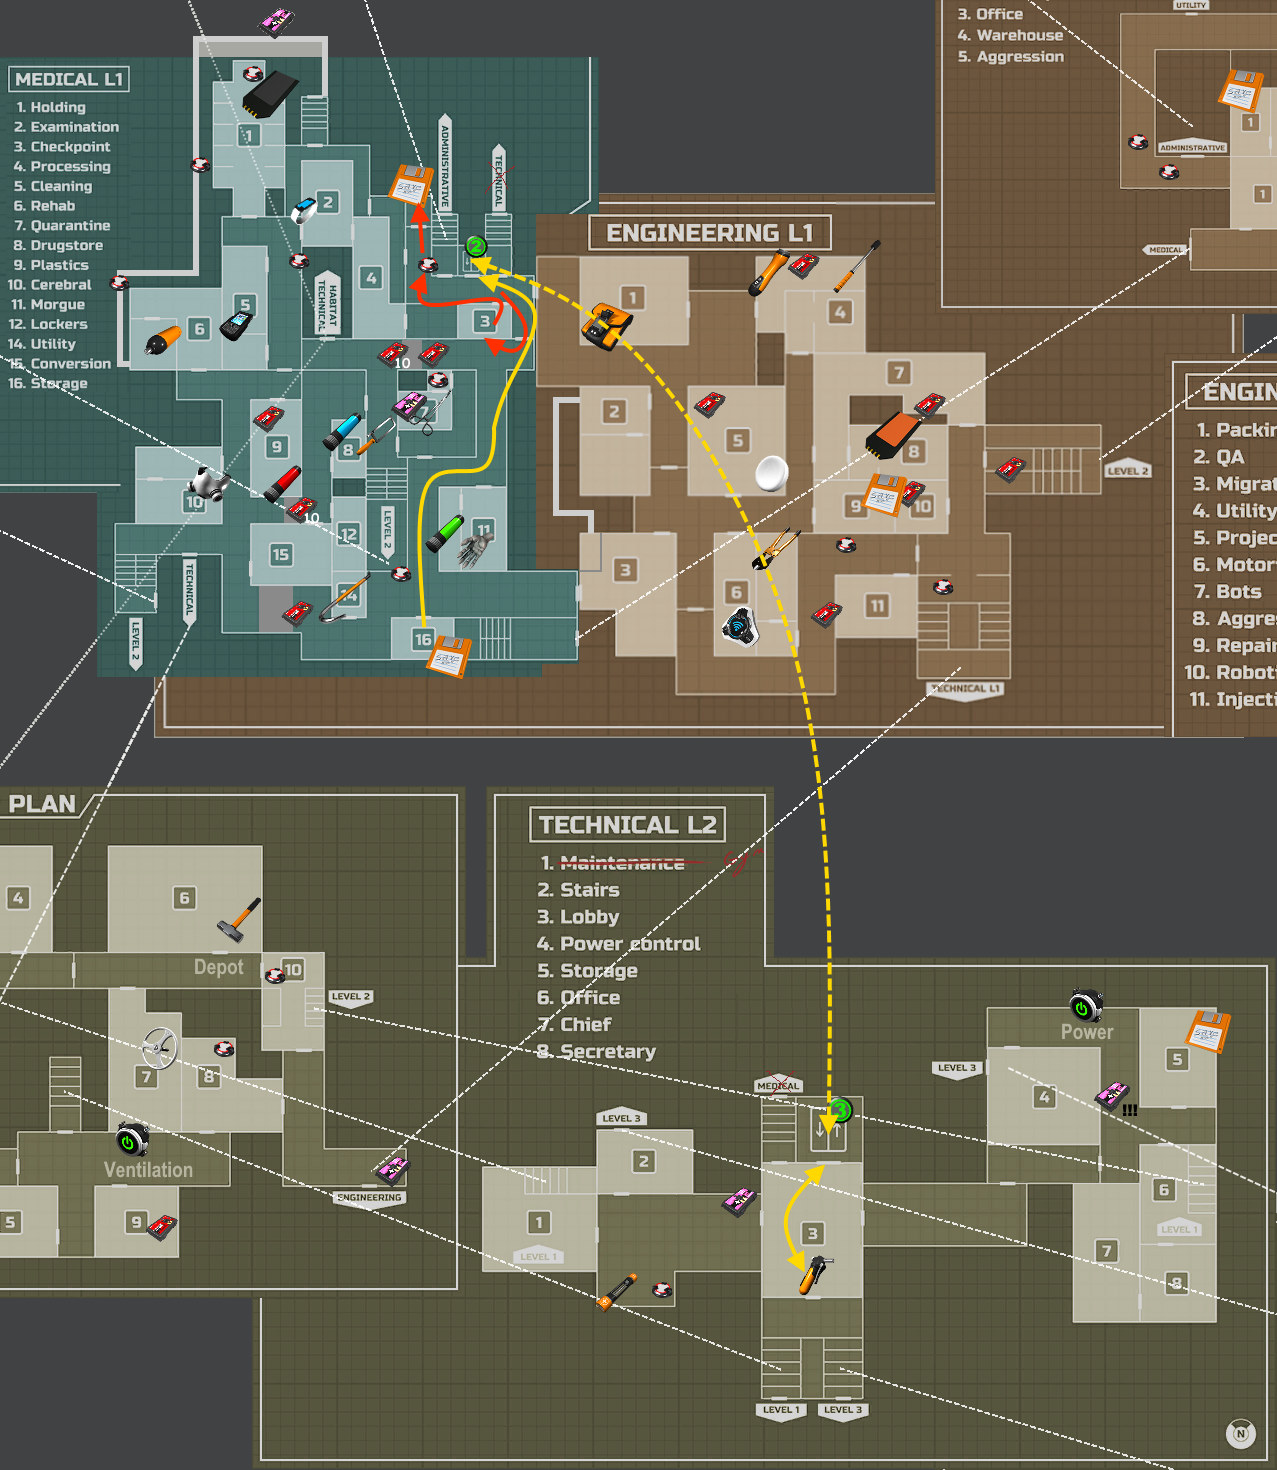
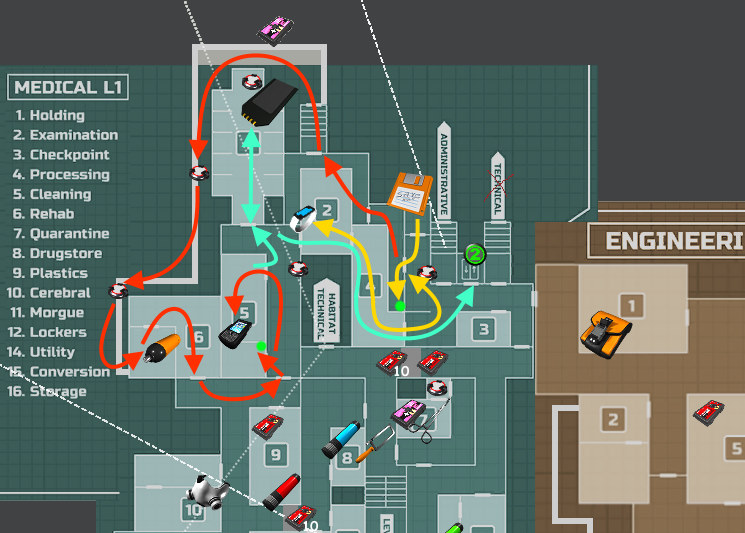
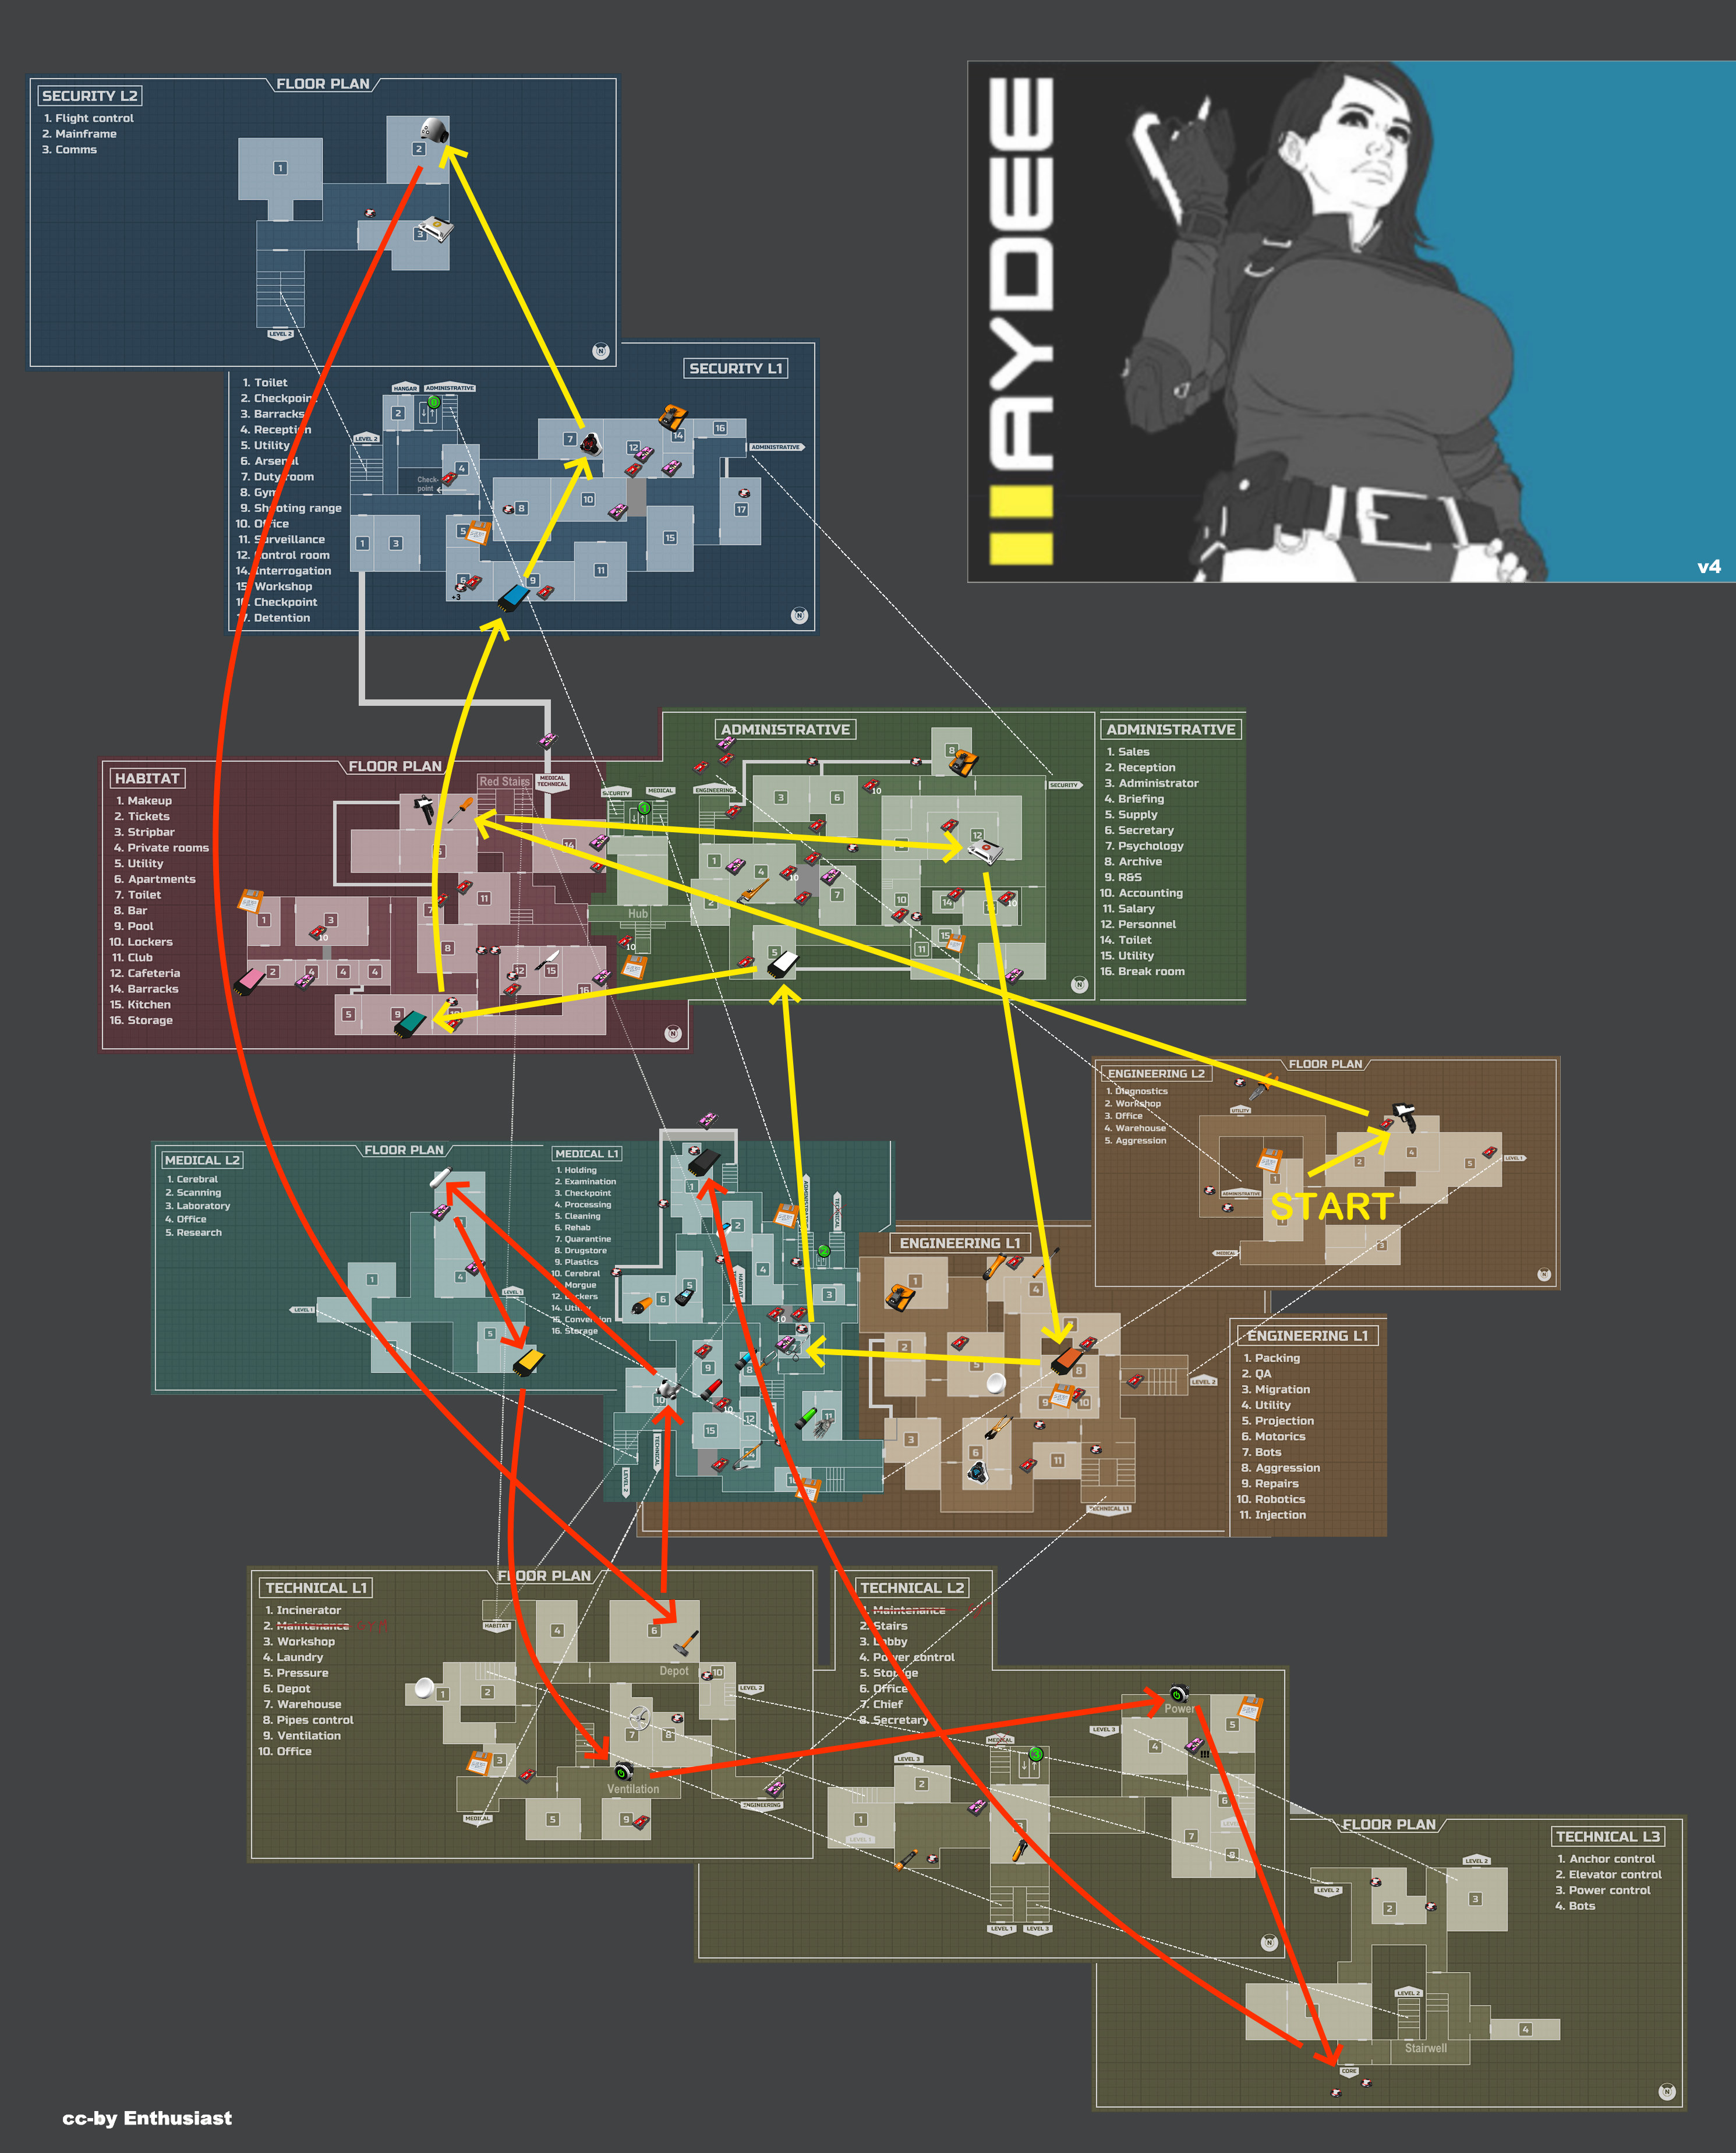
i can't seem to get 'into' that room or access the door to get the jammer, without having to hit the red lasers. (i tried walking from the other side, accessed via the gym, but same thing.. gate shut from when i reset, then walked through. etc. (i will admit, it took.... hours... like 20 of em.. to get the power back on) O.o. it feels like i'm liturally missing one item or something.
Enthusiast  [author] Sep 26, 2021 @ 9:36am 
Unbelievable! Thanks araknis, changed it it immediately.
araknis.slade Sep 25, 2021 @ 10:52pm 
Awesome! Got me 46:11, thanks muchly!
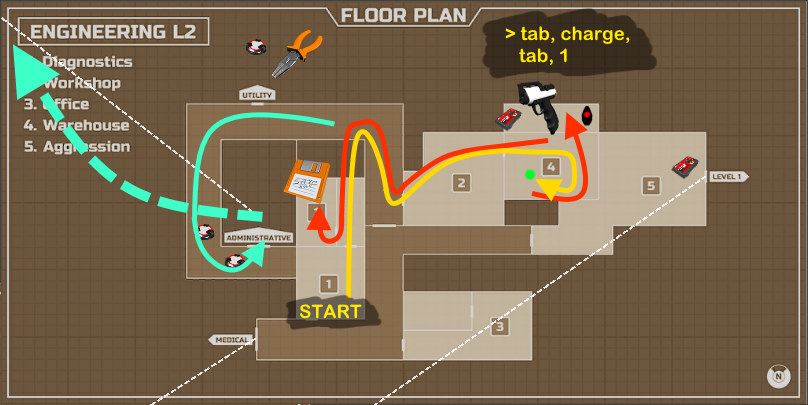
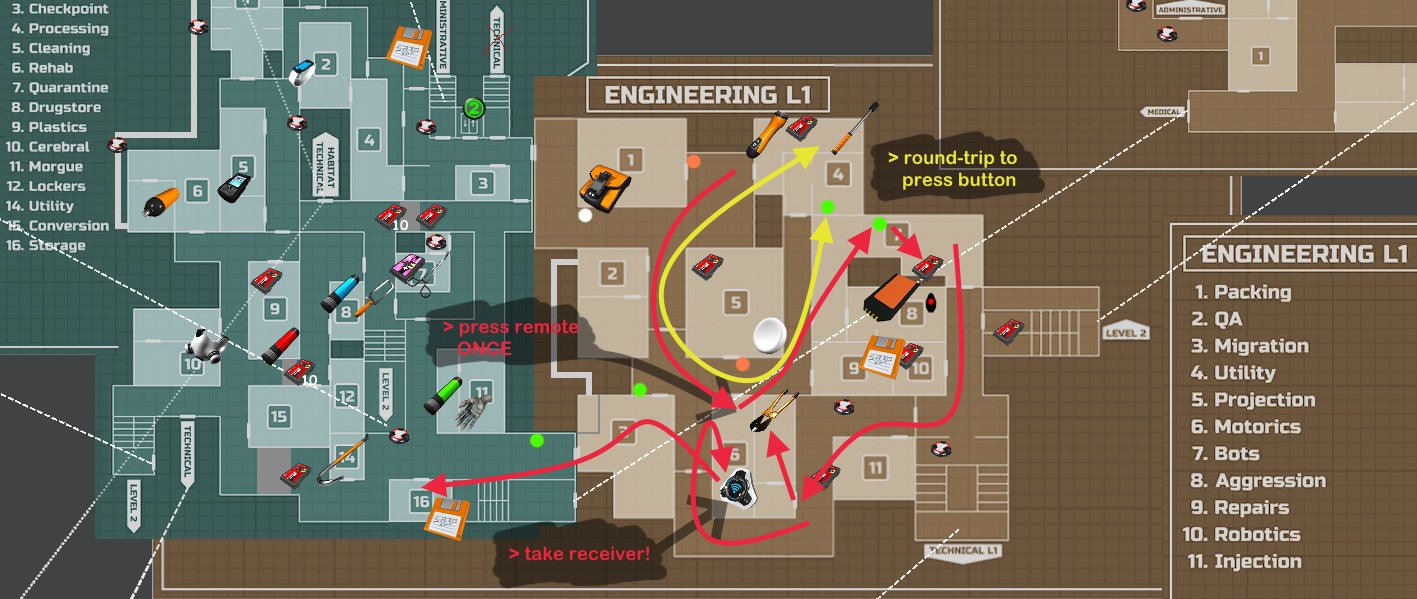
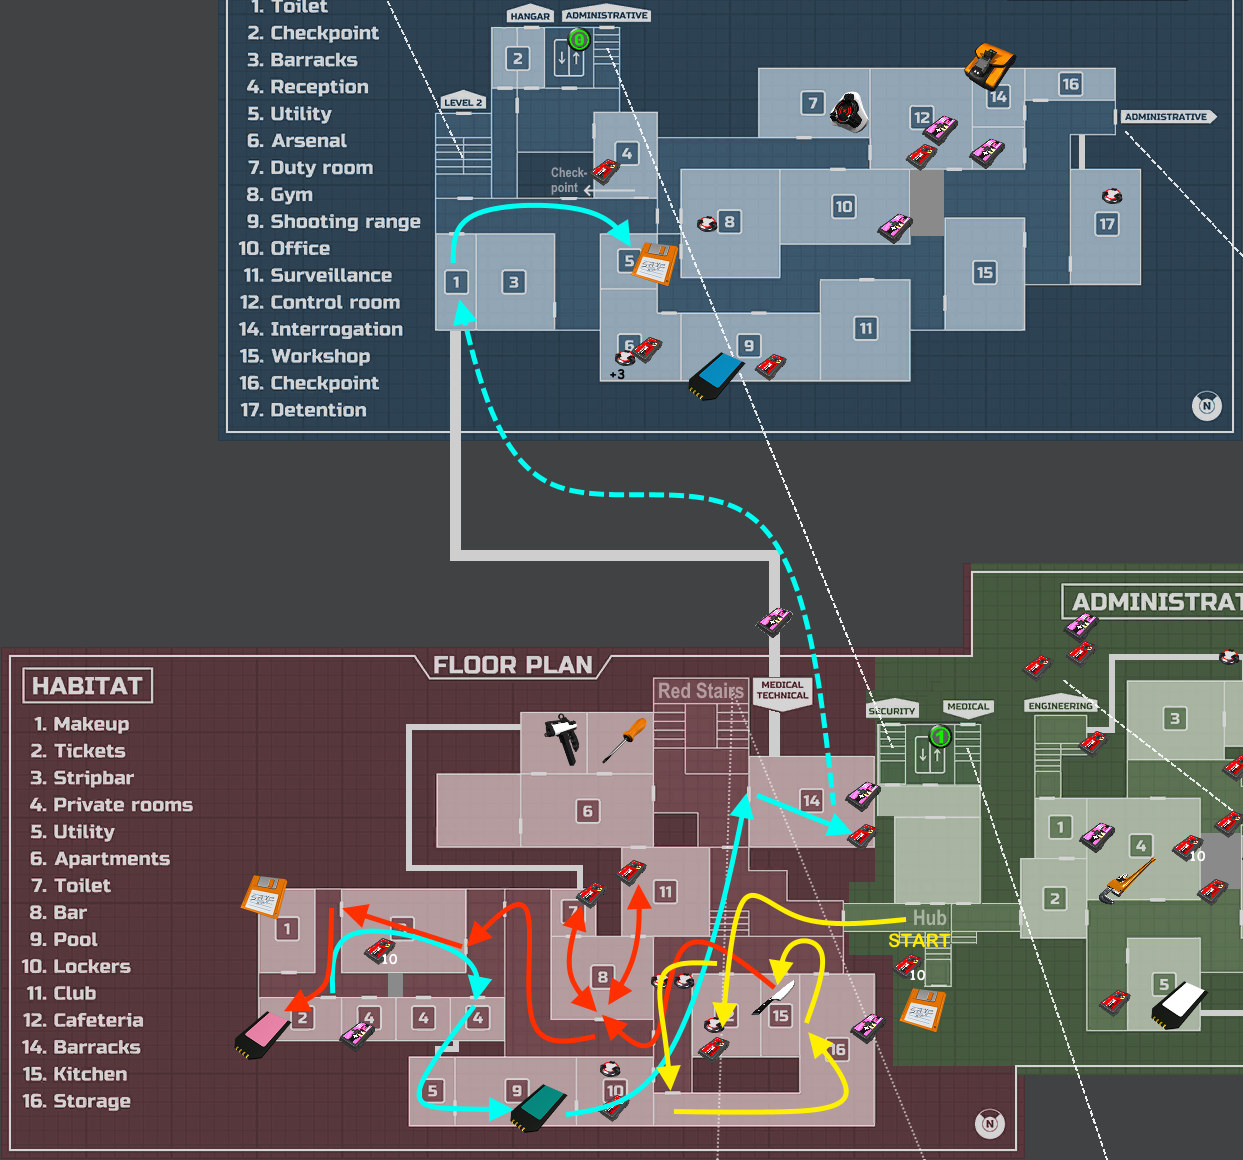
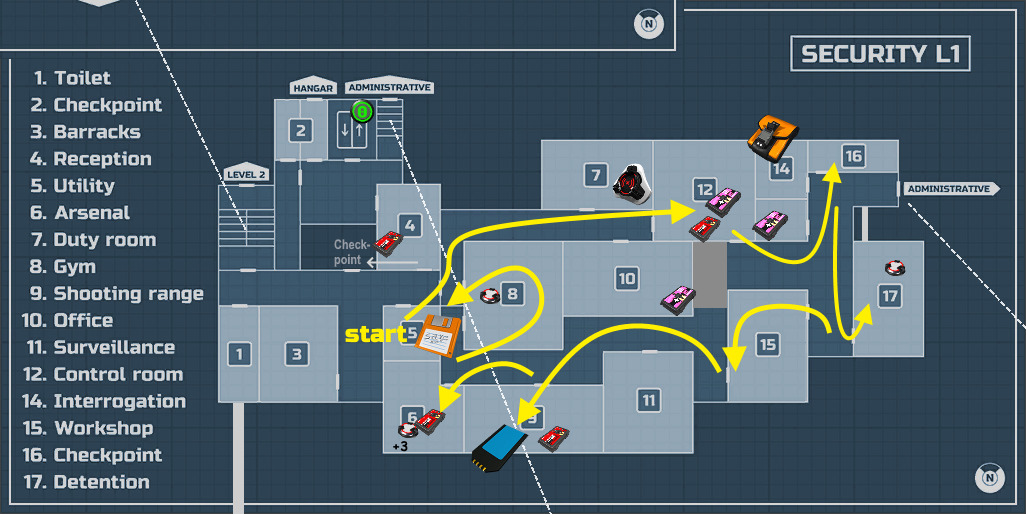
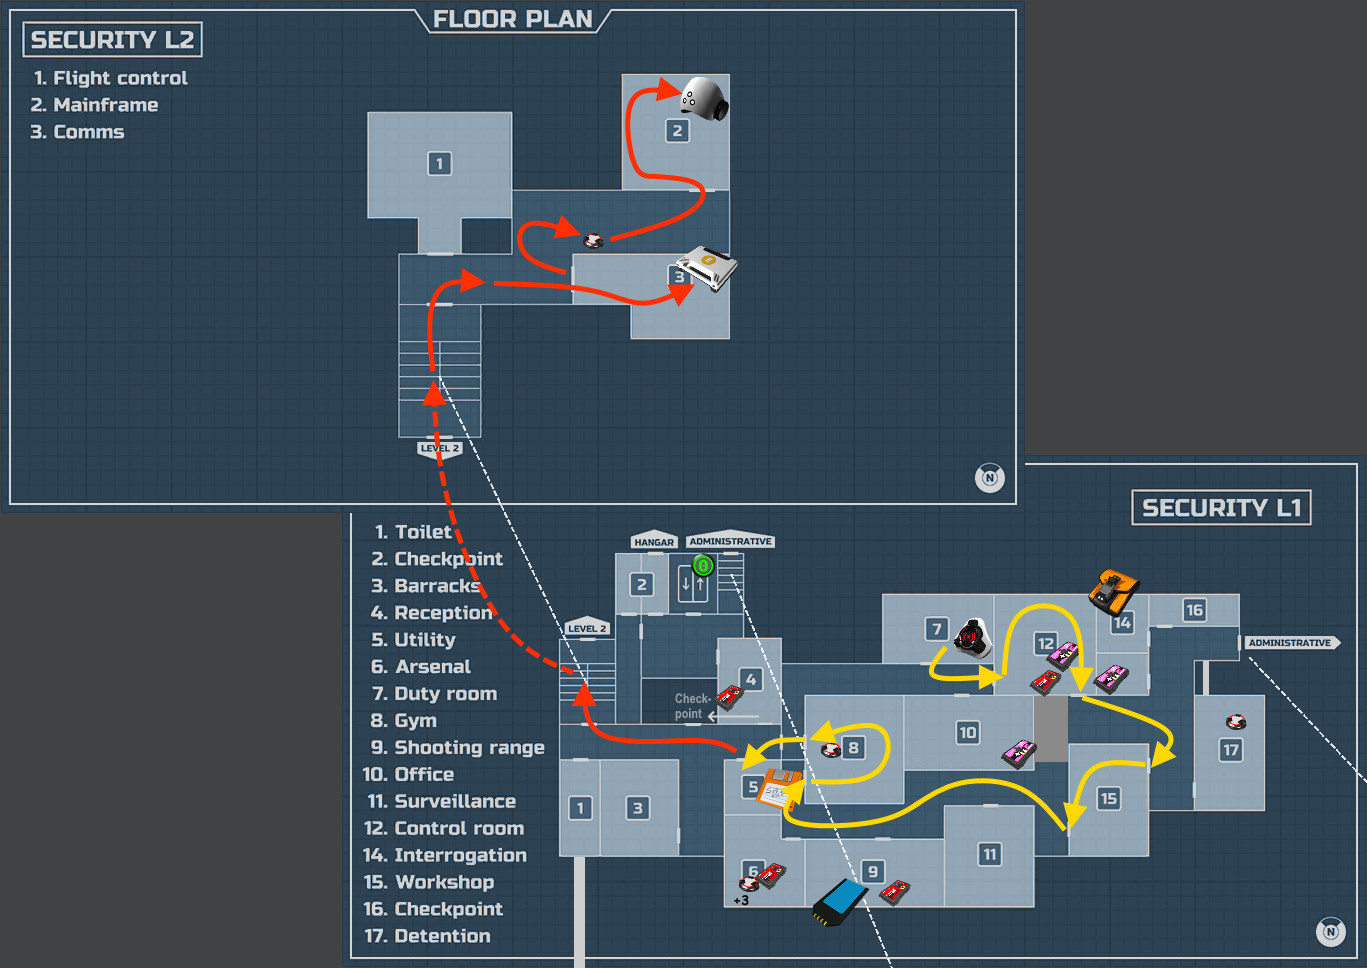
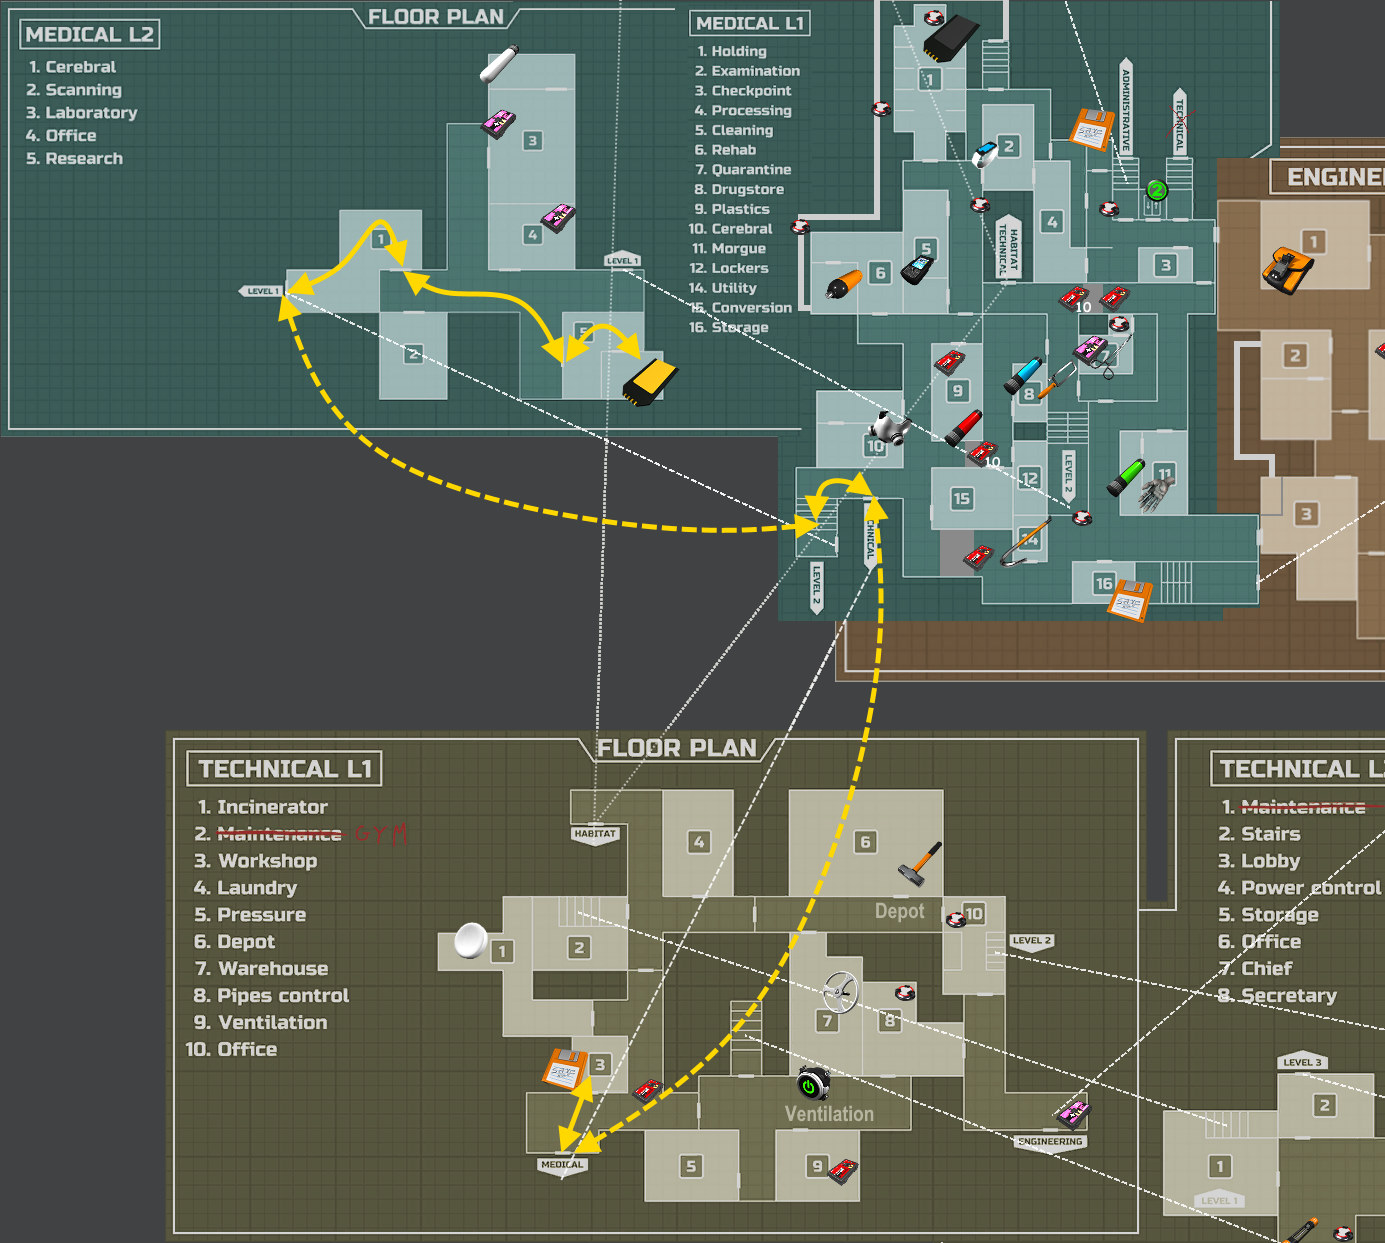
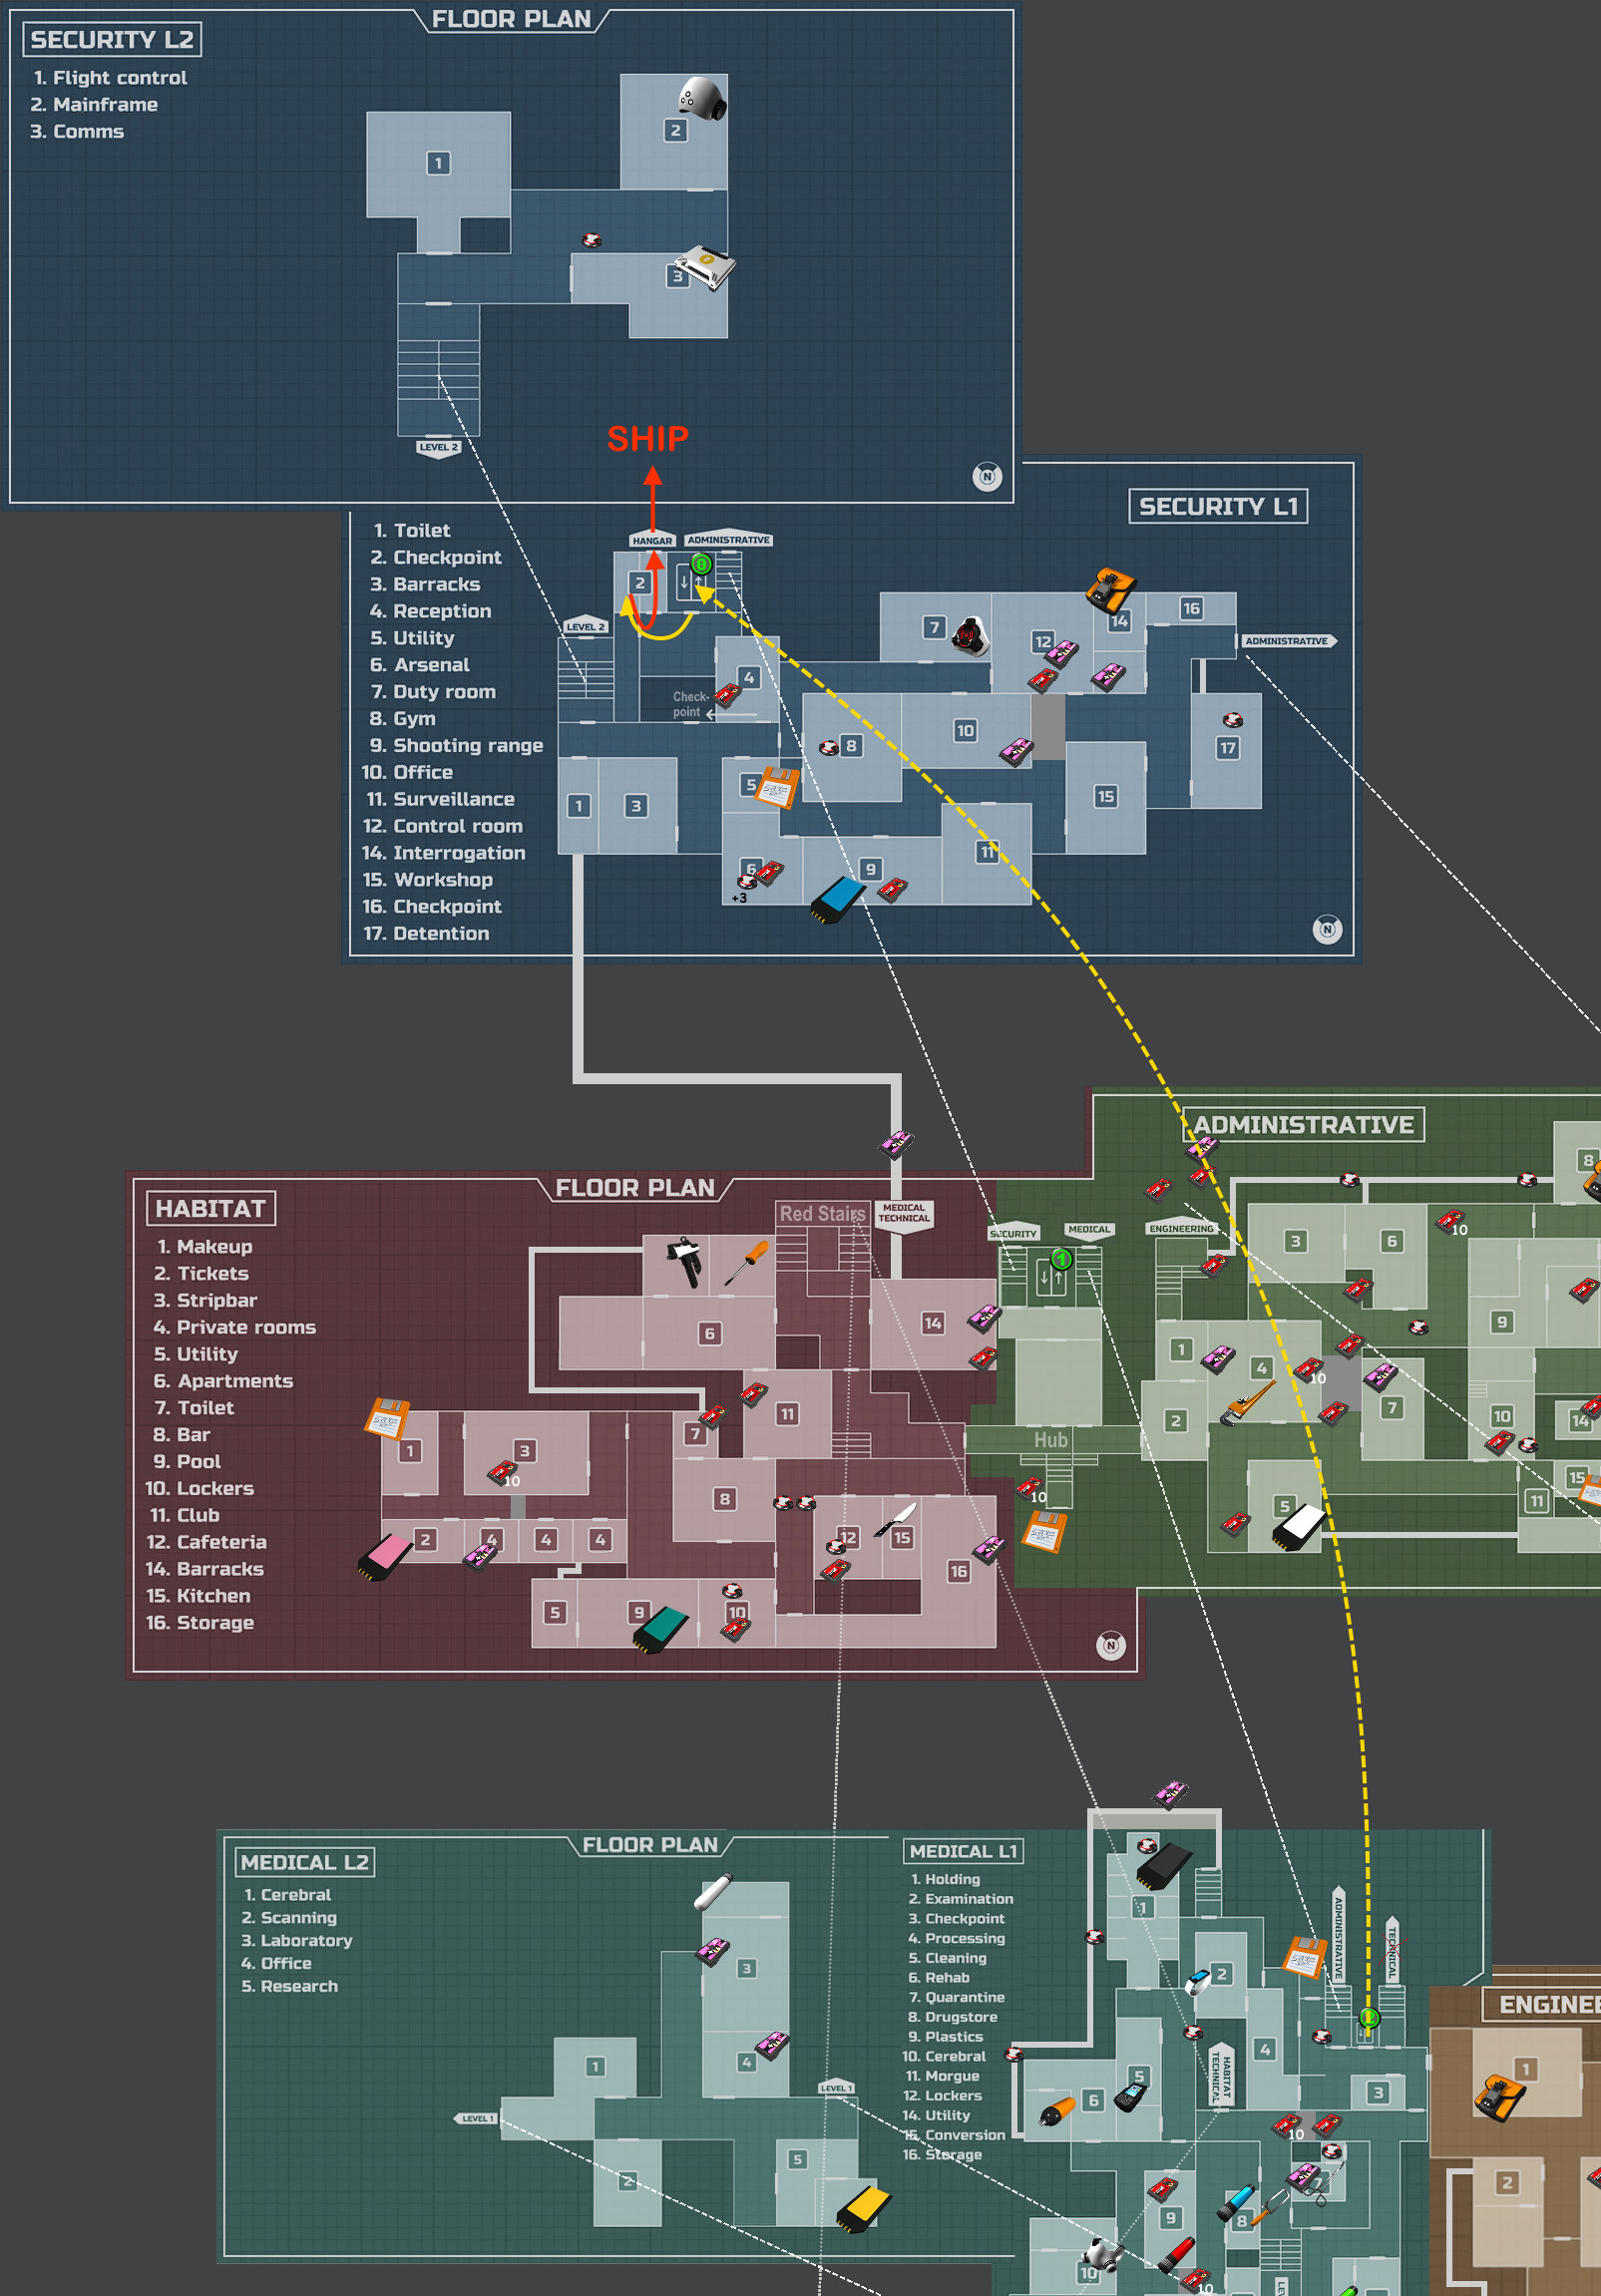
One note, in the blue key section your map is missing going into 16 Checkpoint to hit the button before going into 17 Detention to use the lever.
CogsFixmore Sep 8, 2021 @ 6:33pm 
Just download the Magic room mod, goto the room with the keycard to turn on ship, then teleport to ship to esacpe pogger speed run of 2 mins
Lord Blackthorn Mar 13, 2021 @ 9:30pm 
Thank you brother

Enthusiast  [author] Feb 7, 2021 @ 2:30am 
You're welcome. If this was too easy try a speedrun: https://www.speedrun.com/haydee_2
bmachine3825 Feb 7, 2021 @ 1:57am 
thank you!
Enthusiast  [author] Jan 19, 2021 @ 5:57am 
Nothing. They are not connected to anything. ¯\_(ツ)_/¯